Are you on the hunt for mouthwatering meals that align with your zero-carb lifestyle without sacrificing flavor? Look no further! Our roundup of 20 Delicious Zero Carb Recipes for Healthy Living is here to inspire your kitchen adventures. From quick dinners to comfort food classics, these dishes prove that eating low-carb can be both easy and exciting. Dive in and discover your next favorite meal today!
Grilled Chicken with Avocado Salsa
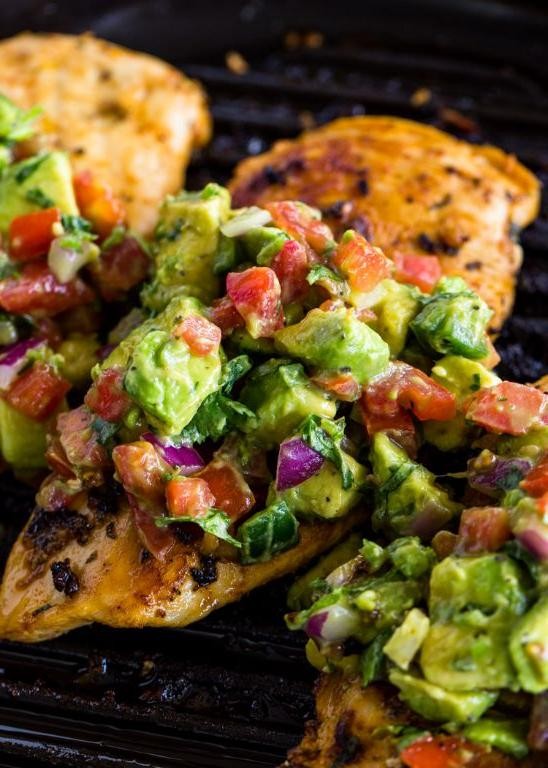
Vibrant and full of flavor, this Grilled Chicken with Avocado Salsa is a perfect blend of smoky and fresh, ideal for a summer evening. The succulent chicken pairs beautifully with the creamy, tangy salsa, creating a dish that’s as visually appealing as it is delicious.
Ingredients
- 4 boneless, skinless chicken breasts
- 2 tbsp olive oil
- 1 tsp salt
- 1/2 tsp black pepper
- 2 avocados, diced
- 1/2 cup red onion, finely chopped
- 1 jalapeño, seeded and minced
- 2 tbsp lime juice
- 1/4 cup cilantro, chopped
Instructions
- Preheat the grill to medium-high heat (375°F to 400°F).
- Brush the chicken breasts with olive oil and season both sides with salt and black pepper.
- Grill the chicken for 6-7 minutes per side, or until the internal temperature reaches 165°F. Tip: Avoid flipping the chicken more than once to ensure juicy, evenly cooked meat.
- While the chicken grills, combine the diced avocados, red onion, jalapeño, lime juice, and cilantro in a medium bowl. Gently toss to mix. Tip: Adding the lime juice immediately helps prevent the avocados from browning.
- Remove the chicken from the grill and let it rest for 5 minutes before slicing. Tip: Resting the chicken allows the juices to redistribute, making it more tender.
- Top the grilled chicken with the avocado salsa and serve immediately.
Zesty and refreshing, the avocado salsa adds a creamy contrast to the smoky grilled chicken, making every bite a delight. Serve this dish with a side of quinoa or a crisp green salad for a complete meal that’s sure to impress.
Beef and Spinach Stuffed Mushrooms
Zesty and sophisticated, these Beef and Spinach Stuffed Mushrooms are a delightful appetizer that marries the earthy flavors of mushrooms with the rich, savory taste of beef and the freshness of spinach, creating a bite-sized culinary masterpiece.
Ingredients
- 12 large white mushrooms
- 1 tbsp olive oil
- 1/2 lb ground beef
- 1/2 cup chopped spinach
- 1/4 cup breadcrumbs
- 1/4 cup grated Parmesan cheese
- 1 tsp garlic powder
- 1/2 tsp salt
- 1/4 tsp black pepper
- 1/4 cup shredded mozzarella cheese
Instructions
- Preheat the oven to 375°F (190°C).
- Clean the mushrooms with a damp paper towel and remove the stems, creating a cavity for the stuffing.
- Heat olive oil in a skillet over medium heat. Add the ground beef, cooking until browned, about 5 minutes.
- Add the chopped spinach to the skillet, stirring until wilted, about 2 minutes.
- Remove the skillet from heat. Stir in breadcrumbs, Parmesan cheese, garlic powder, salt, and pepper until well combined.
- Fill each mushroom cap with the beef and spinach mixture, pressing lightly to pack the filling.
- Sprinkle the tops with shredded mozzarella cheese.
- Bake in the preheated oven for 20 minutes, or until the mushrooms are tender and the cheese is golden and bubbly.
- Let the mushrooms cool for 5 minutes before serving to allow the flavors to meld.
Juicy and flavorful, these stuffed mushrooms offer a perfect balance of textures, from the tender mushroom caps to the crispy, cheesy topping. Serve them on a platter garnished with fresh thyme for an elegant touch at your next gathering.
Pork Chops with Garlic Butter
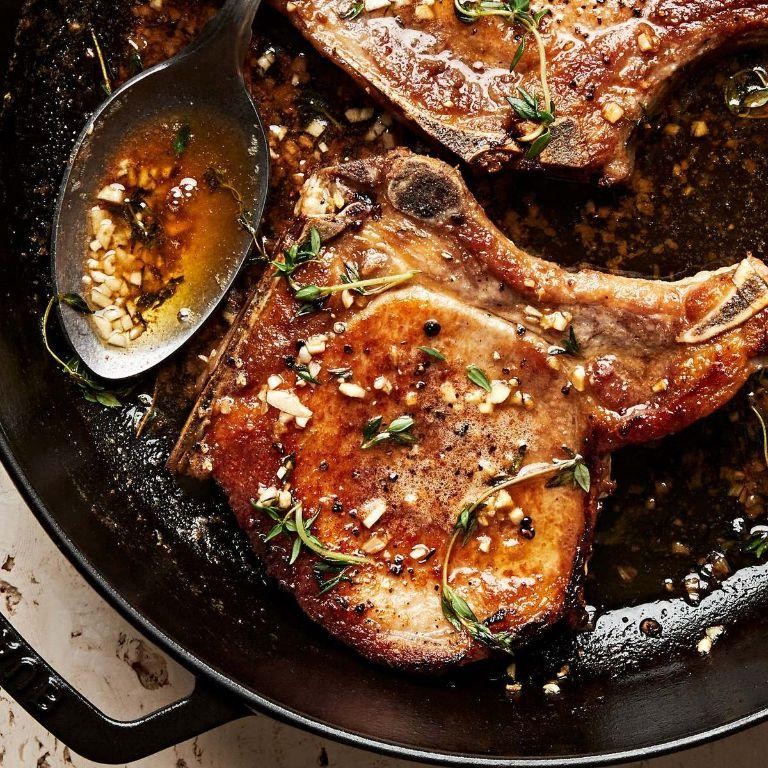
Whisper the name ‘Pork Chops with Garlic Butter’ in any culinary circle, and you’ll evoke images of succulent, tender meat enveloped in a rich, aromatic sauce that dances on the palate. This dish, a harmonious blend of simplicity and sophistication, promises to elevate your dining experience with its bold flavors and comforting warmth.
Ingredients
- 4 bone-in pork chops, 1 inch thick
- 2 tbsp olive oil
- 1 tsp salt
- 1 tsp black pepper
- 4 tbsp unsalted butter
- 4 cloves garlic, minced
- 1 tbsp fresh thyme leaves
- 1/2 cup chicken broth
Instructions
- Preheat your oven to 375°F (190°C) to ensure it’s ready for finishing the pork chops.
- Season both sides of the pork chops evenly with salt and black pepper.
- Heat olive oil in a large oven-safe skillet over medium-high heat until shimmering, about 2 minutes.
- Sear the pork chops for 3 minutes on each side until a golden crust forms, then transfer them to a plate.
- Reduce the heat to medium and add butter to the skillet. Once melted, add minced garlic and thyme, sautéing for 1 minute until fragrant.
- Pour in chicken broth, scraping the bottom of the skillet to deglaze and incorporate the flavorful bits.
- Return the pork chops to the skillet, spooning the garlic butter sauce over them.
- Transfer the skillet to the oven and bake for 10 minutes, or until the pork reaches an internal temperature of 145°F (63°C).
- Let the pork chops rest for 5 minutes before serving to allow the juices to redistribute.
Now, the pork chops emerge from the oven with a perfect balance of juiciness and flavor, the garlic butter sauce clinging to each bite. Serve them atop a bed of creamy mashed potatoes or alongside roasted vegetables for a meal that’s as visually appealing as it is delicious.
Salmon with Lemon and Dill
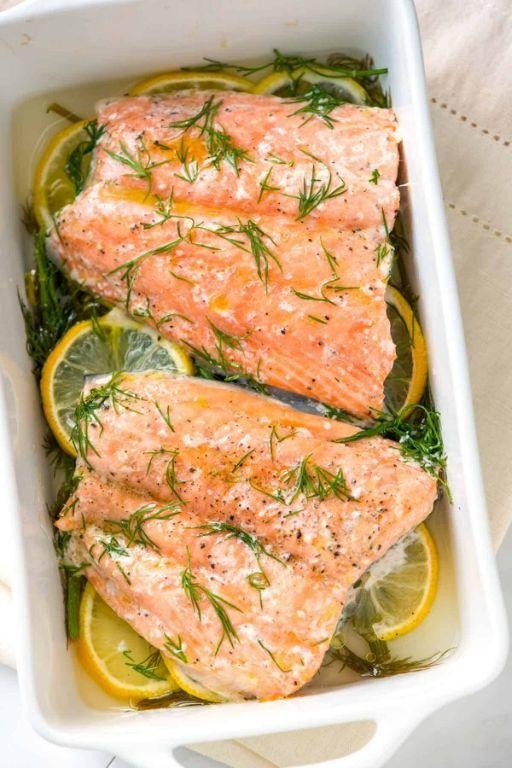
Lusciously tender and infused with the bright flavors of citrus and herbs, this salmon dish is a testament to the beauty of simple, quality ingredients coming together. Perfect for a weeknight dinner or a special occasion, it promises a meal that’s as nutritious as it is delightful.
Ingredients
- 1 lb salmon fillet
- 2 tbsp olive oil
- 1 lemon, thinly sliced
- 2 tbsp fresh dill, chopped
- 1/2 tsp salt
- 1/4 tsp black pepper
Instructions
- Preheat your oven to 375°F (190°C) to ensure it reaches the perfect temperature for baking the salmon evenly.
- Place the salmon fillet on a baking sheet lined with parchment paper, skin-side down, for easy cleanup and to prevent sticking.
- Drizzle the olive oil evenly over the salmon, then season with salt and black pepper, ensuring every bite is flavorful.
- Arrange the lemon slices on top of the salmon, covering as much surface area as possible to infuse the fish with citrusy brightness.
- Sprinkle the chopped dill over the lemon slices and salmon, adding a fresh, herby aroma that complements the dish beautifully.
- Bake in the preheated oven for 12-15 minutes, or until the salmon flakes easily with a fork but remains moist inside.
- Let the salmon rest for 2 minutes after baking to allow the juices to redistribute, ensuring a moist and tender texture.
Succulent and aromatic, this salmon with lemon and dill offers a harmonious blend of flavors and textures. Serve it alongside a crisp green salad or over a bed of quinoa for a complete meal that’s as visually appealing as it is delicious.
Shrimp and Cauliflower Stir Fry
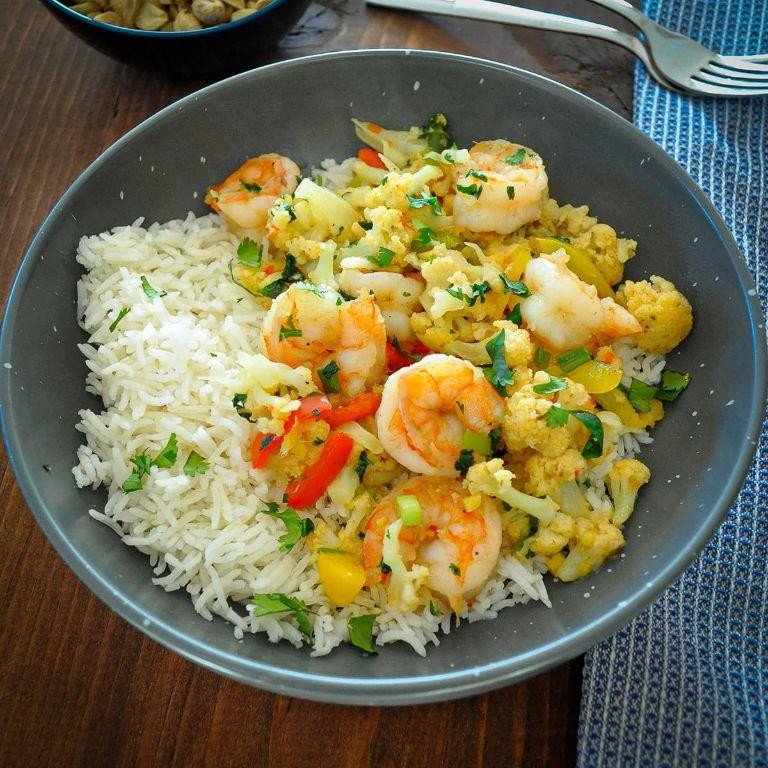
Kickstart your culinary journey with this Shrimp and Cauliflower Stir Fry, a dish that marries the delicate sweetness of shrimp with the earthy tones of cauliflower, all brought together in a symphony of flavors that dance on the palate.
Ingredients
- 1 lb shrimp, peeled and deveined
- 2 cups cauliflower florets
- 2 tbsp olive oil
- 1 tbsp minced garlic
- 1 tbsp soy sauce
- 1/2 tsp red pepper flakes
- 1/4 cup chicken broth
- 1 tbsp lemon juice
- 1/4 tsp salt
- 1/4 tsp black pepper
Instructions
- Heat 2 tbsp olive oil in a large skillet over medium-high heat until shimmering, about 1 minute.
- Add 1 lb shrimp to the skillet, season with 1/4 tsp salt and 1/4 tsp black pepper, and cook until pink and opaque, about 2 minutes per side. Tip: Avoid overcrowding the skillet to ensure each shrimp cooks evenly.
- Remove shrimp from the skillet and set aside on a plate.
- In the same skillet, add 1 tbsp minced garlic and 1/2 tsp red pepper flakes, sautéing until fragrant, about 30 seconds.
- Add 2 cups cauliflower florets to the skillet, stirring to coat with the garlic and pepper flakes. Tip: Cut the florets into uniform sizes for even cooking.
- Pour in 1/4 cup chicken broth and 1 tbsp soy sauce, then cover the skillet and let the cauliflower steam for 5 minutes, or until tender-crisp.
- Return the shrimp to the skillet, add 1 tbsp lemon juice, and toss everything together to combine. Tip: The lemon juice brightens the dish, so add it just before serving to preserve its vibrant flavor.
- Cook for an additional 1 minute to heat through.
With its crisp-tender cauliflower and succulent shrimp, this stir fry offers a delightful contrast in textures. Serve it over a bed of steamed rice or alongside a crisp white wine for an elegant meal that’s as pleasing to the eye as it is to the palate.
Turkey and Cheese Roll Ups

Combining the simplicity of deli favorites with a touch of gourmet flair, these Turkey and Cheese Roll Ups are a delightful twist on the classic sandwich. Perfect for a quick lunch or an elegant appetizer, they’re as versatile as they are delicious.
Ingredients
- 8 slices turkey breast
- 4 slices cheddar cheese
- 4 large flour tortillas
- 1/4 cup mayonnaise
- 1 tbsp Dijon mustard
- 1 cup arugula
- 1/2 cup roasted red peppers, sliced
Instructions
- Lay out the flour tortillas on a clean, flat surface.
- Spread 1 tbsp of mayonnaise evenly over each tortilla, followed by a thin layer of Dijon mustard.
- Place 2 slices of turkey breast on each tortilla, ensuring they cover the surface without overlapping too much.
- Add a slice of cheddar cheese on top of the turkey, followed by a handful of arugula and a few slices of roasted red peppers.
- Roll each tortilla tightly from one end to the other, ensuring the fillings are compact and secure inside.
- Wrap each roll in plastic wrap and refrigerate for 30 minutes to firm up, making them easier to slice.
- Remove from the refrigerator, unwrap, and slice each roll into 1-inch pieces with a sharp knife for clean cuts.
- Arrange the slices on a serving platter, showcasing the colorful layers inside.
Each bite of these roll ups offers a crisp texture from the fresh arugula, a creamy richness from the cheese, and a subtle tang from the Dijon mustard. For an extra touch of elegance, serve them alongside a light vinaigrette salad or as part of a charcuterie board.
Egg and Bacon Breakfast Muffins

Just imagine starting your day with a bite of these Egg and Bacon Breakfast Muffins, where fluffy eggs meet crispy bacon in a perfectly portable package. Elegantly simple yet undeniably delicious, they’re a testament to the beauty of breakfast classics reimagined.
Ingredients
- 6 large eggs
- 1/2 cup whole milk
- 1/2 tsp salt
- 1/4 tsp black pepper
- 6 strips bacon, cooked and crumbled
- 1/2 cup shredded cheddar cheese
- 1 tbsp unsalted butter, melted
Instructions
- Preheat your oven to 350°F and generously grease a 6-cup muffin tin with the melted butter, ensuring each cup is fully coated to prevent sticking.
- In a large bowl, whisk together the eggs, milk, salt, and pepper until the mixture is uniform and slightly frothy, about 1 minute.
- Evenly distribute the crumbled bacon and shredded cheddar cheese among the muffin cups, creating a flavorful base for the egg mixture.
- Pour the egg mixture over the bacon and cheese in each cup, filling them about three-quarters full to allow room for rising.
- Bake for 20-25 minutes, or until the muffins are set and the tops are lightly golden. A toothpick inserted into the center should come out clean.
- Let the muffins cool in the tin for 5 minutes before gently loosening the edges with a knife and transferring them to a wire rack.
With a texture that’s delightfully tender and a flavor profile that balances the smokiness of bacon with the richness of cheese, these muffins are a morning game-changer. Serve them warm with a drizzle of hot sauce or alongside a fresh fruit salad for a breakfast that feels both indulgent and balanced.
Zucchini Noodles with Pesto

Zucchini noodles with pesto offer a refreshing twist on traditional pasta dishes, blending the lightness of spiralized vegetables with the rich, herby flavors of homemade pesto. This dish is a celebration of summer’s bounty, perfect for a light lunch or a sophisticated side.
Ingredients
- 4 medium zucchinis
- 2 cups fresh basil leaves
- 1/2 cup grated Parmesan cheese
- 1/3 cup pine nuts
- 2 garlic cloves
- 1/2 cup extra virgin olive oil
- 1/2 tsp salt
- 1/4 tsp black pepper
Instructions
- Using a spiralizer, turn the zucchinis into noodles. Set aside in a large bowl.
- In a food processor, combine basil, Parmesan, pine nuts, and garlic. Pulse until finely chopped.
- With the processor running, slowly drizzle in the olive oil until the pesto is smooth. Tip: For a brighter pesto, add a squeeze of lemon juice.
- Season the pesto with salt and pepper, then pulse once more to combine.
- In a large skillet over medium heat, warm the zucchini noodles for 2-3 minutes, just until they begin to soften. Tip: Avoid overcooking to maintain a slight crunch.
- Remove from heat and toss the zucchini noodles with the pesto until evenly coated. Tip: For extra flavor, garnish with additional Parmesan and pine nuts before serving.
Finished with a vibrant green hue and a creamy texture, the zucchini noodles with pesto are a delightful contrast of flavors and textures. Serve them chilled for a refreshing summer dish or warm for a comforting meal that doesn’t weigh you down.
Cauliflower Rice with Beef

Brimming with wholesome flavors and textures, this Cauliflower Rice with Beef is a delightful twist on a classic, offering a lighter yet equally satisfying alternative to traditional rice dishes. Perfect for those seeking a nutritious meal without compromising on taste, it’s a versatile dish that promises to impress.
Ingredients
- 1 head cauliflower, riced
- 1 lb ground beef
- 2 tbsp olive oil
- 1 small onion, diced
- 2 cloves garlic, minced
- 1 tsp salt
- 1/2 tsp black pepper
- 1/2 tsp cumin
- 1/4 cup beef broth
- 2 tbsp fresh parsley, chopped
Instructions
- Heat olive oil in a large skillet over medium heat until shimmering.
- Add diced onion and minced garlic to the skillet, sautéing until translucent, about 3 minutes.
- Increase heat to medium-high, add ground beef, breaking it apart with a spoon, and cook until browned, about 5 minutes. Tip: For extra flavor, let the beef develop a slight crust before stirring.
- Stir in salt, black pepper, and cumin, cooking for another minute to toast the spices.
- Add riced cauliflower and beef broth to the skillet, stirring to combine. Cover and cook for 5 minutes, or until the cauliflower is tender. Tip: Avoid overcooking the cauliflower to maintain a rice-like texture.
- Remove from heat, sprinkle with chopped parsley, and serve immediately. Tip: For a colorful presentation, garnish with additional parsley or a squeeze of lemon juice.
Amazingly tender yet crisp, the cauliflower rice absorbs the rich flavors of the beef and spices, creating a harmonious blend of tastes and textures. Serve it in a hollowed-out bell pepper for an eye-catching, edible bowl that’s sure to delight.
Baked Eggs in Avocado
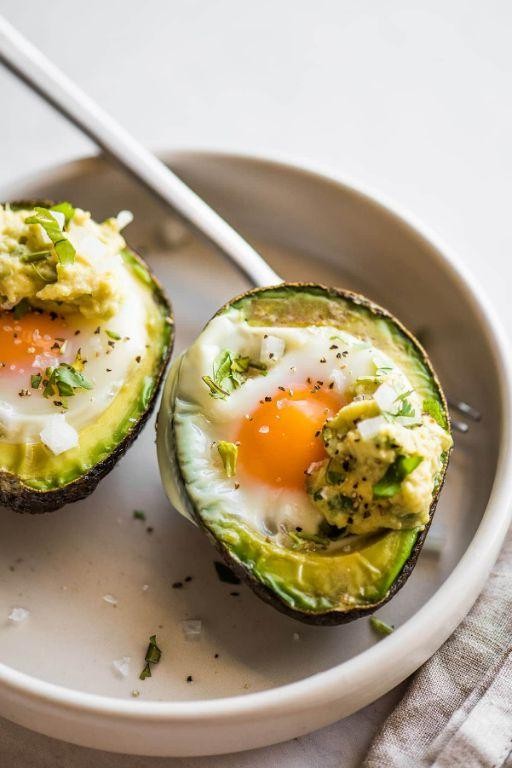
Fusing simplicity with sophistication, this dish transforms the humble avocado into a vessel of creamy, protein-rich delight. Perfect for a leisurely brunch or a light dinner, baked eggs in avocado marry the richness of eggs with the buttery texture of ripe avocados, creating a dish that’s as nutritious as it is indulgent.
Ingredients
- 2 ripe avocados
- 4 large eggs
- 1/4 tsp salt
- 1/4 tsp black pepper
- 1/4 tsp paprika
- 1 tbsp chopped fresh cilantro
Instructions
- Preheat the oven to 425°F and line a baking sheet with parchment paper for easy cleanup.
- Cut the avocados in half and remove the pits. Scoop out about 1 tablespoon of flesh from each half to create a larger well for the eggs.
- Place the avocado halves on the prepared baking sheet, ensuring they’re stable. If they wobble, trim a small slice from the bottom to level them.
- Crack one egg into each avocado half, being careful not to overflow. Tip: For easier handling, crack each egg into a small bowl first, then slide it into the avocado.
- Sprinkle the salt, pepper, and paprika evenly over the eggs. This not only seasons the dish but also adds a pop of color.
- Bake in the preheated oven for 15-18 minutes, or until the egg whites are set but the yolks are still slightly runny. Tip: For firmer yolks, extend the baking time by 2-3 minutes.
- Remove from the oven and garnish with chopped cilantro before serving. Tip: For an extra layer of flavor, add a sprinkle of crumbled feta or a dash of hot sauce.
Yielding a dish where the creamy avocado contrasts beautifully with the soft, baked egg, this recipe is a testament to the magic of simple ingredients. Serve it with a slice of crusty bread to scoop up every last bite, or alongside a crisp salad for a complete meal.
Spicy Tuna Lettuce Wraps

These Spicy Tuna Lettuce Wraps offer a refreshing yet fiery twist on traditional wraps, combining the crispness of fresh lettuce with the bold flavors of seasoned tuna. Perfect for a light lunch or an elegant appetizer, this dish is as nutritious as it is delicious.
Ingredients
- 1 lb fresh tuna steak, diced
- 2 tbsp soy sauce
- 1 tbsp sesame oil
- 1 tsp chili flakes
- 1 tbsp honey
- 1 clove garlic, minced
- 1 tbsp ginger, grated
- 8 large lettuce leaves
- 1/2 cup cucumber, julienned
- 1/4 cup carrots, julienned
- 2 tbsp green onions, sliced
- 1 tbsp sesame seeds
Instructions
- In a medium bowl, combine the diced tuna, soy sauce, sesame oil, chili flakes, honey, minced garlic, and grated ginger. Mix well to ensure the tuna is evenly coated. Tip: For the best flavor, let the tuna marinate for at least 15 minutes before cooking.
- Heat a non-stick skillet over medium-high heat. Add the tuna mixture and cook for 2-3 minutes, stirring occasionally, until the tuna is just cooked through. Tip: Avoid overcooking the tuna to keep it tender and moist.
- Remove the skillet from the heat and let the tuna cool slightly.
- Meanwhile, wash and dry the lettuce leaves, ensuring they are free of moisture to prevent sogginess.
- To assemble, place a spoonful of the spicy tuna mixture onto the center of each lettuce leaf. Top with julienned cucumber, carrots, sliced green onions, and a sprinkle of sesame seeds. Tip: For an extra crunch, add a few crushed peanuts on top.
- Fold the lettuce leaves around the filling to form wraps and serve immediately.
Juxtaposing the cool, crisp lettuce with the warm, spicy tuna filling creates a delightful contrast in textures and temperatures. Serve these wraps on a platter garnished with lime wedges for a zesty finish that elevates the dish to new heights.
Chicken Caesar Salad without Croutons
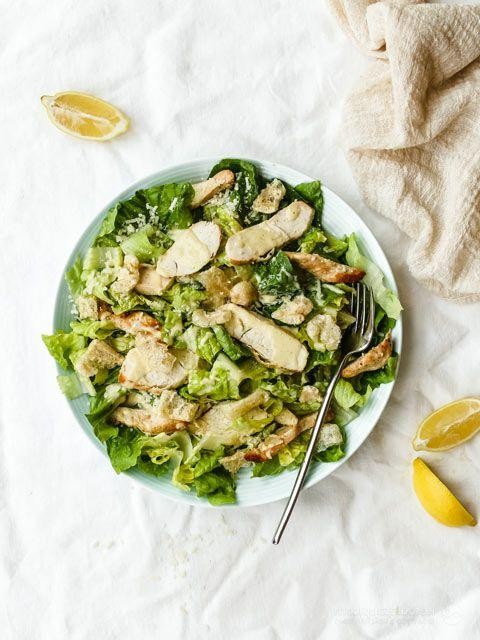
Lusciously crisp and refreshing, this Chicken Caesar Salad without Croutons reimagines the classic with a focus on the tender, juicy chicken and the creamy, garlicky dressing that clings to every leaf of romaine.
Ingredients
- 2 boneless, skinless chicken breasts
- 1 tbsp olive oil
- 1/2 tsp salt
- 1/4 tsp black pepper
- 1 large head romaine lettuce, chopped
- 1/2 cup grated Parmesan cheese
- 1/4 cup Caesar dressing
- 1 tbsp lemon juice
- 1 tsp Dijon mustard
- 1 clove garlic, minced
- 1/4 tsp anchovy paste
Instructions
- Preheat your grill or grill pan to medium-high heat (375°F).
- Brush the chicken breasts with olive oil and season both sides with salt and black pepper.
- Grill the chicken for 6-7 minutes per side, or until the internal temperature reaches 165°F. Tip: Let the chicken rest for 5 minutes before slicing to retain its juices.
- While the chicken rests, in a large bowl, whisk together the Caesar dressing, lemon juice, Dijon mustard, minced garlic, and anchovy paste until well combined.
- Add the chopped romaine lettuce to the bowl with the dressing and toss until evenly coated. Tip: Use your hands to gently toss the salad to prevent bruising the lettuce.
- Slice the rested chicken into thin strips and arrange them over the dressed lettuce.
- Sprinkle the grated Parmesan cheese over the salad. Tip: For an extra flavor boost, use a vegetable peeler to create Parmesan shavings instead of grating the cheese.
Every bite of this salad offers a harmonious blend of textures, from the crisp lettuce to the succulent chicken, all brought together by the rich, umami-packed dressing. Serve it in a chilled bowl for an extra refreshing touch, or alongside a glass of crisp white wine to elevate the dining experience.
Beef Jerky Homemade
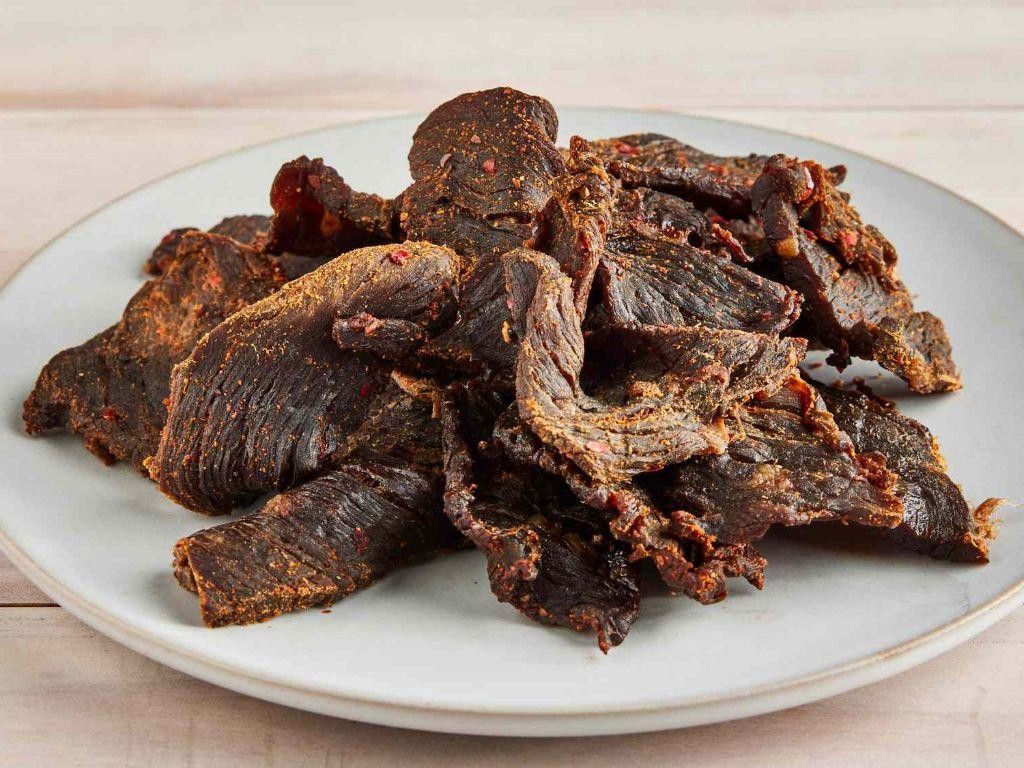
Relish the opportunity to craft your own Beef Jerky Homemade, a timeless snack that combines simplicity with deep, savory flavors. This guide will walk you through creating a batch that’s perfectly chewy, richly seasoned, and utterly satisfying.
Ingredients
- 1.5 lbs lean beef, sliced into 1/4 inch strips
- 1/4 cup soy sauce
- 2 tbsp Worcestershire sauce
- 1 tbsp smoked paprika
- 1 tsp garlic powder
- 1 tsp onion powder
- 1/2 tsp black pepper
- 1/2 tsp liquid smoke
Instructions
- In a large bowl, combine 1/4 cup soy sauce, 2 tbsp Worcestershire sauce, 1 tbsp smoked paprika, 1 tsp garlic powder, 1 tsp onion powder, 1/2 tsp black pepper, and 1/2 tsp liquid smoke. Mix well to create the marinade.
- Add 1.5 lbs of lean beef strips to the marinade, ensuring each piece is thoroughly coated. Cover and refrigerate for at least 8 hours, or overnight for deeper flavor.
- Preheat your oven to 175°F and line a baking sheet with parchment paper. Arrange the marinated beef strips in a single layer on the sheet, avoiding overlap.
- Bake in the preheated oven for 4 hours, flipping the strips halfway through to ensure even drying. For extra crispiness, extend the baking time by 30 minutes, checking frequently.
- Remove from the oven and let the jerky cool completely on a wire rack. This step is crucial for achieving the perfect chewy texture.
The finished jerky boasts a robust flavor profile, with a satisfying chew that makes it irresistible. Serve it as a high-protein snack on hikes, or slice it thinly to top off a gourmet salad for an unexpected twist.
Cucumber and Cream Cheese Bites
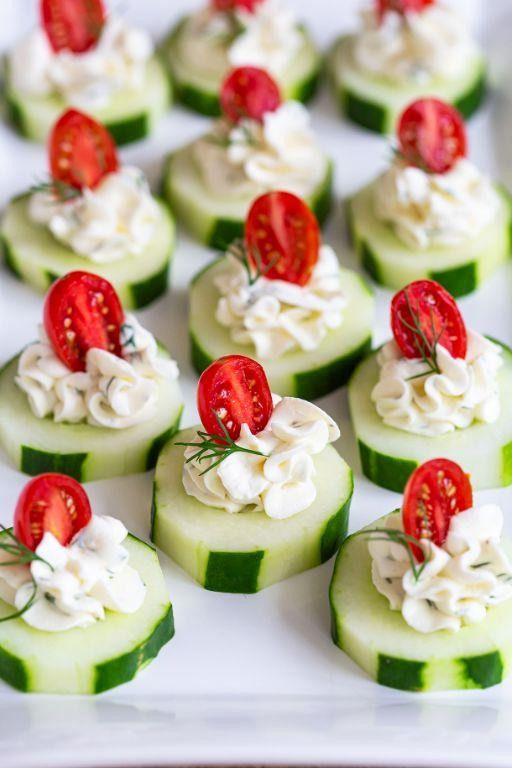
Brimming with freshness and simplicity, these Cucumber and Cream Cheese Bites are the epitome of summer elegance, offering a crisp, creamy contrast that’s as delightful to the palate as it is to the eye.
Ingredients
- 1 English cucumber, sliced into 1/4-inch rounds
- 8 oz cream cheese, softened
- 1 tbsp fresh dill, finely chopped
- 1 tsp lemon zest
- 1/2 tsp garlic powder
- 1/4 tsp salt
- 1/4 tsp black pepper
- 1 tbsp olive oil
Instructions
- In a medium bowl, combine the softened cream cheese, fresh dill, lemon zest, garlic powder, salt, and black pepper. Mix until all ingredients are fully incorporated and the mixture is smooth.
- Using a small spoon or a piping bag, evenly distribute the cream cheese mixture onto each cucumber round, creating a small mound.
- Drizzle the olive oil lightly over the assembled bites for a glossy finish and added flavor.
- Chill the cucumber and cream cheese bites in the refrigerator for at least 30 minutes before serving to allow the flavors to meld and the cream cheese to firm up slightly.
Zesty and refreshing, these bites boast a perfect harmony of textures—crisp cucumber against the smooth, tangy cream cheese. For an extra touch of sophistication, garnish with a sprinkle of smoked paprika or a tiny sprig of dill before serving.
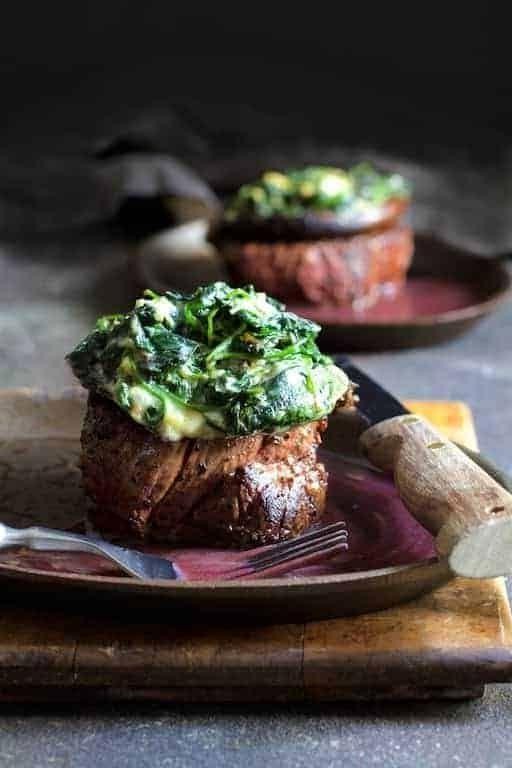
Pan Seared Steak with Herb Butter
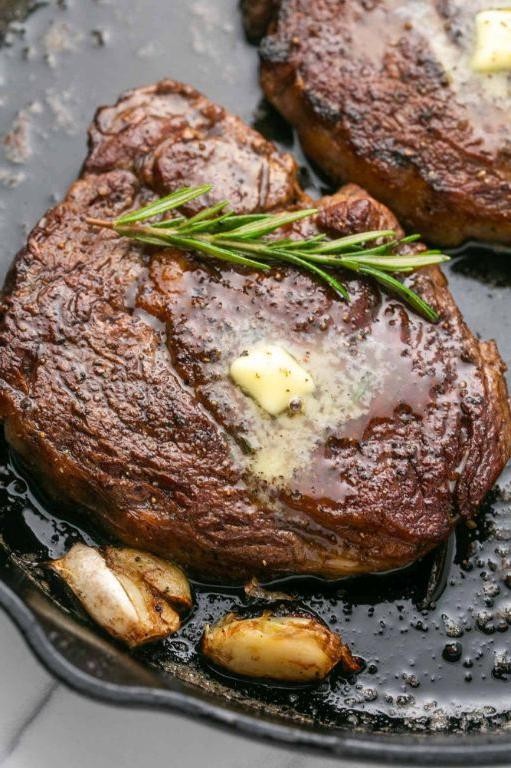
Amidst the hustle of everyday life, there’s something profoundly satisfying about mastering the art of a perfectly pan-seared steak, crowned with a melting pat of herb butter. This dish, with its golden crust and tender interior, is a testament to the beauty of simplicity and the depth of flavor achievable with just a few quality ingredients.
Ingredients
- 1 1/2 lbs ribeye steak
- 2 tbsp unsalted butter
- 1 tbsp olive oil
- 1 tsp kosher salt
- 1/2 tsp black pepper
- 2 cloves garlic, minced
- 1 tbsp fresh rosemary, chopped
- 1 tbsp fresh thyme, chopped
Instructions
- Remove the steak from the refrigerator and let it sit at room temperature for 30 minutes to ensure even cooking.
- Heat a heavy skillet over medium-high heat until very hot, about 3 minutes. Meanwhile, pat the steak dry with paper towels and season both sides with salt and pepper.
- Add olive oil to the skillet, then place the steak in the pan. Sear without moving for 4 minutes to develop a rich, golden crust.
- Flip the steak and add butter, garlic, rosemary, and thyme to the pan. Tilt the pan slightly to pool the butter and spoon it over the steak continuously for 3 minutes for medium-rare (135°F on a meat thermometer).
- Transfer the steak to a cutting board and let it rest for 5 minutes to allow the juices to redistribute.
- Slice against the grain and serve immediately, drizzled with the herb butter from the pan.
With its succulent texture and aromatic herb butter, this steak is a celebration of flavors that pairs beautifully with a crisp salad or roasted vegetables for a complete meal. The contrast between the crispy exterior and the buttery, herb-infused interior makes each bite a delightful experience.
Deviled Eggs with Bacon

Masterfully combining the creamy richness of deviled eggs with the smoky crunch of bacon, this dish elevates a classic appetizer into a gourmet experience. Perfect for brunches or elegant gatherings, these deviled eggs with bacon are a testament to the beauty of simple ingredients transformed into something extraordinary.
Ingredients
- 6 large eggs
- 1/4 cup mayonnaise
- 1 tsp Dijon mustard
- 1/8 tsp salt
- 1/8 tsp black pepper
- 2 tbsp finely chopped chives
- 4 slices bacon, cooked and crumbled
- 1/2 tsp paprika
Instructions
- Place eggs in a single layer in a saucepan and cover with water by 1 inch. Bring to a boil over high heat, then cover and remove from heat. Let stand for 12 minutes.
- Transfer eggs to a bowl of ice water and let cool for 5 minutes. Peel eggs under running water for easier removal of shells.
- Cut eggs in half lengthwise and gently remove yolks into a bowl. Mash yolks with a fork until smooth.
- Add mayonnaise, Dijon mustard, salt, and black pepper to yolks. Stir until mixture is creamy and well combined.
- Fold in chopped chives and half of the crumbled bacon into the yolk mixture.
- Spoon or pipe the yolk mixture back into the egg white halves.
- Sprinkle the filled eggs with the remaining crumbled bacon and paprika for garnish.
Lusciously creamy with a hint of tanginess from the mustard, these deviled eggs are beautifully balanced by the smoky bacon. For an extra touch of elegance, serve them on a platter garnished with additional chives and a light dusting of paprika.
Grilled Lamb Chops with Mint
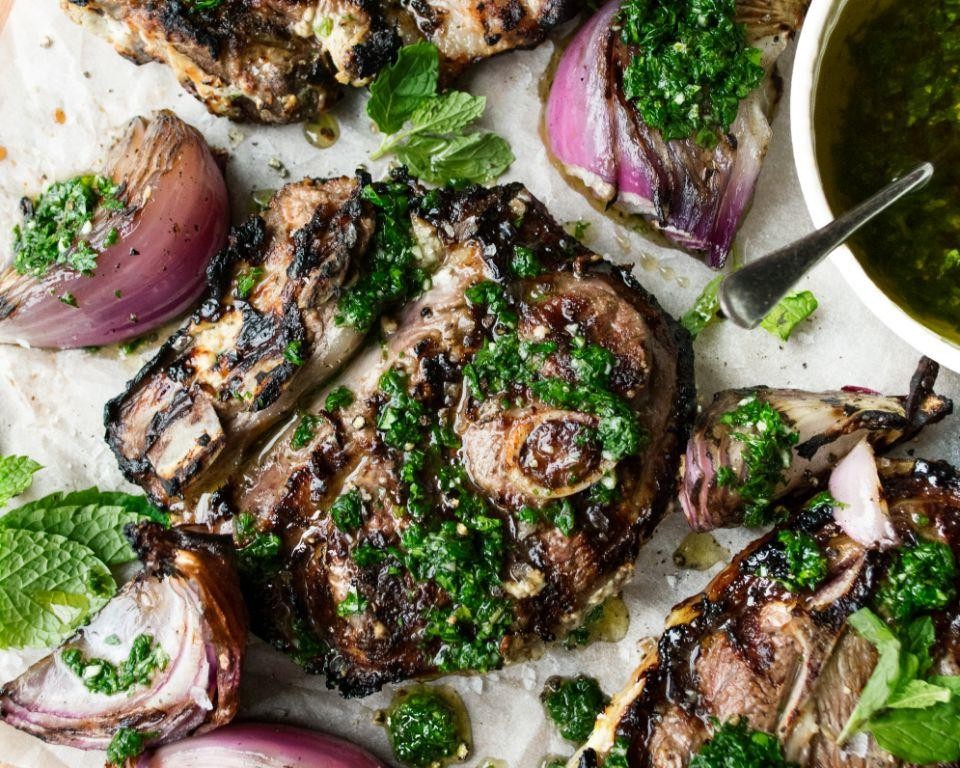
Gracefully balancing robust flavors with a touch of herbaceous freshness, grilled lamb chops with mint offer a succulent centerpiece for any sophisticated meal. This dish, with its perfectly charred exterior and tender, juicy interior, is a testament to the beauty of simple ingredients coming together under the right technique.
Ingredients
- 8 lamb chops, about 1 inch thick
- 2 tbsp olive oil
- 1 tbsp kosher salt
- 1 tsp black pepper
- 2 garlic cloves, minced
- 1 tbsp fresh rosemary, chopped
- 1/4 cup fresh mint leaves, chopped
- 1 tbsp lemon zest
- 1/4 cup lemon juice
Instructions
- Preheat your grill to medium-high heat, aiming for a temperature of 400°F.
- In a small bowl, combine the olive oil, kosher salt, black pepper, minced garlic, chopped rosemary, chopped mint, lemon zest, and lemon juice to create a marinade.
- Coat the lamb chops evenly with the marinade, ensuring each piece is well covered. Let them sit at room temperature for 15 minutes to absorb the flavors.
- Place the lamb chops on the preheated grill. Cook for 3-4 minutes on each side for medium-rare, or until the internal temperature reaches 145°F.
- Remove the lamb chops from the grill and let them rest for 5 minutes before serving to allow the juices to redistribute.
Marvel at the harmonious blend of flavors as the smokiness from the grill complements the bright notes of mint and lemon. The lamb chops boast a delightful crust with a melt-in-your-mouth tenderness, making them an irresistible choice for a gourmet dinner. Serve alongside a crisp salad or roasted vegetables for a complete, visually stunning plate.
Cheesy Broccoli Bake
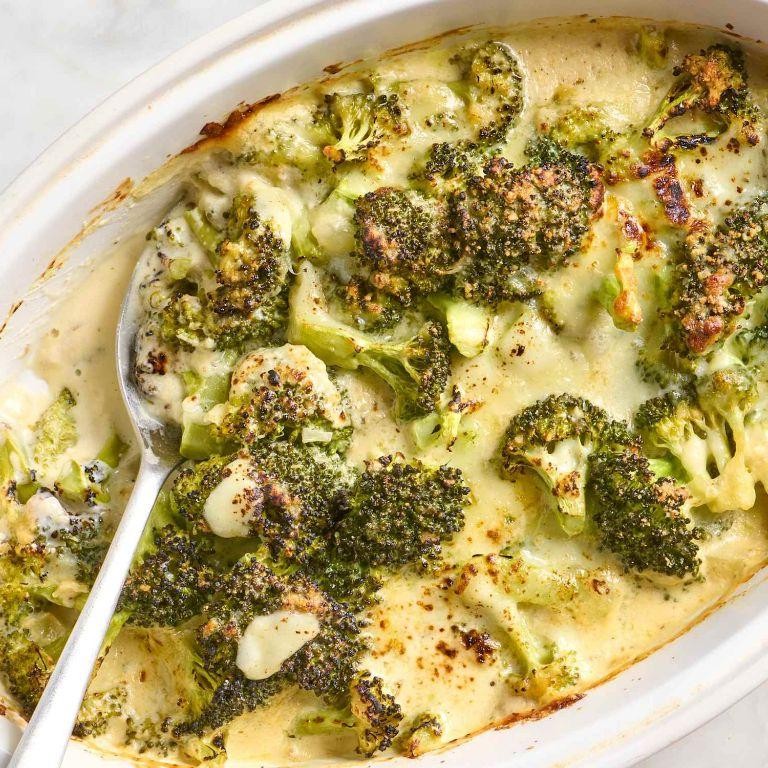
Yield to the comforting embrace of our Cheesy Broccoli Bake, a dish that marries the crisp freshness of broccoli with the rich, velvety allure of melted cheese, creating a symphony of flavors that’s both nourishing and indulgent.
Ingredients
- 1 lb fresh broccoli, cut into florets
- 2 cups shredded cheddar cheese
- 1 cup heavy cream
- 2 tbsp unsalted butter
- 1 tbsp all-purpose flour
- 1/2 tsp salt
- 1/4 tsp black pepper
- 1/4 tsp garlic powder
Instructions
- Preheat your oven to 375°F (190°C) and lightly grease a baking dish with butter.
- Blanch the broccoli florets in boiling water for 2 minutes, then immediately plunge them into ice water to stop the cooking process. Drain well.
- In a saucepan over medium heat, melt the butter. Whisk in the flour and cook for 1 minute to form a roux.
- Gradually add the heavy cream to the roux, whisking constantly to prevent lumps. Cook until the mixture thickens, about 3 minutes.
- Remove the saucepan from heat. Stir in 1 1/2 cups of cheddar cheese, salt, pepper, and garlic powder until the cheese is melted and the sauce is smooth.
- Arrange the blanched broccoli in the prepared baking dish. Pour the cheese sauce evenly over the broccoli.
- Sprinkle the remaining 1/2 cup of cheddar cheese over the top.
- Bake in the preheated oven for 20 minutes, or until the cheese is bubbly and lightly golden.
- Let the bake rest for 5 minutes before serving to allow the sauce to set slightly.
Lusciously creamy with a slight crunch from the broccoli, this bake is a testament to the beauty of simple ingredients transformed. Serve it as a standout side or elevate it to main dish status with a sprinkle of crispy breadcrumbs for added texture.
Smoked Salmon and Cream Cheese Roll
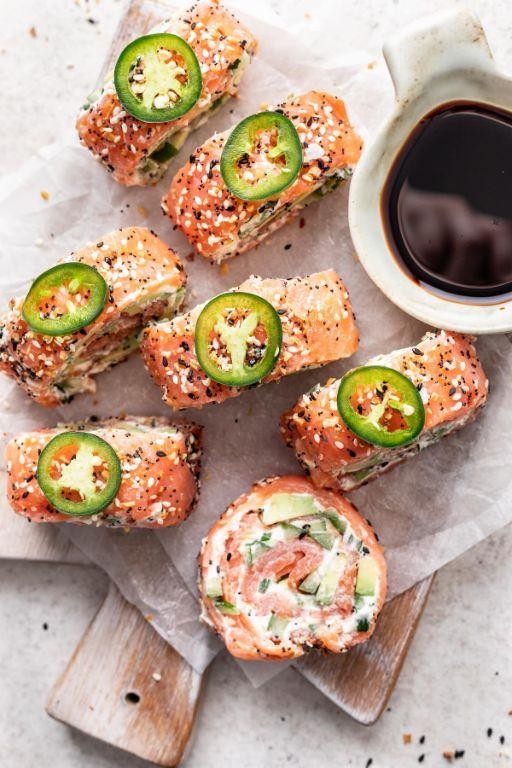
Zesty yet sophisticated, the Smoked Salmon and Cream Cheese Roll is a culinary delight that marries the richness of cream cheese with the smoky elegance of salmon, perfect for elevating any brunch or appetizer spread.
Ingredients
- 8 oz smoked salmon, thinly sliced
- 4 oz cream cheese, softened
- 1 tbsp fresh dill, finely chopped
- 1 tsp lemon zest
- 1/2 tsp black pepper, freshly ground
- 1 cucumber, thinly sliced lengthwise
Instructions
- In a medium bowl, combine the softened cream cheese, fresh dill, lemon zest, and black pepper until smooth. Tip: Ensure the cream cheese is at room temperature for easier mixing.
- Lay out the thinly sliced smoked salmon on a clean surface, slightly overlapping the slices to form a rectangle.
- Spread the cream cheese mixture evenly over the smoked salmon, leaving a small border around the edges.
- Place the thinly sliced cucumber strips horizontally along one edge of the salmon rectangle. Tip: Use a mandoline for uniformly thin cucumber slices.
- Carefully roll the salmon and cream cheese mixture around the cucumber, starting from the edge with the cucumber, to form a tight log. Tip: Use a sheet of parchment paper to help roll evenly without sticking.
- Wrap the roll tightly in plastic wrap and refrigerate for at least 1 hour to firm up.
- Remove the plastic wrap and slice the roll into 1-inch pieces with a sharp knife. Serve chilled.
Gracefully presented, these rolls offer a creamy texture contrasted by the crisp cucumber, with a flavor profile that’s both refreshing and indulgent. For an extra touch of elegance, garnish with additional dill and serve on a slate board for a visually striking appetizer.
Roasted Brussels Sprouts with Bacon
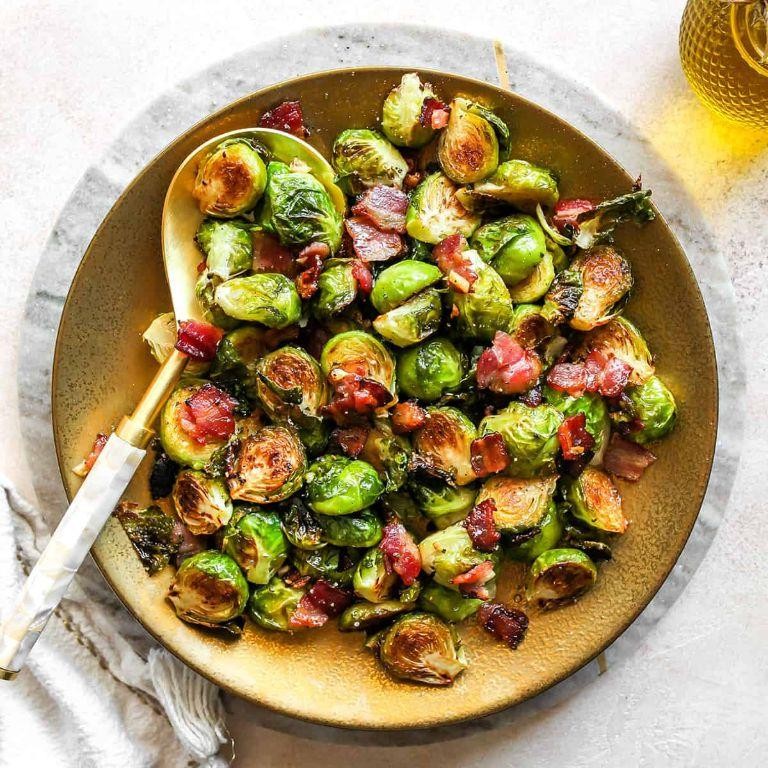
Yieldingly tender and bursting with flavor, Roasted Brussels Sprouts with Bacon transforms the humble vegetable into a dish of sublime sophistication. The caramelized edges of the sprouts paired with the smoky crispness of bacon create a harmonious blend of textures and tastes that elevate any meal.
Ingredients
- 1.5 lbs Brussels sprouts, trimmed and halved
- 4 slices thick-cut bacon, chopped
- 2 tbsp olive oil
- 1/2 tsp salt
- 1/4 tsp black pepper
- 1 tbsp balsamic vinegar
Instructions
- Preheat the oven to 400°F (200°C) and line a baking sheet with parchment paper for easy cleanup.
- In a large bowl, toss the Brussels sprouts with olive oil, salt, and pepper until evenly coated.
- Spread the Brussels sprouts in a single layer on the prepared baking sheet, ensuring they are not overcrowded to allow for proper roasting.
- Scatter the chopped bacon evenly over the Brussels sprouts.
- Roast in the preheated oven for 20 minutes, then stir the sprouts and bacon to promote even cooking.
- Continue roasting for another 10-15 minutes, or until the Brussels sprouts are deeply golden and the bacon is crispy.
- Drizzle the balsamic vinegar over the roasted Brussels sprouts and bacon, tossing gently to combine.
Amazingly versatile, this dish offers a delightful contrast between the crispy bacon and the soft, caramelized Brussels sprouts. Serve it as a standout side dish or atop a creamy polenta for a hearty vegetarian option with a twist.
Conclusion
We hope this roundup of 20 delicious zero-carb recipes inspires your next healthy meal! Whether you’re looking to cut carbs or just add more variety to your diet, these dishes are sure to delight. Don’t forget to try them out, share your favorites in the comments, and pin this article on Pinterest for your next culinary adventure. Happy cooking!


