As the winter chill sets in, there’s nothing quite like gathering around the table for a warm, comforting meal. Our roundup of 20 Cozy Winter Recipes for Dinner Delights is here to inspire your seasonal cooking with dishes that are as hearty as they are delicious. From quick weeknight fixes to slow-cooked favorites, these recipes promise to bring warmth and joy to your dinner table. Let’s dive in!
Hearty Beef Stew with Root Vegetables
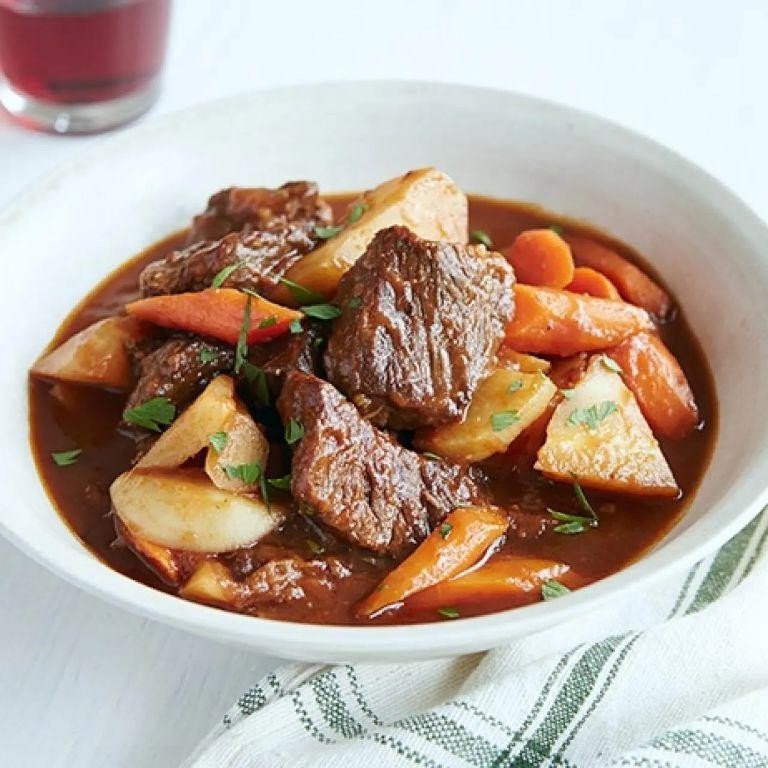
Let’s face it, folks—when the weather turns chilly, there’s nothing like a steaming bowl of hearty beef stew to hug your insides. This version, packed with root vegetables, is the culinary equivalent of your favorite cozy sweater, but way tastier.
Ingredients
- 2 lbs chuck beef, cut into 1-inch cubes
- 3 tbsp clarified butter
- 1 large yellow onion, diced
- 3 cloves garlic, minced
- 4 cups beef stock, preferably homemade
- 2 cups dry red wine
- 3 large carrots, peeled and cut into 1-inch pieces
- 2 parsnips, peeled and cut into 1-inch pieces
- 1 large russet potato, peeled and cut into 1-inch cubes
- 2 tbsp tomato paste
- 1 tsp fresh thyme leaves
- 1 bay leaf
- Salt and freshly ground black pepper, to season
Instructions
- Preheat a large Dutch oven over medium-high heat. Add clarified butter and swirl to coat the bottom.
- Season beef cubes generously with salt and pepper. Working in batches, sear beef on all sides until deeply browned, about 3-4 minutes per side. Transfer to a plate.
- In the same pot, add diced onion and sauté until translucent, about 5 minutes. Add minced garlic and cook for 1 minute more, until fragrant.
- Deglaze the pot with red wine, scraping up any browned bits from the bottom. Allow to reduce by half, about 5 minutes.
- Stir in tomato paste, thyme, and bay leaf. Cook for 1 minute to meld flavors.
- Return beef to the pot along with any accumulated juices. Pour in beef stock, ensuring meat is submerged.
- Bring to a simmer, then reduce heat to low. Cover and cook for 1.5 hours, until beef is tender.
- Add carrots, parsnips, and potato. Continue to simmer, uncovered, for 30 minutes, or until vegetables are fork-tender.
- Season stew with additional salt and pepper if needed. Discard bay leaf before serving.
Zesty and robust, this stew boasts tender beef that melts in your mouth, with root vegetables adding a sweet earthiness. Serve it in a hollowed-out bread bowl for an edible vessel that’s as practical as it is delicious.
Creamy Chicken and Wild Rice Soup

Hold onto your spoons, folks, because we’re about to dive into a bowl of comfort that’s creamier than a rom-com marathon on a rainy Sunday. This soup is the culinary equivalent of a warm hug, with a wild rice twist that’ll have your taste buds doing the cha-cha.
Ingredients
- 1 tablespoon extra-virgin olive oil
- 1 cup diced yellow onion
- 1/2 cup diced celery
- 1/2 cup diced carrot
- 2 cloves garlic, minced
- 1 pound boneless, skinless chicken thighs, trimmed and diced
- 1 teaspoon kosher salt
- 1/2 teaspoon freshly ground black pepper
- 1 teaspoon dried thyme
- 1 bay leaf
- 1/2 cup wild rice
- 4 cups low-sodium chicken stock
- 1 cup heavy cream
- 2 tablespoons unsalted butter
- 1/4 cup all-purpose flour
- 1/2 cup whole milk
- 1 tablespoon fresh parsley, finely chopped
Instructions
- Heat the olive oil in a large Dutch oven over medium heat until shimmering, about 2 minutes.
- Add the onion, celery, and carrot, sautéing until the onions are translucent and the vegetables are softened, about 5 minutes.
- Stir in the garlic and cook until fragrant, about 30 seconds.
- Season the chicken thighs with salt and pepper, then add to the pot, browning on all sides, about 5 minutes.
- Sprinkle in the thyme and add the bay leaf, stirring to combine.
- Pour in the wild rice and chicken stock, bringing the mixture to a boil. Reduce heat to low, cover, and simmer for 45 minutes, or until the rice is tender.
- In a separate saucepan, melt the butter over medium heat. Whisk in the flour to create a roux, cooking for 2 minutes until golden.
- Gradually whisk in the milk and heavy cream, ensuring no lumps remain, and cook until the mixture thickens, about 5 minutes.
- Slowly stir the cream mixture into the soup, then simmer for an additional 10 minutes to blend the flavors.
- Remove the bay leaf, garnish with fresh parsley, and serve hot.
Rich and velvety, this soup boasts a harmonious blend of tender chicken, nutty wild rice, and a creamy broth that’s downright luxurious. For a twist, serve it in a hollowed-out bread bowl to soak up every last drop of goodness.
Slow Cooker Pork Roast with Apples and Onions
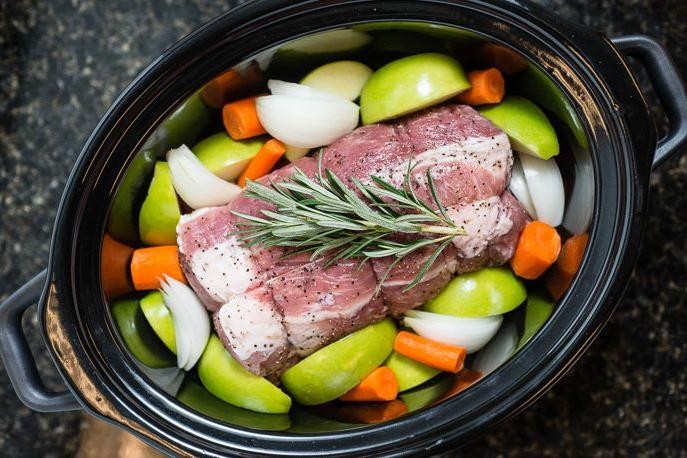
Venture into the realm of slow-cooked perfection where your patience is rewarded with a dish that’s as hearty as it is harmonious. This pork roast, mingling with the sweet whispers of apples and the bold declarations of onions, is your ticket to a flavor-packed journey that’s both effortless and elegant.
Ingredients
- 3 lbs pasture-raised pork shoulder roast, trimmed
- 2 large Granny Smith apples, cored and sliced into 1/2-inch wedges
- 1 large yellow onion, thinly sliced
- 2 tbsp clarified butter
- 1 cup apple cider
- 2 tbsp fresh thyme leaves
- 1 tbsp Dijon mustard
- 1 tsp sea salt
- 1/2 tsp freshly ground black pepper
Instructions
- Heat the clarified butter in a large skillet over medium-high heat until shimmering, about 2 minutes.
- Season the pork shoulder roast evenly with sea salt and freshly ground black pepper.
- Sear the roast on all sides in the skillet until deeply browned, approximately 4 minutes per side.
- Transfer the seared roast to the slow cooker, arranging the apple wedges and sliced onion around it.
- Whisk together the apple cider, Dijon mustard, and fresh thyme leaves in a small bowl, then pour over the roast and apples.
- Cover and cook on low for 8 hours, or until the pork is fork-tender and easily shreds.
- For a glossy finish, remove the pork and apples, then simmer the remaining juices on high for 10 minutes until slightly thickened.
Marvel at the melt-in-your-mouth tenderness of the pork, perfectly complemented by the caramelized apples and onions. Serve this masterpiece over a bed of creamy polenta or alongside roasted root vegetables for a meal that’s as visually stunning as it is delicious.
Baked Macaroni and Cheese with Smoked Gouda

Alright, let’s dive into a dish that’s the culinary equivalent of a warm hug—smoky, creamy, and utterly irresistible. This baked macaroni and cheese with smoked Gouda is the stuff of dreams, perfect for when you want to impress or simply indulge in some cheesy goodness.
Ingredients
- 8 oz elbow macaroni
- 3 tbsp unsalted butter
- 3 tbsp all-purpose flour
- 2 cups whole milk, warmed
- 1 cup heavy cream
- 2 cups smoked Gouda, grated
- 1 cup sharp cheddar, grated
- 1/2 tsp smoked paprika
- 1/4 tsp cayenne pepper
- 1/2 tsp kosher salt
- 1/4 tsp freshly ground black pepper
- 1/2 cup panko breadcrumbs
- 2 tbsp clarified butter, melted
Instructions
- Preheat your oven to 375°F and grease a 9×13-inch baking dish.
- Cook the elbow macaroni in salted boiling water for 6 minutes, until al dente. Drain and set aside.
- In a large saucepan, melt the unsalted butter over medium heat. Whisk in the all-purpose flour and cook for 1 minute, until golden.
- Gradually whisk in the warmed whole milk and heavy cream, ensuring no lumps remain. Cook for 3-4 minutes, until the mixture thickens.
- Reduce the heat to low and stir in the smoked Gouda and sharp cheddar until fully melted and smooth.
- Season the cheese sauce with smoked paprika, cayenne pepper, kosher salt, and freshly ground black pepper.
- Fold the cooked macaroni into the cheese sauce until evenly coated, then transfer to the prepared baking dish.
- In a small bowl, combine the panko breadcrumbs with the melted clarified butter. Sprinkle evenly over the macaroni.
- Bake for 20-25 minutes, until the top is golden and the sauce is bubbly.
- Let the dish rest for 5 minutes before serving to allow the sauce to set slightly.
Lusciously creamy with a smoky depth, this mac and cheese is a showstopper. Serve it with a crisp green salad to cut through the richness, or go all out and top it with crispy bacon for an extra layer of flavor.
Roasted Butternut Squash and Sage Risotto

Yikes, it’s that time of year again when we all pretend to like squash more than we actually do. But hold onto your aprons, because this Roasted Butternut Squash and Sage Risotto is about to change the game—creamy, dreamy, and just a little bit sassy.
Ingredients
- 1 medium butternut squash, peeled, seeded, and diced into 1/2-inch cubes
- 2 tbsp extra virgin olive oil
- 1 tsp kosher salt, divided
- 1/2 tsp freshly ground black pepper, divided
- 4 cups low-sodium chicken stock
- 2 tbsp unsalted butter
- 1 small yellow onion, finely diced
- 2 cloves garlic, minced
- 1 1/2 cups Arborio rice
- 1/2 cup dry white wine
- 1/4 cup freshly grated Parmesan cheese
- 2 tbsp fresh sage leaves, thinly sliced
Instructions
- Preheat your oven to 400°F. Toss the butternut squash cubes with 1 tbsp olive oil, 1/2 tsp salt, and 1/4 tsp pepper on a baking sheet. Roast for 25 minutes, or until fork-tender and slightly caramelized.
- While the squash roasts, heat the chicken stock in a saucepan over low heat. Keep it warm throughout the cooking process.
- In a large, heavy-bottomed pot, melt the butter with the remaining 1 tbsp olive oil over medium heat. Add the onion and cook until translucent, about 5 minutes. Stir in the garlic and cook for 30 seconds until fragrant.
- Add the Arborio rice to the pot, stirring to coat each grain in the fat. Toast the rice for 2 minutes, then deglaze with the white wine, stirring until the liquid is mostly absorbed.
- Begin adding the warm chicken stock, one ladleful at a time, stirring constantly and allowing each addition to be absorbed before adding the next. This process should take about 18-20 minutes.
- Once the rice is al dente and the mixture is creamy, fold in the roasted butternut squash, Parmesan cheese, and sage. Season with the remaining salt and pepper.
- Remove from heat and let stand for 2 minutes before serving. This rest allows the risotto to achieve the perfect consistency.
Perfectly balanced between the earthy sweetness of the squash and the aromatic punch of sage, this risotto is a textural masterpiece. Serve it in a hollowed-out squash for a show-stopping presentation that’ll have your guests swooning.
Spicy Sausage and Lentil Soup
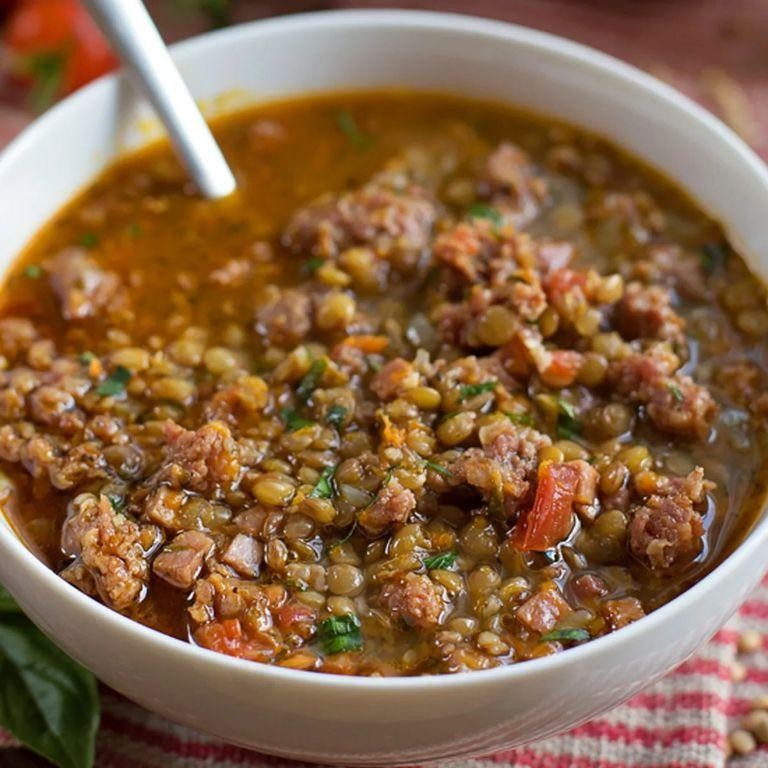
Brace yourselves, soup lovers, because this Spicy Sausage and Lentil Soup is about to rock your taste buds like a culinary concert. It’s hearty, it’s spicy, and it’s packed with flavors that’ll make your spoon dance with joy.
Ingredients
- 1 tbsp extra-virgin olive oil
- 1 lb spicy Italian sausage, casings removed
- 1 cup diced yellow onion
- 2 cloves garlic, minced
- 1 cup dried green lentils, rinsed
- 4 cups chicken stock, low-sodium
- 1 cup diced tomatoes, with juices
- 1 tsp smoked paprika
- 1/2 tsp crushed red pepper flakes
- Salt, to taste
- Freshly ground black pepper, to taste
- 2 cups baby spinach, loosely packed
- 1/4 cup grated Parmesan cheese, for serving
Instructions
- Heat the olive oil in a large pot over medium heat until shimmering, about 1 minute.
- Add the sausage, breaking it apart with a wooden spoon, and cook until browned, about 5 minutes. Tip: For extra flavor, let the sausage get a bit crispy.
- Stir in the onion and garlic, cooking until softened, about 3 minutes. Tip: Don’t rush this step; caramelizing the onions slightly will add depth.
- Add the lentils, chicken stock, diced tomatoes, smoked paprika, and red pepper flakes. Bring to a boil, then reduce heat to low and simmer, covered, for 25 minutes. Tip: Stir occasionally to prevent sticking.
- Season with salt and black pepper, then stir in the spinach until just wilted, about 1 minute.
- Serve hot, garnished with Parmesan cheese.
Every spoonful of this soup is a cozy hug with a spicy kick, perfect for those chilly evenings when you crave something bold. Try serving it with a side of crusty bread to sop up all the deliciousness.
Garlic Butter Salmon with Roasted Potatoes
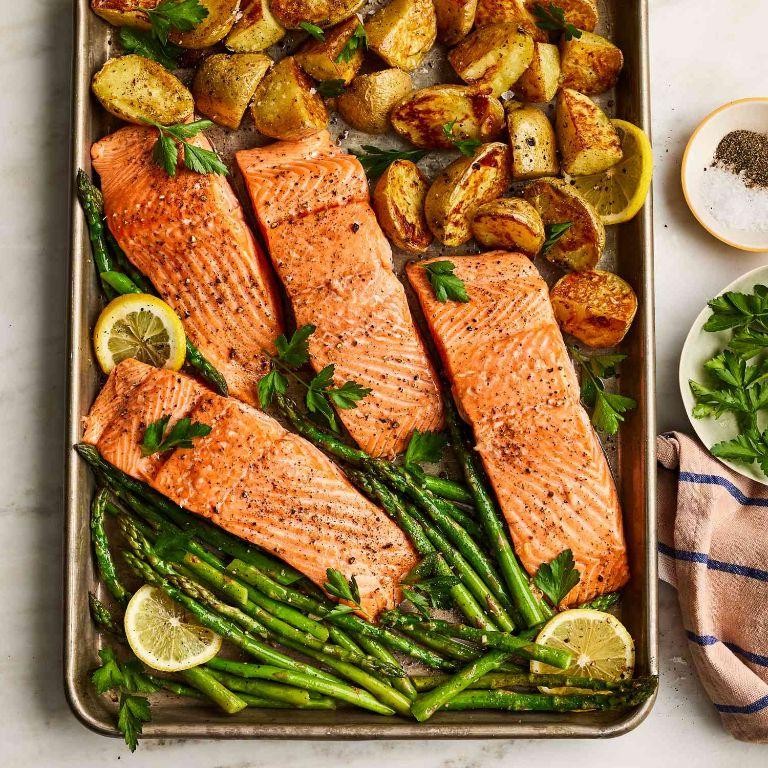
Who knew that the secret to winning hearts (and stomachs) could be as simple as garlic butter and a perfectly cooked piece of salmon? This Garlic Butter Salmon with Roasted Potatoes is your ticket to a dinner that’s as easy to make as it is to devour, proving that elegance and simplicity can indeed share a plate.
Ingredients
- 1.5 lbs wild-caught salmon fillet, skin-on
- 1.5 lbs Yukon Gold potatoes, quartered
- 4 tbsp unsalted butter, clarified
- 4 garlic cloves, minced
- 2 tbsp fresh dill, finely chopped
- 1 tbsp fresh lemon juice
- 1 tsp sea salt
- 1/2 tsp freshly ground black pepper
- 2 tbsp extra virgin olive oil
Instructions
- Preheat your oven to 400°F (204°C) to ensure it’s perfectly heated for roasting.
- Toss the quartered Yukon Gold potatoes with 1 tbsp of extra virgin olive oil, 1/2 tsp of sea salt, and 1/4 tsp of black pepper on a baking sheet, spreading them out in a single layer for even cooking.
- Roast the potatoes in the preheated oven for 25 minutes, or until they start to golden, flipping halfway through for that perfect crisp.
- While the potatoes roast, heat 2 tbsp of clarified butter in a skillet over medium heat, adding the minced garlic to sauté until fragrant, about 1 minute, being careful not to burn.
- Season the salmon fillet with the remaining sea salt and black pepper, then place it skin-side down in the skillet, cooking for 4-5 minutes until the skin is crispy.
- Flip the salmon carefully, add the remaining butter, lemon juice, and dill to the skillet, basting the salmon with the garlic butter mixture for another 3-4 minutes, or until the salmon is just cooked through.
- Remove the potatoes from the oven and the salmon from the skillet, letting both rest for 2 minutes before serving to allow the flavors to meld beautifully.
This dish boasts a symphony of textures—crispy skin, flaky salmon, and tender potatoes—all harmonized by the rich, aromatic garlic butter. Try serving it atop a bed of arugula for a peppery contrast, or with a side of steamed asparagus for a touch of green elegance.
Vegetable Pot Pie with Flaky Crust

Who knew that comfort food could wear a flaky, buttery crown and still be packed with veggies? This Vegetable Pot Pie is here to prove that you can have your pie and eat it too, without a hint of guilt (well, maybe just a smidge when you go for seconds).
Ingredients
- 2 cups all-purpose flour, plus extra for dusting
- 1 cup unsalted butter, chilled and cubed
- 1/2 cup ice water
- 1 tbsp apple cider vinegar
- 1 cup diced carrots
- 1 cup diced celery
- 1 cup frozen peas
- 1 cup diced potatoes
- 1/2 cup diced onion
- 2 cloves garlic, minced
- 3 cups vegetable broth
- 1/2 cup heavy cream
- 2 tbsp all-purpose flour
- 1 tsp fresh thyme leaves
- 1 tsp salt
- 1/2 tsp black pepper
- 1 pasture-raised egg, lightly beaten for egg wash
Instructions
- In a large bowl, combine 2 cups all-purpose flour and salt. Add chilled, cubed butter and use a pastry cutter to blend until the mixture resembles coarse crumbs.
- Gradually add ice water and apple cider vinegar, stirring until the dough just comes together. Tip: Overworking the dough leads to a tough crust, so handle with care.
- Divide the dough in half, shape into discs, wrap in plastic, and refrigerate for at least 1 hour.
- Preheat oven to 375°F. In a large skillet, sauté onion, garlic, carrots, celery, and potatoes over medium heat until slightly softened, about 5 minutes.
- Sprinkle 2 tbsp flour over the vegetables, stirring to coat. Gradually add vegetable broth and heavy cream, bringing to a simmer until the mixture thickens, about 5 minutes.
- Stir in peas, thyme, salt, and pepper. Remove from heat and let cool slightly.
- Roll out one dough disc on a floured surface to fit a 9-inch pie dish. Transfer the dough to the dish, trimming any excess.
- Pour the vegetable filling into the crust. Roll out the second dough disc and place over the filling. Trim and crimp the edges to seal. Cut a few slits in the top for steam to escape.
- Brush the top crust with beaten egg for a golden finish. Tip: For an extra flaky crust, chill the assembled pie for 15 minutes before baking.
- Bake for 45-50 minutes, or until the crust is golden and the filling is bubbly. Tip: Place a baking sheet underneath to catch any drips.
Let this pot pie cool for a few minutes before diving in—trust us, it’s worth the wait. The crust shatters beautifully to reveal a creamy, veggie-packed interior that’s hearty enough to satisfy even the most devout meat-lovers. Serve it with a crisp salad to cut through the richness, or go all-in with a side of mashed potatoes for the ultimate comfort food experience.
Braised Short Ribs with Red Wine Sauce
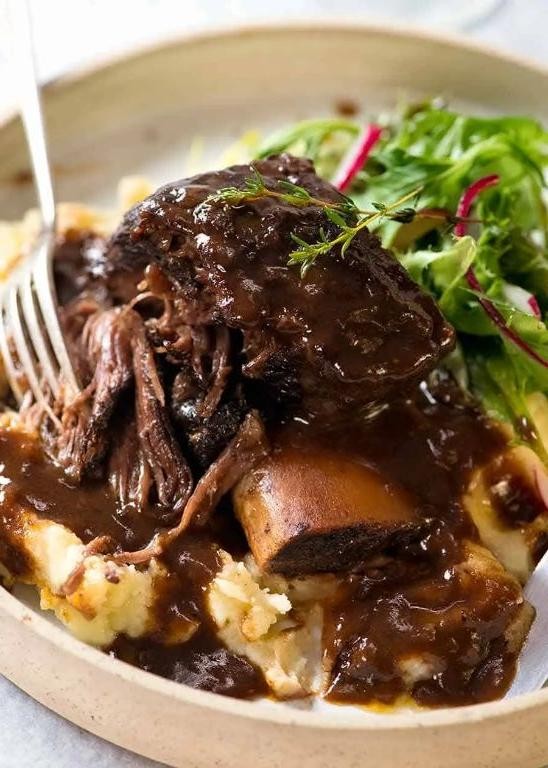
Savory, succulent, and downright seductive, these braised short ribs are the culinary equivalent of a slow dance in the rain – messy, romantic, and utterly unforgettable. Paired with a red wine sauce that’s richer than a billionaire’s bank account, this dish is a love letter to your taste buds.
Ingredients
- 4 lbs bone-in beef short ribs, trimmed of excess fat
- 2 tbsp extra-virgin olive oil
- 1 large yellow onion, finely diced
- 2 medium carrots, peeled and finely diced
- 2 celery stalks, finely diced
- 4 garlic cloves, minced
- 2 tbsp tomato paste
- 2 cups dry red wine (such as Cabernet Sauvignon)
- 4 cups beef stock, preferably homemade
- 2 sprigs fresh thyme
- 2 sprigs fresh rosemary
- 1 bay leaf
- Salt and freshly ground black pepper, to season
Instructions
- Preheat your oven to 325°F (163°C). Season the short ribs generously with salt and pepper on all sides.
- Heat the olive oil in a large Dutch oven over medium-high heat. Sear the short ribs in batches until deeply browned on all sides, about 4-5 minutes per side. Transfer to a plate.
- In the same pot, add the onion, carrots, and celery. Cook, stirring occasionally, until softened and lightly browned, about 8 minutes.
- Add the garlic and tomato paste, cooking for 1 minute until fragrant. Pour in the red wine, scraping up any browned bits from the bottom of the pot.
- Return the short ribs to the pot, along with any accumulated juices. Add the beef stock, thyme, rosemary, and bay leaf. The liquid should nearly cover the ribs.
- Bring to a simmer, then cover and transfer to the oven. Braise for 3 hours, or until the meat is fork-tender.
- Remove the short ribs from the pot and strain the sauce, discarding the solids. Skim off any excess fat and reduce the sauce over medium heat until thickened to your liking.
- Serve the short ribs topped with the red wine sauce. For an extra touch of elegance, garnish with a sprig of fresh thyme.
Every bite of these braised short ribs is a symphony of flavors, with the meat so tender it practically melts in your mouth. The red wine sauce, reduced to a glossy perfection, clings to each rib like a second skin, offering a deep, complex flavor that’s both bold and refined. Try serving them over a bed of creamy polenta or buttery mashed potatoes for a meal that’s nothing short of spectacular.
Quinoa Stuffed Acorn Squash
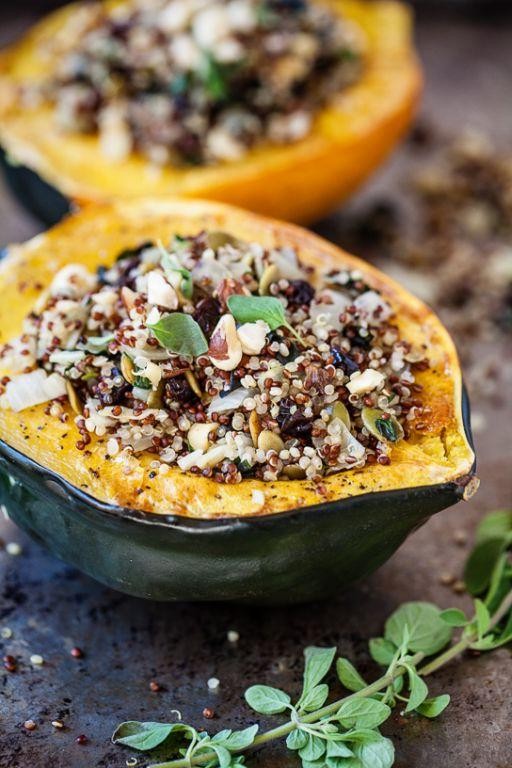
Just when you thought acorn squash couldn’t get any more fabulous, along comes this quinoa-stuffed masterpiece to prove you wrong. Packed with nutty quinoa, a medley of autumnal spices, and a sprinkle of cheese that’s just begging to be Instagrammed, this dish is the epitome of cozy yet chic.
Ingredients
- 2 medium acorn squashes, halved and seeded
- 1 cup quinoa, rinsed
- 2 cups vegetable broth
- 1 tbsp clarified butter
- 1 small yellow onion, finely diced
- 2 cloves garlic, minced
- 1 tsp ground cinnamon
- 1/2 tsp ground nutmeg
- 1/2 cup dried cranberries
- 1/2 cup pecans, toasted and chopped
- 1/2 cup feta cheese, crumbled
- Salt to taste
Instructions
- Preheat your oven to 375°F. Place the acorn squash halves cut-side down on a baking sheet. Roast for 25 minutes until just tender.
- While the squash roasts, combine quinoa and vegetable broth in a saucepan. Bring to a boil, then reduce heat to low, cover, and simmer for 15 minutes. Remove from heat and let stand, covered, for 5 minutes.
- In a large skillet over medium heat, melt clarified butter. Add onion and garlic, sautéing until translucent, about 5 minutes.
- Stir in cinnamon and nutmeg, cooking for 1 minute until fragrant. Tip: Toasting spices releases their essential oils, deepening the flavor.
- Fluff the quinoa with a fork and add to the skillet along with cranberries and pecans. Stir to combine, then remove from heat.
- Flip the roasted squash halves cut-side up. Divide the quinoa mixture among them, packing it gently. Sprinkle with feta cheese.
- Return to the oven and bake for another 10 minutes, until the cheese is slightly melted. Tip: For a golden top, broil for the last 2 minutes.
- Let cool for 5 minutes before serving. Tip: The filling will set slightly as it cools, making it easier to slice.
Craving a dish that’s as visually stunning as it is delicious? The tender squash cradles the fluffy, spiced quinoa filling, with pops of sweet cranberries and crunchy pecans in every bite. Serve it atop a bed of arugula for a color contrast that’ll make your dinner guests swoon.
Chicken Pot Pie Soup with Biscuits

Brace yourselves, comfort food enthusiasts, because we’re about to dive spoon-first into a bowl of cozy that’ll make your taste buds sing. This Chicken Pot Pie Soup with Biscuits is like hugging your grandma, if your grandma was a delicious, creamy soup topped with flaky, buttery biscuits.
Ingredients
- 2 cups shredded, roasted chicken breast
- 3 tbsp clarified butter
- 1 cup diced yellow onion
- 1 cup diced carrots
- 1 cup diced celery
- 3 cloves garlic, minced
- 1/3 cup all-purpose flour
- 4 cups chicken stock, homemade preferred
- 1 cup heavy cream
- 1 cup frozen peas
- 1 tsp fresh thyme leaves
- 1/2 tsp freshly ground black pepper
- 1 batch homemade buttermilk biscuits, baked
Instructions
- In a large Dutch oven over medium heat, melt the clarified butter until shimmering.
- Add the diced onion, carrots, and celery. Sauté until the vegetables are tender, about 5 minutes, stirring occasionally.
- Stir in the minced garlic and cook for an additional 30 seconds, until fragrant.
- Sprinkle the flour over the vegetables and stir to coat, cooking for 1 minute to remove the raw flour taste.
- Gradually whisk in the chicken stock, ensuring no lumps remain, and bring to a simmer.
- Add the shredded chicken, heavy cream, frozen peas, thyme, and black pepper. Simmer for 10 minutes, stirring occasionally.
- While the soup simmers, preheat your oven to 450°F and bake the buttermilk biscuits until golden brown, about 10-12 minutes.
- Ladle the soup into bowls and top each with a warm biscuit. Serve immediately.
Oh, the joy of breaking into that biscuit to reveal the creamy, dreamy soup beneath! The tender chunks of chicken and vegetables swim in a velvety broth that’s rich but not overwhelming, making each spoonful a perfect bite. For an extra touch of whimsy, serve the soup in hollowed-out bread bowls and watch as your dinner guests’ eyes light up with delight.
Beef and Barley Soup with Mushrooms
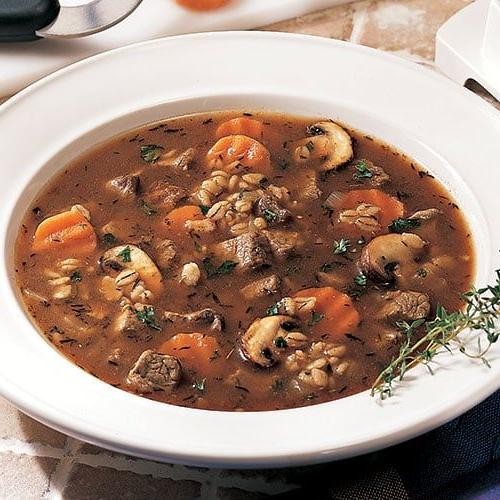
Mmm, nothing says ‘comfort’ like a steaming bowl of Beef and Barley Soup with Mushrooms, especially when it’s crafted with a dash of love and a sprinkle of culinary prowess. This hearty dish is your ticket to flavor town, with tender beef, earthy mushrooms, and chewy barley dancing in a rich, savory broth that’ll make your taste buds sing.
Ingredients
- 1.5 lbs chuck roast, cut into 1-inch cubes
- 2 tbsp clarified butter
- 1 cup pearl barley, rinsed
- 8 oz cremini mushrooms, sliced
- 1 large yellow onion, finely diced
- 2 carrots, peeled and diced
- 2 celery stalks, diced
- 4 cloves garlic, minced
- 6 cups beef stock
- 2 tbsp tomato paste
- 1 tsp fresh thyme leaves
- 1 bay leaf
- Salt and freshly ground black pepper, to season
Instructions
- Heat the clarified butter in a large Dutch oven over medium-high heat until shimmering.
- Season the beef cubes generously with salt and pepper, then sear in the Dutch oven until browned on all sides, about 5 minutes. Remove and set aside.
- In the same pot, add the onion, carrots, and celery. Sauté until the vegetables are softened, about 5 minutes.
- Stir in the garlic and mushrooms, cooking until the mushrooms release their moisture and begin to brown, about 4 minutes.
- Add the tomato paste, stirring constantly for 1 minute to deepen the flavor.
- Return the beef to the pot, along with the barley, beef stock, thyme, and bay leaf. Bring to a boil, then reduce heat to low.
- Cover and simmer for 1 hour, or until the beef is tender and the barley is cooked through. Stir occasionally to prevent sticking.
- Remove the bay leaf, adjust seasoning with salt and pepper, and serve hot.
Oh, the magic of this soup lies in its layers of flavor and texture—tender beef, chewy barley, and a broth that’s rich and deeply satisfying. Serve it with a crusty loaf of bread for dipping, or top with a dollop of sour cream for an extra touch of indulgence.
Sweet Potato and Black Bean Chili
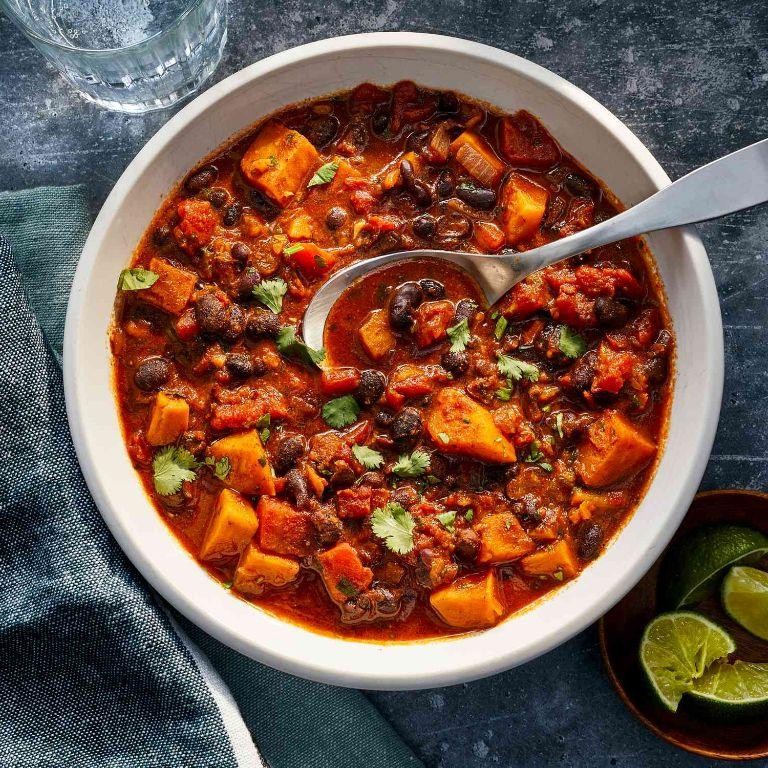
Mmm, imagine a bowl so hearty it could double as a hug in edible form—that’s what you’re in for with this Sweet Potato and Black Bean Chili. It’s the kind of dish that makes you forget about the weather outside, whether it’s a blizzard or just a case of the Mondays.
Ingredients
- 2 tablespoons extra-virgin olive oil
- 1 large sweet potato, peeled and diced into 1/2-inch cubes
- 1 medium yellow onion, finely diced
- 3 cloves garlic, minced
- 1 tablespoon ground cumin
- 1 teaspoon smoked paprika
- 1/2 teaspoon ground cinnamon
- 1 can (15 oz) black beans, drained and rinsed
- 1 can (14.5 oz) fire-roasted diced tomatoes
- 2 cups vegetable broth
- 1/2 teaspoon sea salt
- 1/4 teaspoon freshly ground black pepper
- 1/4 cup fresh cilantro, chopped
- 1 avocado, diced, for garnish
- 1 lime, cut into wedges, for serving
Instructions
- Heat the extra-virgin olive oil in a large pot over medium heat until shimmering, about 1 minute.
- Add the diced sweet potato and onion to the pot, sautéing until the onion is translucent and the sweet potato begins to soften, about 5 minutes.
- Stir in the minced garlic, ground cumin, smoked paprika, and ground cinnamon, cooking until fragrant, about 30 seconds.
- Pour in the black beans, fire-roasted diced tomatoes, and vegetable broth, stirring to combine.
- Bring the mixture to a boil, then reduce the heat to low, simmering uncovered for 20 minutes, or until the sweet potatoes are tender.
- Season with sea salt and freshly ground black pepper, adjusting to your preference.
- Garnish with chopped cilantro, diced avocado, and a squeeze of lime juice before serving.
Who knew comfort could be so colorful? This chili boasts a velvety texture with a smoky-sweet flavor profile that’s downright addictive. Serve it over a bed of quinoa for an extra protein punch, or with a side of crusty bread to sop up every last drop.
Herb Roasted Turkey with Cranberry Sauce
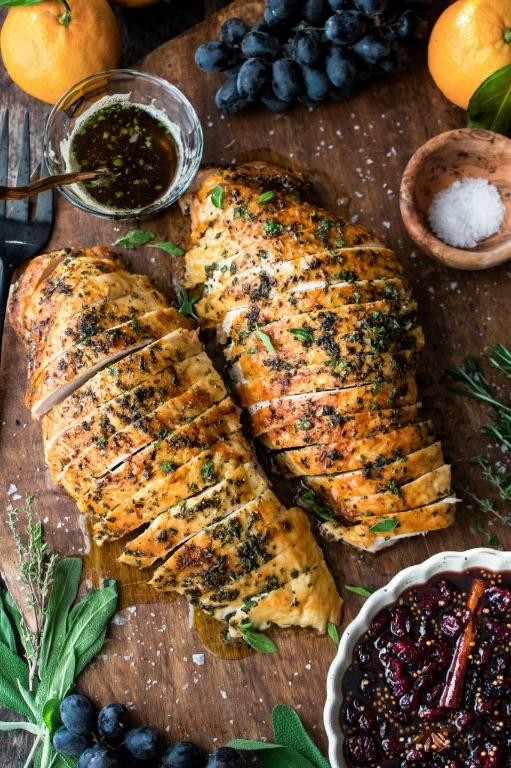
Now, let’s talk about a dish that’s not just for Thanksgiving but deserves a spot on your dinner table any day of the week. This herb-roasted turkey with cranberry sauce is a showstopper, packed with flavors that’ll make your taste buds dance the cha-cha.
Ingredients
- 1 whole turkey (12-14 lbs), patted dry
- 1/2 cup unsalted butter, softened
- 2 tbsp fresh rosemary, finely chopped
- 2 tbsp fresh thyme, finely chopped
- 2 tbsp fresh sage, finely chopped
- 1 tbsp kosher salt
- 1 tsp freshly ground black pepper
- 1 orange, quartered
- 1 onion, quartered
- 2 cups fresh cranberries
- 1/2 cup granulated sugar
- 1/2 cup water
- 1 cinnamon stick
Instructions
- Preheat your oven to 325°F (163°C). Ensure the turkey is at room temperature for even cooking.
- In a bowl, mix the softened butter with rosemary, thyme, sage, salt, and pepper until well combined.
- Gently loosen the skin of the turkey and spread half of the herb butter underneath. Rub the remaining butter over the outside of the turkey.
- Stuff the cavity of the turkey with the quartered orange and onion for added flavor.
- Place the turkey on a rack in a roasting pan and roast for about 3 to 3.5 hours, or until the internal temperature reaches 165°F (74°C) at the thickest part of the thigh.
- While the turkey roasts, combine cranberries, sugar, water, and cinnamon stick in a saucepan over medium heat. Bring to a simmer and cook until the cranberries burst and the sauce thickens, about 10 minutes. Remove the cinnamon stick before serving.
- Let the turkey rest for 20 minutes before carving to allow the juices to redistribute.
Golden and glorious, this herb-roasted turkey is juicy on the inside with a crispy, flavorful skin. The cranberry sauce adds a tangy sweetness that cuts through the richness beautifully. Serve it with a side of roasted vegetables for a meal that’s as colorful as it is delicious.
Spinach and Artichoke Stuffed Shells
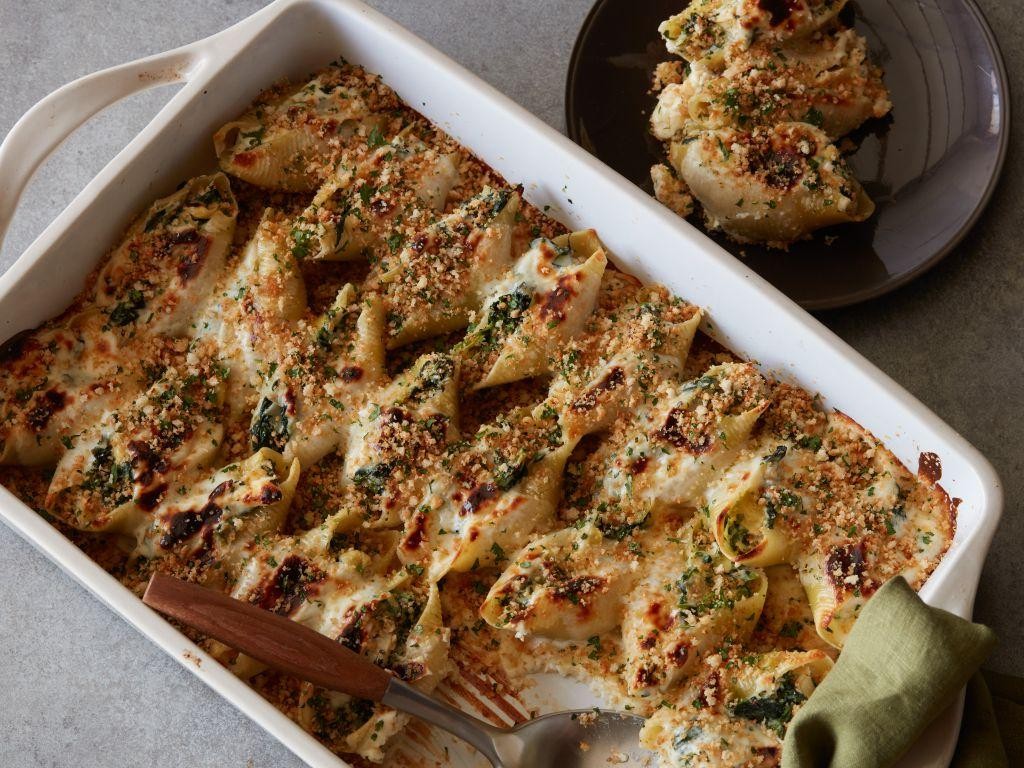
Feast your eyes on this cheesy, dreamy dish that’s about to make your taste buds do a happy dance. Spinach and artichoke stuffed shells are the culinary equivalent of a warm hug, packed with flavors that sing in perfect harmony.
Ingredients
- 12 oz jumbo pasta shells
- 2 cups whole milk ricotta cheese
- 1 cup grated Parmesan cheese
- 1 cup shredded mozzarella cheese
- 1 cup frozen spinach, thawed and squeezed dry
- 1 cup marinated artichoke hearts, drained and chopped
- 2 cloves garlic, minced
- 1 large egg, lightly beaten
- 1/2 tsp sea salt
- 1/4 tsp freshly ground black pepper
- 2 cups marinara sauce
- 1 tbsp extra virgin olive oil
- 1/4 cup fresh basil, chopped
Instructions
- Preheat your oven to 375°F and lightly grease a 9×13 inch baking dish with olive oil.
- Bring a large pot of salted water to a boil and cook the jumbo shells according to package instructions until al dente, about 9 minutes. Drain and set aside.
- In a large mixing bowl, combine ricotta, Parmesan, mozzarella, spinach, artichoke hearts, garlic, egg, salt, and pepper. Mix until well incorporated.
- Spread 1 cup of marinara sauce evenly over the bottom of the prepared baking dish.
- Carefully stuff each cooked shell with the cheese and vegetable mixture, placing them seam side up in the dish.
- Pour the remaining marinara sauce over the stuffed shells, then sprinkle with additional mozzarella if desired.
- Bake uncovered for 25 minutes, or until the cheese is bubbly and slightly golden.
- Let the shells rest for 5 minutes before serving, allowing the flavors to meld beautifully.
- Garnish with fresh basil before serving for a pop of color and freshness.
Creating a masterpiece in the kitchen has never been easier with these spinach and artichoke stuffed shells. The creamy filling paired with the tangy marinara sauce creates a symphony of flavors that’s irresistibly delicious. Serve these beauties with a crisp green salad and a glass of white wine for an unforgettable meal.
Lamb Shanks with Garlic and Rosemary
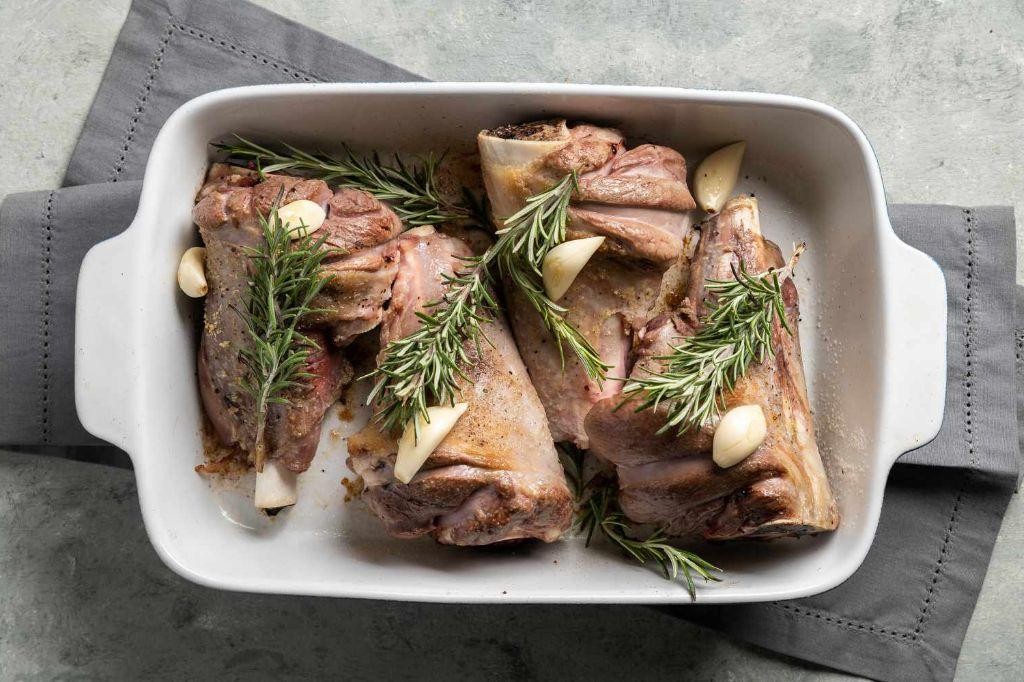
Picture this: a dish so hearty and aromatic, it’ll have your neighbors knocking on your door, pretending they ‘just wanted to borrow some sugar.’ Lamb shanks with garlic and rosemary is that kind of showstopper—tender, flavorful, and guaranteed to make you look like a culinary rockstar with minimal effort.
Ingredients
- 4 lamb shanks, frenched
- 2 tbsp extra virgin olive oil
- 1 cup dry red wine
- 4 cups beef stock, preferably homemade
- 8 garlic cloves, thinly sliced
- 2 tbsp fresh rosemary, finely chopped
- 1 tbsp clarified butter
- Salt and freshly ground black pepper, to season
Instructions
- Preheat your oven to 325°F (163°C) to ensure it’s perfectly tempered for slow cooking.
- Season the lamb shanks generously with salt and pepper on all sides.
- Heat the olive oil in a large, oven-proof Dutch oven over medium-high heat until shimmering but not smoking.
- Sear the lamb shanks for 3-4 minutes per side until a golden-brown crust forms. Tip: Don’t crowd the pot; sear in batches if necessary.
- Remove the lamb shanks and set aside. In the same pot, add the clarified butter and sliced garlic, sautéing until fragrant, about 1 minute.
- Deglaze the pot with red wine, scraping up any browned bits with a wooden spoon, and reduce by half, approximately 5 minutes.
- Return the lamb shanks to the pot, add the beef stock and rosemary, ensuring the liquid comes halfway up the shanks.
- Cover and transfer to the oven, braising for 2.5 to 3 hours until the meat is fork-tender. Tip: Check halfway through to ensure the liquid hasn’t reduced too much.
- Remove from the oven and let rest for 10 minutes before serving. Tip: The resting period allows the juices to redistribute, ensuring maximum flavor.
The lamb shanks will be so tender, they’ll practically fall off the bone at the mere sight of a fork. The garlic and rosemary infuse the meat with a depth of flavor that’s both rustic and refined. Serve atop a creamy polenta or with crusty bread to soak up every last drop of that luxurious sauce.
Creamy Tomato Basil Soup with Grilled Cheese

Ready to dive into a bowl of comfort that hugs your soul? This Creamy Tomato Basil Soup paired with a crispy, gooey Grilled Cheese is the culinary equivalent of a warm blanket on a chilly day—except it’s delicious and you can’t actually wrap it around yourself (though we won’t judge if you try).
Ingredients
- 2 tbsp extra virgin olive oil
- 1 medium yellow onion, finely diced
- 3 cloves garlic, minced
- 28 oz canned San Marzano tomatoes, whole
- 1 cup heavy cream
- 1/4 cup fresh basil leaves, chiffonade
- 1 tsp sugar
- 1/2 tsp red pepper flakes
- Salt, to precise taste
- 4 slices sourdough bread
- 2 tbsp unsalted butter, softened
- 1 1/2 cups sharp cheddar cheese, grated
Instructions
- Heat olive oil in a large pot over medium heat until shimmering, about 1 minute.
- Add diced onion and sauté until translucent, approximately 5 minutes, stirring occasionally.
- Stir in minced garlic and cook until fragrant, about 30 seconds, being careful not to burn.
- Pour in San Marzano tomatoes with their juices, breaking them apart with a wooden spoon.
- Simmer the mixture uncovered for 20 minutes, allowing flavors to meld and the sauce to thicken slightly.
- Blend the soup until smooth using an immersion blender, or carefully transfer to a countertop blender in batches.
- Return the soup to the pot and stir in heavy cream, basil, sugar, and red pepper flakes. Season with salt precisely.
- For the grilled cheese, butter one side of each sourdough slice and place butter-side down on a skillet over medium heat.
- Sprinkle grated cheddar cheese evenly over two slices, then top with the remaining slices, butter-side up.
- Cook until the bread is golden brown and the cheese is melted, about 3-4 minutes per side, pressing down lightly with a spatula.
Kick back and savor the velvety smoothness of the soup, with its bright tomato tang and the subtle heat from the pepper flakes, perfectly complemented by the crunch and melt of the grilled cheese. For an extra twist, dunk your sandwich right into the soup and let the flavors marry in your mouth.
Roasted Chicken with Honey Glazed Carrots
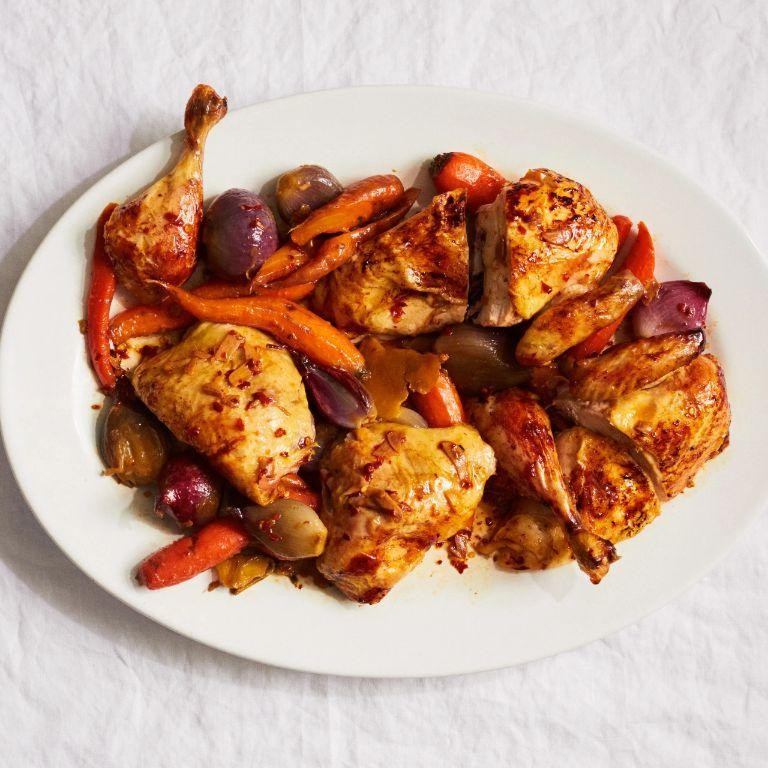
Craving a dish that’s as comforting as your favorite sweater but fancy enough to impress your in-laws? Look no further than this succulent roasted chicken paired with honey-glazed carrots, a duo that’s all about balancing simplicity with a dash of elegance.
Ingredients
- 1 whole pasture-raised chicken (about 4 lbs), patted dry
- 2 tbsp clarified butter, melted
- 1 tsp kosher salt
- 1/2 tsp freshly ground black pepper
- 1 tbsp fresh thyme leaves
- 1 lb heirloom carrots, peeled and halved lengthwise
- 2 tbsp raw honey
- 1 tbsp extra virgin olive oil
- 1/2 tsp ground cinnamon
Instructions
- Preheat your oven to 375°F (190°C) to ensure a perfectly crispy skin.
- Rub the chicken all over with melted clarified butter, then season generously with kosher salt, black pepper, and fresh thyme leaves. Tip: For extra flavor, gently lift the skin and rub some of the seasoning directly onto the meat.
- Place the chicken breast-side up on a rack in a roasting pan and roast for 1 hour and 15 minutes, or until the internal temperature reaches 165°F (74°C) at the thickest part of the thigh.
- While the chicken roasts, toss the heirloom carrots with raw honey, extra virgin olive oil, and ground cinnamon. Tip: Arranging the carrots in a single layer on a baking sheet ensures even caramelization.
- After the chicken has been roasting for 45 minutes, add the carrots to the oven and roast for the remaining 30 minutes, stirring halfway through. Tip: Keep an eye on the carrots during the last 10 minutes to prevent the honey from burning.
- Let the chicken rest for 10 minutes before carving to allow the juices to redistribute.
Every bite of this dish offers a symphony of textures and flavors—crispy, golden skin giving way to tender, juicy meat, and carrots that are sticky-sweet with a hint of spice. Serve it atop a rustic wooden board for a family-style feast that’s as visually stunning as it is delicious.
Vegetable Beef Soup with Cornbread
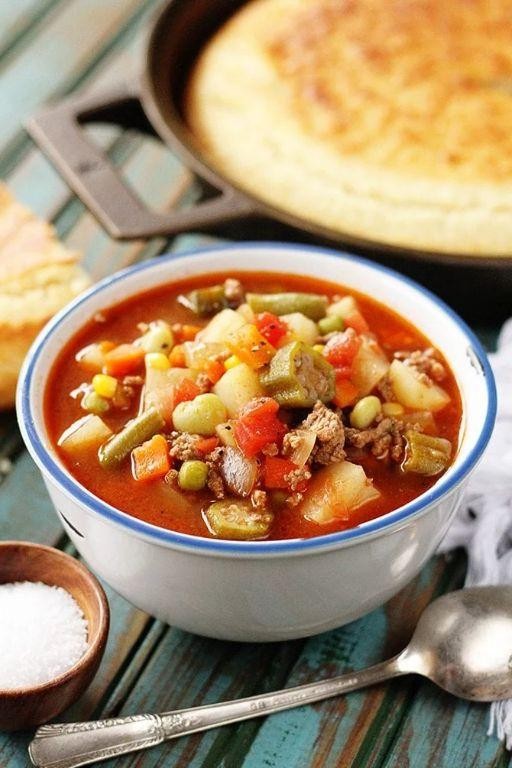
Kickstart your culinary adventure with a bowl of comfort that hugs your soul like a warm blanket on a chilly evening. This Vegetable Beef Soup paired with golden, buttery Cornbread is the dynamic duo your dinner table has been dreaming of.
Ingredients
- 1 lb grass-fed beef chuck, cubed
- 2 tbsp extra virgin olive oil
- 1 large yellow onion, finely diced
- 3 cloves garlic, minced
- 2 large carrots, peeled and sliced into 1/2-inch rounds
- 2 stalks celery, sliced
- 1 cup frozen sweet corn
- 4 cups beef stock, low sodium
- 1 cup all-purpose flour
- 1 cup yellow cornmeal
- 1 tbsp baking powder
- 1 tsp sea salt
- 1 cup buttermilk
- 1 pasture-raised egg, lightly beaten
- 4 tbsp unsalted butter, melted
Instructions
- Heat olive oil in a large Dutch oven over medium-high heat until shimmering, about 2 minutes.
- Add cubed beef chuck, searing until all sides are deeply browned, approximately 4 minutes per side. Tip: Don’t overcrowd the pan to ensure a proper sear.
- Lower heat to medium, add diced onion and minced garlic, sautéing until translucent, about 3 minutes.
- Incorporate carrots and celery, cooking until slightly softened, 5 minutes.
- Pour in beef stock, bringing to a gentle boil. Reduce heat to low, simmering uncovered for 45 minutes. Tip: Skim off any foam for a clearer broth.
- Meanwhile, preheat oven to 425°F and grease a 9-inch cast-iron skillet.
- In a large bowl, whisk together flour, cornmeal, baking powder, and sea salt.
- In another bowl, mix buttermilk, beaten egg, and melted butter. Tip: Ensure all ingredients are at room temperature for a uniform batter.
- Combine wet and dry ingredients, stirring until just incorporated. Pour into prepared skillet, baking for 20 minutes or until golden and a toothpick comes out clean.
- Add frozen corn to the soup during the last 10 minutes of cooking.
Zesty and hearty, this soup boasts tender beef and vibrant vegetables in a rich broth, perfectly complemented by the crumbly, sweet cornbread. Serve it with a dollop of sour cream or a sprinkle of fresh herbs for an extra layer of flavor.
Pumpkin Ravioli with Brown Butter Sage Sauce
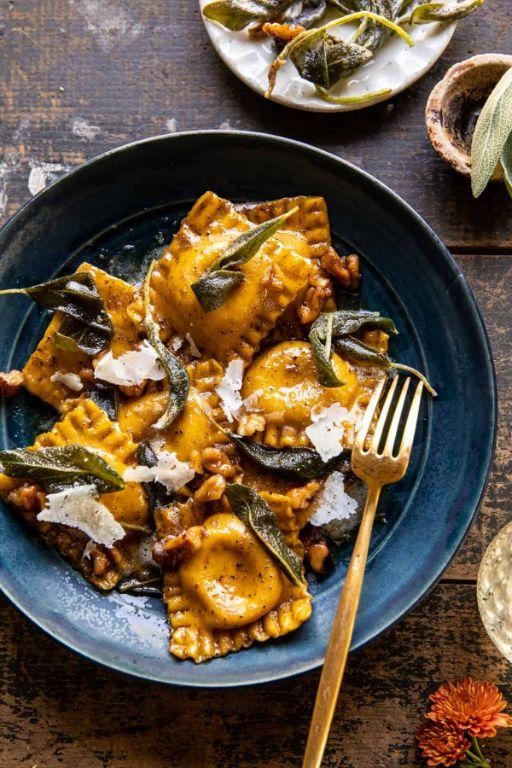
Ah, the sweet, sweet surrender to autumnal flavors begins with this dish that’s as cozy as your favorite sweater and as indulgent as a midnight snack. Pumpkin ravioli with brown butter sage sauce is the culinary equivalent of a warm hug, promising to dazzle your taste buds with its rich, buttery goodness and a hint of earthy sage.
Ingredients
- 1 cup pumpkin puree, homemade or canned
- 1/2 cup ricotta cheese, whole milk
- 1/4 cup Parmesan cheese, freshly grated
- 1/2 tsp nutmeg, freshly grated
- 1/2 tsp salt
- 1/4 tsp black pepper, freshly ground
- 1 package (about 30) wonton wrappers
- 1/2 cup unsalted butter
- 10 fresh sage leaves
- 1/4 cup walnuts, toasted and chopped
Instructions
- In a medium bowl, combine pumpkin puree, ricotta, Parmesan, nutmeg, salt, and pepper until smooth.
- Lay out wonton wrappers on a clean surface. Place 1 tsp of filling in the center of each wrapper.
- Brush edges of wrappers with water, fold over to form a triangle, and press edges to seal tightly.
- Bring a large pot of salted water to a boil. Cook ravioli in batches for 2-3 minutes until they float to the surface.
- Meanwhile, in a large skillet over medium heat, melt butter until it turns a golden brown color, about 3 minutes.
- Add sage leaves to the skillet and cook for 1 minute until crisp.
- Using a slotted spoon, transfer cooked ravioli to the skillet, tossing gently to coat with the brown butter sauce.
- Sprinkle with toasted walnuts before serving.
Unbelievably silky with a nutty crunch, this dish is a textural dream. Serve it atop a bed of arugula for a peppery contrast or alongside a crisp white wine to cut through the richness.
Conclusion
We hope this roundup of 20 cozy winter recipes brings warmth and joy to your dinner table. Each dish is a delight, perfect for chilly evenings. Don’t forget to try them out, share your favorites in the comments, and pin this article on Pinterest to spread the comfort. Happy cooking!


