There’s something undeniably satisfying about biting into a perfectly rolled vegetarian delight, packed with fresh flavors and textures that dance on your palate. Whether you’re in search of quick weeknight dinners, seasonal favorites, or just a cozy comfort food fix, our roundup of 23 delicious vegetarian roll recipes is sure to inspire your next kitchen adventure. Keep scrolling to discover rolls that will make your meals anything but ordinary!
Avocado and Cucumber Sushi Rolls

Did you ever think sushi could be this refreshing and easy to make at home? I stumbled upon this avocado and cucumber sushi roll recipe during a summer picnic, and it’s been a staple in my kitchen ever since. Perfect for those days when you crave something light yet satisfying.
Ingredients
- 1 cup sushi rice, sticky and perfectly cooked
- 2 tbsp rice vinegar, with a subtle sweetness
- 1 ripe avocado, creamy and sliced thinly
- 1 medium cucumber, crisp and julienned
- 2 sheets nori, toasted to a delicate crispness
- 1 tsp sesame seeds, lightly toasted for a nutty flavor
- 1/2 tsp salt, to enhance all the flavors
Instructions
- Rinse the sushi rice under cold water until the water runs clear, then cook according to package instructions for perfectly sticky rice.
- While the rice is still warm, gently fold in the rice vinegar and salt, ensuring every grain is coated for that authentic sushi flavor.
- Lay a nori sheet on a bamboo mat, and evenly spread a thin layer of the seasoned rice, leaving a small margin at the top for sealing.
- Arrange the avocado slices and cucumber juliennes in a line at the bottom edge of the nori sheet, creating the filling for your roll.
- Carefully roll the sushi using the bamboo mat, applying gentle pressure to ensure it holds its shape without squishing the filling.
- Sprinkle the toasted sesame seeds over the roll for an added crunch and nutty taste before slicing into bite-sized pieces with a sharp, wet knife.
Avocado and cucumber sushi rolls offer a delightful contrast of textures, from the creamy avocado to the crisp cucumber, all wrapped in the slight chewiness of nori. Serve them with a side of soy sauce or wasabi for an extra kick, or enjoy them as is for a light, refreshing snack.
Spinach and Cheese Stuffed Phyllo Rolls

Every time I whip up these Spinach and Cheese Stuffed Phyllo Rolls, I’m reminded of the first time I tried them at a cozy little café in Vermont. The combination of crispy phyllo and the creamy, savory filling was unforgettable, and now, it’s a staple in my kitchen for gatherings or when I need a comforting snack.
Ingredients
- 1 package of frozen phyllo dough, thawed to room temperature
- 2 cups of fresh spinach, finely chopped and wilted
- 1 cup of ricotta cheese, creamy and smooth
- 1/2 cup of feta cheese, crumbled and tangy
- 1 large egg, farm-fresh and beaten
- 2 tablespoons of rich extra virgin olive oil
- 1/4 teaspoon of finely ground black pepper
- 1/4 teaspoon of sea salt, for that perfect seasoning
Instructions
- Preheat your oven to 375°F (190°C) and line a baking sheet with parchment paper.
- In a mixing bowl, combine the wilted spinach, ricotta cheese, feta cheese, beaten egg, black pepper, and sea salt. Mix until well incorporated.
- Carefully unroll the phyllo dough on a clean surface. Keep it covered with a damp towel to prevent drying out.
- Place one sheet of phyllo dough on your work surface and lightly brush it with olive oil. Layer another sheet on top and repeat the process until you have 3 layers.
- Cut the layered phyllo dough into 3-inch wide strips. Spoon a tablespoon of the spinach and cheese mixture onto the end of each strip.
- Fold the corner of the phyllo strip over the filling to form a triangle, then continue folding in a zig-zag pattern until the end of the strip.
- Brush the top of each phyllo roll with olive oil and place them on the prepared baking sheet.
- Bake for 20-25 minutes, or until the phyllo rolls are golden brown and crispy.
- Let them cool for a few minutes before serving to allow the filling to set.
How delightful these rolls turn out, with their golden, flaky exterior giving way to a warm, cheesy spinach center. Serve them with a side of tzatziki or a simple salad for a light meal that’s sure to impress.
Sweet Potato and Black Bean Taquitos

Last weekend, I found myself staring at a pile of sweet potatoes and a can of black beans, wondering how to turn them into something crave-worthy. That’s when these crispy, flavorful taquitos were born—perfect for a quick dinner or a party appetizer that’ll have everyone asking for the recipe.
Ingredients
- 2 medium sweet potatoes, peeled and diced into 1/2-inch cubes
- 1 tablespoon rich extra virgin olive oil
- 1 teaspoon ground cumin
- 1/2 teaspoon smoked paprika
- 1/4 teaspoon finely ground black pepper
- 1 can (15 oz) black beans, drained and rinsed
- 1/2 cup shredded Monterey Jack cheese
- 8 small flour tortillas
- 1/4 cup fresh cilantro, chopped
- 1 tablespoon lime juice
- 1/2 cup avocado oil, for frying
Instructions
- Preheat your oven to 400°F (204°C). Line a baking sheet with parchment paper.
- Toss the diced sweet potatoes with olive oil, cumin, smoked paprika, and black pepper until evenly coated. Spread them on the prepared baking sheet.
- Roast for 25 minutes, or until the sweet potatoes are tender and slightly caramelized, stirring halfway through.
- In a large bowl, mash the roasted sweet potatoes slightly. Stir in the black beans, Monterey Jack cheese, cilantro, and lime juice until well combined.
- Warm the tortillas in the microwave for 20 seconds to make them pliable. Spoon about 1/4 cup of the filling onto each tortilla, roll tightly, and secure with a toothpick.
- Heat avocado oil in a large skillet over medium-high heat until shimmering. Fry the taquitos in batches, turning occasionally, until golden and crispy, about 2-3 minutes per side. Drain on paper towels.
- Tip: For an extra crispy exterior, let the taquitos sit for a minute after rolling before frying. Tip: If you prefer baking, brush the taquitos with oil and bake at 425°F (218°C) for 15-20 minutes. Tip: Serve with a side of creamy avocado sauce or spicy salsa for dipping.
The taquitos come out with a delightful crunch, giving way to the creamy sweet potato and bean filling. I love serving them with a bright, tangy slaw to cut through the richness.
Vegetable Spring Rolls with Peanut Sauce

Fresh from my kitchen to yours, I’m thrilled to share a recipe that’s become a staple in my home—Vegetable Spring Rolls with Peanut Sauce. There’s something incredibly satisfying about rolling up crisp, vibrant veggies in delicate rice paper, and dunking them into a creamy, nutty sauce that I could honestly eat by the spoonful.
Ingredients
- 8 rice paper wrappers (thin, translucent, and pliable)
- 1 cup shredded carrots (bright orange and crunchy)
- 1 cup thinly sliced cucumber (cool and refreshing)
- 1 cup fresh mint leaves (fragrant and bright green)
- 1 cup fresh cilantro leaves (earthy and slightly citrusy)
- 1/2 cup creamy peanut butter (rich and smooth)
- 2 tbsp soy sauce (dark and savory)
- 1 tbsp honey (sweet and floral)
- 1 tbsp lime juice (tangy and fresh)
- 1 clove garlic (minced, pungent and spicy)
- 1/4 cup warm water (to thin the sauce)
Instructions
- Fill a large, shallow dish with warm water (about 100°F) for soaking the rice paper wrappers.
- Dip one rice paper wrapper into the water for 10 seconds until it’s soft and pliable, then lay it flat on a clean, damp kitchen towel.
- Layer a small handful of shredded carrots, sliced cucumber, mint leaves, and cilantro leaves in the center of the wrapper, leaving about 2 inches of space on each side.
- Fold the sides of the wrapper over the filling, then roll tightly from the bottom up, like a burrito, to enclose the filling completely.
- Repeat the process with the remaining wrappers and filling ingredients.
- In a small bowl, whisk together the peanut butter, soy sauce, honey, lime juice, minced garlic, and warm water until the sauce is smooth and pourable.
- Serve the spring rolls immediately with the peanut sauce on the side for dipping.
Every bite of these spring rolls is a crunch of freshness, perfectly complemented by the deep, savory-sweet peanut sauce. For an extra touch, try serving them on a platter lined with lettuce leaves for a pop of color and an added crisp texture.
Zucchini and Carrot Ribbon Rolls
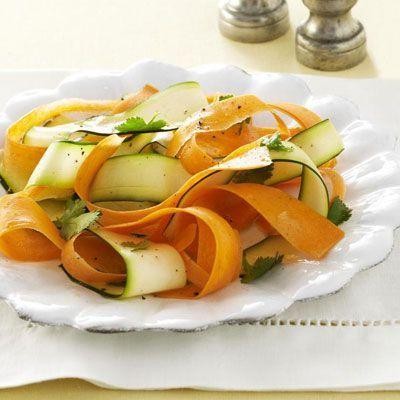
Remember those summer afternoons when the garden is overflowing with zucchini and you’re scratching your head for new ways to enjoy them? That’s exactly how these Zucchini and Carrot Ribbon Rolls came to be in my kitchen—light, refreshing, and packed with color.
Ingredients
- 2 medium zucchinis, thinly sliced into ribbons with a vegetable peeler
- 2 large carrots, peeled and thinly sliced into ribbons with a vegetable peeler
- 1/2 cup creamy goat cheese, at room temperature
- 1 tbsp fresh dill, finely chopped
- 1 tbsp fresh lemon juice
- 1/2 tsp sea salt
- 1/4 tsp freshly ground black pepper
- 1 tbsp extra virgin olive oil, for drizzling
Instructions
- In a small bowl, mix the creamy goat cheese, fresh dill, lemon juice, sea salt, and black pepper until well combined. Tip: Letting the goat cheese come to room temperature makes it easier to mix.
- Lay out a zucchini ribbon on a clean surface. Spread a thin layer of the goat cheese mixture along one end of the ribbon.
- Place a carrot ribbon on top of the goat cheese mixture, then carefully roll the zucchini ribbon around the carrot. Tip: If the ribbons break, don’t worry—just overlap them slightly and continue rolling.
- Repeat with the remaining zucchini and carrot ribbons until all the goat cheese mixture is used.
- Arrange the rolls on a serving platter, drizzle with extra virgin olive oil, and sprinkle with additional dill if desired. Tip: For best flavor, let the rolls sit for 10 minutes before serving to allow the flavors to meld.
Perfect for a light lunch or as an elegant appetizer, these rolls offer a delightful crunch from the fresh vegetables and a creamy tang from the goat cheese. Serve them alongside a crisp white wine for an extra touch of summer sophistication.
Thai Veggie Lettuce Wraps

Kicking off our culinary adventure today, I’m thrilled to share a recipe that’s become a staple in my kitchen, especially when I’m craving something light yet bursting with flavor. These Thai Veggie Lettuce Wraps are not just a meal; they’re a vibrant, hands-on experience that brings the essence of Thai cuisine right to your dining table.
Ingredients
- 1 tbsp fragrant toasted sesame oil
- 2 cloves garlic, minced to aromatic perfection
- 1 tbsp freshly grated ginger, for a zesty kick
- 1 cup finely diced mushrooms, for an earthy depth
- 1 cup crisp red bell pepper, diced
- 1 cup shredded carrots, for a sweet crunch
- 2 tbsp smooth peanut butter
- 2 tbsp soy sauce, for a savory umami touch
- 1 tbsp honey, to balance with a subtle sweetness
- 1 tbsp lime juice, for a bright acidity
- 8 large, sturdy butter lettuce leaves, washed and dried
- 1/4 cup chopped fresh cilantro, for a herby freshness
- 1/4 cup chopped roasted peanuts, for a nutty finish
Instructions
- Heat the toasted sesame oil in a large skillet over medium heat until shimmering, about 1 minute.
- Add the minced garlic and grated ginger, sautéing until fragrant, roughly 30 seconds, being careful not to burn.
- Toss in the diced mushrooms and red bell pepper, cooking until the vegetables soften, about 5 minutes.
- Stir in the shredded carrots, cooking for an additional 2 minutes to retain some crunch.
- In a small bowl, whisk together the peanut butter, soy sauce, honey, and lime juice until smooth.
- Pour the sauce over the vegetable mixture in the skillet, stirring to coat evenly, and cook for another 2 minutes to meld the flavors.
- Remove the skillet from heat and let the mixture cool slightly, about 3 minutes, to prevent the lettuce from wilting.
- Spoon the vegetable mixture into the center of each butter lettuce leaf, dividing evenly.
- Garnish with chopped cilantro and roasted peanuts before serving.
Vibrant and fresh, these wraps offer a delightful contrast of textures, from the crisp lettuce to the tender veggies and crunchy peanuts. Serve them as a light lunch or a fun, interactive appetizer at your next gathering, and watch them disappear in no time.
Eggplant and Ricotta Rollatini

Deliciously tender eggplant slices wrapped around a creamy ricotta filling, then baked to perfection—this Eggplant and Ricotta Rollatini is a dish that feels like a warm hug. I remember the first time I made it; the kitchen was filled with the aroma of garlic and basil, and I knew it was going to be a hit.
Ingredients
- 2 large, firm eggplants, sliced lengthwise into 1/4-inch thick pieces
- 1 1/2 cups whole milk ricotta cheese, creamy and smooth
- 1 cup freshly grated Parmesan cheese, sharp and nutty
- 1 large farm-fresh egg, lightly beaten
- 2 cloves garlic, minced
- 1/4 cup fresh basil leaves, finely chopped
- 1/2 tsp finely ground black pepper
- 1/2 tsp sea salt
- 2 cups marinara sauce, rich and tangy
- 1 tbsp rich extra virgin olive oil
Instructions
- Preheat your oven to 375°F (190°C) and lightly grease a 9×13-inch baking dish with olive oil.
- Lay the eggplant slices on a baking sheet, brush both sides with olive oil, and sprinkle with salt. Roast for 10 minutes until just tender. Tip: Flipping halfway ensures even cooking.
- In a bowl, mix ricotta, 1/2 cup Parmesan, egg, garlic, basil, pepper, and salt until well combined. Tip: Letting the mixture sit for 5 minutes allows the flavors to meld.
- Spread a thin layer of marinara sauce on the bottom of the prepared baking dish.
- Place a tablespoon of the ricotta mixture at one end of each eggplant slice, then roll up tightly. Place seam side down in the dish. Tip: Packing them snugly prevents unrolling.
- Top with remaining marinara and Parmesan. Bake for 25 minutes until bubbly and golden.
Mouthwatering and melt-in-your-mouth, these rollatini are a testament to the magic of simple ingredients. Serve them atop a bed of al dente spaghetti or with a crisp green salad for a complete meal.
Quinoa and Kale Stuffed Collard Rolls
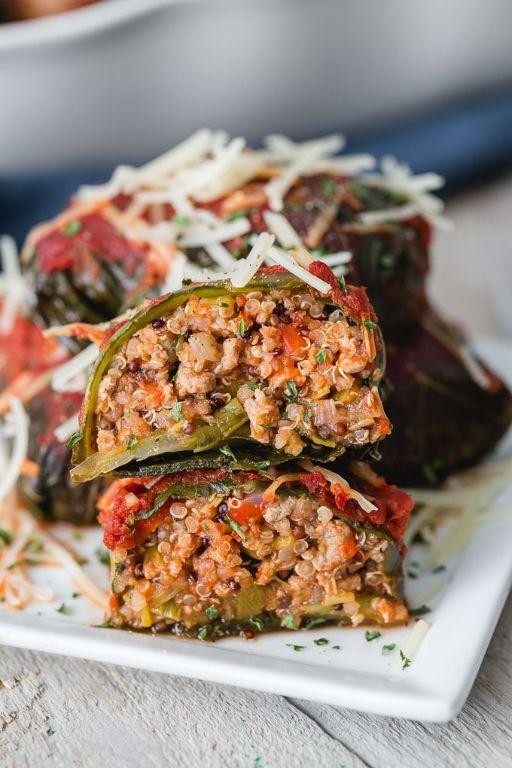
Believe it or not, I stumbled upon this recipe during a lazy Sunday farmers’ market stroll, inspired by the vibrant greens and the promise of a healthy, yet satisfying meal. It’s become my go-to for impressing dinner guests or treating myself to something special.
Ingredients
- 1 cup fluffy, cooked quinoa
- 8 large, tender collard green leaves
- 2 cups finely chopped, curly kale
- 1/2 cup creamy, mashed avocado
- 1/4 cup tangy, crumbled feta cheese
- 2 tbsp rich extra virgin olive oil
- 1 tbsp fresh, zesty lemon juice
- 1 tsp finely ground black pepper
- 1/2 tsp sea salt
Instructions
- Bring a large pot of water to a rolling boil and blanch the collard green leaves for 30 seconds to soften, then immediately plunge into ice water to stop the cooking process.
- Pat the leaves dry with a clean kitchen towel, carefully removing any excess water to ensure the rolls hold together.
- In a large mixing bowl, combine the cooked quinoa, chopped kale, mashed avocado, feta cheese, olive oil, lemon juice, black pepper, and sea salt, mixing until all ingredients are evenly distributed.
- Lay a collard green leaf flat on a clean surface, spoon about 1/4 cup of the quinoa mixture onto the center of the leaf, then fold the sides over the filling and roll tightly from the bottom up, like a burrito.
- Repeat the process with the remaining leaves and filling, placing each roll seam side down on a serving platter.
- For an extra touch of flavor, lightly brush each roll with olive oil and sprinkle with additional feta cheese before serving.
Yield these rolls are a delightful contrast of textures, from the tender collard wraps to the hearty quinoa and kale filling. The avocado adds a creamy richness, while the feta and lemon juice bring a bright, tangy pop. Serve them sliced in half on a bed of mixed greens for a stunning presentation that’s as pleasing to the eye as it is to the palate.
Roasted Red Pepper and Goat Cheese Rolls

My kitchen smelled like a Mediterranean dream the first time I whipped up these Roasted Red Pepper and Goat Cheese Rolls. They’re the perfect blend of creamy, tangy, and slightly sweet, making them a hit at every gathering.
Ingredients
- 2 large, vibrant red bell peppers
- 8 oz creamy, tangy goat cheese
- 1 tbsp rich extra virgin olive oil
- 1/2 tsp finely ground black pepper
- 1/4 tsp sea salt
- 1 package (about 12) thin, pliable whole wheat tortillas
- 1 cup fresh, peppery arugula
Instructions
- Preheat your oven to 400°F (204°C) to roast the peppers to perfection.
- Cut the red bell peppers in half, remove the seeds and stems, then place them cut side down on a baking sheet. Drizzle with the extra virgin olive oil.
- Roast the peppers in the preheated oven for 20-25 minutes, until the skins are charred and the peppers are soft. Tip: For easier peeling, cover the peppers with a kitchen towel after roasting and let them steam for 10 minutes.
- Once cooled, peel the skins off the peppers and slice them into thin strips.
- In a bowl, mix the goat cheese with black pepper and sea salt until well combined. Tip: Let the goat cheese sit at room temperature for 10 minutes before mixing to make it easier to spread.
- Lay out a tortilla and spread a thin layer of the goat cheese mixture over it, leaving a small border around the edges.
- Arrange a few strips of roasted red pepper and a handful of arugula on top of the goat cheese.
- Roll the tortilla tightly, then slice it into 1-inch pieces. Tip: Use a sharp knife for clean cuts and wipe it between slices to keep the rolls neat.
- Serve the rolls on a platter, showcasing the vibrant colors and inviting textures.
Delightfully creamy with a crunch from the arugula and a sweet smokiness from the peppers, these rolls are a feast for the senses. Try serving them with a drizzle of balsamic glaze for an extra layer of flavor.
Cauliflower and Chickpea Shawarma Wraps

After a long day of experimenting in the kitchen, I stumbled upon a combination that’s now a staple in my meal prep—Cauliflower and Chickpea Shawarma Wraps. It’s a dish that brings together the warmth of Middle Eastern spices with the convenience of a wrap, perfect for those busy weeknights or a lazy weekend lunch.
Ingredients
- 1 large head of cauliflower, cut into small, bite-sized florets
- 1 can (15 oz) of chickpeas, drained and rinsed until the water runs clear
- 2 tbsp of rich extra virgin olive oil
- 1 tbsp of shawarma spice blend, fragrant and well-balanced
- 1/2 cup of creamy tahini sauce, for drizzling
- 4 large whole wheat tortillas, soft and pliable
- 1 cup of crisp, shredded lettuce
- 1/2 cup of diced tomatoes, juicy and ripe
- 1/4 cup of finely chopped parsley, fresh and vibrant
Instructions
- Preheat your oven to 425°F (220°C) and line a large baking sheet with parchment paper for easy cleanup.
- In a large bowl, toss the cauliflower florets and chickpeas with olive oil and shawarma spice blend until evenly coated. Tip: Make sure each piece is well-covered with spices for maximum flavor.
- Spread the mixture in a single layer on the prepared baking sheet. Roast for 25 minutes, stirring halfway through, until the cauliflower is tender and the chickpeas are crispy. Tip: Don’t overcrowd the pan to ensure everything gets nicely roasted.
- Warm the tortillas in a dry skillet over medium heat for about 30 seconds on each side, just until they’re soft and pliable. Tip: Cover them with a towel to keep warm while you assemble the wraps.
- Divide the roasted cauliflower and chickpeas among the tortillas. Top with shredded lettuce, diced tomatoes, and chopped parsley. Drizzle generously with tahini sauce.
- Fold the sides of the tortillas over the filling, then roll tightly from the bottom to enclose the filling completely.
Now, these wraps are a symphony of textures—crunchy chickpeas, tender cauliflower, and creamy tahini all wrapped up in a soft tortilla. Serve them with extra tahini sauce on the side for dipping, or add a sprinkle of sumac for an extra tangy kick.
Mushroom and Lentil Stuffed Grape Leaves

After a recent trip to the farmers’ market, I found myself with an abundance of fresh grape leaves and a craving for something hearty yet healthy. That’s when I decided to whip up these Mushroom and Lentil Stuffed Grape Leaves, a dish that’s as nutritious as it is delicious.
Ingredients
- 1 cup of earthy brown lentils, rinsed
- 2 tablespoons of rich extra virgin olive oil
- 1 medium onion, finely chopped
- 2 cloves of garlic, minced
- 8 ounces of cremini mushrooms, finely diced
- 1 teaspoon of ground cumin
- 1/2 teaspoon of smoked paprika
- 1/4 cup of fresh parsley, chopped
- 1/4 cup of fresh dill, chopped
- Salt to taste
- 1 jar of grape leaves in brine, rinsed and drained
- 2 cups of vegetable broth
Instructions
- In a medium saucepan, combine the lentils with 2 cups of water. Bring to a boil, then reduce heat to low, cover, and simmer for 20 minutes until tender. Drain any excess water and set aside.
- Heat the olive oil in a large skillet over medium heat. Add the onion and garlic, sautéing until translucent, about 5 minutes.
- Add the mushrooms to the skillet, cooking until they release their moisture and become golden, about 8 minutes.
- Stir in the cooked lentils, cumin, smoked paprika, parsley, and dill. Cook for another 2 minutes to blend the flavors. Season with salt to taste.
- Lay a grape leaf flat on a work surface, shiny side down. Place a tablespoon of the filling near the stem end, then fold the sides over the filling and roll tightly. Repeat with remaining leaves and filling.
- Arrange the stuffed grape leaves seam side down in a large pot. Pour the vegetable broth over them, ensuring they’re just covered. Place a plate on top to keep them submerged.
- Bring to a simmer over medium heat, then reduce to low and cook for 45 minutes, until the grape leaves are tender and the flavors have melded.
Zesty and satisfying, these stuffed grape leaves are a perfect blend of textures, from the tender leaves to the hearty filling. Serve them with a dollop of creamy yogurt or a squeeze of lemon for an extra burst of flavor.
Beet and Arugula Rolls with Herb Cream Cheese
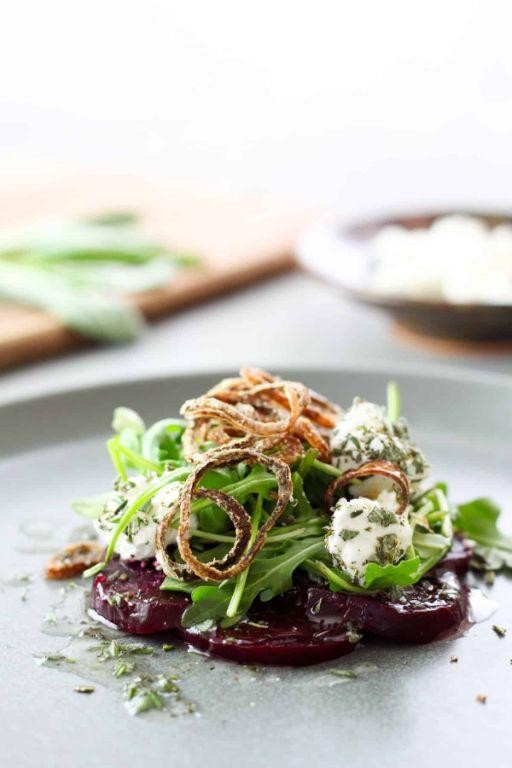
Yesterday, I stumbled upon the most vibrant beets at the farmers’ market, and I knew I had to turn them into something special. That’s how these Beet and Arugula Rolls with Herb Cream Cheese came to life—a dish that’s as fun to make as it is to eat.
Ingredients
- 2 medium-sized, ruby-red beets, peeled and thinly sliced
- 1 cup fresh arugula, lightly packed
- 8 oz cream cheese, softened to room temperature
- 2 tbsp fresh dill, finely chopped
- 1 tbsp fresh chives, finely chopped
- 1 tsp lemon zest, freshly grated
- 1/2 tsp sea salt, finely ground
- 1/4 tsp black pepper, freshly cracked
Instructions
- Preheat your oven to 375°F. Wrap each beet slice in aluminum foil and roast for 25 minutes, or until tender when pierced with a fork. Tip: Roasting beets enhances their natural sweetness.
- While the beets are roasting, mix the softened cream cheese with dill, chives, lemon zest, sea salt, and black pepper in a bowl until well combined. Tip: Letting the cream cheese sit at room temperature for 30 minutes before mixing makes it easier to blend.
- Once the beets are cool enough to handle, lay them flat on a clean surface. Spread a thin layer of the herb cream cheese over each slice.
- Place a few arugula leaves on top of the cream cheese on each beet slice, then gently roll them up. Tip: If the beet slices are too stiff, you can microwave them for 10 seconds to make them more pliable.
- Arrange the rolls on a serving platter and refrigerate for at least 15 minutes before serving to allow the flavors to meld.
Out of the fridge, these rolls are a delightful contrast of creamy, tangy, and earthy flavors, with a slight crunch from the arugula. Serve them as a colorful appetizer or a light lunch alongside a crisp white wine.
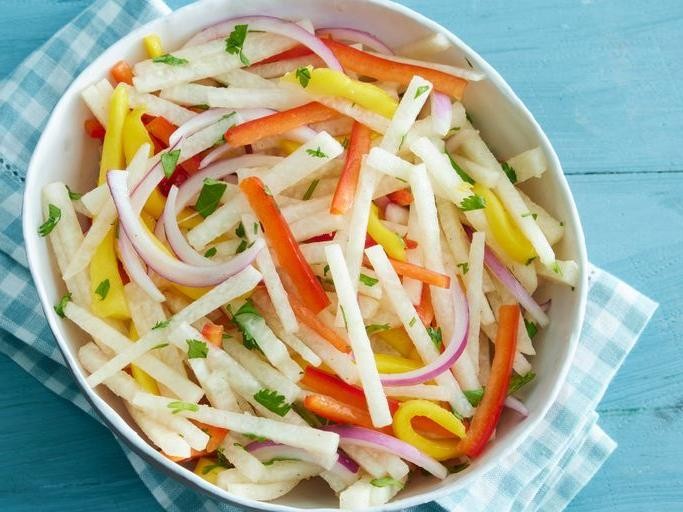
Tofu and Vegetable Summer Rolls

Vibrant and refreshing, these Tofu and Vegetable Summer Rolls are my go-to for a light yet satisfying meal on a hot summer day. Inspired by a trip to a local farmers’ market, I love how the crisp vegetables and soft tofu play off each other, all wrapped up in a chewy rice paper blanket.
Ingredients
- 8 rice paper wrappers (thin, translucent)
- 1 cup firm tofu (drained and cut into thin strips)
- 1 cup shredded carrots (bright orange, crunchy)
- 1 cup cucumber (seedless, julienned)
- 1 cup red bell pepper (thinly sliced, sweet)
- 1/2 cup fresh mint leaves (fragrant, whole)
- 1/2 cup fresh cilantro leaves (bright, whole)
- 2 tbsp smooth peanut butter (creamy, unsweetened)
- 1 tbsp soy sauce (rich, low sodium)
- 1 tbsp lime juice (freshly squeezed, tangy)
- 1 tsp honey (golden, sweet)
- 1/2 tsp garlic (minced, pungent)
- 1/4 tsp red pepper flakes (spicy, optional)
Instructions
- Fill a large bowl with warm water (about 100°F) for soaking the rice paper wrappers.
- Dip one rice paper wrapper into the warm water for 10 seconds until pliable but still slightly firm.
- Lay the wrapper flat on a clean, damp kitchen towel to prevent sticking.
- Arrange a few strips of tofu, shredded carrots, cucumber, red bell pepper, mint, and cilantro in the center of the wrapper, leaving space at the edges.
- Fold the bottom edge over the filling, then fold in the sides, and roll tightly to enclose the filling. Tip: Don’t overfill to avoid tearing.
- Repeat with the remaining wrappers and ingredients.
- In a small bowl, whisk together peanut butter, soy sauce, lime juice, honey, garlic, and red pepper flakes until smooth for the dipping sauce. Tip: Adjust the thickness with a little water if needed.
- Serve the summer rolls immediately with the dipping sauce on the side. Tip: Keep the rolls covered with a damp towel to prevent drying out.
Great for sharing or enjoying solo, these summer rolls offer a delightful crunch with every bite, paired perfectly with the creamy, spicy peanut sauce. Try serving them on a platter with extra herbs for a pop of color and freshness.
Carrot and Daikon Radish Rolls
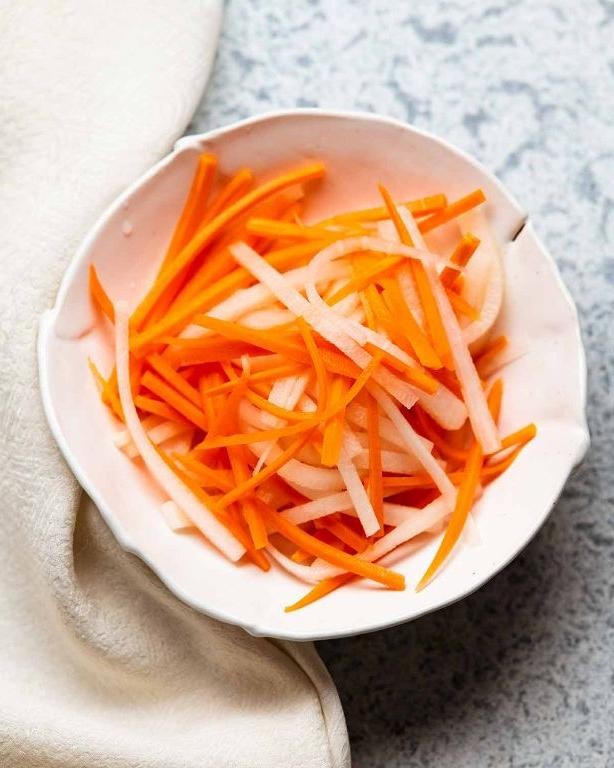
Every time I stumble upon a bundle of fresh carrots and daikon radishes at the farmers’ market, I’m reminded of the vibrant, crunchy rolls my grandma used to make. These Carrot and Daikon Radish Rolls are not just a nod to her legacy but a celebration of simple, fresh ingredients coming together in the most delightful way.
Ingredients
- 1 cup finely julienned fresh carrots
- 1 cup finely julienned daikon radish
- 2 tbsp smooth, golden tahini
- 1 tbsp rich, dark soy sauce
- 1 tsp toasted sesame oil
- 4 large, pliable rice paper wrappers
- 1/2 cup crisp, fresh cilantro leaves
- 1/2 cup crunchy, unsalted peanuts, roughly chopped
Instructions
- Fill a large, shallow dish with warm water (about 110°F) and submerge one rice paper wrapper for 10 seconds until pliable but still slightly firm.
- Lay the softened wrapper flat on a clean, damp kitchen towel and pat dry gently.
- Spread 1/2 tbsp of tahini evenly over the lower third of the wrapper, leaving a 1-inch border at the edges.
- Arrange a quarter of the julienned carrots and daikon radish horizontally over the tahini, followed by a sprinkle of cilantro leaves and chopped peanuts.
- Fold the bottom edge of the wrapper over the filling, then fold in the sides, and roll tightly upwards to enclose the filling completely.
- Repeat the process with the remaining wrappers and ingredients, ensuring each roll is snug and secure.
- Serve the rolls whole or sliced diagonally for a beautiful presentation, accompanied by a small dish of soy sauce mixed with sesame oil for dipping.
Crunchy, fresh, and bursting with flavor, these rolls are a testament to the beauty of minimalism in cooking. Try serving them alongside a spicy peanut sauce for an extra kick that’ll have everyone reaching for more.
Jicama and Mango Wraps with Lime Dressing
Diving into the world of fresh, vibrant flavors has never been easier than with these Jicama and Mango Wraps. I remember the first time I tried this combination at a friend’s backyard BBQ; the crunch of the jicama paired with the sweetness of the mango was a revelation. Now, it’s a staple in my summer recipe rotation.
Ingredients
- 1 large jicama, peeled and julienned into crisp, matchstick-sized pieces
- 2 ripe mangoes, peeled and sliced into thin, juicy strips
- 1/4 cup fresh cilantro leaves, roughly chopped for a burst of herbal freshness
- 1/4 cup roasted peanuts, coarsely chopped for a nutty crunch
- 2 tbsp honey, for a smooth, natural sweetness
- 2 tbsp fresh lime juice, for a zesty kick
- 1 tbsp fish sauce, for an umami depth
- 1 tsp red pepper flakes, for a hint of heat
- 8 large butter lettuce leaves, washed and patted dry for a crisp, edible wrap
Instructions
- In a large mixing bowl, whisk together the honey, fresh lime juice, fish sauce, and red pepper flakes until well combined to create the dressing.
- Add the julienned jicama, sliced mangoes, and chopped cilantro to the bowl with the dressing. Gently toss to ensure all pieces are evenly coated. Tip: Let the mixture sit for 10 minutes to allow the flavors to meld.
- Divide the jicama and mango mixture evenly among the butter lettuce leaves, placing the filling in the center of each leaf.
- Sprinkle the coarsely chopped roasted peanuts over the top of each wrap for added texture. Tip: For an extra crunch, toast the peanuts in a dry skillet over medium heat for 2-3 minutes before chopping.
- Fold the sides of the lettuce leaves over the filling, then roll from the bottom up to form a wrap. Tip: If the lettuce leaves are too stiff, briefly soaking them in ice water can make them more pliable.
Vibrant and refreshing, these wraps are a perfect balance of sweet, tangy, and crunchy. Serve them as a light lunch or a colorful appetizer at your next gathering, and watch them disappear before your eyes.
Stuffed Zucchini Rolls with Tomato Sauce

Remember those summer evenings when the garden is bursting with zucchini, and you’re scratching your head for new ways to enjoy them? That’s exactly how I stumbled upon this delightful recipe for stuffed zucchini rolls, a dish that’s as fun to make as it is to eat.
Ingredients
- 2 medium zucchinis, firm and fresh
- 1 cup ricotta cheese, creamy and smooth
- 1/2 cup grated Parmesan cheese, sharp and nutty
- 1 large egg, farm-fresh
- 1 clove garlic, minced
- 1/4 tsp salt, finely ground
- 1/4 tsp black pepper, freshly cracked
- 2 cups tomato sauce, rich and homemade
- 2 tbsp extra virgin olive oil, rich and fruity
- 1/4 cup fresh basil leaves, torn
Instructions
- Preheat your oven to 375°F (190°C) to ensure it’s ready for baking.
- Slice the zucchinis lengthwise into 1/4-inch thick strips using a mandoline for even slices.
- Brush both sides of the zucchini strips lightly with olive oil and grill for 2 minutes per side until just tender.
- In a mixing bowl, combine ricotta, Parmesan, egg, garlic, salt, and pepper until the mixture is homogenous.
- Spread a tablespoon of the cheese mixture onto each zucchini strip, then roll them up tightly.
- Pour half of the tomato sauce into a baking dish, arranging the zucchini rolls seam side down.
- Top the rolls with the remaining tomato sauce and sprinkle with torn basil leaves.
- Bake in the preheated oven for 20 minutes, or until the sauce is bubbly and the rolls are heated through.
- Let the dish rest for 5 minutes before serving to allow the flavors to meld beautifully.
Great for a light dinner or as an impressive appetizer, these zucchini rolls offer a perfect balance of creamy, tangy, and fresh flavors. Serve them alongside a crisp salad or over a bed of al dente spaghetti for a complete meal.
Falafel and Tahini Pita Rolls

Perfect for a quick lunch or a satisfying snack, these Falafel and Tahini Pita Rolls have become my go-to when I crave something hearty yet healthy. I remember the first time I tried making them at home, the aroma of spices filling my kitchen was absolutely irresistible.
Ingredients
- 1 cup dried chickpeas, soaked overnight (they should plump up like little pillows)
- 1 small onion, roughly chopped (for a sweet, sharp bite)
- 2 cloves garlic, minced (because everything’s better with garlic)
- 1/4 cup fresh parsley, finely chopped (for a burst of color and freshness)
- 1 tsp ground cumin (toasty and warm)
- 1 tsp ground coriander (slightly citrusy and sweet)
- 1/2 tsp baking soda (for that perfect falafel fluffiness)
- Salt to taste (I like a generous pinch)
- Oil for frying (a neutral oil like canola works great)
- 4 pita breads (soft and pillowy)
- 1/2 cup tahini sauce (creamy and nutty)
- 1 cup shredded lettuce (for crunch)
- 1/2 cup diced tomatoes (juicy and fresh)
Instructions
- Drain the soaked chickpeas and pat them dry with a clean towel. This is crucial for getting the right texture.
- In a food processor, combine the chickpeas, onion, garlic, parsley, cumin, coriander, baking soda, and salt. Pulse until the mixture is finely ground but not pureed. Tip: You want it to hold together when pressed.
- Form the mixture into small balls, about 1.5 inches in diameter. If the mixture is too wet, add a tablespoon of flour to help bind it.
- Heat oil in a deep pan to 350°F. Fry the falafel in batches until golden brown and crispy, about 3-4 minutes per batch. Tip: Don’t overcrowd the pan to ensure even cooking.
- Warm the pita breads in a dry skillet for about 30 seconds on each side. This makes them more pliable for rolling.
- Spread a generous amount of tahini sauce inside each pita, then add the falafel, lettuce, and tomatoes. Tip: For extra flavor, drizzle a little more tahini sauce on top before serving.
Golden and crispy on the outside, tender and flavorful on the inside, these rolls are a delight. I love serving them with a side of pickled vegetables for an extra tangy crunch.
Curried Chickpea and Spinach Rolls

Unbelievable how a simple twist on traditional flavors can create something so comforting and new, isn’t it? That’s exactly what I thought when I first tried these Curried Chickpea and Spinach Rolls. They’re a perfect blend of spicy, savory, and slightly sweet, wrapped in a soft, warm blanket of dough. It’s a recipe that came to me during a lazy Sunday afternoon, and now, it’s a staple in my kitchen for quick lunches or as a hearty snack.
Ingredients
- 1 can (15 oz) of chickpeas, drained and rinsed
- 2 cups of fresh spinach, roughly chopped
- 1 tablespoon of rich extra virgin olive oil
- 1 small onion, finely diced
- 2 cloves of garlic, minced
- 1 tablespoon of curry powder
- 1/2 teaspoon of ground cumin
- 1/4 teaspoon of cayenne pepper
- 1/2 teaspoon of sea salt
- 1 package (17.3 oz) of frozen puff pastry, thawed
- 1 farm-fresh egg, beaten
Instructions
- Preheat your oven to 400°F (200°C) and line a baking sheet with parchment paper.
- In a large skillet, heat the olive oil over medium heat. Add the onion and garlic, sautéing until translucent, about 3 minutes.
- Stir in the curry powder, cumin, cayenne pepper, and sea salt, cooking for another minute until fragrant.
- Add the chickpeas and spinach to the skillet, cooking until the spinach is wilted, about 2 minutes. Remove from heat and let cool slightly.
- Roll out the puff pastry on a lightly floured surface into a 12×12 inch square. Cut into 4 equal squares.
- Divide the chickpea mixture among the squares, placing it in the center of each.
- Brush the edges of the squares with the beaten egg, then fold the pastry over the filling to form a triangle. Press the edges to seal.
- Transfer the rolls to the prepared baking sheet and brush the tops with the remaining beaten egg.
- Bake for 20-25 minutes, or until the pastry is golden brown and puffed.
- Let cool for 5 minutes before serving.
The rolls come out with a flaky, buttery crust that gives way to a spicy, hearty filling. They’re perfect on their own or served with a side of cool yogurt to balance the heat. Try them for your next picnic or potluck—they’re always a hit!
Roasted Butternut Squash and Sage Rolls

How many times have I found myself staring at a butternut squash in the grocery store, wondering how to turn it into something extraordinary? This time, I decided to pair its sweet, nutty flavor with the earthy aroma of sage in these irresistible rolls. Perfect for a cozy dinner or a holiday table, they’re a testament to the magic of simple ingredients.
Ingredients
- 1 medium butternut squash, peeled and cubed (about 2 cups)
- 2 tbsp rich extra virgin olive oil
- 1 tbsp finely chopped fresh sage
- 1 tsp kosher salt
- 1/2 tsp finely ground black pepper
- 1 package (1/4 oz) active dry yeast
- 1 cup warm water (110°F)
- 2 tbsp honey
- 3 cups all-purpose flour, plus extra for dusting
- 1 large farm-fresh egg, beaten
Instructions
- Preheat your oven to 400°F. Toss the cubed butternut squash with 1 tbsp olive oil, sage, salt, and pepper. Spread on a baking sheet and roast for 25 minutes, or until tender and caramelized at the edges.
- In a large bowl, dissolve the yeast in warm water. Stir in honey and let sit for 5 minutes, until frothy. Tip: The water should be warm to the touch but not hot, to avoid killing the yeast.
- Add the roasted squash to the yeast mixture, mashing slightly. Gradually mix in flour until a soft dough forms.
- Turn the dough onto a floured surface and knead for 8 minutes, until smooth and elastic. Tip: If the dough sticks, add a little more flour, but avoid adding too much to keep the rolls tender.
- Place the dough in a greased bowl, cover, and let rise in a warm place for 1 hour, or until doubled in size.
- Punch down the dough and divide into 12 pieces. Shape each into a roll and place on a greased baking sheet. Cover and let rise for 30 minutes.
- Preheat the oven to 375°F. Brush the rolls with beaten egg and bake for 20 minutes, or until golden brown. Tip: For an extra glossy finish, brush with egg wash again halfway through baking.
Golden and fragrant straight from the oven, these rolls have a tender crumb with pockets of sweet squash and aromatic sage. Serve them warm with a pat of butter, or alongside a hearty soup for a comforting meal.
Portobello Mushroom and Hummus Wraps
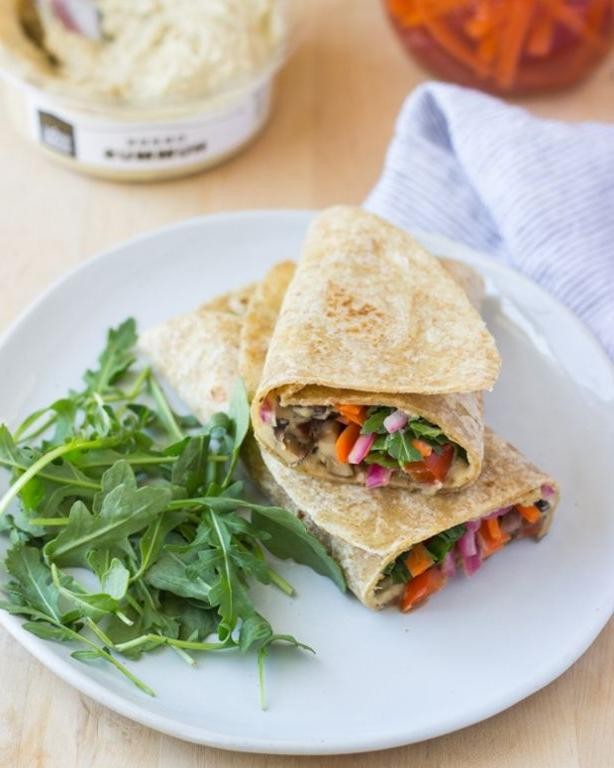
Zesty and vibrant, these Portobello Mushroom and Hummus Wraps have become my go-to lunch for busy days. There’s something about the earthy mushrooms paired with creamy hummus that feels both indulgent and wholesome.
Ingredients
- 2 large Portobello mushrooms, stems removed and caps wiped clean
- 1/2 cup creamy hummus, preferably homemade for that fresh, garlicky punch
- 2 whole wheat tortillas, soft and pliable
- 1 tbsp rich extra virgin olive oil
- 1/2 tsp finely ground black pepper
- 1/4 tsp sea salt, for that perfect seasoning
- 1 cup fresh baby spinach leaves, crisp and vibrant
- 1/4 cup red onion, thinly sliced for a sharp crunch
Instructions
- Preheat your skillet over medium heat and add the rich extra virgin olive oil, letting it warm for about 30 seconds until shimmering.
- Place the Portobello mushroom caps in the skillet, gill side down, and cook for 5 minutes until they start to soften and release their juices.
- Flip the mushrooms, sprinkle with sea salt and finely ground black pepper, and cook for another 5 minutes until tender and slightly caramelized.
- While the mushrooms cook, spread 1/4 cup of creamy hummus evenly over each whole wheat tortilla, leaving a small border around the edges.
- Once the mushrooms are done, transfer them to a cutting board, slice into 1/2-inch strips, and divide evenly between the tortillas.
- Top each tortilla with 1/2 cup of fresh baby spinach leaves and 1/8 cup of thinly sliced red onion.
- Fold the bottom of the tortilla up over the filling, then fold in the sides and roll tightly to secure the wrap.
- Cut each wrap in half diagonally for easy serving and enjoy immediately for the best texture and flavor.
Absolutely delightful, these wraps offer a satisfying crunch from the fresh veggies and a creamy, umami-rich center from the mushrooms and hummus. Try serving them with a side of sweet potato fries for a complete meal that’s sure to impress.
Spicy Tofu and Cucumber Rolls

Many evenings, I find myself craving something light yet packed with flavor, and that’s when these Spicy Tofu and Cucumber Rolls come to the rescue. They’re not only refreshing but also a breeze to whip up, making them perfect for those nights when you want something delicious without spending hours in the kitchen.
Ingredients
- 1 block of firm tofu, pressed and sliced into thin strips
- 2 medium cucumbers, thinly sliced lengthwise
- 1 tbsp of smooth peanut butter
- 1 tbsp of soy sauce
- 1 tsp of sriracha sauce
- 1 tsp of honey
- 1/2 tsp of grated fresh ginger
- 1 clove of garlic, minced
- 1 tbsp of fresh cilantro, chopped
- 1 tbsp of toasted sesame seeds
Instructions
- In a small bowl, whisk together the peanut butter, soy sauce, sriracha, honey, ginger, and garlic until smooth. Tip: If the mixture is too thick, add a teaspoon of warm water to loosen it.
- Lay a cucumber slice flat on a clean surface. Place a strip of tofu at one end, then drizzle with a bit of the peanut sauce. Tip: Don’t overfill the rolls to prevent them from falling apart.
- Sprinkle a pinch of cilantro and sesame seeds over the tofu.
- Carefully roll the cucumber around the tofu, securing it with a toothpick if necessary. Tip: For extra flavor, let the rolls sit in the fridge for 10 minutes before serving to allow the flavors to meld.
- Repeat with the remaining ingredients.
These rolls offer a delightful crunch from the cucumber, a creamy texture from the tofu, and a kick from the spicy peanut sauce. Try serving them on a platter with extra sauce for dipping, or pack them for a picnic—they’re sure to impress.
Herbed Cream Cheese and Veggie Pinwheels

Last weekend, I found myself staring at a fridge full of veggies and a block of cream cheese, wondering how to turn them into a quick, shareable snack. That’s when these Herbed Cream Cheese and Veggie Pinwheels came to life—perfect for last-minute gatherings or a lazy afternoon treat.
Ingredients
- 8 oz softened cream cheese, creamy and smooth
- 1/4 cup finely chopped fresh herbs (dill, chives, and parsley), vibrant and fragrant
- 1/2 tsp garlic powder, for a subtle kick
- 1/4 tsp salt, to enhance flavors
- 1/4 tsp finely ground black pepper, for a bit of heat
- 4 large flour tortillas, soft and pliable
- 1 cup shredded carrots, crisp and sweet
- 1 cup thinly sliced cucumbers, refreshing and crunchy
- 1/2 cup thinly sliced red bell peppers, colorful and sweet
Instructions
- In a medium bowl, combine the softened cream cheese, chopped herbs, garlic powder, salt, and black pepper until smooth and well incorporated.
- Lay out one flour tortilla on a clean, flat surface. Spread an even layer of the herbed cream cheese mixture over the entire tortilla, leaving a small border around the edges.
- Evenly distribute the shredded carrots, sliced cucumbers, and red bell peppers over the cream cheese layer.
- Starting from one end, tightly roll the tortilla into a log. Wrap in plastic wrap and refrigerate for at least 30 minutes to firm up. Tip: Chilling makes slicing easier and prevents the pinwheels from falling apart.
- Using a sharp knife, trim the ends of the roll and slice into 1-inch thick pinwheels. Tip: Wipe the knife clean between cuts for neat, clean edges.
- Arrange the pinwheels on a serving platter. Tip: For an extra pop of color, garnish with additional chopped herbs or a sprinkle of paprika.
Vibrant and packed with fresh flavors, these pinwheels offer a delightful crunch with every bite. Serve them alongside a tangy dip or stack them high for a visually appealing appetizer that’s sure to impress.
Baked Eggplant and Mozzarella Rolls

Sometimes, the simplest ingredients come together to create something unexpectedly delightful. That’s exactly what happened the first time I made these Baked Eggplant and Mozzarella Rolls. It was a lazy Sunday afternoon, and I was looking for a way to use up some fresh eggplant from my garden. The result? A dish that’s become a staple in my home.
Ingredients
- 2 medium eggplants, sliced lengthwise into 1/4-inch thick strips
- 1 cup whole milk mozzarella cheese, shredded
- 1/2 cup ricotta cheese, creamy and smooth
- 1/4 cup fresh basil leaves, finely chopped
- 2 cloves garlic, minced
- 1/4 cup rich extra virgin olive oil
- 1/2 tsp finely ground black pepper
- 1/2 tsp sea salt
- 1 cup marinara sauce, homemade or store-bought
Instructions
- Preheat your oven to 375°F (190°C) and lightly grease a baking dish with olive oil.
- Lay the eggplant slices on a baking sheet, brush both sides with olive oil, and sprinkle with sea salt and black pepper.
- Bake the eggplant slices for 10 minutes, or until they are just tender enough to roll without breaking. Tip: Keep an eye on them to prevent overcooking.
- In a bowl, mix the ricotta cheese, mozzarella cheese, minced garlic, and chopped basil until well combined.
- Spread a tablespoon of the cheese mixture onto each eggplant slice, then roll them up tightly and place seam-side down in the prepared baking dish.
- Pour the marinara sauce over the rolled eggplants, covering them evenly. Tip: For extra flavor, let the sauce simmer with a pinch of red pepper flakes before using.
- Bake for 20 minutes, or until the cheese is melted and bubbly and the sauce is slightly thickened. Tip: Broil for the last 2 minutes for a golden top.
With their creamy filling and tender eggplant wrapping, these rolls are a joy to eat. Serve them over a bed of al dente spaghetti or with a crisp green salad for a complete meal that’s sure to impress.
Conclusion
Craving something tasty and meat-free? This roundup of 23 Delicious Vegetarian Roll Recipes is your go-to for easy, flavorful meals that everyone will love. Whether you’re a seasoned vegetarian or just looking to mix things up, there’s a roll here for you. Don’t forget to try your favorites, leave a comment with what you loved, and share the yum on Pinterest!