As the holiday season twinkles into view, it’s time to gather around the table for meals that warm the heart and delight the palate. Whether you’re celebrating Thanksgiving, Hanukkah, or simply the joy of cooking, our roundup of 18 Festive Recipes is your ticket to a memorable feast. From savory mains to sweet endings, these dishes promise to bring comfort, tradition, and a dash of creativity to your celebrations. Let’s get cooking!
Roasted Turkey with Cranberry Sauce
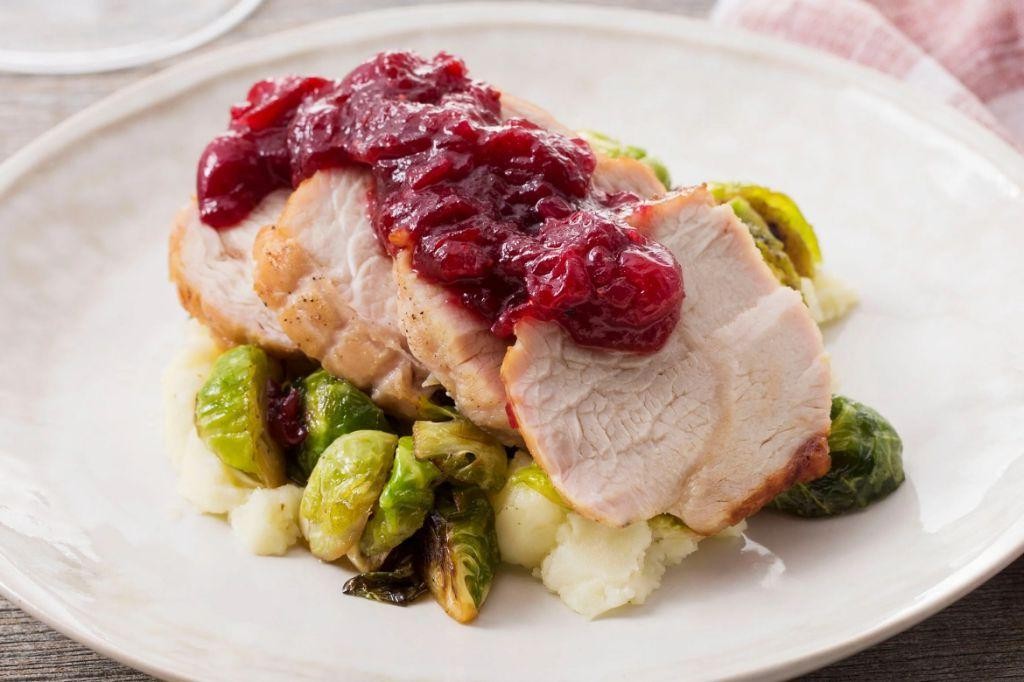
Kickstart your holiday feast with a dish that’s as bold and vibrant as your aunt’s holiday sweater—Roasted Turkey with Cranberry Sauce. This duo brings the perfect balance of savory and sweet to your table, ensuring your taste buds are as entertained as your relatives debating politics.
Ingredients
- For the Turkey:
- 1 whole turkey (12-14 lbs)
- 1/2 cup unsalted butter, melted
- 2 tbsp olive oil
- 1 tbsp salt
- 1 tsp black pepper
- 1 tsp garlic powder
- 1 tsp onion powder
- 1 tsp dried thyme
- For the Cranberry Sauce:
- 12 oz fresh cranberries
- 1 cup granulated sugar
- 1 cup orange juice
- 1/2 tsp cinnamon
Instructions
- Preheat your oven to 325°F (163°C). Ensure the turkey is fully thawed and remove any giblets from the cavity.
- In a small bowl, mix together the melted butter, olive oil, salt, black pepper, garlic powder, onion powder, and dried thyme. Brush this mixture all over the turkey, including under the skin for maximum flavor.
- Place the turkey on a rack in a roasting pan, breast side up. Roast in the preheated oven for about 3 to 3.5 hours, or until the internal temperature reaches 165°F (74°C) in the thickest part of the thigh.
- While the turkey roasts, prepare the cranberry sauce. In a medium saucepan, combine the cranberries, sugar, orange juice, and cinnamon. Bring to a boil over medium heat, then reduce to a simmer for about 10 minutes, stirring occasionally, until the cranberries burst and the sauce thickens.
- Once the turkey is done, let it rest for at least 20 minutes before carving. This allows the juices to redistribute, ensuring a moist and flavorful bird.
Marvel at the golden, crispy skin of your turkey, paired with the tart and sweet cranberry sauce that cuts through the richness like a well-timed joke at the dinner table. Serve this dynamic duo with a side of mashed potatoes and green beans for a plate that’s as colorful as your holiday memories.
Latkes with Applesauce and Sour Cream
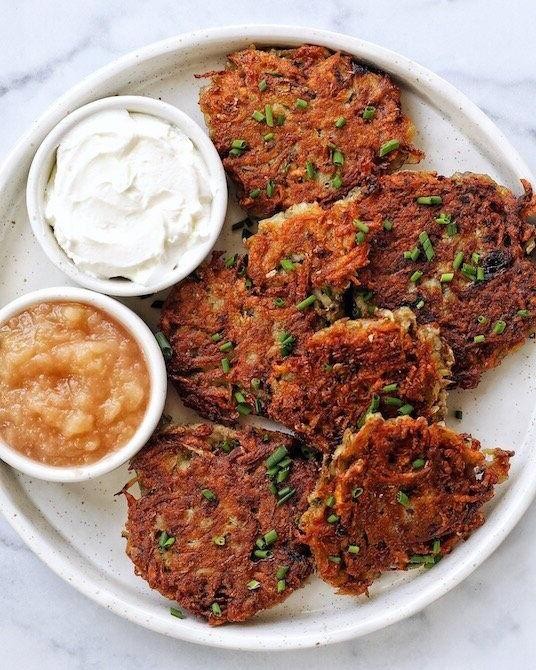
Unbelievably crispy on the outside, tender on the inside, and downright irresistible when topped with cool sour cream and sweet applesauce, these latkes are the ultimate comfort food that’ll have you flipping for more.
Ingredients
- For the latkes:
- 2 large russet potatoes, peeled
- 1 small onion
- 1 large egg
- 2 tbsp all-purpose flour
- 1 tsp salt
- 1/2 tsp black pepper
- 1/2 cup vegetable oil, for frying
- For serving:
- 1 cup applesauce
- 1/2 cup sour cream
Instructions
- Grate the potatoes and onion using the large holes of a box grater. Tip: Squeeze out as much liquid as possible with your hands or a clean kitchen towel to ensure crispier latkes.
- In a large bowl, mix the grated potatoes and onion with the egg, flour, salt, and pepper until well combined.
- Heat the vegetable oil in a large skillet over medium-high heat until it shimmers (about 350°F). Tip: Test the oil’s readiness by dropping a small piece of the mixture in; if it sizzles immediately, you’re good to go.
- Form the potato mixture into small patties (about 1/4 cup each) and carefully place them in the hot oil, flattening slightly with a spatula.
- Fry the latkes for 3-4 minutes per side, or until golden brown and crispy. Tip: Avoid overcrowding the pan to ensure even cooking and crispiness.
- Transfer the cooked latkes to a paper towel-lined plate to drain any excess oil.
- Serve the latkes warm with a dollop of sour cream and a side of applesauce.
Delightfully crunchy with a soft, savory center, these latkes are a textural dream. For a fun twist, try serving them with a sprinkle of chives or a dash of hot sauce to kick the flavor up a notch.
Sweet Potato Casserole with Marshmallows
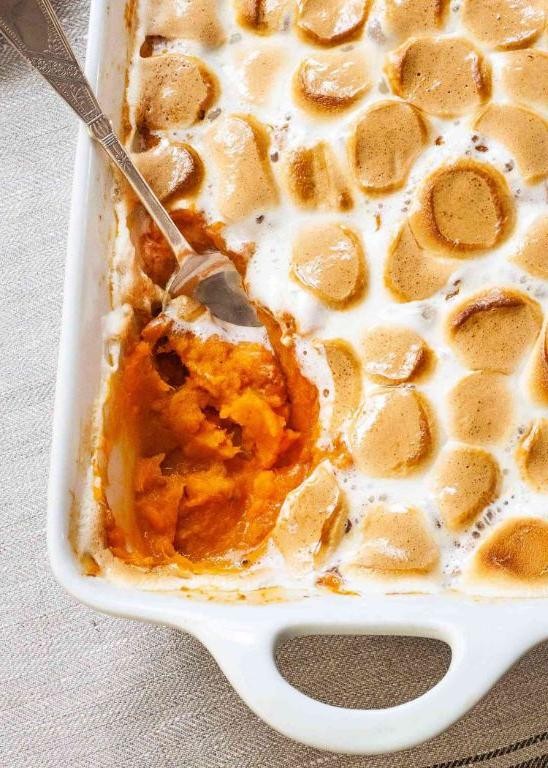
Venture into the realm of comfort food with a dish that’s like a hug for your taste buds—sweet, savory, and topped with a cloud of marshmallows that’ll make you want to dive right in. Perfect for when you need a little sweetness in your life, or just an excuse to eat marshmallows for dinner.
Ingredients
- For the sweet potato base:
- 3 cups mashed sweet potatoes
- 1/2 cup granulated sugar
- 2 large eggs, beaten
- 1/2 tsp salt
- 4 tbsp unsalted butter, melted
- 1/2 cup milk
- 1 tsp vanilla extract
- For the topping:
- 2 cups mini marshmallows
- 1/2 cup packed brown sugar
- 1/4 cup all-purpose flour
- 3 tbsp unsalted butter, cold and cubed
- 1/2 cup chopped pecans (optional)
Instructions
- Preheat your oven to 350°F (175°C) and grease a 9×13 inch baking dish. Tip: A light spray of cooking oil ensures your casserole doesn’t stick.
- In a large bowl, combine the mashed sweet potatoes, granulated sugar, beaten eggs, salt, melted butter, milk, and vanilla extract. Mix until smooth. Tip: For extra creamy potatoes, use a hand mixer on low speed.
- Pour the sweet potato mixture into the prepared baking dish, spreading it evenly with a spatula.
- In a separate bowl, mix the brown sugar and flour. Cut in the cold butter until the mixture resembles coarse crumbs. Stir in the pecans if using. Tip: Your fingers are the best tool for cutting in butter—just make sure they’re clean!
- Sprinkle the topping mixture evenly over the sweet potato base.
- Bake for 25 minutes, or until the edges are bubbly.
- Remove the casserole from the oven and evenly distribute the mini marshmallows on top. Return to the oven and bake for an additional 5 minutes, or until the marshmallows are golden brown. Tip: Watch closely to prevent the marshmallows from burning—they go from golden to charred in seconds!
Absolutely divine, this casserole strikes the perfect balance between the earthy sweetness of the potatoes and the gooey, toasted marshmallows. Serve it as a side that steals the show or enjoy it as a decadent dessert with a dollop of whipped cream.
Brisket with Honey and Spices
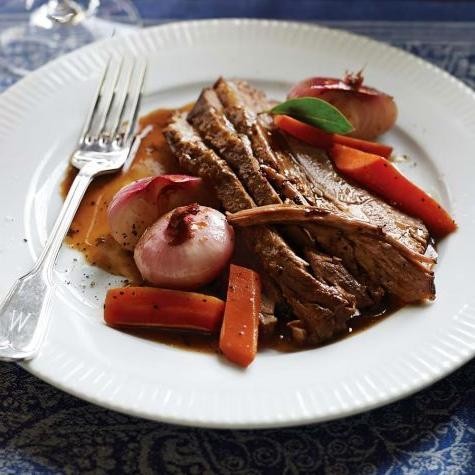
Today’s the day we turn the humble brisket into a show-stopping, flavor-packed masterpiece that’ll have your taste buds doing the cha-cha. With a sweet kiss of honey and a spicy kick, this dish is like a party in your mouth where everyone’s invited.
Ingredients
- For the brisket:
- 1 (5-pound) beef brisket
- 2 tbsp olive oil
- For the honey and spice rub:
- 1/4 cup honey
- 2 tbsp smoked paprika
- 1 tbsp garlic powder
- 1 tbsp onion powder
- 1 tsp cayenne pepper
- 1 tsp salt
- 1 tsp black pepper
- For the braising liquid:
- 1 cup beef broth
- 1/2 cup apple cider vinegar
Instructions
- Preheat your oven to 300°F (150°C) because low and slow is the name of the game here.
- Heat olive oil in a large oven-proof pot over medium-high heat. Sear the brisket on all sides until it’s gloriously browned, about 4 minutes per side. This isn’t just for looks; it locks in those juicy flavors.
- In a bowl, whisk together honey, smoked paprika, garlic powder, onion powder, cayenne pepper, salt, and black pepper. Slather this spicy-sweet concoction all over the brisket like it’s sunscreen on a hot summer day.
- Pour beef broth and apple cider vinegar around the brisket in the pot. The liquid should come up about halfway up the sides of the meat—no swimming lessons needed.
- Cover the pot with a tight-fitting lid and braise in the oven for 4 hours. Resist the urge to peek; patience rewards you with tenderness.
- Remove the brisket from the pot and let it rest for 15 minutes. This isn’t just a break; it’s when the magic happens and the juices redistribute.
- Slice against the grain for maximum tenderness and serve with the braising liquid as a sauce.
The brisket will be so tender, it practically melts at the sight of a fork, with a perfect balance of sweet heat that dances on your palate. Try serving it atop a pile of creamy mashed potatoes or tucked into a soft bun for a sandwich that’ll steal the spotlight at any meal.
Pumpkin Pie with Whipped Cream
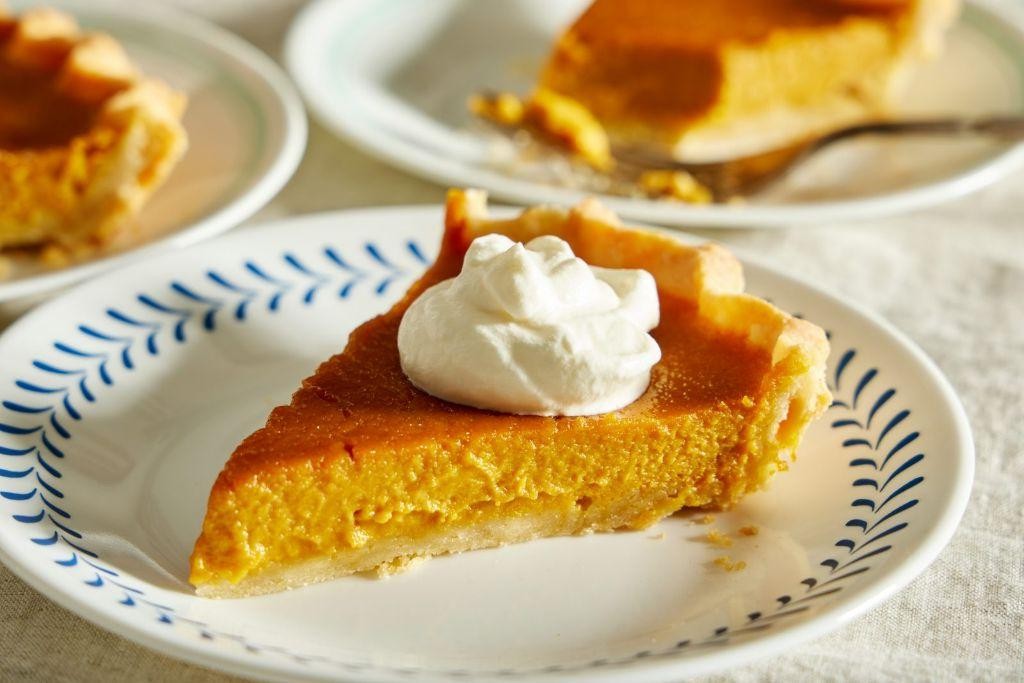
Craving something that screams autumn but can’t wait for the leaves to turn? This pumpkin pie with whipped cream is your golden ticket to flavor town, no season pass required. It’s like hugging a pumpkin, if pumpkins were delicious and didn’t require awkward small talk.
Ingredients
- For the crust:
- 1 1/4 cups all-purpose flour
- 1/2 teaspoon salt
- 1/2 teaspoon sugar
- 1/2 cup unsalted butter, chilled and diced
- 3-4 tablespoons ice water
- For the filling:
- 1 can (15 oz) pumpkin puree
- 3/4 cup sugar
- 1 teaspoon ground cinnamon
- 1/2 teaspoon ground ginger
- 1/4 teaspoon ground cloves
- 1/2 teaspoon salt
- 2 large eggs
- 1 can (12 oz) evaporated milk
- For the whipped cream:
- 1 cup heavy cream
- 2 tablespoons sugar
- 1 teaspoon vanilla extract
Instructions
- Preheat your oven to 375°F (190°C). Because nobody likes a cold pie, except maybe ice cream pie, but that’s a story for another day.
- In a large bowl, whisk together the flour, salt, and sugar for the crust. Add the diced butter and use your fingers to work it into the flour until the mixture resembles coarse crumbs.
- Gradually add ice water, one tablespoon at a time, stirring until the dough comes together. Pro tip: If the dough feels like it’s plotting against you, it’s just right.
- Roll out the dough on a floured surface to fit a 9-inch pie dish. Trim the edges, then crimp them with your fingers or a fork for that Instagram-worthy finish.
- In another bowl, combine the pumpkin puree, sugar, cinnamon, ginger, cloves, and salt. Beat in the eggs, then gradually stir in the evaporated milk until smooth. Pour this luscious mixture into the crust.
- Bake for 40-50 minutes, or until a knife inserted near the center comes out clean. The pie should look set but still jiggle slightly, like a good dance move.
- Let the pie cool on a wire rack for at least 2 hours. Yes, waiting is the hardest part, but think of it as building character.
- For the whipped cream, beat the heavy cream, sugar, and vanilla extract in a chilled bowl until soft peaks form. This is your moment to shine, so whip it good.
Now, the moment of truth: slice into that pie and marvel at the creamy, spiced perfection. The whipped cream adds a cloud-like finish that’s basically a high-five for your taste buds. Serve it up with a side of ‘how did you make this?’ and bask in the glory.
Sufganiyot (Hanukkah Jelly Donuts)
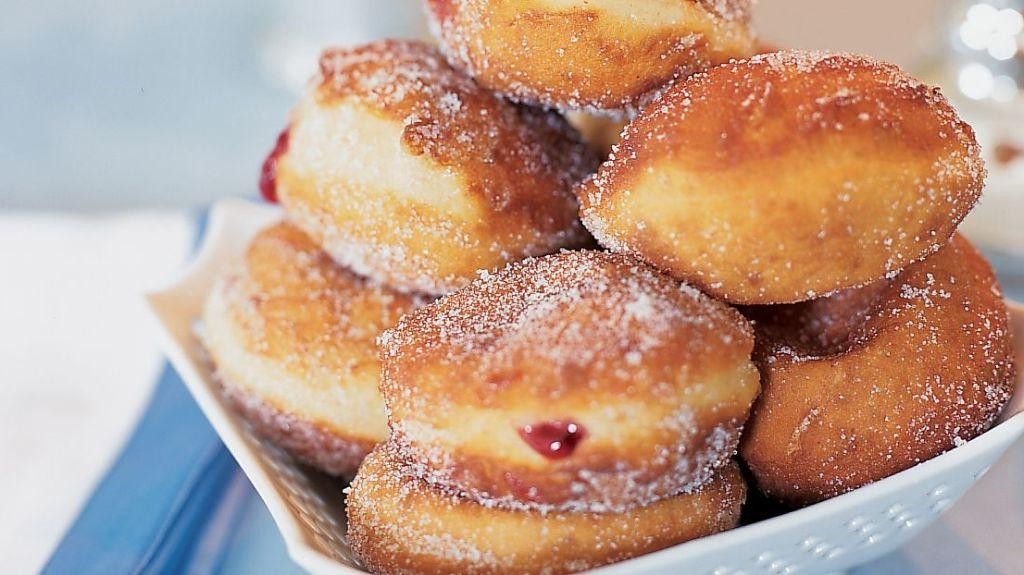
Delightfully decadent and just a tad mischievous, Sufganiyot are the jelly-filled donuts that steal the show during Hanukkah. These pillowy pockets of joy are fried to golden perfection, then stuffed with sweet jelly and dusted with powdered sugar, making them impossible to resist.
Ingredients
- For the dough:
- 4 cups all-purpose flour
- 1/4 cup granulated sugar
- 1 tbsp active dry yeast
- 1/2 cup warm water (110°F)
- 3 large eggs
- 1/4 cup unsalted butter, melted
- 1/2 tsp salt
- For frying and filling:
- Vegetable oil, for frying
- 1 cup raspberry jelly
- 1/2 cup powdered sugar, for dusting
Instructions
- In a small bowl, dissolve the yeast and 1 tsp sugar in warm water. Let sit for 5 minutes until frothy.
- In a large bowl, mix flour, remaining sugar, and salt. Add yeast mixture, eggs, and melted butter. Knead until smooth, about 10 minutes.
- Cover dough with a damp cloth and let rise in a warm place for 1 hour, or until doubled in size.
- On a floured surface, roll dough to 1/2-inch thickness. Cut into 2-inch rounds. Let rise for 30 more minutes.
- Heat oil in a deep fryer or large pot to 350°F. Fry donuts in batches until golden, about 2 minutes per side. Drain on paper towels.
- Using a piping bag, fill each donut with 1 tbsp jelly. Dust with powdered sugar before serving.
Now, these Sufganiyot are not just any donuts; they’re a fluffy, jelly-filled celebration in every bite. Serve them warm to watch the powdered sugar melt into a sweet glaze, or get creative by drizzling with chocolate for an extra indulgent twist.
Green Bean Casserole with Fried Onions
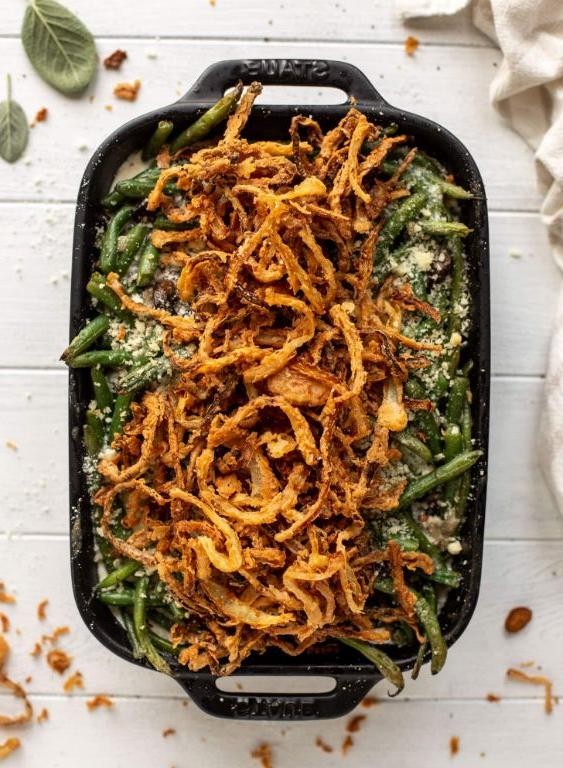
Ready to dive into a dish that’s as fun to make as it is to devour? Our Green Bean Casserole with Fried Onions is the hero your dinner table deserves, combining creamy, crunchy, and a hint of sass in every bite.
Ingredients
- For the casserole:
- 1 lb fresh green beans, trimmed and halved
- 2 cups fried onions
- 1 can (10.5 oz) condensed cream of mushroom soup
- 1/2 cup milk
- 1 tsp soy sauce
- 1/4 tsp black pepper
- For the topping:
- 1 cup fried onions
Instructions
- Preheat your oven to 350°F (175°C) to get it ready for baking magic.
- In a large mixing bowl, whisk together the condensed cream of mushroom soup, milk, soy sauce, and black pepper until smooth. Tip: No lumps allowed—this sauce is the backbone of flavor!
- Add the trimmed and halved green beans to the bowl, tossing them gently to ensure they’re fully coated in the sauce.
- Fold in 2 cups of fried onions, saving the remaining cup for the topping. Tip: The more onions, the merrier—don’t skimp!
- Transfer the mixture to a greased 9×13 inch baking dish, spreading it out evenly.
- Sprinkle the remaining 1 cup of fried onions on top for that irresistible crunch. Tip: For extra golden goodness, place the dish on the middle oven rack.
- Bake for 25-30 minutes, or until the casserole is bubbly and the onions are golden brown.
Zesty, creamy, and with a crunch that’ll have you coming back for seconds, this casserole is a textural dream. Serve it as the star of your holiday table or as a weeknight treat that says ‘I’ve got this’ with zero fuss.
Matzo Ball Soup
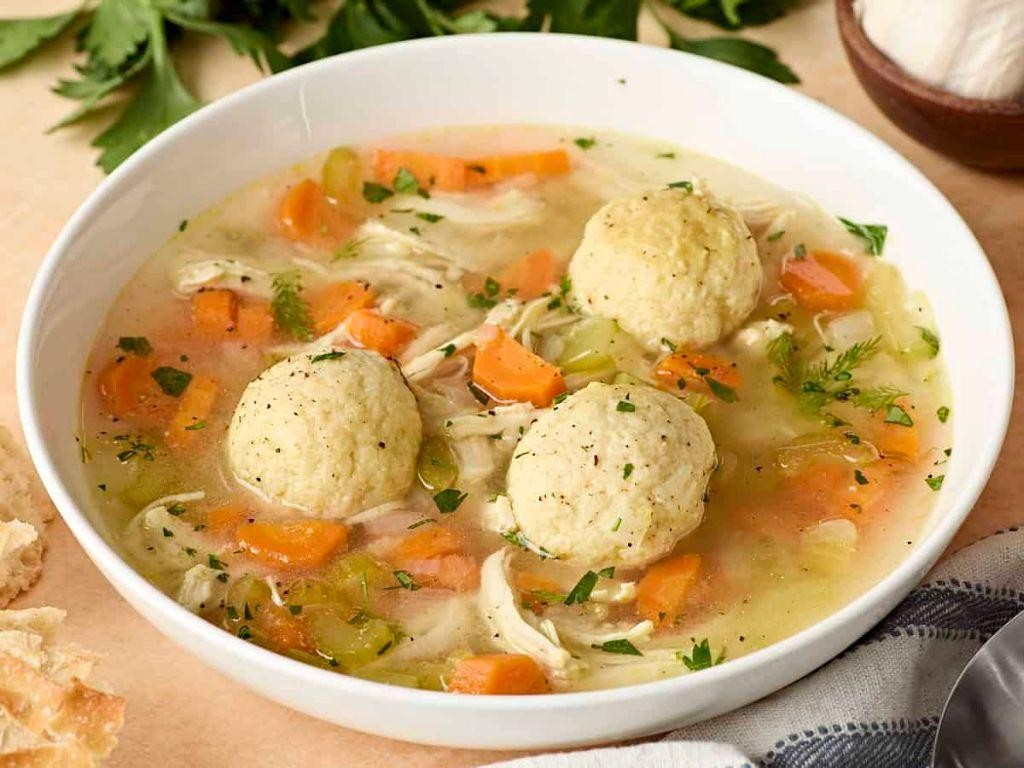
Today’s the day we dive into the cozy, comforting embrace of Matzo Ball Soup, a dish that’s like a warm hug from your Jewish grandma—even if you’ve never met her. This soul-soothing soup is the culinary equivalent of your favorite blanket, but with more flavor and zero risk of shedding.
Ingredients
- For the Matzo Balls:
- 1 cup matzo meal
- 4 large eggs
- 1/4 cup vegetable oil
- 1/4 cup seltzer water
- 1 tsp salt
- 1/2 tsp black pepper
- For the Soup:
- 8 cups chicken broth
- 2 carrots, peeled and sliced
- 2 celery stalks, sliced
- 1 small onion, diced
- 2 cloves garlic, minced
- Salt and pepper to taste
Instructions
- In a large bowl, whisk together the eggs, vegetable oil, and seltzer water until well combined.
- Stir in the matzo meal, salt, and black pepper until the mixture is uniform. Cover and refrigerate for 30 minutes to firm up.
- While the matzo mixture chills, bring the chicken broth to a boil in a large pot. Add the carrots, celery, onion, and garlic, then reduce to a simmer.
- After chilling, wet your hands and form the matzo mixture into 1-inch balls. Gently drop them into the simmering soup.
- Cover the pot and let the matzo balls cook for 20 minutes—no peeking! They’ll puff up beautifully.
- Season the soup with salt and pepper to taste, then ladle into bowls, ensuring each gets a couple of matzo balls.
Kick back and savor the fluffy, cloud-like matzo balls floating in a golden, aromatic broth. Serve with a side of crusty bread for dipping, or go full comfort mode with a sprinkle of fresh dill on top.
Herb-Roasted Chicken
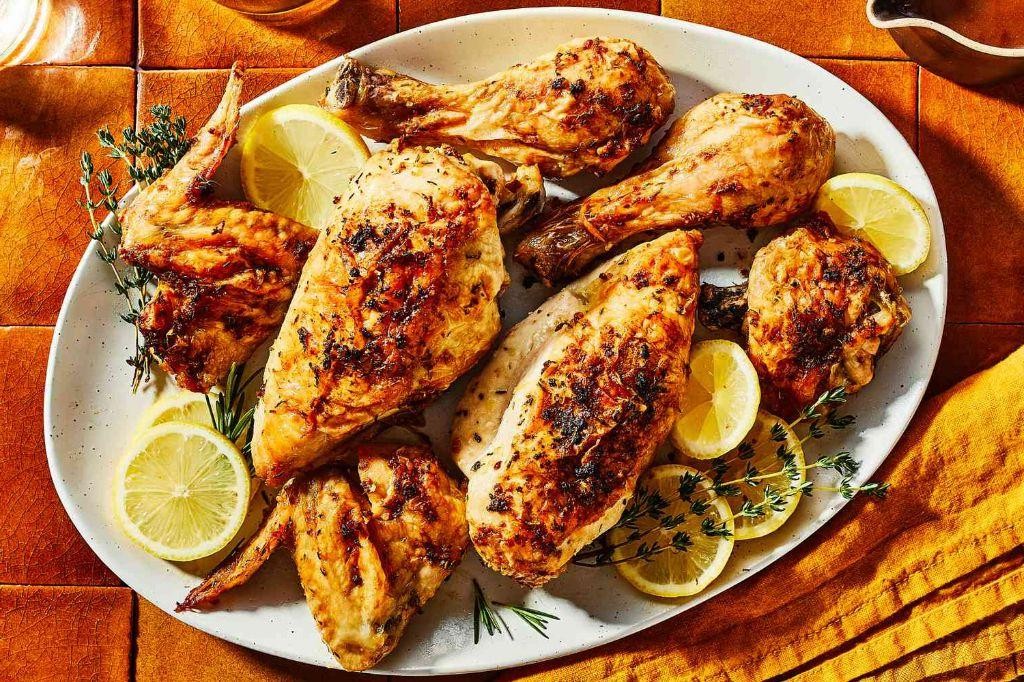
Let’s face it, folks—Herb-Roasted Chicken is the culinary equivalent of a cozy sweater for your soul. It’s simple, comforting, and somehow makes everything better, especially when you’ve had one of those days where even your coffee needs coffee.
Ingredients
- For the chicken:
- 1 whole chicken (about 4 lbs)
- 2 tbsp olive oil
- 1 tsp salt
- 1/2 tsp black pepper
- For the herb rub:
- 1 tbsp chopped fresh rosemary
- 1 tbsp chopped fresh thyme
- 1 tbsp chopped fresh parsley
- 2 cloves garlic, minced
- 1 tsp lemon zest
Instructions
- Preheat your oven to 375°F (190°C) and position the rack in the middle. This ensures even cooking and a golden skin.
- Pat the chicken dry with paper towels. A dry chicken equals crispy skin—trust me, it’s science.
- In a small bowl, mix together the olive oil, salt, pepper, rosemary, thyme, parsley, garlic, and lemon zest to create the herb rub.
- Gently loosen the skin over the chicken breasts and thighs with your fingers, then rub half of the herb mixture underneath the skin. Massage the rest all over the outside of the chicken. This double-layer of flavor is your secret weapon.
- Place the chicken breast-side up on a rack in a roasting pan. Roast for about 1 hour and 15 minutes, or until the internal temperature reaches 165°F (74°C) at the thickest part of the thigh.
- Let the chicken rest for 10 minutes before carving. This lets the juices redistribute, making every bite succulent.
What you’ve got here is a chicken that’s juicy on the inside, herby and crisp on the outside, and downright irresistible. Serve it with a side of roasted veggies or slice it up for a sandwich that’ll make your lunchbox the envy of the break room.
Apple Kugel
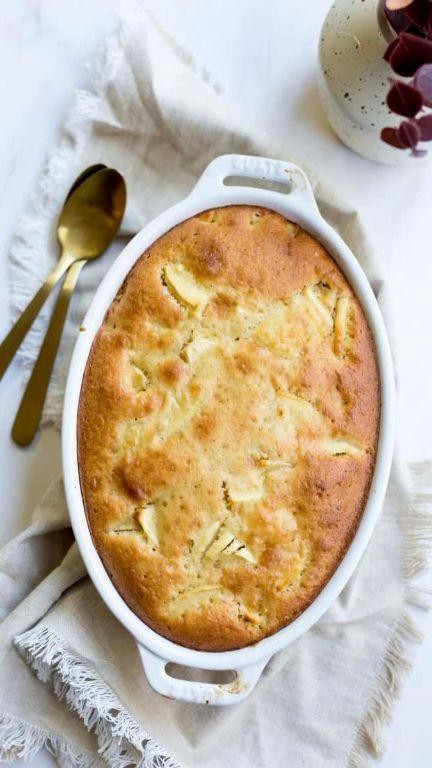
Let’s be real, folks—when it comes to comfort food, Apple Kugel is the unsung hero of the dessert world. It’s like your favorite apple pie and bread pudding had a delicious baby, and we’re all invited to the party.
Ingredients
- For the kugel:
- 8 oz wide egg noodles
- 3 large eggs
- 1/2 cup granulated sugar
- 1/4 cup unsalted butter, melted
- 1 tsp vanilla extract
- 1/2 tsp ground cinnamon
- 1/4 tsp salt
- For the apple mixture:
- 2 large apples, peeled and thinly sliced
- 1/4 cup brown sugar
- 1 tsp ground cinnamon
Instructions
- Preheat your oven to 350°F and grease a 9×13 inch baking dish. This ensures your kugel doesn’t stick and makes cleanup a breeze.
- Cook the egg noodles according to package instructions until al dente, then drain and set aside. Tip: Rinse them under cold water to stop the cooking process and prevent mushiness.
- In a large bowl, whisk together the eggs, granulated sugar, melted butter, vanilla extract, cinnamon, and salt until well combined.
- Add the cooked noodles to the egg mixture, tossing gently to coat every noodle in that sweet, custardy goodness.
- In a separate bowl, toss the apple slices with brown sugar and cinnamon until evenly coated. This little step ensures every bite is packed with flavor.
- Spread half of the noodle mixture into the prepared baking dish, then layer the apple mixture on top. Finish with the remaining noodle mixture. Tip: Press down lightly to compact the layers, which helps the kugel hold together when sliced.
- Bake for 45-50 minutes, or until the top is golden brown and the center is set. A toothpick inserted should come out clean.
- Let the kugel cool for at least 10 minutes before serving. This patience-testing step ensures you don’t burn your tongue and can actually taste your masterpiece.
Serve this Apple Kugel warm, and watch as it disappears faster than a slice of pizza at a party. The crispy top gives way to a soft, custardy interior, with bursts of cinnamon-spiced apples in every bite. For an extra indulgent twist, drizzle with caramel sauce or serve with a scoop of vanilla ice cream.
Cranberry Orange Relish
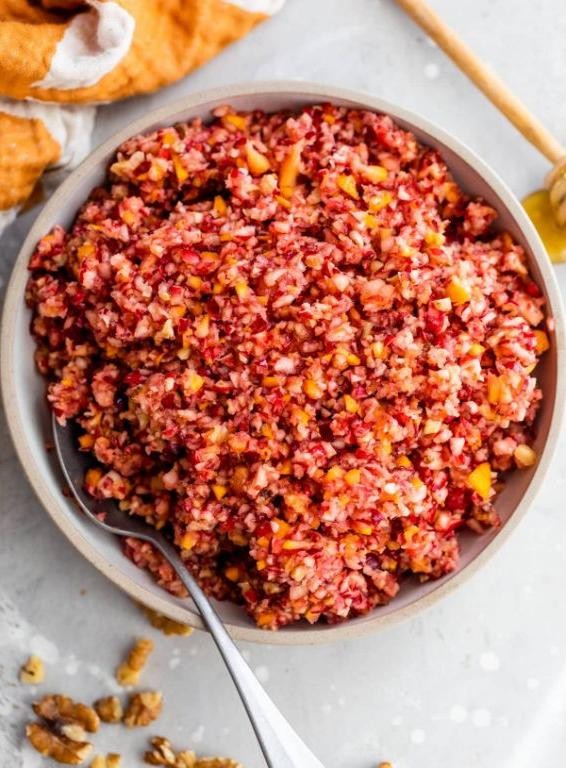
Kickstart your taste buds with this zesty Cranberry Orange Relish that’s about to become the star of your holiday table—or any table, really. Who says cranberries are just for Thanksgiving? This tangy, sweet, and slightly tart condiment is here to prove them wrong, one bite at a time.
Ingredients
- For the relish:
- 12 oz fresh cranberries
- 1 large orange, zest and juice
- 1/2 cup granulated sugar
- 1/4 cup water
- 1/4 tsp ground cinnamon
Instructions
- Rinse the cranberries under cold water and pick out any stems or soft berries.
- In a medium saucepan, combine the cranberries, orange zest, orange juice, sugar, water, and cinnamon.
- Bring the mixture to a boil over medium-high heat, then reduce to a simmer. Cook for 10 minutes, stirring occasionally, until the cranberries burst and the mixture thickens slightly.
- Remove from heat and let cool to room temperature. The relish will continue to thicken as it cools.
- Transfer to a serving bowl or jar and refrigerate for at least 1 hour before serving to allow the flavors to meld.
Absolutely bursting with vibrant flavors, this relish strikes the perfect balance between sweet and tart, with a texture that’s both chunky and saucy. Serve it alongside roasted turkey, spread it on a sandwich, or dollop it over cream cheese for an instant crowd-pleaser.
Potato Knishes
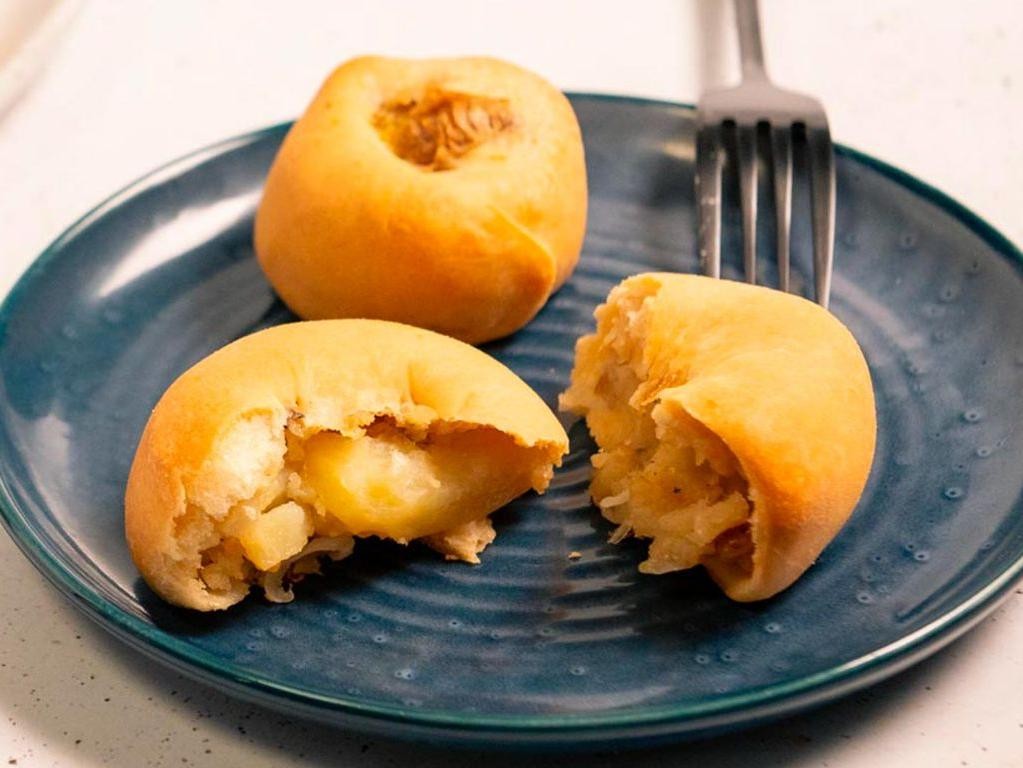
Get ready to roll up your sleeves and dive into the world of Potato Knishes, where crispy meets cozy in every bite. These little pockets of joy are the perfect blend of fluffy potato filling wrapped in a golden, flaky crust that’ll have you coming back for seconds (and thirds).
Ingredients
- For the dough:
- 2 cups all-purpose flour
- 1/2 teaspoon salt
- 1/2 cup water
- 1/4 cup vegetable oil
- 1 egg
- For the filling:
- 2 large potatoes, peeled and cubed
- 1 tablespoon vegetable oil
- 1 small onion, finely chopped
- Salt and pepper to taste
Instructions
- Preheat your oven to 375°F (190°C) and line a baking sheet with parchment paper.
- In a large bowl, whisk together the flour and salt for the dough. Make a well in the center and add the water, vegetable oil, and egg. Mix until a dough forms, then knead on a floured surface for 5 minutes until smooth. Tip: If the dough is too sticky, add a little more flour.
- Cover the dough with a damp cloth and let it rest for 30 minutes.
- Meanwhile, boil the potatoes in salted water until tender, about 15 minutes. Drain and mash.
- In a skillet, heat the vegetable oil over medium heat. Add the onion and sauté until golden, about 5 minutes. Mix into the mashed potatoes and season with salt and pepper.
- Divide the dough into 8 equal pieces. Roll each piece into a thin circle, about 6 inches in diameter.
- Place a spoonful of the potato filling in the center of each circle. Fold the edges over the filling, pinching to seal. Tip: For extra crispiness, brush the tops with a little beaten egg.
- Place the knishes on the prepared baking sheet and bake for 25-30 minutes, until golden brown. Tip: Let them cool for a few minutes before serving to avoid burning your tongue on the hot filling.
How delightful are these Potato Knishes? The crust shatters beautifully to reveal the creamy, savory filling inside. Serve them with a dollop of sour cream or a side of pickles for an extra punch of flavor.
Pecan Pie
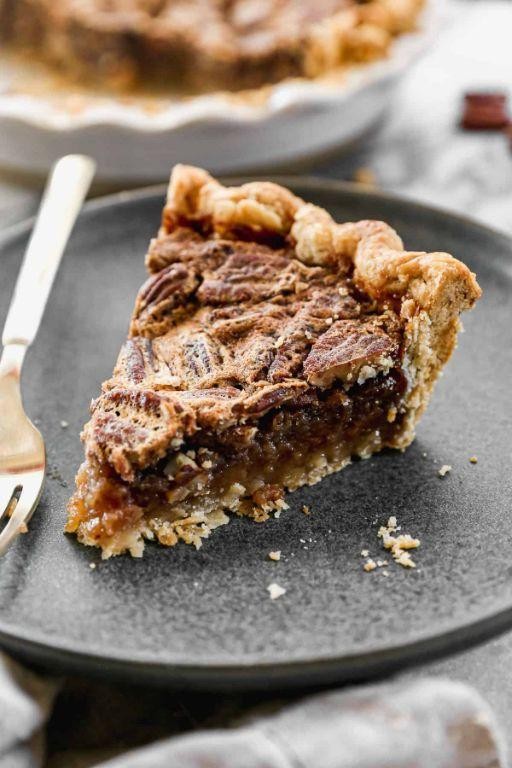
Craving something sweet, nutty, and utterly irresistible? Look no further than this pecan pie, a dessert that’s like a hug in pie form, with its gooey center and crunchy nut topping. Perfect for when you want to impress or just treat yourself, because let’s be honest, you deserve it.
Ingredients
- For the crust:
- 1 1/4 cups all-purpose flour
- 1/2 tsp salt
- 1/2 cup unsalted butter, chilled and diced
- 1/4 cup ice water
- For the filling:
- 3 large eggs
- 1 cup light corn syrup
- 1 cup packed light brown sugar
- 2 tbsp unsalted butter, melted
- 2 tsp vanilla extract
- 1/4 tsp salt
- 2 cups pecan halves
Instructions
- Preheat your oven to 350°F (175°C). This ensures a perfectly baked crust and filling.
- In a large bowl, mix flour and salt for the crust. Add diced butter and blend until the mixture resembles coarse crumbs. Tip: Keep your butter cold for a flakier crust.
- Gradually add ice water, stirring until the dough comes together. Form into a disk, wrap in plastic, and chill for 30 minutes.
- Roll out the dough on a floured surface to fit a 9-inch pie dish. Trim and crimp edges. Tip: Don’t overwork the dough to keep it tender.
- In another bowl, whisk eggs, corn syrup, brown sugar, melted butter, vanilla, and salt until smooth. Stir in pecans.
- Pour the filling into the crust. Bake for 50-60 minutes, until the filling is set but slightly wobbly in the center. Tip: Cover the edges with foil if they brown too quickly.
- Let the pie cool completely on a wire rack before slicing.
Lusciously rich and decadently sweet, this pecan pie boasts a buttery crust that contrasts beautifully with the sticky, nutty filling. Serve it warm with a scoop of vanilla ice cream for an extra indulgent treat, or enjoy a slice with your morning coffee—no judgment here.
Challah Bread Pudding

Unbelievably, this Challah Bread Pudding is here to turn your leftover bread into a show-stopping dessert that’ll have everyone begging for seconds. It’s like the bread version of a phoenix rising from the ashes, but tastier and less mythical.
Ingredients
- For the pudding:
- 6 cups challah bread, cubed
- 2 cups whole milk
- 1 cup heavy cream
- 4 large eggs
- 3/4 cup granulated sugar
- 1 tsp vanilla extract
- 1/2 tsp ground cinnamon
- For the topping:
- 1/4 cup unsalted butter, melted
- 1/4 cup brown sugar
- 1/2 tsp ground cinnamon
Instructions
- Preheat your oven to 350°F (175°C) and grease a 9×13 inch baking dish.
- In a large bowl, whisk together the milk, cream, eggs, granulated sugar, vanilla extract, and cinnamon until well combined.
- Add the cubed challah bread to the bowl, pressing down gently to ensure all pieces are soaked in the mixture. Let it sit for 15 minutes to absorb the liquid.
- Transfer the mixture to the prepared baking dish, spreading it out evenly.
- In a small bowl, mix together the melted butter, brown sugar, and cinnamon for the topping. Drizzle this over the bread mixture.
- Bake for 45-50 minutes, or until the top is golden brown and the center is set. A tip: if the top starts browning too quickly, loosely cover it with aluminum foil.
- Remove from the oven and let it cool for 10 minutes before serving. Another tip: serving it warm enhances the flavors, but it’s also delicious at room temperature.
- For an extra indulgent touch, serve with a scoop of vanilla ice cream or a drizzle of caramel sauce. Final tip: this pudding tastes even better the next day, as the flavors have more time to meld.
Golden and glorious, this Challah Bread Pudding is a textural dream with a crispy top and a soft, custardy center. The cinnamon and vanilla play a delightful duet, making each bite a cozy hug. Try it for breakfast (because why not?) or as a decadent dessert that’ll make you the star of any potluck.
Roasted Brussels Sprouts with Balsamic Glaze
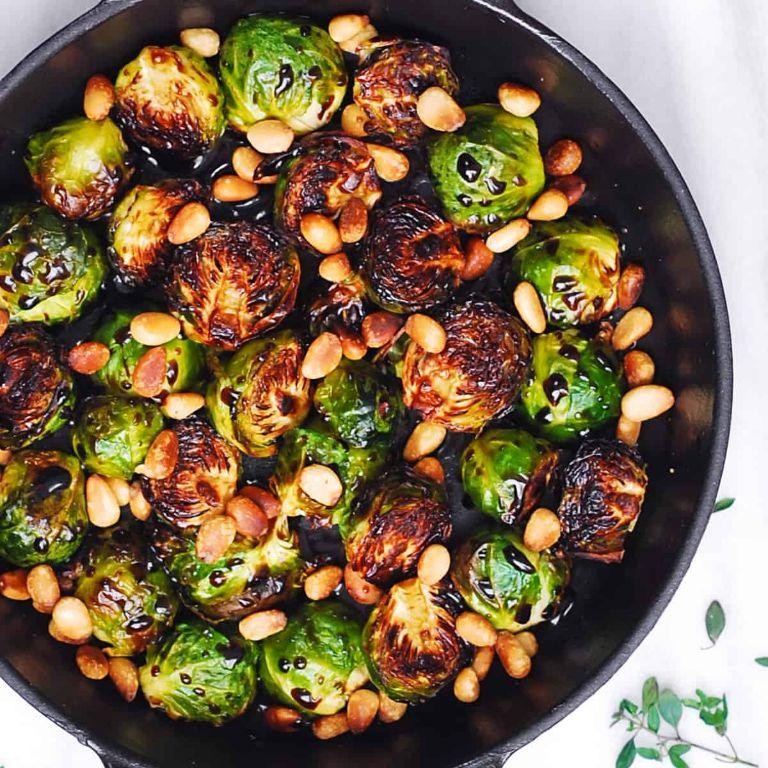
Oh, Brussels sprouts – those tiny cabbages that either make you jump for joy or run for the hills. But trust us, this Roasted Brussels Sprouts with Balsamic Glaze recipe is here to convert the skeptics and delight the fans with its crispy edges, tender heart, and that sweet, tangy glaze that’s basically a hug for your taste buds.
Ingredients
- For the Brussels sprouts:
- 1.5 lbs Brussels sprouts, trimmed and halved
- 3 tbsp olive oil
- 1/2 tsp salt
- 1/4 tsp black pepper
- For the balsamic glaze:
- 1/2 cup balsamic vinegar
- 2 tbsp honey
- 1 tbsp butter
Instructions
- Preheat your oven to 400°F (200°C) and line a baking sheet with parchment paper for easy cleanup.
- In a large bowl, toss the Brussels sprouts with olive oil, salt, and pepper until evenly coated. Spread them out on the prepared baking sheet in a single layer, cut side down, for maximum crispiness.
- Roast in the preheated oven for 20-25 minutes, or until the sprouts are golden brown and crispy on the edges. Flip them halfway through to ensure even cooking.
- While the sprouts are roasting, combine balsamic vinegar and honey in a small saucepan over medium heat. Bring to a simmer, then reduce the heat to low and let it cook for about 10 minutes, stirring occasionally, until the mixture has thickened to a glaze consistency.
- Remove the glaze from heat and stir in the butter until melted and smooth. This adds a rich depth to the glaze that’s absolutely irresistible.
- Once the Brussels sprouts are done, transfer them to a serving dish and drizzle generously with the balsamic glaze. Toss lightly to coat if desired, or leave the glaze on top for a dramatic drizzle effect.
Perfectly crispy on the outside, tender on the inside, and all dressed up in a glossy, sweet-tangy balsamic glaze, these Brussels sprouts are anything but boring. Serve them as a show-stopping side, or toss them with some cooked pasta and grated Parmesan for a quick, veggie-packed meal that’ll have everyone asking for seconds.
Gefilte Fish
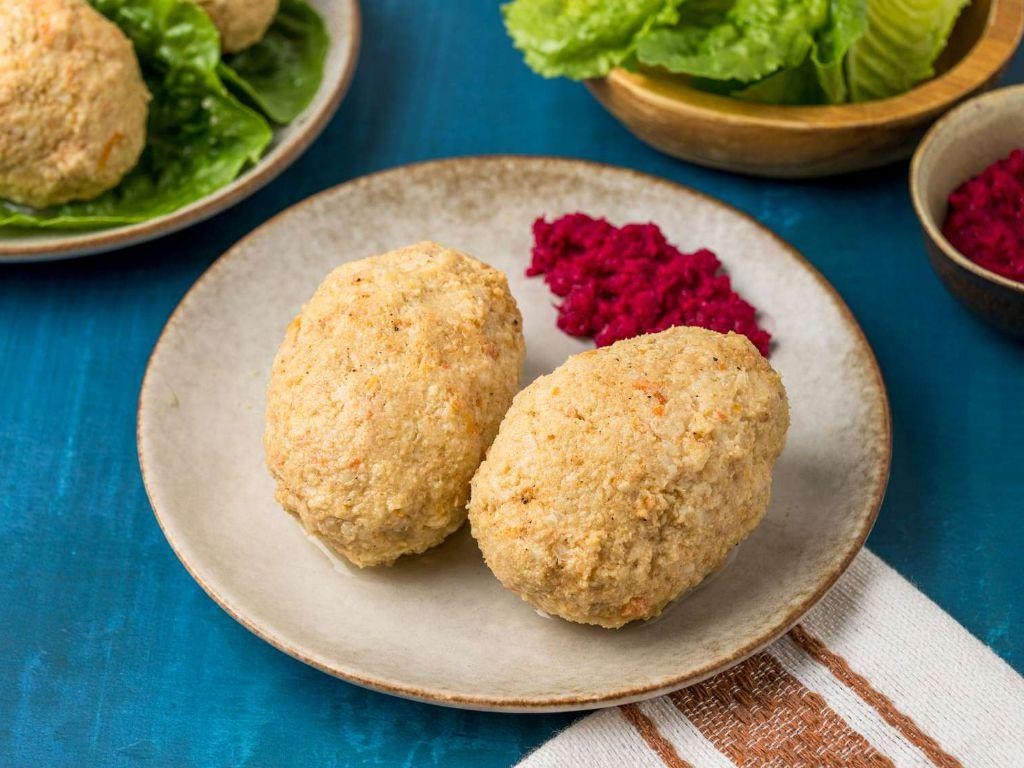
Buckle up, foodies! Today, we’re diving into the world of Gefilte Fish, a dish that’s as fun to say as it is to eat. This traditional Jewish delight is a savory, slightly sweet fish patty that’s perfect for shaking up your dinner routine.
Ingredients
- For the fish mixture:
- 1 lb whitefish fillets, ground
- 1 lb pike fillets, ground
- 1 large onion, finely grated
- 2 large eggs
- 1/4 cup matzo meal
- 1 tbsp sugar
- 1 tsp salt
- 1/2 tsp black pepper
- For the broth:
- 6 cups water
- 2 large onions, sliced
- 2 large carrots, sliced
- 1 tbsp sugar
- 1 tsp salt
Instructions
- In a large bowl, combine the ground whitefish, pike, grated onion, eggs, matzo meal, sugar, salt, and pepper. Mix until well combined. Tip: For extra flavor, let the mixture sit in the fridge for an hour before shaping.
- Shape the mixture into oval patties, about 3 inches long. Tip: Wet your hands with cold water to prevent sticking.
- In a large pot, bring the water, sliced onions, carrots, sugar, and salt to a boil over high heat.
- Gently add the fish patties to the boiling broth. Reduce heat to low, cover, and simmer for 1 hour. Tip: Don’t stir the pot to keep the patties intact.
- Carefully remove the patties from the broth with a slotted spoon and let them cool on a plate.
Gefilte fish is traditionally served chilled with a side of horseradish, but why not try it warm on a toasted bagel for a modern twist? The texture is tender yet firm, with a sweet and savory flavor that’s uniquely delicious.
Cornbread Stuffing
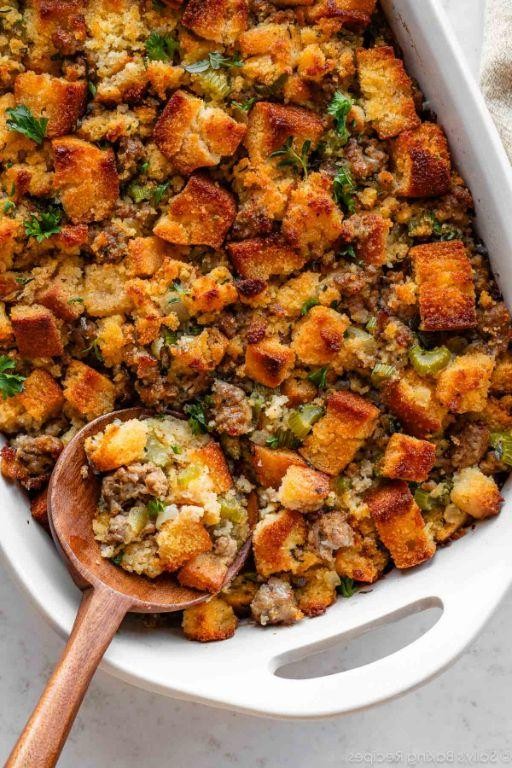
Ready to jazz up your holiday table or just craving some comfort food? This cornbread stuffing is your golden ticket to flavor town, with a crispy top and a moist, savory center that’ll have everyone begging for seconds.
Ingredients
- For the cornbread: 1 cup cornmeal, 1 cup all-purpose flour, 1 tbsp sugar, 1 tsp salt, 1 tbsp baking powder, 1 cup milk, 1 large egg, 1/4 cup unsalted butter (melted)
- For the stuffing: 1/2 cup unsalted butter, 1 large onion (diced), 2 celery stalks (diced), 2 cloves garlic (minced), 4 cups crumbled cornbread, 2 cups chicken broth, 1 tsp dried sage, 1 tsp dried thyme, salt and pepper to taste
Instructions
- Preheat your oven to 400°F and grease an 8-inch square baking dish.
- In a large bowl, whisk together cornmeal, flour, sugar, salt, and baking powder for the cornbread.
- Add milk, egg, and melted butter to the dry ingredients, stirring until just combined. Tip: Don’t overmix to keep the cornbread light.
- Pour the batter into the prepared dish and bake for 20-25 minutes, or until golden and a toothpick comes out clean. Let cool, then crumble.
- In a large skillet over medium heat, melt butter and sauté onion, celery, and garlic until soft, about 5 minutes.
- In a large bowl, combine the sautéed veggies, crumbled cornbread, chicken broth, sage, thyme, salt, and pepper. Tip: The mixture should be moist but not soggy.
- Transfer to a greased baking dish and bake at 350°F for 30 minutes, or until the top is crispy. Tip: Cover with foil if the top browns too quickly.
Lusciously crispy on the outside and tender on the inside, this cornbread stuffing is a textural dream. Serve it alongside your main dish or, for a twist, use it as a hearty base for a poached egg breakfast bowl.
Chocolate Gelt Cookies
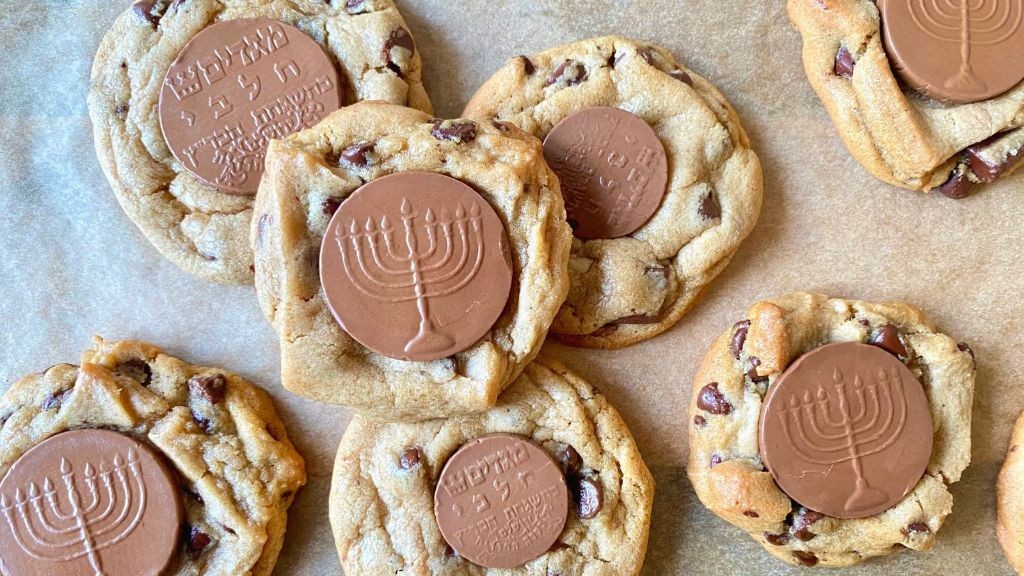
Venture into the world of baking with these Chocolate Gelt Cookies, where every bite is a playful nod to tradition with a twist of modern mischief. Perfect for those who believe that cookies should be as fun to make as they are to eat, these little treasures are your ticket to becoming the cookie hero of any gathering.
Ingredients
- For the dough:
- 1 cup unsalted butter, softened
- 1 cup granulated sugar
- 1 large egg
- 2 tsp vanilla extract
- 2 cups all-purpose flour
- 1/2 cup cocoa powder
- 1/2 tsp baking powder
- 1/4 tsp salt
- For decoration:
- 1 cup chocolate chips, melted
- Edible gold dust
Instructions
- Preheat your oven to 350°F (175°C) and line a baking sheet with parchment paper.
- In a large bowl, cream together the softened butter and granulated sugar until light and fluffy, about 3 minutes.
- Beat in the egg and vanilla extract until well combined.
- In a separate bowl, whisk together the flour, cocoa powder, baking powder, and salt.
- Gradually add the dry ingredients to the wet ingredients, mixing until just combined. Tip: Overmixing can lead to tough cookies, so stop as soon as the flour disappears.
- Roll the dough into 1-inch balls and place them on the prepared baking sheet, spacing them about 2 inches apart.
- Bake for 10-12 minutes, or until the edges are set but the centers are still soft. Tip: They’ll continue to cook on the baking sheet, so don’t wait for them to look done.
- Let the cookies cool on the baking sheet for 5 minutes before transferring to a wire rack to cool completely.
- Once cooled, dip each cookie halfway into the melted chocolate chips and sprinkle with edible gold dust while the chocolate is still wet. Tip: For a smoother finish, tap off excess chocolate gently.
Yield to the allure of these Chocolate Gelt Cookies, where the rich cocoa flavor meets a melt-in-your-mouth texture, and the gold dust adds a touch of whimsy. Serve them stacked like coins or hidden in a treasure chest for an extra element of surprise at your next party.
Conclusion
We hope these 18 festive Thanksgiving and Hanukkah recipes inspire your holiday table with joy and flavor. Each dish is a celebration of tradition and taste, perfect for sharing with loved ones. Don’t forget to try your favorites, leave a comment about what you loved, and share the deliciousness on Pinterest. Happy cooking and happy holidays from our kitchen to yours!


