Delightful, delectable, and downright irresistible—tartlets are the perfect bite-sized treats for any occasion! Whether you’re hosting a fancy dinner party, looking for a quick dessert fix, or simply craving something sweet, our roundup of 23 delicious tartlet recipes has got you covered. From fruity to chocolatey, savory to sweet, there’s a tartlet here to satisfy every palate. So, grab your apron, and let’s get baking!
Mini Lemon Meringue Tartlets
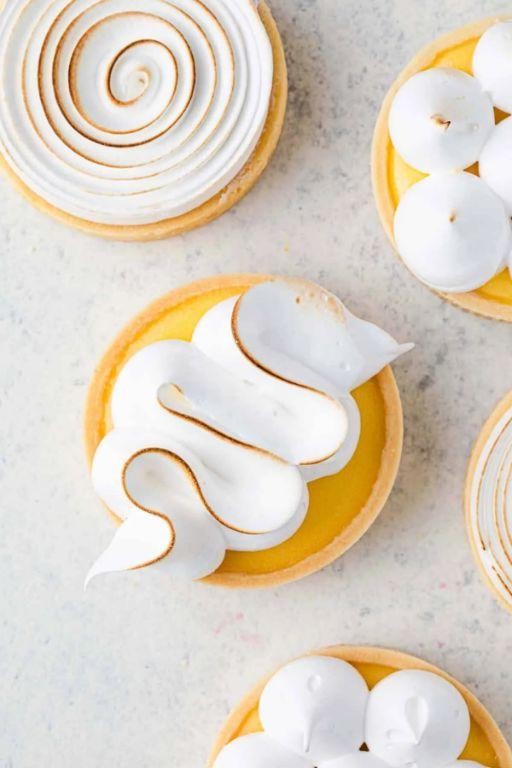
Mmm, who knew something so tiny could pack such a punch of flavor? These Mini Lemon Meringue Tartlets are the perfect bite-sized treat to brighten up your day, with a zesty lemon filling that’ll make your taste buds dance and a fluffy meringue topping that’s like a cloud of sweetness.
Ingredients
- 1 cup of all-purpose flour (because every great tart starts with a solid base)
- A pinch of salt (just to keep things interesting)
- 1/2 cup of unsalted butter, chilled and diced (cold butter makes for a flaky crust)
- A splash of cold water (to bring the dough together)
- 3 lemons, juiced and zested (for that sunny, citrusy kick)
- 1/2 cup of granulated sugar (to sweeten the deal)
- 2 eggs (the glue that holds our filling together)
- 1/4 cup of heavy cream (for a silky smooth filling)
- 3 egg whites (for the meringue that’ll crown our tartlets)
- A couple of tablespoons of powdered sugar (to sweeten the meringue)
Instructions
- Preheat your oven to 350°F (175°C) – no guessing games here, precision is key.
- In a bowl, mix the flour and salt. Add the chilled butter and rub it in until the mixture resembles breadcrumbs. Tip: Keep your hands cold to prevent the butter from melting.
- Add a splash of cold water, just enough to bring the dough together. Wrap it in plastic and chill for 30 minutes. Patience is a virtue, especially in baking.
- Roll out the dough and cut into circles to fit your mini tart pans. Blind bake for 10 minutes. Tip: Use baking beans or rice to keep the crust from puffing up.
- Whisk together lemon juice, zest, sugar, eggs, and heavy cream until smooth. Pour into the pre-baked shells and bake for another 15 minutes.
- Beat the egg whites until stiff peaks form, gradually adding powdered sugar. Pipe or spoon onto the cooled tartlets.
- Use a kitchen torch to lightly brown the meringue, or broil for a minute if you’re feeling adventurous. Tip: Watch closely to avoid a meringue meltdown.
So, there you have it – these tartlets are a symphony of textures, from the crisp crust to the creamy filling and the airy meringue. Serve them at your next brunch to steal the show, or keep them all to yourself; we won’t judge.
Chocolate Ganache Tartlets
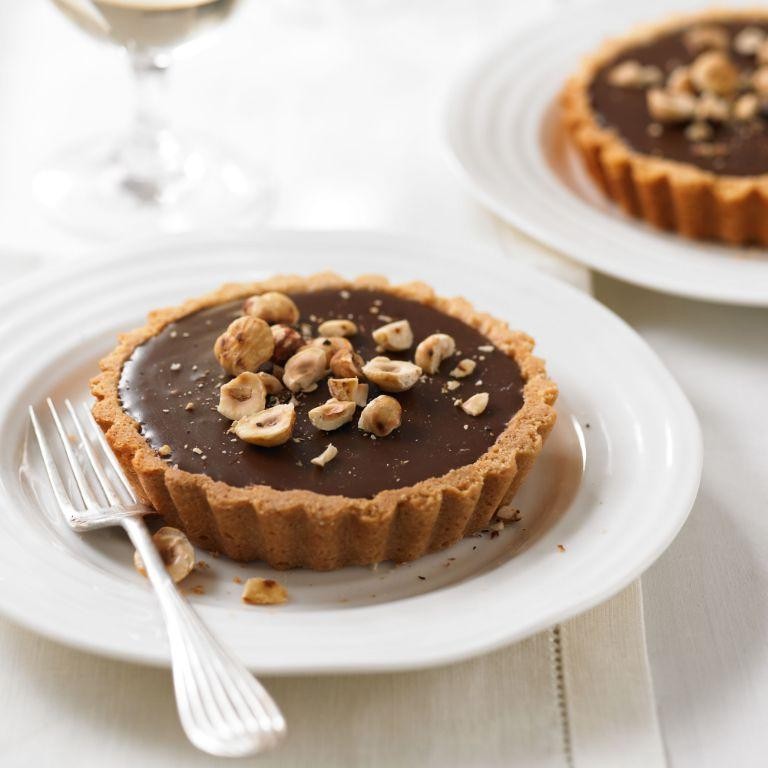
So, you’ve decided to dive into the decadent world of Chocolate Ganache Tartlets, huh? Brace yourself for a journey that’s part baking, part magic show, and entirely delicious. These little beauties are the perfect blend of rich, smooth, and just a tad fancy—ideal for impressing guests or treating yourself to a midnight snack (no judgment here).
Ingredients
- 1 1/2 cups of all-purpose flour (because even tartlets need a solid foundation)
- A pinch of salt (to keep things interesting)
- 1/2 cup of unsalted butter, cold and cubed (like tiny, buttery ice cubes)
- 1/4 cup of powdered sugar (for that sweet, sweet embrace)
- A splash of vanilla extract (because vanilla makes everything better)
- 8 oz of dark chocolate, chopped (the star of the show)
- 3/4 cup of heavy cream (for that luxurious ganache)
- A couple of tablespoons of unsalted butter (yes, more butter)
Instructions
- Preheat your oven to 350°F (175°C) because it’s showtime.
- In a bowl, mix the flour, salt, and powdered sugar like you’re introducing them at a party.
- Add the cold, cubed butter and vanilla extract, then rub the mixture between your fingers until it resembles breadcrumbs. Tip: Cold hands make the best pastry, so if you’re warm-blooded, run them under cold water first.
- Press the mixture into tartlet pans, making sure to give them a little love on the sides. Bake for 15 minutes or until golden. Tip: Blind bake with pie weights or beans if you’re fancy and have them.
- While the crust cools, heat the heavy cream until it’s just about to boil, then pour it over the chopped chocolate. Let it sit for a minute like a spa day, then stir until smooth.
- Add the butter to the ganache and stir until it’s fully incorporated and shiny. Tip: If your ganache is too thick, a tiny bit more cream can save the day.
- Pour the ganache into the cooled tartlet shells and refrigerate for at least 2 hours. Patience is a virtue, especially in dessert making.
Every bite of these tartlets is a creamy, chocolatey dream with a crust that’s just the right amount of crumbly. Serve them with a dusting of cocoa powder or a side of berries for a pop of color and freshness. Either way, they’re bound to disappear faster than you can say ‘more please.’
Strawberry Cream Tartlets
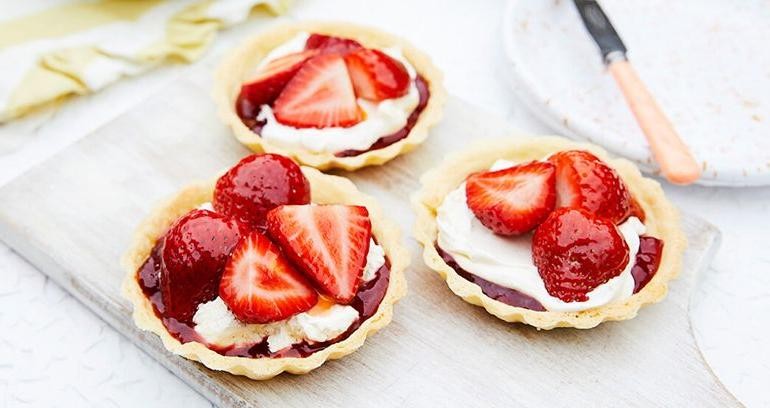
Kickstart your summer with these adorable Strawberry Cream Tartlets that are as fun to make as they are to devour. Perfect for those who believe that desserts should be both Instagram-worthy and irresistibly delicious, these little beauties are your ticket to becoming the star of any picnic or potluck.
Ingredients
- 1 1/2 cups of all-purpose flour (because we’re not reinventing the wheel here)
- A pinch of salt (just enough to whisper ‘I’m here’)
- 1/2 cup of unsalted butter, cold and cubed (keep it chilly)
- 3-4 tbsp of ice water (just a splash to bring it all together)
- 1 cup of heavy cream (for that cloud-like fluff)
- 2 tbsp of powdered sugar (because we’re sweet but not too sweet)
- 1 tsp of vanilla extract (the secret handshake of baking)
- A couple of cups of fresh strawberries, hulled and sliced (the star of the show)
Instructions
- Preheat your oven to 375°F (190°C) because we’re about to get baking.
- In a large bowl, whisk together the flour and salt. Toss in the cold butter cubes and use your fingers to rub them into the flour until it looks like coarse crumbs. Tip: Keep your hands cold to prevent the butter from melting.
- Drizzle in the ice water, a tablespoon at a time, mixing until the dough just comes together. Wrap it in plastic and chill for 30 minutes. Patience is key here.
- Roll out the dough on a floured surface to about 1/8 inch thickness and cut into circles to fit your tartlet pans. Press them in, prick the bottoms with a fork, and bake for 15-20 minutes until golden. Let them cool.
- While the shells cool, whip the heavy cream, powdered sugar, and vanilla extract until stiff peaks form. This is where the magic happens.
- Fill each tartlet shell with a generous dollop of whipped cream and top with sliced strawberries. For an extra touch of elegance, dust with a little more powdered sugar.
These tartlets are a symphony of textures – the crisp shell, the creamy filling, and the juicy strawberries create a bite that’s simply unforgettable. Serve them on a vintage platter for a touch of whimsy, or enjoy them straight from the pan (we won’t judge).
Pumpkin Spice Tartlets
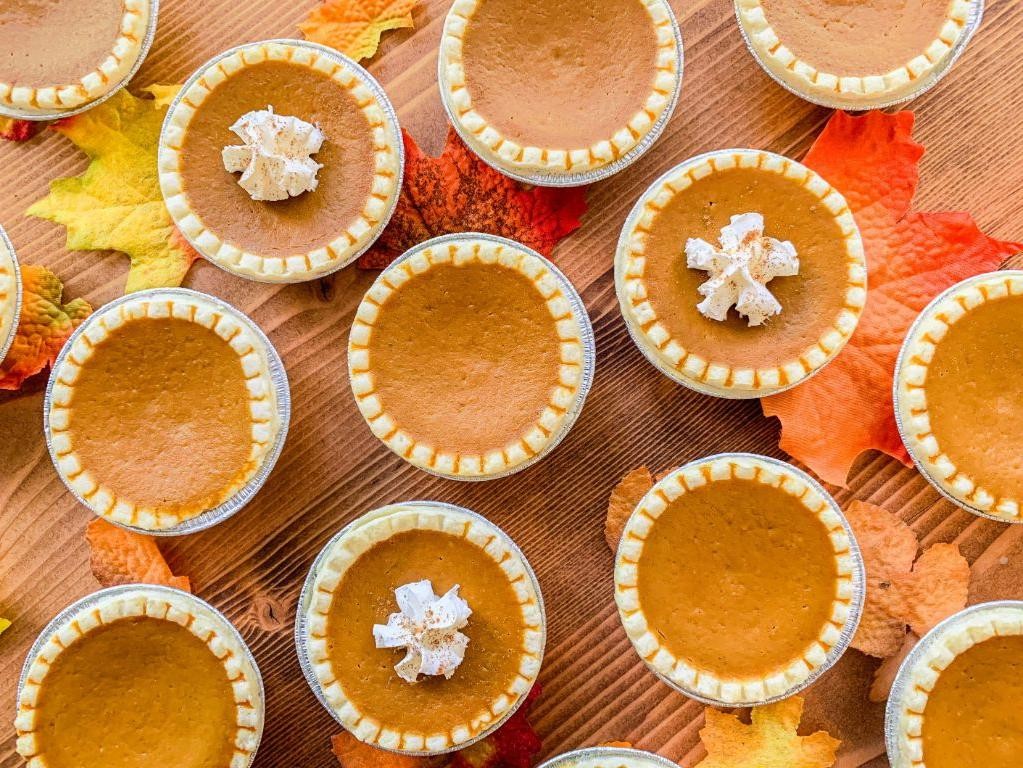
Craving a bite-sized treat that screams autumn? These Pumpkin Spice Tartlets are your ticket to flavor town, blending the cozy vibes of pumpkin pie with the convenience of a handheld delight. Perfect for when you want to impress at potlucks or just treat yo’ self.
Ingredients
- 1 1/2 cups of all-purpose flour (because we’re not reinventing the wheel here)
- A pinch of salt (just enough to whisper ‘I care’)
- 1/2 cup of unsalted butter, chilled and diced (keep it cool, like your demeanor)
- 3-4 tbsp of ice water (for that perfect dough drama)
- 1 cup of pumpkin puree (the star of the show)
- 1/2 cup of brown sugar (for that deep, molasses kiss)
- A couple of eggs (binding everything together like a good friendship)
- 1 tsp of pumpkin spice (because more is more)
- A splash of vanilla extract (for that ‘what’s that amazing smell?’ effect)
- 1/2 cup of heavy cream (because richness is next to deliciousness)
Instructions
- Preheat your oven to 375°F (190°C) – no cheating, let it fully preheat for even baking.
- In a large bowl, whisk together the flour and salt. Add the diced butter and use your fingers to rub it into the flour until it resembles coarse crumbs. Tip: Cold butter is key for flaky pastry, so don’t let it soften.
- Gradually add ice water, one tablespoon at a time, mixing until the dough just comes together. Overworking the dough makes it tough, so show some restraint.
- Roll out the dough on a floured surface to about 1/8 inch thickness and cut into circles to fit your tartlet pans. Press gently into the pans and trim the edges. Prick the bottoms with a fork to prevent puffing.
- Blind bake the shells for 10 minutes. Tip: Use pie weights or dried beans to keep the shells from bubbling up.
- While the shells bake, whisk together the pumpkin puree, brown sugar, eggs, pumpkin spice, and vanilla extract until smooth. Stir in the heavy cream for a silky filling.
- Pour the filling into the pre-baked shells and return to the oven for 20-25 minutes, until the filling is set but still slightly wobbly in the center.
- Let the tartlets cool in the pans for 10 minutes, then transfer to a wire rack to cool completely. Tip: They firm up as they cool, so patience is a virtue here.
Absolutely divine when served with a dollop of whipped cream or a drizzle of caramel, these tartlets boast a creamy, spiced filling encased in a buttery, flaky crust. Perfect for those who believe pumpkin spice isn’t just a season—it’s a lifestyle.
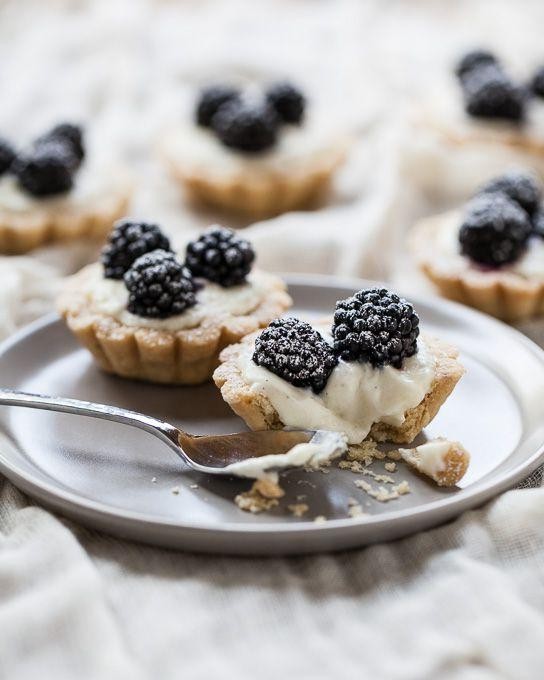
Blueberry Cheesecake Tartlets
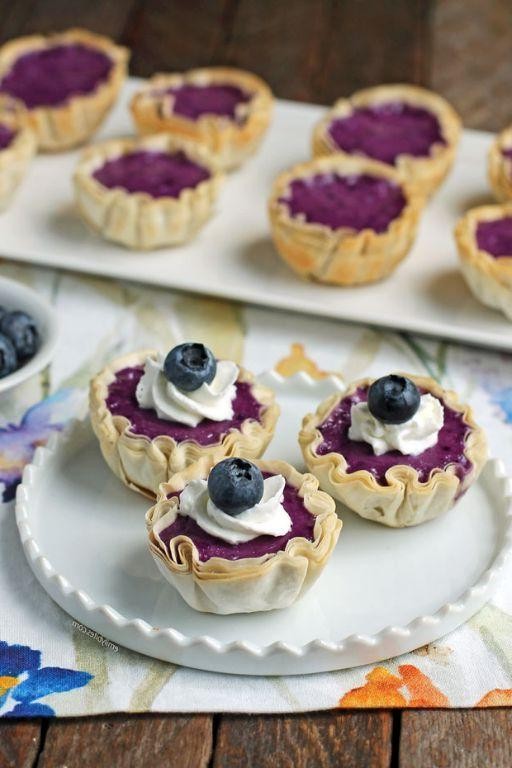
Picture this: a bite-sized burst of creamy, dreamy blueberry bliss that’ll have you forgetting your name. These Blueberry Cheesecake Tartlets are the little black dress of desserts—simple, elegant, and always a showstopper.
Ingredients
- 1 cup of graham cracker crumbs (because every great story starts with a solid foundation)
- A couple of tablespoons of melted butter (the glue that holds our dreams together)
- A splash of vanilla extract (for that ‘I can’t quite put my finger on it’ flavor)
- 8 oz of cream cheese, softened (let’s get soft and spreadable, like your favorite morning butter)
- 1/4 cup of sugar (sweetness is non-negotiable)
- 1 egg (the binding agent of love and baking)
- A handful of fresh blueberries (the star of the show, dressed in their natural blues)
Instructions
- Preheat your oven to 350°F because good things come to those who bake.
- Mix the graham cracker crumbs and melted butter in a bowl until it feels like wet sand at the beach. Press this mixture into the bottoms of your tartlet pans to create the crust. Tip: Use the bottom of a glass to press it down evenly—no crumb left behind!
- In another bowl, beat the cream cheese until it’s as smooth as your pickup lines. Add the sugar and vanilla, beating until combined. Crack in the egg and mix until the filling is smoother than a jazz playlist.
- Pour the filling over the crusts, leaving a little room at the top for the blueberries to party. Drop the blueberries on top like they’re diving into a pool of creamy goodness.
- Bake for 15-20 minutes, or until the edges are set but the center still jiggles slightly, like your confidence on a first date.
- Let them cool completely before serving—patience is a virtue, especially in dessert form.
Unbelievably creamy with a crunch that sings, these tartlets are a symphony of textures. Serve them at your next brunch and watch as they disappear faster than your weekend.
Raspberry Almond Tartlets
Unbelievably, these Raspberry Almond Tartlets are the perfect blend of sweet, tart, and nutty, all wrapped up in a bite-sized package that’s sure to steal the show at any gathering. They’re like little jewels of joy, and the best part? They’re surprisingly easy to whip up, even if your baking skills are more ‘store-bought’ than ‘star baker.’
Ingredients
- 1 cup of all-purpose flour (because, let’s be honest, it’s the backbone of most baking adventures)
- A pinch of salt (just a whisper to balance the sweetness)
- 1/2 cup of unsalted butter, cold and cubed (the colder, the flakier the crust)
- A splash of cold water (to bring the dough together without a fuss)
- 1/2 cup of almond flour (for that nutty, toasty flavor we’re after)
- 1/4 cup of sugar (because life’s too short for unsweetened desserts)
- 1 egg (the glue that holds our tartlet dreams together)
- A handful of fresh raspberries (the tart heroes of our story)
- A drizzle of honey (for that golden, sticky finish)
Instructions
- Preheat your oven to 350°F (175°C) – no guessing games here, precision is key.
- In a large bowl, mix the all-purpose flour and salt. Toss in the cold butter cubes and use your fingers to rub them into the flour until it resembles coarse crumbs. Tip: Keep those fingers light and quick to avoid melting the butter.
- Add a splash of cold water, just enough to bring the dough together into a ball. Wrap it in plastic and chill for 30 minutes – patience makes perfect.
- While the dough chills, whisk together the almond flour, sugar, and egg in a bowl until smooth. This is your frangipane filling, aka the secret weapon.
- Roll out the chilled dough on a floured surface and cut into circles to fit your tartlet molds. Press them in gently – no tearing, we’re going for elegance.
- Spoon a bit of the frangipane into each tartlet shell, then press a raspberry into the center of each. Drizzle with honey because, why not?
- Bake for 20-25 minutes, until the edges are golden and the filling is set. Tip: Keep an eye on them; nobody likes a burnt tartlet.
- Let them cool slightly before serving – they’re best when the raspberry is still a bit warm and oozy.
Now, these tartlets are a textural dream – crisp crust, creamy filling, and that juicy raspberry pop. Serve them with a dollop of whipped cream or, for the overachievers, a scoop of vanilla ice cream. Next time you’re in charge of dessert, you know what to do.
Key Lime Tartlets
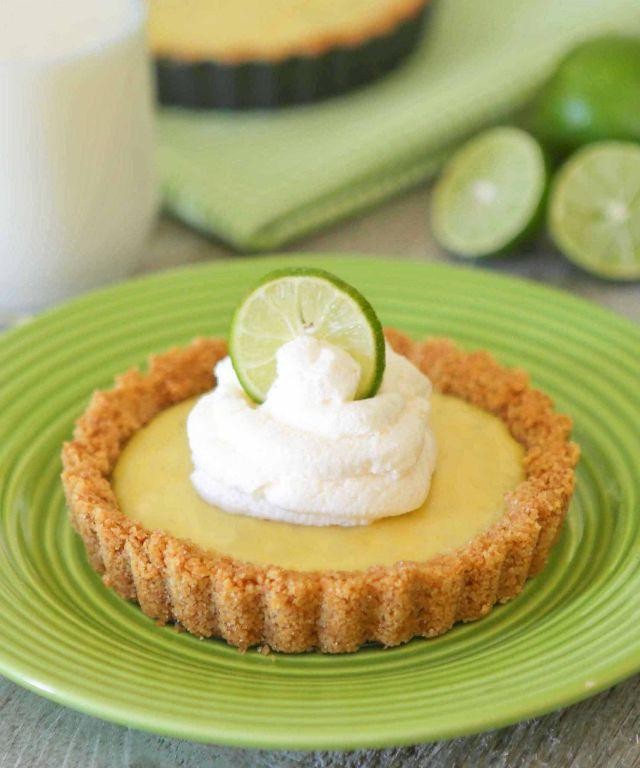
Very few desserts can whisk you away to a tropical paradise with just one bite, but these Key Lime Tartlets are here to do just that—no passport required. Packed with zesty lime flavor and nestled in a buttery crust, they’re the perfect pick-me-up for any day that feels a little too Monday.
Ingredients
- 1 1/2 cups of graham cracker crumbs (because every great adventure starts with a solid foundation)
- 1/2 cup of melted butter (the glue that holds our dreams together)
- 1/4 cup of sugar (for that sweet, sweet happiness)
- 3 egg yolks (the golden tickets to creamy town)
- 1 can (14 oz) of sweetened condensed milk (the secret to richness)
- 1/2 cup of key lime juice (freshly squeezed for that punch of flavor)
- A splash of vanilla extract (because why not?)
- A couple of lime zest (for that fancy, Instagram-worthy finish)
Instructions
- Preheat your oven to 350°F—let’s get this party started.
- Mix the graham cracker crumbs, melted butter, and sugar in a bowl until it feels like wet sand. Press this mixture into your tartlet pans firmly—no wimpy crusts here.
- Bake the crusts for 10 minutes, then let them cool. Patience is a virtue, especially in baking.
- Whisk together the egg yolks, sweetened condensed milk, key lime juice, and vanilla extract until smooth. Tip: Strain the mixture to avoid any eggy surprises.
- Pour the filling into the cooled crusts, filling them almost to the top. They’re not shy.
- Bake for 15 minutes, just until the filling sets. It should jiggle like a confident belly dancer, not a wobbly jelly.
- Let them cool, then chill in the fridge for at least 2 hours. Good things come to those who wait.
- Before serving, zest some lime over the top for that zingy finale.
Bursting with tangy, creamy goodness and a crumbly crust that crumbles just right, these tartlets are a mini vacation in every bite. Serve them chilled with a side of sunset views for maximum effect.
Caramel Apple Tartlets
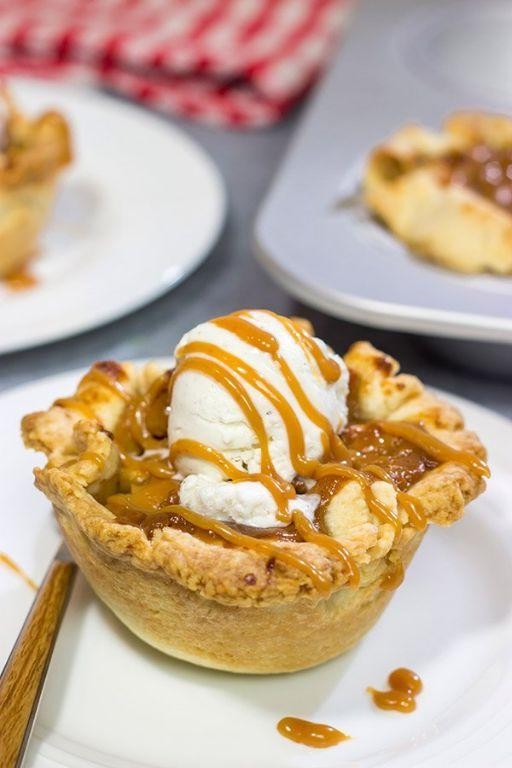
Every now and then, we all crave a little sweetness that doesn’t come with a side of guilt—well, maybe just a smidge. These caramel apple tartlets are here to save your dessert game with their flaky crust, gooey caramel, and just the right amount of apple crunch. Perfect for when you want to impress but also keep it real.
Ingredients
- 1 cup of all-purpose flour (because, duh, we’re baking)
- A pinch of salt (to keep things interesting)
- 1/2 cup of unsalted butter, cold and cubed (the colder, the flakier)
- A splash of ice water (just enough to bring the dough together)
- 2 medium apples, peeled and thinly sliced (go for Granny Smith if you like a tart kick)
- 1/4 cup of granulated sugar (for that sweet, sweet caramelization)
- A couple of tablespoons of caramel sauce (store-bought is fine, we won’t judge)
Instructions
- Preheat your oven to 375°F (190°C) because patience is a virtue, especially in baking.
- In a large bowl, whisk together the flour and salt. Toss in the cold butter cubes and use your fingers to rub them into the flour until it looks like coarse crumbs. Pro tip: Keep those fingers light and quick to avoid melting the butter.
- Add a splash of ice water, just enough to bring the dough together into a ball. Wrap it in plastic and chill for 30 minutes. Yes, chilling is non-negotiable here.
- Roll out the dough on a floured surface to about 1/8 inch thick and cut into circles to fit your tartlet pans. Press the dough into the pans and trim the edges. Prick the bottoms with a fork because nobody likes a puffy tart.
- Toss the apple slices with sugar and arrange them over the dough. Drizzle with caramel sauce because more is more when it comes to caramel.
- Bake for 25-30 minutes until the crust is golden and the apples are tender. Let them cool slightly unless you’re into molten caramel burns (we don’t recommend it).
Absolutely divine when served warm, these tartlets strike the perfect balance between sweet and tart, with a crust that’s flaky enough to make you weep. Try serving them with a dollop of whipped cream or, for the overachievers, a scoop of vanilla ice cream. Because why not?
Peach Cobbler Tartlets
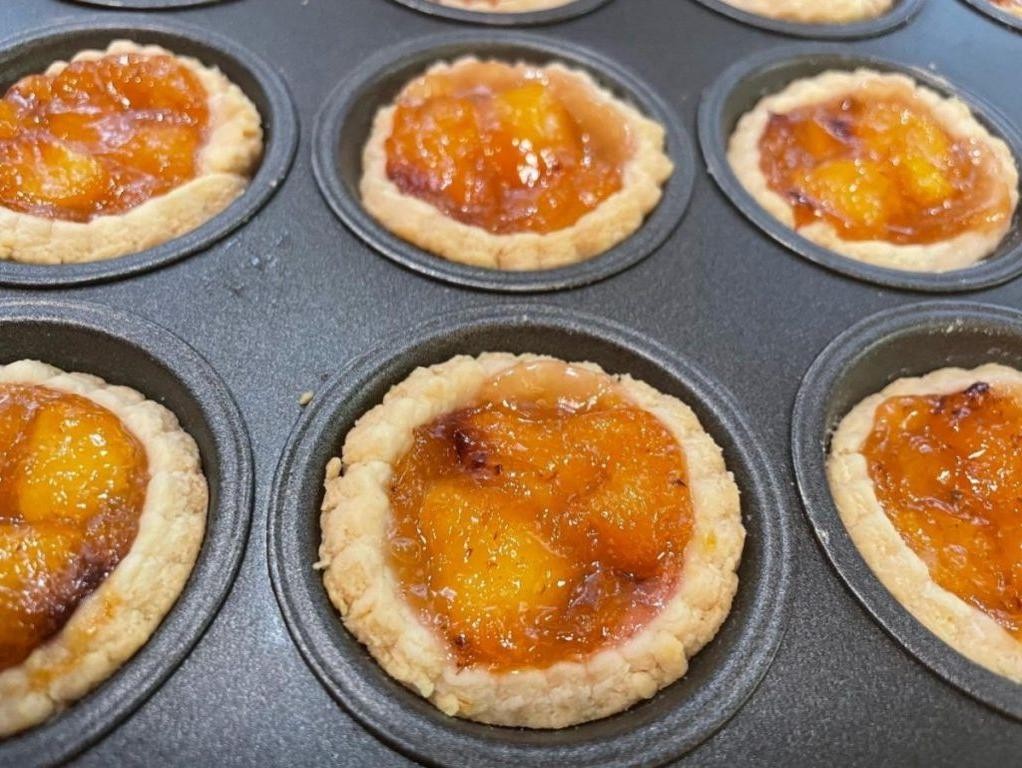
Oh, buckle up, buttercup, because we’re about to dive into a dessert that’s as sassy as it is sweet. These Peach Cobbler Tartlets are the little black dress of summer desserts—effortlessly chic, universally adored, and guaranteed to steal the show at any gathering.
Ingredients
- 2 cups of all-purpose flour (because we’re not reinventing the wheel here)
- A pinch of salt (just enough to keep things interesting)
- 1 cup of unsalted butter, cold and cubed (like your ex’s heart)
- A splash of ice water (to keep the drama to a minimum)
- 4 ripe peaches, sliced (no sad, mealy peaches allowed)
- 1/2 cup of sugar (because life’s too short for unsweetened fruit)
- A couple of tbsp of lemon juice (to brighten things up)
- 1 tsp of cinnamon (for that cozy, hug-in-a-spice-jar vibe)
- 1/4 cup of brown sugar (for that caramelized, deep flavor)
Instructions
- Preheat your oven to 375°F—no peeking until it’s fully heated, or it’ll get stage fright.
- In a large bowl, whisk together the flour and salt. Toss in the butter cubes and use your fingers to rub them into the flour until it looks like coarse crumbs. Pro tip: Keep your hands cold to prevent the butter from melting too soon.
- Drizzle in the ice water, a tablespoon at a time, mixing until the dough just comes together. Overworking it is the enemy of flaky pastry, so show some restraint.
- Roll out the dough on a floured surface and cut into circles to fit your tartlet pans. Press them in gently—no need to manhandle them.
- Toss the peach slices with sugar, lemon juice, and cinnamon. Let them sit for 10 minutes to get all juicy and friendly.
- Divide the peach mixture among the tartlet shells, sprinkle with brown sugar, and bake for 25 minutes, or until the crust is golden and the peaches are bubbling like a gossipy tea party.
- Let them cool for a hot minute before serving—unless you’re into third-degree burns.
And just like that, you’ve got yourself a batch of Peach Cobbler Tartlets that are crispy, juicy, and just the right amount of messy. Serve them with a dollop of whipped cream or a scoop of vanilla ice cream, and watch as they disappear faster than your patience on a Monday morning.
Banoffee Pie Tartlets
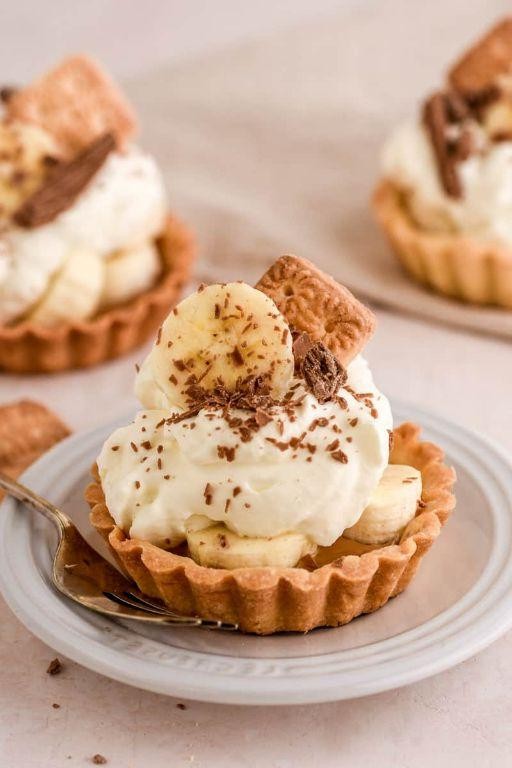
Ready to dive into a dessert that’s a hilarious mix of bananas and toffee, all snuggled up in a buttery tartlet? These Banoffee Pie Tartlets are your ticket to sweet, creamy bliss with a crunch that’ll make your taste buds throw a party.
Ingredients
- 1 cup of graham cracker crumbs (because every great pie starts with a crumbly handshake)
- 1/2 cup of melted butter (the glue that holds our dreams together)
- A pinch of salt (to keep things interesting)
- 1 can of dulce de leche (or a jar of caramel if you’re in a pinch)
- 2 bananas, sliced (the star of the show)
- A splash of vanilla extract (for that ‘oh, what’s that fancy flavor?’ effect)
- 1 cup of heavy cream (whipped into fluffy clouds)
- A couple of chocolate shavings (because chocolate makes everything better)
Instructions
- Preheat your oven to 350°F (175°C) – no guessing games here, we’re baking!
- Mix the graham cracker crumbs, melted butter, and salt in a bowl until it feels like wet sand. Press this mixture into tartlet pans to form the crusts. Tip: Use the bottom of a glass to press down evenly – no crumb left behind!
- Bake the crusts for 10 minutes, then let them cool. They should be golden and smell like heaven.
- Spread a generous layer of dulce de leche over each cooled crust. Tip: Warm it slightly for easier spreading – but don’t turn it into soup!
- Arrange the banana slices over the caramel. Tip: Squeeze a little lemon juice on the bananas to keep them from turning into sad, brown slices.
- Whip the heavy cream with vanilla extract until stiff peaks form. Dollop this over the bananas like you’re frosting a cake.
- Sprinkle chocolate shavings on top because, let’s be honest, it’s not dessert without chocolate.
Delightfully creamy with a crunch that’ll surprise you, these tartlets are like little bites of joy. Serve them chilled for that ‘I can’t believe I made this’ moment, or share them and watch the compliments roll in.
Cherry Chocolate Tartlets
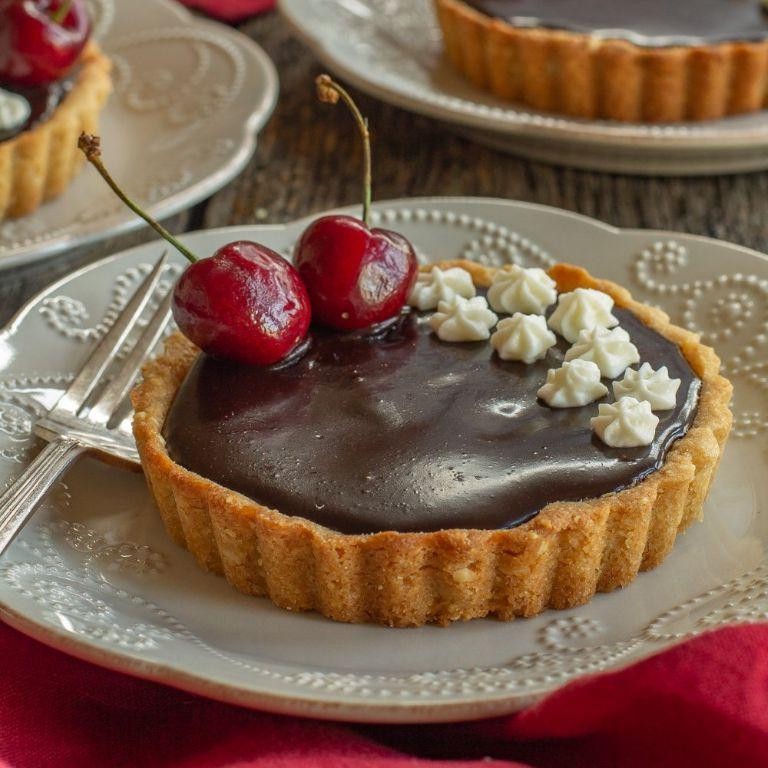
Delightfully decadent and just a tad mischievous, these Cherry Chocolate Tartlets are here to prove that good things do come in small packages. Perfect for when you’re feeling fancy but your patience is snack-sized, they’re a whirlwind romance of tart cherries and rich chocolate, all wrapped up in a buttery crust.
Ingredients
- 1 cup of all-purpose flour (because we’re not reinventing the wheel here)
- A pinch of salt (just a whisper, really)
- 1/2 cup of unsalted butter, cold and cubed (keep it chill like your attitude)
- A splash of ice water (literally just enough to bring it together)
- 1 cup of dark chocolate chips (go dark or go home)
- 1/2 cup of heavy cream (for that lush, velvety texture)
- 1 cup of tart cherry jam (the star of the show)
- A couple of fresh cherries for garnish (because we eat with our eyes first)
Instructions
- Preheat your oven to 350°F (175°C) because we’re about to get baking.
- In a bowl, mix the flour and salt. Add the cold butter and work it in until it looks like coarse crumbs. Pro tip: Use your fingers for this – it’s oddly satisfying.
- Add just enough ice water to bring the dough together. Wrap it in plastic and chill for 30 minutes. Patience is a virtue, especially in pastry.
- Roll out the dough and cut into circles to fit your tartlet pans. Press them in and prick the bottoms with a fork. Bake for 15 minutes or until golden. Let them cool – they’re hot stuff right now.
- While the crusts cool, heat the heavy cream until just simmering. Pour over the chocolate chips and let sit for a minute, then stir until smooth. This is your moment to shine with that glossy ganache.
- Spread a layer of cherry jam in each tartlet shell, then top with the chocolate ganache. Garnish with fresh cherries because pretty food tastes better.
Just like that, you’ve got yourself a batch of Cherry Chocolate Tartlets that are as fun to make as they are to eat. The crust is buttery and crisp, the filling a luscious contrast of tart and sweet, with the chocolate adding a depth that’s downright addictive. Serve these at your next gathering and watch them disappear – or don’t, we won’t judge if you keep them all to yourself.
Lemon Blueberry Tartlets
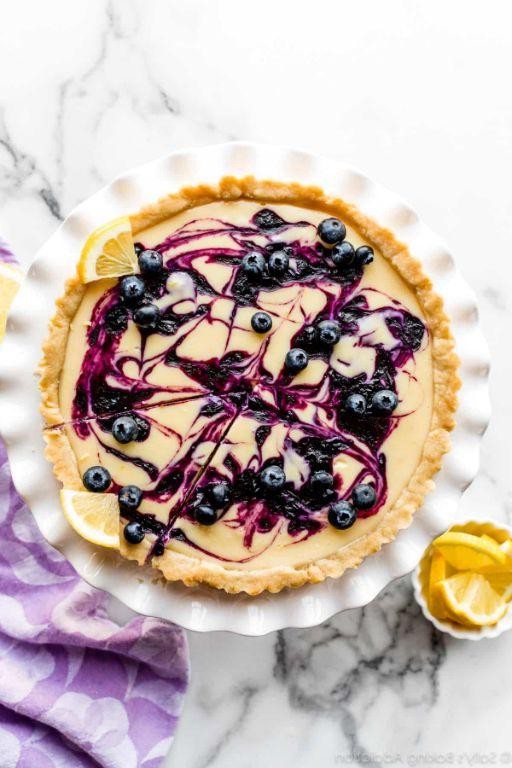
Now, let’s talk about these little bursts of sunshine that are Lemon Blueberry Tartlets. Perfect for when you’re pretending to be a fancy pastry chef but really just want something delicious without the fuss.
Ingredients
- 1 cup of all-purpose flour (because we’re not reinventing the wheel here)
- A pinch of salt (to make the flour feel special)
- 1/2 cup of unsalted butter, cold and cubed (like tiny ice cubes of joy)
- A splash of cold water (just enough to make the dough come together)
- 1 cup of fresh blueberries (the stars of the show)
- 1/2 cup of sugar (to sweeten the deal)
- Zest of 1 lemon (for that zing)
- 2 tbsp of lemon juice (because more zing is always better)
- 1 egg, beaten (for that golden glow)
Instructions
- Preheat your oven to 375°F (190°C) because we’re about to get baking.
- In a bowl, mix the flour and salt like you’re introducing them at a party.
- Add the butter cubes and use your fingers to rub them into the flour until it looks like breadcrumbs. Tip: Keep your hands cold to prevent the butter from melting.
- Sprinkle in the cold water, a little at a time, until the dough comes together. Don’t overdo it; we’re making tartlets, not soup.
- Roll out the dough on a floured surface and cut into circles to fit your tartlet pans. Tip: Use a glass if you don’t have a cutter. Improvise!
- Press the dough into the pans and prick the bottoms with a fork. This isn’t a suggestion; it’s a must to prevent puffing.
- Mix the blueberries, sugar, lemon zest, and juice in a bowl. Spoon this glorious mixture into the tartlet shells.
- Brush the edges of the tartlets with the beaten egg for that Instagram-worthy shine.
- Bake for 20-25 minutes or until the crust is golden and the blueberries are bubbling like a science experiment.
Perfectly tangy with a buttery crust that crumbles just right, these tartlets are begging to be served with a dollop of whipped cream or, let’s be honest, straight into your mouth.
Mocha Tartlets
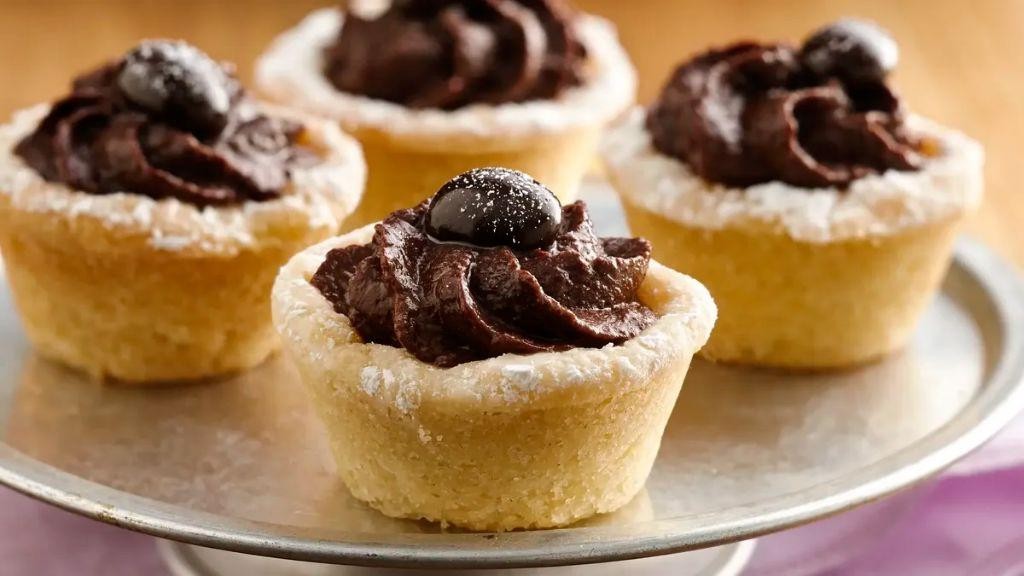
Picture this: a tiny, decadent dessert that packs the punch of your morning coffee and the indulgence of your favorite chocolate bar. These mocha tartlets are here to make your dessert dreams come true, no matter how wild they are.
Ingredients
- 1 cup of all-purpose flour (because we’re not reinventing the wheel here)
- A pinch of salt (just to keep things interesting)
- 1/2 cup of unsalted butter, cold and cubed (like a chilly little puzzle)
- 2 tbsp of granulated sugar (for that sweet, sweet life)
- A splash of vanilla extract (because why not?)
- 1/2 cup of heavy cream (go big or go home)
- 1/2 cup of dark chocolate chips (the darker, the better)
- 1 tbsp of instant coffee granules (for that wake-up call)
- 1 egg yolk (the golden child)
Instructions
- Preheat your oven to 350°F because we’re about to get baking.
- In a bowl, mix the flour, salt, and sugar like you’re introducing them at a party.
- Add the cold butter cubes and use your fingers to rub them into the flour until it looks like breadcrumbs. Tip: Keep your hands cold to prevent the butter from melting.
- Stir in the egg yolk and vanilla extract until the dough comes together. If it’s too dry, a teeny splash of water will do the trick.
- Press the dough into tartlet molds, making sure to poke holes in the bottom with a fork. This prevents puffing up, which is only cute in cartoons.
- Bake for 15 minutes or until golden. Let them cool like they’re sunbathing.
- Meanwhile, heat the heavy cream until it’s just about to boil, then pour it over the chocolate chips and coffee granules. Let it sit for a minute, then stir until smooth. Tip: This is your mocha ganache, and yes, it’s as fancy as it sounds.
- Pour the ganache into the cooled tartlet shells and refrigerate for at least 2 hours. Patience is a virtue, especially in dessert-making.
Last but not least, these mocha tartlets are a textural dream—crispy crust meets silky, rich filling. Serve them with a dusting of cocoa powder or a side of ‘how did you make these?’ from your impressed friends.
Pecan Pie Tartlets
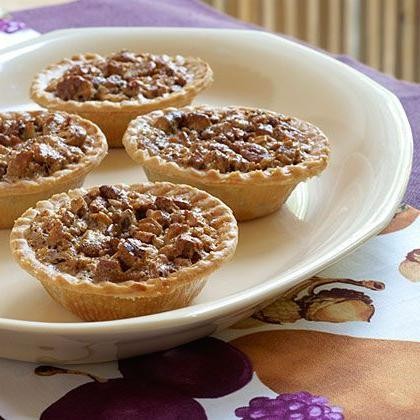
Kickstart your dessert game with these bite-sized pecan pie tartlets that pack all the buttery, nutty goodness of the classic into a cute, pop-able package. Perfect for when you want to impress without the stress, these little guys are the life of the party.
Ingredients
- 1 cup of all-purpose flour (because we’re keeping it classic)
- A pinch of salt (just to keep things interesting)
- 1/2 cup of unsalted butter, cold and cubed (the colder, the flakier)
- A splash of ice water (to bring it all together)
- 1 cup of pecans, chopped (the star of the show)
- 1/2 cup of brown sugar (for that deep, caramel vibe)
- 1/4 cup of corn syrup (the sticky glue that holds our dreams together)
- 1 egg, beaten (for that golden shine)
- A dash of vanilla extract (because why not?)
Instructions
- Preheat your oven to 350°F (175°C) – no peeking until it’s ready!
- In a bowl, mix the flour and salt. Toss in the butter cubes and work them in with your fingers until the mix looks like coarse crumbs. Pro tip: Keep those fingers cold for the best texture.
- Add the ice water, a splash at a time, until the dough comes together. Wrap it in plastic and chill for 30 minutes. Patience is a virtue, especially in pastry.
- Roll out the dough and cut into small circles to fit your tartlet pans. Press them in gently – no tearing!
- In another bowl, mix pecans, brown sugar, corn syrup, and vanilla. Spoon this heavenly mix into your tartlet shells.
- Brush the edges with beaten egg for that perfect golden finish. Bake for 20-25 minutes until the filling is bubbly and the crust is golden. Watch them like a hawk to avoid over-baking.
- Let them cool on a rack – if you can resist the aroma, that is.
Out of the oven, these tartlets are a symphony of textures: crisp crust, gooey center, and crunchy pecans. Serve them warm with a dollop of whipped cream or a scoop of vanilla ice cream for an extra indulgent twist.
Vanilla Bean Tartlets
Mmm, imagine biting into a cloud if clouds were made of vanilla bean dreams and buttery crust—that’s these tartlets for you. Perfect for when you want to impress or just treat yourself because, let’s be honest, you deserve it.
Ingredients
- 1 1/4 cups of all-purpose flour (because we’re not reinventing the wheel here)
- A pinch of salt (just enough to whisper ‘I’m here’)
- 1/2 cup of unsalted butter, cold and cubed (like tiny icebergs waiting to melt)
- 2-3 tbsp of ice water (yes, ice water, don’t skip the ice)
- 1 vanilla bean (the star of the show, don’t even think about extract)
- 1/2 cup of heavy cream (for that lush, velvety filling)
- 2 large eggs (the glue holding our dreams together)
- 1/4 cup of sugar (because sweet is the name of the game)
Instructions
- Preheat your oven to 350°F—no rushing, let it get toasty.
- In a bowl, whisk together flour and salt. Toss in the butter cubes and smash them into the flour until it looks like coarse crumbs. Pro tip: Use your fingers for this—it’s oddly satisfying.
- Drizzle in the ice water, a tablespoon at a time, until the dough comes together. It should feel like playdough, not sticky, not dry.
- Roll out the dough on a floured surface to about 1/8 inch thick. Cut into circles that fit your tartlet pans. Press them in, trim the edges, and poke the bottoms with a fork. Chill for 15 minutes—patience is a virtue.
- Bake the crusts for 10 minutes until they’re just starting to golden. Let them cool slightly.
- Split the vanilla bean and scrape out the seeds. In a bowl, whisk together the seeds, cream, eggs, and sugar until smooth. Pour into the crusts, filling them about 3/4 full.
- Bake for 15-20 minutes until the filling is set but still has a slight jiggle in the center. Let them cool before serving—unless you’re into molten vanilla lava, which, no judgment.
These tartlets are a symphony of textures—crisp crust meets creamy, vanilla-kissed center. Serve them with a dusting of powdered sugar or a dollop of whipped cream, because why stop at delicious when you can go to decadent?
Black Forest Tartlets
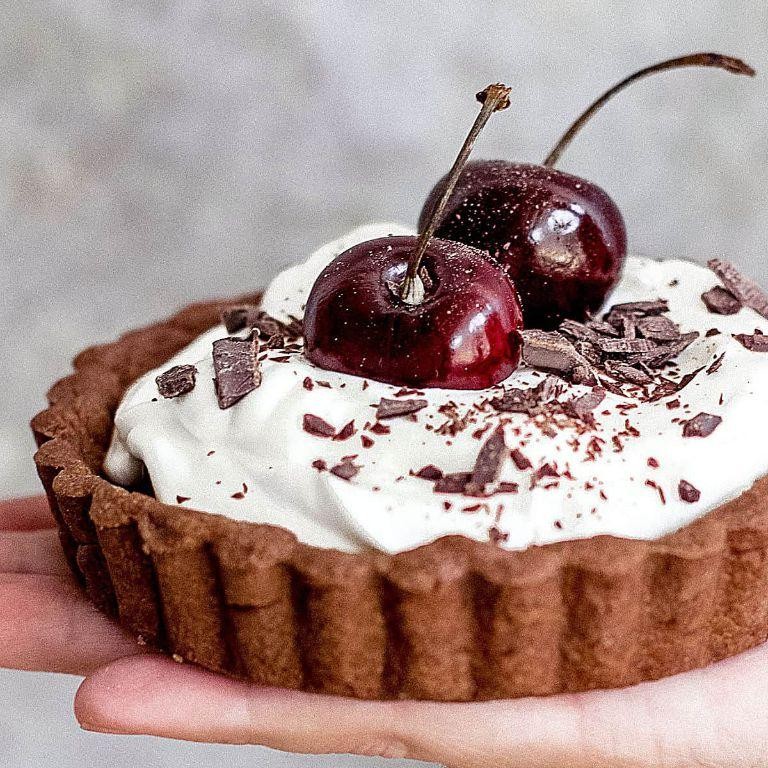
Look no further for a dessert that’s as fun to make as it is to devour, these Black Forest Tartlets are your ticket to chocolatey cherry bliss with a twist that’ll have everyone asking for seconds.
Ingredients
- 1 cup of all-purpose flour (because, duh, we’re baking)
- A pinch of salt (just to keep things interesting)
- 1/2 cup of unsalted butter, cold and cubed (the colder, the flakier)
- A splash of ice water (for that perfect dough drama)
- 1 cup of dark chocolate chips (go big or go home)
- 1/2 cup of heavy cream (for that lush, velvety ganache)
- A couple of cups of pitted cherries (fresh or jarred, we’re not judging)
- 1 tbsp of sugar (because cherries love a sweet talk)
- A dollop of whipped cream (for the grand finale)
Instructions
- Preheat your oven to 375°F because we’re about to get baking.
- In a bowl, mix the flour and salt, then cut in the butter until it looks like coarse crumbs. Tip: Use your fingers for this – it’s oddly satisfying.
- Add ice water, a tablespoon at a time, until the dough comes together. Wrap it in plastic and chill for 30 minutes. Patience is a virtue, especially in baking.
- Roll out the dough and cut into circles to fit your tartlet pans. Press them in and prick the bottoms with a fork. Bake for 15 minutes or until golden. Tip: Blind bake with pie weights or beans to avoid puffing.
- While the crust cools, melt chocolate chips with heavy cream over a double boiler until smooth. Pour into the crusts and chill for 20 minutes. Tip: Stir constantly to avoid chocolate tragedies.
- Toss cherries with sugar and spoon over the set ganache. Top with whipped cream because, well, why not?
Outrageously decadent with a crunch that gives way to a creamy, cherry-packed center, these tartlets are begging to be the star of your next dinner party or, let’s be real, a solo indulgence session.
Matcha Green Tea Tartlets
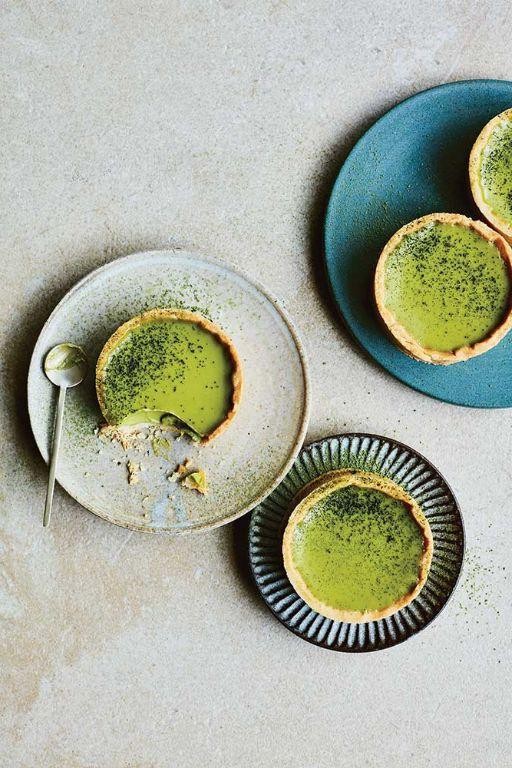
Yikes, have you ever seen something so vibrantly green and thought, ‘I need to eat that immediately’? Well, that’s exactly how you’ll feel about these Matcha Green Tea Tartlets, a perfect blend of earthy and sweet that’ll have you coming back for seconds (or thirds, no judgment here).
Ingredients
- 1 1/2 cups of all-purpose flour (because every great tart starts with a solid foundation)
- A pinch of salt (just to keep things interesting)
- 1/2 cup of unsalted butter, cold and cubed (the secret to a flaky crust)
- 1/4 cup of powdered sugar (for that subtle sweetness)
- 1 egg yolk (the glue that holds our dreams together)
- 1 tbsp of ice water (a splash to bring it all together)
- 1 cup of heavy cream (for that lush, creamy filling)
- 2 tbsp of matcha powder (the star of the show)
- 1/2 cup of white chocolate, melted (because chocolate makes everything better)
- A couple of fresh berries for garnish (for that pop of color and freshness)
Instructions
- Preheat your oven to 350°F (175°C) because we’re about to get baking.
- In a large bowl, whisk together the flour, salt, and powdered sugar. Tip: Cold butter is key here, so don’t let it sit out too long.
- Add the cubed butter to the dry ingredients. Use your fingers to rub the butter into the flour until it resembles coarse crumbs. Tip: This is the perfect time to channel your inner pastry chef.
- Mix in the egg yolk and ice water until the dough comes together. If it’s too dry, add a teeny bit more water.
- Press the dough into tartlet pans, making sure to prick the bottoms with a fork. Bake for 15 minutes or until golden. Tip: Blind baking ensures your crust won’t get soggy.
- While the crust cools, whip the heavy cream to soft peaks, then gently fold in the matcha powder and melted white chocolate.
- Spoon the matcha cream into the cooled tartlet shells and chill for at least 2 hours. Patience is a virtue, especially in dessert making.
- Garnish with fresh berries right before serving to impress your guests (or just yourself).
Rich in flavor with a smooth, creamy texture that contrasts beautifully with the crisp crust, these tartlets are a matcha lover’s dream. Serve them at your next brunch or as a fancy midnight snack—no one will judge.
Tiramisu Tartlets
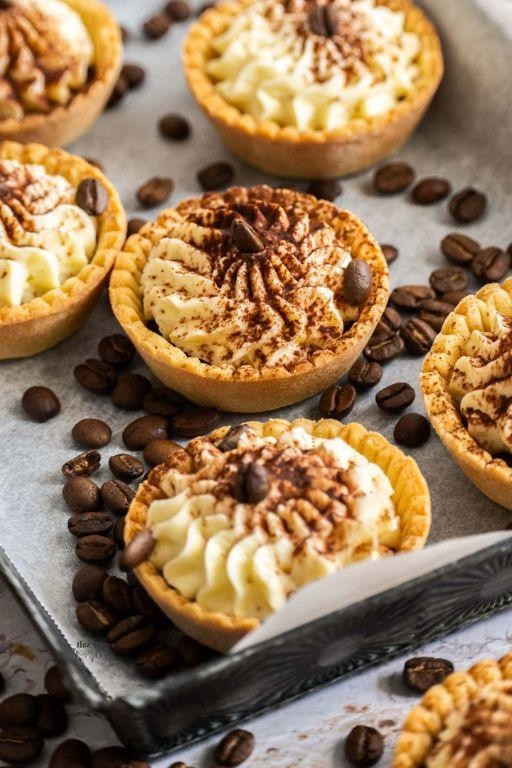
Hold onto your spoons, folks, because we’re about to dive into a dessert that’s as fun to make as it is to devour. These Tiramisu Tartlets are like the cool, bite-sized cousins of the classic Italian dessert, ready to party in your mouth with every forkful.
Ingredients
- 1 cup of all-purpose flour (because every great tart starts with a solid base)
- A pinch of salt (just to keep things interesting)
- 1/2 cup of unsalted butter, cold and cubed (the secret to a flaky crust)
- A splash of cold water (to bring it all together)
- 1 cup of mascarpone cheese (for that creamy dreaminess)
- 1/2 cup of heavy cream (to whip up some magic)
- 1/4 cup of powdered sugar (because sweetness is non-negotiable)
- A couple of shots of espresso, cooled (for that authentic tiramisu kick)
- Cocoa powder, for dusting (the final flourish)
Instructions
- Preheat your oven to 350°F (175°C) – no guessing games here, we’re baking with precision.
- In a bowl, mix the flour and salt. Add the cold butter and work it in with your fingers until it looks like coarse crumbs. Tip: Keep everything cold for the flakiest crust.
- Add a splash of cold water, just enough to bring the dough together. Wrap it in plastic and chill for 30 minutes. Patience is key!
- Roll out the dough and press it into tartlet pans. Prick the bottoms with a fork and bake for 15 minutes, or until golden. Let them cool – hot crusts are a no-go for filling.
- Whip the heavy cream and powdered sugar until stiff peaks form. Gently fold in the mascarpone. Tip: Don’t overmix; we’re going for clouds, not concrete.
- Brush the cooled tartlet shells with espresso. Spoon in the mascarpone mixture and dust with cocoa powder. Tip: Use a fine sieve for that Instagram-worthy dusting.
Crunchy, creamy, and with just the right amount of coffee punch, these tartlets are a textural dream. Serve them on a fancy platter or, let’s be real, straight from the pan – we won’t judge.
Red Velvet Tartlets
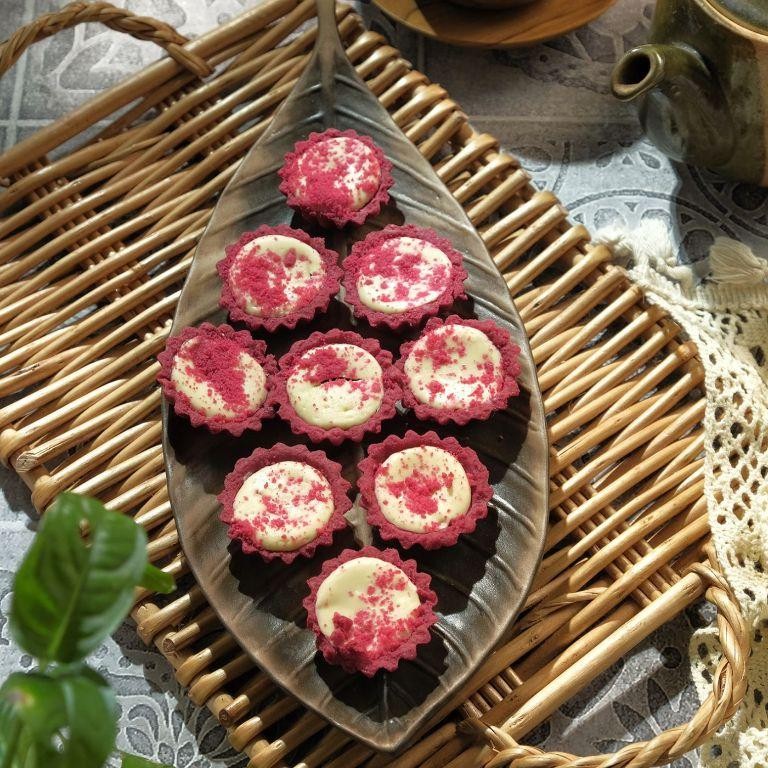
Craving something that’s as fun to make as it is to eat? These Red Velvet Tartlets are your ticket to dessert heaven, combining the classic charm of red velvet with the convenience of bite-sized treats. Perfect for when you want to impress without the stress!
Ingredients
- 1 1/2 cups of all-purpose flour (because greatness starts with the basics)
- A pinch of salt (just to keep things interesting)
- 1/2 cup of unsalted butter, cold and cubed (for that flaky, dreamy crust)
- 4-5 tbsp of ice water (because we’re not making soup here)
- 1 cup of sugar (sweetness is non-negotiable)
- A couple of eggs (the glue that holds our dreams together)
- 1 tsp of vanilla extract (for that whisper of sophistication)
- A splash of red food coloring (go bold or go home)
- 1/2 cup of buttermilk (the secret tang that makes red velvet, well, red velvet)
- 1/2 tsp of baking soda (for that little lift)
- 1 tbsp of vinegar (because chemistry is cool)
- 1 cup of cream cheese frosting (no explanation needed)
Instructions
- Preheat your oven to 350°F (175°C) – no rushing greatness.
- In a large bowl, whisk together the flour and salt. Add the cubed butter and use your fingers to rub it into the flour until it resembles coarse crumbs. Tip: Keep everything cold for the flakiest crust.
- Gradually add ice water, one tablespoon at a time, mixing until the dough just comes together. Wrap it in plastic and chill for 30 minutes. Patience is a virtue.
- Roll out the dough on a floured surface to about 1/8 inch thick and cut into circles to fit your tartlet pans. Press them in and trim the edges. Prick the bottoms with a fork and bake for 10-12 minutes until golden. Let them cool.
- For the filling, beat sugar and eggs until fluffy. Add vanilla and red food coloring, then alternate adding buttermilk and the flour mixture. Mix baking soda and vinegar in a small bowl, then fold into the batter. Tip: The vinegar activates the baking soda, so do this step last for maximum rise.
- Pour the batter into the cooled crusts and bake for 15-20 minutes until a toothpick comes out clean. Let them cool completely before frosting.
- Top each tartlet with a generous dollop of cream cheese frosting. Tip: Use a piping bag for a professional touch, or go rustic with a spoon – we don’t judge.
Outrageously moist with a tender crumb and that iconic tangy-sweet cream cheese frosting, these tartlets are a showstopper. Serve them at your next brunch or sneak one (or three) as a midnight snack – we won’t tell.
Salted Caramel Tartlets
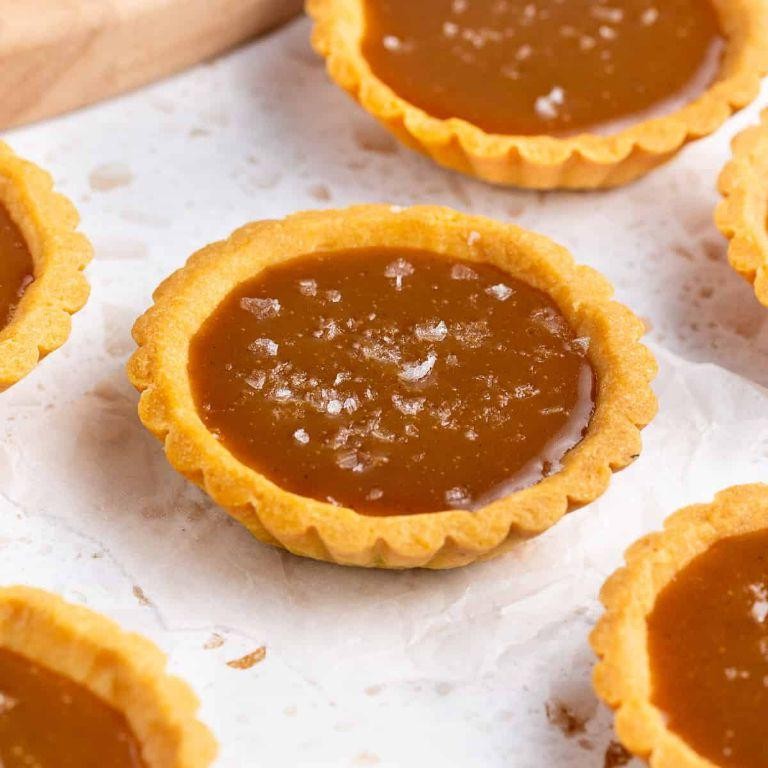
Feast your eyes (and soon, your taste buds) on these little circles of joy—salted caramel tartlets that are here to make your dessert dreams come true. Perfectly crisp, buttery shells hugging a gooey, sweet-meets-salty caramel center, they’re the kind of treat that’ll have you sneaking back for just one more… or three.
Ingredients
- 1 1/4 cups of all-purpose flour (because we’re not reinventing the wheel here)
- A pinch of salt (to keep things interesting)
- 1/2 cup of unsalted butter, cold and cubed (like a chilly little puzzle)
- 2-3 tbsp of ice water (just enough to bring it all together)
- 1 cup of granulated sugar (for that sweet, sweet caramel)
- 6 tbsp of unsalted butter, room temp (because butter makes everything better)
- 1/2 cup of heavy cream (for that luxurious pour)
- 1 tsp of vanilla extract (a dash of love)
- A generous sprinkle of flaky sea salt (the star of the show)
Instructions
- Preheat your oven to 350°F—no rushing this, we’re not savages.
- Whisk together the flour and salt in a bowl. Toss in the cold butter cubes and work them in with your fingers until the mix looks like coarse crumbs. Pro tip: Keep it cool for a flakier crust.
- Drizzle in the ice water, a tablespoon at a time, mixing until the dough just comes together. Wrap it in plastic and chill for 30 minutes—patience is a virtue.
- Roll out the dough on a floured surface to about 1/8 inch thick. Cut into circles to fit your tartlet pans. Press them in, prick the bottoms with a fork, and bake for 15 minutes or until golden. Let them cool like they’re sunbathing.
- For the caramel, melt the sugar in a saucepan over medium heat. Stir occasionally until it turns a deep amber color. Tip: Don’t walk away—sugar has a knack for burning when you’re not looking.
- Remove from heat and whisk in the butter until smooth. Slowly pour in the cream and vanilla, stirring constantly. It’ll bubble like a science experiment—that’s normal.
- Pour the caramel into the cooled shells and sprinkle with sea salt. Let them set for at least an hour. Tip: If you can wait that long, you’re stronger than most.
Unbelievably good, these tartlets strike the perfect balance between sweet and salty, with a crust that crumbles just right. Serve them with a dollop of whipped cream or, let’s be honest, straight from the pan—no judgment here.
Coconut Cream Tartlets

Just when you thought coconut couldn’t get any dreamier, here comes these little tartlets to prove you wrong. Packed with creamy goodness and a crust that’s just the right amount of crumbly, they’re like a mini vacation for your taste buds.
Ingredients
- 1 1/2 cups of all-purpose flour (because we’re not reinventing the wheel here)
- A pinch of salt (just to keep things interesting)
- 1/2 cup of unsalted butter, cold and cubed (the colder, the flakier)
- A splash of ice water (literally just enough to bring it together)
- 1 can of coconut milk (full fat, because why bother otherwise?)
- 1/2 cup of sugar (sweetness is non-negotiable)
- 2 eggs (the glue that holds our dreams together)
- A teaspoon of vanilla extract (for that ‘I can’t quite put my finger on it’ flavor)
Instructions
- Preheat your oven to 350°F because we’re not savages—we bake at the right temperature.
- In a bowl, mix the flour and salt. Toss in the butter cubes and play with them until the mix looks like coarse crumbs. Tip: Use your fingers for this—it’s oddly satisfying.
- Drizzle in the ice water, a little at a time, until the dough just comes together. Don’t overdo it; we’re making tartlets, not soup.
- Press the dough into tartlet pans like you’re tucking them into bed. Chill for 30 minutes because patience is a virtue.
- Blind bake the crusts for 15 minutes. Tip: Use pie weights or dried beans to keep them from puffing up like they’re at a spa.
- Whisk together coconut milk, sugar, eggs, and vanilla until smooth. Pour into the crusts with the confidence of a dessert champion.
- Bake for another 20 minutes or until the filling sets and gets a golden tan. Tip: A slight jiggle in the center is fine—it’ll set as it cools.
Now, these tartlets are the epitome of creamy meets crunchy, with a tropical twist that’ll have you questioning why you ever settled for plain old pie. Serve them with a sprinkle of toasted coconut or a side of ‘how did you make these?’ for maximum effect.
Apple Cinnamon Tartlets

Just when you thought apples couldn’t get any more delightful, here comes a recipe that wraps them in a cozy cinnamon hug, all snuggled in a buttery tartlet crust. Perfect for when you’re feeling fancy but your energy levels are screaming ‘easy does it’.
Ingredients
- 1 cup of all-purpose flour (because we’re not reinventing the wheel here)
- A pinch of salt (just to keep things interesting)
- 1/2 cup of unsalted butter, cold and cubed (like tiny icebergs waiting to chill your dough)
- A splash of ice water (to bring the dough together without a fuss)
- 2 apples, peeled and thinly sliced (choose your fighter: Granny Smith for tart, Honeycrisp for sweet)
- 1/4 cup of sugar (to sweeten the deal)
- 1 tsp of cinnamon (the star of the show)
- A squeeze of lemon juice (to keep those apples from browning on you)
Instructions
- Preheat your oven to 375°F because we’re about to get baking.
- In a bowl, mix the flour and salt. Add the butter cubes and use your fingers to rub them into the flour until it looks like coarse crumbs. Tip: Keep everything cold for the flakiest crust.
- Add the ice water, a tablespoon at a time, mixing until the dough just comes together. Wrap it in plastic and chill for 30 minutes. Patience is a virtue here.
- Roll out the dough on a floured surface and cut into circles to fit your tartlet pans. Press them in and trim the edges. No one likes a messy tartlet.
- Toss the apple slices with sugar, cinnamon, and lemon juice. Arrange them in the tartlet shells. Tip: Overlapping the slices gives you those pretty layers.
- Bake for 25 minutes or until the crust is golden and the apples are tender. Your kitchen should smell like heaven by now.
- Let them cool for a bit before serving. They’re like little edible hugs.
Little bites of joy, these tartlets are crispy, buttery, and just the right amount of sweet. Serve them warm with a dollop of whipped cream or a scoop of vanilla ice cream for that extra ‘wow’ factor.
Dark Chocolate Raspberry Tartlets
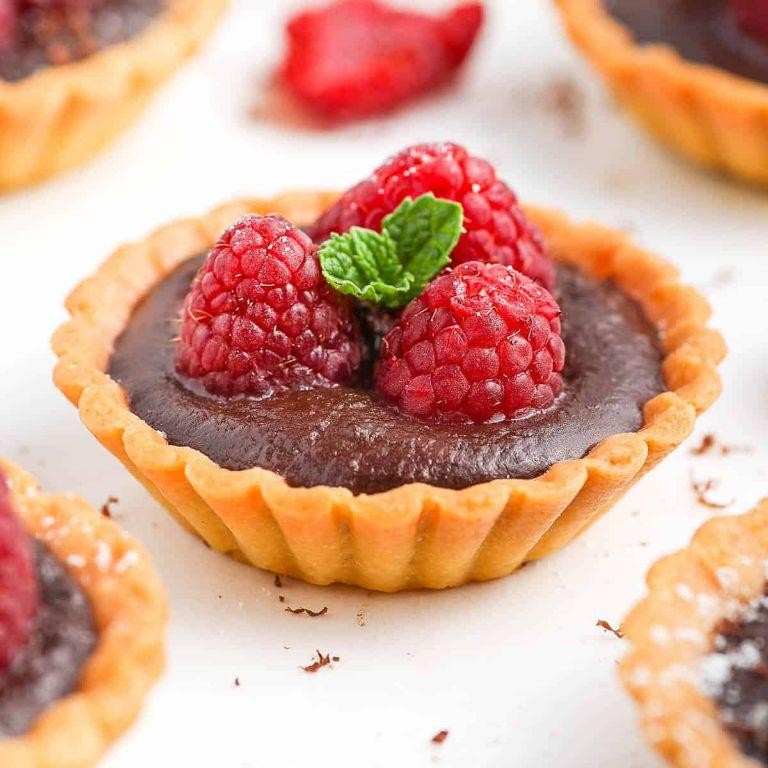
Mmm, imagine biting into a decadent dark chocolate raspberry tartlet that’s just the right amount of sweet, tart, and downright sinful. Perfect for when you’re feeling fancy but also too lazy to make a full-sized tart.
Ingredients
- 1 cup of all-purpose flour (because we’re not reinventing the wheel here)
- A pinch of salt (to keep things interesting)
- 1/2 cup of unsalted butter, cold and cubed (like tiny little butter ice cubes)
- A splash of cold water (just enough to make the dough come together)
- 1 cup of dark chocolate chips (the darker, the better)
- 1/2 cup of heavy cream (for that luxurious feel)
- A handful of fresh raspberries (for that pop of color and tartness)
Instructions
- Preheat your oven to 350°F because we’re about to get baking.
- In a bowl, mix the flour and salt. Toss in the butter cubes and use your fingers to rub them into the flour until it looks like coarse breadcrumbs. Tip: Keep everything cold for a flakier crust.
- Add just enough cold water to bring the dough together. Wrap it in plastic and chill for 30 minutes. Patience is key here.
- Roll out the dough and press it into tartlet pans. Prick the bottoms with a fork and bake for 15 minutes or until golden. Tip: Use pie weights or dried beans to prevent puffing.
- While the crust cools, melt the chocolate chips with the heavy cream over a double boiler until smooth. Pour into the crusts and top with raspberries. Tip: Let the chocolate set a bit before adding berries to prevent sinking.
How about that? You’ve got yourself some tartlets with a crust that’s crisp, a filling that’s silky, and berries that bring the zing. Serve them at your next brunch and watch them disappear faster than you can say ‘more please.’
Conclusion
Hooray! You’ve just discovered 23 scrumptious tartlet recipes perfect for any event, from cozy family dinners to festive gatherings. Each recipe promises to delight your taste buds and impress your guests. We’d love to hear which tartlet stole your heart—drop a comment below! Don’t forget to share this treasure trove of recipes on Pinterest so fellow food lovers can enjoy these delectable treats too. Happy baking!