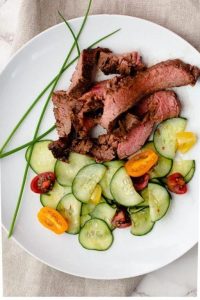
Variety is the spice of life, and that’s exactly what we’re serving up with these 22 Delicious Sub Recipes for Every Occasion. Whether you’re in the mood for a quick weeknight dinner, a seasonal favorite, or just some good old-fashioned comfort food, we’ve got a sub to satisfy every craving. Dive in and discover your next go-to sandwich that’ll make every meal something to look forward to!
Classic Italian Sub Sandwich

Whenever I think about the perfect sandwich, my mind always wanders back to the Classic Italian Sub. It’s the kind of meal that brings back memories of lazy Sunday afternoons and picnics in the park. Today, I’m sharing my go-to recipe that’s sure to transport you to the streets of Italy with every bite.
Ingredients
- 1 loaf Italian bread (about 12 inches long, or any crusty sub roll)
- 1/4 cup mayonnaise (or more, if you like it creamy)
- 1 tbsp red wine vinegar (adds a nice tang)
- 1/2 tsp dried oregano (fresh is great too, just double the amount)
- 1/4 lb sliced salami (Genoa is my favorite)
- 1/4 lb sliced ham (black forest adds a smoky flavor)
- 1/4 lb sliced provolone cheese (or mozzarella for a milder taste)
- 1/2 cup shredded iceberg lettuce (for crunch)
- 1/2 cup sliced tomatoes (ripe but firm)
- 1/4 cup sliced red onions (soak in cold water for 10 minutes to mellow the bite)
- Salt and pepper (adjust to taste)
Instructions
- Slice the Italian bread horizontally, leaving one edge intact to hold the fillings.
- In a small bowl, mix the mayonnaise, red wine vinegar, and oregano until well combined.
- Spread the mayonnaise mixture evenly on both sides of the bread.
- Layer the salami, ham, and provolone cheese on the bottom half of the bread.
- Top with shredded lettuce, sliced tomatoes, and red onions.
- Season with salt and pepper to taste.
- Close the sandwich and press down gently to compact the fillings.
- Slice the sandwich into two or four pieces, depending on preference.
So there you have it, a Classic Italian Sub that’s bursting with flavors and textures. The combination of salty meats, creamy cheese, and crisp vegetables makes every bite a delight. Serve it with a side of potato chips or a crisp pickle for the ultimate sandwich experience.
Philly Cheese Steak Sub
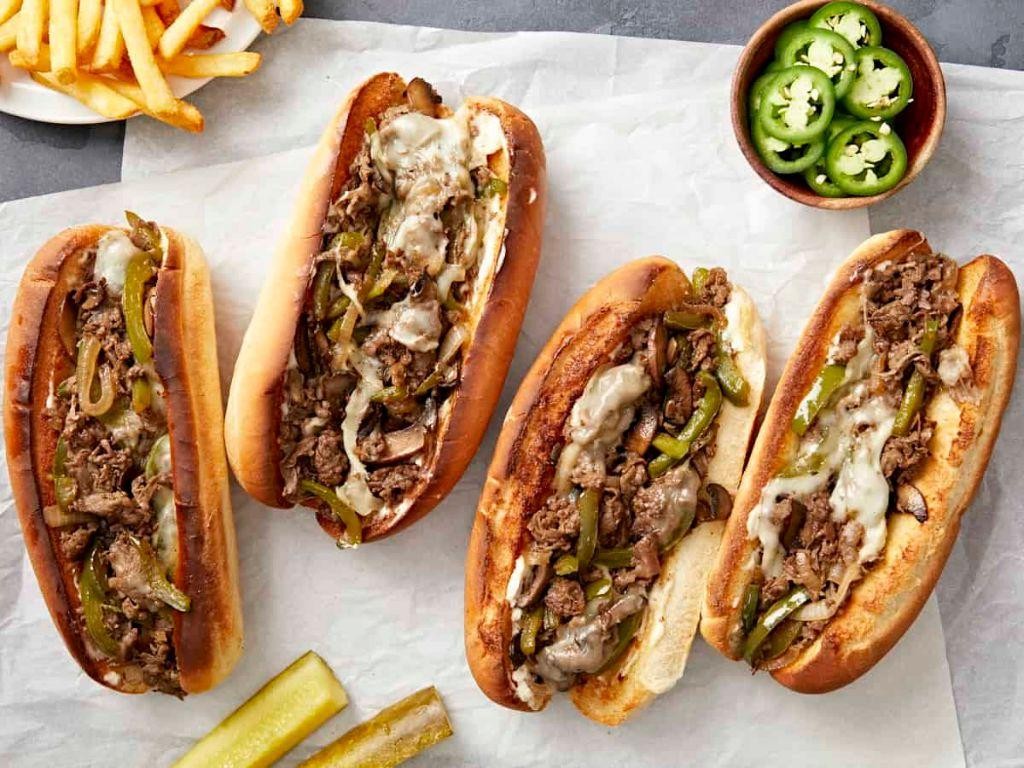
How many times have I found myself craving something hearty, cheesy, and utterly satisfying after a long day? Too many to count, and that’s exactly where the Philly Cheese Steak Sub comes into play. It’s my go-to comfort food that never disappoints, with its juicy slices of beef, melted cheese, and soft, toasted bread.
Ingredients
- 1 lb ribeye steak, thinly sliced (freeze for 30 minutes for easier slicing)
- 1 large onion, thinly sliced (yellow or white for sweetness)
- 1 green bell pepper, thinly sliced (adds a slight crunch)
- 4 sub rolls, split lengthwise (toasted for extra texture)
- 8 slices provolone cheese (or American for a creamier melt)
- 2 tbsp vegetable oil (or any neutral oil)
- Salt and pepper to taste (adjust to your liking)
Instructions
- Heat 1 tbsp of vegetable oil in a large skillet over medium-high heat until shimmering, about 2 minutes.
- Add the sliced onions and bell peppers to the skillet, seasoning with a pinch of salt. Cook, stirring occasionally, until they’re soft and slightly caramelized, about 5-7 minutes. Remove and set aside.
- In the same skillet, add the remaining 1 tbsp of oil and increase the heat to high. Add the thinly sliced ribeye in a single layer, seasoning with salt and pepper. Cook without stirring for 2 minutes to get a good sear.
- Flip the steak slices and cook for another 1-2 minutes until just cooked through. Avoid overcooking to keep the beef tender.
- Reduce the heat to low and return the onions and peppers to the skillet, mixing them with the beef.
- Divide the beef and vegetable mixture evenly among the sub rolls, then top each with 2 slices of provolone cheese.
- Place the subs under a broiler set to high for 1-2 minutes, just until the cheese is melted and bubbly. Watch closely to prevent burning.
Just like that, you’ve got a Philly Cheese Steak Sub that’s bursting with flavors and textures—tender beef, sweet onions, crisp peppers, and gooey cheese all hugged by a crispy roll. Serve it with a side of pickles or a simple salad to cut through the richness. Perfect for game night or a quick weeknight dinner that feels like a treat.
Turkey and Avocado Sub
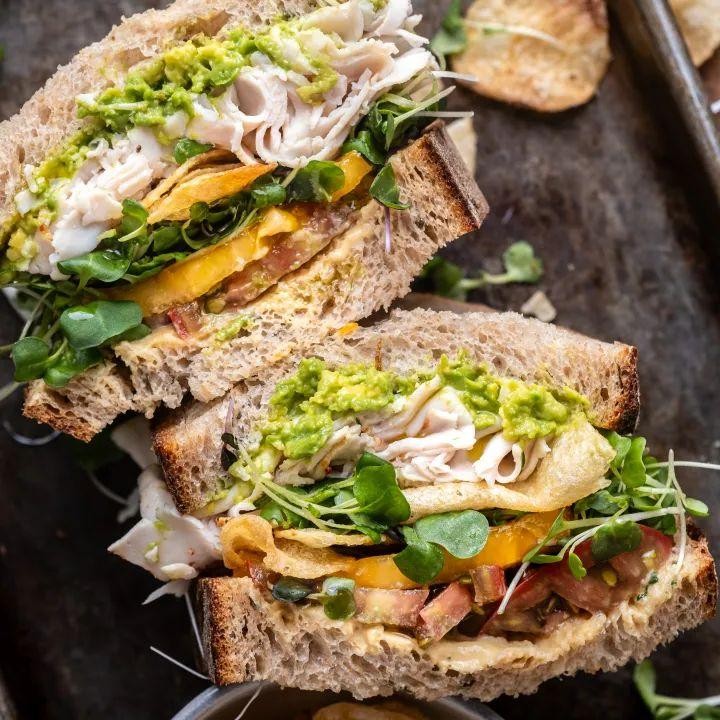
Over the years, I’ve found that the simplest meals often bring the most joy, especially when they’re as satisfying as a Turkey and Avocado Sub. It’s my go-to for a quick lunch that feels gourmet without the fuss, and today, I’m sharing how you can whip it up in no time.
Ingredients
- 1 sub roll (6-inch, or any size you prefer)
- 4 oz sliced turkey breast (look for low-sodium options for a healthier twist)
- 1/2 ripe avocado, sliced (the creamier, the better)
- 1 tbsp mayonnaise (or Greek yogurt for a lighter version)
- 1 tsp Dijon mustard (adjust to taste)
- 1/4 cup arugula (adds a peppery kick)
- 1/4 tsp salt (or to taste)
- 1/4 tsp black pepper (freshly ground for the best flavor)
Instructions
- Slice the sub roll horizontally, being careful not to cut all the way through, creating a hinge.
- Spread the mayonnaise evenly on one side of the roll and the Dijon mustard on the other. This ensures every bite is flavorful.
- Layer the sliced turkey breast on the bottom half of the roll, folding the slices to fit if necessary.
- Arrange the avocado slices over the turkey, gently pressing them down so they stay in place.
- Sprinkle the arugula over the avocado, then season with salt and black pepper.
- Close the sub, pressing down lightly to compact the ingredients slightly for easier eating.
Now, this Turkey and Avocado Sub is not just about the creamy avocado against the savory turkey; it’s the crunch of the roll and the peppery arugula that make it unforgettable. Try serving it with a side of sweet potato fries for a meal that’s both comforting and a bit indulgent.
Vegetarian Sub with Hummus
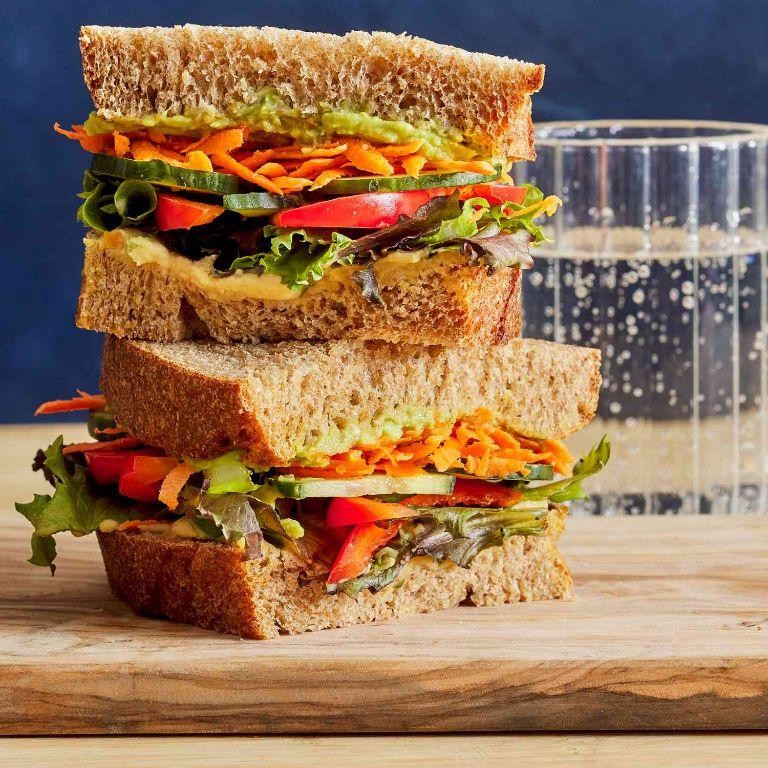
Kicking off the week with a recipe that’s not only a breeze to make but also packs a punch of flavors and textures is my kind of Monday. This Vegetarian Sub with Hummus is my go-to when I need something satisfying yet light, and it’s always a hit with my friends who drop by unannounced—yes, I’m looking at you, Sarah!
Ingredients
- 1 large sub roll (or any crusty bread you prefer)
- 1/2 cup hummus (homemade or store-bought, garlic flavor works great here)
- 1/2 avocado, sliced (add a squeeze of lemon to prevent browning)
- 1/4 cup sliced cucumber (peeled if you’re not a fan of the skin)
- 1/4 cup shredded carrots (for a sweet crunch)
- 1/4 cup alfalfa sprouts (or any sprouts you like)
- 1 tbsp olive oil (or any neutral oil)
- Salt and pepper to taste (adjust to your liking)
Instructions
- Slice the sub roll horizontally, being careful not to cut all the way through, creating a pocket.
- Spread the hummus evenly inside both halves of the sub roll. This acts as a flavorful base and keeps the other ingredients in place.
- Layer the avocado slices on one side of the roll. A little tip: slightly mash the avocado with a fork before spreading for easier eating.
- Arrange the cucumber slices and shredded carrots over the avocado. The crunch from these veggies adds a nice texture contrast.
- Top with alfalfa sprouts for a fresh, peppery bite. If you’re not a fan of sprouts, baby spinach is a great substitute.
- Drizzle with olive oil and season with salt and pepper to taste. This simple step brings all the flavors together beautifully.
- Close the sub gently and press down slightly to compact the ingredients. This makes it easier to eat without everything falling out.
Every bite of this Vegetarian Sub with Hummus is a delightful mix of creamy, crunchy, and fresh flavors. It’s perfect for a quick lunch or even as a hearty snack. For an extra kick, I sometimes add a drizzle of sriracha or a sprinkle of feta cheese on top—trust me, it’s a game-changer!
Chicken Parmesan Sub
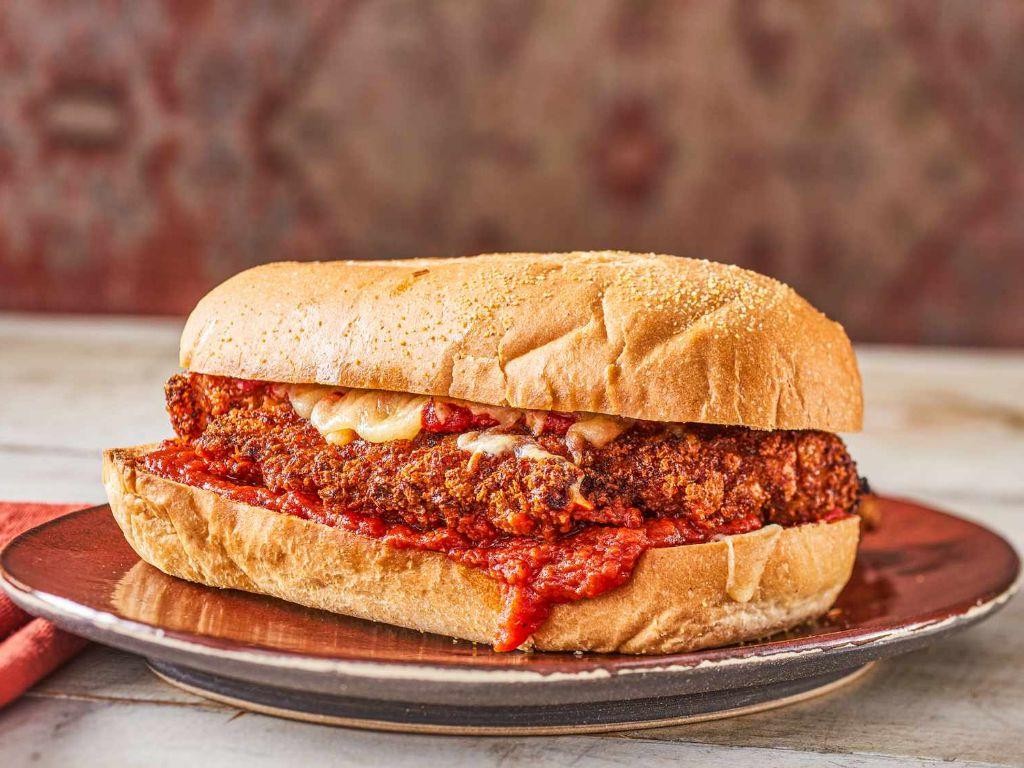
Diving into the world of comfort food, there’s nothing quite like the crispy, cheesy goodness of a Chicken Parmesan Sub. It’s a dish that reminds me of lazy Sunday afternoons spent in the kitchen, experimenting with flavors and textures to create something truly satisfying. Today, I’m sharing my go-to recipe that’s sure to become a staple in your home as well.
Ingredients
- 2 boneless, skinless chicken breasts (pounded to 1/2 inch thickness for even cooking)
- 1 cup Italian breadcrumbs (or panko for extra crunch)
- 1/2 cup grated Parmesan cheese (freshly grated tastes best)
- 1 tsp garlic powder (adjust to taste)
- 1/2 tsp salt
- 1/4 tsp black pepper
- 1 egg (beaten, for egg wash)
- 1/4 cup all-purpose flour (for dredging)
- 2 cups marinara sauce (homemade or store-bought)
- 1 cup shredded mozzarella cheese (for that perfect melt)
- 2 sub rolls (toasted lightly for extra texture)
- 2 tbsp olive oil (or any neutral oil)
Instructions
- Preheat your oven to 375°F (190°C) to ensure it’s ready for baking the subs.
- Combine breadcrumbs, Parmesan cheese, garlic powder, salt, and pepper in a shallow dish for the coating mixture.
- Dredge each chicken breast in flour, shaking off any excess, to help the egg wash adhere better.
- Dip the floured chicken into the beaten egg, then coat thoroughly with the breadcrumb mixture.
- Heat olive oil in a large skillet over medium heat and cook the chicken until golden brown, about 3-4 minutes per side.
- Transfer the chicken to a baking sheet, top each breast with marinara sauce and mozzarella cheese.
- Bake in the preheated oven for 10-12 minutes, or until the cheese is bubbly and slightly golden.
- While the chicken bakes, lightly toast the sub rolls in the oven or on a skillet for about 2 minutes.
- Place a chicken breast inside each toasted sub roll, adding extra marinara sauce if desired.
Golden and crispy on the outside, tender and juicy on the inside, this Chicken Parmesan Sub is a delightful contrast of textures. The melted mozzarella and tangy marinara sauce bring it all together, making it perfect for a game day snack or a hearty dinner. Try serving it with a side of garlic knots or a crisp salad for a complete meal.
Meatball Sub with Marinara Sauce

Kicking off the week with a comfort food classic that never fails to satisfy, the Meatball Sub with Marinara Sauce is my go-to for a hearty, flavorful meal that’s as fun to make as it is to eat. I remember the first time I tried making these at home, worried they wouldn’t live up to my favorite deli’s version, but the secret, I found, lies in the simplicity of quality ingredients and a little patience.
Ingredients
- 1 lb ground beef (80/20 blend for juiciness)
- 1/2 cup breadcrumbs (panko for extra crunch)
- 1/4 cup grated Parmesan cheese (plus extra for serving)
- 1 large egg (room temperature blends better)
- 2 cloves garlic, minced (fresh is best)
- 1 tsp salt (adjust to taste)
- 1/2 tsp black pepper (freshly ground)
- 1 tbsp olive oil (or any neutral oil)
- 2 cups marinara sauce (homemade or store-bought)
- 4 sub rolls (toasted for extra texture)
- 1 cup shredded mozzarella cheese (for that perfect melt)
Instructions
- Preheat your oven to 375°F (190°C) to ensure it’s ready for baking the meatballs.
- In a large bowl, combine the ground beef, breadcrumbs, Parmesan cheese, egg, minced garlic, salt, and pepper. Mix gently with your hands to avoid overworking the meat.
- Shape the mixture into 12 evenly sized meatballs, about 1.5 inches in diameter, for uniform cooking.
- Heat olive oil in a large skillet over medium heat. Add the meatballs, browning them on all sides, about 2 minutes per side. They don’t need to be fully cooked through at this stage.
- Transfer the meatballs to a baking dish, pour the marinara sauce over them, and sprinkle with mozzarella cheese.
- Bake in the preheated oven for 20 minutes, or until the cheese is bubbly and slightly golden.
- While the meatballs bake, lightly toast the sub rolls in the oven for the last 5 minutes of baking time for added crunch.
- To assemble, place 3 meatballs in each toasted sub roll, spoon over extra sauce from the baking dish, and sprinkle with additional Parmesan cheese if desired.
Every bite of this Meatball Sub with Marinara Sauce offers a perfect harmony of juicy meatballs, tangy sauce, and melted cheese, all hugged by a crispy yet soft roll. Try serving it with a side of crispy garlic fries or a simple green salad to round out the meal.
Tuna Salad Sub
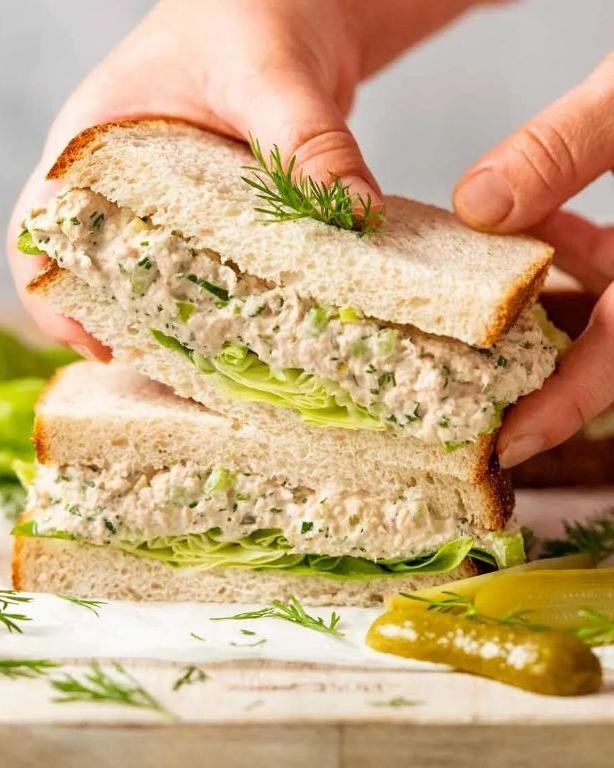
Zesty and refreshing, this Tuna Salad Sub is my go-to for a quick lunch that doesn’t skimp on flavor. I remember whipping this up during a busy workweek, and it’s been a staple ever since. Perfect for those days when you want something satisfying without spending hours in the kitchen.
Ingredients
- 2 cans (5 oz each) tuna in water, drained (packed in oil works too for richer flavor)
- 1/4 cup mayonnaise (or Greek yogurt for a lighter version)
- 1 tbsp Dijon mustard (adjust to taste)
- 1/4 cup finely diced celery (adds a nice crunch)
- 2 tbsp finely diced red onion (soak in cold water for 5 minutes to mellow the bite)
- 1 tbsp lemon juice (freshly squeezed for the best flavor)
- Salt and pepper to taste (start with 1/4 tsp salt and adjust)
- 1 sub roll, about 6 inches long (toasted or untoasted, your choice)
- Lettuce leaves and tomato slices for serving (optional)
Instructions
- In a medium bowl, flake the drained tuna with a fork until no large chunks remain.
- Add the mayonnaise, Dijon mustard, diced celery, red onion, and lemon juice to the bowl with the tuna.
- Gently mix all the ingredients until well combined. Taste and adjust the seasoning with salt and pepper as needed.
- If toasting your sub roll, preheat your oven to 350°F and toast the roll for about 5 minutes, or until lightly golden and crisp.
- Layer the bottom half of the sub roll with lettuce leaves and tomato slices, if using.
- Spoon the tuna salad mixture over the lettuce and tomato, spreading it evenly.
- Place the top half of the roll over the tuna salad to complete the sub.
- Cut the sub in half if desired, and serve immediately.
Rich in texture and flavor, this Tuna Salad Sub is a delightful mix of creamy and crunchy. For an extra kick, add a sprinkle of chili flakes or a dash of hot sauce before serving. It’s also great with a side of pickles or chips for that classic deli feel.
BLT Sub with Mayo
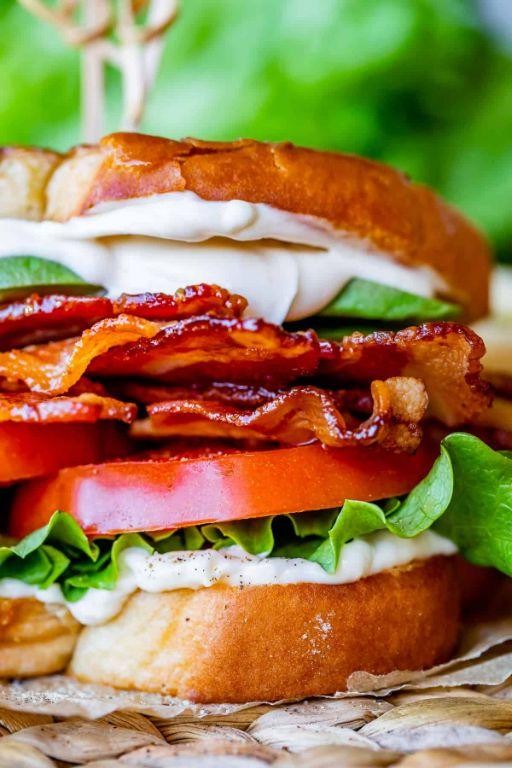
Mmm, there’s nothing quite like the classic BLT sandwich, but have you ever tried turning it into a hearty sub? I remember the first time I swapped out the usual bread for a soft sub roll—it was a game-changer. The extra space means more room for all those crispy bacon strips, fresh lettuce, and juicy tomato slices, all held together with a generous slather of mayo. It’s the perfect lunch for those days when you’re craving something satisfying yet simple.
Ingredients
- 1 soft sub roll (or any long sandwich roll of your choice)
- 4 strips of bacon (thick-cut for extra crunch)
- 1/2 cup iceberg lettuce, shredded (for that perfect crunch)
- 1 medium tomato, sliced (ripe but firm)
- 2 tbsp mayonnaise (or more, if you’re a mayo lover)
- Salt and pepper (just a pinch to enhance the flavors)
Instructions
- Preheat your oven to 375°F (190°C) and line a baking sheet with parchment paper.
- Lay the bacon strips on the prepared baking sheet, ensuring they don’t overlap. Bake for 15-20 minutes until crispy. Tip: For even cooking, flip the bacon halfway through.
- While the bacon cooks, slice the sub roll horizontally, being careful not to cut all the way through. Open it up like a book.
- Spread mayonnaise evenly on both sides of the inside of the roll. Tip: Toasting the roll lightly before adding the mayo can add an extra layer of texture.
- Once the bacon is done, transfer it to a paper towel-lined plate to drain excess grease.
- Layer the shredded lettuce and tomato slices on the bottom half of the roll. Season the tomatoes lightly with salt and pepper.
- Place the crispy bacon strips on top of the tomatoes, then close the sub with the top half of the roll.
- Press down gently to compact the ingredients slightly, making it easier to eat. Tip: For a neat cut, use a serrated knife to slice the sub in half.
Ooh, the first bite is always the best—crunchy, creamy, and bursting with flavor. This BLT sub is fantastic on its own, but pairing it with a side of sweet potato fries takes it to another level. Enjoy the mess and the deliciousness!
Roast Beef and Cheddar Sub
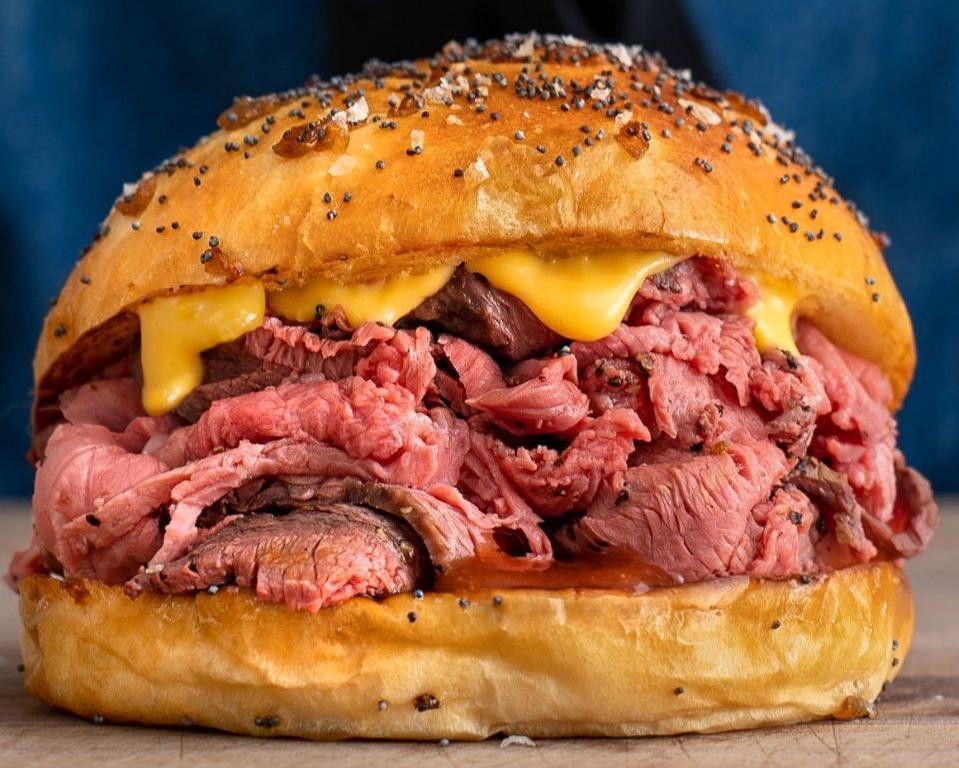
Every now and then, I crave something hearty and comforting, and nothing hits the spot quite like a Roast Beef and Cheddar Sub. It’s my go-to for a quick lunch that feels indulgent yet is surprisingly simple to whip up at home.
Ingredients
- 1 lb roast beef, thinly sliced (ask your deli to slice it thin for the best texture)
- 4 sub rolls, 6 inches each (toasted for extra crunch)
- 8 slices cheddar cheese (sharp cheddar adds a nice bite)
- 1/2 cup mayonnaise (or substitute with your favorite spread)
- 1 tbsp Dijon mustard (adjust to taste)
- 1 cup arugula (adds a peppery freshness)
- 1/2 red onion, thinly sliced (soak in cold water for 10 minutes to mellow the flavor)
Instructions
- Preheat your oven to 350°F (175°C) to toast the sub rolls for about 5 minutes until they’re lightly golden and crisp.
- While the rolls are toasting, mix the mayonnaise and Dijon mustard in a small bowl. This spread adds a tangy depth to the sub.
- Once the rolls are ready, spread the mayonnaise mixture evenly on the inside of each roll.
- Layer the roast beef slices on the bottom half of each roll, folding them slightly to fit.
- Place two slices of cheddar cheese on top of the roast beef in each roll. The residual heat from the meat and rolls will help melt the cheese slightly.
- Top with a handful of arugula and a few slices of red onion for crunch and flavor.
- Close the subs with the top halves of the rolls and press down gently to secure all the ingredients.
Now, this Roast Beef and Cheddar Sub is all about the contrast—tender, savory beef against the sharpness of cheddar, with arugula and onion adding freshness and bite. Try serving it with a side of pickles or chips for that deli-style meal at home.
Ham and Swiss Sub with Honey Mustard

Remember those lazy Sunday afternoons when all you wanted was something hearty yet effortless to whip up? That’s exactly where this Ham and Swiss Sub with Honey Mustard comes into play—a perfect blend of savory and sweet that’s as easy to make as it is delicious.
Ingredients
- 1 French baguette (or any sub roll of your choice)
- 8 oz sliced ham (deli-style works best for thin slices)
- 4 slices Swiss cheese (feel free to add more if you’re a cheese lover)
- 2 tbsp honey mustard (adjust to taste)
- 1 tbsp mayonnaise (or skip if you’re not a fan)
- 1 cup shredded lettuce (iceberg or romaine for crunch)
- 1/2 cup sliced tomatoes (ripe but firm)
- 1/4 cup sliced red onions (soak in cold water for 5 minutes to mellow the sharpness)
Instructions
- Preheat your oven to 350°F (175°C) to warm the bread slightly for a better texture.
- Slice the baguette open lengthwise, being careful not to cut all the way through.
- Spread the honey mustard on one side of the bread and mayonnaise on the other, if using.
- Layer the ham slices evenly on the bottom half of the bread, followed by the Swiss cheese.
- Place the open-faced sub in the oven for about 5 minutes, just until the cheese starts to melt.
- Remove from the oven and top with shredded lettuce, sliced tomatoes, and red onions.
- Close the sub, press gently to compact the ingredients, and slice into serving portions.
One bite into this sub, and you’ll love the contrast of the warm, melty cheese against the crisp, fresh veggies. Serve it with a side of pickles or chips for that deli-style meal at home.
Grilled Chicken Sub with Ranch
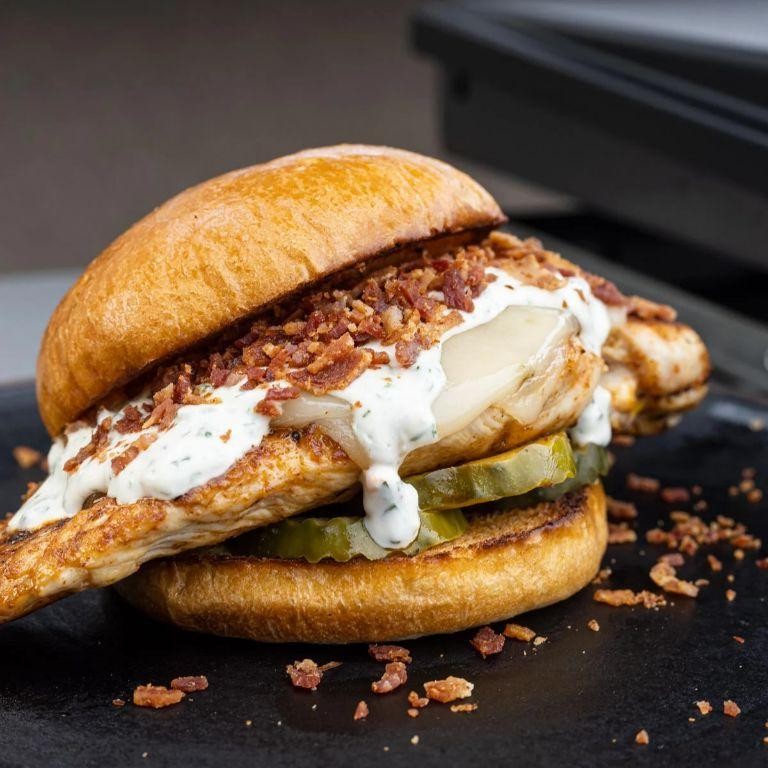
Whenever I’m craving something hearty yet easy to whip up, my go-to is always a Grilled Chicken Sub with Ranch. There’s something about the smoky chicken paired with the cool, creamy ranch that just hits the spot every time. Plus, it’s a great way to use up any leftover grilled chicken from last night’s dinner.
Ingredients
- 2 boneless, skinless chicken breasts (about 1 lb total) – pound to even thickness for uniform cooking
- 1 tbsp olive oil – or any neutral oil
- 1 tsp garlic powder – adjust to taste
- 1 tsp smoked paprika – for that extra smoky flavor
- 1/2 tsp salt – adjust to taste
- 1/4 tsp black pepper – freshly ground preferred
- 4 sub rolls – lightly toasted for extra crunch
- 1/2 cup ranch dressing – homemade or store-bought
- 1 cup shredded lettuce – for freshness
- 1/2 cup sliced tomatoes – adds a juicy bite
- 1/4 cup sliced red onions – for a slight sharpness
Instructions
- Preheat your grill to medium-high heat (about 375°F to 400°F). A well-heated grill ensures those perfect grill marks and locks in juices.
- In a small bowl, mix together the olive oil, garlic powder, smoked paprika, salt, and black pepper. Rub this mixture evenly over the chicken breasts. Marinating even for just 15 minutes can enhance the flavor.
- Grill the chicken breasts for 6-7 minutes per side, or until the internal temperature reaches 165°F. Letting the chicken rest for 5 minutes before slicing ensures it stays juicy.
- While the chicken rests, lightly toast the sub rolls on the grill for about 1 minute per side. Watch closely to avoid burning.
- Slice the grilled chicken into thin strips. Assembling the subs with warm chicken helps the flavors meld beautifully.
- Spread ranch dressing on the bottom half of each toasted sub roll. Layer with shredded lettuce, sliced tomatoes, red onions, and the grilled chicken strips. Top with the other half of the roll.
Now, nothing beats the combination of smoky, tender chicken with the cool crunch of veggies and creamy ranch in every bite. For an extra kick, try adding a few slices of jalapeño or a sprinkle of chili flakes.
Vegan Sub with Grilled Vegetables

After a long day of experimenting in the kitchen, I stumbled upon a combination that’s not only bursting with flavors but also kind to our planet. A vegan sub with grilled vegetables is my go-to for a quick, satisfying meal that doesn’t compromise on taste or texture. It’s perfect for those busy weeknights or a lazy Sunday lunch.
Ingredients
- 1 large zucchini, sliced lengthwise (about 1/4 inch thick)
- 1 red bell pepper, seeded and quartered
- 1 yellow bell pepper, seeded and quartered
- 1 small red onion, sliced into rings
- 2 tbsp olive oil (or any neutral oil)
- 1 tsp salt (adjust to taste)
- 1/2 tsp black pepper (adjust to taste)
- 1 tsp dried oregano
- 4 vegan sub rolls
- 1/2 cup vegan mayonnaise
- 1 tbsp lemon juice
- 1 clove garlic, minced
Instructions
- Preheat your grill to medium-high heat (about 400°F).
- In a large bowl, toss the zucchini, bell peppers, and red onion with olive oil, salt, black pepper, and dried oregano until evenly coated.
- Grill the vegetables for 4-5 minutes on each side, or until they have nice grill marks and are tender.
- While the vegetables are grilling, mix the vegan mayonnaise, lemon juice, and minced garlic in a small bowl to create a spread.
- Slice the vegan sub rolls open and lightly toast them on the grill for about 1 minute.
- Spread the garlic mayonnaise mixture on both sides of each roll.
- Layer the grilled vegetables inside the rolls, pressing down slightly to fit everything in.
- Serve immediately, or wrap in parchment paper for a picnic-friendly option.
Fresh off the grill, the vegetables bring a smoky sweetness that pairs beautifully with the creamy, tangy garlic mayo. For an extra crunch, add a handful of arugula or spinach before closing the sub. This dish is a testament to how simple ingredients can create something truly extraordinary.
Buffalo Chicken Sub
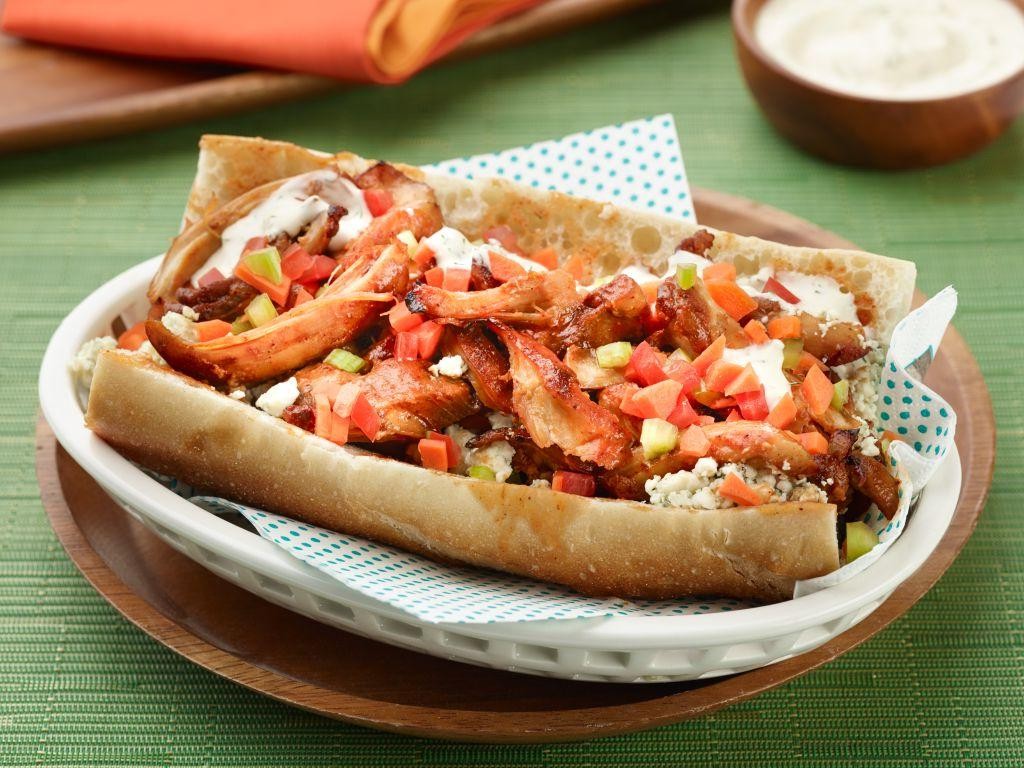
Remember those game days when all you wanted was something spicy, hearty, and utterly satisfying? That’s exactly what this Buffalo Chicken Sub brings to the table. I’ve tweaked this recipe over the years, adding a little more heat or a dash of something sweet, depending on the crowd.
Ingredients
- 2 cups shredded cooked chicken (leftover rotisserie works great)
- 1/2 cup hot sauce (Frank’s RedHot is my go-to)
- 1/4 cup unsalted butter, melted (for a richer sauce)
- 1 tbsp honey (balances the heat)
- 4 sub rolls, split (toasted for extra crunch)
- 1 cup shredded lettuce (for a fresh contrast)
- 1/2 cup blue cheese or ranch dressing (pick your favorite)
- 1/2 cup crumbled blue cheese (optional for extra tang)
Instructions
- In a medium bowl, combine the shredded chicken, hot sauce, melted butter, and honey. Stir until the chicken is evenly coated. Tip: Let it sit for 10 minutes to soak up the flavors.
- Preheat your oven to 350°F (175°C). Place the split sub rolls on a baking sheet, cut side up, and toast in the oven for 5 minutes, or until lightly golden. Tip: Keep an eye on them to prevent burning.
- Evenly divide the buffalo chicken mixture among the toasted sub rolls. Top with shredded lettuce, a drizzle of blue cheese or ranch dressing, and crumbled blue cheese if using. Tip: For a mess-free eat, wrap the subs in parchment paper before serving.
Every bite of this Buffalo Chicken Sub is a perfect balance of spicy, tangy, and crunchy. Serve it with extra napkins and a side of celery sticks for that classic buffalo experience.
Pulled Pork Sub with Coleslaw
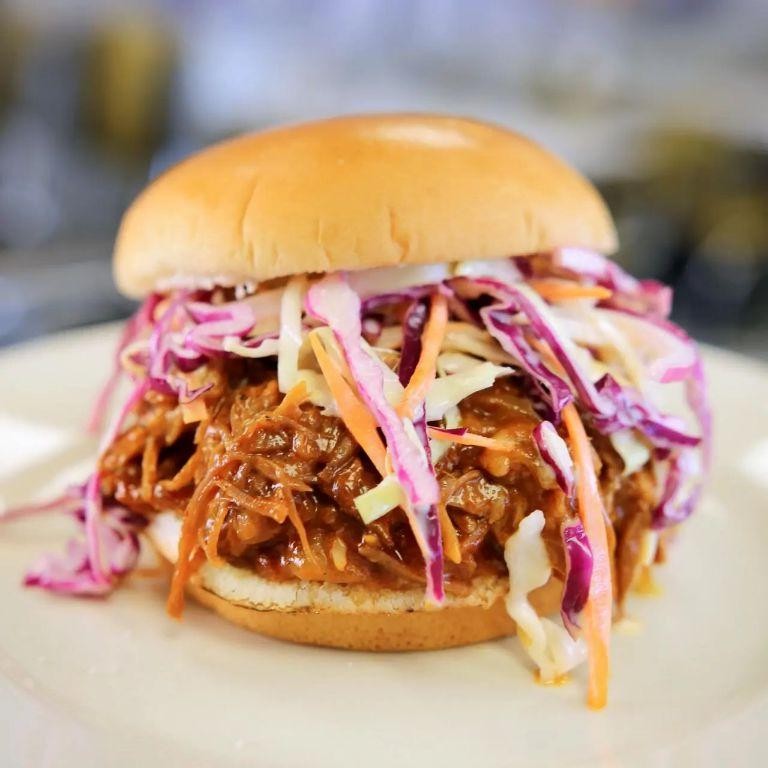
Zesty flavors and tender textures define this Pulled Pork Sub with Coleslaw, a dish that’s become a staple in my kitchen for its unbeatable combination of savory and sweet. I remember the first time I tried it at a small diner in the South; the memory of that first bite inspired me to recreate it at home, tweaking it until it was just right.
Ingredients
- 3 lbs pork shoulder (also known as pork butt)
- 1 tbsp olive oil (or any neutral oil)
- 1 cup barbecue sauce (adjust to taste)
- 1/2 cup apple cider vinegar
- 1/4 cup brown sugar
- 1 tbsp smoked paprika
- 1 tsp garlic powder
- 1 tsp onion powder
- 1/2 tsp cayenne pepper (adjust to taste)
- 4 sub rolls
- 2 cups coleslaw mix
- 1/2 cup mayonnaise
- 1 tbsp lemon juice
- 1 tsp sugar
- Salt and pepper to taste
Instructions
- Preheat your oven to 300°F (150°C). This low and slow temperature is key for tender pulled pork.
- Heat olive oil in a large oven-safe pot over medium-high heat. Sear the pork shoulder on all sides until browned, about 3-4 minutes per side. This step locks in the flavors.
- In a bowl, mix together barbecue sauce, apple cider vinegar, brown sugar, smoked paprika, garlic powder, onion powder, and cayenne pepper. Pour this mixture over the pork in the pot.
- Cover the pot with a lid and transfer it to the oven. Cook for about 4 hours, or until the pork is tender enough to shred with a fork.
- While the pork cooks, prepare the coleslaw by combining coleslaw mix, mayonnaise, lemon juice, sugar, salt, and pepper in a bowl. Chill in the refrigerator until ready to serve.
- Once the pork is done, remove it from the pot and shred it using two forks. Mix the shredded pork with the sauce in the pot to keep it moist.
- Toast the sub rolls lightly for a bit of crunch. Fill each roll with a generous amount of pulled pork and top with coleslaw.
The contrast between the warm, smoky pulled pork and the cool, crisp coleslaw is nothing short of magical. Serve these subs with a side of pickles or extra barbecue sauce for dipping to elevate the experience even further.
Egg Salad Sub
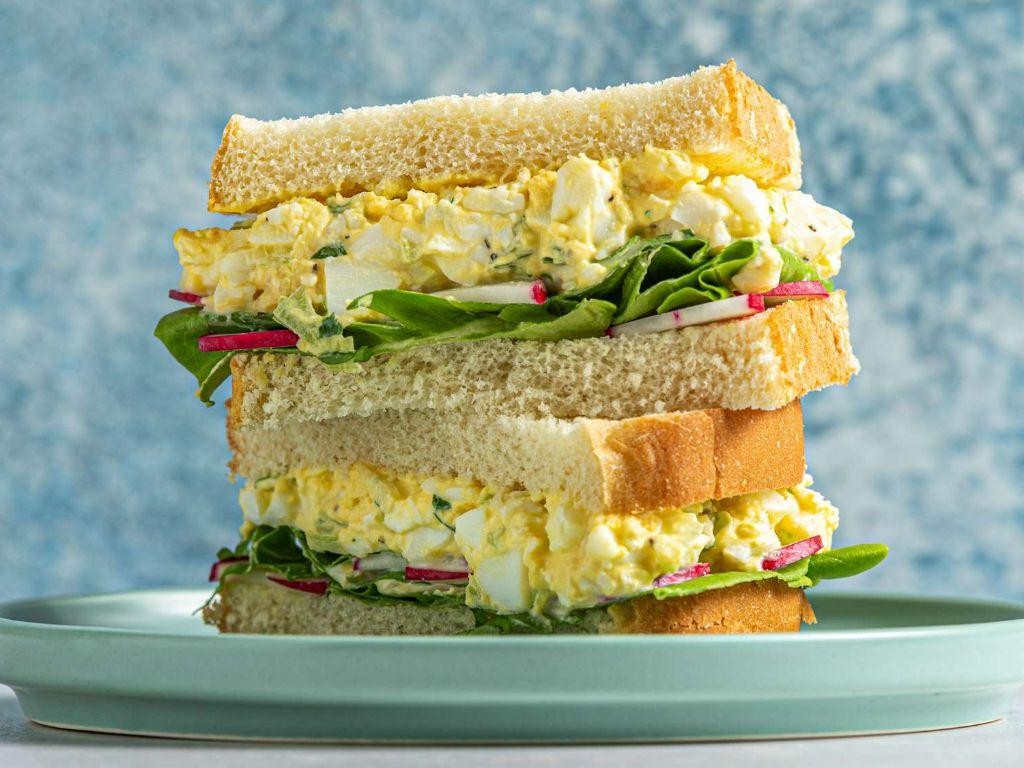
Sometimes, the simplest dishes bring the most comfort, and that’s exactly what this Egg Salad Sub does for me. It’s a throwback to my college days when I needed something quick, satisfying, and packed with protein to power through late-night study sessions.
Ingredients
- 6 large eggs (farm-fresh if possible, for the best flavor)
- 1/4 cup mayonnaise (or Greek yogurt for a lighter version)
- 1 tbsp Dijon mustard (adjust to taste)
- 1/2 tsp paprika (smoked paprika adds a nice depth)
- Salt and pepper to taste (I like a generous pinch of each)
- 1/4 cup finely chopped celery (for a nice crunch)
- 2 tbsp finely chopped red onion (soak in cold water for 5 minutes to mellow the bite)
- 4 sub rolls (toasted lightly for extra texture)
- Lettuce leaves (for serving, optional)
Instructions
- Place the eggs in a single layer in a saucepan and cover with water by 1 inch. Bring to a boil over high heat.
- Once boiling, cover the pan and remove from heat. Let stand for 12 minutes for perfectly hard-boiled eggs.
- Transfer the eggs to a bowl of ice water to cool for at least 5 minutes. This makes peeling easier.
- Peel the eggs and chop them into small pieces. I like mine chunky for texture.
- In a large bowl, mix together the mayonnaise, Dijon mustard, paprika, salt, and pepper until well combined.
- Add the chopped eggs, celery, and red onion to the bowl. Gently fold everything together to avoid mashing the eggs too much.
- Taste and adjust the seasoning if necessary. Sometimes a little extra mustard or salt makes all the difference.
- Split the sub rolls and line them with lettuce leaves if using. Spoon the egg salad generously into each roll.
Freshly made, this Egg Salad Sub is creamy with a satisfying crunch from the celery and a slight kick from the mustard. Try serving it with a side of pickles or potato chips for that perfect picnic feel.
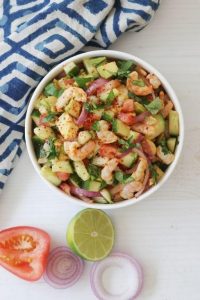
Seafood Sub with Shrimp and Crab
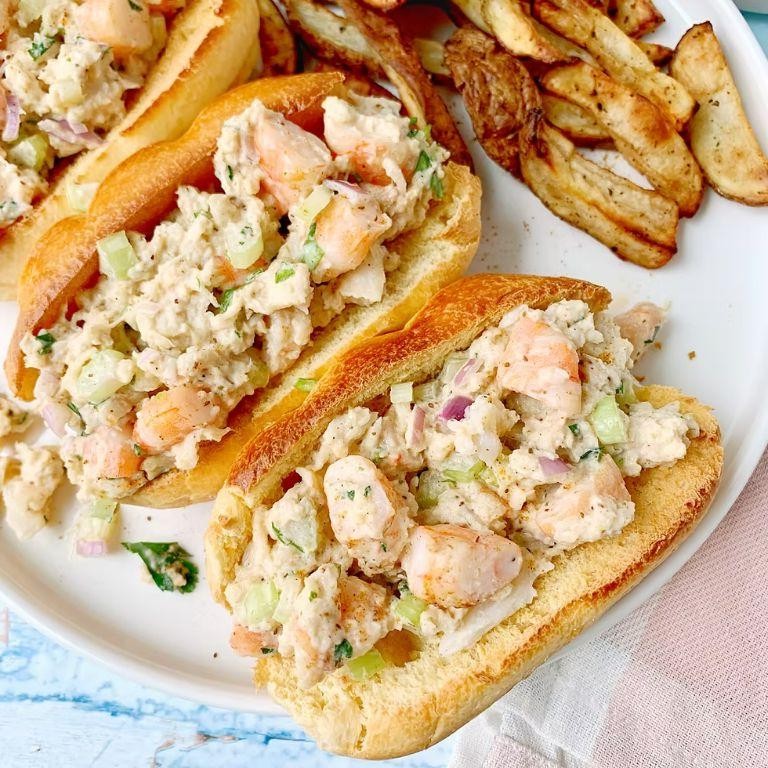
Over the years, I’ve found that there’s something incredibly satisfying about biting into a seafood sub that’s packed with shrimp and crab. It’s a dish that reminds me of summer picnics by the beach, where the flavors of the ocean are just a bite away.
Ingredients
- 1 lb shrimp, peeled and deveined (medium size works best)
- 1/2 lb crab meat, fresh or canned (drain if using canned)
- 1/4 cup mayonnaise (or more for creamier texture)
- 1 tbsp lemon juice (freshly squeezed for brighter flavor)
- 1/2 tsp Old Bay seasoning (adjust to taste)
- 1/4 cup celery, finely diced (adds a nice crunch)
- 4 sub rolls, lightly toasted (or any bread of choice)
- 1 tbsp butter, melted (for toasting the rolls)
- Lettuce leaves (for serving)
Instructions
- In a large bowl, combine the shrimp, crab meat, mayonnaise, lemon juice, Old Bay seasoning, and celery. Mix gently until all ingredients are well incorporated.
- Preheat a skillet over medium heat. Add the shrimp mixture and cook for 5-7 minutes, stirring occasionally, until the shrimp are pink and opaque.
- While the shrimp mixture cooks, brush the inside of the sub rolls with melted butter and toast in a separate skillet or under the broiler for 1-2 minutes until golden brown.
- Once the shrimp mixture is cooked, remove from heat and let it cool slightly for about 2 minutes.
- Line each toasted sub roll with lettuce leaves, then generously fill with the shrimp and crab mixture.
- Serve immediately, or wrap in parchment paper for a picnic-friendly option.
The combination of tender shrimp and sweet crab with the creamy, slightly tangy dressing is irresistible. Try serving these subs with a side of crispy sweet potato fries for a delightful contrast in textures.
Caprese Sub with Fresh Mozzarella

Nothing beats the simplicity and freshness of a Caprese Sub, especially during these warm summer months. I remember the first time I made this for a picnic; the combination of juicy tomatoes, creamy mozzarella, and fragrant basil was a hit. It’s my go-to recipe when I need something quick, delicious, and visually appealing.
Ingredients
- 1 French baguette (about 12 inches long, for a softer sub, use Italian bread)
- 8 oz fresh mozzarella cheese, sliced (look for the freshest you can find)
- 2 medium tomatoes, sliced (ripe but firm)
- 1/4 cup fresh basil leaves (tear larger leaves for easier eating)
- 2 tbsp extra virgin olive oil (or any high-quality olive oil)
- 1 tbsp balsamic glaze (reduce balsamic vinegar for a homemade version)
- Salt and pepper to taste (I prefer sea salt for its texture)
Instructions
- Preheat your oven to 350°F (175°C) to lightly toast the baguette for about 5 minutes, or until just golden. This step adds a nice crunch without drying out the bread.
- Slice the baguette horizontally, being careful not to cut all the way through, creating a hinge. This makes it easier to stuff and eat.
- Layer the mozzarella slices on one side of the bread, followed by the tomato slices. Overlapping them slightly ensures every bite is flavorful.
- Tuck the basil leaves between the cheese and tomatoes. The warmth from the bread will slightly wilt the basil, releasing its aroma.
- Drizzle the olive oil and balsamic glaze over the fillings. A little goes a long way, so distribute evenly.
- Season with salt and pepper to taste. I like to grind the pepper fresh for extra flavor.
- Close the sub and press gently to meld the flavors together. Let it sit for a couple of minutes before slicing to allow the bread to absorb some of the juices.
What makes this Caprese Sub stand out is the contrast between the crisp bread and the soft, juicy fillings. The balsamic glaze adds a sweet tanginess that ties everything together. For an extra touch, serve it with a side of mixed greens drizzled with the same olive oil and balsamic glaze.
BBQ Chicken Sub
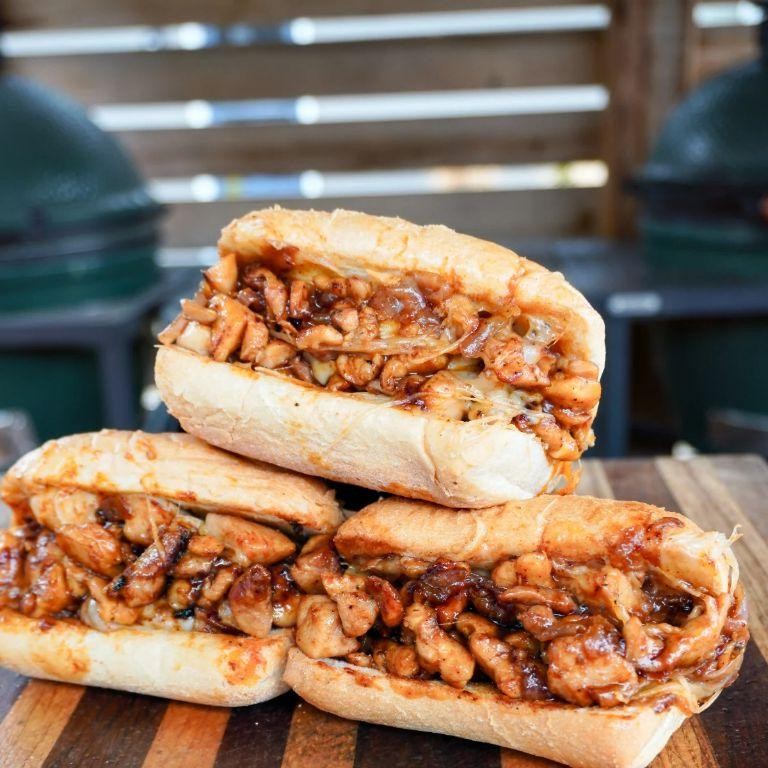
Perfect for those summer evenings when the grill is calling your name, this BBQ Chicken Sub is a crowd-pleaser that’s as fun to make as it is to eat. I remember the first time I whipped this up for a backyard gathering—the subs disappeared before I could even snap a photo!
Ingredients
- 2 cups shredded cooked chicken (leftover rotisserie chicken works great)
- 1/2 cup BBQ sauce (plus extra for drizzling)
- 1/4 cup mayonnaise (or Greek yogurt for a lighter option)
- 1 tbsp olive oil (or any neutral oil)
- 1/2 tsp garlic powder
- 1/2 tsp smoked paprika
- 4 sub rolls, split lengthwise (toasted for extra crunch)
- 1 cup coleslaw mix (homemade or store-bought)
- 1/2 cup shredded cheddar cheese (adjust to taste)
Instructions
- In a large bowl, mix the shredded chicken with BBQ sauce, mayonnaise, olive oil, garlic powder, and smoked paprika until well combined.
- Preheat your grill or a grill pan over medium heat (350°F) and lightly toast the split sub rolls for about 1-2 minutes per side, just until they have nice grill marks.
- Divide the BBQ chicken mixture evenly among the toasted sub rolls, piling it high.
- Top each sub with coleslaw mix and a generous sprinkle of shredded cheddar cheese.
- Drizzle with additional BBQ sauce if desired, and serve immediately.
Yielded by the smoky BBQ sauce and the creamy coleslaw, every bite of this sub is a perfect balance of flavors and textures. Try serving it with a side of sweet potato fries for an unbeatable combo.
Greek Sub with Feta and Olives
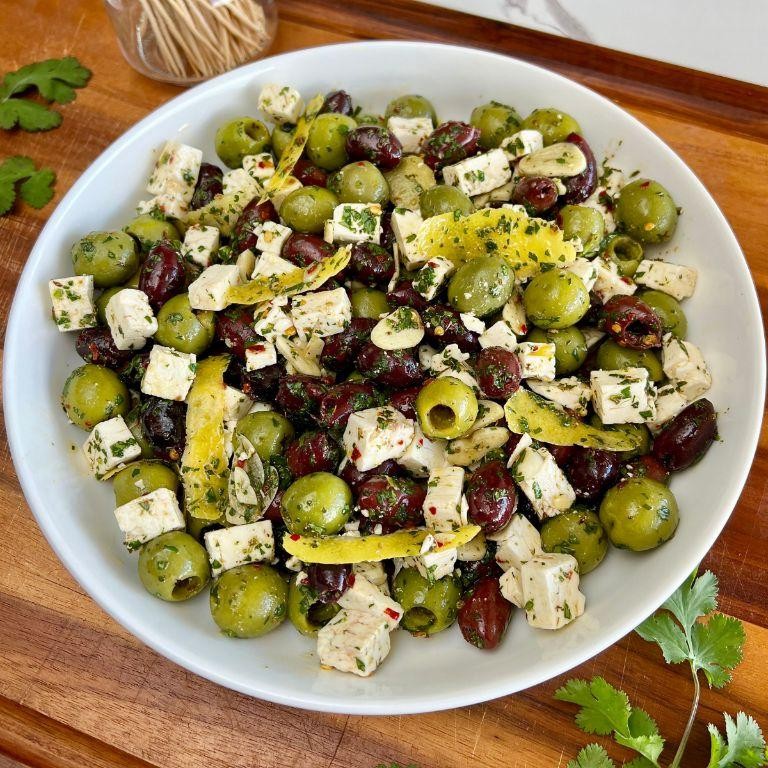
Last summer, I stumbled upon this incredible Greek sub at a tiny deli in Chicago, and it’s been a staple in my kitchen ever since. The combination of tangy feta and briny olives is just unbeatable, especially when you’re craving something hearty yet refreshing.
Ingredients
- 1 loaf of French bread (about 12 inches long, or any crusty sub roll will do)
- 1/2 cup crumbled feta cheese (for best flavor, use authentic Greek feta)
- 1/4 cup pitted Kalamata olives, sliced (green olives work too if you prefer)
- 1/4 cup diced cucumber (peeled for a smoother texture)
- 1/4 cup diced tomato (seeds removed to prevent sogginess)
- 2 tbsp olive oil (extra virgin for the best taste)
- 1 tbsp red wine vinegar (adjust to taste)
- 1 tsp dried oregano (fresh is even better if you have it)
- Salt and pepper to taste (start with a pinch and adjust)
Instructions
- Preheat your oven to 350°F to warm the bread slightly, about 5 minutes, just until it’s warm to the touch but not crispy.
- While the bread warms, in a small bowl, whisk together the olive oil, red wine vinegar, oregano, salt, and pepper to make the dressing.
- Slice the French bread horizontally, being careful not to cut all the way through, creating a pocket for the fillings.
- Drizzle half of the dressing inside the bread pocket, ensuring it’s evenly distributed.
- Layer the crumbled feta, sliced olives, diced cucumber, and tomato inside the bread.
- Drizzle the remaining dressing over the fillings, then close the bread gently.
- Let the sub sit for 2-3 minutes before slicing to allow the flavors to meld together.
Serve this Greek sub with a side of crispy potato chips or a simple Greek salad for an extra touch of Mediterranean flair. The creamy feta and juicy vegetables make every bite a delightful mix of textures and flavors.
Pastrami Sub with Spicy Mustard

Hungry for a sandwich that packs a punch? I stumbled upon this Pastrami Sub with Spicy Mustard recipe during a lazy Sunday fridge raid, and it’s been a game-changer for my lunch prep. The combination of tender pastrami with the kick of spicy mustard is something you’ll crave after just one bite.
Ingredients
- 1 sub roll (6-inch, or any fresh hoagie roll)
- 4 oz pastrami (thinly sliced, for easy layering)
- 2 tbsp spicy mustard (or adjust to taste)
- 1/2 cup sauerkraut (drained well to avoid soggy bread)
- 2 slices Swiss cheese (or provolone for a milder flavor)
- 1 tbsp butter (softened, for toasting the roll)
Instructions
- Preheat your oven to 350°F to warm the pastrami and melt the cheese perfectly.
- Slice the sub roll horizontally, being careful not to cut all the way through, creating a hinge.
- Spread the softened butter on the inside of the roll and toast in the oven for 5 minutes, or until lightly golden. Tip: This step adds a crunch that contrasts beautifully with the soft fillings.
- Layer the pastrami slices evenly inside the toasted roll, then top with the Swiss cheese.
- Return the sub to the oven for 3-4 minutes, just until the cheese starts to melt. Tip: Watch closely to prevent the bread from over-toasting.
- Remove from the oven and evenly spread the spicy mustard over the cheese, followed by the sauerkraut. Tip: The sauerkraut adds a tangy crunch that elevates the sandwich.
- Close the sub, press gently to combine the flavors, and serve immediately.
Mmm, the first bite delivers a symphony of textures—crunchy, soft, and everything in between. The spicy mustard cuts through the richness of the pastrami, making each bite as exciting as the last. Try serving it with a side of pickles for an extra tangy crunch.
Chicken Caesar Sub
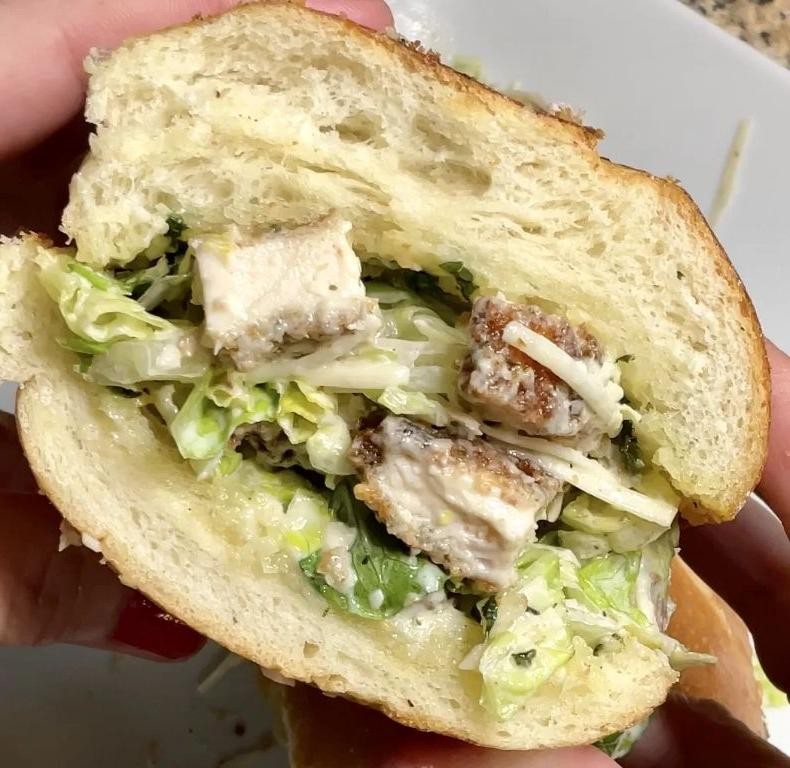
Unbelievably, the Chicken Caesar Sub has become my go-to lunch for those days when I crave something hearty yet refreshing. It’s the perfect blend of crispy, juicy chicken and that iconic Caesar dressing we all love, all tucked into a soft sub roll. I remember the first time I made it at home, thinking it would be complicated, but it’s surprisingly straightforward and now a staple in my kitchen.
Ingredients
- 2 boneless, skinless chicken breasts (about 1 lb total, pounded to even thickness for uniform cooking)
- 1 tbsp olive oil (or any neutral oil)
- 1/2 tsp salt (adjust to taste)
- 1/4 tsp black pepper (freshly ground preferred)
- 1/2 cup Caesar dressing (homemade or store-bought)
- 1 cup romaine lettuce, shredded (for that crisp texture)
- 1/4 cup grated Parmesan cheese (the real deal makes a difference)
- 2 sub rolls, 6-inch (toasted for extra crunch)
Instructions
- Preheat your skillet over medium-high heat and add the olive oil, ensuring the pan is hot before adding the chicken to get a good sear.
- Season the chicken breasts with salt and pepper on both sides, then place them in the skillet. Cook for about 6-7 minutes per side, or until the internal temperature reaches 165°F and the exterior is golden brown.
- Remove the chicken from the skillet and let it rest on a cutting board for 5 minutes. This keeps the juices inside when you slice it.
- While the chicken rests, toast the sub rolls in the same skillet or a toaster until they’re lightly golden and crisp.
- Slice the chicken thinly against the grain for tender bites.
- Spread a generous amount of Caesar dressing on the bottom half of each toasted sub roll.
- Layer the sliced chicken on top of the dressing, followed by the shredded romaine lettuce.
- Sprinkle the grated Parmesan cheese over the lettuce, then cap with the top half of the roll.
Perfectly balanced, the Chicken Caesar Sub offers a delightful contrast between the warm, savory chicken and the cool, crisp lettuce. For an extra kick, I sometimes add a few dashes of hot sauce to the dressing before spreading it on the roll. It’s a simple twist that elevates the whole experience.
Jalapeno Popper Sub with Cream Cheese
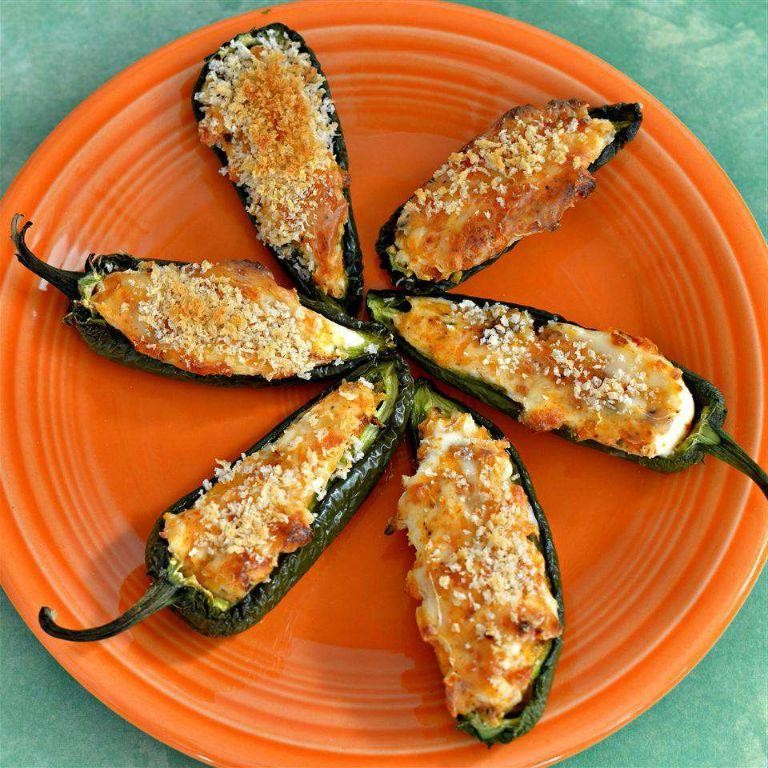
After a long day of experimenting in the kitchen, I stumbled upon a creation that’s become a game-changer for my snack game—a Jalapeno Popper Sub with Cream Cheese. It’s the perfect blend of spicy, creamy, and utterly satisfying, especially when you’re craving something indulgent yet easy to whip up.
Ingredients
- 1 French baguette (about 12 inches long, or any sub roll of your choice)
- 8 oz cream cheese, softened (for easier spreading)
- 1/2 cup shredded cheddar cheese (sharp for more flavor)
- 4 jalapenos, sliced (remove seeds for less heat)
- 1/4 cup mayonnaise (or Greek yogurt for a lighter option)
- 1 tsp garlic powder (adjust to taste)
- 1/2 tsp smoked paprika (for a subtle smokiness)
- 1 tbsp butter, melted (for brushing the bread)
Instructions
- Preheat your oven to 375°F (190°C) to ensure it’s ready for toasting the sub.
- Slice the baguette horizontally, leaving one edge intact to create a hinge. This makes it easier to fill and eat.
- In a bowl, mix the softened cream cheese, shredded cheddar, mayonnaise, garlic powder, and smoked paprika until well combined. Tip: Letting the cream cheese sit at room temperature for 30 minutes makes mixing easier.
- Spread the cream cheese mixture evenly inside the baguette. Layer the jalapeno slices on top of the mixture. Tip: Wear gloves when handling jalapenos to avoid skin irritation.
- Brush the outside of the baguette with melted butter for a golden, crispy exterior.
- Wrap the sub loosely in aluminum foil, leaving the top slightly open to allow the bread to crisp up.
- Bake for 15 minutes, then unwrap and bake for an additional 5 minutes to crisp the bread further. Tip: Keep an eye on it to prevent over-browning.
Devouring this sub is an experience—the creamy, spicy filling contrasts beautifully with the crispy bread. Serve it with a side of cool ranch or blue cheese dressing to balance the heat, or slice it into smaller portions for a party appetizer that’s sure to disappear fast.
Conclusion
From quick lunches to cozy dinners, these 22 sub recipes offer something for every taste and occasion. We hope you’re inspired to try them out and find new favorites. Don’t forget to leave a comment sharing which recipe you loved the most and pin this article on Pinterest to keep these delicious ideas handy for your next meal!