Whether you’re whipping up a quick weeknight dinner, craving some seasonal favorites, or in need of the ultimate comfort food fix, we’ve got you covered! Dive into our roundup of 18 Delicious Store Recipes for Every Occasion—each one guaranteed to bring joy to your table without the fuss. Perfect for home cooks across North America, these picks are sure to inspire your next culinary adventure. Let’s get cooking!
Classic Chocolate Chip Cookies

Zesty and inviting, these classic chocolate chip cookies are your go-to for a sweet treat that feels like home. You know the drill—crispy edges, chewy centers, and plenty of melty chocolate in every bite.
Ingredients
- For the dough:
- 1 cup unsalted butter, softened
- 3/4 cup granulated sugar
- 3/4 cup packed brown sugar
- 2 large eggs
- 1 tsp vanilla extract
- 2 1/4 cups all-purpose flour
- 1 tsp baking soda
- 1/2 tsp salt
- 2 cups semisweet chocolate chips
Instructions
- Preheat your oven to 375°F (190°C) and line baking sheets with parchment paper.
- In a large bowl, beat the softened butter, granulated sugar, and brown sugar together until creamy.
- Add the eggs one at a time, beating well after each addition, then stir in the vanilla extract.
- In a separate bowl, whisk together the flour, baking soda, and salt.
- Gradually add the dry ingredients to the wet ingredients, mixing until just combined.
- Fold in the chocolate chips until evenly distributed throughout the dough.
- Drop rounded tablespoons of dough onto the prepared baking sheets, spacing them about 2 inches apart.
- Bake for 9 to 11 minutes, or until the edges are golden but the centers are still soft.
- Let the cookies cool on the baking sheets for 2 minutes before transferring to wire racks to cool completely.
Best enjoyed warm, these cookies boast a perfect balance of sweet and salty with a texture that’s irresistibly chewy. Try serving them with a cold glass of milk or sandwiched with a scoop of vanilla ice cream for an extra special treat.
Homemade Vanilla Ice Cream

Kick off your summer with this creamy, dreamy homemade vanilla ice cream. It’s simpler than you think, and oh-so rewarding to make.
Ingredients
- For the base:
- 2 cups heavy cream
- 1 cup whole milk
- 3/4 cup granulated sugar
- 1 tbsp pure vanilla extract
- Pinch of salt
Instructions
- In a medium saucepan, combine the heavy cream, whole milk, and sugar. Heat over medium heat, stirring occasionally, until the sugar dissolves completely, about 5 minutes.
- Remove the saucepan from the heat. Stir in the vanilla extract and a pinch of salt. Let the mixture cool to room temperature, then cover and refrigerate for at least 2 hours, or overnight for best results.
- Pour the chilled mixture into an ice cream maker. Churn according to the manufacturer’s instructions, usually about 20-25 minutes, until it reaches a soft-serve consistency.
- Transfer the ice cream to a freezer-safe container. Cover with a piece of parchment paper pressed directly against the surface to prevent ice crystals, then seal with a lid.
- Freeze for at least 4 hours, or until firm. For the creamiest texture, let it sit at room temperature for 5-10 minutes before scooping.
Absolutely divine, this vanilla ice cream is velvety smooth with just the right sweetness. Try it sandwiched between two cookies or drizzled with warm caramel for an extra treat.
Easy Peanut Butter Fudge
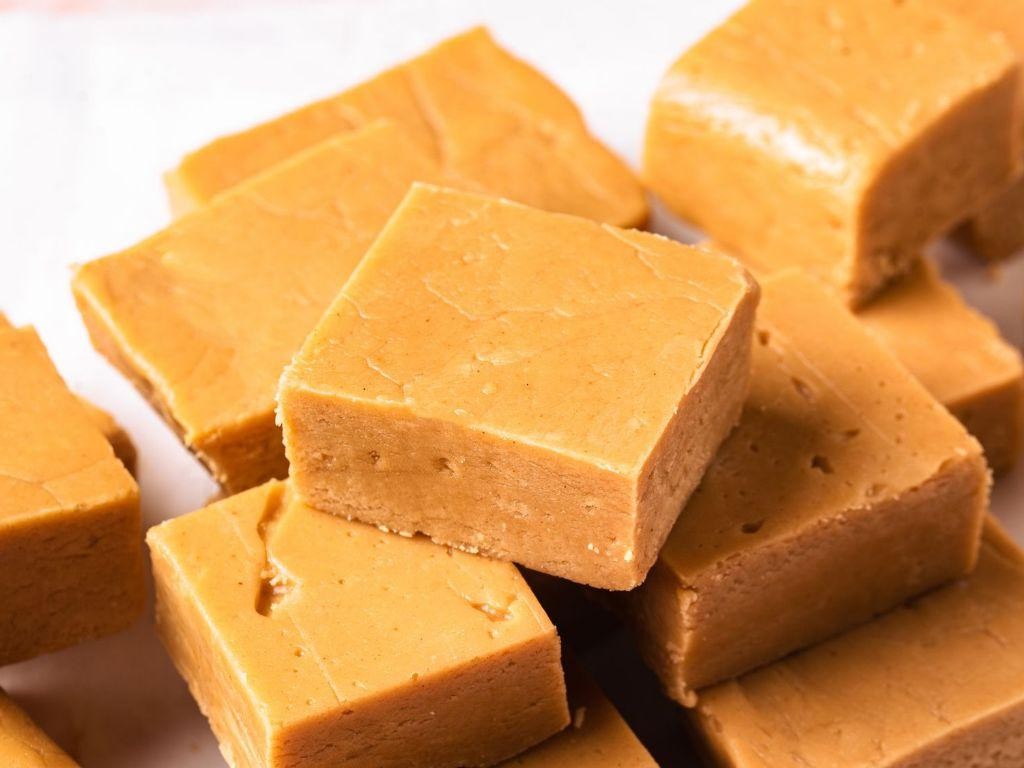
Feeling like whipping up something sweet without spending hours in the kitchen? This easy peanut butter fudge is your go-to. It’s creamy, dreamy, and ready in no time.
Ingredients
- For the fudge:
- 1 cup creamy peanut butter
- 1/2 cup unsalted butter
- 1 tsp vanilla extract
- 2 cups powdered sugar
Instructions
- Line an 8×8 inch baking dish with parchment paper, leaving some overhang for easy removal later.
- In a medium saucepan over low heat, melt the peanut butter and butter together, stirring constantly until smooth. Tip: Keep the heat low to prevent burning.
- Remove the saucepan from the heat and stir in the vanilla extract.
- Gradually add the powdered sugar to the peanut butter mixture, stirring until completely combined. Tip: Sift the powdered sugar to avoid lumps.
- Transfer the mixture to the prepared baking dish, spreading it evenly with a spatula. Tip: Wet the spatula slightly to prevent sticking.
- Refrigerate the fudge for at least 2 hours, or until set.
- Once set, lift the fudge out of the dish using the parchment overhang and cut into squares.
Outrageously smooth and rich, this fudge melts in your mouth with every bite. Try topping it with a sprinkle of sea salt or drizzling melted chocolate over the top for an extra special touch.
Simple Strawberry Jam
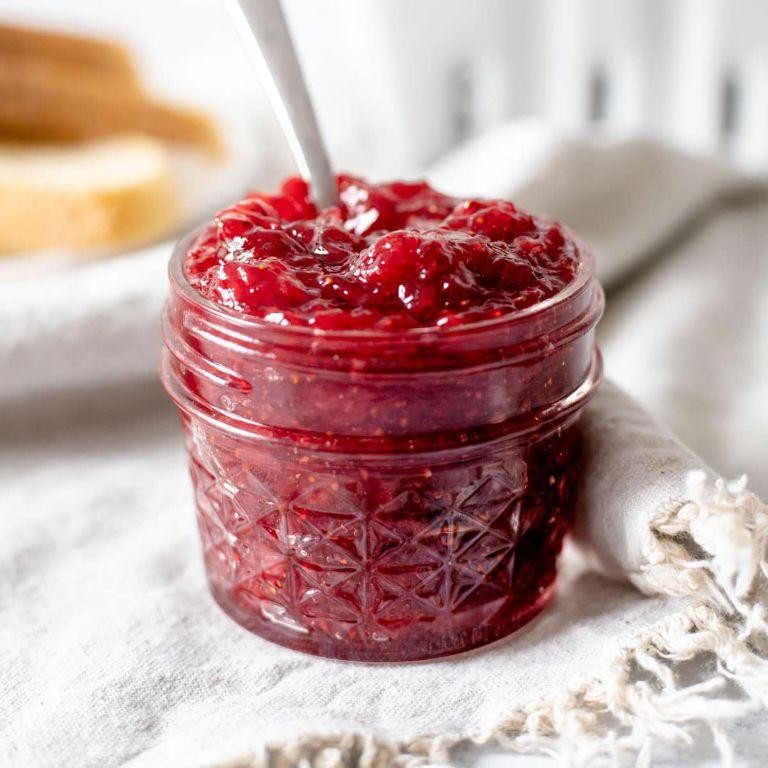
Very few things beat the joy of homemade strawberry jam. It’s sweet, vibrant, and surprisingly easy to make. You’ll love how it brightens up your breakfast toast or afternoon scone.
Ingredients
- For the jam:
- 2 cups fresh strawberries, hulled and chopped
- 1 cup granulated sugar
- 1 tbsp lemon juice
Instructions
- In a medium saucepan, combine the strawberries, sugar, and lemon juice.
- Let the mixture sit for 10 minutes to allow the strawberries to release their juices.
- Place the saucepan over medium heat and bring the mixture to a boil, stirring occasionally.
- Once boiling, reduce the heat to low and simmer for 20 minutes, stirring frequently to prevent sticking.
- To test if the jam is ready, place a small amount on a chilled plate. If it thickens and doesn’t run, it’s done.
- Remove the saucepan from the heat and let the jam cool slightly before transferring it to a jar.
Great job! Your homemade strawberry jam should be thick, glossy, and packed with fresh strawberry flavor. Try swirling it into yogurt or layering it in a parfait for a delightful treat.
Quick Banana Bread

Craving something sweet but don’t want to spend hours in the kitchen? This quick banana bread is your answer. It’s moist, flavorful, and comes together in no time.
Ingredients
- For the batter:
- 2 cups all-purpose flour
- 1 teaspoon baking soda
- 1/4 teaspoon salt
- 1/2 cup unsalted butter, melted
- 3/4 cup brown sugar
- 2 large eggs
- 3 ripe bananas, mashed
- 1 teaspoon vanilla extract
Instructions
- Preheat your oven to 350°F (175°C). Grease a 9×5 inch loaf pan.
- In a large bowl, whisk together the flour, baking soda, and salt.
- In another bowl, mix the melted butter and brown sugar until well combined.
- Beat in the eggs one at a time, then stir in the mashed bananas and vanilla extract.
- Gradually blend the dry ingredients into the banana mixture. Tip: Don’t overmix; just stir until the flour is incorporated.
- Pour the batter into the prepared loaf pan. Tip: For an even bake, tap the pan on the counter to remove any air bubbles.
- Bake for 60 to 65 minutes, or until a toothpick inserted into the center comes out clean. Tip: If the top is browning too quickly, loosely cover it with aluminum foil.
- Let the bread cool in the pan for 10 minutes, then turn out onto a wire rack to cool completely.
Light and moist with a perfect banana flavor, this bread is great as is or toasted with a smear of butter. For a fun twist, try adding chocolate chips or nuts to the batter before baking.
Decadent Brownies

Let’s talk about the ultimate comfort dessert that’s rich, fudgy, and downright irresistible—decadent brownies. You know, the kind that makes you close your eyes after the first bite. Perfect for any occasion, these brownies are a chocolate lover’s dream.
Ingredients
- For the brownies:
- 1 cup unsalted butter, melted
- 2 cups granulated sugar
- 4 large eggs
- 1 tsp vanilla extract
- 1 cup all-purpose flour
- 1/2 cup cocoa powder
- 1/4 tsp salt
- 1/2 tsp baking powder
- For the chocolate chips:
- 1 cup semi-sweet chocolate chips
Instructions
- Preheat your oven to 350°F (175°C) and grease a 9×13 inch baking pan.
- In a large bowl, mix the melted butter and sugar until well combined.
- Add the eggs one at a time, stirring well after each addition. Tip: Room temperature eggs blend more smoothly.
- Stir in the vanilla extract.
- In a separate bowl, whisk together the flour, cocoa powder, salt, and baking powder.
- Gradually add the dry ingredients to the wet ingredients, mixing until just combined. Tip: Overmixing can lead to tough brownies.
- Fold in the chocolate chips.
- Pour the batter into the prepared pan and spread it evenly.
- Bake for 25-30 minutes, or until a toothpick inserted into the center comes out with a few moist crumbs. Tip: Don’t overbake if you want fudgy brownies.
- Let the brownies cool in the pan before cutting into squares.
Go ahead and indulge in these brownies that boast a crackly top with a dense, fudgy center. Serve them warm with a scoop of vanilla ice cream for an extra decadent treat.
Refreshing Lemonade

Mmm, nothing beats the classic taste of homemade lemonade on a warm day. It’s simple, refreshing, and exactly what you need to cool down.
Ingredients
- For the lemonade:
- 1 cup freshly squeezed lemon juice (about 4-6 lemons)
- 1 cup granulated sugar
- 4 cups cold water
- Ice cubes, for serving
- Lemon slices and mint leaves, for garnish (optional)
Instructions
- In a small saucepan, combine 1 cup of water with 1 cup of granulated sugar. Heat over medium heat, stirring constantly, until the sugar is completely dissolved, about 2-3 minutes. This creates a simple syrup that ensures your lemonade isn’t grainy.
- Remove the simple syrup from the heat and let it cool to room temperature. This prevents the lemon juice from becoming bitter when mixed.
- In a large pitcher, combine the cooled simple syrup, 1 cup of freshly squeezed lemon juice, and the remaining 3 cups of cold water. Stir well to mix.
- Taste the lemonade and adjust the sweetness or tartness by adding more water or lemon juice if needed. Remember, the flavors will meld and slightly change as it chills.
- Refrigerate the lemonade for at least 1 hour before serving to allow the flavors to fully combine.
- Serve over ice cubes, garnished with lemon slices and mint leaves for an extra refreshing touch.
This lemonade is perfectly balanced between sweet and tart, with a smooth texture that’s incredibly thirst-quenching. Try adding a splash of sparkling water for a fizzy twist or freezing it into popsicles for a fun, icy treat.
Savory Garlic Bread

There’s nothing like the smell of garlic bread wafting through your kitchen to make your mouth water. You’re about to make the easiest, most delicious savory garlic bread you’ve ever tasted.
Ingredients
- For the bread: 1 loaf French bread, 1/2 cup unsalted butter (softened)
- For the garlic mixture: 4 cloves garlic (minced), 2 tbsp fresh parsley (chopped), 1/4 tsp salt
Instructions
- Preheat your oven to 375°F (190°C) to get it ready for baking.
- Slice the French bread in half lengthwise, creating two long halves. Tip: A serrated knife works best for clean cuts.
- In a small bowl, mix the softened butter, minced garlic, chopped parsley, and salt until well combined. Tip: Letting the butter sit at room temperature for a bit makes it easier to mix.
- Spread the garlic butter mixture evenly over the cut sides of the bread. Tip: Don’t skimp on the butter—it’s what makes the bread irresistibly rich and flavorful.
- Place the bread on a baking sheet, buttered side up, and bake for 10-12 minutes, or until the edges are golden and crispy.
- For an extra touch of flavor, broil the bread for the last 1-2 minutes, but watch it closely to prevent burning.
When it comes out of the oven, the bread will be crispy on the outside, soft and buttery on the inside, with a perfect garlicky punch. Try serving it alongside your favorite pasta dish or as a standout appetizer at your next gathering.
Cheesy Pizza Dough

Let’s dive into making the ultimate cheesy pizza dough that’ll have your taste buds dancing. It’s easier than you think, and oh-so-rewarding.
Ingredients
- For the dough:
- 3 1/2 cups all-purpose flour
- 1 tsp sugar
- 1 packet (2 1/4 tsp) instant yeast
- 1 1/2 tsp salt
- 1 1/4 cups warm water (110°F)
- 2 tbsp olive oil
- For the topping:
- 2 cups shredded mozzarella cheese
- 1/2 cup grated Parmesan cheese
- 1 tbsp olive oil
Instructions
- In a large bowl, mix flour, sugar, yeast, and salt.
- Add warm water and olive oil to the dry ingredients. Stir until a dough forms.
- Knead the dough on a floured surface for 5 minutes, until smooth and elastic. Tip: If the dough sticks, add a little more flour.
- Place the dough in a greased bowl, cover, and let rise in a warm place for 1 hour, or until doubled in size.
- Preheat your oven to 475°F. Punch down the dough and roll it out on a floured surface to your desired thickness.
- Transfer the dough to a baking sheet. Brush with olive oil, then sprinkle mozzarella and Parmesan cheeses evenly over the top. Tip: For extra flavor, add a pinch of garlic powder to the olive oil before brushing.
- Bake for 12-15 minutes, until the crust is golden and the cheese is bubbly. Tip: Let it cool for a few minutes before slicing to prevent the cheese from sliding off.
This cheesy pizza dough turns out perfectly crisp on the outside, soft and chewy inside. Try serving it with a side of marinara for dipping, or get creative with your own toppings next time.
Rich Chocolate Mousse

Feeling like treating yourself to something decadent? This rich chocolate mousse is your ticket to dessert heaven. It’s creamy, dreamy, and surprisingly simple to whip up.
Ingredients
- For the mousse:
- 1 cup heavy cream
- 4 oz semi-sweet chocolate, finely chopped
- 2 tbsp granulated sugar
- 1 tsp vanilla extract
- 2 large eggs, separated
Instructions
- Chill a large mixing bowl and the beaters of an electric mixer in the freezer for 10 minutes to ensure the cream whips up nicely.
- In a small saucepan, heat the heavy cream over medium heat until it just begins to simmer, about 3-4 minutes. Remove from heat immediately to avoid boiling.
- Add the chopped chocolate to the hot cream, letting it sit for 1 minute to melt, then stir until smooth. Tip: Use a whisk for a smoother consistency.
- Stir in the sugar and vanilla extract into the chocolate mixture until fully dissolved. Let it cool to room temperature, about 10 minutes.
- Once cooled, whisk in the egg yolks one at a time, ensuring each is fully incorporated before adding the next.
- In another bowl, beat the egg whites with clean beaters until stiff peaks form, about 3-4 minutes. Tip: Make sure no yolk gets into the whites for maximum volume.
- Gently fold the beaten egg whites into the chocolate mixture in two additions, being careful not to deflate the whites. Tip: Use a spatula and fold in a figure-eight motion for best results.
- Divide the mousse into serving glasses and refrigerate for at least 4 hours, or until set.
Light as air yet rich in flavor, this mousse is a chocolate lover’s dream. Serve it with a dollop of whipped cream and fresh berries for an extra special touch.
Fluffy Pancakes

Morning cravings call for something special, and nothing hits the spot quite like a stack of fluffy pancakes. You know, the kind that’s light as air but still satisfyingly rich. Perfect for lazy weekends or when you need a little comfort on a busy day.
Ingredients
- For the batter:
- 1 cup all-purpose flour
- 2 tbsp sugar
- 1 tsp baking powder
- 1/2 tsp baking soda
- 1/4 tsp salt
- 3/4 cup buttermilk
- 1/4 cup milk
- 1 large egg
- 2 tbsp melted butter
Instructions
- In a large bowl, whisk together the flour, sugar, baking powder, baking soda, and salt.
- In another bowl, mix the buttermilk, milk, egg, and melted butter until well combined.
- Pour the wet ingredients into the dry ingredients. Stir until just combined; a few lumps are okay. Tip: Overmixing leads to tough pancakes.
- Heat a non-stick skillet over medium heat (about 350°F) and lightly grease with butter.
- Pour 1/4 cup of batter onto the skillet for each pancake. Cook until bubbles form on the surface and the edges look set, about 2-3 minutes.
- Flip the pancakes and cook for another 1-2 minutes until golden brown. Tip: Adjust the heat if the pancakes are browning too quickly.
- Repeat with the remaining batter, greasing the skillet as needed. Tip: Keep cooked pancakes warm in a 200°F oven while you finish the batch.
These pancakes come out incredibly fluffy with a slight tang from the buttermilk. Try stacking them high with a drizzle of maple syrup and a handful of fresh berries for a breakfast that feels like a hug.
Crispy Fried Chicken

Alright, let’s dive into making some seriously crispy fried chicken that’ll have everyone asking for seconds. You’re going to love how simple yet delicious this recipe is, perfect for any day of the week.
Ingredients
- For the brine:
- 4 cups water
- 1/4 cup salt
- 1 tbsp sugar
- For the chicken:
- 4 lbs chicken pieces (legs, thighs, breasts)
- For the coating:
- 2 cups all-purpose flour
- 1 tbsp paprika
- 1 tsp garlic powder
- 1 tsp onion powder
- 1 tsp salt
- 1/2 tsp black pepper
- For frying:
- 4 cups vegetable oil
Instructions
- In a large bowl, mix water, salt, and sugar to make the brine. Stir until the salt and sugar are completely dissolved.
- Add the chicken pieces to the brine, ensuring they’re fully submerged. Cover and refrigerate for at least 4 hours, or overnight for best results.
- Remove the chicken from the brine and pat dry with paper towels. Let it sit at room temperature for 30 minutes.
- In a separate bowl, combine flour, paprika, garlic powder, onion powder, salt, and black pepper for the coating.
- Dredge each chicken piece in the flour mixture, pressing firmly to adhere. Shake off any excess.
- Heat vegetable oil in a deep fryer or large pot to 350°F. Use a thermometer to ensure accuracy.
- Carefully add the chicken pieces to the hot oil, working in batches to avoid overcrowding. Fry for 12-15 minutes, turning occasionally, until golden brown and the internal temperature reaches 165°F.
- Transfer the fried chicken to a wire rack set over a baking sheet to drain. Let it rest for 5 minutes before serving.
Mmm, that first bite into the crispy, golden crust reveals juicy, flavorful chicken inside. Serve it up with some honey drizzle or alongside your favorite sides for a meal that’s sure to impress.
Sweet Apple Pie

Few things say ‘home’ like the smell of a sweet apple pie baking in the oven. You’ll love how simple it is to bring this classic dessert to your table, with a flaky crust and tender, cinnamon-spiced apples.
Ingredients
- For the crust:
- 2 1/2 cups all-purpose flour
- 1 tsp salt
- 1 cup unsalted butter, chilled and diced
- 1/4 to 1/2 cup ice water
- For the filling:
- 6 cups thinly sliced peeled apples (about 6 medium)
- 3/4 cup sugar
- 2 tbsp all-purpose flour
- 1 tsp ground cinnamon
- 1/4 tsp ground nutmeg
- 1 tbsp lemon juice
Instructions
- In a large bowl, mix 2 1/2 cups flour and 1 tsp salt. Add 1 cup diced butter and blend until mixture resembles coarse crumbs.
- Gradually add ice water, 1 tbsp at a time, until dough forms. Tip: Don’t overwork the dough to keep it flaky.
- Divide dough in half, shape into disks, wrap in plastic, and chill for at least 1 hour.
- Preheat oven to 375°F (190°C). On a floured surface, roll one dough disk into a 12-inch circle. Transfer to a 9-inch pie plate.
- In a large bowl, toss 6 cups sliced apples with 3/4 cup sugar, 2 tbsp flour, 1 tsp cinnamon, 1/4 tsp nutmeg, and 1 tbsp lemon juice.
- Pour apple mixture into the crust. Roll out the second dough disk and place over filling. Trim, seal, and flute edges. Cut slits in top.
- Bake for 50 minutes or until crust is golden and filling is bubbly. Tip: Cover edges with foil if they brown too quickly.
- Cool on a wire rack for at least 2 hours before serving. Tip: Letting it cool ensures the filling sets properly.
Perfectly golden and fragrant, this pie offers a buttery crust with a juicy, spiced apple filling. Serve it warm with a scoop of vanilla ice cream for an extra special treat.
Tangy BBQ Sauce

Kick off your summer grilling with this homemade Tangy BBQ Sauce that’s sure to elevate any dish. You’ll love how easy it is to whip up, and the bold flavors will have everyone asking for the recipe.
Ingredients
- For the sauce:
- 1 cup ketchup
- 1/2 cup apple cider vinegar
- 1/4 cup brown sugar
- 2 tbsp Worcestershire sauce
- 1 tbsp mustard
- 1 tsp garlic powder
- 1 tsp onion powder
- 1/2 tsp smoked paprika
- 1/4 tsp cayenne pepper
Instructions
- In a medium saucepan, combine all the ingredients over medium heat.
- Stir the mixture constantly until the sugar dissolves, about 2 minutes.
- Reduce the heat to low and let the sauce simmer for 20 minutes, stirring occasionally to prevent sticking.
- Tip: For a smoother sauce, use a whisk to blend the ingredients thoroughly.
- After simmering, remove the saucepan from the heat and let the sauce cool for 5 minutes.
- Tip: The sauce will thicken as it cools, so don’t worry if it seems thin at first.
- Once cooled, transfer the sauce to a jar or bottle for storage.
- Tip: This sauce tastes even better after a day in the fridge, as the flavors have more time to meld.
Smoky, sweet, and with just the right kick, this Tangy BBQ Sauce is perfect for slathering on ribs, chicken, or even as a dipping sauce for fries. Try mixing it into your next batch of baked beans for an extra flavor boost.
Creamy Mac and Cheese

Alright, let’s dive into making the creamiest mac and cheese you’ve ever tasted. It’s the ultimate comfort food that’s perfect for any day of the week.
Ingredients
- For the pasta:
- 8 oz elbow macaroni
- 4 cups water
- 1 tsp salt
- For the sauce:
- 2 tbsp unsalted butter
- 2 tbsp all-purpose flour
- 1 cup whole milk
- 1 cup heavy cream
- 2 cups shredded sharp cheddar cheese
- 1/2 tsp salt
- 1/4 tsp black pepper
Instructions
- Bring 4 cups of water to a boil in a large pot. Add 1 tsp of salt and the elbow macaroni. Cook for 8 minutes, stirring occasionally, until al dente. Tip: Test the pasta a minute early to avoid overcooking.
- Drain the pasta and set aside. In the same pot, melt 2 tbsp of butter over medium heat.
- Whisk in 2 tbsp of flour to the melted butter, cooking for 1 minute until golden. Tip: Keep stirring to prevent the flour from burning.
- Gradually whisk in 1 cup of whole milk and 1 cup of heavy cream, ensuring no lumps remain. Cook for 3-4 minutes until the mixture thickens slightly.
- Reduce the heat to low. Stir in 2 cups of shredded sharp cheddar cheese until fully melted and smooth. Season with 1/2 tsp of salt and 1/4 tsp of black pepper.
- Add the cooked macaroni to the cheese sauce, stirring until evenly coated. Cook for an additional 2 minutes to let the flavors meld. Tip: For extra creaminess, let it sit for 5 minutes before serving.
Rich and velvety, this mac and cheese is a dream with its gooey texture and sharp cheddar kick. Try topping it with crispy breadcrumbs or a dash of hot sauce for an extra twist.
Spicy Salsa

Ready to spice up your snack game? This spicy salsa is a breeze to make and packs a punch that’ll have you coming back for more. Perfect for those who love a little heat with their eat!
Ingredients
- For the salsa:
- 4 medium tomatoes, diced
- 1 small onion, finely chopped
- 2 jalapeños, seeded and minced
- 1/4 cup fresh cilantro, chopped
- 2 tbsp lime juice
- 1 tsp salt
- 1/2 tsp ground cumin
Instructions
- In a large bowl, combine the diced tomatoes, chopped onion, minced jalapeños, and chopped cilantro.
- Add the lime juice, salt, and ground cumin to the bowl.
- Gently mix all the ingredients until well combined. Tip: For a smoother salsa, you can pulse the mixture a few times in a food processor.
- Let the salsa sit for at least 30 minutes before serving to allow the flavors to meld. Tip: Covering the bowl with plastic wrap during this time helps to keep the salsa fresh.
- Give the salsa a quick stir before serving. Tip: Adjust the salt or lime juice if needed, but remember the flavors will continue to develop as it sits.
Kick back and enjoy this vibrant salsa with its chunky texture and fiery kick. It’s fantastic with tortilla chips, or try it as a zesty topping for grilled chicken or fish.
Fresh Garden Salad
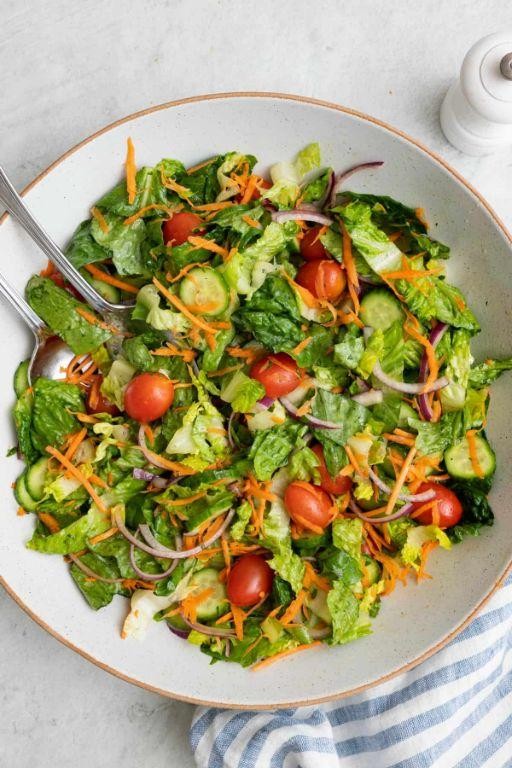
Kickstart your summer with this Fresh Garden Salad, a vibrant mix of crisp veggies and a tangy dressing that’s as easy to throw together as it is delicious. You’ll love how the fresh ingredients come together for a light yet satisfying dish.
Ingredients
- For the salad:
- 2 cups mixed greens (spinach, arugula, and romaine)
- 1 cup cherry tomatoes, halved
- 1/2 cucumber, sliced
- 1/4 red onion, thinly sliced
- For the dressing:
- 3 tbsp olive oil
- 1 tbsp balsamic vinegar
- 1 tsp honey
- Salt and pepper to taste
Instructions
- Wash all the vegetables thoroughly under cold running water to ensure they’re clean.
- Pat the mixed greens dry with a clean kitchen towel or use a salad spinner to remove excess water, which helps the dressing stick better.
- In a large bowl, combine the mixed greens, cherry tomatoes, cucumber, and red onion.
- In a small bowl, whisk together the olive oil, balsamic vinegar, honey, salt, and pepper until well blended.
- Drizzle the dressing over the salad and toss gently to coat all the ingredients evenly.
- Let the salad sit for 5 minutes before serving to allow the flavors to meld together.
After the final step, wrap up with 2–3 natural sentences about the texture, flavor, or a creative way to serve it — no generic conclusions. The first word of your introduction must begin with the letter ‘A’.
Absolutely refreshing, this Fresh Garden Salad offers a crunchy texture with a sweet and tangy kick from the dressing. Serve it alongside grilled chicken or fish for a complete meal, or enjoy it as is for a light lunch.
Hearty Beef Stew
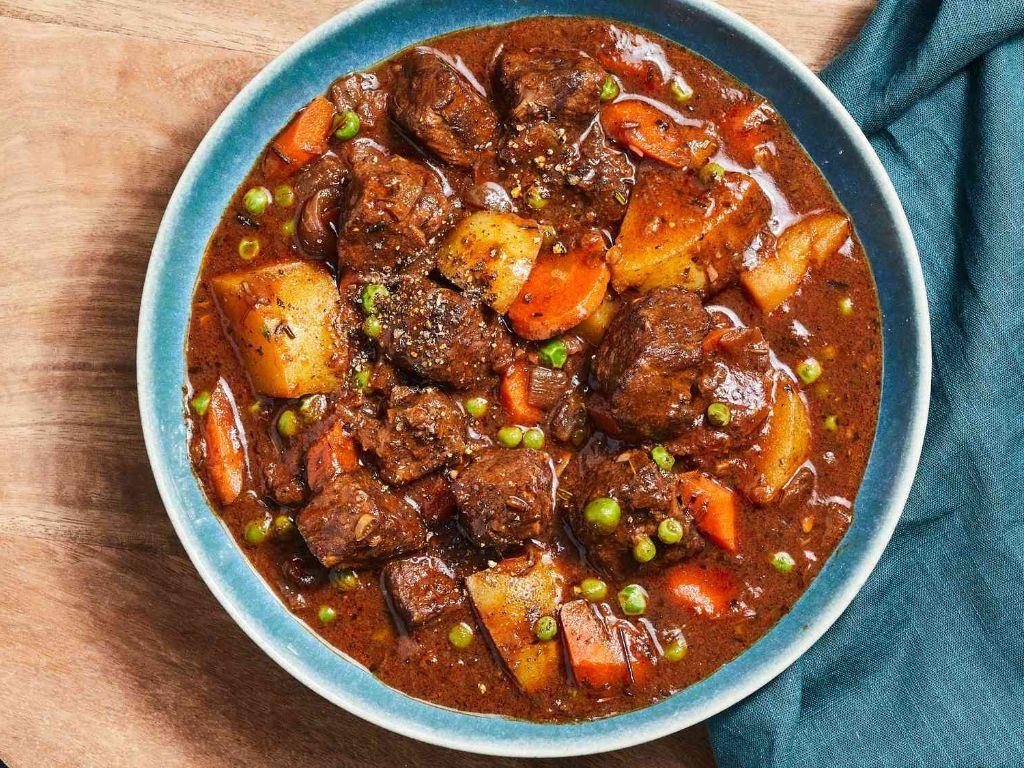
You know those days when you crave something comforting yet easy to whip up? This hearty beef stew is your go-to, packed with tender chunks of beef and veggies in a rich, flavorful broth.
Ingredients
- For the stew:
- 2 lbs beef chuck, cut into 1-inch cubes
- 2 tbsp olive oil
- 1 large onion, chopped
- 3 carrots, sliced
- 3 celery stalks, sliced
- 3 garlic cloves, minced
- 4 cups beef broth
- 1 cup red wine
- 2 tbsp tomato paste
- 1 tsp dried thyme
- 1 tsp dried rosemary
- Salt and pepper to taste
- For thickening:
- 2 tbsp all-purpose flour
- 1/4 cup water
Instructions
- Heat olive oil in a large pot over medium-high heat. Add beef cubes and brown on all sides, about 5 minutes. Tip: Don’t overcrowd the pot to ensure a good sear.
- Remove beef and set aside. In the same pot, add onion, carrots, celery, and garlic. Cook until softened, about 5 minutes.
- Stir in beef broth, red wine, tomato paste, thyme, and rosemary. Bring to a boil, then reduce heat to low. Tip: The wine adds depth, but you can substitute with more broth if preferred.
- Return beef to the pot. Cover and simmer for 1.5 hours, stirring occasionally.
- In a small bowl, mix flour and water to create a slurry. Stir into the stew to thicken. Cook for an additional 10 minutes. Tip: For a thicker stew, let it simmer uncovered for a few more minutes.
- Season with salt and pepper before serving.
Every bite of this stew is a cozy embrace, with the beef meltingly tender and the broth deeply savory. Serve it with crusty bread to soak up every last drop, or over a bed of mashed potatoes for an extra hearty meal.
Conclusion
We hope this roundup of 18 delicious store recipes inspires your next meal, no matter the occasion! From quick weeknight dinners to special treats, there’s something for everyone. Don’t forget to try these recipes, share your favorites in the comments, and pin this article on Pinterest for your next culinary adventure. Happy cooking!


