Welcome to a world where squash blossoms aren’t just a garden’s pride but the star of your kitchen all year round! Whether you’re whipping up a quick summer dinner or craving a cozy winter comfort dish, these 24 recipes will inspire you to transform these delicate blooms into mouthwatering meals. Ready to explore the versatility of squash blossoms? Let’s dive into these delicious ideas that promise to delight your taste buds in every season.
Squash Blossom Quesadillas
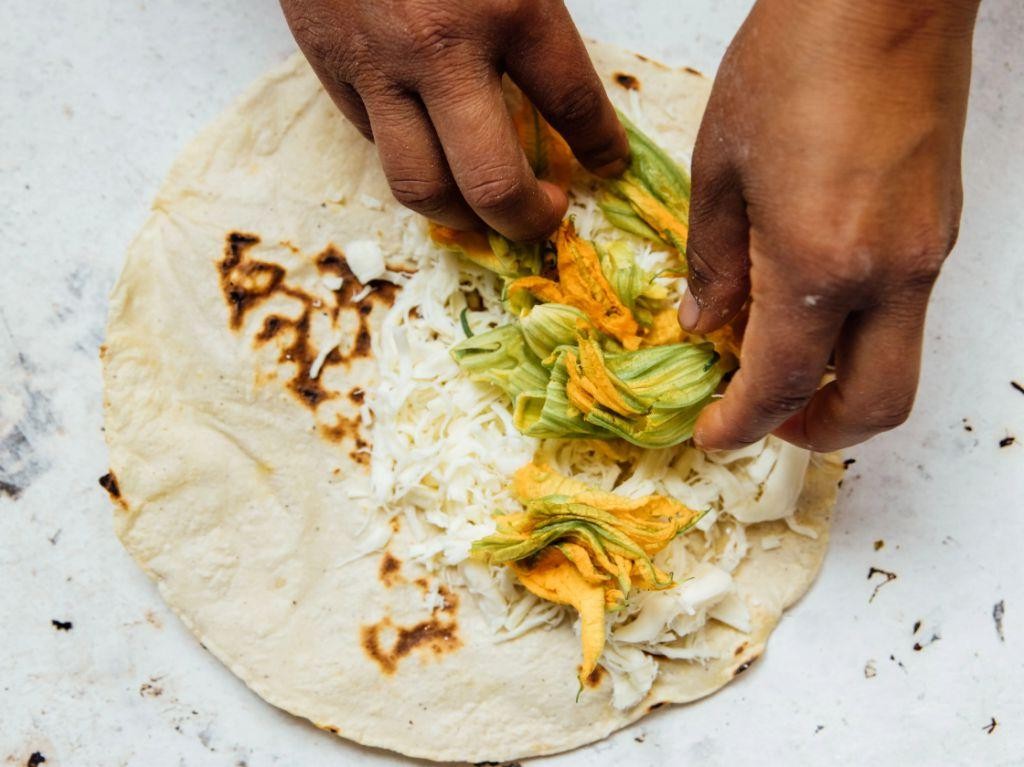
Craving something that dances on the line between gourmet and garden-fresh? Let’s taco ’bout Squash Blossom Quesadillas, where every bite is a fiesta of flavors and textures that’ll make your taste buds do the cha-cha.
Ingredients
- 8 fresh squash blossoms, gently rinsed and patted dry
- 1 cup shredded Oaxaca cheese, melty and mild
- 1/2 cup crumbled queso fresco, for a salty finish
- 1/4 cup finely chopped white onion, for a sharp crunch
- 2 tbsp rich extra virgin olive oil, for frying
- 4 small corn tortillas, warm and pliable
- 1/2 tsp finely ground black pepper, for a subtle kick
- 1/4 tsp sea salt, to enhance all the flavors
Instructions
- Heat a large skillet over medium heat and add 1 tbsp of the extra virgin olive oil, swirling to coat the pan evenly.
- Place one tortilla in the skillet, sprinkle half of the Oaxaca cheese evenly over it, then arrange 4 squash blossoms on top, followed by half of the queso fresco, onion, black pepper, and sea salt.
- Top with another tortilla, pressing down gently, and cook for 2-3 minutes until the bottom is golden and the cheese begins to melt.
- Carefully flip the quesadilla using a wide spatula, adding the remaining 1 tbsp of olive oil to the skillet if needed, and cook for another 2-3 minutes until the second side is golden and the cheese is fully melted.
- Repeat the process with the remaining ingredients to make the second quesadilla.
- Let the quesadillas rest for a minute before slicing into wedges, allowing the cheese to set slightly for easier cutting.
Now, the moment of truth: these quesadillas are a textural dream with the crisp exterior giving way to the creamy, cheesy interior and the delicate squash blossoms adding a whisper of summer. Serve them with a dollop of cool crema or a vibrant salsa verde to elevate the experience from great to ‘where have you been all my life?’
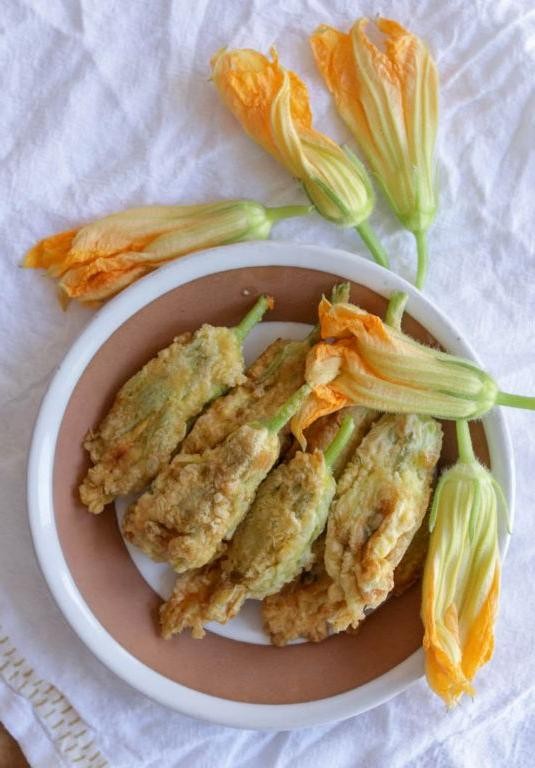
Stuffed Squash Blossoms with Ricotta and Herbs
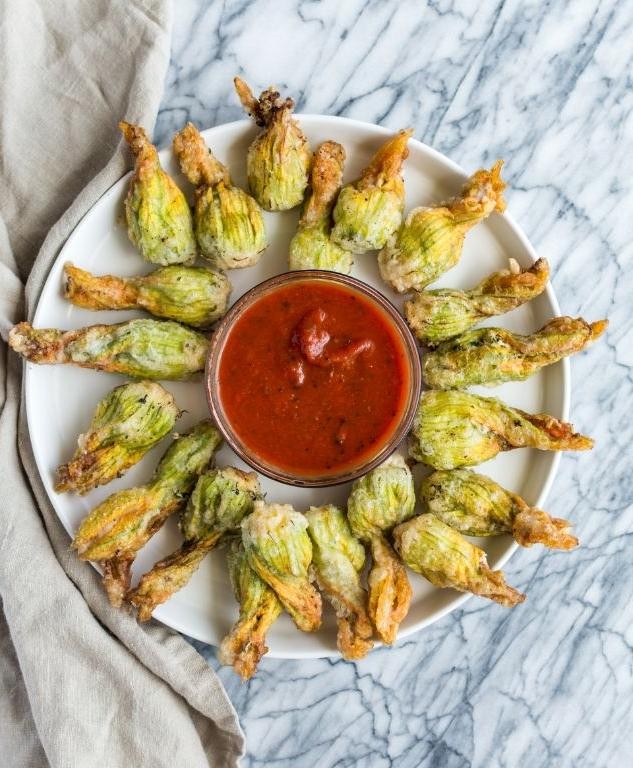
Unbelievably delightful and slightly fancy, these stuffed squash blossoms are your ticket to impressing everyone at the dinner table without breaking a sweat. Packed with creamy ricotta and a punch of fresh herbs, they’re like little edible gifts from the garden.
Ingredients
- 12 fresh squash blossoms, gently rinsed and patted dry
- 1 cup whole milk ricotta cheese, creamy and smooth
- 1/4 cup grated Parmesan cheese, sharp and salty
- 2 tbsp fresh basil, finely chopped and fragrant
- 1 tbsp fresh mint, finely chopped for a cool burst
- 1 clove garlic, minced to perfection
- 1/2 tsp finely ground black pepper, for a little kick
- 1/4 tsp sea salt, to balance the flavors
- 1 cup all-purpose flour, for a light and crispy coating
- 1 cup sparkling water, ice-cold for extra crispiness
- 1 quart vegetable oil, for frying to golden perfection
Instructions
- In a medium bowl, mix the ricotta, Parmesan, basil, mint, garlic, black pepper, and sea salt until well combined. Taste and adjust seasoning if needed, but remember, the Parmesan is salty!
- Carefully open each squash blossom and remove the stamen inside. Gently spoon about 1 tablespoon of the ricotta mixture into each blossom, then twist the petals to seal the filling inside.
- In a large bowl, whisk together the flour and sparkling water until smooth. The batter should be the consistency of thin pancake batter. Tip: For extra crispy blossoms, keep the batter cold until ready to use.
- Heat the vegetable oil in a deep fryer or large pot to 375°F. Use a thermometer to ensure accuracy—this is key for perfect frying.
- Dip each stuffed blossom into the batter, letting excess drip off, then carefully lower into the hot oil. Fry in batches to avoid overcrowding, about 2-3 minutes per side, until golden and crispy. Tip: Keep an eye on the temperature, adjusting the heat as needed to maintain 375°F.
- Remove the blossoms with a slotted spoon and drain on paper towels. Sprinkle with a pinch of sea salt while still hot. Tip: Serve immediately for the best texture, but be careful—the filling will be hot!
What you’ll get is a crispy, golden exterior giving way to a creamy, herby center that’s downright addictive. Try serving these beauties on a platter with a drizzle of honey for a sweet contrast, or alongside a crisp, green salad for a light summer meal.
Squash Blossom and Corn Soup
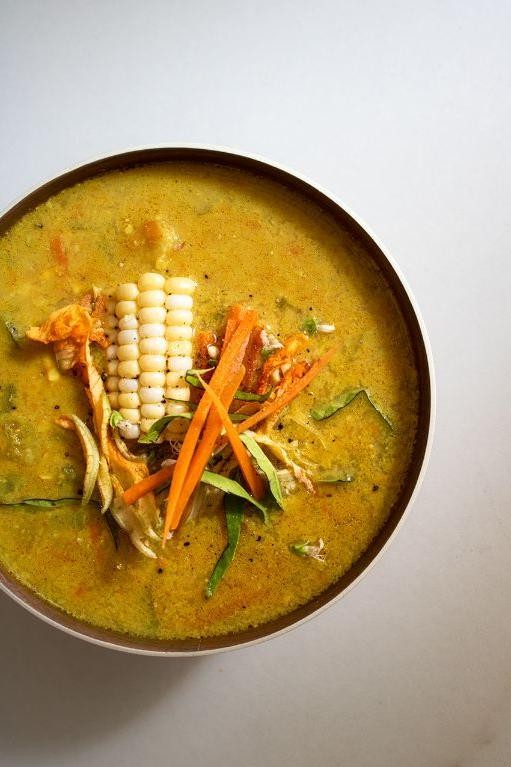
Alright, let’s dive into a bowl of sunshine with this Squash Blossom and Corn Soup that’s as vibrant as your summer playlist. A dish so delightful, it’ll have you forgetting all about that air conditioner you’ve been hugging.
Ingredients
- 2 tablespoons rich extra virgin olive oil
- 1 medium sweet onion, finely diced
- 2 cloves garlic, minced with love
- 4 cups fresh corn kernels, cut straight from the cob
- 1 cup squash blossoms, gently cleaned and chopped
- 4 cups vegetable broth, as golden as a sunset
- 1/2 cup heavy cream, for that velvety finish
- Salt and finely ground black pepper, to make it sing
- Fresh cilantro leaves, for a pop of color
Instructions
- Heat the olive oil in a large pot over medium heat until it shimmers like a mirage.
- Add the onion and garlic, sautéing until they’re as soft as your favorite sweater, about 5 minutes.
- Toss in the corn and squash blossoms, stirring until the corn is brighter than your future, about 3 minutes.
- Pour in the vegetable broth, bringing the mixture to a boil, then reduce the heat to a simmer. Let it bubble away for 15 minutes, or until the corn is tender.
- Blend the soup until smooth, using an immersion blender for ease, or in batches in a traditional blender (tip: hold the lid tight to avoid a soup explosion).
- Stir in the heavy cream, warming through but not boiling, to keep it as smooth as a jazz tune.
- Season with salt and pepper, tasting as you go until it’s just right.
Velvety, with a sweet corn melody and the delicate whisper of squash blossoms, this soup is a summer serenade. Serve it chilled for a refreshing twist, or hot with a sprinkle of cilantro for that extra flair.
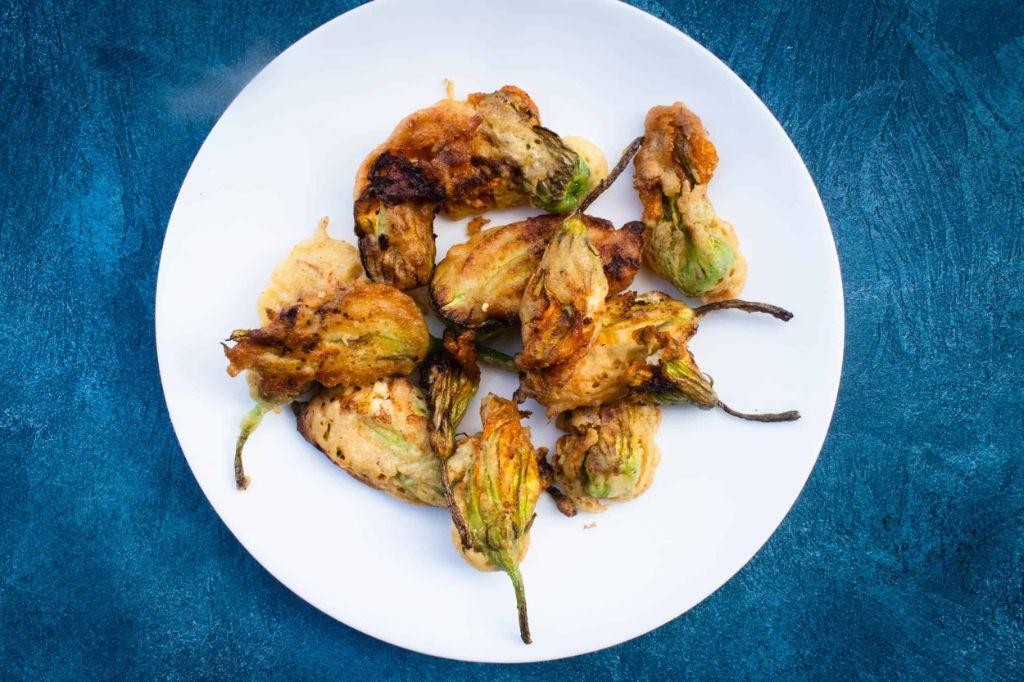
Fried Squash Blossoms with Spicy Aioli

Oh, the joys of summer gardening when your zucchini plants are practically throwing their beautiful blossoms at you, begging to be stuffed, fried, and devoured. These Fried Squash Blossoms with Spicy Aioli are your golden ticket to turning those floral offerings into crispy, creamy bites of heaven.
Ingredients
- 12 fresh squash blossoms, gently rinsed and patted dry
- 1 cup all-purpose flour, sifted for lightness
- 1 cup sparkling water, ice-cold for maximum crispiness
- 1 large farm-fresh egg, lightly beaten
- 1/2 tsp sea salt, finely ground
- 1/4 tsp freshly ground black pepper
- 1 cup rich extra virgin olive oil, for frying
- 1/2 cup mayonnaise, creamy and smooth
- 1 tbsp Sriracha sauce, for that spicy kick
- 1 tsp lemon juice, freshly squeezed
- 1 small garlic clove, minced to perfection
Instructions
- In a medium bowl, whisk together the sifted all-purpose flour, ice-cold sparkling water, and lightly beaten farm-fresh egg until smooth. Tip: The batter should coat the back of a spoon; if it’s too thick, add a splash more sparkling water.
- Heat the rich extra virgin olive oil in a deep skillet over medium heat until it reaches 375°F. Use a candy thermometer for accuracy.
- Gently dip each squash blossom into the batter, letting excess drip off, then carefully lower into the hot oil. Fry in batches to avoid crowding, about 2 minutes per side, until golden and crispy. Tip: Keep an eye on the temperature, adjusting the heat as needed to maintain 375°F.
- Transfer the fried blossoms to a paper towel-lined plate and immediately sprinkle with finely ground sea salt and freshly ground black pepper.
- For the spicy aioli, in a small bowl, mix together the creamy mayonnaise, Sriracha sauce, freshly squeezed lemon juice, and minced garlic until well combined. Tip: Let the aioli sit for 10 minutes before serving to allow the flavors to meld.
Perfectly crispy on the outside with a tender, slightly sweet blossom inside, these fried delights are a textural dream. Serve them with the spicy aioli for dipping, or get creative by tucking them into a soft brioche bun for an unforgettable sandwich experience.
Squash Blossom Pizza with Fresh Mozzarella

Zesty and vibrant, this squash blossom pizza is like summer decided to throw a party on your palate, and everyone’s invited—especially that fresh mozzarella stealing the spotlight.
Ingredients
- 1 lb pizza dough (store-bought or homemade, as soft as a cloud)
- 1/2 cup rich extra virgin olive oil (the kind that makes you want to dip bread in it forever)
- 1 cup fresh mozzarella cheese (torn into rustic, juicy chunks)
- 10-12 squash blossoms (delicate, with a whisper of earthiness)
- 1/4 cup grated Parmesan cheese (sharp enough to wake up your taste buds)
- 1 tsp finely ground black pepper (for that gentle kick)
- 1/2 tsp sea salt (because flavor matters)
Instructions
- Preheat your oven to a fiery 475°F—this is where the magic begins.
- Roll out the pizza dough on a floured surface until it’s as thin as your patience on a Monday morning.
- Brush the dough with a generous layer of extra virgin olive oil, making sure it’s slicker than a politician’s promise.
- Scatter the fresh mozzarella chunks evenly over the dough, leaving no spot un-cheesed.
- Gently place the squash blossoms on top, arranging them like they’re posing for a food magazine.
- Sprinkle the grated Parmesan, black pepper, and sea salt over the top, because we’re not savages.
- Bake for 10-12 minutes, or until the crust is golden and the cheese is bubbling like a hot spring.
- Let it cool for a hot minute—unless you enjoy molten cheese burns, you rebel.
Bite into this masterpiece and you’ll be greeted with a crispy crust, a gooey cheese pull, and the subtle, floral notes of squash blossoms. Serve it with a side of smug satisfaction for having made something this beautiful.
Squash Blossom Frittata

Buckle up, brunch lovers! This Squash Blossom Frittata is here to turn your morning from meh to magnificent with its fluffy eggs and delicate blossoms that whisper sweet nothings to your taste buds.
Ingredients
- 6 farm-fresh eggs, beaten until frothy
- 1/2 cup whole milk, creamy and rich
- 1 cup squash blossoms, gently rinsed and patted dry
- 1/4 cup grated Parmesan cheese, sharp and nutty
- 2 tbsp rich extra virgin olive oil
- 1/2 tsp finely ground black pepper
- 1/4 tsp sea salt, flaky and bright
Instructions
- Preheat your oven to 350°F, because we’re about to get this party started.
- In a large bowl, whisk together the beaten eggs and whole milk until they’re best friends.
- Heat the olive oil in a 10-inch oven-safe skillet over medium heat until it shimmers like a summer mirage.
- Gently lay the squash blossoms in the skillet, letting them cozy up for about 2 minutes until they’re just tender.
- Pour the egg mixture over the blossoms, sprinkling the Parmesan, black pepper, and sea salt like you’re seasoning with confidence.
- Let the mixture cook undisturbed for 5 minutes, or until the edges start to set like your morning routine.
- Transfer the skillet to the oven and bake for 15 minutes, or until the frittata is puffed and golden like a sunbathing goddess.
- Let it cool for a hot minute before slicing, because patience is a virtue (and also, it’s molten lava hot).
Light as a cloud with pockets of creamy cheese and the subtle earthiness of squash blossoms, this frittata is a brunch showstopper. Serve it with a side of sass and a mimosa for the full effect.
Squash Blossom and Goat Cheese Tart

Who knew that the humble squash blossom could steal the show in such a spectacular fashion? This Squash Blossom and Goat Cheese Tart is a summer stunner, blending the delicate, slightly sweet blossoms with the tangy punch of goat cheese, all nestled in a buttery, flaky crust that’s begging to be devoured.
Ingredients
- 1 1/4 cups all-purpose flour, plus extra for dusting
- 1/2 teaspoon salt
- 1/2 cup unsalted butter, chilled and cubed
- 4-5 tablespoons ice water
- 8 ounces fresh goat cheese, creamy and spreadable
- 1/4 cup heavy cream
- 1 large egg, farm-fresh and beaten
- 12 fresh squash blossoms, gently rinsed and patted dry
- 2 tablespoons fresh thyme leaves, fragrant and finely chopped
- 1/2 teaspoon finely ground black pepper
- 1 tablespoon rich extra virgin olive oil
Instructions
- In a large bowl, whisk together the flour and salt. Add the chilled butter cubes and use your fingers to work them into the flour until the mixture resembles coarse crumbs.
- Gradually add ice water, one tablespoon at a time, mixing until the dough just comes together. Tip: Don’t overwork the dough to ensure a flaky crust.
- Form the dough into a disk, wrap in plastic, and chill for at least 30 minutes. This rest period is crucial for easy rolling.
- Preheat your oven to 375°F (190°C). On a lightly floured surface, roll out the dough to fit a 9-inch tart pan. Press into the pan and trim the edges. Prick the bottom with a fork.
- In a medium bowl, mix the goat cheese, heavy cream, beaten egg, thyme, and black pepper until smooth. Spread this mixture evenly over the tart crust.
- Carefully arrange the squash blossoms on top of the goat cheese mixture, pressing them gently into the filling. Drizzle with olive oil.
- Bake for 25-30 minutes, or until the crust is golden and the filling is set. Tip: Let the tart cool for 10 minutes before slicing to ensure clean cuts.
Delightfully crisp at the edges with a creamy, tangy center, this tart is a textural dream. Serve it warm with a drizzle of honey for a sweet contrast, or pair with a crisp white wine for the ultimate summer soirée.
Squash Blossom Pasta with Garlic and Olive Oil
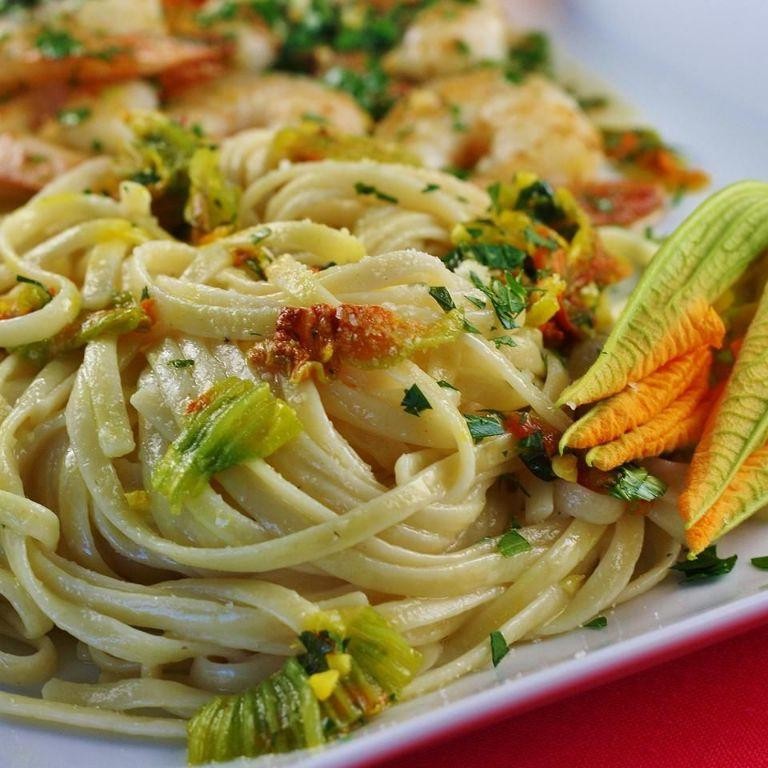
Kickstart your culinary adventure with this Squash Blossom Pasta that’s as vibrant and lively as a summer garden party. Perfect for those who love their meals with a side of sunshine and a sprinkle of whimsy.
Ingredients
- 8 ounces of delicate spaghetti
- 12 fresh squash blossoms, gently rinsed and patted dry
- 3 cloves of garlic, thinly sliced for a punchy bite
- 1/4 cup of rich extra virgin olive oil
- 1/2 teaspoon of crushed red pepper flakes for a subtle kick
- 1/2 cup of freshly grated Parmesan cheese, because everything’s better with cheese
- Salt to taste, but let’s not go overboard
- A handful of fresh basil leaves, torn for a fragrant finish
Instructions
- Bring a large pot of salted water to a rolling boil over high heat. Add the spaghetti and cook according to package instructions until al dente, about 8-10 minutes. Tip: Reserve 1/2 cup of pasta water before draining for later use.
- While the pasta cooks, heat the olive oil in a large skillet over medium heat. Add the garlic and red pepper flakes, sautéing until the garlic is golden and fragrant, about 1-2 minutes. Tip: Keep an eye on the garlic to prevent burning.
- Gently add the squash blossoms to the skillet, cooking for about 1 minute until slightly wilted. Tip: Handle the blossoms with care to keep their delicate structure intact.
- Drain the pasta and add it to the skillet, tossing to coat evenly with the garlic and olive oil mixture. If needed, add the reserved pasta water a little at a time to loosen the sauce.
- Remove from heat and stir in the Parmesan cheese and torn basil leaves. Season with salt to taste.
Gorgeously golden and bursting with the delicate flavors of summer, this pasta is a celebration on a plate. Serve it with a crisp white wine and watch as it becomes the star of your dining table.
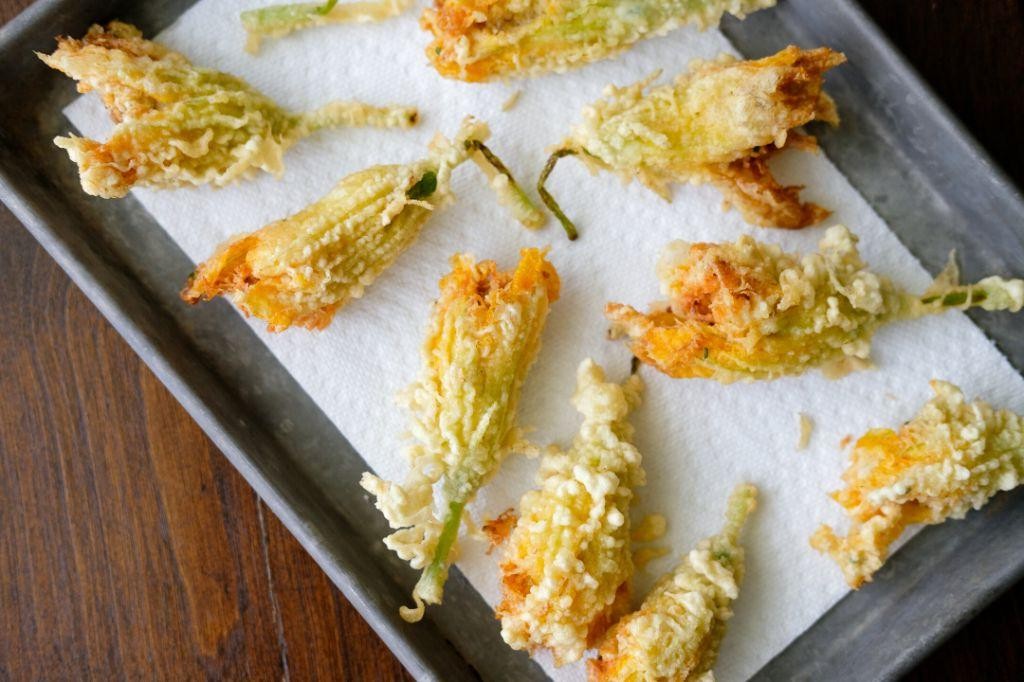
Squash Blossom Tempura

So, you’ve stumbled upon the culinary gem that is squash blossom tempura, and let me tell you, your taste buds are in for a treat that’s as delightful as finding money in last season’s jacket.
Ingredients
- 1 cup all-purpose flour, sifted for that airy lightness
- 1 cup ice-cold sparkling water, because bubbles make everything better
- 1 large egg, farm-fresh and beaten to perfection
- 12 fresh squash blossoms, gently rinsed and patted dry
- 1/2 teaspoon sea salt, the flaky kind that whispers of the ocean
- 1 quart vegetable oil, for frying to golden glory
Instructions
- In a large mixing bowl, whisk together the sifted all-purpose flour and sea salt.
- Gradually add the ice-cold sparkling water and beaten egg to the flour mixture, stirring gently until just combined. Tip: Lumps are your friend here; overmixing is the enemy of crispy tempura.
- Heat the vegetable oil in a deep fryer or heavy pot to 375°F. A candy thermometer is your best pal for accuracy.
- Dip each squash blossom into the batter, letting excess drip off, then carefully lower into the hot oil. Tip: Fry in batches to avoid overcrowding and ensure each blossom gets its moment to shine.
- Fry for 2-3 minutes, or until the tempura is golden and crisp. Tip: Listen for the sizzle to quiet down slightly—that’s your cue they’re done.
- Remove with a slotted spoon and drain on paper towels. Serve immediately for maximum crunch.
What you’ve got now are blossoms so light and crispy, they’ll have you questioning why you ever settled for plain old fries. Serve them with a side of spicy mayo or just enjoy them solo—either way, they’re a bite of summer you won’t forget.
Squash Blossom and Zucchini Salad
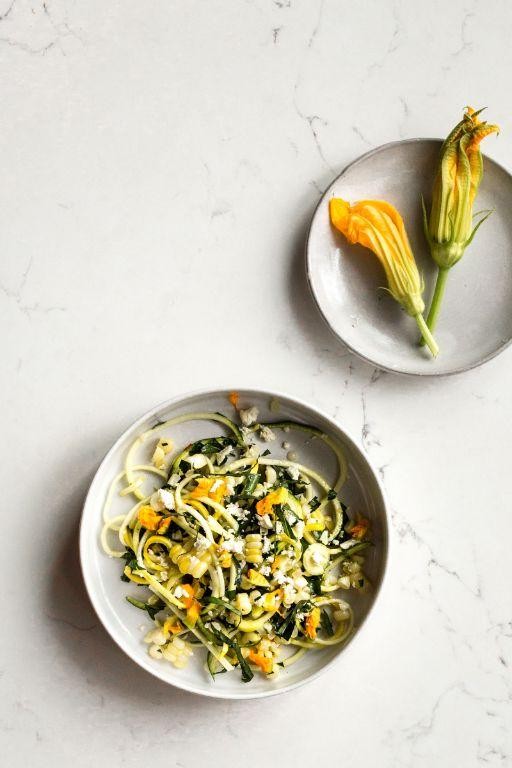
Now, let’s dive into a dish that’s as fun to make as it is to eat, blending the delicate charm of squash blossoms with the humble zucchini in a salad that’s anything but ordinary. Perfect for those who love a plate that’s as colorful as their personality!
Ingredients
- 8 fresh squash blossoms, gently rinsed and patted dry
- 2 medium zucchinis, thinly sliced into ribbons with a vegetable peeler
- 1/4 cup rich extra virgin olive oil
- 2 tbsp fresh lemon juice, squeezed from a sun-ripened lemon
- 1/2 tsp finely ground black pepper
- 1/4 tsp flaky sea salt
- 1/4 cup crumbled feta cheese, because everything’s better with cheese
- 2 tbsp toasted pine nuts, for that irresistible crunch
Instructions
- In a large mixing bowl, whisk together the extra virgin olive oil and fresh lemon juice until emulsified. Tip: The dressing should lightly coat the back of a spoon.
- Add the zucchini ribbons to the bowl, tossing gently to coat them in the dressing. Let them sit for 5 minutes to soften slightly. Tip: This step ensures the zucchini absorbs all the lemony goodness.
- Carefully fold in the squash blossoms, being mindful not to bruise their delicate petals. Tip: Handle them like you would a precious flower—because, well, they are.
- Sprinkle the salad with flaky sea salt, finely ground black pepper, crumbled feta cheese, and toasted pine nuts.
- Serve immediately, allowing the vibrant colors and textures to shine. The salad is a symphony of crisp, creamy, and crunchy, with a dressing that sings with brightness. Perfect for a sunny afternoon or when you need a reminder that eating your greens can be downright luxurious.
Squash Blossom Risotto
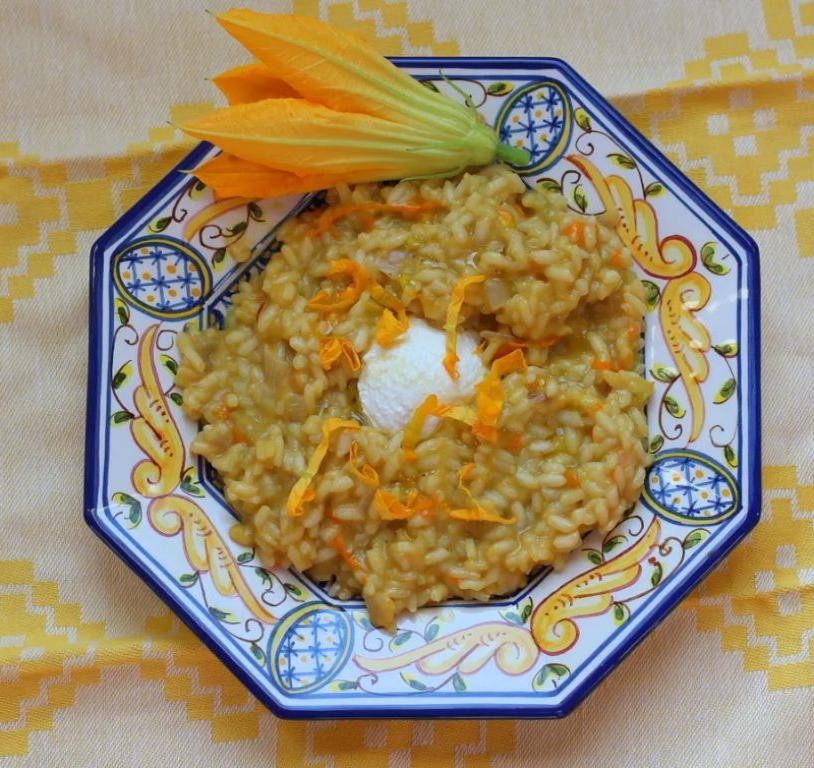
Risotto, the creamy dream of Italian cuisine, just got a summer makeover with squash blossoms that’ll make your taste buds do a happy dance. This Squash Blossom Risotto is like a hug in a bowl, but fancier and with more cheese—because why not?
Ingredients
- 1 cup Arborio rice (the short-grain superstar)
- 4 cups chicken stock (homemade or store-bought, but make it rich)
- 1/2 cup dry white wine (something you’d actually drink)
- 1/2 cup grated Parmesan cheese (the sharper, the better)
- 2 tbsp unsalted butter (because everything’s better with butter)
- 1 tbsp extra virgin olive oil (the good stuff)
- 1 small onion, finely diced (no one likes a chunky onion surprise)
- 1 garlic clove, minced (fresh is best)
- 10-12 fresh squash blossoms, cleaned and chopped (nature’s edible confetti)
- Salt and freshly ground black pepper (to make everything pop)
Instructions
- In a medium saucepan, heat the chicken stock over low heat. Keep it warm, like a cozy blanket for your rice.
- In a large, heavy-bottomed pan, heat the olive oil and 1 tbsp of butter over medium heat until the butter melts and starts to sizzle like a summer day.
- Add the diced onion and cook until translucent, about 3 minutes, stirring occasionally. Think of it as sweating the onions, not making them cry.
- Stir in the minced garlic and cook for 1 minute until fragrant, because garlic is the soul of flavor.
- Add the Arborio rice to the pan, stirring to coat each grain in the buttery goodness, and toast for 2 minutes. This step is like giving the rice a little tan.
- Pour in the white wine and stir until the liquid is absorbed, about 2 minutes. The alcohol cooks off, leaving behind a party of flavors.
- Begin adding the warm chicken stock, one ladle at a time, stirring constantly and allowing each addition to be absorbed before adding the next. This is where patience pays off in creaminess.
- After about 18 minutes, when the rice is al dente and the mixture is creamy, stir in the remaining 1 tbsp of butter, Parmesan cheese, and chopped squash blossoms. Season with salt and pepper to taste.
- Remove from heat, cover, and let it rest for 2 minutes. This is the risotto’s beauty nap.
Dive into this risotto and you’ll find it’s luxuriously creamy with a subtle crunch from the al dente rice, while the squash blossoms add a delicate, slightly sweet flavor. Serve it in a shallow bowl with a sprinkle of extra Parmesan and a glass of that white wine you didn’t use in the recipe—because you deserve it.
Squash Blossom and Tomato Bruschetta
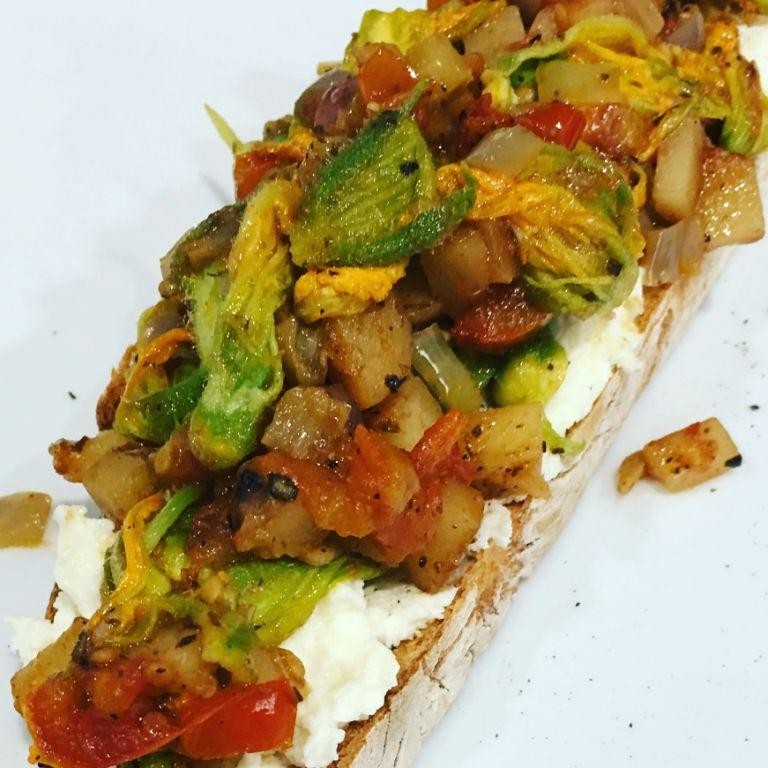
Now, let’s dive into a dish that’s as fun to say as it is to eat—Squash Blossom and Tomato Bruschetta. Perfect for those who love their appetizers with a side of sunshine and a sprinkle of whimsy.
Ingredients
- 1 loaf crusty artisan bread, sliced into 1/2-inch thick pieces
- 3 tbsp rich extra virgin olive oil, plus extra for drizzling
- 2 cloves garlic, finely minced
- 1 cup ripe cherry tomatoes, halved and bursting with juiciness
- 8 fresh squash blossoms, gently cleaned and patted dry
- 1/4 cup fresh basil leaves, torn into fragrant pieces
- 1/2 tsp sea salt, for that perfect pinch of flavor
- 1/4 tsp finely ground black pepper, to add a little kick
- 1/2 cup creamy ricotta cheese, for a smooth finish
Instructions
- Preheat your oven to 375°F (190°C) to get it nice and toasty for the bread.
- Brush each slice of bread with olive oil on both sides, ensuring they’re lightly coated but not drenched.
- Place the bread slices on a baking sheet and toast in the oven for 5-7 minutes, or until golden and crisp. Tip: Keep an eye on them to avoid over-toasting!
- While the bread toasts, heat 3 tbsp of olive oil in a pan over medium heat. Add the minced garlic and sauté for 1 minute until fragrant—just don’t let it brown!
- Add the cherry tomatoes to the pan, cooking for 3-4 minutes until they start to soften. Tip: A little char adds character, but we’re not making tomato jerky here.
- Gently fold in the squash blossoms and cook for another 2 minutes, just until they wilt slightly. They’re delicate, so treat them with care!
- Remove the pan from heat and stir in the torn basil, sea salt, and black pepper. Tip: The basil adds a fresh pop, so don’t skip it!
- Spread a generous layer of ricotta cheese on each toasted bread slice, then top with the tomato and squash blossom mixture.
- Drizzle with a little extra olive oil for a glossy finish and serve immediately.
Every bite of this bruschetta is a crunch followed by a burst of creamy, tangy, and slightly sweet flavors. Try serving it with a chilled glass of rosé for a match made in summer heaven.
Squash Blossom Stuffed with Crab Meat
Fancy a bite of summer’s delicate bounty? Let’s dive into the whimsical world of squash blossoms, stuffed to the brim with succulent crab meat, creating a dish that’s as Instagram-worthy as it is mouthwateringly delicious.
Ingredients
- 12 fresh squash blossoms, gently rinsed and patted dry
- 1 cup lump crab meat, carefully picked for shells
- 1/2 cup ricotta cheese, creamy and smooth
- 1/4 cup grated Parmesan cheese, sharp and nutty
- 1 tbsp fresh lemon juice, zesty and bright
- 1 tsp lemon zest, for a citrusy punch
- 1/4 tsp sea salt, fine and flaky
- 1/4 tsp freshly ground black pepper, aromatic and bold
- 1 tbsp extra virgin olive oil, rich and fruity
- 1/4 cup panko breadcrumbs, for a crispy finish
Instructions
- Preheat your oven to 375°F (190°C) and line a baking sheet with parchment paper for easy cleanup.
- In a mixing bowl, combine the lump crab meat, ricotta cheese, Parmesan cheese, lemon juice, lemon zest, sea salt, and black pepper. Mix gently to keep the crab meat chunky.
- Carefully open each squash blossom and spoon about 1 tablespoon of the crab mixture inside. Twist the petals to seal the filling inside. Tip: Handle the blossoms gently to avoid tearing.
- Place the stuffed blossoms on the prepared baking sheet. Drizzle with extra virgin olive oil and sprinkle with panko breadcrumbs for that golden crunch.
- Bake for 15-20 minutes, or until the blossoms are tender and the breadcrumbs are golden brown. Tip: Keep an eye on them after 15 minutes to prevent over-browning.
- Remove from the oven and let cool for a couple of minutes before serving. Tip: They’re best enjoyed warm, when the flavors are most vibrant.
Ready to impress? These squash blossoms offer a delightful contrast of textures—crispy on the outside, creamy and savory within. Serve them atop a bed of arugula for a pop of color, or alongside a chilled glass of Sauvignon Blanc to complement the citrus notes. Bon appétit!
Squash Blossom and Mushroom Quiche
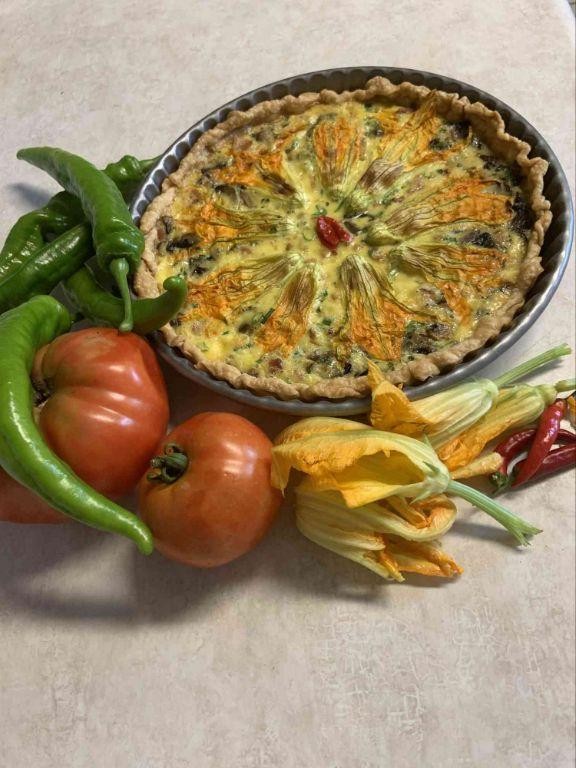
Alright, let’s dive into a dish that’s as fun to make as it is to say: Squash Blossom and Mushroom Quiche. This isn’t just any quiche; it’s a fluffy, golden masterpiece that’ll have your brunch guests thinking you’ve secretly trained in Paris.
Ingredients
- 1 9-inch pie crust, store-bought or homemade, chilled to perfection
- 1 cup heavy cream, luxuriously thick
- 4 large farm-fresh eggs, beaten until just right
- 1 cup shredded Gruyère cheese, because fancy
- 1/2 cup sautéed mushrooms, sliced thin and earthy
- 1/2 cup squash blossoms, gently cleaned and chopped
- 1 tbsp rich extra virgin olive oil
- 1/2 tsp finely ground black pepper, for that subtle kick
- 1/4 tsp sea salt, to balance the flavors
Instructions
- Preheat your oven to 375°F (190°C), because precision is key.
- Roll out your chilled pie crust into a 9-inch pie dish, crimping the edges for that homemade touch.
- In a skillet over medium heat, warm the olive oil and sauté the mushrooms until they’re golden and irresistible, about 5 minutes.
- Whisk together the heavy cream, eggs, salt, and pepper in a bowl until the mixture is as smooth as your morning latte.
- Sprinkle half of the Gruyère cheese onto the pie crust, followed by the sautéed mushrooms and chopped squash blossoms.
- Pour the egg mixture over the fillings, then top with the remaining cheese for a gooey, golden finish.
- Bake for 35-40 minutes, or until the quiche is set and the top is a glorious golden brown.
- Let it cool for 10 minutes before slicing—patience is a virtue, especially with quiche.
Craving a bite? This quiche boasts a creamy interior with a crisp crust, and the squash blossoms add a delicate, slightly sweet flavor that’s downright addictive. Serve it warm with a side of sass and a crisp green salad for the ultimate brunch flex.
Squash Blossom Tacos with Avocado Crema

Who knew that the secret to stealing the spotlight at your next taco night was hiding in your garden all along? Squash blossoms, those vibrant, edible flowers, are about to take your tacos from ‘meh’ to ‘more, please!’ in just a few simple steps. Paired with a creamy avocado crema, these tacos are a celebration of textures and flavors that’ll make your taste buds do a happy dance.
Ingredients
- 12 fresh squash blossoms, gently rinsed and patted dry
- 1 cup all-purpose flour, sifted for lightness
- 1 tsp kosher salt, for that perfect pinch
- 1 cup sparkling water, ice-cold for extra crispiness
- 1 ripe avocado, creamy and perfectly soft
- 1/2 cup sour cream, rich and tangy
- 1 lime, juiced for a zesty kick
- 1/4 tsp cumin, freshly ground for warmth
- 1/4 cup cilantro, finely chopped for a fresh finish
- 8 small corn tortillas, warmed to pliable perfection
- Vegetable oil, for frying until golden
Instructions
- In a large bowl, whisk together the sifted flour and kosher salt. Gradually add the ice-cold sparkling water, stirring until the batter is smooth and lump-free. Let it rest for 10 minutes to allow the flour to hydrate fully.
- While the batter rests, make the avocado crema by blending the ripe avocado, sour cream, lime juice, ground cumin, and chopped cilantro in a blender until smooth and creamy. Set aside in the fridge to chill.
- Heat vegetable oil in a deep skillet over medium-high heat until it reaches 375°F. Use a candy thermometer for accuracy to ensure perfectly crispy blossoms.
- Dip each squash blossom into the batter, letting excess drip off, then carefully place it into the hot oil. Fry in batches to avoid overcrowding, about 2-3 minutes per side, until golden and crispy. Transfer to a paper towel-lined plate to drain.
- Warm the corn tortillas in a dry skillet over medium heat for about 30 seconds per side, or until they’re soft and pliable.
- To assemble, spread a dollop of avocado crema on each tortilla, top with two fried squash blossoms, and garnish with additional cilantro if desired.
How’s that for a taco transformation? The crispy, airy squash blossoms paired with the velvety avocado crema create a contrast that’s nothing short of magical. Serve these beauties with an extra lime wedge on the side for a squeeze of brightness that ties it all together.
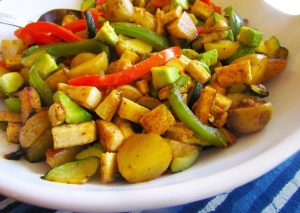
Squash Blossom and Potato Hash

Look alive, food lovers! We’re diving fork-first into a dish that’s as vibrant as your grandma’s tablecloth—Squash Blossom and Potato Hash. It’s the kind of breakfast that makes you want to write poetry, or at least Instagram a haiku.
Ingredients
- 2 cups of golden, crispy-edged diced potatoes
- 1 tbsp of rich extra virgin olive oil
- 1/2 cup of tender, just-picked squash blossoms, chopped
- 1/4 cup of sharp, tangy crumbled feta cheese
- 2 farm-fresh eggs
- 1/4 tsp of finely ground black pepper
- 1/4 tsp of sea salt, as coarse as your morning attitude
Instructions
- Heat the olive oil in a large skillet over medium heat until it shimmers like a mirage in the desert.
- Add the diced potatoes, spreading them out in a single layer. Let them cook undisturbed for 5 minutes to achieve that golden crust we all crave.
- Flip the potatoes with the confidence of a pancake master and cook for another 5 minutes. Tip: Resist the urge to stir constantly—patience rewards you with crunch.
- Toss in the squash blossoms and cook for 2 minutes, just until they wilt like a dramatic actor.
- Create two wells in the hash with the back of a spoon and crack an egg into each. Cover the skillet and cook for 3 minutes for runny yolks, or 5 minutes if you like them set.
- Sprinkle with feta, black pepper, and sea salt. Tip: The feta adds a salty punch, so taste before adding extra salt.
- Serve immediately, because good food waits for no one. Tip: For an extra flair, garnish with a whole squash blossom on top.
Ready to plate up? This hash is a textural dream—crispy potatoes, creamy eggs, and the subtle crunch of squash blossoms. Try serving it with a drizzle of hot honey for a sweet heat that’ll wake up your taste buds faster than your alarm clock.
Squash Blossom and Chicken Enchiladas

Picture this: a dish so vibrant and flavorful, it’ll make your taste buds do a happy dance. Our Squash Blossom and Chicken Enchiladas are here to steal the spotlight at your dinner table, combining the delicate charm of squash blossoms with the hearty comfort of chicken, all wrapped up in a cozy blanket of tortillas.
Ingredients
- 1.5 cups shredded, juicy rotisserie chicken
- 12 fresh, tender squash blossoms, cleaned and stems removed
- 2 cups shredded, melty Monterey Jack cheese
- 1/2 cup rich, tangy sour cream
- 1/4 cup finely chopped, aromatic cilantro
- 1 small, pungent white onion, diced
- 2 cloves garlic, minced to fragrant perfection
- 1 tbsp vibrant, ground cumin
- 1 tsp smoky, sweet paprika
- 8 soft, pliable corn tortillas
- 2 cups zesty, homemade enchilada sauce
- 2 tbsp luxurious, extra virgin olive oil
- Salt, just enough to make the flavors pop
Instructions
- Preheat your oven to a toasty 375°F (190°C), because it’s time to get baking.
- In a large skillet, heat the extra virgin olive oil over medium heat until it shimmers like a desert mirage.
- Add the diced onion and minced garlic, sautéing until they’re as soft and golden as a summer sunset, about 3-4 minutes.
- Toss in the shredded chicken, cumin, and paprika, stirring until the chicken is warmly coated and smells like a spice market dream.
- Remove from heat and gently fold in the sour cream and cilantro, creating a mixture that’s as creamy as it is colorful.
- Carefully stuff each squash blossom with the chicken mixture, then roll them up in the corn tortillas like tiny, delicious burritos.
- Arrange the enchiladas in a baking dish, seam side down, and drown them in that zesty enchilada sauce like they’re taking a spa day.
- Sprinkle the Monterey Jack cheese on top like you’re decorating a Christmas tree, then bake for 20 minutes or until the cheese is bubbly and slightly golden.
- Let them rest for 5 minutes; patience is a virtue, especially when cheese is involved.
Velvety squash blossoms and savory chicken meld together in these enchiladas, offering a texture that’s both tender and satisfying. Serve them with a side of crisp, refreshing salad or a dollop of guacamole for a meal that’s as visually stunning as it is delicious.
Squash Blossom and Shrimp Stir Fry
Feast your eyes on this vibrant stir fry that’s as delightful to look at as it is to devour! Squash blossoms, those golden gems of the garden, meet plump, juicy shrimp in a dance of flavors that’ll make your taste buds do the tango.
Ingredients
- 1 cup fresh squash blossoms, gently rinsed and patted dry
- 12 large shrimp, peeled and deveined, with tails on for that fancy look
- 2 tbsp rich extra virgin olive oil
- 3 cloves garlic, minced to aromatic perfection
- 1/2 tsp crushed red pepper flakes, for a kick that whispers ‘hello’
- 1/4 cup chicken broth, low-sodium to keep things light
- Salt, just a pinch to wake up all the flavors
Instructions
- Heat the olive oil in a large skillet over medium-high heat until it shimmers like a summer mirage.
- Add the minced garlic and red pepper flakes, sautéing for about 30 seconds until the garlic is golden and the air smells like an Italian kitchen.
- Toss in the shrimp, cooking for 2 minutes per side until they turn pink and curl up like they’re hugging themselves.
- Gently add the squash blossoms and chicken broth, stirring carefully to not tear the delicate blossoms. Cook for another 2 minutes, just until the blossoms wilt slightly but still hold their shape.
- Season with a pinch of salt, give everything one last gentle toss, and remove from heat.
Present this dish over a bed of fluffy jasmine rice to soak up the savory broth, or go rogue and stuff it into tacos for a fusion twist. The blossoms offer a subtle sweetness that plays beautifully against the shrimp’s briny pop, making each bite a little celebration.
Squash Blossom and Basil Pesto
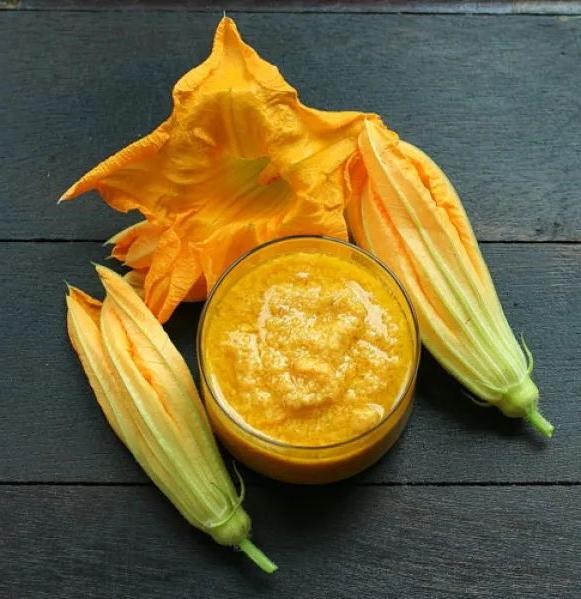
Get ready to dazzle your taste buds with a dish that’s as whimsical as it is delicious! Squash blossoms aren’t just for admiring in the garden—they’re the star of this vibrant pesto that’ll have you seeing basil in a whole new light.
Ingredients
- 1 cup fresh squash blossoms, gently rinsed and patted dry
- 2 cups packed fresh basil leaves, vibrant and fragrant
- 1/2 cup rich extra virgin olive oil
- 1/3 cup freshly grated Parmesan cheese, sharp and nutty
- 1/4 cup pine nuts, lightly toasted for a buttery crunch
- 2 cloves garlic, minced for a pungent kick
- 1/2 tsp fine sea salt, for that perfect seasoning
- 1/4 tsp freshly ground black pepper, for a subtle heat
Instructions
- In a food processor, combine the squash blossoms, basil leaves, and minced garlic. Pulse until roughly chopped.
- Add the toasted pine nuts, Parmesan cheese, sea salt, and black pepper to the processor. Blend until the mixture starts to come together.
- With the processor running, slowly drizzle in the extra virgin olive oil until the pesto is smooth and emulsified. Tip: Scrape down the sides of the bowl occasionally to ensure everything is evenly incorporated.
- Taste and adjust seasoning if necessary, but remember, the flavors will meld and intensify as it sits. Tip: For a brighter pesto, add a squeeze of lemon juice.
- Transfer the pesto to an airtight container and refrigerate until ready to use. Tip: To prevent browning, place a piece of plastic wrap directly on the surface of the pesto before sealing.
Craving something extraordinary? This pesto boasts a creamy texture with a floral hint from the squash blossoms, balanced by the peppery basil and rich Parmesan. Slather it on crusty bread, toss it with pasta, or dollop it over grilled chicken for a meal that’s anything but ordinary.
Squash Blossom and Eggplant Parmesan
Howdy, food lovers! Ever stared into your fridge and dreamed of a dish that’s part summer garden, part comfort food hug? Let’s turn those squash blossoms and eggplants into a Parmesan masterpiece that’ll make your taste buds do a happy dance.
Ingredients
- 8 large, vibrant squash blossoms, gently rinsed and patted dry
- 1 medium eggplant, sliced into 1/2-inch rounds
- 1 cup all-purpose flour, for that perfect crispy coating
- 2 large, farm-fresh eggs, beaten to golden perfection
- 1 cup panko breadcrumbs, for an extra crunch
- 1/2 cup grated Parmesan cheese, because cheese is life
- 1 cup marinara sauce, rich and tangy
- 1 cup shredded mozzarella cheese, for that gooey goodness
- 2 tbsp rich extra virgin olive oil, for frying
- 1 tsp finely ground black pepper, for a little kick
- 1 tsp sea salt, to bring all the flavors together
Instructions
- Preheat your oven to 375°F (190°C) to get it ready for baking magic.
- Season the eggplant slices with sea salt and let them sit for 10 minutes to draw out moisture, then pat dry. Tip: This prevents sogginess!
- Dredge each eggplant slice and squash blossom in flour, dip into beaten eggs, then coat with a mix of panko and Parmesan. Tip: For extra crispiness, press the coating gently to adhere.
- Heat olive oil in a large skillet over medium heat. Fry the coated eggplant and blossoms until golden brown, about 2-3 minutes per side. Tip: Don’t overcrowd the pan to ensure even cooking.
- Spread a thin layer of marinara sauce in a baking dish. Arrange the fried eggplant and blossoms on top, cover with remaining sauce, and sprinkle with mozzarella.
- Bake for 20 minutes, or until the cheese is bubbly and slightly golden.
Ready to serve? This dish is a textural dream—crispy, creamy, and utterly cheesy. Try layering it over a bed of al dente spaghetti for a twist on the classic, or enjoy it straight from the dish with a side of crusty bread to sop up all that saucy goodness.
Squash Blossom and Black Bean Tostadas
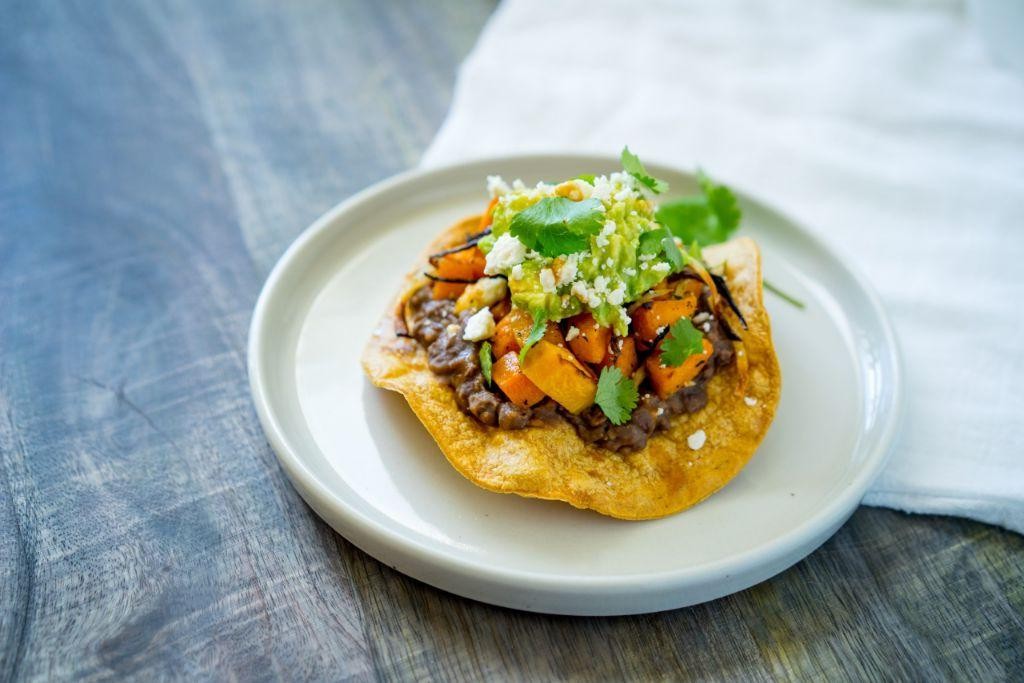
Picture this: a tostada so vibrant and packed with flavor, it’ll make your taste buds do a happy dance. Perfect for those who love a little crunch with their lunch, these Squash Blossom and Black Bean Tostadas are a fiesta on a plate.
Ingredients
- 6 small corn tortillas, crispy and golden
- 1 cup black beans, creamy and seasoned to perfection
- 12 fresh squash blossoms, delicate and slightly sweet
- 1/2 cup queso fresco, crumbled and tangy
- 1/4 cup red onion, finely diced for a sharp bite
- 2 tbsp fresh cilantro, chopped and aromatic
- 1 tbsp lime juice, zesty and bright
- 1/2 tsp cumin, warm and earthy
- 1/4 tsp salt, to enhance all the flavors
- 2 tbsp olive oil, rich and smooth
Instructions
- Preheat your oven to 375°F to get it ready for toasting the tortillas.
- Brush each corn tortilla lightly with olive oil on both sides for that perfect crispness.
- Place the tortillas on a baking sheet in a single layer and bake for 10 minutes, flipping halfway through, until they’re golden and crispy.
- While the tortillas bake, warm the black beans in a small pot over medium heat, stirring occasionally, for about 5 minutes. Tip: Add a splash of water if the beans seem too thick.
- Gently rinse the squash blossoms under cool water and pat them dry with a paper towel to remove any dirt.
- In a bowl, toss the squash blossoms with lime juice, cumin, and salt, ensuring they’re evenly coated for maximum flavor.
- Once the tortillas are ready, spread a generous layer of warm black beans on each one.
- Top the beans with the marinated squash blossoms, followed by a sprinkle of queso fresco, red onion, and cilantro.
- Serve immediately to enjoy the contrast of the crispy tortilla with the creamy beans and fresh toppings. Tip: For an extra kick, drizzle with your favorite hot sauce.
Kick back and savor the symphony of textures—from the crunch of the tostada to the melt-in-your-mouth blossoms. These tostadas aren’t just a meal; they’re a conversation starter, so serve them up at your next gathering and watch them disappear.
Squash Blossom and Spinach Stuffed Shells

Let’s dive into a dish that’s as fun to make as it is to eat, turning your kitchen into a playground of flavors with these Squash Blossom and Spinach Stuffed Shells. Who knew stuffed shells could get such a vibrant, garden-fresh makeover?
Ingredients
- 1 box (12 oz) jumbo pasta shells, as sturdy as a linebacker
- 2 cups ricotta cheese, creamy and dreamy
- 1 cup fresh spinach, chopped finer than your last breakup
- 1/2 cup squash blossoms, chopped, because flowers aren’t just for vases
- 1/2 cup grated Parmesan cheese, the salty, nutty king of cheeses
- 1 large egg, farm-fresh and ready to bind
- 2 cloves garlic, minced with the fury of a thousand suns
- 1 tbsp rich extra virgin olive oil, for that golden touch
- 2 cups marinara sauce, homemade or jarred, no judgment here
- 1/2 tsp finely ground black pepper, for a little kick
- 1/2 tsp sea salt, because seasoning is key
Instructions
- Preheat your oven to 375°F, because it’s showtime.
- Boil the jumbo pasta shells in salted water for 9 minutes, or until al dente, then drain and let them cool. Tip: Stir occasionally to prevent sticking.
- In a mixing bowl, combine ricotta, spinach, squash blossoms, Parmesan, egg, garlic, salt, and pepper. Mix until it’s as unified as a boy band.
- Lightly grease a baking dish with olive oil, because nobody likes a sticky situation.
- Stuff each shell with the ricotta mixture, packing them like you’re preparing for a cross-country move.
- Spread marinara sauce at the bottom of the dish, then arrange the stuffed shells on top. Cover with more sauce, because more is more.
- Bake for 25 minutes, or until the sauce is bubbling like a gossip column. Tip: Let it rest for 5 minutes before serving to avoid a cheese avalanche.
- Broil for an additional 2-3 minutes for a golden top, watching closely to prevent a kitchen tragedy.
Zesty, creamy, and with a slight crunch from the squash blossoms, these stuffed shells are a textural dream. Serve them with a side of garlic bread to sop up any rogue sauce, or go rogue yourself and pair with a crisp white wine for an unbeatable duo.
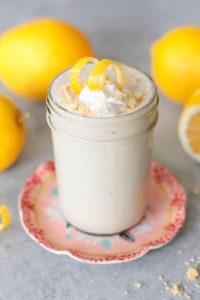
Squash Blossom and Lemon Ricotta Pancakes
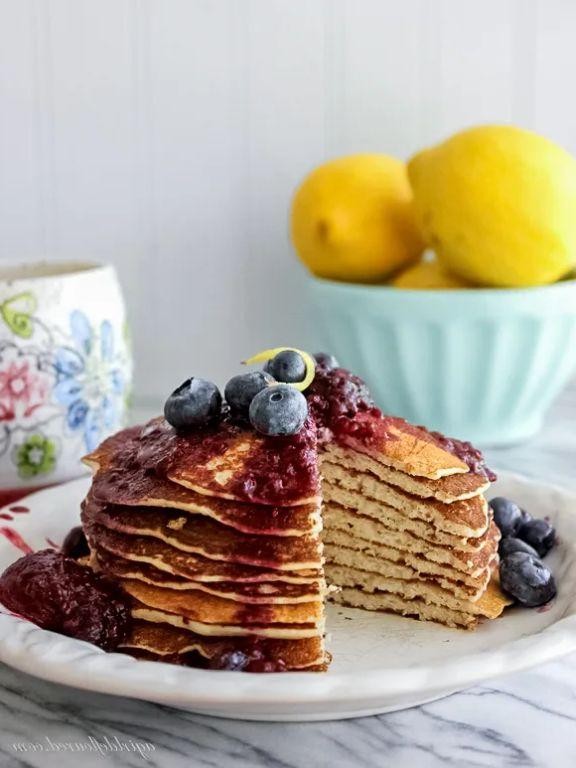
So, you’ve stumbled upon the culinary equivalent of a summer fling—light, fleeting, and utterly irresistible. These Squash Blossom and Lemon Ricotta Pancakes are here to dazzle your taste buds and then some, blending the delicate charm of squash blossoms with the zesty whisper of lemon ricotta.
Ingredients
- 1 cup all-purpose flour, sifted for that airy lift
- 2 tbsp granulated sugar, because a little sweetness never hurt nobody
- 1 tsp baking powder, the unsung hero of fluffiness
- 1/2 tsp salt, to make all the flavors pop
- 1 cup whole milk ricotta cheese, creamy and dreamy
- 2 large farm-fresh eggs, because quality matters
- Zest of 1 lemon, for that sunny disposition
- 1 tbsp fresh lemon juice, to brighten things up
- 1/2 cup squash blossoms, chopped, for a touch of whimsy
- 2 tbsp unsalted butter, melted, for richness
- Maple syrup and powdered sugar, for serving (because why not?)
Instructions
- In a large bowl, whisk together the sifted flour, sugar, baking powder, and salt until well combined.
- In another bowl, mix the ricotta cheese, eggs, lemon zest, and lemon juice until smooth. Tip: For extra fluffy pancakes, let the batter rest for 10 minutes before cooking.
- Gently fold the wet ingredients into the dry ingredients until just combined. Stir in the chopped squash blossoms and melted butter. Tip: Don’t overmix; a few lumps are perfectly fine.
- Heat a non-stick skillet over medium heat (about 350°F) and lightly grease it with butter or cooking spray.
- Pour 1/4 cup of batter onto the skillet for each pancake. Cook until bubbles form on the surface and the edges look set, about 2-3 minutes. Tip: Wait for those bubbles—it’s nature’s way of telling you it’s time to flip.
- Flip the pancakes and cook for another 1-2 minutes, until golden brown and cooked through.
- Serve warm, drizzled with maple syrup and a dusting of powdered sugar. Delight in the contrast of the crispy edges against the pillowy centers, with the squash blossoms adding a subtle, garden-fresh crunch. Perfect for a brunch that’s anything but basic.
Dare to serve these pancakes with a side of crispy bacon or a dollop of whipped cream for an extra indulgent twist. The lemon ricotta keeps them light, while the squash blossoms add a pop of color and a hint of earthiness that’s downright addictive.
Squash Blossom and Honey Glazed Carrots
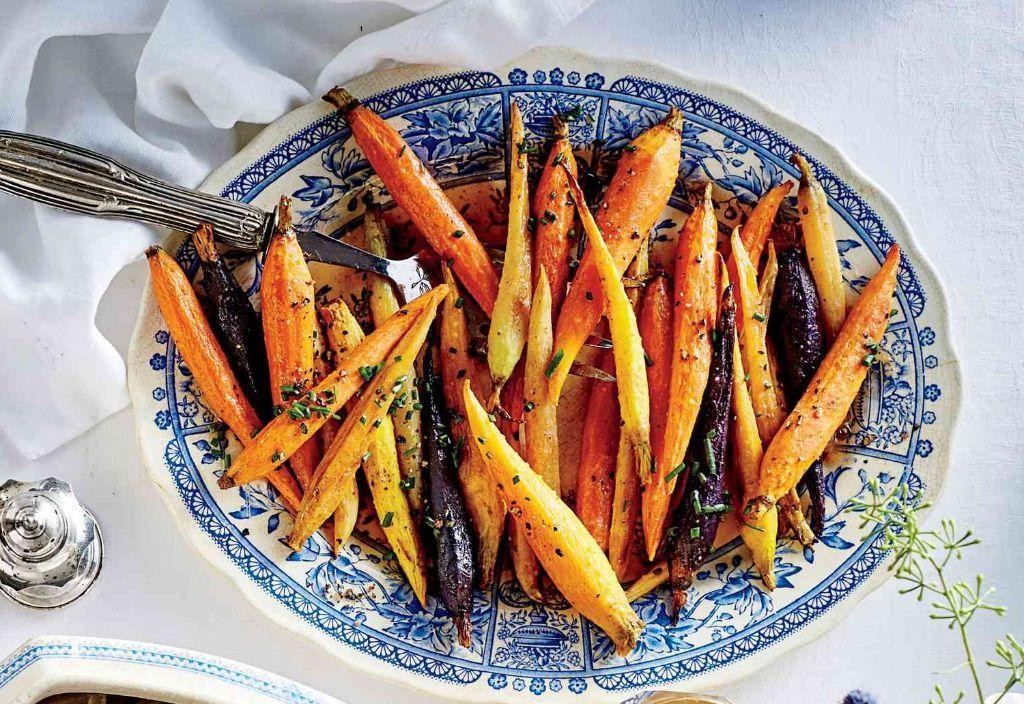
Spring has sprung, and so have these squash blossoms, ready to take your taste buds on a whimsical journey paired with the sweet embrace of honey-glazed carrots. It’s a dish that sings of garden freshness and the kind of sweetness that doesn’t come with a gym membership guilt.
Ingredients
- 1 cup of vibrant, just-picked squash blossoms
- 2 tablespoons of golden, sticky honey
- 1 pound of crisp, organic carrots
- 2 tablespoons of rich extra virgin olive oil
- 1 teaspoon of finely ground sea salt
- 1/2 teaspoon of freshly cracked black pepper
Instructions
- Preheat your oven to 375°F, because we’re about to turn these carrots into caramelized perfection.
- Wash and peel the carrots, then slice them into uniform sticks to ensure even cooking.
- Toss the carrot sticks with olive oil, salt, and pepper in a bowl until they’re evenly coated. Tip: Uniform coating means every bite is as delicious as the last.
- Spread the carrots on a baking sheet in a single layer, giving them space to roast rather than steam.
- Roast for 20 minutes, then drizzle with honey and gently toss. Tip: The honey will caramelize, so keep an eye to prevent burning.
- Return to the oven for another 10 minutes until the carrots are tender and glazed to a glossy finish.
- While the carrots roast, gently rinse the squash blossoms and pat them dry. Tip: Handle with care; these beauties are as delicate as they are delicious.
- Arrange the roasted carrots on a serving platter and adorn with the fresh squash blossoms for a pop of color and a hint of garden-fresh flavor.
Unbelievably tender with a sweet and slightly earthy flavor, these honey-glazed carrots paired with squash blossoms are a feast for the eyes and the palate. Serve them atop a rustic wooden board for that Instagram-worthy rustic charm, or alongside a grilled protein for a meal that’s as balanced as your life pretends to be.
Conclusion
Craving something unique? Our roundup of 24 Delicious Squash Blossom Recipes offers a treasure trove of ideas for every season. From savory dishes to sweet treats, there’s something to inspire every home cook. We’d love to hear which recipes you try—leave a comment with your favorites! Don’t forget to share the love by pinning this article on Pinterest. Happy cooking!