Hosting a Shabbat dinner doesn’t have to be daunting! Whether you’re a seasoned chef or just starting out, our roundup of 19 Delicious Shabbat Dinner Recipes is here to inspire your next family gathering. From timeless classics to modern twists, these dishes promise to bring warmth and joy to your table. Ready to make this Shabbat unforgettable? Let’s dive into these mouthwatering recipes that everyone will love!
Classic Challah Bread
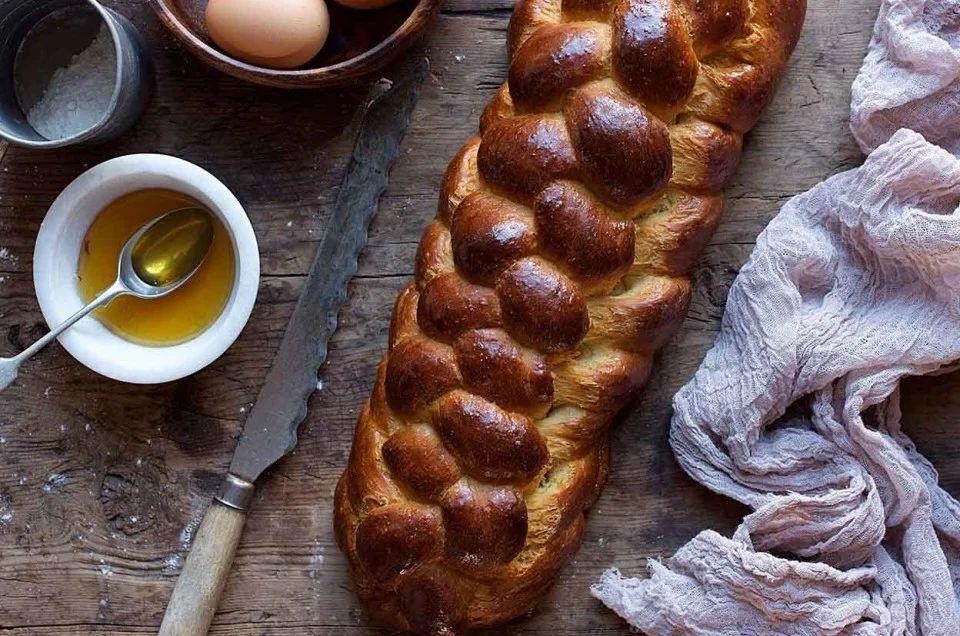
Baking your own bread at home can be a rewarding experience, especially when it’s as timeless as Classic Challah. This recipe walks you through each step, ensuring even beginners can achieve that perfect, golden loaf.
Ingredients
- 4 cups all-purpose flour (plus extra for dusting)
- 1/4 cup granulated sugar
- 1 tsp salt
- 2 1/4 tsp active dry yeast (1 packet)
- 1/2 cup warm water (110°F, or warm to the touch)
- 1/4 cup vegetable oil (or any neutral oil)
- 2 large eggs (1 for dough, 1 for egg wash)
- 1 tbsp honey (adjust to taste)
Instructions
- In a large bowl, whisk together flour, sugar, salt, and yeast.
- Add warm water, oil, 1 egg, and honey to the dry ingredients. Mix until a shaggy dough forms.
- Turn the dough onto a floured surface and knead for 10 minutes, until smooth and elastic. Tip: If the dough sticks, add a little more flour, but avoid adding too much to keep the bread tender.
- Place the dough in a greased bowl, cover with a damp towel, and let rise in a warm place for 1 hour, or until doubled in size.
- Punch down the dough and divide into 3 equal pieces. Roll each piece into a long rope, about 16 inches long.
- Braid the ropes together, pinching the ends to seal. Tip: For a tighter braid, stretch the ropes slightly as you braid.
- Transfer the braid to a baking sheet lined with parchment paper. Cover and let rise for another 30 minutes.
- Preheat the oven to 375°F. Beat the remaining egg and brush it over the braid. Tip: For a shinier crust, you can brush the loaf with egg wash again halfway through baking.
- Bake for 25-30 minutes, until the bread is golden brown and sounds hollow when tapped on the bottom.
Lightly sweet and wonderfully soft, this Challah is perfect for sandwiches, French toast, or simply enjoyed with a smear of butter. The braided design not only looks impressive but also creates delightful texture in every slice.
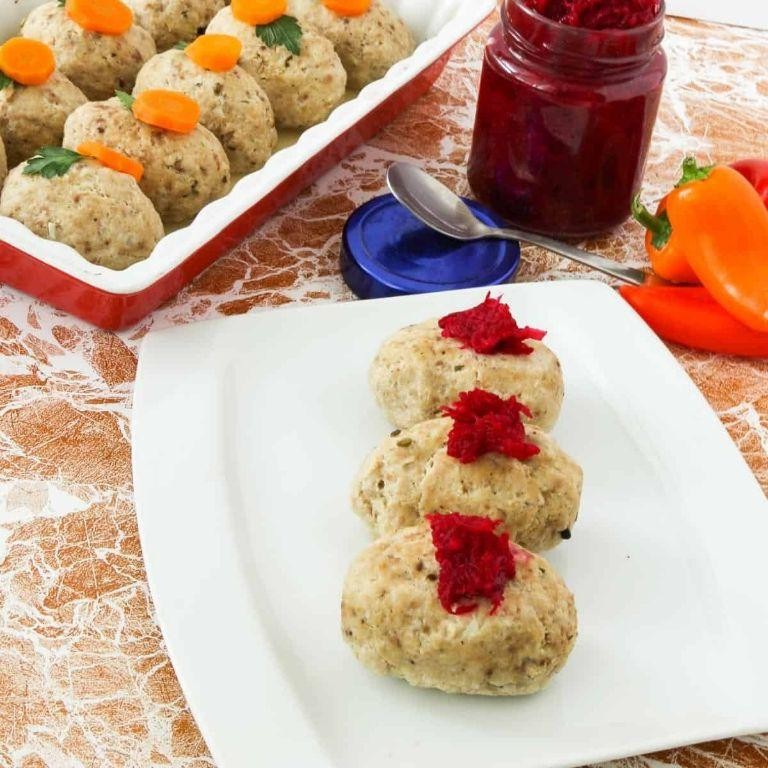
Homemade Matzo Ball Soup
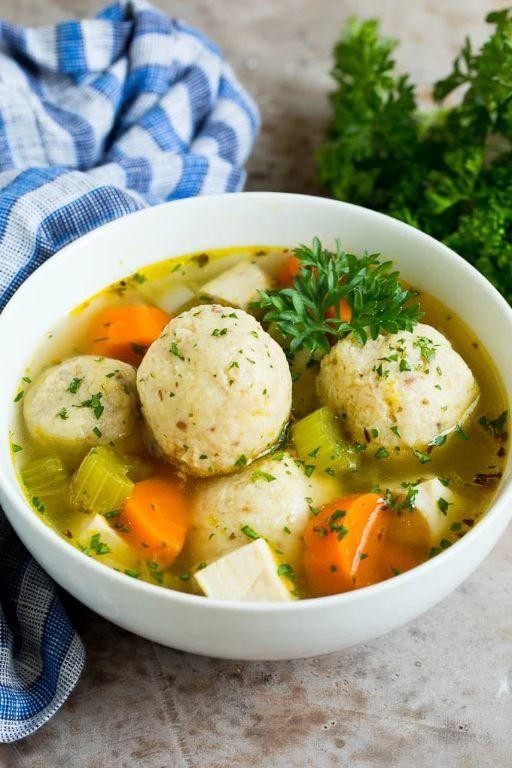
Creating a comforting bowl of homemade Matzo Ball Soup is easier than you might think, especially when you follow these step-by-step instructions. Let’s start by gathering all the necessary ingredients and then move on to the cooking process.
Ingredients
- 4 large eggs (room temperature for best results)
- 1/4 cup vegetable oil (or any neutral oil)
- 1 cup matzo meal
- 1 tsp salt (adjust to taste)
- 1/4 tsp black pepper (freshly ground preferred)
- 4 cups chicken broth (homemade or store-bought)
- 1 carrot, diced (for a sweet crunch)
- 1 stalk celery, diced (adds freshness)
- 1 small onion, diced (for depth of flavor)
- 2 tbsp fresh dill, chopped (or parsley for a different herb note)
Instructions
- In a large bowl, whisk together the eggs and vegetable oil until fully combined.
- Stir in the matzo meal, salt, and black pepper into the egg mixture until a thick batter forms. Let it rest for 15 minutes to allow the matzo meal to absorb the liquid.
- While the batter rests, bring the chicken broth to a simmer in a large pot over medium heat. Add the diced carrot, celery, and onion to the broth to cook until tender, about 10 minutes.
- With wet hands, form the matzo batter into 1-inch balls and gently drop them into the simmering broth. Cover the pot and let the matzo balls cook for 20 minutes without lifting the lid.
- After 20 minutes, check a matzo ball by cutting it in half; it should be light and fluffy throughout. If not, cover and cook for an additional 5 minutes.
- Stir in the fresh dill just before serving to preserve its vibrant color and flavor.
Velvety matzo balls floating in a savory broth with tender vegetables make this soup a heartwarming dish. Serve it with a sprinkle of extra dill on top for a beautiful presentation and an extra burst of flavor.
Slow Cooker Beef Brisket

Mastering the art of slow cooking begins with understanding the simplicity and depth of flavors it can bring to your table, especially with a dish as hearty as beef brisket.
Ingredients
- 3 lbs beef brisket (trim excess fat for leaner results)
- 1 tbsp olive oil (or any neutral oil)
- 1 cup beef broth (low sodium recommended)
- 1/4 cup soy sauce (adjust to taste)
- 1/4 cup brown sugar (packed)
- 1 tbsp Worcestershire sauce
- 1 tsp garlic powder
- 1 tsp onion powder
- 1/2 tsp black pepper (freshly ground preferred)
Instructions
- Heat olive oil in a large skillet over medium-high heat until shimmering, about 2 minutes.
- Season the brisket evenly with garlic powder, onion powder, and black pepper.
- Sear the brisket in the skillet for 3-4 minutes per side until a golden-brown crust forms.
- Transfer the brisket to the slow cooker, fat side up.
- In a medium bowl, whisk together beef broth, soy sauce, brown sugar, and Worcestershire sauce until the sugar dissolves.
- Pour the mixture over the brisket in the slow cooker, ensuring it’s well-coated.
- Cover and cook on LOW for 8-10 hours or on HIGH for 5-6 hours, until the meat is fork-tender.
- Remove the brisket from the slow cooker and let it rest for 10 minutes before slicing against the grain.
Brisket cooked this way falls apart with minimal effort, offering a melt-in-your-mouth texture and a rich, savory-sweet flavor profile. Serve it atop a mound of creamy mashed potatoes or shred it for sandwiches with a side of pickles for a delightful contrast.
Roasted Chicken with Garlic and Herbs
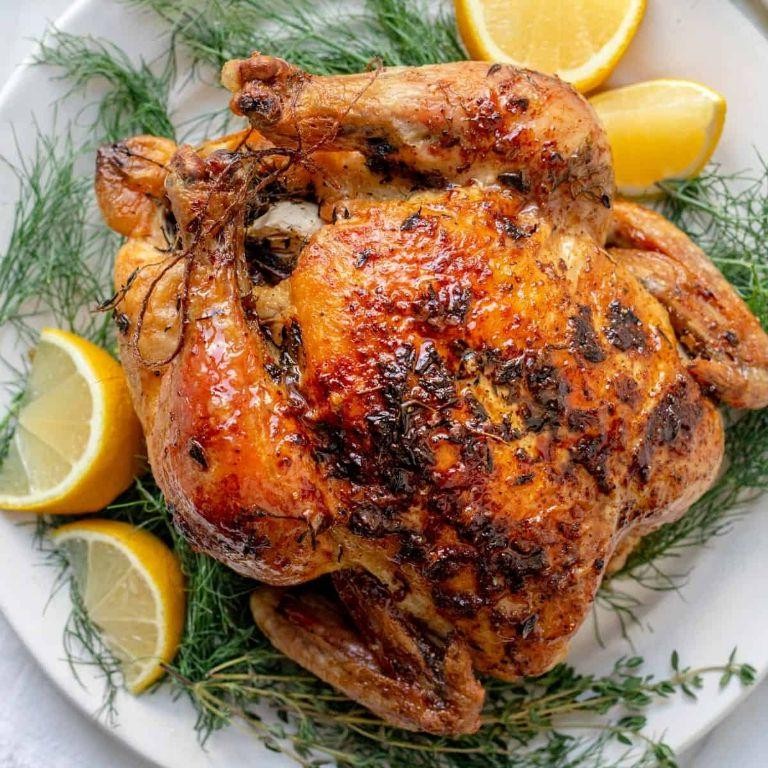
Every home cook needs a reliable roasted chicken recipe in their arsenal, and this Roasted Chicken with Garlic and Herbs is as foolproof as it gets. Let’s walk through the process together, ensuring you end up with a juicy, flavorful centerpiece for your meal.
Ingredients
- 1 whole chicken (about 4 lbs), patted dry
- 2 tbsp olive oil (or any neutral oil)
- 1 tbsp kosher salt (adjust to taste)
- 1 tsp black pepper
- 1 head garlic, cloves separated and peeled
- 1 bunch fresh herbs (thyme, rosemary, or sage), tied with kitchen twine
- 1 lemon, halved
Instructions
- Preheat your oven to 425°F (220°C) and position the rack in the middle.
- Rub the chicken all over with olive oil, then season inside and out with salt and pepper.
- Stuff the cavity with the garlic cloves, herb bundle, and lemon halves. Tip: The lemon adds moisture and a subtle citrus note.
- Truss the legs with kitchen twine to ensure even cooking. Tip: This step isn’t just for presentation; it helps the chicken cook uniformly.
- Place the chicken breast-side up on a rack in a roasting pan. Tip: Using a rack allows heat to circulate, crisping the skin all around.
- Roast for 50-60 minutes, or until the internal temperature reaches 165°F (74°C) at the thickest part of the thigh.
- Let the chicken rest for 15 minutes before carving. This allows the juices to redistribute, ensuring moist meat.
Flavorful and aromatic, this roasted chicken boasts crispy skin and tender meat infused with garlic and herbs. Serve it alongside roasted vegetables or over a bed of wild rice for a complete meal.
Sweet and Sour Meatballs

Now, let’s dive into making Sweet and Sour Meatballs, a dish that perfectly balances tangy and sweet flavors, making it a hit at any gathering. This recipe is straightforward, ensuring even beginners can achieve delicious results.
Ingredients
- 1 lb ground beef (or ground turkey for a lighter option)
- 1/2 cup breadcrumbs (panko works great for extra crunch)
- 1 large egg (helps bind the meatballs)
- 1/4 cup milk (any type, to moisten the breadcrumbs)
- 1 tbsp soy sauce (adds depth of flavor)
- 1/2 tsp garlic powder (or fresh minced garlic for more punch)
- 1/2 cup ketchup (the base for the sweet and sour sauce)
- 1/4 cup brown sugar (adjust to taste for sweetness)
- 2 tbsp apple cider vinegar (for the tangy kick)
- 1 tbsp cornstarch (mixed with water to thicken the sauce)
Instructions
- Preheat your oven to 375°F (190°C) and line a baking sheet with parchment paper for easy cleanup.
- In a large bowl, combine the ground beef, breadcrumbs, egg, milk, soy sauce, and garlic powder. Mix gently until just combined to avoid tough meatballs.
- Shape the mixture into 1-inch balls and place them on the prepared baking sheet, spacing them about an inch apart.
- Bake for 20 minutes, or until the meatballs are cooked through and lightly browned.
- While the meatballs bake, whisk together the ketchup, brown sugar, apple cider vinegar, and 1/4 cup water in a saucepan over medium heat.
- In a small bowl, mix the cornstarch with 2 tbsp water until smooth, then stir into the saucepan. Cook, stirring constantly, until the sauce thickens, about 5 minutes.
- Once the meatballs are done, toss them in the sweet and sour sauce until evenly coated.
Lusciously coated in a glossy, tangy-sweet sauce, these meatballs are irresistibly tender with a slight bite from the breadcrumbs. Serve them over steamed rice or as a party appetizer with toothpicks for easy grabbing.
Potato Kugel
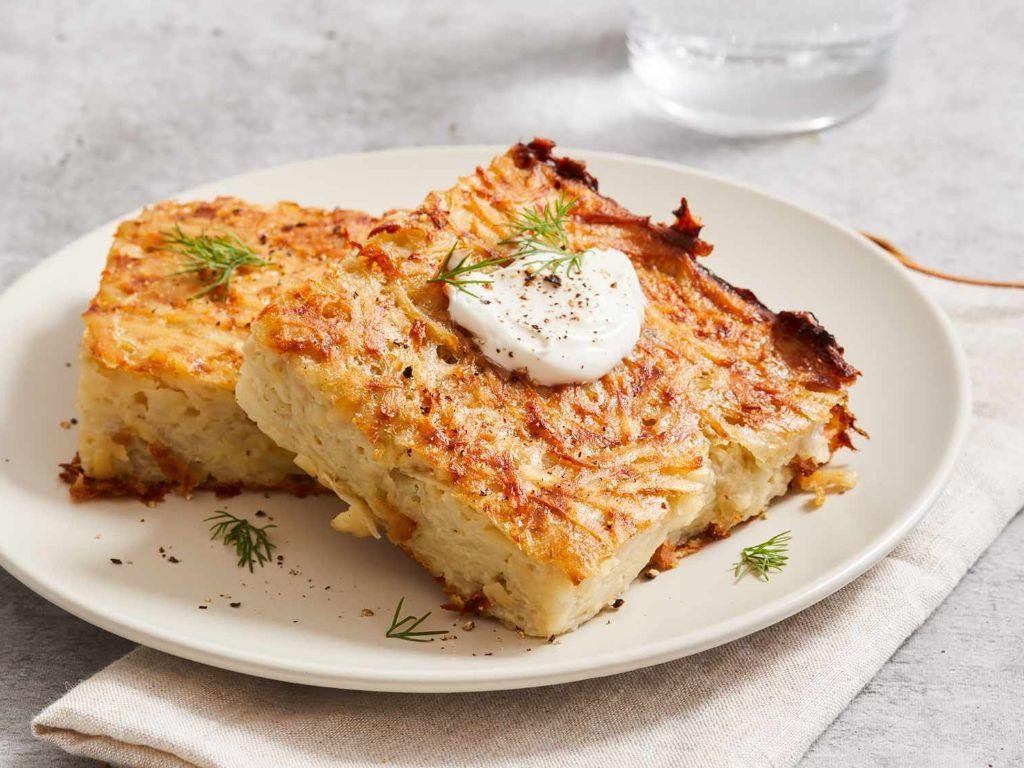
Just like grandma used to make, Potato Kugel is a comforting, crispy-edged Jewish dish that’s perfect for any occasion. This guide will walk you through making it from scratch, ensuring delicious results every time.
Ingredients
- 6 large potatoes, peeled (Yukon Gold recommended for creaminess)
- 1 large onion
- 4 large eggs
- 1/3 cup vegetable oil (or any neutral oil)
- 1/4 cup all-purpose flour
- 1 1/2 tsp salt (adjust to taste)
- 1/2 tsp black pepper (adjust to taste)
Instructions
- Preheat your oven to 375°F (190°C) and grease a 9×13 inch baking dish with some of the vegetable oil.
- Grate the potatoes and onion using a food processor or box grater. For a finer texture, pulse the potatoes in the food processor.
- Squeeze out as much liquid as possible from the grated potatoes and onion using a clean kitchen towel or cheesecloth. This step is crucial for achieving a crispy texture.
- In a large bowl, whisk together the eggs, remaining vegetable oil, flour, salt, and pepper until well combined.
- Add the grated potatoes and onion to the bowl and mix until everything is evenly coated with the egg mixture.
- Transfer the mixture to the prepared baking dish and spread it out evenly with a spatula.
- Bake in the preheated oven for 60-70 minutes, or until the top is golden brown and the edges are crispy. For an even crispier top, broil for the last 2-3 minutes, watching carefully to prevent burning.
- Let the kugel cool for about 10 minutes before slicing. This allows it to set and makes it easier to cut into neat squares.
Nowhere does comfort food get better than this Potato Kugel, with its golden crust and tender interior. Serve it warm with a dollop of sour cream or applesauce for a traditional touch, or enjoy it as a hearty side to your favorite main dishes.
Tzimmes with Carrots and Sweet Potatoes

Ready to dive into a dish that’s as vibrant in color as it is in flavor? Tzimmes with carrots and sweet potatoes is a sweet and savory delight that’s perfect for any season, combining simple ingredients into a comforting side or main.
Ingredients
- 2 cups carrots, peeled and sliced into 1-inch pieces (uniform sizes ensure even cooking)
- 2 cups sweet potatoes, peeled and cubed into 1-inch pieces (similar in size to carrots for consistency)
- 1/2 cup orange juice (freshly squeezed for the best flavor, or store-bought works fine)
- 1/4 cup honey (adjust based on your sweetness preference)
- 1 tbsp olive oil (or any neutral oil)
- 1/2 tsp cinnamon (adds a warm, spicy note)
- 1/4 tsp salt (adjust to taste)
Instructions
- Preheat your oven to 375°F (190°C) to ensure it’s ready for baking.
- In a large mixing bowl, combine the carrots and sweet potatoes. Drizzle with olive oil and toss to coat evenly, which helps in roasting them to perfection.
- Add the orange juice, honey, cinnamon, and salt to the bowl. Mix well until all pieces are evenly coated with the mixture, ensuring every bite is flavorful.
- Transfer the mixture to a baking dish, spreading it out in a single layer for uniform cooking.
- Bake in the preheated oven for 45 minutes, stirring halfway through, until the vegetables are tender and the sauce has thickened slightly.
- Tip: Check the vegetables at the 30-minute mark to prevent overcooking. They should be fork-tender but not mushy.
- Tip: If the sauce is too thin after baking, you can simmer the dish on the stove for a few minutes to reduce it further.
- Tip: For a caramelized finish, broil the tzimmes for the last 2-3 minutes of cooking, watching closely to avoid burning.
Mouthwatering and hearty, this tzimmes offers a delightful contrast between the soft vegetables and the sticky, sweet glaze. Serve it alongside roasted chicken or as part of a vegetarian feast for a colorful and satisfying dish.
Gefilte Fish with Horseradish
Kickstarting your culinary journey with a classic Jewish dish, Gefilte Fish with Horseradish is a delightful way to explore traditional flavors. This recipe simplifies the process, making it accessible for beginners eager to try their hand at this festive dish.
Ingredients
- 1 lb ground whitefish and pike mix (fresh or frozen, thawed)
- 1 large egg (room temperature for better binding)
- 1/4 cup matzo meal (or breadcrumbs as a substitute)
- 1 small onion, finely grated (about 1/4 cup)
- 1 tsp sugar (adjust to taste)
- 1 tsp salt
- 1/4 tsp black pepper
- 1 cup water (for poaching)
- 1 carrot, sliced (for garnish and flavor)
- 1/2 cup prepared horseradish (adjust spiciness to preference)
Instructions
- In a large bowl, combine the ground fish, egg, matzo meal, grated onion, sugar, salt, and pepper. Mix gently until just combined; overmixing can make the fish balls tough.
- Wet your hands with cold water to prevent sticking, then form the mixture into 8 equal-sized balls. Tip: Chilling the mixture for 30 minutes beforehand can make shaping easier.
- In a wide pot, bring 1 cup of water to a simmer over medium heat. Add the carrot slices to the water for extra flavor.
- Gently place the fish balls into the simmering water, ensuring they are not crowded. Cover and simmer on low heat for 20 minutes. Tip: Do not boil, as high heat can break the fish balls apart.
- After 20 minutes, carefully remove the fish balls with a slotted spoon and let them cool on a plate. The cooking liquid can be strained and reduced to make a light sauce, if desired.
- Serve the gefilte fish chilled or at room temperature, accompanied by a generous dollop of horseradish. Tip: For an extra touch, garnish with the poached carrot slices and a sprinkle of fresh dill.
Offering a delicate balance of sweet and savory, this Gefilte Fish with Horseradish is wonderfully light yet satisfying. The horseradish adds a sharp contrast that elevates the mild fish, making it a perfect starter for any meal. Try serving it on a bed of lettuce for a refreshing presentation.
Israeli Salad with Cucumbers and Tomatoes

Now, let’s dive into making a refreshing Israeli Salad with Cucumbers and Tomatoes, a dish that’s as vibrant as it is simple to prepare. Perfect for beginners, this recipe will guide you through each step to ensure a delicious outcome.
Ingredients
- 2 cups diced cucumbers (peeled if desired for a milder taste)
- 2 cups diced tomatoes (ripe but firm for the best texture)
- 1/4 cup finely chopped red onion (soak in cold water for 10 minutes to mellow the flavor)
- 2 tbsp extra virgin olive oil (or any neutral oil)
- 1 tbsp fresh lemon juice (adjust to taste)
- 1/2 tsp salt (adjust to taste)
- 1/4 tsp black pepper (freshly ground preferred)
- 2 tbsp chopped fresh parsley (for garnish)
Instructions
- In a large mixing bowl, combine the diced cucumbers and tomatoes.
- Add the finely chopped red onion to the bowl, ensuring it’s evenly distributed among the cucumbers and tomatoes.
- Drizzle the extra virgin olive oil and fresh lemon juice over the salad.
- Sprinkle the salt and black pepper over the ingredients.
- Gently toss the salad to coat all the ingredients evenly with the dressing, being careful not to crush the tomatoes.
- Let the salad sit for 5 minutes to allow the flavors to meld together.
- Before serving, garnish with chopped fresh parsley for a pop of color and freshness.
This Israeli Salad boasts a crisp texture and a bright, tangy flavor that’s incredibly refreshing. Serve it alongside grilled meats or as a standalone dish with a sprinkle of feta cheese for an extra layer of flavor.
Stuffed Cabbage Rolls
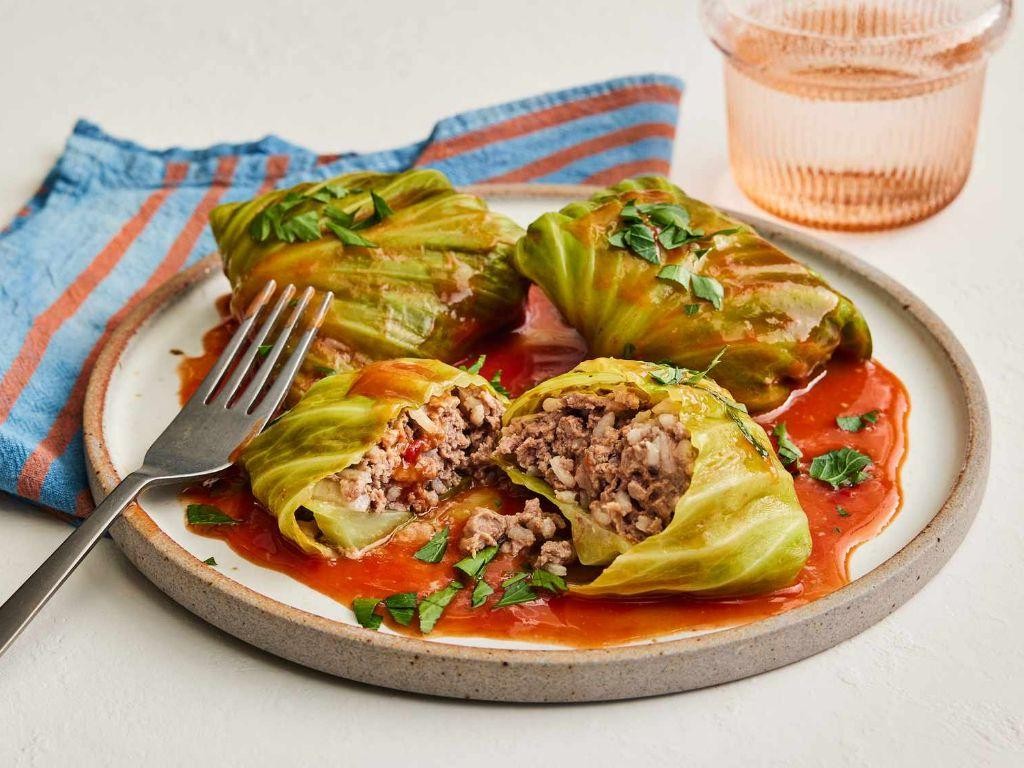
Here’s a classic comfort dish that’s as satisfying to make as it is to eat. Stuffed cabbage rolls, with their tender leaves and savory filling, are a testament to the beauty of simple ingredients coming together.
Ingredients
- 1 large head of cabbage (look for one with loose, pliable leaves)
- 1 lb ground beef (or a mix of beef and pork for more flavor)
- 1 cup cooked white rice (leftover rice works great here)
- 1 small onion, finely diced (about 1/2 cup)
- 2 cloves garlic, minced (or 1/2 tsp garlic powder)
- 1 egg, lightly beaten (helps bind the filling)
- 1 tsp salt (adjust to taste)
- 1/2 tsp black pepper (freshly ground preferred)
- 2 cups tomato sauce (homemade or store-bought)
- 1 tbsp olive oil (or any neutral oil)
Instructions
- Bring a large pot of water to a boil. Carefully submerge the whole head of cabbage and boil for 3-5 minutes until the leaves are soft and pliable. Remove and let cool slightly before peeling off 12 large leaves.
- In a mixing bowl, combine the ground beef, cooked rice, onion, garlic, egg, salt, and pepper. Mix gently but thoroughly to ensure even distribution of ingredients.
- Lay a cabbage leaf flat and place about 1/4 cup of the filling near the stem end. Fold the sides over the filling and roll tightly from the stem end to the top. Repeat with remaining leaves and filling.
- Heat olive oil in a large skillet over medium heat. Arrange the rolls seam-side down in the skillet and brown lightly for 2-3 minutes on each side for added flavor.
- Pour tomato sauce over the rolls, cover, and simmer on low heat for 45 minutes, ensuring the sauce doesn’t boil dry. Check occasionally and add a little water if needed.
Expect tender cabbage leaves enveloping a juicy, flavorful filling, all bathed in a rich tomato sauce. Serve these rolls over mashed potatoes or with a side of crusty bread to soak up the delicious sauce.
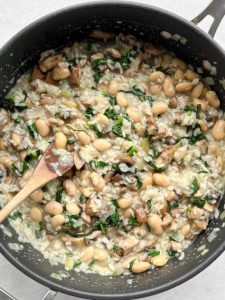
Lentil Soup with Vegetables
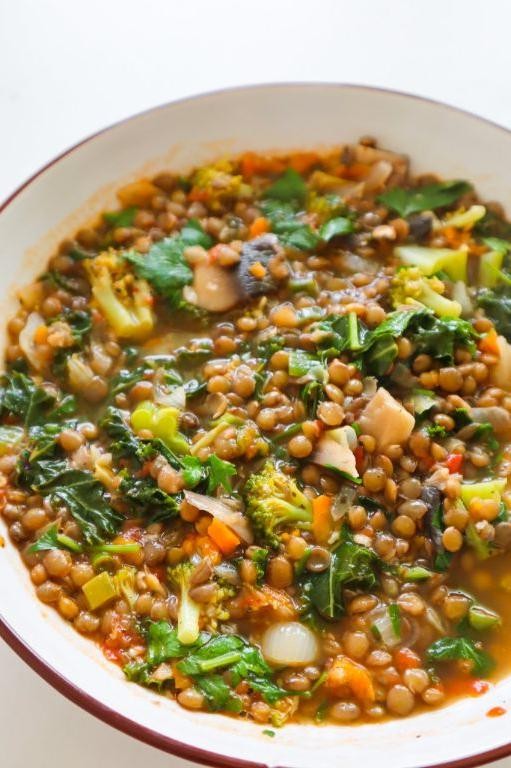
Unlock the comforting embrace of a hearty Lentil Soup with Vegetables, a dish that marries simplicity with depth of flavor, perfect for any season. This guide will walk you through each step, ensuring a delicious outcome every time.
Ingredients
- 1 cup dried lentils (rinsed and drained)
- 2 tbsp olive oil (or any neutral oil)
- 1 medium onion, diced
- 2 carrots, peeled and diced
- 2 celery stalks, diced
- 3 garlic cloves, minced
- 6 cups vegetable broth (adjust for desired thickness)
- 1 tsp ground cumin (adjust to taste)
- 1/2 tsp smoked paprika
- Salt and pepper to taste
- 2 cups spinach, roughly chopped (optional for added greens)
Instructions
- Heat the olive oil in a large pot over medium heat until shimmering, about 1 minute.
- Add the diced onion, carrots, and celery to the pot. Cook, stirring occasionally, until the vegetables soften, about 5 minutes.
- Stir in the minced garlic, ground cumin, and smoked paprika. Cook for 1 minute until fragrant, being careful not to burn the garlic.
- Add the rinsed lentils and vegetable broth to the pot. Bring to a boil, then reduce heat to low. Cover and simmer for 25 minutes, or until the lentils are tender.
- Season the soup with salt and pepper to taste. If using, stir in the spinach until just wilted, about 1 minute.
- Remove from heat and let the soup sit for 5 minutes before serving to allow the flavors to meld.
Velvety lentils and tender vegetables come together in this soup for a satisfying texture, while the cumin and smoked paprika offer a warm, smoky flavor. Serve with a slice of crusty bread or a dollop of yogurt for an extra touch of comfort.
Roasted Root Vegetables
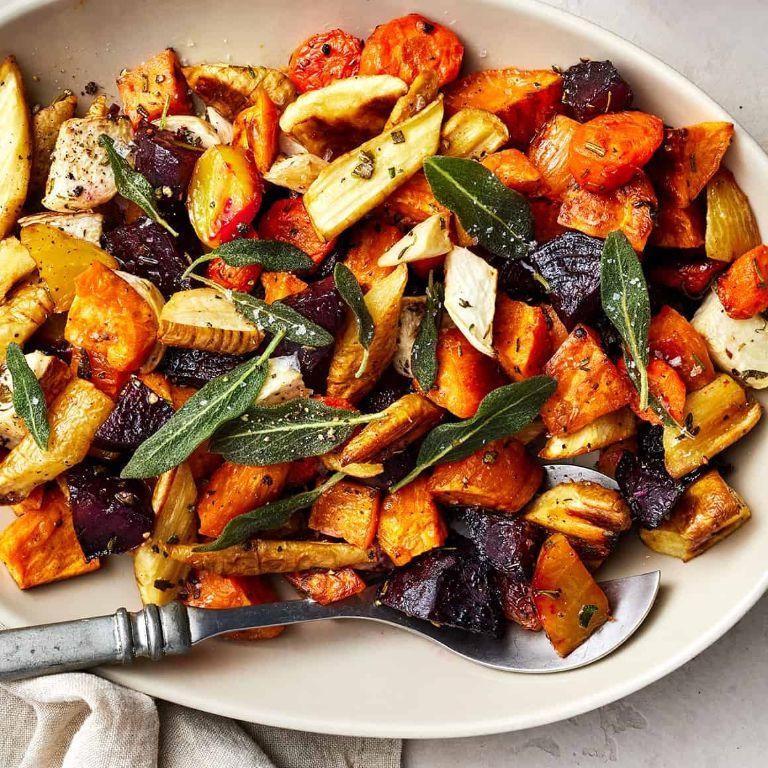
Preparing roasted root vegetables is a straightforward way to bring out the natural sweetness and earthy flavors of your favorite winter veggies. Perfect for beginners, this method ensures a deliciously caramelized result every time.
Ingredients
- 2 cups carrots, peeled and cut into 1-inch pieces (uniform sizes cook evenly)
- 2 cups parsnips, peeled and cut into 1-inch pieces
- 2 cups sweet potatoes, peeled and cut into 1-inch cubes
- 3 tbsp olive oil (or any neutral oil)
- 1 tsp salt (adjust to taste)
- 1/2 tsp black pepper (freshly ground preferred)
- 1 tsp dried thyme (or 1 tbsp fresh)
Instructions
- Preheat your oven to 400°F (200°C) to ensure it’s hot enough for roasting.
- In a large bowl, toss the carrots, parsnips, and sweet potatoes with olive oil until evenly coated. Tip: Use your hands for an even coat.
- Spread the vegetables in a single layer on a baking sheet. Crowding can lead to steaming instead of roasting.
- Sprinkle the salt, pepper, and thyme over the vegetables. Tip: Seasoning evenly ensures every bite is flavorful.
- Roast in the preheated oven for 25-30 minutes, stirring halfway through, until the vegetables are tender and golden brown. Tip: The edges should be slightly caramelized for the best flavor.
Golden and crispy on the outside while tender inside, these roasted root vegetables offer a delightful contrast in textures. Serve them alongside your favorite protein or toss into a grain bowl for a hearty meal.
Chicken Soup with Noodles

Zesty and comforting, chicken soup with noodles is a classic dish that warms the soul and fills the belly. Perfect for any season, this recipe is straightforward and yields a deliciously hearty meal.
Ingredients
- 1 tbsp olive oil (or any neutral oil)
- 1 medium onion, diced
- 2 carrots, peeled and sliced
- 2 celery stalks, sliced
- 2 garlic cloves, minced
- 1 lb chicken breast, cubed
- 6 cups chicken broth (low sodium preferred)
- 2 cups egg noodles
- 1 tsp salt (adjust to taste)
- 1/2 tsp black pepper (adjust to taste)
- 1 tsp dried thyme
- 2 tbsp fresh parsley, chopped (for garnish)
Instructions
- Heat olive oil in a large pot over medium heat until shimmering, about 1 minute.
- Add diced onion, sliced carrots, and celery to the pot. Cook, stirring occasionally, until vegetables are softened, about 5 minutes.
- Stir in minced garlic and cook for 30 seconds until fragrant.
- Add cubed chicken breast to the pot. Cook until the chicken is no longer pink on the outside, about 3 minutes.
- Pour in chicken broth, then add salt, black pepper, and dried thyme. Bring to a boil.
- Once boiling, reduce heat to low and simmer for 15 minutes to allow flavors to meld.
- Add egg noodles to the pot and cook according to package instructions, usually about 8 minutes, until noodles are tender.
- Garnish with fresh parsley before serving.
Best enjoyed hot, this chicken soup with noodles offers a comforting texture with tender chicken and soft noodles. For a creative twist, serve with a sprinkle of grated Parmesan cheese or a side of crusty bread for dipping.
Baked Salmon with Dill Sauce

Zesty and flavorful, this Baked Salmon with Dill Sauce is a perfect dish for those looking to impress with minimal effort. Follow these steps to create a meal that’s both elegant and easy to make.
Ingredients
- 1 lb salmon fillet (skin-on for extra flavor)
- 1 tbsp olive oil (or any neutral oil)
- 1/2 tsp salt (adjust to taste)
- 1/4 tsp black pepper (freshly ground preferred)
- 1/2 cup sour cream (for a lighter version, use Greek yogurt)
- 2 tbsp fresh dill, chopped (plus extra for garnish)
- 1 tbsp lemon juice (freshly squeezed for best flavor)
- 1/2 tsp garlic powder (or 1 clove fresh garlic, minced)
Instructions
- Preheat your oven to 375°F (190°C) and line a baking sheet with parchment paper for easy cleanup.
- Place the salmon fillet on the prepared baking sheet, skin side down. Drizzle with olive oil and season with salt and black pepper.
- Bake in the preheated oven for 12-15 minutes, or until the salmon flakes easily with a fork. Tip: Avoid overcooking to keep the salmon moist.
- While the salmon bakes, prepare the dill sauce by combining sour cream, chopped dill, lemon juice, and garlic powder in a small bowl. Mix well. Tip: Let the sauce sit for 10 minutes to allow the flavors to meld.
- Once the salmon is done, let it rest for 2 minutes before serving. This helps the juices redistribute.
- Serve the baked salmon with a generous dollop of dill sauce on top. Garnish with additional fresh dill if desired.
Amazingly tender and flaky, the salmon pairs beautifully with the creamy, tangy dill sauce. For a complete meal, serve alongside roasted vegetables or a crisp green salad.
Spinach and Cheese Bourekas

Baking Spinach and Cheese Bourekas is a delightful way to bring a taste of the Mediterranean into your kitchen. These flaky pastries are perfect for any meal, offering a savory blend of spinach and cheese wrapped in a crispy crust.
Ingredients
- 1 package (17.3 oz) frozen puff pastry, thawed (keep cold until use)
- 1 cup ricotta cheese (whole milk for creaminess)
- 1 cup feta cheese, crumbled (adds a tangy flavor)
- 1 cup frozen spinach, thawed and squeezed dry (prevents sogginess)
- 1 egg, beaten (for egg wash)
- 1 tbsp olive oil (or any neutral oil)
- 1/2 tsp salt (adjust to taste)
- 1/4 tsp black pepper (freshly ground preferred)
Instructions
- Preheat your oven to 375°F (190°C) and line a baking sheet with parchment paper.
- In a mixing bowl, combine ricotta cheese, feta cheese, spinach, olive oil, salt, and pepper until well mixed.
- Unfold one sheet of puff pastry on a lightly floured surface and roll it out slightly to smooth any seams.
- Cut the pastry into 9 equal squares using a sharp knife or pizza cutter.
- Place a tablespoon of the spinach and cheese mixture in the center of each square.
- Fold the pastry over the filling to form a triangle, pressing the edges firmly to seal. Use a fork to crimp the edges for a decorative touch.
- Transfer the bourekas to the prepared baking sheet and brush the tops with beaten egg for a golden finish.
- Bake for 20-25 minutes, or until the bourekas are puffed and golden brown.
- Let cool on the baking sheet for 5 minutes before serving to allow the filling to set.
Kickstart your meal with these Spinach and Cheese Bourekas, where the crispy exterior gives way to a creamy, flavorful filling. Serve them warm with a side of tzatziki or a fresh salad for a complete experience.
Apple Honey Cake

Here’s a delightful Apple Honey Cake that combines the sweetness of honey with the tartness of apples for a perfect balance. This recipe is straightforward, making it ideal for beginners eager to bake something special.
Ingredients
- 2 cups all-purpose flour (sifted for a lighter texture)
- 1 tsp baking soda (ensure it’s fresh for best rise)
- 1/2 tsp salt (fine sea salt recommended)
- 1 tsp ground cinnamon (or adjust to taste)
- 1/2 cup unsalted butter, softened (room temperature for easier mixing)
- 3/4 cup honey (local honey preferred for flavor)
- 2 large eggs (room temperature blends better)
- 1 tsp vanilla extract (pure extract for best flavor)
- 2 cups diced apples (peeled, any tart variety like Granny Smith)
Instructions
- Preheat your oven to 350°F (175°C) and grease a 9-inch round cake pan, lining the bottom with parchment paper for easy removal.
- In a medium bowl, whisk together the flour, baking soda, salt, and cinnamon until well combined. This ensures an even distribution of leavening agents.
- In a large bowl, beat the softened butter and honey together on medium speed until light and fluffy, about 3 minutes. Scrape down the sides as needed.
- Add the eggs one at a time to the butter mixture, beating well after each addition. Stir in the vanilla extract for flavor depth.
- Gradually fold the dry ingredients into the wet mixture until just combined. Overmixing can lead to a dense cake.
- Gently fold in the diced apples until evenly distributed throughout the batter.
- Pour the batter into the prepared cake pan, smoothing the top with a spatula. Tap the pan lightly on the counter to remove any air bubbles.
- Bake for 40-45 minutes, or until a toothpick inserted into the center comes out clean. The cake should be golden and spring back when lightly touched.
- Allow the cake to cool in the pan for 10 minutes before transferring to a wire rack to cool completely. This prevents it from breaking apart.
Combining the moist texture from the apples with the rich sweetness of honey, this cake is a comforting treat. Serve it warm with a dollop of whipped cream or a drizzle of caramel for an extra indulgent dessert.
Chocolate Babka

Creating a Chocolate Babka might seem daunting at first, but with this step-by-step guide, you’ll find it’s quite achievable. Carefully follow each step to ensure your babka turns out perfectly twisted and deliciously chocolatey.
Ingredients
- 4 cups all-purpose flour (spooned and leveled)
- 1/2 cup granulated sugar
- 1 packet (2 1/4 tsp) active dry yeast
- 1/2 cup whole milk, warmed to 110°F (use a thermometer for accuracy)
- 2 large eggs, at room temperature
- 1 tsp vanilla extract
- 1/2 cup unsalted butter, softened (cut into pieces for easier mixing)
- 1/2 tsp salt
- 1 cup semisweet chocolate chips (or chopped chocolate for a richer flavor)
- 1/4 cup unsweetened cocoa powder
- 1/2 cup powdered sugar (for dusting, optional)
Instructions
- In a large bowl, whisk together flour, granulated sugar, and yeast.
- Add warmed milk, eggs, and vanilla extract to the dry ingredients. Mix until a shaggy dough forms.
- Gradually incorporate the softened butter and salt, kneading the dough for about 10 minutes until smooth and elastic.
- Cover the bowl with a damp towel and let the dough rise in a warm place for 1 to 1.5 hours, or until doubled in size.
- While the dough rises, mix chocolate chips and cocoa powder in a small bowl for the filling.
- Once risen, punch down the dough and roll it out on a floured surface into a 16×12-inch rectangle.
- Sprinkle the chocolate filling evenly over the dough, leaving a 1-inch border around the edges.
- Starting from the long side, tightly roll the dough into a log. Using a sharp knife, cut the log in half lengthwise.
- Twist the two halves together, keeping the cut sides facing up, then transfer to a greased 9×5-inch loaf pan.
- Cover and let rise for another 45 minutes. Preheat your oven to 350°F during the last 15 minutes of rising.
- Bake the babka for 30-35 minutes, or until a toothpick inserted into the center comes out clean.
- Let cool in the pan for 10 minutes, then transfer to a wire rack to cool completely. Dust with powdered sugar before serving, if desired.
When you slice into your Chocolate Babka, you’ll be greeted with beautiful swirls of chocolate throughout the tender, slightly sweet bread. Enjoy it warm with a cup of coffee for a truly indulgent experience.
Rugelach with Jam and Nuts

You’ll find that making Rugelach with Jam and Nuts is a delightful way to bring a touch of sweetness to your table. This recipe walks you through creating these tender, flaky pastries filled with your favorite jam and crunchy nuts, perfect for any occasion.
Ingredients
- 2 cups all-purpose flour (spooned and leveled)
- 1/2 tsp salt
- 1 cup unsalted butter, cold and cubed (for flakier pastry)
- 8 oz cream cheese, cold and cubed
- 1/4 cup granulated sugar
- 1/2 cup your favorite jam (apricot or raspberry works well)
- 1/2 cup finely chopped nuts (walnuts or pecans recommended)
- 1 egg (for egg wash)
- 1 tbsp water (for egg wash)
Instructions
- In a large bowl, whisk together the flour and salt until combined.
- Add the cold butter and cream cheese to the flour mixture. Use a pastry cutter or your fingers to work them in until the mixture resembles coarse crumbs.
- Sprinkle the granulated sugar over the mixture and gently mix to incorporate.
- Gather the dough into a ball, divide it into two equal parts, and flatten each into a disk. Wrap in plastic wrap and refrigerate for at least 1 hour, or until firm.
- Preheat your oven to 350°F (175°C) and line two baking sheets with parchment paper.
- On a lightly floured surface, roll one disk of dough into a 1/8-inch thick circle. Spread half of the jam evenly over the dough, then sprinkle with half of the chopped nuts.
- Cut the circle into 12 wedges. Starting from the wide end, roll each wedge tightly towards the point.
- Place the rugelach on the prepared baking sheets, seam side down. Repeat with the second disk of dough.
- In a small bowl, whisk together the egg and water to make an egg wash. Brush the tops of the rugelach lightly with the egg wash.
- Bake for 20-25 minutes, or until golden brown. Let cool on the baking sheets for 5 minutes before transferring to a wire rack to cool completely.
These rugelach emerge from the oven with a beautifully golden exterior and a tender, flaky interior. The jam and nuts create a sweet and nutty filling that’s irresistible. Serve them warm with a dusting of powdered sugar for an extra touch of sweetness.
Shakshuka with Eggs and Tomatoes

This shakshuka recipe is a vibrant, comforting dish that’s perfect for any meal of the day. Traditionally hailing from North Africa, it’s a simple yet flavorful combination of eggs poached in a spicy tomato sauce. Let’s dive into making this delicious dish step by step.
Ingredients
- 2 tbsp olive oil (or any neutral oil)
- 1 medium onion, diced
- 1 bell pepper, diced (any color)
- 3 garlic cloves, minced
- 1 tsp ground cumin
- 1 tsp paprika (adjust to taste)
- 1/4 tsp chili flakes (adjust to taste)
- 28 oz canned whole tomatoes, crushed by hand
- Salt to taste
- 4 large eggs
- Fresh cilantro or parsley, chopped (for garnish)
Instructions
- Heat olive oil in a large skillet over medium heat until shimmering, about 2 minutes.
- Add diced onion and bell pepper. Cook, stirring occasionally, until softened, about 5 minutes.
- Stir in minced garlic, cumin, paprika, and chili flakes. Cook until fragrant, about 1 minute.
- Add crushed tomatoes and salt. Simmer, uncovered, until the sauce thickens slightly, about 10 minutes.
- Using a spoon, make 4 small wells in the sauce. Crack an egg into each well.
- Cover the skillet and cook until the eggs are done to your liking, about 5 minutes for runny yolks.
- Garnish with chopped cilantro or parsley before serving.
Best enjoyed straight from the skillet, this shakshuka boasts a rich, velvety tomato sauce with perfectly cooked eggs. Serve with crusty bread to soak up all the delicious sauce.
Conclusion
Exploring these 19 Delicious Shabbat Dinner Recipes offers a treasure trove of inspiration for your next family gathering. Each dish is a celebration of flavor and tradition, perfect for bringing everyone together. We’d love to hear which recipes become your family’s favorites—leave a comment below! And don’t forget to share this roundup on Pinterest to spread the joy of cooking. Happy Shabbat!