Nothing beats the joy of biting into a sweet, creamy sandwich cookie, especially when it’s homemade! Whether you’re craving classic flavors or eager to try something new, our roundup of 16 Delicious Sandwich Cookie Recipes is sure to delight your sweet tooth. From timeless favorites to innovative twists, these recipes promise to bring a little extra happiness to your baking adventures. Let’s dive into the deliciousness!
Classic Vanilla Sandwich Cookies with Creamy Filling

Now, as the early morning light filters through the kitchen window, there’s something comforting about the thought of baking. These vanilla sandwich cookies, with their creamy filling, are like little hugs in cookie form, perfect for savoring with a cup of tea or sharing with someone special.
Ingredients
- 2 cups of all-purpose flour, because that’s what gives them their tender crumb
- A pinch of salt, just to balance the sweetness
- 1 cup of unsalted butter, softened to room temperature for that perfect mixability
- 3/4 cup of granulated sugar, for that just-right sweetness
- 1 large egg, to bind everything together beautifully
- 2 teaspoons of vanilla extract, because vanilla is the star here
- A splash of milk, if the dough needs a little help coming together
- 1 1/2 cups of powdered sugar, for the filling that’s dreamily creamy
- 1/4 cup of butter, softened, because it’s all about that smooth texture
- 1 teaspoon of vanilla extract, to echo the cookie’s flavor
- A couple of tablespoons of heavy cream, to get the filling to that spreadable consistency
Instructions
- Preheat your oven to 350°F (175°C), because a consistent temperature is key to even baking.
- In a bowl, whisk together the flour and salt, setting the stage for your dry ingredients.
- Cream the butter and granulated sugar together until light and fluffy, about 3 minutes, which introduces air for a lighter cookie.
- Beat in the egg and vanilla extract until fully incorporated, ensuring every bite is flavorful.
- Gradually mix in the dry ingredients, being careful not to overwork the dough—this keeps the cookies tender.
- If the dough feels too dry, add a splash of milk, just until it comes together.
- Roll the dough into small balls and place them on a baking sheet, then gently flatten with your fingers for that classic cookie shape.
- Bake for 10-12 minutes, until the edges are just golden, watching closely to avoid overbaking.
- Let the cookies cool on the sheet for 5 minutes, then transfer to a wire rack to cool completely—patience here ensures they don’t break when filled.
- For the filling, beat together the powdered sugar, butter, and vanilla extract, then add heavy cream a tablespoon at a time until it’s smooth and spreadable.
- Once the cookies are cool, spread a generous amount of filling on the flat side of one cookie and top with another, pressing gently to sandwich them together.
Vanilla sandwich cookies are a delightful treat, with a tender crumb that gives way to a creamy, dreamy center. They’re perfect for afternoon tea or as a sweet ending to any meal, and if you’re feeling adventurous, a sprinkle of edible flowers or a drizzle of melted chocolate can elevate them to something truly special.
Chocolate Sandwich Cookies with Mint Buttercream
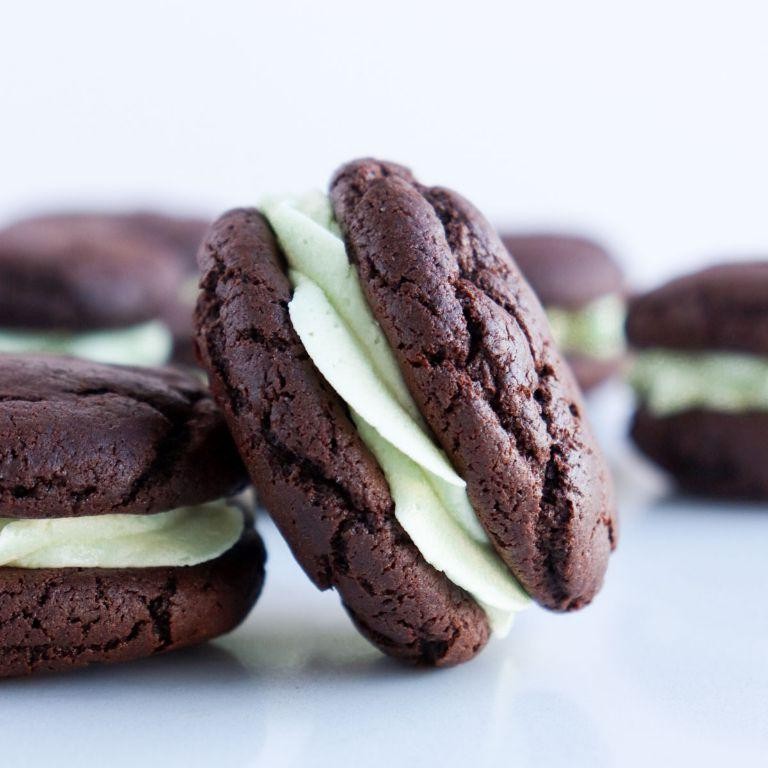
Evenings like these call for something sweet, something that feels like a quiet moment wrapped in chocolate and mint. These chocolate sandwich cookies with mint buttercream are just that—a little escape in every bite.
Ingredients
- 1 cup of all-purpose flour
- 1/2 cup of unsweetened cocoa powder
- 1/2 teaspoon of baking soda
- 1/4 teaspoon of salt
- 1/2 cup of softened unsalted butter
- 3/4 cup of granulated sugar
- 1 large egg
- 1 teaspoon of vanilla extract
- For the mint buttercream: 1/2 cup of softened unsalted butter, 2 cups of powdered sugar, a splash of milk, 1/2 teaspoon of peppermint extract, and a couple of drops of green food coloring (optional)
Instructions
- Preheat your oven to 350°F and line a baking sheet with parchment paper.
- In a bowl, whisk together the flour, cocoa powder, baking soda, and salt.
- In another bowl, beat the softened butter and granulated sugar until fluffy, about 3 minutes.
- Add the egg and vanilla extract to the butter mixture, beating until just combined.
- Gradually mix in the dry ingredients until a dough forms. Tip: Don’t overmix to keep the cookies tender.
- Roll the dough into 1-inch balls, place them on the baking sheet, and flatten slightly with your palm.
- Bake for 10-12 minutes, until the edges are set but the centers are still soft. Tip: They’ll firm up as they cool.
- Let the cookies cool on the sheet for 5 minutes, then transfer to a wire rack to cool completely.
- For the buttercream, beat the softened butter until creamy, then gradually add the powdered sugar, milk, and peppermint extract. Add food coloring if using.
- Spread a generous amount of buttercream on the flat side of a cookie and sandwich with another. Tip: Chill the cookies for 30 minutes before serving to let the flavors meld.
Soft cookies with a crisp edge embrace the cool, creamy mint filling, creating a contrast that’s as delightful as it is delicious. Serve these with a glass of cold milk or crumble over vanilla ice cream for an extra treat.
Peanut Butter Sandwich Cookies with Jelly Filling

Fondly remembering the simple joys of childhood, these peanut butter sandwich cookies with jelly filling bring a nostalgic warmth to any kitchen. They’re a tender nod to the past, perfect for quiet afternoons or sharing with someone special.
Ingredients
- 1 cup of creamy peanut butter, plus a little extra for spreading
- 1/2 cup of unsalted butter, softened to room temperature
- 1/2 cup of granulated sugar
- 1/2 cup of packed brown sugar
- 1 large egg
- 1 tsp of vanilla extract
- 1 1/4 cups of all-purpose flour
- 1/2 tsp of baking soda
- 1/4 tsp of salt
- A generous splash of your favorite jelly or jam
Instructions
- Preheat your oven to 350°F and line a baking sheet with parchment paper.
- In a large bowl, cream together the peanut butter, butter, granulated sugar, and brown sugar until light and fluffy, about 3 minutes.
- Beat in the egg and vanilla extract until fully incorporated.
- Whisk together the flour, baking soda, and salt in a separate bowl, then gradually mix into the peanut butter mixture until just combined.
- Roll the dough into 1-inch balls and place them on the prepared baking sheet, spacing them about 2 inches apart.
- Flatten each ball slightly with the back of a fork, creating a crisscross pattern.
- Bake for 10-12 minutes, or until the edges are just starting to turn golden. Let them cool on the baking sheet for 5 minutes before transferring to a wire rack.
- Once cooled, spread a thin layer of peanut butter on the flat side of half the cookies, then top with a small spoonful of jelly.
- Place the remaining cookies on top to form sandwiches, pressing gently to adhere.
With their crumbly texture and sweet, gooey center, these cookies are a delightful contrast. Serve them alongside a cold glass of milk for a classic pairing, or get creative by using different jams to surprise your taste buds.
Lemon Sandwich Cookies with Zesty Lemon Cream

On a quiet morning like this, there’s something deeply comforting about the idea of lemon sandwich cookies. They’re like little bursts of sunshine, with their zesty lemon cream nestled between tender, buttery cookies. It’s the kind of treat that feels both indulgent and refreshing, perfect for savoring slowly.
Ingredients
- 2 cups of all-purpose flour, because that’s what we always have on hand
- A pinch of salt, just to balance the sweetness
- 1 cup of unsalted butter, softened to room temperature because it creams better
- 3/4 cup of granulated sugar, for that perfect sweetness
- 1 large egg, to bind everything together
- The zest of 2 lemons, for that bright, citrusy kick
- A splash of vanilla extract, because it makes everything better
- 1/2 cup of powdered sugar, for the cream filling
- 2 tablespoons of lemon juice, freshly squeezed for the freshest taste
Instructions
- Preheat your oven to 350°F (175°C) and line a baking sheet with parchment paper. This ensures your cookies won’t stick and bake evenly.
- In a bowl, whisk together the flour and salt. This step is quick but crucial for evenly distributing the salt.
- In another bowl, cream the butter and granulated sugar together until light and fluffy. This should take about 3 minutes with a mixer on medium speed.
- Beat in the egg, lemon zest, and vanilla extract until well combined. The mixture might look a bit curdled, but that’s okay.
- Gradually add the flour mixture to the wet ingredients, mixing just until combined. Overmixing can make the cookies tough.
- Roll the dough into small balls, about 1 inch in diameter, and place them on the prepared baking sheet. Flatten slightly with the back of a spoon.
- Bake for 10-12 minutes, or until the edges are just starting to turn golden. They’ll continue to firm up as they cool.
- While the cookies cool, make the filling by whisking together the powdered sugar and lemon juice until smooth. The consistency should be thick but spreadable.
- Once the cookies are completely cool, spread a generous amount of lemon cream on the flat side of one cookie and sandwich with another.
Buttery and tender, these cookies melt in your mouth with a bright lemon flavor that’s not too overpowering. They’re delightful with a cup of tea in the afternoon or as a sweet ending to a summer dinner. Try stacking them high on a cake stand for a charming dessert display.
Red Velvet Sandwich Cookies with Cream Cheese Filling

Lately, I’ve found myself craving something sweet yet comforting, a treat that feels like a hug in cookie form. That’s when I remembered these red velvet sandwich cookies, with their tender crumb and luscious cream cheese filling, perfect for savoring slowly with a cup of tea.
Ingredients
- 2 1/2 cups of all-purpose flour, because that’s what we always have on hand
- a couple of tablespoons of cocoa powder, just enough to whisper ‘chocolate’
- a pinch of salt, to make everything else taste better
- 1 cup of unsalted butter, softened to room temperature because patience is key
- 1 1/2 cups of granulated sugar, for that sweet, sweet love
- 2 large eggs, because they bind everything together
- a splash of vanilla extract, for warmth
- a tablespoon of red food coloring, to make them as vibrant as your mood
- 8 oz of cream cheese, softened, because it’s the star of the filling
- 1/4 cup of powdered sugar, to sweeten the deal
Instructions
- Preheat your oven to 350°F (175°C), because every good baking session starts with preheating.
- In a bowl, whisk together the flour, cocoa powder, and salt. This ensures your dry ingredients are well-mixed and lump-free.
- In another bowl, beat the butter and granulated sugar until light and fluffy. This step is crucial for that perfect cookie texture.
- Add the eggs one at a time to the butter mixture, beating well after each addition. Then, mix in the vanilla and red food coloring.
- Gradually add the dry ingredients to the wet, mixing until just combined. Overmixing is the enemy of tender cookies.
- Drop tablespoon-sized balls of dough onto a baking sheet lined with parchment paper, spacing them about 2 inches apart. They’ll spread a bit as they bake.
- Bake for 10-12 minutes, until the edges are set but the centers are still soft. They’ll firm up as they cool.
- While the cookies cool, beat the cream cheese and powdered sugar together until smooth. This is your filling.
- Once the cookies are completely cool, spread a generous amount of filling on the flat side of one cookie and top with another to make a sandwich.
Unbelievably soft with a slight chew, these cookies are a dream. The cream cheese filling adds a tangy contrast to the sweet, subtly chocolatey cookies. Try serving them with a dusting of powdered sugar on top for an extra touch of elegance.
Oreo-Inspired Chocolate Sandwich Cookies
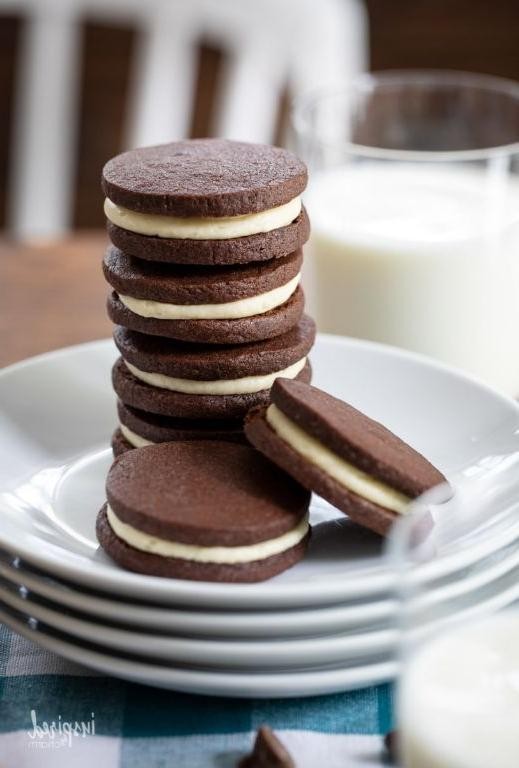
Perhaps there’s nothing quite as comforting as the classic combination of chocolate and cream, especially when it comes in the form of a homemade Oreo-inspired cookie. Today, let’s take a moment to slow down and savor the process of creating these delightful treats, perfect for sharing or enjoying in a quiet moment alone.
Ingredients
- 2 cups of all-purpose flour
- 3/4 cup of unsweetened cocoa powder
- 1 tsp of baking soda
- 1/4 tsp of baking powder
- 1 cup of unsalted butter, softened
- 1 cup of granulated sugar
- 1 large egg
- 1 tsp of vanilla extract
- A splash of milk, if needed
- 1/2 cup of butter, softened
- 2 cups of powdered sugar
- 1 tsp of vanilla extract
Instructions
- Preheat your oven to 350°F (175°C) and line two baking sheets with parchment paper.
- In a medium bowl, whisk together the flour, cocoa powder, baking soda, and baking powder until well combined.
- In a large bowl, beat the softened butter and granulated sugar together until light and fluffy, about 3 minutes.
- Add the egg and vanilla extract to the butter mixture, beating until fully incorporated.
- Gradually mix in the dry ingredients until a dough forms. If the dough is too dry, add a splash of milk.
- Roll the dough into small balls, about 1 inch in diameter, and place them on the prepared baking sheets. Flatten slightly with your hand.
- Bake for 10-12 minutes, until the cookies are set but still soft in the center. Let them cool on the baking sheets for 5 minutes before transferring to a wire rack.
- While the cookies cool, make the filling by beating the softened butter, powdered sugar, and vanilla extract together until smooth and creamy.
- Once the cookies are completely cool, spread a generous amount of filling on the flat side of one cookie and sandwich with another.
- Repeat with the remaining cookies and filling.
Unbelievably rich and creamy, these homemade Oreo-inspired cookies offer a perfect balance of crisp and soft textures. For an extra special touch, try serving them with a cold glass of milk or crumbling them over vanilla ice cream.
Strawberry Shortcake Sandwich Cookies

Remembering the first time I stumbled upon the idea of turning classic strawberry shortcake into a handheld treat, it felt like uncovering a secret path in a well-trodden garden. These Strawberry Shortcake Sandwich Cookies are a tender nod to tradition, with a playful twist that makes them perfect for picnics or a quiet afternoon treat.
Ingredients
- 1 cup of all-purpose flour, because sometimes simplicity is key
- A pinch of salt, just to wake up the flavors
- 1/2 cup of unsalted butter, softened to room temperature for that perfect creaminess
- 1/3 cup of granulated sugar, for a gentle sweetness
- 1 large egg, to bind our dreams together
- A splash of vanilla extract, for that whisper of warmth
- 1/2 cup of fresh strawberries, diced small for bursts of joy
- 1/4 cup of heavy cream, whipped to soft peaks for cloud-like filling
Instructions
- Preheat your oven to 350°F (175°C), lining a baking sheet with parchment paper to avoid any sticky situations.
- In a bowl, whisk together the flour and salt, setting the stage for our cookies.
- Cream the butter and sugar together in another bowl until light and fluffy, about 3 minutes, showing patience pays off.
- Beat in the egg and vanilla extract until just combined, ensuring everything is harmonious.
- Gently fold in the dry ingredients, mixing until a dough forms, careful not to overwork it.
- Drop tablespoon-sized balls of dough onto the prepared baking sheet, spacing them about 2 inches apart for room to grow.
- Bake for 12-15 minutes, until the edges are just golden, a sign they’re ready to cool.
- Once cooled, spread a dollop of whipped cream on half the cookies, topping with diced strawberries and another cookie to sandwich the love inside.
Zesty yet tender, these cookies carry the essence of summer in every bite. Serve them on a vintage plate for a touch of nostalgia, or pack them for a hike to enjoy nature’s backdrop.
Matcha Green Tea Sandwich Cookies with White Chocolate Filling
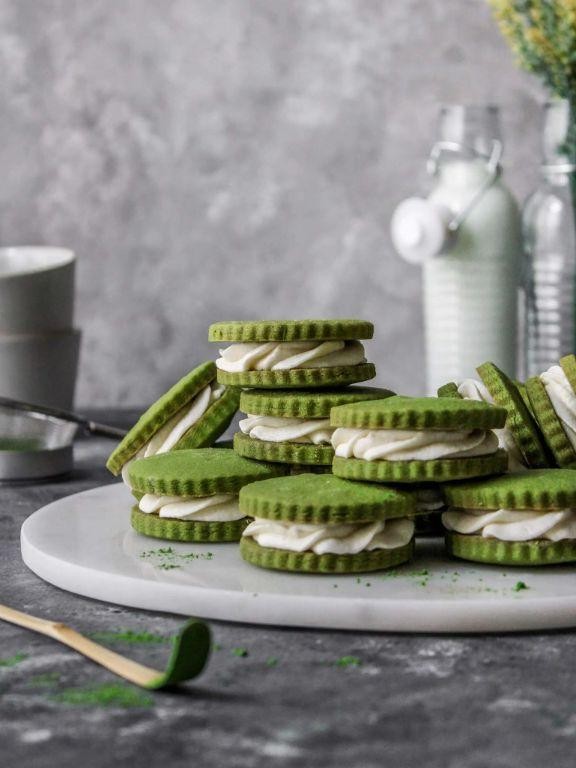
Gently, the morning light filters through the kitchen window, casting a soft glow on the counter where these matcha green tea sandwich cookies will soon come to life. There’s something quietly magical about blending the earthy tones of matcha with the sweet embrace of white chocolate, a pairing that feels both comforting and exotic.
Ingredients
- 1 cup all-purpose flour, plus a little extra for dusting
- 1 tbsp matcha green tea powder, for that vibrant hue and subtle bitterness
- 1/2 cup unsalted butter, softened to room temperature, because cold butter just won’t do
- 1/3 cup granulated sugar, for a touch of sweetness
- 1 large egg yolk, to bind everything together with richness
- A pinch of salt, to balance the flavors
- 1/2 cup white chocolate chips, melted, for the creamy filling that dreams are made of
- A splash of vanilla extract, for that whisper of warmth
Instructions
- Preheat your oven to 350°F (175°C), ensuring it’s perfectly heated for even baking.
- In a bowl, whisk together the flour, matcha powder, and salt, sifting if necessary to avoid any lumps.
- Cream the softened butter and sugar together in another bowl until light and fluffy, about 3 minutes, which is the secret to tender cookies.
- Beat in the egg yolk and vanilla extract until just combined, careful not to overmix.
- Gradually add the dry ingredients to the wet, mixing until a dough forms. If it’s sticky, a light dusting of flour on your hands will make it easier to handle.
- Roll the dough into small balls, about 1 inch in diameter, and place them on a baking sheet lined with parchment paper, leaving space for them to spread.
- Bake for 10-12 minutes, until the edges are just starting to turn golden. They’ll firm up as they cool, so don’t wait for them to harden in the oven.
- Let the cookies cool completely on a wire rack, then spread a generous layer of melted white chocolate on the flat side of one cookie and sandwich with another.
Softly crumbly with a melt-in-your-mouth quality, these cookies carry the delicate bitterness of matcha beautifully offset by the sweet, creamy filling. Serve them alongside a cup of jasmine tea for an afternoon treat that feels like a gentle hug.
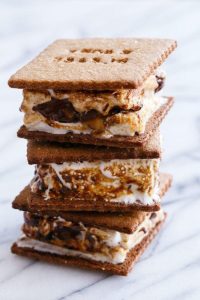
S’mores Sandwich Cookies with Marshmallow Fluff

Lazy afternoons call for something sweet, something that whispers of campfires and childhood summers. These S’mores Sandwich Cookies with Marshmallow Fluff are just that—a tender hug in cookie form.
Ingredients
- 1 cup of graham cracker crumbs, because every good s’more starts here
- 1/2 cup of unsalted butter, softened to just the right squishiness
- 1/2 cup of brown sugar, for that deep, caramel sweetness
- 1 large egg, to bind our memories together
- 1 tsp of vanilla extract, a splash of warmth
- 1 cup of all-purpose flour, the foundation of our cookie dreams
- 1/2 tsp of baking soda, for a little lift
- A pinch of salt, to balance the sweetness
- 1/2 cup of mini chocolate chips, because why not?
- 1 cup of marshmallow fluff, the cloud-like heart of our sandwich
Instructions
- Preheat your oven to 350°F (175°C), and line a baking sheet with parchment paper. This little step saves so much cleanup time later.
- In a large bowl, cream together the softened butter and brown sugar until fluffy. This is where the magic starts, so don’t rush it.
- Beat in the egg and vanilla extract until just combined. Overmixing here can make the cookies tough, so gentle does it.
- Gradually mix in the graham cracker crumbs, flour, baking soda, and salt. The dough will be soft but should hold together when pinched.
- Fold in the mini chocolate chips. They’re like little surprises in every bite.
- Roll the dough into 1-inch balls and place them on the prepared baking sheet, spacing them about 2 inches apart. They’ll spread as they bake.
- Bake for 8-10 minutes, until the edges are just golden. The centers will look soft, but they’ll firm up as they cool—trust the process.
- Let the cookies cool on the baking sheet for 5 minutes, then transfer to a wire rack to cool completely. Patience is key here.
- Once cooled, spread a generous dollop of marshmallow fluff on the flat side of half the cookies, then top with another cookie to make a sandwich. The fluff will peek out the sides, and that’s perfectly okay.
Fluffy, gooey, and just a little bit crunchy, these cookies are a textural dream. Serve them with a cold glass of milk for the ultimate nostalgia trip, or get fancy and drizzle them with melted chocolate for an extra indulgent touch.
Pumpkin Spice Sandwich Cookies with Maple Cream

On a quiet morning like this, when the air carries the first whispers of autumn, there’s something deeply comforting about the idea of pumpkin spice sandwich cookies with maple cream. It’s a recipe that feels like a warm hug, blending the earthy sweetness of pumpkin with the rich, caramel-like depth of maple.
Ingredients
- 2 cups of all-purpose flour, because that’s what we always have on hand
- A teaspoon of baking soda, to give them just the right lift
- A pinch of salt, because it makes everything taste better
- A tablespoon of pumpkin spice, for that unmistakable fall flavor
- A half cup of unsalted butter, softened to room temperature
- A cup of brown sugar, packed tight for that molasses richness
- A splash of vanilla extract, because it’s the soul of baking
- A half cup of pumpkin puree, not pie filling, for the real deal
- An egg, to bind it all together
- A quarter cup of maple syrup, the star of the cream filling
- A cup of powdered sugar, to sweeten the deal
- A couple of tablespoons of heavy cream, to bring the maple cream to life
Instructions
- Preheat your oven to 350°F. This ensures everything bakes evenly, and who doesn’t love a cookie with just the right crunch?
- In a bowl, whisk together the flour, baking soda, salt, and pumpkin spice. Tip: Sifting the flour can make your cookies lighter.
- In another bowl, cream the butter and brown sugar until fluffy. This is where the magic starts, so don’t rush it.
- Beat in the vanilla, pumpkin puree, and egg until just combined. Overmixing can lead to tough cookies, so gentle does it.
- Gradually mix in the dry ingredients. The dough will be soft, but that’s perfect for sandwich cookies.
- Drop tablespoon-sized balls of dough onto a baking sheet, spacing them about 2 inches apart. They’ll spread as they bake.
- Bake for 10-12 minutes, until the edges are just starting to golden. Tip: They’ll continue to firm up as they cool, so don’t overbake.
- Let the cookies cool on the baking sheet for 5 minutes, then transfer to a wire rack to cool completely. Patience is key here.
- For the maple cream, beat together the maple syrup, powdered sugar, and heavy cream until smooth and spreadable. Tip: If it’s too thick, a little more cream will loosen it up.
- Once the cookies are cool, spread a generous amount of maple cream on the flat side of one cookie and top with another. The sandwich part is non-negotiable.
The cookies are tender with a slight chew, the pumpkin spice warm but not overpowering, and the maple cream? It’s like autumn in a bite. Try stacking them high on a plate for a cozy centerpiece that invites everyone to take one (or two).
Almond Sandwich Cookies with Raspberry Jam
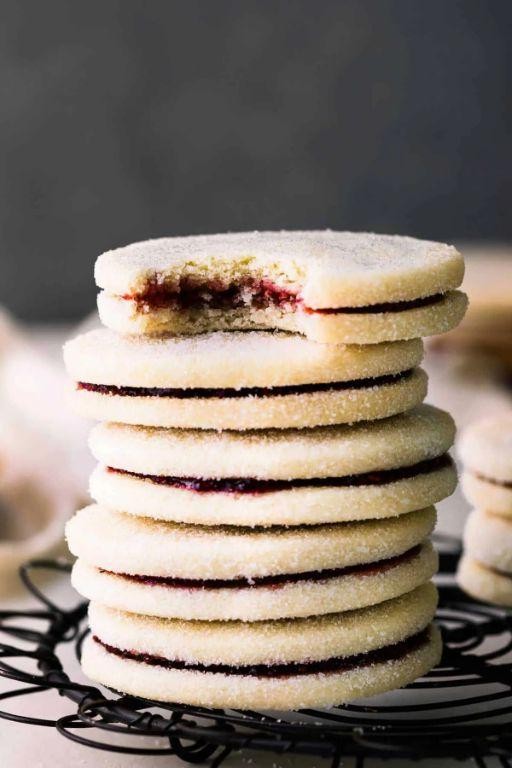
Remembering the first time I stumbled upon the recipe for these almond sandwich cookies, it felt like uncovering a hidden gem in an old cookbook. The combination of nutty almond and sweet raspberry jam seemed like a match made in heaven, promising a delightful treat that’s both simple and sophisticated.
Ingredients
- 1 cup of almond flour, for that rich, nutty base
- A couple of tablespoons of granulated sugar, just to sweeten the deal
- A pinch of salt, to balance the flavors
- 1/2 cup of unsalted butter, softened, because everything’s better with butter
- A splash of vanilla extract, for that warm, aromatic touch
- 1/4 cup of raspberry jam, the star filling that brings it all together
Instructions
- Preheat your oven to 350°F (175°C), ensuring it’s perfectly heated for even baking.
- In a mixing bowl, combine the almond flour, granulated sugar, and a pinch of salt, whisking them together to avoid any lumps.
- Add the softened butter and vanilla extract to the dry ingredients, mixing until the dough comes together smoothly. Tip: If the dough feels too sticky, chilling it for 10 minutes makes it easier to handle.
- Roll the dough into small balls, about 1 inch in diameter, and place them on a baking sheet lined with parchment paper.
- Flatten each ball slightly with the back of a spoon, creating a small indentation in the center for the jam later. Tip: This step ensures the jam stays put and doesn’t spill over during baking.
- Bake for 12-15 minutes, or until the edges are just starting to turn golden. Tip: Keep an eye on them after the 10-minute mark to prevent over-browning.
- Let the cookies cool on the baking sheet for 5 minutes before transferring them to a wire rack to cool completely.
- Once cooled, spread a thin layer of raspberry jam on the flat side of half the cookies, then top with the remaining cookies to form sandwiches.
You’ll love the contrast between the crisp, buttery cookies and the soft, fruity jam center. Try serving them with a dusting of powdered sugar for an extra touch of elegance at your next tea party.
Coconut Macaroon Sandwich Cookies with Chocolate Ganache
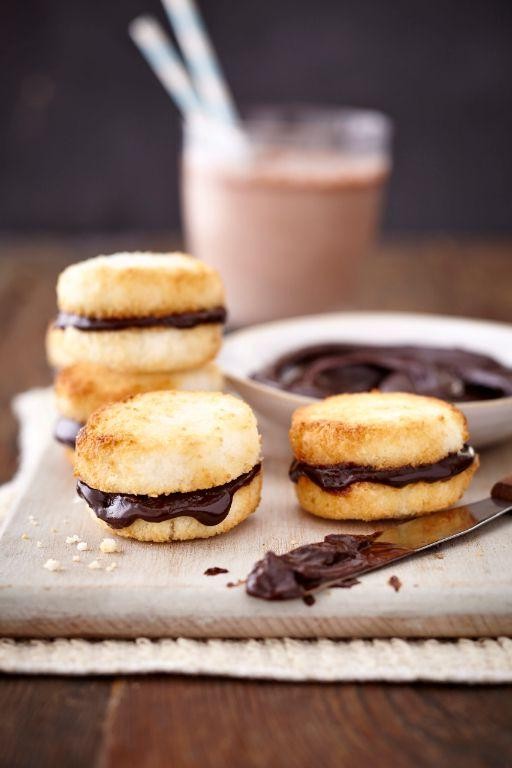
Now, as the early morning light filters through the kitchen window, there’s something deeply comforting about the thought of baking these coconut macaroon sandwich cookies. They’re a sweet escape, a little project that feels both indulgent and intimate, especially when filled with that rich chocolate ganache.
Ingredients
- 2 cups of sweetened shredded coconut
- 3/4 cup of granulated sugar
- a pinch of salt
- 2 large egg whites
- 1/2 teaspoon of vanilla extract
- a splash of almond extract
- 1 cup of heavy cream
- 8 ounces of semi-sweet chocolate, finely chopped
Instructions
- Preheat your oven to 325°F and line a baking sheet with parchment paper.
- In a large bowl, mix together the shredded coconut, granulated sugar, and a pinch of salt.
- Stir in the egg whites, vanilla extract, and a splash of almond extract until everything is well combined.
- Using a tablespoon, scoop the mixture onto the prepared baking sheet, spacing them about 2 inches apart.
- Bake for 20-25 minutes, or until the edges are golden brown. Tip: Rotate the baking sheet halfway through for even baking.
- Let the cookies cool on the baking sheet for 5 minutes, then transfer to a wire rack to cool completely.
- For the ganache, heat the heavy cream in a small saucepan over medium heat until it just begins to simmer.
- Place the chopped chocolate in a heatproof bowl and pour the hot cream over it. Let it sit for 2 minutes, then stir until smooth. Tip: If the ganache is too thick, a little more cream can be added.
- Once the cookies are cool, spread a generous amount of ganache on the flat side of one cookie and sandwich with another. Tip: For a firmer ganache, let the filled cookies set in the fridge for 30 minutes before serving.
Just like that, you’ve got these tender, chewy cookies with a decadent chocolate center. They’re perfect with a cup of tea in the afternoon or as a sweet ending to a dinner party, maybe even drizzled with a little extra ganache for good measure.
Espresso Sandwich Cookies with Mocha Filling

Mornings like these call for something special, something that marries the boldness of espresso with the sweetness of a cookie, creating a moment of quiet indulgence. These espresso sandwich cookies with mocha filling are just that—a little treat to savor slowly, with a cup of your favorite brew.
Ingredients
- 1 cup of all-purpose flour
- 1/2 cup of unsalted butter, softened
- 1/2 cup of granulated sugar
- 1 large egg
- 2 tbsp of finely ground espresso
- 1 tsp of vanilla extract
- A pinch of salt
- 1/2 cup of powdered sugar
- 1 tbsp of cocoa powder
- A splash of milk
- 1/4 cup of unsalted butter, softened (for the filling)
Instructions
- Preheat your oven to 350°F and line a baking sheet with parchment paper.
- In a bowl, cream together 1/2 cup of softened butter and granulated sugar until light and fluffy.
- Beat in the egg, then mix in the vanilla extract and ground espresso until well combined.
- Gradually add the flour and a pinch of salt, mixing until a dough forms. Tip: If the dough feels too sticky, chill it for 30 minutes for easier handling.
- Roll the dough into small balls, place them on the prepared baking sheet, and flatten slightly with the back of a spoon.
- Bake for 10-12 minutes, or until the edges are just starting to turn golden. Tip: They’ll firm up as they cool, so don’t overbake.
- Let the cookies cool on the baking sheet for 5 minutes, then transfer to a wire rack to cool completely.
- For the filling, beat together 1/4 cup of softened butter, powdered sugar, cocoa powder, and a splash of milk until smooth and spreadable.
- Once the cookies are cool, spread a generous amount of mocha filling on the flat side of one cookie and sandwich with another. Tip: For an extra espresso kick, sprinkle a little more ground espresso on top of the filling before sandwiching.
Soft with a slight crunch, these cookies are a delightful contrast of textures, with the rich mocha filling adding a creamy depth. Serve them alongside an afternoon espresso or as a sweet end to a dinner party, perhaps with a dusting of cocoa powder for an elegant touch.
Gingerbread Sandwich Cookies with Spiced Buttercream
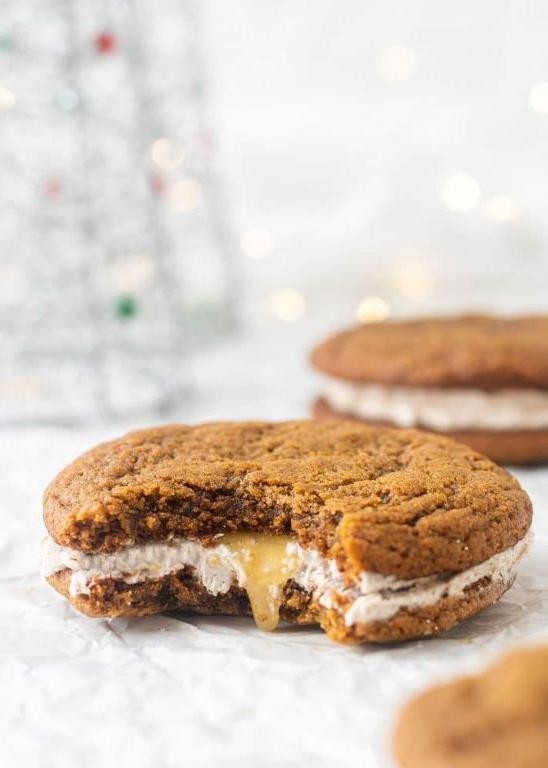
Just imagine the warmth of gingerbread meeting the creamy embrace of spiced buttercream, a delightful pairing that feels like a hug in cookie form. This recipe is a cozy nod to tradition, with a twist that makes it perfect for sharing or savoring slowly.
Ingredients
- 2 cups of all-purpose flour, because that’s what we always have on hand
- 1 tsp of baking soda, for that little lift
- 1/2 tsp of salt, to balance the sweetness
- 1 tbsp of ground ginger, for that signature warmth
- 1 tsp of cinnamon, because it’s the spice of life
- 1/2 cup of unsalted butter, softened to room temperature
- 3/4 cup of brown sugar, packed for richness
- 1 large egg, to bind it all together
- 1/4 cup of molasses, for that deep, dark sweetness
- 1 tsp of vanilla extract, for a hint of floral
- 1/2 cup of powdered sugar, for the buttercream
- 1/4 cup of butter, softened, for the buttercream
- a splash of milk, to smooth things out
- a pinch of nutmeg and cloves, to spice up the buttercream
Instructions
- Preheat your oven to 350°F (175°C), because every good baking session starts with a preheated oven.
- In a bowl, whisk together the flour, baking soda, salt, ginger, and cinnamon. This ensures your spices are evenly distributed.
- In another bowl, cream together the softened butter and brown sugar until light and fluffy. This step is key for a tender cookie.
- Beat in the egg, molasses, and vanilla extract until well combined. The molasses adds moisture, so don’t skip it.
- Gradually mix in the dry ingredients until a dough forms. Tip: If the dough feels sticky, chill it for 30 minutes for easier handling.
- Roll the dough into 1-inch balls and place them on a baking sheet. Flatten slightly with your palm for even baking.
- Bake for 10-12 minutes, until the edges are just firm. They’ll continue to set as they cool, so don’t overbake.
- For the buttercream, beat together the powdered sugar, softened butter, milk, nutmeg, and cloves until smooth. Tip: Adjust the milk for your desired consistency.
- Once the cookies are completely cool, spread or pipe the buttercream onto the flat side of one cookie and sandwich with another.
Best enjoyed with a cup of tea, these cookies offer a chewy texture with a spicy kick, balanced by the creamy buttercream. Try dusting them with a little extra powdered sugar for a snowy effect that’s as pretty as it is tasty.
Black and White Sandwich Cookies with Vanilla and Chocolate Cream
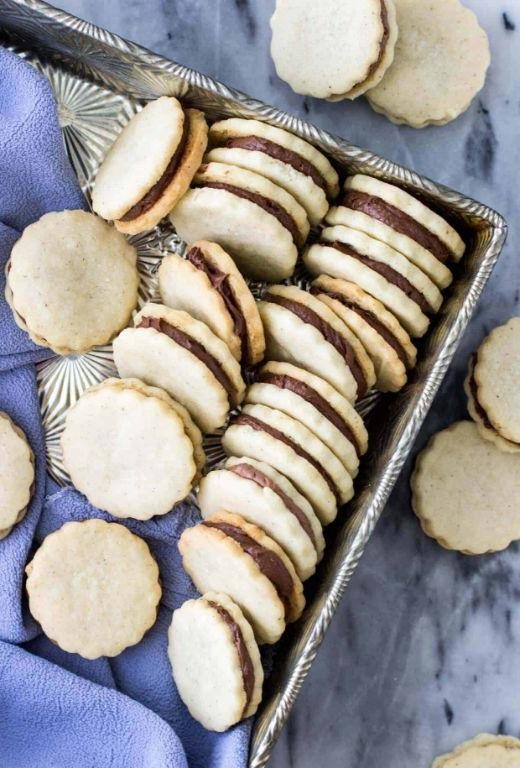
Venturing into the kitchen on a quiet morning, the thought of creating something sweet and nostalgic lingers in the air. These black and white sandwich cookies, with their delicate balance of vanilla and chocolate cream, promise a comforting treat that feels like a gentle hug.
Ingredients
- 2 cups of all-purpose flour, because that’s what we always reach for first
- A pinch of salt, just to wake up the flavors
- 1 cup of unsalted butter, softened to room temperature because patience is key
- 3/4 cup of granulated sugar, for that sweet, sweet base
- 1 large egg, to bind our dreams together
- 2 tsp of vanilla extract, for that unmistakable warmth
- 1/2 cup of cocoa powder, because chocolate makes everything better
- A splash of milk, to bring it all together
- 1 cup of powdered sugar, for the creamy filling that’ll sandwich our cookies
- 2 tbsp of heavy cream, because richness is non-negotiable
Instructions
- Preheat your oven to 350°F (175°C), letting it warm up while you mix your ingredients.
- In a bowl, whisk together the flour and salt, setting the stage for your cookie dough.
- Cream the butter and granulated sugar together until light and fluffy, about 3 minutes, showing off your mixer’s power.
- Beat in the egg and vanilla extract, ensuring everything is beautifully incorporated.
- Divide the dough in half. Mix cocoa powder into one half, creating your chocolate dough.
- Roll out each dough between two sheets of parchment paper to 1/4-inch thickness, aiming for uniformity.
- Cut out circles using a 2-inch cookie cutter, placing them on a baking sheet lined with parchment paper.
- Bake for 10-12 minutes, until the edges are just starting to firm up, then let them cool completely.
- For the filling, whisk together powdered sugar, heavy cream, and vanilla extract until smooth, then spread onto the vanilla cookies and top with chocolate ones.
Yieldingly soft yet crisp, these cookies offer a dance of flavors between the vanilla and chocolate cream. Try stacking them high for a playful twist, or enjoy them one by one, savoring each bite as a moment of quiet indulgence.
Caramel Apple Sandwich Cookies with Cinnamon Cream
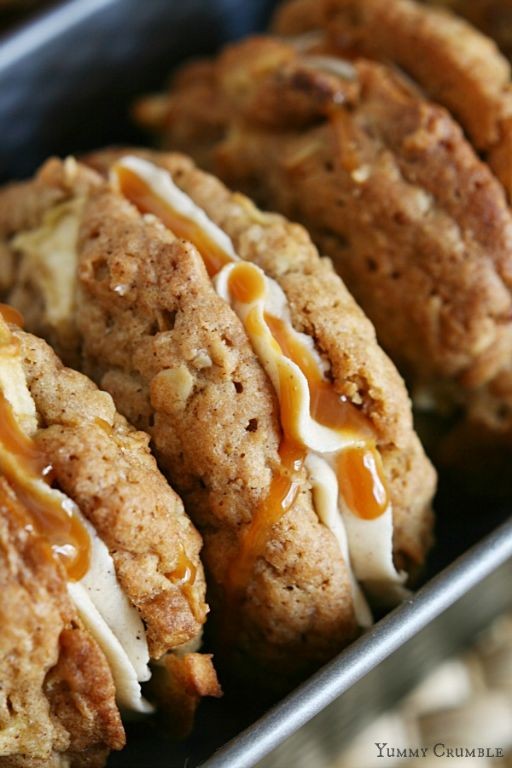
Golden afternoons call for treats that whisper of autumn’s approach, and these caramel apple sandwich cookies with cinnamon cream are just that—a tender embrace of seasonal flavors. Imagine biting into a soft, spiced cookie filled with a velvety cinnamon cream, each bite a little nod to the cozy days ahead.
Ingredients
- 2 cups of all-purpose flour, because that’s what holds our dreams together
- A pinch of salt, just to keep things interesting
- 1 tsp of baking soda, for that perfect lift
- 1/2 cup of unsalted butter, softened to room temperature, because patience is key
- 3/4 cup of brown sugar, for that deep, molasses kiss
- 1 large egg, to bind our hopes and dreams
- 1 tsp of vanilla extract, a splash of liquid comfort
- 1/2 cup of apple sauce, for moisture and a hint of fruit
- 1 tsp of cinnamon, because what’s autumn without it?
- 1/2 cup of caramel bits, for those gooey pockets of joy
- 1/2 cup of powdered sugar, to sweeten the deal
- 2 tbsp of heavy cream, because richness matters
- Another 1/2 tsp of cinnamon, because why not double down on goodness?
Instructions
- Preheat your oven to 350°F (175°C), letting it warm up like a cozy blanket.
- In a bowl, whisk together the flour, salt, and baking soda—this is the foundation of your cookie dreams.
- In another bowl, cream the butter and brown sugar until it’s as fluffy as a cloud at sunset.
- Beat in the egg and vanilla extract, mixing until just combined to keep the texture light.
- Gently fold in the apple sauce and cinnamon, then gradually add the dry ingredients, mixing until a soft dough forms.
- Stir in the caramel bits, distributing them like little treasures throughout the dough.
- Drop tablespoon-sized balls of dough onto a baking sheet, spacing them about 2 inches apart—they’ll spread like morning sunlight.
- Bake for 10-12 minutes, until the edges are just golden but the centers are still soft.
- Let the cookies cool on the baking sheet for 5 minutes, then transfer to a wire rack to cool completely—patience is a virtue here.
- For the cinnamon cream, whisk together powdered sugar, heavy cream, and cinnamon until smooth and spreadable.
- Once the cookies are cool, spread a generous layer of cinnamon cream on the flat side of one cookie and sandwich with another.
Unwrap one of these cookies to find layers of soft, spiced dough hugging a creamy cinnamon filling, each bite a perfect balance of sweet and spice. Serve them with a hot cup of tea on a crisp afternoon, or pack them for a picnic to savor under the changing leaves.
Conclusion
Just imagine the delight of biting into these 16 scrumptious sandwich cookies, each offering a unique twist to satisfy your sweet cravings. Perfect for home cooks looking to impress or simply treat themselves, this roundup is your ticket to cookie heaven. Don’t forget to try these recipes, share your favorites in the comments, and pin your must-makes on Pinterest. Happy baking!