Oh, the magic that happens when salt, fat, acid, and heat come together in the kitchen! It’s the secret behind every unforgettable dish, transforming simple ingredients into culinary masterpieces. Whether you’re craving comfort food, quick dinners, or seasonal favorites, we’ve got 16 savory recipes that celebrate these four pillars of flavor. Ready to elevate your cooking game? Let’s dive into these delicious creations that promise to delight your taste buds!
Herb-Infused Salt Crusted Chicken
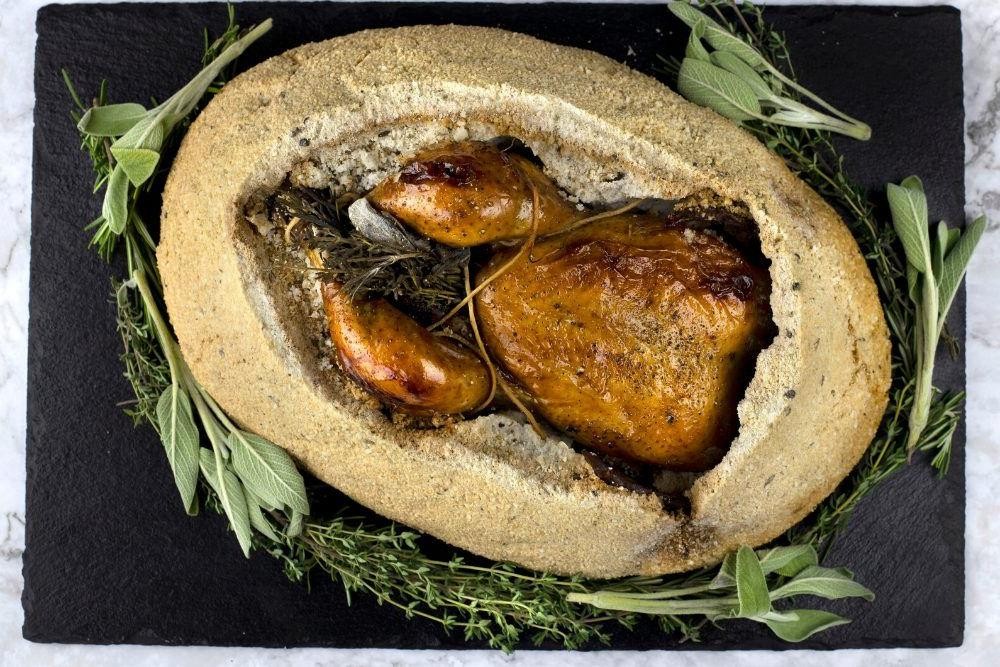
Zesty flavors and simple techniques are my go-to for weeknight dinners, and this Herb-Infused Salt Crusted Chicken is no exception. I stumbled upon this method during a lazy Sunday experiment, and now it’s a staple in my kitchen for its juicy results and minimal cleanup.
Ingredients
- a whole chicken, about 4 lbs
- a couple of cups of kosher salt
- a handful of fresh rosemary
- a handful of fresh thyme
- a splash of olive oil
- a couple of garlic cloves, smashed
- a lemon, halved
Instructions
- Preheat your oven to 400°F and grab a roasting pan that fits your chicken snugly.
- In a bowl, mix the kosher salt with just enough water to make it packable, like wet sand at the beach.
- Stuff the chicken cavity with the rosemary, thyme, garlic cloves, and lemon halves. This not only flavors the meat from the inside but also keeps it moist.
- Rub the outside of the chicken with a splash of olive oil. This helps the salt crust adhere and gives the skin a beautiful golden color.
- Pack the salt mixture around the chicken, covering it completely to form a crust. Don’t worry about overdoing it—the salt crust protects the chicken from drying out.
- Roast in the preheated oven for about 1 hour and 15 minutes. The crust will harden and turn a light brown, which is your cue it’s done.
- Let the chicken rest for 10 minutes before cracking open the salt crust. Be careful—it’s hot and the steam is no joke!
- Remove the herbs and lemon from the cavity, carve, and serve. The skin will be perfectly seasoned and the meat unbelievably tender.
Golden and aromatic, this chicken is a showstopper with minimal effort. Serve it with a simple salad or roasted veggies to let the herb-infused flavors shine. The salt crust might seem intimidating, but it’s a foolproof way to ensure every bite is moist and flavorful.
Brown Butter and Sage Pasta
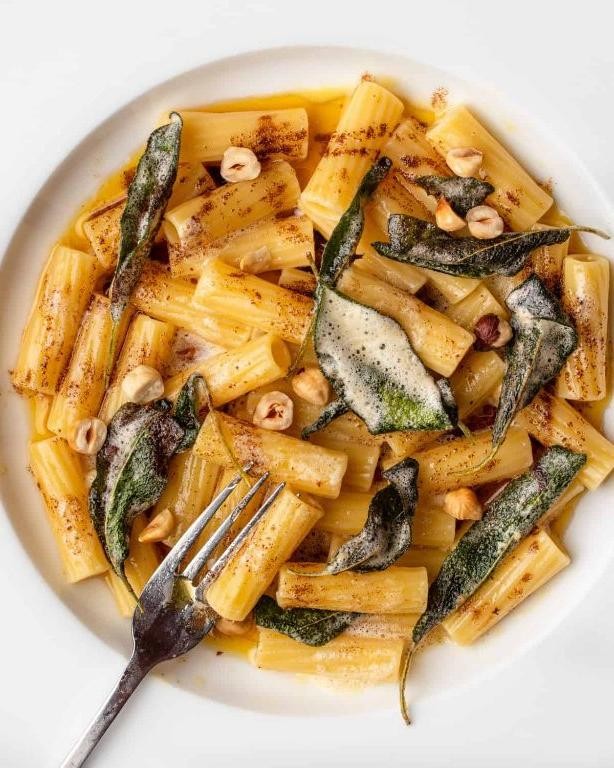
Oh, the magic that happens when brown butter meets sage in a pasta dish is nothing short of culinary alchemy. I stumbled upon this combination during a lazy Sunday fridge forage, and it’s been a staple in my kitchen ever since. It’s the kind of meal that feels fancy but is deceptively simple to whip up, perfect for those evenings when you want something special without the fuss.
Ingredients
- 8 oz of your favorite pasta (I’m partial to fettuccine for this one)
- A stick of unsalted butter (because we’re browning it, and salted butter can throw off the flavor)
- A handful of fresh sage leaves (about 10-12, trust me, they’re the star)
- A couple of garlic cloves, minced (because garlic makes everything better)
- A splash of pasta water (save it! it’s liquid gold)
- A generous sprinkle of Parmesan cheese (for that salty, nutty finish)
- Salt and freshly ground black pepper (to season, but we’ll be specific about when)
Instructions
- Start by cooking your pasta in a large pot of salted boiling water until al dente, about 8-10 minutes. Reserve a cup of pasta water before draining.
- While the pasta cooks, melt the butter in a large skillet over medium heat. Keep an eye on it; you’ll see it foam, then start to turn a golden brown and smell nutty. This is your cue it’s done, about 3-4 minutes.
- Add the sage leaves to the brown butter and let them crisp up for about 30 seconds. They’ll turn a darker green and become fragrant.
- Toss in the minced garlic and cook for another 30 seconds, just until it’s golden but not burnt. Burnt garlic is a no-go.
- Add the drained pasta to the skillet with a splash of the reserved pasta water. Toss everything together until the pasta is beautifully coated.
- Finish with a generous sprinkle of Parmesan, a pinch of salt, and a grind of black pepper. Give it one final toss.
Dive into this dish and you’ll be greeted with the rich, nutty depth of brown butter, the earthy crispness of sage, and the perfect al dente bite of pasta. Serve it with a simple green salad and a glass of white wine for a meal that feels like a hug in a bowl.
Lemon Garlic Butter Shrimp
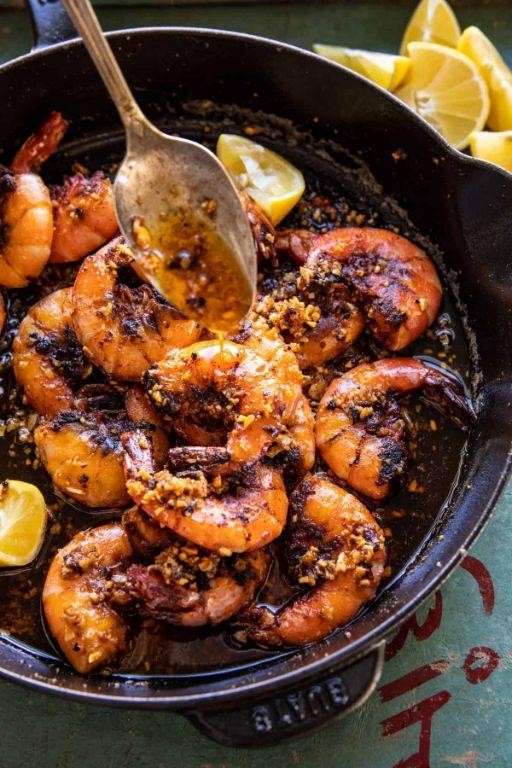
Mmm, there’s nothing quite like the zesty kick of lemon paired with the rich, savory depth of garlic butter, especially when it’s hugging perfectly cooked shrimp. I remember the first time I whipped this up on a whim for a last-minute dinner party, and it was such a hit that it’s now my go-to when I need something quick yet impressive.
Ingredients
- 1 pound of large shrimp, peeled and deveined
- 3 tablespoons of unsalted butter
- 2 cloves of garlic, minced
- A splash of olive oil
- The juice of 1 lemon
- A couple of tablespoons of chopped fresh parsley
- Salt and freshly ground black pepper, to season
Instructions
- Heat a large skillet over medium heat and add a splash of olive oil.
- Once the oil is shimmering, add the shrimp in a single layer. Cook for about 2 minutes on one side until they start to turn pink. Tip: Don’t overcrowd the pan, or the shrimp will steam instead of sear.
- Flip the shrimp and add the butter and minced garlic to the pan. Cook for another 2 minutes, stirring the garlic so it doesn’t burn.
- Squeeze the lemon juice over the shrimp and sprinkle with salt and pepper. Give everything a good stir to coat the shrimp evenly. Tip: Fresh lemon juice makes all the difference here, so skip the bottled stuff if you can.
- Remove from heat and sprinkle with chopped parsley. Tip: The parsley adds a fresh pop of color and flavor, but if you’re in a pinch, dried parsley can work too.
And just like that, you’ve got a dish that’s bursting with bright, tangy flavors and a buttery richness that’s downright addictive. Serve it over a bed of fluffy rice to soak up all that delicious sauce, or keep it low-carb with a side of steamed veggies. Either way, it’s a surefire crowd-pleaser.
Crispy Roasted Potatoes with Rosemary Salt
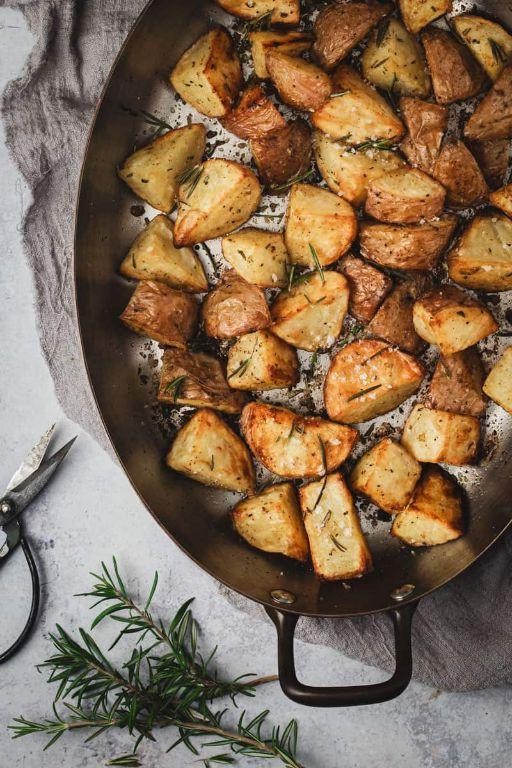
Every time I think about the perfect side dish, my mind immediately goes to these crispy roasted potatoes with rosemary salt. There’s something about the golden crunch on the outside and the fluffy inside that just makes my heart sing, not to mention the aromatic rosemary salt that takes it to another level. I remember the first time I made these; my kitchen smelled like a cozy, rustic restaurant, and that’s when I knew this recipe was a keeper.
Ingredients
- 2 pounds of baby potatoes, halved (because their size is just perfect for roasting)
- A generous glug of olive oil (about 1/4 cup, but who’s measuring?)
- 1 tablespoon of finely chopped fresh rosemary (trust me, fresh makes all the difference)
- 1 teaspoon of sea salt (for that perfect salty crunch)
- A pinch of black pepper (because a little spice never hurt anybody)
Instructions
- Preheat your oven to 425°F. This high heat is the secret to getting those potatoes crispy.
- Toss the halved potatoes with olive oil, rosemary, salt, and pepper in a large bowl. Make sure every piece is lovingly coated.
- Spread them out on a baking sheet in a single layer. Crowding the pan is a no-go if you want them crispy.
- Roast for about 40 minutes, flipping halfway through. You’ll know they’re done when they’re golden and fork-tender.
- Let them sit for a couple of minutes before serving. This waiting game lets the flavors settle and the crispiness set.
Just imagine biting into these potatoes: the crunch, the salt, the hint of rosemary. They’re perfect alongside a juicy steak or, honestly, just by themselves with a dollop of sour cream. Sometimes, I even toss them in a salad for a hearty twist. Whatever you do, don’t skip the rosemary salt—it’s the star of the show.
Caramelized Onion and Goat Cheese Tart

Believe it or not, the first time I tried making a caramelized onion and goat cheese tart, I was skeptical about how such simple ingredients could transform into something so divine. But here we are, years later, and it’s become a staple in my kitchen for those days when I want to impress without the stress.
Ingredients
- 2 large onions, thinly sliced (trust me, they shrink down)
- A splash of olive oil
- A couple of tablespoons of butter
- A pinch of sugar
- A splash of balsamic vinegar
- 1 sheet of frozen puff pastry, thawed
- A small log of goat cheese (about 4 oz), crumbled
- A handful of fresh thyme leaves
- Salt and pepper to taste
Instructions
- Heat a large skillet over medium-low heat and add the olive oil and butter. Once the butter melts, add the onions, stirring to coat them in the fat.
- Sprinkle the sugar over the onions and continue to cook, stirring occasionally, for about 40 minutes until they’re deeply golden and caramelized. Tip: Lower the heat if they start to burn.
- Add the balsamic vinegar to the onions, stir, and cook for another 2 minutes. Remove from heat and let cool slightly.
- Preheat your oven to 400°F. Roll out the puff pastry on a baking sheet lined with parchment paper, prick it all over with a fork, and bake for 10 minutes until lightly golden.
- Spread the caramelized onions over the pre-baked pastry, then sprinkle with crumbled goat cheese and thyme leaves. Season with salt and pepper.
- Bake for another 15-20 minutes until the edges are puffed and golden. Tip: Let it cool for a few minutes before slicing to prevent the cheese from oozing out.
Absolutely nothing beats the contrast of the sweet, jammy onions against the tangy goat cheese and flaky pastry. Try serving it with a light arugula salad dressed with lemon vinaigrette for a complete meal that feels anything but simple.
Spicy Miso Butter Corn on the Cob

Oh, the joy of summer barbecues and the irresistible allure of corn on the cob! I remember the first time I tried adding a spicy miso butter twist to my corn; it was a game-changer. Now, it’s a staple at my family gatherings, and today, I’m sharing this little secret with you.
Ingredients
- 4 ears of fresh corn, husks on
- A generous dollop of unsalted butter, about 1/2 cup
- A couple of tablespoons of white miso paste
- A splash of sriracha, or to your heat preference
- A pinch of salt
Instructions
- Preheat your grill to medium-high, around 400°F, ensuring it’s hot enough to char the corn slightly.
- While the grill heats, mix the butter, miso paste, sriracha, and salt in a small bowl until well combined. Tip: Let the butter soften at room temperature for easier mixing.
- Peel back the corn husks without removing them, remove the silk, then slather each ear with the miso butter mixture. Tip: Use the back of a spoon for an even coat.
- Pull the husks back over the corn and tie the ends with kitchen string to keep them in place during grilling.
- Grill the corn for about 15 minutes, turning occasionally, until the husks are charred and the corn is tender. Tip: Listen for a slight sizzle; that’s when you know it’s getting perfectly caramelized.
- Let the corn cool for a minute before serving, as the butter will be piping hot.
Absolutely divine! The spicy miso butter creates a crispy, flavorful crust that contrasts beautifully with the sweet, juicy corn. Try serving it with a sprinkle of smoked paprika for an extra layer of flavor.
Garlic Confit with Crusty Bread
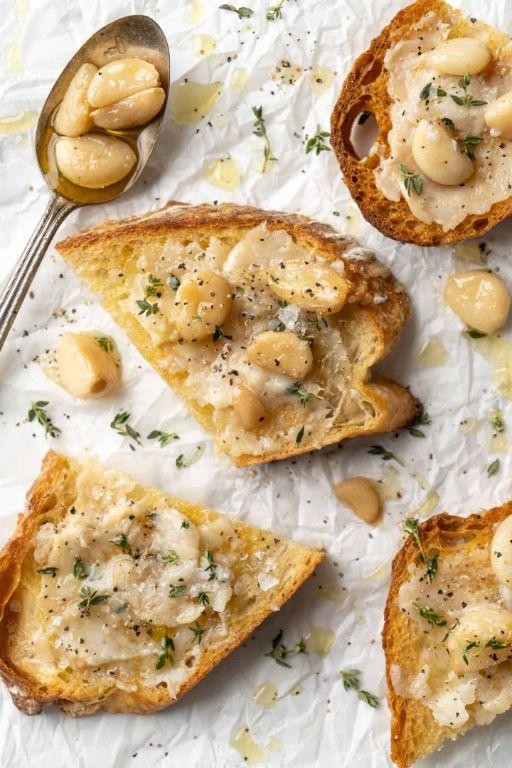
Nothing beats the aroma of garlic slowly cooking in olive oil, transforming into something utterly magical. I remember the first time I made garlic confit; it was a game-changer for my weeknight dinners, adding depth to everything from pasta to toast. Here’s how I do it, with a few tricks I’ve picked up along the way.
Ingredients
- 2 cups of peeled garlic cloves (yes, it’s a lot, but trust me)
- A couple of cups of good quality olive oil (enough to cover the garlic)
- A pinch of salt (because everything needs a little salt)
- A few sprigs of fresh thyme (optional, but it adds a nice touch)
- A loaf of crusty bread (for serving, because what’s garlic confit without bread?)
Instructions
- Preheat your oven to 250°F. Low and slow is the key here.
- In a small ovenproof dish, combine the garlic cloves and olive oil. The oil should just cover the garlic. Add the thyme sprigs if you’re using them.
- Cover the dish with aluminum foil and bake for about 2 hours. You’ll know it’s done when the garlic is golden and soft enough to spread.
- Let it cool slightly before serving. The oil is liquid gold, so don’t waste it!
Every bite of this garlic confit is a creamy, mellow revelation, with none of the sharpness of raw garlic. Spread it on warm crusty bread, drizzle a bit of that garlic-infused oil on top, and maybe a sprinkle of flaky salt for good measure. It’s simple, but it feels like a luxury.
Balsamic Glazed Brussels Sprouts with Bacon
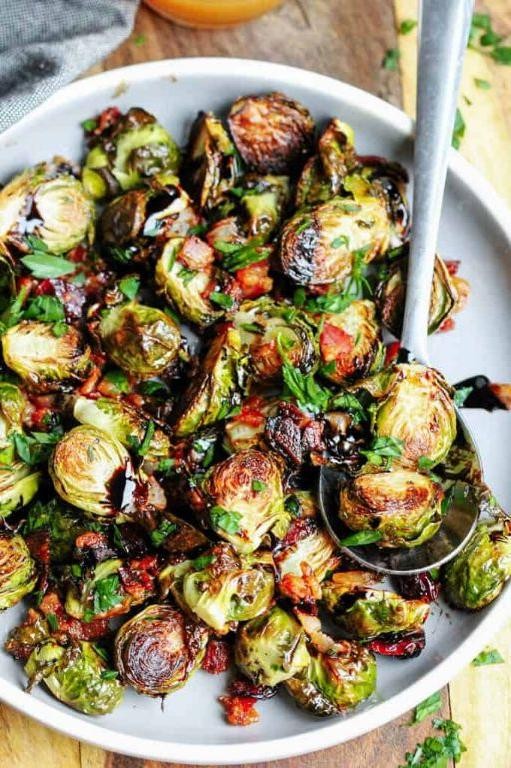
Unbelievably, there was a time when I turned my nose up at Brussels sprouts, but now, they’re a staple in my kitchen, especially when paired with the rich flavors of balsamic glaze and crispy bacon. This dish is a game-changer, turning skeptics into believers with just one bite.
Ingredients
- 1 pound of Brussels sprouts, trimmed and halved
- 4 slices of bacon, chopped into small pieces
- 2 tablespoons of olive oil
- A generous splash of balsamic vinegar
- 1 tablespoon of honey
- A pinch of salt and pepper
Instructions
- Preheat your oven to 400°F (200°C) and line a baking sheet with parchment paper for easy cleanup.
- Toss the halved Brussels sprouts with olive oil, salt, and pepper on the baking sheet, making sure they’re evenly coated. Tip: Don’t overcrowd the pan, or they’ll steam instead of roast.
- Scatter the chopped bacon over the Brussels sprouts. The bacon fat will render as it cooks, adding incredible flavor.
- Roast in the preheated oven for 20 minutes, then give everything a good stir. Tip: Look for the edges of the Brussels sprouts to start caramelizing for the best flavor.
- While the sprouts are roasting, whisk together the balsamic vinegar and honey in a small bowl.
- After the initial 20 minutes, drizzle the balsamic-honey mixture over the sprouts and bacon, then return to the oven for another 10 minutes. Tip: The glaze should be sticky and slightly thickened, not runny.
- Remove from the oven and let cool for a couple of minutes before serving. The Brussels sprouts should be tender with a slight crunch, and the bacon perfectly crispy.
Combining the sweetness of the glaze with the savory bacon and the earthy Brussels sprouts creates a dish that’s irresistibly complex. Serve it as a side that steals the show or toss it with pasta for a hearty main dish.
Chili Lime Grilled Avocados
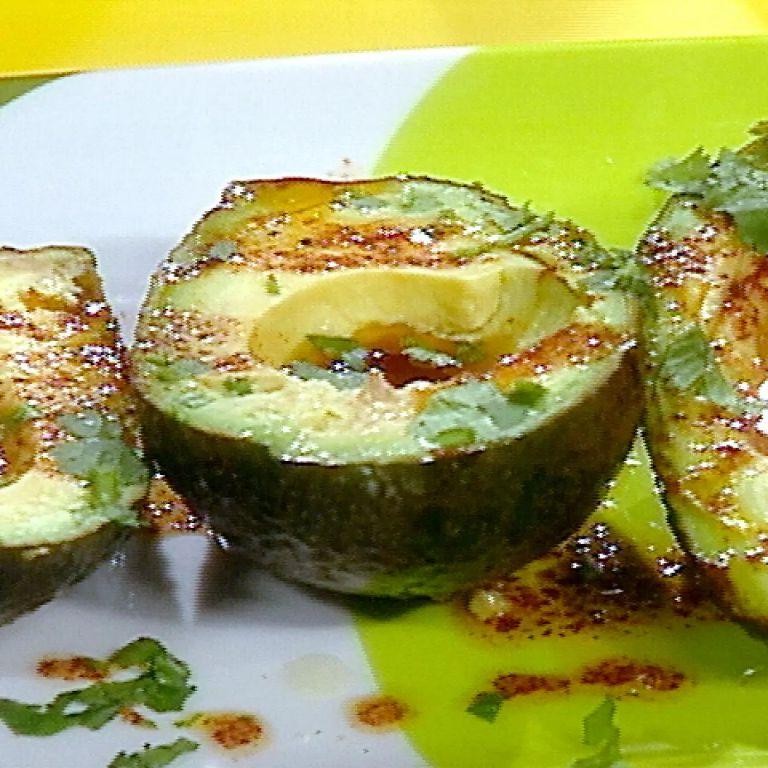
Kind of obsessed with avocados? Same here. That’s why I’m sharing this game-changing Chili Lime Grilled Avocados recipe that’s perfect for summer BBQs or just spicing up your weeknight dinner. It’s a simple, flavorful dish that brings a little zest to your table.
Ingredients
- 2 ripe avocados, halved and pitted
- A splash of olive oil
- A couple of limes, juiced
- A pinch of chili powder
- A sprinkle of salt
- A handful of cilantro, chopped
Instructions
- Preheat your grill to medium-high heat, about 400°F.
- Brush the cut sides of the avocados lightly with olive oil to prevent sticking.
- Place the avocados cut side down on the grill. Grill for about 2-3 minutes until you see those beautiful grill marks. Tip: Don’t move them around too much to get those perfect lines.
- Carefully flip the avocados and grill the skin side for another 2 minutes. This helps soften them just right.
- Remove the avocados from the grill and drizzle with lime juice. Tip: Fresh lime juice makes all the difference here.
- Sprinkle with chili powder, salt, and chopped cilantro. Tip: Adjust the chili powder based on how spicy you like it.
So there you have it—creamy avocados with a smoky char, a kick of chili, and a bright lime finish. Serve them as a side, or get creative and top with a fried egg for a hearty breakfast.
Roasted Tomato and Basil Soup

Nothing warms the soul quite like a bowl of homemade roasted tomato and basil soup, especially when it’s made with love and a little bit of kitchen chaos. I remember the first time I tried making this soup; the aroma of roasting tomatoes filled my kitchen, and I knew I was onto something special.
Ingredients
- 4 cups of ripe tomatoes, halved (because summer tomatoes make all the difference)
- A couple of tablespoons of olive oil (for that golden roast)
- 1 medium onion, chopped (it’s all about the base)
- 4 cloves of garlic, minced (because garlic is life)
- A splash of balsamic vinegar (for a little tang)
- 2 cups of vegetable broth (homemade if you’ve got it)
- A handful of fresh basil leaves (torn, not chopped, to keep it fragrant)
- Salt and pepper (to bring it all together)
Instructions
- Preheat your oven to 400°F. This is the perfect temp for getting those tomatoes nicely caramelized.
- Toss the halved tomatoes with olive oil, salt, and pepper on a baking sheet. Roast for 25 minutes until they’re soft and slightly charred. Tip: Don’t overcrowd the pan, or they’ll steam instead of roast.
- While the tomatoes are roasting, heat a splash of olive oil in a pot over medium heat. Add the onion and garlic, cooking until they’re soft and fragrant, about 5 minutes.
- Add the roasted tomatoes, balsamic vinegar, and vegetable broth to the pot. Bring to a simmer, then let it cook for 10 minutes to meld the flavors. Tip: A wooden spoon is perfect for gently breaking up the tomatoes as they cook.
- Blend the soup until smooth, then stir in the torn basil leaves. Tip: If you like a bit of texture, blend half the soup and leave the other half chunky.
Mmm, the result is a velvety soup with a deep, rich flavor that’s balanced by the freshness of basil. Serve it with a grilled cheese sandwich for the ultimate comfort food experience, or drizzle with a little cream for extra decadence.
Parmesan Crusted Pork Chops

Wow, do I have a treat for you today! Parmesan crusted pork chops are my go-to when I want something crispy, cheesy, and utterly satisfying without spending hours in the kitchen. It’s the kind of dish that makes you feel like a gourmet chef, even on your busiest days.
Ingredients
- 4 boneless pork chops, about 1-inch thick
- A good glug of olive oil
- 1 cup of grated Parmesan cheese
- 1/2 cup of breadcrumbs
- A couple of cloves of garlic, minced
- A pinch of salt and pepper
- 1 egg, beaten
- A splash of milk
Instructions
- Preheat your oven to 375°F and line a baking sheet with parchment paper.
- In a shallow dish, mix together the Parmesan cheese, breadcrumbs, minced garlic, salt, and pepper.
- In another dish, whisk together the egg and a splash of milk.
- Dip each pork chop into the egg mixture, then dredge in the Parmesan mixture, pressing gently to adhere.
- Heat a good glug of olive oil in a large skillet over medium-high heat.
- Cook the pork chops for about 2-3 minutes on each side, or until golden brown. Tip: Don’t overcrowd the pan; cook in batches if necessary.
- Transfer the pork chops to the prepared baking sheet and bake for about 10-15 minutes, or until the internal temperature reaches 145°F. Tip: Use a meat thermometer for perfect doneness.
- Let the pork chops rest for 5 minutes before serving. Tip: Resting allows the juices to redistribute, making the chops even more tender.
Golden and crispy on the outside, juicy on the inside, these pork chops are a dream. Serve them over a bed of arugula with a squeeze of lemon for a fresh contrast, or alongside roasted potatoes for a hearty meal.
Maple Butter Roasted Acorn Squash

When the leaves start to turn and there’s a crispness in the air, I find myself reaching for recipes that bring warmth and sweetness to the table. This Maple Butter Roasted Acorn Squash is one of those dishes that feels like a hug in a bowl, perfect for those cozy autumn evenings. I love how the maple syrup caramelizes in the oven, creating a glaze that’s just irresistible.
Ingredients
- 1 medium acorn squash, halved and seeded
- A couple of tablespoons of unsalted butter, melted
- A generous drizzle of pure maple syrup
- A pinch of salt
- A sprinkle of cinnamon
Instructions
- Preheat your oven to 400°F (200°C) and line a baking sheet with parchment paper for easy cleanup.
- Place the acorn squash halves cut-side up on the prepared baking sheet. Brush the inside of each half with melted butter, making sure to coat it evenly.
- Drizzle maple syrup over the buttered squash halves, then sprinkle with a pinch of salt and cinnamon. Tip: For an extra flavor boost, you can add a dash of nutmeg or ginger.
- Roast in the preheated oven for about 45 minutes, or until the squash is tender when pierced with a fork and the edges are caramelized. Tip: Baste the squash with the maple butter mixture halfway through roasting for extra moisture and flavor.
- Remove from the oven and let it cool for a few minutes before serving. Tip: For a beautiful presentation, sprinkle some chopped pecans or walnuts on top for added crunch.
You’ll love how the squash turns out tender and sweet, with a rich maple butter flavor that’s perfectly balanced by the warmth of cinnamon. Serve it as a side dish, or get creative and use it as a base for a grain bowl topped with quinoa, roasted veggies, and a dollop of yogurt.
Salted Caramel Chocolate Tart

Back when I first stumbled upon the idea of combining salted caramel with chocolate in a tart, I was skeptical. But oh, how wrong I was! This Salted Caramel Chocolate Tart has since become my go-to dessert for impressing guests or treating myself after a long week.
Ingredients
- 1 1/2 cups of all-purpose flour
- a pinch of salt
- 1/2 cup of unsalted butter, cold and cubed
- a couple of tablespoons of ice water
- 1 cup of heavy cream
- 1/2 cup of granulated sugar
- a splash of vanilla extract
- 1/4 teaspoon of sea salt
- 1 1/2 cups of dark chocolate chips
Instructions
- Preheat your oven to 350°F (175°C).
- In a large bowl, mix the flour and salt. Add the cold, cubed butter and use your fingers to rub it into the flour until the mixture resembles coarse crumbs.
- Gradually add ice water, one tablespoon at a time, until the dough comes together. Tip: Don’t overwork the dough, or it’ll become tough.
- Press the dough into a 9-inch tart pan with a removable bottom, making sure to press up the sides. Prick the bottom with a fork.
- Bake for 15 minutes, or until lightly golden. Let it cool completely.
- In a saucepan over medium heat, combine the heavy cream, sugar, and vanilla extract. Stir constantly until the sugar dissolves and the mixture thickens, about 5 minutes.
- Remove from heat and stir in the sea salt. Pour the caramel over the cooled crust.
- Sprinkle the dark chocolate chips over the hot caramel. Tip: The heat from the caramel will melt the chocolate, so no need to melt it separately.
- Let the tart set in the refrigerator for at least 2 hours. Tip: For cleaner slices, dip your knife in hot water before cutting.
Silky smooth chocolate over a layer of gooey salted caramel, all nestled in a buttery crust—this tart is a dream. Serve it with a dollop of whipped cream or a sprinkle of flaky sea salt on top for an extra touch of elegance.
Citrus and Herb Roasted Whole Fish
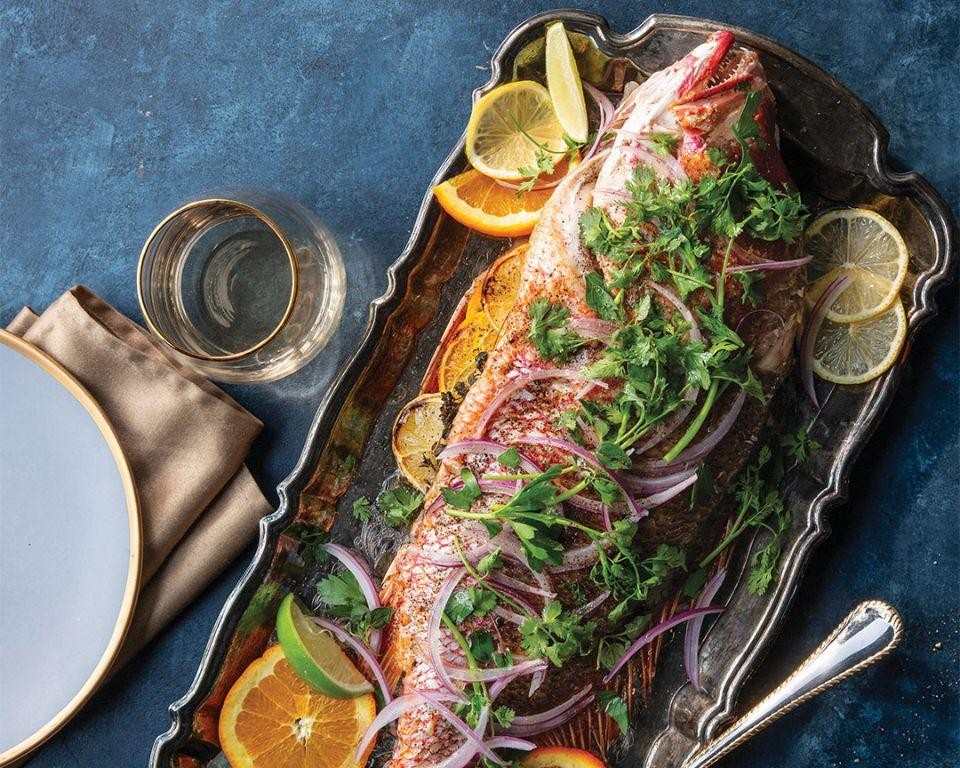
Believe it or not, the first time I tried roasting a whole fish, I was intimidated by the idea. But let me tell you, the moment I pulled that golden, herb-crusted beauty out of the oven, I knew I’d been missing out. It’s simpler than you think, and the flavors? Absolutely unforgettable.
Ingredients
- 1 whole fish (about 2-3 lbs), cleaned and scaled—I like using branzino or snapper
- A couple of lemons, thinly sliced
- A handful of fresh herbs (think thyme, rosemary, and parsley)
- A splash of olive oil
- A pinch of salt and freshly ground black pepper
- A couple of garlic cloves, minced
Instructions
- Preheat your oven to 400°F (200°C). While it’s heating up, pat the fish dry inside and out with paper towels—this helps the skin get crispy.
- Make a few diagonal cuts on each side of the fish. This isn’t just for looks; it helps the heat penetrate evenly.
- Stuff the cavity with lemon slices, a handful of herbs, and minced garlic. Don’t be shy; the more flavor, the better.
- Rub the outside of the fish with olive oil, then season generously with salt and pepper. Tip: Getting oil on your hands? Rub them with a bit of lemon to cut the grease.
- Place the fish on a baking sheet lined with parchment paper or foil for easy cleanup. Roast for about 25-30 minutes. You’ll know it’s done when the skin is crispy and the flesh flakes easily with a fork.
- Let it rest for 5 minutes before serving. This lets the juices redistribute, making every bite moist and flavorful.
Craving something that feels gourmet but is surprisingly easy? This citrus and herb roasted whole fish is your answer. The skin crisps up beautifully, while the inside stays tender and infused with all those bright, herby flavors. Serve it with a simple salad or some roasted veggies, and you’ve got a meal that’s as impressive as it is delicious.
Whipped Feta with Hot Honey and Thyme
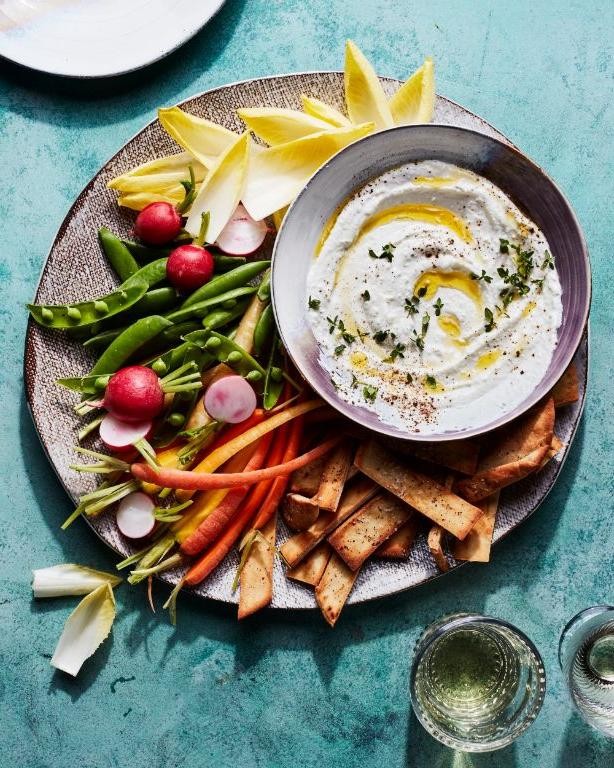
Nothing beats the joy of discovering a recipe that’s as easy to make as it is impressive to serve. That’s exactly how I felt when I first whipped up this creamy, tangy whipped feta topped with spicy hot honey and fragrant thyme. It’s become my go-to appetizer for gatherings, and today, I’m sharing the magic with you.
Ingredients
- 8 oz block of feta cheese (because crumbles just don’t whip the same)
- A generous splash of olive oil (about 2 tbsp)
- A couple of tbsp of hot honey (adjust based on how brave you’re feeling)
- A few sprigs of fresh thyme (dried works in a pinch, but fresh is best)
- A pinch of black pepper (because everything’s better with a little pepper)
Instructions
- Start by crumbling the feta into your food processor. This makes it easier to whip into that dreamy consistency we’re after.
- Add the olive oil to the feta. Process on high until the mixture is smooth and creamy, scraping down the sides as needed. Tip: If it’s too thick, a little more olive oil can loosen it up.
- Transfer the whipped feta to a serving bowl. Use the back of a spoon to make swirls on the surface – these little grooves will hold the hot honey beautifully.
- Drizzle the hot honey over the whipped feta. Don’t be shy; the contrast between the sweet heat and the salty feta is what makes this dish unforgettable.
- Strip the thyme leaves from their stems and sprinkle them over the top, along with that pinch of black pepper.
Every bite of this whipped feta is a perfect balance of creamy, spicy, and herby. Serve it with crusty bread or crisp veggies for dipping, or get creative by spreading it on grilled chicken or fish for an instant flavor upgrade.
Smoky Paprika Butter Popcorn

Yesterday, I stumbled upon the most irresistible snack while experimenting with my spice rack—Smoky Paprika Butter Popcorn. It’s the perfect blend of smoky, buttery, and just a hint of spice that makes it impossible to stop eating. Trust me, your movie nights are about to get a major upgrade.
Ingredients
- 1/2 cup of popcorn kernels
- 3 tbsp of unsalted butter
- 1 tsp of smoked paprika
- A pinch of salt
- A splash of olive oil
Instructions
- Heat a large pot over medium heat and add a splash of olive oil to coat the bottom.
- Add 1/2 cup of popcorn kernels to the pot and cover with a lid. Shake the pot occasionally to prevent burning.
- Once the popping slows to about 2 seconds between pops, remove the pot from the heat and let it sit for 30 seconds to catch any late poppers.
- In a small saucepan, melt 3 tbsp of unsalted butter over low heat. Stir in 1 tsp of smoked paprika and a pinch of salt until well combined.
- Drizzle the smoky paprika butter over the popped popcorn and toss gently to coat evenly. Tip: Use a large bowl for tossing to ensure every piece gets flavored.
- Serve immediately for the best crunch. Tip: If you’re feeling adventurous, add a sprinkle of grated Parmesan for an extra flavor kick.
What makes this popcorn stand out is the smoky depth from the paprika paired with the rich butteriness—it’s a flavor explosion in every bite. Try serving it in individual paper cones for a fun, party-friendly presentation.
Conclusion
Just as we’ve explored, these 16 Savory Salt Fat Acid Heat Recipes are a treasure trove of flavors waiting to elevate your cooking game. Whether you’re a seasoned chef or a curious beginner, there’s something here for everyone. We’d love to hear which recipes became your favorites—drop us a comment below! And if you enjoyed this roundup, don’t forget to share the deliciousness on Pinterest. Happy cooking!