Who says you need an oven to whip up something sweet and spectacular? Dive into our roundup of 18 Delicious Refrigerated Cakes Recipes Easy, where no-bake meets no-fuss for desserts that are as simple to make as they are satisfying to eat. Perfect for busy bees or last-minute cravings, these chilled treats promise to delight without the heat. Ready to cool down with some scrumptious slices? Let’s get started!
Chocolate Refrigerator Cake
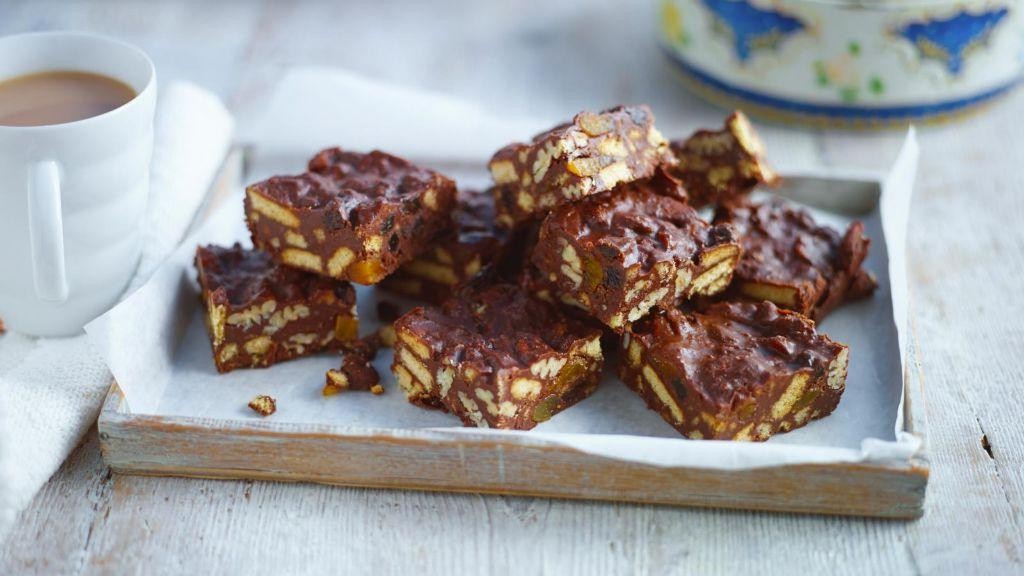
Perfect for those lazy summer days when you crave something sweet but don’t want to turn on the oven, this Chocolate Refrigerator Cake has been my go-to dessert. It’s a no-bake wonder that combines the richness of chocolate with the crunch of cookies, and the best part? It gets better as it sits in the fridge.
Ingredients
- 2 cups of crushed graham crackers (I like to use a mix of honey and chocolate flavored for extra depth)
- 1/2 cup of unsalted butter, melted (I always keep mine at room temp for easier mixing)
- 1/4 cup of granulated sugar (just enough to sweeten the crust without overpowering the chocolate)
- 1 1/2 cups of heavy cream (the higher the fat content, the silkier the ganache)
- 12 oz of semi-sweet chocolate chips (I swear by Ghirardelli for their meltability)
- 1 tsp of vanilla extract (a splash of bourbon vanilla makes it heavenly)
Instructions
- In a medium bowl, mix the crushed graham crackers, melted butter, and sugar until well combined. Tip: Press the mixture firmly into the bottom of a 9×9 inch pan to create a solid base.
- Pour the heavy cream into a small saucepan and heat over medium heat until it just begins to simmer, about 3-4 minutes. Tip: Keep an eye on it to prevent boiling over.
- Place the chocolate chips in a heatproof bowl. Once the cream is hot, pour it over the chocolate chips and let it sit for 2 minutes to soften the chocolate.
- Add the vanilla extract to the chocolate and cream mixture, then stir until smooth and glossy. Tip: If there are any unmelted chips, you can microwave the mixture in 10-second bursts, stirring in between.
- Pour the chocolate ganache over the prepared graham cracker crust, spreading it evenly with a spatula.
- Refrigerate the cake for at least 4 hours, or until the ganache is set. Tip: For cleaner slices, dip your knife in hot water before cutting.
Zesty with a hint of vanilla and a satisfying crunch from the graham cracker crust, this cake is a dream. Serve it chilled with a dollop of whipped cream or a sprinkle of sea salt for an extra flavor kick.
Lemon Icebox Cake
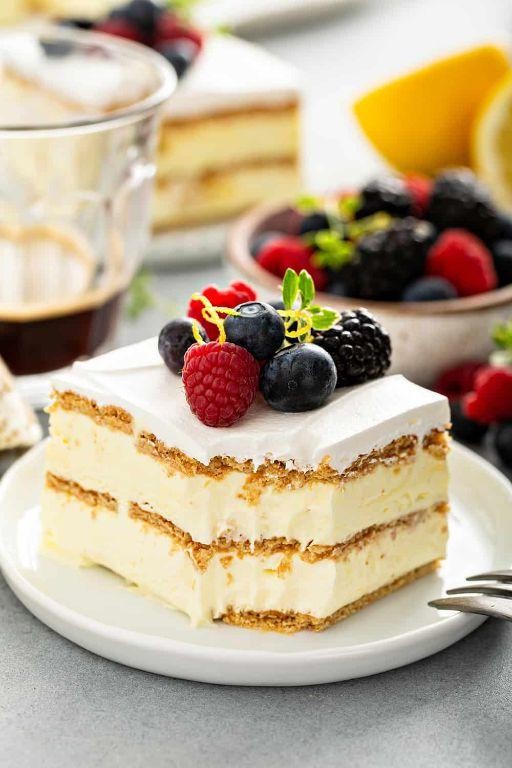
Just when I thought summer couldn’t get any better, I stumbled upon this no-bake Lemon Icebox Cake that’s become my go-to for beating the heat. It’s creamy, tangy, and ridiculously easy to make—perfect for those days when you can’t bear to turn on the oven.
Ingredients
- 2 cups heavy cream (I always chill the bowl and beaters first for fluffier whipped cream)
- 1/2 cup powdered sugar (sifted to avoid lumps, because nobody likes biting into a sugar clump)
- 1 tbsp lemon zest (from about 2 lemons, and yes, the zest adds a punch of flavor)
- 1/4 cup fresh lemon juice (strained to keep it smooth)
- 1 tsp vanilla extract (the real deal, please)
- 1 package graham crackers (about 14 full sheets, because layering is key)
Instructions
- In your chilled bowl, whip the heavy cream on medium-high speed until soft peaks form, about 3 minutes.
- Gradually add the powdered sugar, lemon zest, lemon juice, and vanilla extract, continuing to whip until stiff peaks form, about 2 more minutes. Tip: Don’t overbeat, or you’ll end up with butter!
- In an 8×8 inch dish, layer graham crackers to cover the bottom, breaking them as needed to fit.
- Spread half of the lemon cream over the graham crackers, ensuring an even layer.
- Repeat with another layer of graham crackers and the remaining lemon cream. Tip: Smooth the top with a spatula for a prettier finish.
- Cover and refrigerate for at least 4 hours, or overnight. Tip: The longer it chills, the softer the graham crackers become, melding into the cream for that perfect cake texture.
Fresh out of the fridge, this cake is a dream—creamy with a hint of crunch from the graham crackers, and the lemon flavor is just the right amount of zing. Serve it with a sprinkle of extra lemon zest or a dollop of whipped cream for an extra special touch.
Strawberry Refrigerator Cake
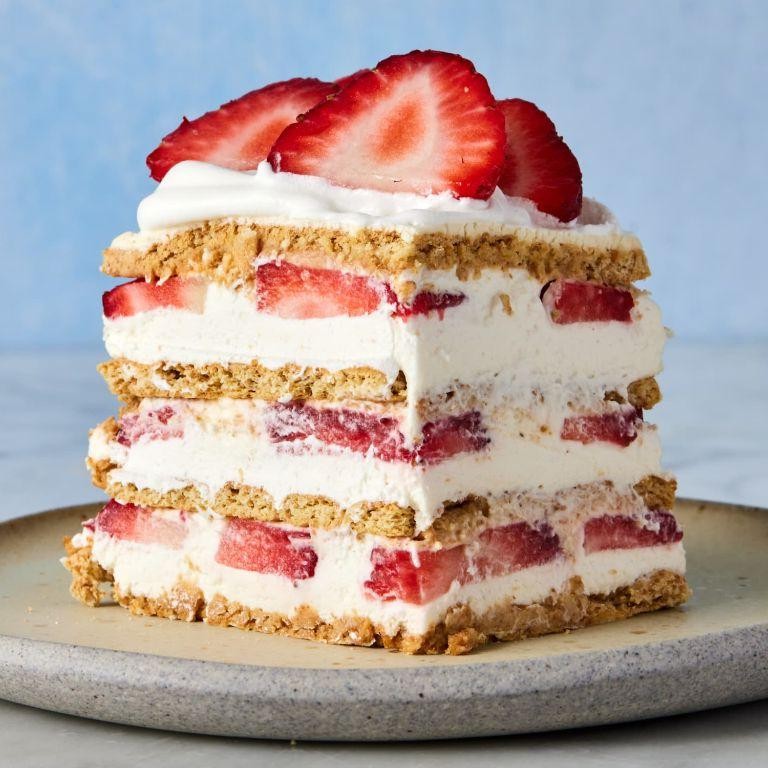
Did you ever have one of those days where you crave something sweet but don’t want to turn on the oven? That’s exactly how this Strawberry Refrigerator Cake came to be in my kitchen last summer. It’s a no-bake wonder that’s as easy to make as it is delicious, perfect for those lazy afternoons or when you need a quick dessert that looks like you spent hours on it.
Ingredients
- 2 cups heavy cream (I always chill the bowl and beaters first for fluffier whipped cream)
- 1/4 cup powdered sugar (a little extra for dusting on top never hurt anyone)
- 1 tsp vanilla extract (the real stuff makes all the difference)
- 1 lb fresh strawberries, hulled and sliced (save a few whole ones for garnish)
- 1 package (14 oz) graham crackers (the honey kind adds a nice touch)
- 1/2 cup strawberry jam (warmed slightly for easier spreading)
Instructions
- In a large chilled bowl, whip the heavy cream, powdered sugar, and vanilla extract together until stiff peaks form, about 3-4 minutes. Tip: Don’t overwhip, or you’ll end up with butter!
- Spread a thin layer of the whipped cream on the bottom of a 9×13 inch dish to prevent the graham crackers from sticking.
- Arrange a single layer of graham crackers over the whipped cream, breaking them as needed to fit.
- Spread half of the remaining whipped cream over the graham crackers, then top with half of the sliced strawberries.
- Repeat the layers: graham crackers, whipped cream, and strawberries, ending with a layer of graham crackers on top.
- Warm the strawberry jam in the microwave for about 20 seconds, then spread it evenly over the top layer of graham crackers. Tip: A pastry brush works great for this!
- Cover and refrigerate for at least 4 hours, or overnight. Tip: The longer it chills, the softer the graham crackers become, making it easier to slice.
- Before serving, garnish with the reserved whole strawberries and a dusting of powdered sugar.
So there you have it, a dessert that’s as effortless as it is impressive. The layers meld together beautifully in the fridge, creating a cake that’s creamy, fruity, and just the right amount of sweet. Serve it straight from the dish for a rustic look, or plate individual slices with a dollop of extra whipped cream for a more refined presentation.
Vanilla Icebox Cake
Unbelievable how a simple dessert can bring back so many childhood memories, isn’t it? That’s exactly how I feel every time I whip up this Vanilla Icebox Cake. It’s the perfect no-bake treat for those sweltering summer days when turning on the oven feels like a crime.
Ingredients
- 2 cups heavy cream (I always chill the bowl and beaters first for fluffier peaks)
- 1/4 cup powdered sugar (because who doesn’t love a little sweetness?)
- 1 tsp pure vanilla extract (the real deal makes all the difference)
- 1 package (14.4 oz) graham crackers (the backbone of this dreamy dessert)
- 1/2 cup cold whole milk (trust me, the fat content matters here)
Instructions
- In your chilled bowl, whip the heavy cream on medium speed until it begins to thicken, about 2 minutes.
- Gradually add the powdered sugar and vanilla extract, then increase the speed to high and whip until stiff peaks form, about another 2 minutes. Tip: Don’t walk away! Over-whipping can turn your cream to butter.
- Pour the cold milk into a shallow dish. Quickly dip each graham cracker into the milk, ensuring both sides are moist but not soggy. Tip: A quick dip is all you need—think ‘in and out’.
- Layer the bottom of a 9×13 inch baking dish with a single layer of moistened graham crackers.
- Spread half of the whipped cream evenly over the crackers.
- Repeat the layers once more: crackers, then the remaining whipped cream.
- Cover the dish with plastic wrap and refrigerate for at least 4 hours, or overnight for best results. Tip: Patience is key here; the cake needs time to soften and meld.
What you’ll love most about this cake is its magical transformation in the fridge—the crackers soften into a cake-like texture, while the cream sets into a lush, velvety layer. Serve it straight from the fridge with a sprinkle of cinnamon or fresh berries for a pop of color and freshness.
Peanut Butter Refrigerator Cake

Unbelievably easy and irresistibly creamy, this Peanut Butter Refrigerator Cake has been my go-to dessert for those last-minute potlucks or when I’m craving something sweet without the fuss. I remember the first time I made it; my kitchen was a mess, but the compliments kept coming, and now it’s a staple in my recipe box.
Ingredients
- 1 1/2 cups graham cracker crumbs (I always keep a box in the pantry for emergencies like this)
- 1/2 cup unsalted butter, melted (trust me, the unsalted makes all the difference)
- 1 cup creamy peanut butter (I’m loyal to the all-natural kind, but use what you love)
- 1 cup powdered sugar (sifted to avoid those pesky lumps)
- 1 1/2 cups heavy cream (chilled is best for whipping)
- 1 tsp vanilla extract (the real deal, please)
- 1/4 cup mini chocolate chips (because who doesn’t love a little chocolate?)
Instructions
- In a medium bowl, mix the graham cracker crumbs and melted butter until well combined. Press firmly into the bottom of a 9×9 inch pan to form the crust. Tip: Use the back of a measuring cup to get it nice and even.
- In another bowl, beat the peanut butter and powdered sugar together until smooth. Spread this mixture over the crust. Tip: A spatula lightly sprayed with cooking oil makes spreading a breeze.
- In a chilled bowl, whip the heavy cream and vanilla extract until stiff peaks form. Gently fold in the mini chocolate chips, then spread over the peanut butter layer. Tip: Don’t overmix to keep the whipped cream light and fluffy.
- Cover and refrigerate for at least 4 hours, or overnight for best results. The waiting is the hardest part!
Once set, the cake is a dreamy layers of crunch, creamy peanut butter, and light whipped topping. I love serving it with a drizzle of chocolate sauce or a sprinkle of sea salt for that sweet-salty kick. It’s the kind of dessert that looks like you spent hours on, but we’ll keep that our little secret.
Banana Pudding Icebox Cake
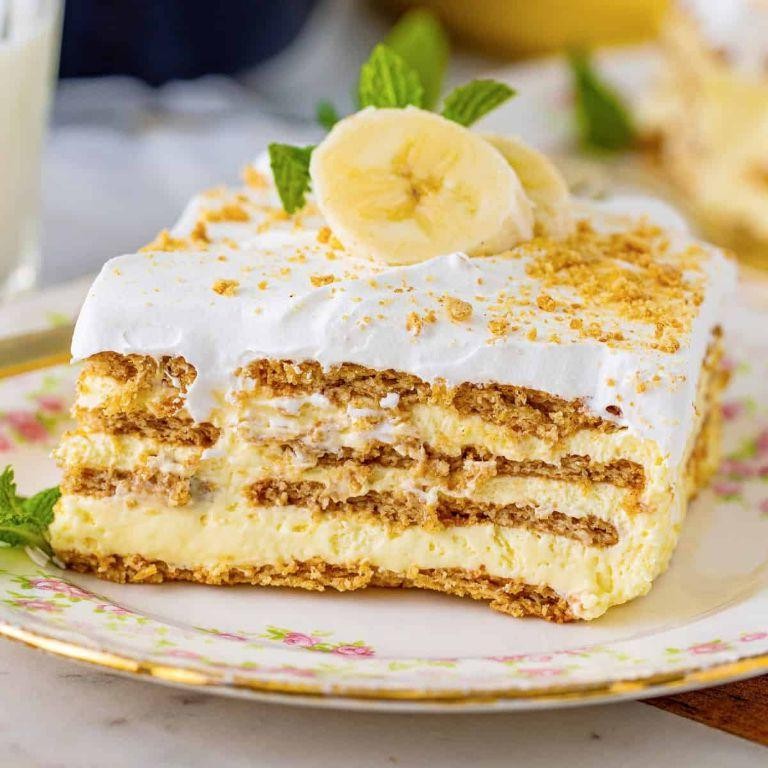
Banana pudding icebox cake is one of those no-bake wonders that feels like a hug in dessert form. I stumbled upon this recipe during a sweltering summer when turning on the oven felt like a crime, and it’s been a staple in my kitchen ever since.
Ingredients
- 2 cups heavy whipping cream (I always chill the bowl and beaters first for peak fluffiness)
- 1/2 cup powdered sugar (sifted to avoid lumps, because nobody wants a gritty surprise)
- 1 tsp vanilla extract (the real deal, please—imitation just doesn’t cut it)
- 1 box vanilla wafers (about 11 oz, because their crunch is legendary)
- 4 ripe bananas (spotted ones are perfect here—sweet and soft)
- 3.4 oz box instant banana pudding mix (this is the cheat code for maximum flavor)
- 2 cups cold whole milk (the richer, the better for that creamy dreaminess)
Instructions
- In your chilled bowl, whip the heavy cream on medium-high speed until soft peaks form, about 3 minutes.
- Gradually add the powdered sugar and vanilla extract, then continue whipping until stiff peaks form, about 2 more minutes. Tip: Overbeating can turn your cream to butter, so keep an eye on it!
- In a separate bowl, whisk the banana pudding mix with cold milk until thickened, about 2 minutes. Let it sit for 5 minutes to set. Tip: Whisking by hand prevents overmixing and keeps the pudding smooth.
- Slice the bananas into 1/4-inch rounds. Tip: A slight angle on your slices makes for prettier layers.
- In a 9×13-inch dish, layer vanilla wafers, banana slices, and pudding, repeating until all ingredients are used, ending with a layer of whipped cream.
- Cover and refrigerate for at least 4 hours, or overnight for best results. The wafers will soften into cake-like layers.
You’ll love how the layers meld into a creamy, dreamy texture with just the right amount of banana flavor. Serve it straight from the dish for a homey feel, or dress it up with a sprinkle of crushed wafers on top for a bit of crunch.
Oreo Refrigerator Cake
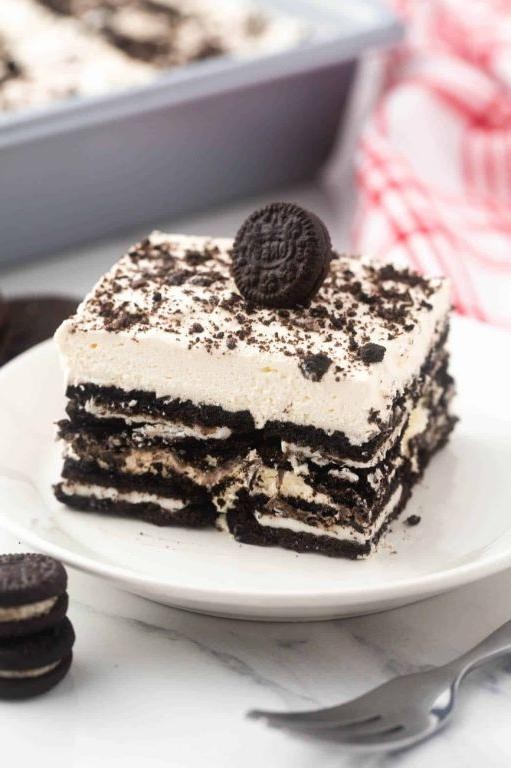
Goodness, have I got a treat for you today! It’s one of those no-bake wonders that saved me during last summer’s heatwave when turning on the oven felt like a crime. This Oreo Refrigerator Cake is not just a dessert; it’s a memory maker, perfect for those lazy days or when you need a quick sweet fix.
Ingredients
- 2 cups heavy cream (I always chill the bowl and beaters first for extra fluffy peaks)
- 1/4 cup powdered sugar (sifted to avoid lumps, because nobody wants a gritty surprise)
- 1 tsp vanilla extract (the real deal, please—imitation just doesn’t cut it)
- 24 Oreo cookies (I sometimes sneak a few extra for the chef’s snack)
- 1/2 cup unsalted butter, melted (let it cool a bit so it doesn’t melt the cookies)
Instructions
- In your chilled bowl, whip the heavy cream on high speed until soft peaks form, about 3 minutes. Tip: Overbeating turns cream to butter, so keep an eye on it!
- Gently fold in the powdered sugar and vanilla extract until fully incorporated. This keeps the cream light and airy.
- Crush 20 Oreos into coarse chunks (save 4 for garnish). I use a bag and rolling pin for control—less mess, more fun.
- Mix the crushed Oreos with melted butter until evenly coated. Press this mixture into the bottom of a 9-inch springform pan to form the crust.
- Spread the whipped cream over the Oreo crust, smoothing the top with a spatula. Crumble the remaining Oreos on top for that Instagram-worthy finish.
- Refrigerate for at least 4 hours, or overnight if you can wait. Tip: The longer it chills, the better the flavors meld.
Unbelievable how something so simple can be so decadent. The contrast between the crunchy Oreo base and the silky cream is pure magic. Try serving it with a drizzle of chocolate sauce or fresh berries for an extra touch of elegance.
Pineapple Refrigerator Cake
Wondering what to do with that leftover pineapple sitting in your fridge? I was in the same boat last summer, which led me to create this no-bake Pineapple Refrigerator Cake. It’s a breeze to make, and the tropical flavors are a perfect pick-me-up on a hot day.
Ingredients
- 2 cups heavy cream (I always chill the bowl and beaters first for fluffier whipped cream)
- 1/2 cup powdered sugar (sifted to avoid lumps)
- 1 tsp vanilla extract (the real deal, not imitation)
- 20 oz can crushed pineapple, drained well (save the juice for smoothies!)
- 1 package graham crackers (about 12 full sheets, crushed into crumbs)
- 1/2 cup unsalted butter, melted (I like to add a pinch of salt to enhance the flavor)
Instructions
- In a large chilled bowl, whip the heavy cream on high speed until soft peaks form, about 3 minutes.
- Gradually add the powdered sugar and vanilla extract, continuing to whip until stiff peaks form, about 2 more minutes. Tip: Overbeating can turn your cream to butter, so keep an eye on it!
- Fold in the drained crushed pineapple gently until just combined.
- In a separate bowl, mix the graham cracker crumbs with the melted butter until the crumbs are evenly coated.
- Press half of the graham cracker mixture into the bottom of a 9×9 inch dish to form the crust. Tip: Use the back of a spoon to compact it evenly.
- Spread the pineapple cream mixture over the crust, smoothing the top with a spatula.
- Sprinkle the remaining graham cracker mixture over the top, covering the cream layer completely.
- Cover and refrigerate for at least 4 hours, or overnight for best results. Tip: The longer it chills, the more the flavors meld together.
The cake sets into a creamy, dreamy texture with a delightful crunch from the graham crackers. Serve it chilled with a drizzle of pineapple juice or a sprinkle of toasted coconut for an extra tropical twist.
Raspberry Icebox Cake
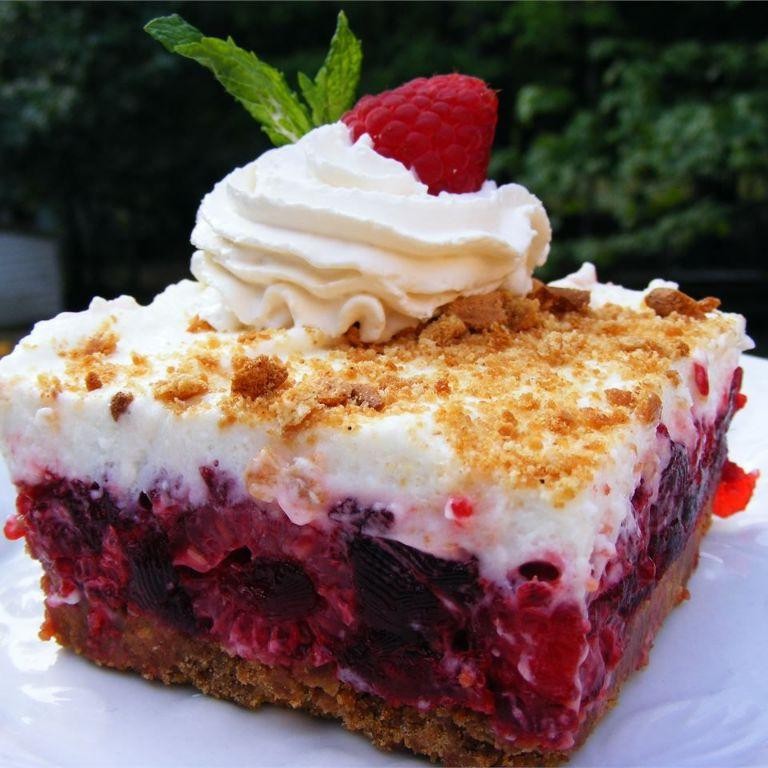
Mmm, there’s nothing quite like the simplicity and refreshing taste of a no-bake dessert, especially when it’s as easy to throw together as this Raspberry Icebox Cake. I remember the first time I made it; the kitchen was sweltering, and the thought of turning on the oven was unbearable. This cake was my savior, and it’s been a summer staple ever since.
Ingredients
- 2 cups heavy cream (I always chill the bowl and beaters first for fluffier whipped cream)
- 1/4 cup powdered sugar (a little extra doesn’t hurt for sweetness)
- 1 tsp vanilla extract (the real deal, please)
- 1 package (about 14 oz) graham crackers (the classic choice, but feel free to experiment)
- 3 cups fresh raspberries (plus a handful more for garnish because we eat with our eyes first)
Instructions
- In your chilled bowl, whip the heavy cream on high speed until soft peaks form, about 3 minutes.
- Gently fold in the powdered sugar and vanilla extract until fully incorporated. Tip: Overmixing can deflate the cream, so be gentle.
- In a 9×13 inch baking dish, arrange a single layer of graham crackers, breaking them as needed to fit.
- Spread half of the whipped cream mixture over the graham crackers, then sprinkle half of the raspberries on top.
- Repeat the layers with the remaining graham crackers, whipped cream, and raspberries. Tip: Press down lightly on the second graham cracker layer to help everything stick together.
- Cover and refrigerate for at least 4 hours, or overnight for best results. Tip: The longer it chills, the softer the graham crackers become, mimicking the texture of cake layers.
Cool and creamy with a delightful tang from the raspberries, this icebox cake is a dream come true on a hot day. Try serving it with a drizzle of chocolate sauce or a sprinkle of crushed graham crackers for an extra touch of indulgence.
Tiramisu Refrigerator Cake
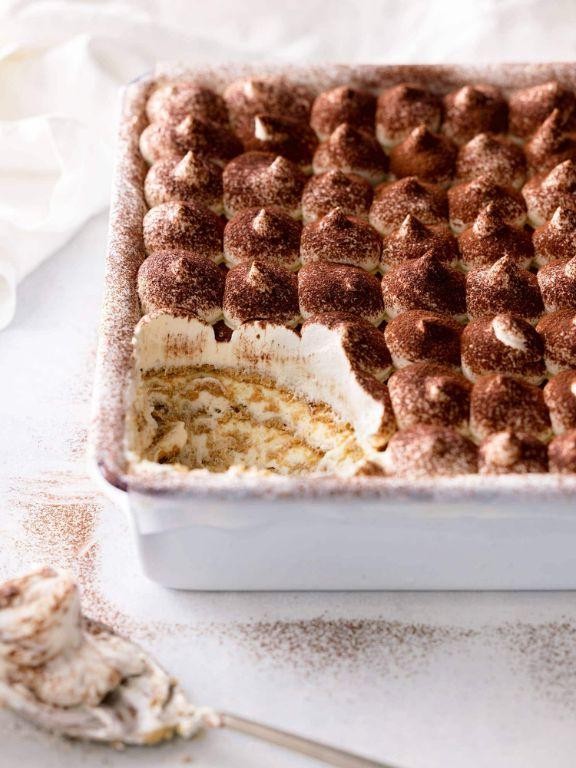
After a long day of testing recipes, I stumbled upon this no-bake Tiramisu Refrigerator Cake that’s become my go-to dessert for impromptu gatherings. It’s layers of coffee-soaked ladyfingers and creamy mascarpone that come together with minimal effort, perfect for those who love dessert but dread the oven.
Ingredients
- 1 cup strong brewed coffee, cooled (I like to use a dark roast for a deeper flavor)
- 24 ladyfingers (the crisp ones work best for soaking up the coffee)
- 16 oz mascarpone cheese, at room temperature (it blends smoother when not cold)
- 1/2 cup granulated sugar (I sometimes reduce this to 1/3 cup if I want it less sweet)
- 1 cup heavy cream (chilled, it whips up better)
- 2 tbsp cocoa powder (for dusting, and yes, the darker the better in my book)
Instructions
- Brew 1 cup of strong coffee and let it cool to room temperature. Tip: Adding a splash of vanilla extract can elevate the coffee flavor.
- In a large bowl, beat the mascarpone and sugar together until smooth. Tip: Ensure the mascarpone is at room temperature to avoid lumps.
- In another bowl, whip the heavy cream until stiff peaks form, then gently fold it into the mascarpone mixture. Tip: Fold slowly to keep the mixture light and airy.
- Quickly dip each ladyfinger into the cooled coffee and layer them in the bottom of a 9×9 inch dish. Tip: Don’t soak them too long or they’ll fall apart.
- Spread half of the mascarpone mixture over the ladyfingers, then repeat with another layer of coffee-dipped ladyfingers and the remaining mascarpone mixture.
- Dust the top with cocoa powder. Tip: Use a fine mesh sieve for an even dusting.
- Cover and refrigerate for at least 4 hours, or overnight for best results. The waiting is the hardest part!
Keep this Tiramisu Refrigerator Cake chilled until serving to maintain its structure. The layers meld together beautifully, offering a creamy texture with a coffee kick that’s not too overpowering. For a festive twist, top with chocolate shavings or serve with a side of fresh berries.
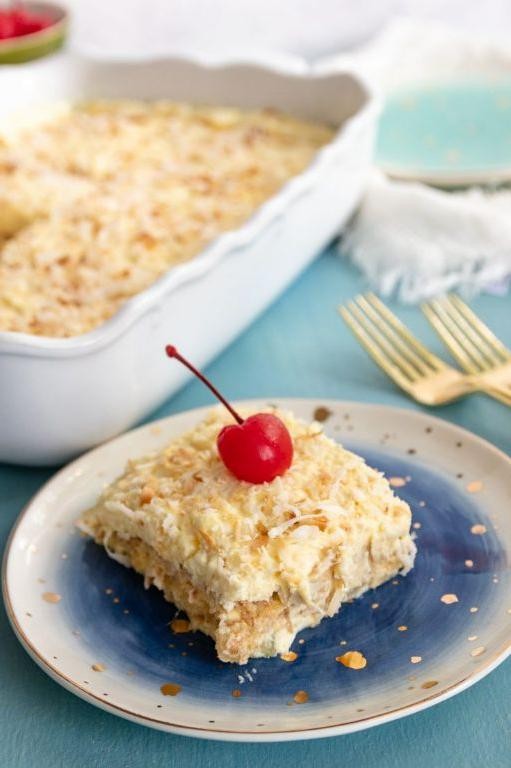
Coconut Refrigerator Cake
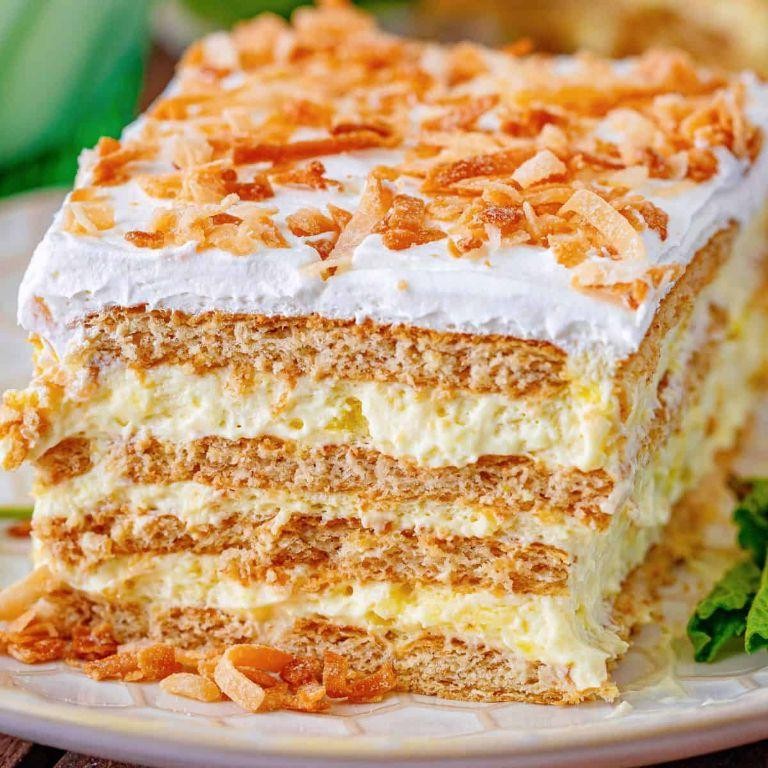
Many of my fondest childhood memories involve digging into a slice of my grandma’s Coconut Refrigerator Cake. It’s a no-bake wonder that’s as easy to make as it is delicious, perfect for those days when you’re craving something sweet but don’t want to turn on the oven.
Ingredients
- 2 cups graham cracker crumbs (I always keep a box in the pantry for emergencies like this)
- 1/2 cup unsalted butter, melted (I find that using unsalted butter lets me control the sweetness better)
- 1 cup sweetened shredded coconut (toasting it lightly brings out an amazing flavor)
- 1 can (14 oz) sweetened condensed milk (this is the magic glue that holds everything together)
- 1 tsp vanilla extract (a splash of vanilla makes everything better)
- 1 1/2 cups heavy whipping cream (chilled, because it whips up so much better when cold)
Instructions
- In a medium bowl, mix the graham cracker crumbs and melted butter until well combined. Press firmly into the bottom of a 9×13 inch pan to form the crust. Tip: Use the bottom of a measuring cup to press the crumbs down evenly.
- Sprinkle the shredded coconut evenly over the crust. Tip: Lightly toasting the coconut beforehand adds a depth of flavor that’s irresistible.
- Pour the sweetened condensed milk over the coconut layer, spreading it out with a spatula to cover completely.
- In a large bowl, whip the heavy cream and vanilla extract until stiff peaks form. This usually takes about 3-4 minutes. Tip: Make sure your cream is cold and your bowl is chilled for the best results.
- Spread the whipped cream over the condensed milk layer, smoothing the top with a spatula.
- Cover and refrigerate for at least 4 hours, or overnight if you can wait that long. The longer it chills, the better the flavors meld together.
You’ll love the creamy texture and the way the coconut adds a chewy contrast. Serve it straight from the fridge with a sprinkle of toasted coconut on top for an extra special touch.
Blueberry Icebox Cake
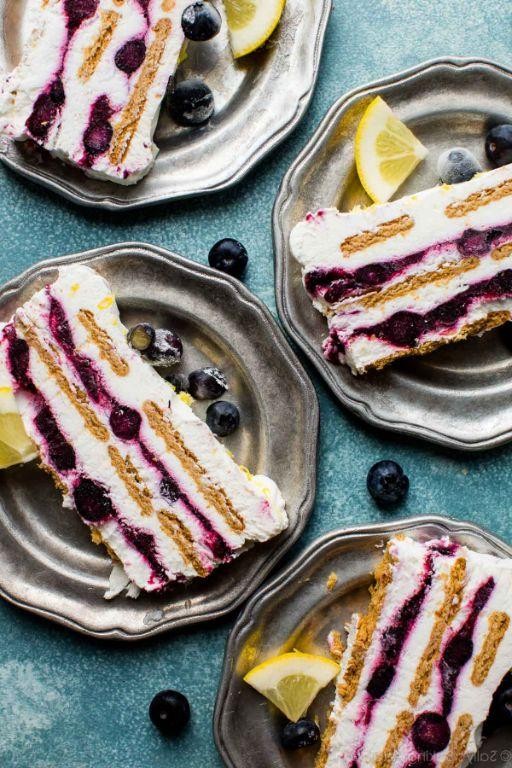
This summer, I stumbled upon the most effortless yet show-stopping dessert that’s perfect for those sweltering days when turning on the oven feels like a crime. The Blueberry Icebox Cake has become my go-to for impressing guests without breaking a sweat, and I’m thrilled to share it with you.
Ingredients
- 2 cups heavy cream (I always chill the bowl and beaters first for peak fluffiness)
- 1/4 cup powdered sugar (a little extra never hurt anybody)
- 1 tsp vanilla extract (the real deal, please)
- 1 package graham crackers (about 14 full sheets, but who’s counting?)
- 3 cups fresh blueberries (washed and patted dry, because nobody likes a soggy cake)
- 1/2 cup blueberry jam (homemade or store-bought, no judgment here)
Instructions
- In your chilled bowl, whip the heavy cream, powdered sugar, and vanilla extract on high speed until stiff peaks form, about 3 minutes. Tip: Stop the mixer just before you think it’s done to avoid over-whipping.
- Spread a thin layer of the whipped cream on the bottom of an 8×8 inch baking dish to prevent sticking.
- Arrange a single layer of graham crackers over the whipped cream, breaking them as needed to fit.
- Spread half of the remaining whipped cream over the graham crackers, then sprinkle with 1 cup of blueberries.
- Repeat the layers: graham crackers, whipped cream, and blueberries, ending with a layer of graham crackers on top.
- Warm the blueberry jam slightly in the microwave for about 20 seconds, then drizzle it over the top layer of graham crackers. Tip: A fork works wonders for creating those Instagram-worthy swirls.
- Cover the dish with plastic wrap and refrigerate for at least 4 hours, or overnight for best results. Tip: The longer it sits, the softer the graham crackers become, mimicking the texture of cake layers.
Unbelievably, this no-bake marvel transforms into something magical overnight, with layers that meld together into a creamy, dreamy texture. Serve it straight from the fridge with a sprinkle of fresh blueberries on top for a pop of color and freshness that’ll have everyone asking for seconds.
Cherry Refrigerator Cake
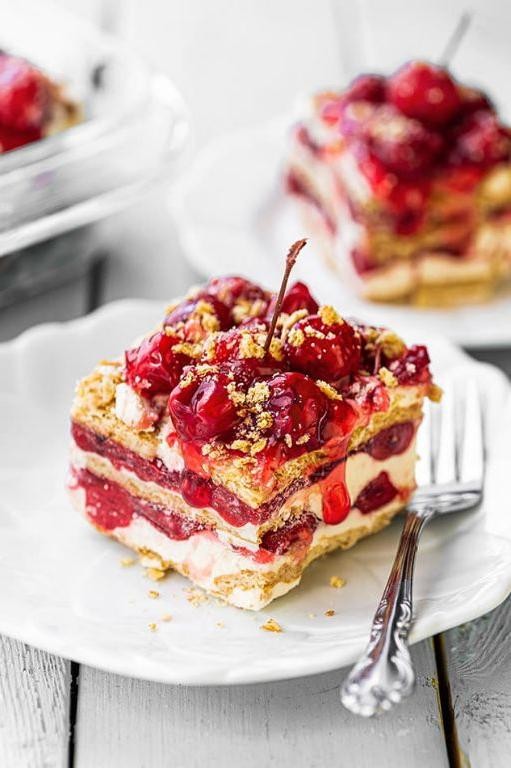
Yesterday, I stumbled upon the simplest yet most delightful dessert that’s perfect for these warm June evenings—no baking required! It’s a throwback to those no-fuss recipes our grandmas loved, and honestly, it’s a lifesaver when you’re craving something sweet without the hassle.
Ingredients
- 2 cups heavy cream (I always chill the bowl and beaters first for extra fluffy peaks)
- 1/2 cup powdered sugar (sifted to avoid lumps, because nobody likes a gritty dessert)
- 1 tsp vanilla extract (the real deal, please—imitation just doesn’t cut it)
- 24 oz jarred cherries in syrup (drained, but save that syrup for cocktails or pancakes!)
- 1 package (14 oz) graham crackers (the classic honey kind adds a nice touch)
Instructions
- In your chilled bowl, whip the heavy cream on medium speed until soft peaks form, about 3 minutes.
- Gradually add the powdered sugar and vanilla extract, then increase speed to high and whip until stiff peaks form, about 2 more minutes. Tip: Overbeating turns cream to butter, so keep an eye on it!
- In a 9×13 inch dish, layer graham crackers to cover the bottom completely.
- Spread half of the whipped cream over the graham crackers, then scatter half of the drained cherries on top.
- Repeat the layers with remaining graham crackers, whipped cream, and cherries. Tip: For neat slices, chill the cake for at least 4 hours, though overnight is best.
- Cover and refrigerate for at least 4 hours before serving. Tip: The graham crackers will soften into a cake-like texture, so patience is key here.
Before you know it, you’ll have a creamy, dreamy dessert that’s layers of sweet cherries and velvety cream between soft graham crackers. Try serving it with a drizzle of the reserved cherry syrup or a sprinkle of crushed graham crackers on top for an extra crunch.
Pistachio Icebox Cake
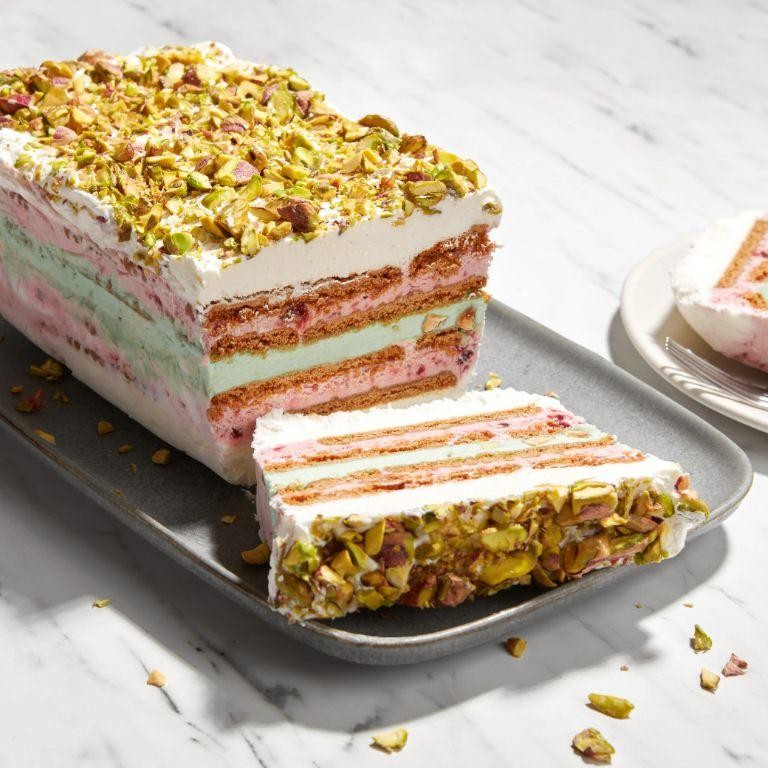
Very few desserts can claim to be as effortlessly delicious as the Pistachio Icebox Cake. I remember the first time I made it, thinking it would be complicated, but to my delight, it was as simple as layering a few ingredients and letting the fridge do the rest. Now, it’s my go-to when I need a dessert that’s both impressive and easy.
Ingredients
- 2 cups heavy cream (I always chill the bowl and beaters first for extra fluffy whipped cream)
- 1/2 cup powdered sugar (sifted to avoid lumps)
- 1 tsp vanilla extract (the real deal, not imitation)
- 1 1/2 cups pistachio pudding mix (this is where the magic happens)
- 3 cups cold whole milk (trust me, the richness makes a difference)
- 1 box graham crackers (about 24 crackers, for that perfect crunch)
- 1/2 cup chopped pistachios (for garnish, because we eat with our eyes first)
Instructions
- In a large chilled bowl, whip the heavy cream on medium-high speed until soft peaks form, about 3 minutes.
- Gradually add the powdered sugar and vanilla extract, continuing to whip until stiff peaks form, about 2 more minutes. Tip: Don’t overwhip, or you’ll end up with butter!
- In another bowl, whisk together the pistachio pudding mix and cold milk until smooth and slightly thickened, about 2 minutes. Let it sit for 5 minutes to set.
- Gently fold half of the whipped cream into the pudding mixture until fully incorporated. This lightens the pudding and makes it extra creamy.
- In a 9×13 inch dish, layer graham crackers to cover the bottom, breaking them as needed to fit.
- Spread half of the pudding mixture over the graham crackers, smoothing it into an even layer.
- Repeat the layers: graham crackers, remaining pudding mixture, and a final layer of graham crackers.
- Spread the remaining whipped cream over the top layer of graham crackers, creating a smooth or decorative finish as you prefer.
- Sprinkle the chopped pistachios over the top for a beautiful and tasty garnish.
- Cover and refrigerate for at least 4 hours, or overnight for best results. Tip: The longer it chills, the softer the graham crackers become, blending beautifully with the creamy layers.
When you’re ready to serve, you’ll notice how the layers have melded together into a creamy, dreamy dessert with a subtle crunch from the pistachios. For a fun twist, try serving individual portions in mason jars for a portable treat that’s as charming as it is delicious.
Matcha Refrigerator Cake
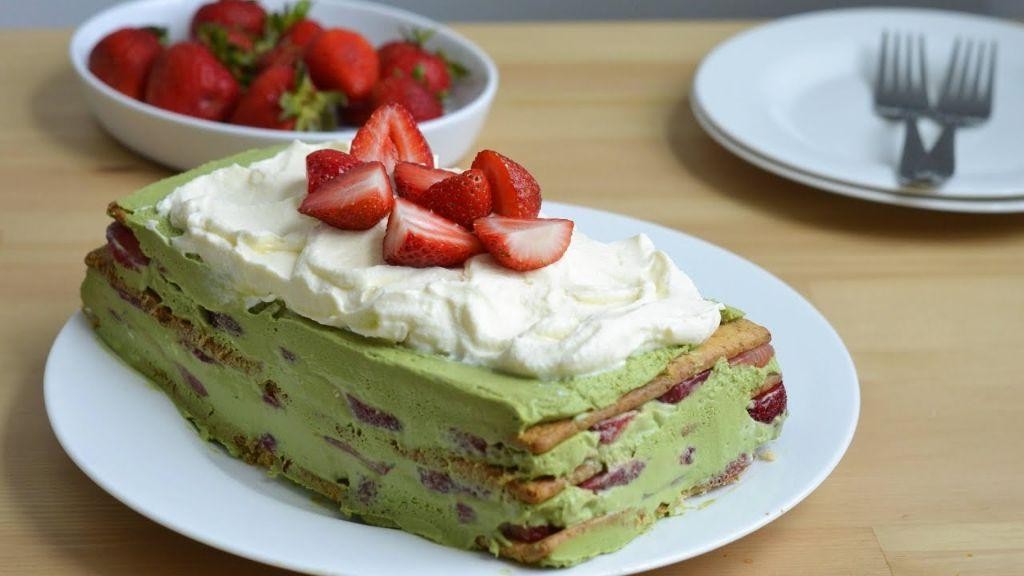
Craving something sweet but don’t want to turn on the oven in this summer heat? I’ve got you covered with this no-bake Matcha Refrigerator Cake that’s as easy to make as it is delicious. It’s my go-to when I need a quick dessert that impresses without the stress.
Ingredients
- 2 cups heavy cream (I always chill the bowl and beaters first for extra fluffy whipped cream)
- 1/4 cup powdered sugar (sifted to avoid lumps)
- 2 tbsp matcha powder (go for ceremonial grade if you can—it makes all the difference)
- 1 tsp vanilla extract (the real deal, not imitation)
- 24 ladyfingers (the soft kind work best here)
- 1/2 cup hot water (just off the boil to dissolve the matcha perfectly)
Instructions
- In a large bowl, whip the heavy cream on medium speed until soft peaks form, about 3 minutes. Tip: Overwhipping can turn your cream to butter, so keep an eye on it!
- Gently fold in the powdered sugar, matcha powder, and vanilla extract until fully combined. The mixture should be a vibrant green with no streaks.
- Quickly dip each ladyfinger into the hot water for about 1 second per side—just enough to soften but not soggy.
- Layer the bottom of a 9×9 inch dish with half of the ladyfingers, then spread half of the matcha cream over them. Repeat the layers.
- Cover and refrigerate for at least 4 hours, though overnight is better. Tip: This cake gets better the longer it sits, as the flavors meld together.
- Before serving, dust the top with a little extra matcha powder for a pop of color and flavor. Tip: Use a fine mesh sieve for an even dusting.
Just like that, you’ve got a creamy, dreamy dessert that’s bursting with matcha flavor. The layers soften into a cake-like texture that’s irresistibly light. Try serving it with fresh berries for a refreshing contrast.
Caramel Refrigerator Cake
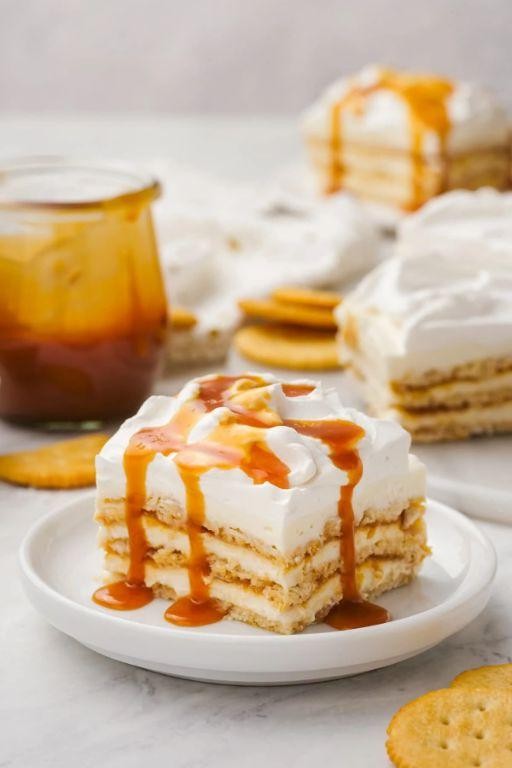
Every now and then, I stumble upon a recipe that’s so effortlessly delicious, it feels like cheating. This caramel refrigerator cake is one of those magical no-bake desserts that comes together in minutes but tastes like you spent hours on it. I first made it for a last-minute potluck, and it was such a hit that it’s now my go-to for any occasion.
Ingredients
- 2 cups graham cracker crumbs (I always keep a box in the pantry for emergencies like this.)
- 1 cup unsalted butter, melted (There’s no substitute for the rich flavor of butter here.)
- 1/2 cup granulated sugar (Just enough to sweeten the crust without overpowering the caramel.)
- 1 can (14 oz) sweetened condensed milk (The secret to the creamiest caramel layer.)
- 1 cup heavy cream (Chilled, for whipping into clouds of goodness.)
- 1 tsp vanilla extract (A splash of vanilla makes everything better.)
Instructions
- In a medium bowl, mix the graham cracker crumbs, melted butter, and sugar until well combined. Tip: Press the mixture firmly into the bottom of a 9×13 inch pan to create a solid base.
- Pour the sweetened condensed milk into a saucepan over medium heat. Stir constantly for about 5 minutes, until it thickens and turns a light caramel color. Tip: Keep the heat medium to avoid burning the milk.
- Spread the caramelized milk evenly over the graham cracker base. Let it cool for 10 minutes.
- In a large bowl, whip the heavy cream and vanilla extract until stiff peaks form. Tip: Chill your bowl and beaters in the freezer for 10 minutes before whipping for best results.
- Spread the whipped cream over the caramel layer. Cover and refrigerate for at least 4 hours, or overnight.
Decadent doesn’t even begin to describe this cake. The layers meld together in the fridge, creating a dessert that’s rich, creamy, and irresistibly smooth. Serve it chilled with a drizzle of extra caramel or a sprinkle of sea salt for an extra touch of luxury.
Apple Cinnamon Icebox Cake
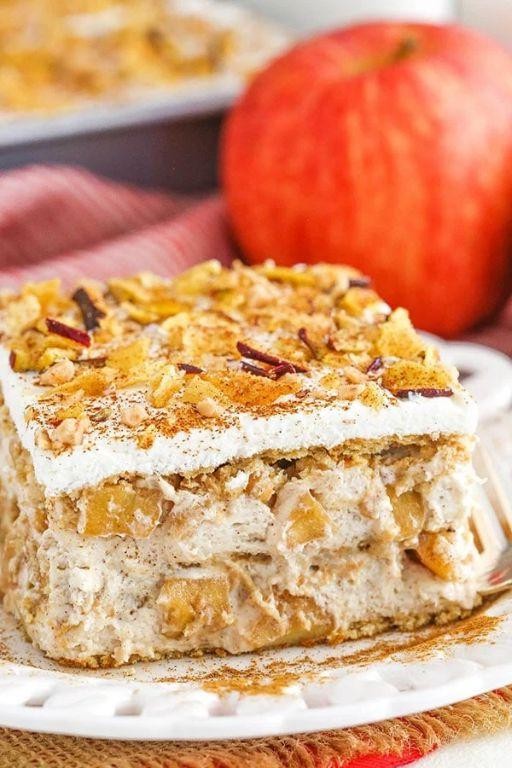
Apple cinnamon icebox cake is the kind of dessert that feels like a hug in dessert form. It’s my go-to when I need something fuss-free yet impressive, and the layers of spiced apples and creamy goodness are always a hit at gatherings.
Ingredients
- 2 cups heavy cream (I always chill the bowl and beaters first for peak whipped cream)
- 1/4 cup powdered sugar (a little extra for dusting on top never hurt)
- 1 tsp vanilla extract (the real deal, please)
- 1/2 tsp ground cinnamon (plus a pinch more for sprinkling)
- 3 medium apples, thinly sliced (I like a mix of Granny Smith and Honeycrisp for tart and sweet)
- 1 package graham crackers (about 24 crackers, give or take)
Instructions
- In your chilled bowl, whip the heavy cream on medium speed until soft peaks form, about 3 minutes.
- Add the powdered sugar, vanilla extract, and 1/2 tsp cinnamon to the whipped cream. Continue whipping until stiff peaks form, about 2 more minutes. Tip: Don’t over-whip, or you’ll end up with butter!
- Spread a thin layer of the whipped cream mixture on the bottom of a 9×13 inch baking dish to prevent sticking.
- Arrange a single layer of graham crackers over the whipped cream, breaking them as needed to fit.
- Spread about 1/3 of the remaining whipped cream over the graham crackers.
- Arrange a layer of apple slices over the whipped cream, then sprinkle lightly with cinnamon.
- Repeat the layers (graham crackers, whipped cream, apples, cinnamon) two more times, ending with a final layer of whipped cream.
- Cover and refrigerate for at least 4 hours, or overnight for best results. Tip: The longer it sits, the softer the graham crackers become, mimicking the texture of cake layers.
- Before serving, dust the top with a little extra powdered sugar and cinnamon for a pretty finish. Tip: Serve chilled for the best texture and flavor.
Zesty and comforting, this apple cinnamon icebox cake is a delightful contrast of creamy and crisp textures. Try serving it with a drizzle of caramel sauce or a scoop of vanilla ice cream for an extra indulgent treat.
Black Forest Refrigerator Cake
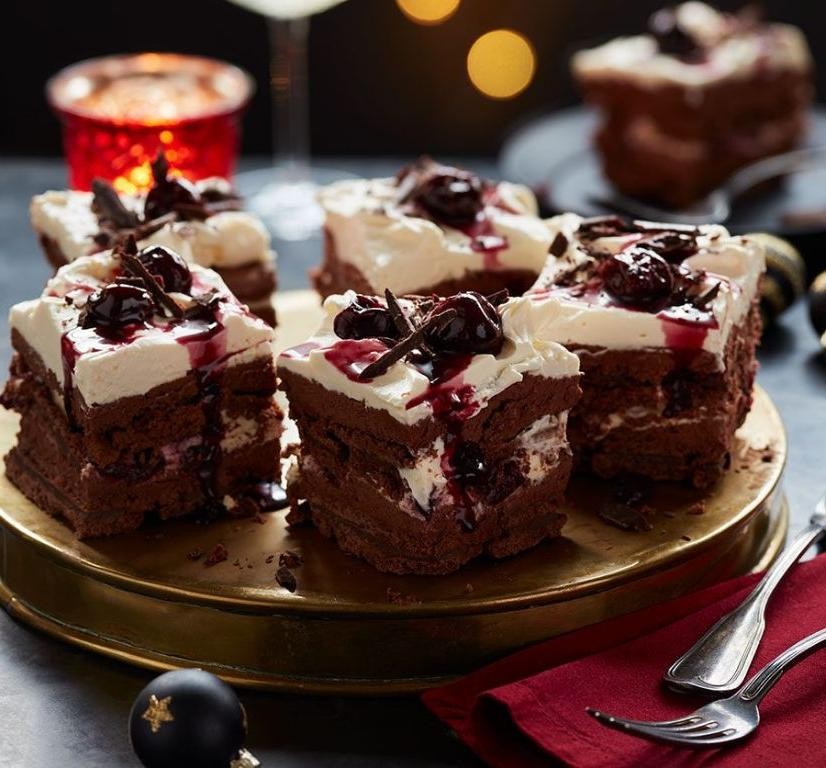
Oh, the joy of discovering a no-bake dessert that’s as delightful to make as it is to eat! That’s exactly how I felt when I first stumbled upon the Black Forest Refrigerator Cake. It’s a perfect blend of chocolate and cherries, with a texture that’s irresistibly creamy and crunchy. Plus, it’s a lifesaver during those hot summer days when turning on the oven feels like a crime.
Ingredients
- 2 cups heavy cream (I always chill the bowl and beaters first for fluffier whipped cream)
- 1/2 cup powdered sugar (sifted to avoid lumps)
- 1 tsp vanilla extract (the real deal, not imitation)
- 1 package (about 18 oz) chocolate sandwich cookies (I like to use the ones with a bit more cocoa for a deeper flavor)
- 1 can (21 oz) cherry pie filling (look for one with whole cherries for better texture)
- 1/2 cup unsalted butter, melted (I microwave it in 20-second bursts to prevent overheating)
Instructions
- In a large chilled bowl, whip the heavy cream, powdered sugar, and vanilla extract on high speed until stiff peaks form, about 3 minutes. Tip: Stop whipping as soon as peaks form to avoid turning the cream grainy.
- Crush the chocolate sandwich cookies into coarse crumbs using a food processor or a zip-top bag and a rolling pin. Tip: Leave some larger pieces for added crunch.
- Mix the crushed cookies with melted butter until well combined. Press this mixture firmly into the bottom of a 9×13 inch baking dish to form the crust.
- Spread the whipped cream evenly over the crust. Tip: Use an offset spatula for a smooth, professional-looking layer.
- Dollop the cherry pie filling over the whipped cream, then gently spread it out to cover the surface.
- Cover the dish with plastic wrap and refrigerate for at least 4 hours, or overnight for best results. The cake needs this time to set properly.
Here’s the best part: slicing into this cake reveals layers that are a feast for the eyes. The cherries add a juicy burst of flavor against the creamy and crunchy layers. Serve it chilled, straight from the fridge, and watch it disappear before your eyes!
Conclusion
We hope this roundup of 18 delicious refrigerated cakes has inspired you to try something new and easy in your kitchen! Each recipe offers a simple way to delight your taste buds without the fuss. Don’t forget to share your favorite in the comments and pin this article on Pinterest to spread the sweetness. Happy baking!