Welcome to a world where nutritious meets delicious! Ragi flour, a powerhouse of health benefits, is about to become your kitchen’s new best friend. Whether you’re whipping up quick weeknight dinners or indulging in some comfort food, our roundup of 20 ragi flour recipes promises to delight your taste buds while keeping things wholesome. Ready to explore these tasty gems? Let’s dive in!
Ragi Flour Pancakes
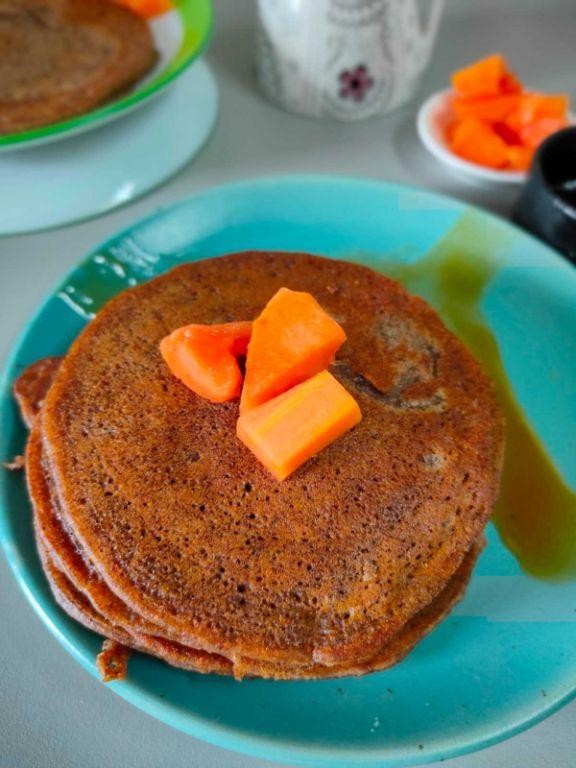
Under the soft glow of the morning light, there’s something deeply comforting about stirring together a batch of ragi flour pancakes. These earthy, nutty delights offer a wholesome start to the day, blending simplicity with nourishment in every bite.
Ingredients
- 1 cup ragi flour (I love the slightly sweet, nutty flavor it brings)
- 1 cup whole milk (for richness, though any milk works)
- 1 large egg (room temperature eggs blend more smoothly)
- 1 tbsp honey (a drizzle of local honey adds a lovely warmth)
- 1/2 tsp baking powder (the secret to fluffy pancakes)
- 1 tbsp unsalted butter, melted (plus extra for the pan)
- A pinch of salt (to balance the sweetness)
Instructions
- In a large bowl, whisk together the ragi flour, baking powder, and salt until well combined.
- In another bowl, beat the egg lightly, then mix in the milk, honey, and melted butter.
- Pour the wet ingredients into the dry ingredients, stirring gently until just combined. Tip: Don’t overmix; a few lumps are okay for tender pancakes.
- Heat a non-stick skillet over medium heat (about 350°F) and brush with a little butter.
- Pour 1/4 cup of batter for each pancake, cooking until bubbles form on the surface and the edges look set, about 2 minutes. Tip: Wait for those bubbles—it’s the perfect time to flip.
- Flip the pancakes and cook for another 1-2 minutes until golden and cooked through. Tip: Keep finished pancakes warm in a low oven while you cook the rest.
These pancakes emerge with a delightful crisp edge giving way to a soft, spongy center, their earthy flavor beautifully complemented by the honey’s sweetness. Try stacking them high with fresh berries and a dollop of yogurt for a breakfast that feels both indulgent and wholesome.
Ragi Flour Dosa
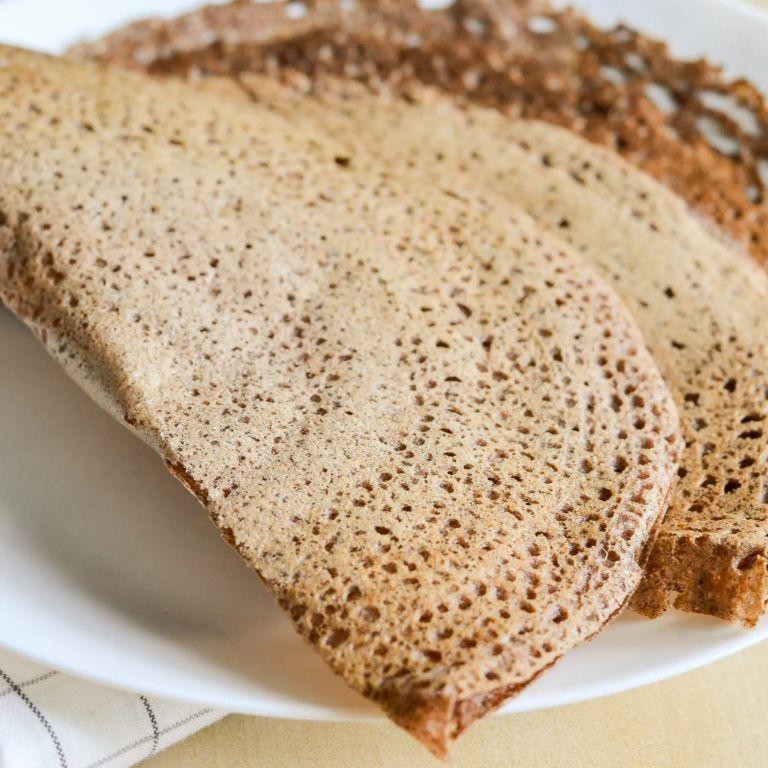
Falling into the rhythm of morning, I find myself drawn to the simplicity and nourishment of Ragi Flour Dosa, a dish that whispers the secrets of ancient grains with every bite. It’s a gentle reminder of how uncomplicated ingredients can weave together into something profoundly comforting.
Ingredients
- 1 cup ragi flour (I love the earthy aroma it brings to the kitchen)
- 1/4 cup rice flour (for that perfect crisp edge)
- 1/2 tsp salt (just enough to awaken the flavors)
- 1 1/2 cups water (room temperature, to blend smoothly)
- 1 tbsp coconut oil (my favorite for its subtle sweetness)
Instructions
- In a large mixing bowl, combine ragi flour, rice flour, and salt, whisking them together to ensure no lumps remain.
- Gradually add water to the dry ingredients, stirring continuously until the batter achieves a smooth, pourable consistency. Let it rest for 10 minutes; this patience allows the flours to fully hydrate.
- Heat a non-stick skillet over medium heat (350°F is ideal) and lightly brush with coconut oil, just enough to coat the surface.
- Pour a ladleful of batter onto the center of the skillet, quickly spreading it outward in a circular motion to form a thin, even dosa.
- Cook for 2-3 minutes until the edges lift easily, then flip to cook the other side for another 2 minutes, aiming for a golden hue with slight crispiness.
- Transfer the dosa to a plate and repeat the process with the remaining batter, adding a touch of coconut oil to the skillet each time.
Nowhere does the humble ragi flour shine brighter than in this dosa, with its delicate crispness giving way to a soft, nutty interior. Serve it warm, draped over a bowl of spicy sambar or alongside a dollop of coconut chutney, and let the flavors dance.
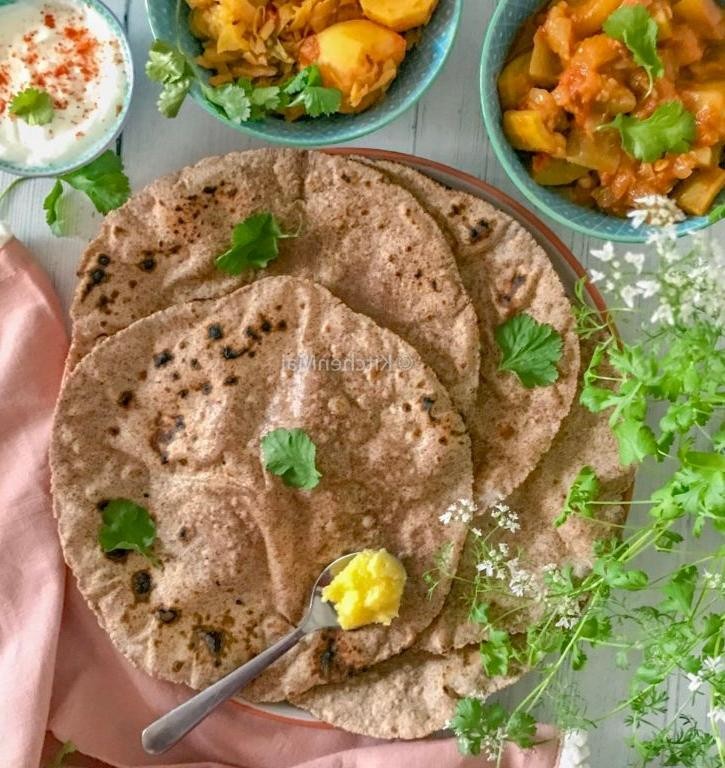
Ragi Flour Roti
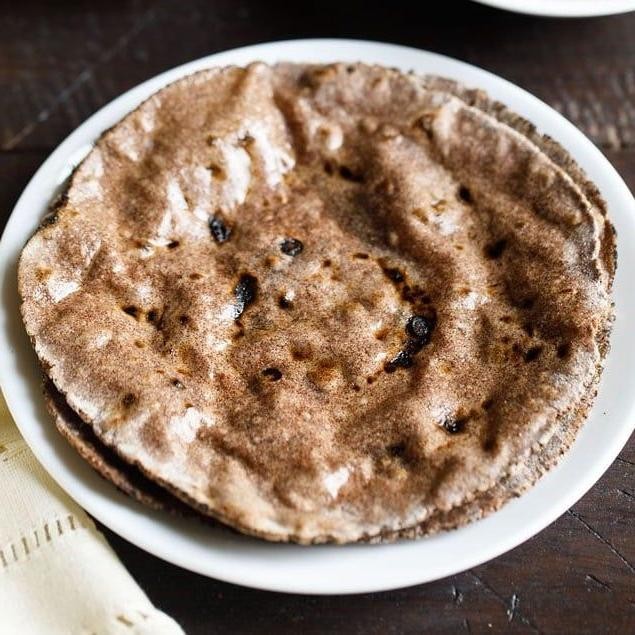
Zestfully, let’s embrace the simplicity and nourishment of Ragi Flour Roti, a humble yet profound dish that connects us to the earth with every bite. Its rustic charm and wholesome goodness make it a comforting choice for any meal, inviting us to slow down and savor the moment.
Ingredients
- 1 cup ragi flour (I love the earthy aroma it brings to the kitchen)
- 1/2 cup warm water (just enough to bring the dough together)
- 1/4 tsp salt (a pinch to enhance the flavors)
- 1 tbsp ghee (for that rich, buttery finish)
Instructions
- In a large mixing bowl, combine the ragi flour and salt, whisking them together to ensure even distribution.
- Gradually add warm water to the flour mixture, kneading gently until a soft, pliable dough forms. Tip: The dough should not stick to your hands; adjust water or flour as needed.
- Divide the dough into 4 equal portions, rolling each into a smooth ball between your palms.
- On a lightly floured surface, flatten each ball with a rolling pin into a thin, round roti, about 6 inches in diameter. Tip: Dust the rolling pin with flour to prevent sticking.
- Heat a skillet over medium heat (350°F) and cook each roti for 2 minutes on one side until small bubbles appear.
- Flip the roti and cook for another 2 minutes, pressing gently with a spatula to ensure even cooking. Tip: A golden brown spot indicates it’s perfectly done.
- Brush each roti lightly with ghee before serving to enhance its flavor and texture.
Delightfully, the Ragi Flour Roti offers a slightly nutty flavor with a tender yet chewy texture, making it a versatile companion to both spicy curries and sweet spreads. Try tearing it into pieces and dipping into warm honey for a simple, satisfying treat.
Ragi Flour Cookies
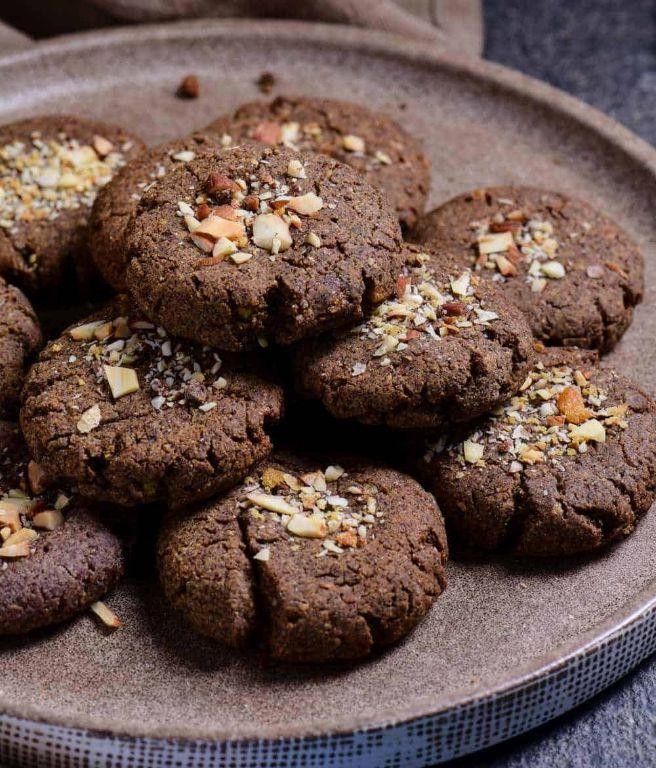
Comfort comes in many forms, and today, it’s in the shape of these wholesome Ragi Flour Cookies. As I mix the ingredients, the kitchen fills with a warm, nutty aroma, promising a treat that’s both nourishing and delightful.
Ingredients
- 1 cup ragi flour (I love the earthy depth it brings)
- 1/2 cup unsalted butter, softened (room temperature blends smoother)
- 1/2 cup brown sugar (for that caramel-like sweetness)
- 1 egg (always room temperature for me)
- 1 tsp vanilla extract (the pure kind makes all the difference)
- 1/2 tsp baking powder (for just the right lift)
- A pinch of salt (to balance the sweetness)
Instructions
- Preheat your oven to 350°F (175°C), ensuring it’s fully heated for even baking.
- In a large bowl, cream together the softened butter and brown sugar until light and fluffy, about 3 minutes. Tip: Scrape the bowl sides to incorporate everything evenly.
- Beat in the egg and vanilla extract until well combined, adding a silky texture to the mix.
- Whisk together the ragi flour, baking powder, and salt in a separate bowl to avoid lumps. Tip: Sifting the flour can make the cookies even lighter.
- Gradually add the dry ingredients to the wet, mixing until just combined. Overmixing can lead to tough cookies.
- Drop tablespoon-sized balls of dough onto a parchment-lined baking sheet, spacing them 2 inches apart. Tip: Flatten slightly for a crispier edge.
- Bake for 12-15 minutes, until the edges are just golden. The centers will firm up as they cool.
- Let the cookies cool on the sheet for 5 minutes before transferring to a wire rack to cool completely.
Kindly savor these cookies as they are—crisp on the outside, tender within, with a rustic sweetness that pairs wonderfully with a cup of herbal tea. For an extra touch, drizzle with dark chocolate or serve alongside fresh berries for a contrast in flavors.
Ragi Flour Cake
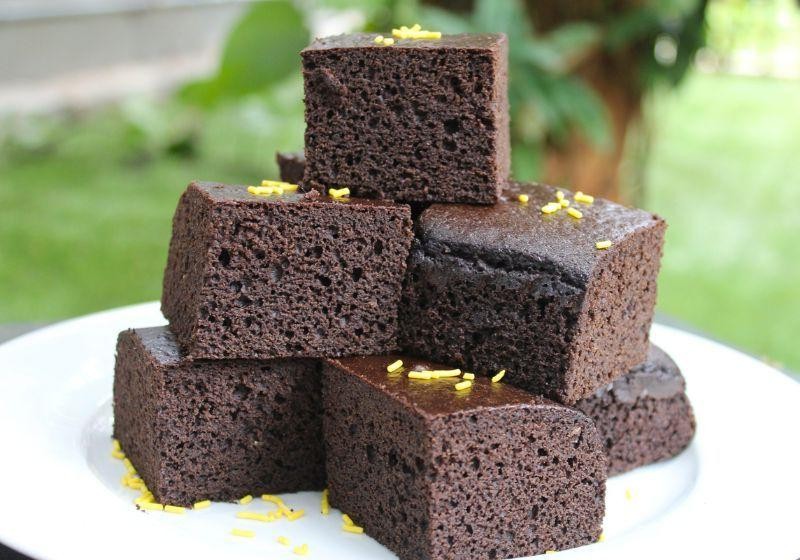
Zestfully, let’s embrace the humble beginnings of a ragi flour cake, a journey that starts with a single spoonful of this nutritious flour and ends with a heartwarming slice of comfort. It’s a recipe that feels like a quiet morning, simple yet profoundly satisfying.
Ingredients
- 1 cup ragi flour (I love the earthy aroma it brings to the cake)
- 1/2 cup jaggery, powdered (for that deep, caramel-like sweetness)
- 1/2 cup yogurt (room temperature works best to blend smoothly)
- 1/4 cup water (just enough to bring the batter together)
- 1/2 tsp baking soda (the magic lift for our cake)
- 1/4 tsp cardamom powder (a whisper of spice that makes all the difference)
- 1 tbsp ghee, melted (for that rich, buttery flavor)
Instructions
- Preheat your oven to 350°F (175°C), ensuring it’s perfectly heated for even baking.
- In a large bowl, whisk together the ragi flour and powdered jaggery until well combined.
- Add the yogurt and water to the dry ingredients, stirring gently to avoid lumps. Tip: A smooth batter ensures a uniform texture.
- Sprinkle in the baking soda and cardamom powder, mixing just until incorporated. Tip: Overmixing can lead to a dense cake.
- Pour the melted ghee into the batter, folding it in with care to maintain the airiness.
- Transfer the batter to a greased baking pan, smoothing the top with a spatula. Tip: Lining the pan with parchment paper makes for easy removal.
- Bake for 25 minutes, or until a toothpick inserted into the center comes out clean.
Delightfully, the ragi flour cake emerges with a moist crumb and a subtle sweetness, perfectly balanced by the warmth of cardamom. Serve it slightly warm with a dollop of yogurt or a drizzle of honey for an extra touch of indulgence.
Ragi Flour Porridge
Sometimes, the simplest dishes bring the most comfort, especially when they’re steeped in tradition and nourishment. Ragi flour porridge is one such dish, a humble yet powerful meal that whispers of home and health with every spoonful.
Ingredients
- 1 cup ragi flour – I find the slightly nutty aroma of freshly ground ragi irresistible.
- 4 cups water – Filtered or spring water makes a difference here, lending a cleaner taste.
- 1/2 tsp salt – Just a pinch to elevate the flavors without overpowering.
- 1 tbsp ghee – My grandmother always insisted on ghee for its richness and depth.
- 1/4 cup jaggery or honey – Depending on the day, I sway between the earthy tones of jaggery and the floral notes of honey.
Instructions
- In a heavy-bottomed pan, bring 4 cups of water to a rolling boil over medium-high heat.
- Reduce the heat to low and gradually whisk in 1 cup of ragi flour, ensuring no lumps form. Tip: A wooden spoon works wonders here for a smooth consistency.
- Add 1/2 tsp salt and continue to stir continuously for about 10 minutes, or until the porridge thickens to your liking. Tip: The porridge should coat the back of a spoon when it’s ready.
- Stir in 1 tbsp ghee until it melts completely, enriching the porridge with its velvety texture.
- Sweeten with 1/4 cup jaggery or honey, adjusting according to your preference, and cook for another 2 minutes. Tip: For a deeper flavor, let the jaggery dissolve completely before turning off the heat.
You’ll find the porridge has a comforting, creamy texture with a subtle earthiness that’s beautifully balanced by the sweetness. Try serving it warm with a dollop of yogurt or a sprinkle of toasted nuts for an extra layer of texture and flavor.
Ragi Flour Bread
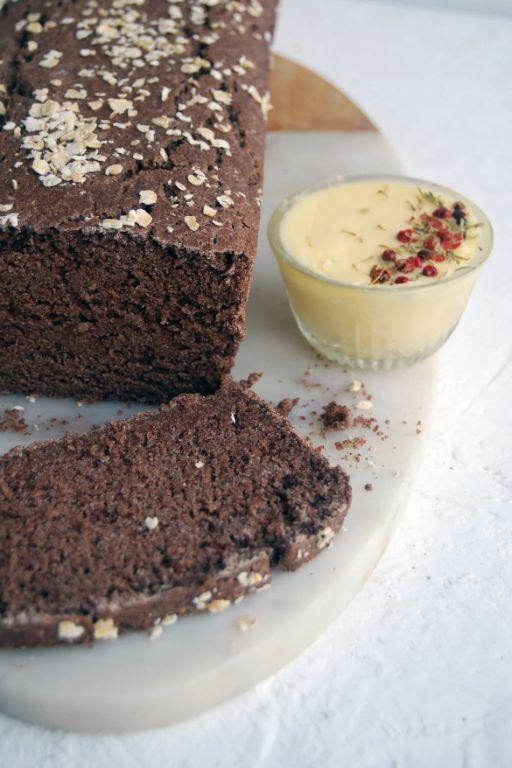
Lately, I’ve found myself drawn to the simplicity and nourishment of ragi flour bread, a humble yet deeply satisfying creation that whispers of home and health with every slice.
Ingredients
- 1 cup ragi flour (I love the earthy aroma it brings to the kitchen)
- 1 cup whole wheat flour (for that perfect balance of texture)
- 1 tsp salt (just enough to enhance the flavors)
- 1 tbsp honey (a touch of sweetness to complement the ragi)
- 1 tsp active dry yeast (the magic starter)
- 1 cup warm water (around 110°F, it’s the ideal temperature to wake the yeast)
- 2 tbsp extra virgin olive oil (my go-to for its fruity notes)
Instructions
- In a small bowl, dissolve the honey in warm water, then sprinkle the yeast over the top. Let it sit for about 5 minutes until frothy.
- In a large mixing bowl, combine the ragi flour, whole wheat flour, and salt. Make a well in the center.
- Pour the yeast mixture and olive oil into the well. Stir with a wooden spoon until the dough comes together.
- Turn the dough onto a lightly floured surface and knead for about 10 minutes until smooth and elastic. Tip: If the dough sticks, a bit more flour can be added, but sparingly to keep the bread tender.
- Place the dough in a greased bowl, cover with a damp cloth, and let it rise in a warm place for 1 hour or until doubled in size.
- Punch down the dough and shape it into a loaf. Place it in a greased loaf pan, cover, and let it rise again for 30 minutes.
- Preheat your oven to 375°F. Bake the bread for 25-30 minutes until the top is golden and the loaf sounds hollow when tapped. Tip: For an extra glossy crust, brush the top with a little milk before baking.
- Let the bread cool in the pan for 10 minutes, then transfer to a wire rack to cool completely. Tip: Resist the urge to cut into it right away; letting it cool ensures the perfect texture.
Warm from the oven, this ragi flour bread offers a delightful contrast of a crisp crust and a soft, slightly dense interior, with a nutty flavor that pairs wonderfully with a smear of almond butter or a drizzle of honey.
Ragi Flour Idli
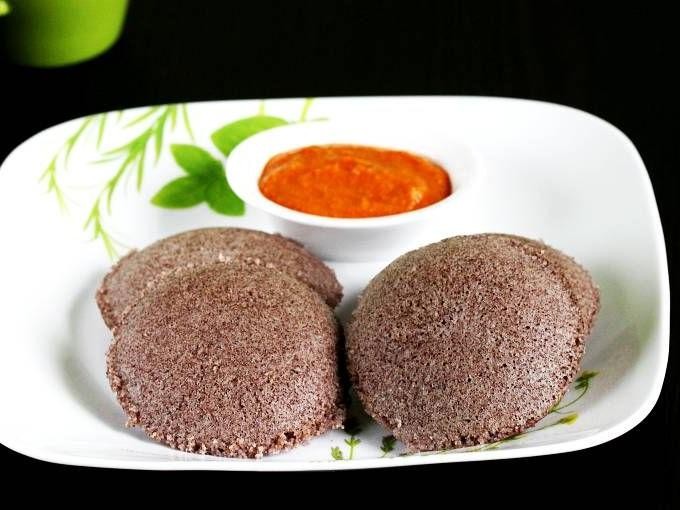
Under the soft glow of the morning light, there’s something profoundly comforting about preparing ragi flour idli, a dish that whispers the tales of nourishment and simplicity. It’s a gentle reminder of how unassuming ingredients can come together to create something deeply satisfying.
Ingredients
- 1 cup ragi flour (I find the slightly nutty flavor of organic ragi flour adds a wonderful depth)
- 1/2 cup urad dal (soaked overnight, they should feel plump and tender)
- 1/4 teaspoon fenugreek seeds (just a pinch, for that hint of bitterness that balances the sweetness)
- 1/2 teaspoon salt (I like to use Himalayan pink salt for its subtle mineral notes)
- 1 cup water (at room temperature, to blend into a smooth batter)
- 1 tablespoon coconut oil (for greasing the idli molds, it adds a faint, sweet aroma)
Instructions
- Rinse the urad dal and fenugreek seeds together until the water runs clear, then soak them in 2 cups of water overnight or for at least 8 hours.
- Drain the soaked dal and seeds, then grind them with 1/2 cup water in a blender until the mixture is smooth and fluffy, about 5 minutes.
- In a large bowl, combine the ground dal mixture with ragi flour and salt, mixing gently to incorporate. The batter should be thick but pourable; adjust with a little more water if needed.
- Cover the bowl with a clean cloth and let the batter ferment in a warm place for 8-12 hours. You’ll know it’s ready when the volume has slightly increased and the surface is bubbly.
- Lightly grease the idli molds with coconut oil, then pour the batter into each mold, filling them about 3/4 full.
- Steam the idlis in a steamer over medium heat for 10-12 minutes. A toothpick inserted into the center should come out clean.
- Allow the idlis to cool for a minute before gently removing them from the molds with a spoon.
Fluffy and light, these ragi flour idlis have a delicate texture that pairs beautifully with a dollop of ghee or a side of coconut chutney. For an unexpected twist, try serving them with a drizzle of honey and a sprinkle of toasted sesame seeds, bridging the gap between traditional and contemporary flavors.
Ragi Flour Ladoo

Amidst the quiet hum of the kitchen, there’s something deeply comforting about shaping ragi flour ladoos, a treat that carries the warmth of tradition and the simplicity of wholesome ingredients.
Ingredients
- 1 cup ragi flour (I love the earthy aroma it brings to the kitchen)
- 1/2 cup jaggery, grated (the darker the better for a rich, caramel-like sweetness)
- 1/4 cup ghee (clarified butter, for that unmistakable golden hue and richness)
- 1/4 cup water (just enough to dissolve the jaggery into a syrup)
- 1/2 tsp cardamom powder (a whisper of spice that elevates the flavor)
- 2 tbsp chopped nuts (I use a mix of almonds and cashews for crunch)
Instructions
- Heat a pan on medium-low and dry roast the ragi flour for 5-7 minutes, stirring constantly, until it releases a nutty fragrance. Tip: Keep the flame low to avoid burning.
- In another pan, combine jaggery and water. Heat on medium until the jaggery dissolves completely, about 3-4 minutes. Strain to remove any impurities.
- Return the jaggery syrup to the pan, add ghee, and bring to a gentle boil. Cook for 2 minutes until slightly thickened. Tip: The syrup should coat the back of a spoon.
- Reduce heat to low, add the roasted ragi flour and cardamom powder to the syrup. Mix vigorously to avoid lumps. Tip: A wooden spoon works best for even mixing.
- Once the mixture comes together and leaves the sides of the pan, turn off the heat. Let it cool slightly until it’s safe to handle.
- Add the chopped nuts and mix well. Shape the mixture into small, even balls while still warm. If the mixture hardens, warm it slightly for easier shaping.
These ladoos are a delightful interplay of textures—crunchy nuts against the soft, melt-in-the-mouth sweetness. Try serving them with a drizzle of warm ghee for an extra indulgent touch.
Ragi Flour Halwa
Evenings like these call for something warm, comforting, and slightly nostalgic. Ragi flour halwa, with its earthy sweetness and creamy texture, is just the dish to slow down time and savor the moment.
Ingredients
- 1 cup ragi flour (I love the nutty aroma it brings to the dish)
- 1/2 cup ghee (clarified butter, for that rich, velvety base)
- 1 cup jaggery, grated (adjust slightly if you prefer a less sweet halwa)
- 2 cups water (filtered, to ensure purity in every bite)
- 1/4 tsp cardamom powder (a whisper of spice to elevate the flavors)
- A handful of cashews, chopped (for that delightful crunch)
Instructions
- Heat a heavy-bottomed pan over medium heat and add the ghee, allowing it to melt slowly.
- Once the ghee is warm, add the ragi flour, stirring continuously to prevent lumps. Toast for about 5 minutes until the flour releases a fragrant aroma.
- In a separate saucepan, bring the water to a gentle boil, then dissolve the jaggery in it, stirring until completely melted.
- Carefully pour the jaggery water into the toasted ragi flour, stirring vigorously to combine and avoid any lumps.
- Reduce the heat to low and continue stirring the mixture for about 10 minutes, or until it thickens to a halwa-like consistency.
- Sprinkle in the cardamom powder and mix well, letting the flavors meld together for another 2 minutes.
- In a small pan, lightly toast the chopped cashews in a teaspoon of ghee until golden, then fold them into the halwa.
- Remove from heat and let it sit for a couple of minutes before serving, allowing the halwa to set slightly.
The halwa should be luxuriously thick, with the ragi flour offering a deep, earthy flavor that’s beautifully balanced by the sweetness of jaggery. Serve it warm, perhaps with a drizzle of extra ghee on top, or alongside a cup of spiced chai for a truly comforting experience.
Ragi Flour Biscuits

Just as the morning light filters through the kitchen window, there’s something deeply comforting about the simplicity of baking. Today, I’m drawn to the earthy warmth of Ragi Flour Biscuits, a humble yet nourishing treat that feels like a gentle embrace.
Ingredients
- 1 cup ragi flour (I love its nutty flavor, a perfect base for these biscuits)
- 1/4 cup unsalted butter, softened (room temperature blends smoother)
- 1/4 cup sugar (for a subtle sweetness that doesn’t overpower)
- 1/2 tsp baking powder (the lift it gives is just magical)
- 1/4 cup milk (whole milk adds richness, but any works)
- A pinch of salt (to balance the flavors beautifully)
Instructions
- Preheat your oven to 350°F (177°C), ensuring it’s perfectly heated for even baking.
- In a mixing bowl, cream together the softened butter and sugar until light and fluffy. Tip: This step is key for texture, so take your time.
- Sift in the ragi flour, baking powder, and salt, mixing gently to avoid lumps. Tip: Sifting ensures a smoother dough.
- Gradually add milk, kneading into a soft dough. The dough should come together without being sticky. Tip: If too dry, a teaspoon more milk can help.
- Roll out the dough to about 1/4 inch thickness on a lightly floured surface.
- Cut into desired shapes using a cookie cutter or a sharp knife.
- Place the biscuits on a baking sheet lined with parchment paper, leaving space between each.
- Bake for 15-20 minutes, or until the edges are lightly golden. The biscuits will firm up as they cool.
How these biscuits turn out is nothing short of delightful—crisp on the outside, tender within, with a rustic charm that’s hard to resist. Enjoy them with a drizzle of honey or alongside your favorite tea for a moment of quiet joy.
Ragi Flour Pizza Base

Rarely does a gluten-free alternative surprise me, but this ragi flour pizza base has become a quiet favorite in my kitchen, its earthy tones and sturdy texture a canvas for endless toppings.
Ingredients
- 1 cup ragi flour (I love the nutty flavor it brings, a departure from the usual wheat)
- 1/2 cup warm water (just enough to bring the dough together without sticking)
- 1 tbsp olive oil (extra virgin, for that fruity depth)
- 1/2 tsp salt (a pinch more if you’re feeling bold)
- 1 tsp active dry yeast (the magic that gives it lift)
- 1 tsp honey (a whisper of sweetness to wake the yeast)
Instructions
- In a small bowl, dissolve honey in warm water and sprinkle yeast over it. Let it sit for 10 minutes until frothy, a sign your yeast is alive and ready.
- In a larger bowl, mix ragi flour and salt. Make a well in the center and pour in the yeast mixture and olive oil.
- Stir with a wooden spoon until a shaggy dough forms, then knead on a lightly floured surface for 5 minutes until smooth. Tip: If the dough feels too sticky, a dusting more of ragi flour helps without drying it out.
- Place the dough in a greased bowl, cover with a damp cloth, and let it rise in a warm spot for 1 hour, or until doubled in size.
- Preheat your oven to 425°F (220°C) and place a pizza stone or inverted baking sheet inside to heat up.
- Punch down the dough and roll it out on parchment paper to your desired thickness. Tip: For a crispier base, roll it thinner; for a chewier bite, leave it a bit thicker.
- Transfer the parchment with the dough onto the hot pizza stone or baking sheet. Bake for 10 minutes before adding toppings, ensuring the base sets properly.
- Add your favorite toppings and bake for another 10-15 minutes, until the edges are golden and crispy.
Kindly, this pizza base offers a delightful crunch with a hint of earthiness, perfect for those evenings when you crave something wholesome yet indulgent. Try it with a smear of pesto and a sprinkle of goat cheese for a twist that sings.
Ragi Flour Noodles
Comfort comes in many forms, and today, it arrives in the shape of Ragi Flour Noodles, a dish that wraps you in warmth with every bite. This recipe is a humble nod to the simplicity of ingredients and the joy of creating something nourishing from scratch.
Ingredients
- 1 cup ragi flour (I love the earthy tone it brings to the dish)
- 1/2 cup water (just warm enough to bring the dough together)
- 1 tbsp extra virgin olive oil (my kitchen staple for that smooth finish)
- A pinch of salt (to elevate the flavors subtly)
Instructions
- In a mixing bowl, combine the ragi flour and salt, whisking them together to ensure even distribution.
- Gradually add warm water to the flour mixture, kneading continuously until a smooth, pliable dough forms. Tip: The dough should not stick to your hands; adjust water or flour as needed.
- Cover the dough with a damp cloth and let it rest for 10 minutes. This step ensures the dough is easier to roll out.
- Divide the dough into small portions. On a floured surface, roll each portion into thin sheets. Tip: Rolling between two sheets of parchment paper prevents sticking without extra flour.
- Cut the rolled sheets into thin strips to form noodles. Dust lightly with ragi flour to prevent them from sticking together.
- Bring a pot of water to a rolling boil. Add the noodles and cook for 3-4 minutes, or until they float to the surface. Tip: Stir gently to ensure even cooking.
- Drain the noodles and rinse under cold water to stop the cooking process. Toss with olive oil to keep them from clumping.
Mild yet distinct, these Ragi Flour Noodles carry a nutty flavor that pairs beautifully with a drizzle of olive oil or your favorite sauce. Their slightly chewy texture makes them a delightful base for both bold and subtle toppings, inviting you to explore beyond the usual.
Ragi Flour Pasta
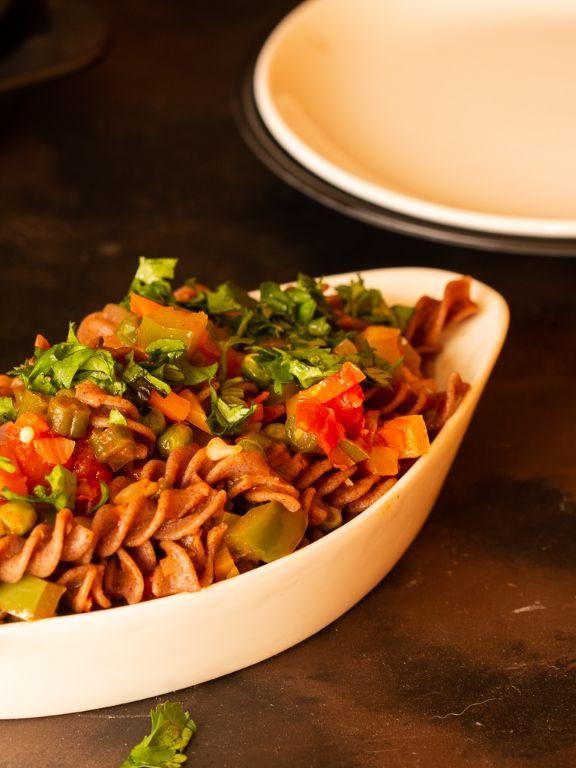
Falling into the rhythm of a quiet kitchen morning, I found myself reaching for the ragi flour, a humble yet mighty ingredient that promises both nourishment and comfort. This ragi flour pasta, a twist on the classic, is my ode to simplicity and health, blending the earthy tones of millet with the familiar embrace of pasta.
Ingredients
- 1 cup ragi flour (I love the nutty flavor it brings, a little goes a long way)
- 2 cups all-purpose flour (for that perfect pasta texture)
- 3 large eggs (room temperature, they bind the dough beautifully)
- 1 tbsp extra virgin olive oil (my go-to for its fruity notes)
- 1 tsp salt (just enough to enhance the flavors)
- 4 cups water (for boiling, because pasta needs space to dance)
Instructions
- In a large mixing bowl, combine ragi flour and all-purpose flour, creating a well in the center for the eggs.
- Add the eggs and olive oil into the well, gently beating them with a fork before incorporating the flour gradually.
- Knead the mixture into a smooth, elastic dough for about 10 minutes. Tip: If the dough feels too dry, a sprinkle of water can help.
- Cover the dough with a damp cloth and let it rest for 30 minutes. This patience rewards you with easier rolling.
- Divide the dough into 4 parts, rolling each into thin sheets on a floured surface. Tip: Keep the unused dough covered to prevent drying.
- Cut the sheets into desired pasta shapes, dusting lightly with flour to avoid sticking.
- Bring water to a rolling boil in a large pot, adding salt. Tip: The water should taste like the sea for perfectly seasoned pasta.
- Cook the pasta for 3-4 minutes or until it floats to the surface, indicating it’s al dente.
Nowhere does the heart of ragi flour shine brighter than in this pasta, offering a tender bite with a whisper of earthiness. Serve it draped in a light garlic butter sauce or simply with a drizzle of olive oil and a sprinkle of Parmesan for a meal that speaks to the soul.
Ragi Flour Muffins
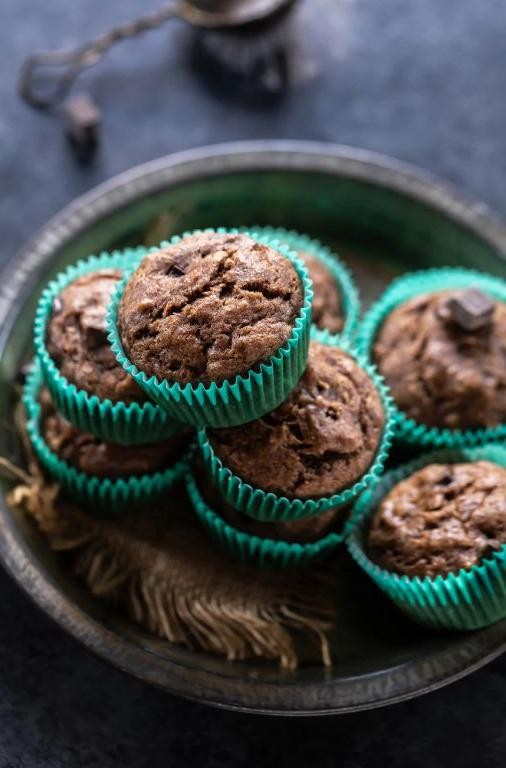
Just like the quiet morning light that filters through my kitchen window, these Ragi Flour Muffins bring a gentle warmth to the start of any day. Their earthy sweetness and tender crumb are a comforting embrace, a simple pleasure that feels both nourishing and indulgent.
Ingredients
- 1 cup ragi flour (I love the nutty depth it adds, a wholesome base that’s gluten-free)
- 1/2 cup almond flour (for a subtle richness and moist texture)
- 1/4 cup honey (local if possible, its floral notes elevate the muffins)
- 1/4 cup melted coconut oil (extra virgin, it lends a delicate fragrance)
- 2 eggs (room temperature, they blend more smoothly into the batter)
- 1 tsp vanilla extract (pure, for that irreplaceable aroma)
- 1/2 tsp baking soda (the lift that makes them perfectly fluffy)
- A pinch of salt (just enough to balance the sweetness)
Instructions
- Preheat your oven to 350°F (175°C), ensuring it’s fully heated for even baking.
- In a large bowl, whisk together the ragi flour, almond flour, baking soda, and salt until well combined.
- In another bowl, beat the eggs lightly, then mix in the honey, melted coconut oil, and vanilla extract until smooth.
- Gently fold the wet ingredients into the dry ingredients, mixing just until incorporated to avoid overworking the batter.
- Divide the batter evenly among a lined muffin tin, filling each cup about 2/3 full to allow room for rising.
- Bake for 18-20 minutes, or until a toothpick inserted into the center comes out clean and the tops are golden.
- Let the muffins cool in the tin for 5 minutes, then transfer to a wire rack to cool completely.
These muffins emerge with a tender crumb that’s subtly sweet, their earthy ragi flavor shining through. Enjoy them warm with a drizzle of honey, or alongside your morning coffee for a moment of quiet delight.
Ragi Flour Chapati
Dusk settles softly outside, and here in the kitchen, the simple act of kneading dough feels like a quiet rebellion against the rush of the day. Ragi flour chapati, with its earthy tones and comforting warmth, is more than just a meal; it’s a moment of peace.
Ingredients
- 1 cup ragi flour (I love the nutty flavor it brings, a reminder of childhood breakfasts)
- 1/2 cup warm water (just enough to bring the dough together, not too hot to touch)
- A pinch of salt (it’s amazing how such a small amount can elevate the whole dish)
- 1 tbsp ghee (for cooking, though sometimes I use a bit more for that golden crisp)
Instructions
- In a large mixing bowl, combine the ragi flour and salt, whisking them together to ensure the salt is evenly distributed.
- Gradually add warm water to the flour mixture, stirring continuously until a rough dough begins to form. Tip: The water should be warm to the touch but not boiling, as too hot can make the dough tough.
- Knead the dough on a lightly floured surface for about 5 minutes, until it becomes smooth and pliable. If the dough feels too sticky, a sprinkle of ragi flour can help.
- Divide the dough into 4 equal portions, rolling each into a ball between your palms. Tip: Cover the dough balls with a damp cloth to prevent them from drying out while you work.
- Heat a skillet over medium heat (about 350°F) and lightly grease it with ghee.
- Roll out each dough ball into a thin circle, about 6 inches in diameter, using a rolling pin. Tip: If the dough sticks, dust the rolling pin and surface with a bit more ragi flour.
- Cook each chapati on the skillet for about 2 minutes on each side, pressing down gently with a spatula to ensure even cooking, until golden spots appear.
- Brush each chapati lightly with ghee right after cooking, stacking them to keep warm until serving.
Mornings might call for these chapatis with a dollop of honey, but evenings? They’re perfect torn by hand, dipped into a spicy lentil curry. The texture is wonderfully chewy, with a slight crispness at the edges, and the flavor—deep, earthy, and unmistakably nourishing.
Ragi Flour Upma
Calm mornings call for something nourishing yet simple, a dish that feels like a warm hug. Ragi flour upma, with its earthy tones and comforting texture, is just that—a humble bowl of goodness that starts the day right.
Ingredients
- 1 cup ragi flour (I love the nutty flavor it brings, a staple in my pantry)
- 2 cups water (filtered, for the purest taste)
- 1 tbsp ghee (extra virgin olive oil works too, but ghee adds a richness)
- 1/2 tsp mustard seeds (they pop beautifully, a sight I never tire of)
- 1/4 cup finely chopped onions (yellow ones, for their slight sweetness)
- 1 green chili, finely chopped (adjust to your heat preference)
- Salt, 1/2 tsp (or more, depending on your day)
- A handful of curry leaves (their aroma is unmatched, truly)
Instructions
- Heat a pan over medium heat and add the ghee, letting it melt slowly to infuse its flavor.
- Add the mustard seeds, waiting until they start to pop—a sign they’re ready to release their aroma.
- Toss in the chopped onions and green chili, sautéing until the onions turn translucent, about 3 minutes.
- Stir in the curry leaves, letting their fragrance envelop the kitchen for about 30 seconds.
- Pour in the water and bring to a gentle boil, a step that sets the foundation for the upma’s texture.
- Reduce the heat to low and gradually sprinkle in the ragi flour, stirring continuously to avoid lumps.
- Add the salt, mixing well to ensure it’s evenly distributed throughout the mixture.
- Cover and let it cook on low heat for 5 minutes, allowing the flavors to meld together beautifully.
- Remove the lid and give it a final stir, checking that the upma has a porridge-like consistency.
Mornings with this upma feel grounded. The texture is softly granular, each spoonful a mix of earthy ragi and the sharpness of green chili. Serve it with a dollop of yogurt or a sprinkle of fresh cilantro for a contrast in flavors and colors.
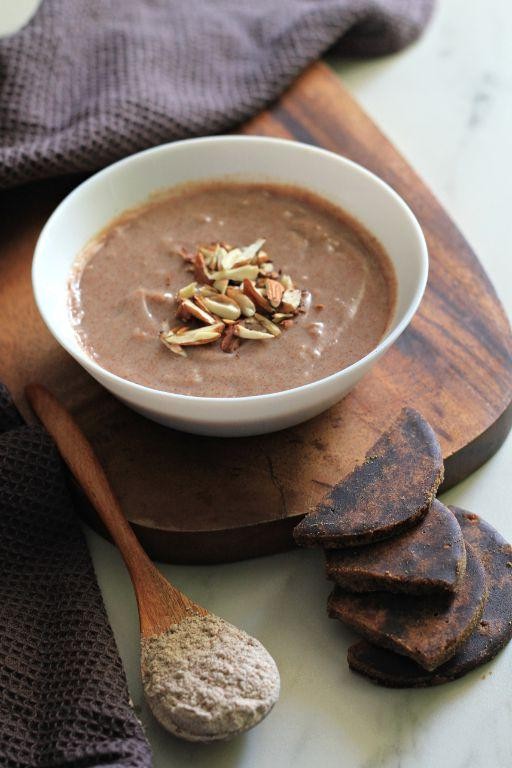
Ragi Flour Kheer
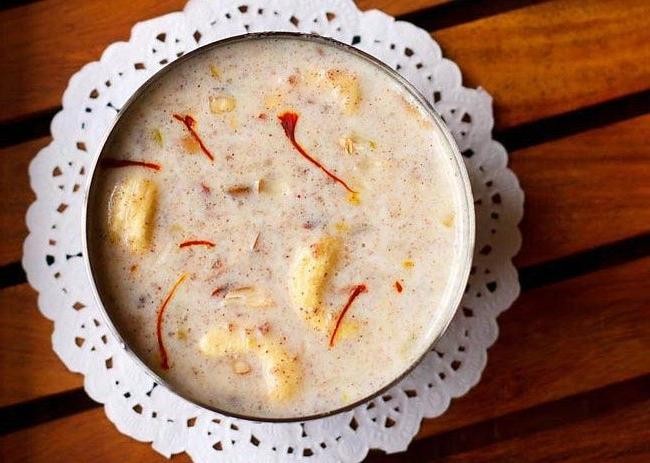
Kneading through the memories of my grandmother’s kitchen, I often find myself drawn to the simplicity and warmth of traditional desserts. Today, I’m sharing a recipe that’s close to my heart, a creamy, comforting bowl of Ragi Flour Kheer, perfect for those quiet evenings when you crave something sweet yet wholesome.
Ingredients
- 1/2 cup ragi flour (I love the earthy aroma it brings to the dish)
- 4 cups whole milk (for that rich, creamy texture)
- 1/2 cup sugar (adjust according to your sweetness preference)
- 1/4 tsp cardamom powder (a hint of spice elevates the flavor)
- 2 tbsp ghee (my secret to a richer taste)
- A handful of chopped nuts (almonds and cashews are my favorites for crunch)
- A pinch of saffron strands (for that golden hue and subtle fragrance)
Instructions
- Heat a heavy-bottomed pan over medium heat and add the ghee, letting it melt completely.
- Add the ragi flour to the pan, stirring continuously to roast it for about 5 minutes, until it releases a nutty aroma. Tip: Keep the flame low to avoid burning.
- Gradually pour in the milk, whisking constantly to prevent lumps from forming.
- Bring the mixture to a gentle boil, then reduce the heat to low, simmering for 10 minutes. Stir occasionally to ensure it doesn’t stick to the bottom.
- Add the sugar, cardamom powder, and saffron strands, stirring well until the sugar dissolves completely.
- Continue to cook for another 5 minutes, allowing the kheer to thicken to your desired consistency. Tip: The kheer will thicken further as it cools.
- Turn off the heat and garnish with the chopped nuts. Tip: For an extra layer of flavor, lightly toast the nuts in ghee before adding them.
Warm and comforting, this Ragi Flour Kheer is a delightful blend of textures and flavors, with the creaminess of milk perfectly complementing the earthy notes of ragi. Serve it chilled for a refreshing twist or warm for a cozy dessert experience.
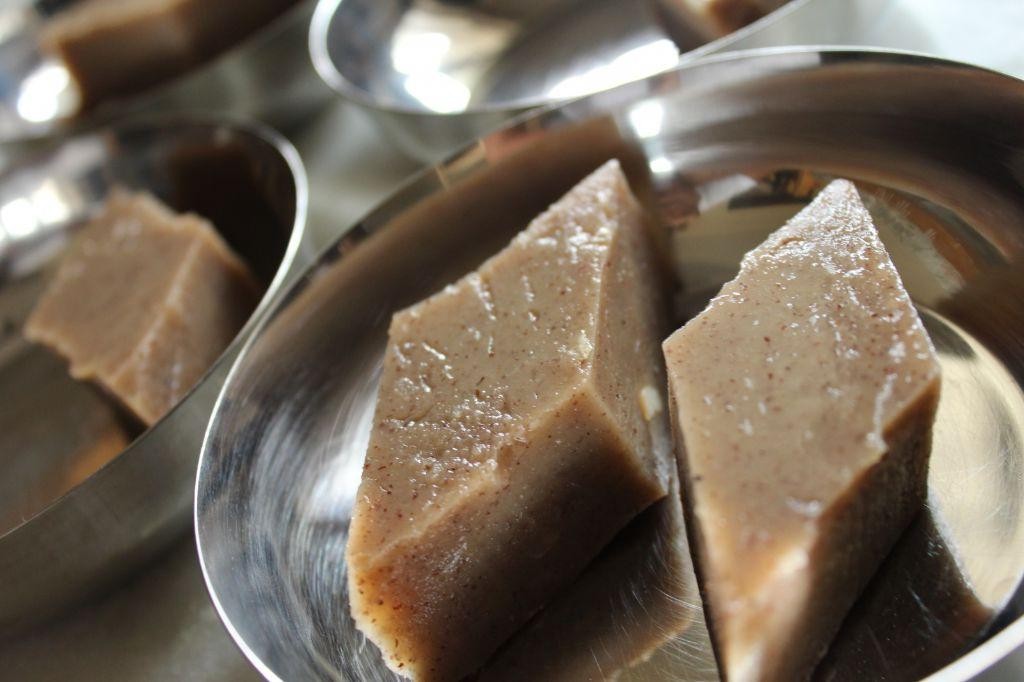
Ragi Flour Barfi
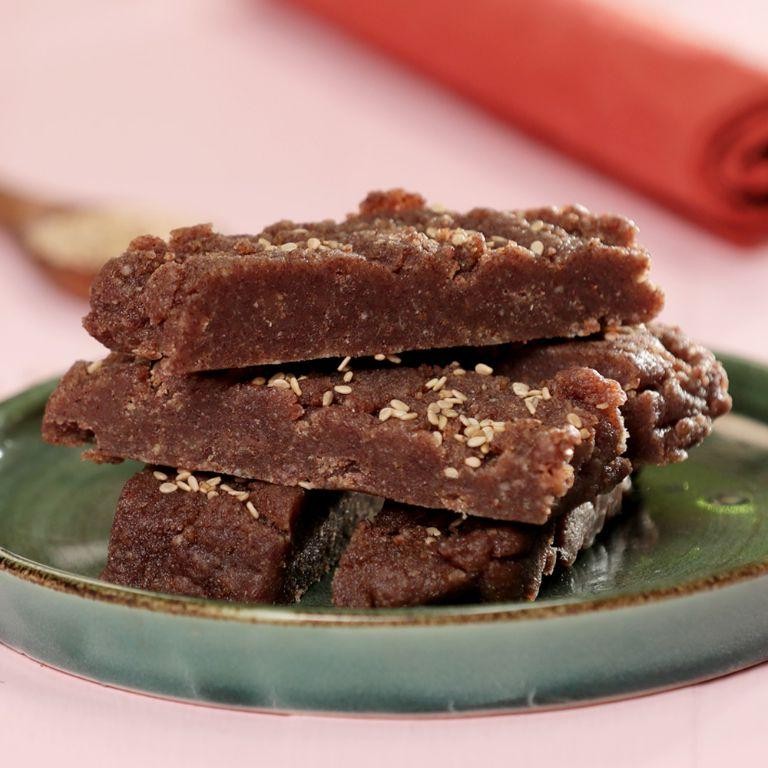
Wandering through the flavors of traditional sweets, I stumbled upon the humble yet profoundly satisfying Ragi Flour Barfi. Its simplicity and nourishment speak volumes, especially when crafted with care and a touch of personal flair.
Ingredients
- 1 cup ragi flour (I love the earthy aroma it brings to the dish)
- 1/2 cup ghee (clarified butter, for that rich, melt-in-your-mouth texture)
- 1 cup jaggery, grated (the unrefined sweetness pairs beautifully with ragi)
- 1/4 cup water (just enough to dissolve the jaggery)
- 1/2 tsp cardamom powder (a whisper of spice to elevate the flavors)
- 2 tbsp chopped nuts (almonds or cashews, for a delightful crunch)
Instructions
- Heat a heavy-bottomed pan over medium heat and add the ghee, allowing it to melt gently.
- Add the ragi flour to the pan and roast it in the ghee for about 10 minutes, stirring constantly, until it emits a nutty fragrance. Tip: Keep the flame medium to avoid burning.
- In a separate saucepan, combine the jaggery and water, heating over low heat until the jaggery completely dissolves. Strain to remove any impurities.
- Pour the jaggery syrup into the roasted ragi flour, mixing vigorously to prevent lumps. Tip: A wooden spoon works best for smooth blending.
- Add the cardamom powder and continue to cook the mixture on low heat for another 5 minutes, until it starts to leave the sides of the pan.
- Transfer the mixture to a greased tray, smoothing the top with a spatula. Sprinkle the chopped nuts evenly over the surface, pressing them lightly into the barfi. Tip: Greasing the spatula helps in spreading the mixture smoothly.
- Allow the barfi to cool for at least 2 hours before cutting into squares or diamonds.
Now, the Ragi Flour Barfi stands ready, its texture wonderfully dense yet soft, with the jaggery’s caramel notes dancing alongside the ragi’s earthiness. Serve it as a thoughtful afternoon treat or pack it for a wholesome snack on the go.
Ragi Flour Smoothie
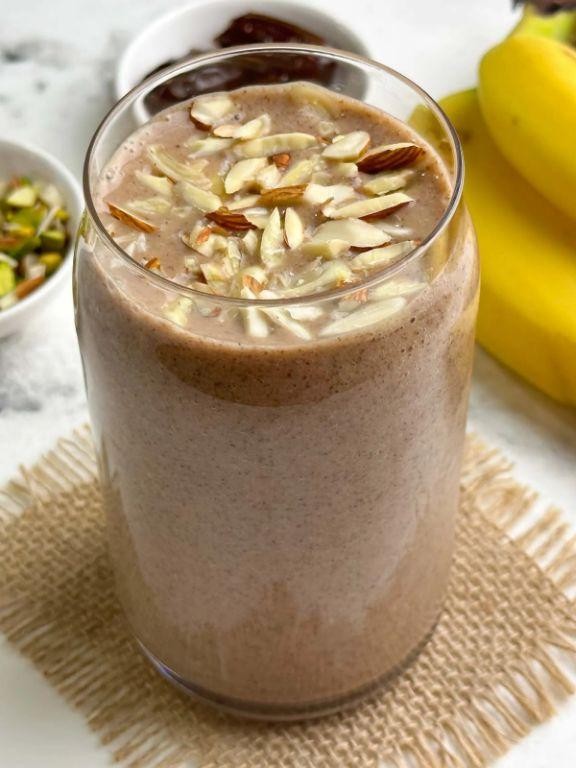
Kindly imagine a quiet morning, the sun just beginning to stretch its golden fingers across the kitchen counter, where a simple yet nourishing bowl of Ragi Flour Smoothie awaits. It’s a humble dish, really, but one that carries the warmth of the earth and the promise of a day well begun.
Ingredients
- 1 cup ragi flour – I find the slightly nutty aroma of ragi flour incredibly comforting, especially in the early hours.
- 2 cups water – Always use filtered water for the purest taste.
- 1 tbsp honey – A drizzle of local honey adds just the right touch of sweetness.
- 1/2 tsp cardamom powder – This is my little secret for a fragrant lift.
- A pinch of salt – Just a whisper to balance the flavors.
Instructions
- In a medium saucepan, gently whisk together the ragi flour and water until no lumps remain. Tip: A silicone whisk works wonders here to prevent sticking.
- Place the saucepan over medium heat and bring the mixture to a simmer, stirring constantly to avoid any clumps forming. This should take about 5 minutes.
- Once the mixture thickens to a smooth, porridge-like consistency, reduce the heat to low. Stir in the honey, cardamom powder, and salt, blending them well into the smoothie. Tip: The key here is patience; let the flavors meld together for about 2 minutes.
- Remove from heat and let it sit for a minute before serving. Tip: A quick stir before serving ensures a silky texture.
Light and velvety, this smoothie carries the earthy tones of ragi beautifully balanced with the sweetness of honey and the aromatic hint of cardamom. Serve it warm in your favorite mug for a comforting start to the day, or chill it for a refreshing afternoon pick-me-up.
Conclusion
We hope you’re inspired to explore the versatility and nutrition of ragi flour with these 20 delicious recipes! Whether you’re baking, cooking, or blending, there’s something for every home cook to try. Don’t forget to share your favorites in the comments and pin this article on Pinterest to spread the ragi love. Happy cooking!