Gathering around the table for a potluck is one of life’s simple joys, offering a feast of flavors that bring everyone together. Whether you’re tasked with bringing a dish to share or hosting the spread, our roundup of 20 Delicious Potluck Recipes Everyone Loves is your go-to guide for crowd-pleasing favorites. From hearty casseroles to sweet treats, these recipes are sure to make your next gathering a hit. Let’s dig in!
Classic Macaroni and Cheese
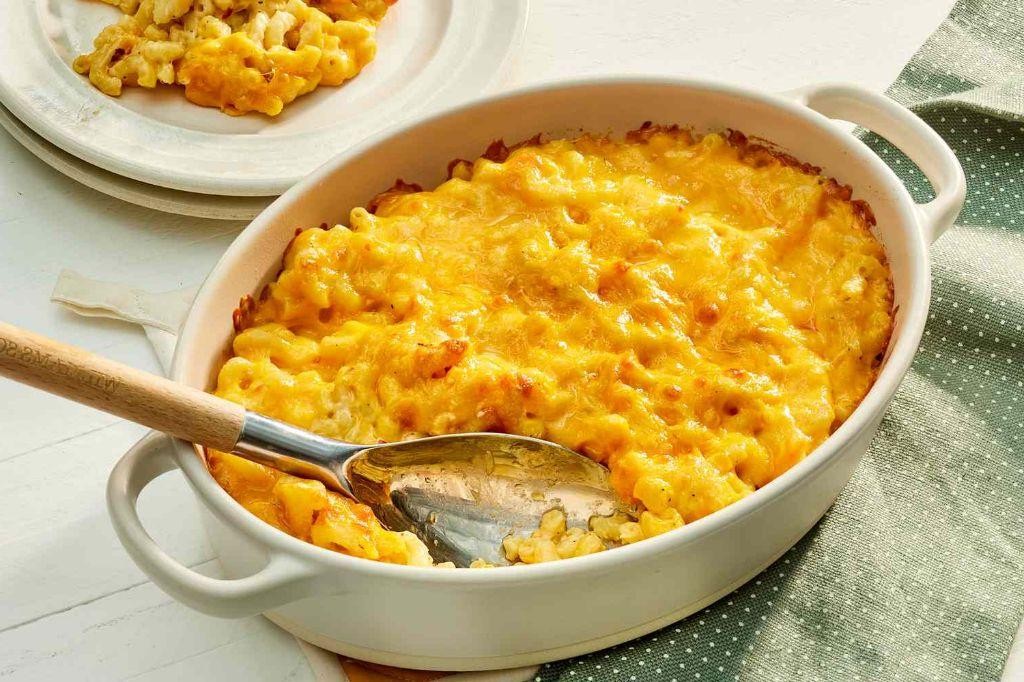
Today, we’re diving fork-first into the creamy, dreamy world of Classic Macaroni and Cheese. This isn’t just any mac and cheese; it’s the kind that makes you forget your name for a second because, wow, that’s good.
Ingredients
- 8 oz elbow macaroni (because elbows are the only pasta that truly hugs the cheese)
- 2 cups shredded sharp cheddar cheese (the sharper, the better—like your wit)
- 1/2 cup grated Parmesan cheese (for that fancy touch)
- 3 tbsp butter (because butter makes everything better)
- 3 tbsp all-purpose flour (the unsung hero of thickness)
- 2 cups whole milk (skim milk is for the weak)
- 1/2 tsp salt (adjust to taste, but don’t be shy)
- 1/4 tsp black pepper (for a little kick)
- 1/4 tsp paprika (optional, for color and a whisper of smoke)
Instructions
- Preheat your oven to 350°F (175°C)—this is where the magic happens.
- Cook the macaroni according to the package instructions until al dente, then drain and set aside. Tip: Salt the water like the sea for flavor that goes all the way through.
- In a saucepan, melt the butter over medium heat. Whisk in the flour and cook for 1 minute to make a roux—this is your sauce’s foundation.
- Gradually whisk in the milk, ensuring no lumps form. Cook until the mixture thickens, about 5 minutes. Tip: Constant whisking is the secret to a smooth sauce.
- Remove from heat and stir in the cheddar and Parmesan cheeses until melted and smooth. Add salt, pepper, and paprika. Tip: For extra creaminess, add a splash more milk if needed.
- Combine the cheese sauce with the cooked macaroni, stirring until every noodle is coated in cheesy goodness.
- Transfer to a baking dish and bake for 20 minutes, or until bubbly and golden on top.
Velvety, rich, and with a golden crust that crackles under your fork, this Classic Macaroni and Cheese is a hug in a dish. Serve it straight from the oven with a side of nostalgia, or jazz it up with crispy bacon bits for a twist that’ll have everyone talking.
Slow Cooker Pulled Pork
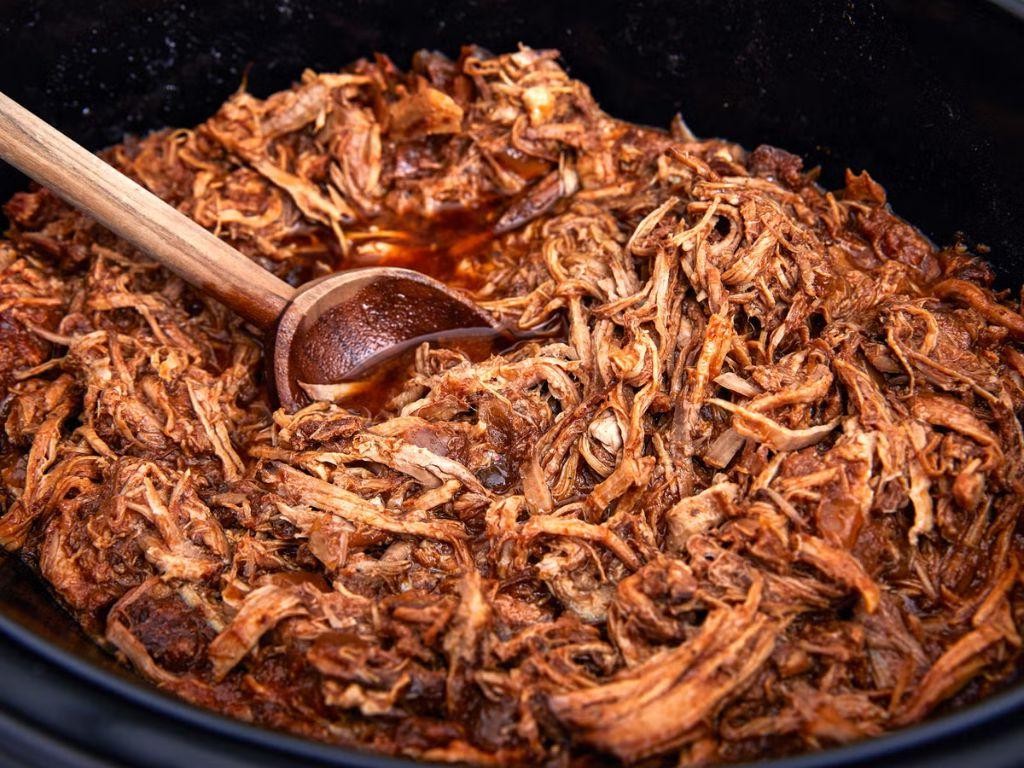
Oh boy, are you ready to turn your slow cooker into a magic pork-pulling machine? This Slow Cooker Pulled Pork is so tender, it practically waves a white flag before surrendering to your fork. Perfect for lazy Sundays or when you want to impress without the stress.
Ingredients
- 4 lbs pork shoulder (also known as pork butt, because, well, humor)
- 1 cup BBQ sauce (go for smoky or sweet, your call)
- 1/2 cup apple cider vinegar (for that tangy kick)
- 1/4 cup brown sugar (because sweet and pork are BFFs)
- 1 tbsp smoked paprika (for a whisper of smoke)
- 1 tbsp garlic powder (no fresh garlic? No problem.)
- 1 tbsp onion powder (onion’s shy cousin)
- 1 tsp salt (just enough to make it pop)
- 1 tsp black pepper (freshly ground if you’re fancy)
- 1/2 tsp cayenne pepper (optional, for those who like it hot)
Instructions
- Trim excess fat from the pork shoulder, because nobody likes a greasy situation.
- In a bowl, whisk together BBQ sauce, apple cider vinegar, brown sugar, smoked paprika, garlic powder, onion powder, salt, black pepper, and cayenne pepper. Taste and adjust if you’re feeling adventurous.
- Place the pork shoulder in the slow cooker and pour the sauce mixture over it, ensuring it’s fully coated. No naked pork allowed.
- Cover and cook on LOW for 8 hours or HIGH for 4 hours. The pork should be fork-tender, meaning it falls apart if you look at it too hard.
- Remove the pork from the slow cooker and shred it using two forks. Pro tip: Discard any large fat pieces unless you’re into that.
- Return the shredded pork to the slow cooker and mix it with the juices. Let it sit for 10 minutes to soak up all that saucy goodness.
How about that? You’ve just made pulled pork that’s juicy, flavorful, and versatile enough to star in sandwiches, tacos, or even atop a fancy pizza. The texture is so tender, it’s like the pork shoulder took a spa day just for you.
Homemade Meatballs in Sauce
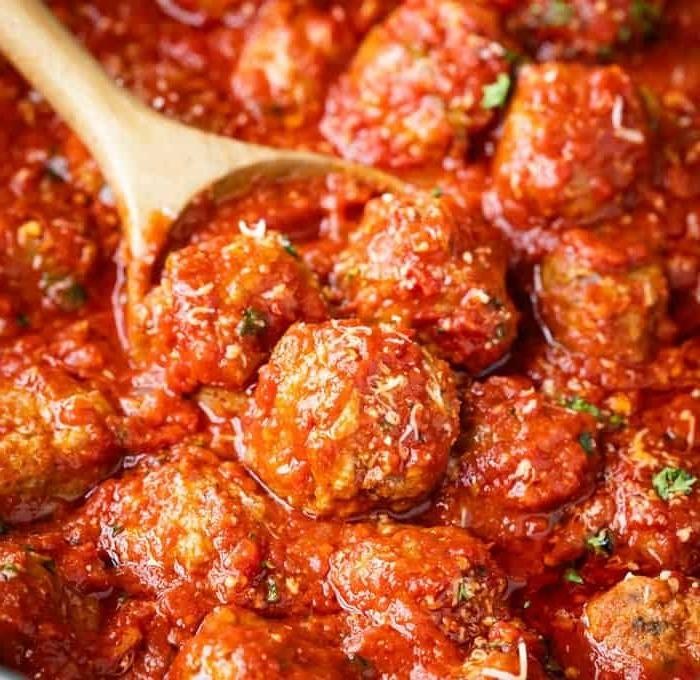
Now, let’s dive into the world of comfort food with a twist—homemade meatballs in sauce that’ll have your taste buds doing a happy dance. Perfect for those days when you crave something hearty but don’t want to spend hours in the kitchen.
Ingredients
- 1 lb ground beef (or a mix of beef and pork for extra flavor)
- 1/2 cup breadcrumbs (panko works wonders for texture)
- 1/4 cup grated Parmesan cheese (the real deal, please)
- 1 large egg (because binders are friends, not foes)
- 2 cloves garlic, minced (more if you’re a garlic fiend)
- 1 tsp salt (adjust to taste, but don’t be shy)
- 1/2 tsp black pepper (freshly ground is the way to go)
- 2 tbsp olive oil (or any neutral oil for frying)
- 24 oz marinara sauce (homemade or store-bought, no judgment here)
- 1/4 cup fresh basil, chopped (for that pop of color and freshness)
Instructions
- In a large bowl, combine the ground beef, breadcrumbs, Parmesan cheese, egg, minced garlic, salt, and black pepper. Mix gently with your hands until just combined—overmixing is the enemy of tender meatballs.
- Shape the mixture into 1.5-inch meatballs (about the size of a golf ball for uniformity in cooking).
- Heat olive oil in a large skillet over medium heat. Once hot, add the meatballs in batches, making sure not to overcrowd the pan. Brown them on all sides, about 2-3 minutes per side.
- Pour the marinara sauce over the browned meatballs, bringing it to a gentle simmer. Cover and let cook for 15-20 minutes, or until the meatballs are cooked through.
- Sprinkle with chopped fresh basil before serving. Tip: Letting the meatballs rest in the sauce for a few minutes before serving allows the flavors to meld beautifully.
Craving a bite yet? These meatballs are juicy, flavorful, and smothered in a sauce that’s just the right amount of tangy. Serve them over a bed of spaghetti, stuffed into a sub, or just straight out of the skillet—no one’s watching.
Vegetable Lasagna
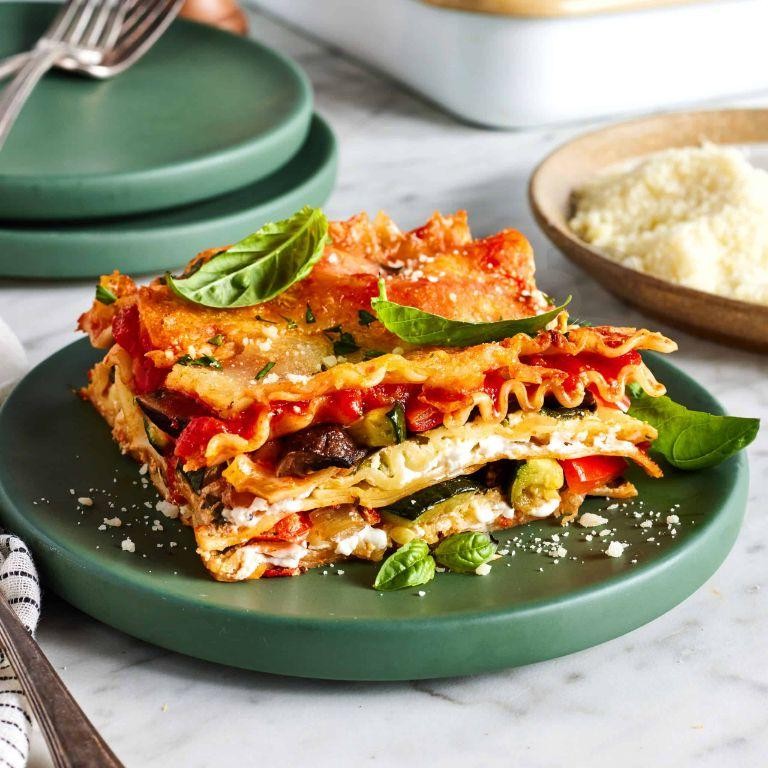
Alright, let’s dive into the world of layered goodness where vegetables and cheese throw a party in your mouth. This Vegetable Lasagna is the hero we all need—comforting, hearty, and sneakily packed with veggies. Perfect for those days when you want to feel virtuous but also want to indulge.
Ingredients
- 9 lasagna noodles (no-boil kind saves time)
- 2 cups ricotta cheese (whole milk for extra creaminess)
- 1 egg (helps bind the ricotta)
- 2 cups shredded mozzarella (because more cheese is always better)
- 1/2 cup grated Parmesan (the salty, nutty kick)
- 2 cups marinara sauce (homemade or store-bought, no judgment here)
- 2 cups mixed vegetables (zucchini, spinach, and mushrooms work wonders)
- 2 tbsp olive oil (or any oil you have on hand)
- 1 tsp garlic powder (because garlic makes everything better)
- 1 tsp Italian seasoning (or a mix of dried basil, oregano, and thyme)
- Salt and pepper (adjust to taste, but don’t be shy)
Instructions
- Preheat your oven to 375°F (190°C) and lightly grease a 9×13 inch baking dish with olive oil.
- In a large skillet, heat 2 tbsp olive oil over medium heat. Add the mixed vegetables and sauté until they’re just tender, about 5-7 minutes. Tip: Don’t overcrowd the pan to ensure even cooking.
- In a bowl, mix the ricotta cheese, egg, garlic powder, Italian seasoning, salt, and pepper until well combined. Tip: Taste the mixture and adjust seasoning before layering.
- Spread 1/2 cup of marinara sauce at the bottom of the prepared baking dish. Layer 3 lasagna noodles on top, followed by half of the ricotta mixture, half of the sautéed vegetables, and 1/2 cup of mozzarella. Repeat the layers once more.
- Top with the remaining 3 noodles, the rest of the marinara sauce, and the remaining mozzarella and Parmesan cheeses. Tip: Cover with foil for the first 25 minutes to prevent the top from burning, then uncover for the last 10 minutes to get that golden, bubbly finish.
- Bake for 35 minutes, or until the cheese is melted and the edges are bubbly. Let it sit for 10 minutes before slicing—this helps the layers set.
Mmm, the first bite reveals layers of tender noodles, creamy ricotta, and vibrant veggies, all hugged by gooey cheese. Serve it with a crisp salad to cut through the richness, or go all out with garlic bread for the ultimate comfort meal.
Chicken Alfredo Pasta
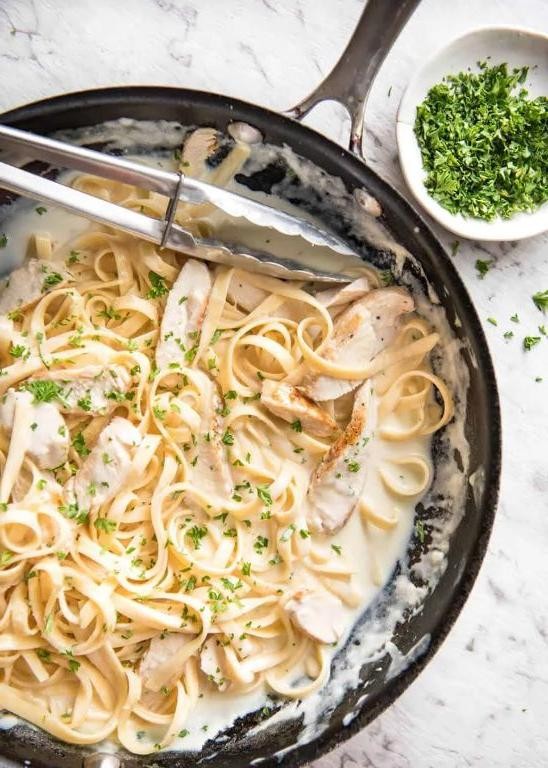
Yum, who doesn’t love a creamy, dreamy bowl of Chicken Alfredo Pasta? It’s the ultimate comfort food that’s like a hug in a bowl, perfect for when you’re craving something indulgent yet surprisingly easy to whip up. Let’s dive into making this cheesy, garlicky masterpiece that’ll have everyone asking for seconds.
Ingredients
- 8 oz fettuccine pasta (or any pasta you love, but fettuccine is classic)
- 2 boneless, skinless chicken breasts, cut into bite-sized pieces (thighs work too for more flavor)
- 2 tbsp olive oil (or any neutral oil, but olive adds a nice flavor)
- 3 cloves garlic, minced (because more garlic is always better)
- 1 cup heavy cream (for that luxurious sauce)
- 1/2 cup grated Parmesan cheese (freshly grated melts smoother)
- 1/2 tsp salt (adjust to taste, but don’t skimp)
- 1/4 tsp black pepper (freshly ground if you’ve got it)
- 1/4 tsp nutmeg (a pinch adds a warm, subtle depth)
- 2 tbsp unsalted butter (because butter makes everything better)
- Fresh parsley, chopped (for a pop of color and freshness)
Instructions
- Bring a large pot of salted water to a boil over high heat. Add the fettuccine and cook according to package instructions until al dente, about 8-10 minutes. Reserve 1/2 cup of pasta water before draining.
- While the pasta cooks, heat olive oil in a large skillet over medium-high heat. Add the chicken pieces and cook until golden brown and no longer pink inside, about 5-6 minutes. Remove chicken and set aside.
- In the same skillet, melt butter over medium heat. Add minced garlic and sauté until fragrant, about 30 seconds—be careful not to burn it!
- Pour in the heavy cream, stirring constantly. Let it simmer gently for 2 minutes to thicken slightly.
- Stir in the Parmesan cheese, salt, pepper, and nutmeg until the cheese is melted and the sauce is smooth. If the sauce is too thick, add reserved pasta water a tablespoon at a time until desired consistency is reached.
- Add the cooked pasta and chicken back to the skillet, tossing everything together until well coated in the sauce. Cook for an additional 1-2 minutes to heat through.
- Garnish with chopped parsley before serving. For an extra touch of elegance, serve with a sprinkle of extra Parmesan and a side of garlic bread.
Boom! You’ve just made a Chicken Alfredo Pasta that’s creamy, rich, and packed with flavor. The pasta should be perfectly coated in that velvety sauce, with tender chicken pieces in every bite. Try serving it with a crisp green salad to cut through the richness, or go all out with a glass of white wine for the full Italian bistro experience at home.
Deviled Eggs

Zesty and zippy, deviled eggs are the ultimate party pleaser that’s as fun to make as they are to eat. These little flavor bombs are a classic for a reason, and with our twist, they’re sure to disappear faster than you can say ‘more mayo, please!’
Ingredients
– 6 large eggs (fresh for easier peeling)
– 1/4 cup mayonnaise (or sub Greek yogurt for a tangier twist)
– 1 tsp yellow mustard (Dijon works too for extra zing)
– 1/2 tsp white vinegar (apple cider vinegar adds a nice depth)
– Salt and pepper to taste (start with 1/8 tsp each)
– Paprika for garnish (smoked paprika kicks it up a notch)
Instructions
1. Place eggs in a single layer in a saucepan and cover with water by 1 inch. Bring to a rolling boil over high heat.
2. Once boiling, cover the pan and remove from heat. Let sit for 12 minutes for perfectly firm yolks.
3. Transfer eggs to an ice bath for 5 minutes to stop cooking and make peeling a breeze.
4. Gently crack and peel eggs under cool running water to help remove shells smoothly.
5. Slice eggs in half lengthwise and pop yolks into a bowl. Arrange whites on a serving platter.
6. Mash yolks with a fork, then mix in mayonnaise, mustard, vinegar, salt, and pepper until smooth.
7. Spoon or pipe the yolk mixture back into the egg whites. Sprinkle with paprika for that classic finish.
Mouthwateringly creamy with a hint of tang, these deviled eggs are a texture dream. Serve them on a bed of greens for a pop of color or alongside crispy bacon bits for a salty crunch that’ll have guests raving.
Potato Salad
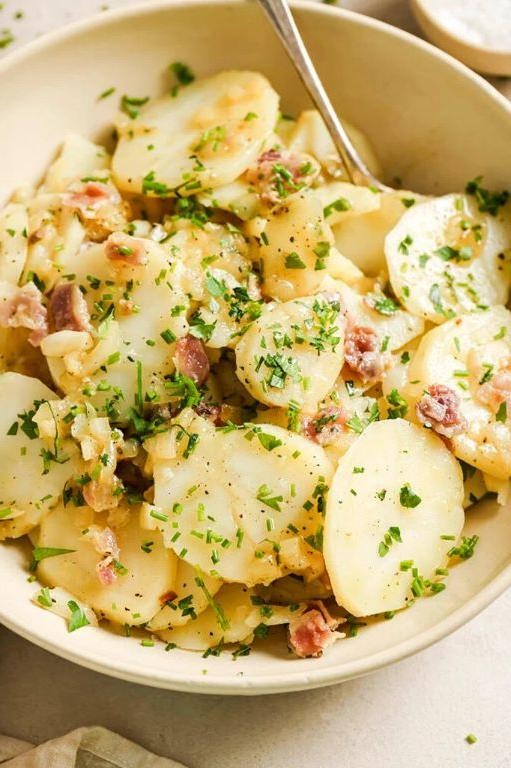
Let’s be real, potato salad is the unsung hero of picnics and potlucks everywhere. It’s the dish that says, ‘I’m here to please, but I won’t steal the spotlight’—unless, of course, it’s your grandma’s secret recipe, in which case, bow down.
Ingredients
- 2 lbs russet potatoes, peeled and cubed (for that perfect bite-sized goodness)
- 1/2 cup mayonnaise (or go wild with Greek yogurt for a tangy twist)
- 2 tbsp yellow mustard (because we’re keeping it classic)
- 1/4 cup diced red onion (soak in cold water for 5 mins to mellow the bite)
- 2 hard-boiled eggs, chopped (for that protein punch)
- 1 tsp salt (adjust to taste, but don’t be shy)
- 1/2 tsp black pepper (freshly ground, please)
- 1 tbsp apple cider vinegar (for a little zing)
- 1/4 cup chopped fresh parsley (because color is life)
Instructions
- Place the cubed potatoes in a large pot and cover with cold water by 1 inch. Bring to a boil over high heat, then reduce to a simmer and cook until the potatoes are fork-tender, about 10-12 minutes.
- Drain the potatoes and let them cool slightly. Tip: Spread them on a baking sheet to cool faster and avoid mushiness.
- In a large bowl, whisk together the mayonnaise, mustard, apple cider vinegar, salt, and pepper. Tip: Taste as you go—your palate is the boss.
- Add the slightly cooled potatoes, diced red onion, chopped eggs, and parsley to the bowl. Gently fold everything together until well combined. Tip: Overmixing is the enemy of texture.
- Cover and refrigerate for at least 1 hour before serving to let the flavors marry. Tip: Overnight is even better if you can resist the temptation.
Kick back and watch as this creamy, tangy, and slightly crunchy potato salad becomes the star of your next gathering. Serve it atop a bed of greens for a fancy twist, or straight from the bowl—no judgment here.
Three Bean Salad
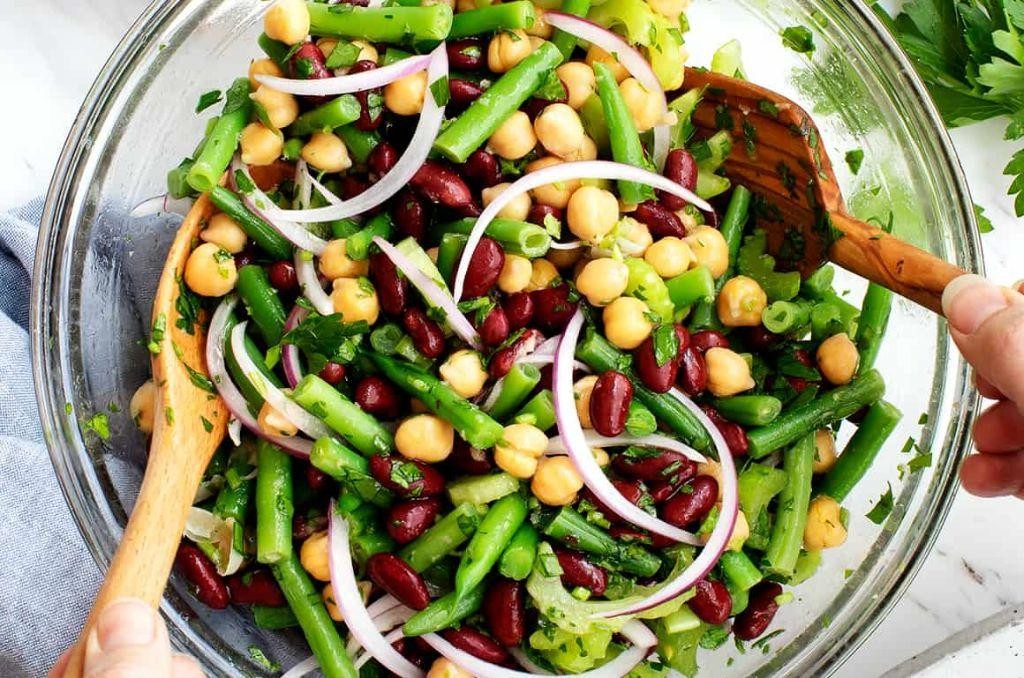
Craving something crunchy, colorful, and downright easy to whip up? Our Three Bean Salad is the answer to your lazy-day prayers, packing a punch of protein and a rainbow of flavors that’ll make your taste buds do a happy dance.
Ingredients
- 1 can (15 oz) kidney beans, drained and rinsed (for that meaty bite)
- 1 can (15 oz) garbanzo beans, drained and rinsed (or chickpeas, if you’re fancy)
- 1 can (15 oz) green beans, drained (fresh works too, but who’s got time?)
- 1/2 cup red onion, finely diced (soak in cold water to mellow the bite)
- 1/4 cup olive oil (or any oil that won’t judge you)
- 2 tbsp apple cider vinegar (for a tangy kick)
- 1 tbsp honey (or maple syrup for the vegans)
- 1 tsp Dijon mustard (because plain mustard is just sad)
- Salt and pepper to taste (don’t be shy)
Instructions
- In a large bowl, combine kidney beans, garbanzo beans, and green beans. Mix gently to avoid turning them into mush.
- Add the finely diced red onion to the bowl. If you skipped the soaking step, brace yourself for some onion breath.
- In a small bowl, whisk together olive oil, apple cider vinegar, honey, and Dijon mustard until emulsified. Taste and adjust seasoning with salt and pepper.
- Pour the dressing over the beans and onions. Toss everything together until evenly coated. Let it sit for at least 30 minutes to let the flavors mingle and get to know each other.
- Before serving, give the salad a quick stir and adjust the seasoning if necessary. For an extra crunch, sprinkle some toasted almonds on top.
You’ll love the contrast of textures—creamy, crunchy, and everything in between—with a dressing that’s sweet, tangy, and just a little bit sassy. Serve it up with grilled chicken or scoop it straight from the bowl; we won’t tell.
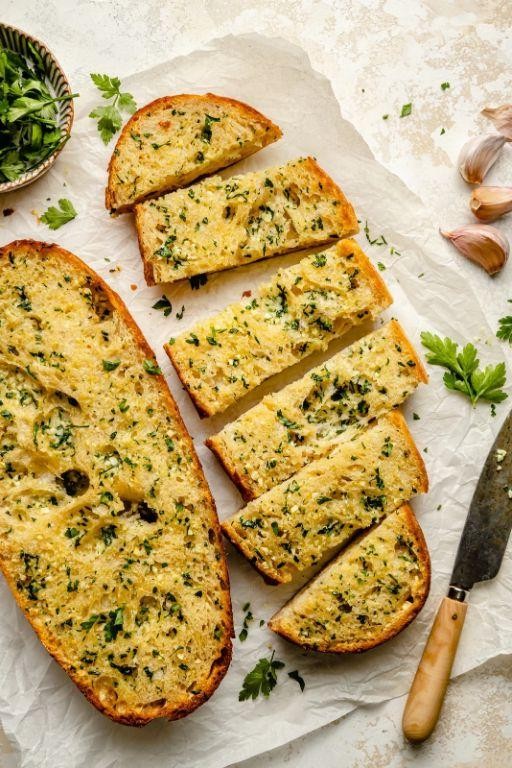
Garlic Bread
Today is ‘2025-06-08 02:58:29.760652’, You’re a professional food blogger writing a relatable US-based roundup-style recipe article. Introduce the dish: ‘Garlic Bread’ using the structure below.
Tone: Use a playful, witty voice. Add light humor, bold phrasing, and fun energy throughout.
Write a short 2-3 sentence intro, The first word of your introduction must begin with the letter ‘T’. Do not display the title. Start directly with the introduction.
Ingredients
- 1 loaf of French bread (or any crusty bread you love)
- 1/2 cup unsalted butter, softened (because life’s too short for hard butter)
- 4 cloves garlic, minced (adjust to taste, but let’s be real, is there such a thing as too much garlic?)
- 2 tbsp fresh parsley, finely chopped (for that pop of color and freshness)
- 1/4 tsp salt (just a pinch to make everything sing)
- 1/4 tsp black pepper (for a little kick)
Instructions
- Preheat your oven to 375°F (because we’re not savages, we preheat).
- Slice the French bread in half lengthwise, like you’re performing bread surgery.
- In a bowl, mix the softened butter, minced garlic, parsley, salt, and pepper until it’s as harmonious as a boy band.
- Spread the garlic butter mixture evenly on both halves of the bread. Don’t be shy; lather it on like it’s sunscreen in July.
- Place the bread on a baking sheet and bake for 10 minutes, then broil for 2-3 minutes until the top is golden and bubbly. Watch it like a hawk during broiling—it goes from golden to charcoal in seconds.
- Remove from the oven and let it cool for a minute (if you can resist the aroma).
- Slice into generous pieces and serve immediately. Pro tip: Serve with a side of marinara for dipping, because why not?
Zesty, buttery, and with just the right amount of crunch, this garlic bread is the side dish of your dreams. Perfect for sopping up spaghetti sauce or, let’s be honest, eating straight off the tray while no one’s looking.
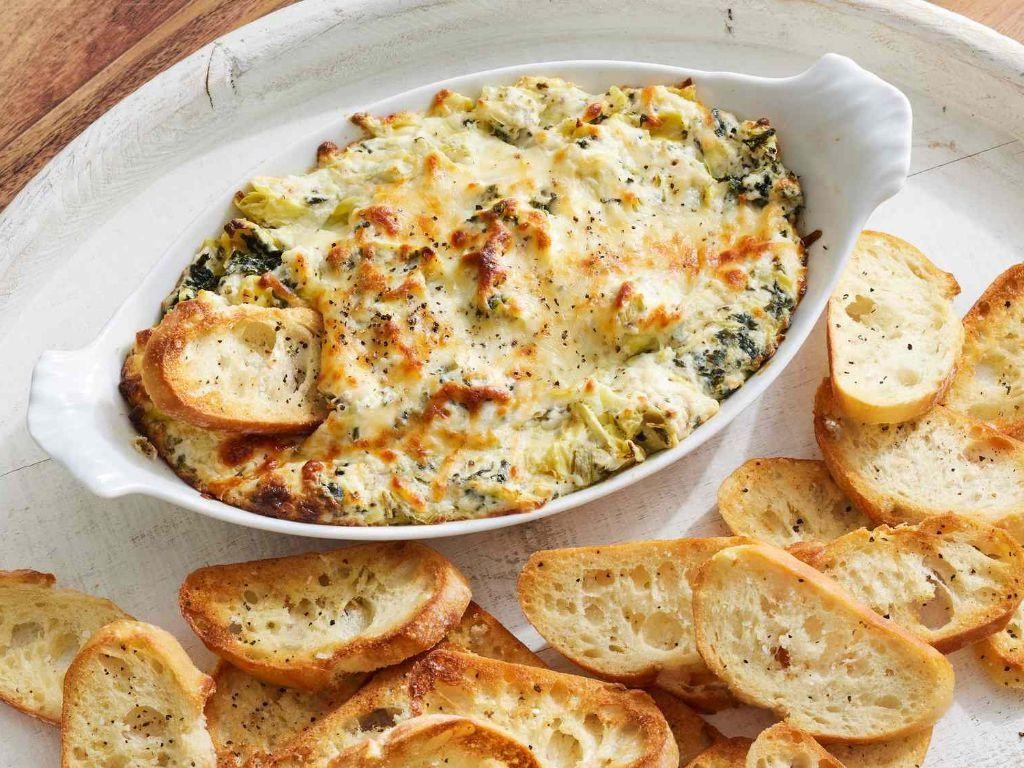
Spinach and Artichoke Dip
Alright, let’s dive into the creamy, dreamy world of Spinach and Artichoke Dip, the ultimate party pleaser that’s as easy to make as it is to devour. Whether you’re hosting a shindig or just treating yourself, this dip is your golden ticket to flavor town.
Ingredients
- 1 cup mayonnaise (or Greek yogurt for a tangier twist)
- 1 cup sour cream (full-fat for maximum creaminess)
- 1 cup grated Parmesan cheese (the real deal, please)
- 1 cup shredded mozzarella cheese (because more cheese is always better)
- 1 can (14 oz) artichoke hearts, drained and chopped (squeeze out excess water)
- 1 package (10 oz) frozen spinach, thawed and drained (squeeze it like you mean it)
- 2 cloves garlic, minced (or more if you’re a garlic fiend)
- 1/2 tsp red pepper flakes (for a subtle kick, adjust to taste)
- Salt and pepper to taste (but don’t be shy)
Instructions
- Preheat your oven to 350°F (175°C) and grab a baking dish. No need to grease it; we’re keeping it simple.
- In a large bowl, mix together the mayonnaise, sour cream, Parmesan, and mozzarella until well combined. Tip: Let the cheeses come to room temperature for easier mixing.
- Add the chopped artichokes, spinach, garlic, and red pepper flakes to the bowl. Stir until everything is evenly distributed. Tip: Squeeze the spinach and artichokes thoroughly to avoid a watery dip.
- Season with salt and pepper, then give it one final mix. Taste and adjust the seasoning if needed. Tip: Remember, the cheeses are salty, so go easy on the salt at first.
- Transfer the mixture to the baking dish and spread it out evenly. Bake for 25-30 minutes, or until the top is golden and bubbly.
- Let it cool for a few minutes before serving. It’ll be molten lava hot, and we don’t want any burnt tongues.
Serve this luscious dip with a side of toasted baguette, tortilla chips, or even veggie sticks for the health-conscious. The combination of creamy, cheesy goodness with the slight crunch of the artichokes and the earthy spinach is downright addictive. So, go ahead, dip into happiness!
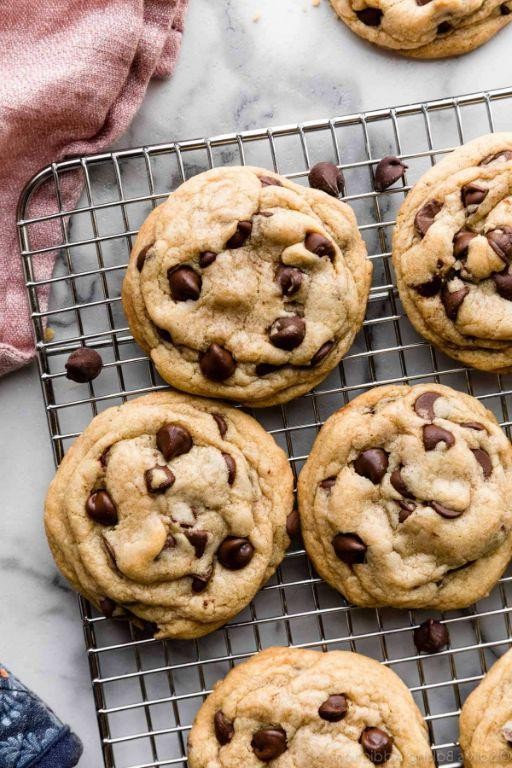
Chocolate Chip Cookies
Buckle up, buttercups, because we’re about to embark on a journey to chocolate chip cookie paradise—where every bite is a little piece of heaven and your kitchen smells like a bakery (in the best way possible).
Ingredients
- 1 cup unsalted butter, softened (room temp is key for that perfect mix)
- 3/4 cup granulated sugar (because sweet is the name of the game)
- 3/4 cup packed brown sugar (for that deep, molasses-y goodness)
- 2 large eggs (farm-fresh if you can swing it)
- 1 tsp vanilla extract (the real deal, please)
- 2 1/4 cups all-purpose flour (spooned and leveled, no packing!)
- 1 tsp baking soda (aka the cookie’s best friend)
- 1/2 tsp salt (to balance all that sweetness)
- 2 cups semisweet chocolate chips (or go wild with dark or milk)
Instructions
- Preheat your oven to 375°F (190°C) and line your baking sheets with parchment paper for easy cleanup.
- In a large bowl, cream together the softened butter, granulated sugar, and brown sugar until light and fluffy—about 3 minutes with a mixer.
- Beat in the eggs one at a time, then stir in the vanilla extract. Tip: Scrape down the sides of the bowl to ensure everything’s well mixed.
- In a separate bowl, whisk together the flour, baking soda, and salt. Gradually add this to the wet ingredients, mixing just until combined. Tip: Overmixing leads to tough cookies, so show some restraint!
- Fold in the chocolate chips until evenly distributed throughout the dough.
- Drop rounded tablespoons of dough onto the prepared baking sheets, spacing them about 2 inches apart. Tip: For picture-perfect cookies, press a few extra chocolate chips on top of each dough ball before baking.
- Bake for 9 to 11 minutes, or until the edges are golden but the centers are still soft. They’ll firm up as they cool, promise.
- Let the cookies cool on the baking sheets for 5 minutes before transferring to a wire rack to cool completely—if you can resist eating them warm, that is.
Every bite of these cookies is a crispy-on-the-outside, chewy-on-the-inside dream, with pools of melted chocolate that’ll have you reaching for just one more. Serve them stacked high on a vintage plate for that Instagram-worthy moment, or just eat them straight off the rack—no judgment here.
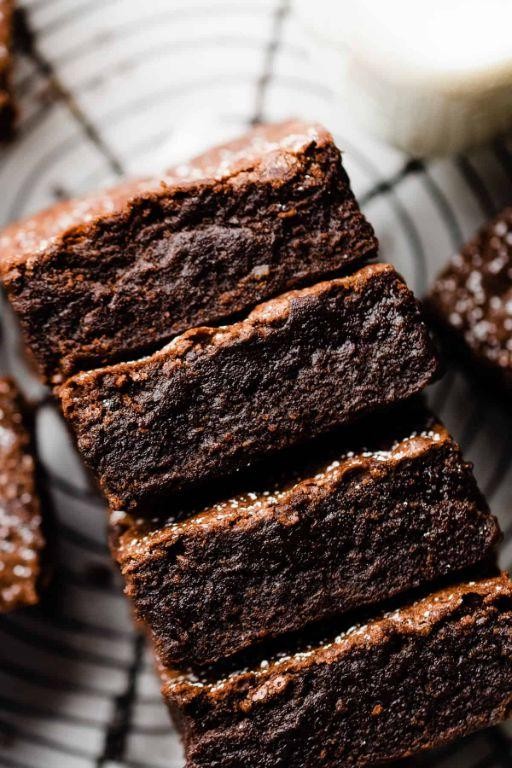
Brownies
Howdy, chocolate lovers! If you’re on the hunt for a dessert that’s as easy to make as it is to devour, look no further than these decadent brownies. They’re the perfect blend of fudgy, chewy, and downright irresistible, guaranteed to satisfy your sweet tooth in the most delightful way.
Ingredients
- 1 cup unsalted butter (melted, or any neutral oil for a lighter version)
- 2 cups granulated sugar (because life’s too short for less sugar)
- 4 large eggs (room temperature for best results)
- 1 tsp vanilla extract (the secret to depth of flavor)
- 1 cup all-purpose flour (sifted to avoid lumps)
- 3/4 cup cocoa powder (dark for the chocoholics)
- 1/2 tsp salt (just a pinch to balance the sweetness)
- 1/2 tsp baking powder (for that perfect rise)
- 1 cup chocolate chips (because more chocolate is always better)
Instructions
- Preheat your oven to 350°F (175°C) and grease a 9×13 inch baking pan. Tip: Lining the pan with parchment paper makes removal a breeze.
- In a large bowl, whisk together the melted butter and sugar until well combined. Tip: This step is crucial for that glossy, crackly top.
- Add the eggs one at a time, whisking well after each addition, then stir in the vanilla extract.
- Sift in the flour, cocoa powder, salt, and baking powder, folding gently until just combined. Tip: Overmixing leads to tough brownies, so keep it light.
- Fold in the chocolate chips, then pour the batter into the prepared pan, spreading it evenly.
- Bake for 25-30 minutes, or until a toothpick inserted into the center comes out with a few moist crumbs. Tip: They’ll continue to set as they cool, so don’t overbake.
Best enjoyed warm, these brownies are a chocolate lover’s dream with their rich, fudgy center and slightly crisp edges. Serve them with a scoop of vanilla ice cream for an extra indulgent treat, or enjoy them straight from the pan—no judgment here.
Fruit Salad

Let’s face it, fruit salad is the unsung hero of potlucks and picnics everywhere—easy to love, impossible to mess up, and always the first to disappear. This version? It’s like a party in a bowl, where every fruit brings its A-game.
Ingredients
- 2 cups strawberries, hulled and quartered (the juicier, the better)
- 1 cup blueberries (because every salad needs a pop of color)
- 1 cup pineapple chunks (fresh or canned, but drain if using canned)
- 1 banana, sliced (add last to prevent browning)
- 1 tbsp honey (or maple syrup for a vegan twist)
- 1 tbsp fresh lime juice (trust us, it’s a game-changer)
- 1/4 cup fresh mint leaves, chopped (optional but highly recommended)
Instructions
- In a large bowl, combine strawberries, blueberries, and pineapple chunks. Gently toss to mix.
- Drizzle honey and lime juice over the fruit. Toss again to ensure everything is lightly coated. Tip: The lime juice not only adds zest but also keeps the fruits looking fresh.
- Right before serving, add the banana slices and gently mix to incorporate. Tip: Adding bananas last prevents them from getting mushy.
- Sprinkle chopped mint leaves on top for an extra burst of flavor. Tip: Mint can be overpowering, so start with a little and add more to taste.
Bright, refreshing, and with just the right amount of sweetness, this fruit salad is a testament to simplicity done right. Serve it in a hollowed-out watermelon for an Instagram-worthy presentation that’ll have everyone talking.
Cheesecake Bars

Just when you thought cheesecake couldn’t get any more irresistible, along come these cheesecake bars to prove you wrong. Perfectly portable and packed with all the creamy, dreamy goodness of their round counterpart, they’re here to make your dessert dreams come true—no fork required.
Ingredients
- 2 cups graham cracker crumbs (about 16 full sheets, crushed)
- 1/2 cup unsalted butter, melted (plus a little extra for greasing the pan)
- 1/4 cup granulated sugar (for that sweet, sweet crust)
- 24 oz cream cheese, softened to room temperature (this is non-negotiable for smoothness)
- 3/4 cup granulated sugar (because cheesecake should be sweet, not shy)
- 3 large eggs (room temperature blends better)
- 1 tsp vanilla extract (the good stuff, please)
- 1 cup sour cream (for that tangy twist)
Instructions
- Preheat your oven to 325°F (163°C) and grease a 9×13 inch baking pan with butter. Tip: Lining the pan with parchment paper makes removal a breeze.
- In a medium bowl, mix graham cracker crumbs, melted butter, and 1/4 cup sugar until combined. Press firmly into the bottom of the prepared pan. Tip: Use the bottom of a measuring cup to press the crust evenly.
- Bake the crust for 10 minutes, then let it cool slightly. This pre-baking step ensures your crust won’t turn soggy.
- In a large bowl, beat the cream cheese and 3/4 cup sugar until smooth. Tip: Scrape down the sides of the bowl to ensure everything is evenly mixed.
- Add eggs one at a time, beating well after each addition. Stir in vanilla and sour cream until just combined. Tip: Overmixing can incorporate too much air, leading to cracks.
- Pour the filling over the crust and smooth the top with a spatula. Bake for 40-45 minutes, until the edges are set but the center still jiggles slightly.
- Turn off the oven, crack the door open, and let the cheesecake cool inside for 1 hour. This gradual cooling helps prevent cracks.
- Refrigerate for at least 4 hours, or overnight, before cutting into bars. Tip: Use a hot knife for clean cuts.
Mmm, these cheesecake bars are the perfect combo of creamy and crumbly, with a tangy kick that’ll have you coming back for seconds. Serve them up at your next picnic or potluck, or just keep them all to yourself—we won’t judge.
Buffalo Chicken Dip

Just when you thought chicken couldn’t get any more addictive, along comes Buffalo Chicken Dip to prove you wrong. This creamy, spicy, utterly irresistible dish is the love child of game day and your deepest cravings, ready to party in your mouth.
Ingredients
- 2 cups shredded cooked chicken (rotisserie works wonders here)
- 8 oz cream cheese, softened (microwave for 20 sec if you’re impatient)
- 1/2 cup hot sauce (Frank’s RedHot or go home)
- 1/2 cup ranch dressing (or blue cheese, if you’re feeling rebellious)
- 1/2 cup shredded cheddar cheese (because more cheese is always the answer)
- 1/4 cup crumbled blue cheese (optional, for the brave)
- Tortilla chips, celery sticks, or carrot sticks (for dipping, duh)
Instructions
- Preheat your oven to 350°F (175°C) because we’re baking, not sunbathing.
- In a large bowl, mix the shredded chicken, cream cheese, hot sauce, and ranch dressing until they’re best friends. Tip: Use a hand mixer if you want it extra smooth.
- Fold in the cheddar cheese (and blue cheese if you’re using it) like you’re tucking it into bed.
- Transfer the mixture to a baking dish and spread it out like you’re frosting a cake, but way easier.
- Bake for 20 minutes or until the edges are bubbly and the top is lightly golden. Tip: If you like it extra crispy, broil for the last 2 minutes.
- Let it cool for 5 minutes unless you enjoy molten lava burns. Tip: It thickens as it cools, so patience is a virtue.
This dip is the perfect combo of creamy, cheesy, and spicy, with a texture that’s scoopable yet substantial. Serve it with a side of celery sticks for a crunchy contrast, or go all in with a spoon—no judgment here.
Cornbread
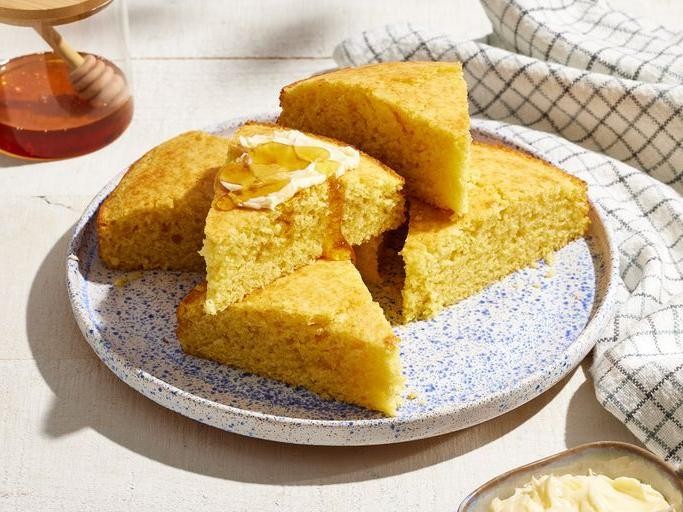
So, you think you’ve got what it takes to whip up a batch of cornbread that’ll make your taste buds do a happy dance? Well, buckle up, buttercup, because we’re about to dive into the golden, crumbly goodness that is cornbread – the unsung hero of the bread world.
Ingredients
- 1 cup cornmeal (the star of the show)
- 1 cup all-purpose flour (for that perfect structure)
- 1/4 cup sugar (because sweet cornbread is the best cornbread)
- 1 tbsp baking powder (the lift master)
- 1/2 tsp salt (just a pinch to balance the sweet)
- 1 cup milk (whole milk for richness, or any milk you prefer)
- 1/4 cup unsalted butter, melted (or any neutral oil, but butter is better)
- 1 large egg (the binder that holds our dreams together)
Instructions
- Preheat your oven to 400°F (200°C) – because timing is everything, and we want it hot and ready.
- In a large bowl, whisk together the cornmeal, flour, sugar, baking powder, and salt. Tip: Sifting the dry ingredients can prevent lumps, but who’s got time for that?
- In another bowl, beat the egg, then stir in the milk and melted butter. Tip: Let the melted butter cool a bit unless you fancy scrambled eggs in your cornbread.
- Pour the wet ingredients into the dry ingredients and stir until just combined. Tip: Overmixing is the enemy of fluffy cornbread – think of it as a gentle hug, not a wrestling match.
- Pour the batter into a greased 8-inch square baking pan or a cast-iron skillet for that rustic charm.
- Bake for 20-25 minutes, or until the top is golden and a toothpick inserted in the center comes out clean. Tip: If you’re into crusty edges, a cast-iron skillet is your best friend.
Moist, slightly sweet, and with just the right amount of crumble, this cornbread is begging to be slathered with butter or dunked into a bowl of chili. Or, for the adventurous souls out there, try it with a drizzle of honey and a sprinkle of sea salt for a sweet-salty situation that’s downright addictive.
Green Bean Casserole
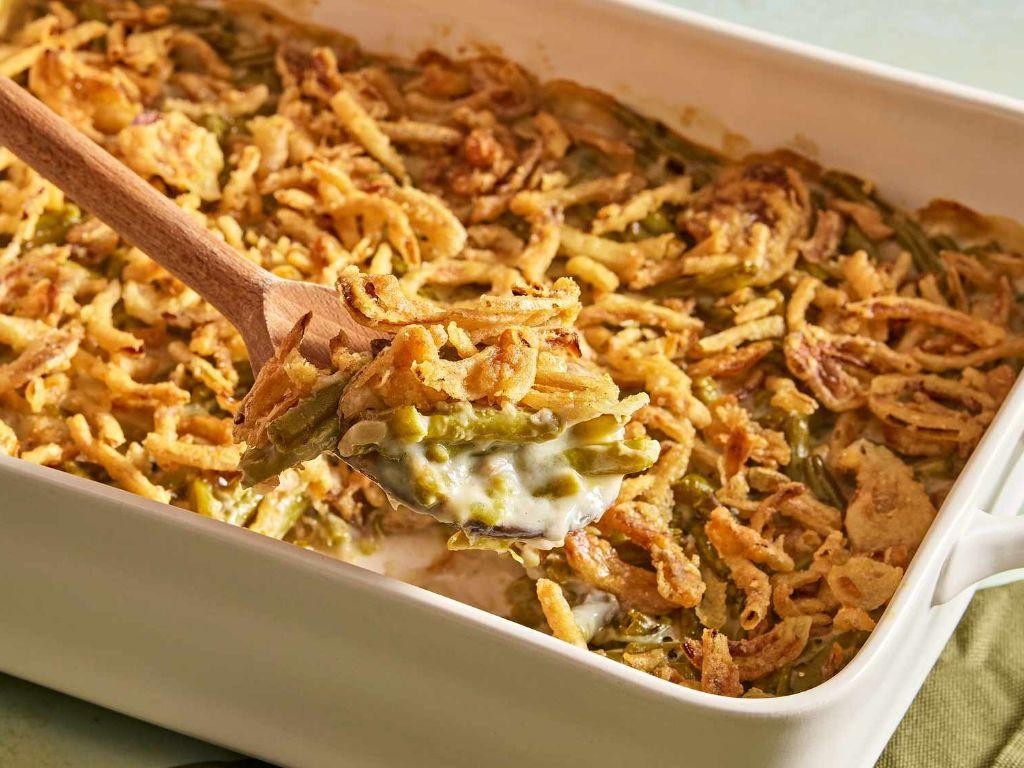
Ready to dive into a dish that’s as easy to love as it is to make? Green Bean Casserole is the unsung hero of comfort food, blending creamy, crunchy, and a touch of savory in every bite. Perfect for when you need a side dish that steals the show without stealing your time.
Ingredients
- 1 can (10.5 oz) condensed cream of mushroom soup (or cream of chicken for a twist)
- 1/2 cup milk (whole milk for richness, but any works)
- 1 tsp soy sauce (adds umami, adjust to taste)
- 1/8 tsp black pepper (freshly ground for best flavor)
- 2 cans (14.5 oz each) green beans, drained (or 4 cups fresh, steamed until tender)
- 1 1/3 cups French fried onions (because more is always better)
Instructions
- Preheat your oven to 350°F (175°C) – no guessing, just perfect casserole conditions.
- In a mixing bowl, whisk together the condensed soup, milk, soy sauce, and black pepper until smooth. Tip: A little elbow grease here ensures no lumpy surprises.
- Stir in the green beans until they’re evenly coated in the soup mixture. Fresh bean tip: Pat them dry to keep the sauce from getting watery.
- Transfer the mixture to a 1.5-quart baking dish, spreading it out evenly. No fancy dish? Any oven-safe pan will do.
- Bake uncovered for 25 minutes – the edges should be bubbly, and the center hot.
- Sprinkle the French fried onions over the top, then return to the oven for 5 more minutes, just until the onions are golden and crispy. Watch closely; they go from golden to gone in seconds.
Just like that, you’ve got a casserole that’s creamy beneath its crispy onion blanket, with green beans that still have a bit of bite. Serve it straight from the dish for that homey feel, or fancy it up with a sprinkle of fresh herbs for the ‘gram.
Pumpkin Pie
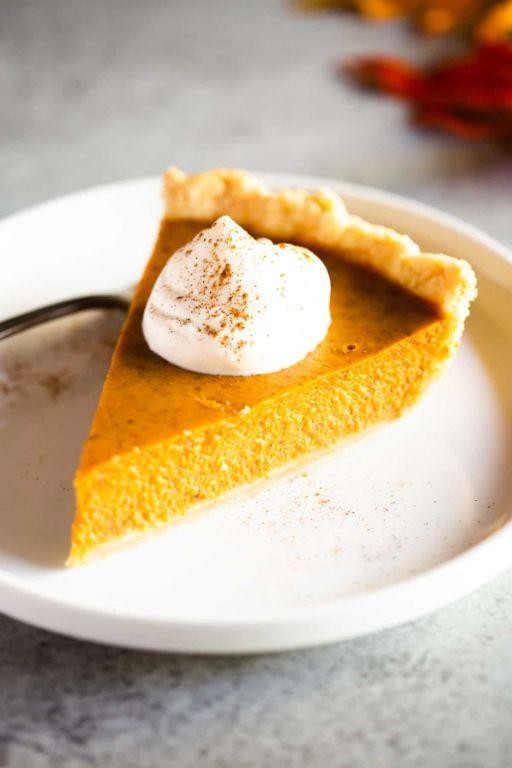
Howdy, pie enthusiasts! If you’re ready to dive fork-first into the epitome of autumn bliss, let’s talk pumpkin pie—the dessert that’s basically a hug in pie form. Whether you’re a seasoned baker or a newbie with a pie pan, this recipe is your ticket to Thanksgiving fame (or at least some serious compliments from your dinner guests).
Ingredients
- 1 15-ounce can pumpkin puree (not pumpkin pie filling)
- 3/4 cup granulated sugar (adjust to taste)
- 1 1/2 tsp ground cinnamon (because pumpkin and cinnamon are BFFs)
- 1/2 tsp salt (to balance the sweetness)
- 1/2 tsp ground ginger (for a little zing)
- 1/4 tsp ground cloves (just a pinch, it’s potent!)
- 2 large eggs (room temperature blends better)
- 1 12-ounce can evaporated milk (for that creamy dreamy texture)
- 1 unbaked 9-inch pie crust (homemade or store-bought, no judgment here)
Instructions
- Preheat your oven to 425°F (because precision is key to pie perfection).
- In a large bowl, whisk together the pumpkin puree, sugar, cinnamon, salt, ginger, and cloves until smooth (no lumps allowed!).
- Beat in the eggs one at a time, ensuring each is fully incorporated before adding the next (patience, young grasshopper).
- Gradually stir in the evaporated milk until the mixture is silky and uniform (think liquid gold).
- Pour the filling into the unbaked pie crust, smoothing the top with a spatula (for that Instagram-worthy finish).
- Bake at 425°F for 15 minutes, then reduce the oven temperature to 350°F and continue baking for 40-50 minutes (the pie should jiggle slightly in the center when done).
- Cool on a wire rack for at least 2 hours (yes, waiting is the hardest part).
Finally, this pumpkin pie is a creamy, spiced masterpiece with a texture so smooth, it’ll make you want to write sonnets about it. Serve it with a dollop of whipped cream or a scoop of vanilla ice cream for an extra decadent touch—because why not?
Apple Crisp
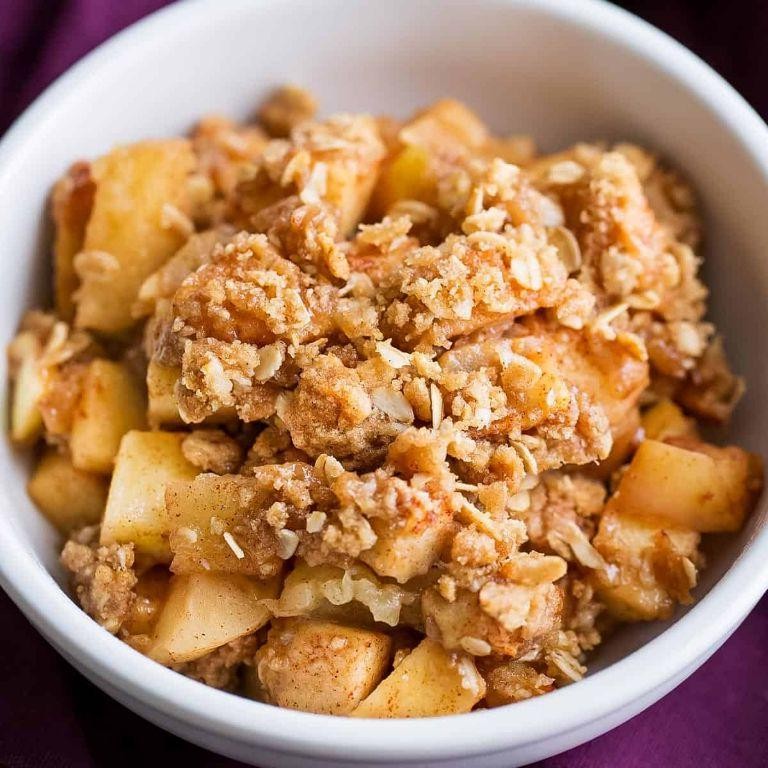
Craving something sweet, comforting, and ridiculously easy to whip up? Look no further than this apple crisp, your new go-to dessert that’s like a warm hug from your oven. With a crispy, buttery topping and tender, cinnamon-kissed apples underneath, it’s the kind of dish that’ll have you sneaking back for seconds (and maybe thirds).
Ingredients
- 6 cups thinly sliced apples (Granny Smith or Honeycrisp work wonders)
- 1 cup all-purpose flour (for that perfect crumble)
- 1 cup rolled oats (the secret to extra crunch)
- 1 cup brown sugar (because life’s too short for white sugar here)
- 1/2 cup unsalted butter, melted (or salted if you’re feeling daring)
- 1 tsp cinnamon (adjust to taste, but why would you?)
- 1/4 tsp nutmeg (for that whisper of warmth)
Instructions
- Preheat your oven to 375°F (190°C) and grease a 9×13 inch baking dish. Because nobody likes a sticky situation.
- In a large bowl, toss the sliced apples with cinnamon and nutmeg until they’re evenly coated. This is where the magic starts.
- Spread the apple mixture evenly in the prepared baking dish. No apple left behind!
- In another bowl, mix the flour, oats, and brown sugar. Pour in the melted butter and stir until the mixture resembles coarse crumbs. This is your crispy crown.
- Sprinkle the topping over the apples like you’re decorating the most delicious cake ever.
- Bake for 30-35 minutes, or until the topping is golden brown and the apples are bubbling at the edges. The smell will tell you when it’s ready.
Best served warm, this apple crisp is a textural dream—crispy on top, soft underneath, with a flavor that’s like autumn in every bite. Try it with a scoop of vanilla ice cream for that hot-cold contrast that’ll make your taste buds sing.
Peanut Butter Blossoms

Buckle up, buttercup, because we’re about to dive into the world of Peanut Butter Blossoms—a cookie that’s as fun to make as it is to eat. These little gems are the perfect blend of peanut buttery goodness and chocolatey delight, guaranteed to make your taste buds do a happy dance.
Ingredients
- 1/2 cup granulated sugar (for rolling, because we’re fancy like that)
- 1/2 cup packed brown sugar (the secret to that chewy center)
- 1/2 cup creamy peanut butter (or crunchy, if you’re feeling rebellious)
- 1/2 cup unsalted butter, softened (room temp is key, folks)
- 1 large egg (the glue that holds our dreams together)
- 1 tsp vanilla extract (because vanilla makes everything better)
- 1 3/4 cups all-purpose flour (spooned and leveled, please)
- 1 tsp baking soda (for that perfect rise)
- 1/2 tsp salt (to balance the sweet)
- 48 milk chocolate kisses, unwrapped (because no one likes a surprise foil)
Instructions
- Preheat your oven to 375°F (190°C) and line two baking sheets with parchment paper. Pro tip: This prevents sticking and makes cleanup a breeze.
- In a large bowl, cream together the softened butter, peanut butter, granulated sugar, and brown sugar until light and fluffy. About 3 minutes should do the trick.
- Beat in the egg and vanilla extract until just combined. Overmixing is the enemy of tender cookies.
- In a separate bowl, whisk together the flour, baking soda, and salt. Gradually add this to the wet ingredients, mixing until no flour pockets remain.
- Roll the dough into 1-inch balls, then roll each ball in granulated sugar for that sparkling finish. Place them 2 inches apart on the prepared baking sheets.
- Bake for 8-10 minutes, or until the edges are just starting to golden. They’ll look underdone, but trust the process.
- Immediately press a chocolate kiss into the center of each cookie. The warmth will soften the chocolate slightly, creating that iconic blossom look.
- Let the cookies cool on the baking sheets for 5 minutes before transferring to a wire rack to cool completely. Patience is a virtue, especially when cookies are involved.
Delight in the contrast of the crisp sugar coating against the soft, peanut buttery center, crowned with a melt-in-your-mouth chocolate kiss. Serve these beauties at your next gathering, or keep them all to yourself—we won’t judge.
Conclusion
We hope this roundup of 20 delicious potluck recipes inspires your next gathering! From savory mains to sweet treats, there’s something for everyone to enjoy. Don’t forget to try these dishes at home, share your favorites in the comments, and pin this article on Pinterest for your future potluck planning. Happy cooking!