Ready to spice up your kitchen routine with flavors that whisk you away to tropical shores? Our roundup of 18 Exotic Polynesian Recipes is your ticket to a culinary adventure, right from the comfort of your home. From succulent grilled meats to refreshing island-inspired desserts, these dishes promise to bring a burst of sunshine to your table. Dive in and let’s get cooking—aloha awaits!
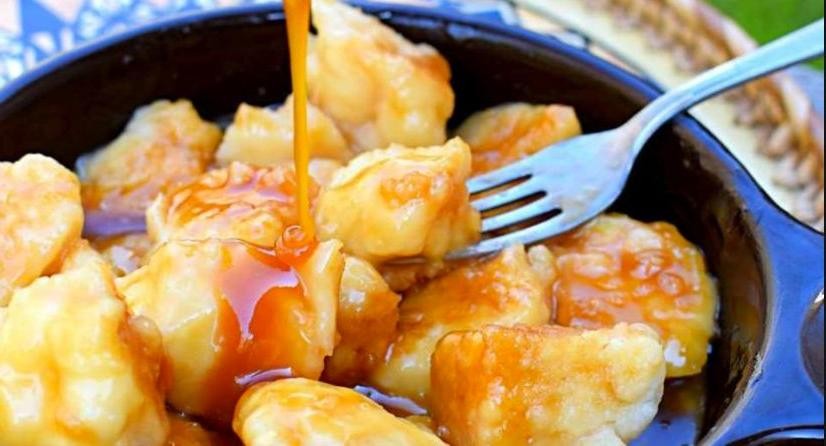
Polynesian Pulled Pork

Sometimes, the best meals come from the most unexpected inspirations. That’s exactly how this Polynesian Pulled Pork came to be in my kitchen, after a friend’s trip to Hawaii left me dreaming of tropical flavors. It’s a dish that’s as fun to make as it is to eat, blending sweet, tangy, and savory notes into something truly special.
Ingredients
- For the marinade:
- 1/2 cup soy sauce
- 1/4 cup brown sugar
- 2 tbsp pineapple juice
- 1 tbsp ginger, grated
- 2 cloves garlic, minced
- For the pork:
- 3 lbs pork shoulder
- 1 tbsp vegetable oil
- For serving:
- 4 hamburger buns
- 1/2 cup coleslaw
Instructions
- In a large bowl, whisk together soy sauce, brown sugar, pineapple juice, ginger, and garlic to create the marinade.
- Place the pork shoulder in a resealable bag and pour the marinade over it. Seal the bag and refrigerate for at least 4 hours, or overnight for best results. Tip: Turning the bag occasionally ensures the pork marinates evenly.
- Preheat your oven to 300°F. Heat vegetable oil in a large oven-safe pot over medium-high heat.
- Remove the pork from the marinade, reserving the marinade. Sear the pork on all sides until browned, about 3-4 minutes per side.
- Pour the reserved marinade over the pork, cover the pot, and transfer to the oven. Cook for 4 hours, or until the pork is tender and easily shreds with a fork. Tip: Check the pork occasionally to ensure it’s not drying out, adding a splash of water if needed.
- Remove the pork from the pot and shred it using two forks. Return the shredded pork to the pot and mix with the juices.
- Serve the pulled pork on hamburger buns topped with coleslaw. Tip: For an extra kick, drizzle with a bit of sriracha mayo.
Every bite of this Polynesian Pulled Pork is a burst of flavor, with the meat so tender it practically melts in your mouth. Try serving it alongside a fresh pineapple salad for a complete tropical feast that’ll transport your taste buds straight to the islands.
Hawaiian Poke Bowl
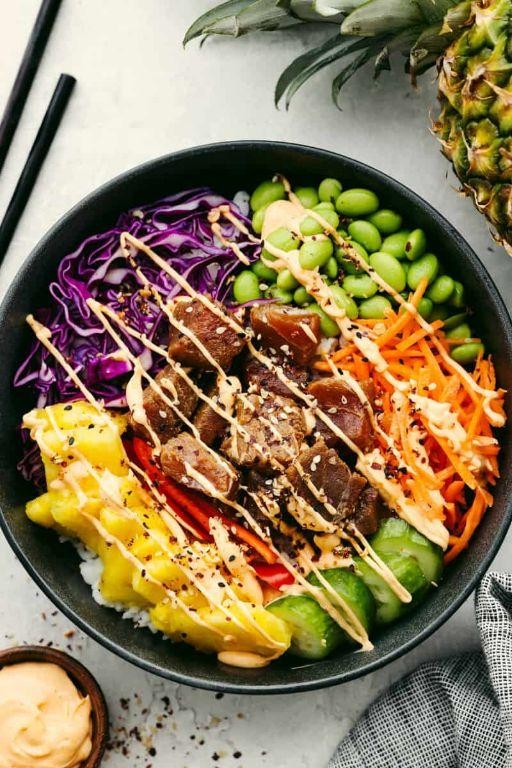
Growing up in California, I was lucky enough to be introduced to the vibrant flavors of Hawaiian cuisine early on, and nothing brings back those sunny beach memories quite like a fresh poke bowl. It’s my go-to dish when I’m craving something light yet satisfying, and today, I’m sharing my foolproof recipe that’s perfect for a quick lunch or a fancy dinner.
Ingredients
- For the poke:
- 1 lb fresh ahi tuna, cubed
- 1/4 cup soy sauce
- 1 tbsp sesame oil
- 1 tsp grated ginger
- 1/2 tsp crushed red pepper flakes
- For the bowl:
- 2 cups cooked sushi rice
- 1/2 avocado, sliced
- 1/4 cup diced cucumber
- 1/4 cup shredded carrots
- 1 tbsp toasted sesame seeds
- 1 green onion, thinly sliced
Instructions
- In a medium bowl, combine the cubed ahi tuna, soy sauce, sesame oil, grated ginger, and crushed red pepper flakes. Gently mix to coat the tuna evenly. Tip: For the best flavor, let the tuna marinate in the fridge for at least 15 minutes.
- While the tuna is marinating, divide the cooked sushi rice between two bowls.
- Arrange the avocado slices, diced cucumber, and shredded carrots on top of the rice.
- Remove the tuna from the fridge and spoon it over the prepared bowls. Tip: For an extra touch of freshness, squeeze a little lime juice over the tuna before serving.
- Sprinkle the bowls with toasted sesame seeds and sliced green onions. Tip: If you like a bit of crunch, add some crispy fried onions on top.
Every bite of this poke bowl is a burst of freshness, with the creamy avocado balancing the spicy, savory tuna perfectly. I love serving it with a side of seaweed salad for an extra oceanic flavor, or sometimes I’ll swap the rice for quinoa for a healthier twist.
Tahitian Poisson Cru
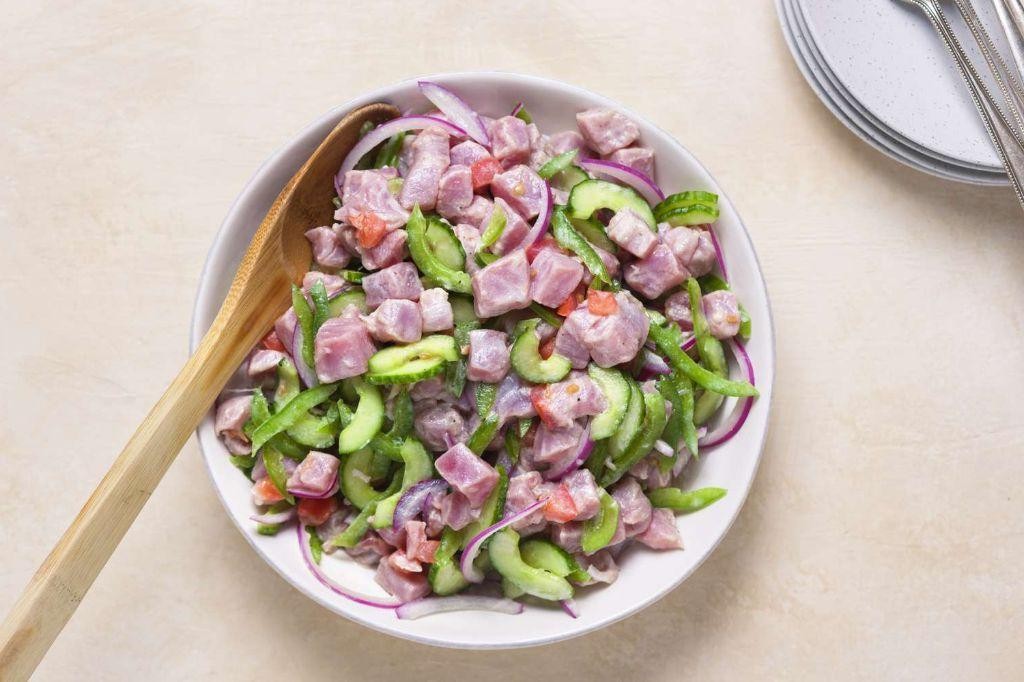
Wandering through the vibrant markets of Tahiti last summer, I stumbled upon a dish that stole my heart—Poisson Cru. It’s a refreshing, citrus-marinated fish salad that’s as simple to make as it is delicious. Today, I’m sharing my take on this Tahitian classic, perfect for those warm summer evenings when you crave something light yet satisfying.
Ingredients
- For the marinade:
- 1 lb fresh ahi tuna, cubed
- 1 cup fresh lime juice
- 1/2 cup coconut milk
- 1 tbsp olive oil
- For the salad:
- 1 cucumber, diced
- 1 tomato, diced
- 1/2 red onion, thinly sliced
- 1/4 cup chopped cilantro
- Salt to taste
Instructions
- In a large bowl, combine the cubed ahi tuna with lime juice, ensuring all pieces are fully submerged. Let it marinate in the refrigerator for 15 minutes, or until the tuna turns opaque.
- While the tuna marinates, prepare the salad by mixing cucumber, tomato, red onion, and cilantro in a separate bowl.
- Drain the lime juice from the tuna, reserving 2 tablespoons for the dressing.
- In a small bowl, whisk together the reserved lime juice, coconut milk, and olive oil to create the dressing.
- Gently fold the dressing into the marinated tuna until evenly coated.
- Combine the dressed tuna with the prepared salad vegetables, tossing lightly to mix.
- Season with salt to taste, and let the dish sit for 5 minutes before serving to allow the flavors to meld.
Marvel at the vibrant colors and fresh flavors of this Tahitian Poisson Cru. The creamy coconut milk balances the acidity of the lime, while the crisp vegetables add a delightful crunch. Serve it in a hollowed-out coconut shell for an authentic island experience that’ll transport your taste buds straight to Tahiti.
Samoan Palusami
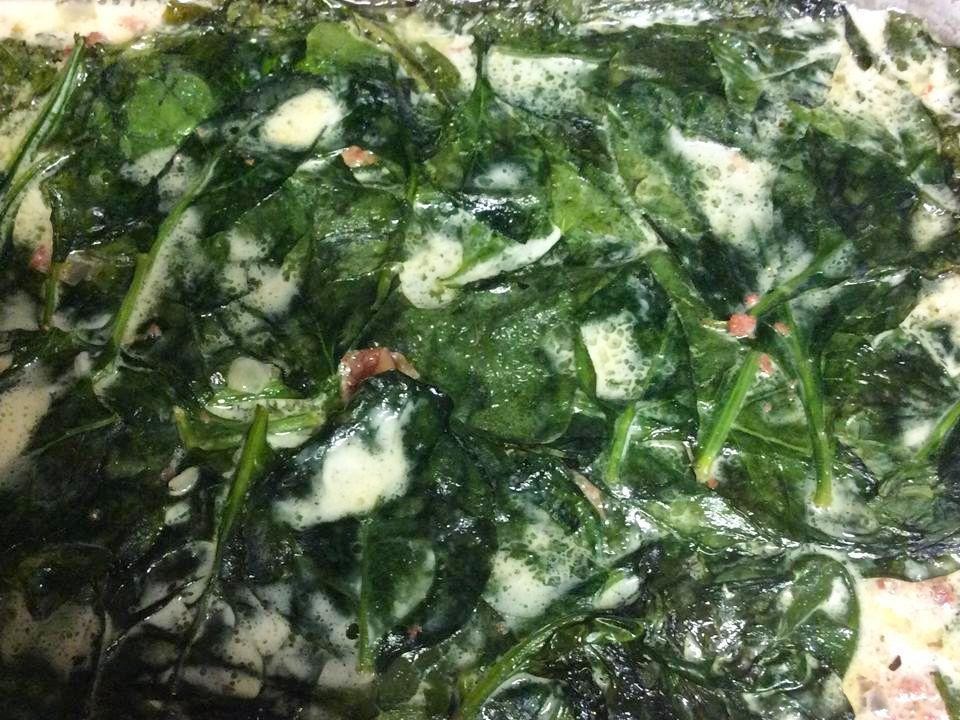
Very few dishes transport me back to my childhood like Samoan Palusami does. It’s a humble yet rich dish that reminds me of family gatherings where the aroma of coconut milk and taro leaves filled the air. Today, I’m excited to share how you can bring this taste of the Pacific into your kitchen.
Ingredients
- For the filling:
- 2 cups young taro leaves, washed and stems removed
- 1 cup coconut milk
- 1 onion, thinly sliced
- For wrapping:
- Banana leaves or aluminum foil for wrapping
Instructions
- Preheat your oven to 350°F (175°C) to prepare for baking the Palusami.
- Layer the taro leaves in a bowl, sprinkling sliced onions between each layer. This ensures every bite is flavorful.
- Pour the coconut milk over the layered leaves and onions, making sure they’re well coated. The coconut milk is the soul of this dish, so don’t skimp!
- Cut banana leaves into large squares (about 12×12 inches) and briefly pass them over an open flame to make them pliable. If using aluminum foil, skip this step.
- Spoon the taro leaf mixture onto the center of each banana leaf or foil square, then fold the edges to create a tight parcel. This keeps the flavors locked in during cooking.
- Place the parcels on a baking tray and bake in the preheated oven for 45 minutes. The leaves should be tender, and the coconut milk thickened.
- Let the Palusami rest for 5 minutes before unwrapping to serve. This allows the flavors to meld beautifully.
Enjoy the Palusami as is, or pair it with grilled fish for a complete meal. The creamy coconut milk and tender taro leaves create a dish that’s both comforting and exotic. Every bite is a reminder of the simple pleasures in life.
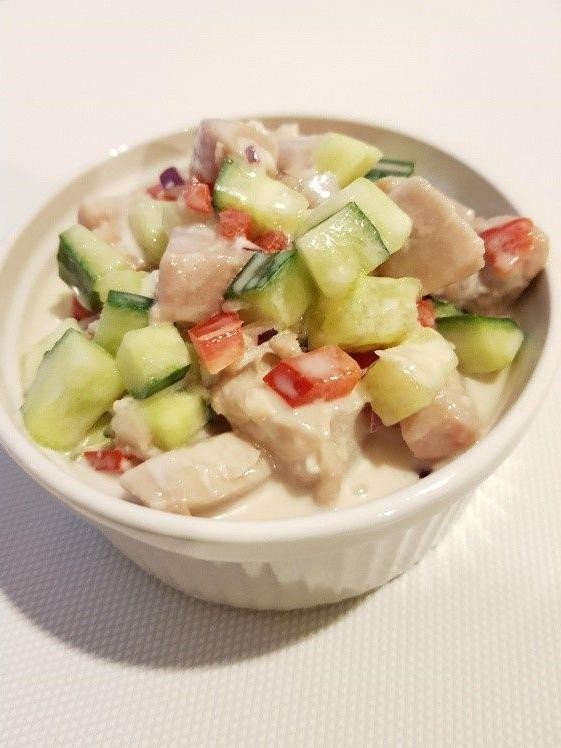
Fijian Kokoda

Every time I think about Fijian Kokoda, I’m transported back to a sunny afternoon in Fiji, where I first tasted this refreshing dish. It’s a perfect blend of fresh fish, creamy coconut milk, and zesty lime, making it an ideal summer treat. I love how it’s both light and satisfying, a dish that brings a piece of tropical paradise to your table.
Ingredients
- For the fish:
- 1 lb fresh white fish (like snapper or mahi-mahi), cut into 1-inch cubes
- 1 cup lime juice
- For the coconut mixture:
- 1 cup coconut milk
- 1 small red onion, thinly sliced
- 1 small cucumber, diced
- 1 tomato, diced
- 1 green chili, finely chopped (optional)
- Salt, to taste
Instructions
- Place the fish cubes in a bowl and pour the lime juice over them, ensuring all pieces are fully submerged. Cover and refrigerate for 4 hours, or until the fish turns opaque and ‘cooked’ by the lime juice.
- Drain the lime juice from the fish and gently squeeze out any excess juice.
- In a separate bowl, mix the coconut milk, red onion, cucumber, tomato, green chili (if using), and salt until well combined.
- Add the fish to the coconut mixture and stir gently to combine, being careful not to break the fish pieces.
- Cover and refrigerate for at least 1 hour before serving to allow the flavors to meld.
Marvel at the creamy texture and vibrant flavors of this Fijian Kokoda, a dish that’s as beautiful to look at as it is delicious to eat. Serve it in a coconut shell for an authentic touch or with a side of steamed rice to soak up all the delicious coconut milk.
Tongan Lu Pulu
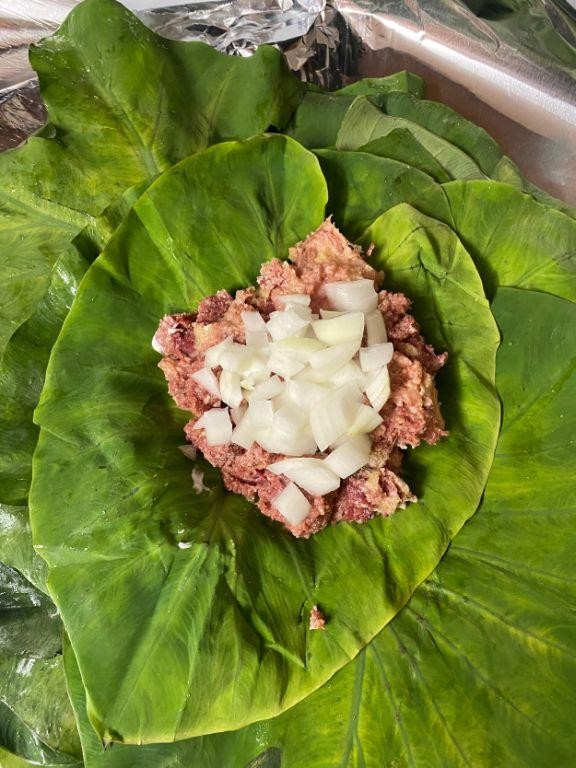
First discovered during my travels to the Pacific, Tongan Lu Pulu has become a cherished dish in my kitchen, especially for gatherings. Its rich flavors and hearty ingredients make it a perfect comfort food that tells a story of tradition and warmth.
Ingredients
- For the meat: 2 lbs corned beef, 1 cup coconut milk, 1 onion (sliced), 2 tomatoes (diced)
- For the wrapping: 4 large taro leaves (or spinach leaves as an alternative), aluminum foil
Instructions
- Preheat your oven to 350°F (175°C) to ensure it’s ready for baking.
- In a large bowl, combine the corned beef, coconut milk, sliced onion, and diced tomatoes. Mix thoroughly to blend the flavors.
- Lay out a piece of aluminum foil and place a taro leaf on top. Spoon a generous portion of the meat mixture onto the center of the leaf.
- Fold the taro leaf over the mixture, then wrap the aluminum foil around it tightly to seal. Repeat with the remaining leaves and mixture.
- Place the wrapped parcels on a baking tray and bake in the preheated oven for 1 hour. Tip: Check after 45 minutes to ensure the leaves are not burning.
- Carefully open one parcel to check if the meat is tender and the flavors have melded together. Tip: The aroma should be rich and inviting.
- Serve the Lu Pulu parcels directly in their foil for a dramatic unwrapping at the table. Tip: Accompany with a side of steamed rice to soak up the delicious juices.
Out of the oven, Tongan Lu Pulu offers a succulent texture with the corned beef meltingly tender, enveloped in the creamy coconut sauce. The taro leaves impart a subtle earthiness, making each bite a harmonious blend of flavors. For an authentic experience, serve it on a banana leaf and eat with your hands, embracing the communal spirit of Tongan dining.
Maori Hangi
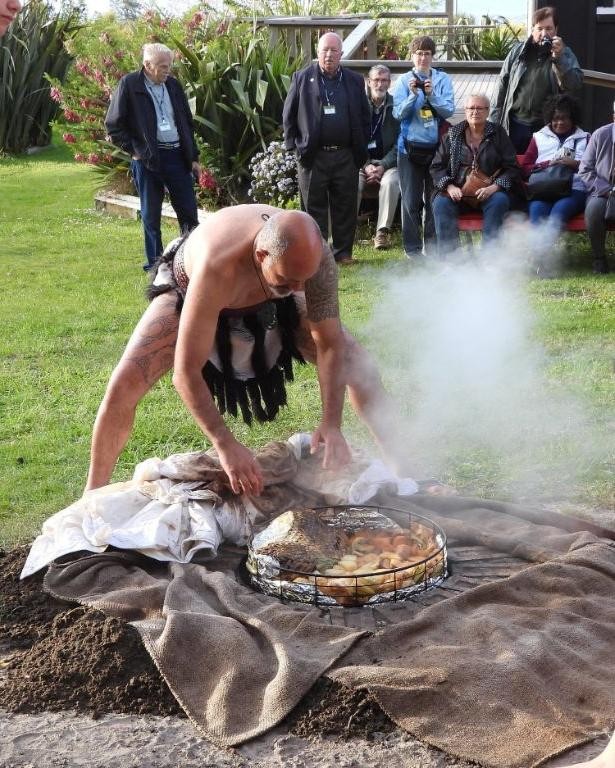
Yesterday, I stumbled upon a traditional Maori Hangi at a cultural festival, and the earthy, smoky flavors instantly transported me to New Zealand. It’s a communal dish cooked underground, and I’ve been obsessed with recreating its unique taste at home ever since. Here’s how you can bring this culinary adventure to your backyard.
Ingredients
- For the meat: 2 lbs pork shoulder, 2 lbs chicken thighs
- For the vegetables: 4 large sweet potatoes, 4 carrots, 1 cabbage
- For the wrapping: Banana leaves or aluminum foil
- For the pit: Volcanic rocks, wood for burning
Instructions
- Dig a pit in your backyard approximately 3 feet deep and line the bottom with volcanic rocks.
- Build a fire over the rocks and let it burn for about 2 hours until the rocks are extremely hot.
- While the fire burns, prepare the meat and vegetables by cutting them into large chunks.
- Wrap the meat and vegetables separately in banana leaves or aluminum foil, ensuring they’re tightly sealed to keep the steam in.
- Once the rocks are hot, remove the embers and quickly place the wrapped food on top of the rocks.
- Cover the food with wet cloths or more banana leaves, then fill the pit with soil to trap the heat.
- Let the food cook underground for about 3 hours. The slow cooking process is key to infusing the smoky flavor.
- After 3 hours, carefully uncover the pit and remove the food packages.
- Unwrap the packages and serve the Hangi hot, straight from the earth.
Hearty and deeply flavorful, the Maori Hangi offers a smoky tenderness that’s hard to replicate with conventional cooking methods. Serve it on a large platter for a communal dining experience, or pair it with a crisp salad to balance the richness.
Rarotongan Ika Mata
Craving something fresh and exotic for your summer table? Let me introduce you to Rarotongan Ika Mata, a vibrant Polynesian dish that’s as refreshing as a dip in the ocean. I stumbled upon this recipe during my travels and have been tweaking it to perfection ever since, making it a staple in my summer menu.
Ingredients
- For the fish:
- 1 lb fresh tuna, diced into 1/2-inch cubes
- 1/2 cup lime juice
- For the sauce:
- 1/2 cup coconut milk
- 1 tbsp soy sauce
- 1 tsp grated ginger
- For the garnish:
- 1/2 cup diced cucumber
- 1/4 cup diced red onion
- 1/4 cup chopped cilantro
Instructions
- In a glass bowl, combine the diced tuna and lime juice, ensuring the fish is fully submerged. Cover and refrigerate for 30 minutes to ‘cook’ the fish in the lime juice.
- While the fish is marinating, whisk together the coconut milk, soy sauce, and grated ginger in a small bowl to create the sauce. Set aside.
- After 30 minutes, drain the lime juice from the fish, gently squeezing out excess juice without breaking the fish pieces.
- Fold the sauce into the fish until evenly coated, then gently mix in the cucumber, red onion, and cilantro.
- Chill the mixture for an additional 10 minutes to allow the flavors to meld before serving.
Bright and zesty, this Rarotongan Ika Mata is a celebration of textures and flavors, with the creaminess of coconut milk balancing the acidity of lime. Serve it in coconut shells for an authentic touch that’ll transport your guests straight to the islands.
Polynesian Chicken with Pineapple
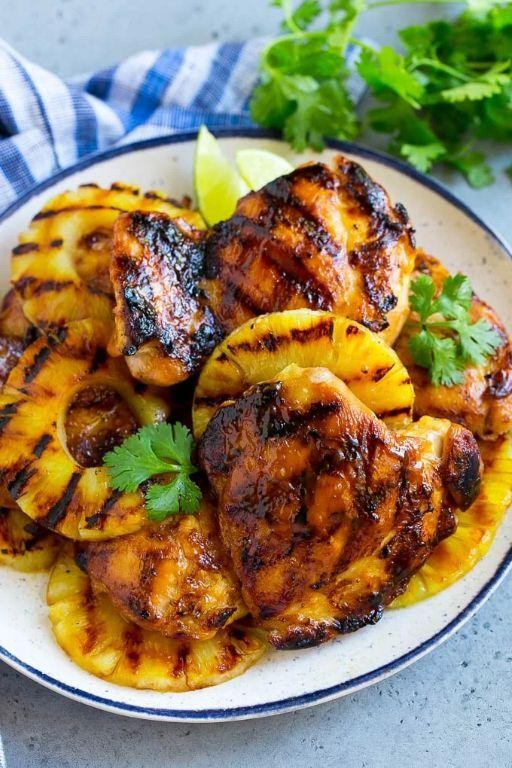
Yesterday, I stumbled upon a recipe that brought back memories of my first trip to Hawaii, where the flavors of the islands captivated my taste buds. This Polynesian Chicken with Pineapple is a delightful way to bring a taste of the tropics into your kitchen, combining sweet and savory in every bite.
Ingredients
- For the marinade:
- 1/2 cup soy sauce
- 1/4 cup brown sugar
- 2 tbsp minced garlic
- 1 tbsp grated ginger
- For the chicken:
- 4 boneless, skinless chicken breasts
- 1 tbsp vegetable oil
- For the topping:
- 1 cup pineapple chunks
- 1/4 cup chopped green onions
Instructions
- In a large bowl, whisk together soy sauce, brown sugar, minced garlic, and grated ginger to create the marinade.
- Add the chicken breasts to the marinade, ensuring they are fully coated. Cover and refrigerate for at least 2 hours, or overnight for deeper flavor.
- Heat vegetable oil in a large skillet over medium-high heat. Remove chicken from marinade, letting excess drip off, and cook for 6-7 minutes on each side until golden brown and internal temperature reaches 165°F.
- While the chicken cooks, reserve 2 tbsp of the marinade. In a small saucepan, bring the reserved marinade to a boil for 1 minute to kill any bacteria, then set aside.
- Once the chicken is cooked, top each breast with pineapple chunks and drizzle with the boiled marinade. Garnish with chopped green onions before serving.
Delightfully, the chicken turns out juicy and flavorful, with the pineapple adding a sweet contrast that’s irresistible. Serve it over a bed of steamed rice to soak up all the delicious sauce, or alongside a crisp salad for a lighter meal.
Hawaiian Shoyu Chicken
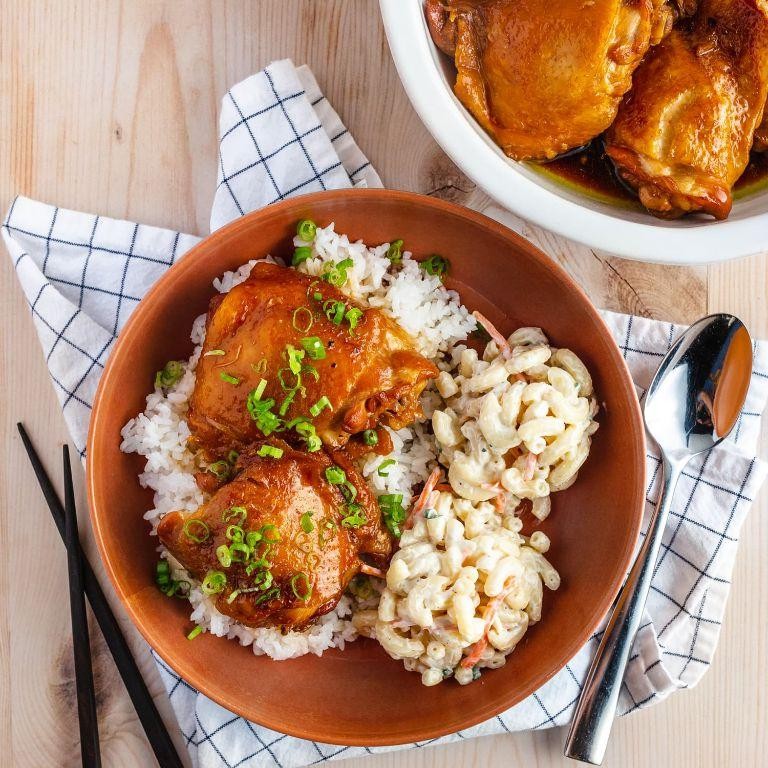
First introduced to me by a friend from Hawaii, this Hawaiian Shoyu Chicken has become a staple in my kitchen for its perfect balance of sweet and savory flavors. It’s the kind of dish that brings a little island warmth to your dinner table, no matter where you are.
Ingredients
- For the marinade:
- 1 cup soy sauce
- 1 cup brown sugar
- 1 cup water
- 4 cloves garlic, minced
- 1 inch ginger, grated
- 1 tbsp sesame oil
- For the chicken:
- 4 lbs chicken thighs, bone-in and skin-on
- 2 green onions, sliced (for garnish)
Instructions
- In a large bowl, whisk together soy sauce, brown sugar, water, minced garlic, grated ginger, and sesame oil to create the marinade.
- Add the chicken thighs to the marinade, ensuring each piece is well coated. Cover and refrigerate for at least 4 hours, or overnight for deeper flavor.
- Preheat your grill to medium-high heat (about 375°F) or prepare your oven to bake at 375°F if grilling isn’t an option.
- Remove the chicken from the marinade, letting excess drip off. Reserve the marinade for basting.
- Grill the chicken for about 6-7 minutes per side, basting occasionally with the reserved marinade, until the internal temperature reaches 165°F and the skin is caramelized and slightly charred.
- If baking, place the chicken on a lined baking sheet and bake for 25-30 minutes, basting halfway through, until the internal temperature reaches 165°F.
- Garnish with sliced green onions before serving.
The caramelized edges of the chicken offer a delightful contrast to the tender, juicy meat inside, infused with the rich flavors of the marinade. Serve it over a bed of steamed rice with a side of macaroni salad for a truly Hawaiian experience.
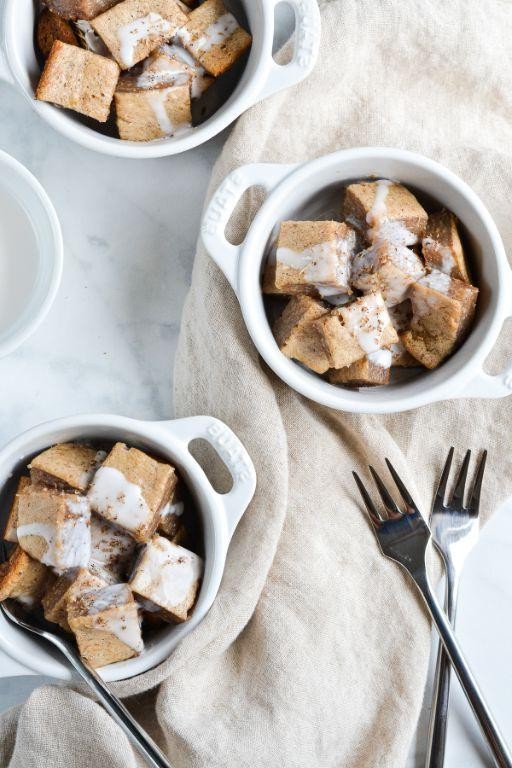
Tahitian Vanilla Pudding
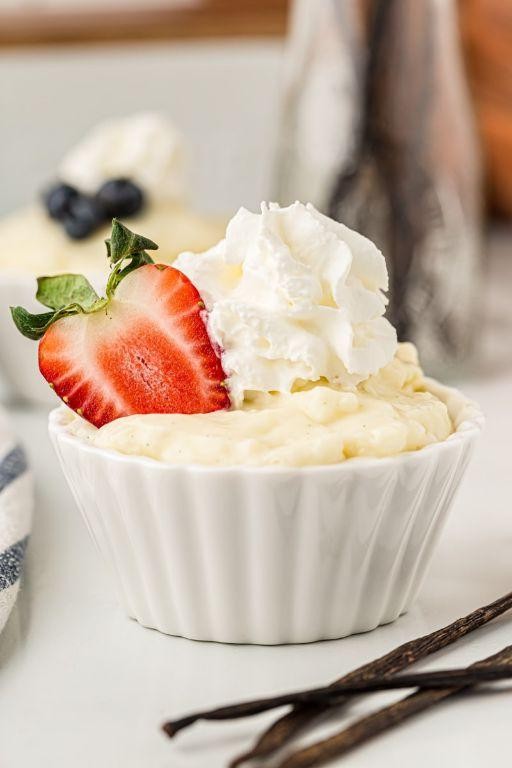
Sometimes, the simplest desserts bring the most comfort, and this Tahitian Vanilla Pudding is no exception. I remember the first time I made it, the aroma of vanilla filled my kitchen, turning an ordinary evening into something special. It’s a recipe that’s as easy to make as it is delightful to eat, perfect for those nights when you crave something sweet but don’t want to spend hours in the kitchen.
Ingredients
- For the pudding:
- 2 cups whole milk
- 1/2 cup granulated sugar
- 1/4 cup cornstarch
- 1/8 teaspoon salt
- 2 teaspoons Tahitian vanilla extract
- 1 tablespoon unsalted butter
Instructions
- In a medium saucepan, whisk together 1 1/2 cups of the whole milk, granulated sugar, cornstarch, and salt until no lumps remain.
- Place the saucepan over medium heat and cook, stirring constantly with a wooden spoon, until the mixture begins to thicken, about 5 minutes.
- Once thickened, reduce the heat to low and continue to cook for another 2 minutes, stirring constantly to prevent the pudding from sticking to the bottom of the pan.
- Remove the saucepan from the heat and stir in the remaining 1/2 cup of whole milk, Tahitian vanilla extract, and unsalted butter until the butter is completely melted and the pudding is smooth.
- Pour the pudding into four individual serving dishes or one large bowl.
- Cover the pudding with plastic wrap, pressing it directly onto the surface to prevent a skin from forming, and refrigerate for at least 2 hours, or until set.
Light and creamy with a rich vanilla flavor, this pudding is a dream come true for vanilla lovers. Serve it with a sprinkle of cinnamon or fresh berries for an extra touch of elegance.
Samoan Coconut Bread

Delving into the heart of Samoan cuisine brings me to this irresistible Coconut Bread, a staple that’s as comforting as it is exotic. I remember stumbling upon this recipe during a beachside potluck in Hawaii, where the sweet aroma of coconut and the bread’s tender crumb won me over instantly.
Ingredients
- For the dough:
- 4 cups all-purpose flour
- 1 cup sugar
- 1 tbsp baking powder
- 1/2 tsp salt
- 1 can (13.5 oz) coconut milk
- 1/2 cup water
- 2 eggs, beaten
- For the topping:
- 1/2 cup shredded coconut
- 2 tbsp melted butter
Instructions
- Preheat your oven to 350°F (175°C) and grease a 9×5 inch loaf pan.
- In a large bowl, whisk together the flour, sugar, baking powder, and salt.
- Make a well in the center of the dry ingredients and pour in the coconut milk, water, and beaten eggs. Mix until just combined; overmixing can make the bread tough.
- Pour the batter into the prepared loaf pan and smooth the top with a spatula.
- Sprinkle the shredded coconut evenly over the batter, then drizzle with melted butter.
- Bake for 60-70 minutes, or until a toothpick inserted into the center comes out clean. The top should be golden brown.
- Let the bread cool in the pan for 10 minutes, then transfer to a wire rack to cool completely.
Now, this bread is a dream with its moist interior and slightly crispy coconut topping. I love serving it thickly sliced with a dab of butter or alongside a cup of strong coffee for a truly indulgent breakfast.
Fijian Cassava Cake
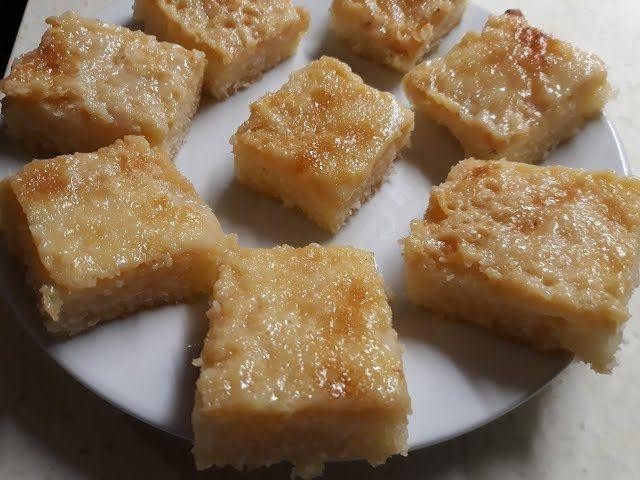
Perfect for those who love exploring global desserts, Fijian Cassava Cake is a tropical treat that’s both gluten-free and irresistibly chewy. I first stumbled upon this gem during a friend’s potluck, and its unique texture had me hooked—now, it’s my go-to for summer gatherings.
Ingredients
- For the cake:
- 2 cups grated cassava
- 1 cup coconut milk
- 1/2 cup sugar
- 2 eggs, beaten
- 1/4 cup melted butter
- 1 tsp vanilla extract
- For the topping:
- 1/4 cup coconut milk
- 2 tbsp sugar
- 1/4 tsp vanilla extract
Instructions
- Preheat your oven to 350°F (175°C) and grease an 8-inch square baking pan.
- In a large bowl, mix the grated cassava, 1 cup coconut milk, 1/2 cup sugar, beaten eggs, melted butter, and 1 tsp vanilla extract until well combined. Tip: For extra smoothness, blend the cassava before mixing.
- Pour the mixture into the prepared pan and bake for 45 minutes, or until the edges start to pull away from the pan. Tip: The center should still be slightly jiggly for the perfect texture.
- While the cake bakes, prepare the topping by combining 1/4 cup coconut milk, 2 tbsp sugar, and 1/4 tsp vanilla extract in a small saucepan. Heat over low until the sugar dissolves, then set aside.
- Once the cake is baked, pour the topping evenly over the hot cake. Tip: Use a brush to spread the topping if needed for even coverage.
- Broil the cake for 2-3 minutes, or until the topping bubbles and turns golden brown. Watch closely to prevent burning.
- Allow the cake to cool completely before slicing to let the texture set properly.
Delightfully chewy with a crispy, caramelized top, this Fijian Cassava Cake is a tropical escape in every bite. Serve it with a scoop of coconut ice cream for an extra indulgent treat.
Tongan Faikakai Topai
Venturing into the flavors of Tonga brings me to a dish that’s close to my heart, Faikakai Topai. It’s a simple yet profound dumpling dessert that reminds me of the first time I tried it at a friend’s potluck, where its sweet, coconutty goodness stood out amidst a sea of dishes. Today, I’m sharing my take on this Tongan classic, perfect for those who adore desserts that are not overly complicated but rich in flavor.
Ingredients
- For the dumplings:
- 2 cups all-purpose flour
- 1/2 cup water
- 1/4 tsp salt
- For the coconut sauce:
- 1 can (13.5 oz) coconut milk
- 1/2 cup brown sugar
- 1/2 tsp vanilla extract
Instructions
- In a large mixing bowl, combine the all-purpose flour and salt. Gradually add water, mixing until a dough forms. Tip: The dough should be soft but not sticky; adjust with a little more flour or water as needed.
- Divide the dough into small pieces and roll each into a ball, about the size of a walnut. Tip: Keep the dough covered with a damp cloth to prevent it from drying out while you work.
- Bring a large pot of water to a boil over high heat. Gently drop the dough balls into the boiling water and cook for about 5 minutes, or until they float to the surface. Tip: Don’t overcrowd the pot; cook in batches if necessary.
- While the dumplings cook, prepare the coconut sauce. In a saucepan over medium heat, combine the coconut milk, brown sugar, and vanilla extract. Stir continuously until the sugar dissolves and the sauce slightly thickens, about 5 minutes.
- Once the dumplings are cooked, drain them and immediately toss them in the warm coconut sauce until well coated.
Lightly sweet and incredibly comforting, these Faikakai Topai dumplings are a delightful treat. Serve them warm for the best experience, perhaps with a sprinkle of toasted coconut on top for an extra layer of texture and flavor.
Maori Rewena Bread
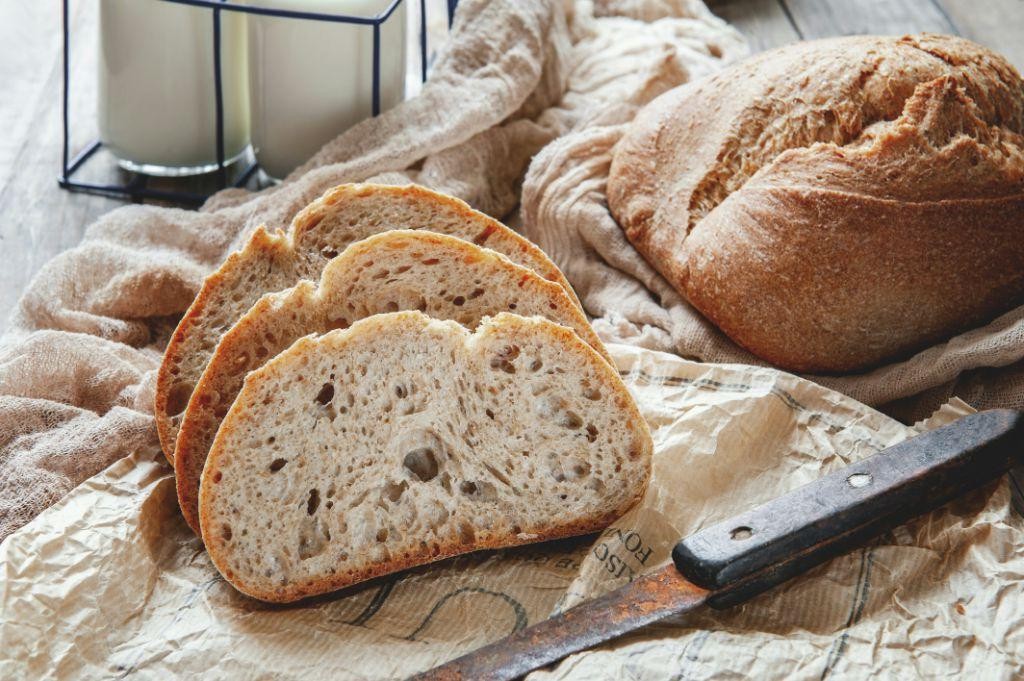
Baking has always been my escape, and there’s nothing quite like the smell of fresh bread filling the house. Today, I’m excited to share with you a traditional Maori Rewena Bread, a sourdough potato bread that’s both hearty and slightly tangy, perfect for those who love a rustic loaf with a story.
Ingredients
- For the starter:
- 1 cup mashed potatoes, cooled
- 1/2 cup sugar
- 2 cups flour
- 1 cup water, lukewarm
- For the dough:
- 4 cups flour
- 1 tsp salt
- 1/2 cup sugar
- 1/2 cup butter, melted
- 1 cup starter (from above)
Instructions
- To make the starter, mix mashed potatoes, sugar, flour, and water in a large bowl. Cover with a cloth and let it ferment in a warm place for 24 hours until bubbly.
- For the dough, combine flour, salt, and sugar in a large mixing bowl. Make a well in the center and pour in the melted butter and 1 cup of the starter.
- Mix until a soft dough forms, then turn onto a floured surface and knead for 10 minutes until smooth and elastic. Tip: The dough should be slightly sticky but manageable with floured hands.
- Place the dough in a greased bowl, cover, and let rise in a warm place for 2 hours or until doubled in size.
- Punch down the dough, shape into a loaf, and place in a greased loaf pan. Cover and let rise for another hour. Tip: For a crustier top, brush the loaf with water before baking.
- Preheat the oven to 350°F and bake the loaf for 40-45 minutes until golden brown and sounds hollow when tapped. Tip: To ensure even baking, rotate the pan halfway through.
This Maori Rewena Bread has a delightful chewy texture with a subtle sweetness and tang. Serve it warm with a slather of butter or alongside your favorite soup for a comforting meal.
Rarotongan Banana Po’e
After my trip to the Cook Islands, I couldn’t wait to recreate the comforting Rarotongan Banana Po’e I fell in love with. It’s a simple, yet exotic dessert that brings a taste of the tropics to your kitchen, and today, I’m sharing my version with you.
Ingredients
- For the banana mixture:
- 4 ripe bananas, mashed
- 1 cup coconut milk
- 1/2 cup sugar
- For the topping:
- 1/4 cup cornstarch
- 1/4 cup water
Instructions
- In a medium saucepan, combine the mashed bananas, coconut milk, and sugar over medium heat.
- Stir the mixture constantly for about 5 minutes, until the sugar has completely dissolved and the bananas are well incorporated into the coconut milk.
- In a small bowl, mix the cornstarch and water to create a smooth slurry.
- Gradually add the cornstarch slurry to the banana mixture, stirring continuously to prevent lumps.
- Cook the mixture for another 5 minutes, or until it thickens to a pudding-like consistency. Tip: If the mixture seems too thick, you can add a little more coconut milk to reach your desired consistency.
- Remove the saucepan from the heat and let the po’e cool slightly before serving. Tip: For an extra touch of flavor, sprinkle some toasted coconut flakes on top before serving.
- Serve the banana po’e warm or chilled, according to your preference. Tip: This dessert pairs wonderfully with a scoop of vanilla ice cream for a contrast in temperatures and textures.
Delightfully creamy with a subtle sweetness, this Rarotongan Banana Po’e is a testament to how simple ingredients can create something truly special. Whether you’re reminiscing about island adventures or just in the mood for something different, this dessert is sure to transport your taste buds.
Polynesian Sweet Potato Mash
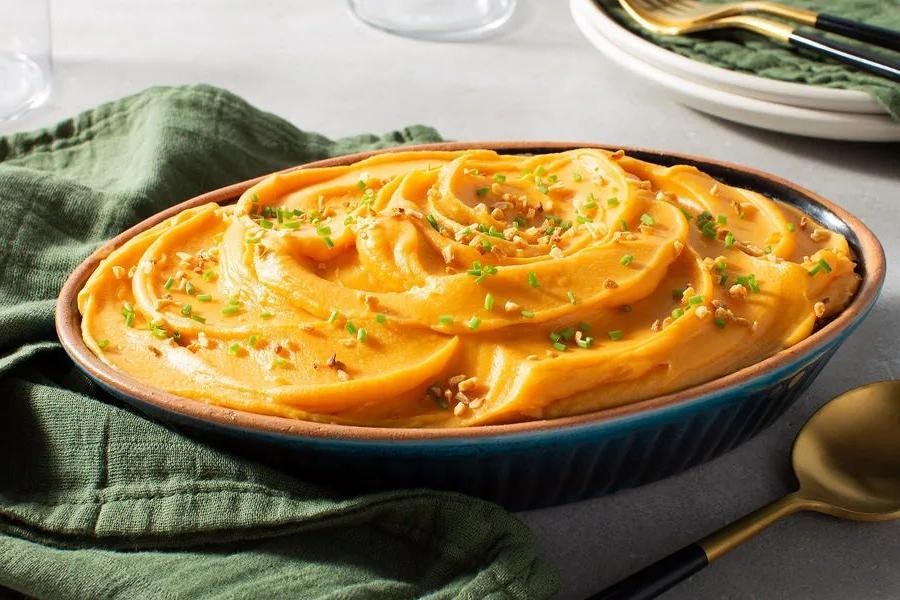
Last weekend, I stumbled upon the most vibrant sweet potatoes at the farmers’ market, sparking the idea for this Polynesian-inspired mash. It’s a twist on the classic that brings a tropical flair to your dinner table, perfect for those evenings when you’re craving something both comforting and exciting.
Ingredients
- For the mash:
- 2 large sweet potatoes, peeled and cubed
- 1/2 cup coconut milk
- 2 tbsp unsalted butter
- 1 tbsp brown sugar
- 1/2 tsp vanilla extract
- 1/4 tsp salt
- For the topping:
- 1/4 cup toasted coconut flakes
- 1 tbsp chopped macadamia nuts
Instructions
- Preheat your oven to 400°F (200°C). Place the sweet potato cubes on a baking sheet and roast for 25 minutes, or until they’re fork-tender.
- Transfer the roasted sweet potatoes to a large mixing bowl. Add the coconut milk, butter, brown sugar, vanilla extract, and salt.
- Using a potato masher or an electric mixer, blend the ingredients until smooth. Tip: For extra creaminess, warm the coconut milk before adding it to the potatoes.
- Toast the coconut flakes in a dry skillet over medium heat for 2-3 minutes, stirring constantly until golden. Tip: Keep a close eye on them to prevent burning.
- Serve the mash warm, topped with the toasted coconut flakes and chopped macadamia nuts. Tip: A drizzle of honey can add an extra layer of sweetness if desired.
Rich and velvety with a hint of tropical sweetness, this mash is a delightful departure from the ordinary. Try pairing it with grilled fish or chicken for a meal that transports you straight to the islands.
Hawaiian Haupia
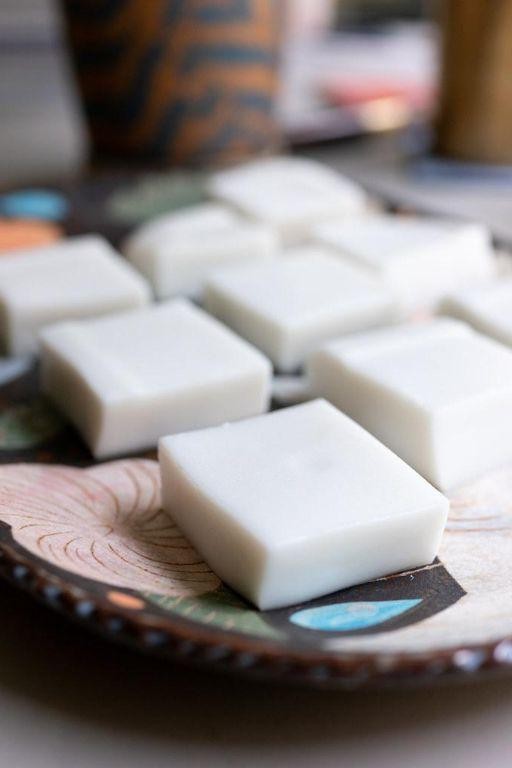
Discovering Hawaiian Haupia was a game-changer for my summer dessert repertoire. Its creamy, coconutty goodness reminds me of the first time I tasted it at a beachside luau, and now, I love making it for family gatherings to bring a taste of the islands to our backyard.
Ingredients
- For the Haupia:
- 2 cups coconut milk
- 1 cup water
- 1/2 cup sugar
- 1/2 cup cornstarch
Instructions
- In a medium saucepan, combine 1 cup of coconut milk and water over medium heat. Heat until the mixture is warm but not boiling, about 3 minutes.
- In a separate bowl, mix the sugar and cornstarch with the remaining 1 cup of coconut milk until smooth. This prevents lumps in your Haupia.
- Slowly whisk the cornstarch mixture into the warm coconut milk and water in the saucepan. Tip: Constant whisking is key to a smooth texture.
- Continue to cook the mixture over medium heat, stirring constantly, until it thickens to a pudding-like consistency, about 5-7 minutes. Tip: The Haupia is ready when it coats the back of a spoon.
- Pour the thickened Haupia into a greased 8×8 inch dish. Smooth the top with a spatula for an even layer.
- Refrigerate the Haupia for at least 2 hours, or until set. Tip: For quicker setting, place it in the freezer for the first 30 minutes before transferring to the fridge.
Just like that, you’ve got a silky, coconut-infused dessert that’s perfect on its own or layered with fresh fruit for a tropical twist. The texture is luxuriously smooth, making each bite a little escape to Hawaii.
Conclusion
We hope these 18 Exotic Polynesian recipes inspire your next culinary adventure! Each dish offers a unique taste of the islands, perfect for spicing up your meal rotation. Don’t forget to try your favorites, share your experiences in the comments, and pin this article on Pinterest to spread the aloha spirit. Happy cooking!