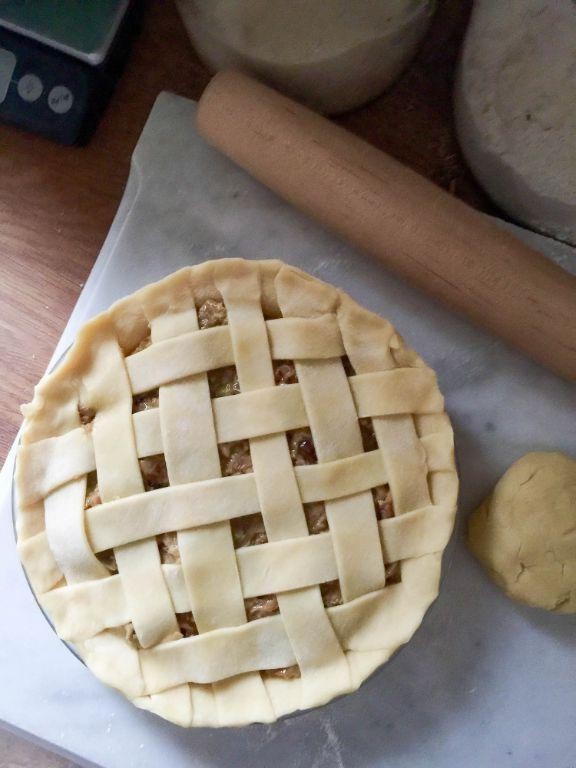
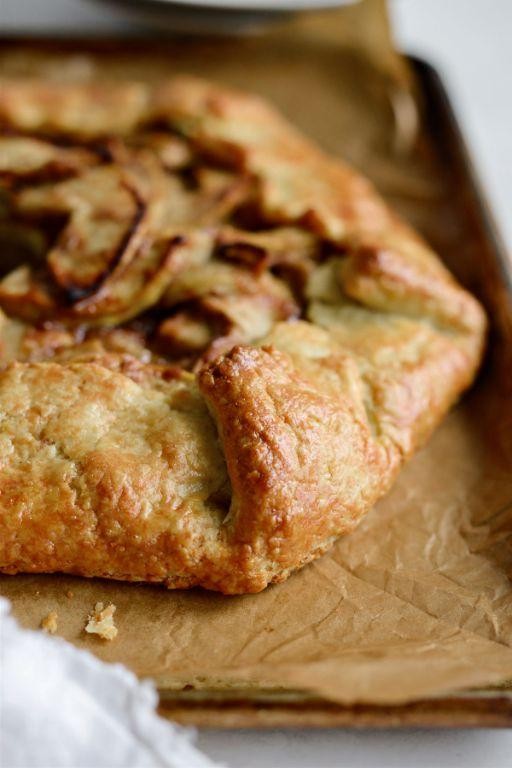
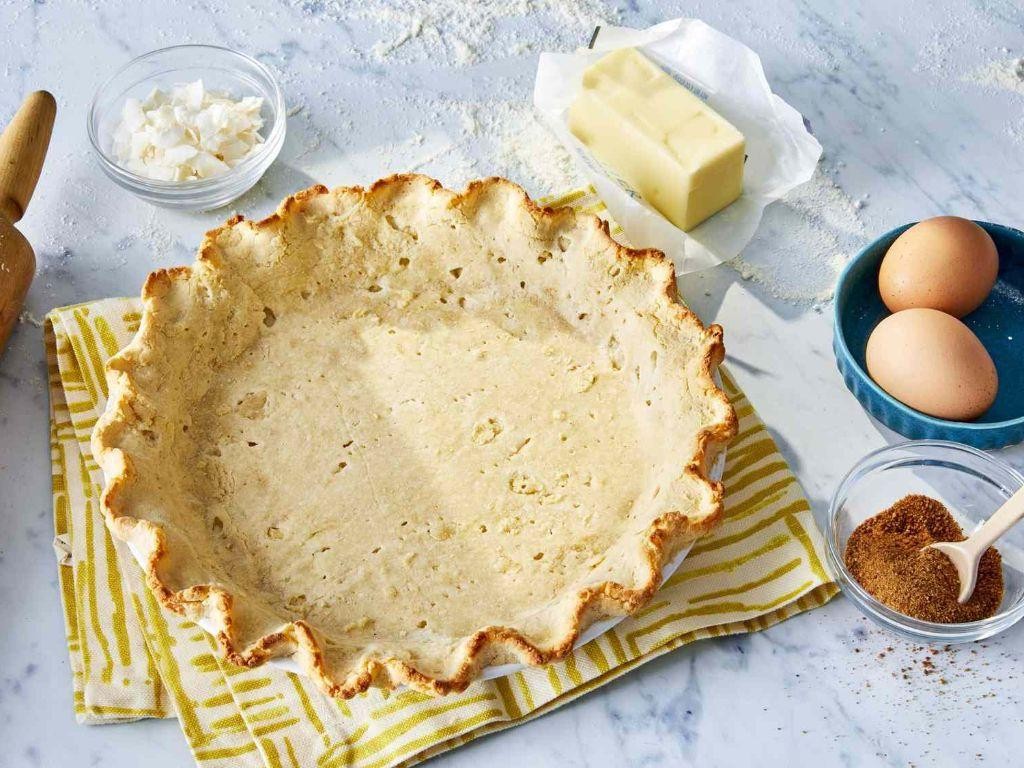
There’s something undeniably magical about a flaky, buttery pie crust that crumbles just right with every bite. Whether you’re whipping up a quick weeknight dinner, celebrating seasonal favorites, or indulging in the ultimate comfort food, mastering the perfect pie crust is a game-changer. Dive into our roundup of 18 Flaky Pie Crust Recipes that promise to elevate your baking from good to unforgettable. Let’s get baking!
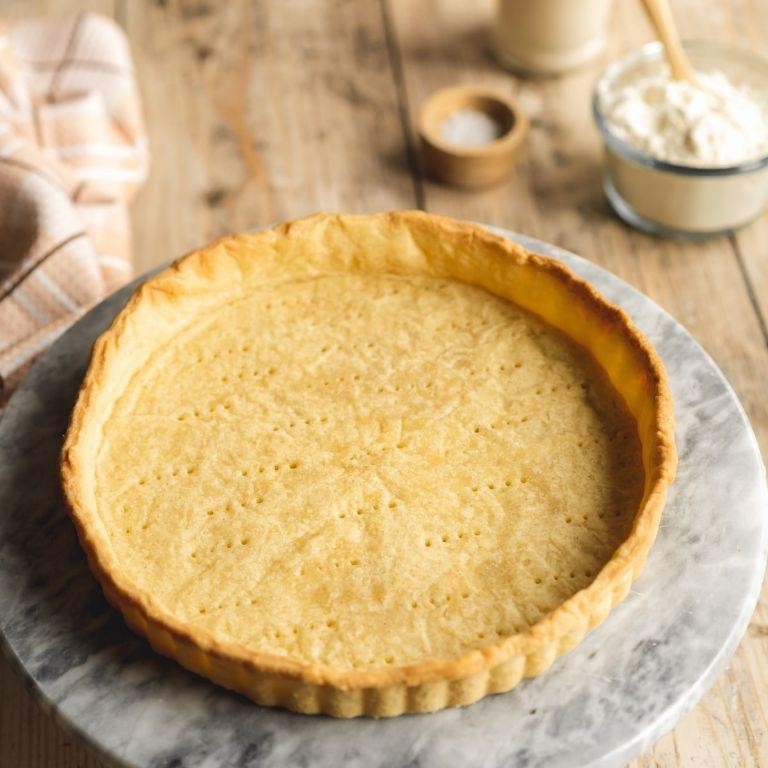
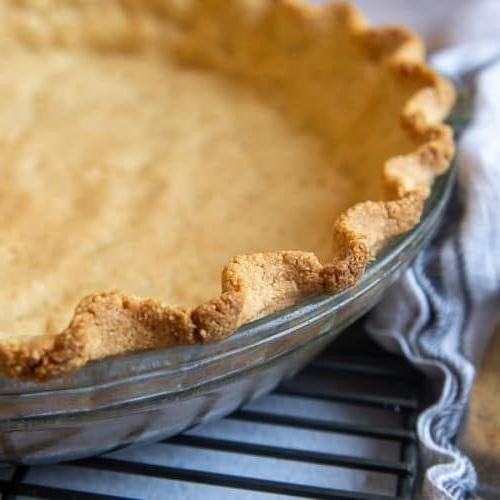
Classic Butter Pie Crust
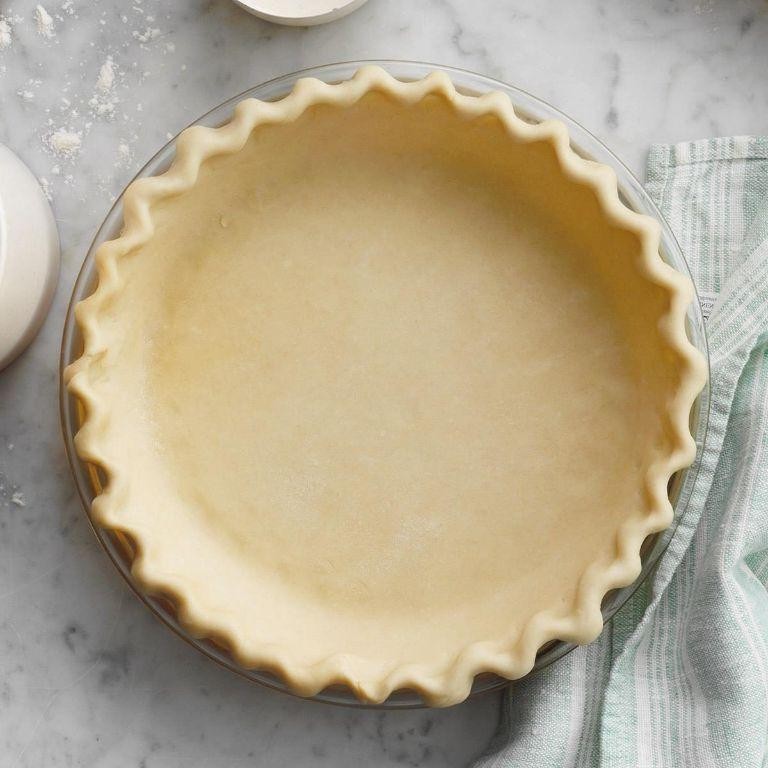
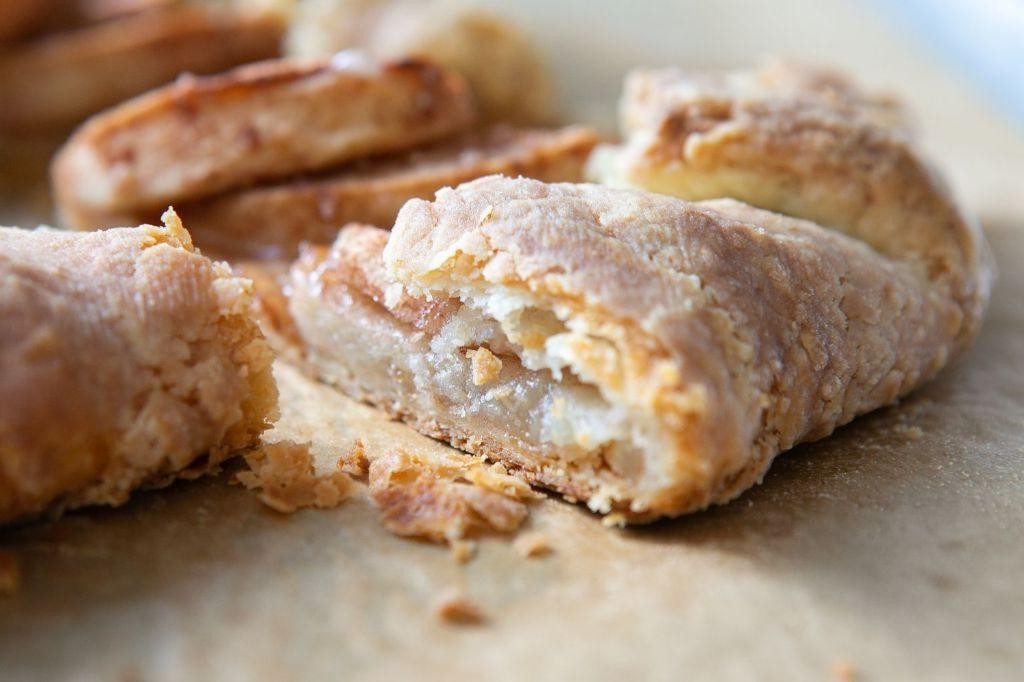
Mmm, nothing says ‘I love carbs’ quite like a buttery, flaky pie crust that’s begging to be filled with your favorite sweet or savory goodness. Whether you’re a pie newbie or a seasoned baker, this classic butter pie crust is your ticket to pastry paradise—no passport required.
Ingredients
- Flour – 2 ½ cups
- Salt – 1 tsp
- Butter – 1 cup, chilled and cubed
- Ice water – 6-8 tbsp
Instructions
- In a large bowl, whisk together the flour and salt until well combined.
- Add the chilled, cubed butter to the flour mixture. Using a pastry cutter or your fingers, work the butter into the flour until the mixture resembles coarse crumbs with some pea-sized butter pieces remaining.
- Drizzle 6 tablespoons of ice water over the mixture. Gently stir with a fork until the dough begins to come together. If needed, add more water, 1 tablespoon at a time, until the dough holds together when pressed.
- Turn the dough out onto a lightly floured surface. Divide it in half and shape each half into a disk. Wrap each disk tightly in plastic wrap and refrigerate for at least 1 hour, or up to 2 days.
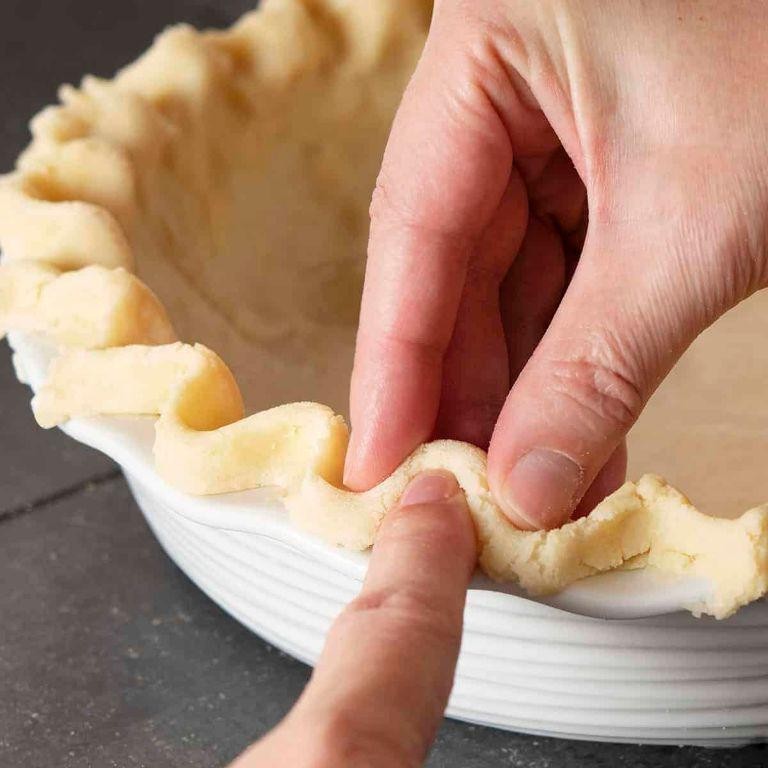
- Preheat your oven to 375°F. On a lightly floured surface, roll out one disk of dough to fit your pie dish. Transfer the dough to the dish, trim the edges, and crimp as desired.
- For a pre-baked crust, line the dough with parchment paper and fill with pie weights or dried beans. Bake for 15 minutes, then remove the weights and parchment and bake for another 10-15 minutes, until golden brown.
Just imagine the crisp, buttery layers of this crust cradling a luscious filling—be it apple, pumpkin, or even a quiche. Serve it warm to bask in the glory of your baking prowess, or let it cool to let the flavors shine in a chilled pie. Either way, you’re in for a treat.
Vegan Pie Crust
Today is ‘2025-06-08 05:43:23.170944’, You’re a professional food blogger writing a relatable US-based roundup-style recipe article. Introduce the dish: ‘Vegan Pie Crust’ using the structure below.
Tone: Use a playful, witty voice. Add light humor, bold phrasing, and fun energy throughout.
Write a short 2-3 sentence intro, The first word of your introduction must begin with the letter ‘T’. Do not display the title. Start directly with the introduction.
Ingredients
- Flour – 1 1/4 cups
- Salt – 1/2 tsp
- Vegan butter – 1/2 cup, chilled
- Ice water – 3-4 tbsp
Instructions
- Preheat your oven to 375°F (190°C). Tip: A hot oven is key for a flaky crust, so don’t skimp on the preheating.
- In a large bowl, whisk together the flour and salt. Tip: Sifting the flour can prevent lumps, but it’s not a deal-breaker.
- Cut the chilled vegan butter into small cubes and add to the flour mixture. Use your fingers or a pastry cutter to blend until the mixture resembles coarse crumbs. Tip: Keep your hands cold to prevent the butter from melting.
- Gradually add ice water, 1 tablespoon at a time, mixing until the dough just comes together. Be careful not to overwork it.
- Form the dough into a ball, flatten into a disk, wrap in plastic, and chill for at least 30 minutes. This rest period is crucial for easy rolling.
- On a lightly floured surface, roll the dough out to fit your pie dish. Transfer carefully, trim the edges, and crimp as desired.
- For a pre-baked crust, prick the bottom with a fork, line with parchment, fill with pie weights, and bake for 15 minutes. Remove weights and bake for another 10-15 minutes until golden.
Yield a crust that’s flaky, buttery, and holds up like a champ. Try filling it with a luscious vegan chocolate ganache for a dessert that’ll have everyone fooled.
Gluten-Free Pie Crust
Picture this: a gluten-free pie crust so flaky and buttery, it’ll have your gluten-loving friends questioning their life choices. Perfect for those who dare to defy the wheat norm, this crust is your ticket to pie paradise without the bellyache.
Ingredients
- Gluten-free flour blend – 1 ¼ cups
- Salt – ½ tsp
- Butter (cold, cubed) – ½ cup
- Ice water – 3-4 tbsp
Instructions
- Preheat your oven to 375°F (190°C) because we’re not baking with wishes and dreams.
- In a large bowl, whisk together the gluten-free flour blend and salt like you’re mixing a potion.
- Add the cold, cubed butter to the flour mixture. Use your fingers or a pastry cutter to work the butter into the flour until it resembles coarse crumbs. Pro tip: Keep the butter cold for a flakier crust.
- Drizzle in the ice water, 1 tablespoon at a time, mixing gently until the dough just comes together. Overworking the dough is the enemy of tenderness.
- Gather the dough into a ball, flatten it into a disk, and wrap it in plastic wrap. Chill in the fridge for at least 30 minutes. Patience is key here, folks.
- Roll out the chilled dough on a lightly floured surface to fit your pie dish. Transfer carefully to avoid tears, unless you’re into that rustic look.
- Bake according to your pie recipe’s instructions, or for a pre-baked crust, prick the bottom with a fork and bake for 10-12 minutes until golden. Keep an eye on it; gluten-free crusts can go from golden to gone in a blink.
Just like that, you’ve got a gluten-free pie crust that’s crisp, tender, and ready to cradle your favorite fillings. Serve it up with a scoop of ice cream for a dessert that laughs in the face of dietary restrictions.
Whole Wheat Pie Crust
Ever tried to convince yourself that pie can be healthy? Well, buckle up, buttercup, because this whole wheat pie crust is about to make your dreams (and your taste buds) very happy indeed.
Ingredients
- Whole wheat flour – 1 ¼ cups
- Unsalted butter – ½ cup, chilled and cubed
- Ice water – ¼ cup
- Salt – ½ tsp
Instructions
- In a large bowl, whisk together the whole wheat flour and salt until well combined.
- Add the chilled, cubed butter to the flour mixture. Using your fingertips or a pastry cutter, work the butter into the flour until the mixture resembles coarse crumbs with some pea-sized pieces of butter remaining. Tip: Keeping the butter cold is key to a flaky crust, so work quickly!
- Gradually drizzle in the ice water, 1 tablespoon at a time, stirring with a fork after each addition, until the dough just comes together. Tip: You might not need all the water, so stop when the dough holds together when pinched.
- Turn the dough out onto a lightly floured surface and gently knead it a few times to bring it together into a ball. Flatten the ball into a disk, wrap it in plastic wrap, and refrigerate for at least 1 hour before rolling out. Tip: This rest period allows the gluten to relax, making the dough easier to roll and preventing shrinkage during baking.
- Preheat your oven to 375°F (190°C). Roll out the chilled dough on a floured surface to fit your pie dish, then carefully transfer it to the dish. Trim and crimp the edges as desired.
- For a pre-baked crust, prick the bottom all over with a fork, line with parchment paper, and fill with pie weights or dried beans. Bake for 15 minutes, then remove the weights and parchment and bake for another 5-10 minutes until golden. For a crust to be filled and baked, follow your pie recipe’s instructions.
Kick your pie game up a notch with this crust that’s nutty, tender, and just sturdy enough to hold all your favorite fillings. Serve it with a scoop of vanilla ice cream for a contrast that’s downright heavenly, or go bold with a savory quiche that’ll have everyone asking for seconds.
Shortcrust Pastry
Dive into the buttery, flaky world of shortcrust pastry, where simplicity meets sophistication in a dance of flour and fat. Perfect for pies, tarts, and quiches, this versatile dough is your ticket to baking glory—no fancy skills required, just a willingness to get your hands a little dirty.
Ingredients
- Flour – 2 cups
- Butter – 1 cup, chilled and cubed
- Salt – ½ tsp
- Water – 4 tbsp, ice-cold
Instructions
- Preheat your oven to 375°F (190°C) and lightly flour a clean work surface.
- In a large bowl, combine the flour and salt, whisking them together to ensure even distribution.
- Add the chilled, cubed butter to the flour mixture. Using your fingertips, rub the butter into the flour until the mixture resembles coarse breadcrumbs. Tip: Keep your hands cool to prevent the butter from melting.
- Sprinkle the ice-cold water over the mixture, one tablespoon at a time, gently mixing with a fork until the dough just comes together. Tip: Overworking the dough leads to toughness, so stop as soon as it forms a ball.
- Turn the dough out onto the floured surface and knead lightly into a smooth ball. Flatten into a disc, wrap in plastic, and chill for 30 minutes. Tip: Chilling relaxes the gluten, making the pastry easier to roll and preventing shrinkage during baking.
- Roll out the chilled dough on the floured surface to your desired thickness, then transfer to a pie dish or use as directed in your recipe.
- Bake according to your recipe’s instructions, or if pre-baking, line with parchment, fill with pie weights, and bake for 15 minutes. Remove weights and bake for another 5 minutes until golden.
Just like that, you’ve got a shortcrust pastry that’s crisp, tender, and ready to cradle whatever sweet or savory filling your heart desires. Serve it warm with a scoop of ice cream for a dessert that’ll have everyone asking for seconds, or go savory with a rich, cheesy quiche that’s perfect for brunch.
Sweet Pie Crust

Yikes! Who knew something as simple as a sweet pie crust could be the star of the show? This buttery, flaky masterpiece is the unsung hero of pies, and today, we’re giving it the spotlight it deserves.
Ingredients
- Flour – 1 ¼ cups
- Sugar – 1 tbsp
- Salt – ½ tsp
- Butter – ½ cup, chilled and cubed
- Ice water – 3-4 tbsp
Instructions
- Preheat your oven to 375°F (190°C). A hot oven is key for that perfect golden crust.
- In a large bowl, whisk together flour, sugar, and salt. This ensures your crust is evenly seasoned.
- Add the chilled butter cubes to the flour mixture. Using your fingers or a pastry cutter, work the butter into the flour until the mixture resembles coarse crumbs. Tip: The butter should be cold to ensure flakiness.
- Gradually add ice water, one tablespoon at a time, mixing until the dough just comes together. Overworking the dough leads to toughness.
- Gather the dough into a ball, flatten into a disk, and wrap in plastic. Chill in the fridge for at least 30 minutes. This rest period relaxes the gluten, making the crust tender.
- On a floured surface, roll out the dough to fit your pie dish. Transfer carefully to avoid tearing.
- Trim and crimp the edges as desired. For a decorative touch, use a fork or your fingers to create a pattern.
- Bake for 15-20 minutes, or until the crust is lightly golden. Keep an eye on it; nobody likes a burnt offering.
This crust is a dream—crisp, buttery, and just sweet enough to complement any filling. Try it with a dollop of whipped cream or a scoop of vanilla ice cream for a match made in dessert heaven.
Savory Pie Crust
You’ve probably been in a pie crust predicament before—too crumbly, too tough, or just plain blah. Let’s turn that frown upside down with a Savory Pie Crust that’s as foolproof as it is flavorful. Ready to roll? Let’s dough this!
Ingredients
- Flour – 2 cups
- Butter – 1 cup, chilled and cubed
- Salt – 1 tsp
- Ice water – 4 tbsp
Instructions
- Preheat your oven to 375°F—because patience is a virtue, but preheating is a must.
- In a large bowl, whisk together the flour and salt like you’re mixing a potion for the perfect crust.
- Add the chilled butter cubes to the bowl. Use your fingers or a pastry cutter to work the butter into the flour until the mixture resembles coarse crumbs. Tip: Keep those butter pieces pea-sized for a flakier crust.
- Drizzle in the ice water, one tablespoon at a time, mixing gently with a fork after each addition. Stop when the dough just comes together. Tip: Overworking the dough is the enemy of tenderness.
- Gather the dough into a ball, flatten it into a disk, and wrap it in plastic. Chill in the fridge for at least 30 minutes. Tip: This rest period relaxes the gluten, making your crust easier to roll and more tender to bite.
- On a lightly floured surface, roll the dough out to fit your pie dish. Transfer carefully, trim the edges, and crimp as desired.
- For a pre-baked crust, prick the bottom with a fork, line with parchment, fill with pie weights or dried beans, and bake for 15 minutes. Remove weights and bake for another 10 minutes until golden.
Perfectly flaky and buttery, this Savory Pie Crust is your ticket to pie perfection. Serve it filled with your favorite quiche or pot pie filling, or get adventurous with a savory galette. The crust is your canvas—paint it delicious!
Cheddar Cheese Pie Crust
Alright, let’s dive into the cheesy goodness that is this Cheddar Cheese Pie Crust—because who said pies can’t have a little attitude? This crust is the rebellious cousin of the traditional pie base, packing a punch of flavor that’ll make your taste buds do a happy dance.
Ingredients
- Flour – 1 ¼ cups
- Salt – ½ tsp
- Butter – ½ cup, chilled and cubed
- Cheddar cheese – 1 cup, shredded
- Ice water – 3-4 tbsp
Instructions
- Preheat your oven to 375°F (190°C) to get it ready for the crust.
- In a large bowl, whisk together the flour and salt to ensure even distribution.
- Add the chilled, cubed butter to the flour mixture. Use your fingers or a pastry cutter to blend until the mixture resembles coarse crumbs. Tip: Keep the butter cold for a flakier crust.
- Stir in the shredded cheddar cheese until evenly distributed throughout the mixture.
- Gradually add ice water, one tablespoon at a time, mixing until the dough just comes together. Tip: Don’t overwork the dough to keep it tender.
- Form the dough into a ball, flatten into a disk, wrap in plastic, and chill in the refrigerator for at least 30 minutes. Tip: Chilling relaxes the gluten, making the crust easier to roll.
- On a lightly floured surface, roll the dough out to fit your pie dish. Carefully transfer and press into the dish.
- Trim any excess dough and crimp the edges as desired. Prick the bottom with a fork to prevent bubbling.
- Bake for 20-25 minutes, or until golden brown and crisp.
So, what’s the verdict? This crust is irresistibly flaky with a bold cheddar kick that elevates any pie from mundane to magnificent. Try it with a savory quiche or go wild with a cheesy apple pie—because rules are made to be broken, especially in the kitchen.
Graham Cracker Pie Crust
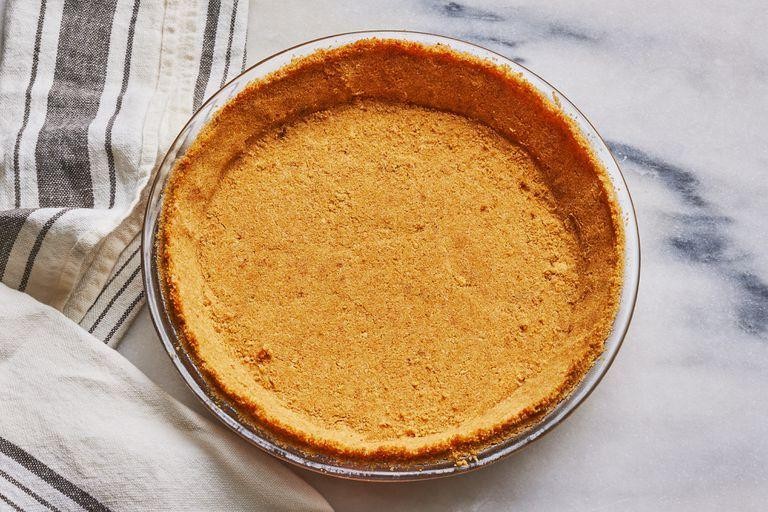
Now, who knew that something as simple as graham crackers could transform into the foundation of dessert dreams? This graham cracker pie crust is your ticket to pie perfection, no fancy skills required—just a dash of humor and a sprinkle of patience.
Ingredients
- Graham crackers – 1 ½ cups, crushed
- Sugar – 3 tbsp
- Butter – 6 tbsp, melted
Instructions
- Preheat your oven to 375°F—because every great crust starts with a little heat.
- Crush the graham crackers into fine crumbs. Pro tip: A food processor does this in a flash, but a zip-top bag and a rolling pin work just as well for some stress relief.
- Mix the graham cracker crumbs and sugar in a bowl. This is where the magic begins.
- Pour in the melted butter and stir until the mixture resembles wet sand. If it holds together when pressed, you’re golden.
- Press the mixture firmly into a 9-inch pie dish, making sure to cover the bottom and sides evenly. Another pro tip: Use the bottom of a measuring cup to get a smooth, even layer.
- Bake for 7 minutes, then let it cool completely before filling. This step is non-negotiable—patience is the secret ingredient here.
Golden, buttery, and with just the right amount of sweetness, this crust is the unsung hero of pies. Serve it filled with your favorite no-bake filling for a quick dessert, or get fancy with a layer of chocolate before adding the filling. Either way, it’s a win.
Oreo Pie Crust
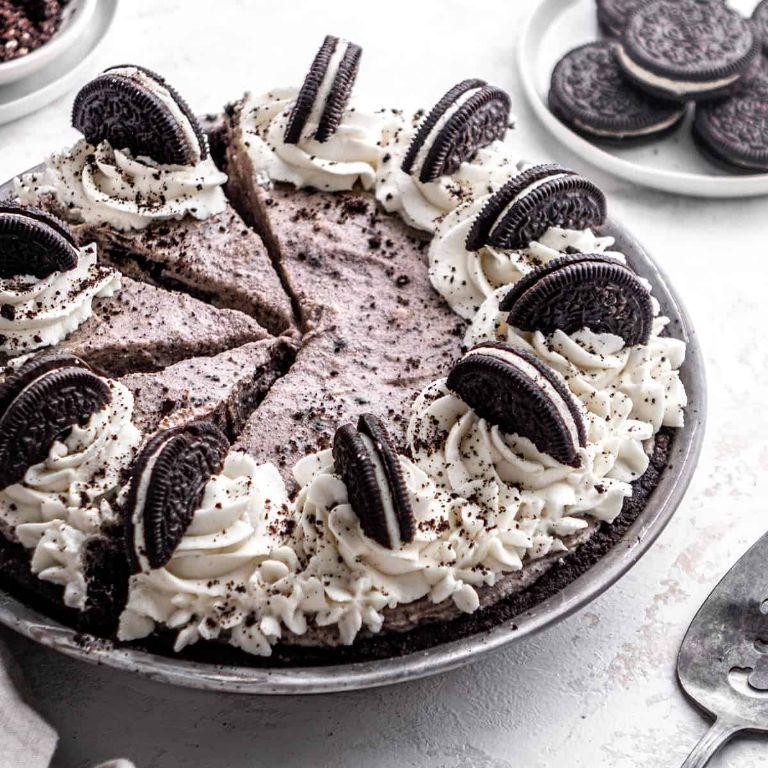
Ready to dive into a dessert that’s as easy to make as it is to devour? This Oreo Pie Crust is your ticket to no-bake bliss, combining the crunch of everyone’s favorite cookie with the creamy fillings of your dreams. Let’s get cracking—literally!
Ingredients
- Oreo cookies – 24
- Butter – 6 tbsp, melted
Instructions
- Preheat your oven to 350°F (175°C) to toast the crust for an extra crunch, if desired.
- Place all 24 Oreo cookies in a food processor and pulse until you have fine crumbs. No processor? No problem! Seal the cookies in a bag and crush them with a rolling pin.
- Transfer the crumbs to a bowl and pour in the melted butter. Mix until the crumbs are evenly coated and resemble wet sand.
- Press the mixture firmly into a 9-inch pie dish, making sure to cover the bottom and sides evenly. Pro tip: Use the bottom of a measuring cup to smooth it out for a professional look.
- For a firmer crust, bake for 10 minutes at 350°F (175°C), then let it cool completely. Skipping the bake? Chill in the fridge for at least 30 minutes.
- Fill with your favorite no-bake filling, like chocolate mousse or cheesecake, and refrigerate until set.
Absolutely irresistible, this crust offers a perfect balance of chocolatey crunch and buttery richness. Serve it up with a dollop of whipped cream and a sprinkle of crushed Oreos for that Instagram-worthy finish!
Almond Flour Pie Crust
Zesty and ready to revolutionize your pie game, this almond flour pie crust is the gluten-free, flavor-packed foundation your desserts have been dreaming of. Perfect for those who believe crust shouldn’t just be a vehicle for filling but a star in its own right.
Ingredients
- Almond flour – 2 cups
- Butter – ½ cup, chilled
- Egg – 1
- Salt – ¼ tsp
Instructions
- Preheat your oven to 350°F (175°C) to ensure it’s ready when your crust is.
- In a large bowl, combine almond flour and salt, whisking them together to avoid any salty surprises.
- Cut the chilled butter into small cubes and add them to the flour mixture. Use your fingers to work the butter into the flour until the mixture resembles coarse crumbs. Tip: Keep your hands cold to prevent the butter from melting.
- Beat the egg lightly and add it to the mixture, stirring until a dough forms. If it’s too sticky, chill it for 10 minutes. Tip: This is a great time to wash your hands and admire your work.
- Press the dough evenly into a 9-inch pie dish, making sure to cover the bottom and sides. Tip: Use the bottom of a measuring cup to smooth it out for a professional look.
- Bake for 10-12 minutes, or until the edges are just starting to turn golden. Keep an eye on it; almond flour can go from golden to gone in seconds.
Yum! This crust comes out with a delightful crunch and a nutty flavor that pairs perfectly with everything from fruity fillings to rich chocolate. Try serving it with a dollop of whipped cream and a sprinkle of cinnamon for an extra touch of magic.
Coconut Flour Pie Crust
Fancy a pie crust that’s not just a vessel for your filling but a star in its own right? Meet the Coconut Flour Pie Crust—a gluten-free, subtly sweet base that’s about to make your dessert game stronger than your coffee.
Ingredients
- Coconut flour – 1 cup
- Butter – ½ cup, melted
- Egg – 1 large
- Salt – ¼ tsp
Instructions
- Preheat your oven to 350°F (175°C). This ensures your crust bakes evenly, not like a sunbather who forgot to turn over.
- In a mixing bowl, combine 1 cup coconut flour and ¼ tsp salt. Whisk them together like you’re trying to introduce them at a party.
- Add ½ cup melted butter to the dry ingredients. Mix until the mixture resembles wet sand, perfect for building a castle, or in this case, a crust.
- Crack in 1 large egg. Stir until the dough comes together. If it’s too crumbly, pretend it’s a puzzle and press it together with your fingers.
- Press the dough into a 9-inch pie dish, ensuring an even layer on the bottom and sides. Use the back of a spoon for a smooth finish, or leave it rustic—your pie, your rules.
- Bake for 10-12 minutes, or until the edges are golden brown. Keep an eye on it; nobody likes a crust that’s more tan than a reality TV star.
- Let the crust cool before filling. This isn’t a race; patience leads to a crust that holds up like a champ.
Unbelievably versatile, this crust pairs beautifully with everything from tangy lemon curd to rich chocolate ganache. Its texture? Think crisp yet tender, with a hint of coconut that whispers sweet nothings to your taste buds. Serve it with a dollop of whipped cream and watch it disappear faster than your resolve to eat just one slice.
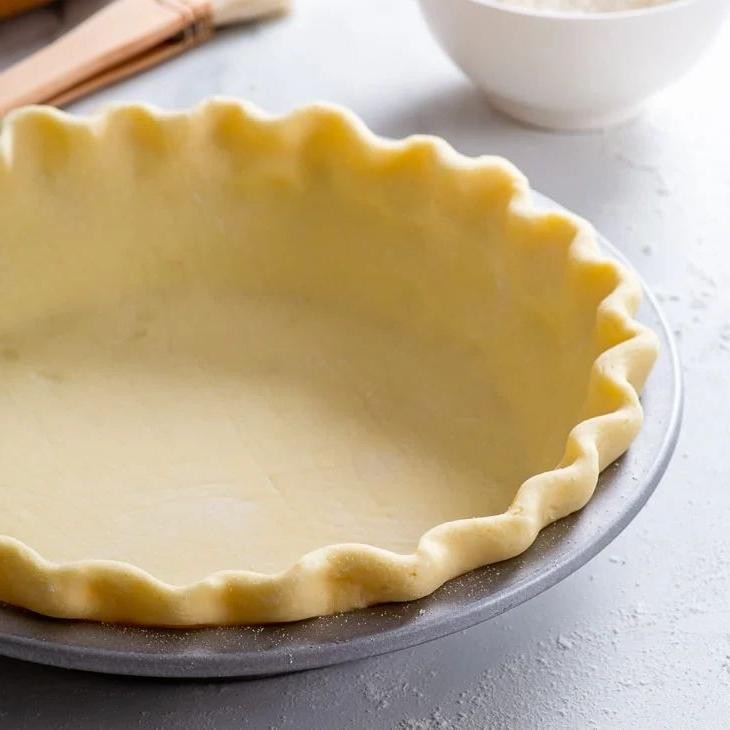
Lard Pie Crust
Get ready to roll with the most flaky, buttery, and downright irresistible lard pie crust you’ve ever met. This isn’t just any crust—it’s the golden ticket to pie perfection, with a playful twist that’ll have your taste buds dancing.
Ingredients
- Flour – 2 cups
- Salt – 1 tsp
- Lard – ¾ cup
- Ice water – ¼ cup
Instructions
- Preheat your oven to 375°F (190°C) to ensure it’s ready when your crust is.
- In a large bowl, whisk together the flour and salt to combine them evenly.
- Add the lard to the flour mixture. Use a pastry cutter or your fingers to blend until the mixture resembles coarse crumbs. Tip: Keep your hands cold to prevent the lard from melting.
- Gradually add ice water, 1 tablespoon at a time, mixing until the dough just comes together. Tip: Overworking the dough makes it tough, so stop as soon as it holds.
- Form the dough into a ball, then flatten into a disk. Wrap in plastic and chill for at least 30 minutes. Tip: Chilling relaxes the gluten, making the crust tender.
- On a floured surface, roll the dough to a 12-inch circle. Carefully transfer to a 9-inch pie plate.
- Trim and crimp the edges as desired. Prick the bottom with a fork to prevent bubbling.
- Bake for 15-20 minutes, or until golden brown. Let cool before filling.
Every bite of this lard pie crust is a flaky, buttery dream, with a richness that elevates any filling from good to unforgettable. Try it with a savory quiche or a sweet apple pie for a match made in heaven.
Oil-Based Pie Crust

Oh, the humble pie crust—often feared, rarely understood, but always delicious when done right. Today, we’re demystifying the oil-based pie crust, a game-changer for those who butter just doesn’t butter up to.
Ingredients
- Flour – 2 cups
- Salt – ½ tsp
- Vegetable oil – ½ cup
- Cold water – ¼ cup
Instructions
- Preheat your oven to 375°F (190°C). A hot oven is key to a flaky crust, so don’t skimp on the preheat.
- In a large bowl, whisk together the flour and salt. This isn’t just mixing; it’s the first step to crust greatness.
- Add the vegetable oil to the flour mixture. Use a fork to blend until the mixture resembles coarse crumbs. Tip: If it looks like wet sand, you’re on the right track.
- Gradually add cold water, one tablespoon at a time, mixing until the dough just comes together. Overworking the dough is the enemy of flakiness.
- Roll the dough out on a lightly floured surface to fit your pie dish. No rolling pin? A wine bottle works in a pinch—just make sure it’s clean.
- Carefully transfer the dough to your pie dish, pressing it gently into the bottom and sides. Trim any excess dough with a knife or scissors.
- For a pre-baked crust, prick the bottom with a fork and bake for 15-20 minutes, or until golden. Tip: Use pie weights or dried beans to prevent bubbling.
Light, flaky, and with just the right amount of crunch, this oil-based pie crust is your ticket to pie perfection. Serve it filled with your favorite sweet or savory filling, or get wild and use it as the base for a decadent dessert pizza.
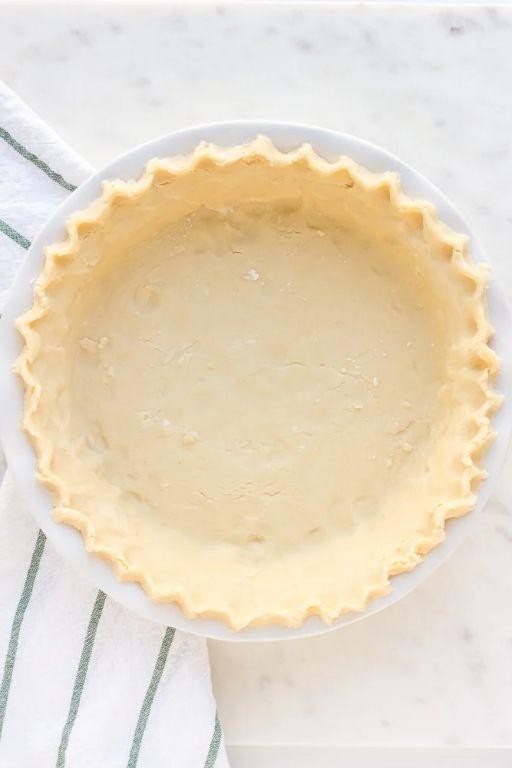
Sour Cream Pie Crust
Today is ‘2025-06-08 05:47:57.376832’, You’re a professional food blogger writing a relatable US-based roundup-style recipe article. Introduce the dish: ‘Sour Cream Pie Crust’ using the structure below.
Tone: Use a playful, witty voice. Add light humor, bold phrasing, and fun energy throughout.
Write a short 2-3 sentence intro, The first word of your introduction must begin with the letter ‘T’. Do not display the title. Start directly with the introduction.
Ingredients
- Flour – 2 cups
- Salt – 1 tsp
- Butter – 1 cup, chilled and cubed
- Sour cream – 1/2 cup
Instructions
- Preheat your oven to 375°F (190°C) to ensure it’s ready when your crust is.
- In a large bowl, whisk together the flour and salt to combine them evenly.
- Add the chilled, cubed butter to the flour mixture. Use your fingers or a pastry cutter to work the butter into the flour until the mixture resembles coarse crumbs. Tip: Keep your hands cold to prevent the butter from melting.
- Gently stir in the sour cream until the dough just comes together. Overmixing can lead to a tough crust, so stop as soon as it’s combined.
- Turn the dough out onto a lightly floured surface and knead it briefly into a ball. Flatten into a disk, wrap in plastic, and chill for at least 1 hour. This rest period is crucial for a flaky texture.
- Roll out the chilled dough on a floured surface to fit your pie dish. Carefully transfer it to the dish, trim the edges, and crimp as desired. Tip: For extra flakiness, chill the rolled-out crust in the dish for 15 minutes before baking.
- If pre-baking, prick the bottom with a fork, line with parchment, and fill with pie weights or dried beans. Bake for 15 minutes, remove weights and parchment, then bake for another 10 minutes until golden. Tip: For a shiny finish, brush the crust with an egg wash before baking.
Rich in flavor with a tender, flaky texture, this sour cream pie crust is a game-changer for your baking repertoire. Serve it filled with your favorite sweet or savory fillings, or get adventurous by sprinkling the baked crust with cinnamon sugar for a delightful snack.
Cream Cheese Pie Crust
Buckle up, buttercups, because we’re about to dive into the creamiest, dreamiest pie crust that’ll have your taste buds doing the cha-cha. This cream cheese pie crust is the secret weapon in your baking arsenal, promising flaky layers with a tangy twist that’s downright irresistible.
Ingredients
- Flour – 2 cups
- Salt – ½ tsp
- Butter – 1 cup, cold and cubed
- Cream cheese – 4 oz, cold and cubed
- Ice water – 3 tbsp
Instructions
- In a large bowl, whisk together the flour and salt until well combined.
- Add the cold, cubed butter and cream cheese to the bowl. Using a pastry cutter or your fingers, work the fats into the flour until the mixture resembles coarse crumbs with some pea-sized pieces remaining. Tip: Keep everything cold for the flakiest crust.
- Sprinkle the ice water over the mixture, 1 tablespoon at a time, gently stirring with a fork after each addition until the dough just begins to come together. Tip: Don’t overmix, or your crust will be tough.
- Turn the dough out onto a lightly floured surface and knead it gently a few times to bring it together into a ball. Divide the dough in half, flatten each half into a disk, and wrap tightly in plastic wrap. Chill in the refrigerator for at least 1 hour before rolling out. Tip: Chilling the dough relaxes the gluten, making it easier to roll.
- Preheat your oven to 375°F. Roll out one disk of dough on a floured surface to fit your pie dish, then carefully transfer it to the dish. Trim and crimp the edges as desired. Prick the bottom with a fork, line with parchment paper, and fill with pie weights or dried beans. Bake for 15 minutes, then remove the weights and parchment and bake for another 10 minutes, or until golden brown.
Craving a slice of heaven? This cream cheese pie crust delivers a buttery, flaky texture with a subtle tang that elevates any filling from good to ‘can I have another slice?’ Serve it with a dollop of whipped cream and fresh berries for a dessert that’s as beautiful as it is delicious.
Chocolate Pie Crust

Who knew that the secret to winning hearts (and dessert tables) could be wrapped up in a chocolatey, crumbly embrace? This chocolate pie crust is your ticket to pie perfection, blending simplicity with a dash of decadence. Let’s dive into the magic!
Ingredients
- Flour – 1 ¼ cups
- Cocoa powder – ¼ cup
- Sugar – 2 tbsp
- Salt – ½ tsp
- Butter – ½ cup, chilled and cubed
- Ice water – 3-4 tbsp
Instructions
- Preheat your oven to 375°F (190°C). A hot oven is key for that perfect crispness.
- In a large bowl, whisk together flour, cocoa powder, sugar, and salt. This ensures your crust is evenly flavored.
- Add chilled butter cubes to the dry ingredients. Use your fingers or a pastry cutter to blend until the mixture resembles coarse crumbs. Tip: The colder the butter, the flakier the crust.
- Gradually add ice water, 1 tbsp at a time, mixing until the dough just comes together. Overworking the dough leads to toughness.
- Press the dough into a 9-inch pie dish, ensuring an even layer on the bottom and sides. Chill for 15 minutes before baking to prevent shrinkage.
- Bake for 15-20 minutes, or until the crust is firm and smells like chocolate heaven. Let it cool before filling.
Goodness, this crust is a game-changer—crisp, rich, and begging to be filled with your favorite creamy or fruity filling. Serve it up with a dollop of whipped cream or a scoop of vanilla ice cream for that irresistible contrast.
Pecan Pie Crust
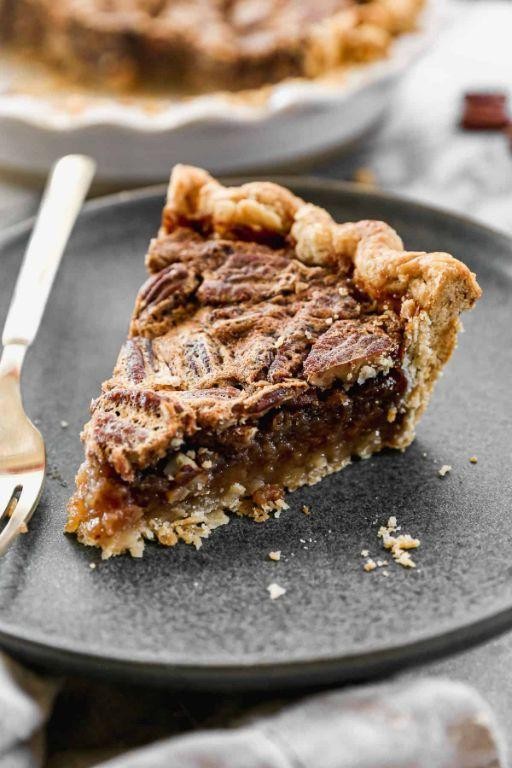
Dive into the buttery, nutty embrace of this pecan pie crust, where every bite is a crunchy prelude to the sweet symphony that awaits. Perfect for those who believe the crust is the unsung hero of any pie, this recipe is your ticket to flaky, golden perfection.
Ingredients
- Flour – 1 ¼ cups
- Butter – ½ cup, chilled and cubed
- Salt – ¼ tsp
- Ice water – 3 tbsp
Instructions
- Preheat your oven to 375°F (190°C) to ensure it’s ready for your crust.
- In a large bowl, combine the flour and salt. Tip: Sifting the flour can prevent lumps for a smoother dough.
- Add the chilled, cubed butter to the flour mixture. Using your fingers or a pastry cutter, work the butter into the flour until the mixture resembles coarse crumbs. Tip: Keep the butter cold for a flakier crust.
- Gradually add ice water, one tablespoon at a time, mixing until the dough just comes together. Tip: Overworking the dough can make it tough, so stop as soon as it forms a ball.
- Roll out the dough on a lightly floured surface to fit your pie dish. Carefully transfer the dough to the dish, pressing it gently into the bottom and sides.
- Trim any excess dough from the edges, then crimp or flute the edges for a decorative finish.
- Prick the bottom of the crust with a fork to prevent bubbling during baking.
- Bake the crust for 15-20 minutes, or until it’s lightly golden. Let it cool before adding your pecan pie filling.
So there you have it—a crust that’s as sturdy as it is tender, ready to cradle your luscious pecan filling. Serve it up with a dollop of whipped cream or a scoop of vanilla ice cream for a dessert that’s downright irresistible.
Conclusion
We hope these 18 flaky pie crust recipes inspire your next baking adventure! Whether you’re a novice or a seasoned baker, there’s a perfect crust waiting for you. Don’t forget to share your favorites in the comments and pin this roundup for later. Happy baking!


