Venture into the vibrant flavors of Panama with our roundup of 20 delicious, authentic recipes that bring the warmth of Central American cuisine right to your kitchen. Whether you’re craving the comfort of a hearty sancocho or the zesty kick of ceviche, these dishes promise a culinary adventure. Perfect for home cooks looking to spice up their meal rotation, each recipe is a ticket to taste the tropics. Let’s get cooking!
Sancocho
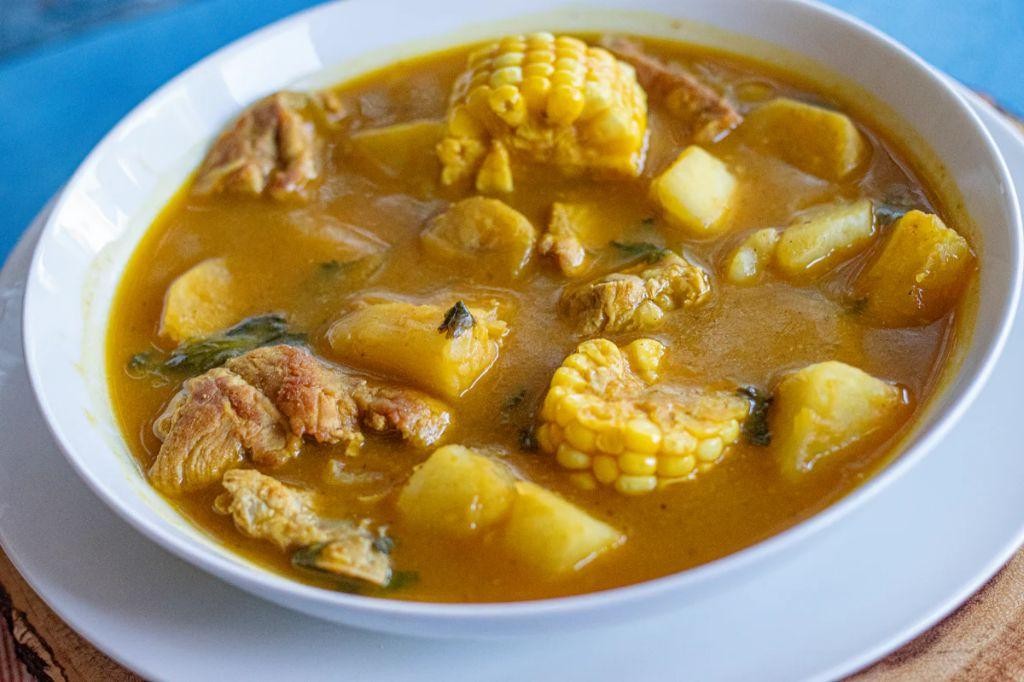
Rich in flavor and steeped in tradition, Sancocho is a hearty stew that brings the warmth of Latin American kitchens to your table, blending tender meats, root vegetables, and aromatic herbs into a comforting bowl of goodness.
Ingredients
- 2 lbs of chicken thighs, bone-in
- 1 lb of beef chuck, cut into chunks
- a couple of ears of corn, cut into thirds
- 2 green plantains, peeled and sliced
- 1 large yuca, peeled and chopped
- a splash of olive oil
- 1 onion, diced
- 4 garlic cloves, minced
- a handful of cilantro, chopped
- 1 tsp of ground cumin
- 8 cups of chicken broth
- salt to taste
Instructions
- Heat a splash of olive oil in a large pot over medium heat.
- Add the diced onion and minced garlic, sautéing until translucent, about 3 minutes.
- Season the chicken thighs and beef chunks with salt and ground cumin, then add to the pot, browning on all sides, about 5 minutes.
- Pour in the chicken broth, bringing the mixture to a boil, then reduce to a simmer.
- Add the yuca, plantains, and corn to the pot, ensuring they’re submerged in the broth.
- Cover and simmer for about 45 minutes, or until the meats are tender and the vegetables are soft.
- Stir in the chopped cilantro just before serving for a fresh burst of flavor.
Fragrant and deeply satisfying, this Sancocho boasts a velvety broth that clings to the succulent meats and starchy vegetables. Serve it with a side of avocado slices and a sprinkle of fresh cilantro for an extra layer of richness and color.
Arroz con Pollo
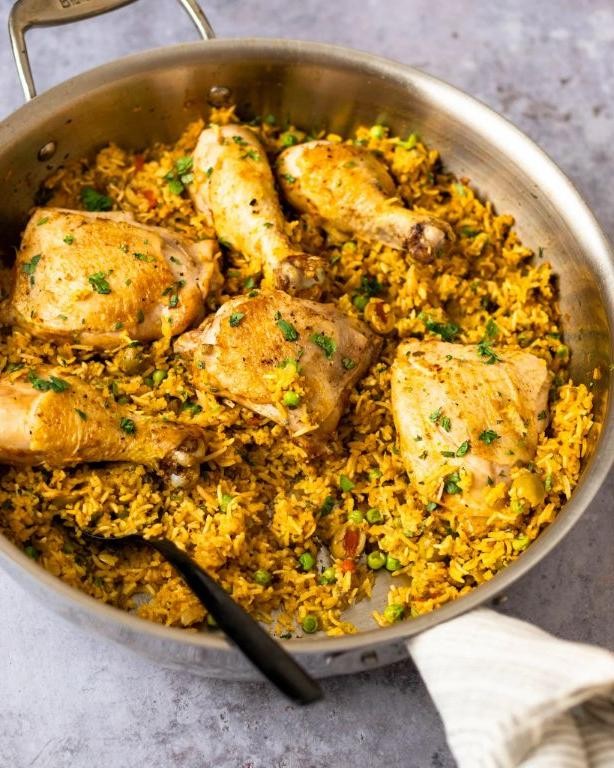
Amidst the bustling flavors of Latin cuisine, Arroz con Pollo stands as a comforting yet vibrant dish, marrying tender chicken with golden rice infused with a medley of spices and herbs.
Ingredients
- 2 cups of long-grain white rice
- 4 chicken thighs, bone-in and skin-on
- A splash of olive oil
- 1 medium onion, finely chopped
- A couple of garlic cloves, minced
- 1 red bell pepper, diced
- 1 teaspoon of ground cumin
- A pinch of saffron threads
- 2 cups of chicken broth
- 1 cup of frozen peas
- Salt and pepper, just enough to season
Instructions
- Heat a splash of olive oil in a large skillet over medium heat. Add the chicken thighs, skin side down, and cook until golden brown, about 5 minutes per side. Remove and set aside.
- In the same skillet, add the chopped onion, minced garlic, and diced red bell pepper. Sauté until soft, about 3 minutes.
- Stir in the rice, ground cumin, and saffron threads, coating the rice well with the oil and spices for about 2 minutes.
- Pour in the chicken broth, bring to a boil, then reduce heat to low. Nestle the chicken thighs back into the skillet, cover, and simmer for 20 minutes.
- Scatter the frozen peas over the top, cover again, and cook for an additional 5 minutes. Tip: Let the rice rest off the heat for 5 minutes before serving to allow the flavors to meld.
- Season with salt and pepper to your liking. Tip: For an extra burst of color and flavor, garnish with fresh cilantro or a squeeze of lime before serving.
Fluffy and fragrant, this Arroz con Pollo boasts a perfect harmony of textures, from the crispy chicken skin to the tender peas nestled within the saffron-kissed rice. Serve it straight from the skillet for a rustic presentation, or plate it with a side of avocado salad for a refreshing contrast.
Ropa Vieja
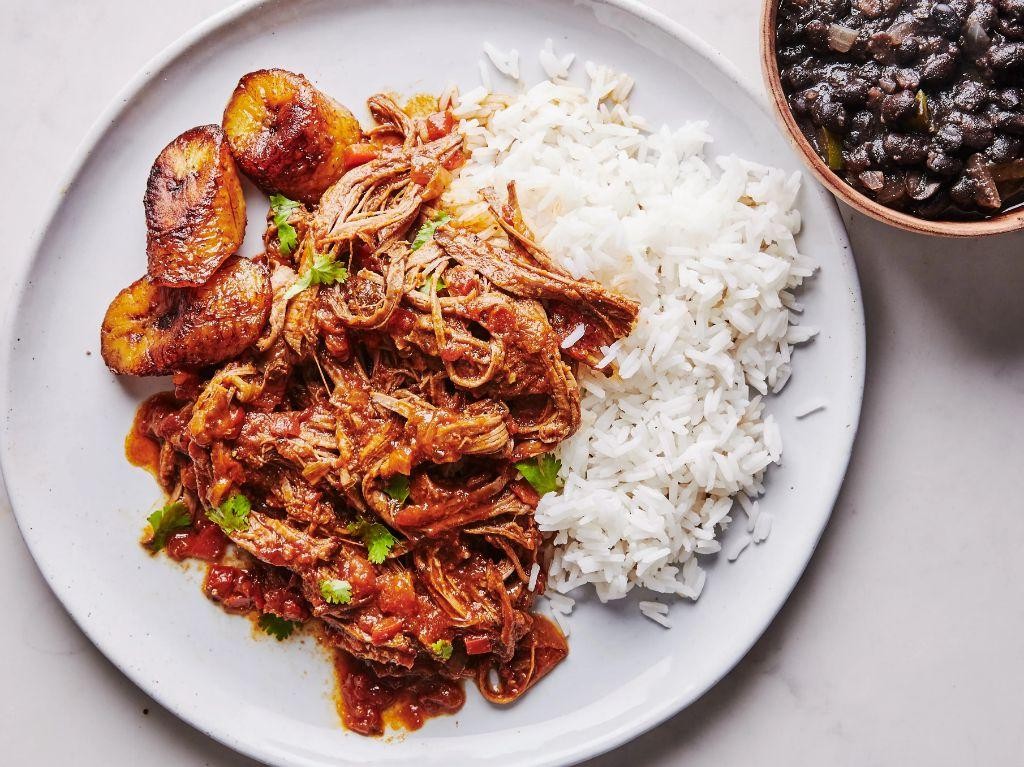
Elegantly simmered to perfection, Ropa Vieja is a classic Cuban dish that transforms simple ingredients into a symphony of flavors, with tender shredded beef melding harmoniously with a vibrant, spiced tomato sauce.
Ingredients
- 2 lbs flank steak, the star of the show
- A couple of bell peppers, sliced into strips
- 1 large onion, thinly sliced
- 4 cloves of garlic, minced
- A splash of olive oil
- 1 cup of beef broth, for depth
- 1 can (14.5 oz) of diced tomatoes, with their juices
- 2 tbsp tomato paste, for richness
- 1 tsp ground cumin, for warmth
- 1 tsp smoked paprika, for a hint of smokiness
- Salt and pepper, just enough to season
- A handful of pitted green olives, for a briny contrast
- 2 bay leaves, for aromatic depth
Instructions
- Heat a splash of olive oil in a large pot over medium-high heat. Once hot, add the flank steak and sear until browned on both sides, about 4 minutes per side. Tip: Don’t rush the sear; it builds flavor.
- Remove the steak and set aside. In the same pot, add the bell peppers, onion, and garlic. Sauté until softened, about 5 minutes.
- Stir in the beef broth, diced tomatoes, tomato paste, cumin, smoked paprika, salt, and pepper. Bring to a simmer.
- Return the steak to the pot, add the bay leaves, and cover. Reduce heat to low and simmer for 2 hours, or until the steak is fork-tender. Tip: Low and slow is the key to tender meat.
- Remove the steak and shred it using two forks. Return the shredded beef to the pot, add the green olives, and simmer uncovered for another 10 minutes to thicken the sauce. Tip: The olives add a perfect salty bite, so taste before adding more salt.
- Discard the bay leaves before serving.
Beautifully tender and richly flavored, Ropa Vieja boasts a perfect balance of savory and slightly sweet notes. Serve it over a bed of fluffy white rice or with warm tortillas for a comforting meal that’s as versatile as it is delicious.
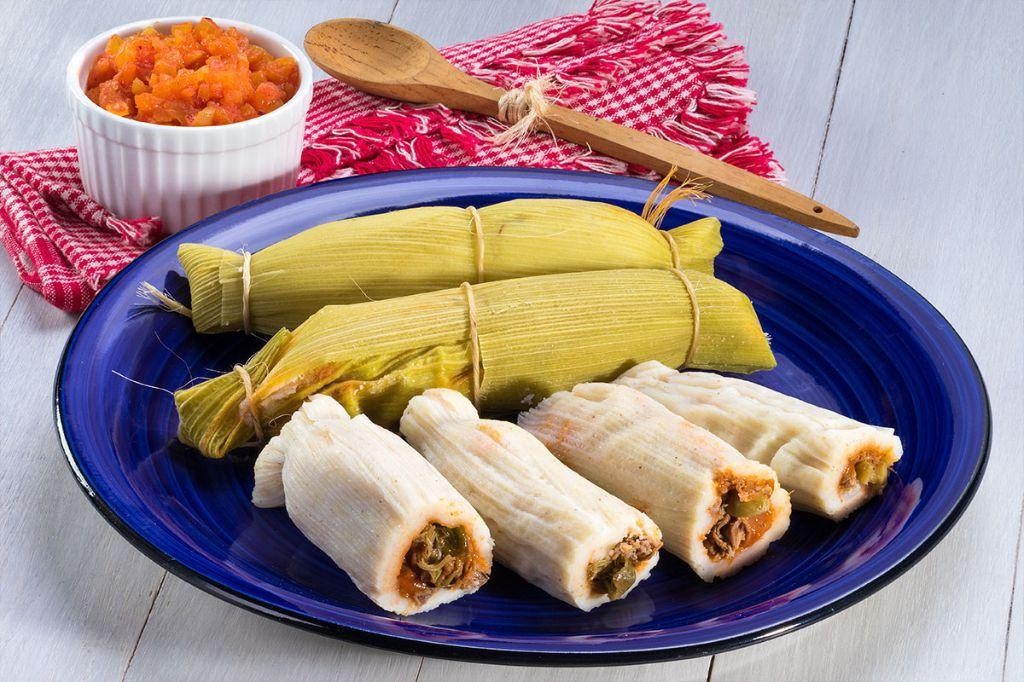
Tamales Panameños
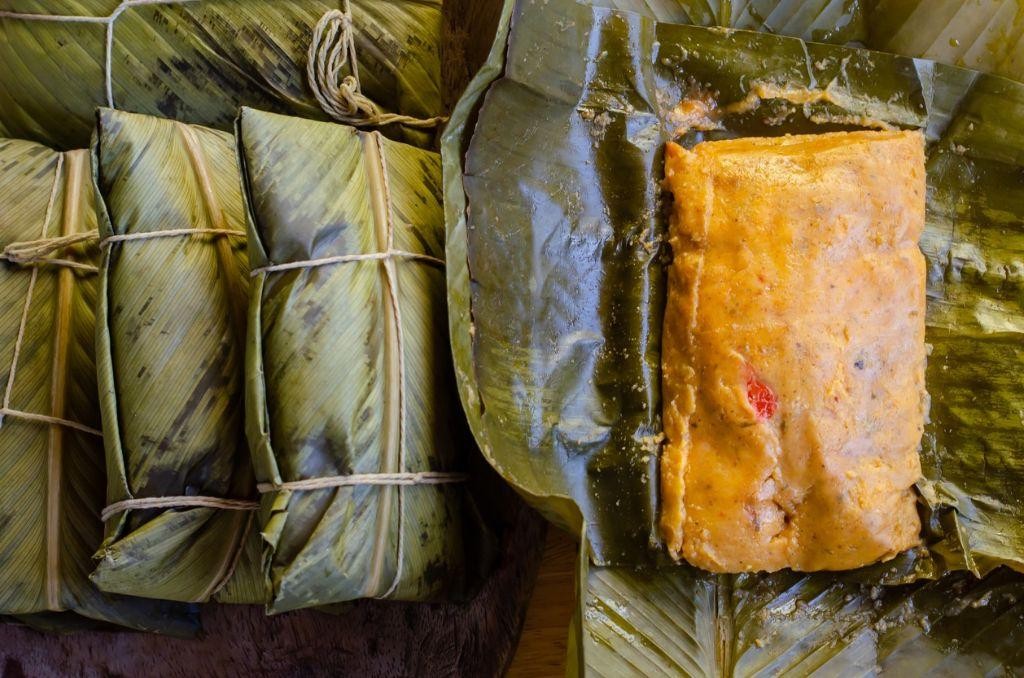
On a day like today, when the warmth of summer envelops us, there’s nothing quite like the comforting embrace of Tamales Panameños, a dish that marries the richness of tradition with the vibrancy of Panamanian flavors.
Ingredients
- 2 cups of masa harina
- A splash of chicken broth, about 1 cup
- A couple of tablespoons of achiote oil, for that signature color and flavor
- 1 pound of chicken, shredded and seasoned just right
- A handful of green olives, because they add that perfect briny contrast
- Some banana leaves, softened and cut into squares, for wrapping
- A pinch of salt, to bring all the flavors together
Instructions
- Start by mixing the masa harina with the chicken broth in a large bowl until you get a smooth, pliable dough. Tip: The dough should feel like playdough—easy to shape but not sticky.
- Heat the achiote oil in a pan over medium heat, then add the shredded chicken, cooking until it’s nicely coated and fragrant, about 5 minutes.
- Lay out a banana leaf square, spread a thin layer of the masa dough in the center, then top with a spoonful of the chicken mixture and a couple of olives.
- Fold the banana leaf around the filling to form a neat package, tying it with a strip of banana leaf if needed. Tip: The tighter the wrap, the better the tamale holds together during cooking.
- Steam the tamales for about 1 hour over medium heat. Tip: Check the water level occasionally to ensure it doesn’t dry out.
- Let them rest for a few minutes before unwrapping to serve.
Just unwrap these little parcels of joy to reveal the moist, flavorful masa enveloping the savory chicken and briny olives. Serve them with a side of hot sauce for an extra kick, or enjoy them as is for a truly authentic experience.
Carimañolas
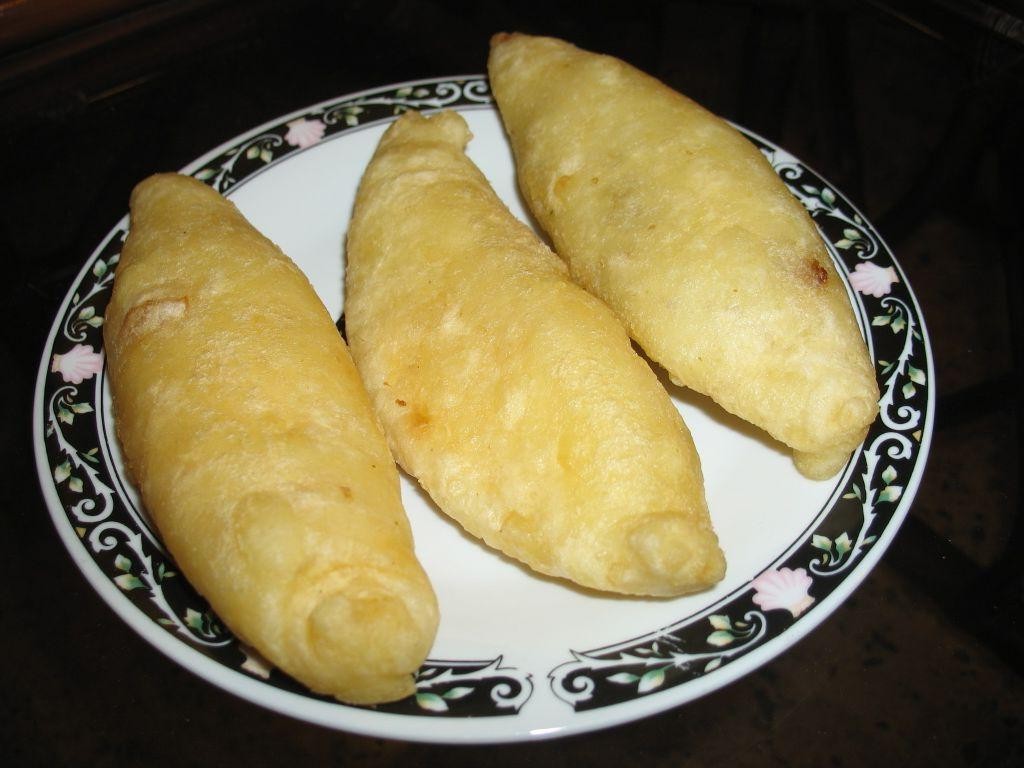
Savory and satisfying, Carimañolas are a delightful Colombian treasure, blending the heartiness of yuca dough with a succulent meat filling, all fried to golden perfection. These stuffed yuca fritters are a testament to the beauty of simple ingredients transformed into something extraordinary.
Ingredients
- 2 cups of grated yuca, squeezed dry
- A splash of milk, about 2 tablespoons
- A couple of eggs, beaten
- 1 tablespoon of butter, melted
- A pinch of salt
- 1 cup of ground beef, cooked and seasoned
- 1 small onion, finely chopped
- A drizzle of olive oil for frying
Instructions
- In a large bowl, mix the grated yuca with the milk, beaten eggs, melted butter, and a pinch of salt until a dough forms. Tip: The dough should be pliable but not sticky; add a bit more yuca if needed.
- Divide the dough into 8 equal portions, rolling each into a ball. Flatten each ball into a disc about 1/4 inch thick.
- Place a tablespoon of the seasoned ground beef and a bit of chopped onion in the center of each disc. Fold the dough over the filling, sealing the edges tightly to form a half-moon shape.
- Heat olive oil in a deep fryer or large skillet to 350°F. Fry the Carimañolas in batches until golden brown, about 3-4 minutes per side. Tip: Don’t overcrowd the pan to ensure even cooking.
- Drain on paper towels to remove excess oil. Tip: Serve immediately for the crispiest texture.
Absolutely irresistible when hot, Carimañolas boast a crispy exterior giving way to a soft, flavorful interior. Pair them with a tangy ají sauce for an extra kick or enjoy as is for a truly authentic experience.
Patacones
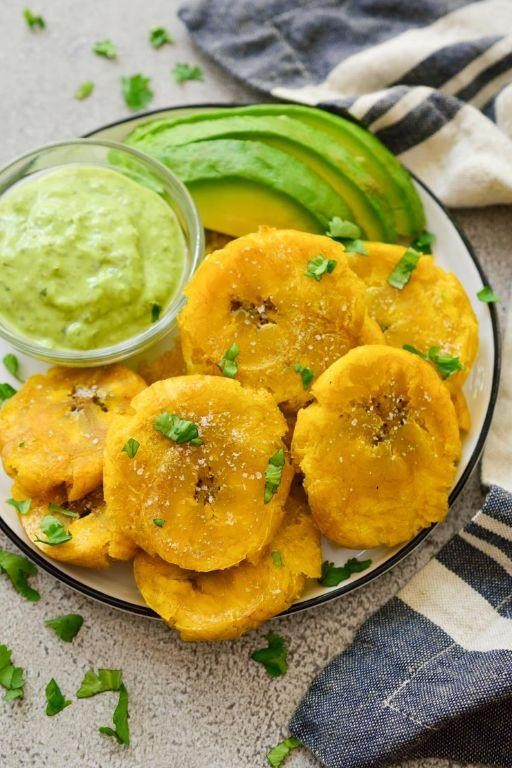
Patacones, a beloved Latin American delight, offer a crispy, golden exterior with a tender heart, perfect for savoring as a snack or alongside your favorite dishes. Pair them with a zesty dipping sauce for an irresistible treat that’s both simple and sophisticated.
Ingredients
- 2 green plantains
- A generous splash of vegetable oil
- A couple of pinches of salt
- 1/2 cup of water
Instructions
- Peel the green plantains and cut them into 1-inch thick slices.
- Heat the vegetable oil in a large skillet over medium-high heat until it reaches 350°F.
- Fry the plantain slices for about 3 minutes on each side, or until they’re lightly golden but not fully cooked.
- Remove the slices from the oil and place them on a paper towel-lined plate to drain. Let them cool for a minute.
- Using the bottom of a glass or a flat object, gently press each slice to about 1/4-inch thickness. Tip: If the plantains stick, lightly oil the glass.
- Return the flattened plantains to the hot oil and fry for another 2 minutes on each side, until crispy and golden brown.
- Remove the patacones from the oil and drain on fresh paper towels. Sprinkle with salt while still hot. Tip: For extra flavor, rub a cut garlic clove on the warm patacones.
- Serve immediately with a side of water to help balance the richness. Tip: Patacones are best enjoyed fresh but can be kept warm in a 200°F oven for up to 30 minutes.
How the patacones achieve a delightful contrast between their crunchy exterior and soft interior makes them a versatile canvas for toppings or dips. Host your next gathering with a platter of these golden disks, and watch them disappear before your eyes.
Hojaldras
Gracefully bridging the gap between simplicity and sophistication, Hojaldras are a testament to the beauty of traditional baking. These flaky, buttery pastries, with their golden layers and delicate texture, invite a moment of indulgence into any day.
Ingredients
- 2 cups of all-purpose flour, plus a little extra for dusting
- A pinch of salt
- 1 cup of unsalted butter, cold and cut into small cubes
- A splash of cold water
- A couple of tablespoons of sugar for sprinkling
Instructions
- In a large bowl, whisk together the flour and salt to ensure they’re well combined.
- Add the cold butter cubes to the flour mixture. Using your fingertips, gently rub the butter into the flour until the mixture resembles coarse crumbs with some larger pieces of butter remaining.
- Make a well in the center of the mixture and add a splash of cold water. Stir with a fork until the dough begins to come together.
- Turn the dough out onto a lightly floured surface and knead gently just until it forms a smooth ball. Wrap in plastic wrap and chill in the refrigerator for 30 minutes.
- Preheat your oven to 375°F (190°C) and line a baking sheet with parchment paper.
- Roll out the chilled dough on a floured surface to about 1/4-inch thickness. Fold the dough into thirds, like a letter, then roll out again and repeat the folding process two more times.
- Cut the dough into desired shapes, sprinkle with sugar, and place on the prepared baking sheet.
- Bake for 20-25 minutes, or until the Hojaldras are puffed and golden brown.
Delightfully crisp on the outside with tender, flaky layers within, Hojaldras are perfect paired with a morning coffee or as an elegant dessert drizzled with honey. Their versatility and exquisite texture make them a beloved treat for any occasion.
Tortilla Changa
Transform your breakfast routine with this innovative twist on the classic tortilla. The ‘Tortilla Changa’ is a delightful fusion of textures and flavors, perfect for those mornings when you crave something extraordinary yet effortlessly elegant.
Ingredients
- a couple of large eggs
- a splash of whole milk
- a pinch of salt
- a dash of freshly ground black pepper
- a tablespoon of unsalted butter
- a handful of shredded cheddar cheese
- a few slices of ripe avocado
- a small handful of fresh cilantro leaves
Instructions
- Crack the eggs into a bowl, add the milk, salt, and pepper, then whisk until fully combined.
- Heat the butter in a non-stick skillet over medium heat until it’s just beginning to foam.
- Pour the egg mixture into the skillet, tilting it to ensure an even layer. Let it cook undisturbed for about 2 minutes, or until the edges start to set.
- Sprinkle the shredded cheddar cheese evenly over the eggs. Continue to cook for another minute, or until the cheese begins to melt.
- Using a spatula, gently fold the tortilla in half, covering the cheese. Cook for an additional 30 seconds to ensure the cheese is perfectly melted.
- Transfer the Tortilla Changa to a plate, top with avocado slices and cilantro leaves for a fresh, vibrant finish.
You’ll love the creamy, melty cheese against the soft, fluffy eggs, with the avocado adding a buttery contrast. Serve it with a side of salsa for an extra kick, or enjoy it as is for a simple, satisfying meal.
Bollos Preñados
Amidst the bustling streets of Spain, Bollos Preñados stand as a testament to the simplicity and richness of traditional Spanish cuisine, offering a delightful blend of fluffy bread and savory fillings that promise to transport your senses to a sunny Iberian plaza.
Ingredients
- 2 cups of all-purpose flour
- 1 tsp of salt
- 1 tbsp of sugar
- 1 packet of active dry yeast
- A splash of warm water
- 2 tbsp of olive oil
- A couple of chorizo sausages, sliced
- 1 egg, beaten (for egg wash)
Instructions
- In a large bowl, whisk together the flour, salt, and sugar. Make a well in the center and add the yeast.
- Gradually add warm water and olive oil to the well, mixing until a dough forms. Tip: The water should be just warm to the touch to activate the yeast properly.
- Knead the dough on a floured surface for about 10 minutes until it’s smooth and elastic. Let it rest in a greased bowl, covered, for 1 hour or until doubled in size.
- Punch down the dough and divide it into equal portions. Roll each into a ball, then flatten slightly to create a disc.
- Place a few slices of chorizo in the center of each disc, then fold the dough over the filling, sealing the edges tightly. Tip: Ensure the edges are well-sealed to prevent the filling from leaking during baking.
- Arrange the filled dough balls on a baking sheet, brush with beaten egg, and let them rise for another 30 minutes.
- Preheat your oven to 375°F (190°C) and bake the bollos for 20-25 minutes, or until golden brown. Tip: For an extra glossy finish, brush with a little more egg wash halfway through baking.
Perfectly golden and irresistibly fragrant, these Bollos Preñados boast a tender crumb that gives way to the spicy, smoky chorizo within. Serve them warm, perhaps with a side of alioli for dipping, to elevate this humble snack into a memorable meal.
Sopa Borracha
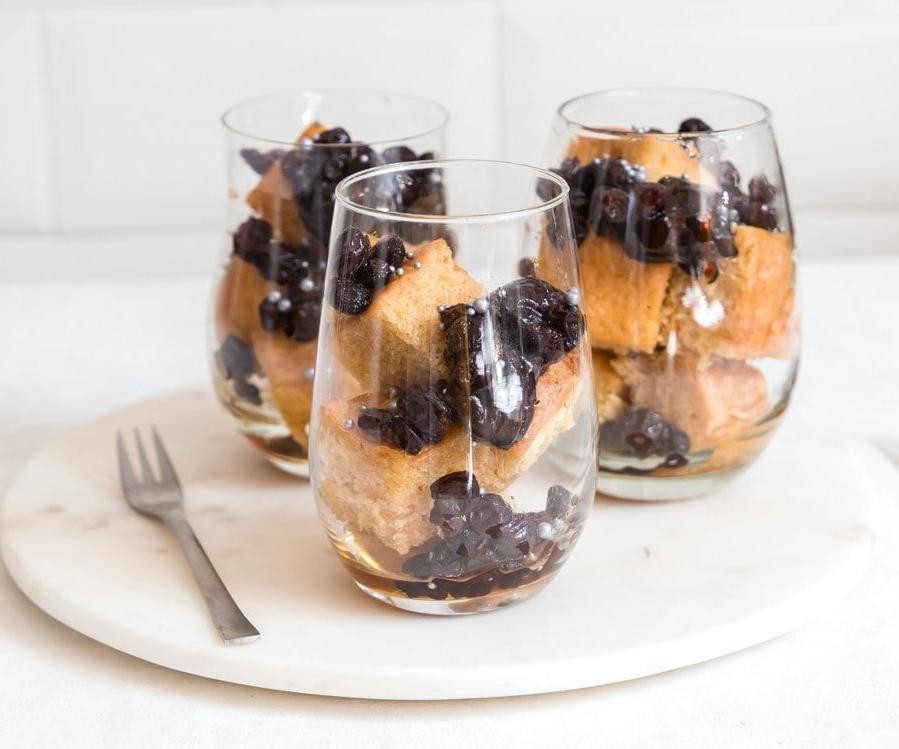
Delightfully rich and steeped in tradition, Sopa Borracha is a decadent dessert that marries the moist tenderness of sponge cake with the bold, intoxicating flavors of rum and syrup. This Latin American classic is a celebration of textures and tastes, perfect for those who appreciate a dessert with a spirited twist.
Ingredients
- 1 cup of sugar
- 1 cup of water
- a splash of dark rum
- a couple of cinnamon sticks
- 1 store-bought sponge cake, cut into slices
- a handful of raisins
- a sprinkle of shredded coconut for garnish
Instructions
- In a saucepan over medium heat, combine 1 cup of sugar and 1 cup of water, stirring until the sugar dissolves completely.
- Add a splash of dark rum and a couple of cinnamon sticks to the syrup, then simmer for 5 minutes to infuse the flavors.
- Remove the cinnamon sticks and let the syrup cool slightly, about 10 minutes, to prevent the cake from becoming too soggy.
- Arrange the sponge cake slices in a deep dish, then pour the warm syrup over them, ensuring each piece is well-coated.
- Scatter a handful of raisins over the top, then cover and refrigerate for at least 4 hours, allowing the cake to absorb the syrup fully.
- Before serving, sprinkle with shredded coconut for a touch of texture and visual appeal.
Creating the perfect Sopa Borracha hinges on balancing the syrup’s sweetness with the rum’s warmth, so adjust the rum to your preference. For an even more luxurious version, layer the cake with whipped cream or serve alongside a scoop of vanilla ice cream. The result is a dessert that’s irresistibly moist, with each bite offering a harmonious blend of sweet, spicy, and boozy notes.
Pescado Frito con Patacones
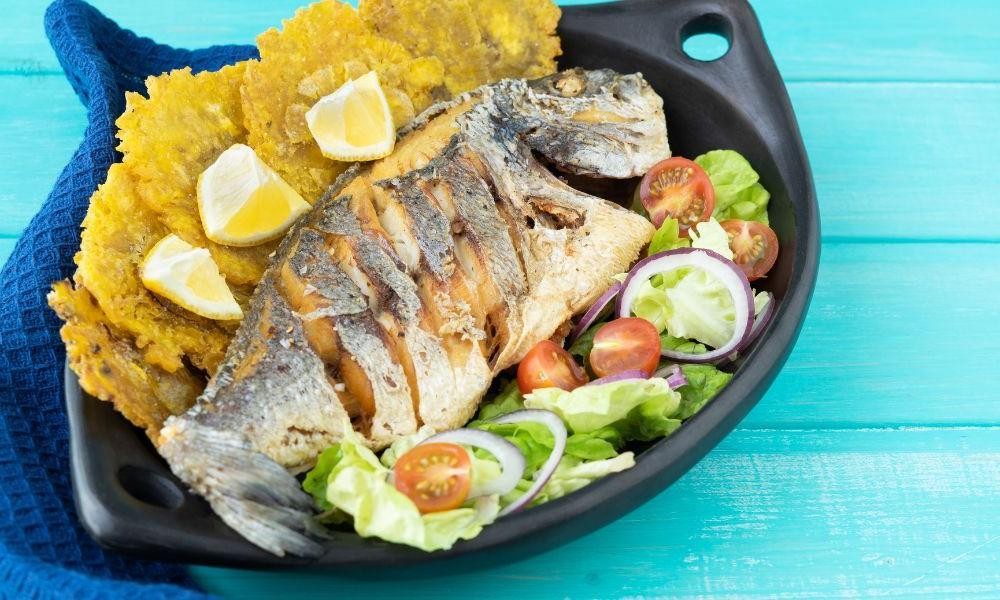
Exquisite in its simplicity, Pescado Frito con Patacones is a dish that marries the crispiness of fried fish with the hearty satisfaction of twice-fried green plantains, offering a delightful contrast in textures and flavors that’s perfect for any occasion.
Ingredients
- 2 cups of vegetable oil, for frying
- 4 green plantains, peeled and sliced into 1-inch rounds
- 2 lbs of white fish fillets (like cod or tilapia), cut into serving pieces
- 1 cup of all-purpose flour
- A splash of lime juice
- A couple of garlic cloves, minced
- Salt, to generously season
Instructions
- Heat the vegetable oil in a deep fryer or large skillet to 350°F over medium-high heat.
- Fry the plantain rounds in batches for about 3 minutes per side, until they’re golden but not fully cooked. Remove and drain on paper towels.
- Using the bottom of a glass, gently flatten each plantain round to about 1/2 inch thick. Tip: For even flattening, place the plantains between two sheets of parchment paper.
- Return the flattened plantains to the hot oil and fry for another 3 minutes per side, until crispy and golden brown. Drain on fresh paper towels and sprinkle with salt while still warm.
- In a shallow dish, mix the flour with minced garlic and a generous pinch of salt. Drizzle the fish fillets with lime juice, then dredge them in the flour mixture, shaking off any excess.
- Fry the fish in the same oil, maintaining the temperature at 350°F, for about 4 minutes per side or until the coating is crispy and the fish is cooked through. Tip: Avoid overcrowding the pan to ensure even cooking.
- Drain the fish on paper towels and serve immediately with the patacones. Tip: For an extra zing, serve with a side of spicy mayo or a fresh lime wedge.
Unbelievably crispy on the outside yet tender within, this dish offers a symphony of textures and flavors. The golden patacones provide a perfect crunch alongside the succulent fish, making it a meal that’s as visually appealing as it is delicious. Serve it with a vibrant salad or a cold beer to round off the experience.
Guacho de Mariscos
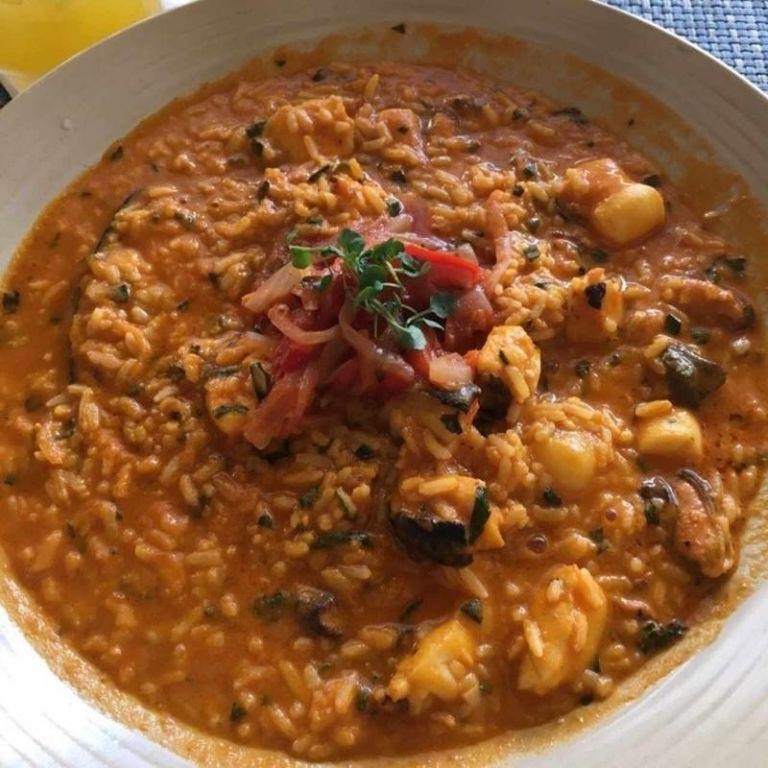
Marvel at the rich, coastal flavors of Guacho de Mariscos, a sumptuous seafood stew that brings the essence of the ocean to your table with its vibrant colors and aromatic spices.
Ingredients
- 2 cups of mixed seafood (shrimp, squid, and mussels)
- 1 cup of white rice
- 4 cups of fish stock
- a splash of olive oil
- a couple of garlic cloves, minced
- 1 onion, finely chopped
- 1 red bell pepper, diced
- a pinch of saffron threads
- 1 tsp of smoked paprika
- salt to your liking
- a handful of fresh parsley, chopped
Instructions
- Heat a splash of olive oil in a large pot over medium heat until shimmering.
- Add the minced garlic and chopped onion, sautéing until translucent, about 3 minutes.
- Stir in the diced red bell pepper and cook for another 2 minutes until softened.
- Sprinkle in the saffron threads and smoked paprika, stirring to coat the vegetables evenly.
- Pour in the fish stock and bring the mixture to a gentle boil.
- Add the white rice, reducing the heat to low, and simmer uncovered for 15 minutes.
- Gently fold in the mixed seafood, cooking until the shrimp are pink and the mussels have opened, about 5 minutes.
- Season with salt to your liking and sprinkle with fresh parsley before serving.
Outstanding in its depth of flavor, this Guacho de Mariscos boasts a tender texture from the seafood and a slight chewiness from the rice. Serve it in wide bowls to showcase its vibrant hues, perhaps with a side of crusty bread for dipping into the fragrant broth.
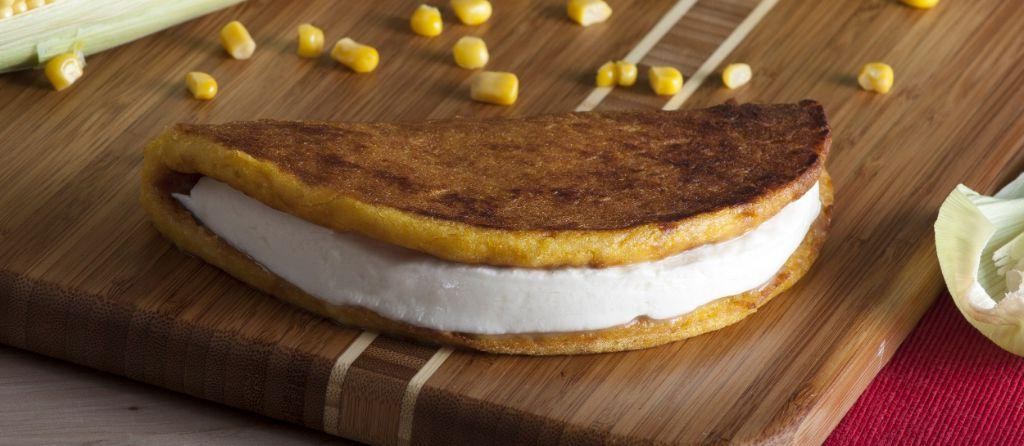
Chicheme

Yearning for a taste of tropical comfort? Chicheme, a creamy and sweet corn-based drink, hails from Panama but has found a cozy spot in the hearts of many across the US. This delightful beverage, often enjoyed chilled, is a perfect blend of homely warmth and refreshing zest, making it an ideal treat for any season.
Ingredients
- 2 cups of white corn kernels, soaked overnight
- 4 cups of water
- 1 cup of whole milk
- 1 cinnamon stick
- A splash of vanilla extract
- 1/2 cup of sugar
- A pinch of salt
Instructions
- Drain the soaked corn kernels and rinse them under cold water.
- In a large pot, combine the corn kernels and water. Bring to a boil over high heat, then reduce to a simmer for about 2 hours, or until the corn is very soft. Tip: Stir occasionally to prevent sticking.
- Remove the pot from heat and let it cool slightly. Blend the mixture until smooth, then strain through a fine mesh sieve back into the pot. Tip: Press down on the solids to extract as much liquid as possible.
- Add the milk, cinnamon stick, vanilla extract, sugar, and salt to the pot. Stir well to combine.
- Return the pot to the stove and simmer over low heat for another 30 minutes, stirring occasionally. Tip: The mixture should thicken slightly but still be pourable.
- Remove the cinnamon stick and let the chicheme cool to room temperature before refrigerating until chilled.
Nowhere does simplicity meet sophistication quite like in a glass of chicheme. Its velvety texture and harmonious blend of sweet and spiced flavors make it a versatile drink—serve it over ice for a refreshing sip or warm it gently for a comforting nightcap.
Arroz con Guandú
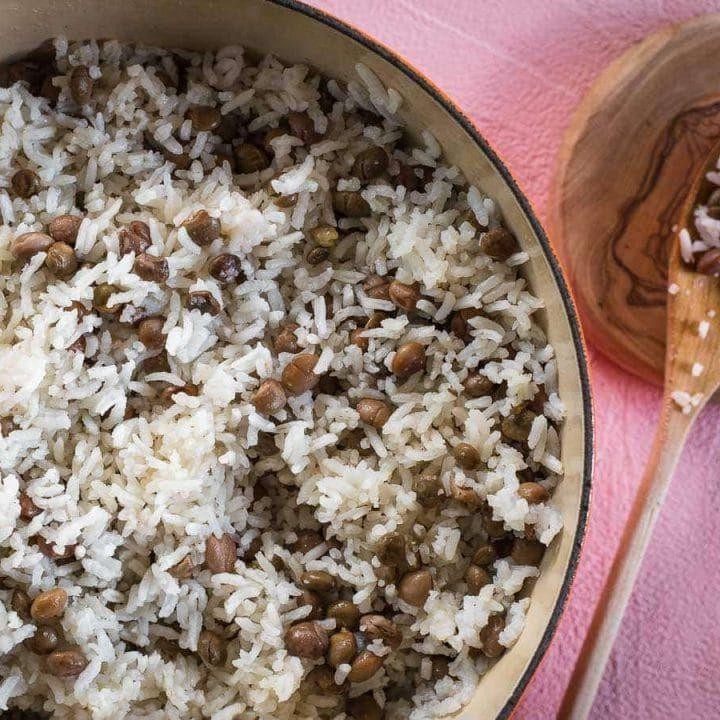
Masterfully blending the earthy tones of guandú beans with the comforting simplicity of rice, this Arroz con Guandú is a celebration of texture and flavor that promises to transport your senses to the heart of traditional cuisine.
Ingredients
- 2 cups of long-grain white rice
- 1 cup of guandú beans, soaked overnight
- a splash of olive oil
- a couple of garlic cloves, minced
- 1 small onion, finely chopped
- a pinch of ground cumin
- a handful of fresh cilantro, chopped
- 4 cups of chicken or vegetable broth
- salt to your liking
Instructions
- Heat a splash of olive oil in a large pot over medium heat until shimmering.
- Add the minced garlic and chopped onion, sautéing until they’re soft and fragrant, about 3 minutes.
- Stir in the soaked guandú beans and a pinch of ground cumin, cooking for another 2 minutes to let the flavors meld.
- Tip in the rice, stirring to coat each grain with the oil and spices, ensuring a nutty flavor base.
- Pour in the chicken or vegetable broth, bringing the mixture to a gentle boil before reducing the heat to low.
- Cover the pot and let the rice simmer for 20 minutes, or until the liquid is absorbed and the rice is tender.
- Remove from heat and let it sit, covered, for 5 minutes to steam—this makes the rice fluffier.
- Gently fold in the chopped cilantro and adjust the salt if needed before serving.
The final dish boasts a delightful contrast between the creamy beans and fluffy rice, with the cilantro adding a fresh burst of color and flavor. Serve it alongside grilled fish or chicken for a meal that’s as nourishing as it is vibrant.
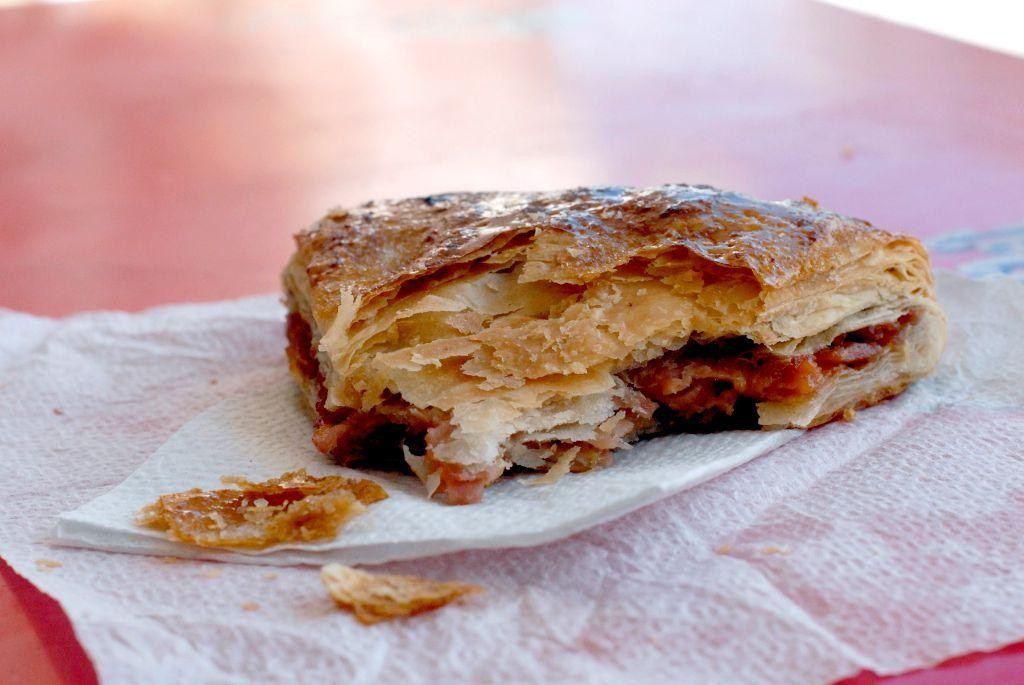
Empanadas de Carne

These golden, flaky empanadas de carne are a delightful fusion of savory beef and aromatic spices, encased in a buttery crust that crumbles with every bite. Today, we’re sharing a foolproof recipe that brings the vibrant flavors of Latin America right to your kitchen.
Ingredients
- 2 cups all-purpose flour
- A pinch of salt
- A stick of cold butter, cubed
- 1/4 cup ice water
- 1 lb ground beef
- A small onion, finely chopped
- A couple of garlic cloves, minced
- A splash of olive oil
- 1 tsp cumin
- 1/2 tsp paprika
- A handful of green olives, sliced
- 1 hard-boiled egg, chopped
- 1 egg, beaten (for egg wash)
Instructions
- In a large bowl, mix the flour and salt. Add the cold butter cubes and use your fingers to rub them into the flour until the mixture resembles coarse crumbs.
- Gradually add ice water, a tablespoon at a time, mixing until the dough comes together. Wrap in plastic and chill for 30 minutes.
- Heat olive oil in a pan over medium heat. Sauté the onion and garlic until soft, about 5 minutes.
- Add the ground beef, breaking it apart with a spoon. Cook until browned, then stir in cumin, paprika, olives, and chopped egg. Let cool.
- Preheat your oven to 375°F. Roll out the dough on a floured surface to about 1/8-inch thickness. Cut into 6-inch circles.
- Spoon the beef mixture onto one half of each circle, leaving a border. Fold over and seal edges with a fork.
- Brush the empanadas with beaten egg for a golden finish. Bake for 25 minutes, or until golden and crisp.
With their crisp exterior and juicy, flavorful filling, these empanadas are perfect for a festive gathering or a cozy night in. Serve them with a side of chimichurri for an extra kick of flavor.
Pan de Yuca
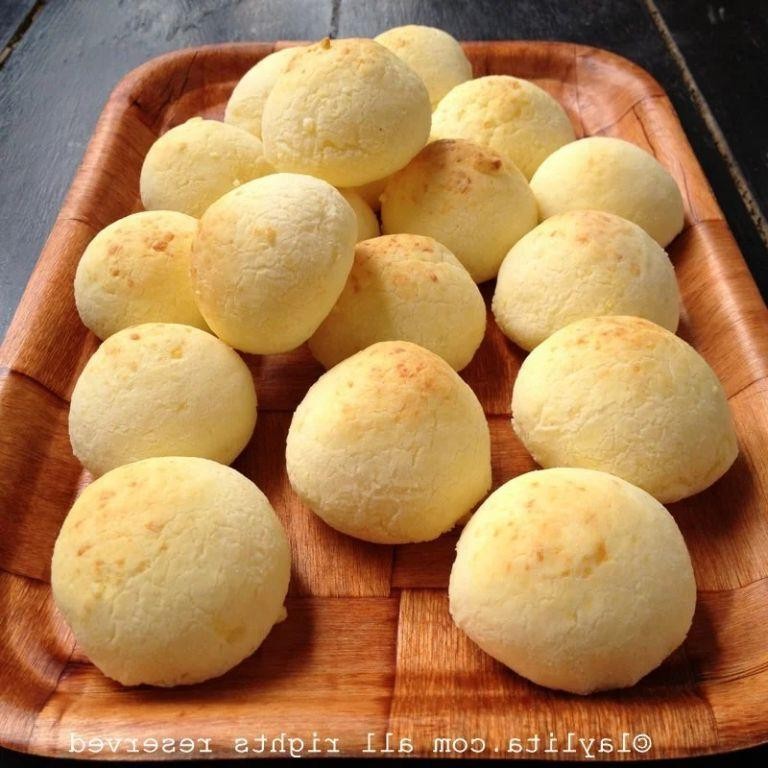
Savory and subtly sweet, Pan de Yuca is a gluten-free delight that hails from Ecuador, offering a chewy interior with a delightfully crisp exterior. This cheese-infused bread is perfect for those seeking a unique twist on traditional bread recipes, promising a melt-in-your-mouth experience with every bite.
Ingredients
- 2 cups of yuca flour
- 1 cup of grated mozzarella cheese
- 1/2 cup of grated Parmesan cheese
- 1/4 cup of butter, softened
- A couple of eggs
- A splash of milk
- 1 tsp of baking powder
- A pinch of salt
Instructions
- Preheat your oven to 350°F (175°C) and line a baking sheet with parchment paper.
- In a large bowl, mix together the yuca flour, mozzarella, Parmesan, softened butter, and a pinch of salt until well combined.
- Add the eggs one at a time, mixing thoroughly after each addition to ensure a smooth dough.
- Pour in a splash of milk and sprinkle the baking powder over the dough, then knead until the mixture is uniform and slightly sticky.
- Divide the dough into small portions, rolling each into a ball before placing them on the prepared baking sheet, leaving space between each for expansion.
- Bake in the preheated oven for about 20 minutes, or until the rolls are golden brown and puffed up.
- Let them cool on the baking sheet for a few minutes before transferring to a wire rack to cool slightly more.
Enjoy these warm, with the cheese pulling apart in strings, or serve alongside a cup of hot chocolate for a truly indulgent treat. The contrast between the crispy crust and soft, chewy center makes Pan de Yuca a memorable addition to any meal or snack time.
Chorizo Panameño
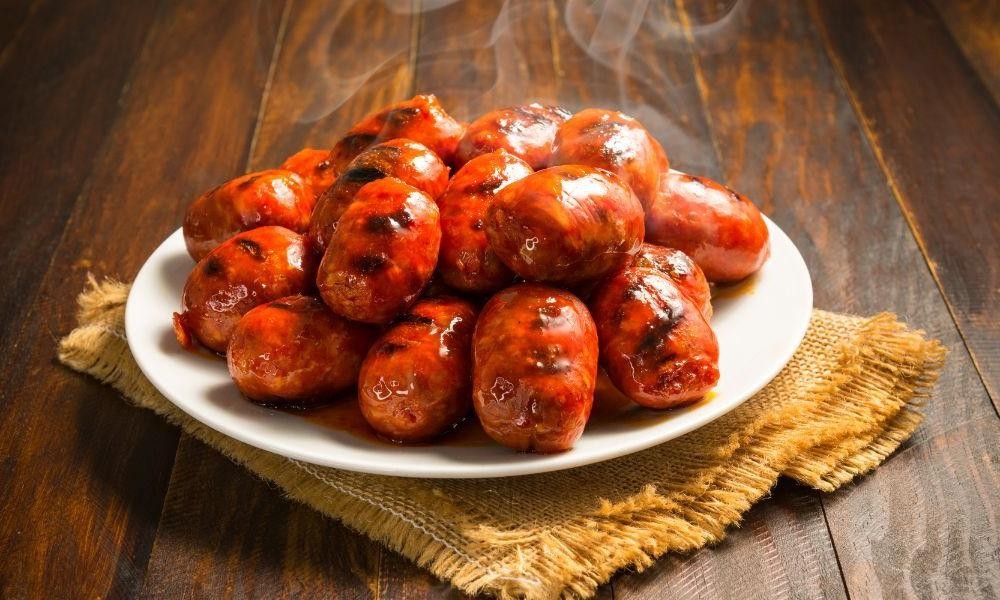
This vibrant dish, with its rich hues and bold flavors, is a testament to the culinary traditions of Panama, offering a delightful twist on the classic chorizo that’s sure to captivate your palate.
Ingredients
- 1 lb of Panamanian chorizo, sliced into 1/2-inch pieces
- A couple of tablespoons of olive oil
- 1 large onion, thinly sliced
- 2 cloves of garlic, minced
- A splash of white wine
- 1 red bell pepper, sliced
- 1 green bell pepper, sliced
- A pinch of salt and freshly ground black pepper
Instructions
- Heat a couple of tablespoons of olive oil in a large skillet over medium heat until shimmering.
- Add the sliced chorizo and cook for about 5 minutes, until it starts to brown, stirring occasionally to ensure even cooking.
- Toss in the thinly sliced onion and minced garlic, sautéing for another 3 minutes until the onion becomes translucent. Tip: Keep the heat medium to avoid burning the garlic.
- Pour in a splash of white wine to deglaze the pan, scraping up any browned bits for extra flavor.
- Add the sliced red and green bell peppers, cooking for about 5 minutes until they’re just tender but still crisp. Tip: The peppers should retain a bit of crunch for texture.
- Season with a pinch of salt and freshly ground black pepper, adjusting to your preference. Tip: Taste as you go to balance the flavors perfectly.
Chorizo Panameño boasts a harmonious blend of smoky, spicy, and slightly sweet flavors, with the peppers adding a refreshing crunch. Serve it over a bed of fluffy rice or alongside warm tortillas for a meal that’s as colorful as it is delicious.
Lechona
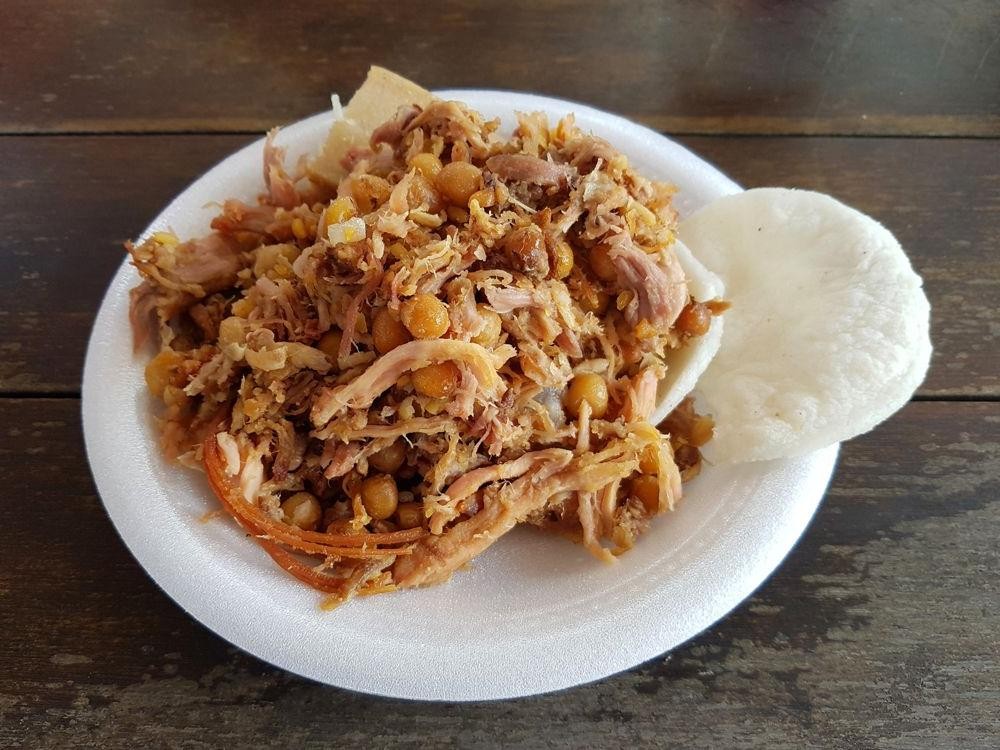
Kickstarting our culinary journey today, we delve into the rich, savory depths of Lechona, a traditional Colombian dish that marries crispy skin with tender, flavorful meat, all encased in a golden, crackling shell. This dish is a celebration of textures and tastes, perfect for those who appreciate the artistry of slow-cooked meals.
Ingredients
- a whole pork shoulder, about 10 lbs
- a couple of cups of cooked white rice
- a handful of green peas
- a splash of orange juice
- a tablespoon of ground cumin
- a teaspoon of salt
- a pinch of black pepper
- a cup of chopped onions
- a couple of minced garlic cloves
- a tablespoon of achiote powder
Instructions
- Preheat your oven to 300°F, ensuring it’s ready for slow cooking.
- In a large bowl, mix the cooked white rice, green peas, chopped onions, minced garlic, achiote powder, ground cumin, salt, and black pepper to create the stuffing.
- Carefully stuff the pork shoulder with the rice mixture, ensuring it’s packed tightly but not overfilled.
- Sew the opening shut with kitchen twine to keep all the goodness inside during cooking.
- Rub the outside of the pork with orange juice for a subtle citrus note that enhances the meat’s flavor.
- Place the pork in a roasting pan and cook in the preheated oven for about 8 hours, or until the skin is crispy and the meat is tender.
- Halfway through cooking, baste the pork with its own juices to keep it moist and flavorful.
- Once done, let it rest for 20 minutes before carving to allow the juices to redistribute.
How the Lechona presents a symphony of textures—from the crackling skin to the succulent meat and the soft, aromatic rice inside—is nothing short of magical. Serve it with a side of ají for an extra kick, or enjoy it as is for a truly authentic experience.
Arroz con Coco
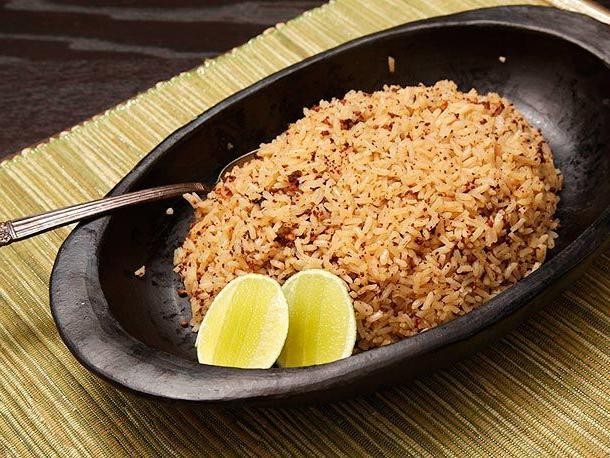
Gracefully blending the tropical allure of coconut with the humble simplicity of rice, Arroz con Coco is a dish that transports your senses to sun-drenched beaches with every fragrant bite. This Caribbean classic, with its creamy texture and subtle sweetness, is a testament to the magic that happens when pantry staples meet a touch of culinary creativity.
Ingredients
- 2 cups of long-grain white rice
- 1 can (13.5 oz) of coconut milk
- A splash of water
- A couple of tablespoons of sugar
- A pinch of salt
- A handful of raisins (optional for a sweet twist)
Instructions
- Rinse the rice under cold water until the water runs clear, to remove excess starch and prevent clumping.
- In a medium saucepan, combine the rinsed rice, coconut milk, a splash of water, sugar, and a pinch of salt. Stir gently to mix.
- Bring the mixture to a boil over medium-high heat, then reduce the heat to low, cover, and simmer for about 20 minutes. Tip: Resist the urge to stir the rice as it cooks to avoid breaking the grains.
- After 20 minutes, check the rice. If it’s still too firm, add a tablespoon of water and cook for another 5 minutes. Tip: The rice should be tender and the liquid fully absorbed.
- If using raisins, sprinkle them over the rice, cover, and let sit off the heat for 5 minutes to plump up. Tip: The residual heat will soften the raisins without making them mushy.
- Fluff the rice with a fork before serving to separate the grains and release the aromatic steam.
Delightfully creamy with a hint of sweetness, Arroz con Coco pairs beautifully with grilled fish or chicken for a balanced meal. For an extra touch of indulgence, serve it with a drizzle of coconut cream and a sprinkle of toasted coconut flakes on top.
Bistec Picado
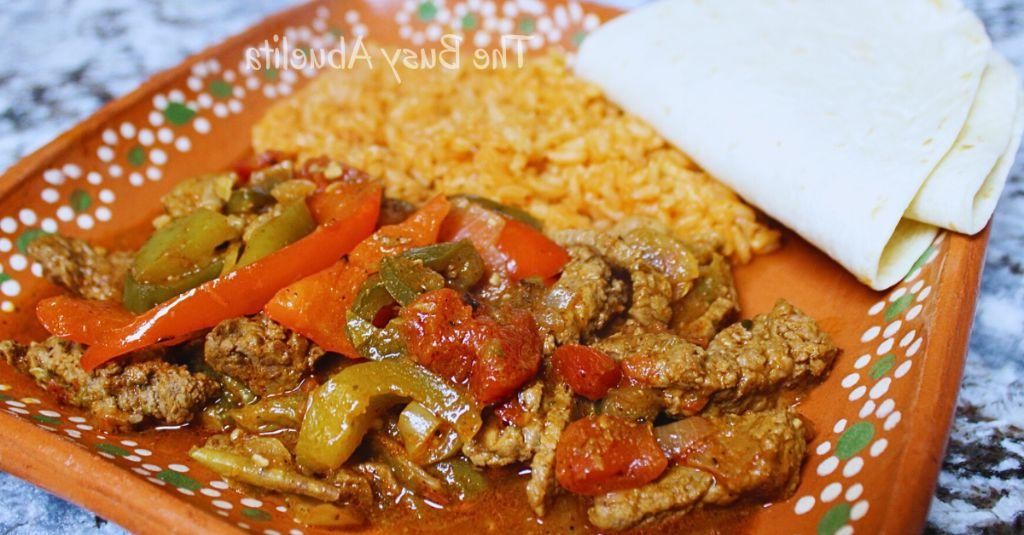
Zesty and vibrant, Bistec Picado is a dish that marries the bold flavors of Latin cuisine with the simplicity of home cooking, offering a symphony of taste that’s both comforting and sophisticated.
Ingredients
- 1.5 lbs of flank steak, sliced into thin strips
- A couple of tablespoons of olive oil
- A splash of white vinegar
- 3 cloves of garlic, minced
- 1 teaspoon of ground cumin
- A pinch of salt and freshly ground black pepper
- 1 large onion, thinly sliced
- 1 bell pepper, thinly sliced
- A handful of fresh cilantro, chopped
- Juice of 1 lime
Instructions
- In a large bowl, combine the flank steak strips with white vinegar, minced garlic, ground cumin, salt, and pepper. Let it marinate for at least 30 minutes in the fridge for maximum flavor.
- Heat olive oil in a large skillet over medium-high heat. Add the marinated steak and cook for about 5 minutes, stirring occasionally, until the steak is nicely browned.
- Tip: Don’t overcrowd the skillet to ensure each piece of steak gets a good sear.
- Add the sliced onion and bell pepper to the skillet. Cook for another 5 minutes, until the vegetables are soft but still crisp.
- Tip: For an extra layer of flavor, deglaze the pan with a splash of water or broth, scraping up any browned bits.
- Remove from heat and stir in the fresh cilantro and lime juice. Adjust seasoning if necessary.
- Tip: Let the dish rest for a couple of minutes before serving to allow the flavors to meld together beautifully.
Delightfully tender with a hint of tanginess, this Bistec Picado pairs wonderfully with warm tortillas or over a bed of fluffy rice. The vibrant colors and aromas make it a feast for the senses, perfect for a lively dinner table.
Conclusion
Just like that, we’ve journeyed through the vibrant flavors of Panama with these 20 authentic recipes! Whether you’re craving the comfort of Sancocho or the zest of Ceviche, there’s something here to delight every palate. We’d love to hear which dishes you try—drop a comment with your favorites and don’t forget to share this culinary adventure on Pinterest. Happy cooking!