Ready to transform your meals into a powerhouse of nutrition without sacrificing flavor? You’re in the right place! Our roundup of 19 Delicious Nutrient-Dense Recipes for Healthy Living is packed with dishes that are as good for your body as they are for your taste buds. From quick weeknight dinners to hearty comfort foods, these recipes promise to keep you energized and satisfied. Let’s dive in!
Quinoa and Black Bean Stuffed Peppers

Nothing beats the comfort of a hearty, healthy meal that’s as pleasing to the eye as it is to the palate. That’s why quinoa and black bean stuffed peppers have become a staple in my kitchen—they’re vibrant, nutritious, and endlessly customizable. I remember the first time I made them; my kitchen was filled with the most inviting aromas, and the colors were so vibrant, it felt like a celebration on a plate.
Ingredients
- 4 large bell peppers, any color (I love using a mix for a pop of color)
- 1 cup quinoa, rinsed (trust me, rinsing removes that bitter taste)
- 1 can (15 oz) black beans, drained and rinsed (I sometimes use low-sodium for better control over the salt)
- 1 cup corn kernels (fresh or frozen, but I always have frozen on hand for convenience)
- 1 tbsp extra virgin olive oil (my go-to for its flavor and health benefits)
- 1 tsp cumin (it adds a warm depth that’s irresistible)
- 1/2 tsp chili powder (adjust based on your heat preference)
- 1 cup shredded cheese (I’m a fan of sharp cheddar for its meltiness and tang)
- Salt to taste (I like to add it at the end to perfectly season the dish)
Instructions
- Preheat your oven to 375°F. This ensures a perfectly cooked pepper with a slight char.
- Cut the tops off the bell peppers and remove the seeds and membranes. A sharp knife makes this step a breeze.
- In a medium saucepan, bring 2 cups of water to a boil. Add the quinoa, reduce heat to low, cover, and simmer for 15 minutes. Tip: Let it sit covered for 5 minutes off the heat for fluffier quinoa.
- Heat olive oil in a large skillet over medium heat. Add the cooked quinoa, black beans, corn, cumin, and chili powder. Stir well to combine and cook for 5 minutes. Tip: Taste and adjust seasoning now for the best flavor.
- Stuff each pepper with the quinoa mixture and place them in a baking dish. Top with shredded cheese. Tip: For extra crispiness, broil for the last 2 minutes.
- Bake for 25-30 minutes, until the peppers are tender and the cheese is bubbly and golden.
Let these stuffed peppers cool for a few minutes before serving—they’re worth the wait. The quinoa and black bean filling is hearty and flavorful, with a slight crunch from the corn, all nestled in a sweet, tender pepper. Serve with a dollop of sour cream or avocado slices for an extra layer of richness.
Kale and Spinach Green Smoothie
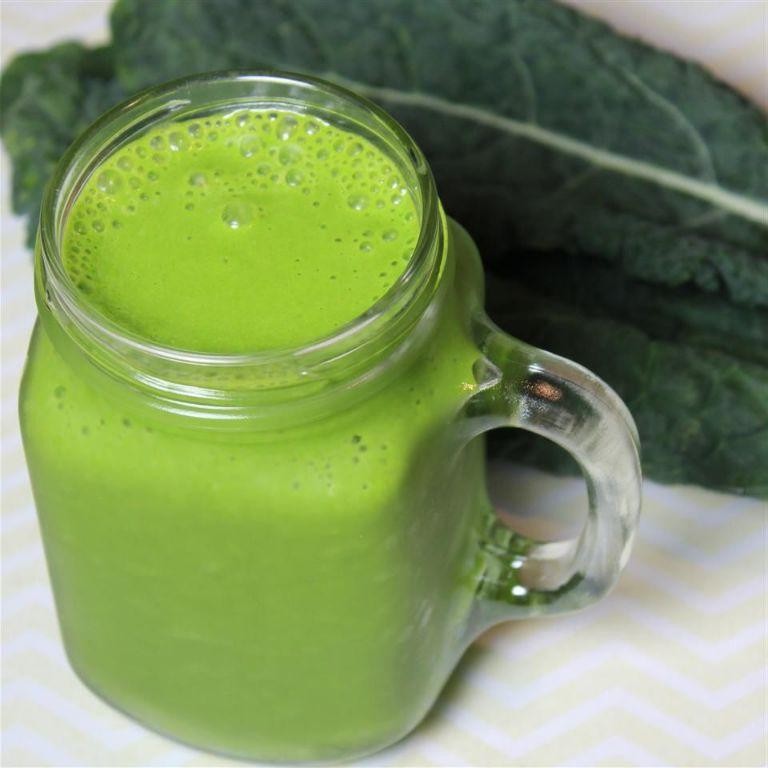
Perfect for those mornings when you’re rushing out the door but still want to pack in the nutrients, this Kale and Spinach Green Smoothie has become my go-to. I remember the first time I tried it, skeptical about the greens, but the sweetness of the banana and the tang of the lemon won me over.
Ingredients
- 2 cups fresh kale, stems removed (I like to massage the kale first to soften it)
- 1 cup fresh spinach (baby spinach is sweeter and more tender)
- 1 ripe banana (the spottier, the better for natural sweetness)
- 1/2 cup plain Greek yogurt (I prefer full-fat for creaminess)
- 1 tbsp honey (local if you can find it, for that floral touch)
- 1/2 lemon, juiced (about 1 tbsp, and yes, fresh makes a difference)
- 1 cup almond milk (unsweetened keeps it from being too sweet)
- A handful of ice cubes (because no one likes a warm smoothie)
Instructions
- Wash the kale and spinach thoroughly under cold water to remove any dirt or grit.
- Remove the stems from the kale and tear the leaves into smaller pieces for easier blending.
- Peel the banana and break it into chunks to help your blender out.
- Add all the ingredients into the blender in the order listed: kale, spinach, banana, Greek yogurt, honey, lemon juice, almond milk, and ice cubes.
- Blend on high for 45-60 seconds, or until the mixture is completely smooth. If it’s too thick, add a splash more almond milk.
- Pour into your favorite glass and enjoy immediately for the best texture and flavor.
Delightfully creamy with just the right balance of sweet and tangy, this smoothie is a vibrant start to any day. Try topping it with a sprinkle of chia seeds or a few slices of banana for an extra touch of elegance.
Salmon and Avocado Salad
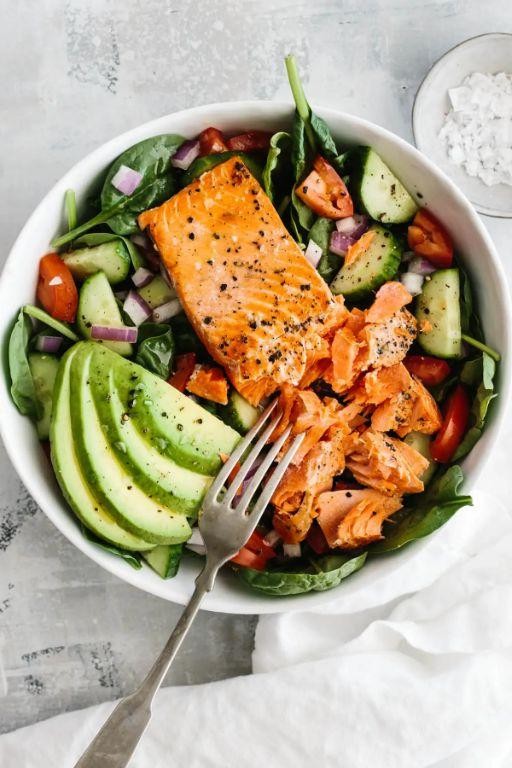
Perfect for those warm summer evenings, this Salmon and Avocado Salad has become my go-to for a quick yet satisfying meal. It’s a dish that reminds me of a breezy evening by the coast, where the freshness of the ingredients truly shines.
Ingredients
- 1 lb fresh salmon fillet (I always ask for the center cut for even thickness)
- 2 ripe avocados (the kind that yields slightly to pressure is perfect)
- 1 cup cherry tomatoes, halved (I love the burst of color and sweetness they add)
- 1/4 cup extra virgin olive oil (my kitchen staple for dressings)
- 2 tbsp lemon juice (freshly squeezed, please, for that zesty kick)
- 1/2 tsp salt (I prefer sea salt for its subtle crunch)
- 1/4 tsp black pepper (freshly ground makes all the difference)
- 2 cups mixed greens (the more variety, the better for texture and flavor)
Instructions
- Preheat your oven to 375°F (190°C) and line a baking sheet with parchment paper for easy cleanup.
- Place the salmon fillet on the prepared baking sheet, drizzle with 1 tbsp of olive oil, and season with 1/4 tsp salt and 1/8 tsp black pepper.
- Bake the salmon for 12-15 minutes, until it flakes easily with a fork. Tip: Don’t overcook to keep it moist.
- While the salmon bakes, halve the avocados and remove the pits. Slice them thinly and toss gently with lemon juice to prevent browning.
- In a large bowl, combine the mixed greens, cherry tomatoes, and avocado slices.
- Once the salmon is done, let it cool for a few minutes, then flake it into large chunks over the salad.
- Drizzle the remaining olive oil and lemon juice over the salad, then sprinkle with the remaining salt and pepper. Tip: Toss gently to keep the avocado slices intact.
- Serve immediately. Tip: For an extra crunch, sprinkle with toasted almonds or seeds.
Mmm, the creamy avocado pairs beautifully with the flaky salmon, while the lemon dressing adds a refreshing zing. Try serving it on a warm tortilla for a delightful twist.
Sweet Potato and Chickpea Curry

Craving something hearty yet healthy? I recently whipped up this Sweet Potato and Chickpea Curry on a chilly evening, and it was the perfect comfort food that didn’t leave me feeling weighed down. The blend of spices fills your kitchen with an aroma that’s absolutely irresistible, making it hard to wait until it’s done!
Ingredients
- 1 tbsp extra virgin olive oil (my go-to for its flavor and health benefits)
- 1 large sweet potato, peeled and diced into 1-inch cubes (I find the uniform size ensures even cooking)
- 1 can (15 oz) chickpeas, drained and rinsed (for that perfect bite)
- 1 small onion, finely chopped (I like yellow for their sweetness)
- 2 cloves garlic, minced (fresh is best here, in my opinion)
- 1 tbsp curry powder (I sometimes add a pinch more for extra warmth)
- 1 can (14 oz) coconut milk (full fat for creaminess)
- 1 cup vegetable broth (low sodium lets you control the saltiness)
- Salt to taste (I start with 1/4 tsp and adjust from there)
Instructions
- Heat the olive oil in a large pot over medium heat until shimmering, about 1 minute.
- Add the chopped onion and sauté until translucent, about 3 minutes, stirring occasionally to prevent burning.
- Stir in the minced garlic and curry powder, cooking for another minute until fragrant. Tip: Don’t let the garlic brown, or it’ll turn bitter.
- Add the diced sweet potato to the pot, stirring to coat with the spices. Cook for 2 minutes to slightly soften the edges.
- Pour in the coconut milk and vegetable broth, bringing the mixture to a gentle boil. Tip: A slow boil prevents the coconut milk from separating.
- Reduce heat to low, cover, and simmer for 15 minutes, or until the sweet potatoes are tender when pierced with a fork.
- Add the chickpeas and salt, simmering uncovered for another 5 minutes to heat through. Tip: This is when I taste and adjust the salt or curry powder if needed.
This curry is a beautiful harmony of creamy and hearty, with the sweet potatoes melting just enough to thicken the sauce. Serve it over a bed of fluffy basmati rice or with a side of warm naan for scooping up every last bit of that delicious sauce.
Beetroot and Walnut Salad
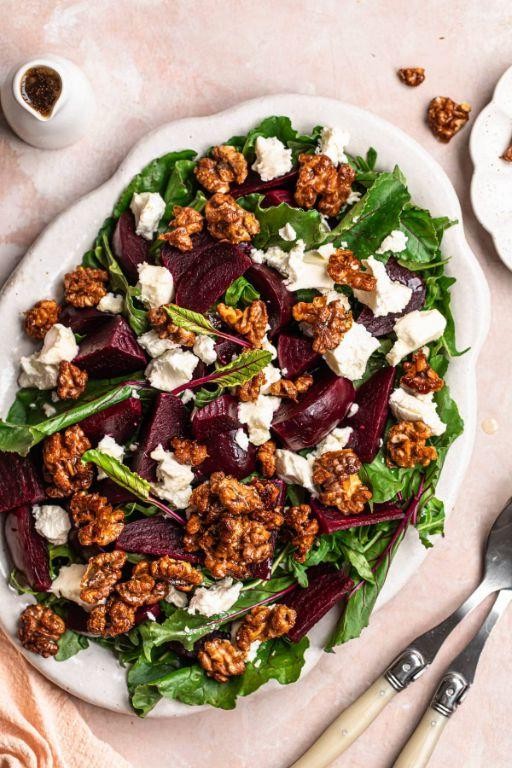
Mmm, there’s something about the earthy sweetness of beetroots paired with the crunch of walnuts that just feels like a hug in a bowl. I stumbled upon this combo at a farmer’s market last fall, and it’s been a staple in my kitchen ever since, especially during those weeks when I’m craving something both nourishing and effortless.
Ingredients
- 2 medium beetroots, peeled and diced into 1/2-inch cubes (I love using golden beets for their milder flavor, but the classic red works beautifully too)
- 1/2 cup walnuts, roughly chopped (toasting them lightly brings out their nuttiness, trust me)
- 2 tbsp extra virgin olive oil (my go-to for dressings because of its fruity notes)
- 1 tbsp balsamic vinegar (a good quality one makes all the difference)
- 1/2 tsp salt (I prefer sea salt for its subtle crunch)
- 1/4 tsp black pepper, freshly ground
- 2 cups arugula (for that peppery kick that contrasts the sweetness of the beets)
Instructions
- Preheat your oven to 400°F (200°C). This ensures your beets roast evenly and get those slightly crispy edges.
- Toss the diced beetroots with 1 tbsp of olive oil, salt, and pepper on a baking sheet. Spread them out in a single layer to avoid steaming. Roast for 25 minutes, or until they’re tender and slightly caramelized at the edges.
- While the beets are roasting, heat a dry skillet over medium heat. Add the chopped walnuts and toast for about 3-5 minutes, stirring frequently, until they’re fragrant and slightly darker. Tip: Keep an eye on them; nuts can go from toasted to burnt in seconds.
- In a large bowl, whisk together the remaining 1 tbsp of olive oil and balsamic vinegar to create a simple dressing.
- Add the roasted beets, toasted walnuts, and arugula to the bowl with the dressing. Gently toss everything together until well combined. Tip: If you’re not serving immediately, keep the arugula separate to prevent wilting.
This salad is a delightful mix of textures—creamy beets, crunchy walnuts, and the slight bite of arugula. The flavors meld together beautifully, making it a perfect side or a light main. Try serving it with a sprinkle of goat cheese on top for an extra layer of creaminess.
Lentil and Vegetable Soup
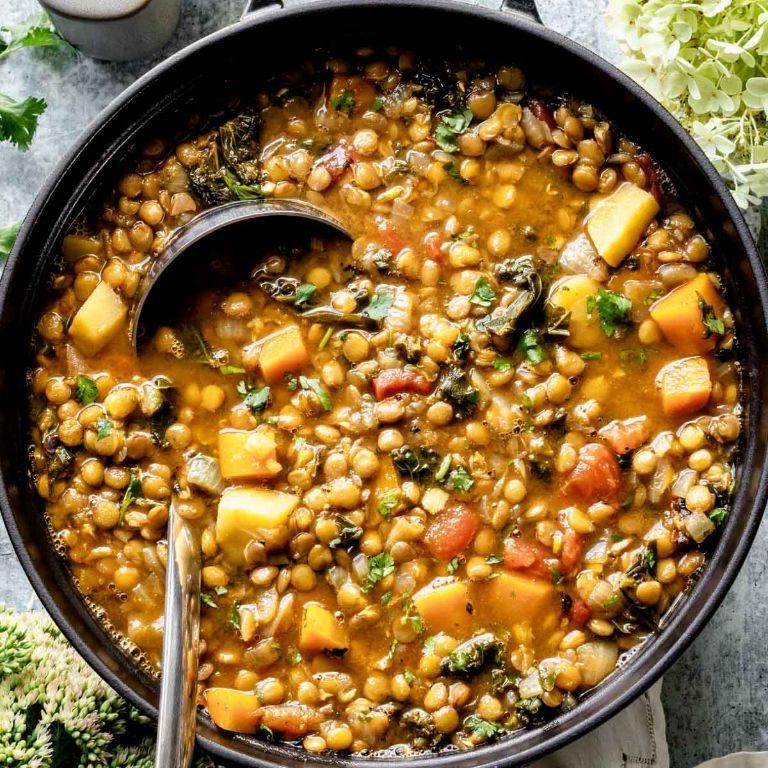
Sometimes, all I crave is a bowl of something hearty, healthy, and utterly comforting—enter my Lentil and Vegetable Soup. It’s the kind of dish that simmers away on the stove, filling the kitchen with an aroma that promises warmth and satisfaction, no matter the season.
Ingredients
- 1 cup dried green lentils (I always give them a quick rinse to remove any debris)
- 2 tbsp extra virgin olive oil (my go-to for its fruity depth)
- 1 large onion, diced (yellow onions are my preference for their sweetness)
- 2 carrots, peeled and diced (about 1 cup)
- 2 celery stalks, diced (for that classic flavor base)
- 3 garlic cloves, minced (because more garlic is always better)
- 6 cups vegetable broth (homemade if you have it, but store-bought works in a pinch)
- 1 tsp dried thyme (it’s amazing how this little herb lifts the whole dish)
- Salt and freshly ground black pepper (to taste, but don’t be shy)
Instructions
- Heat the olive oil in a large pot over medium heat until shimmering—about 2 minutes.
- Add the onion, carrots, and celery, cooking until the vegetables soften, about 5 minutes. Stir occasionally to prevent sticking.
- Stir in the garlic and dried thyme, cooking for another minute until fragrant. This is where the magic starts!
- Add the rinsed lentils and vegetable broth, bringing the mixture to a boil.
- Once boiling, reduce the heat to low, cover, and simmer for 25 minutes. The lentils should be tender but not mushy.
- Season with salt and pepper, then taste and adjust the seasoning if needed. A little tip: letting the soup sit for 10 minutes off the heat allows the flavors to meld beautifully.
Zesty with a hint of earthiness from the thyme, this soup is a texture dream—creamy lentils with just the right bite from the veggies. Serve it with a crusty bread for dipping, or for a twist, top with a dollop of pesto or a sprinkle of feta cheese to elevate it to dinner-party status.
Chia Seed Pudding with Berries
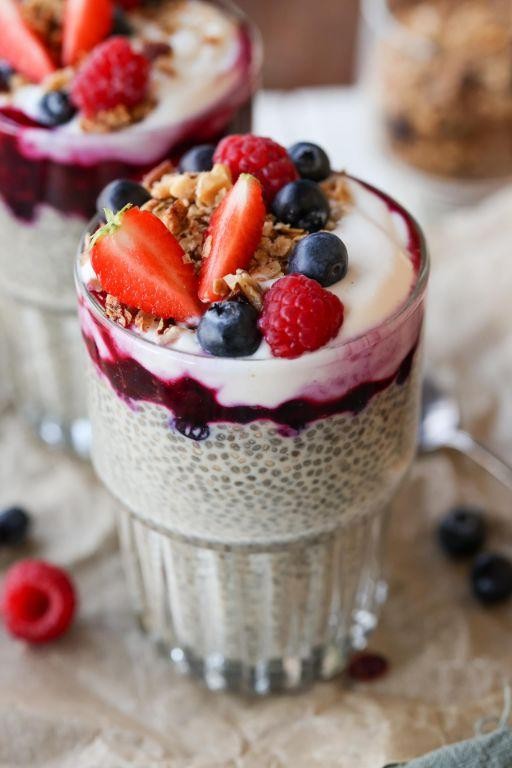
Craving something sweet yet healthy for breakfast? I stumbled upon this chia seed pudding recipe during one of those lazy Sunday mornings when I wanted something no-fuss but nutritious. It’s become my go-to for a quick, satisfying meal that feels like a treat.
Ingredients
- 1/4 cup chia seeds (I love how these tiny seeds expand into a pudding-like texture)
- 1 cup almond milk (unsweetened is my preference, but any milk works)
- 1 tbsp maple syrup (for that subtle sweetness; honey works too)
- 1/2 tsp vanilla extract (a dash of this really elevates the flavor)
- 1/2 cup mixed berries (fresh or frozen, I use whatever’s in season)
Instructions
- In a medium bowl, combine the chia seeds and almond milk. Stir well to prevent clumping.
- Add the maple syrup and vanilla extract to the mixture. Stir again until everything is well incorporated.
- Cover the bowl and refrigerate for at least 4 hours, or overnight. Tip: Giving it a stir after the first hour helps achieve a smoother texture.
- Once the pudding has thickened, give it a good stir. Tip: If it’s too thick, you can thin it with a little more almond milk.
- Divide the pudding into two serving bowls and top with mixed berries. Tip: For an extra touch, drizzle a bit more maple syrup on top before serving.
The pudding sets into a creamy, dreamy texture that’s perfectly complemented by the fresh burst of berries. I sometimes layer it in a glass with granola for an extra crunch, making it not just a breakfast but a dessert-worthy treat.
Broccoli and Almond Stir Fry
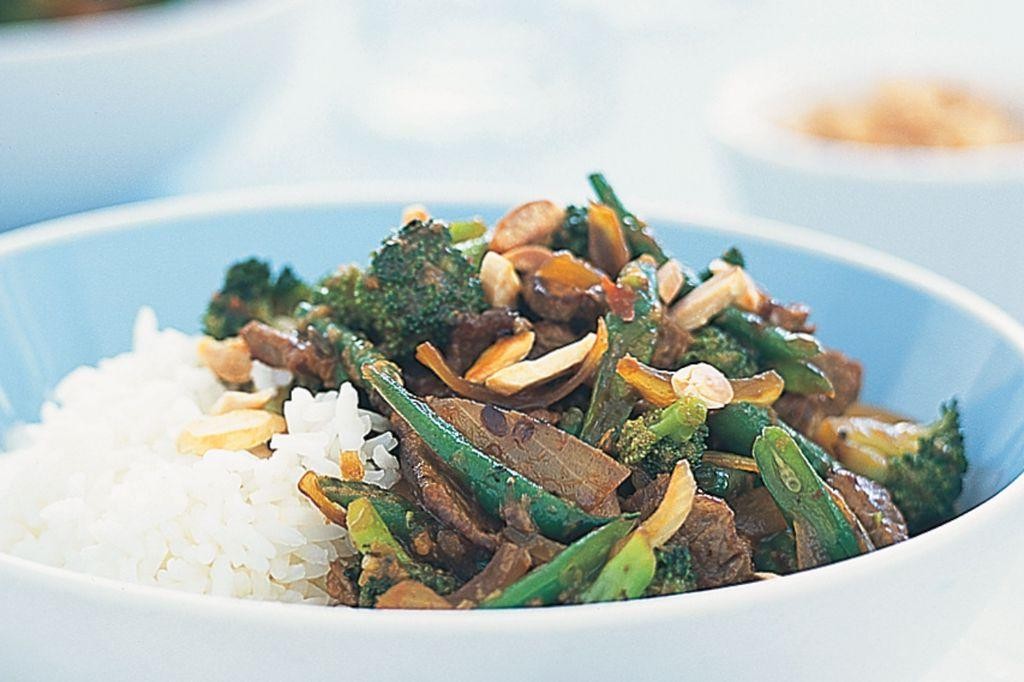
After a long day, there’s nothing I love more than whipping up a quick, nutritious stir-fry that doesn’t skimp on flavor. This Broccoli and Almond Stir Fry has become a weeknight staple in my kitchen, especially when I’m craving something green and crunchy with a satisfying nutty twist.
Ingredients
- 2 cups broccoli florets (I like them small for quicker cooking)
- 1/2 cup raw almonds (toasting them brings out their flavor)
- 2 tbsp extra virgin olive oil (my go-to for its fruity notes)
- 1 tbsp minced garlic (because more garlic is always better)
- 1/2 tsp red pepper flakes (for a subtle kick)
- 1 tbsp soy sauce (I opt for low-sodium to control the saltiness)
- 1 tsp honey (just a touch to balance the flavors)
Instructions
- Heat a large skillet over medium heat and add the almonds. Toast for 3-4 minutes, stirring occasionally, until they’re golden and fragrant. Tip: Keep an eye on them to prevent burning.
- Remove the almonds from the skillet and set aside. In the same skillet, heat the olive oil over medium-high heat.
- Add the minced garlic and red pepper flakes to the oil, sautéing for about 30 seconds until fragrant. Tip: Don’t let the garlic brown too much to avoid bitterness.
- Toss in the broccoli florets and stir-fry for 5-6 minutes, until they’re bright green and slightly tender but still crisp. Tip: A little char adds great flavor, so don’t shy away from high heat.
- Return the toasted almonds to the skillet, then drizzle with soy sauce and honey. Stir everything together for another minute until well combined and heated through.
Crunchy, nutty, and with just the right amount of sweetness and heat, this stir-fry is fantastic on its own or served over a bed of fluffy quinoa for a more filling meal.
Oatmeal with Flaxseeds and Banana
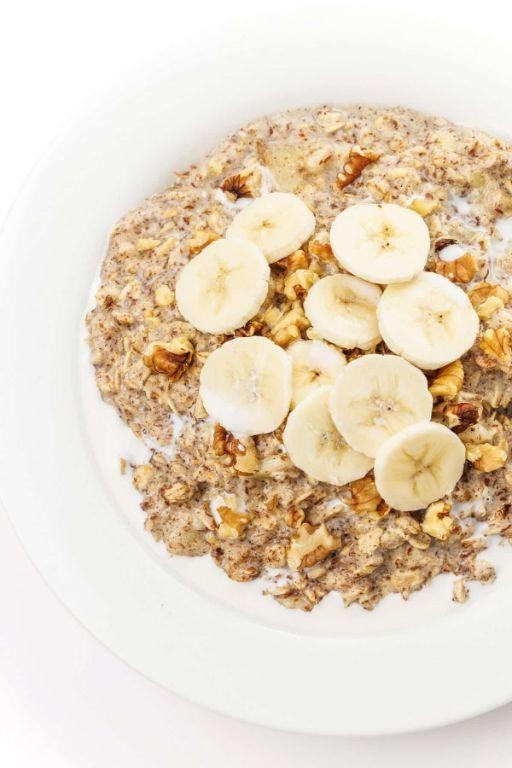
After a chilly morning walk, there’s nothing like a warm bowl of oatmeal to start the day. I stumbled upon this combination of flaxseeds and banana during a lazy Sunday experiment, and it’s been a staple ever since.
Ingredients
- 1 cup rolled oats (I love the texture they bring)
- 2 cups water (for a creamier texture, swap half with almond milk)
- 1 tbsp flaxseeds (a powerhouse of nutrients)
- 1 banana, sliced (the riper, the sweeter)
- A pinch of salt (just to elevate the flavors)
Instructions
- In a medium saucepan, bring 2 cups of water to a boil over high heat. Tip: Keep an eye on it to prevent boiling over.
- Stir in 1 cup of rolled oats and reduce the heat to medium-low. Let it simmer for about 5 minutes, stirring occasionally. Tip: The occasional stir prevents clumping.
- Add a pinch of salt and 1 tbsp of flaxseeds to the oatmeal, stirring well to combine. Cook for another 2 minutes. Tip: Flaxseeds add a nutty flavor and are great for digestion.
- Remove the saucepan from the heat and let it sit for a minute to thicken.
- Transfer the oatmeal to a bowl and top with sliced banana. The heat will slightly soften the banana, enhancing its sweetness.
Great for those who appreciate a hearty yet simple breakfast. The oatmeal turns out creamy with a slight crunch from the flaxseeds, and the banana adds a natural sweetness. Try drizzling a bit of honey on top for an extra touch of sweetness.
Grilled Chicken with Steamed Vegetables
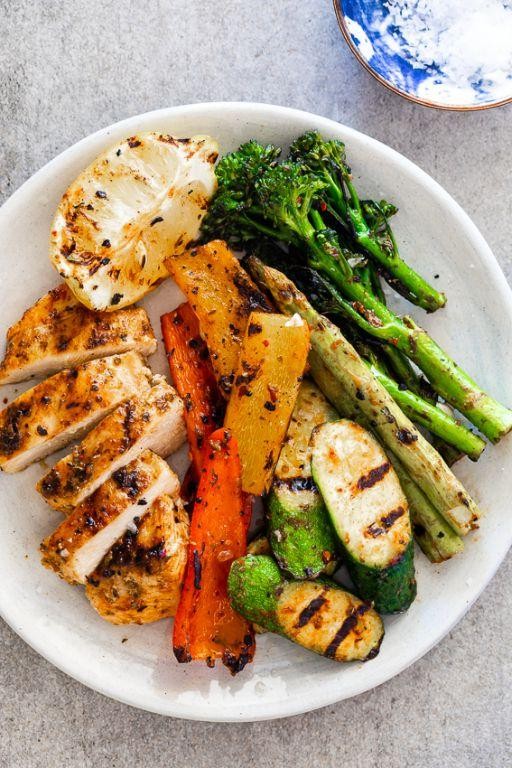
There’s something incredibly satisfying about firing up the grill on a warm evening, and this Grilled Chicken with Steamed Vegetables recipe is my go-to for a quick, healthy meal that doesn’t skimp on flavor. I remember the first time I made this dish; it was a hit with my family, and now it’s a staple in our weekly dinner rotation.
Ingredients
- 2 boneless, skinless chicken breasts (I like to pound them to an even thickness for uniform cooking)
- 1 tbsp extra virgin olive oil (my go-to for its fruity flavor)
- 1 tsp garlic powder (because fresh garlic burns too quickly on the grill)
- 1/2 tsp smoked paprika (adds a nice depth of flavor)
- Salt and freshly ground black pepper (to season the chicken perfectly)
- 2 cups mixed vegetables (broccoli, carrots, and zucchini are my favorites for this)
- 1/2 cup water (for steaming the veggies to crisp-tender perfection)
Instructions
- Preheat your grill to medium-high heat, about 375°F, ensuring it’s clean to prevent sticking.
- While the grill heats, rub the chicken breasts with olive oil, then season both sides with garlic powder, smoked paprika, salt, and pepper.
- Place the chicken on the grill. Cook for 6-7 minutes per side, or until the internal temperature reaches 165°F. Tip: Resist the urge to flip the chicken more than once to get those perfect grill marks.
- Meanwhile, place the mixed vegetables in a steamer basket over 1/2 cup of boiling water. Cover and steam for 5-6 minutes, just until they’re bright and crisp-tender. Tip: Don’t overcook the veggies; they’ll continue to cook slightly from residual heat.
- Remove the chicken from the grill and let it rest for 5 minutes before slicing. This keeps the juices from running out when you cut into it.
- Serve the grilled chicken alongside the steamed vegetables. Tip: A squeeze of fresh lemon juice over the top adds a refreshing zing.
Here’s why I love this dish: the chicken comes out juicy with a smoky char, while the vegetables stay crisp and vibrant. For a fun twist, try serving it over a bed of quinoa or with a side of garlic aioli for dipping.
Avocado and Egg Toast

Zesty mornings call for something simple yet satisfying, and that’s exactly what this Avocado and Egg Toast brings to the table. I remember stumbling upon this combo during a lazy Sunday brunch, and it’s been my go-to ever since for its effortless elegance and hearty flavors.
Ingredients
- 2 slices of sourdough bread (I love the tangy kick it adds, but any thick-cut bread works)
- 1 ripe avocado (the kind that yields slightly to pressure—perfect for mashing)
- 2 large eggs (I prefer room temp eggs here for even cooking)
- 1 tbsp extra virgin olive oil (my go-to for its fruity notes)
- Salt and pepper to taste (I’m generous with the pepper for a bit of heat)
- A pinch of red pepper flakes (optional, but I love the extra spice)
Instructions
- Heat a non-stick skillet over medium heat and add the olive oil, swirling to coat the pan evenly.
- Once the oil is shimmering (about 30 seconds), crack the eggs into the skillet, being careful not to break the yolks.
- Cook the eggs for 3 minutes for runny yolks, or until the whites are fully set. Tip: Covering the skillet helps the tops cook faster without flipping.
- While the eggs cook, toast the sourdough slices until golden and crisp, about 2 minutes per side in a toaster or on a grill pan.
- Halve the avocado, remove the pit, and scoop the flesh into a bowl. Mash lightly with a fork, leaving some chunks for texture. Tip: A squeeze of lemon juice can prevent browning if you’re prepping ahead.
- Spread the mashed avocado evenly over the toasted bread slices. Season with salt, pepper, and red pepper flakes if using.
- Top each toast with a cooked egg, gently placing it over the avocado. Tip: For an extra touch, drizzle with a bit more olive oil before serving.
Avocado and Egg Toast is all about contrasts—the creamy avocado against the crispy toast, the rich yolk mingling with the spicy pepper flakes. Serve it with a side of fresh fruit or a light salad for a complete meal that feels indulgent yet wholesome.
Brown Rice and Mushroom Risotto
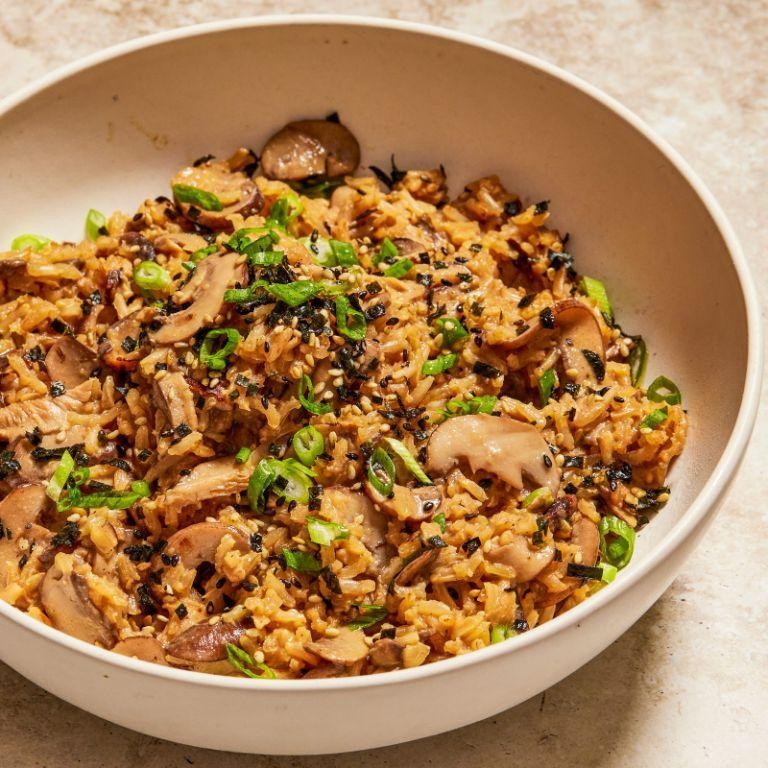
Many evenings, I find myself craving something hearty yet healthy, and that’s when this Brown Rice and Mushroom Risotto comes to mind. It’s a dish that feels indulgent but is packed with nutrients, and the earthy flavors of mushrooms paired with the nuttiness of brown rice make it a comforting meal any day of the week.
Ingredients
- 1 cup brown rice (I love the texture it adds, far better than white rice in my opinion)
- 4 cups vegetable broth (homemade if you have it, but store-bought works in a pinch)
- 2 tbsp extra virgin olive oil (my go-to for its fruity notes)
- 1 lb mushrooms, sliced (cremini are my favorite for their depth of flavor)
- 1 small onion, finely diced (yellow onions work best here)
- 2 cloves garlic, minced (fresh is always better)
- 1/2 cup grated Parmesan cheese (because what’s risotto without a little cheese?)
- Salt and pepper to taste (I’m generous with the pepper for a bit of heat)
Instructions
- Heat the olive oil in a large pan over medium heat until shimmering, about 2 minutes.
- Add the diced onion and cook until translucent, stirring occasionally, about 5 minutes.
- Stir in the minced garlic and cook for another minute until fragrant.
- Add the sliced mushrooms and cook until they release their moisture and start to brown, about 8 minutes.
- Stir in the brown rice, coating it well with the oil and vegetables, for about 2 minutes.
- Begin adding the vegetable broth, one cup at a time, stirring frequently and allowing the rice to absorb the broth before adding more. This process should take about 40 minutes.
- Once the rice is tender and the risotto has a creamy consistency, remove from heat and stir in the Parmesan cheese.
- Season with salt and pepper to taste, and let it sit for 2 minutes before serving.
Finally, this risotto is wonderfully creamy with a satisfying chew from the brown rice. The mushrooms add a meaty texture, making it a perfect dish to serve with a crisp green salad or a glass of white wine for an extra touch of elegance.
Blueberry and Almond Butter Smoothie
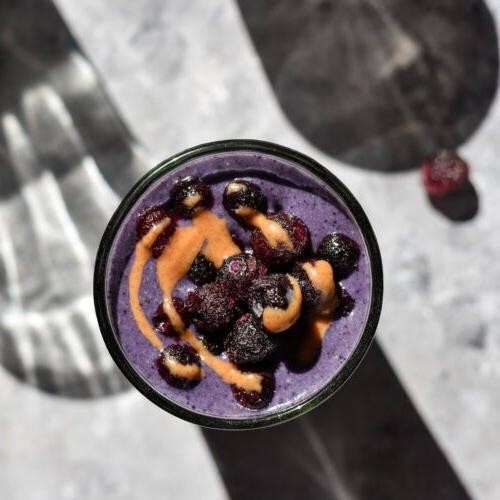
After a long morning of chasing deadlines, I found myself craving something sweet yet nutritious to kickstart my day. That’s when I stumbled upon the idea of blending up a Blueberry and Almond Butter Smoothie—a perfect balance of fruity freshness and creamy richness that’s become my go-to breakfast.
Ingredients
- 1 cup frozen blueberries (I love how the frozen berries make the smoothie extra chilly without diluting the flavor.)
- 2 tbsp almond butter (A creamy, unsalted version works best here for that smooth texture.)
- 1 cup almond milk (I prefer the unsweetened kind to keep it healthy, but vanilla-flavored adds a nice touch.)
- 1 tbsp honey (Just a drizzle to sweeten the deal, but feel free to adjust based on your sweet tooth.)
- 1/2 tsp vanilla extract (A splash of this elevates the flavor profile beautifully.)
- A pinch of salt (Trust me, it makes all the difference in balancing the flavors.)
Instructions
- Grab your blender and add the frozen blueberries, almond butter, almond milk, honey, vanilla extract, and a pinch of salt.
- Blend on high for about 45 seconds, or until the mixture is completely smooth. Tip: If the smoothie is too thick, add a splash more almond milk to reach your desired consistency.
- Pour the smoothie into your favorite glass. Tip: For an extra chill, pop the glass in the freezer for a few minutes before serving.
- Give it a quick taste and adjust the sweetness with a bit more honey if needed. Tip: A dash of cinnamon on top can add a warm, spicy note that complements the blueberries wonderfully.
Lusciously creamy with a vibrant berry flavor, this smoothie is a delight to sip on a warm morning. For a fun twist, try topping it with a handful of granola or a few fresh blueberries for added texture.
Turkey and Quinoa Meatballs
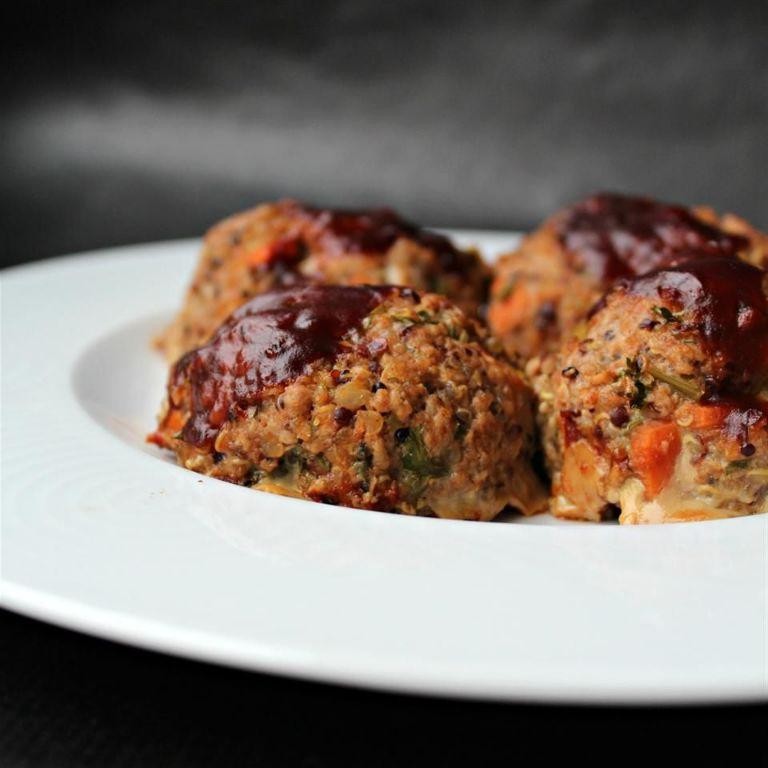
Many evenings, I find myself craving something hearty yet healthy, and that’s how these Turkey and Quinoa Meatballs came to be. They’re a perfect blend of lean protein and whole grains, and honestly, they’ve become a staple in my meal prep routine.
Ingredients
- 1 lb ground turkey (I find the 93% lean works best for moisture)
- 1/2 cup cooked quinoa (cooled to room temp, trust me, it mixes better)
- 1/4 cup grated Parmesan cheese (the real deal, not the powdered stuff)
- 1 large egg (room temperature eggs bind the mixture more evenly)
- 2 cloves garlic, minced (because garlic makes everything better)
- 1 tsp dried oregano (I love the earthy flavor it adds)
- 1/2 tsp salt (I use sea salt for a cleaner taste)
- 1/4 tsp black pepper (freshly ground, if you have it)
- 2 tbsp extra virgin olive oil (my go-to for frying)
Instructions
- In a large bowl, combine the ground turkey, cooked quinoa, Parmesan cheese, egg, minced garlic, oregano, salt, and black pepper. Mix until just combined; overmixing can make the meatballs tough.
- Heat the olive oil in a large skillet over medium heat (about 350°F). You’ll know it’s ready when a small piece of the mixture sizzles upon contact.
- Form the mixture into 1.5-inch balls. I use a cookie scoop for uniformity, which also helps them cook evenly.
- Place the meatballs in the skillet, being careful not to overcrowd. Cook for about 4 minutes on the first side, then flip and cook for another 3-4 minutes, until golden brown and cooked through. A meat thermometer should read 165°F when inserted into the center.
- Transfer the cooked meatballs to a plate lined with paper towels to drain any excess oil.
Finally, these meatballs are wonderfully tender with a slight crunch from the quinoa. Serve them over a bed of zucchini noodles for a low-carb option, or tuck them into a whole wheat pita with some tzatziki for a quick and satisfying meal.
Zucchini Noodles with Pesto
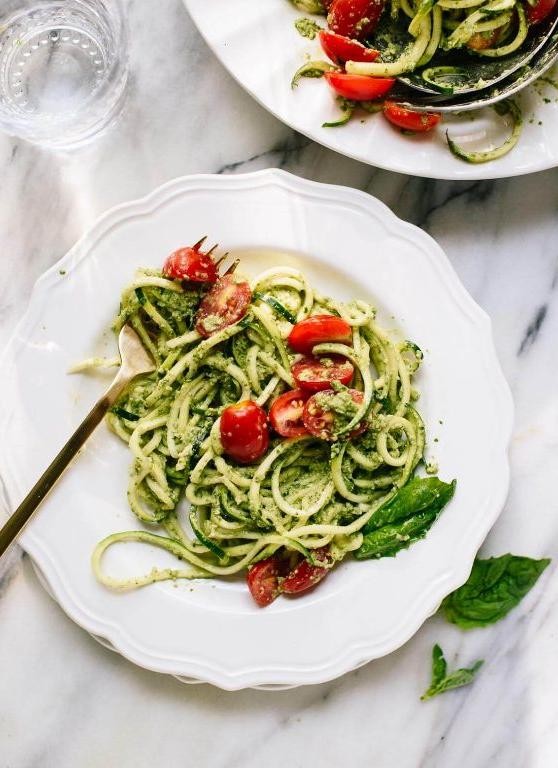
Very few things beat the freshness of a home-cooked meal, especially when it’s as vibrant and healthy as zucchini noodles with pesto. I remember the first time I tried swapping out pasta for zucchini; it was a game-changer for my weeknight dinners.
Ingredients
- 2 medium zucchinis – I like them firm for the best noodle texture.
- 1 cup fresh basil leaves – packed, because more basil means more flavor.
- 1/4 cup extra virgin olive oil – my go-to for its fruity notes.
- 1/4 cup grated Parmesan cheese – the real deal, none of that pre-shredded stuff.
- 2 tbsp pine nuts – toasted, they add a lovely crunch.
- 1 garlic clove – because pesto isn’t pesto without it.
- Salt to taste – I use sea salt for a cleaner taste.
Instructions
- Using a spiralizer, turn the zucchinis into noodles. Tip: If you don’t have a spiralizer, a julienne peeler works in a pinch.
- In a food processor, combine basil, olive oil, Parmesan, pine nuts, and garlic. Pulse until smooth. Tip: Scrape down the sides occasionally for an even blend.
- Season the pesto with salt, then give it one last pulse to mix. Tip: Taste as you go; you can always add more salt but you can’t take it out.
- In a large bowl, toss the zucchini noodles with the pesto until evenly coated.
- Let the dish sit for 5 minutes before serving to allow the flavors to meld.
Delightfully fresh and bursting with flavor, these zucchini noodles with pesto are a testament to how simple ingredients can create something extraordinary. Serve them with a sprinkle of extra Parmesan on top for that perfect finish.
Pumpkin and Lentil Stew

During the chilly evenings of fall, nothing warms my soul quite like a hearty bowl of Pumpkin and Lentil Stew. It’s a dish that reminds me of my grandmother’s kitchen, where the aroma of spices would fill the air, promising a meal that was as nourishing as it was delicious.
Ingredients
- 1 tbsp extra virgin olive oil (my go-to for its fruity notes)
- 1 medium onion, diced (I like them finely chopped for a smoother texture)
- 2 cloves garlic, minced (fresh is best here, trust me)
- 1 cup dried green lentils (rinsed and picked over for any stones)
- 3 cups pumpkin, cubed (I prefer sugar pumpkin for its sweetness)
- 4 cups vegetable broth (homemade if you have it)
- 1 tsp ground cumin (toast it lightly for extra flavor)
- 1/2 tsp smoked paprika (it adds a lovely depth)
- Salt to taste (I start with 1/2 tsp and adjust)
Instructions
- Heat the olive oil in a large pot over medium heat until shimmering.
- Add the diced onion and cook, stirring occasionally, until translucent, about 5 minutes.
- Stir in the minced garlic and cook for another minute until fragrant.
- Add the lentils, pumpkin cubes, vegetable broth, cumin, and smoked paprika to the pot.
- Bring the mixture to a boil, then reduce the heat to low and simmer, covered, for 25 minutes.
- After 25 minutes, check the lentils and pumpkin for tenderness. They should be soft but not mushy.
- Season with salt, starting with 1/2 tsp and adjusting to your preference.
- Let the stew sit off the heat for 5 minutes before serving to allow the flavors to meld.
Perfectly balanced between creamy and hearty, this stew is a celebration of fall flavors. Serve it with a dollop of yogurt or a sprinkle of fresh herbs for an extra touch of brightness.
Spinach and Feta Stuffed Chicken
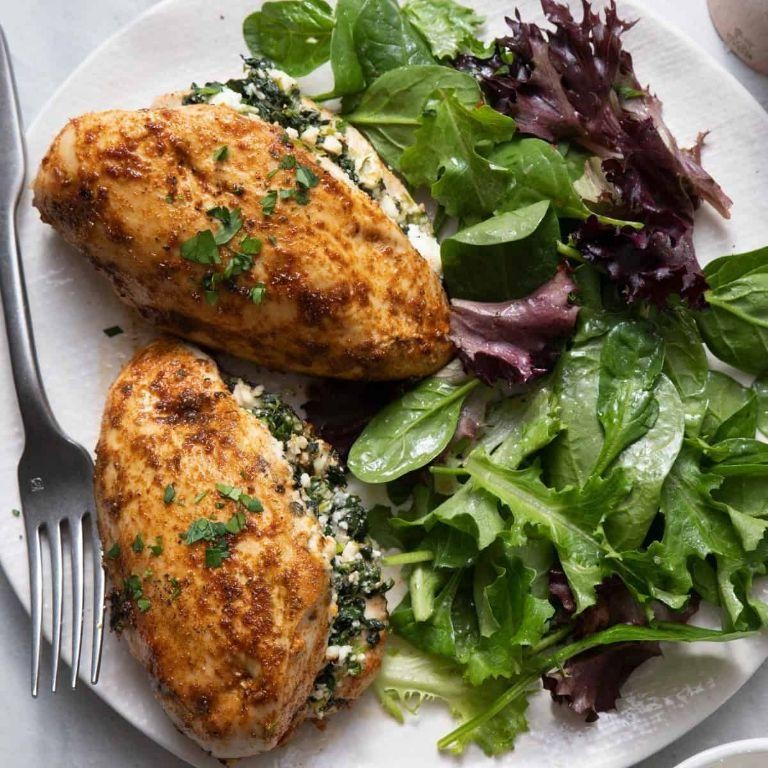
Every time I think about making a dish that’s both elegant and easy, Spinach and Feta Stuffed Chicken comes to mind. It’s a recipe that never fails to impress, whether it’s a quiet dinner at home or a gathering with friends. I remember the first time I made it, thinking it would be complicated, but it turned out to be a breeze, and now it’s a staple in my kitchen.
Ingredients
- 4 boneless, skinless chicken breasts (I like to pound them to an even thickness for uniform cooking)
- 1 cup fresh spinach, tightly packed (baby spinach works great here)
- 1/2 cup crumbled feta cheese (the tangier, the better in my opinion)
- 1 tbsp extra virgin olive oil (my go-to for its flavor)
- 1 tsp garlic powder (because fresh garlic can burn, and this distributes flavor evenly)
- Salt and pepper to taste (I’m generous with the pepper for a little kick)
Instructions
- Preheat your oven to 375°F (190°C) to ensure it’s ready when you are.
- Lay each chicken breast flat and make a horizontal slit to create a pocket, being careful not to cut all the way through.
- In a bowl, mix the spinach and feta cheese, then stuff each chicken breast evenly with the mixture.
- Season the outside of each breast with garlic powder, salt, and pepper.
- Heat olive oil in an oven-safe skillet over medium-high heat, then add the chicken breasts.
- Sear the chicken for 2-3 minutes on each side until golden brown (this locks in the juices).
- Transfer the skillet to the oven and bake for 20-25 minutes, or until the internal temperature reaches 165°F (74°C).
- Let the chicken rest for 5 minutes before slicing to keep all those delicious juices inside.
After resting, the chicken is juicy and flavorful, with the feta and spinach creating a creamy, savory center. I love serving it over a bed of quinoa or with roasted vegetables for a complete meal that’s as nutritious as it is delicious.
Almond and Date Energy Balls
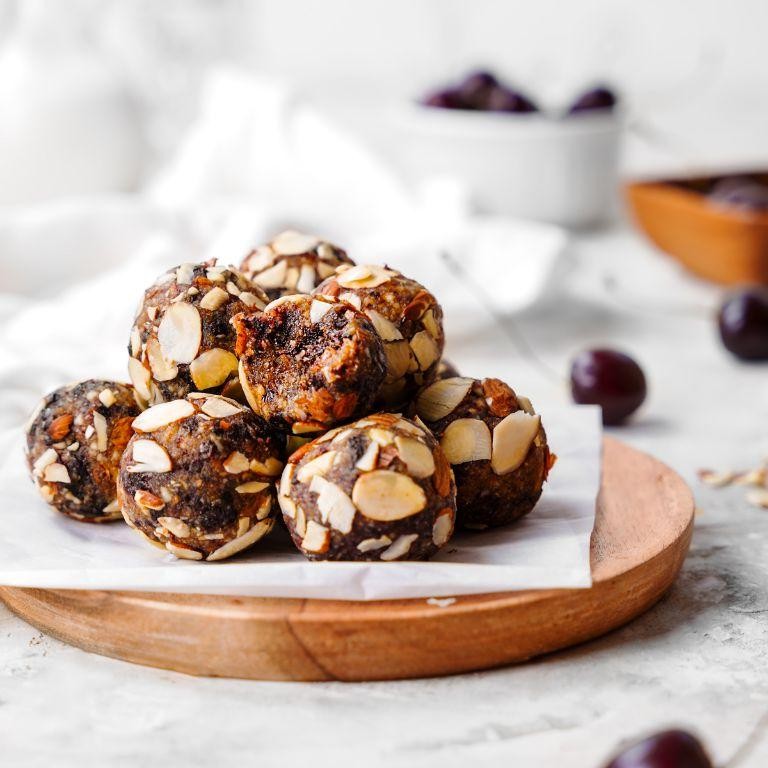
Every time I need a quick pick-me-up, these Almond and Date Energy Balls are my go-to. They’re not just delicious; they’re packed with nutrients to keep you going. I remember making these for the first time during a hectic week, and they’ve been a staple in my kitchen ever since.
Ingredients
- 1 cup Medjool dates, pitted (I love how their natural sweetness means less added sugar)
- 1 cup raw almonds (for that perfect crunch)
- 2 tbsp almond butter (creamy or crunchy, depending on your texture preference)
- 1 tbsp chia seeds (a little goes a long way for that omega-3 boost)
- 1/2 tsp vanilla extract (the real deal, not imitation)
- A pinch of sea salt (to balance the sweetness)
Instructions
- Soak the pitted dates in warm water for 10 minutes to soften them, making blending easier.
- While the dates soak, pulse the almonds in a food processor until finely chopped but not powdered.
- Drain the dates and add them to the food processor with the almonds, almond butter, chia seeds, vanilla extract, and sea salt.
- Process the mixture until it starts to clump together. If it’s too dry, add a teaspoon of water at a time until it reaches the right consistency.
- Roll the mixture into 1-inch balls with your hands. For easier handling, lightly wet your palms to prevent sticking.
- Place the balls on a baking sheet lined with parchment paper and refrigerate for at least 30 minutes to firm up.
Let these energy balls chill in the fridge for a bit longer if you prefer a firmer texture. The combination of sweet dates and crunchy almonds makes these bites irresistibly delicious. Try rolling them in coconut flakes or cocoa powder for an extra special treat.
Roasted Brussels Sprouts with Garlic
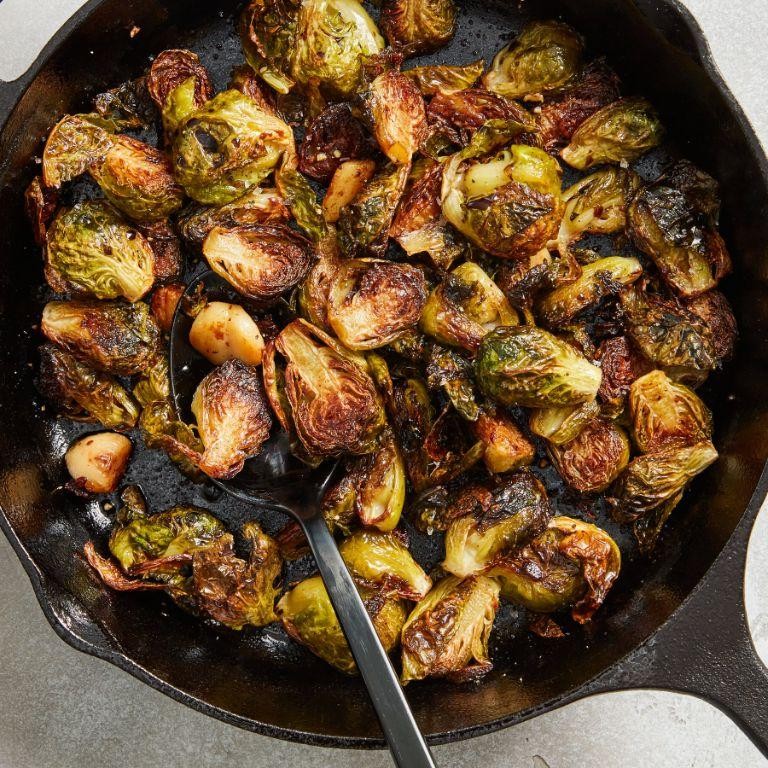
Delightfully simple yet packed with flavor, roasted Brussels sprouts with garlic have become my go-to side dish for almost any meal. There’s something about the way the edges crisp up in the oven while the inside stays tender that keeps me coming back for more.
Ingredients
- 1 lb Brussels sprouts, halved (I look for the smaller ones; they’re sweeter and more tender)
- 3 tbsp extra virgin olive oil (my kitchen staple for roasting)
- 4 cloves garlic, minced (because more garlic is always better)
- 1/2 tsp salt (I use sea salt for its subtle crunch)
- 1/4 tsp black pepper (freshly ground, if you have it)
Instructions
- Preheat your oven to 400°F (200°C). A hot oven is key for getting those crispy edges.
- In a large bowl, toss the halved Brussels sprouts with olive oil, minced garlic, salt, and pepper until evenly coated. Tip: Make sure every sprout gets a little love from the oil and seasoning.
- Spread the sprouts in a single layer on a baking sheet. Crowding the pan steams them instead of roasting, so give them space.
- Roast for 20-25 minutes, stirring halfway through, until they’re golden brown and crispy on the outside. Tip: Keep an eye on them after the 15-minute mark to prevent burning.
- Remove from the oven and let them sit for a minute. They’ll crisp up even more as they cool slightly.
Perfectly roasted Brussels sprouts with garlic offer a delightful contrast of textures and a deep, nutty flavor that’s hard to resist. Try serving them with a drizzle of balsamic glaze or a sprinkle of Parmesan cheese for an extra flavor boost.
Conclusion
Healthy living starts with what’s on your plate, and our roundup of 19 nutrient-dense recipes is here to inspire your next meal. Whether you’re craving something sweet, savory, or somewhere in between, there’s a dish for every taste. We’d love to hear which recipes become your favorites—drop us a comment below! Don’t forget to share the love by pinning this article on Pinterest for others to discover. Happy cooking!