Embarking on a healthier lifestyle doesn’t mean you have to sacrifice flavor or satisfaction! Dive into our roundup of 18 Delicious No Sugar No Flour Recipes that promise to keep your meals exciting and your body thanking you. Whether you’re craving quick dinners, seasonal favorites, or cozy comfort food, we’ve got you covered. Get ready to transform your kitchen into a haven of wholesome, tasty creations!
Almond Flour Pancakes

Feeling like flipping your morning routine on its head? These almond flour pancakes are here to shake things up, offering a gluten-free twist that’s as fluffy as your favorite pillow and twice as satisfying.
Ingredients
- 1 1/2 cups almond flour – because who says you can’t have your pancakes and eat your nutrients too?
- 3 large eggs – I swear by room temp eggs for that perfect blend.
- 1/4 cup almond milk – or any milk that tickles your fancy, really.
- 1 tbsp honey – for that sweet, sweet love note.
- 1 tsp vanilla extract – the secret handshake of baking.
- 1/2 tsp baking soda – the little lift that could.
- A pinch of salt – to make all the flavors pop like confetti.
Instructions
- In a large bowl, whisk together the almond flour, baking soda, and salt like you’re mixing a potion.
- In another bowl, beat the eggs, almond milk, honey, and vanilla extract until it’s as smooth as your morning jazz playlist.
- Pour the wet ingredients into the dry ones and stir until just combined. Overmixing is the enemy of fluffiness, so show some restraint.
- Heat a non-stick skillet over medium heat (about 350°F) and lightly grease it. I’m team coconut oil here, but you do you.
- Pour 1/4 cup of batter for each pancake and cook until bubbles form on the surface and the edges look set, about 2-3 minutes. This is your pancake’s way of saying, ‘Flip me, I’m ready!’
- Flip and cook for another 1-2 minutes until golden brown. If you’re feeling fancy, now’s the time to throw in some blueberries or chocolate chips.
- Serve warm with your favorite toppings. Maple syrup is classic, but a dollop of almond butter takes it to next-level yum.
You’ll love how these pancakes strike the perfect balance between nutty and sweet, with a texture that’s delightfully tender. Try stacking them high with fresh berries and a drizzle of honey for a breakfast that’s basically a hug in plate form.
Chocolate Avocado Mousse
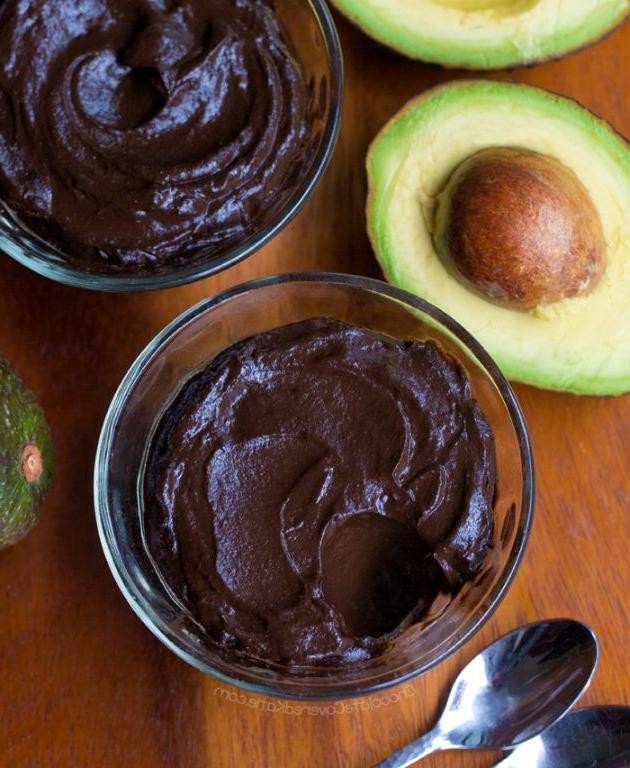
Forget everything you thought you knew about avocados, because this Chocolate Avocado Mousse is about to blow your mind—and your taste buds. It’s creamy, dreamy, and secretly healthy, making it the perfect guilt-free indulgence for when you’re craving something sweet but don’t want to undo all your good habits.
Ingredients
- 2 ripe avocados (the kind that yields slightly to a gentle squeeze—no mushy business here)
- 1/4 cup cocoa powder (the darker, the better for that rich chocolatey depth)
- 1/4 cup maple syrup (because we’re fancy like that, but honey works in a pinch)
- 1 tsp vanilla extract (the real deal, please—none of that imitation stuff)
- A pinch of salt (to make all the flavors pop like a confetti cannon)
- 1/2 cup coconut milk (full-fat for that luxuriously smooth texture)
Instructions
- Scoop the avocados into a blender or food processor, making sure to leave any brown spots behind—we’re going for gold here, not bronze.
- Add the cocoa powder, maple syrup, vanilla extract, and that all-important pinch of salt to the blender.
- Pour in the coconut milk, then blend on high until the mixture is smoother than a jazz saxophonist’s solo. This should take about 1-2 minutes. Tip: Scrape down the sides halfway through to ensure everything gets perfectly incorporated.
- Once blended, taste and adjust sweetness if needed, but remember, we’re making mousse, not candy—balance is key.
- Transfer the mousse to serving dishes and chill in the fridge for at least 30 minutes. This waiting period is the perfect time to practice your patience or, you know, lick the blender clean.
- Serve chilled, topped with a sprinkle of cocoa powder or some fresh berries if you’re feeling extra. Tip: For an even more decadent experience, add a dollop of whipped cream on top—because why not?
Mmm, the texture of this mousse is so velvety, it’s like chocolate clouds melting in your mouth. The avocado gives it a richness that’s hard to pinpoint but impossible to ignore, making it a fantastic conversation starter at parties. Try serving it in espresso cups for a cute, portion-controlled treat that’ll have everyone asking for the recipe.
Zucchini Noodles with Pesto
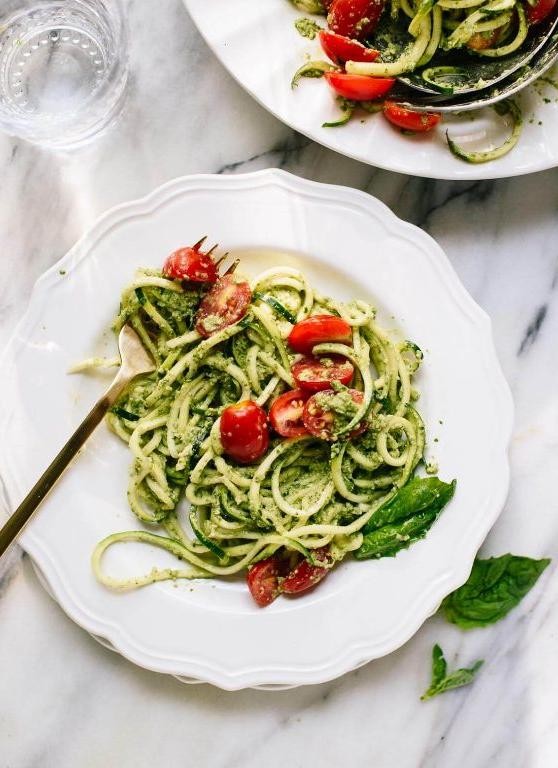
Let’s spiral into the world of healthy eating without sacrificing flavor—zucchini noodles with pesto are here to save your dinner routine! This dish is a vibrant, green machine that’s as fun to make as it is to eat, proving that ‘healthy’ doesn’t have to mean ‘boring.’
Ingredients
- 4 medium zucchinis (because size does matter when you’re spiralizing)
- 2 cups fresh basil leaves (packed, like you’re stuffing a tiny green suitcase)
- 1/2 cup extra virgin olive oil (my liquid gold for everything pesto)
- 1/3 cup pine nuts (toasted, because we’re fancy like that)
- 2 garlic cloves (minced, unless you’re planning to keep vampires at bay)
- 1/2 cup grated Parmesan cheese (the real deal, please)
- Salt to taste (but let’s not turn this into a salt lick)
Instructions
- Wash and dry the zucchinis thoroughly—no one likes watery noodles.
- Using a spiralizer, turn those zucchinis into noodles. If you don’t have a spiralizer, a julienne peeler will do in a pinch.
- In a food processor, combine basil, pine nuts, garlic, and Parmesan. Pulse until finely chopped.
- With the processor running, slowly drizzle in the olive oil until the pesto is smooth. Taste and add salt as needed—remember, we’re seasoning, not preserving.
- In a large bowl, toss the zucchini noodles with the pesto until evenly coated. No noodle left behind!
- Let the dish sit for 5 minutes to allow the flavors to marry. Patience is a virtue, especially in cooking.
Dig into this dish and marvel at how the zucchini noodles hold their own against the rich, herby pesto. Serve it up in a hollowed-out zucchini boat for an extra touch of whimsy, or top with grilled chicken for those who insist on meat. Either way, it’s a dish that’s as versatile as it is delicious.
Cauliflower Pizza Crust

Get ready to toss your traditional pizza dough out the window—because this cauliflower pizza crust is about to revolutionize your pizza night with its guilt-free glory and sneaky veggie power!
Ingredients
- 1 medium head of cauliflower (because size does matter when it comes to crust thickness)
- 1/4 cup grated Parmesan cheese (the powdery kind that sticks to your fingers—worth it)
- 1/4 cup shredded mozzarella cheese (for that stretchy, Instagram-worthy pull)
- 1 egg (I crack mine straight into the mix, no bowl needed—living on the edge)
- 1/2 tsp dried oregano (or fresh if you’re feeling fancy)
- 1/2 tsp garlic powder (because everything’s better with garlic)
- 1/4 tsp salt (just a pinch to make the flavors pop)
Instructions
- Preheat your oven to 400°F—no lukewarm efforts here, we’re going for gold.
- Chop the cauliflower into florets and pulse in a food processor until it resembles snow—winter in a bowl, minus the cold.
- Microwave the cauliflower snow for 4 minutes, then let it cool just enough so you don’t burn your fingers—patience is a virtue.
- Wrap the cauliflower in a clean towel and squeeze out as much water as you can—think of it as wringing out your worries.
- In a bowl, mix the dried cauliflower with Parmesan, mozzarella, egg, oregano, garlic powder, and salt until it feels like dough—magic in the making.
- Press the dough onto a parchment-lined baking sheet into your desired crust shape—round, square, heart-shaped, no judgment here.
- Bake for 20 minutes or until the edges are golden and the center is firm—like a sunbather with the perfect tan.
- Flip the crust (yes, flip it!) and bake for another 10 minutes—this is the secret to a crust that’s crispy, not soggy.
Now, marvel at your creation—a crust that’s crispy on the outside, tender on the inside, and ready to be topped with whatever your heart desires. Not your average pizza night, huh?
Coconut Flour Banana Bread
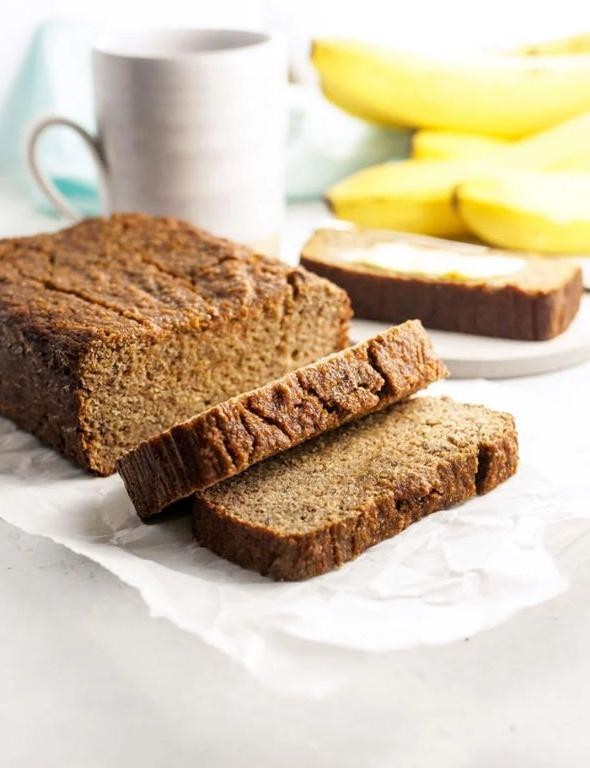
Now, who knew that combining the tropical vibes of coconut flour with the classic comfort of banana bread could lead to such bliss? This Coconut Flour Banana Bread is your ticket to a guilt-free indulgence that’s as easy to make as it is delicious to devour.
Ingredients
- 3 ripe bananas (the spottier, the better for that sweet, sweet flavor)
- 4 large eggs (I swear by room temp eggs for a smoother batter)
- 1/2 cup coconut flour (the star of the show, giving it that fluffy texture)
- 1/4 cup honey (nature’s candy, because we’re keeping it sweet but healthy)
- 1/4 cup coconut oil, melted (extra virgin is my go-to for that rich, coconutty essence)
- 1 tsp vanilla extract (because vanilla makes everything better)
- 1/2 tsp baking soda (the little lift that could)
- 1/2 tsp cinnamon (for that warm, spicy kick)
- A pinch of salt (to balance all that sweetness)
Instructions
- Preheat your oven to 350°F (175°C) and grease a loaf pan with a bit of coconut oil to prevent sticking.
- In a large bowl, mash the bananas until smooth. Tip: A fork works wonders here, but don’t overdo it—a few lumps add character.
- Whisk in the eggs one at a time, ensuring each is fully incorporated before adding the next. Room temp eggs blend more easily, avoiding a lumpy batter.
- Stir in the melted coconut oil, honey, and vanilla extract until the mixture is homogenous.
- Sift in the coconut flour, baking soda, cinnamon, and salt. Mix until just combined. Tip: Coconut flour is thirsty, so don’t be alarmed if the batter thickens quickly.
- Pour the batter into the prepared loaf pan and smooth the top with a spatula.
- Bake for 40-45 minutes, or until a toothpick inserted into the center comes out clean. Tip: Ovens vary, so start checking at 35 minutes to avoid overbaking.
- Let the bread cool in the pan for 10 minutes, then transfer to a wire rack to cool completely.
Craving a slice? This bread is moist, subtly sweet, and packed with coconut flavor. Toast it lightly and slather with almond butter for a next-level breakfast or enjoy as is for a satisfying snack. Either way, it’s a win.
Sweet Potato Toast
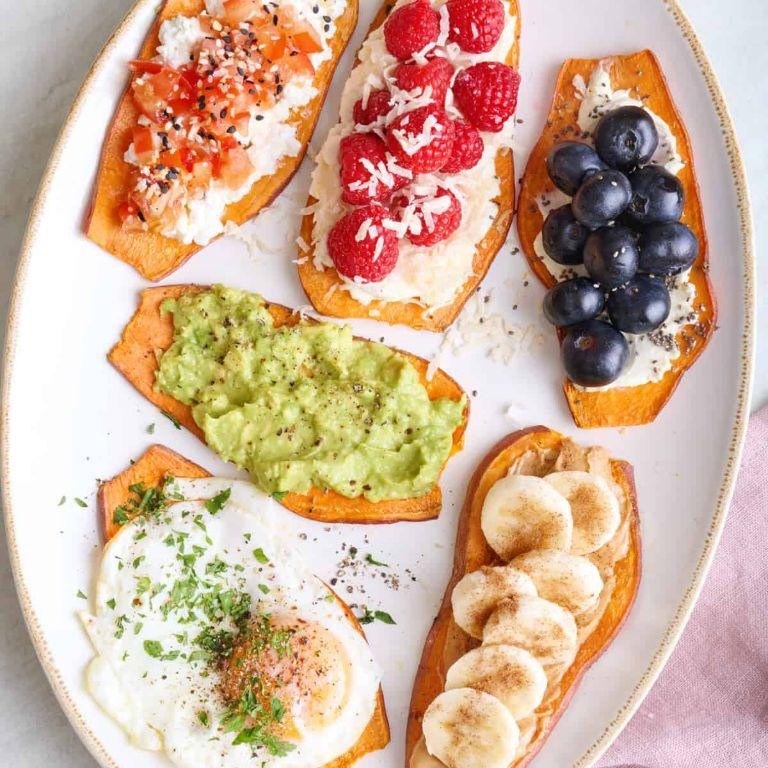
Who knew that your humble sweet potato could moonlight as toast? This isn’t just a trend; it’s a revolution on a plate, offering a gluten-free, nutrient-packed base for all your favorite toppings. Let’s turn this tuber into the toast of the town!
Ingredients
- 1 large sweet potato (look for one that’s firm and smooth, like it’s been hitting the gym)
- 1 tbsp extra virgin olive oil (the good stuff, because your sweet potato deserves it)
- A pinch of sea salt (flaky, because we’re fancy like that)
Instructions
- Preheat your oven to 400°F because we’re about to get this party started.
- Slice the sweet potato lengthwise into 1/4-inch thick slabs. Pro tip: aim for even thickness to avoid some pieces turning into charcoal while others are still raw.
- Brush both sides of each slice with olive oil. This isn’t just for flavor; it’s the secret handshake that gets them crispy.
- Lay the slices on a baking sheet in a single layer—no overlapping unless you’re into steamed sweet potatoes.
- Sprinkle with sea salt. This is where you can get creative, but don’t go overboard; we’re seasoning, not preserving.
- Bake for 20 minutes, then flip each slice. They should be golden and slightly crispy around the edges. If not, give them a few more minutes—patience is a virtue, especially in the kitchen.
- Bake for another 15-20 minutes until they’re crispy on the outside but still tender inside. Think of it as the sweet potato equivalent of a well-done steak.
Done! These sweet potato toasts are a delightful mix of crispy edges and soft centers, with a natural sweetness that pairs perfectly with both savory and sweet toppings. Try them with avocado and a poached egg for breakfast, or almond butter and banana slices for a snack that’ll make you forget regular toast ever existed.
Avocado Egg Salad
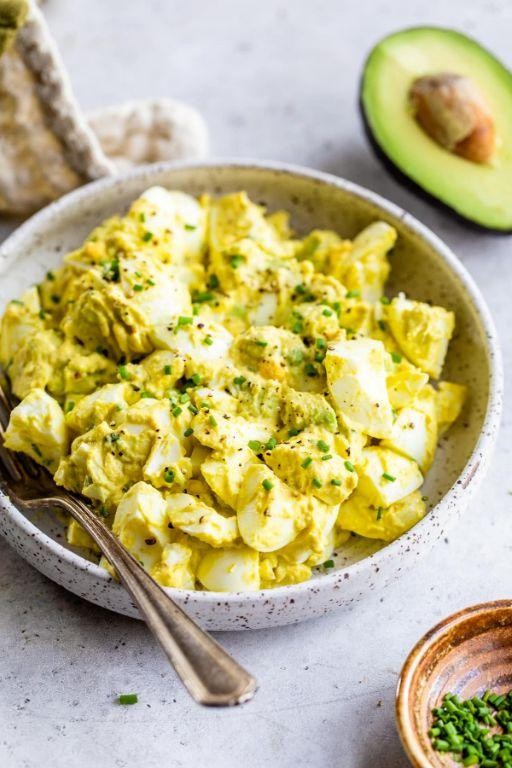
Absolutely nothing beats the creamy, dreamy combo of avocado and eggs, especially when they decide to tango in a salad that’s as easy to whip up as it is to devour. Let’s dive into this bowl of green goodness that’s perfect for those ‘I can’t even’ mornings or lazy lunches.
Ingredients
- 2 ripe avocados (because nobody likes a sad, unripe avocado)
- 4 large eggs (room temp eggs peel like a dream, just saying)
- 1/4 cup mayonnaise (the real MVP for creaminess)
- 1 tbsp lemon juice (for that zesty kick)
- 1/2 tsp salt (sea salt if you’re feeling fancy)
- 1/4 tsp black pepper (freshly ground, because we’re not savages)
- 2 tbsp chopped chives (for a pop of color and a mild oniony vibe)
Instructions
- Place the eggs in a saucepan and cover with water by 1 inch. Bring to a boil over high heat, then cover and remove from heat. Let sit for 12 minutes for perfectly hard-boiled eggs.
- While the eggs are doing their thing, halve the avocados, remove the pits, and scoop the flesh into a large bowl. Mash them up with a fork until creamy but still a bit chunky.
- Once the eggs are ready, plunge them into ice water for 5 minutes to cool. This stops the cooking process and makes peeling a breeze.
- Peel the eggs, then chop them into small pieces. Add them to the bowl with the avocado.
- Stir in the mayonnaise, lemon juice, salt, and pepper until everything is well combined. Fold in the chives last for that fresh, herby finish.
- Taste and adjust seasoning if needed, but remember, the flavors will meld and intensify as it chills.
Who knew something so simple could taste so luxurious? The avocado egg salad is creamy with a slight tang, perfect on toast, wrapped in lettuce, or straight from the bowl with a spoon (no judgment here). The chives add a subtle sharpness that cuts through the richness, making each bite a little celebration.
Pumpkin Spice Protein Balls
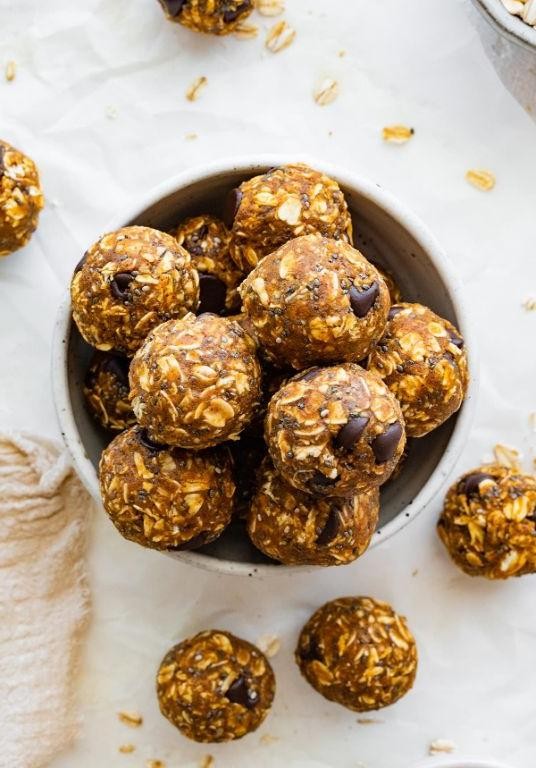
Every autumn, when the leaves start to throw shade in vibrant hues, my kitchen becomes a pumpkin spice battleground. This year, I’ve weaponized my love for the season into these no-bake, energy-packed Pumpkin Spice Protein Balls—because why should lattes have all the fun?
Ingredients
- 1 cup old-fashioned oats (the heartier, the better—like a good pair of boots)
- 1/2 cup pumpkin puree (not pie filling, unless you’re into sweet surprises)
- 1/2 cup almond butter (smooth or crunchy, depending on your texture loyalty)
- 1/4 cup honey (local if you can, your bees need love too)
- 1 scoop vanilla protein powder (the secret muscle behind the flavor)
- 1 tsp pumpkin pie spice (because autumn in a jar is a thing)
- 1/2 tsp vanilla extract (the good stuff, please)
- A pinch of salt (to make the sweet stuff pop)
Instructions
- In a large mixing bowl, combine the oats, pumpkin puree, almond butter, honey, protein powder, pumpkin pie spice, vanilla extract, and salt. Stir until the mixture looks like it could double as autumn-themed playdough.
- Roll the mixture into 1-inch balls. If the mixture sticks to your hands, a quick tip: wet your palms slightly—it’s like giving your hands a non-stick coating.
- Place the balls on a baking sheet lined with parchment paper. Here’s a pro tip: spacing them out prevents a protein ball merger, which sounds like a gym event but is just messy.
- Chill in the refrigerator for at least 30 minutes. This step is non-negotiable unless you enjoy eating pumpkin spice mush (no judgment).
Munching on these Pumpkin Spice Protein Balls is like biting into a tiny, protein-packed pumpkin pie that’s been hitting the gym. Serve them as a post-workout snack or sneak them into your kid’s lunchbox—they’ll never suspect they’re eating something healthy.
Spinach and Feta Stuffed Chicken
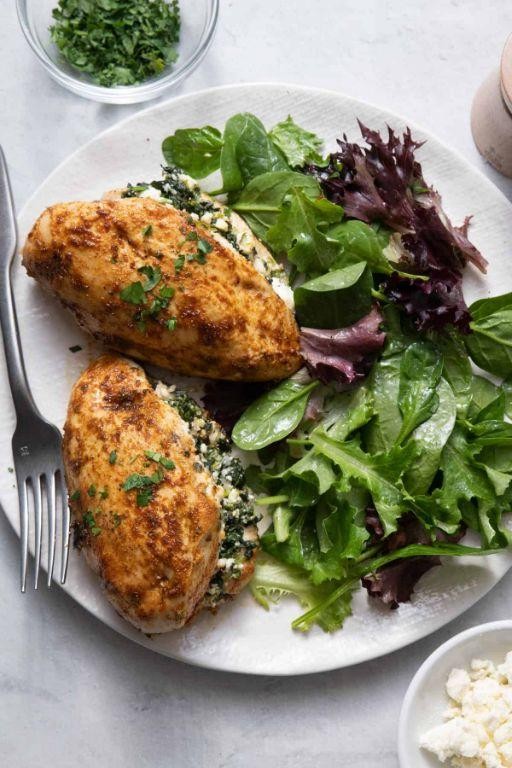
Ever had one of those days where you’re craving something fancy but your energy levels are screaming ‘easy peasy’? Enter this Spinach and Feta Stuffed Chicken—your ticket to gourmet town without the passport of effort.
Ingredients
- 4 boneless, skinless chicken breasts (because who has time for bones?)
- 1 cup fresh spinach, chopped (the greener, the meaner)
- 1/2 cup feta cheese, crumbled (the saltier, the better)
- 2 tbsp extra virgin olive oil (my liquid gold)
- 1 tsp garlic powder (because fresh garlic is too much work today)
- 1/2 tsp salt (just enough to make your taste buds dance)
- 1/4 tsp black pepper (for that little kick)
Instructions
- Preheat your oven to 375°F—no guessing games here, folks.
- In a bowl, mix the spinach, feta, garlic powder, salt, and pepper like you’re the DJ of flavors.
- Slice a pocket into each chicken breast—think of it as a little sleeping bag for the filling.
- Stuff each chicken breast with the spinach and feta mixture. No overstuffing; we’re not making a Thanksgiving turkey.
- Heat the olive oil in an oven-safe skillet over medium-high heat. When it shimmers, it’s showtime.
- Sear the chicken for 3-4 minutes per side until golden brown. This isn’t just for looks—it locks in the juices.
- Transfer the skillet to the oven and bake for 20-25 minutes, or until the chicken reaches an internal temperature of 165°F. Yes, a meat thermometer is your best friend here.
- Let the chicken rest for 5 minutes. Patience is a virtue, especially when it comes to juicy chicken.
Velvety chicken with a gooey, cheesy center and a hint of garlic—this dish is like a warm hug for your stomach. Serve it over a bed of quinoa or with a side of roasted veggies, and watch it disappear faster than your last Netflix binge.
Chia Seed Pudding
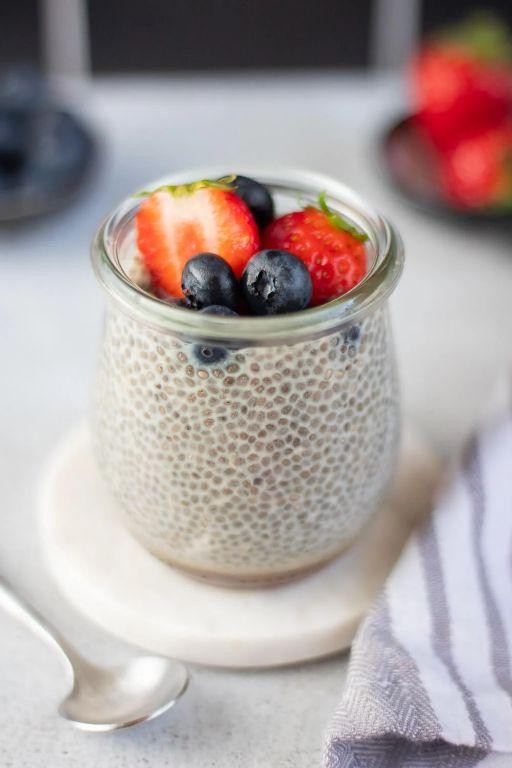
Kickstart your morning with a dish that’s as fun to make as it is to eat—chia seed pudding! This no-cook wonder is your ticket to a hassle-free, nutritious breakfast that’ll have you bouncing out of bed (or at least not hitting snooze for the third time).
Ingredients
- 1/4 cup chia seeds (the tiny but mighty stars of the show)
- 1 cup almond milk (or any milk that tickles your fancy—I’m partial to coconut for a tropical twist)
- 1 tbsp maple syrup (because life’s too short for bland breakfasts)
- 1/2 tsp vanilla extract (the secret whisper of flavor)
- A pinch of salt (to make the sweet stuff pop)
Instructions
- In a medium bowl, whisk together the chia seeds and almond milk until they’re best friends.
- Add the maple syrup, vanilla extract, and that sneaky pinch of salt, then give it another good whisk to combine.
- Let the mixture sit for 5 minutes, then whisk again to prevent any chia clumps from forming—nobody likes a clumpy pudding.
- Cover the bowl and refrigerate for at least 4 hours, or overnight if you’re the plan-ahead type (the chia seeds need time to work their magic and thicken up).
- Give the pudding a stir before serving to check the consistency. If it’s thicker than your favorite sweater, add a splash more milk to loosen it up.
Dive into this creamy, dreamy pudding that’s got the perfect balance of sweet and subtle. Serve it topped with fresh berries for a burst of color, or layer it with granola for that crunch factor. Either way, it’s a breakfast win.
Beef and Broccoli Stir Fry
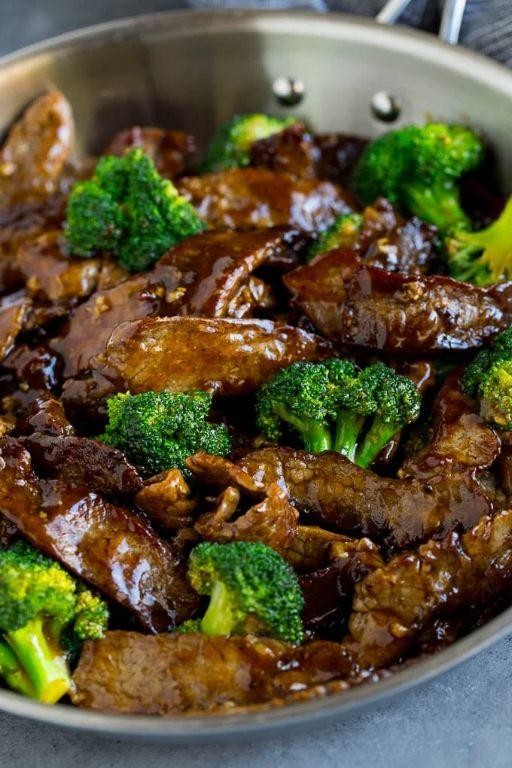
Let’s face it, folks—beef and broccoli stir fry is the superhero of weeknight dinners, swooping in to save us from the mundane with its saucy, savory charm. It’s the culinary equivalent of a high-five, and who doesn’t love a good high-five?
Ingredients
- 1 lb flank steak, sliced thin (because nobody likes chewing their dinner like it’s a part-time job)
- 3 cups broccoli florets (fresh is fab, but frozen will do in a pinch)
- 2 tbsp vegetable oil (the unsung hero of the stir-fry world)
- 3 cloves garlic, minced (more is merrier in my book)
- 1/2 cup soy sauce (low-sodium if you’re watching the salt)
- 2 tbsp brown sugar (for that sweet, sweet balance)
- 1 tbsp cornstarch (the magic thickener)
- 1/2 cup water (H2O, keeping it simple)
- 1 tsp ginger, grated (fresh ginger is a game-changer, trust me)
Instructions
- In a bowl, whisk together soy sauce, brown sugar, cornstarch, water, and ginger. Set aside—this saucy concoction is your ticket to flavor town.
- Heat 1 tbsp vegetable oil in a large skillet or wok over medium-high heat until it’s shimmering like a disco ball.
- Add the beef slices and stir-fry for 2-3 minutes until they’re just shy of being done. Tip: Don’t overcrowd the pan, or you’ll steam the beef instead of searing it.
- Remove the beef and set aside. In the same pan, add the remaining 1 tbsp oil and toss in the broccoli and garlic. Stir-fry for 3-4 minutes until the broccoli is bright green and slightly tender. Tip: A splash of water can help steam the broccoli if you like it softer.
- Return the beef to the pan and pour the sauce over everything. Stir well and cook for another 2 minutes until the sauce thickens and coats the beef and broccoli like a glossy coat of deliciousness. Tip: If the sauce thickens too much, a little more water can loosen it up.
Perfectly tender beef meets crisp-tender broccoli in a sauce that’s the right kind of clingy. Serve it over a bed of rice, or for a low-carb twist, try cauliflower rice—because even superheroes need a sidekick.
Eggplant Lasagna
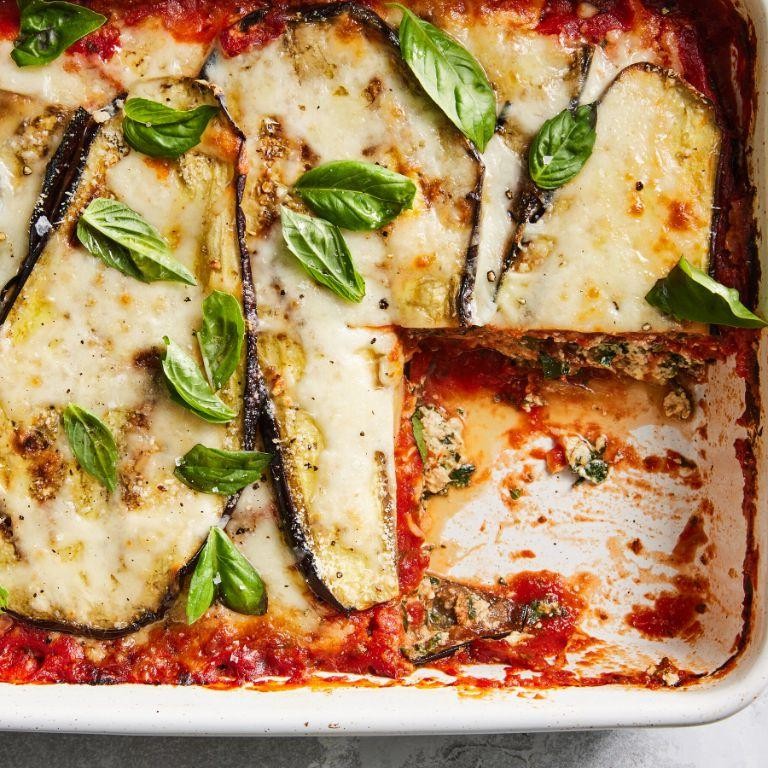
Just when you thought lasagna couldn’t get any more veggie-packed, along comes this eggplant lasagna to prove you wrong—because who needs noodles when you’ve got slices of eggplant playing the starring role?
Ingredients
- 2 large eggplants, sliced into 1/4-inch rounds (because nobody likes a floppy lasagna layer)
- 1 lb ground beef (or go wild with turkey for a lighter twist)
- 24 oz marinara sauce (homemade if you’re fancy, jarred if you’re human)
- 15 oz ricotta cheese (the creamier, the better)
- 1 egg (room temp, unless you enjoy the thrill of lumpy ricotta)
- 2 cups shredded mozzarella (because cheese is life)
- 1/2 cup grated Parmesan (the salty sprinkle of the gods)
- 1 tbsp olive oil (extra virgin, because we’re not savages)
- 1 tsp garlic powder (for that ‘I know what I’m doing’ flavor)
- Salt and pepper (to pretend we’re measuring)
Instructions
- Preheat your oven to 375°F because patience is a virtue, especially in lasagna making.
- Toss the eggplant slices with olive oil, salt, and pepper, then lay them out on a baking sheet. Roast for 20 minutes until they’re just shy of crispy—think ‘golden brown with dreams of being chips’.
- While the eggplants are dreaming, brown the ground beef in a pan over medium heat. Drain the fat unless you’re into that sort of thing.
- Stir in the marinara sauce and garlic powder into the beef, letting it simmer for 5 minutes. This is where the magic happens.
- In a bowl, mix the ricotta, egg, and a pinch of salt and pepper. This is your glue, make it sticky.
- Now, layer like your life depends on it: sauce, eggplant, ricotta mix, mozzarella, repeat. Top with Parmesan because we’re fancy.
- Bake uncovered for 25 minutes until bubbly and slightly golden. Let it sit for 10 minutes unless you enjoy lasagna soup.
Kind of amazing how those eggplant slices hold up, right? This lasagna is a hearty, cheesy masterpiece with a sneaky veggie twist. Serve it with a side of garlic bread to carb-load like a champion.
Carrot Cake Oatmeal

Alright, let’s dive into a breakfast that’s basically dessert in disguise—Carrot Cake Oatmeal! Because why should cake have all the fun? This bowl of cozy, spiced goodness will make your morning routine feel like a celebration, minus the guilt and plus all the fiber.
Ingredients
- 1 cup rolled oats (not the instant kind—we’re keeping it hearty here)
- 1 1/2 cups water (for boiling, because we’re not savages)
- 1/2 cup milk of choice (I’m team almond, but you do you)
- 1 medium carrot, grated (about 1/2 cup—trust me, it’s worth the arm workout)
- 1 tbsp maple syrup (the real deal, none of that pancake syrup nonsense)
- 1/2 tsp cinnamon (because it’s not carrot cake without it)
- 1/4 tsp nutmeg (for that warm, hug-in-a-spice effect)
- 1/4 tsp vanilla extract (the secret weapon)
- 2 tbsp chopped walnuts (for crunch and to pretend we’re being healthy)
- A pinch of salt (to make all the flavors pop)
Instructions
- In a medium saucepan, bring the water to a boil over high heat. Tip: Keep an eye on it—water has a sneaky way of boiling over when you’re not looking.
- Stir in the oats and reduce the heat to medium-low. Let them simmer for about 5 minutes, stirring occasionally. Tip: This is your chance to grate that carrot if you haven’t already—multitasking at its finest.
- Add the grated carrot, milk, maple syrup, cinnamon, nutmeg, vanilla extract, and salt to the saucepan. Stir well to combine. Tip: The mixture will thicken as it cooks, so don’t panic if it looks a bit soupy at first.
- Continue to cook for another 3-4 minutes, stirring frequently, until the oatmeal reaches your desired consistency.
- Remove from heat and let it sit for a minute (because patience is a virtue, especially when it comes to not burning your tongue).
- Top with chopped walnuts and an extra drizzle of maple syrup if you’re feeling fancy.
This Carrot Cake Oatmeal is like a warm hug in a bowl—creamy, spiced, and just sweet enough. The walnuts add a delightful crunch, making each bite a little adventure. Serve it in your favorite mug for maximum coziness, or go all out with a dollop of Greek yogurt on top for a protein boost. Either way, you’re winning at breakfast.
Turkey and Spinach Meatballs

Gather ’round, folks, because we’re about to turn the humble meatball into a showstopper that even your spinach-hating uncle will secretly adore. These Turkey and Spinach Meatballs are here to prove that healthy can be hearty, and delicious can be downright easy.
Ingredients
- 1 lb ground turkey (the leaner, the meaner, but 85/15 works wonders)
- 1 cup fresh spinach, finely chopped (because we’re fancy like that)
- 1/2 cup breadcrumbs (I’m team panko for that extra crunch)
- 1/4 cup grated Parmesan (the real deal, none of that shaky cheese nonsense)
- 1 large egg (room temp, please—it’s a texture thing)
- 2 cloves garlic, minced (more if you’re not kissing anyone later)
- 1 tbsp extra virgin olive oil (my kitchen MVP)
- 1 tsp salt (don’t be shy, but don’t go overboard)
- 1/2 tsp black pepper (freshly ground, because we’re not savages)
- 1/2 tsp dried oregano (for that little Italian whisper)
Instructions
- Preheat your oven to 375°F (no peeking until it’s fully preheated—patience is a virtue).
- In a large bowl, combine the ground turkey, spinach, breadcrumbs, Parmesan, egg, garlic, salt, pepper, and oregano. Mix gently with your hands (yes, hands—tools are for the weak).
- Roll the mixture into 1.5-inch balls (pro tip: slightly wet hands prevent sticking).
- Heat the olive oil in a large skillet over medium heat. Brown the meatballs in batches, about 2 minutes per side (just a quick tan, not a full sunburn).
- Transfer the meatballs to a baking sheet and bake for 15 minutes (or until they’re cooked through—no pink, please).
- Let them rest for 5 minutes (this is their well-deserved spa moment).
Now, these bad boys are juicy, packed with flavor, and have just the right amount of green to make you feel virtuous. Serve them over zoodles for a low-carb feast, or dunk them in marinara like the comfort food champions they are.
Peanut Butter Protein Cookies

Unbelievably, these Peanut Butter Protein Cookies are the sneaky little heroes of snack time, packing a punch of protein without skimping on that irresistible peanut butter charm. Perfect for when your sweet tooth and gym goals decide to play nice.
Ingredients
- 1 cup creamy peanut butter (the kind that makes you want to eat it straight from the jar)
- 1/2 cup vanilla protein powder (because we’re fancy like that)
- 1/3 cup honey (nature’s liquid gold)
- 1 large egg (room temp, unless you enjoy the thrill of cold eggs in your batter)
- 1 tsp vanilla extract (the secret handshake of baking)
- 1/2 tsp baking soda (the tiny bubbles of joy)
- A pinch of salt (to make the sweet stuff pop)
Instructions
- Preheat your oven to 350°F because we’re not savages—we bake at the right temperature.
- In a bowl, mix the peanut butter, protein powder, honey, egg, vanilla extract, baking soda, and salt until it looks like a unified dough. Tip: If the dough feels too sticky, a dash more protein powder can save the day.
- Roll the dough into 12 balls, because who doesn’t love a cookie that’s already portioned for guilt-free snacking?
- Place them on a baking sheet lined with parchment paper, then gently flatten each with a fork in a criss-cross pattern. Tip: Dip the fork in water to prevent sticking—it’s a game-changer.
- Bake for 10-12 minutes until the edges are just golden. Tip: They’ll firm up as they cool, so resist the urge to overbake.
- Let them cool on the baking sheet for 5 minutes, then transfer to a wire rack because patience is a virtue, especially with cookies.
Here’s the deal: these cookies are chewy with a slight crisp on the edges, and the peanut butter flavor is front and center with a subtle vanilla backdrop. Serve them with a glass of cold milk, or crumble them over yogurt for a breakfast that thinks it’s dessert.
Grilled Salmon with Asparagus
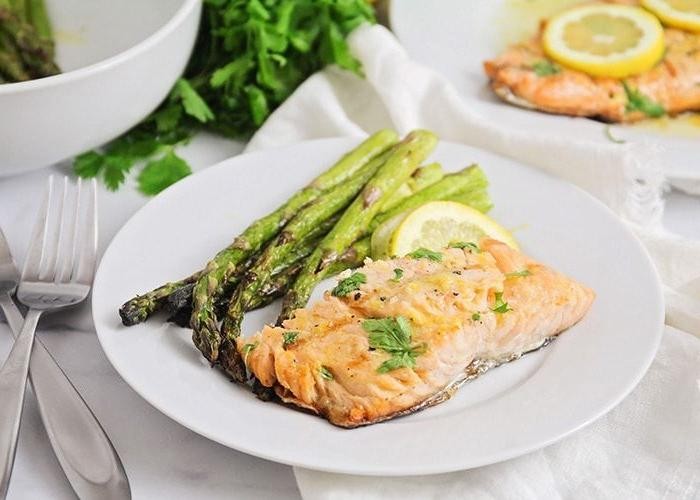
Oh, the joys of summer grilling! Nothing says ‘I’ve got my life together’ like serving up a perfectly grilled salmon with a side of crisp asparagus. It’s the kind of meal that’ll have your guests thinking you’re a gourmet chef, and we’ll keep that little secret between us.
Ingredients
- 1 lb salmon fillet (skin-on for that crispy goodness)
- 1 bunch asparagus (the thicker spears are my jam—more crunch!)
- 2 tbsp extra virgin olive oil (because cheap oil is a crime against flavor)
- 1 tsp garlic powder (fresh garlic burns too fast, trust me)
- 1/2 tsp smoked paprika (for that ‘I know what I’m doing’ smoky vibe)
- Salt and freshly ground black pepper (to make everything better)
- 1 lemon (half for cooking, half for showing off)
Instructions
- Preheat your grill to medium-high, about 375°F. No guesswork—use a thermometer.
- While the grill heats, toss the asparagus with 1 tbsp olive oil, salt, and pepper. Lay them out like they’re sunbathing.
- Rub the salmon with the remaining olive oil, then season with garlic powder, smoked paprika, salt, and pepper. Be generous; salmon can take it.
- Place the salmon skin-side down on the grill. Close the lid and let it cook for 4 minutes. No peeking—heat escapes!
- Flip the salmon carefully. Grill for another 3-4 minutes until it flakes easily but still looks juicy.
- Throw the asparagus on the grill last minute, turning once after 2 minutes. You want char, not charcoal.
- Squeeze half the lemon over everything right before serving. The other half? Slice it for garnish because we eat with our eyes first.
Crunchy asparagus meets buttery salmon with a smoky, citrusy kick—this dish is a symphony of textures and flavors. Serve it on a platter with the lemon slices artfully arranged, and watch as your dining table turns into a Michelin-starred restaurant. Just kidding, but they’ll definitely ask for seconds.
Berry Smoothie Bowl
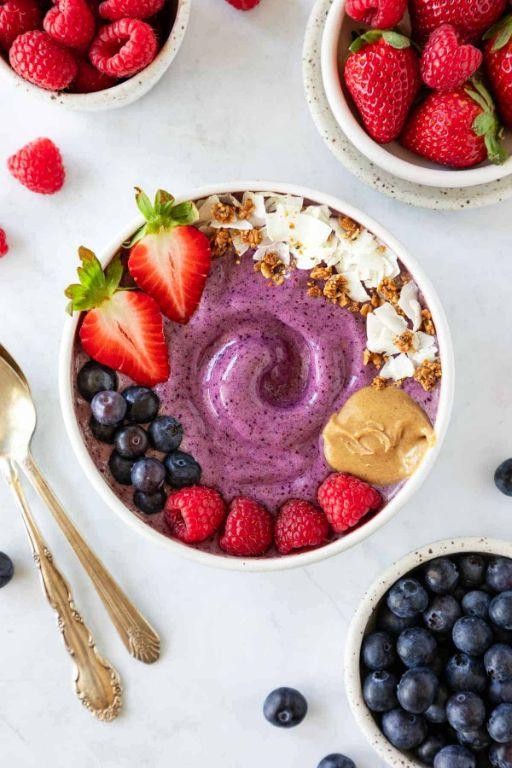
Vibrant, vivacious, and virtually begging to be Instagrammed, this Berry Smoothie Bowl is your ticket to breakfast bliss. Packed with antioxidants and a pop of color, it’s like a party in a bowl—and everyone’s invited!
Ingredients
- 1 cup frozen mixed berries (because who has time to pick them one by one?)
- 1 ripe banana (the spottier, the sweeter—trust me on this)
- 1/2 cup Greek yogurt (I go for full-fat; life’s too short for skim)
- 1/4 cup almond milk (or whatever milk makes your heart sing)
- 1 tbsp honey (local if you’ve got it, bees need love too)
- A handful of granola (for that essential crunch factor)
- A few fresh berries and mint leaves (because we eat with our eyes first)
Instructions
- In a blender, combine the frozen mixed berries, banana, Greek yogurt, almond milk, and honey. Blend on high until smooth and creamy, about 1 minute. Tip: If it’s too thick, add a splash more almond milk. Too thin? More frozen berries to the rescue!
- Pour the smoothie into a bowl. This is your canvas, so make it pretty.
- Sprinkle the granola over the top like you’re decorating the most important cake of your life.
- Artfully arrange the fresh berries and mint leaves on top. Instagram moment? I think yes.
Dive into this bowl of berry goodness and let the flavors dance on your palate. The creamy smoothie paired with the crunchy granola is a texture match made in heaven. Serve it in a hollowed-out pineapple for that extra ‘wow’ factor at your next brunch.
Lentil Soup
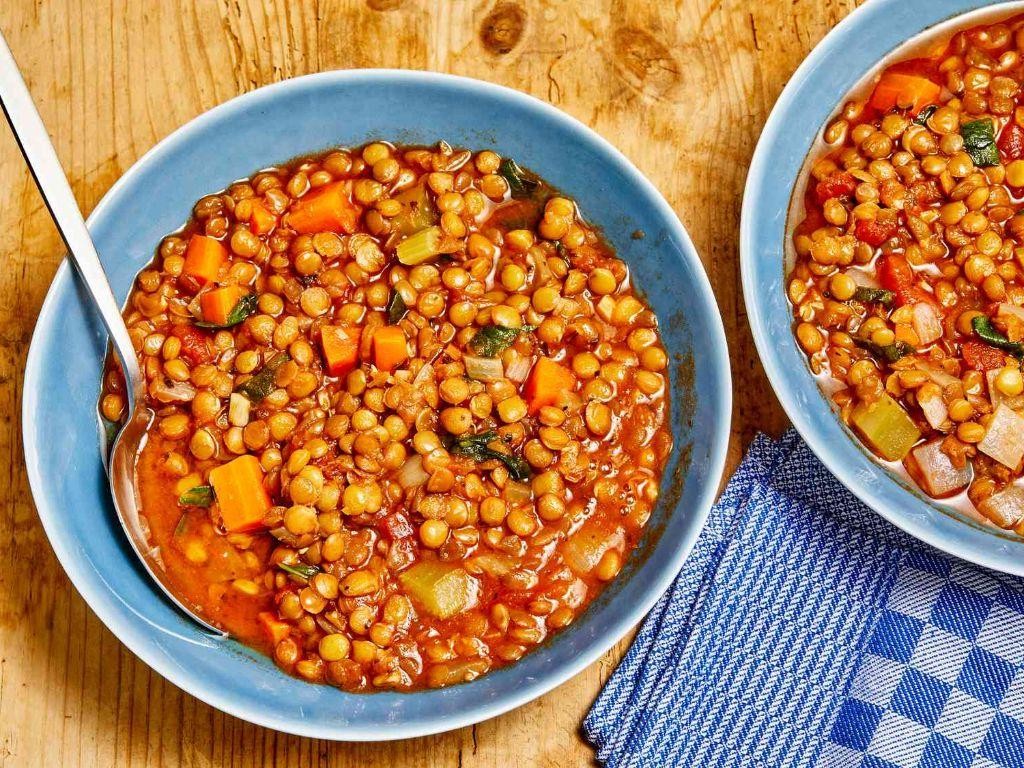
Veg out with this hearty lentil soup that’s as comforting as your favorite blanket but way more nutritious. Perfect for those days when you want to feel like a domestic goddess without actually putting in goddess-level effort.
Ingredients
- 1 cup dried lentils (because canned lentils are for quitters)
- 1 tbsp extra virgin olive oil (the fancier, the better)
- 1 medium onion, diced (tears are optional but likely)
- 2 carrots, chopped (rainbow carrots if you’re feeling extra)
- 2 cloves garlic, minced (or more, we don’t judge)
- 4 cups vegetable broth (homemade if you’re winning at life)
- 1 tsp cumin (for that earthy vibe)
- Salt to taste (but seriously, taste it)
Instructions
- Heat the olive oil in a large pot over medium heat until it shimmers like your future.
- Add the onion and carrots, sautéing until the onion is translucent and the carrots start to soften, about 5 minutes.
- Stir in the garlic and cumin, cooking for another minute until fragrant. Tip: Don’t let the garlic burn unless you’re into that.
- Add the lentils and vegetable broth, bringing the mixture to a boil. Tip: Skim off any foam that forms for a clearer soup.
- Reduce heat to low, cover, and simmer for 25-30 minutes, or until the lentils are tender but not mushy. Tip: Lentils should hold their shape like your dignity on a Friday night.
- Season with salt to taste, remembering that broth can be salty, so start small.
Yum! This soup is a cozy hug in a bowl, with the lentils offering a satisfying bite and the cumin adding a warm, spicy note. Serve it with a dollop of yogurt or a sprinkle of fresh herbs to really impress your imaginary dinner guests.
Conclusion
We hope you’re inspired by these 18 delicious no sugar, no flour recipes that prove healthy eating doesn’t mean sacrificing flavor. Whether you’re looking to refresh your meal plan or indulge guilt-free, there’s something here for everyone. Try them out, share your favorites in the comments, and don’t forget to pin this article on Pinterest to keep these tasty ideas handy. Happy cooking!