Welcome to a culinary journey through New England’s most cherished flavors! Whether you’re craving the comfort of a creamy clam chowder or the sweet delight of maple-glazed treats, our roundup of 20 Delicious New England Recipes Traditional is your ticket to bringing regional classics right to your kitchen. Perfect for home cooks looking to explore or revisit these timeless dishes, let’s dive into recipes that warm the heart and satisfy the soul.
New England Clam Chowder

Yesterday, as the cool breeze hinted at the coming fall, I found myself craving the creamy, comforting embrace of New England Clam Chowder. There’s something about this dish that feels like a warm hug on a chilly day, and my version, packed with tender clams and hearty potatoes, never fails to satisfy.
Ingredients
- 2 cups chopped clams (I love using fresh, but canned works in a pinch)
- 4 slices of bacon, diced (because everything’s better with bacon)
- 1 large onion, finely chopped (yellow onions are my go-to for their sweetness)
- 2 cups diced potatoes (Yukon Golds hold their shape beautifully)
- 3 cups whole milk (for that rich, creamy texture)
- 1 cup heavy cream (because why not?)
- 2 tbsp butter (unsalted, so I can control the seasoning)
- 1 tbsp all-purpose flour (to thicken things up just right)
- 1 tsp salt (plus more to taste)
- 1/2 tsp black pepper (freshly ground, if you have it)
Instructions
- In a large pot over medium heat, cook the diced bacon until crispy, about 5 minutes. Remove with a slotted spoon and set aside, leaving the drippings in the pot.
- Add the butter to the bacon drippings. Once melted, stir in the chopped onion and cook until translucent, about 3 minutes.
- Sprinkle the flour over the onions, stirring constantly for 1 minute to create a roux.
- Gradually whisk in the milk and heavy cream, ensuring no lumps form. Bring to a gentle simmer.
- Add the diced potatoes, salt, and pepper. Cook, stirring occasionally, until the potatoes are tender, about 15 minutes.
- Stir in the chopped clams and cooked bacon. Heat through for another 5 minutes, then adjust seasoning if needed.
This chowder is luxuriously creamy with a perfect balance of smoky bacon and sweet clams. Serve it in a hollowed-out sourdough loaf for an edible bowl that’s as fun to eat as it is delicious.
Boston Baked Beans
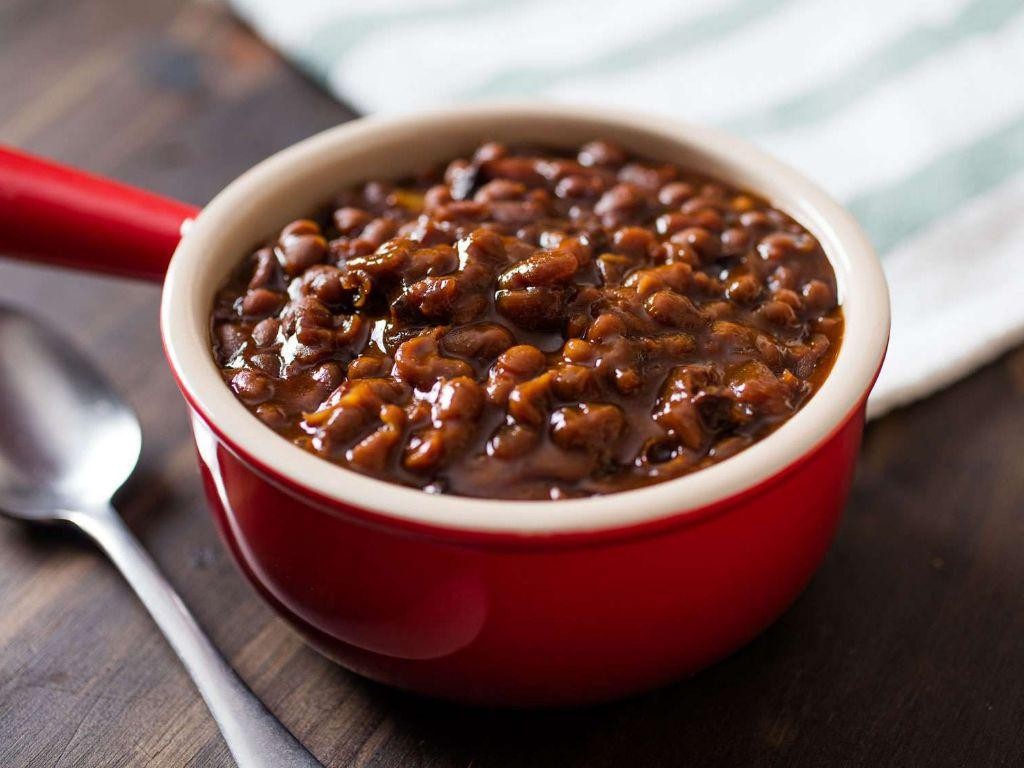
Digging into a bowl of Boston Baked Beans takes me back to my grandmother’s kitchen, where the sweet and savory aroma filled the air every Sunday. It’s a dish that’s as hearty as it is nostalgic, perfect for those who appreciate a slow-cooked meal with deep flavors.
Ingredients
- 2 cups dried navy beans – I always soak them overnight for that perfect tenderness.
- 1/2 cup molasses – The darker, the better for that rich, deep flavor.
- 1/4 cup brown sugar – Packed tightly, because a little extra sweetness never hurt anyone.
- 1 teaspoon dry mustard – Just enough to give it a subtle kick.
- 4 ounces salt pork, diced – It’s all about that salty, meaty goodness.
- 1 small onion, finely chopped – I like mine diced small so they melt into the sauce.
- 1/2 teaspoon salt – To balance the sweetness.
- 4 cups water – Filtered is my preference, but tap works in a pinch.
Instructions
- Preheat your oven to 300°F (150°C) – low and slow is the key here.
- Drain the soaked navy beans and give them a quick rinse under cold water.
- In a large oven-safe pot, combine the beans, molasses, brown sugar, dry mustard, salt pork, onion, salt, and water.
- Give everything a good stir to ensure the molasses and sugar are fully dissolved.
- Cover the pot with a lid and bake in the preheated oven for 6 hours. Tip: Check the beans after 5 hours; if they’re too dry, add a bit more water.
- After 6 hours, remove the lid and bake for an additional 30 minutes to thicken the sauce. Tip: The beans should be tender but not mushy.
- Let the beans sit for 10 minutes before serving to allow the flavors to meld even more. Tip: This is the perfect time to taste and adjust the seasoning if needed.
Zesty and rich, these Boston Baked Beans have a velvety texture that pairs wonderfully with crusty bread or over a baked potato for a twist on the classic.
Lobster Roll
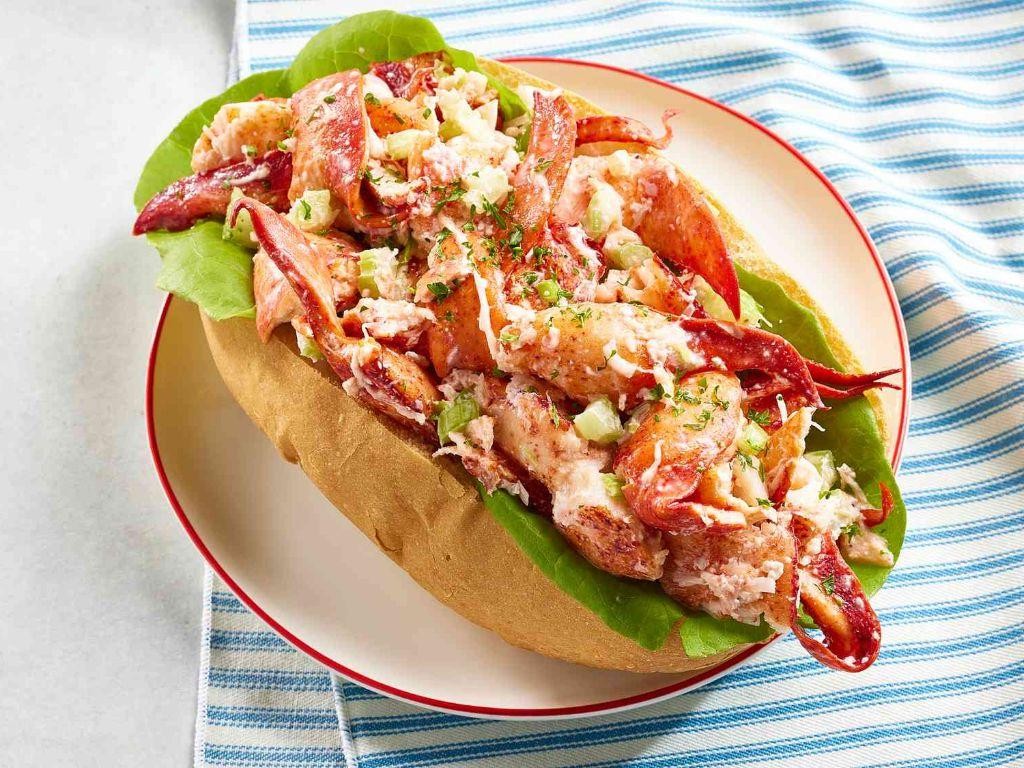
Venturing into the world of seafood sandwiches, there’s nothing quite like the luxurious yet comforting bite of a lobster roll. I remember my first time trying one at a quaint seaside shack in Maine, and ever since, I’ve been on a mission to recreate that perfect balance of tender lobster, creamy dressing, and buttery toast at home.
Ingredients
- 1 lb fresh lobster meat, chopped (I find that claw and knuckle meat offers the best flavor and texture)
- 1/4 cup mayonnaise (Hellmann’s is my go-to for its rich taste)
- 1 tbsp fresh lemon juice (because bottled just doesn’t give the same zing)
- 1/4 cup finely chopped celery (for that essential crunch)
- 1 tbsp chopped fresh chives (from my little herb garden, if possible)
- Salt and pepper to taste (I’m generous with the pepper for a bit of heat)
- 2 tbsp unsalted butter, softened (European-style butter makes all the difference)
- 4 New England-style hot dog buns (toasted to golden perfection)
Instructions
- In a large mixing bowl, combine the chopped lobster meat, mayonnaise, lemon juice, celery, and chives. Gently fold the ingredients together until evenly mixed. Tip: Overmixing can break down the lobster meat, so be gentle.
- Season the mixture with salt and pepper to taste. Tip: Always taste as you go to adjust the seasoning perfectly.
- Spread the softened butter evenly on the outsides of the hot dog buns. Tip: This step is crucial for achieving that golden, crispy exterior when toasting.
- Heat a large skillet over medium heat. Place the buttered buns in the skillet, buttered side down, and toast for 2-3 minutes, or until golden brown and crispy.
- Fill each toasted bun generously with the lobster mixture. Serve immediately. Tip: For an extra touch, sprinkle a few additional chives on top for color and flavor.
How the creamy, lightly dressed lobster pairs with the crisp, buttery bun is nothing short of magical. For a summer twist, serve these rolls with a side of sweet potato fries or a crisp, cold slaw to round out the meal.
New England Boiled Dinner
Remember those chilly evenings when all you crave is something hearty and comforting? That’s exactly when I turn to my trusty New England Boiled Dinner, a one-pot wonder that’s as nourishing as it is nostalgic.
Ingredients
- 3 lbs corned beef brisket (I always look for one with a good fat cap for extra flavor)
- 1 large onion, quartered (yellow onions are my go-to for their sweetness)
- 4 carrots, peeled and cut into 3-inch pieces (I like to leave a bit of the green top for a rustic look)
- 4 medium potatoes, peeled and quartered (Yukon Golds are my favorite for their buttery texture)
- 1 small cabbage, cut into wedges (save the core to keep the wedges intact during cooking)
- 2 cups water (enough to cover the ingredients without drowning them)
- 1 tbsp whole peppercorns (for a subtle spice that doesn’t overpower)
Instructions
- Place the corned beef brisket in a large pot, fat side up. This positioning helps the fat render down into the meat, keeping it moist.
- Add the quartered onion, carrots, potatoes, and peppercorns around the brisket.
- Pour in the water until the ingredients are just covered. Too much water can dilute the flavors, so be mindful.
- Bring the pot to a boil over high heat, then reduce to a simmer. Cover and let it cook for 2.5 hours. The low and slow method ensures the brisket becomes fork-tender.
- After 2.5 hours, add the cabbage wedges to the pot. They only need about 15 minutes to become tender but still hold their shape.
- Once the cabbage is cooked, remove the pot from the heat. Let it sit for 5 minutes before serving to allow the flavors to meld.
Perfectly tender brisket with vegetables that have soaked up all the savory goodness is what you’ll get. Serve it with a dollop of horseradish on the side for an extra kick, or keep it classic with a slice of rye bread to sop up the broth.
Apple Cider Donuts
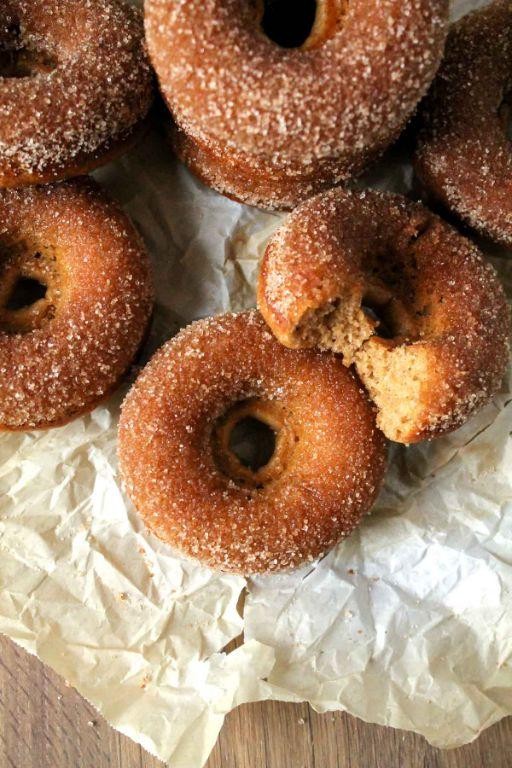
Apple cider donuts are the epitome of fall comfort, but let’s be honest, I make them year-round because who can resist that spiced, apple-y goodness? A batch of these never lasts more than a day in my house, especially when my kids catch wind of them cooling on the rack.
Ingredients
- 2 cups all-purpose flour (I swear by King Arthur for consistent results)
- 1/2 cup granulated sugar (because life’s sweet enough, but not too sweet)
- 1 tsp baking powder (the fresher, the better—check that expiration date!)
- 1 tsp cinnamon (I add an extra pinch because why not?)
- 1/2 tsp salt (sea salt is my preference for its subtle crunch)
- 1/2 cup apple cider (reduced from 1 cup for that concentrated flavor)
- 1/4 cup milk (whole milk makes them extra tender)
- 1 large egg (room temp, always—it blends so much better)
- 2 tbsp unsalted butter, melted (and slightly cooled)
- Vegetable oil for frying (enough to fill your pot by 2 inches)
Instructions
- In a large bowl, whisk together the flour, sugar, baking powder, cinnamon, and salt until well combined.
- In another bowl, mix the reduced apple cider, milk, egg, and melted butter until smooth.
- Gradually add the wet ingredients to the dry, stirring just until combined—overmixing leads to tough donuts.
- Heat the vegetable oil in a deep pot to 375°F, using a candy thermometer to monitor the temperature.
- While the oil heats, roll the dough to 1/2-inch thickness on a floured surface and cut into donut shapes.
- Fry the donuts in batches, about 1 minute per side, until golden brown. Tip: Don’t overcrowd the pot to maintain oil temperature.
- Transfer to a wire rack set over paper towels to drain. Tip: Flip them once to ensure even draining.
- While still warm, toss the donuts in cinnamon sugar if desired. Tip: Doing this while warm helps the sugar stick better.
You’ll love the crispy exterior giving way to a soft, moist interior packed with apple and spice flavors. Try serving them with a side of warm apple cider for dipping—it’s a game-changer.
Pumpkin Whoopie Pies
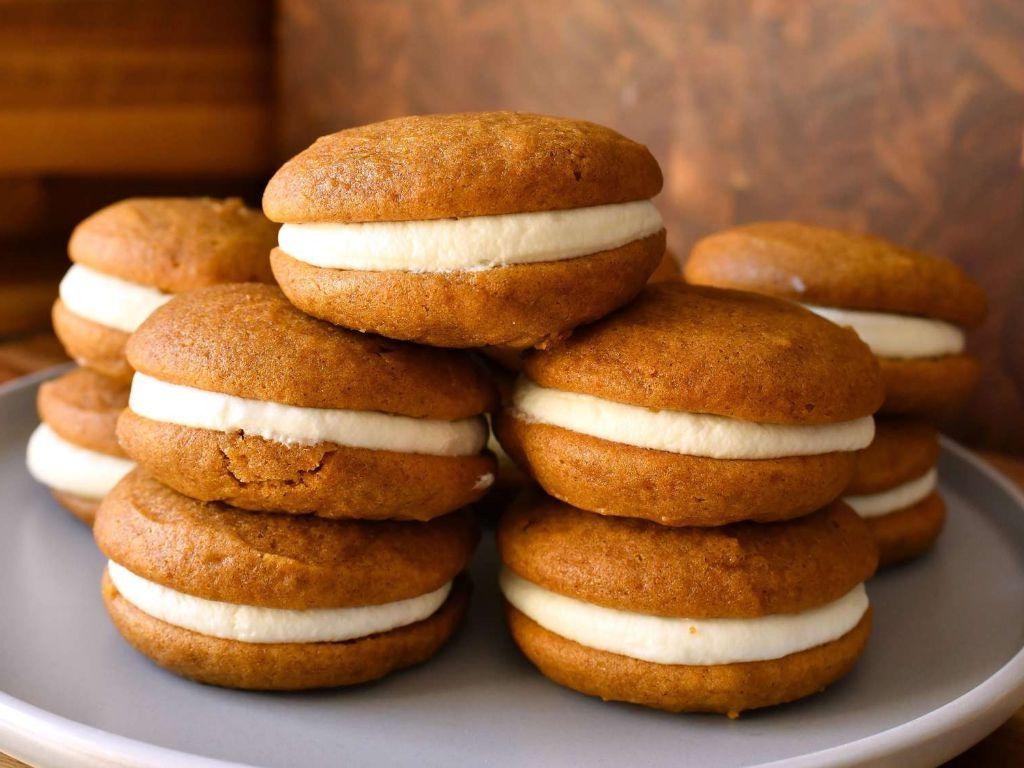
Zesty flavors and cozy autumn vibes come together in these Pumpkin Whoopie Pies, a treat that’s as fun to make as it is to eat. I remember the first time I baked these, the kitchen filled with the warm spices of pumpkin and cinnamon, and I knew this recipe was a keeper.
Ingredients
- 2 cups all-purpose flour (I like to sift mine for extra fluffiness)
- 1 tsp baking powder (freshness is key, so I always check the date)
- 1 tsp baking soda (to give those pies the perfect rise)
- 1 tsp ground cinnamon (the heart of the spice blend)
- 1/2 tsp ground ginger (for a little extra kick)
- 1/2 tsp salt (I use sea salt for its clean taste)
- 1 cup packed brown sugar (dark brown for deeper flavor)
- 1/2 cup vegetable oil (a neutral oil lets the pumpkin shine)
- 1 1/2 cups canned pumpkin puree (not pie filling, and organic is my preference)
- 1 large egg (room temp blends better, I’ve found)
- 1 tsp vanilla extract (pure, not imitation, makes all the difference)
- 1/2 cup unsalted butter, softened (for the creamy filling)
- 4 oz cream cheese, softened (full-fat for richness)
- 2 cups powdered sugar (sifted to avoid lumps)
- 1 tsp vanilla extract (yes, more vanilla, because why not?)
Instructions
- Preheat your oven to 350°F (175°C) and line two baking sheets with parchment paper.
- In a medium bowl, whisk together the flour, baking powder, baking soda, cinnamon, ginger, and salt until well combined.
- In a large bowl, beat the brown sugar and vegetable oil on medium speed until smooth, about 2 minutes.
- Add the pumpkin puree, egg, and vanilla extract to the sugar mixture, beating until fully incorporated.
- Gradually add the dry ingredients to the wet, mixing on low speed just until combined. Tip: Overmixing can lead to dense whoopie pies, so stop as soon as you see no flour streaks.
- Using a cookie scoop or tablespoon, drop mounds of dough onto the prepared baking sheets, spacing them about 2 inches apart.
- Bake for 10-12 minutes, or until the pies spring back when lightly touched. Tip: Rotate the pans halfway through for even baking.
- Let the pies cool on the baking sheets for 5 minutes, then transfer to a wire rack to cool completely.
- While the pies cool, make the filling by beating the butter and cream cheese together until smooth and creamy.
- Gradually add the powdered sugar and vanilla, beating until light and fluffy. Tip: If the filling is too soft, chill it for 15 minutes before using.
- Once the pies are cool, spread or pipe the filling onto the flat side of half the pies, then top with the remaining pies.
Absolutely delightful, these Pumpkin Whoopie Pies boast a soft, cake-like texture with a creamy, tangy filling that balances the sweetness. Serve them with a dusting of powdered sugar or a drizzle of caramel for an extra special touch.
Maple Syrup Glazed Salmon
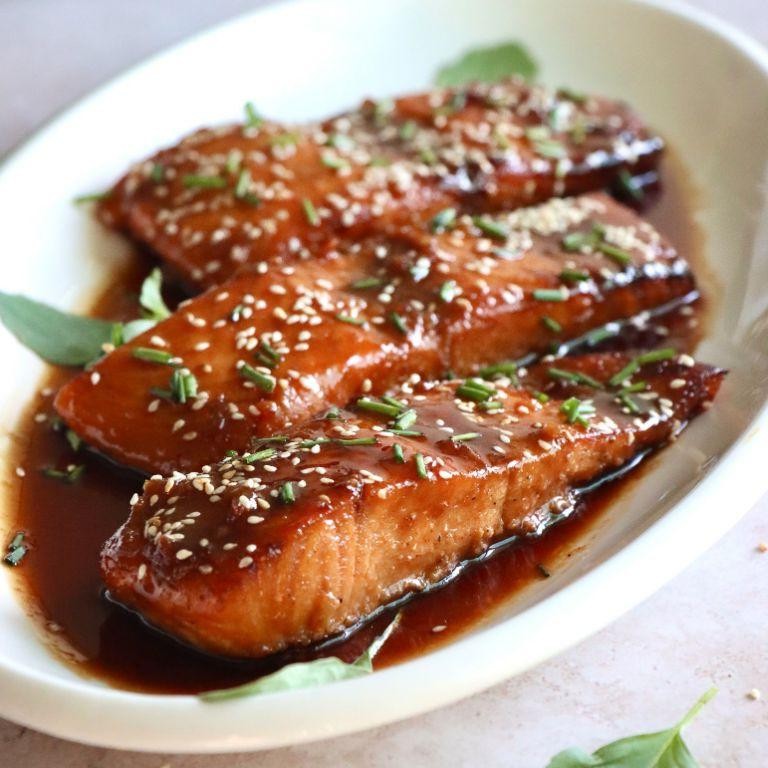
Perfect for a cozy dinner or impressing guests, this Maple Syrup Glazed Salmon is a dish I’ve come to love for its perfect balance of sweet and savory. I remember the first time I tried it; the glaze caramelized beautifully, leaving a sticky, golden crust that’s simply irresistible.
Ingredients
- 1.5 lbs salmon fillet (I always look for wild-caught for its superior flavor and texture)
- 1/4 cup pure maple syrup (the real deal makes all the difference here)
- 2 tbsp soy sauce (I opt for low-sodium to control the saltiness)
- 1 tbsp olive oil (extra virgin is my go-to for its fruity notes)
- 1 tsp minced garlic (freshly minced gives the best flavor punch)
- 1/2 tsp black pepper (freshly ground for that extra kick)
Instructions
- Preheat your oven to 375°F (190°C) and line a baking sheet with parchment paper for easy cleanup.
- In a small bowl, whisk together the maple syrup, soy sauce, olive oil, minced garlic, and black pepper until well combined. Tip: Let the mixture sit for 5 minutes to allow the flavors to meld.
- Place the salmon fillet on the prepared baking sheet and brush half of the glaze evenly over the top. Tip: Ensure the salmon is at room temperature for even cooking.
- Bake in the preheated oven for 10 minutes, then remove and brush with the remaining glaze. Tip: Watch closely during the last few minutes to prevent overcaramelization.
- Return to the oven and bake for another 5-7 minutes, or until the salmon flakes easily with a fork and the glaze is bubbly and slightly darkened.
You’ll love how the maple syrup glaze forms a glossy, flavorful crust on the salmon, while the inside remains tender and moist. Serve it over a bed of quinoa or with roasted vegetables for a complete meal that’s as nutritious as it is delicious.
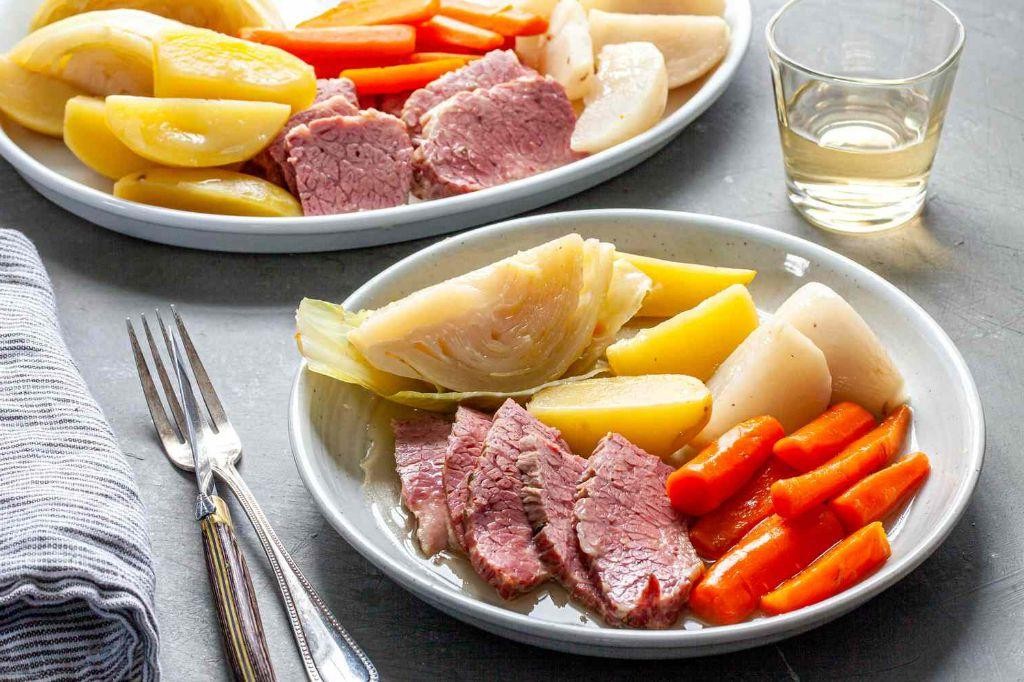
Corned Beef and Cabbage

Ah, there’s nothing quite like the comforting embrace of a hearty Corned Beef and Cabbage to bring the family together. I remember my grandmother simmering this dish for hours, the aroma filling every corner of her tiny kitchen, promising a meal that was as nourishing as it was delicious.
Ingredients
- 3 lbs corned beef brisket (I always look for one with a good layer of fat for extra flavor)
- 1 large head of cabbage, cut into wedges (the crispier, the better in my book)
- 4 large carrots, peeled and cut into 3-inch pieces (I like them chunky for a satisfying bite)
- 4 medium potatoes, quartered (Yukon Golds are my go-to for their buttery texture)
- 1 onion, quartered (it’s all about building those layers of flavor)
- 4 cups water (just enough to cover the brisket)
- 2 tbsp pickling spice (the secret weapon that ties everything together)
Instructions
- Place the corned beef brisket in a large pot, fat side up. This positioning helps the fat render down, basting the meat as it cooks.
- Add the water and pickling spice to the pot, ensuring the brisket is just covered. Bring to a boil over high heat, then reduce to a simmer. Cover and let it cook for 2.5 hours. Tip: Resist the urge to peek; keeping the lid on ensures a tender brisket.
- After 2.5 hours, add the potatoes, carrots, and onion to the pot. Cover and simmer for another 20 minutes. Tip: Cutting the vegetables uniformly ensures they cook evenly.
- Add the cabbage wedges to the pot, tucking them around the edges. Cover and simmer for an additional 15 minutes. Tip: Don’t overcrowd the pot; the cabbage needs room to soften properly.
- Remove the brisket and let it rest for 10 minutes before slicing against the grain. This ensures each slice is tender and easy to chew.
- Serve the sliced brisket with the vegetables and a ladle of the cooking liquid for extra flavor.
Velvety tender brisket paired with the slight crunch of perfectly cooked vegetables makes this dish a textural dream. For a twist, try serving it over a slice of toasted rye bread to soak up all those delicious juices.
Blueberry Pie

Very few things say summer quite like a homemade blueberry pie. I remember the first time I made one; the kitchen was a mess, but the aroma was absolutely worth it. Now, it’s a tradition every June, and I’ve picked up a few tricks along the way.
Ingredients
- 2 cups all-purpose flour (I like to sift mine for extra flakiness)
- 1 tsp salt (a pinch more if you’re using unsalted butter)
- 3/4 cup unsalted butter, chilled and diced (trust me, cold butter is key)
- 6-8 tbsp ice water (just enough to bring the dough together)
- 4 cups fresh blueberries (frozen works in a pinch, but fresh is best)
- 3/4 cup sugar (adjust based on how sweet your berries are)
- 2 tbsp cornstarch (this keeps the filling from being too runny)
- 1 tbsp lemon juice (a splash brightens the whole pie)
- 1 egg, beaten (for that golden crust)
Instructions
- Preheat your oven to 375°F (190°C). A properly heated oven ensures even baking.
- In a large bowl, mix flour and salt. Add butter and use your fingers to rub it into the flour until it resembles coarse crumbs. Tip: Keep everything cold for the flakiest crust.
- Gradually add ice water, 1 tbsp at a time, mixing until the dough just comes together. Overworking the dough makes it tough.
- Divide the dough in half, shape into disks, wrap in plastic, and chill for at least 1 hour. This rest period is crucial for easy rolling.
- Roll out one disk on a floured surface to fit a 9-inch pie plate. Transfer carefully, trimming any excess.
- In another bowl, toss blueberries with sugar, cornstarch, and lemon juice. Let sit for 10 minutes to draw out juices.
- Pour the blueberry mixture into the crust. Roll out the second dough disk and place over the filling. Seal edges, cut slits on top, and brush with beaten egg.
- Bake for 50-60 minutes, until the crust is golden and the filling is bubbly. Tip: Place a baking sheet underneath to catch any drips.
Kind of magical how those simple ingredients transform, isn’t it? The crust should be flaky and buttery, contrasting the sweet, slightly tart filling. Serve it warm with a scoop of vanilla ice cream for the ultimate summer dessert.
Rhode Island Johnnycakes
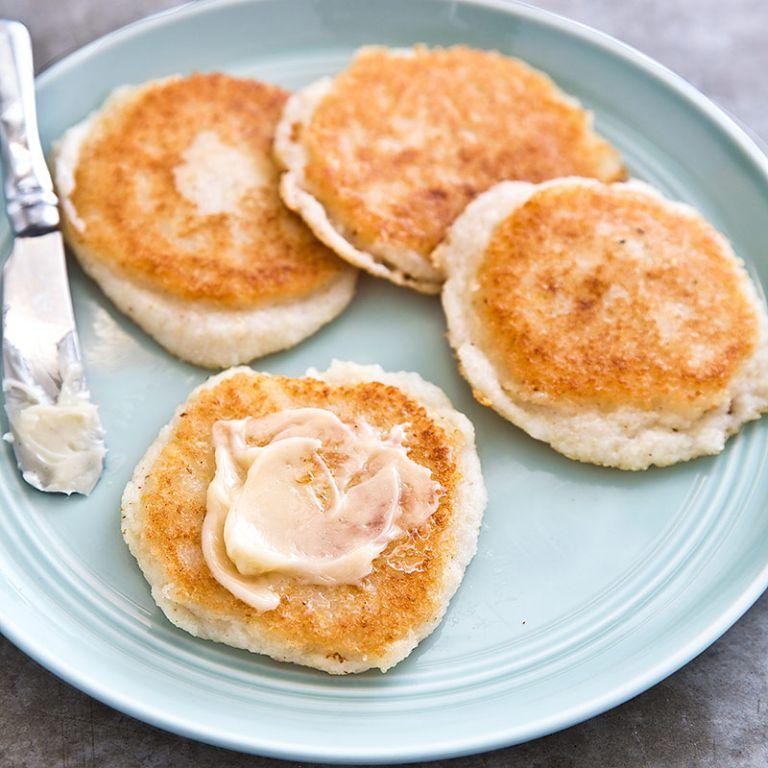
Many mornings, I find myself craving something simple yet deeply satisfying, and that’s when Rhode Island Johnnycakes come to mind. There’s something about their crispy edges and tender centers that feels like a warm hug from breakfast past.
Ingredients
- 1 cup stone-ground white cornmeal – the finer the grind, the smoother your johnnycakes will be.
- 1 teaspoon sugar – just a hint to balance the corn’s natural sweetness.
- 1/2 teaspoon salt – I like to use sea salt for its subtle crunch.
- 1 cup boiling water – this is key for hydrating the cornmeal properly.
- 1/2 cup milk – whole milk gives the best richness, but any will do in a pinch.
- Butter for frying – because everything’s better with butter, right?
Instructions
- In a medium bowl, whisk together the cornmeal, sugar, and salt. This ensures everything’s evenly distributed.
- Pour in the boiling water and stir until the mixture thickens. Let it sit for 10 minutes to fully hydrate the cornmeal.
- Stir in the milk until you have a batter that’s thick but pourable. If it’s too thick, add a splash more milk.
- Heat a large skillet or griddle over medium heat and melt a tablespoon of butter. The butter should sizzle but not brown too quickly.
- Pour 1/4 cup of batter for each johnnycake onto the skillet. Cook for about 3 minutes until the edges look set and bubbles form on top.
- Flip carefully and cook for another 2-3 minutes until golden brown. Don’t rush the flipping; patience gives you that perfect crust.
- Repeat with the remaining batter, adding more butter to the skillet as needed. Keep the cooked johnnycakes warm in a low oven.
Delightfully crisp on the outside with a soft, creamy interior, these johnnycakes are a testament to the beauty of simplicity. Serve them with a drizzle of maple syrup or a dollop of apple butter for a touch of sweetness that complements their corn flavor perfectly.
New England Fish Pie
Unbelievably comforting and packed with flavor, this New England Fish Pie is my go-to dish when I’m craving something hearty yet refined. I remember the first time I tried it at a quaint seaside diner in Maine; the creamy filling and flaky crust won me over instantly. Now, I make it at home with a few personal tweaks that I think elevate it even further.
Ingredients
- 1 lb cod fillets, skinless and cut into chunks (I find that slightly frozen fish is easier to cut)
- 1 cup heavy cream (for that rich, velvety texture we all love)
- 1/2 cup whole milk (2% works in a pinch, but whole gives the best consistency)
- 1/4 cup unsalted butter (I always use European-style for its higher fat content)
- 1 medium onion, finely diced (yellow onions are my preference for their sweetness)
- 2 tbsp all-purpose flour (to thicken the sauce just right)
- 1 tsp salt (I like to use sea salt for its clean taste)
- 1/2 tsp black pepper (freshly ground makes all the difference)
- 1 sheet puff pastry, thawed (store-bought works wonderfully here)
- 1 egg, beaten (for that golden, glossy crust)
Instructions
- Preheat your oven to 400°F (200°C) to ensure it’s hot enough for the pastry to puff up beautifully.
- In a large skillet over medium heat, melt the butter until it’s just beginning to foam, about 2 minutes.
- Add the diced onion and sauté until translucent, around 5 minutes, stirring occasionally to prevent burning.
- Sprinkle the flour over the onions, stirring constantly for 1 minute to cook out the raw flour taste.
- Gradually whisk in the heavy cream and milk, ensuring no lumps remain, and bring to a gentle simmer.
- Add the cod chunks, salt, and pepper, gently folding them into the sauce to avoid breaking the fish.
- Cook for 5 minutes, just until the fish begins to flake but isn’t fully cooked through (it will finish in the oven).
- Transfer the mixture to a pie dish and cover with the puff pastry, trimming any excess and crimping the edges to seal.
- Brush the pastry with the beaten egg for a golden finish, then cut a few slits in the top to allow steam to escape.
- Bake for 25-30 minutes, until the pastry is puffed and golden brown.
Here’s the thing about this pie: the contrast between the flaky, buttery crust and the creamy, tender fish inside is nothing short of magical. Serve it with a simple green salad to cut through the richness, or go all out with a side of buttery peas for a truly New England experience.
Anadama Bread
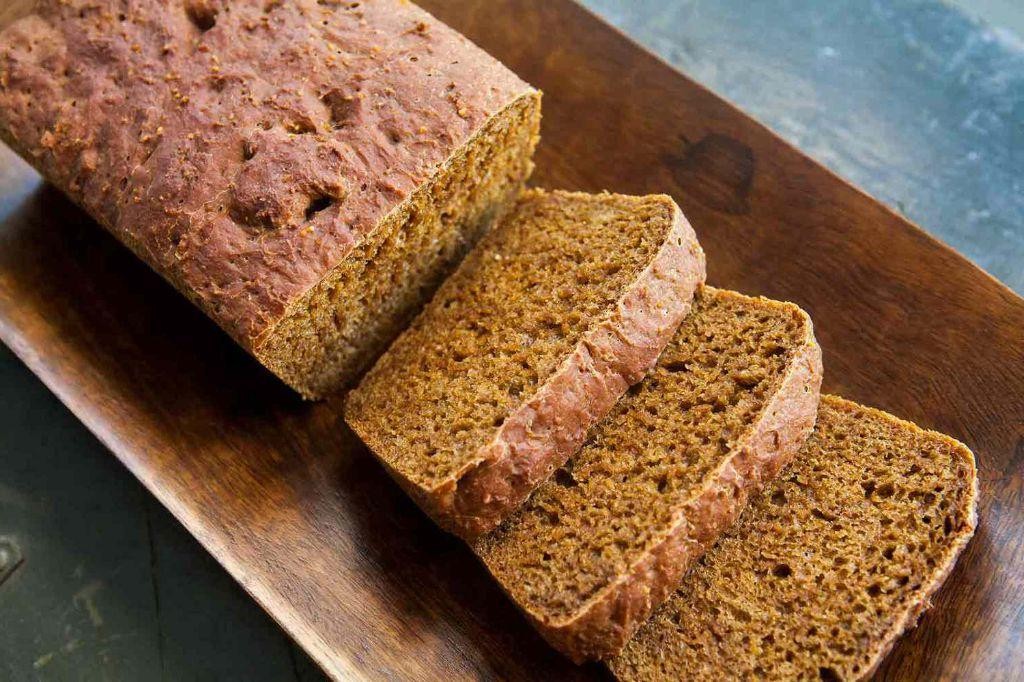
Every now and then, I stumble upon a recipe that feels like a warm hug, and Anadama Bread is exactly that. It’s a delightful blend of cornmeal and molasses that brings a unique sweetness and texture to your table. I remember the first time I baked it; the aroma filled my kitchen, promising something truly special.
Ingredients
- 1 cup warm water (110°F) – just like a cozy bath for the yeast
- 1/2 cup cornmeal – I love the slight crunch it adds
- 1/4 cup molasses – the darker, the better for that deep flavor
- 2 tbsp unsalted butter, softened – because everything’s better with butter
- 1 tsp salt – to balance the sweetness
- 1 package active dry yeast – the magic maker
- 3 cups all-purpose flour – plus extra for dusting
Instructions
- In a large bowl, combine warm water, cornmeal, molasses, butter, salt, and yeast. Let it sit for 5 minutes until the yeast is frothy. Tip: This is your proof that the yeast is alive and ready to work its magic.
- Gradually add flour, mixing until a dough forms. Knead on a floured surface for about 10 minutes until smooth and elastic. Tip: If the dough sticks to your hands, add a little more flour, but don’t overdo it.
- Place the dough in a greased bowl, cover with a damp cloth, and let rise in a warm place for 1 hour or until doubled in size. Tip: My oven with the light on creates the perfect rising environment.
- Punch down the dough, shape it into a loaf, and place it in a greased 9×5 inch loaf pan. Let it rise again for 30 minutes.
- Preheat your oven to 375°F. Bake the bread for 30-35 minutes until golden brown and sounds hollow when tapped. Tip: A digital thermometer should read 190°F when inserted into the center.
Rich in flavor with a tender crumb and a slight chewiness from the cornmeal, this Anadama Bread is perfect toasted with a smear of butter or as the base for your favorite sandwich. The molasses gives it a beautiful color and a hint of sweetness that pairs wonderfully with savory toppings.
Boston Cream Pie
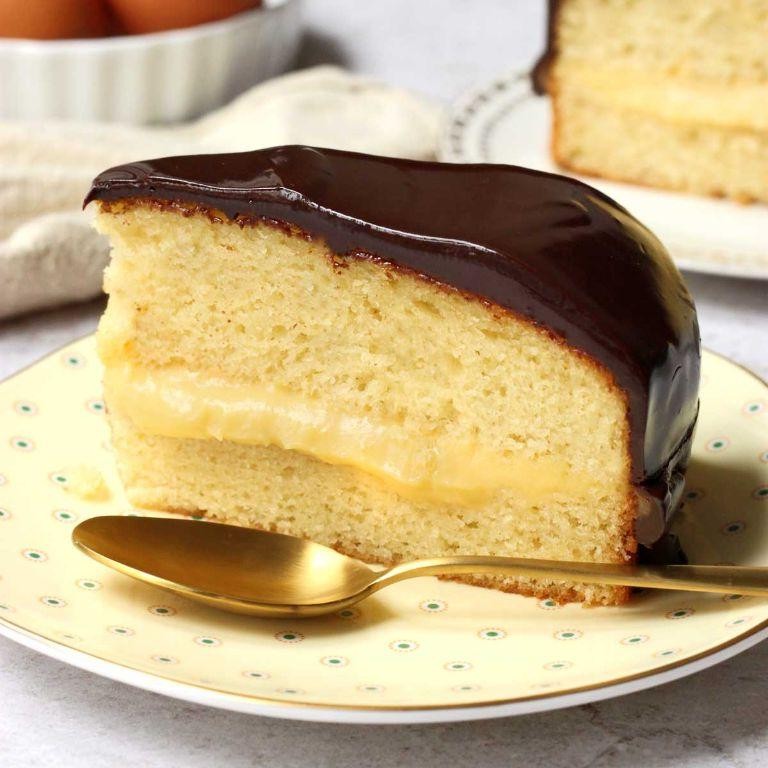
Craving something sweet yet sophisticated? Let me introduce you to the Boston Cream Pie, a dessert that’s as fun to make as it is to eat. I remember the first time I tried it; the combination of fluffy cake, rich custard, and glossy chocolate glaze was nothing short of magical.
Ingredients
- 1 cup all-purpose flour (I swear by King Arthur for consistent results)
- 1 cup granulated sugar (because life’s too short for less sweet)
- 1/2 cup unsalted butter, softened (room temp makes all the difference)
- 2 large eggs (room temp eggs blend smoother, trust me)
- 1 tsp vanilla extract (the real deal, not imitation)
- 1/2 cup whole milk (for that rich custard texture)
- 1 cup heavy cream (the secret to a dreamy custard)
- 4 oz semisweet chocolate (I prefer Ghirardelli for a deep flavor)
- 1 tbsp unsalted butter (for that silky glaze finish)
Instructions
- Preheat your oven to 350°F (175°C) and grease a 9-inch round cake pan. Tip: Use butter for greasing to add extra flavor.
- In a large bowl, cream together 1/2 cup softened butter and 1 cup sugar until light and fluffy. Tip: This should take about 3 minutes with an electric mixer.
- Beat in 2 eggs, one at a time, then stir in 1 tsp vanilla extract.
- Alternately add 1 cup flour and 1/2 cup milk to the creamed mixture, starting and ending with flour. Mix just until combined.
- Pour the batter into the prepared pan and bake for 25-30 minutes, or until a toothpick inserted comes out clean. Tip: Don’t open the oven door too early to avoid sinking the cake.
- While the cake cools, heat 1 cup heavy cream over medium heat until it just begins to boil. Remove from heat and whisk in 4 oz chopped chocolate and 1 tbsp butter until smooth for the glaze.
- Once the cake is cool, slice it horizontally and spread the custard on the bottom layer. Place the top layer over the custard and pour the chocolate glaze over the top.
Unbelievably, the first bite takes me back to that initial taste every time. The contrast between the soft cake, creamy custard, and the snap of chocolate glaze is perfection. Serve it with a dollop of whipped cream for an extra indulgent treat.
Clam Cakes

Many summers ago, while visiting a quaint coastal town in Rhode Island, I stumbled upon a local favorite that quickly became a staple in my kitchen—clam cakes. These golden, crispy bites are perfect for those who love a taste of the sea with a comforting, doughy interior. Here’s how I make them, with a few personal tweaks along the way.
Ingredients
- 1 cup all-purpose flour (I always sift mine for extra fluffiness)
- 1 tsp baking powder (the fresher, the better)
- 1/2 tsp salt (I like to use sea salt to enhance the seafood flavor)
- 1/4 tsp black pepper (freshly ground makes all the difference)
- 1 egg, beaten (room temperature eggs blend more smoothly)
- 1/2 cup milk (whole milk gives the best texture)
- 1 cup minced clams, drained (reserve the juice for adjusting batter consistency)
- Vegetable oil for frying (I find it gives a lighter crisp than other oils)
Instructions
- In a large bowl, whisk together the flour, baking powder, salt, and black pepper until well combined.
- Make a well in the center of the dry ingredients and pour in the beaten egg and milk. Stir until just combined; the batter should be thick but pourable. If too thick, add a tablespoon of reserved clam juice at a time until desired consistency is reached.
- Gently fold in the minced clams, being careful not to overmix to keep the cakes tender.
- Heat vegetable oil in a deep fryer or large pot to 375°F. A candy thermometer is handy here to maintain the right temperature.
- Drop tablespoon-sized portions of batter into the hot oil, frying in batches to avoid overcrowding. Fry for 2-3 minutes or until golden brown and crispy, turning once for even cooking.
- Remove the clam cakes with a slotted spoon and drain on paper towels. Serve immediately for the best texture.
Rich in flavor with a delightful contrast between the crispy exterior and soft, clam-filled center, these clam cakes are a hit at any gathering. Try serving them with a side of tartar sauce or a squeeze of lemon for an extra zing.
Indian Pudding
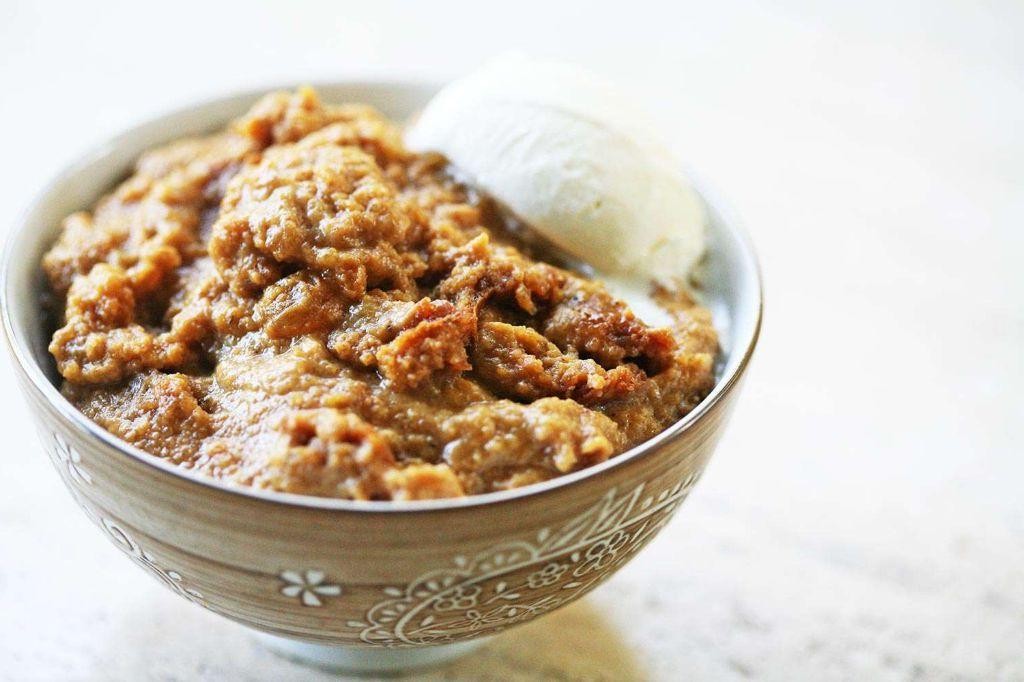
Always on the lookout for comforting desserts that tell a story, I stumbled upon Indian Pudding, a traditional New England dish with roots deep in American history. It’s a humble yet rich dessert that warms the soul, especially on those chilly evenings when you crave something sweet and spicy.
Ingredients
- 4 cups whole milk (I find the richness of whole milk makes the pudding incredibly creamy)
- 1/2 cup yellow cornmeal (the backbone of this dish, giving it that unique texture)
- 1/2 cup molasses (for that deep, caramel-like sweetness)
- 1/4 cup granulated sugar (to balance the molasses’ intensity)
- 1 tsp ground ginger (adds a warm, spicy note)
- 1/2 tsp ground cinnamon (a must for that autumnal flavor)
- 1/4 tsp salt (just a pinch to enhance all the flavors)
- 2 tbsp unsalted butter (I always use unsalted to control the dish’s saltiness)
- 1 large egg, lightly beaten (room temperature eggs blend more smoothly)
Instructions
- Preheat your oven to 275°F (135°C). A slow oven is key to achieving the perfect texture.
- In a medium saucepan, heat the milk over medium heat until it’s just about to boil. Keep an eye on it to prevent scorching.
- Gradually whisk in the cornmeal, reducing the heat to low. Cook for about 10 minutes, stirring constantly, until the mixture thickens. Tip: A wooden spoon works best here to prevent lumps.
- Remove from heat and stir in the molasses, sugar, ginger, cinnamon, salt, and butter until everything is well combined and the butter is melted.
- Let the mixture cool slightly, then whisk in the beaten egg. This step ensures the egg doesn’t scramble from the heat.
- Pour the mixture into a greased 1 1/2-quart baking dish. Bake for 2 hours, until the pudding is set and a knife inserted comes out clean. Tip: The pudding will continue to set as it cools, so don’t worry if it’s a bit wobbly.
- Let it cool for at least 30 minutes before serving. This patience pays off with the perfect consistency.
Perfectly spiced and wonderfully creamy, this Indian Pudding is a testament to simple ingredients creating complex flavors. Serve it warm with a scoop of vanilla ice cream for a delightful contrast, or enjoy it as is for a pure, unadulterated taste of history.
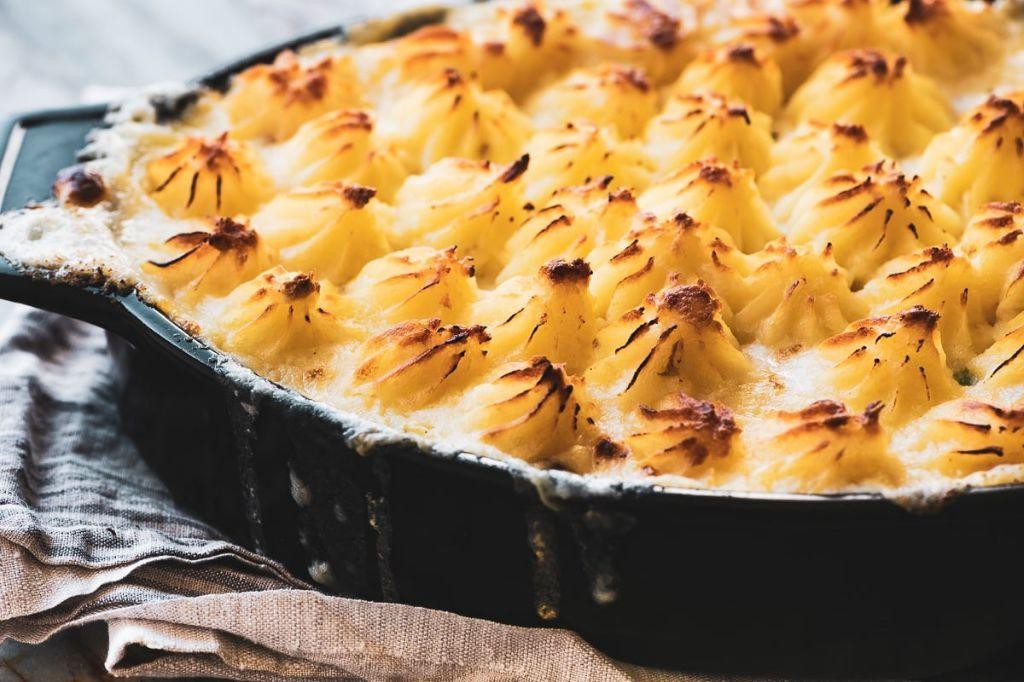
New England Pot Roast
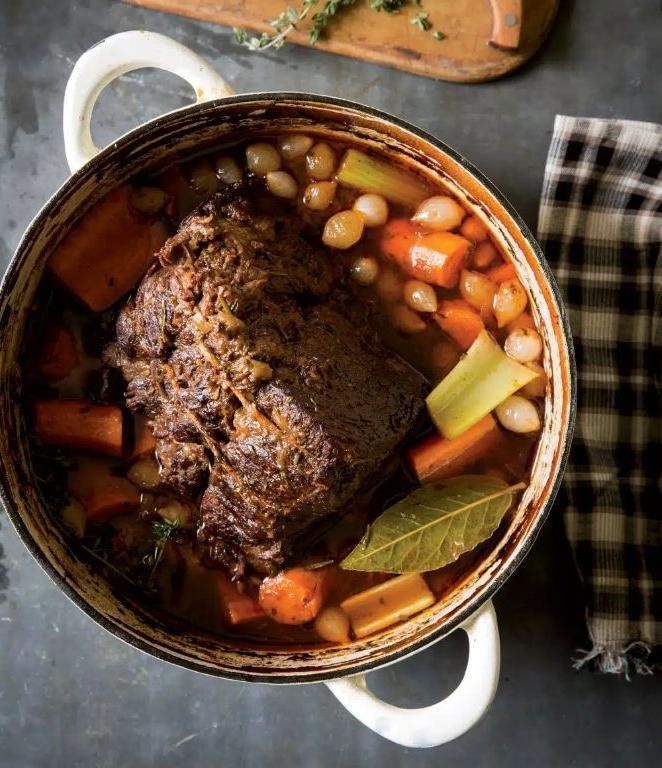
Waking up to the aroma of a slow-cooked New England Pot Roast simmering in the oven is one of my favorite weekend rituals. There’s something incredibly comforting about this dish, with its tender meat and rich, savory gravy, that makes it a staple in my household, especially during the colder months.
Ingredients
- 3 lbs beef chuck roast (I find the marbling in chuck roast makes it perfect for slow cooking)
- 2 tbsp extra virgin olive oil (my go-to for searing)
- 1 large onion, chopped (I love the sweetness it adds)
- 3 carrots, peeled and cut into 2-inch pieces (they hold up well during cooking)
- 3 celery stalks, cut into 2-inch pieces (for that classic New England flavor)
- 4 garlic cloves, minced (because garlic makes everything better)
- 2 cups beef broth (homemade if you have it, but store-bought works fine)
- 1 tbsp Worcestershire sauce (a little secret ingredient for depth)
- 1 tsp dried thyme (I prefer it over fresh for this recipe)
- Salt and pepper to taste (I’m generous with both)
Instructions
- Preheat your oven to 325°F. This low and slow temperature is key to tender meat.
- Season the beef chuck roast generously with salt and pepper on all sides.
- Heat the extra virgin olive oil in a large Dutch oven over medium-high heat. Once hot, sear the roast for about 4-5 minutes on each side until a deep brown crust forms. This step is crucial for flavor.
- Remove the roast and set aside. In the same pot, add the chopped onion, carrots, and celery. Cook for about 5 minutes until they start to soften.
- Add the minced garlic and cook for another minute until fragrant.
- Return the roast to the pot. Pour in the beef broth and Worcestershire sauce, then sprinkle the dried thyme over everything.
- Cover the pot and transfer it to the oven. Let it cook for about 3 hours, or until the meat is fork-tender.
- Once done, remove the pot from the oven and let the roast rest for 10 minutes before slicing. This allows the juices to redistribute.
But the magic of this New England Pot Roast lies in its melt-in-your-mouth texture and the rich, flavorful gravy that’s perfect for spooning over mashed potatoes or crusty bread. It’s a dish that feels like a warm hug on a chilly day.
Fried Clams
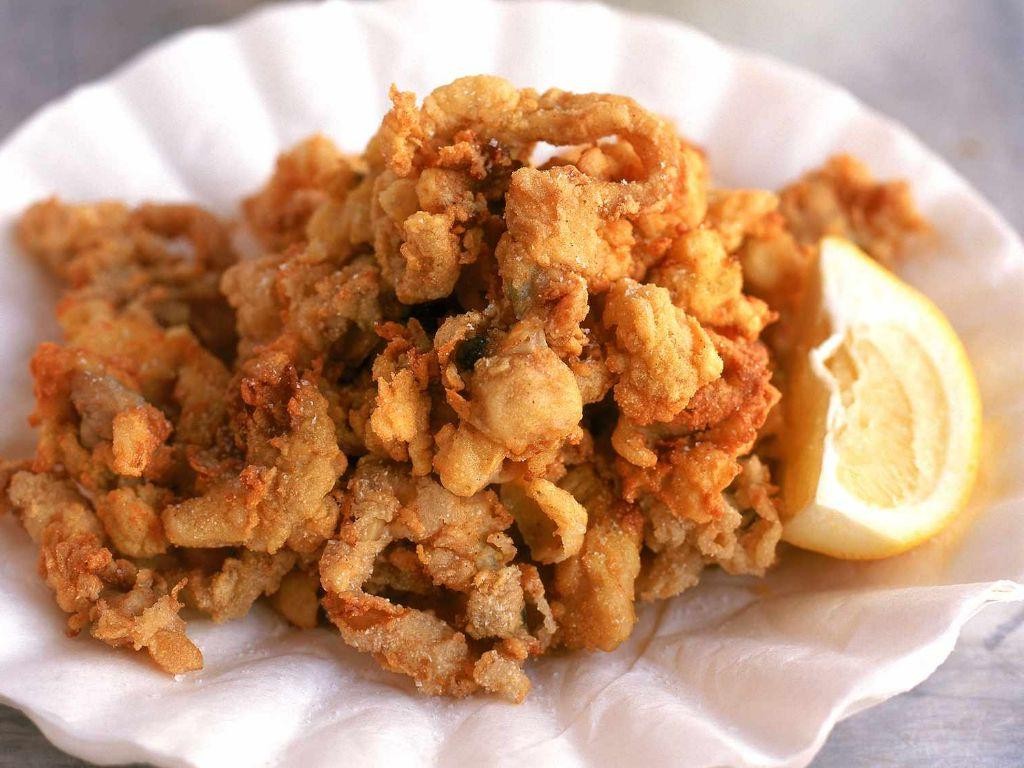
Kicking off summer with a bang, I can’t help but reminisce about the first time I tried fried clams at a seaside shack in Maine. There’s something magical about their crispy exterior giving way to tender, briny goodness. Today, I’m sharing my go-to recipe that brings that coastal vibe right to your kitchen.
Ingredients
- 1 pound fresh clams, shucked (I always ask my fishmonger for the day’s catch)
- 1 cup all-purpose flour (for that perfect golden crust)
- 1/2 cup cornmeal (adds a delightful crunch)
- 1 tsp salt (sea salt, if you have it, to echo the ocean)
- 1/2 tsp black pepper (freshly ground makes all the difference)
- 1 cup buttermilk (the secret to ultra-tender clams)
- Vegetable oil for frying (about 2 cups, or enough to submerge the clams)
Instructions
- In a large bowl, whisk together the flour, cornmeal, salt, and pepper. This blend is your ticket to that iconic crispy coating.
- Pour the buttermilk into another bowl. Dunk each clam in the buttermilk, letting the excess drip off, then dredge in the flour mixture. Tip: Keep one hand wet and one dry to avoid clumpy fingers.
- Heat the vegetable oil in a deep fryer or large pot to 375°F. A candy thermometer is your best friend here to maintain the perfect temperature.
- Fry the clams in batches for about 2 minutes, or until golden brown. Don’t overcrowd the pot, or the temperature will drop, leading to soggy clams.
- Use a slotted spoon to transfer the fried clams to a paper towel-lined plate. Tip: Sprinkle with a pinch of salt right after frying to enhance the flavor.
Unbelievably crispy on the outside and succulent on the inside, these fried clams are a testament to simple ingredients done right. Serve them with a squeeze of lemon or dunked in tartar sauce for an extra layer of tanginess. Either way, they’re bound to disappear fast.
Parker House Rolls
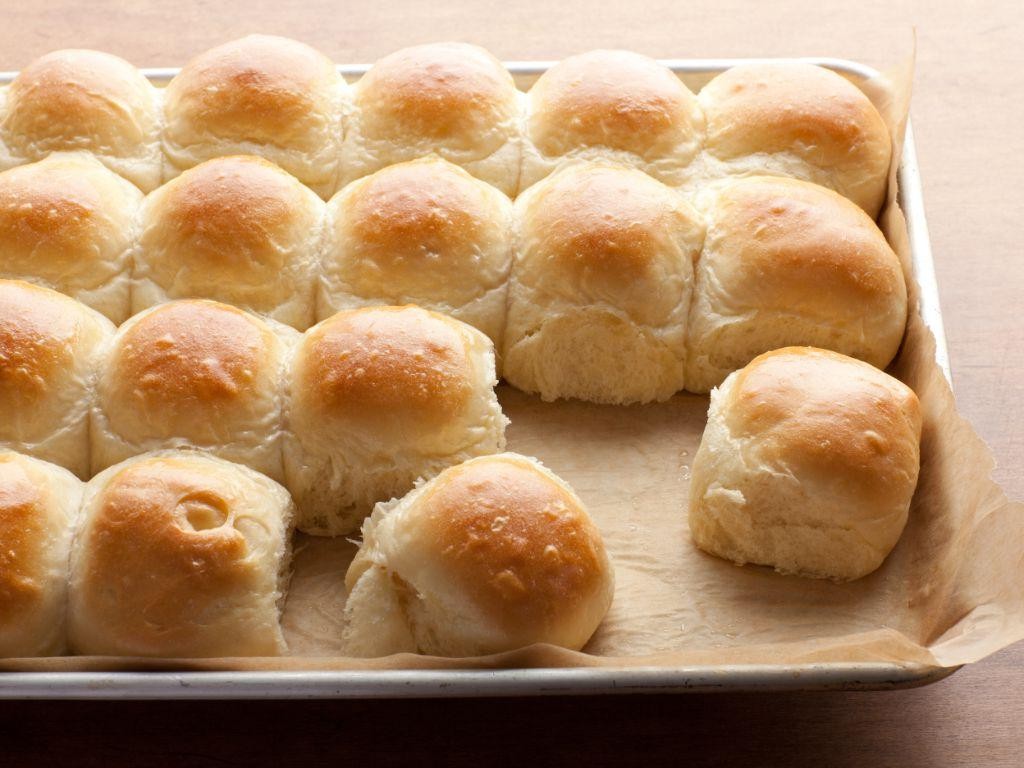
First introduced to me by my grandmother, Parker House Rolls have always been a staple at our family gatherings. There’s something about their buttery, soft texture that makes them irresistible, and today, I’m sharing my go-to recipe that never fails to impress.
Ingredients
- 1 cup whole milk, warmed to about 110°F (I find whole milk gives the rolls a richer flavor)
- 1/4 cup granulated sugar (just the right amount to sweeten the dough without overpowering it)
- 1 packet (2 1/4 tsp) active dry yeast (always check the expiration date to ensure it’s active)
- 4 cups all-purpose flour, plus extra for dusting (I like to use unbleached for a more natural taste)
- 1/2 cup unsalted butter, melted and slightly cooled (I prefer unsalted to control the saltiness)
- 1 large egg, room temperature (it blends into the dough more evenly when not cold)
- 1 1/2 tsp salt (a must for balancing the sweetness)
Instructions
- In a large bowl, combine the warmed milk, sugar, and yeast. Let it sit for about 5 minutes until frothy. This is your proof that the yeast is active.
- Add 3 cups of flour, melted butter, egg, and salt to the yeast mixture. Stir until a sticky dough forms.
- Gradually add the remaining 1 cup of flour, kneading the dough on a lightly floured surface for about 5 minutes until smooth and elastic. Tip: If the dough sticks to your hands, add a little more flour, but be careful not to overdo it.
- Place the dough in a greased bowl, cover with a damp towel, and let it rise in a warm place for 1 hour or until doubled in size. Tip: I like to place mine in the oven with the light on for a consistent temperature.
- Punch down the dough and divide it into 12 equal pieces. Shape each piece into a smooth ball and place them in a greased 9×13 inch baking dish, spacing them about 1 inch apart.
- Cover the rolls with the damp towel again and let them rise for another 30 minutes. Meanwhile, preheat your oven to 375°F.
- Bake the rolls for 20-25 minutes or until golden brown on top. Tip: For an extra glossy finish, brush the tops with melted butter right after they come out of the oven.
You’ll love the light, fluffy interior and the slightly crisp, buttery exterior of these Parker House Rolls. They’re perfect for tearing apart and sharing, or try serving them with a drizzle of honey for a sweet twist.
Steamed Cheeseburgers
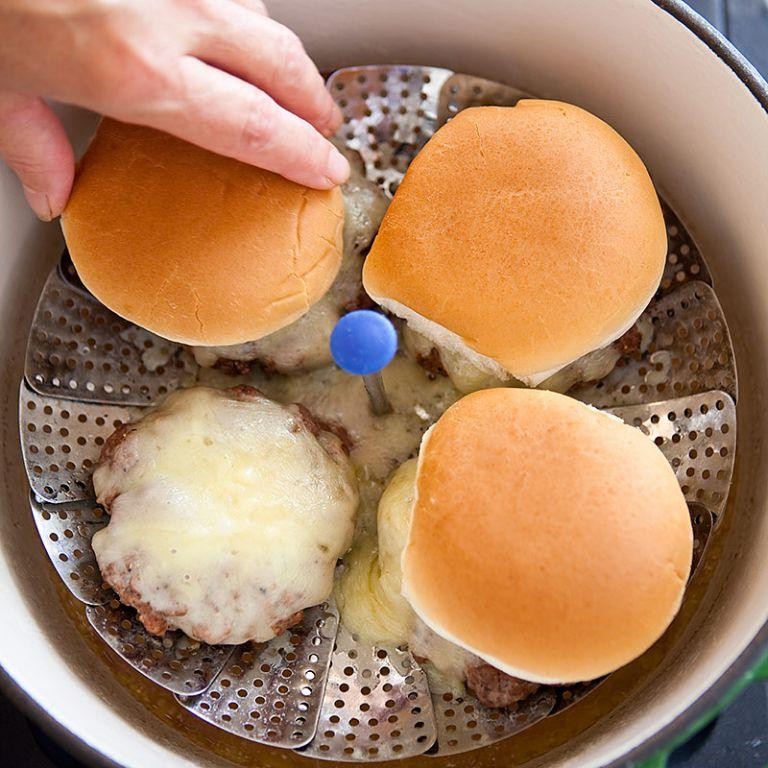
First off, let me tell you about the first time I stumbled upon steamed cheeseburgers during a road trip through Connecticut. It was love at first bite, and I’ve been obsessed with recreating that juicy, tender patty at home ever since.
Ingredients
- 1 lb ground beef (80/20 blend for that perfect fat ratio)
- 4 slices of American cheese (trust me, it melts like a dream)
- 1 tbsp vegetable oil (just a smidge to prevent sticking)
- Salt and pepper (I’m generous with the pepper for a little kick)
- 4 hamburger buns (toasted, because texture matters)
Instructions
- Preheat your steamer to 212°F. Yes, boiling point is key here for that steam magic.
- While the steamer heats, divide the ground beef into 4 equal portions. Gently shape them into patties—no compacting, or they’ll turn tough.
- Season both sides of each patty with salt and pepper. Remember, seasoning is your flavor foundation.
- Lightly brush the steamer basket with vegetable oil to prevent sticking. Place the patties inside, ensuring they’re not touching.
- Cover and steam for 7 minutes for medium doneness. Tip: Resist the urge to peek; keeping the steam in is crucial.
- After 7 minutes, place a slice of American cheese on each patty. Cover and steam for an additional 30 seconds, just until the cheese melts into gooey perfection.
- While the cheese melts, toast your hamburger buns until golden. A crispy bun contrasts beautifully with the soft patty.
- Assemble your burgers by placing a cheesy patty on each bun bottom. Add your favorite toppings, then crown with the bun top.
Great news—these steamed cheeseburgers are as juicy and flavorful as they sound. The steam locks in moisture, making each bite tender, while the melted cheese adds a creamy contrast. Serve them with pickles and a side of sweet potato fries for a meal that’s downright addictive.
New England Apple Crisp

Delightfully warm and comforting, New England Apple Crisp has been a fall favorite in my family for generations. There’s something magical about the way the cinnamon and apples fill the house with an irresistible aroma, making it impossible not to sneak a bite before it even hits the table.
Ingredients
- 6 cups of thinly sliced apples (I love using a mix of Granny Smith and Honeycrisp for the perfect balance of tart and sweet)
- 1 cup of old-fashioned oats (the heartier, the better for that crisp topping)
- 1/2 cup of packed brown sugar (dark brown sugar adds a deeper flavor, but light works too)
- 1/2 cup of all-purpose flour (I always sift mine to avoid any lumps)
- 1/2 cup of cold unsalted butter, cubed (trust me, cold butter is key to that perfect crumble)
- 1 tsp of ground cinnamon (a little extra never hurt anyone)
- 1/4 tsp of salt (just a pinch to balance the sweetness)
Instructions
- Preheat your oven to 375°F (190°C) and lightly grease a 9×13 inch baking dish. This ensures your crisp doesn’t stick and makes cleanup a breeze.
- In a large bowl, toss the sliced apples with 1/2 tsp of the cinnamon until evenly coated. This little step enhances the apples’ natural flavors.
- Spread the apples evenly in the prepared baking dish. Try to layer them nicely for even cooking.
- In another bowl, combine the oats, flour, brown sugar, remaining 1/2 tsp of cinnamon, and salt. Mixing these dry ingredients first ensures an even distribution of flavors.
- Add the cold cubed butter to the dry mixture. Using your fingers, work the butter into the mixture until it resembles coarse crumbs. This tactile method is oddly satisfying and guarantees the perfect texture.
- Sprinkle the crumb mixture evenly over the apples in the baking dish. Don’t press down; let it stay loose for maximum crispiness.
- Bake for 35-40 minutes, or until the topping is golden brown and the apples are bubbly around the edges. The smell will tell you when it’s close to done.
Rich with cinnamon and brown sugar, this apple crisp comes out with a golden, crunchy topping that contrasts beautifully with the soft, tender apples beneath. Serve it warm with a scoop of vanilla ice cream for an extra indulgent treat, or enjoy it as is for a cozy breakfast the next day.
Conclusion
We hope you’ve enjoyed exploring these 20 Delicious New England Recipes Traditional as much as we loved sharing them. Each dish offers a taste of New England’s rich culinary heritage, perfect for home cooks looking to bring some regional flair to their table. Don’t forget to try your favorites, leave a comment sharing which ones you loved, and pin this article on Pinterest to keep these recipes handy for your next cooking adventure!