Spice up your kitchen routine with our fiery collection of 18 Spicy Mini Pepper Recipes that promise to deliver big flavors in every bite! Whether you’re craving quick weeknight dinners or looking to impress at your next gathering, these little peppers pack a punch that’s sure to delight. Dive into our roundup and discover your next favorite dish that’s as vibrant and lively as your taste buds demand!
Stuffed Mini Peppers with Cream Cheese
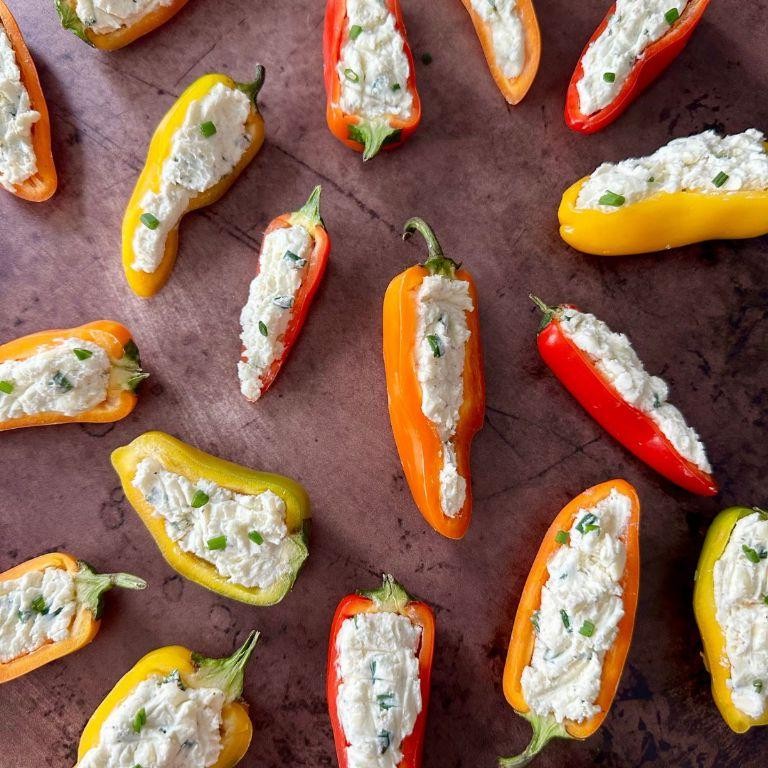
Last weekend, I stumbled upon the most adorable mini peppers at the farmers’ market, and I knew I had to stuff them with something creamy and delicious. These Stuffed Mini Peppers with Cream Cheese are the perfect bite-sized appetizer that’s as fun to make as it is to eat!
Ingredients
- A dozen mini peppers, halved and seeds removed
- 8 oz cream cheese, softened
- A quarter cup of shredded cheddar cheese
- A couple of green onions, finely chopped
- A splash of hot sauce
- A pinch of salt and pepper
Instructions
- Preheat your oven to 350°F and line a baking sheet with parchment paper for easy cleanup.
- In a mixing bowl, combine the softened cream cheese, shredded cheddar, green onions, hot sauce, salt, and pepper until well blended. Tip: Letting the cream cheese sit out for a bit makes it easier to mix.
- Carefully spoon the cream cheese mixture into each pepper half, filling them just to the top. Tip: A small cookie scoop works wonders here for neat and even filling.
- Arrange the stuffed peppers on the prepared baking sheet and bake for about 15 minutes, or until the peppers are slightly tender and the filling is bubbly. Tip: For a golden top, broil for the last 2 minutes, but keep an eye on them to prevent burning.
Out of the oven, these peppers are a delightful mix of creamy, spicy, and slightly sweet. Serve them warm with a drizzle of balsamic glaze for an extra touch of elegance, or just pop them straight into your mouth—I won’t judge!
Mini Pepper Nachos

Sometimes, the best party snacks come from the simplest ideas, and these Mini Pepper Nachos are no exception. I stumbled upon this recipe during a last-minute gathering at my place, and let me tell you, they were a hit! Perfect for when you’re craving something crunchy, cheesy, and a little bit healthy.
Ingredients
- a dozen mini bell peppers, halved and seeded
- a cup of shredded cheddar cheese
- a splash of olive oil
- a couple of tablespoons of taco seasoning
- a handful of black beans, rinsed and drained
- a few slices of jalapeño for that extra kick
- a dollop of sour cream and some chopped cilantro for garnish
Instructions
- Preheat your oven to 375°F and line a baking sheet with parchment paper for easy cleanup.
- Toss the halved mini peppers with a splash of olive oil and a sprinkle of taco seasoning until they’re evenly coated. This little step ensures every bite is flavorful.
- Arrange the peppers cut side up on the baking sheet. Here’s a tip: don’t overcrowd them, or they’ll steam instead of getting that nice crunch.
- Sprinkle the shredded cheddar cheese and black beans over the peppers. The cheese acts as the glue that holds all the delicious toppings together.
- Add a few slices of jalapeño on top if you like it spicy. Remember, a little goes a long way!
- Bake for about 10-12 minutes, or until the cheese is bubbly and slightly golden. Keep an eye on them to prevent burning.
- Once out of the oven, let them cool for a minute before adding a dollop of sour cream and a sprinkle of chopped cilantro. This not only adds freshness but also a pop of color.
Out of the oven, these Mini Pepper Nachos are a delightful mix of crunchy, cheesy, and slightly spicy. Serve them straight from the baking sheet for a fun, communal eating experience, or plate them up for a more elegant appetizer. Either way, they’re bound to disappear fast!
Mini Pepper Pizza Bites

Who doesn’t love a bite-sized snack that packs all the flavors of a classic pizza? I stumbled upon the idea of Mini Pepper Pizza Bites during a lazy Sunday when I was craving something cheesy and spicy but didn’t want to deal with the hassle of making dough. These little guys are not only adorable but also incredibly easy to whip up, making them perfect for last-minute gatherings or a cozy night in.
Ingredients
- a dozen mini bell peppers, halved and seeds removed
- a cup of shredded mozzarella cheese
- a half cup of pepperoni slices, chopped into tiny bits
- a couple of tablespoons of olive oil
- a splash of balsamic glaze for drizzling
- a pinch of dried oregano
- a pinch of red pepper flakes (because life’s too short for bland food)
Instructions
- Preheat your oven to 375°F and line a baking sheet with parchment paper.
- Arrange your halved mini peppers on the baking sheet, cut side up. Drizzle them lightly with olive oil—this helps them get a bit crispy.
- Sprinkle a generous amount of shredded mozzarella into each pepper half. Don’t be shy; the cheese is the star here.
- Top each cheesy pepper with a few pieces of chopped pepperoni. For an extra kick, add a tiny pinch of red pepper flakes on top.
- Bake in the preheated oven for about 10-12 minutes, or until the cheese is bubbly and slightly golden. Keep an eye on them to prevent burning.
- Once out of the oven, sprinkle with dried oregano and drizzle with balsamic glaze for that gourmet touch.
Delightfully crunchy, cheesy, and with just the right amount of spice, these Mini Pepper Pizza Bites are a game-changer. Serve them on a wooden board for a rustic look, or pop them into a bowl for a more casual vibe. Either way, they’re bound to disappear in seconds.
Roasted Mini Peppers with Garlic
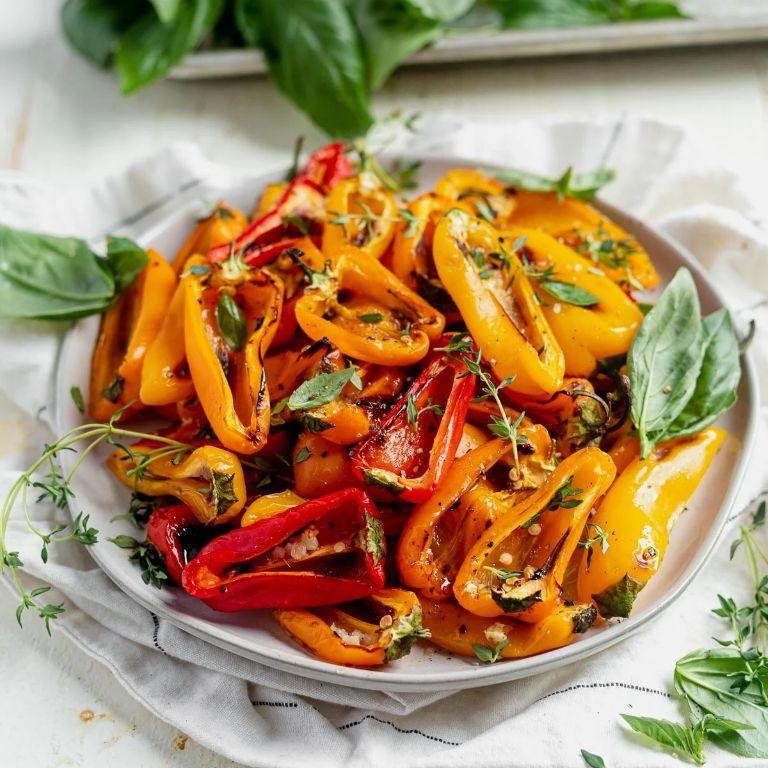
Craving something simple yet bursting with flavor? I recently stumbled upon this delightful combination of roasted mini peppers and garlic during a lazy Sunday fridge clean-out, and it’s been a staple in my kitchen ever since. The sweetness of the peppers paired with the pungent kick of garlic is a match made in heaven, and the best part? It’s incredibly easy to whip up.
Ingredients
- A couple of handfuls of mini peppers, halved and seeded
- 3 cloves of garlic, thinly sliced
- A generous drizzle of olive oil
- A pinch of salt
- A sprinkle of crushed red pepper flakes (if you like a bit of heat)
Instructions
- Preheat your oven to 400°F (200°C). This ensures your peppers get perfectly roasted without burning.
- Toss the halved mini peppers and sliced garlic in a bowl with olive oil, salt, and red pepper flakes until everything is nicely coated. Tip: Don’t skimp on the olive oil; it helps the peppers caramelize beautifully.
- Spread the peppers and garlic out on a baking sheet in a single layer. This avoids steaming and ensures each piece gets evenly roasted.
- Roast in the preheated oven for about 20 minutes, or until the peppers are soft and the edges start to char. Tip: Give the tray a shake halfway through for even cooking.
- Let them cool for a couple of minutes before serving. They’re piping hot right out of the oven!
Finally, these roasted mini peppers with garlic are a textural dream—soft with a slight char, and the garlic turns wonderfully mellow. I love tossing them into a fresh salad or piling them onto crusty bread with a smear of goat cheese for an easy, flavorful appetizer.
Mini Pepper Stir Fry
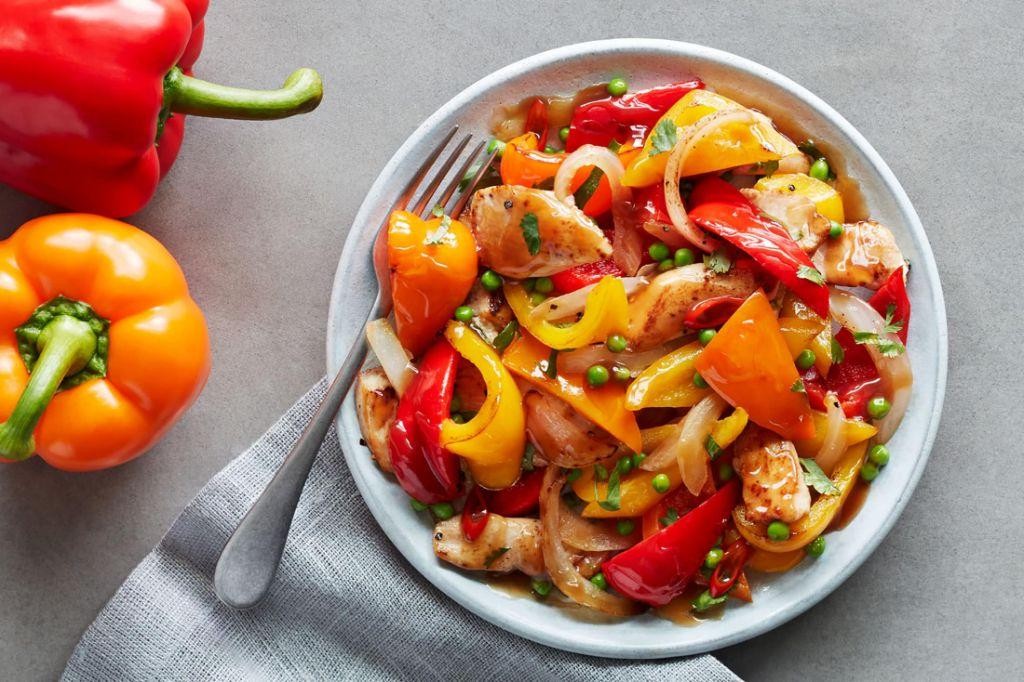
Goodness, do I have a quick and colorful dish for you today! It’s one of those throw-together-in-minutes kind of meals that never fails to impress with its vibrant colors and crunch. I stumbled upon this recipe during a frantic fridge clean-out, and now it’s a weekly staple.
Ingredients
- A couple of tablespoons of olive oil
- 1 pound of mini bell peppers, sliced into rings
- A splash of soy sauce
- 2 cloves of garlic, minced
- A handful of green onions, chopped
- A pinch of red pepper flakes
Instructions
- Heat a large skillet over medium-high heat and add the olive oil. Wait until it shimmers—that’s how you know it’s ready.
- Toss in the mini bell pepper rings. Stir them around for about 5 minutes until they start to soften but still keep a bit of crunch.
- Add the minced garlic and a pinch of red pepper flakes. Stir for another minute until the garlic is fragrant but not browned. Tip: Burnt garlic is bitter, so keep an eye on it!
- Pour in a splash of soy sauce and give everything a good stir to coat. Let it cook for another 2 minutes so the flavors meld together.
- Throw in the chopped green onions at the last minute, stir once more, and then take the skillet off the heat. Tip: Adding the green onions last keeps them crisp and bright.
- Serve immediately. Tip: This stir fry is fantastic over a bowl of steamed rice or as a vibrant side to grilled chicken.
Mmm, the crunch of those peppers with the savory depth from the soy sauce and the kick of red pepper flakes is just unbeatable. Sometimes, I like to sprinkle a little sesame seeds on top for an extra nutty flavor and texture. It’s a simple dish that packs a punch in both looks and taste!
Grilled Mini Peppers with Balsamic Glaze
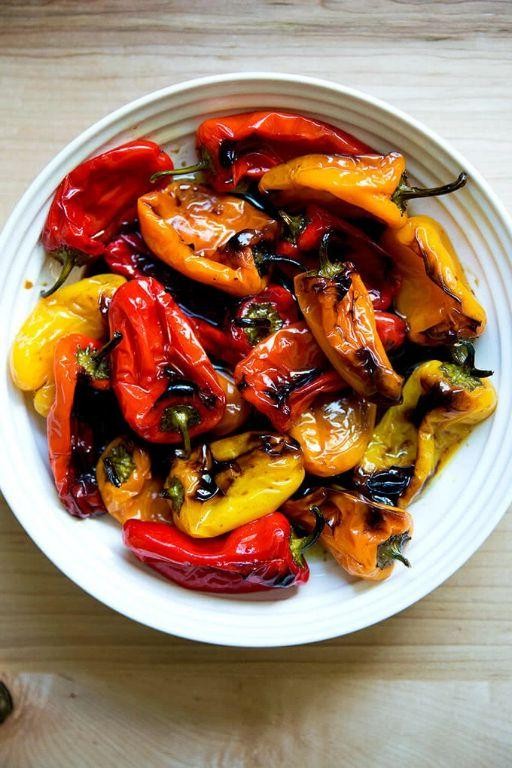
Diving into summer grilling has never been easier or more colorful than with these grilled mini peppers. I stumbled upon this recipe during a lazy Sunday BBQ at my friend’s place, and let me tell you, these little gems stole the show with their sweet, smoky flavor and that gorgeous balsamic glaze.
Ingredients
- A couple of handfuls of mini sweet peppers, halved and seeded
- A splash of olive oil
- A generous drizzle of balsamic glaze
- A pinch of salt
- A sprinkle of freshly ground black pepper
Instructions
- Preheat your grill to a medium-high heat, about 400°F, to get those perfect grill marks without burning.
- Toss the halved mini peppers in a bowl with a splash of olive oil, just enough to coat them lightly. This helps in getting that beautiful char.
- Place the peppers on the grill, cut side down first. Grill for about 3-4 minutes until you see those lovely char marks. Flip them and grill for another 3 minutes. Tip: Don’t overcrowd the grill to ensure each piece cooks evenly.
- Transfer the grilled peppers to a serving plate. While they’re still warm, drizzle with balsamic glaze and season with a pinch of salt and a sprinkle of freshly ground black pepper. Tip: The warmth helps the glaze stick better, giving each bite a perfect balance of sweet and tangy.
- Let them sit for a minute before serving to allow the flavors to meld together. Tip: If you’re feeling adventurous, add a sprinkle of crumbled feta or goat cheese on top for an extra layer of flavor.
Ready to serve, these grilled mini peppers with balsamic glaze are a burst of sweetness with a smoky undertone, making them the perfect side or a standout appetizer. I love serving them on a rustic wooden board for that extra touch of charm at my summer gatherings.
Mini Pepper Tacos

Wow, do I have a treat for you today! These Mini Pepper Tacos are not just adorable; they’re packed with flavor and perfect for those nights when you want something fun yet easy to whip up. I stumbled upon this idea during a lazy Sunday fridge clean-out, and now it’s a staple in my house.
Ingredients
- 12 mini bell peppers, halved and seeded
- 1 lb ground turkey
- 1 tbsp olive oil
- 1/2 cup diced onion
- 2 cloves garlic, minced
- 1 tsp cumin
- 1 tsp chili powder
- A pinch of salt
- 1/2 cup shredded cheddar cheese
- A handful of fresh cilantro, chopped
- A splash of lime juice
Instructions
- Preheat your oven to 375°F and line a baking sheet with parchment paper.
- Heat olive oil in a skillet over medium heat, then add the onion and garlic, sautéing until they’re just soft, about 2 minutes.
- Add the ground turkey, breaking it apart with a spoon, and cook until no pink remains, roughly 5 minutes. Tip: Don’t overcrowd the pan to ensure even cooking.
- Stir in the cumin, chili powder, and salt, mixing well to coat the turkey evenly. Cook for another minute to let the flavors meld.
- Arrange the pepper halves on the prepared baking sheet, cut side up. Spoon the turkey mixture into each pepper half.
- Sprinkle the shredded cheese over the top of each filled pepper.
- Bake for 10-12 minutes, or until the cheese is bubbly and slightly golden. Tip: Keep an eye on them after 10 minutes to prevent the cheese from burning.
- Remove from the oven and let them cool for a couple of minutes. Tip: They’ll be piping hot, so give them a moment before diving in.
- Finish with a sprinkle of fresh cilantro and a splash of lime juice for that extra zing.
Finally, these Mini Pepper Tacos are a delightful mix of crunchy, juicy, and cheesy with a hint of lime to brighten everything up. Serve them on a platter with extra lime wedges for squeezing, and watch them disappear in no time.
Mini Pepper and Sausage Skewers
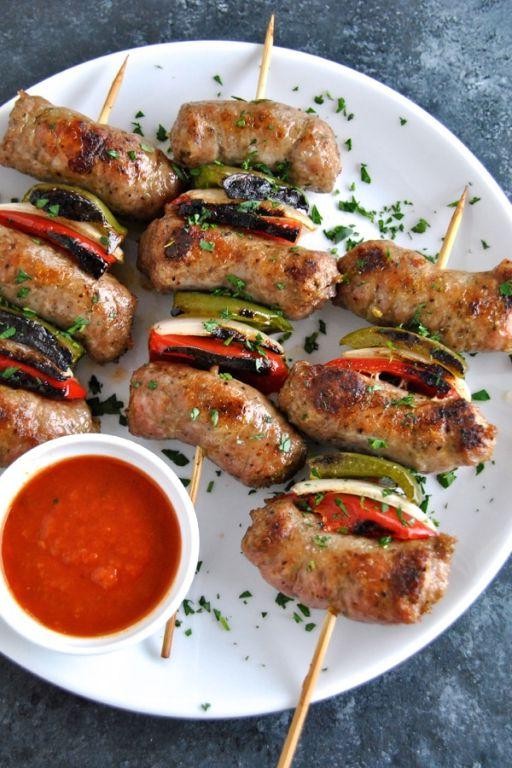
Hosting a backyard BBQ this weekend had me scrambling for a quick, crowd-pleasing appetizer. That’s when I remembered these Mini Pepper and Sausage Skewers—a hit every time, with their vibrant colors and smoky flavors. Plus, they’re a breeze to assemble, leaving me more time to enjoy the party.
Ingredients
- A pack of mini sweet peppers (about 20)
- 1 lb of smoked sausage, sliced into 1/2-inch pieces
- A couple of tbsp of olive oil
- A splash of balsamic vinegar
- A pinch of salt and pepper
Instructions
- Preheat your grill to medium-high, around 400°F, to get those perfect grill marks.
- While the grill heats, slice the mini peppers in half lengthwise and remove the seeds for a neat presentation.
- Toss the pepper halves and sausage pieces in a bowl with olive oil, balsamic vinegar, salt, and pepper. This little marinade adds a depth of flavor, so don’t skip it!
- Thread the peppers and sausage onto skewers, alternating between them for a colorful effect. If using wooden skewers, remember to soak them in water for 30 minutes first to prevent burning.
- Place the skewers on the grill. Cook for about 4 minutes on each side, or until the peppers are slightly charred and the sausage is heated through.
- Let them rest for a minute off the grill—this helps the flavors meld together beautifully.
Delightfully smoky with a hint of sweetness from the peppers, these skewers are a feast for the eyes and the palate. Serve them on a rustic wooden board for that Instagram-worthy look, or pile them high on a platter for a casual, shareable snack.
Mini Pepper Jelly
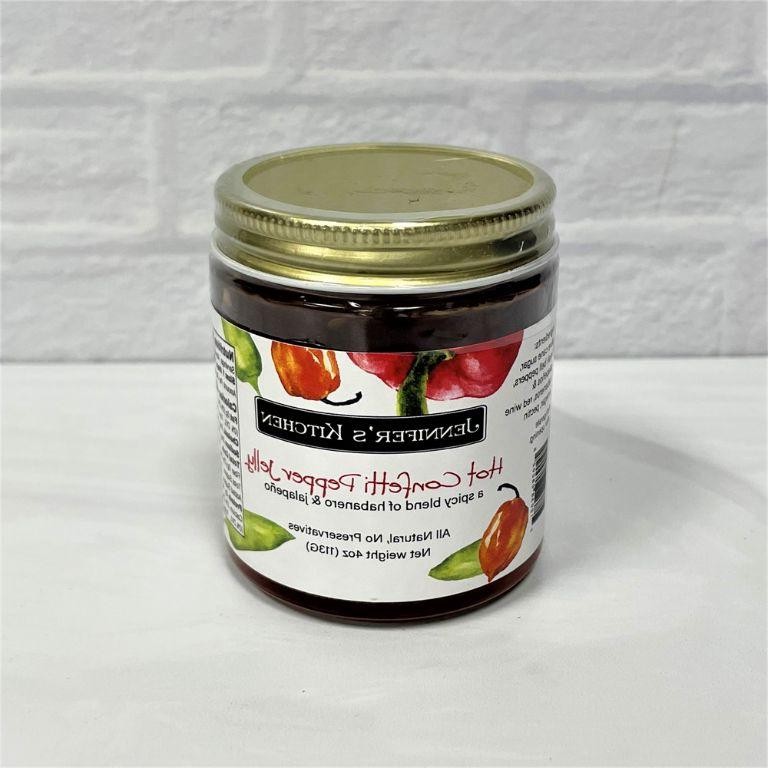
First off, let me tell you, there’s something incredibly satisfying about making your own pepper jelly. It’s that perfect blend of sweet and spicy that can elevate any cheese board or sandwich. I remember the first time I tried it at a friend’s picnic, and I’ve been hooked ever since.
Ingredients
- a couple of cups of mini sweet peppers, finely chopped
- a cup of apple cider vinegar
- a splash of water
- 3 cups of sugar (yes, it’s a lot, but trust me)
- a packet of pectin
- a pinch of salt
Instructions
- Grab your mini sweet peppers and give them a fine chop. You want them small enough to blend well but still give a bit of texture.
- In a large pot, combine the chopped peppers, apple cider vinegar, and a splash of water. Bring this to a boil over medium heat, then let it simmer for about 10 minutes to soften the peppers.
- Stir in the sugar and a pinch of salt. Keep stirring until the sugar is completely dissolved. This is crucial to avoid any graininess in your jelly.
- Once the sugar is dissolved, sprinkle in the pectin while stirring constantly to prevent clumping. Bring the mixture back to a rolling boil for exactly 1 minute.
- Remove from heat and let it cool slightly before pouring into sterilized jars. Leave about a quarter-inch of space at the top for sealing.
- Seal the jars and process them in a boiling water bath for 10 minutes to ensure they’re shelf-stable.
Here’s the thing about this mini pepper jelly—it’s got this gorgeous glossy finish and a kick that sneaks up on you. Try it slathered on a warm biscuit with a slice of sharp cheddar; it’s a game-changer.
Mini Pepper Salad with Feta
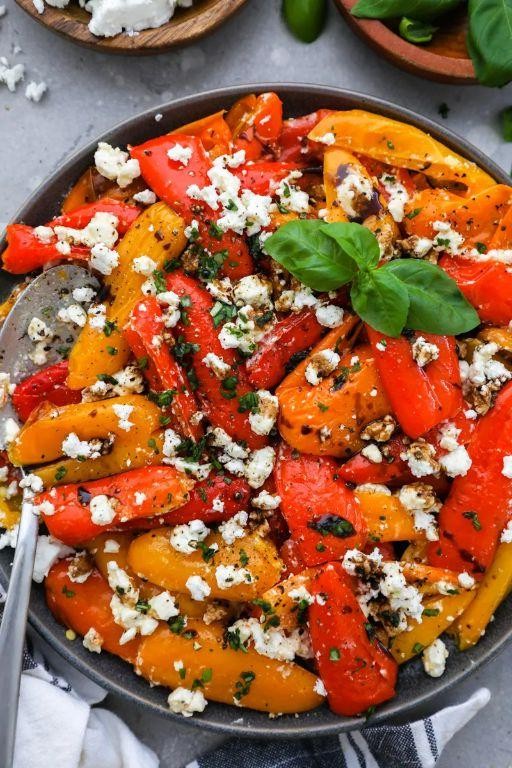
Goodness, have I got a treat for you today! This Mini Pepper Salad with Feta is my go-to when I need something quick, colorful, and bursting with flavor. It’s the kind of dish that makes you feel like a gourmet chef with minimal effort, perfect for those lazy summer afternoons.
Ingredients
- A couple of cups of mini bell peppers, sliced into rings
- A generous handful of feta cheese, crumbled
- A splash of olive oil
- A drizzle of balsamic glaze
- A pinch of salt
- A sprinkle of freshly ground black pepper
- A few basil leaves, torn for garnish
Instructions
- Start by washing the mini bell peppers under cold water, then pat them dry with a clean towel.
- Slice the peppers into thin rings, about 1/4 inch thick, removing the seeds as you go.
- In a large bowl, toss the pepper rings with a splash of olive oil until they’re lightly coated.
- Sprinkle a pinch of salt and a bit of freshly ground black pepper over the peppers, giving them another gentle toss.
- Arrange the dressed peppers on a serving platter, then scatter the crumbled feta cheese over the top.
- Drizzle the balsamic glaze over the salad for that sweet and tangy finish.
- Garnish with torn basil leaves for a fresh, herby touch.
Every bite of this salad is a delightful mix of crunchy peppers, creamy feta, and the sweet tang of balsamic. Try serving it alongside grilled chicken or fish for a meal that’s as beautiful as it is delicious.
Mini Pepper Poppers
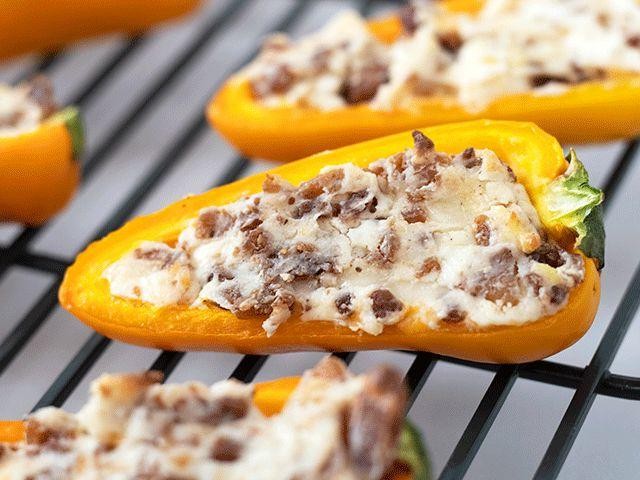
Remember those lazy Sunday afternoons when you just want something quick, delicious, and a little bit fancy? That’s exactly how I felt when I first stumbled upon the idea of Mini Pepper Poppers. They’re the perfect bite-sized treat that’s as fun to make as it is to eat, and today, I’m sharing my go-to recipe with you.
Ingredients
- 12 mini sweet peppers, halved and seeds removed
- 4 oz cream cheese, softened
- 1/2 cup shredded cheddar cheese
- 1/4 tsp garlic powder
- A pinch of salt
- A couple of slices of bacon, cooked and crumbled
- A splash of olive oil
Instructions
- Preheat your oven to 375°F and line a baking sheet with parchment paper for easy cleanup.
- In a bowl, mix together the cream cheese, cheddar cheese, garlic powder, and salt until well combined. Tip: Letting the cream cheese sit out for a bit makes it easier to mix.
- Fill each pepper half with the cheese mixture, then top with crumbled bacon. Tip: A small spoon or a piping bag can make filling the peppers a breeze.
- Drizzle the filled peppers with a splash of olive oil to help them crisp up in the oven.
- Bake for 15-20 minutes, or until the peppers are tender and the cheese is bubbly and slightly golden. Tip: Keep an eye on them after 15 minutes to prevent burning.
Let these Mini Pepper Poppers cool for a minute before serving—trust me, the cheese will be molten hot! The combination of the sweet peppers, creamy cheese, and smoky bacon is irresistible. I love serving them on a wooden board for a rustic look, or skewered on toothpicks for easy grabbing at parties.
Mini Pepper and Chicken Quesadillas
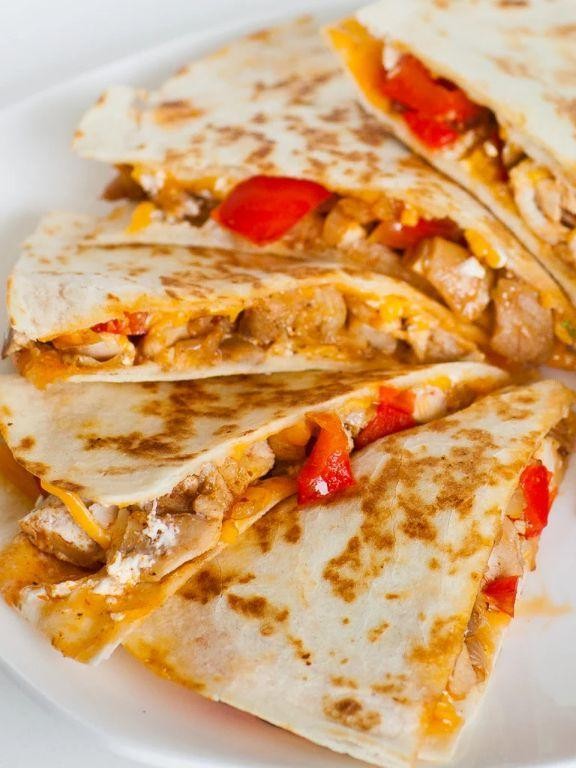
Over the weekend, I found myself staring at a bag of mini peppers and some leftover chicken, wondering how to turn them into something delicious without too much fuss. That’s when the idea for these Mini Pepper and Chicken Quesadillas hit me—quick, easy, and packed with flavor, they’re perfect for a lazy Sunday snack or a fun weeknight dinner.
Ingredients
- 1 cup of shredded cooked chicken (leftovers work great here!)
- a couple of mini bell peppers, thinly sliced
- 1/2 cup of shredded cheese (I love a mix of cheddar and Monterey Jack)
- a splash of olive oil
- 4 small flour tortillas
- a pinch of salt and pepper
- a dollop of sour cream and some chopped cilantro for serving (optional, but highly recommended)
Instructions
- Heat a splash of olive oil in a large skillet over medium heat. Tip: Make sure the skillet is hot before adding anything to it to get that perfect crisp on your quesadilla.
- Add the sliced mini peppers to the skillet and sauté for about 2 minutes, just until they start to soften. Tip: Don’t overcrowd the skillet; you want them to sauté, not steam.
- Sprinkle the shredded chicken over the peppers, add a pinch of salt and pepper, and give everything a quick stir to combine. Cook for another minute to warm the chicken through.
- Lay out the tortillas and divide the chicken and pepper mixture evenly between them, spreading it over one half of each tortilla. Sprinkle the cheese over the top of the mixture.
- Fold the tortillas over to cover the filling, pressing down gently.
- Return the skillet to medium heat and cook each quesadilla for about 2-3 minutes per side, until golden brown and the cheese is melted. Tip: Use a spatula to press down on the quesadillas as they cook to help them stick together.
- Remove from the skillet, let them cool for a minute (so you don’t burn your mouth!), then slice each quesadilla into wedges.
Delightfully crispy on the outside with a gooey, cheesy center, these quesadillas are a hit every time. Serve them with a dollop of sour cream and a sprinkle of cilantro for an extra flavor boost, or get creative and dip them in your favorite salsa or guacamole.
Mini Pepper Salsa
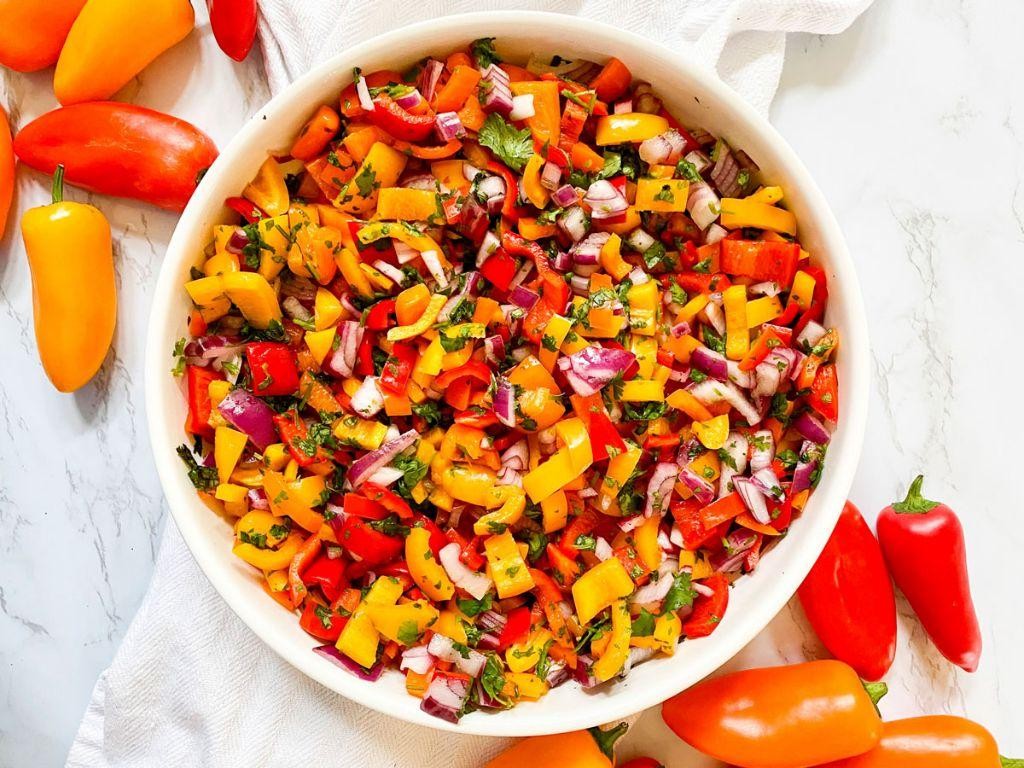
Unbelievably fresh and bursting with flavor, this Mini Pepper Salsa is my go-to for summer gatherings. I stumbled upon this recipe during a lazy Sunday farmers’ market visit, and it’s been a hit ever since. The vibrant colors and crisp texture make it not just a dish but a conversation starter.
Ingredients
- A couple of cups of mini bell peppers, finely diced (I love using a mix of colors for that rainbow effect)
- A splash of lime juice (about 2 tbsp, but hey, who’s measuring?)
- A handful of cilantro, chopped (if you’re not a fan, parsley works too)
- A small red onion, finely diced (soak in cold water for 5 minutes if you want to tone down the sharpness)
- A pinch of salt (start with 1/4 tsp, you can always add more)
- A dash of olive oil (about 1 tbsp, just enough to bring it all together)
Instructions
- Start by washing and drying your mini bell peppers thoroughly. No one likes a watery salsa.
- Finely dice the peppers, aiming for uniform pieces so every bite is perfect. Tip: A sharp knife makes this step a breeze and keeps the peppers from bruising.
- Toss the diced peppers into a mixing bowl. Add the finely diced red onion and chopped cilantro.
- Squeeze in the lime juice, drizzle with olive oil, and sprinkle that pinch of salt. Tip: Fresh lime juice is key here—bottled just doesn’t give the same zing.
- Gently mix everything together. Let it sit for about 10 minutes before serving to let the flavors meld. Tip: If you can resist, letting it chill in the fridge for an hour takes it to the next level.
Every bite of this salsa is a crunch of freshness, with the lime and cilantro playing off each other beautifully. Serve it with crispy tortilla chips, or get creative by spooning it over grilled fish for a bright, flavorful topping.
Mini Pepper and Goat Cheese Crostini

Zesty and vibrant, these Mini Pepper and Goat Cheese Crostini are my go-to when I need a quick yet impressive appetizer. I remember the first time I made them for a friend’s gathering; they were gone in minutes, and I’ve been tweaking the recipe ever since to perfection.
Ingredients
- a baguette, sliced into about 24 thin pieces
- a couple of tablespoons of olive oil
- a pinch of salt
- about 8 mini bell peppers, thinly sliced
- a splash of balsamic vinegar
- 4 ounces of goat cheese, at room temperature
- a handful of fresh basil leaves, chopped
- a drizzle of honey
Instructions
- Preheat your oven to 375°F and line a baking sheet with parchment paper.
- Arrange the baguette slices on the baking sheet, brush each lightly with olive oil, and sprinkle a tiny pinch of salt over them. Tip: Evenly brushing ensures each crostini gets perfectly crispy.
- Bake for about 10 minutes, or until the edges are golden brown. Keep an eye on them to prevent burning.
- While the crostini are baking, toss the sliced mini peppers with a splash of balsamic vinegar in a bowl. Tip: Letting them sit for a few minutes helps the flavors meld.
- Once the crostini are out of the oven and slightly cooled, spread a thin layer of goat cheese on each piece.
- Top each with a few slices of the balsamic-tossed peppers and a sprinkle of chopped basil. Tip: For an extra touch of sweetness, drizzle a little honey over the top before serving.
These crostini strike a beautiful balance between the creamy goat cheese and the crisp, sweet peppers. Try serving them on a rustic wooden board for that extra cozy, inviting look at your next dinner party.
Mini Pepper Ratatouille
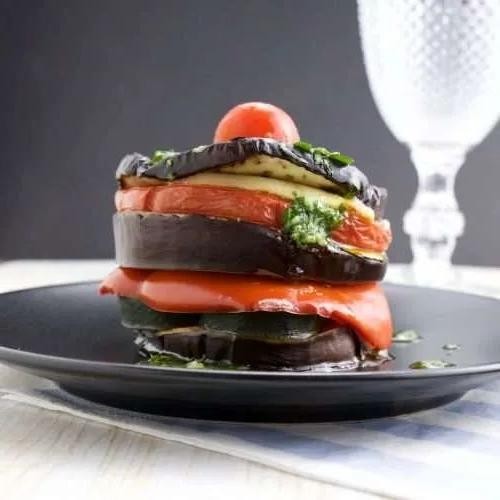
Kitchen adventures have led me to some of the most delightful dishes, and this Mini Pepper Ratatouille is no exception. It’s a vibrant, veggie-packed dish that’s as fun to make as it is to eat, perfect for those summer evenings when you want something light yet satisfying.
Ingredients
- a couple of mini bell peppers, sliced into rings
- a small zucchini, diced
- a small eggplant, diced
- a handful of cherry tomatoes, halved
- a splash of olive oil
- a clove of garlic, minced
- a pinch of salt and pepper
- a sprinkle of fresh basil, chopped
Instructions
- Preheat your oven to 375°F (190°C). This ensures everything cooks evenly and gets nicely caramelized.
- In a large bowl, toss the mini bell peppers, zucchini, eggplant, and cherry tomatoes with a splash of olive oil and a pinch of salt and pepper. Tip: Cutting your veggies roughly the same size ensures they cook at the same rate.
- Spread the veggies out on a baking sheet in a single layer. Crowding the pan steams the veggies instead of roasting them, so use two sheets if needed.
- Roast in the preheated oven for about 25 minutes, or until the veggies are tender and starting to brown at the edges. Tip: Give the pan a shake halfway through to promote even cooking.
- Remove from the oven and sprinkle with minced garlic and chopped fresh basil. The residual heat will soften the garlic just enough. Tip: Adding the garlic at the end prevents it from burning and becoming bitter.
Every bite of this Mini Pepper Ratatouille is a burst of summer flavors, with the sweetness of the peppers and tomatoes balancing the earthiness of the eggplant and zucchini. Serve it over a bed of quinoa or with crusty bread to soak up all the delicious juices.
Mini Pepper and Beef Stuffed Shells

Oh, the joy of discovering a recipe that’s as fun to make as it is to eat! That’s exactly how I felt when I first whipped up these Mini Pepper and Beef Stuffed Shells. Perfect for those nights when you want something a little different but still comforting.
Ingredients
- a box of jumbo pasta shells
- a pound of ground beef
- a couple of mini bell peppers, diced
- a cup of ricotta cheese
- a half cup of grated Parmesan
- a splash of olive oil
- a teaspoon of garlic powder
- a pinch of salt and pepper
- a jar of your favorite marinara sauce
- a handful of shredded mozzarella
Instructions
- Preheat your oven to 375°F and grab a large pot to boil the pasta shells according to the package instructions, but keep them al dente since they’ll bake more later.
- While the pasta cooks, heat a splash of olive oil in a pan over medium heat and brown the ground beef, breaking it up as it cooks.
- Toss in the diced mini peppers and cook until they’re just soft, about 5 minutes, then stir in the garlic powder, salt, and pepper.
- Drain the pasta shells and let them cool just enough to handle. In a bowl, mix the ricotta and Parmesan cheese.
- Now, the fun part: stuff each shell with a spoonful of the beef mixture, then a dollop of the cheese mixture.
- Spread a thin layer of marinara sauce in the bottom of a baking dish, arrange the stuffed shells snugly, and top with the remaining sauce and a generous sprinkle of mozzarella.
- Bake for 20 minutes, or until the cheese is bubbly and golden. Let it sit for 5 minutes before serving to let everything set.
My favorite part? The way the mini peppers add a sweet crunch against the creamy, cheesy filling. Serve these with a crisp green salad and watch them disappear!
Mini Pepper and Shrimp Scampi

Wondering what to whip up for a quick yet impressive dinner? I stumbled upon this Mini Pepper and Shrimp Scampi recipe during one of those evenings when my fridge was nearly empty, but I still wanted something special. It’s become a go-to for its simplicity and the way the sweet mini peppers complement the succulent shrimp.
Ingredients
- A couple of tablespoons of olive oil
- 1 pound of large shrimp, peeled and deveined
- A splash of white wine (about 1/4 cup)
- 3 cloves of garlic, minced
- A handful of mini sweet peppers, sliced
- 1/2 cup of chicken broth
- 2 tablespoons of butter
- A squeeze of lemon juice
- Salt and freshly ground black pepper to taste
- A sprinkle of chopped parsley for garnish
Instructions
- Heat the olive oil in a large skillet over medium heat until it shimmers, about 2 minutes.
- Add the shrimp to the skillet, seasoning lightly with salt and pepper, and cook until they’re just pink, about 2 minutes per side. Tip: Don’t overcrowd the shrimp to ensure they sear nicely.
- Remove the shrimp from the skillet and set aside on a plate.
- In the same skillet, add the minced garlic and sliced mini peppers, sautéing until the peppers soften slightly, about 3 minutes.
- Pour in the white wine and chicken broth, bringing the mixture to a simmer. Let it reduce by half, about 5 minutes. Tip: This reduction is key for concentrating the flavors.
- Stir in the butter until melted and the sauce becomes slightly creamy.
- Return the shrimp to the skillet, adding a squeeze of lemon juice, and toss everything together to coat the shrimp in the sauce. Cook for another minute until the shrimp are heated through. Tip: The lemon juice brightens the dish, so don’t skip it!
- Garnish with chopped parsley before serving.
Last night, I served this scampi over a bed of zucchini noodles for a low-carb option, and the crisp texture of the peppers against the tender shrimp was a hit. The sauce, rich with garlic and butter, clings beautifully to every bite, making it irresistible.
Mini Pepper and Mushroom Risotto
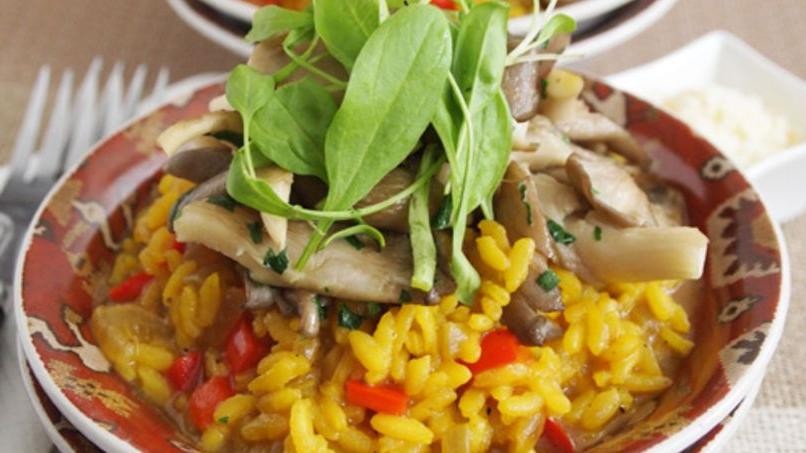
Yesterday, I found myself staring at a bag of mini peppers and some mushrooms in my fridge, wondering what magic I could whip up. That’s when it hit me—a creamy, dreamy Mini Pepper and Mushroom Risotto that’s as comforting as it is colorful. Trust me, it’s the kind of dish that makes you feel like a gourmet chef with minimal effort.
Ingredients
- 1 cup Arborio rice
- A couple of mini peppers, diced
- A handful of mushrooms, sliced
- 4 cups chicken or vegetable broth, kept warm
- A splash of white wine (optional, but highly recommended)
- 1 small onion, finely chopped
- 2 cloves garlic, minced
- 2 tbsp butter
- 1/4 cup grated Parmesan cheese
- Salt and pepper to taste
- A drizzle of olive oil
Instructions
- Heat a drizzle of olive oil and 1 tbsp butter in a large pan over medium heat. Tip: Use a wide pan to ensure even cooking.
- Add the chopped onion and sauté until translucent, about 3 minutes. Then, stir in the garlic for another minute until fragrant.
- Toss in the diced mini peppers and sliced mushrooms. Cook until they start to soften, about 5 minutes. Tip: Don’t overcrowd the pan to get a nice sear on the veggies.
- Add the Arborio rice, stirring to coat it in the butter and oil, and toast for about 2 minutes until the edges become slightly translucent.
- Pour in a splash of white wine, stirring constantly until it’s fully absorbed. Tip: This step adds depth to the risotto’s flavor.
- Begin adding the warm broth, one ladle at a time, stirring frequently. Wait until each addition is almost fully absorbed before adding the next. This process should take about 18-20 minutes.
- Once the rice is creamy and al dente, remove from heat. Stir in the remaining 1 tbsp butter and grated Parmesan cheese. Season with salt and pepper to taste.
The risotto should be luxuriously creamy, with the mini peppers adding a sweet crunch and the mushrooms bringing an earthy depth. Serve it in a warm bowl, maybe with an extra sprinkle of Parmesan on top for good measure.
Conclusion
We hope these 18 spicy mini pepper recipes inspire your next kitchen adventure! Perfect for adding a kick to any meal, there’s something for every taste. Don’t forget to try your favorites, share your thoughts in the comments, and pin the recipes you love on Pinterest. Happy cooking!


