Unwind after a long day without spending hours in the kitchen! Our roundup of 20 Quick Microwave Recipes for Busy Nights is here to save your evening. From comforting mac ‘n’ cheese to savory mug cakes, these speedy dishes are perfect for those nights when time is tight but hunger strikes hard. Dive in and discover how your microwave can be your best ally in whipping up delicious meals in minutes!
Microwave Scrambled Eggs
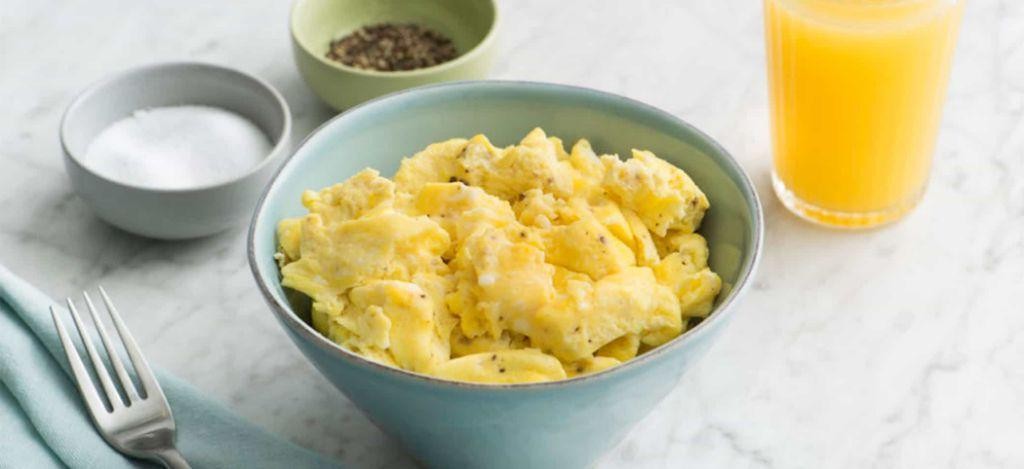
Kneading through the quiet of the morning, there’s something profoundly comforting about the simplicity of scrambled eggs, especially when time is of the essence. This microwave version offers a quick, yet equally delightful alternative to the stovetop classic, perfect for those reflective moments when you’re alone with your thoughts.
Ingredients
- 2 pasture-raised eggs, lightly beaten
- 1 tablespoon whole milk
- 1/2 tablespoon unsalted butter
- 1/8 teaspoon fine sea salt
- 1/8 teaspoon freshly ground black pepper
Instructions
- In a microwave-safe bowl, combine the lightly beaten pasture-raised eggs and whole milk, whisking until fully incorporated.
- Add the unsalted butter to the bowl and microwave on high for 30 seconds. Remove and stir gently with a fork.
- Return the bowl to the microwave and cook on high for an additional 30 seconds. The eggs should be slightly runny; this is when you add the fine sea salt and freshly ground black pepper.
- Stir the eggs once more, then microwave for a final 15-20 seconds, or until the eggs are softly set but still moist.
- Let the eggs stand in the microwave for 1 minute to finish cooking with residual heat, ensuring they remain tender and not rubbery.
Light and fluffy, these microwave scrambled eggs carry a delicate texture that’s surprisingly close to their stovetop counterpart. Serve them atop a slice of artisan toast or alongside a handful of fresh arugula for a simple, yet satisfying meal that doesn’t skimp on flavor or comfort.
Microwave Mac and Cheese
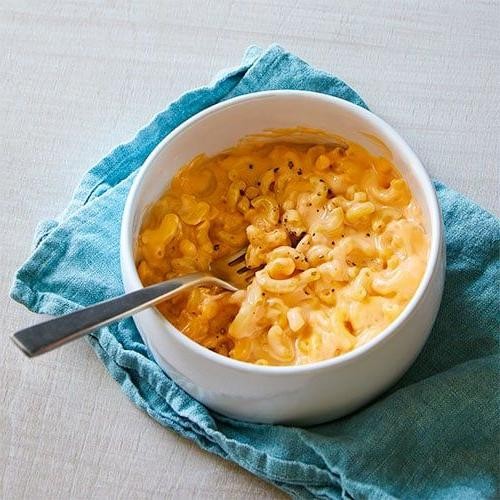
Lazy afternoons call for comfort in its simplest form, a bowl of microwave mac and cheese that whispers of childhood yet stands proud with gourmet touches.
Ingredients
- 1 cup elbow macaroni
- 1 cup whole milk
- 1 cup sharp cheddar cheese, freshly grated
- 1/4 cup Parmesan cheese, finely grated
- 1 tbsp unsalted butter
- 1/2 tsp Dijon mustard
- 1/4 tsp smoked paprika
- 1/8 tsp freshly ground black pepper
- 1/8 tsp sea salt
Instructions
- In a microwave-safe bowl, combine the elbow macaroni and enough water to cover by 1 inch. Microwave on high for 8 minutes, stirring halfway through, until the pasta is al dente.
- Drain the pasta thoroughly and return it to the bowl. Tip: Shaking the colander gently helps remove excess water without breaking the pasta.
- Add the whole milk, unsalted butter, Dijon mustard, smoked paprika, black pepper, and sea salt to the bowl with the pasta. Stir to combine.
- Microwave on high for 2 minutes, then stir. The mixture should be slightly thickened. Tip: Watching the microwave ensures the milk doesn’t boil over.
- Add the sharp cheddar and Parmesan cheeses to the bowl. Stir until the cheeses are completely melted and the sauce is smooth, about 1 minute of microwaving in 30-second intervals. Tip: Freshly grated cheese melts more evenly than pre-shredded.
- Let the mac and cheese stand for 2 minutes before serving to allow the sauce to thicken slightly.
Silky with a hint of smokiness, this mac and cheese clings to each noodle, offering a creamy bite that’s elevated by the sharpness of the cheddar. Serve it straight from the bowl for a cozy night in, or top with crispy breadcrumbs for an added texture contrast.
Microwave Mug Cake

Now, as the quiet hum of the microwave fills the kitchen, there’s something deeply comforting about the simplicity of a mug cake. It’s a small indulgence, a momentary pause in the day, where flour, sugar, and a few other pantry staples come together in a dance of heat and time.
Ingredients
- 1/4 cup all-purpose flour
- 2 tbsp granulated sugar
- 1 tbsp unsweetened cocoa powder
- 1/4 tsp baking powder
- Pinch of fine sea salt
- 3 tbsp whole milk
- 1 tbsp clarified butter, melted
- 1/2 tsp pure vanilla extract
Instructions
- In a 12-ounce microwave-safe mug, whisk together the all-purpose flour, granulated sugar, unsweetened cocoa powder, baking powder, and fine sea salt until no lumps remain.
- Add the whole milk, clarified butter, and pure vanilla extract to the dry ingredients. Stir gently with a fork until the batter is smooth and all ingredients are fully incorporated.
- Place the mug in the microwave and cook on high for 90 seconds. The cake is done when it has risen and the top appears set but still slightly moist.
- Allow the mug cake to cool for 1 minute before serving. This brief resting period lets the structure set, ensuring a perfect texture.
Velvety and rich, this microwave mug cake offers a tender crumb and deep chocolate flavor that belies its quick preparation. For an extra touch of indulgence, serve it with a dollop of whipped cream or a sprinkle of powdered sugar, transforming this simple treat into a moment of pure delight.
Microwave Popcorn
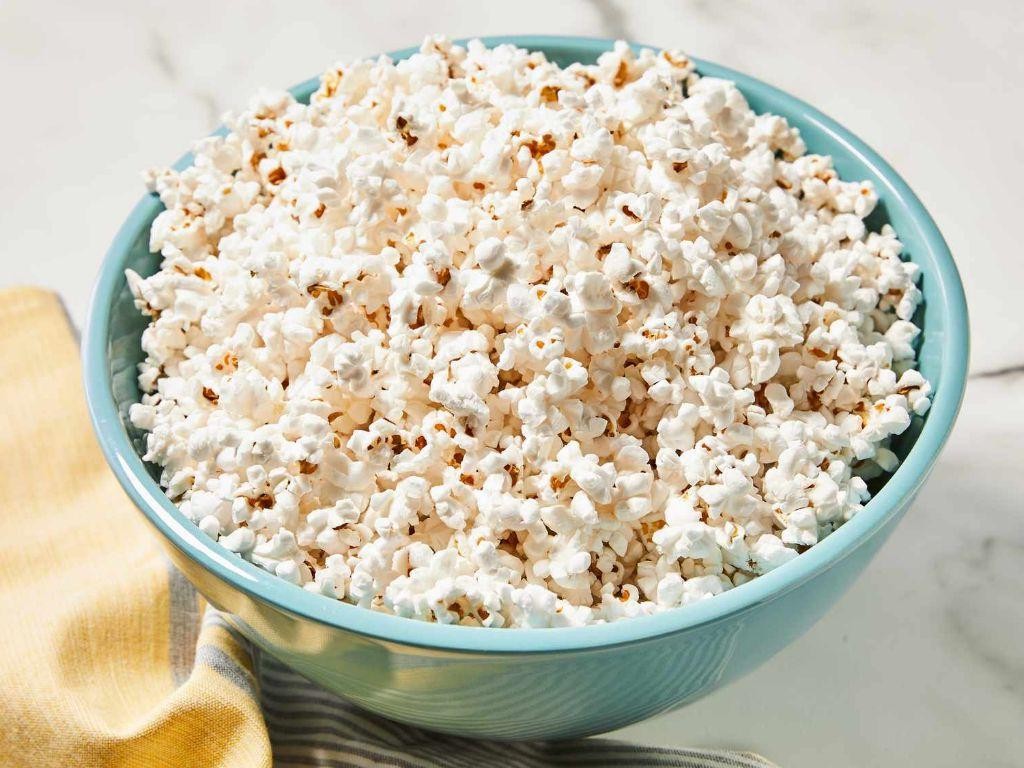
How often do we find ourselves craving a simple, comforting snack that doesn’t require much effort yet delivers on taste and nostalgia? Microwave popcorn, a humble yet universally loved treat, offers just that—minimal preparation for maximum satisfaction, a quiet moment of indulgence in our busy lives.
Ingredients
- 1/4 cup organic popcorn kernels
- 1 tablespoon clarified butter, melted
- 1/2 teaspoon fine sea salt
- 1 paper lunch bag
Instructions
- Place the organic popcorn kernels evenly at the bottom of a paper lunch bag.
- Fold the top of the bag over twice, ensuring it’s securely closed to prevent kernels from escaping during popping.
- Set the microwave to high power and place the bag inside, laying it flat on the turntable.
- Microwave for 2 minutes and 30 seconds, or until there are about 2 seconds between pops, indicating the popcorn is fully popped.
- Carefully remove the bag from the microwave, opening it away from your face to avoid steam.
- Drizzle the melted clarified butter over the popcorn, using a spoon to evenly distribute it.
- Sprinkle the fine sea salt over the buttered popcorn, tossing gently to coat evenly.
Crunchy and light, this microwave popcorn carries the rich aroma of clarified butter, with each kernel perfectly salted for a balanced flavor. Serve it in a large bowl for sharing during movie nights, or enjoy it straight from the bag for a personal treat.
Microwave Baked Potato

Perhaps there’s no simpler pleasure than the humble baked potato, especially when time is of the essence. This microwave version offers a quick path to comfort, with a fluffy interior and a skin that’s just tender enough to hold all your favorite toppings.
Ingredients
- 1 large russet potato, scrubbed clean
- 1 tablespoon extra-virgin olive oil
- 1/2 teaspoon kosher salt
- 1/4 teaspoon freshly ground black pepper
- 1 tablespoon unsalted butter, room temperature
- 2 tablespoons sour cream
- 1 tablespoon finely chopped chives
Instructions
- Pierce the potato all over with a fork, about 6-8 times, to allow steam to escape during cooking.
- Rub the potato with olive oil, then season evenly with salt and pepper.
- Place the potato on a microwave-safe plate and microwave on high for 5 minutes.
- Carefully flip the potato and microwave for another 5 minutes, or until a knife inserts easily into the center.
- Let the potato rest for 2 minutes to finish cooking through and to allow the skin to crisp slightly.
- Split the potato open with a knife, fluff the interior with a fork, then top with butter, sour cream, and chives.
Lightly creamy with a hint of earthiness, this microwave baked potato is a canvas for creativity. Try topping with crispy bacon bits or a sprinkle of sharp cheddar for a heartier twist.
Microwave Steamed Vegetables
Zenfully simple yet profoundly satisfying, microwave steamed vegetables offer a quick path to nourishing your body with minimal fuss. This method preserves the vibrant colors and crisp textures that make vegetables so appealing, all while requiring little more than your microwave and a moment of patience.
Ingredients
- 1 cup broccoli florets, cut into uniform sizes
- 1 cup carrots, thinly sliced on a bias
- 1/2 cup green beans, trimmed and halved
- 2 tbsp water
- 1 tbsp clarified butter
- 1/2 tsp sea salt
- 1/4 tsp freshly ground black pepper
Instructions
- Place the broccoli florets, carrots, and green beans in a microwave-safe bowl.
- Add 2 tablespoons of water to the bowl, ensuring the vegetables are lightly moistened.
- Cover the bowl with a microwave-safe lid or plate, leaving a small vent for steam to escape.
- Microwave on high for 3 minutes, then carefully remove the cover to stir the vegetables for even cooking.
- Re-cover and microwave for an additional 2 minutes, or until the vegetables are tender-crisp when pierced with a fork.
- Drain any excess water from the bowl, then drizzle the vegetables with clarified butter.
- Sprinkle with sea salt and freshly ground black pepper, tossing gently to coat.
The result is a dish where each vegetable retains its distinct texture, from the snap of green beans to the slight give of carrots, all enveloped in the rich, nutty aroma of clarified butter. Serve alongside a seared salmon fillet or fold into a warm quinoa salad for a meal that feels both effortless and elegant.
Microwave Chicken Quesadilla
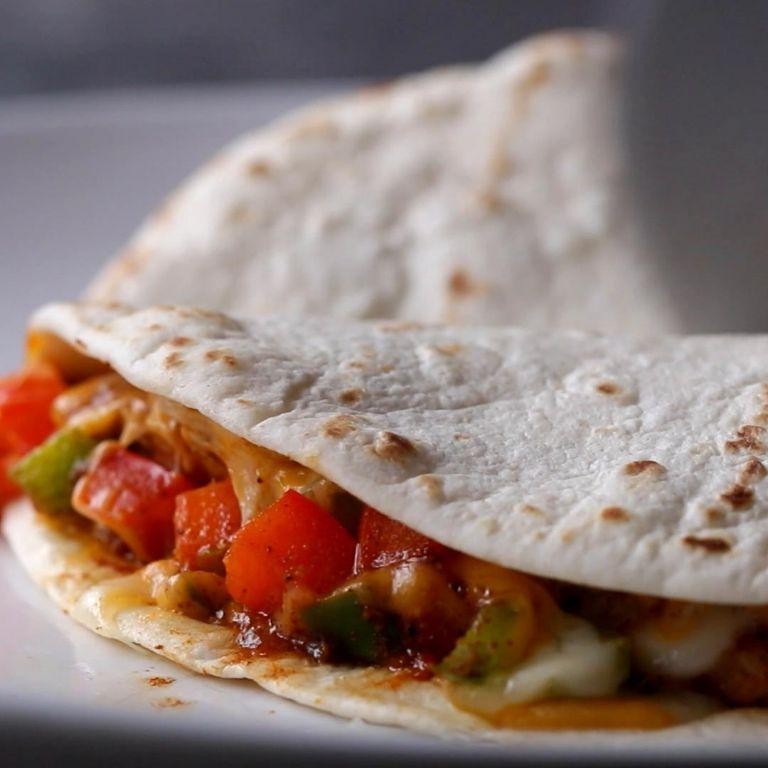
How quietly the evening settles in, the perfect moment to share a simple yet comforting recipe that feels like a warm hug. This microwave chicken quesadilla is a testament to the beauty of quick, effortless meals that don’t compromise on flavor or texture.
Ingredients
- 1 cup shredded, cooked chicken breast (preferably free-range)
- 1/2 cup sharp cheddar cheese, freshly grated
- 1/4 cup Monterey Jack cheese, freshly grated
- 2 tbsp unsalted butter, clarified
- 1/4 cup red bell pepper, finely diced
- 2 tbsp green onions, thinly sliced
- 1/2 tsp ground cumin
- 1/4 tsp smoked paprika
- 2 large flour tortillas (about 10-inch diameter)
- 1/4 cup fresh cilantro leaves, for garnish
Instructions
- In a medium mixing bowl, combine the shredded chicken, cheddar cheese, Monterey Jack cheese, red bell pepper, green onions, ground cumin, and smoked paprika. Mix gently until all ingredients are evenly distributed.
- Place one flour tortilla on a microwave-safe plate. Spread the chicken and cheese mixture evenly over the tortilla, leaving a 1-inch border around the edges.
- Top with the second tortilla, pressing down lightly to adhere. Brush the top tortilla with half of the clarified butter.
- Microwave on high for 1 minute, then carefully flip the quesadilla using a wide spatula. Brush the other side with the remaining clarified butter.
- Microwave for an additional 1 minute, or until the cheese is fully melted and the tortilla edges are slightly crispy.
- Remove from the microwave and let it rest for 30 seconds. This allows the cheese to set slightly, making it easier to cut.
- Garnish with fresh cilantro leaves before serving. For an extra touch, serve with a side of homemade salsa or a dollop of sour cream.
Velvety melted cheese clings to the tender chicken, while the crisp tortilla provides a satisfying crunch. Consider pairing this quesadilla with a light, citrusy salad to balance the richness, or enjoy it as is for a quick, comforting meal.
Microwave Oatmeal

Falling into the rhythm of the morning, there’s something deeply comforting about the simplicity of microwave oatmeal. It’s a humble dish that carries the warmth of home, a quick yet nourishing start to any day.
Ingredients
- 1/2 cup rolled oats
- 1 cup filtered water
- 1/4 tsp fine sea salt
- 1 tbsp pure maple syrup
- 1/4 cup whole milk
- 1/2 tsp vanilla extract
- 1 tbsp unsalted butter
- 1/4 tsp ground cinnamon
Instructions
- In a microwave-safe bowl, combine the rolled oats, filtered water, and fine sea salt.
- Microwave on high for 2 minutes, then stir gently to ensure even cooking.
- Add the pure maple syrup, whole milk, vanilla extract, unsalted butter, and ground cinnamon to the bowl.
- Microwave on high for an additional 1 minute, or until the oatmeal reaches your desired consistency.
- Let the oatmeal stand for 1 minute to thicken slightly before serving.
Buttery and rich, this microwave oatmeal boasts a velvety texture with a hint of cinnamon warmth. Serve it topped with a dollop of Greek yogurt and a drizzle of honey for an extra layer of flavor.
Microwave Fudge
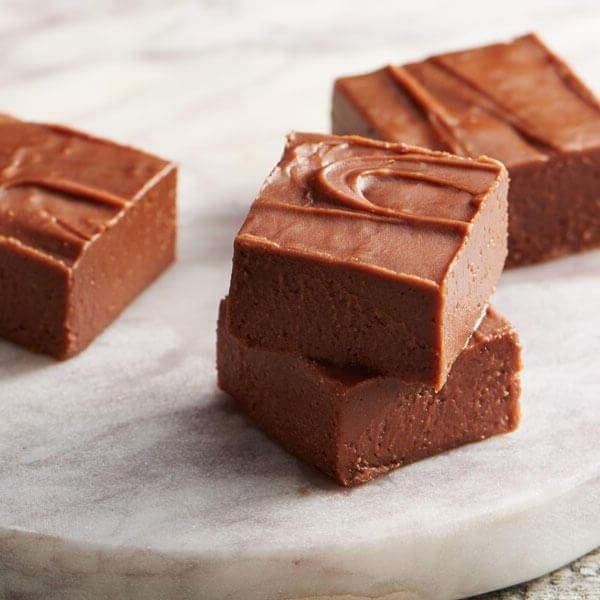
Dusk settles softly outside, and in the quiet of the kitchen, the simplicity of making microwave fudge feels like a small, sweet rebellion against the complexity of the day. This recipe, with its minimal ingredients and effortless method, is a tender nod to the joys of homemade treats.
Ingredients
- 2 cups granulated sugar
- 1/2 cup unsalted butter, cubed
- 1/2 cup heavy cream
- 1/4 cup Dutch-process cocoa powder, sifted
- 1 tsp pure vanilla extract
- 1/8 tsp fine sea salt
Instructions
- In a large, microwave-safe bowl, combine the granulated sugar, unsalted butter, heavy cream, and sifted Dutch-process cocoa powder.
- Microwave on high for 2 minutes, then carefully remove and stir with a heat-resistant spatula until the ingredients are fully incorporated.
- Return the bowl to the microwave and heat on high for an additional 2 minutes. Watch closely to prevent boiling over.
- After heating, immediately add the pure vanilla extract and fine sea salt, stirring vigorously for 1 minute to ensure a smooth, glossy texture.
- Pour the fudge into a parchment-lined 8×8 inch baking dish, using the spatula to spread it evenly.
- Allow the fudge to cool at room temperature for 1 hour, then refrigerate for an additional 2 hours to set completely.
Whispering of rich cocoa and velvety sweetness, this fudge breaks with a satisfying firmness yet melts luxuriously on the tongue. Consider dusting the top with flaky sea salt or serving alongside a glass of cold milk for a contrast that delights.
Microwave Rice
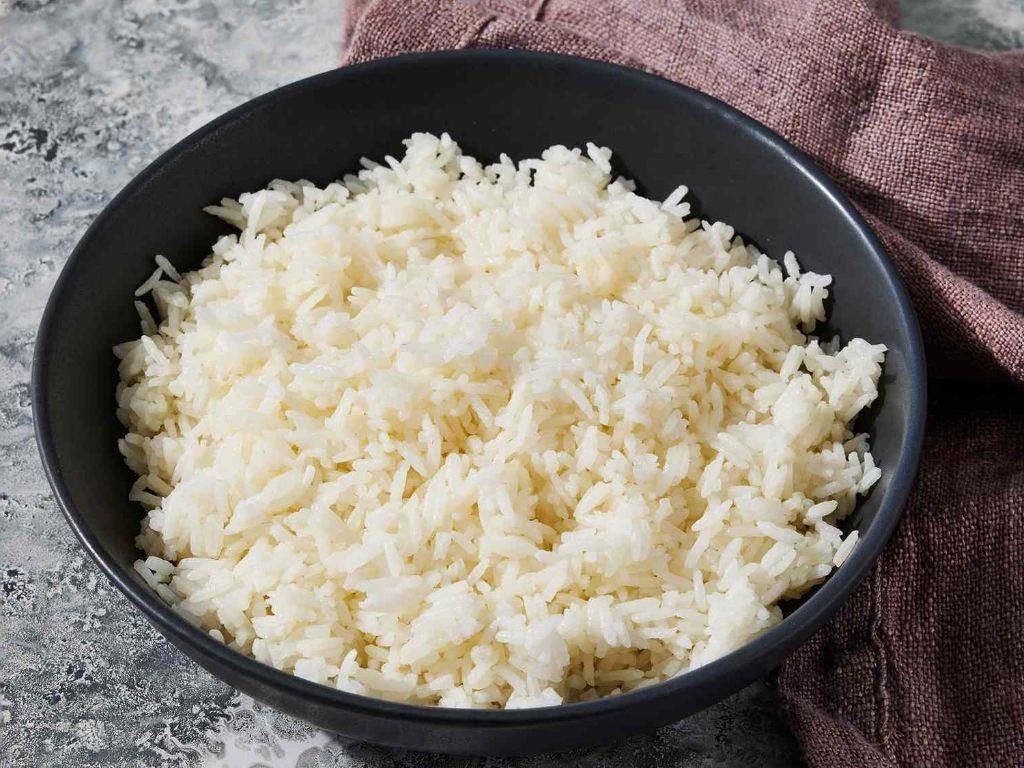
How often do we find ourselves in need of a quick, comforting side that requires minimal effort yet delivers maximum satisfaction? Microwave rice, a humble yet versatile dish, offers just that—simplicity and warmth with every fluffy grain.
Ingredients
- 1 cup long-grain white rice, rinsed until the water runs clear
- 1 1/2 cups filtered water
- 1/2 teaspoon fine sea salt
- 1 tablespoon unsalted butter, cut into small cubes
Instructions
- In a microwave-safe bowl, combine the rinsed rice, filtered water, and fine sea salt, stirring gently to distribute the salt evenly.
- Dot the surface of the water with the cubes of unsalted butter, allowing them to melt naturally into the mixture as it cooks.
- Cover the bowl tightly with a microwave-safe lid or plastic wrap, leaving a small vent for steam to escape.
- Microwave on high for 5 minutes, then reduce the power to 50% and continue microwaving for another 10 minutes. Tip: The initial high heat helps the water boil quickly, while the reduced power ensures the rice cooks evenly without drying out.
- Let the rice stand, covered, for 5 minutes after microwaving. Tip: This resting period allows the rice to absorb any remaining moisture and become perfectly tender.
- Fluff the rice gently with a fork before serving. Tip: For an extra layer of flavor, consider stirring in a teaspoon of toasted sesame oil or a handful of chopped fresh herbs at this stage.
Buttery and light, this microwave rice boasts a delicate texture that pairs beautifully with robust main dishes or stands alone with a drizzle of soy sauce. Try shaping it into small cakes and pan-frying for a crispy twist on leftovers.
Microwave Pancakes

There’s something quietly comforting about the simplicity of pancakes, especially when they can be made in the microwave, blending convenience with the warmth of homemade breakfast. This method transforms the traditional into something effortlessly modern, without losing the soul of the dish.
Ingredients
- 1 cup all-purpose flour, sifted
- 2 tbsp granulated sugar
- 1 tsp baking powder
- 1/2 tsp fine sea salt
- 3/4 cup whole milk, at room temperature
- 1 large pasture-raised egg, lightly beaten
- 2 tbsp unsalted butter, melted and slightly cooled
- 1 tsp pure vanilla extract
Instructions
- In a medium mixing bowl, whisk together the sifted all-purpose flour, granulated sugar, baking powder, and fine sea salt until well combined.
- Add the whole milk, lightly beaten pasture-raised egg, melted unsalted butter, and pure vanilla extract to the dry ingredients. Whisk until the batter is smooth and free of lumps, being careful not to overmix.
- Lightly grease a microwave-safe plate or shallow bowl with a thin layer of butter to prevent sticking.
- Pour 1/4 cup of the batter onto the prepared plate, spreading it gently into a circle about 1/2 inch thick.
- Microwave on high for 1 minute and 30 seconds, or until the pancake is fully set and springs back when lightly touched. Tip: Microwave strengths vary, so adjust time accordingly.
- Carefully remove the plate from the microwave using oven mitts, as it will be hot. Let the pancake cool for 30 seconds before transferring to a serving plate.
- Repeat the process with the remaining batter, greasing the plate as needed between pancakes.
- Serve immediately with your choice of toppings. Tip: For an extra touch, drizzle with maple syrup warmed for 15 seconds in the microwave.
Fluffy and light, these microwave pancakes carry the delicate sweetness of vanilla and the rich undertones of butter, making them a quick yet satisfying breakfast. Try layering them with fresh berries and a dollop of whipped cream for an elegant twist.
Microwave Pizza

Yesterday, I found myself craving something comforting yet effortlessly simple, a dish that wouldn’t pull me away from the quiet of the evening for too long. Microwave pizza, with its humble beginnings and surprisingly satisfying outcome, became my unexpected solace.
Ingredients
- 1 whole wheat English muffin, split
- 2 tbsp organic tomato sauce, no salt added
- 1/4 cup part-skim mozzarella cheese, freshly grated
- 5 slices pepperoni, nitrate-free
- 1 tsp extra virgin olive oil
- 1/4 tsp dried oregano
- 1/4 tsp garlic powder
Instructions
- Place the split English muffin halves on a microwave-safe plate, cut side up.
- Lightly brush each half with extra virgin olive oil to prevent sogginess and enhance flavor.
- Spread 1 tbsp of organic tomato sauce evenly over each half, ensuring coverage to the edges for a balanced taste.
- Sprinkle freshly grated part-skim mozzarella cheese evenly over the sauce, allowing some to reach the edges for a delightful crisp.
- Arrange nitrate-free pepperoni slices on top of the cheese, then lightly dust with dried oregano and garlic powder for aromatic depth.
- Microwave on high for 1 minute, or until the cheese is fully melted and bubbly. Watch closely to avoid overcooking, as microwave strengths vary.
- Let the pizza sit for 30 seconds before serving to allow the flavors to meld and the temperature to settle for the perfect bite.
Golden and inviting, this microwave pizza offers a crispy edge with a tender center, a testament to simplicity’s charm. Consider garnishing with fresh basil leaves for a vibrant contrast, or a drizzle of chili oil for those who favor a gentle heat.
Microwave Brownies

Just imagine the comfort of sinking your teeth into a warm, fudgy brownie, the kind that feels like a hug from the inside. This microwave version brings that joy into your life in minutes, with minimal fuss and maximum flavor.
Ingredients
- 1/2 cup unsalted butter, clarified
- 1 cup granulated sugar
- 2 pasture-raised eggs, lightly beaten
- 1 teaspoon pure vanilla extract
- 1/3 cup high-quality cocoa powder
- 1/2 cup all-purpose flour, sifted
- 1/4 teaspoon fine sea salt
- 1/4 teaspoon baking powder
Instructions
- In a microwave-safe bowl, melt the clarified butter on high for 45 seconds. Tip: Ensure the bowl is large enough to accommodate all ingredients for easy mixing.
- Stir in the granulated sugar until fully incorporated. The mixture should look glossy.
- Add the lightly beaten eggs and pure vanilla extract, whisking vigorously to create a smooth base. Tip: Room temperature eggs blend more evenly, preventing the batter from seizing.
- Sift in the cocoa powder, all-purpose flour, fine sea salt, and baking powder, folding gently to avoid overmixing. Tip: Sifting eliminates lumps, ensuring a uniformly tender texture.
- Pour the batter into a greased microwave-safe dish, smoothing the top with a spatula.
- Microwave on high for 2 minutes, then check for doneness. The brownies should be slightly moist in the center but firm around the edges. If needed, microwave in additional 15-second intervals.
So rich and decadent, these brownies boast a crackly top with a molten center. Serve them warm with a scoop of vanilla bean ice cream for an indulgent contrast, or enjoy them as they are, letting the deep chocolate flavor take center stage.
Microwave Corn on the Cob
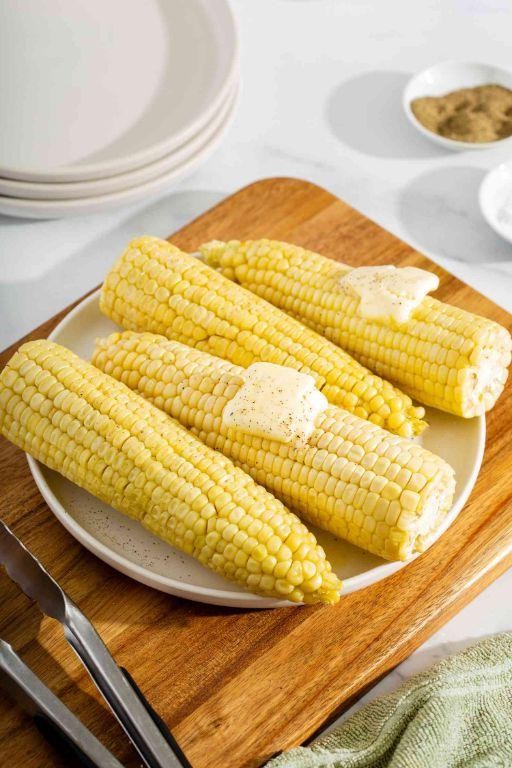
Gently, the microwave hums to life, a modern kitchen’s quiet companion, as we embark on a simple yet profound culinary journey with corn on the cob. This method, unassuming in its ease, coaxes out the corn’s inherent sweetness, offering a tender bite with minimal fuss.
Ingredients
- 4 ears of fresh sweet corn, husks removed
- 2 tablespoons unsalted butter, clarified
- 1 teaspoon fine sea salt
- 1/2 teaspoon freshly ground black pepper
Instructions
- Place the ears of corn on a microwave-safe plate, ensuring they do not overlap.
- Cover the corn with a damp paper towel to retain moisture during cooking.
- Microwave on high for 4 minutes, then carefully rotate each ear of corn 180 degrees for even cooking.
- Continue microwaving for another 4 minutes, or until the kernels are tender when pierced with a fork.
- Remove the plate from the microwave using oven mitts, as it will be hot.
- Let the corn rest, covered, for 2 minutes to allow the heat to distribute evenly.
- Brush each ear of corn with clarified butter, ensuring an even coating.
- Sprinkle the corn with fine sea salt and freshly ground black pepper to taste.
Remarkably, the microwave preserves the corn’s juiciness, yielding a texture that’s both plump and crisp. The clarified butter adds a velvety richness, while the seasoning highlights the corn’s natural flavors. For a playful twist, serve alongside a sprinkle of smoked paprika or a drizzle of lime-infused honey.
Microwave Apple Crisp
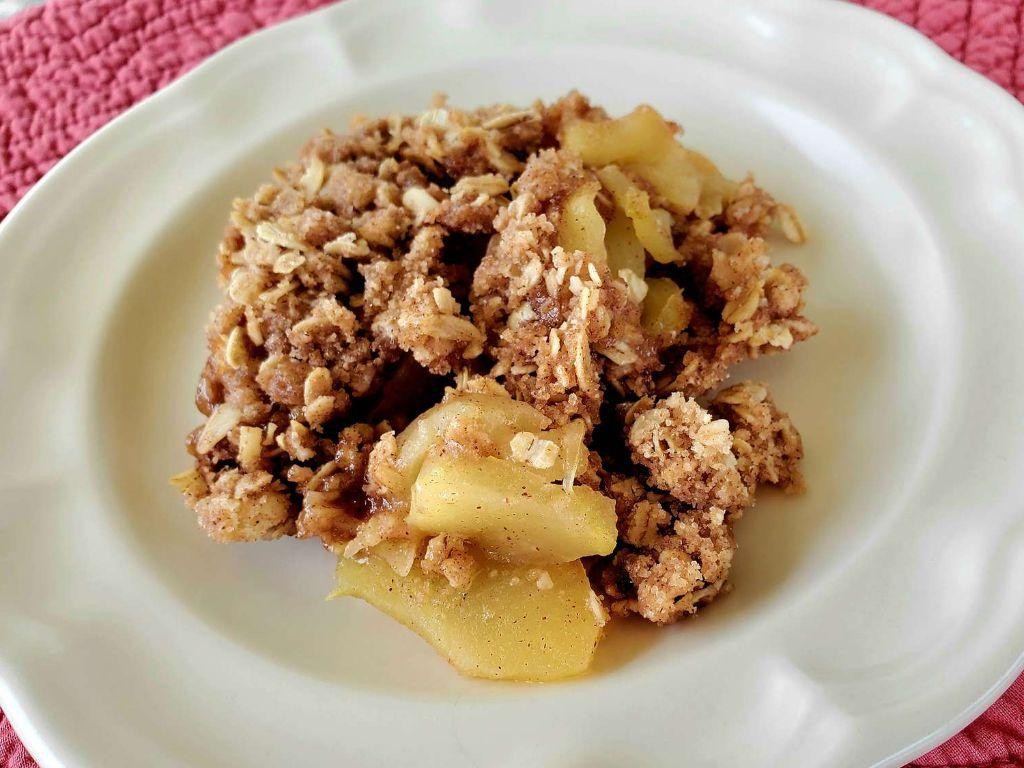
Comfort comes in many forms, and today, it arrives in the simplicity of a microwave apple crisp, a dish that marries the rustic charm of autumn with the convenience of modern cooking. Let’s embrace the warmth it promises, a gentle reminder of home.
Ingredients
- 2 medium Granny Smith apples, peeled, cored, and thinly sliced
- 1/4 cup all-purpose flour
- 1/4 cup old-fashioned rolled oats
- 1/4 cup packed light brown sugar
- 1/4 tsp ground cinnamon
- 1/8 tsp ground nutmeg
- 2 tbsp unsalted butter, chilled and diced
- 1 tbsp fresh lemon juice
Instructions
- In a medium microwave-safe bowl, toss the thinly sliced apples with fresh lemon juice to prevent browning.
- In a separate bowl, combine the all-purpose flour, rolled oats, light brown sugar, ground cinnamon, and ground nutmeg, whisking until evenly mixed.
- Add the chilled, diced unsalted butter to the dry ingredients. Using your fingertips, rub the butter into the mixture until it resembles coarse crumbs.
- Layer the apple slices evenly in the bottom of a microwave-safe dish. Sprinkle the crumb mixture over the apples, covering them completely.
- Microwave on high for 5 minutes, or until the apples are tender when pierced with a fork and the topping is slightly golden.
- Let the crisp stand for 2 minutes before serving to allow the flavors to meld and the topping to crisp further.
The crisp offers a delightful contrast between the soft, cinnamon-spiced apples and the crunchy, buttery topping. Try serving it warm with a scoop of vanilla bean ice cream for an indulgent twist.
Microwave Spaghetti Squash
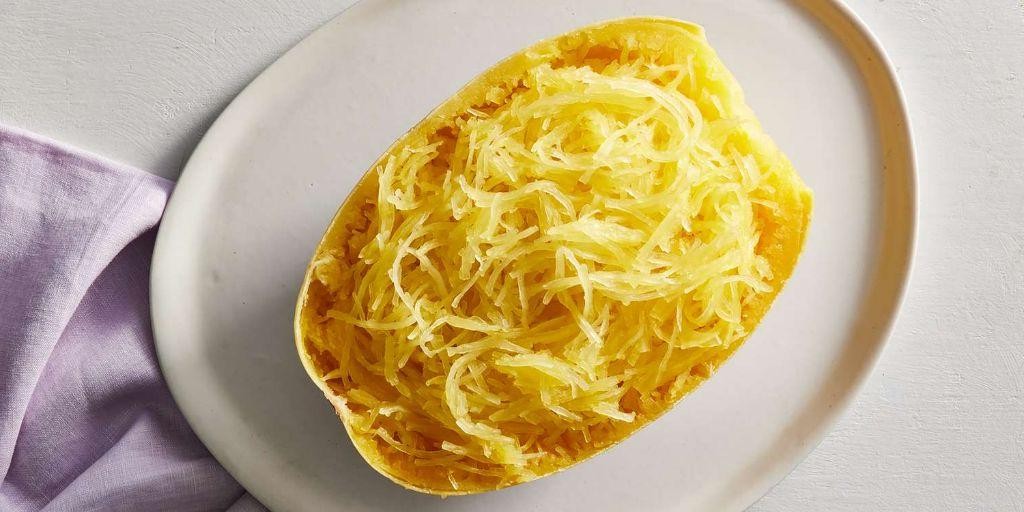
Often, the simplest dishes bring the most comfort, especially when they emerge from the humble microwave with minimal fuss. Microwave spaghetti squash is one such dish, a tender, noodle-like vegetable that’s both versatile and satisfying, perfect for those evenings when time and energy are in short supply.
Ingredients
- 1 medium spaghetti squash, halved lengthwise and seeds removed
- 2 tablespoons extra-virgin olive oil
- 1 teaspoon kosher salt
- 1/2 teaspoon freshly ground black pepper
- 1/4 cup water
Instructions
- Place the halved spaghetti squash cut-side down in a microwave-safe dish large enough to hold both halves without overlapping.
- Pour the water into the dish around the squash to create steam during cooking.
- Cover the dish tightly with microwave-safe plastic wrap, leaving a small vent for steam to escape.
- Microwave on high for 10 minutes, then carefully remove the dish and check the squash for tenderness by piercing the skin with a fork. If not tender, microwave in additional 2-minute increments until fork-tender.
- Let the squash stand, covered, for 5 minutes to finish steaming and to cool slightly for handling.
- Use a fork to scrape the flesh of the squash into strands, transferring to a serving bowl as you go.
- Drizzle the spaghetti squash strands with extra-virgin olive oil and season with kosher salt and freshly ground black pepper, tossing gently to combine.
But the beauty of microwave spaghetti squash lies in its delicate strands, which carry a subtle sweetness and a satisfying al dente bite. Serve it as a low-carb pasta alternative, topped with a robust marinara and a sprinkle of Parmesan, or keep it light with a drizzle of olive oil and a handful of fresh herbs.
Microwave Chocolate Chip Cookie
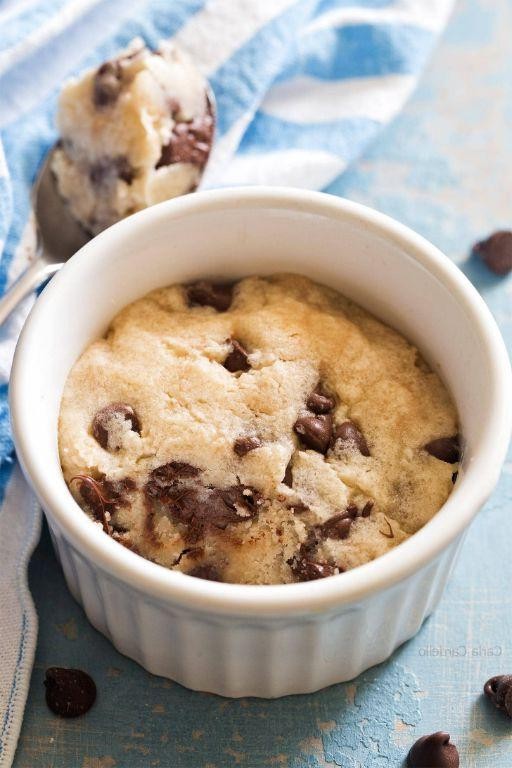
Whispering the secrets of comfort into the quiet kitchen, this microwave chocolate chip cookie emerges as a solitary delight, a quick embrace of warmth and sweetness for those moments when time stands still.
Ingredients
- 1/4 cup all-purpose flour, sifted
- 2 tbsp granulated sugar
- 1 tbsp light brown sugar, packed
- 1/8 tsp baking soda
- 1/8 tsp fine sea salt
- 1 tbsp unsalted butter, melted and slightly cooled
- 1/2 tsp pure vanilla extract
- 1 tbsp pasture-raised egg, lightly beaten
- 2 tbsp semi-sweet chocolate chips
Instructions
- In a small mixing bowl, whisk together the sifted all-purpose flour, granulated sugar, light brown sugar, baking soda, and fine sea salt until well combined.
- Add the melted unsalted butter, pure vanilla extract, and lightly beaten pasture-raised egg to the dry ingredients. Stir until a cohesive dough forms.
- Gently fold in the semi-sweet chocolate chips until evenly distributed throughout the dough.
- Transfer the dough to a microwave-safe mug or small bowl, pressing it down lightly to form an even layer.
- Microwave on high for 50-60 seconds, or until the cookie has puffed up and the surface appears set. Tip: The cookie will continue to cook slightly from residual heat, so avoid overcooking.
- Allow the cookie to cool in the mug or bowl for 1-2 minutes before serving. Tip: This resting period helps the cookie set further, ensuring a perfect texture.
- For an extra touch of indulgence, serve warm with a scoop of vanilla ice cream or a drizzle of caramel sauce. Tip: The contrast of temperatures and textures elevates this simple treat to a decadent dessert.
The cookie boasts a tender, slightly chewy center with a delicate crispness at the edges, the chocolate chips melting into pockets of gooey richness. Enjoy it as a solitary moment of indulgence or share the mug, passing the spoon back and forth in silent companionship.
Microwave Bacon
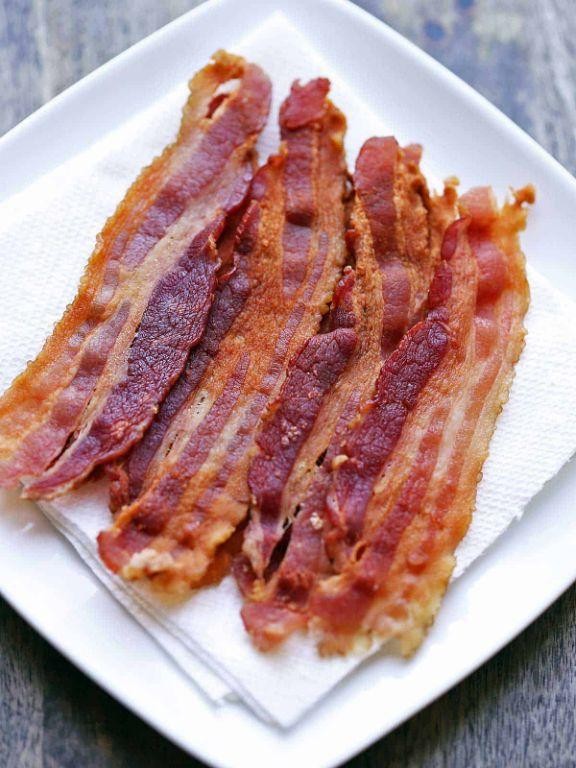
On a quiet morning like this, the simplicity of making microwave bacon feels almost meditative, a small ritual that fills the kitchen with its comforting aroma.
Ingredients
- 8 slices of thick-cut, applewood-smoked bacon
- 1 tablespoon of pure maple syrup (optional, for glazing)
Instructions
- Line a microwave-safe plate with two layers of paper towels to absorb excess grease.
- Arrange 4 slices of bacon on the prepared plate, ensuring they do not overlap for even cooking.
- Cover the bacon with another layer of paper towel to prevent splattering.
- Microwave on high for 4 minutes, then check for desired crispiness. For crispier bacon, continue microwaving in 30-second intervals.
- Transfer the cooked bacon to a wire rack to cool, allowing it to crisp further as it drains.
- Repeat the process with the remaining 4 slices of bacon.
- For a sweet variation, lightly brush the cooked bacon with pure maple syrup before the final 30 seconds of microwaving.
Perfectly crisp with a tender chew, this microwave bacon carries a smoky depth that pairs wonderfully with the subtle sweetness of maple. Try crumbling it over a fresh avocado toast for a delightful contrast of textures.
Microwave Lemon Curd

Zestfully, the simplicity of a microwave lemon curd brings a bright, tangy sweetness to any moment, requiring just a few minutes and a handful of ingredients to transform into a velvety spread.
Ingredients
- 1 cup granulated sugar
- 3 pasture-raised eggs, lightly beaten
- 1/2 cup freshly squeezed lemon juice
- 1/4 cup clarified butter, melted
- 1 tbsp lemon zest
Instructions
- In a large microwave-safe bowl, whisk together the granulated sugar and lightly beaten pasture-raised eggs until smooth.
- Gradually stir in the freshly squeezed lemon juice and melted clarified butter, ensuring the mixture is well combined.
- Microwave the mixture on high for 1 minute, then remove and whisk vigorously to prevent the eggs from scrambling.
- Return the bowl to the microwave and cook for an additional 30 seconds. Repeat the whisking process.
- Continue microwaving in 30-second intervals, whisking after each, until the curd thickens enough to coat the back of a spoon, about 2 to 3 minutes total.
- Stir in the lemon zest for an extra burst of flavor, then strain the curd through a fine-mesh sieve into a clean bowl to ensure a silky texture.
- Cover the curd with plastic wrap, pressing it directly onto the surface to prevent a skin from forming, and refrigerate until set, at least 1 hour.
Velvety and vibrant, this microwave lemon curd boasts a perfect balance of tart and sweet, with a lush texture that makes it ideal for dolloping over scones, swirling into yogurt, or layering in a tart.
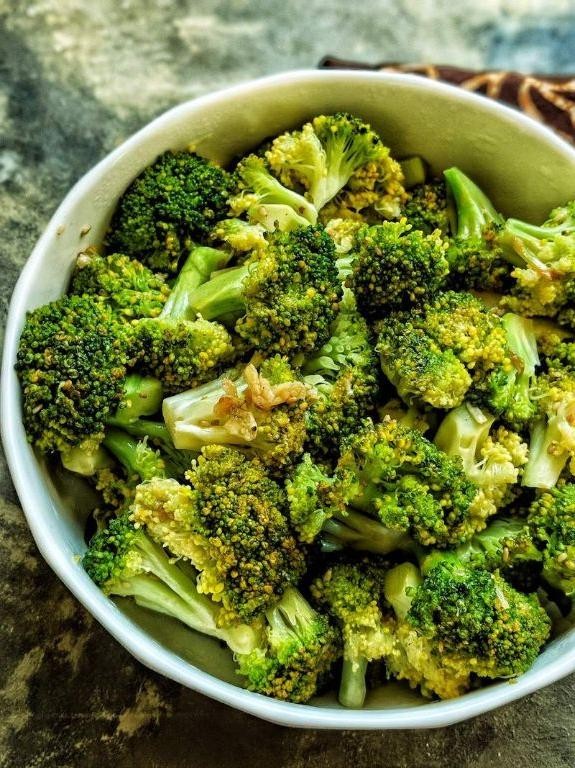
Microwave Cheesy Broccoli
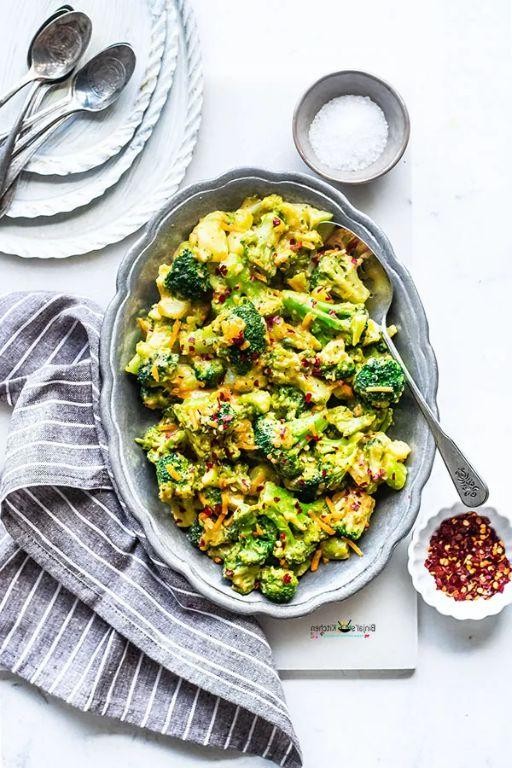
Evenings like these call for simplicity, a dish that comforts without complication, much like the quiet moments we cherish. Microwave Cheesy Broccoli is just that—a humble, quick-to-make dish that brings warmth and a touch of indulgence to your table with minimal effort.
Ingredients
- 2 cups fresh broccoli florets, cut into uniform sizes
- 1/2 cup sharp cheddar cheese, freshly grated
- 2 tablespoons unsalted butter
- 1/4 cup heavy cream
- 1/2 teaspoon garlic powder
- 1/4 teaspoon smoked paprika
- 1/8 teaspoon fine sea salt
Instructions
- Place the broccoli florets in a microwave-safe bowl. Cover with a microwave-safe lid or plate, leaving a small vent for steam to escape.
- Microwave on high for 3 minutes, then carefully remove the cover and stir the broccoli. Tip: Uniformly sized florets ensure even cooking.
- Add the unsalted butter, heavy cream, garlic powder, smoked paprika, and fine sea salt to the bowl. Stir gently to combine.
- Cover again and microwave on high for an additional 2 minutes. Tip: The steam created under the cover helps meld the flavors together beautifully.
- Remove the bowl from the microwave and sprinkle the freshly grated sharp cheddar cheese over the broccoli. Do not stir.
- Cover and let sit for 1 minute to allow the residual heat to melt the cheese. Tip: Letting the dish sit for a minute ensures the cheese melts perfectly without becoming greasy.
- Give the mixture a final gentle stir to evenly distribute the melted cheese.
Just like that, you have a dish where the broccoli is tender yet crisp, enveloped in a creamy, cheesy sauce with a hint of smokiness. Serve it as a side to grilled chicken or spoon it over toasted sourdough for a quick, satisfying meal.
Conclusion
Just like that, you’ve got 20 speedy microwave recipes to turn to on those hectic evenings! Whether you’re craving comfort food or something light, this roundup has you covered. We’d love to hear which dishes become your go-tos—drop a comment below. And if you found this list helpful, why not share the love? Pin this article on Pinterest to keep these quick fixes at your fingertips!