Unlock the secret to transforming that leftover buttermilk sitting in your fridge into something spectacular! Whether you’re whipping up quick dinners, indulging in comfort food, or exploring seasonal favorites, our roundup of 20 delicious recipes has got you covered. Dive in to discover creative ways to give your buttermilk a second life—your taste buds will thank you!
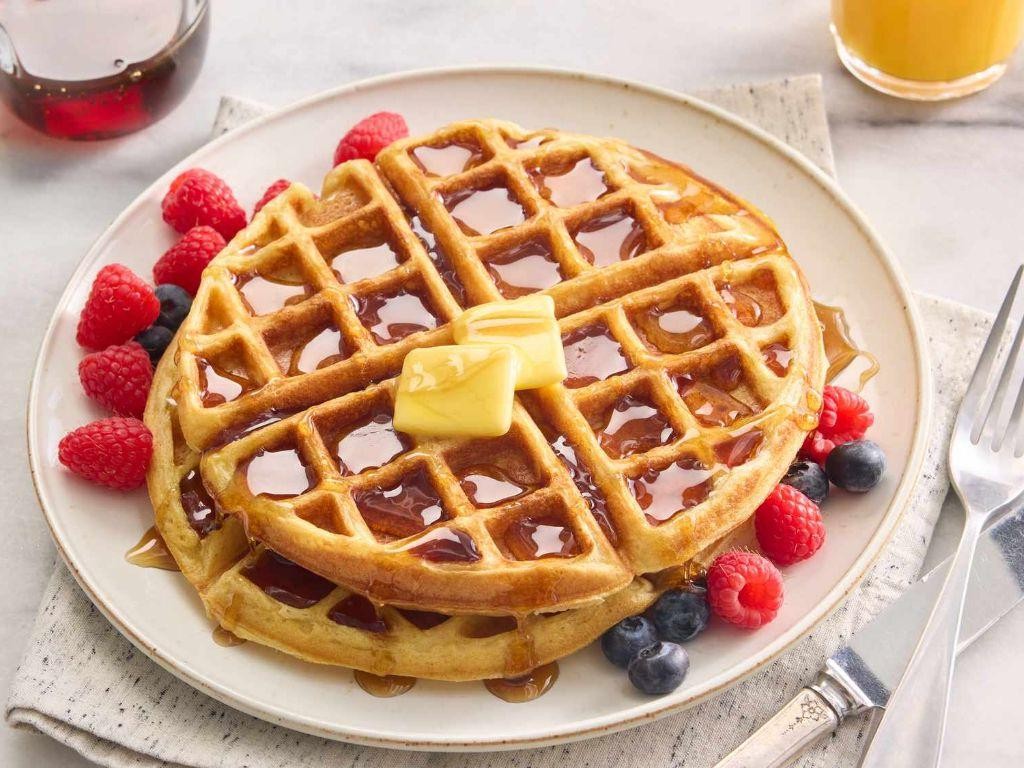
Buttermilk Pancakes
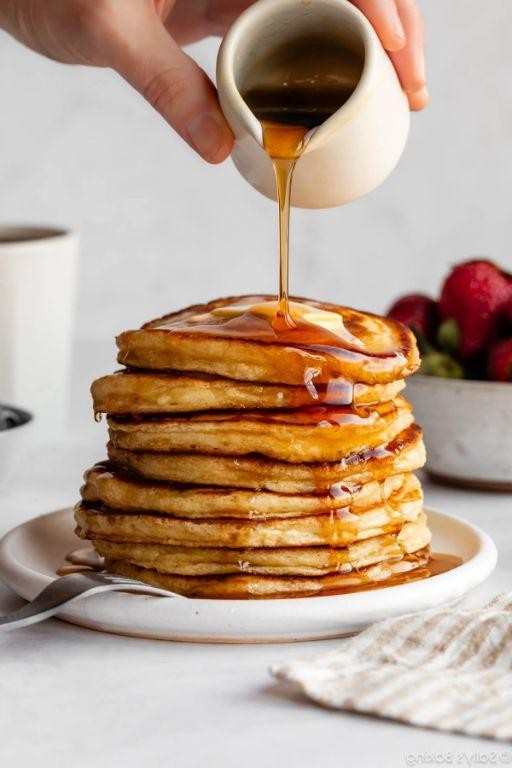
Every morning deserves a special start, and what better way to kick it off than with a stack of fluffy buttermilk pancakes? This recipe is your ticket to mastering the art of pancake making, ensuring golden, tender results every time.
Ingredients
- 1 and a half cups of all-purpose flour
- 2 tablespoons of sugar
- 1 teaspoon of baking powder
- Half a teaspoon of baking soda
- A pinch of salt
- 1 and a quarter cups of buttermilk
- 1 large egg
- 2 tablespoons of melted butter, plus a bit more for the pan
- A splash of vanilla extract
Instructions
- In a large bowl, whisk together the flour, sugar, baking powder, baking soda, and salt until well combined.
- In another bowl, beat the buttermilk, egg, melted butter, and vanilla extract until smooth. Tip: Make sure your buttermilk is at room temperature to ensure a smooth batter.
- Pour the wet ingredients into the dry ingredients and stir until just combined. Tip: A few lumps are okay; overmixing will make your pancakes tough.
- Heat a non-stick skillet or griddle over medium heat and brush with a little melted butter. Tip: The pan is ready when a drop of water sizzles upon contact.
- Pour a quarter cup of batter onto the skillet for each pancake. Cook until bubbles form on the surface and the edges look set, about 2-3 minutes.
- Flip the pancakes and cook for another 1-2 minutes, until golden brown and cooked through.
Fluffy, buttery, and with just the right amount of sweetness, these buttermilk pancakes are a dream. Serve them stacked high with a drizzle of maple syrup and a handful of fresh berries for a breakfast that feels like a hug.
Buttermilk Fried Chicken
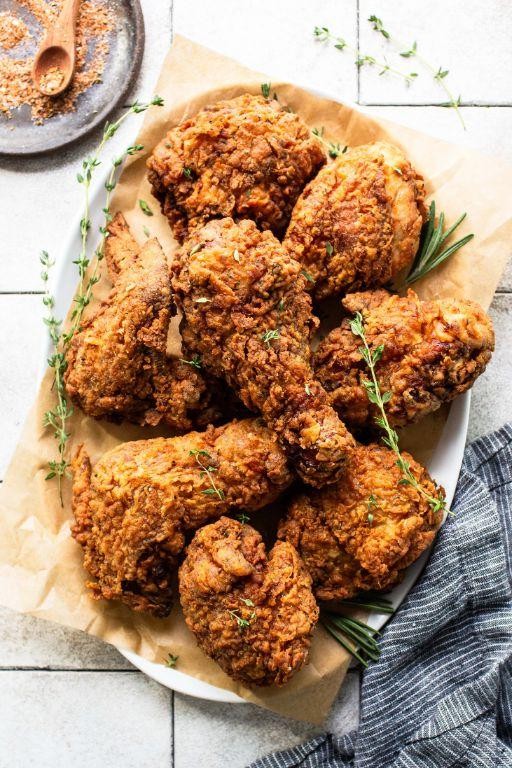
Creating the perfect buttermilk fried chicken is all about patience and precision. Let’s break it down into simple, foolproof steps to achieve that crispy, golden exterior and juicy interior every time.
Ingredients
- 4 cups of buttermilk, because it’s the secret to tenderness
- A couple of tablespoons of hot sauce, for that subtle kick
- 3 cups of all-purpose flour, the foundation of our crispy coating
- A tablespoon of garlic powder, because flavor is key
- A tablespoon of paprika, for color and a hint of sweetness
- 2 teaspoons of salt, to season perfectly
- 1 teaspoon of black pepper, for a little heat
- A gallon of vegetable oil, for frying to golden perfection
- 8 pieces of chicken, your choice of cuts
Instructions
- In a large bowl, whisk together the buttermilk and hot sauce. This marinade will tenderize the chicken and add flavor.
- Add the chicken pieces to the buttermilk mixture, ensuring they’re fully submerged. Cover and refrigerate for at least 12 hours, or overnight for best results. Tip: The longer it marinates, the more flavorful and tender the chicken will be.
- In another large bowl, mix the flour, garlic powder, paprika, salt, and black pepper. This will be your dredging station.
- Remove the chicken from the buttermilk, letting excess drip off. Dredge each piece in the flour mixture, pressing gently to adhere. Tip: For extra crispiness, let the coated chicken sit for 10 minutes before frying.
- Heat the vegetable oil in a deep fryer or large pot to 350°F. Use a thermometer to ensure accuracy. Tip: Maintaining the right temperature is crucial for even cooking and crispiness.
- Fry the chicken in batches, about 15-18 minutes, until golden brown and the internal temperature reaches 165°F. Avoid overcrowding to keep the oil temperature steady.
- Transfer the fried chicken to a wire rack over a baking sheet to drain. This keeps the bottom from getting soggy.
Absolutely irresistible, this buttermilk fried chicken boasts a crunchy, flavorful crust with succulent meat inside. Serve it atop waffles for a sweet and savory twist, or keep it classic with sides of coleslaw and mashed potatoes.
Buttermilk Biscuits
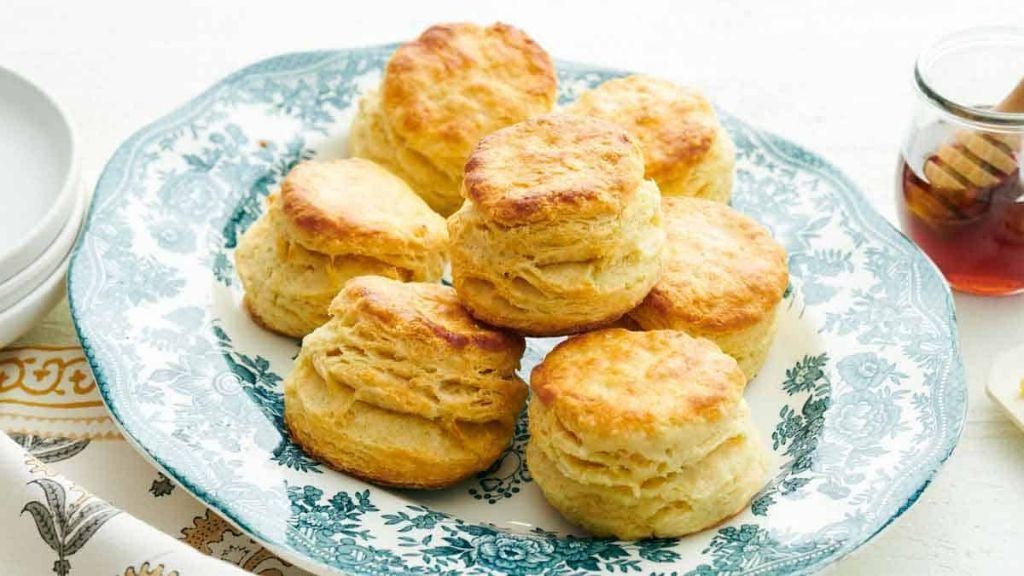
You’ll find that making buttermilk biscuits from scratch is simpler than you might think, and the results are utterly rewarding. Let’s walk through the process together, ensuring you end up with fluffy, golden biscuits every time.
Ingredients
- 2 cups of all-purpose flour, plus a little extra for dusting
- 1 tablespoon of baking powder
- 1/2 teaspoon of baking soda
- 1 teaspoon of salt
- 1/2 cup of unsalted butter, cold and cut into small pieces
- 3/4 cup of buttermilk, plus a splash more if needed
Instructions
- Preheat your oven to 450°F (232°C) and line a baking sheet with parchment paper.
- In a large bowl, whisk together the flour, baking powder, baking soda, and salt.
- Add the cold butter pieces to the flour mixture. Using your fingers or a pastry cutter, work the butter into the flour until the mixture resembles coarse crumbs. Tip: Keep the butter cold for flakier biscuits.
- Make a well in the center of the mixture and pour in the buttermilk. Stir just until the dough comes together. If it’s too dry, add a splash more buttermilk. Tip: Overmixing leads to tough biscuits, so mix until just combined.
- Turn the dough out onto a lightly floured surface and gently pat it into a 1-inch thick rectangle.
- Using a floured biscuit cutter or a sharp knife, cut out biscuits and place them on the prepared baking sheet. Tip: For higher rise, place biscuits close together on the baking sheet.
- Bake for 12-15 minutes, or until the biscuits are golden brown on top.
Warm from the oven, these biscuits boast a tender crumb and buttery layers that pull apart effortlessly. Serve them slathered with honey or jam for a sweet touch, or alongside gravy for a savory twist.
Buttermilk Ranch Dressing
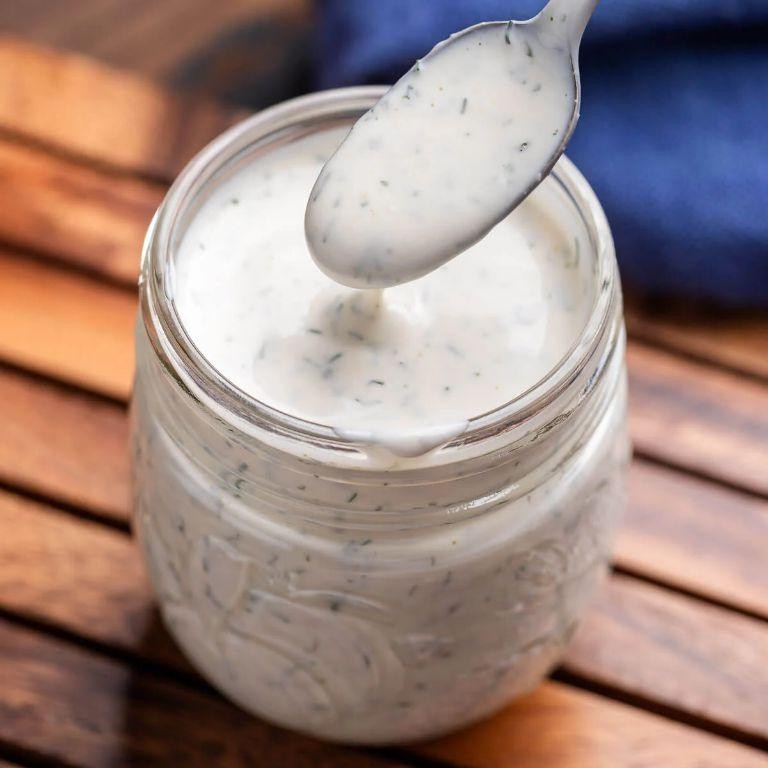
You might think making your own buttermilk ranch dressing is a task for the pros, but with this simple guide, you’ll see it’s as easy as whisking together a few ingredients you likely already have in your kitchen.
Ingredients
- 1 cup of mayonnaise (the real deal, not the low-fat stuff)
- 1/2 cup of buttermilk (shake the carton well before measuring)
- 1/4 cup of sour cream (for that extra tang)
- 1 tbsp of fresh lemon juice (about half a lemon)
- 1 tsp of garlic powder (not garlic salt)
- 1 tsp of onion powder
- A couple of dashes of Worcestershire sauce (trust me on this)
- A small handful of fresh parsley, finely chopped (about 2 tbsp)
- A pinch of salt and freshly ground black pepper (to start, you can always add more)
Instructions
- In a medium mixing bowl, combine the mayonnaise, buttermilk, and sour cream. Whisk until smooth and well blended.
- Add the lemon juice, garlic powder, onion powder, and Worcestershire sauce to the bowl. Whisk again to incorporate all the flavors.
- Fold in the chopped parsley with a spatula, then season with a pinch of salt and pepper. Give it a taste and adjust the seasoning if needed.
- Cover the bowl with plastic wrap and let the dressing chill in the fridge for at least 30 minutes. This resting time allows the flavors to meld together beautifully.
- Before serving, give the dressing a good stir. If it’s thicker than you’d like, thin it out with a splash of buttermilk until it reaches your desired consistency.
A creamy, herby, and slightly tangy buttermilk ranch dressing is now ready to elevate your salads, wings, or even as a dip for fresh veggies. For a fun twist, try adding a teaspoon of smoked paprika or dill for a different flavor profile.
Buttermilk Cornbread
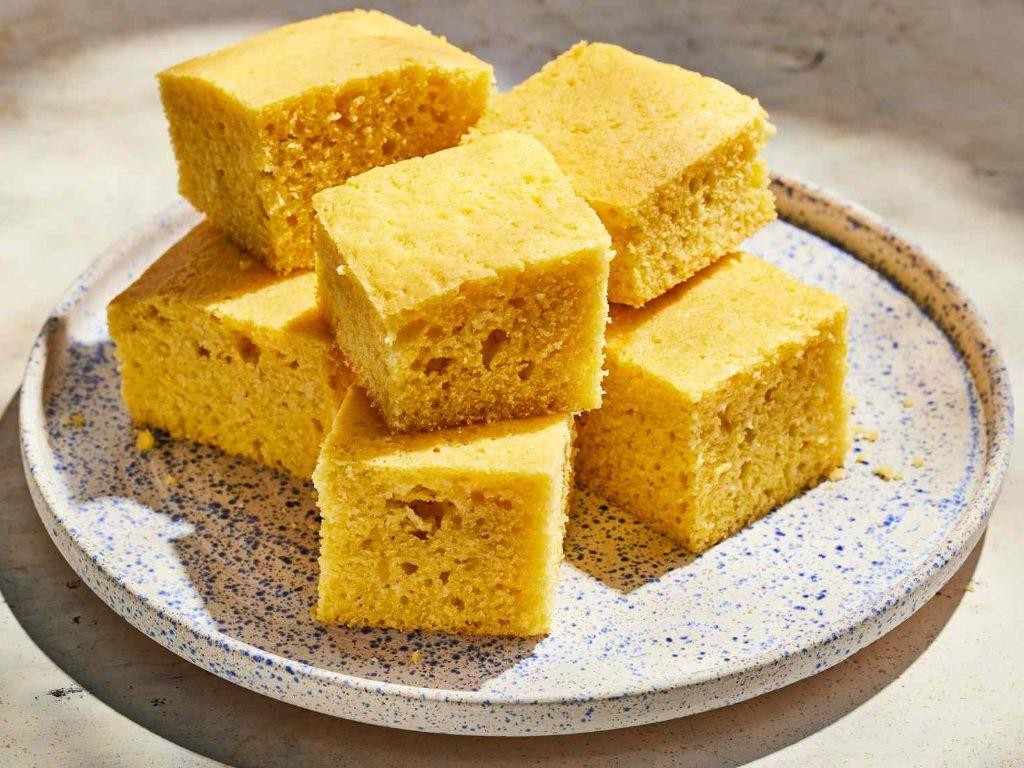
Buttermilk cornbread is a classic Southern staple that’s as versatile as it is delicious. Baking it at home brings a warm, comforting aroma to your kitchen, and with this straightforward guide, you’ll master it in no time.
Ingredients
- 1 cup of cornmeal
- 1 cup of all-purpose flour
- 1/4 cup of sugar
- 1 tsp of baking powder
- 1/2 tsp of baking soda
- 1/2 tsp of salt
- 1 cup of buttermilk
- 1/3 cup of melted butter
- 1 large egg
Instructions
- Preheat your oven to 375°F (190°C) and grease an 8-inch square baking pan.
- In a large bowl, whisk together the cornmeal, flour, sugar, baking powder, baking soda, and salt.
- In another bowl, mix the buttermilk, melted butter, and egg until well combined.
- Pour the wet ingredients into the dry ingredients and stir until just combined; don’t overmix to keep the cornbread tender.
- Pour the batter into the prepared pan and smooth the top with a spatula.
- Bake for 20-25 minutes, or until the top is golden and a toothpick inserted into the center comes out clean.
- Let the cornbread cool in the pan for 10 minutes before slicing to allow it to set properly.
Warm from the oven, this buttermilk cornbread boasts a crispy crust with a moist, fluffy interior. Serve it alongside a bowl of chili or slathered with honey butter for a sweet and savory treat.
Buttermilk Waffles
These buttermilk waffles are a classic breakfast treat that’s surprisingly simple to make at home. Today, we’ll walk through each step to ensure your waffles come out perfectly golden and fluffy every time.
Ingredients
- 2 cups of all-purpose flour
- 2 tablespoons of sugar
- 2 teaspoons of baking powder
- 1 teaspoon of baking soda
- 1/2 teaspoon of salt
- 2 cups of buttermilk
- 2 large eggs
- 1/4 cup of melted butter
- A splash of vanilla extract
Instructions
- Preheat your waffle iron to 375°F to ensure it’s hot enough for a crispy exterior.
- In a large bowl, whisk together the flour, sugar, baking powder, baking soda, and salt until well combined.
- In another bowl, beat the buttermilk, eggs, melted butter, and vanilla extract until smooth. Tip: Room temperature ingredients blend more easily.
- Pour the wet ingredients into the dry ingredients and stir until just combined. Tip: Overmixing can lead to tough waffles, so a few lumps are okay.
- Lightly grease the waffle iron with butter or cooking spray, then pour in enough batter to cover the grid. Tip: The amount depends on your waffle iron size, but usually about 1/2 cup does the trick.
- Close the lid and cook until the waffle is golden brown and steam stops coming out, about 3-5 minutes.
- Carefully remove the waffle and repeat with the remaining batter.
Light and airy with a slight tang from the buttermilk, these waffles are perfect with a drizzle of maple syrup or a dollop of whipped cream. For a twist, try adding blueberries or chocolate chips to the batter before cooking.
Buttermilk Pie
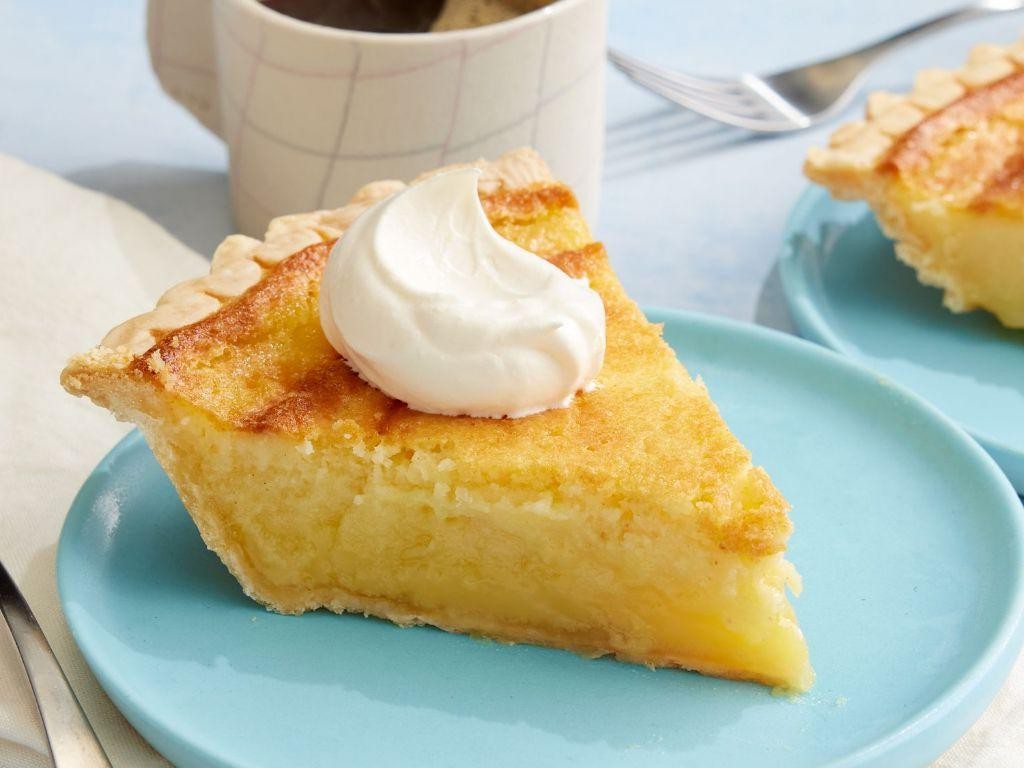
Great news for anyone looking to whip up a classic Southern dessert that’s both simple and satisfying. Buttermilk pie is a creamy, tangy treat that’s perfect for any occasion, and today, I’ll guide you through making it from scratch.
Ingredients
- 1 1/2 cups of granulated sugar
- 1/2 cup of unsalted butter, melted
- 3 large eggs
- 1/4 cup of all-purpose flour
- A pinch of salt
- 1 cup of buttermilk
- A splash of vanilla extract
- 1 unbaked 9-inch pie crust
Instructions
- Preheat your oven to 350°F (175°C) to ensure it’s ready for baking.
- In a large mixing bowl, combine the granulated sugar and melted butter, stirring until the mixture is smooth.
- Add the eggs one at a time, beating well after each addition to incorporate air and ensure a light texture.
- Mix in the all-purpose flour and a pinch of salt, stirring until just combined to avoid overworking the batter.
- Pour in the buttermilk and a splash of vanilla extract, mixing gently to maintain the batter’s consistency.
- Place the unbaked pie crust on a baking sheet for easier handling, then pour the filling into the crust.
- Bake for 45 to 50 minutes, or until the center is set and the top is golden brown. A toothpick inserted in the center should come out clean.
- Allow the pie to cool on a wire rack for at least an hour before serving to let the filling set properly.
This buttermilk pie boasts a custard-like texture with a delightful balance of sweetness and tang. Serve it chilled with a dollop of whipped cream or a sprinkle of nutmeg for an extra touch of flavor.
Buttermilk Chocolate Cake
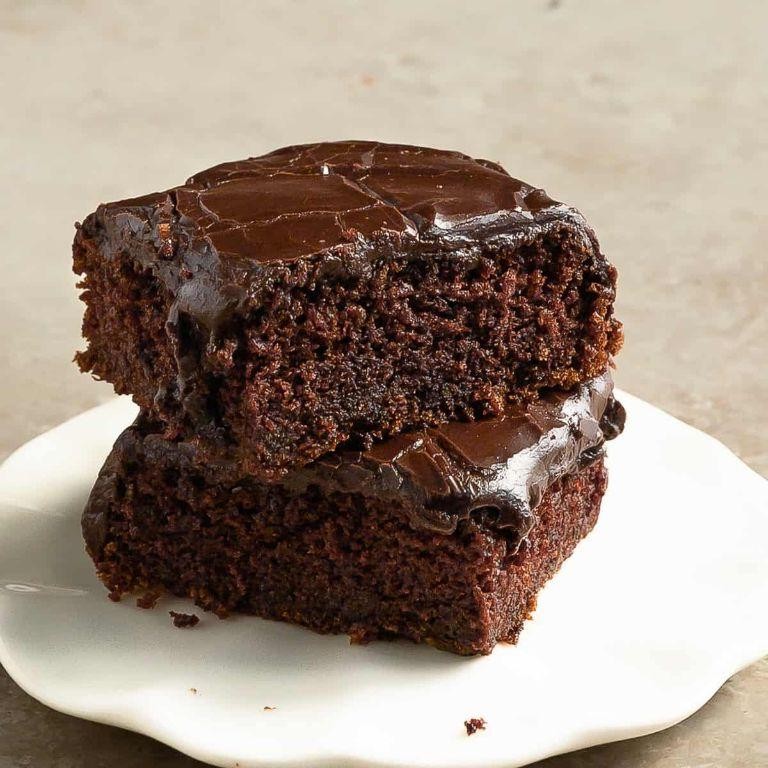
Great news for chocolate lovers! Today, we’re diving into the world of baking with a classic Buttermilk Chocolate Cake that’s as easy to make as it is delicious. Follow along, and you’ll have a moist, rich cake ready to impress in no time.
Ingredients
- 1 and 3/4 cups of all-purpose flour
- 2 cups of sugar
- 3/4 cup of unsweetened cocoa powder
- 1 and 1/2 teaspoons of baking soda
- 1 and 1/2 teaspoons of baking powder
- 1 teaspoon of salt
- 2 eggs
- 1 cup of buttermilk
- 1/2 cup of vegetable oil
- 2 teaspoons of vanilla extract
- 1 cup of boiling water
- A splash of milk for the frosting
- A couple of cups of powdered sugar
- 1/2 cup of softened butter
- 1/4 cup of cocoa powder for the frosting
Instructions
- Preheat your oven to 350°F (175°C) and grease two 9-inch round baking pans. Tip: Lining the bottoms with parchment paper ensures easy removal.
- In a large bowl, sift together the flour, sugar, cocoa powder, baking soda, baking powder, and salt. This prevents lumps and ensures a smooth batter.
- Add the eggs, buttermilk, oil, and vanilla to the dry ingredients. Mix on medium speed until well combined. Tip: Scrape the sides of the bowl to incorporate all the dry ingredients.
- Gradually add the boiling water to the batter, mixing on low speed. The batter will be thin, but that’s perfect for a moist cake.
- Divide the batter evenly between the prepared pans. Bake for 30 to 35 minutes, or until a toothpick inserted into the center comes out clean. Tip: Avoid opening the oven door too early to prevent the cake from sinking.
- Let the cakes cool in the pans for 10 minutes, then transfer to a wire rack to cool completely.
- For the frosting, beat the softened butter, cocoa powder, powdered sugar, and a splash of milk until smooth and spreadable. Adjust the milk or sugar to reach your desired consistency.
- Once the cakes are cool, frost the top of one layer, place the second layer on top, and frost the entire cake.
Enjoy the rich, chocolatey goodness of this Buttermilk Chocolate Cake, with its tender crumb and velvety frosting. Serve it with a scoop of vanilla ice cream for an extra indulgent treat.
Buttermilk Blueberry Muffins
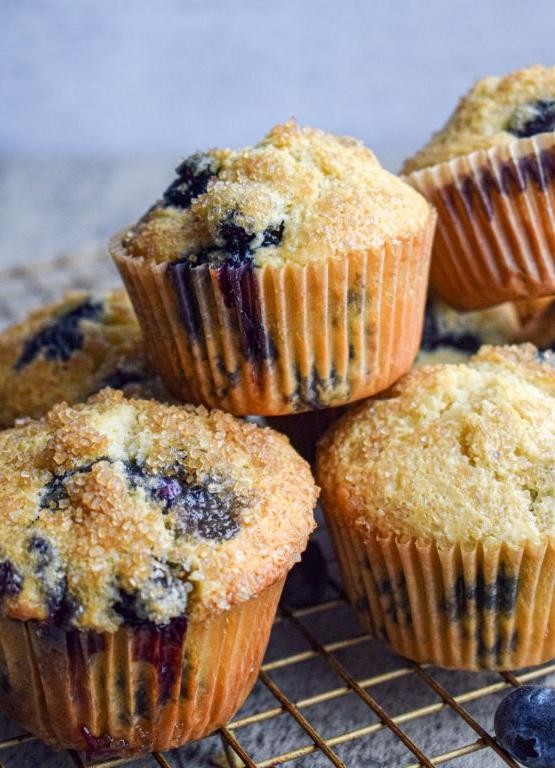
Whipping up a batch of buttermilk blueberry muffins is a delightful way to start your day, offering a perfect balance of tangy buttermilk and sweet blueberries. Follow these steps to create muffins that are fluffy, moist, and bursting with flavor.
Ingredients
- 2 cups of all-purpose flour
- 1/2 cup of granulated sugar
- 1/2 cup of brown sugar
- 1 tbsp of baking powder
- 1/2 tsp of salt
- 1 cup of buttermilk
- 1/2 cup of melted butter
- 1 large egg
- 1 tsp of vanilla extract
- 1 1/2 cups of fresh blueberries
- A splash of milk for brushing
- A couple of tbsp of coarse sugar for sprinkling
Instructions
- Preheat your oven to 375°F (190°C) and line a muffin tin with paper liners.
- In a large bowl, whisk together the flour, granulated sugar, brown sugar, baking powder, and salt.
- In another bowl, mix the buttermilk, melted butter, egg, and vanilla extract until well combined.
- Tip: Ensure your buttermilk is at room temperature to avoid solidifying the melted butter.
- Gently fold the wet ingredients into the dry ingredients until just combined; overmixing leads to tough muffins.
- Carefully fold in the blueberries to distribute evenly without crushing them.
- Tip: Toss the blueberries in a little flour before adding to prevent them from sinking to the bottom.
- Divide the batter evenly among the muffin cups, filling each about 3/4 full.
- Lightly brush the tops with milk and sprinkle with coarse sugar for a crispy top.
- Tip: The sugar adds texture and sweetness, making the muffins extra special.
- Bake for 20-25 minutes, or until a toothpick inserted into the center comes out clean.
- Let the muffins cool in the tin for 5 minutes before transferring to a wire rack.
Light and fluffy with a tender crumb, these muffins are a testament to the magic of buttermilk. Serve them warm with a pat of butter or enjoy them as is for a quick, satisfying treat.
Buttermilk Scones
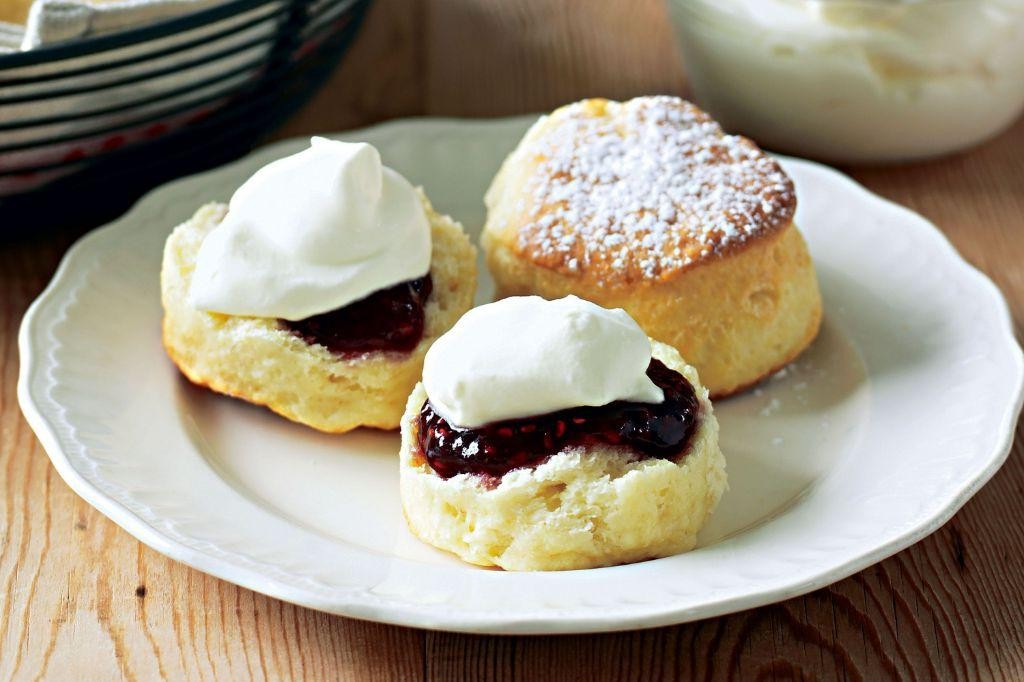
Very few things compare to the joy of biting into a warm, buttery scone with a cup of tea. Today, we’re making buttermilk scones that are flaky, tender, and just the right amount of sweet.
Ingredients
- 2 cups of all-purpose flour
- 1/4 cup of granulated sugar
- 1 tsp of baking powder
- 1/2 tsp of baking soda
- 1/2 tsp of salt
- 1/2 cup of unsalted butter, cold and cubed
- 3/4 cup of buttermilk
- A splash of vanilla extract
Instructions
- Preheat your oven to 400°F (200°C) and line a baking sheet with parchment paper.
- In a large bowl, whisk together the flour, sugar, baking powder, baking soda, and salt.
- Add the cold, cubed butter to the dry ingredients. Use your fingers to rub the butter into the flour until the mixture resembles coarse crumbs. Tip: Keep the butter cold for flakier scones.
- Make a well in the center of the mixture and pour in the buttermilk and vanilla extract. Stir until just combined. Tip: Don’t overmix to avoid tough scones.
- Turn the dough onto a lightly floured surface and gently pat it into a 1-inch thick circle.
- Cut the dough into 8 wedges and transfer them to the prepared baking sheet. Tip: For golden tops, brush the scones with a little extra buttermilk before baking.
- Bake for 15-20 minutes, or until the scones are golden brown and a toothpick inserted into the center comes out clean.
Just out of the oven, these scones are wonderfully crisp on the outside and soft inside. Serve them warm with clotted cream and jam for a classic treat, or enjoy them as is for a simple, satisfying snack.
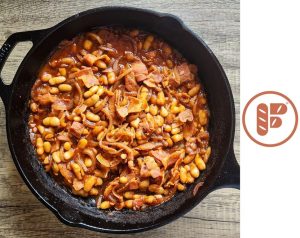
Buttermilk Mashed Potatoes
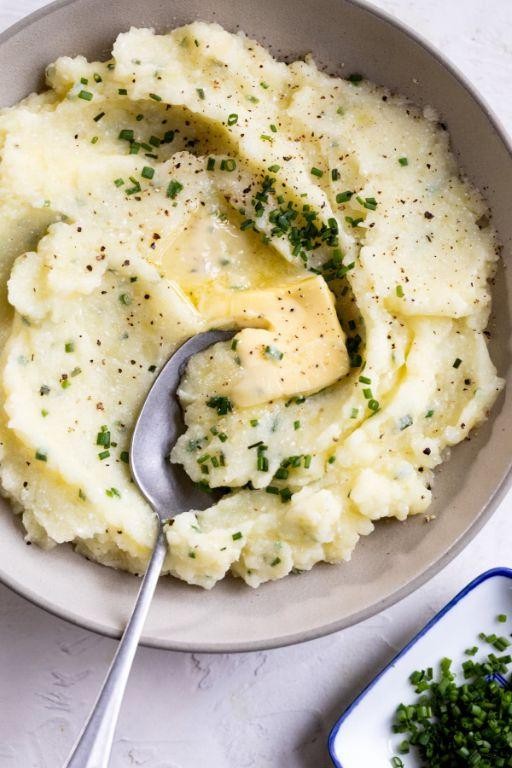
Buttermilk mashed potatoes are a creamy, tangy twist on the classic comfort food that’s surprisingly simple to whip up. Begin by gathering your ingredients and prepping your potatoes for a smooth, lump-free finish.
Ingredients
- 2 pounds of Yukon Gold potatoes, peeled and quartered
- A splash of water, just enough to cover the potatoes in the pot
- A couple of tablespoons of unsalted butter
- A generous half cup of buttermilk
- A pinch of salt, to start
Instructions
- Place your peeled and quartered potatoes in a large pot and cover them with a splash of water. The water should just barely cover the potatoes to prevent them from becoming waterlogged.
- Bring the water to a boil over high heat, then reduce to a simmer. Cook the potatoes for about 15-20 minutes, or until they’re fork-tender. Tip: Start checking at 15 minutes to avoid overcooking.
- Drain the potatoes well and return them to the pot. Let them sit for a minute to evaporate any excess moisture, which helps achieve a fluffier texture.
- Add a couple of tablespoons of butter and a generous half cup of buttermilk to the potatoes. Mash everything together until smooth. Tip: For extra creaminess, warm the buttermilk before adding it.
- Season with a pinch of salt, then taste and adjust as needed. Tip: If the mash is too thick, a little more buttermilk can loosen it up without making it runny.
Yukon Gold potatoes give these buttermilk mashed potatoes a naturally buttery flavor and velvety texture that’s hard to resist. Serve them alongside roasted chicken or fold in some roasted garlic for an aromatic twist.
Buttermilk Ice Cream
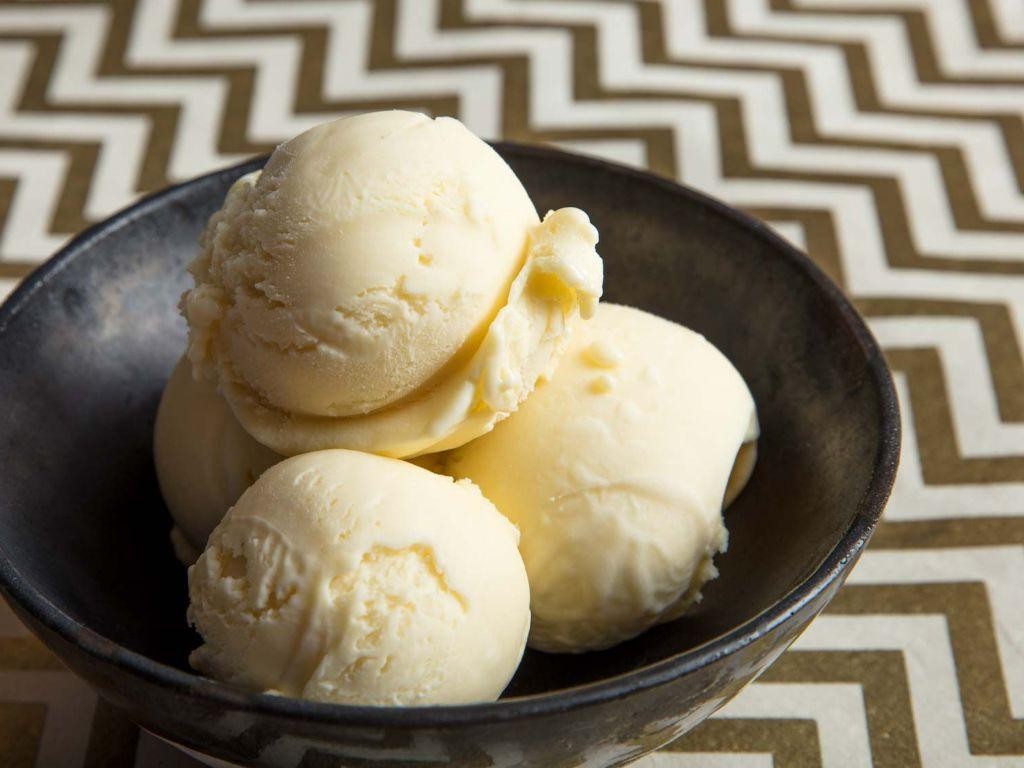
For those sweltering summer days when only something cool and creamy will do, buttermilk ice cream offers a tangy twist on the classic dessert. Follow these steps to create a batch that’s as refreshing as it is easy to make.
Ingredients
- 2 cups of heavy cream
- 1 cup of buttermilk
- 3/4 cup of granulated sugar
- A pinch of salt
- 1 tbsp of vanilla extract
Instructions
- In a large bowl, whisk together the heavy cream, buttermilk, and granulated sugar until the sugar is completely dissolved. Tip: Ensure the mixture is smooth to avoid graininess in your ice cream.
- Add a pinch of salt and the vanilla extract to the mixture, stirring gently to combine. Tip: The salt enhances the flavors, so don’t skip it!
- Pour the mixture into your ice cream maker and churn according to the manufacturer’s instructions, usually about 20-25 minutes. Tip: The ice cream should look thick and creamy when it’s ready.
- Transfer the churned ice cream to a freezer-safe container and freeze for at least 4 hours, or until firm.
After the final freeze, you’ll find the buttermilk ice cream has a delightfully smooth texture with a perfect balance of sweet and tangy flavors. Serve it with fresh berries or a drizzle of honey for an extra special treat.
Buttermilk Banana Bread
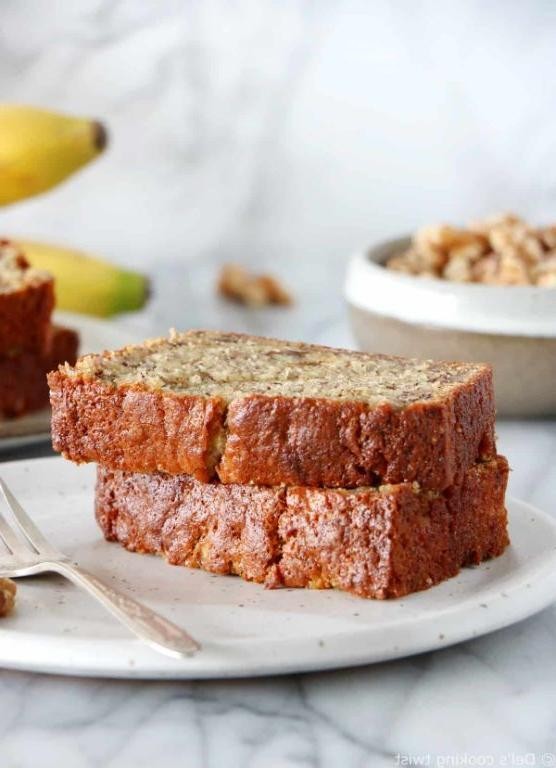
Alright, let’s dive into making this comforting buttermilk banana bread that’s perfect for any time of the day. A moist, tender loaf with the sweet aroma of ripe bananas and a subtle tang from buttermilk, it’s a recipe that promises to be a hit.
Ingredients
- 2 cups of all-purpose flour
- 1 teaspoon of baking soda
- A pinch of salt
- 1/2 cup of unsalted butter, softened
- 1 cup of sugar
- 2 large eggs
- A splash of vanilla extract
- 3 ripe bananas, mashed
- 1/2 cup of buttermilk
Instructions
- Preheat your oven to 350°F (175°C) and grease a 9×5 inch loaf pan.
- In a medium bowl, whisk together the flour, baking soda, and salt. Tip: Sifting the flour can make your bread lighter.
- In a large bowl, cream the butter and sugar together until light and fluffy. Tip: Room temperature butter mixes more evenly.
- Beat in the eggs one at a time, then stir in the vanilla extract.
- Mix in the mashed bananas until well combined.
- Alternately add the flour mixture and buttermilk to the banana mixture, starting and ending with the flour. Tip: Do not overmix to keep the bread tender.
- Pour the batter into the prepared loaf pan and smooth the top with a spatula.
- Bake for 60-65 minutes, or until a toothpick inserted into the center comes out clean.
- Let the bread cool in the pan for 10 minutes, then transfer to a wire rack to cool completely.
Crumbly yet moist, this buttermilk banana bread has a perfect balance of sweetness and tang. Serve it warm with a dollop of whipped cream or toasted with a smear of butter for an extra indulgent treat.
Buttermilk Cheddar Biscuits
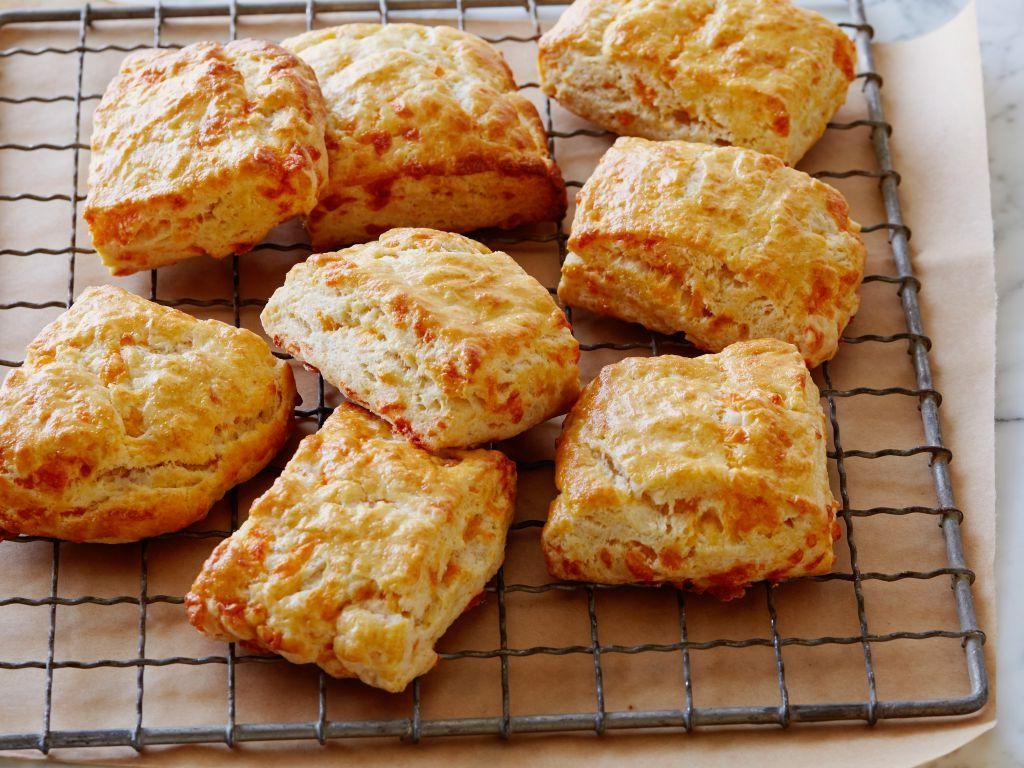
Now, let’s dive into making some fluffy, golden Buttermilk Cheddar Biscuits that are perfect for any meal of the day. These biscuits are a delightful blend of tangy buttermilk and sharp cheddar, baked to perfection.
Ingredients
- 2 cups of all-purpose flour
- 1 tablespoon of baking powder
- 1/2 teaspoon of baking soda
- 1/2 teaspoon of salt
- 1/2 cup of unsalted butter, cold and cubed
- 1 cup of sharp cheddar cheese, shredded
- 3/4 cup of buttermilk, plus a splash more if needed
Instructions
- Preheat your oven to 450°F (232°C) and line a baking sheet with parchment paper.
- In a large bowl, whisk together the flour, baking powder, baking soda, and salt.
- Add the cold, cubed butter to the dry ingredients. Use your fingers or a pastry cutter to work the butter into the flour until the mixture resembles coarse crumbs. Tip: Keeping the butter cold ensures flaky biscuits.
- Stir in the shredded cheddar cheese until evenly distributed.
- Make a well in the center of the mixture and pour in the buttermilk. Stir just until the dough comes together. If it’s too dry, add a splash more buttermilk. Tip: Overmixing leads to tough biscuits, so mix until just combined.
- Turn the dough onto a lightly floured surface and gently pat it into a 1-inch thick rectangle.
- Use a biscuit cutter or a sharp knife to cut out biscuits. Press straight down without twisting for the best rise. Tip: Re-roll the scraps only once to avoid overworking the dough.
- Place the biscuits on the prepared baking sheet, leaving a little space between each.
- Bake for 12-15 minutes, or until the biscuits are golden brown on top.
These biscuits come out incredibly tender with a slight crunch on the outside, thanks to the buttermilk and cheddar. Serve them warm with a drizzle of honey or split them open for a mini sandwich—they’re versatile and always a hit.
Buttermilk Donuts
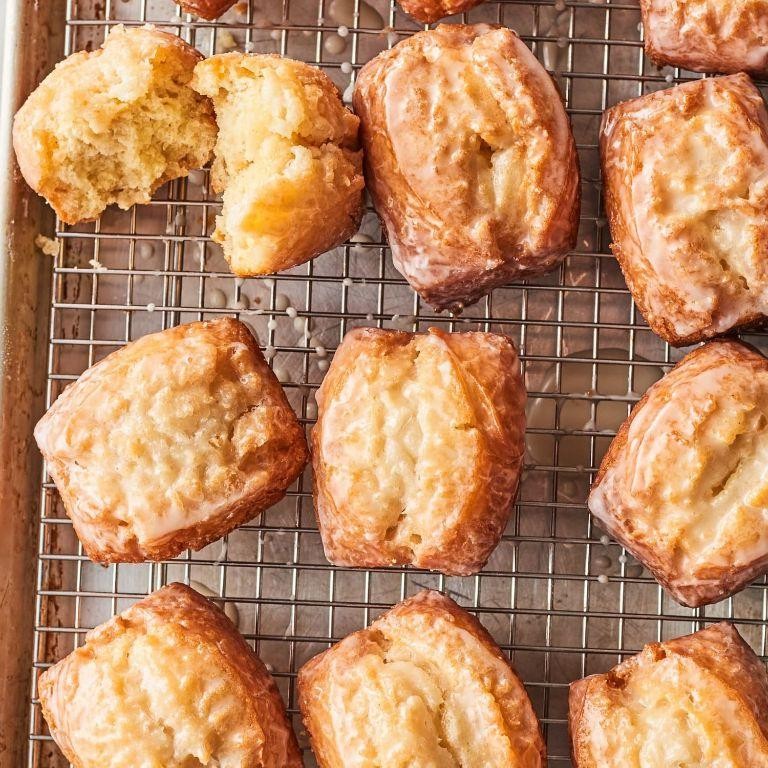
Kickstart your morning with these fluffy, homemade buttermilk donuts that are sure to bring a smile to your face. Perfect for beginners, this recipe walks you through each step to ensure your donuts come out golden and delicious.
Ingredients
- 2 cups of all-purpose flour
- 1/2 cup of granulated sugar
- 1 tsp of baking powder
- 1/2 tsp of baking soda
- 1/2 tsp of salt
- 1/2 cup of buttermilk
- 1 large egg
- 2 tbsp of melted butter
- A splash of vanilla extract
- Oil for frying (enough to fill your pot about 2 inches deep)
- A couple of tbsp of powdered sugar for dusting
Instructions
- In a large bowl, whisk together the flour, sugar, baking powder, baking soda, and salt.
- In another bowl, mix the buttermilk, egg, melted butter, and vanilla extract until well combined.
- Gradually add the wet ingredients to the dry ingredients, stirring until just combined. Tip: Overmixing can make the donuts tough.
- Heat the oil in a deep pot to 375°F. Use a candy thermometer to check the temperature.
- Drop tablespoon-sized portions of the batter into the hot oil, frying a few at a time to avoid overcrowding. Tip: The donuts should float to the top and turn golden brown in about 2 minutes per side.
- Use a slotted spoon to remove the donuts from the oil and place them on a paper towel-lined plate to drain.
- While still warm, dust the donuts with powdered sugar. Tip: For extra flavor, try adding a pinch of cinnamon to the powdered sugar.
Enjoy these buttermilk donuts warm for the best texture—crispy on the outside, soft and fluffy on the inside. They’re perfect with a cup of coffee or as a sweet treat any time of day.
Buttermilk Coleslaw
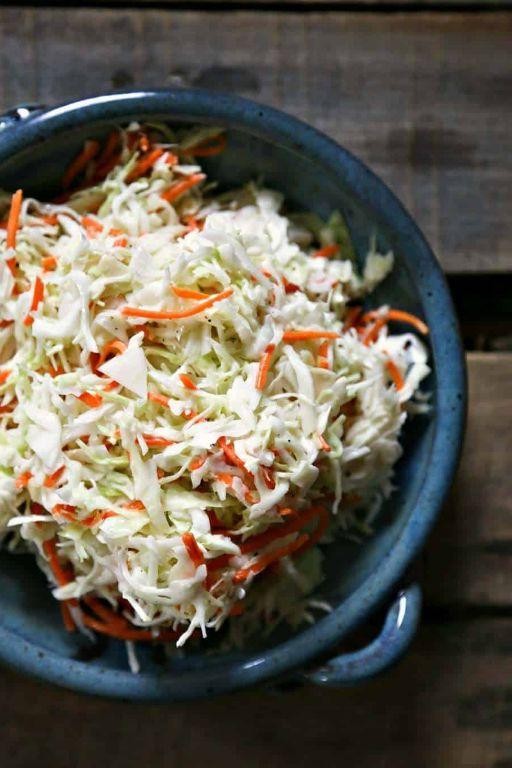
Delving into the world of homemade coleslaw, our buttermilk version stands out for its creamy texture and tangy flavor, perfect for summer picnics or as a refreshing side to your favorite barbecue dishes.
Ingredients
- Half a head of green cabbage, thinly sliced
- A couple of carrots, grated
- A splash of buttermilk, about 1/2 cup
- A dollop of mayonnaise, roughly 1/4 cup
- A tablespoon of apple cider vinegar
- A pinch of sugar
- Salt and pepper, just a sprinkle to start
Instructions
- In a large bowl, combine the thinly sliced cabbage and grated carrots.
- In a separate smaller bowl, whisk together the buttermilk, mayonnaise, apple cider vinegar, and a pinch of sugar until smooth. Tip: The sugar balances the tanginess, so adjust according to your preference.
- Pour the dressing over the cabbage and carrots. Tip: Start with half the dressing, mix, then add more as needed to avoid overdressing.
- Toss everything together until the vegetables are evenly coated. Tip: Use your hands or tongs for a more even mix.
- Season with salt and pepper, then give it one final toss. Let it sit in the fridge for at least 30 minutes before serving to allow the flavors to meld.
Ultra-creamy with a crisp bite, this buttermilk coleslaw is a versatile side that pairs wonderfully with pulled pork sandwiches or can be jazzed up with a handful of dried cranberries for a sweet twist.
Buttermilk Garlic Bread

Haven’t you ever wished for a side dish that’s both comforting and bursting with flavor? Let’s dive into making Buttermilk Garlic Bread, a twist on the classic that’s sure to impress.
Ingredients
– A loaf of your favorite crusty bread (about 1 lb)
– 1/2 cup of buttermilk
– 4 tbsp of melted butter
– 3 cloves of garlic, minced
– A pinch of salt
– A sprinkle of parsley for garnish
Instructions
1. Preheat your oven to 375°F (190°C) to get it ready for baking.
2. Slice the bread into 1-inch thick pieces without cutting all the way through, keeping the bottom intact.
3. In a small bowl, whisk together the buttermilk, melted butter, minced garlic, and a pinch of salt until well combined.
4. Gently pour the buttermilk mixture over the bread, making sure to get it in between the slices.
5. Wrap the bread loosely in aluminum foil and bake for 15 minutes.
6. Uncover the bread and bake for an additional 5 minutes, or until the top is golden and crispy.
7. Remove from the oven and sprinkle with parsley for a fresh, colorful finish.
Tip: For an extra crispy top, broil the bread for the last 2 minutes of baking.
Tip: Let the bread sit for a couple of minutes after baking to allow the flavors to meld together beautifully.
Tip: If you’re short on time, you can use pre-minced garlic, but fresh garlic will give you the best flavor.
Look at that golden, crispy top with the soft, flavorful interior—this Buttermilk Garlic Bread is a game-changer. Serve it alongside your favorite soup or as a standout side at your next dinner party.
Buttermilk Panna Cotta
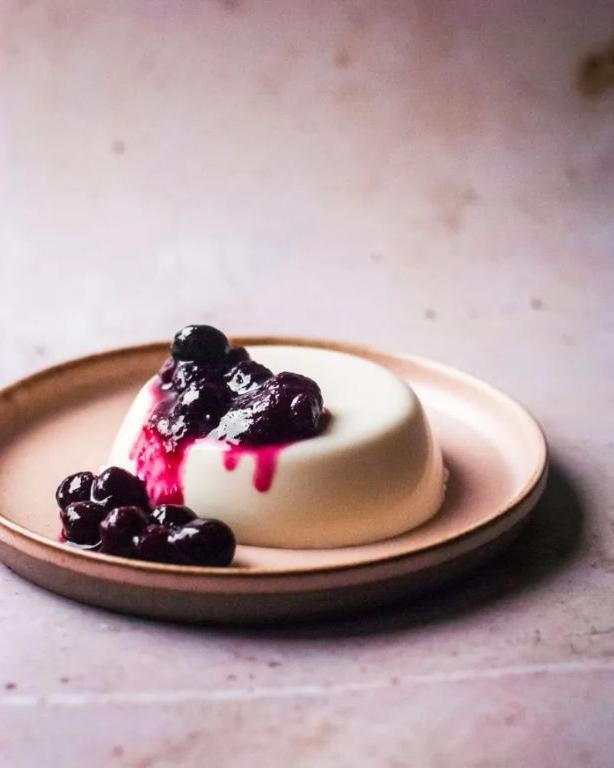
Whipping up a silky buttermilk panna cotta is simpler than you might think, and it’s the perfect dessert to impress with minimal effort. Let’s walk through the process together, ensuring you end up with a dessert that’s as delightful to make as it is to eat.
Ingredients
- 2 cups of heavy cream
- 1/2 cup of sugar
- 1 packet (about 2 1/4 tsp) of unflavored gelatin
- 1/4 cup of cold water
- 1 cup of buttermilk
- A splash of vanilla extract
Instructions
- In a small bowl, sprinkle the gelatin over the cold water and let it sit for about 5 minutes to bloom. Tip: This step ensures your panna cotta sets perfectly.
- Meanwhile, in a saucepan over medium heat, combine the heavy cream and sugar, stirring until the sugar dissolves and the mixture is warm but not boiling, about 5 minutes.
- Remove the saucepan from heat and whisk in the bloomed gelatin until it’s completely dissolved. Tip: Make sure there are no gelatin lumps for a smooth texture.
- Stir in the buttermilk and vanilla extract until well combined. Tip: For an extra smooth mixture, strain it through a fine-mesh sieve.
- Pour the mixture into 4 ramekins or glasses and refrigerate for at least 4 hours, or until set. The panna cotta should wobble slightly when gently shaken.
Zesty yet creamy, this buttermilk panna cotta offers a delightful tanginess balanced by the richness of cream. Serve it with a drizzle of honey or a sprinkle of fresh berries for an extra touch of elegance.
Buttermilk Caramel Sauce
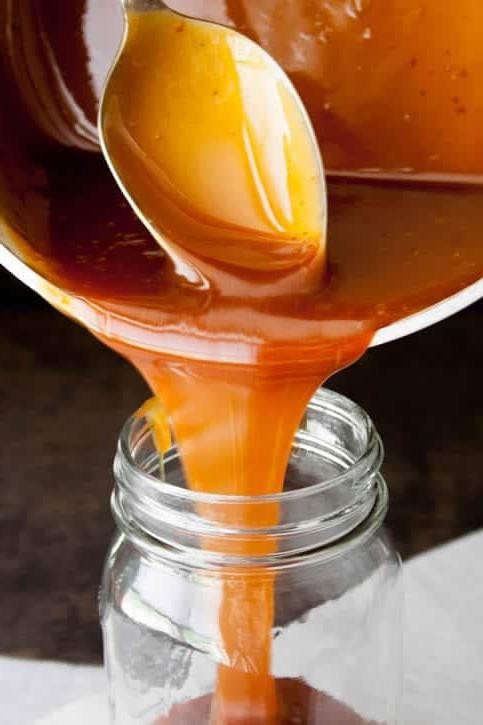
This buttermilk caramel sauce is a game-changer for your dessert repertoire, offering a perfect balance of sweetness and tang. Today, we’ll walk through making this luscious sauce step by step, ensuring even beginners can achieve perfection.
Ingredients
- 1 cup of granulated sugar
- 1/2 cup of buttermilk
- 1/4 cup of unsalted butter
- A splash of vanilla extract
- A pinch of baking soda
Instructions
- Grab a medium-sized saucepan and place it over medium heat.
- Add the granulated sugar to the pan, stirring constantly until it melts into a smooth, amber-colored liquid. This should take about 5 minutes. Tip: Keep the heat steady to avoid burning the sugar.
- Once the sugar is fully melted, carefully whisk in the buttermilk. The mixture will bubble up, so stand back a bit. Tip: Adding the buttermilk slowly helps control the reaction.
- Stir in the unsalted butter until it’s completely melted and the mixture is smooth.
- Add a splash of vanilla extract and a pinch of baking soda, stirring well to combine. Tip: The baking soda helps create a lighter texture, so don’t skip it.
- Continue to cook the sauce for another 2-3 minutes, until it thickens slightly. You’ll know it’s ready when it coats the back of a spoon.
- Remove the saucepan from the heat and let the sauce cool for about 10 minutes before serving.
With its velvety texture and rich, buttery flavor with a hint of tang, this buttermilk caramel sauce is irresistible drizzled over ice cream, pancakes, or even as a dip for fresh fruit. Whichever way you choose to enjoy it, it’s sure to elevate your dessert game.
Buttermilk Lemonade
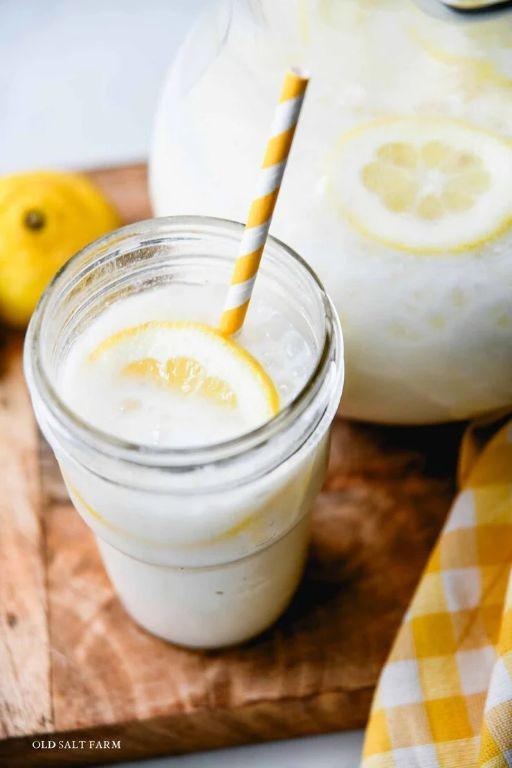
On a hot summer day like today, nothing beats the refreshing tang of homemade buttermilk lemonade. This unique twist on a classic combines the creamy richness of buttermilk with the bright zest of lemons for a drink that’s both soothing and invigorating.
Ingredients
- 1 cup of freshly squeezed lemon juice (about 4-5 lemons)
- 1/2 cup of granulated sugar
- 4 cups of cold water
- 1 cup of buttermilk
- A splash of vanilla extract
- A couple of ice cubes for serving
Instructions
- In a large pitcher, combine the freshly squeezed lemon juice and granulated sugar. Stir until the sugar is completely dissolved.
- Add the cold water to the pitcher and mix well to combine all the ingredients.
- Gently stir in the buttermilk and a splash of vanilla extract until the mixture is smooth and uniform.
- Chill the buttermilk lemonade in the refrigerator for at least 1 hour to allow the flavors to meld together.
- Serve over a couple of ice cubes in tall glasses for the ultimate refreshing experience.
The buttermilk lemonade boasts a creamy texture with a perfect balance of sweet and tart flavors. For an extra touch, garnish each glass with a thin lemon slice or a sprig of mint before serving.
Conclusion
From pancakes to dressings, our roundup of 20 Delicious Leftover Buttermilk Recipes offers endless inspiration to make the most of that carton in your fridge. Whether you’re baking, cooking, or mixing up a marinade, there’s something here for every home cook. We’d love to hear which recipes you try—drop a comment with your favorites and don’t forget to share the love on Pinterest!