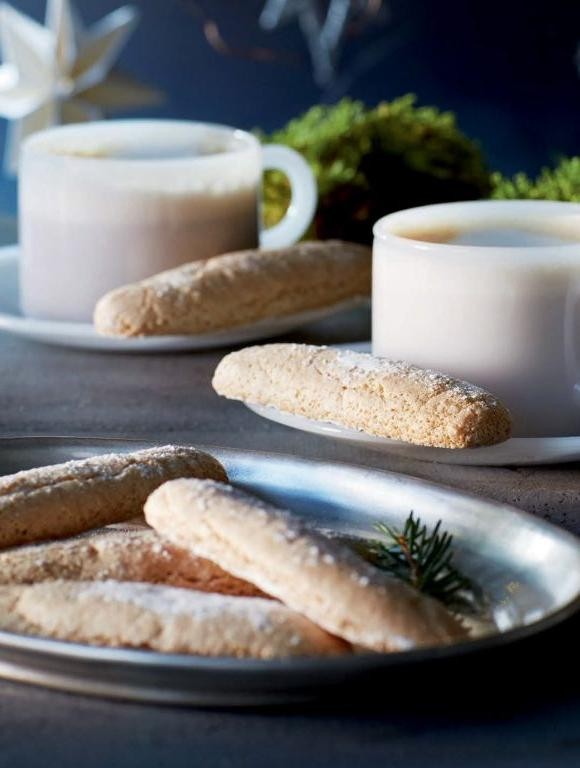
Kickstart your baking adventure with our roundup of 18 Delicious Ladyfinger Cookies Recipes that promise to amaze! Whether you’re crafting a delicate tiramisu or simply craving a sweet, airy treat, these ladyfinger variations are your ticket to dessert heaven. Perfect for home cooks looking to impress, each recipe is a blend of simplicity and elegance. Ready to find your new favorite? Let’s dive in!
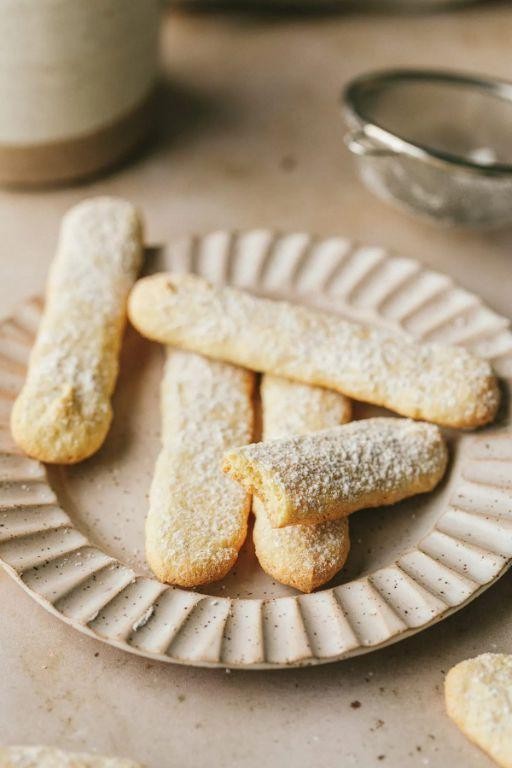
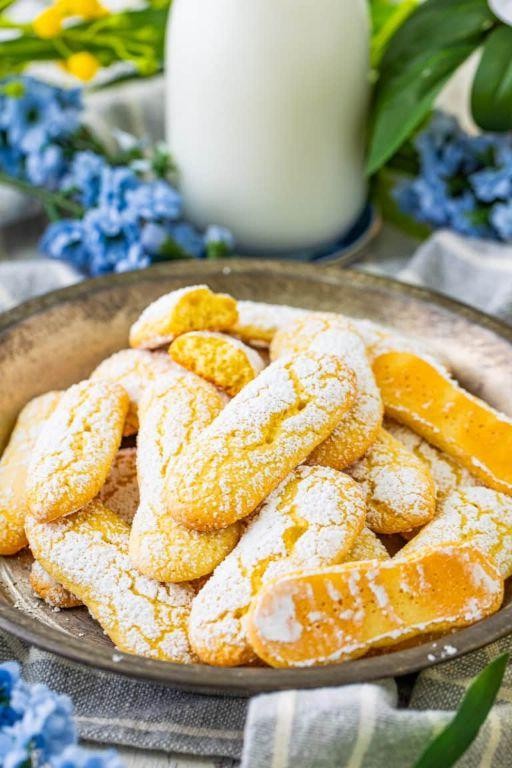
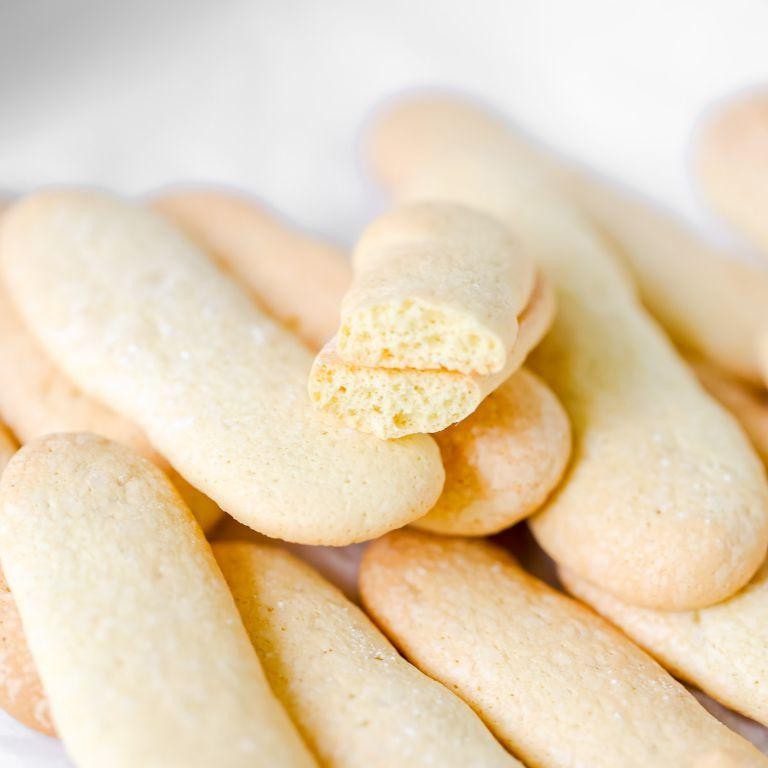
Classic Ladyfinger Cookies
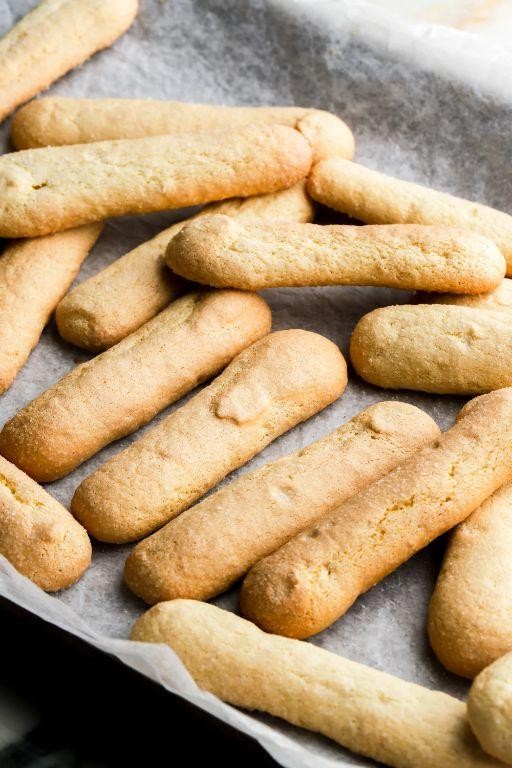
Now, let’s dive into the delightful world of baking with a recipe that’s as elegant as it is simple: Classic Ladyfinger Cookies. These light, airy treats are perfect for beginners and seasoned bakers alike, offering a crisp exterior with a soft, sponge-like interior that’s ideal for pairing with coffee or using in desserts like tiramisu.
Ingredients
- 3 large eggs, separated (room temperature for best volume)
- 1/2 cup granulated sugar (divided, for yolks and whites)
- 1/2 tsp vanilla extract (pure for best flavor)
- 2/3 cup all-purpose flour (sifted to avoid lumps)
- 1/8 tsp salt (enhances flavor)
- Powdered sugar for dusting (optional, for a sweet finish)
Instructions
- Preheat your oven to 350°F (175°C) and line two baking sheets with parchment paper to prevent sticking.
- In a large bowl, beat the egg yolks with 1/4 cup of granulated sugar until pale and thick, about 3 minutes. Tip: Use a stand mixer or hand mixer for ease and consistency.
- Add the vanilla extract to the yolk mixture and mix until just combined.
- In another clean, dry bowl, beat the egg whites on medium speed until foamy. Gradually add the remaining 1/4 cup of sugar, beating until stiff peaks form. Tip: Ensure no yolk mixes with the whites for maximum volume.
- Gently fold the egg whites into the yolk mixture in three additions, being careful not to deflate the batter.
- Sift the flour and salt over the batter in two additions, folding gently after each until just combined. Tip: Overmixing can lead to dense cookies.
- Transfer the batter to a piping bag fitted with a large round tip. Pipe 3-inch long strips onto the prepared baking sheets, spacing them about 1 inch apart.
- Bake for 12-15 minutes, or until the cookies are lightly golden and firm to the touch. Rotate the pans halfway through for even baking.
- Let the cookies cool on the baking sheets for 5 minutes, then transfer to a wire rack to cool completely. Dust with powdered sugar if desired.
Golden and crisp on the outside with a tender, airy center, these Classic Ladyfinger Cookies are a versatile treat. Enjoy them as is, or layer them into your favorite dessert for an extra touch of elegance.
Chocolate Dipped Ladyfinger Cookies
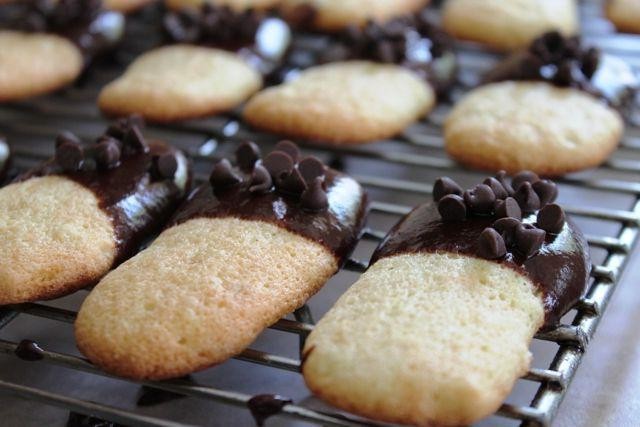
Here’s how to create the perfect Chocolate Dipped Ladyfinger Cookies, a delightful treat that combines the lightness of ladyfingers with the rich taste of chocolate. This guide will walk you through each step to ensure your cookies turn out perfectly every time.
Ingredients
- 1 package ladyfinger cookies (about 24 cookies)
- 8 oz semi-sweet chocolate chips (or dark chocolate for a richer flavor)
- 1 tbsp coconut oil (helps in achieving a smooth chocolate coating)
- Sprinkles or crushed nuts for decoration (optional)
Instructions
- Line a baking sheet with parchment paper to prepare for the dipped cookies.
- In a microwave-safe bowl, combine the chocolate chips and coconut oil. Microwave in 30-second intervals, stirring in between, until the chocolate is fully melted and smooth. Tip: Avoid overheating to prevent the chocolate from seizing.
- Hold a ladyfinger cookie by one end and dip the other end into the melted chocolate, covering about half of the cookie. Allow any excess chocolate to drip off.
- Place the dipped cookie on the prepared baking sheet. If desired, immediately sprinkle with your choice of decorations before the chocolate sets. Tip: Work quickly as the chocolate will begin to harden.
- Repeat the dipping and decorating process with the remaining cookies.
- Once all cookies are dipped and decorated, place the baking sheet in the refrigerator for about 15 minutes, or until the chocolate is completely set. Tip: Chilling helps the chocolate harden faster for a crisp coating.
Light and airy ladyfinger cookies meet the decadent crunch of chocolate in this simple yet elegant dessert. Serve them as a sophisticated snack with coffee or as a sweet finish to a dinner party. The contrast between the soft cookie and the firm chocolate coating makes each bite a delightful experience.
Lemon Glazed Ladyfinger Cookies
Start by preheating your oven to 350°F (175°C) to ensure it’s ready for baking. These Lemon Glazed Ladyfinger Cookies are a delightful treat that combines the light, airy texture of ladyfingers with a tangy lemon glaze, perfect for any occasion.
Ingredients
- 1 cup all-purpose flour (sifted for lighter cookies)
- 1/2 cup granulated sugar (adjust to taste)
- 3 large eggs (room temperature for better volume)
- 1 tbsp lemon zest (freshly grated for maximum flavor)
- 1/4 cup lemon juice (freshly squeezed preferred)
- 1 cup powdered sugar (for the glaze, sifted to avoid lumps)
Instructions
- In a large mixing bowl, beat the eggs and granulated sugar together on high speed until the mixture is pale and thick, about 5 minutes.
- Gently fold in the sifted flour and lemon zest with a spatula, being careful not to deflate the mixture, until just combined.
- Transfer the batter to a piping bag fitted with a round tip and pipe 3-inch long fingers onto a parchment-lined baking sheet, spacing them 1 inch apart.
- Bake in the preheated oven for 10-12 minutes, or until the edges are lightly golden and the cookies spring back when touched.
- While the cookies cool, whisk together the lemon juice and powdered sugar in a small bowl until smooth to create the glaze.
- Dip the top of each cooled ladyfinger into the glaze, allowing the excess to drip off, then place them on a wire rack to set for about 30 minutes.
Enjoy these cookies with their crisp exterior and soft, spongy interior, complemented by the bright, citrusy glaze. They’re perfect alongside a cup of tea or as a light dessert after a meal.
Almond Flavored Ladyfinger Cookies
Gathering the right ingredients and tools is the first step to creating these delicate almond-flavored ladyfinger cookies, perfect for any occasion. Let’s walk through the process together, ensuring even beginners can achieve bakery-quality results.
Ingredients
- 1 cup all-purpose flour (sifted for lightness)
- 1/2 cup granulated sugar (adjust to taste)
- 3 large eggs (room temperature for better volume)
- 1 tsp almond extract (pure for best flavor)
- 1/4 tsp salt (enhances sweetness)
- Powdered sugar for dusting (optional, for presentation)
Instructions
- Preheat your oven to 350°F (175°C) and line a baking sheet with parchment paper.
- In a large bowl, beat the eggs and granulated sugar together on high speed until the mixture is pale and thick, about 5 minutes.
- Gently fold in the sifted flour, almond extract, and salt with a spatula, being careful not to deflate the egg mixture.
- Transfer the batter to a piping bag fitted with a round tip and pipe 3-inch long fingers onto the prepared baking sheet, spacing them 1 inch apart.
- Bake for 10-12 minutes, or until the cookies are lightly golden and firm to the touch.
- Allow the cookies to cool on the baking sheet for 5 minutes before transferring them to a wire rack to cool completely.
- Dust with powdered sugar before serving, if desired.
Creating these almond-flavored ladyfinger cookies yields a light, airy texture with a subtly sweet and nutty flavor. Consider serving them alongside a cup of espresso or layering them in a tiramisu for an elegant dessert.
Vanilla Bean Ladyfinger Cookies

Mastering the art of baking these Vanilla Bean Ladyfinger Cookies is simpler than you might think, especially when you follow these detailed steps. Let’s dive into the process, ensuring each cookie is as delightful as the last.
Ingredients
- 1 cup all-purpose flour (sifted for lighter cookies)
- 1/2 cup granulated sugar (fine grain blends better)
- 3 large egg whites (room temperature for optimal volume)
- 1 vanilla bean (split and scraped, or 2 tsp pure vanilla extract as an alternative)
- 1/4 tsp salt (enhances flavor)
Instructions
- Preheat your oven to 350°F (175°C) and line a baking sheet with parchment paper.
- In a large bowl, whisk together the sifted flour and salt until well combined.
- In another bowl, beat the egg whites on medium speed until foamy, then gradually add the sugar, continuing to beat until stiff peaks form. Tip: Ensure no yolk mixes with the whites for the best volume.
- Gently fold in the vanilla bean seeds or extract into the egg white mixture, being careful not to deflate the whites.
- Add the flour mixture to the egg whites in three additions, folding gently after each until just combined. Tip: Overmixing will result in dense cookies.
- Transfer the batter to a piping bag fitted with a round tip and pipe 3-inch long fingers onto the prepared baking sheet, spacing them about 1 inch apart.
- Bake for 12-15 minutes, or until the cookies are lightly golden and firm to the touch. Tip: Rotate the baking sheet halfway through for even baking.
- Allow the cookies to cool on the baking sheet for 5 minutes before transferring to a wire rack to cool completely.
Unbelievably light and crisp, these Vanilla Bean Ladyfinger Cookies carry a delicate sweetness perfect for layering in desserts or enjoying with a cup of tea. For an extra touch, dust them with powdered sugar before serving.
Espresso Infused Ladyfinger Cookies
These espresso-infused ladyfinger cookies are a delightful twist on the classic, offering a perfect balance of coffee flavor and delicate texture. They’re ideal for pairing with your morning coffee or as a sophisticated dessert component.
Ingredients
- 1 cup all-purpose flour (sifted for lightness)
- 3 large eggs (room temperature for better volume)
- 1/2 cup granulated sugar (adjust to sweetness preference)
- 1 tbsp instant espresso powder (dissolved in 1 tbsp hot water)
- 1/4 tsp salt (enhances flavors)
Instructions
- Preheat your oven to 350°F (175°C) and line a baking sheet with parchment paper.
- In a large bowl, beat the eggs and sugar together on high speed until the mixture is pale and thick, about 5 minutes.
- Gently fold in the sifted flour and salt with a spatula, being careful not to deflate the mixture.
- Add the dissolved espresso powder to the batter, folding until just combined to ensure even flavor distribution.
- Transfer the batter to a piping bag fitted with a round tip and pipe 3-inch long fingers onto the prepared baking sheet, spacing them 1 inch apart.
- Bake for 10-12 minutes, or until the cookies are lightly golden and firm to the touch.
- Let the cookies cool on the baking sheet for 5 minutes before transferring to a wire rack to cool completely.
Ultimate in flavor and texture, these cookies boast a crisp exterior with a soft, airy interior. Serve them alongside a scoop of vanilla gelato for an indulgent treat or dip them in melted chocolate for an extra layer of decadence.
Coconut Coated Ladyfinger Cookies

You’ll find these Coconut Coated Ladyfinger Cookies to be a delightful treat that combines the delicate texture of ladyfingers with the tropical flair of coconut. Perfect for beginners, this recipe walks you through each step to ensure success.
Ingredients
- 1 cup all-purpose flour (sifted for lighter cookies)
- 1/2 cup granulated sugar (adjust to taste)
- 1/4 cup unsalted butter, softened (or any neutral oil)
- 2 large eggs (room temperature for better mixing)
- 1 tsp vanilla extract (pure for best flavor)
- 1/2 cup shredded coconut (sweetened or unsweetened, based on preference)
Instructions
- Preheat your oven to 350°F (175°C) and line a baking sheet with parchment paper.
- In a large bowl, cream together the softened butter and granulated sugar until light and fluffy, about 2 minutes.
- Add the eggs one at a time to the butter mixture, beating well after each addition, then stir in the vanilla extract.
- Gradually mix in the sifted all-purpose flour until just combined, being careful not to overmix the dough.
- Shape the dough into small, finger-sized logs and roll each in shredded coconut to coat evenly.
- Place the coated cookies on the prepared baking sheet, spacing them about 2 inches apart to allow for spreading.
- Bake in the preheated oven for 12-15 minutes, or until the edges are lightly golden and the coconut is toasted.
- Remove from the oven and let cool on the baking sheet for 5 minutes before transferring to a wire rack to cool completely.
Just out of the oven, these cookies offer a crisp exterior with a soft, chewy center, and the coconut adds a sweet, nutty crunch. Serve them alongside a cup of tea or as a light dessert after dinner for a touch of elegance.
Raspberry Filled Ladyfinger Cookies
Baking these Raspberry Filled Ladyfinger Cookies is a delightful way to bring a touch of elegance to your dessert table. Perfect for beginners, this recipe guides you through each step to ensure success.
Ingredients
- 1 cup all-purpose flour (sifted for lightness)
- 1/2 cup granulated sugar (adjust to sweetness preference)
- 3 large eggs (room temperature for better volume)
- 1/2 tsp vanilla extract (or almond extract for variation)
- 1/4 cup raspberry jam (seedless for smoother filling)
- Powdered sugar for dusting (optional for presentation)
Instructions
- Preheat your oven to 350°F (175°C) and line a baking sheet with parchment paper.
- In a large bowl, beat the eggs and granulated sugar together on high speed until the mixture is pale and thick, about 5 minutes.
- Gently fold in the sifted flour and vanilla extract with a spatula, being careful not to deflate the mixture.
- Transfer the batter to a piping bag fitted with a round tip and pipe 3-inch long fingers onto the prepared baking sheet, spacing them 1 inch apart.
- Bake for 10-12 minutes, or until the cookies are lightly golden and firm to the touch.
- Allow the cookies to cool on the baking sheet for 5 minutes, then transfer to a wire rack to cool completely.
- Once cooled, spread a thin layer of raspberry jam on the flat side of half the cookies and sandwich with the remaining halves.
- Dust with powdered sugar before serving, if desired.
Offering a delicate crunch with a sweet raspberry center, these cookies are a perfect match for afternoon tea or as a light dessert. For an extra touch, serve them alongside a scoop of vanilla ice cream.
Pistachio Crusted Ladyfinger Cookies
Always looking for a delightful twist on classic desserts? These Pistachio Crusted Ladyfinger Cookies combine the delicate texture of ladyfingers with the rich, nutty flavor of pistachios for a treat that’s as elegant as it is delicious.
Ingredients
- 1 cup shelled pistachios, finely chopped (for a vibrant green color, use unsalted)
- 1/2 cup granulated sugar (adjust to taste)
- 1/4 cup unsalted butter, melted (or any neutral oil for a lighter version)
- 1 package (7 oz) ladyfinger cookies (ensure they’re fresh for the best texture)
- 1 large egg white, lightly beaten (helps the pistachio crust adhere)
Instructions
- Preheat your oven to 350°F (175°C) and line a baking sheet with parchment paper for easy cleanup.
- In a shallow bowl, mix the finely chopped pistachios with granulated sugar until well combined.
- Brush each ladyfinger cookie lightly with melted butter on both sides for a golden finish.
- Dip the buttered ladyfingers into the beaten egg white, then press into the pistachio mixture to coat evenly. Tip: Use a spoon to help cover any missed spots.
- Place the coated ladyfingers on the prepared baking sheet, leaving space between each for even baking.
- Bake for 10-12 minutes, or until the pistachio crust is lightly golden and fragrant. Tip: Rotate the baking sheet halfway through for uniform browning.
- Allow the cookies to cool on the baking sheet for 5 minutes before transferring to a wire rack to cool completely. Tip: They’ll crisp up as they cool.
Now these Pistachio Crusted Ladyfinger Cookies offer a delightful crunch with every bite, thanks to the pistachio crust, while the ladyfinger inside remains tender. Serve them alongside a cup of espresso for a sophisticated afternoon treat or as a unique dessert at your next dinner party.
Honey Drizzled Ladyfinger Cookies
Whipping up a batch of honey drizzled ladyfinger cookies is a delightful way to bring a touch of sweetness to your afternoon tea or coffee break. These delicate cookies, with their light texture and golden honey glaze, are surprisingly simple to make, even for beginners.
Ingredients
- 1 cup all-purpose flour (sifted for lightness)
- 1/2 cup granulated sugar (adjust to taste)
- 3 large eggs (room temperature for better volume)
- 1/4 cup unsalted butter, melted (or any neutral oil)
- 1 tsp vanilla extract (pure for best flavor)
- 2 tbsp honey (warmed for easy drizzling)
Instructions
- Preheat your oven to 350°F (175°C) and line a baking sheet with parchment paper.
- In a large bowl, beat the eggs and sugar together until the mixture is pale and thick, about 5 minutes.
- Gently fold in the sifted flour, melted butter, and vanilla extract until just combined to keep the batter light.
- Transfer the batter to a piping bag fitted with a round tip and pipe 3-inch fingers onto the prepared baking sheet, spacing them 1 inch apart.
- Bake for 10-12 minutes, or until the cookies are lightly golden and firm to the touch.
- While still warm, drizzle the cookies with warmed honey, using a spoon or piping bag for precision.
- Allow the cookies to cool on the baking sheet for 5 minutes before transferring to a wire rack to cool completely.
Buttery and light, these honey drizzled ladyfinger cookies offer a perfect balance of sweetness and texture. Serve them alongside a dollop of whipped cream and fresh berries for an elegant dessert, or enjoy them as they are for a simple, satisfying treat.
Cinnamon Spiced Ladyfinger Cookies
Whipping up a batch of Cinnamon Spiced Ladyfinger Cookies is a delightful way to bring a touch of elegance to your baking repertoire. These delicate, lightly spiced treats are perfect for pairing with your afternoon tea or coffee, offering a simple yet sophisticated flavor profile that’s sure to impress.
Ingredients
- 1 cup all-purpose flour (sifted for lightness)
- 1/2 cup unsalted butter, softened (room temperature for easy mixing)
- 1/4 cup granulated sugar (adjust to taste)
- 1 tsp ground cinnamon (for that warm spice note)
- 1 large egg yolk (adds richness to the dough)
- 1/2 tsp vanilla extract (or almond extract for variation)
- Pinch of salt (balances the sweetness)
Instructions
- Preheat your oven to 350°F (175°C) and line a baking sheet with parchment paper to prevent sticking.
- In a mixing bowl, cream together the softened butter and granulated sugar until light and fluffy, about 2-3 minutes, to ensure a tender cookie.
- Beat in the egg yolk and vanilla extract until fully incorporated, adding depth of flavor to the dough.
- Sift together the flour, cinnamon, and salt in a separate bowl, then gradually mix into the wet ingredients to form a smooth dough.
- Transfer the dough to a piping bag fitted with a round tip and pipe 3-inch fingers onto the prepared baking sheet, spacing them 1 inch apart to allow for slight spreading.
- Bake for 12-15 minutes, or until the edges are just golden, indicating they’re perfectly baked without being overdone.
- Allow the cookies to cool on the baking sheet for 5 minutes before transferring to a wire rack to cool completely, ensuring they firm up properly.
These Cinnamon Spiced Ladyfinger Cookies boast a crisp exterior with a tender, melt-in-your-mouth interior, highlighted by the warm undertones of cinnamon. For an extra special touch, drizzle with a simple glaze or dip one end in melted chocolate for a decadent twist.
Orange Zest Ladyfinger Cookies
Whipping up a batch of Orange Zest Ladyfinger Cookies is a delightful way to bring a citrusy brightness to your cookie jar. These delicate, airy cookies are perfect for pairing with your afternoon tea or coffee, offering a subtle sweetness and a refreshing orange aroma.
Ingredients
- 1 cup all-purpose flour (sifted for lightness)
- 1/2 cup granulated sugar (adjust to taste)
- 3 large eggs (room temperature for better volume)
- 1 tbsp orange zest (freshly grated for maximum flavor)
- 1/4 tsp salt (enhances flavors)
- 1/2 tsp vanilla extract (or almond extract for variation)
Instructions
- Preheat your oven to 350°F (175°C) and line a baking sheet with parchment paper.
- In a large bowl, beat the eggs and sugar together on high speed until the mixture is pale and thick, about 5 minutes.
- Gently fold in the sifted flour, salt, and vanilla extract with a spatula, being careful not to deflate the mixture.
- Add the orange zest and mix until just incorporated.
- Transfer the batter to a piping bag fitted with a round tip and pipe 3-inch long strips onto the prepared baking sheet, spacing them about 1 inch apart.
- Bake for 10-12 minutes, or until the cookies are lightly golden around the edges and firm to the touch.
- Let the cookies cool on the baking sheet for 5 minutes before transferring them to a wire rack to cool completely.
Very light and crisp, these Orange Zest Ladyfinger Cookies carry a vibrant citrus note that makes them stand out. For an elegant presentation, serve them alongside a scoop of vanilla ice cream or dip one end in melted dark chocolate for a decadent twist.
Matcha Green Tea Ladyfinger Cookies
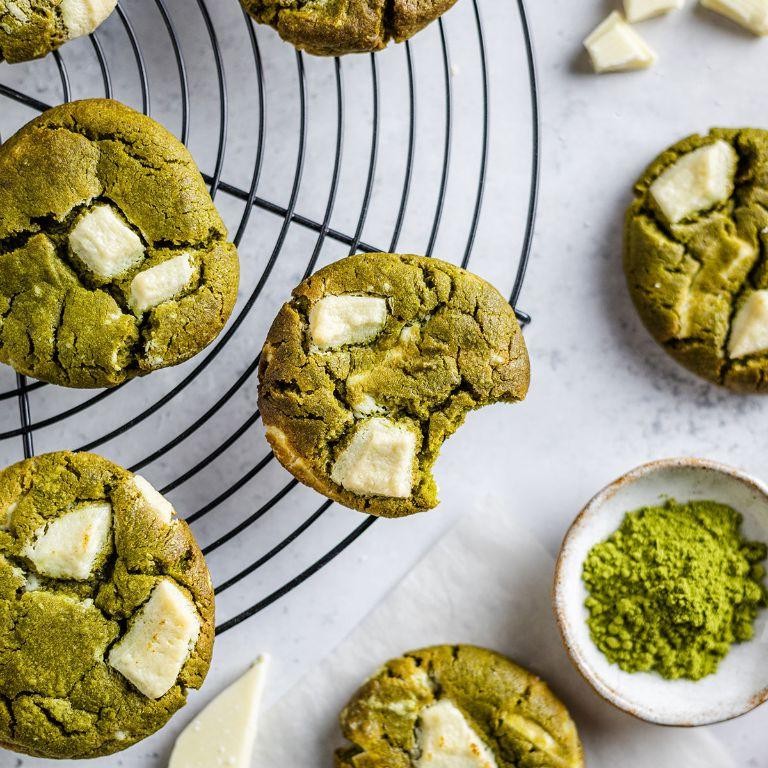
These Matcha Green Tea Ladyfinger Cookies are a delightful twist on the classic, offering a subtle earthy flavor paired with a light, airy texture. Perfect for tea time or as a sophisticated snack, they’re surprisingly simple to make with the right guidance.
Ingredients
- 1 cup all-purpose flour (sifted for lightness)
- 1/2 cup granulated sugar (adjust to taste)
- 3 large egg whites (room temperature for better volume)
- 1 tbsp matcha green tea powder (high quality for vibrant color and flavor)
- 1/4 tsp salt (enhances flavor)
- 1/2 tsp vanilla extract (or almond extract for variation)
Instructions
- Preheat your oven to 350°F (175°C) and line a baking sheet with parchment paper.
- In a large bowl, sift together the flour and matcha powder to ensure no lumps.
- Using an electric mixer, beat the egg whites on medium speed until foamy, about 2 minutes.
- Gradually add the sugar and salt, continuing to beat until stiff peaks form, about 5 minutes.
- Gently fold in the vanilla extract and the sifted dry ingredients with a spatula, being careful not to deflate the egg whites.
- Transfer the batter to a piping bag fitted with a round tip and pipe 3-inch fingers onto the prepared baking sheet, spacing them 1 inch apart.
- Bake for 12-15 minutes, or until the edges are lightly golden and the cookies are firm to the touch.
- Let cool on the baking sheet for 5 minutes before transferring to a wire rack to cool completely.
Light and crisp, these cookies carry the distinct, aromatic flavor of matcha, making them a perfect pair with your favorite cup of tea. For an extra touch, dust them with powdered sugar or dip one end in melted white chocolate.
Red Velvet Ladyfinger Cookies
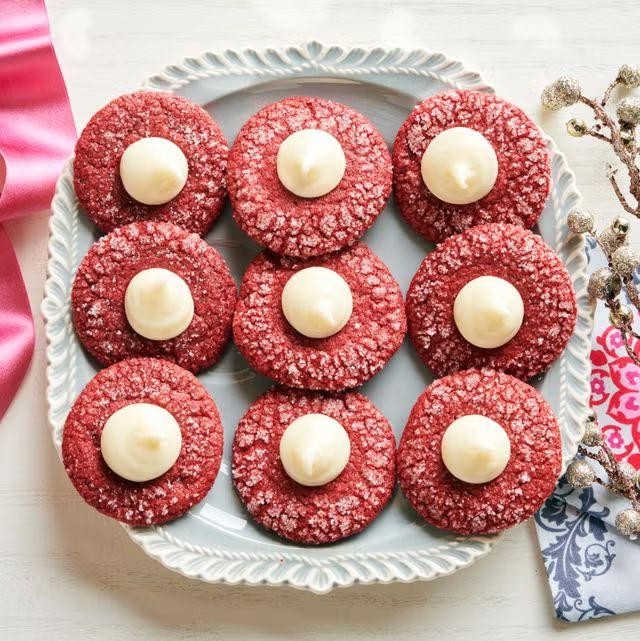
Preparing Red Velvet Ladyfinger Cookies is a delightful way to bring a touch of elegance to your dessert table. These cookies, with their vibrant color and delicate shape, are perfect for any occasion, offering a unique twist on the classic ladyfinger.
Ingredients
- 1 1/4 cups all-purpose flour (sifted for lightness)
- 1/4 cup cocoa powder (unsweetened, for deep color)
- 1/2 tsp baking soda (to help them rise)
- 1/4 tsp salt (enhances flavor)
- 1/2 cup unsalted butter, softened (for easy mixing)
- 3/4 cup granulated sugar (adjust to sweetness preference)
- 1 large egg (room temperature for better incorporation)
- 1 tsp vanilla extract (pure for best flavor)
- 1 tbsp red food coloring (gel for vibrant color)
- 1/2 cup buttermilk (adds tenderness)
Instructions
- Preheat your oven to 350°F (175°C) and line a baking sheet with parchment paper.
- In a medium bowl, whisk together the flour, cocoa powder, baking soda, and salt until well combined.
- In a large bowl, beat the softened butter and sugar together until light and fluffy, about 3 minutes.
- Add the egg and vanilla extract to the butter mixture, beating until fully incorporated.
- Mix in the red food coloring until the desired color is achieved.
- Alternately add the dry ingredients and buttermilk to the wet ingredients, beginning and ending with the dry ingredients. Mix until just combined.
- Transfer the batter to a piping bag fitted with a round tip and pipe 3-inch long fingers onto the prepared baking sheet, spacing them 2 inches apart.
- Bake for 10-12 minutes, or until the cookies are set but still soft in the center.
- Allow the cookies to cool on the baking sheet for 5 minutes before transferring to a wire rack to cool completely.
Great for pairing with coffee or tea, these Red Velvet Ladyfinger Cookies boast a soft, cake-like texture with a rich cocoa flavor. Serve them alongside a scoop of vanilla ice cream for an indulgent treat or as part of a dessert charcuterie board for a visually stunning presentation.
Peanut Butter Stuffed Ladyfinger Cookies
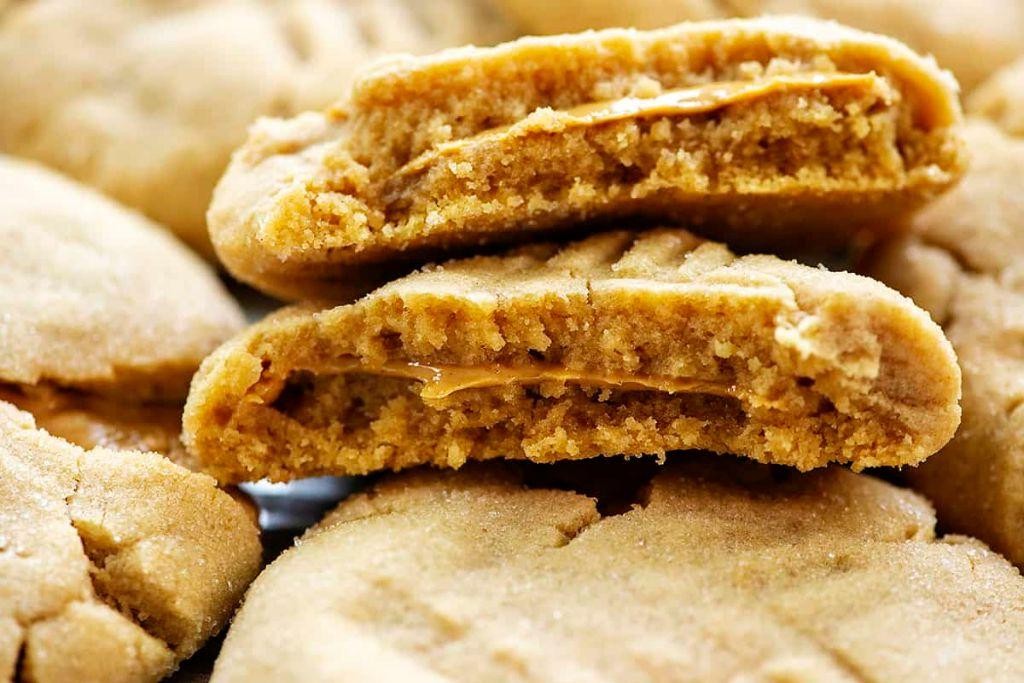
These peanut butter stuffed ladyfinger cookies are a delightful twist on the classic, combining the delicate texture of ladyfingers with the rich, creamy taste of peanut butter. Perfect for any occasion, they’re surprisingly easy to make with just a few simple ingredients.
Ingredients
- 1 cup smooth peanut butter (for a chunkier texture, use crunchy)
- 1/2 cup powdered sugar (sift to avoid lumps)
- 24 ladyfinger cookies (store-bought or homemade)
- 1 tbsp milk (adjust as needed for consistency)
- 1/2 tsp vanilla extract (for enhanced flavor)
Instructions
- In a medium bowl, combine the peanut butter, powdered sugar, milk, and vanilla extract. Mix until smooth and creamy.
- Take a ladyfinger cookie and gently spread a teaspoon of the peanut butter mixture on the flat side.
- Place another ladyfinger cookie on top to create a sandwich, pressing lightly to adhere.
- Repeat the process with the remaining cookies and peanut butter mixture.
- For best results, chill the stuffed cookies in the refrigerator for at least 30 minutes before serving to allow the filling to set.
Keep these cookies stored in an airtight container to maintain their crispness. The contrast between the soft peanut butter filling and the crisp ladyfingers makes for a delightful texture. Serve them as a snack or alongside a cup of coffee for a sweet treat.
Caramel Swirl Ladyfinger Cookies
Ready to dive into the world of baking with a twist? These Caramel Swirl Ladyfinger Cookies combine the delicate texture of traditional ladyfingers with a rich caramel swirl, creating a dessert that’s as fun to make as it is to eat. Follow along for a step-by-step guide to mastering this delightful treat.
Ingredients
- 1 cup all-purpose flour (sifted for lightness)
- 1/2 cup granulated sugar (for a sweeter cookie, increase to 2/3 cup)
- 3 large eggs (room temperature for best results)
- 1/4 cup caramel sauce (homemade or store-bought, slightly warmed for easy swirling)
- 1/2 tsp vanilla extract (or almond extract for a different flavor profile)
- Pinch of salt (to balance the sweetness)
Instructions
- Preheat your oven to 350°F (175°C) and line a baking sheet with parchment paper.
- In a large bowl, beat the eggs and sugar together on high speed until the mixture is pale and thick, about 5 minutes.
- Gently fold in the sifted flour and salt with a spatula, being careful not to deflate the mixture.
- Add the vanilla extract and mix until just combined.
- Transfer the batter to a piping bag fitted with a round tip and pipe 3-inch long fingers onto the prepared baking sheet, spacing them about 1 inch apart.
- Drizzle the warmed caramel sauce over the piped fingers and use a toothpick to swirl the caramel into the batter.
- Bake for 10-12 minutes, or until the cookies are lightly golden and firm to the touch.
- Allow the cookies to cool on the baking sheet for 5 minutes before transferring to a wire rack to cool completely.
Soft yet slightly crisp, these cookies offer a delightful contrast in textures with the caramel adding a gooey richness. Serve them alongside a cup of coffee for dipping or as a sophisticated addition to your dessert platter.
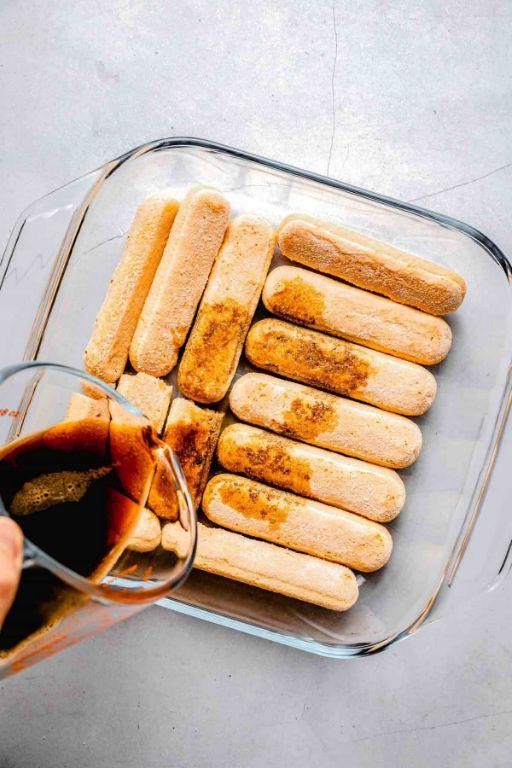
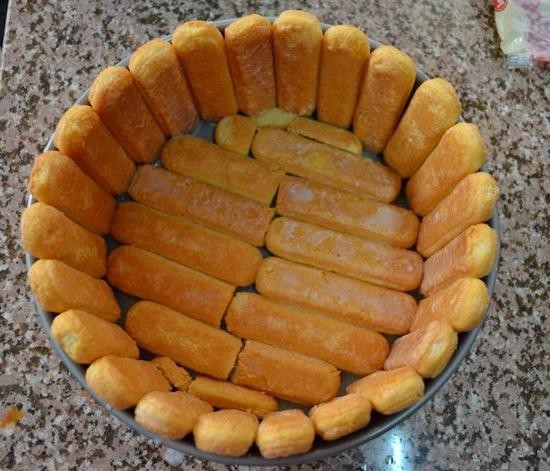
Tiramisu Inspired Ladyfinger Cookies
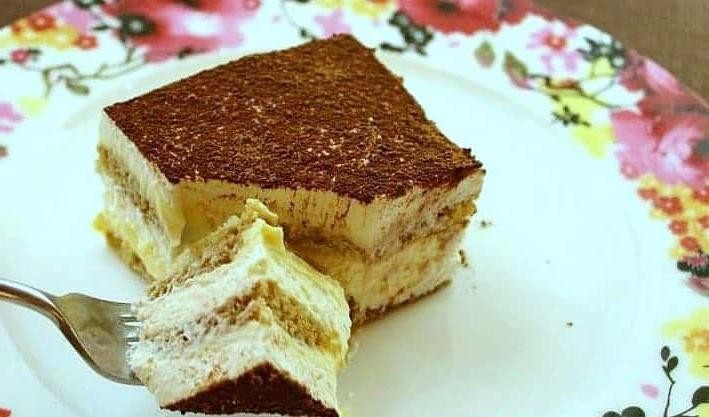
Unveiling a delightful twist on the classic Italian dessert, these Tiramisu Inspired Ladyfinger Cookies bring the essence of tiramisu into a bite-sized treat. Perfect for beginners, this recipe guides you through each step to achieve cookies that are crisp on the outside, yet soft and coffee-infused on the inside.
Ingredients
- 1 cup all-purpose flour (sifted for lightness)
- 3 large eggs (room temperature for better volume)
- 1/2 cup granulated sugar (adjust to sweetness preference)
- 1 tbsp instant coffee powder (dissolved in 1 tbsp hot water)
- 1/2 tsp vanilla extract (or almond extract for variation)
- Pinch of salt (enhances flavors)
Instructions
- Preheat your oven to 350°F (175°C) and line a baking sheet with parchment paper to prevent sticking.
- In a large bowl, beat the eggs and sugar together on high speed until the mixture is pale and thick, about 5 minutes. This step is crucial for the cookies’ light texture.
- Gently fold in the sifted flour, salt, and vanilla extract with a spatula, being careful not to deflate the egg mixture. Overmixing can lead to dense cookies.
- Transfer the batter into a piping bag fitted with a round tip. Pipe 3-inch long fingers onto the prepared baking sheet, spacing them about 1 inch apart.
- Bake for 10-12 minutes, or until the edges are golden and the tops are slightly firm to the touch. Rotate the baking sheet halfway through for even baking.
- While still warm, brush the tops of the cookies with the dissolved coffee mixture for that signature tiramisu flavor. Allow them to cool on the sheet for 5 minutes before transferring to a wire rack.
Offering a perfect balance of sweetness and coffee, these cookies are a fantastic standalone snack or can be layered with mascarpone cream for a deconstructed tiramisu. Their light, airy texture makes them irresistibly delicate, ideal for pairing with your afternoon coffee or as a sophisticated dessert option.
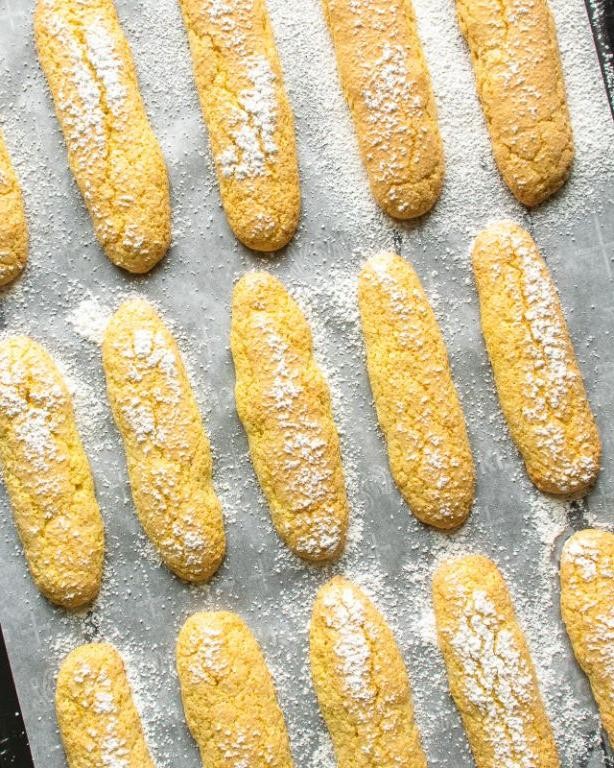
Gluten Free Ladyfinger Cookies

For those who love baking but need to avoid gluten, these Gluten Free Ladyfinger Cookies are a delightful treat that doesn’t compromise on taste or texture. Follow these steps carefully to create light, airy cookies that are perfect for dipping in coffee or layering in desserts.
Ingredients
- 1 cup gluten-free flour blend (look for one with xanthan gum for better texture)
- 1/2 cup granulated sugar (adjust to taste)
- 3 large eggs, separated (room temperature for best results)
- 1/4 tsp cream of tartar (helps stabilize egg whites)
- 1/2 tsp vanilla extract (or almond extract for a different flavor)
Instructions
- Preheat your oven to 350°F (175°C) and line a baking sheet with parchment paper.
- In a large bowl, beat the egg whites and cream of tartar until stiff peaks form, about 3-5 minutes.
- In another bowl, whisk the egg yolks and sugar until pale and thick, then stir in the vanilla extract.
- Gently fold the gluten-free flour into the yolk mixture until just combined.
- Carefully fold the beaten egg whites into the batter in two additions, preserving as much air as possible.
- Transfer the batter to a piping bag fitted with a round tip and pipe 3-inch fingers onto the prepared baking sheet.
- Bake for 12-15 minutes, or until the cookies are lightly golden and firm to the touch.
- Let cool on the baking sheet for 5 minutes before transferring to a wire rack to cool completely.
Zesty and light, these cookies have a delicate crispness outside with a soft interior, making them ideal for tiramisu or simply enjoyed with a dusting of powdered sugar.
Conclusion
Now that you’ve explored these 18 delicious ladyfinger cookies recipes, it’s clear there’s a perfect treat for every occasion. Whether you’re a novice or a seasoned baker, these recipes promise to delight. We’d love to hear which ones become your favorites—drop us a comment below! And if you enjoyed this roundup, don’t forget to share the love on Pinterest. Happy baking!