Kids and fish might not always seem like a perfect match, but we’re here to change that with our roundup of 18 Delicious Kid-Friendly Fish Recipes Easy to Make! Whether you’re whipping up a quick weeknight dinner or looking for healthy options that’ll please even the pickiest eaters, these dishes are sure to make a splash. Dive in to discover recipes that’ll have your little ones hooked from the first bite!
Crispy Baked Fish Sticks
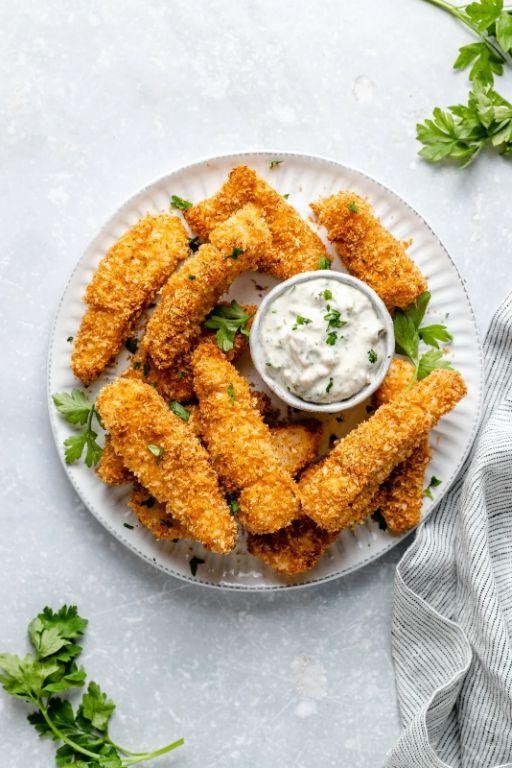
Zesty, crispy, and downright irresistible, these baked fish sticks are about to become your weeknight hero. No deep fryer? No problem! We’re giving you all the crunch without the guilt, and trust us, your taste buds won’t know the difference.
Ingredients
- 1 lb cod fillets (or any firm white fish)
- 1 cup panko breadcrumbs (for maximum crunch)
- 1/2 cup grated Parmesan cheese (the secret flavor booster)
- 1 tsp garlic powder (because garlic makes everything better)
- 1/2 tsp paprika (for a hint of smokiness)
- 2 large eggs (the glue that holds it all together)
- 1 tbsp olive oil (or any neutral oil)
- 1/2 tsp salt (adjust to taste)
- 1/4 tsp black pepper (freshly ground for best flavor)
Instructions
- Preheat your oven to 425°F and line a baking sheet with parchment paper for easy cleanup.
- Cut the cod fillets into 1-inch wide strips, pat them dry with paper towels to ensure the coating sticks.
- In a shallow bowl, whisk the eggs with a splash of water to create an egg wash.
- In another bowl, mix the panko, Parmesan, garlic powder, paprika, salt, and pepper for your crispy coating.
- Dip each fish strip into the egg wash, then dredge in the panko mixture, pressing gently to adhere.
- Place the coated strips on the prepared baking sheet, drizzle lightly with olive oil for extra crispiness.
- Bake for 12-15 minutes, flipping halfway through, until golden brown and crispy.
- Let them rest for a minute or two before serving – patience is key for maximum crunch.
These fish sticks are a textural dream – crispy on the outside, tender and flaky on the inside. Serve them with a side of tangy tartar sauce or a zesty aioli for dipping, or get creative and toss them in a taco for a fun twist on Taco Tuesday.
Simple Tuna Pasta Salad

Just when you thought your lunch routine couldn’t get any more ‘meh,’ along comes this Simple Tuna Pasta Salad to save the day—no cape required. It’s the perfect mix of ‘I actually cooked’ and ‘I totally have my life together,’ with a side of ‘Oops, I ate it all.’
Ingredients
- 8 oz elbow pasta (or any small pasta shape, because life’s too short for boring noodles)
- 1 can (5 oz) tuna in water, drained (or oil, if you’re feeling fancy)
- 1/2 cup mayonnaise (or Greek yogurt for a tangy twist)
- 1/4 cup red onion, finely diced (soak in cold water for 5 mins to mellow the bite)
- 1/2 cup celery, diced (for that essential crunch factor)
- 1 tbsp lemon juice (freshly squeezed, because bottled lemon juice is a crime)
- 1/2 tsp salt (adjust to taste, but don’t be shy)
- 1/4 tsp black pepper (freshly ground, unless you’re in a pinch)
- 1/4 cup parsley, chopped (optional, but it makes you look like a pro)
Instructions
- Bring a large pot of salted water to a boil over high heat. (Tip: Salt it like the sea for perfectly seasoned pasta.)
- Add the pasta and cook according to package instructions until al dente, about 8-10 minutes. (Tip: Stir occasionally to prevent sticking.)
- Drain the pasta and rinse under cold water to stop the cooking process. Shake off excess water.
- In a large bowl, combine the drained tuna, mayonnaise, red onion, celery, lemon juice, salt, and pepper. Mix well. (Tip: Use a fork to flake the tuna for even distribution.)
- Add the cooled pasta to the bowl and toss gently to coat with the tuna mixture. (Tip: Fold in the parsley now if using, for a pop of color and freshness.)
- Cover and refrigerate for at least 30 minutes to let the flavors meld. (Tip: The longer it sits, the better it gets—patience is a virtue.)
Here’s the scoop: this salad is creamy, crunchy, and packed with flavor, making it a hit at picnics or as a fridge staple for those ‘what’s for lunch?’ dilemmas. Serve it on a bed of greens, stuffed in a tomato, or straight from the bowl—no judgment here.
Fun Fish Tacos with Avocado
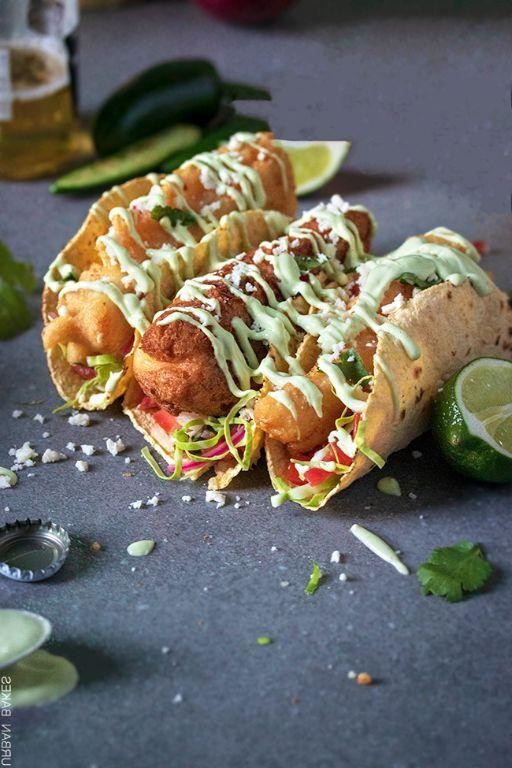
Buckle up, taco enthusiasts! We’re diving fork-first into a dish that’s as fun to make as it is to devour—Fun Fish Tacos with Avocado. Perfect for those days when you’re craving something light yet packed with flavor, and let’s be honest, when isn’t that?
Ingredients
- 1 lb white fish fillets (like cod or tilapia), cut into strips
- 1 cup all-purpose flour (for a lighter option, try almond flour)
- 1 tsp salt (sea salt adds a nice crunch)
- 1 tsp paprika (smoked paprika for an extra kick)
- 1/2 tsp garlic powder
- 1/2 cup milk (any type works, even almond milk)
- 1 egg, beaten
- 1 cup panko breadcrumbs (for that perfect crunch)
- 1/4 cup vegetable oil (or any neutral oil)
- 8 small corn tortillas
- 1 avocado, sliced (because everything’s better with avocado)
- 1/2 cup shredded cabbage (for a crisp texture)
- 1/4 cup cilantro, chopped (omit if you’re one of those cilantro-haters)
- Lime wedges, for serving
Instructions
- Preheat your oven to 200°F to keep the cooked fish warm.
- In a shallow dish, mix flour, salt, paprika, and garlic powder.
- In another dish, whisk together milk and egg.
- Place panko breadcrumbs in a third dish. Tip: For extra crispy fish, double coat by dipping back into the egg mixture and breadcrumbs again.
- Heat oil in a large skillet over medium-high heat until shimmering, about 350°F.
- Dredge fish strips in the flour mixture, then dip into the egg mixture, and finally coat with breadcrumbs.
- Fry fish in batches until golden brown, about 2-3 minutes per side. Don’t overcrowd the pan to ensure even cooking.
- Transfer cooked fish to a paper towel-lined plate, then keep warm in the oven.
- Warm tortillas in a dry skillet over medium heat for about 30 seconds per side. Tip: Keep them wrapped in a clean towel to stay warm and pliable.
- Assemble tacos with fish, avocado slices, shredded cabbage, and cilantro. Serve with lime wedges.
How about that? These tacos are a crispy, creamy dream with a zesty lime finish. Serve them up with a side of mango salsa for a tropical twist that’ll have your taste buds doing the cha-cha.
Healthy Salmon Veggie Nuggets
Let’s face it, we’ve all been there—staring into the abyss of our fridge, wondering how to turn that lonely salmon fillet and assorted veggies into something that doesn’t scream ‘I gave up.’ Enter: Healthy Salmon Veggie Nuggets, your new best friend for sneaking nutrients into your diet without sacrificing flavor or fun.
Ingredients
- 1 lb salmon fillet, skinless and finely chopped (or pulsed in a food processor for ease)
- 1 cup grated zucchini, squeezed dry (trust us, no one likes soggy nuggets)
- 1/2 cup grated carrot (for a sweet crunch)
- 1/4 cup finely chopped onion (or shallot for a milder flavor)
- 1/2 cup whole wheat breadcrumbs (or panko for extra crispiness)
- 1 large egg, beaten (the glue that holds our nugget dreams together)
- 1 tbsp olive oil (or any neutral oil for frying)
- 1/2 tsp garlic powder (because garlic makes everything better)
- 1/2 tsp salt (adjust to taste, but don’t be shy)
- 1/4 tsp black pepper (for a little kick)
Instructions
- Preheat your oven to 400°F (200°C) and line a baking sheet with parchment paper for easy cleanup.
- In a large bowl, combine the salmon, zucchini, carrot, onion, breadcrumbs, egg, garlic powder, salt, and pepper. Mix until well incorporated. Tip: If the mixture feels too wet, add a bit more breadcrumbs.
- Form the mixture into small nuggets (about 1.5 inches in diameter) and place them on the prepared baking sheet. Tip: Wet your hands slightly to prevent sticking.
- Brush each nugget lightly with olive oil to help them crisp up in the oven.
- Bake for 15 minutes, then flip each nugget and bake for another 10-15 minutes until golden brown and crispy. Tip: For extra crispiness, broil for the last 2 minutes, but watch closely to avoid burning.
Who knew healthy could taste this good? These nuggets are crispy on the outside, tender on the inside, and packed with flavors that even picky eaters will love. Serve them with a side of sweet chili sauce or tuck them into a pita for a quick, nutritious meal that doesn’t skimp on taste.
Quick and Easy Fish Quesadillas
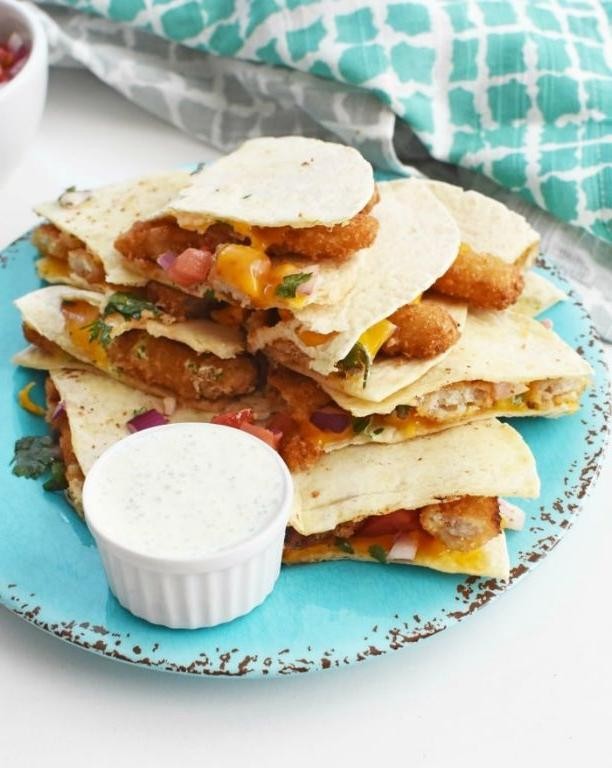
Yum, who knew fish and cheese could be such a match made in culinary heaven? These Quick and Easy Fish Quesadillas are here to prove that seafood can totally be the life of the party, especially when it’s tucked between crispy tortillas and oozing with melty goodness. Perfect for those ‘I can’t even’ weeknights or when you’re trying to impress with minimal effort.
Ingredients
- 1 lb white fish fillets (like tilapia or cod), cut into bite-sized pieces
- 1 tbsp olive oil (or any neutral oil)
- 1 tsp chili powder (adjust to taste)
- 1/2 tsp garlic powder
- 1/2 tsp cumin
- Salt to taste
- 4 large flour tortillas
- 2 cups shredded Monterey Jack cheese (or any melty cheese you love)
- 1/2 cup diced tomatoes (for a fresh crunch)
- 1/4 cup chopped cilantro (because green is good)
- Lime wedges for serving (squeeze it like you mean it)
Instructions
- Heat olive oil in a large skillet over medium-high heat. Add the fish pieces, chili powder, garlic powder, cumin, and salt. Cook for 3-4 minutes, flipping once, until the fish is opaque and flakes easily with a fork. Tip: Don’t overcrowd the pan to ensure each piece gets perfectly cooked.
- Remove the fish from the skillet and set aside. Wipe the skillet clean with a paper towel.
- Place one tortilla in the skillet over medium heat. Sprinkle 1/2 cup of cheese evenly over the tortilla, then layer half of the cooked fish, diced tomatoes, and cilantro on one half. Tip: Let the cheese melt slightly before adding toppings to prevent a slip-and-slide situation.
- Fold the tortilla in half over the filling and press down gently with a spatula. Cook for 2-3 minutes on each side, until golden brown and crispy. Repeat with the remaining tortillas and filling.
- Cut each quesadilla into wedges and serve with lime wedges on the side. Tip: For an extra kick, serve with a side of salsa or avocado crema.
Delightfully crispy on the outside with a tender, flavorful fish filling, these quesadillas are a textural dream. The fresh tomatoes and cilantro add a pop of color and freshness, making them as pretty as they are tasty. Try serving them with a cold beer or a margarita for the ultimate ‘I’m definitely a chef’ vibe.
Homemade Fish Fingers with Sweet Potato Fries

Ready to dive into a dish that’s as fun to make as it is to eat? Let’s talk about turning your kitchen into a mini seaside bistro with these crispy, golden delights and their sweet, spuddy sidekicks.
Ingredients
- 1 lb white fish fillets (cod or haddock work wonders)
- 1 cup panko breadcrumbs (for that unbeatable crunch)
- 1/2 cup all-purpose flour (or gluten-free blend for a twist)
- 2 large eggs (the glue that holds the magic together)
- 2 large sweet potatoes (because orange is the new black)
- 1 tsp paprika (for a smoky whisper)
- 1/2 tsp garlic powder (because garlic makes everything better)
- Salt and pepper (the dynamic duo of seasoning)
- Vegetable oil for frying (or any neutral oil that doesn’t shy away from heat)
Instructions
- Preheat your oven to 425°F (220°C) for the sweet potato fries. Line a baking sheet with parchment paper.
- Cut the sweet potatoes into 1/2-inch thick fries. Toss them with 1 tbsp oil, paprika, garlic powder, salt, and pepper. Spread out on the baking sheet. Tip: Don’t overcrowd the fries, or they’ll steam instead of crisp.
- Bake for 25-30 minutes, flipping halfway, until golden and crispy.
- While the fries bake, cut the fish into 1-inch thick strips. Pat dry to ensure the coating sticks.
- Set up a breading station: one bowl with flour, one with beaten eggs, and one with panko mixed with salt and pepper.
- Dip each fish strip into flour, then egg, then panko, pressing gently to adhere. Tip: Use one hand for dry ingredients and the other for wet to avoid breadcrumb fingers.
- Heat 1/2 inch of oil in a pan over medium-high heat (350°F). Fry fish fingers in batches for 2-3 minutes per side until golden. Tip: Keep cooked pieces warm in the oven on a wire rack to maintain crispiness.
- Drain on paper towels and season with salt while hot.
Light, crispy fish fingers meet their match with smoky sweet potato fries for a texture party in your mouth. Serve with a cheeky dip or stack them high for a fish finger tower that’ll make dinner feel like a celebration.
Cheesy Tuna Melt Sandwich
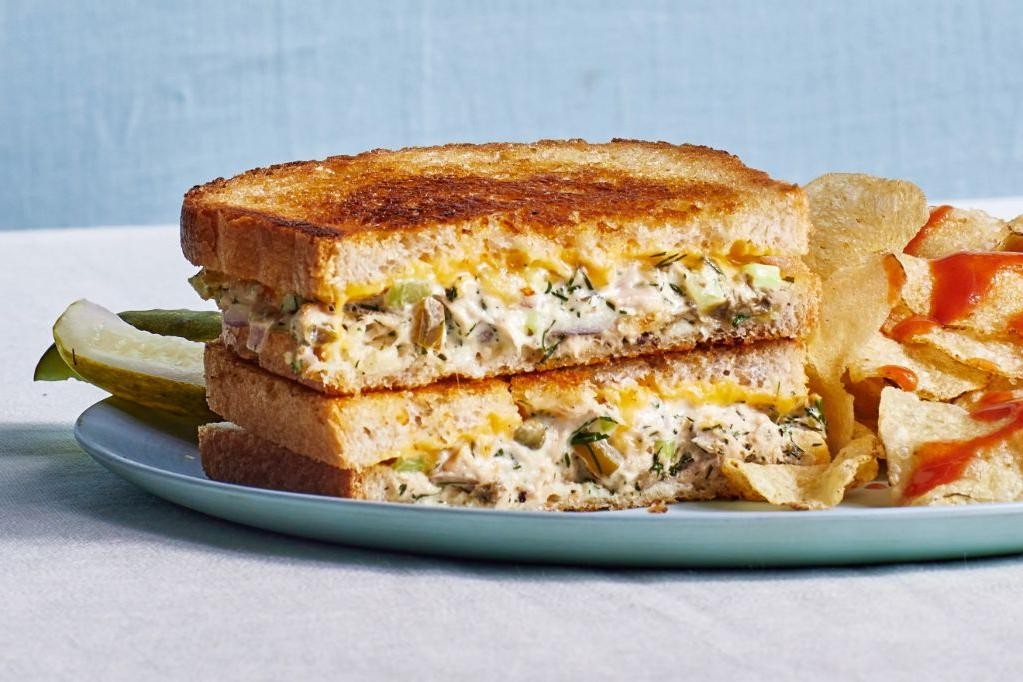
So, you’re staring into the abyss of your fridge, and lo and behold, a can of tuna winks back at you. Fear not, for the Cheesy Tuna Melt Sandwich is here to save your lunch from the mundane with its gooey, crispy, and utterly comforting embrace.
Ingredients
- 2 slices of sourdough bread (or any bread that toasts well)
- 1 can (5 oz) tuna in water, drained (oil-packed works too for extra richness)
- 1/4 cup mayonnaise (adjust to your creaminess preference)
- 1/2 cup shredded cheddar cheese (sharp for a flavor punch)
- 1 tbsp butter, softened (for that golden, crispy exterior)
- 1/4 tsp garlic powder (because everything’s better with garlic)
- Salt and pepper to taste (don’t skip; tuna needs its friends)
Instructions
- In a bowl, mix the drained tuna, mayonnaise, shredded cheddar cheese, garlic powder, salt, and pepper until well combined.
- Heat a skillet over medium heat (about 350°F) and butter one side of each bread slice.
- Place one bread slice, buttered side down, in the skillet. Spread the tuna mixture evenly on top.
- Top with the second bread slice, buttered side up, and press down gently with a spatula.
- Cook for 3-4 minutes on each side, or until the bread is golden brown and the cheese is melty. Tip: Covering the skillet with a lid for the last minute can help melt the cheese faster.
- Remove from heat, let it sit for a minute (this prevents the filling from oozing out when you cut it), then slice diagonally because triangles taste better.
Let’s be real: the first bite will transport you to a world where every sandwich is this perfect. The crispy, buttery bread gives way to a creamy, cheesy tuna filling that’s packed with flavor. Serve it with a side of pickles or a simple salad to cut through the richness, or just enjoy it in all its unapologetic glory.
Baked Cod with a Crunchy Cornflake Topping
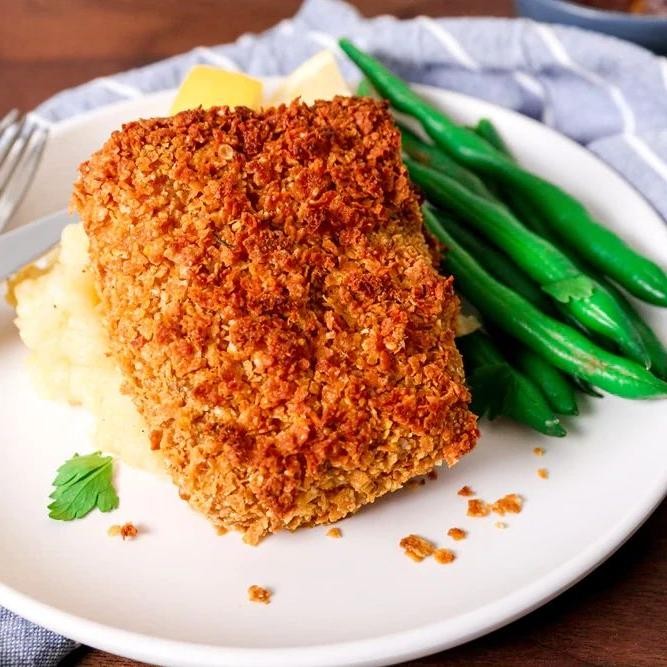
Oh boy, do we have a treat for you today! Imagine tender, flaky cod getting a makeover with a crispy, golden cornflake crust that’s about to make your taste buds do a happy dance. It’s the kind of dish that looks fancy but is secretly a breeze to whip up—perfect for impressing guests or treating yourself on a lazy Tuesday.
Ingredients
- 1 lb cod fillets (fresh or thawed, because frozen adventures are for Disney, not dinner)
- 1 cup cornflakes, crushed (the cereal aisle’s gift to crunchy toppings)
- 2 tbsp melted butter (or olive oil for a lighter twist)
- 1 tbsp Dijon mustard (for a tangy kick that whispers ‘gourmet’)
- 1/2 tsp garlic powder (because everything’s better with garlic)
- 1/4 tsp salt (just enough to make the flavors pop)
- 1/4 tsp black pepper (freshly ground if you’re feeling fancy)
Instructions
- Preheat your oven to 400°F (because we’re about to turn up the heat on this cod).
- Line a baking sheet with parchment paper (for easy cleanup, because who likes scrubbing pans?).
- In a bowl, mix the crushed cornflakes, melted butter, Dijon mustard, garlic powder, salt, and pepper until well combined (this is where the magic starts).
- Place the cod fillets on the prepared baking sheet (giving them some space to breathe).
- Evenly spread the cornflake mixture over the top of each fillet, pressing gently to adhere (like tucking them in with a crunchy blanket).
- Bake for 15-18 minutes, or until the topping is golden and the fish flakes easily with a fork (patience is key, but so is not overcooking).
Ready to dive in? The contrast between the juicy cod and that irresistible crunchy topping is nothing short of a texture symphony. Serve it alongside a zesty lemon wedge and a simple green salad for a meal that’s as balanced as your life aspires to be.
Fish and Chips with a Twist

Oh, the classic fish and chips—just when you thought it couldn’t get any better, we’re here to shake things up with a twist that’ll have your taste buds doing a happy dance. Imagine the crunchiest, most flavorful coating hugging tender fish, paired with chips that are anything but ordinary. Let’s dive in!
Ingredients
- 1 lb cod fillets (or any firm white fish)
- 1 cup all-purpose flour (for that perfect crisp)
- 1 tsp baking powder (the secret to extra fluffiness)
- 1 cup beer (or sparkling water for a non-alcoholic version)
- 1 tsp salt (adjust to taste)
- 1/2 tsp black pepper (for a little kick)
- 2 large potatoes (russets work best for chips)
- 1 quart vegetable oil (or any neutral oil for frying)
- 1 tbsp vinegar (malt or apple cider, for serving)
Instructions
- Cut the potatoes into thick strips, rinse under cold water, and pat dry thoroughly to ensure crispiness.
- Heat the oil in a deep fryer or large pot to 325°F. Fry the potato strips in batches for 3-4 minutes until soft but not colored. Remove and drain on paper towels.
- Increase the oil temperature to 375°F. Fry the potatoes again in batches for 2-3 minutes until golden and crispy. Drain and season with salt.
- In a large bowl, whisk together flour, baking powder, salt, and pepper. Gradually add beer, stirring until the batter is smooth.
- Dip each cod fillet into the batter, letting excess drip off. Carefully lower into the hot oil and fry for 4-5 minutes until golden and cooked through.
- Drain the fish on paper towels and serve immediately with the chips and vinegar on the side.
Unbelievably crispy on the outside, tender and flaky on the inside, this fish and chips with a twist is a game-changer. Serve it wrapped in newspaper for a fun, authentic touch, or alongside a zesty tartar sauce to take it over the top.
Salmon and Cream Cheese Pinwheels

Buckle up, buttercups, because we’re about to roll into the world of no-fuss, all-flavor appetizers that’ll have your guests doing double takes. These Salmon and Cream Cheese Pinwheels are the party starters you didn’t know you needed, combining creamy, tangy, and smoky flavors in one bite-sized package.
Ingredients
- 1 large flour tortilla (10-inch, for easy rolling)
- 4 oz cream cheese, softened (microwave for 10 seconds if needed)
- 2 oz smoked salmon, thinly sliced (lox-style works great)
- 1 tbsp capers, drained (for a briny pop)
- 1/4 cup red onion, finely diced (soak in cold water for 5 minutes to mellow the bite)
- 1 tsp fresh dill, chopped (dried works in a pinch, but fresh is best)
- 1/2 tsp lemon zest (brightens up the whole shebang)
Instructions
- Lay the tortilla flat on a clean surface. Spread the softened cream cheese evenly over the entire surface, leaving a 1/2-inch border around the edges.
- Arrange the smoked salmon slices in a single layer over the cream cheese, covering as much surface as possible.
- Sprinkle the capers, red onion, dill, and lemon zest evenly over the salmon.
- Starting at one edge, tightly roll the tortilla into a log, pressing gently to seal the edge. Wrap in plastic and chill for at least 30 minutes to firm up (this makes slicing easier).
- Using a sharp knife, trim the ends and slice the log into 1/2-inch pinwheels. Serve immediately or refrigerate until ready to serve.
Light as a feather yet packed with flavor, these pinwheels offer a delightful contrast between the creamy filling and the smoky salmon. For an extra touch of elegance, serve them on a platter garnished with lemon wedges and a sprinkle of fresh dill.
Easy Fish Pie with Mashed Potato Topping
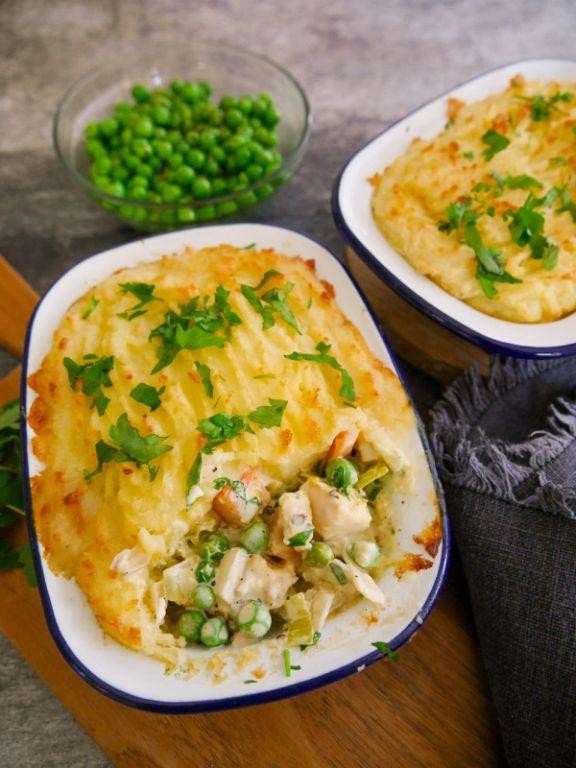
Now, who said fish pie has to be fussy? Dive fork-first into this ridiculously easy, comfort-food masterpiece that’ll have your taste buds doing the cha-cha. Perfect for those ‘I can’t even’ weeknights, it’s creamy, dreamy, and topped with a cloud of mashed potatoes that’s basically a hug in edible form.
Ingredients
- 1 lb white fish fillets, like cod or haddock (thaw if frozen, folks!)
- 1 cup whole milk (because skim milk is just water lying about being milk)
- 2 tbsp butter (the unsalted kind, unless you like living on the edge)
- 1 cup frozen peas (no need to thaw, lazy cooks rejoice!)
- 2 cups mashed potatoes (leftovers work here, no judgment)
- 1/2 tsp salt (adjust to taste, but don’t be shy)
- 1/4 tsp black pepper (freshly ground if you’re fancy)
- 1/2 cup shredded cheddar cheese (because cheese makes everything better)
Instructions
- Preheat your oven to 375°F (because patience is a virtue, but preheating is non-negotiable).
- In a saucepan, gently heat the milk and butter over medium heat until the butter melts. No boiling, unless you’re into fish soup.
- Add the fish fillets to the saucepan, cover, and simmer for 5 minutes. The fish should flake easily with a fork—no muscle required.
- Remove the fish with a slotted spoon, leaving the milky goodness behind. Flake the fish into a pie dish, then scatter the peas like confetti.
- Pour the reserved milk mixture over the fish and peas. Season with salt and pepper like you mean it.
- Spread the mashed potatoes over the top, sealing the edges to prevent a volcanic eruption of filling. Sprinkle with cheddar cheese because, again, cheese.
- Bake for 25 minutes, or until the top is golden and the filling is bubbling like a witch’s cauldron.
Pull this golden beauty from the oven, and behold: a creamy, flaky filling beneath a crispy, cheesy potato blanket. Serve it with a side of green beans or a crisp salad to pretend you’re healthy. Either way, it’s comfort food that doesn’t skimp on the comfort—or the food.
Grilled Fish Skewers with Veggies
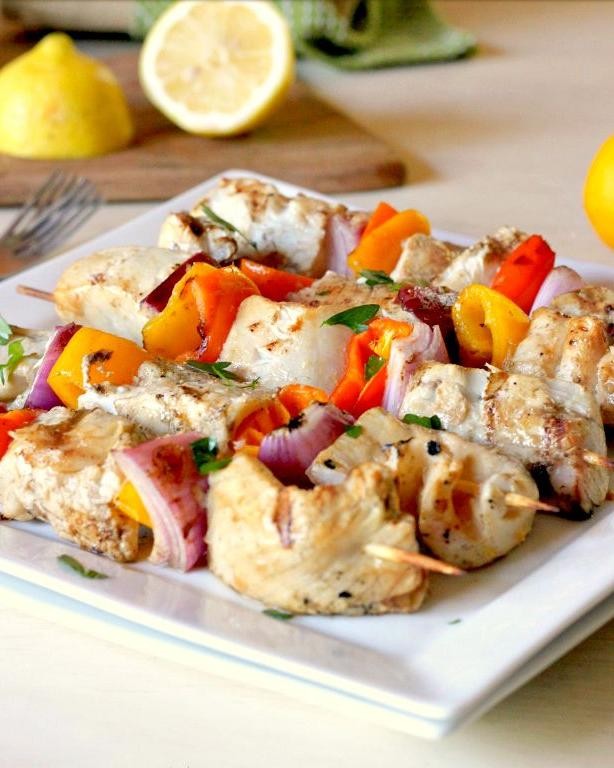
Summer’s here, and so is the perfect excuse to fire up the grill for some Grilled Fish Skewers with Veggies that’ll make your taste buds dance faster than a TikTok trend. Let’s turn up the heat and skewer our way to flavor town, where the fish is always flaky and the veggies are just the right amount of charred.
Ingredients
- 1 lb firm white fish (like cod or halibut), cut into 1-inch cubes – because flaky is the goal, folks!
- 2 tbsp olive oil (or any neutral oil) – for that slick, non-stick magic.
- 1 tsp garlic powder – because fresh is great, but we’re keeping it simple.
- 1 tsp smoked paprika – for a hint of mystery and depth.
- 1/2 tsp salt – adjust to taste, but don’t be shy.
- 1/4 tsp black pepper – a little kick for good measure.
- 1 bell pepper, cut into 1-inch pieces – color of your choice, rainbow optional.
- 1 zucchini, sliced into 1/2-inch rounds – green is good, but we’re not judging.
- 1 red onion, cut into 1-inch pieces – for those who love a good cry.
Instructions
- Preheat your grill to medium-high heat (about 375°F to 400°F) – no one likes a lukewarm welcome.
- In a large bowl, toss the fish cubes with olive oil, garlic powder, smoked paprika, salt, and black pepper until evenly coated. Think of it as a fish spa day.
- Thread the fish and veggies onto skewers, alternating between fish and veggies for that Instagram-worthy pattern. Pro tip: Soak wooden skewers in water for 30 minutes to prevent them from turning into matchsticks.
- Place the skewers on the grill and cook for 3-4 minutes per side, or until the fish is opaque and flakes easily with a fork. Watch closely – fish cooks faster than gossip spreads.
- Remove from the grill and let them rest for a minute. Patience is a virtue, especially when it comes to juicy fish.
Voilà! You’ve just crafted skewers that are a symphony of smoky, savory, and slightly sweet flavors, with a texture that’s tender yet satisfyingly firm. Serve them over a bed of quinoa for a wholesome meal, or alongside a crisp salad to keep things light and breezy.
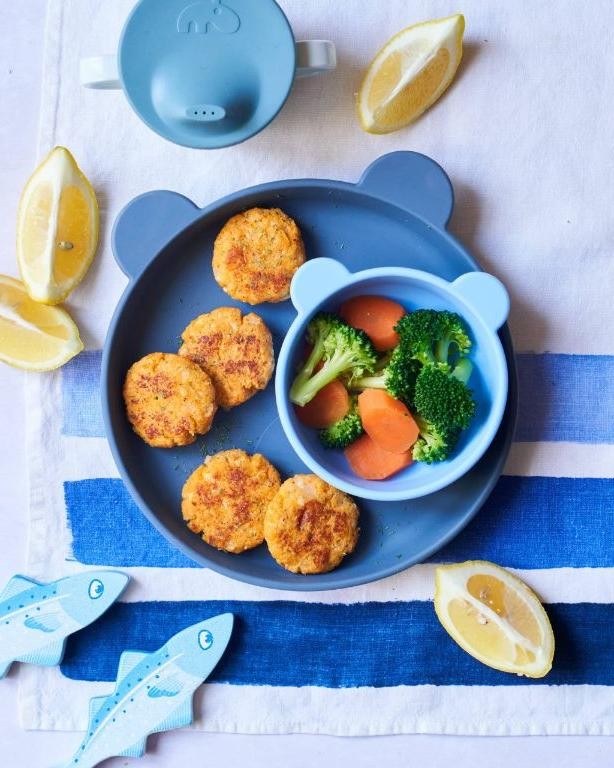
Fish and Sweetcorn Patties

Picture this: a golden, crispy patty that’s packed with the sweet melody of corn and the savory whisper of fish, all dancing together in perfect harmony. It’s the kind of dish that makes you forget you’re eating something healthy—until your brain catches up and high-fives you for being so clever.
Ingredients
- 1 cup cooked, flaked white fish (like cod or haddock, because they’re the wallflowers of the sea)
- 1 cup sweetcorn kernels (fresh or canned, but let’s be real, canned is the lazy cook’s best friend)
- 1/2 cup breadcrumbs (panko for that extra crunch, or regular if you’re feeling nostalgic)
- 1 large egg (the glue that holds our patty dreams together)
- 2 tbsp mayonnaise (or Greek yogurt if you’re trying to impress your fitness-obsessed cousin)
- 1 tbsp lemon juice (because every dish needs a little zing)
- 1/2 tsp salt (adjust to taste, but don’t be shy)
- 1/4 tsp black pepper (for that gentle kick)
- 2 tbsp olive oil (or any neutral oil, but olive oil makes you feel fancy)
Instructions
- In a large bowl, combine the flaked fish, sweetcorn, breadcrumbs, egg, mayonnaise, lemon juice, salt, and black pepper. Mix gently—think of it as a first date, no need to be too aggressive.
- Shape the mixture into 4 equal patties, about 1/2 inch thick. Pro tip: Wet your hands to prevent sticking, because nobody likes a clingy patty.
- Heat the olive oil in a non-stick skillet over medium heat (350°F if you’re into specifics) until shimmering. This is where the magic happens.
- Cook the patties for 3-4 minutes on each side, or until they’re golden brown and crispy. Flip them like you’re flipping pancakes on a Sunday morning—with confidence and a spatula.
- Transfer the patties to a paper towel-lined plate to drain any excess oil, because we’re going for crispy, not greasy.
Unbelievably crispy on the outside, tender and flaky on the inside, these patties are a textural dream. Serve them on a bed of greens for a light lunch, or slap them between two buns with a dollop of tartar sauce for a burger that’ll make your taste buds sing.
Tuna and Cheese Stuffed Peppers

Picture this: a dish so effortlessly chic, it’s like the little black dress of your dinner lineup—Tuna and Cheese Stuffed Peppers. These bad boys are here to jazz up your meal prep with minimal fuss and maximum flavor.
Ingredients
- 4 large bell peppers (any color, but go wild with a rainbow for Instagram glory)
- 2 cups canned tuna, drained (because nobody wants a soggy pepper)
- 1 cup shredded cheddar cheese (or mix it up with mozzarella for a gooey surprise)
- 1/2 cup mayonnaise (the secret glue holding this masterpiece together)
- 1/4 cup diced onions (for a little crunch and a lot of attitude)
- 1 tbsp lemon juice (to cut through the richness like a boss)
- 1/2 tsp salt (because seasoning is not optional)
- 1/4 tsp black pepper (adjust to taste, but why hold back?)
Instructions
- Preheat your oven to 375°F (because patience is a virtue, especially when cheese is involved).
- Slice the tops off the bell peppers and remove the seeds and membranes (think of it as gutting a pumpkin, but less messy).
- In a mixing bowl, combine the tuna, cheddar cheese, mayonnaise, diced onions, lemon juice, salt, and black pepper (this is where the magic happens).
- Stuff each pepper with the tuna mixture until they’re generously filled (like a Thanksgiving turkey, but without the drama).
- Place the stuffed peppers in a baking dish and bake for 25-30 minutes, or until the peppers are tender and the cheese is bubbly and golden (the visual cue you’ve been waiting for).
- Let them cool for a few minutes before serving (unless you’re into molten cheese burns, no judgment here).
Zesty, creamy, and with just the right amount of crunch, these Tuna and Cheese Stuffed Peppers are a textural dream. Serve them atop a bed of greens for a deconstructed salad vibe or alongside a crisp white wine for those ‘I’ve got my life together’ moments.
Simple Sardine on Toast
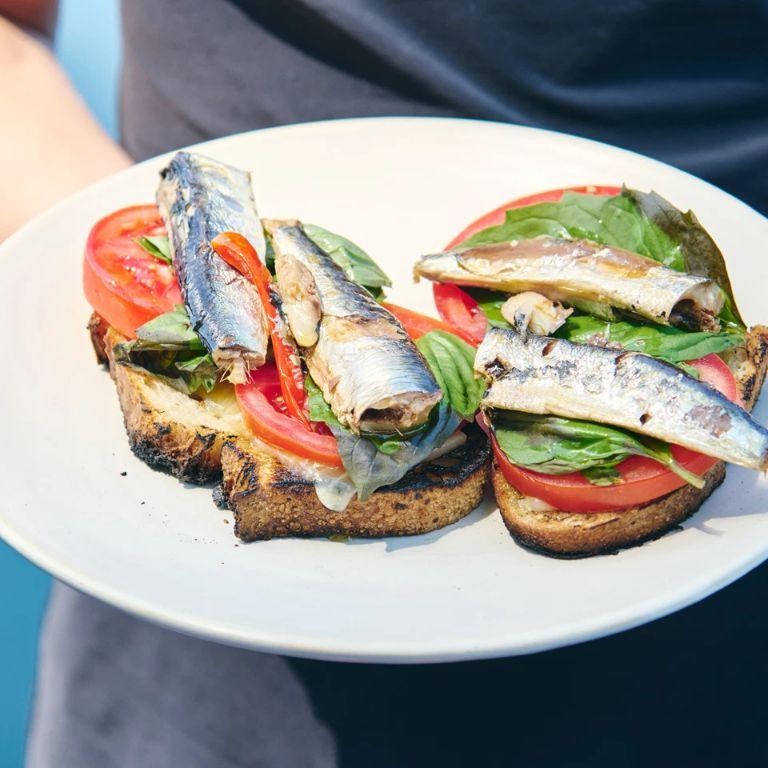
Craving something deliciously simple yet unexpectedly gourmet? Let’s talk about transforming those humble sardines into a toast-topping superstar that’ll make your taste buds dance and your mornings a tad more fabulous.
Ingredients
- 1 can sardines in olive oil (drained, or any oil-packed sardines)
- 2 slices whole grain bread (or your favorite artisan loaf)
- 1 tbsp olive oil (extra virgin, for drizzling)
- 1/2 lemon (juiced, adjust to taste)
- 1/4 tsp red pepper flakes (or skip if you’re not into heat)
- Salt (just a pinch, because sardines are already salty)
- Fresh parsley (chopped, for a pop of color and freshness)
Instructions
- Preheat your oven to 375°F (190°C) to get it ready for toasting perfection.
- Place the bread slices on a baking sheet and drizzle lightly with olive oil. Toast in the oven for 5-7 minutes until golden and crisp.
- While the bread toasts, open the can of sardines and drain the oil. Gently flake the sardines with a fork, keeping some chunks for texture.
- Once the bread is toasted, arrange the flaked sardines evenly on top of each slice.
- Squeeze fresh lemon juice over the sardines, then sprinkle with red pepper flakes and a tiny pinch of salt.
- Garnish with chopped parsley for that Instagram-worthy finish.
Unbelievably easy, right? This dish brings a delightful crunch from the toast, a rich umami punch from the sardines, and a zesty kick from the lemon. Try serving it with a side of avocado slices for a creamy contrast or atop a bed of arugula for a peppery bite.
Baked Haddock with a Cheesy Breadcrumb Topping
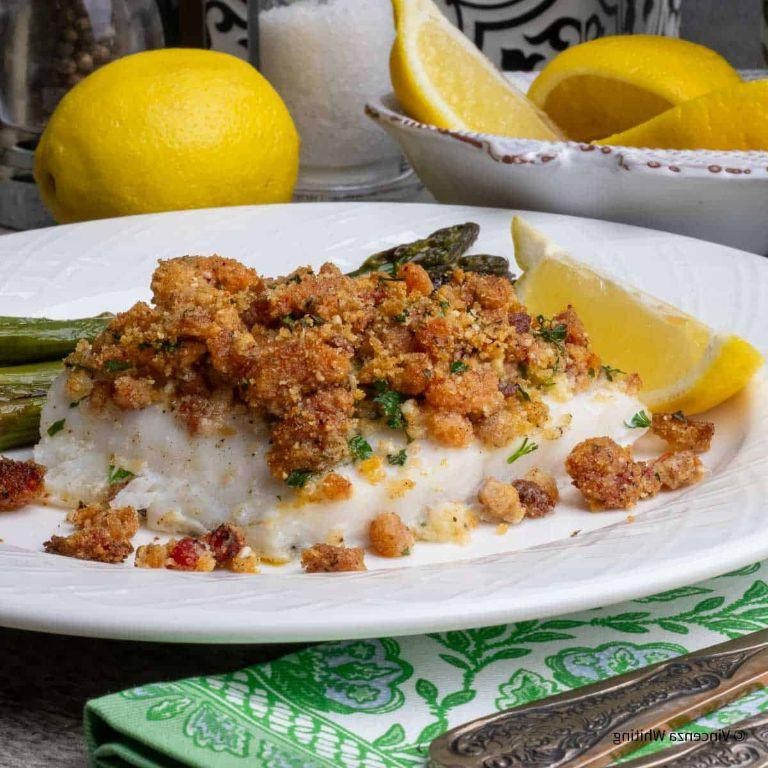
Who knew that haddock could be the life of the party? This baked haddock with a cheesy breadcrumb topping is here to prove that fish Fridays can be fun, flavorful, and downright fabulous. Let’s dive into a dish that’s as easy to make as it is to devour.
Ingredients
- 1.5 lbs haddock fillets (fresh or thawed, because nobody likes a frosty fish)
- 1 cup panko breadcrumbs (for that perfect crunch)
- 1/2 cup grated Parmesan cheese (the cheesier, the better)
- 1/4 cup melted butter (or olive oil for a lighter touch)
- 1 tbsp lemon juice (freshly squeezed, because bottled is so last year)
- 1 tsp garlic powder (adjust to taste, unless you’re a vampire)
- 1/2 tsp paprika (for a smoky whisper of flavor)
- Salt and pepper to taste (because seasoning is not optional)
Instructions
- Preheat your oven to 375°F (190°C) and line a baking sheet with parchment paper for easy cleanup.
- Pat the haddock fillets dry with paper towels to ensure the topping sticks like a best friend.
- In a bowl, mix together the panko breadcrumbs, Parmesan cheese, melted butter, lemon juice, garlic powder, paprika, salt, and pepper until it resembles a sandy beach.
- Place the haddock fillets on the prepared baking sheet and generously top each with the breadcrumb mixture, pressing lightly to adhere.
- Bake for 15-20 minutes, or until the fish flakes easily with a fork and the topping is golden brown and crispy.
- Let it rest for 2 minutes before serving to avoid a steam burn that’s hotter than your last argument.
Zesty, crispy, and utterly irresistible, this baked haddock is a textural dream with a golden crust that’ll have everyone fighting for the last bite. Serve it over a bed of greens or alongside roasted veggies for a meal that’s as balanced as your life aspires to be.
Fish and Rice Cakes

Zesty and zippy, these Fish and Rice Cakes are about to become your new favorite way to turn leftovers into a crispy, golden delight. Perfect for those ‘what should I make for dinner’ nights, they’re a playful twist on the classics that’ll have your taste buds doing a happy dance.
Ingredients
- 2 cups cooked rice (day-old works best for texture)
- 1 cup flaked cooked fish (salmon or cod are stellar choices)
- 1 egg, beaten (the glue that holds our cakey dreams together)
- 2 tbsp mayonnaise (or Greek yogurt for a tangy twist)
- 1 tbsp lemon juice (freshly squeezed, because we’re fancy)
- 1/2 tsp salt (adjust to taste, you salty sea dog)
- 1/4 cup breadcrumbs (panko for extra crunch)
- 2 tbsp olive oil (or any neutral oil for frying)
Instructions
- In a large bowl, mix the cooked rice, flaked fish, beaten egg, mayonnaise, lemon juice, and salt until well combined. Tip: If the mixture feels too wet, add a bit more breadcrumbs to tighten it up.
- Form the mixture into small patties, about 1/2 inch thick. Tip: Wet your hands slightly to prevent sticking.
- Heat the olive oil in a non-stick skillet over medium heat (350°F if you’re using a thermometer).
- Carefully place the patties in the skillet and cook for 3-4 minutes on each side, or until golden brown and crispy. Tip: Don’t overcrowd the pan; cook in batches if necessary.
- Transfer the cooked cakes to a paper towel-lined plate to drain any excess oil.
Bursting with flavor, these Fish and Rice Cakes offer a delightful contrast between the crispy exterior and the tender, flavorful inside. Serve them atop a bed of greens with a dollop of tartar sauce, or slide them between buns for an unconventional but utterly delicious burger experience.
Quick Fish Soup with Alphabet Pasta
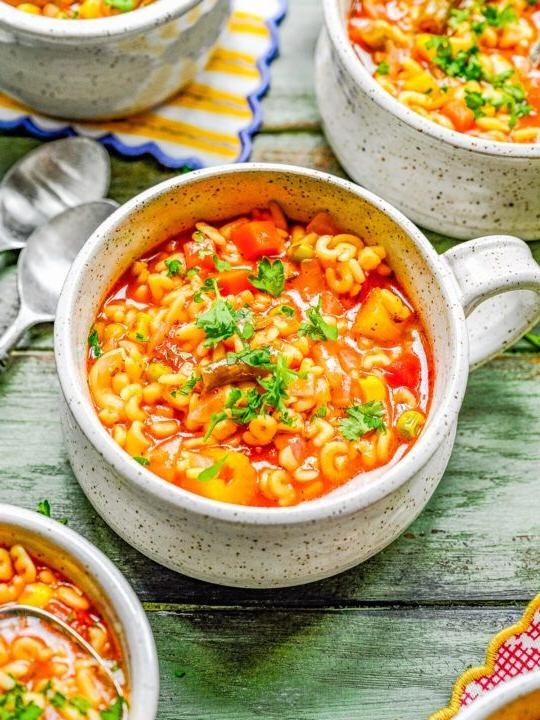
Every now and then, we all crave a dish that’s as fun to make as it is to eat, and this Quick Fish Soup with Alphabet Pasta is here to spell out deliciousness in every spoonful. It’s the perfect blend of simplicity and whimsy, turning an ordinary soup into a conversation starter.
Ingredients
- 1 tbsp olive oil (or any neutral oil)
- 1 small onion, diced (about 1/2 cup)
- 2 cloves garlic, minced
- 1 cup alphabet pasta
- 4 cups fish stock (homemade or store-bought)
- 1 lb white fish fillets, cut into bite-sized pieces (cod or haddock work great)
- 1 cup diced tomatoes (canned is fine, just drain them)
- 1/2 tsp salt (adjust to taste)
- 1/4 tsp black pepper
- 1/4 cup fresh parsley, chopped (for garnish)
Instructions
- Heat the olive oil in a large pot over medium heat until shimmering, about 1 minute.
- Add the diced onion and sauté until translucent, about 3 minutes, stirring occasionally to prevent burning.
- Stir in the minced garlic and cook for another 30 seconds, just until fragrant.
- Pour in the fish stock and bring to a boil over high heat. Tip: A rolling boil helps infuse the soup with flavor faster.
- Add the alphabet pasta to the boiling stock and cook according to package instructions, usually about 8 minutes, stirring occasionally to prevent sticking.
- Gently add the fish pieces and diced tomatoes to the pot, reducing the heat to a simmer. Cook for 5 minutes, or until the fish is opaque and flakes easily with a fork. Tip: Don’t stir too vigorously to keep the fish intact.
- Season with salt and pepper, then taste and adjust seasoning if necessary. Tip: A squeeze of lemon juice can brighten the flavors if the soup tastes flat.
- Ladle the soup into bowls, garnish with fresh parsley, and serve immediately.
Ready to dive in? This soup boasts a light yet satisfying broth, tender chunks of fish, and playful pasta letters that make every bite a surprise. Serve it with crusty bread for dipping, or go the extra mile with a side of grilled cheese for the ultimate comfort meal.
Conclusion
Just like that, you’ve got 18 scrumptious, kid-approved fish recipes at your fingertips! Whether you’re a seasoned chef or a busy parent looking for quick meal solutions, these dishes promise to delight your little ones and simplify your dinner routine. Don’t forget to whip up your favorites, share your thoughts in the comments, and pin this article to your Pinterest board for easy access to these tasty ideas. Happy cooking!