There’s no need to sacrifice flavor for convenience, especially when you’re juggling a busy schedule and sticking to a keto lifestyle. Our roundup of 19 Delicious Keto Lunch Recipes for Busy Weekdays is here to save the day with quick, satisfying meals that keep carbs in check. From hearty salads to savory wraps, these recipes promise to make your midday meal both effortless and exciting. Let’s dive in!
Avocado and Egg Salad
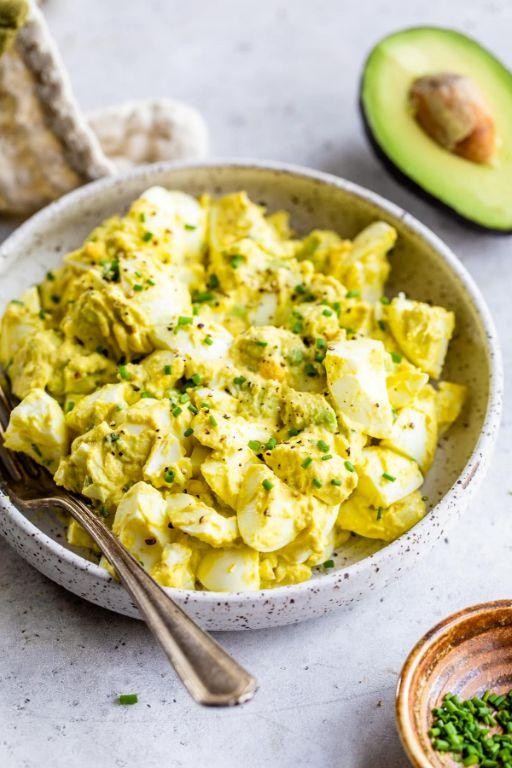
Kickstart your morning with a nutritious and satisfying Avocado and Egg Salad, perfect for those seeking a healthy yet hearty meal. This dish combines creamy avocado with protein-rich eggs, creating a balance of flavors and textures that will delight your palate.
Ingredients
- 2 ripe Hass avocados, peeled and pitted
- 4 pasture-raised eggs, hard-boiled and chopped
- 1/4 cup mayonnaise
- 1 tbsp Dijon mustard
- 1/2 tsp sea salt
- 1/4 tsp freshly ground black pepper
- 1 tbsp fresh lemon juice
- 2 tbsp finely chopped chives
Instructions
- Place the eggs in a medium saucepan and cover with cold water by 1 inch. Bring to a boil over high heat, then cover and remove from heat. Let stand for 12 minutes for perfectly hard-boiled eggs.
- Transfer the eggs to a bowl of ice water to cool for 5 minutes, then peel and chop them into small pieces.
- In a large mixing bowl, mash the avocados with a fork until smooth but slightly chunky.
- Add the chopped eggs, mayonnaise, Dijon mustard, sea salt, black pepper, and lemon juice to the bowl with the avocados.
- Gently fold all the ingredients together until well combined, being careful not to overmix to maintain some texture.
- Stir in the chopped chives for a fresh, oniony flavor.
- Serve immediately or chill in the refrigerator for 30 minutes to allow the flavors to meld together.
Wholesome and creamy, this Avocado and Egg Salad offers a delightful contrast between the smooth avocado and the tender chunks of egg. For an extra crunch, serve it on toasted whole-grain bread or alongside crisp lettuce leaves for a low-carb option.
Keto Chicken Caesar Wrap
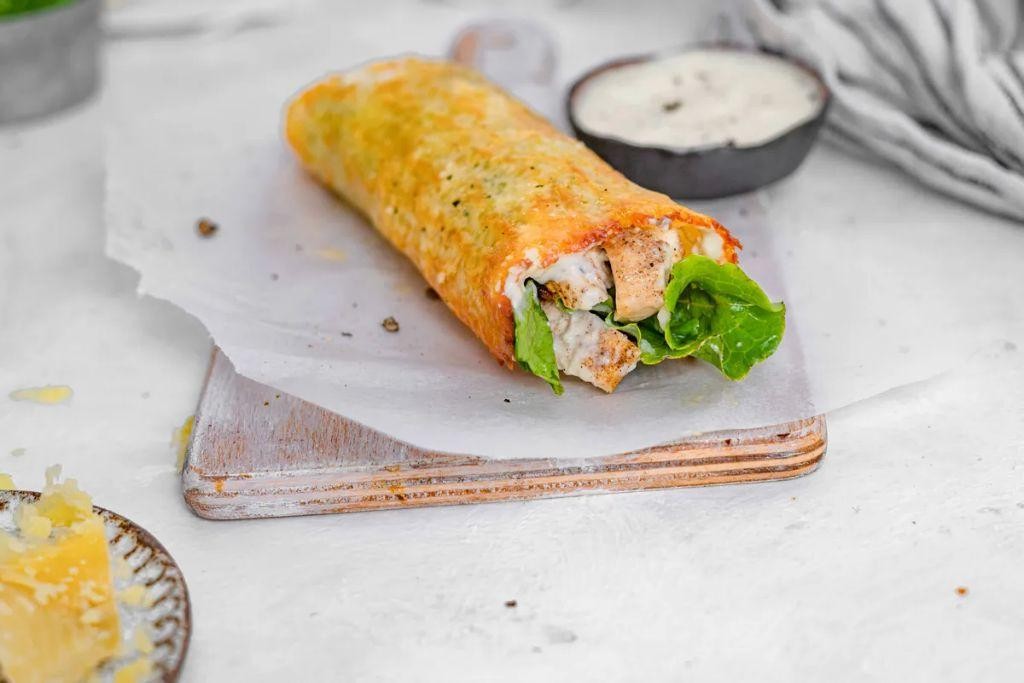
Brimming with flavor and perfect for a quick lunch, this Keto Chicken Caesar Wrap combines crisp, fresh ingredients with rich, savory notes for a satisfying low-carb meal. Let’s dive into creating this delicious wrap with precision and ease.
Ingredients
- 2 cups shredded, cooked chicken breast (preferably free-range)
- 1/2 cup full-fat Caesar dressing (sugar-free)
- 1/4 cup grated Parmesan cheese (aged 24 months)
- 2 cups romaine lettuce, finely chopped
- 4 large low-carb tortillas (almond flour-based)
- 1 tbsp extra virgin olive oil
- 1 tsp garlic powder
- 1/2 tsp sea salt
- 1/4 tsp freshly ground black pepper
Instructions
- In a large mixing bowl, combine the shredded chicken, Caesar dressing, grated Parmesan cheese, garlic powder, sea salt, and black pepper. Mix until all ingredients are evenly coated. Tip: For enhanced flavor, let the mixture marinate for 10 minutes before assembling the wraps.
- Lay out the low-carb tortillas on a clean, flat surface. Divide the chicken mixture evenly among the tortillas, spreading it in the center of each.
- Top each tortilla with 1/2 cup of finely chopped romaine lettuce. Tip: Ensure the lettuce is dry to prevent the wraps from becoming soggy.
- Drizzle 1/4 tbsp of extra virgin olive oil over the lettuce on each tortilla for added richness.
- Fold the sides of each tortilla inward, then roll tightly from the bottom to enclose the filling. Tip: For a crispier exterior, lightly grill the wraps on a pan over medium heat for 1-2 minutes per side.
Rich in textures and flavors, this Keto Chicken Caesar Wrap offers a crunchy contrast between the crisp lettuce and tender chicken, all wrapped in a soft, low-carb tortilla. Serve it sliced diagonally for an elegant presentation or pack it whole for a convenient on-the-go meal.
Zucchini Noodles with Pesto and Chicken
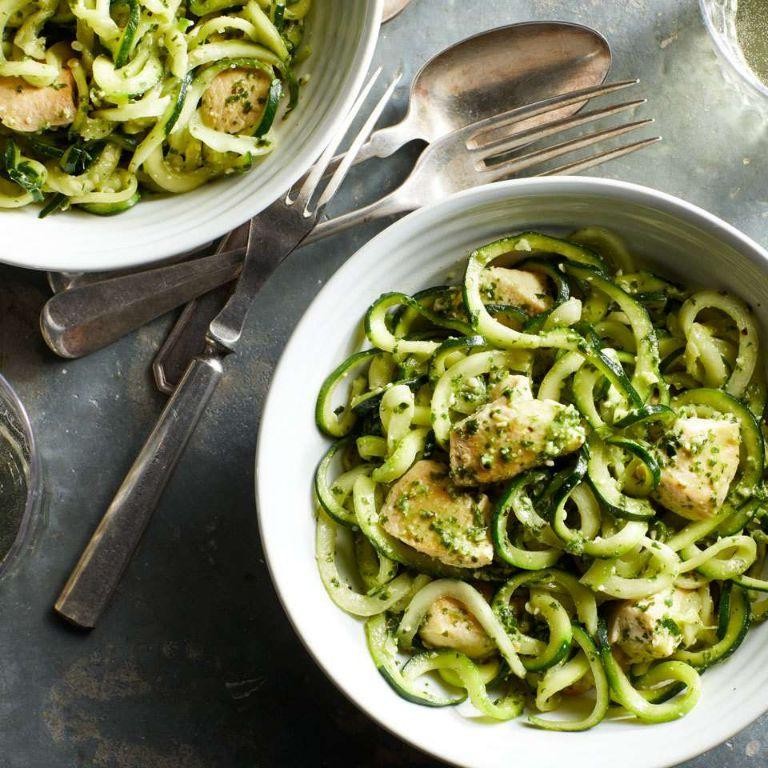
Unlock the simplicity of transforming fresh zucchini into a delightful pasta alternative with this Zucchini Noodles with Pesto and Chicken recipe. Perfect for a light yet satisfying meal, this dish combines the freshness of homemade pesto with the lean protein of chicken, all tossed with crisp zucchini noodles.
Ingredients
- 2 medium zucchinis, spiralized into noodles
- 1 boneless, skinless chicken breast (about 6 oz), cubed
- 1/4 cup extra-virgin olive oil
- 1/4 cup pine nuts, toasted
- 1 cup fresh basil leaves, tightly packed
- 1/2 cup grated Parmesan cheese
- 2 garlic cloves, minced
- 1/2 tsp sea salt
- 1/4 tsp freshly ground black pepper
- 1 tbsp lemon juice
Instructions
- In a food processor, combine basil, pine nuts, Parmesan cheese, garlic, sea salt, and black pepper. Pulse until finely chopped.
- With the processor running, slowly drizzle in olive oil until the pesto is smooth. Add lemon juice and pulse once more to combine. Set aside.
- Heat a large skillet over medium-high heat. Add cubed chicken and cook for 5-7 minutes, turning occasionally, until golden brown and cooked through. Tip: Ensure the chicken is dry before adding to the skillet for better browning.
- Remove chicken from the skillet and set aside. In the same skillet, add zucchini noodles and sauté for 2-3 minutes, just until slightly softened. Tip: Avoid overcooking the zucchini to maintain its texture.
- Return the chicken to the skillet with the zucchini noodles. Add the prepared pesto and toss gently to combine. Heat for an additional 1-2 minutes until everything is warmed through. Tip: For extra flavor, garnish with additional Parmesan and pine nuts before serving.
A harmonious blend of textures and flavors, this dish offers the creaminess of pesto, the tenderness of chicken, and the slight crunch of zucchini noodles. Serve it in a hollowed-out zucchini boat for an elegant presentation or alongside a crisp white wine for a refreshing summer meal.
Cauliflower Fried Rice
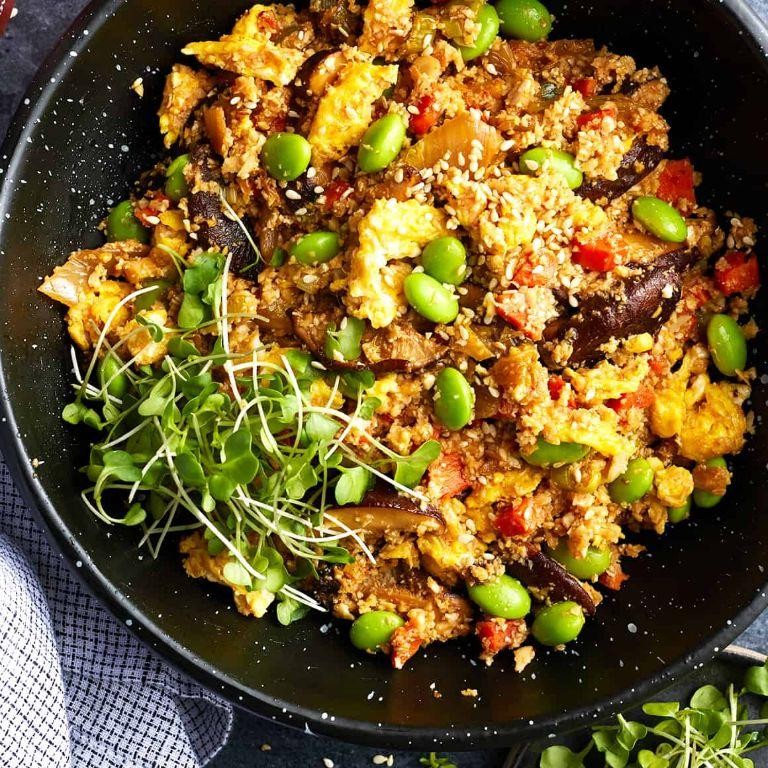
This versatile dish transforms humble cauliflower into a low-carb, nutrient-packed alternative to traditional fried rice, perfect for a quick weeknight dinner or a healthy meal prep option.
Ingredients
- 1 large head of cauliflower, riced (about 4 cups)
- 2 tbsp avocado oil
- 2 pasture-raised eggs, lightly beaten
- 1/2 cup diced yellow onion
- 1/2 cup diced carrots
- 1/2 cup frozen peas, thawed
- 2 cloves garlic, minced
- 2 tbsp coconut aminos
- 1 tsp toasted sesame oil
- 1/4 tsp sea salt
- 1/4 tsp freshly ground black pepper
- 2 green onions, thinly sliced
Instructions
- Heat 1 tbsp avocado oil in a large skillet over medium-high heat until shimmering, about 1 minute.
- Add the beaten eggs to the skillet, stirring constantly until softly scrambled, about 2 minutes. Transfer to a plate and set aside.
- In the same skillet, heat the remaining 1 tbsp avocado oil. Add the diced onion and carrots, sautéing until the onions are translucent and the carrots begin to soften, about 3 minutes.
- Stir in the minced garlic and riced cauliflower, cooking for another 5 minutes until the cauliflower is tender but not mushy.
- Add the thawed peas, coconut aminos, sesame oil, sea salt, and black pepper, stirring to combine evenly.
- Return the scrambled eggs to the skillet, mixing gently to incorporate without breaking the eggs into too small pieces.
- Garnish with sliced green onions before serving.
A light yet satisfying dish, this cauliflower fried rice boasts a delightful crunch from the vegetables and a rich umami flavor from the coconut aminos and sesame oil. Serve it topped with a fried egg for an extra protein boost or alongside grilled chicken for a complete meal.
Keto Taco Salad
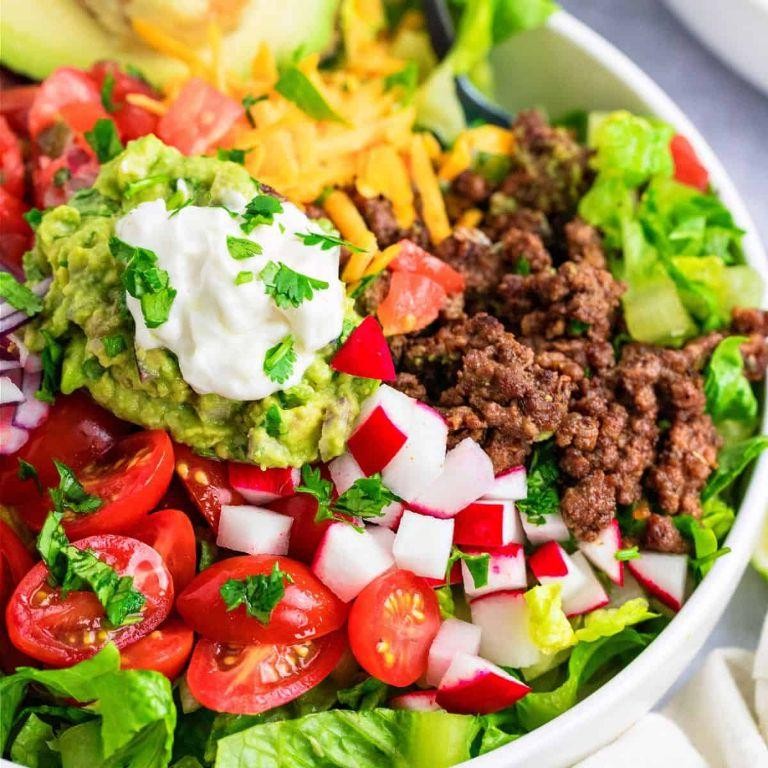
For those seeking a deliciously satisfying meal that aligns with a ketogenic lifestyle, this Keto Taco Salad is a perfect choice. Follow these steps to create a dish that’s as nutritious as it is flavorful.
Ingredients
- 1 lb ground beef, 85% lean
- 1 tbsp avocado oil
- 1 tbsp taco seasoning, no sugar added
- 1/2 cup shredded cheddar cheese
- 1/2 cup romaine lettuce, finely chopped
- 1/4 cup cherry tomatoes, halved
- 1/4 cup sour cream
- 1/4 cup guacamole
- 1 tbsp fresh cilantro, chopped
Instructions
- Heat a large skillet over medium-high heat and add the avocado oil, ensuring the pan is evenly coated.
- Add the ground beef to the skillet, breaking it apart with a spatula, and cook until no pink remains, approximately 5-7 minutes.
- Sprinkle the taco seasoning over the cooked beef, stirring to combine, and cook for an additional 1 minute to meld the flavors.
- While the beef cooks, arrange the romaine lettuce on a serving plate as the base of your salad.
- Top the lettuce with the seasoned ground beef, followed by the shredded cheddar cheese, allowing the heat to slightly melt the cheese.
- Scatter the cherry tomatoes over the salad, then dollop with sour cream and guacamole.
- Garnish with fresh cilantro for a burst of color and flavor.
Great for a quick lunch or dinner, this Keto Taco Salad offers a crunchy, creamy, and savory experience. Serve it with a side of pork rinds for an extra crunch or enjoy it as is for a low-carb feast.
Buffalo Chicken Stuffed Peppers
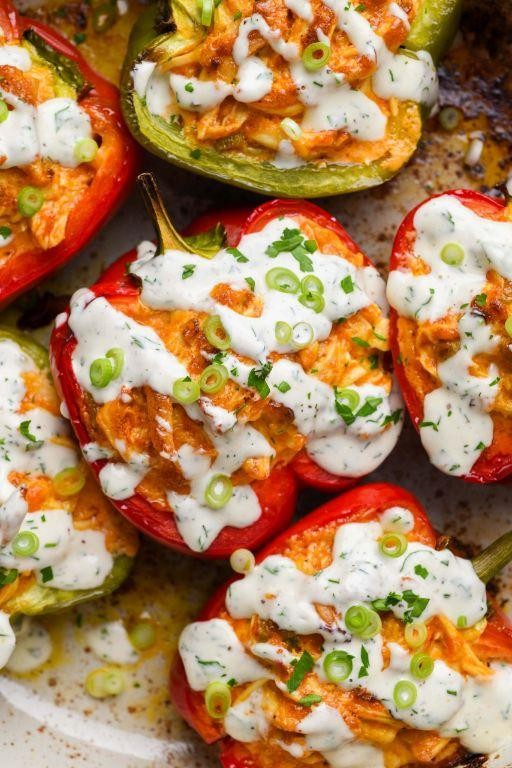
Sometimes, the best dishes come from combining classic flavors in new ways, and that’s exactly what we’re doing today with these Buffalo Chicken Stuffed Peppers. Perfect for a weeknight dinner or a game-day appetizer, this recipe brings together the spicy, tangy taste of buffalo sauce with the comforting, hearty texture of stuffed peppers.
Ingredients
- 4 large bell peppers, tops removed and seeds discarded
- 2 cups cooked chicken, shredded (preferably from a rotisserie chicken for added flavor)
- 1/2 cup buffalo sauce (choose a high-quality sauce for the best flavor)
- 1/2 cup blue cheese crumbles
- 1/4 cup cream cheese, softened
- 1/4 cup celery, finely diced
- 1/4 cup green onions, thinly sliced
- 1 tbsp clarified butter
- 1 tsp garlic powder
- 1/2 tsp smoked paprika
- Salt to taste
Instructions
- Preheat your oven to 375°F (190°C) and lightly grease a baking dish with clarified butter to prevent sticking.
- In a large mixing bowl, combine the shredded chicken, buffalo sauce, blue cheese crumbles, softened cream cheese, diced celery, green onions, garlic powder, smoked paprika, and salt. Mix until all ingredients are evenly distributed.
- Carefully stuff each bell pepper with the chicken mixture, packing it in tightly to ensure each pepper is fully filled.
- Place the stuffed peppers in the prepared baking dish and bake in the preheated oven for 25-30 minutes, or until the peppers are tender and the filling is heated through.
- For a golden top, broil the peppers for an additional 2-3 minutes, watching closely to prevent burning.
- Remove from the oven and let rest for 5 minutes before serving to allow the flavors to meld together.
Yield: These Buffalo Chicken Stuffed Peppers offer a delightful contrast of textures, from the crisp-tender peppers to the creamy, spicy filling. Serve them with a side of ranch or blue cheese dressing for dipping, or slice them into rings for a unique presentation at your next gathering.
Spinach and Feta Stuffed Chicken Breast
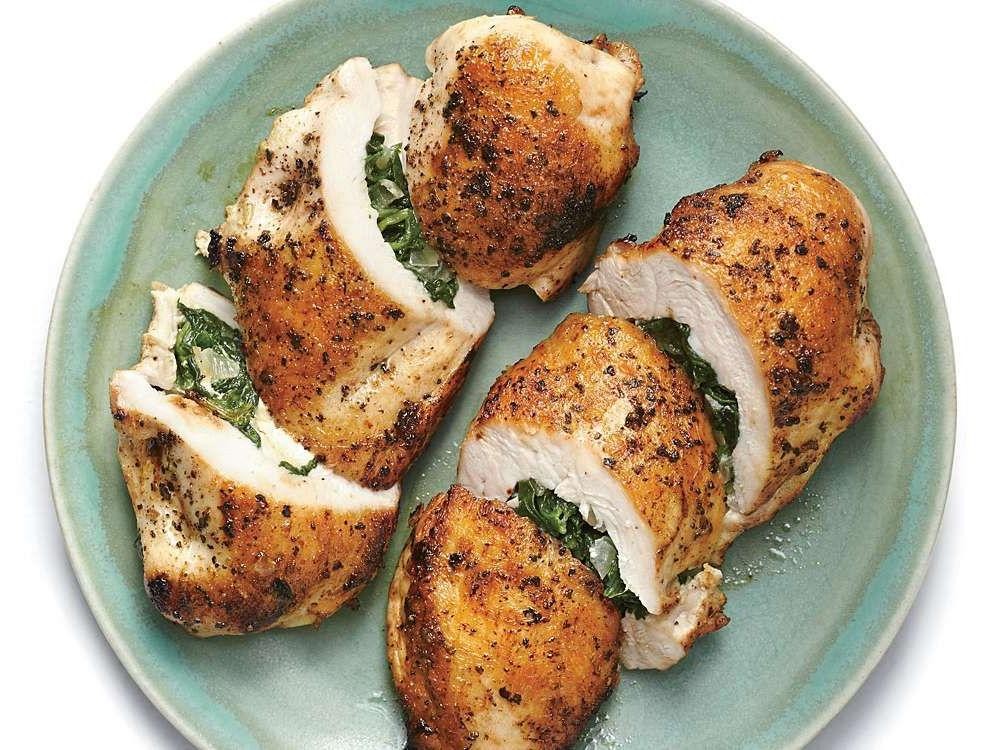
Zesty and flavorful, this Spinach and Feta Stuffed Chicken Breast is a delightful dish that combines tender chicken with a rich, creamy filling. Perfect for a weeknight dinner or a special occasion, it’s surprisingly simple to make with a bit of guidance.
Ingredients
- 4 boneless, skinless chicken breasts (about 6 oz each)
- 1 cup fresh spinach, finely chopped
- 1/2 cup feta cheese, crumbled
- 1/4 cup cream cheese, softened
- 1 tbsp clarified butter
- 1 tsp garlic, minced
- 1/2 tsp dried oregano
- 1/4 tsp salt
- 1/4 tsp black pepper, freshly ground
- 1 tbsp olive oil
Instructions
- Preheat your oven to 375°F (190°C) to ensure it’s ready for baking.
- In a mixing bowl, combine the finely chopped spinach, crumbled feta, softened cream cheese, minced garlic, dried oregano, salt, and black pepper. Mix until well incorporated.
- Using a sharp knife, carefully cut a pocket into the side of each chicken breast, being careful not to cut all the way through.
- Stuff each chicken breast with an equal amount of the spinach and feta mixture, then secure the opening with toothpicks if necessary.
- Heat the olive oil and clarified butter in an oven-safe skillet over medium-high heat until the butter is melted and the oil is shimmering.
- Add the stuffed chicken breasts to the skillet and sear for 3-4 minutes on each side, or until golden brown.
- Transfer the skillet to the preheated oven and bake for 20-25 minutes, or until the chicken reaches an internal temperature of 165°F (74°C).
- Remove the chicken from the oven and let it rest for 5 minutes before serving to allow the juices to redistribute.
Delightfully juicy and packed with flavor, the chicken breasts emerge from the oven with a golden crust and a meltingly tender interior. Serve alongside a crisp salad or roasted vegetables for a complete meal that’s as nutritious as it is delicious.
Keto Broccoli Cheese Soup
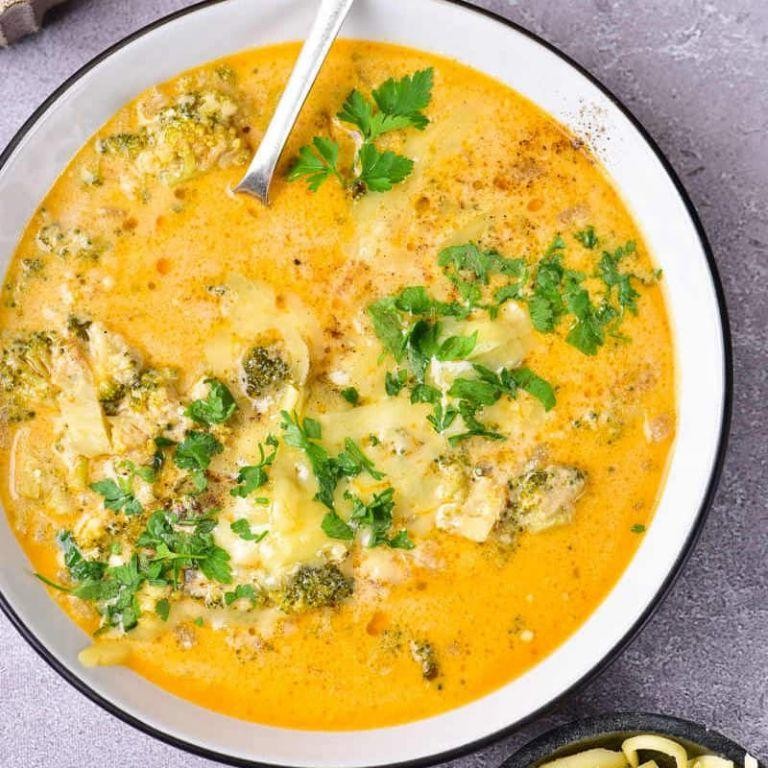
On a chilly evening, nothing warms the soul quite like a bowl of creamy Keto Broccoli Cheese Soup. This recipe is designed to guide you through each step with precision, ensuring a delicious outcome every time.
Ingredients
- 4 cups fresh broccoli florets, finely chopped
- 2 cups sharp cheddar cheese, freshly grated
- 1/2 cup heavy cream
- 4 tbsp unsalted butter
- 1/2 cup onion, finely diced
- 2 cloves garlic, minced
- 4 cups chicken broth, homemade preferred
- 1/2 tsp xanthan gum (for thickening)
- Salt and freshly ground black pepper, to precise taste
Instructions
- In a large pot over medium heat, melt the unsalted butter until it begins to foam slightly.
- Add the finely diced onion and minced garlic, sautéing until translucent, about 3-4 minutes, stirring occasionally to prevent burning.
- Pour in the chicken broth, bringing the mixture to a gentle boil before reducing to a simmer.
- Add the finely chopped broccoli florets to the pot, cooking until they are tender but still vibrant green, approximately 5-6 minutes.
- Sprinkle the xanthan gum over the soup, whisking vigorously to incorporate and thicken the broth without forming lumps.
- Reduce the heat to low, then stir in the heavy cream and freshly grated sharp cheddar cheese until the cheese is fully melted and the soup is smooth.
- Season with salt and freshly ground black pepper, adjusting carefully to achieve the perfect balance of flavors.
Ultimate comfort in a bowl, this Keto Broccoli Cheese Soup boasts a velvety texture with a rich, cheesy flavor that’s both satisfying and indulgent. Serve it with a sprinkle of extra cheddar on top or a side of crispy bacon bits for an added crunch.
Garlic Butter Steak Bites
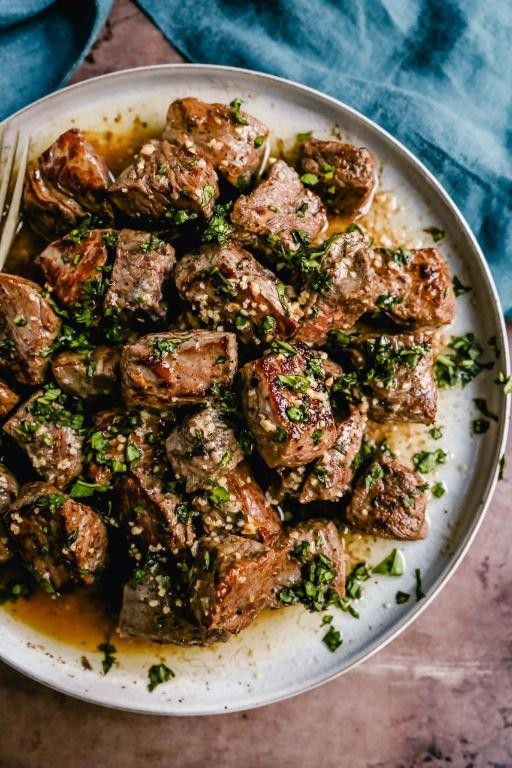
Delightfully simple yet irresistibly flavorful, these Garlic Butter Steak Bites are a perfect introduction to cooking steak at home. Designed for beginners, this recipe breaks down each step to ensure succulent, garlicky bites every time.
Ingredients
- 1.5 lbs sirloin steak, cut into 1-inch cubes
- 3 tbsp unsalted butter, clarified
- 4 garlic cloves, minced
- 1 tbsp fresh rosemary, finely chopped
- 1 tsp kosher salt
- 1/2 tsp freshly ground black pepper
- 2 tbsp extra virgin olive oil
Instructions
- Pat the sirloin steak cubes dry with paper towels to ensure a good sear.
- Season the steak cubes evenly with kosher salt and freshly ground black pepper.
- Heat extra virgin olive oil in a large skillet over medium-high heat until shimmering, about 2 minutes.
- Add the steak cubes in a single layer, ensuring they are not overcrowded to allow for even cooking.
- Sear the steak cubes for 2 minutes on each side, or until a golden-brown crust forms.
- Reduce the heat to medium and add clarified butter, minced garlic, and chopped rosemary to the skillet.
- Continue cooking, stirring frequently, for an additional 1-2 minutes, or until the garlic is fragrant but not browned.
- Remove the skillet from heat and let the steak bites rest for 2 minutes before serving.
Zesty and rich, these Garlic Butter Steak Bites boast a tender interior with a beautifully caramelized exterior. Serve them over a bed of creamy mashed potatoes or alongside a crisp green salad for a complete meal.
Keto BLT with Cloud Bread
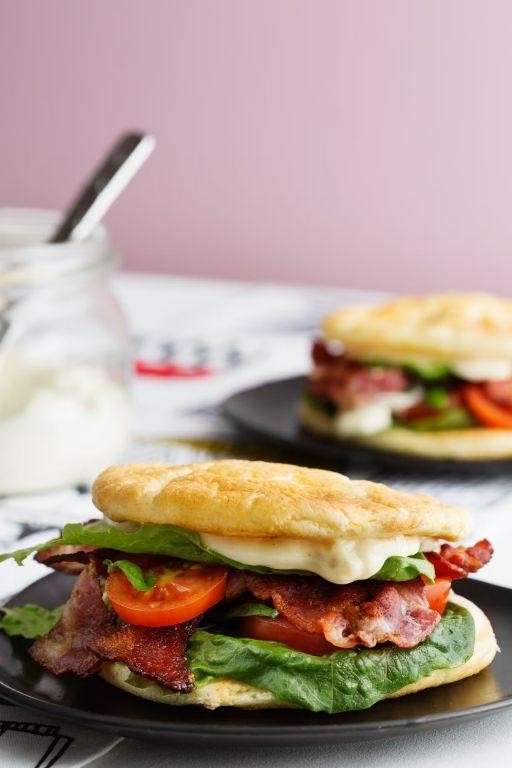
Delightfully simple yet satisfying, this Keto BLT with Cloud Bread transforms the classic sandwich into a low-carb masterpiece. Perfect for those following a ketogenic diet, it combines crispy bacon, fresh lettuce, and juicy tomatoes with the light, airy texture of homemade cloud bread.
Ingredients
- 4 large pasture-raised eggs, separated
- 1/4 tsp cream of tartar
- 3 oz full-fat cream cheese, softened
- 1/4 tsp sea salt
- 6 slices sugar-free bacon
- 1 cup iceberg lettuce, shredded
- 1 medium heirloom tomato, thinly sliced
- 2 tbsp mayonnaise
Instructions
- Preheat your oven to 300°F (150°C) and line a baking sheet with parchment paper.
- In a large bowl, beat the egg whites and cream of tartar with an electric mixer until stiff peaks form, about 3 minutes.
- In a separate bowl, mix the egg yolks, softened cream cheese, and sea salt until smooth.
- Gently fold the yolk mixture into the beaten egg whites until just combined, being careful not to deflate the whites.
- Spoon the mixture onto the prepared baking sheet, forming 4 even rounds. Bake for 25 minutes, or until golden and set.
- While the cloud bread bakes, cook the bacon in a skillet over medium heat until crispy, about 5 minutes per side. Drain on paper towels.
- Once the cloud bread is cooled, assemble the sandwiches by spreading mayonnaise on each piece, then layering with lettuce, tomato slices, and bacon.
- Tip: For extra flavor, lightly toast the cloud bread before assembling. Tip: Ensure the cream cheese is fully softened to avoid lumps in the batter. Tip: Use a serrated knife to slice the tomato for even, thin slices.
Keto BLT with Cloud Bread offers a delightful contrast of textures, from the crispiness of the bacon to the soft, pillowy cloud bread. Serve it with a side of avocado slices for an added layer of creaminess and healthy fats.
Salmon Avocado Salad
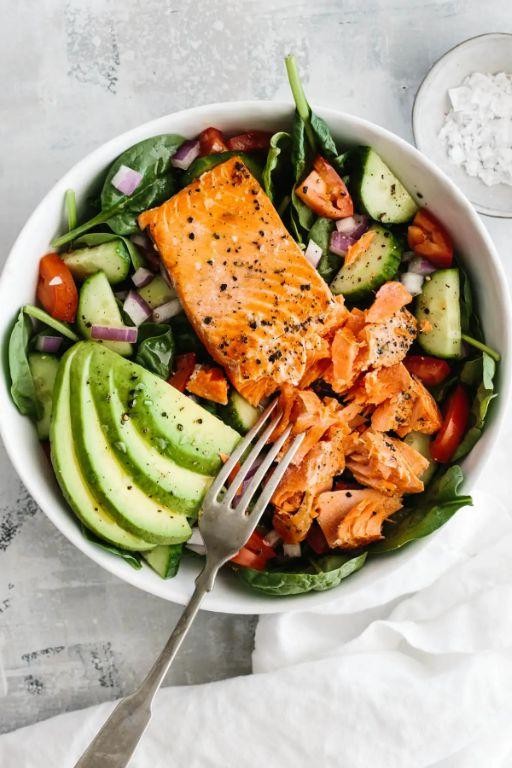
Begin by exploring the delightful harmony of flavors and textures in this Salmon Avocado Salad, a dish that perfectly balances the richness of salmon with the creamy, buttery texture of avocado. Ideal for a light lunch or a sophisticated starter, this recipe is as nutritious as it is delicious.
Ingredients
- 1 lb wild-caught salmon fillet, skin removed
- 2 ripe Hass avocados, diced
- 1 cup cherry tomatoes, halved
- 1/4 cup red onion, finely minced
- 2 tbsp extra-virgin olive oil
- 1 tbsp fresh lemon juice
- 1/2 tsp sea salt
- 1/4 tsp freshly ground black pepper
- 1 tbsp fresh dill, chopped
Instructions
- Preheat your oven to 375°F (190°C) and line a baking sheet with parchment paper.
- Place the salmon fillet on the prepared baking sheet, drizzle with 1 tbsp of extra-virgin olive oil, and season with sea salt and black pepper.
- Bake the salmon for 12-15 minutes, or until it flakes easily with a fork. Tip: For even cooking, let the salmon come to room temperature before baking.
- While the salmon bakes, combine the diced avocados, cherry tomatoes, red onion, and fresh dill in a large mixing bowl.
- In a small bowl, whisk together the remaining 1 tbsp of extra-virgin olive oil and fresh lemon juice to create the dressing.
- Once the salmon is cooked, let it cool for 5 minutes, then flake it into large chunks using a fork.
- Gently fold the flaked salmon into the avocado mixture, then drizzle with the dressing. Tip: For the best texture, add the salmon while it’s still slightly warm.
- Toss the salad gently to combine, being careful not to mash the avocados. Tip: Use a silicone spatula for gentle mixing.
Combining the flaky, moist salmon with the creamy avocados and crisp vegetables creates a salad that’s both refreshing and satisfying. Serve it on a bed of mixed greens for an extra crunch or in a toasted whole-grain pita for a hearty lunch option.
Keto Meatballs with Zucchini Noodles
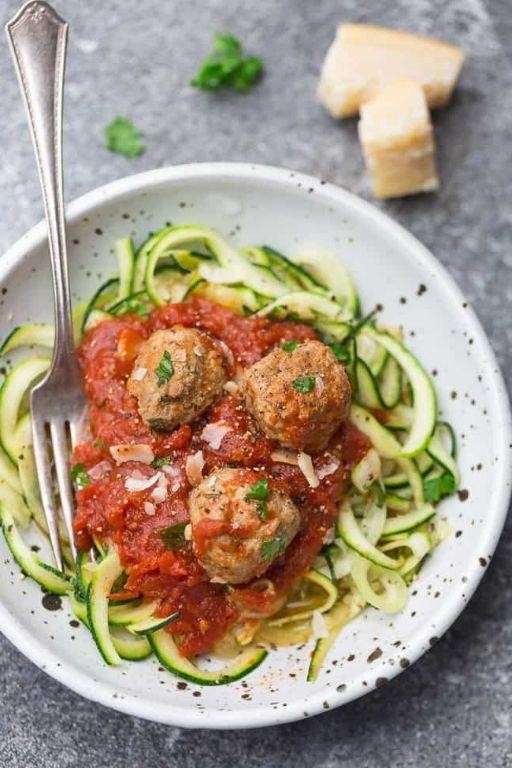
Amidst the hustle of daily life, finding a meal that’s both satisfying and aligns with your keto goals can feel like a quest. Let me guide you through creating Keto Meatballs with Zucchini Noodles, a dish that’s as nourishing as it is delightful, perfect for any night of the week.
Ingredients
- 1 lb ground beef, 80% lean
- 1/2 cup almond flour
- 1/4 cup grated Parmesan cheese
- 1 large pasture-raised egg, lightly beaten
- 2 cloves garlic, minced
- 1 tsp sea salt
- 1/2 tsp black pepper, freshly ground
- 2 tbsp olive oil
- 2 medium zucchinis, spiralized into noodles
- 1 tbsp clarified butter
- 1/4 cup fresh basil, thinly sliced
Instructions
- Preheat your oven to 375°F (190°C) and line a baking sheet with parchment paper.
- In a large mixing bowl, combine the ground beef, almond flour, Parmesan cheese, beaten egg, minced garlic, sea salt, and black pepper. Mix until just combined to avoid tough meatballs.
- Form the mixture into 1-inch diameter meatballs, placing each onto the prepared baking sheet as you go. This recipe should yield about 20 meatballs.
- Bake in the preheated oven for 20 minutes, or until the meatballs are golden brown and reach an internal temperature of 160°F (71°C).
- While the meatballs bake, heat olive oil in a large skillet over medium heat. Add the zucchini noodles and sauté for 2-3 minutes, just until they begin to soften. Tip: Avoid overcooking to maintain a slight crunch.
- Remove the zucchini noodles from the skillet and set aside. In the same skillet, melt the clarified butter over medium heat.
- Add the baked meatballs to the skillet, tossing gently to coat in the butter, and cook for an additional 2 minutes to enhance flavor.
- Divide the zucchini noodles among plates, top with the meatballs, and garnish with fresh basil.
Combining the savory depth of the meatballs with the fresh, light zucchini noodles creates a balanced dish that’s both hearty and refreshing. For an extra touch of elegance, drizzle with a bit of high-quality olive oil before serving.
Cheesy Bacon and Egg Muffins

Let’s dive into making these irresistibly savory Cheesy Bacon and Egg Muffins, perfect for a quick breakfast or a hearty snack. These muffins combine the richness of cheese, the smokiness of bacon, and the fluffy texture of eggs in a convenient handheld form.
Ingredients
- 6 slices thick-cut bacon, diced
- 1 cup sharp cheddar cheese, grated
- 6 pasture-raised eggs, lightly beaten
- 1/4 cup whole milk
- 1/2 tsp sea salt
- 1/4 tsp freshly ground black pepper
- 1 tbsp clarified butter, for greasing
Instructions
- Preheat your oven to 350°F (175°C) and grease a 6-cup muffin tin with clarified butter, ensuring each cup is lightly coated to prevent sticking.
- In a skillet over medium heat, cook the diced bacon until crispy, about 5-7 minutes. Transfer to a paper towel-lined plate to drain excess fat.
- In a large mixing bowl, whisk together the lightly beaten eggs, whole milk, sea salt, and black pepper until fully combined.
- Evenly distribute the cooked bacon and grated sharp cheddar cheese among the prepared muffin cups.
- Carefully pour the egg mixture over the bacon and cheese in each muffin cup, filling each about 3/4 full to allow room for rising.
- Bake in the preheated oven for 20-25 minutes, or until the muffins are set and the tops are lightly golden. A toothpick inserted into the center should come out clean.
- Let the muffins cool in the tin for 5 minutes before transferring to a wire rack. This rest period helps them set further and makes removal easier.
Kickstart your morning with these Cheesy Bacon and Egg Muffins, where the melty cheese and crispy bacon bits create a delightful contrast with the soft, fluffy egg. Serve them warm with a dollop of sour cream or a side of avocado slices for an extra layer of flavor.
Keto Turkey and Cheese Roll-Ups

Every home cook needs a go-to recipe that’s both satisfying and simple to prepare, and these Keto Turkey and Cheese Roll-Ups fit the bill perfectly. Let’s walk through the process together, ensuring you end up with a delicious, low-carb meal that doesn’t skimp on flavor.
Ingredients
- 4 large, thinly sliced pasture-raised turkey breast cutlets (about 1/4 inch thick)
- 4 slices of aged cheddar cheese (about 1 oz each)
- 1 tbsp Dijon mustard
- 1 tbsp extra-virgin olive oil
- 1/2 tsp smoked paprika
- 1/4 tsp sea salt
- 1/4 tsp freshly ground black pepper
- 4 fresh basil leaves
Instructions
- Lay the turkey cutlets flat on a clean work surface. Season both sides evenly with sea salt and freshly ground black pepper.
- Spread 1/4 tbsp of Dijon mustard evenly over each turkey cutlet.
- Place one slice of aged cheddar cheese and one basil leaf on the lower third of each turkey cutlet.
- Starting from the end with the cheese and basil, tightly roll each turkey cutlet away from you, securing the ends with toothpicks if necessary.
- Heat extra-virgin olive oil in a non-stick skillet over medium heat (350°F) until shimmering.
- Add the turkey roll-ups to the skillet, seam side down, and cook for 3-4 minutes until golden brown. Rotate to cook all sides evenly, about 12 minutes total.
- Sprinkle the cooked roll-ups with smoked paprika for an extra layer of flavor.
- Remove from heat and let rest for 2 minutes before slicing or serving whole.
You’ll love the contrast between the crispy exterior and the melty cheese inside. For an elegant presentation, slice the roll-ups diagonally and serve atop a bed of mixed greens drizzled with olive oil.
Spicy Tuna Avocado Boats
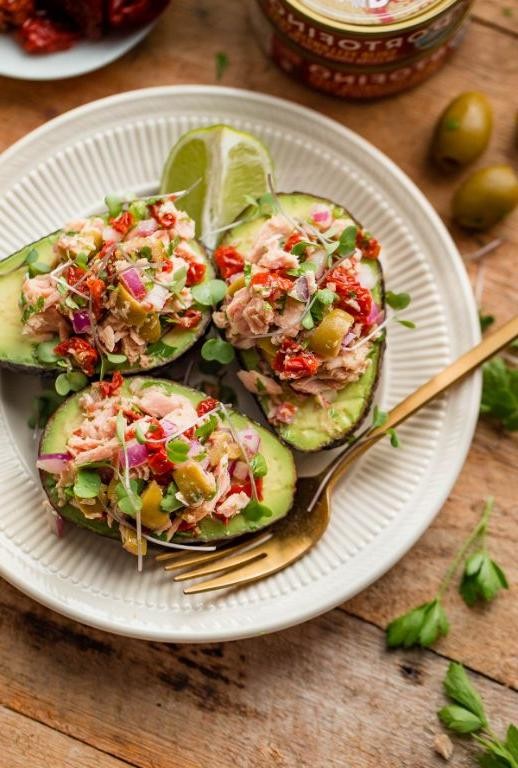
Delightfully simple yet bursting with flavor, these Spicy Tuna Avocado Boats are a perfect blend of creamy, spicy, and fresh. Ideal for a quick lunch or an elegant appetizer, this recipe guides you through creating a dish that’s as nutritious as it is delicious.
Ingredients
- 2 ripe avocados, halved and pitted
- 1 cup sushi-grade tuna, finely diced
- 1 tbsp sriracha sauce
- 1 tbsp mayonnaise
- 1 tsp soy sauce
- 1/2 tsp sesame oil
- 1 tbsp fresh lime juice
- 1/4 cup red onion, finely diced
- 1 tbsp cilantro, finely chopped
- 1/2 tsp sea salt
- 1/4 tsp freshly ground black pepper
- 1 tbsp toasted sesame seeds
Instructions
- In a medium mixing bowl, combine the diced tuna, sriracha, mayonnaise, soy sauce, sesame oil, and lime juice. Stir gently until all ingredients are evenly incorporated.
- Add the diced red onion and chopped cilantro to the tuna mixture. Fold gently to combine, ensuring the onion and cilantro are evenly distributed throughout.
- Season the mixture with sea salt and freshly ground black pepper, adjusting to your preference but starting with the recommended amounts for balance.
- Scoop the spicy tuna mixture evenly into the hollowed-out halves of the avocados, dividing the mixture among the four halves.
- Sprinkle the filled avocado boats with toasted sesame seeds for a nutty flavor and appealing crunch.
- Serve immediately, or chill in the refrigerator for up to 30 minutes to allow the flavors to meld together more intensely.
Offering a creamy texture from the avocado contrasted with the spicy, tangy tuna mixture, these boats are a feast for the senses. For an extra touch of elegance, garnish with microgreens or a drizzle of additional sriracha before serving.
Keto Hamburger Salad
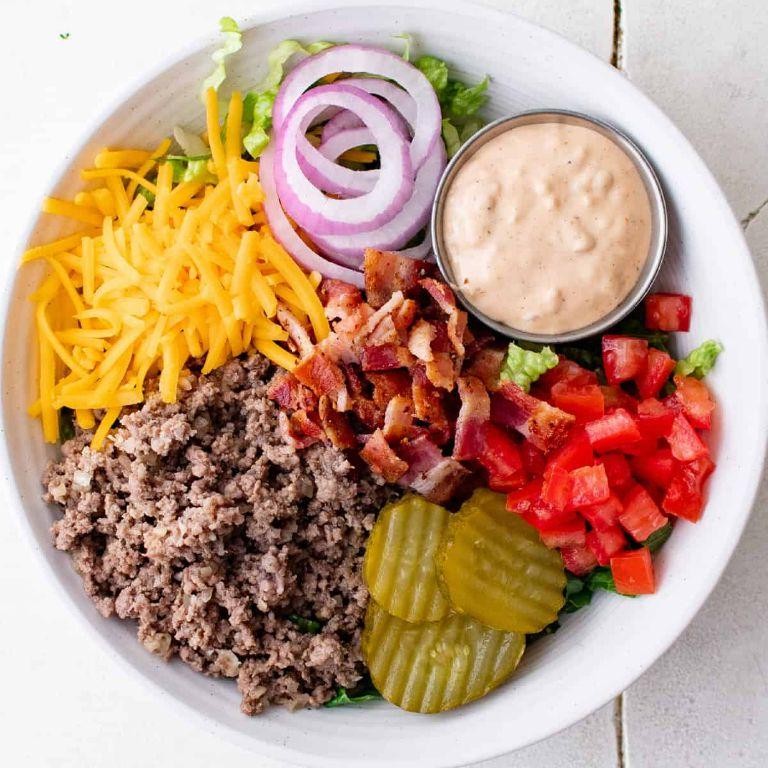
Now, let’s dive into creating a Keto Hamburger Salad that’s as nutritious as it is delicious. This dish combines the hearty flavors of a classic hamburger with the freshness of a salad, making it a perfect meal for those following a ketogenic lifestyle.
Ingredients
- 1 lb ground beef, 80/20 blend
- 1 tbsp avocado oil
- 1 tsp sea salt
- 1/2 tsp black pepper, freshly ground
- 1 tsp garlic powder
- 1 tsp onion powder
- 4 cups romaine lettuce, chopped
- 1/2 cup cherry tomatoes, halved
- 1/4 cup red onion, thinly sliced
- 1/2 cup cheddar cheese, shredded
- 1/4 cup sugar-free pickles, chopped
- 2 tbsp mayonnaise
- 1 tbsp mustard
- 1 tsp apple cider vinegar
Instructions
- Heat a large skillet over medium-high heat and add the avocado oil.
- Add the ground beef to the skillet, breaking it apart with a spatula. Cook for 5 minutes, or until the beef is no longer pink.
- Season the beef with sea salt, black pepper, garlic powder, and onion powder. Stir to combine and cook for an additional 2 minutes. Tip: For extra flavor, consider browning the beef slightly.
- Remove the skillet from heat and let the beef cool slightly.
- In a large bowl, combine the romaine lettuce, cherry tomatoes, red onion, cheddar cheese, and sugar-free pickles.
- In a small bowl, whisk together the mayonnaise, mustard, and apple cider vinegar to create the dressing.
- Add the slightly cooled ground beef to the salad bowl.
- Drizzle the dressing over the salad and toss gently to combine. Tip: Ensure the salad is evenly coated with the dressing for the best flavor.
- Serve immediately. Tip: For an extra crunch, add a handful of crushed pork rinds on top before serving.
Absolutely satisfying, this Keto Hamburger Salad offers a delightful mix of textures from the crisp lettuce to the juicy beef, all brought together with a tangy dressing. Consider serving it in a hollowed-out tomato for a creative presentation that’s sure to impress.
Creamy Tuscan Garlic Chicken

Sometimes, the most comforting dishes come together with just a few simple steps and ingredients. Creamy Tuscan Garlic Chicken is a perfect example, blending rich flavors and creamy textures in a dish that feels both luxurious and approachable.
Ingredients
- 4 boneless, skinless chicken breasts, patted dry
- 1 tbsp extra virgin olive oil
- 2 tbsp unsalted butter
- 3 cloves garlic, minced
- 1 cup heavy cream
- 1/2 cup chicken broth
- 1 tsp garlic powder
- 1 tsp Italian seasoning
- 1/2 cup sun-dried tomatoes, chopped
- 1 cup baby spinach, tightly packed
- 1/2 cup grated Parmesan cheese
- Salt and freshly ground black pepper, to taste
Instructions
- Season the chicken breasts with salt, pepper, garlic powder, and Italian seasoning on both sides.
- Heat olive oil in a large skillet over medium-high heat until shimmering, about 2 minutes.
- Add the chicken breasts to the skillet and cook for 5-7 minutes per side, or until golden brown and cooked through. Remove and set aside on a plate.
- In the same skillet, melt butter over medium heat. Add minced garlic and sauté for 1 minute, or until fragrant.
- Pour in heavy cream and chicken broth, stirring to combine. Bring to a simmer and cook for 3 minutes, allowing the sauce to slightly thicken.
- Add sun-dried tomatoes and spinach to the sauce, stirring until the spinach wilts, about 2 minutes.
- Stir in Parmesan cheese until melted and the sauce is smooth, about 1 minute.
- Return the chicken breasts to the skillet, spooning the sauce over them. Cook for an additional 2 minutes to heat through.
Best enjoyed immediately, this dish offers a velvety sauce that clings to the tender chicken, with the sun-dried tomatoes adding a sweet tanginess. For an extra touch of elegance, serve over a bed of al dente fettuccine or with a side of roasted vegetables.
Keto Sushi Rolls
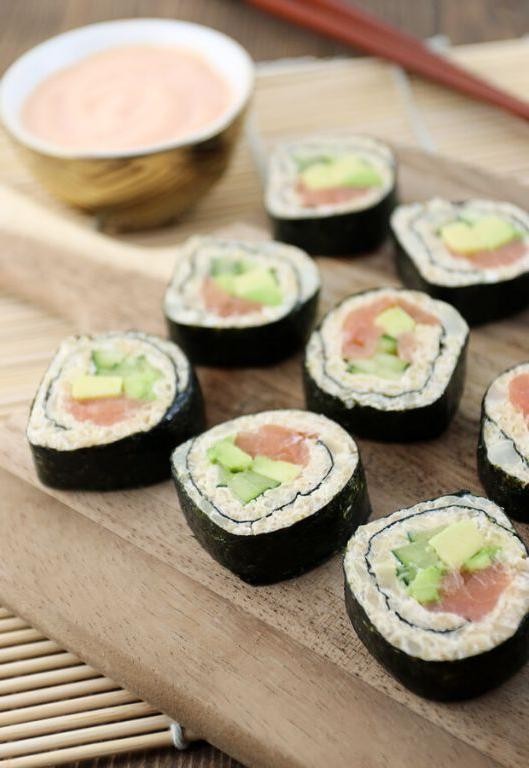
Let’s dive into making Keto Sushi Rolls, a delightful low-carb alternative that doesn’t skimp on flavor or texture. Perfect for those following a ketogenic lifestyle or anyone looking to reduce their carb intake without sacrificing their sushi cravings.
Ingredients
- 1 cup cauliflower rice, steamed and cooled
- 2 tbsp cream cheese, softened
- 1 tbsp rice vinegar
- 1/2 tsp erythritol
- 1/4 tsp sea salt
- 4 sheets nori
- 1/2 avocado, thinly sliced
- 4 oz smoked salmon, thinly sliced
- 1/4 cucumber, julienned
- 1 tbsp sesame seeds, toasted
Instructions
- In a medium bowl, combine the steamed cauliflower rice, softened cream cheese, rice vinegar, erythritol, and sea salt. Mix until well incorporated. Tip: Ensure the cauliflower rice is cooled to prevent the nori from becoming soggy.
- Lay a nori sheet on a bamboo sushi mat. Spread 1/4 of the cauliflower mixture evenly over the nori, leaving a 1-inch border at the top.
- Arrange slices of avocado, smoked salmon, and julienned cucumber horizontally across the center of the cauliflower mixture.
- Using the bamboo mat, tightly roll the nori away from you, applying even pressure. Tip: Wet the 1-inch border with a bit of water to help seal the roll.
- Repeat the process with the remaining nori sheets and filling.
- Sprinkle the toasted sesame seeds over the rolls. Tip: Use a sharp knife to slice each roll into 6 pieces, wiping the knife with a damp cloth between cuts for clean slices.
Serve these Keto Sushi Rolls with a side of tamari or coconut aminos for dipping. The combination of creamy avocado, smoky salmon, and crisp cucumber wrapped in flavorful cauliflower rice offers a satisfying crunch and a burst of freshness in every bite.
Baked Parmesan Crusted Pork Chops

Yieldingly tender and packed with flavor, these Baked Parmesan Crusted Pork Chops are a foolproof way to impress at the dinner table. Perfect for beginners, this recipe guides you through each step to achieve a golden, crispy exterior with a juicy interior.
Ingredients
- 4 bone-in pork chops, 1-inch thick
- 1 cup finely grated Parmesan cheese
- 1/2 cup panko breadcrumbs
- 1 tbsp garlic powder
- 1 tbsp Italian seasoning
- 1/2 tsp kosher salt
- 1/4 tsp freshly ground black pepper
- 2 pasture-raised eggs, lightly beaten
- 1/4 cup clarified butter, melted
Instructions
- Preheat your oven to 400°F (204°C) and line a baking sheet with parchment paper.
- In a shallow dish, combine the Parmesan cheese, panko breadcrumbs, garlic powder, Italian seasoning, kosher salt, and black pepper.
- Dip each pork chop into the beaten eggs, ensuring full coverage.
- Coat the egg-dipped pork chops in the Parmesan mixture, pressing gently to adhere.
- Place the coated pork chops on the prepared baking sheet and drizzle with melted clarified butter.
- Bake for 20-25 minutes, or until the internal temperature reaches 145°F (63°C) and the crust is golden brown.
- Let the pork chops rest for 5 minutes before serving to allow the juices to redistribute.
Crispy on the outside and succulent within, these pork chops offer a delightful contrast in textures. Serve alongside a crisp arugula salad or over a bed of creamy mashed potatoes for a complete meal.
Conclusion
Whether you’re new to keto or a seasoned pro, these 19 delicious lunch recipes are sure to keep your weekdays exciting and flavorful. We hope this roundup inspires you to try something new and makes meal prep a breeze. Don’t forget to leave a comment with your favorite recipe and share this article on Pinterest to spread the keto love!