Welcome to a taste of Southern Kentucky, where comfort meets tradition in every bite! Whether you’re craving the warmth of homemade biscuits or the rich flavors of slow-cooked barbecue, our roundup of 18 delicious recipes is your ticket to a culinary adventure. Perfect for home cooks looking to bring a piece of the South into their kitchen, these dishes promise to delight. Ready to explore? Let’s dive in!
Kentucky Hot Brown Sandwich

Unbelievably comforting and rich, the Kentucky Hot Brown Sandwich is a dish that takes me back to my first visit to the Bluegrass State, where I learned that this open-faced sandwich is more than just a meal—it’s a celebration of Southern hospitality. Perfect for using up leftover turkey, it’s a creamy, cheesy, and utterly indulgent treat that’s surprisingly simple to make at home.
Ingredients
- 2 slices of thick-cut bread (Texas toast works wonderfully)
- 4 oz roasted turkey breast, sliced (leftovers are perfect here)
- 2 slices of tomato (ripe but firm)
- 4 strips of bacon (thick-cut for extra crunch)
- 1/2 cup shredded cheddar cheese (sharp for more flavor)
- 1/2 cup Mornay sauce (see tip below for a quick version)
- 1 tbsp unsalted butter (for toasting the bread)
- Paprika and parsley for garnish (optional but adds color)
Instructions
- Preheat your oven to 400°F (200°C) to get it ready for broiling the sandwiches.
- In a skillet over medium heat, cook the bacon until crispy, about 4 minutes per side. Drain on paper towels and set aside.
- Butter one side of each bread slice and toast in the skillet until golden, about 2 minutes per side. Tip: Keep an eye on the bread to prevent burning.
- Place the toasted bread on a baking sheet. Layer each slice with turkey, tomato slices, and half of the Mornay sauce. Tip: Warm the Mornay sauce slightly if it’s too thick to spread easily.
- Sprinkle shredded cheddar cheese evenly over the sandwiches. Broil in the oven for 3-5 minutes, until the cheese is bubbly and slightly browned. Tip: Watch closely during broiling to avoid over-browning.
- Remove from the oven, top each sandwich with two bacon strips, and garnish with paprika and parsley if desired.
Kentucky Hot Brown Sandwich emerges from the oven with a glorious mix of textures—crispy bacon, creamy sauce, and melted cheese over tender turkey and toast. Serve it with a side of pickles or a simple green salad to cut through the richness, making it a meal to remember.
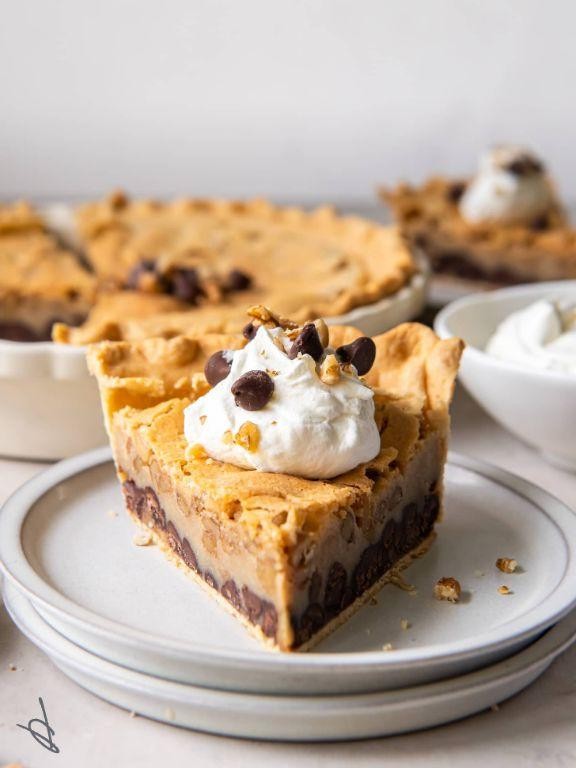
Derby Pie
How many times have I found myself craving something sweet, nutty, and utterly comforting? Too many to count, and that’s exactly why Derby Pie has become a staple in my kitchen. It’s like a hug in dessert form, perfect for those days when only chocolate and pecans will do.
Ingredients
- 1 cup all-purpose flour (spooned and leveled)
- 1/2 cup granulated sugar
- 1/2 cup packed brown sugar (light or dark, your choice)
- 1/2 cup unsalted butter, melted and slightly cooled
- 2 large eggs, at room temperature
- 1 tsp vanilla extract (pure for best flavor)
- 1 cup semi-sweet chocolate chips
- 1 cup chopped pecans (toast them for extra flavor)
- 1 unbaked 9-inch pie crust (homemade or store-bought)
Instructions
- Preheat your oven to 350°F (175°C). This ensures it’s perfectly heated by the time your pie is ready to bake.
- In a large bowl, whisk together the flour, granulated sugar, and brown sugar until well combined.
- Add the melted butter, eggs, and vanilla extract to the dry ingredients. Mix until just combined; overmixing can make the pie tough.
- Fold in the chocolate chips and pecans gently, ensuring they’re evenly distributed throughout the batter.
- Pour the batter into the unbaked pie crust, spreading it evenly with a spatula.
- Bake for 40-45 minutes, or until the top is golden and a toothpick inserted into the center comes out mostly clean. A few crumbs are okay; it will set as it cools.
- Let the pie cool on a wire rack for at least 2 hours before slicing. This patience pays off with cleaner slices.
Zesty as it may sound, the contrast between the gooey chocolate and crunchy pecans in this Derby Pie is nothing short of magical. Serve it slightly warm with a scoop of vanilla ice cream for an unforgettable dessert experience.
Bourbon Balls

Very few things bring me as much joy as whipping up a batch of Bourbon Balls during the holiday season. There’s something about the rich, boozy flavor combined with the simplicity of the recipe that makes it a staple in my kitchen. I remember the first time I made them, thinking they’d be complicated, but they’re surprisingly straightforward and always a hit at parties.
Ingredients
- 2 cups finely crushed vanilla wafers (about 60 wafers)
- 1 cup powdered sugar, plus extra for rolling
- 2 tbsp cocoa powder (unsweetened for a deeper flavor)
- 1/2 cup bourbon (adjust to taste, but don’t skimp!)
- 1/4 cup light corn syrup (helps bind the mixture)
- 1 cup finely chopped pecans (toasting them first adds a nice crunch)
Instructions
- In a large mixing bowl, combine the crushed vanilla wafers, powdered sugar, cocoa powder, and chopped pecans. Stir until well mixed.
- Add the bourbon and light corn syrup to the dry ingredients. Mix until the dough comes together. If it’s too dry, add a teaspoon more bourbon; too wet, a bit more powdered sugar.
- Using your hands, roll the mixture into 1-inch balls. This is messy but fun—don’t worry about perfection!
- Roll each ball in powdered sugar to coat. This not only adds sweetness but also prevents sticking.
- Place the coated balls on a baking sheet lined with parchment paper. Let them sit at room temperature for at least 1 hour to set. This waiting period is crucial for the flavors to meld.
- Store in an airtight container at room temperature for up to 2 weeks. They get better with time as the bourbon flavor deepens.
Decadently rich with a perfect balance of sweetness and bourbon kick, these Bourbon Balls are a dream. Serve them on a platter with coffee for a grown-up treat, or package them in cute boxes as edible gifts. Either way, they’re sure to impress.
Kentucky Burgoo
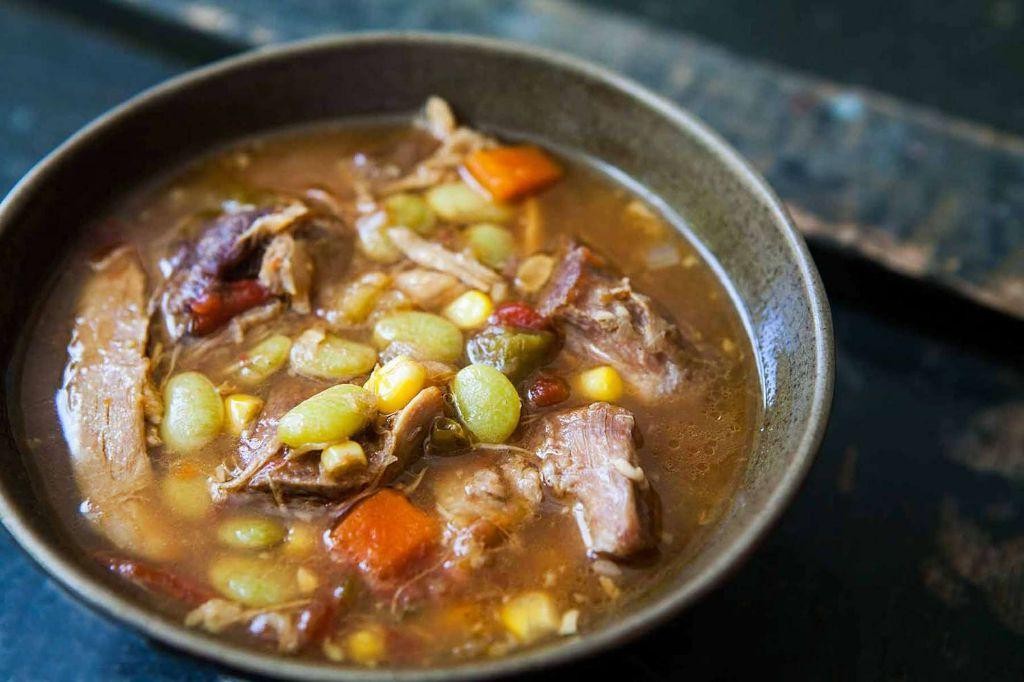
After a recent trip to Kentucky, I found myself utterly obsessed with the idea of making a traditional Kentucky Burgoo at home. It’s a hearty stew that’s as versatile as it is delicious, perfect for feeding a crowd or just cozying up on a chilly evening. I love how it brings together a little bit of everything from the garden and the pantry, creating something truly special.
Ingredients
- 2 lbs mixed meats (chicken, pork, and beef, diced into 1-inch pieces)
- 1/2 cup all-purpose flour (for dredging, or use gluten-free as needed)
- 2 tbsp vegetable oil (or any neutral oil)
- 1 large onion, diced (about 1 cup)
- 3 cloves garlic, minced
- 6 cups chicken stock (homemade preferred, but store-bought works)
- 2 cups diced potatoes (about 2 medium)
- 1 cup diced carrots (about 2 large)
- 1 cup frozen lima beans
- 1 cup frozen corn
- 1 can (14.5 oz) diced tomatoes, undrained
- 1 tbsp Worcestershire sauce (adjust to taste)
- 1 tsp salt (adjust to taste)
- 1/2 tsp black pepper (adjust to taste)
- 1/2 tsp dried thyme
- 1/4 tsp cayenne pepper (optional, for a little heat)
Instructions
- In a large bowl, dredge the mixed meats in flour until lightly coated. Shake off any excess.
- Heat the vegetable oil in a large pot or Dutch oven over medium-high heat. Add the floured meats and brown on all sides, about 5-7 minutes total. Remove and set aside.
- In the same pot, add the onion and garlic. Cook, stirring frequently, until softened, about 3 minutes.
- Return the meats to the pot. Add the chicken stock, potatoes, carrots, lima beans, corn, diced tomatoes, Worcestershire sauce, salt, pepper, thyme, and cayenne pepper. Stir to combine.
- Bring the mixture to a boil, then reduce heat to low. Cover and simmer for 2 hours, stirring occasionally, until the meats are tender and the vegetables are soft.
- Tip: If the stew is too thick, add a little more chicken stock or water to reach your desired consistency.
- Tip: Taste and adjust seasoning before serving. Sometimes a little extra Worcestershire sauce or salt can really bring out the flavors.
- Tip: For an even deeper flavor, let the stew sit overnight in the refrigerator and reheat the next day.
Rich and comforting, this Kentucky Burgoo is a celebration of flavors and textures, with tender meats and vegetables in a savory broth. Serve it with a side of cornbread or over a bed of rice for a complete meal that’s sure to satisfy.
Fried Chicken with Kentucky Gravy

Zesty flavors and crispy textures are what come to mind when I think of Fried Chicken with Kentucky Gravy. It’s a dish that reminds me of summer picnics and family gatherings, where the chicken is always the star. I’ve tweaked this recipe over the years to get that perfect crunch paired with a gravy that’s rich and comforting.
Ingredients
- 2 cups all-purpose flour (for a lighter coating, you can mix half flour and half cornstarch)
- 1 tbsp paprika (smoked paprika adds a nice depth)
- 1 tsp garlic powder
- 1 tsp onion powder
- 1 tsp salt (adjust to taste)
- 1/2 tsp black pepper
- 1 cup buttermilk (essential for tender chicken)
- 1 whole chicken, cut into pieces (or use your favorite parts)
- 1/2 cup vegetable oil (or any neutral oil for frying)
- 2 tbsp butter
- 2 tbsp all-purpose flour
- 1 cup chicken broth (homemade or store-bought)
- 1/2 cup milk
- Salt and pepper to taste
Instructions
- In a large bowl, mix 2 cups flour, paprika, garlic powder, onion powder, salt, and black pepper.
- Pour buttermilk into another bowl. Dip each chicken piece in buttermilk, then dredge in the flour mixture, pressing lightly to adhere.
- Heat oil in a large skillet over medium-high heat until it reaches 350°F. Fry chicken in batches, turning once, until golden brown and internal temperature reaches 165°F, about 10-12 minutes per side.
- Transfer fried chicken to a wire rack set over a baking sheet to keep crispy. Tip: Letting it rest here prevents sogginess.
- For the gravy, melt butter in a saucepan over medium heat. Whisk in 2 tbsp flour until smooth and golden, about 1 minute.
- Gradually whisk in chicken broth and milk. Bring to a simmer, stirring constantly, until thickened, about 5 minutes. Season with salt and pepper.
- Serve the fried chicken hot with the Kentucky gravy drizzled over or on the side for dipping. Tip: Pair with a side of mashed potatoes for a classic comfort meal.
Fried to perfection, this chicken boasts a crispy exterior that gives way to juicy, flavorful meat. The Kentucky gravy adds a creamy, savory element that ties everything together beautifully. For a twist, try serving it atop waffles for a sweet and savory brunch option.
Cornbread Salad
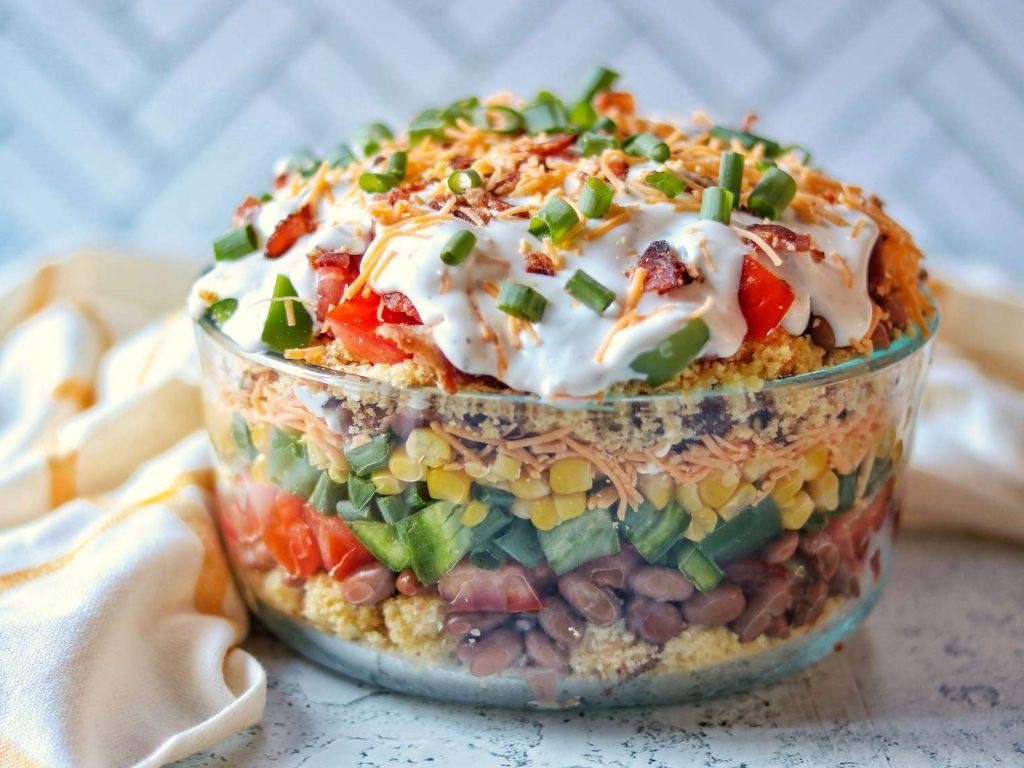
First off, let me tell you, this Cornbread Salad is a game-changer for potlucks and summer gatherings. I stumbled upon this recipe during a family reunion in the South, and it’s been a staple in my kitchen ever since. It’s the perfect blend of savory, sweet, and crunchy, with a dressing that ties everything together beautifully.
Ingredients
- 2 cups crumbled cornbread (day-old works best for texture)
- 1 cup mayonnaise (or Greek yogurt for a lighter version)
- 1/2 cup buttermilk (adjust to achieve desired dressing consistency)
- 1 tbsp apple cider vinegar (adds a nice tang)
- 1 tsp sugar (balances the acidity)
- 1/2 tsp salt (adjust to taste)
- 1/4 tsp black pepper (freshly ground preferred)
- 1 cup diced tomatoes (seeds removed for less moisture)
- 1/2 cup diced red onion (soak in cold water for 10 minutes to mellow the bite)
- 1 cup cooked and crumbled bacon (for a smoky flavor)
- 1/2 cup shredded cheddar cheese (sharp cheddar recommended)
- 1/4 cup chopped fresh parsley (for a fresh finish)
Instructions
- In a large bowl, whisk together mayonnaise, buttermilk, apple cider vinegar, sugar, salt, and black pepper until smooth. This is your dressing. Tip: Taste and adjust seasoning before adding to the salad.
- Add the crumbled cornbread, diced tomatoes, red onion, bacon, and cheddar cheese to the bowl with the dressing. Gently toss to combine. Tip: Be gentle to keep the cornbread from turning into mush.
- Cover and refrigerate for at least 1 hour to allow the flavors to meld. Tip: This salad tastes even better the next day.
- Before serving, sprinkle with chopped fresh parsley for a pop of color and freshness.
You’ll love how the cornbread soaks up the dressing, creating a moist yet crumbly texture. The smoky bacon and sharp cheddar add depth, while the fresh parsley brightens every bite. Serve it in a clear bowl to show off the layers, or scoop it into individual cups for easy serving at your next barbecue.
Kentucky Beer Cheese
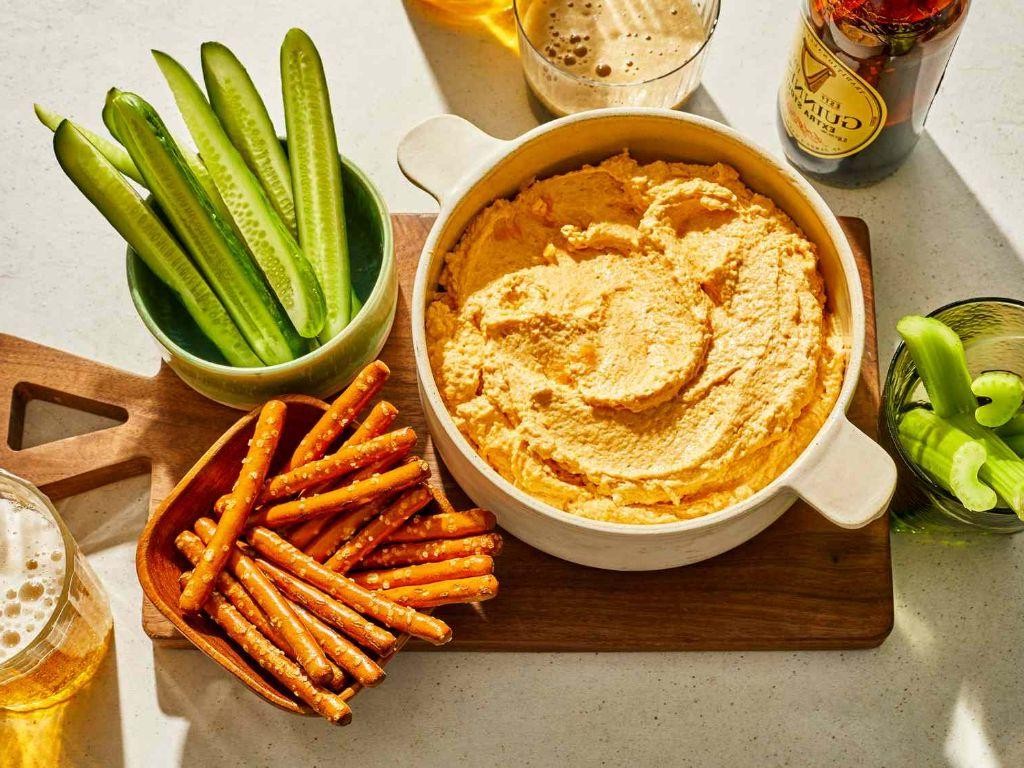
Did you know that Kentucky Beer Cheese is not just a dip but a cultural icon in the Bluegrass State? I first stumbled upon this creamy, tangy delight at a local farmers’ market, and it was love at first bite. Now, I make it at home for game days, and it’s always the first to disappear.
Ingredients
- 2 cups sharp cheddar cheese, shredded (pre-shredded works in a pinch)
- 1/2 cup flat beer (a lager or ale adds depth)
- 1/4 cup cream cheese, softened (for smoother blending)
- 1 garlic clove, minced (or 1/2 tsp garlic powder for convenience)
- 1 tbsp Worcestershire sauce (adds umami)
- 1/2 tsp smoked paprika (for a hint of smokiness)
- 1/4 tsp cayenne pepper (adjust to spice preference)
- Salt to taste (start with 1/4 tsp)
Instructions
- In a medium bowl, combine the shredded cheddar cheese, cream cheese, and minced garlic. Tip: Let the cream cheese sit at room temperature for easier mixing.
- Gradually pour in the flat beer while stirring continuously to avoid clumping. Tip: Flat beer blends better, so let your beer sit open for an hour or stir vigorously to remove bubbles.
- Add the Worcestershire sauce, smoked paprika, cayenne pepper, and salt. Mix until all ingredients are fully incorporated. Tip: Taste as you go and adjust seasonings to your liking.
- Transfer the mixture to a food processor and blend until smooth, about 1-2 minutes. For a chunkier texture, pulse a few times instead.
- Serve immediately or refrigerate for at least an hour to let the flavors meld. Tip: The dip thickens when chilled, so take it out 30 minutes before serving for optimal consistency.
Once you try this Kentucky Beer Cheese, you’ll understand why it’s a staple. The smooth texture and bold flavors pair perfectly with pretzels, veggies, or even slathered on a burger. Trust me, it’s a game-changer.
Southern Biscuits with Sawmill Gravy
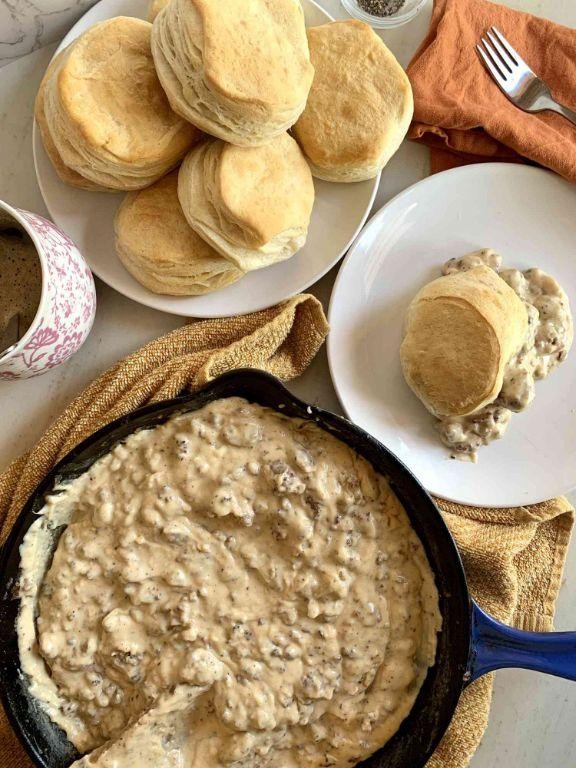
Ah, there’s nothing quite like waking up to the smell of freshly baked Southern biscuits smothered in sawmill gravy. It’s a dish that takes me back to my grandma’s kitchen, where the biscuits were always flaky and the gravy rich with the flavor of sausage.
Ingredients
- 2 cups all-purpose flour (for a lighter biscuit, sift the flour)
- 1 tbsp baking powder (ensure it’s fresh for maximum rise)
- 1/2 tsp salt (adjust to taste)
- 1/4 cup cold unsalted butter, cubed (keep it cold for flaky layers)
- 3/4 cup whole milk (or buttermilk for extra tang)
- 1/2 lb breakfast sausage (choose a spicy variety for more flavor)
- 2 tbsp all-purpose flour (for thickening the gravy)
- 2 cups whole milk (for a creamy gravy)
- Salt and pepper to taste (freshly ground pepper recommended)
Instructions
- Preheat your oven to 450°F (232°C) to ensure it’s hot enough for the biscuits to rise properly.
- In a large bowl, whisk together 2 cups of all-purpose flour, 1 tablespoon of baking powder, and 1/2 teaspoon of salt.
- Add 1/4 cup of cold, cubed unsalted butter to the flour mixture. Use your fingers or a pastry cutter to blend until the mixture resembles coarse crumbs.
- Gradually stir in 3/4 cup of whole milk until just combined. Be careful not to overmix to keep the biscuits tender.
- Turn the dough onto a floured surface, gently knead it a few times, then roll out to about 1/2 inch thickness. Cut into rounds with a biscuit cutter.
- Place the biscuits on a baking sheet and bake for 10-12 minutes, or until golden brown.
- While the biscuits bake, cook 1/2 lb of breakfast sausage in a skillet over medium heat until browned. Do not drain the fat.
- Sprinkle 2 tablespoons of all-purpose flour over the sausage, stirring to coat. Cook for 1 minute to remove the raw flour taste.
- Slowly whisk in 2 cups of whole milk, bringing the mixture to a simmer. Cook until thickened, about 5 minutes. Season with salt and pepper to taste.
- Split the warm biscuits in half and generously spoon the sawmill gravy over the top.
Rich and comforting, these Southern biscuits with sawmill gravy are the ultimate breakfast treat. The biscuits are wonderfully flaky, while the gravy is creamy with just the right amount of spice from the sausage. Serve them with a side of scrambled eggs for a hearty start to your day.
Kentucky Spoonbread
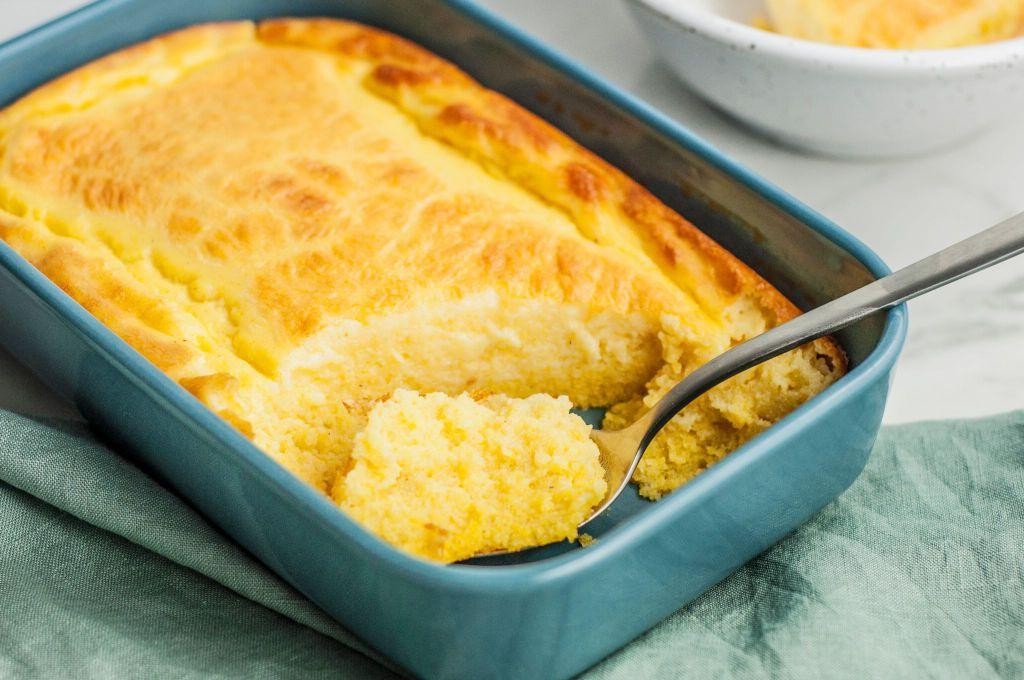
First off, let me tell you, there’s something incredibly comforting about a dish that’s been passed down through generations, and Kentucky Spoonbread is just that. It’s a Southern classic that feels like a warm hug on a chilly evening, and today, I’m sharing my take on this creamy, dreamy side dish that’s perfect for any gathering or just a cozy night in.
Ingredients
- 1 cup cornmeal (stone-ground for the best texture)
- 4 cups whole milk (or substitute with buttermilk for a tangier flavor)
- 3 large eggs, separated (room temperature eggs whip better)
- 1/4 cup unsalted butter, melted (plus extra for greasing the dish)
- 1 tsp salt (adjust to taste)
- 1 tbsp sugar (optional, for a slight sweetness)
- 1 tsp baking powder (for that perfect rise)
Instructions
- Preheat your oven to 375°F (190°C) and generously butter a 2-quart baking dish.
- In a medium saucepan, whisk together the cornmeal and milk over medium heat. Cook, stirring constantly, until the mixture thickens to a porridge-like consistency, about 10 minutes. Tip: A wooden spoon helps prevent lumps.
- Remove from heat and stir in the melted butter, salt, and sugar (if using). Let cool slightly.
- Whisk in the egg yolks one at a time, ensuring each is fully incorporated before adding the next.
- In a separate bowl, beat the egg whites until stiff peaks form. Tip: A pinch of cream of tartar can help stabilize the whites.
- Gently fold the beaten egg whites into the cornmeal mixture in two additions to keep the batter light and airy.
- Pour the batter into the prepared baking dish and bake for 35-40 minutes, or until the top is golden and the center is just set. Tip: The spoonbread should jiggle slightly when shaken, as it will continue to set as it cools.
Out of the oven, this spoonbread is a delightful cross between a soufflé and cornbread, with a creamy interior and a slightly crisp top. Serve it warm with a drizzle of honey or alongside your favorite barbecue for a truly Southern experience.
Country Ham with Red Eye Gravy
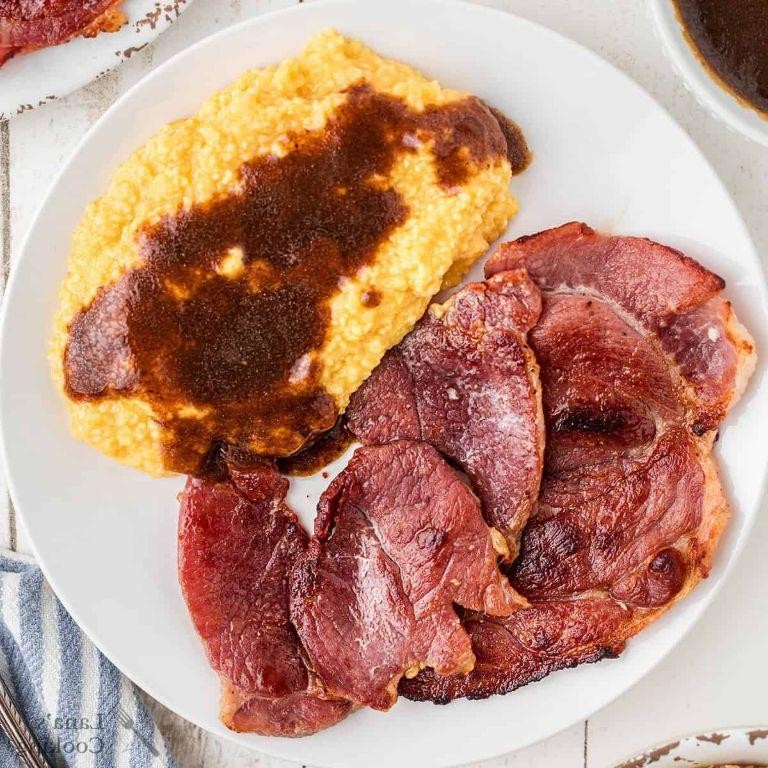
Waking up to the aroma of country ham sizzling in the skillet is one of those simple pleasures that never gets old. It reminds me of Sunday mornings at my grandma’s, where the kitchen was always the heart of the home. Today, I’m sharing my take on the classic Country Ham with Red Eye Gravy, a dish that’s as rich in flavor as it is in tradition.
Ingredients
- 1/2 lb country ham slices (thick-cut works best for that hearty bite)
- 1 cup strong black coffee (the stronger, the better for that authentic red eye gravy)
- 1 tbsp unsalted butter (or bacon fat for extra flavor)
- 1/2 cup water (to adjust the gravy’s consistency)
- 1 tsp brown sugar (optional, for a slight sweetness)
Instructions
- Heat a large skillet over medium-high heat. No need to add oil; the ham will render its own fat.
- Add the country ham slices to the skillet. Cook for 3-4 minutes on each side until nicely browned and slightly crispy at the edges.
- Remove the ham from the skillet and set aside on a warm plate. Keep the rendered fat in the skillet for the gravy.
- Pour the black coffee into the skillet with the ham fat. Be careful as it may splatter. Scrape up any browned bits from the bottom of the skillet; these are flavor gold.
- Add the water and bring the mixture to a simmer. Let it cook down for about 5 minutes until it thickens slightly. Tip: The gravy should coat the back of a spoon but still be pourable.
- Stir in the butter (or bacon fat) and brown sugar if using. Cook for another minute until everything is well combined.
- Return the ham to the skillet, turning to coat in the gravy, and heat through for about 1 minute.
Now, the ham is perfectly salty and savory, while the red eye gravy adds a deep, coffee-infused richness that’s just irresistible. Serve it over a warm biscuit or with a side of grits to soak up all that delicious gravy. Nothing beats the comfort of this Southern classic, especially when shared with loved ones.
Kentucky Benedictine Spread
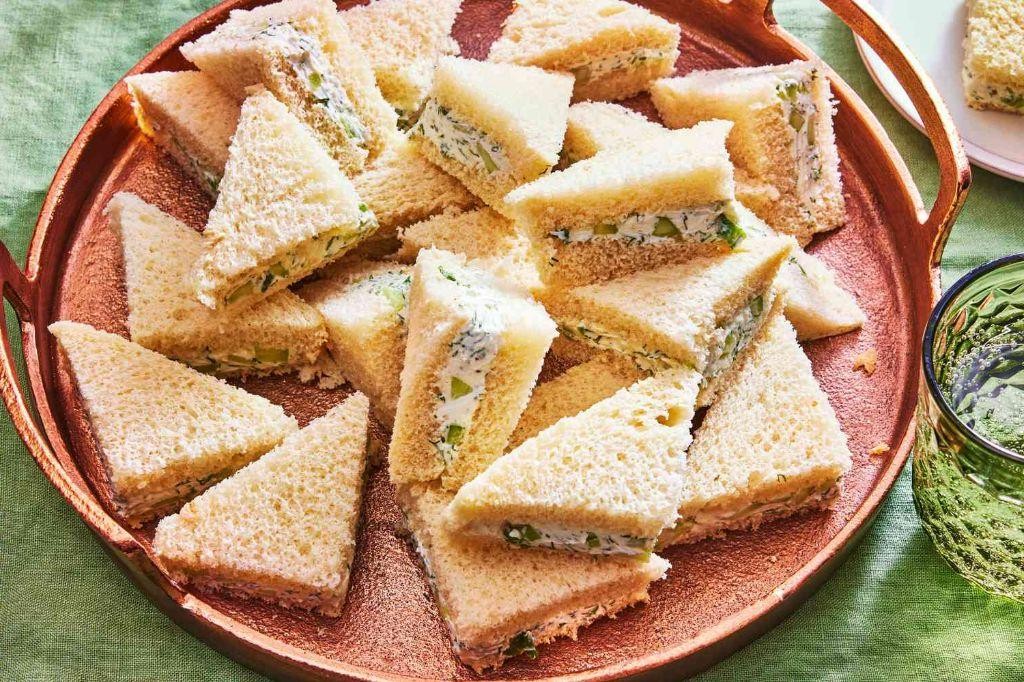
Many mornings, I find myself craving something creamy, herby, and utterly spreadable to slather on my toast or to dollop atop a crisp cucumber slice. That’s when I turn to my beloved Kentucky Benedictine Spread, a recipe that’s as versatile as it is delicious. It’s a staple in my kitchen, especially when I’m hosting brunch or looking for a quick, flavorful snack.
Ingredients
- 8 oz cream cheese, softened (leave out at room temperature for 30 minutes for easier mixing)
- 1/4 cup cucumber, peeled, seeded, and finely grated (squeeze out excess water with a clean towel)
- 1 tbsp onion, finely grated (use a microplane for the best texture)
- 1/4 tsp salt (adjust to taste)
- 1/8 tsp black pepper (freshly ground preferred)
- 1 tbsp mayonnaise (or Greek yogurt for a lighter version)
- 1 tsp fresh dill, minced (dried dill can work in a pinch, but fresh is best)
Instructions
- In a medium mixing bowl, combine the softened cream cheese and mayonnaise until smooth. A hand mixer can speed up this process, but a sturdy spoon works too.
- Add the grated cucumber and onion to the cream cheese mixture. Stir until well incorporated.
- Season with salt, black pepper, and fresh dill. Mix thoroughly to distribute the flavors evenly.
- Cover the bowl with plastic wrap and refrigerate for at least 1 hour before serving. This chilling time allows the flavors to meld beautifully.
Light and refreshing, this spread has a delightful crunch from the cucumber and a subtle kick from the onion. Serve it on whole-grain crackers for a hearty snack or use it as a unique sandwich spread to elevate your lunch game.
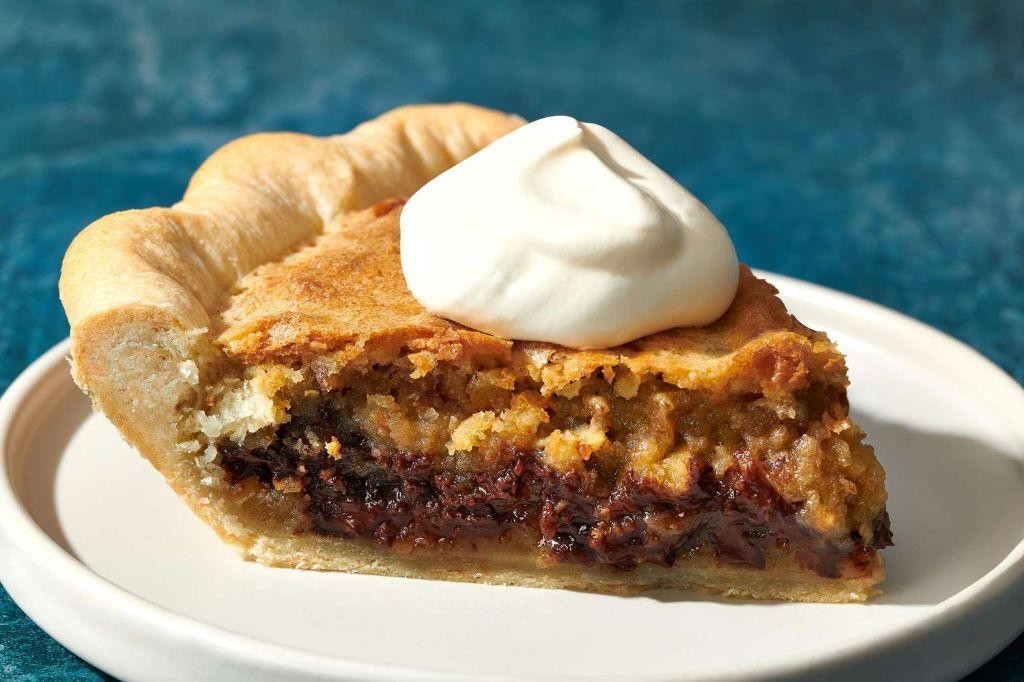
Chocolate Walnut Pie
Yesterday, as I was rummaging through my grandma’s old recipe box, I stumbled upon a handwritten note for Chocolate Walnut Pie. The edges were frayed, and the ink had faded, but the memories it brought back were as vivid as ever. It’s the perfect blend of crunchy and gooey, with a rich chocolatey depth that’s impossible to resist.
Ingredients
- 1 1/2 cups all-purpose flour (for a flakier crust, use half butter and half shortening)
- 1/2 cup unsalted butter, chilled and diced (keep it cold for the best texture)
- 1/4 cup ice water (just enough to bring the dough together)
- 1 cup granulated sugar (adjust slightly if you prefer less sweetness)
- 3/4 cup light corn syrup (dark corn syrup can be used for a deeper flavor)
- 3 large eggs (room temperature blends better)
- 2 tbsp unsalted butter, melted (for a richer filling)
- 1 tsp vanilla extract (pure extract for the best flavor)
- 1/2 tsp salt (balances the sweetness)
- 1 cup semi-sweet chocolate chips (or chopped chocolate for more texture)
- 1 1/2 cups walnuts, roughly chopped (toast them for extra crunch)
Instructions
- Preheat your oven to 350°F (175°C) to ensure it’s ready for baking.
- In a large bowl, mix the flour and diced butter until the mixture resembles coarse crumbs. Tip: Use a pastry cutter or your fingers for best results.
- Gradually add ice water, one tablespoon at a time, until the dough comes together. Be careful not to overwork it.
- Roll out the dough on a floured surface to fit a 9-inch pie dish. Trim and crimp the edges for a decorative finish.
- In another bowl, whisk together sugar, corn syrup, eggs, melted butter, vanilla, and salt until smooth. Tip: Ensure all ingredients are at room temperature to avoid a lumpy mixture.
- Stir in the chocolate chips and walnuts, then pour the filling into the prepared crust.
- Bake for 45-50 minutes, or until the filling is set and the crust is golden brown. Tip: Cover the edges with foil if they brown too quickly.
- Let the pie cool completely on a wire rack before slicing to allow the filling to set properly.
Out of the oven, this Chocolate Walnut Pie is a masterpiece of contrasts—crispy crust, chewy filling, and the occasional crunch of walnuts. Serve it slightly warm with a scoop of vanilla ice cream for an unforgettable dessert experience.
Kentucky Mutton Barbecue
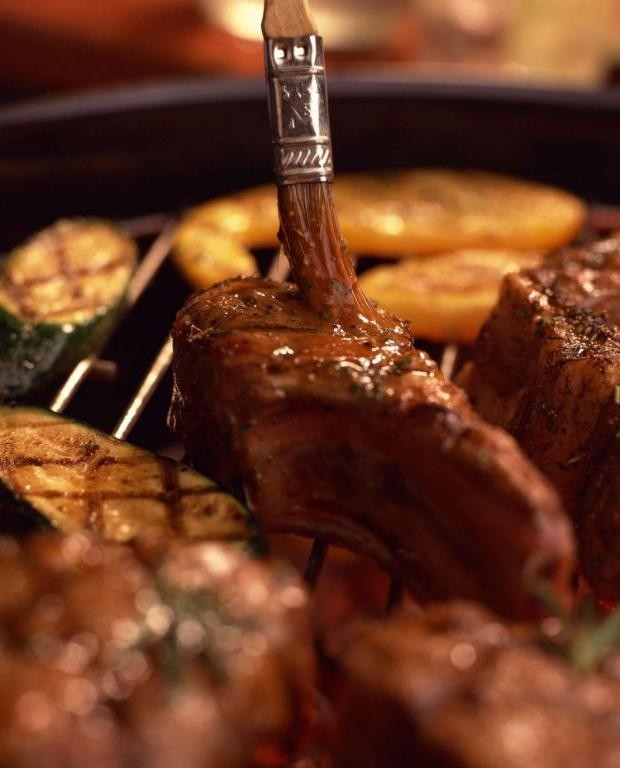
Venturing into the heart of Southern barbecue, I stumbled upon a gem that’s been a well-kept secret in Kentucky—mutton barbecue. It’s a dish that tells a story of tradition, patience, and the kind of flavor that sticks with you long after the last bite. I remember my first time trying it at a small roadside stand; the smoky aroma was irresistible, and the tender, flavorful meat had me hooked instantly.
Ingredients
- 4 lbs mutton shoulder (bone-in for more flavor)
- 1 cup apple cider vinegar (adds a tangy kick)
- 1/2 cup Worcestershire sauce (for depth)
- 1/4 cup brown sugar (balances the acidity)
- 2 tbsp smoked paprika (or regular paprika for a milder taste)
- 1 tbsp garlic powder (adjust to taste)
- 1 tbsp onion powder
- 1 tsp cayenne pepper (optional for heat)
- Salt and black pepper to taste
Instructions
- Trim excess fat from the mutton shoulder, leaving a thin layer for moisture.
- In a bowl, whisk together apple cider vinegar, Worcestershire sauce, brown sugar, smoked paprika, garlic powder, onion powder, cayenne pepper, salt, and black pepper to create the marinade.
- Place the mutton shoulder in a large resealable bag and pour the marinade over it. Seal the bag and refrigerate for at least 12 hours, turning occasionally to ensure even marination.
- Preheat your smoker to 225°F. If using a grill, set it up for indirect heat and maintain the same temperature.
- Remove the mutton from the marinade, letting excess drip off. Reserve the marinade for basting.
- Place the mutton on the smoker or grill, fat side up. Smoke for 6-8 hours, basting with the reserved marinade every hour, until the internal temperature reaches 195°F.
- Let the mutton rest for 30 minutes before shredding or slicing against the grain.
Delightfully tender with a perfect balance of smoky, tangy, and sweet flavors, this Kentucky mutton barbecue is a testament to the magic of low and slow cooking. Serve it piled high on a bun with a side of coleslaw, or go traditional with a slice of white bread and a dollop of extra sauce for dipping.
Fried Green Tomatoes
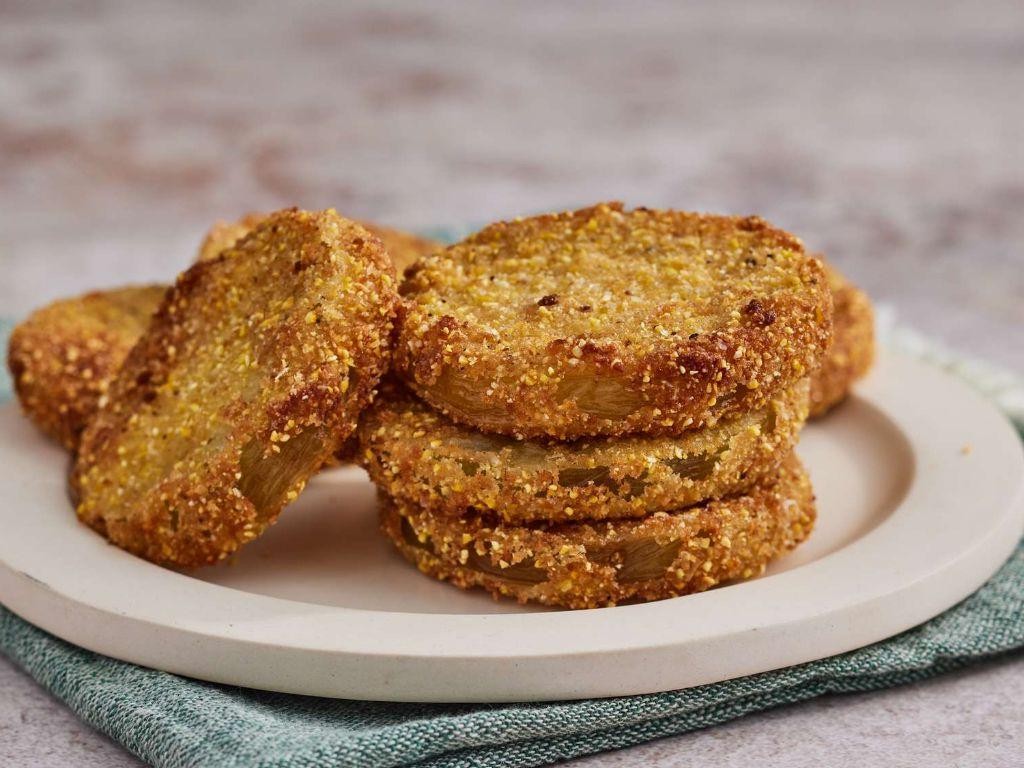
Just when I thought summer couldn’t get any better, I stumbled upon the joy of making Fried Green Tomatoes. There’s something about the crisp exterior and the tangy, firm interior that makes this dish a staple at my family gatherings. Let me share how I bring this Southern classic to life in my own kitchen.
Ingredients
- 4 medium green tomatoes, sliced 1/4 inch thick (firm to the touch works best)
- 1 cup all-purpose flour (for a gluten-free option, use almond flour)
- 1 tbsp cornmeal (adds a nice crunch)
- 1 tsp salt (adjust to taste)
- 1/2 tsp black pepper (freshly ground preferred)
- 1 cup buttermilk (or substitute with milk mixed with 1 tbsp vinegar)
- 1 large egg (room temperature blends better)
- 1/2 cup vegetable oil (or any neutral oil for frying)
Instructions
- In a shallow dish, whisk together the flour, cornmeal, salt, and pepper.
- In another dish, beat the buttermilk and egg until well combined.
- Dip each tomato slice into the flour mixture, then the buttermilk mixture, and back into the flour mixture, ensuring each slice is fully coated.
- Heat the oil in a large skillet over medium heat until it reaches 375°F (use a thermometer for accuracy).
- Fry the coated tomato slices in batches, about 3-4 minutes per side, until golden brown and crispy.
- Transfer the fried tomatoes to a paper towel-lined plate to drain any excess oil.
These Fried Green Tomatoes are a delightful contrast of textures and flavors—crispy on the outside, tender and slightly tart on the inside. Try serving them with a spicy remoulade sauce or atop a fresh salad for a refreshing summer meal.
Pinto Beans with Cornbread

Back in my grandma’s kitchen, the comforting aroma of pinto beans simmering on the stove was a sure sign of a hearty meal to come. Today, I’m sharing my take on this classic dish, paired with fluffy cornbread that’s just begging to be dunked.
Ingredients
- 1 lb dried pinto beans, rinsed and picked over (soaking overnight reduces cooking time)
- 6 cups water (or enough to cover beans by 2 inches)
- 1 medium onion, diced (yellow or white for sweetness)
- 2 cloves garlic, minced (fresh is best for vibrant flavor)
- 1 tsp salt (adjust to taste after cooking)
- 1/2 tsp black pepper (freshly ground preferred)
- 1 tbsp olive oil (or any neutral oil)
- 1 cup cornmeal (stone-ground gives a rustic texture)
- 1 cup all-purpose flour (for lighter cornbread)
- 1 tbsp sugar (optional, for a hint of sweetness)
- 1 tbsp baking powder (ensure it’s fresh for maximum rise)
- 1 cup milk (whole milk adds richness)
- 1 large egg (room temperature blends better)
- 1/4 cup melted butter (or vegetable oil for a lighter version)
Instructions
- In a large pot, heat olive oil over medium heat. Add diced onion and sauté until translucent, about 5 minutes.
- Add minced garlic and cook for another minute, stirring constantly to prevent burning.
- Stir in rinsed pinto beans, water, salt, and pepper. Bring to a boil, then reduce heat to low, cover, and simmer for 1.5 to 2 hours, or until beans are tender. Stir occasionally and add more water if needed to keep beans covered.
- While beans cook, preheat oven to 425°F and grease an 8-inch square baking pan.
- In a large bowl, whisk together cornmeal, flour, sugar, baking powder, and salt. In another bowl, mix milk, egg, and melted butter. Combine wet and dry ingredients, stirring just until mixed (overmixing leads to tough cornbread).
- Pour batter into prepared pan and bake for 20-25 minutes, or until golden and a toothpick inserted in the center comes out clean.
- Let cornbread cool slightly before serving alongside the pinto beans.
The beans should be creamy and flavorful, perfect for spooning over a slice of warm cornbread. For a twist, top with shredded cheese or a dollop of sour cream before serving.
Kentucky Stack Cake
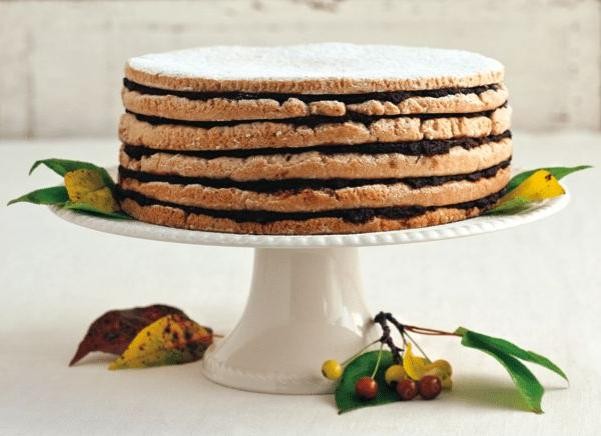
Did you know that the Kentucky Stack Cake is a traditional Appalachian dessert that’s as rich in history as it is in flavor? I first stumbled upon this gem at a local potluck, and its layers of spiced cake soaked in apple butter left me utterly smitten. It’s a humble yet deeply satisfying treat that’s perfect for sharing.
Ingredients
- 3 cups all-purpose flour (sifted for a lighter texture)
- 1 cup sugar (adjust to taste)
- 1 tsp baking soda (helps the cake rise)
- 1 tsp ground ginger (for a warm spice note)
- 1/2 cup unsalted butter, softened (or margarine for a dairy-free option)
- 1 cup buttermilk (adds moisture and tang)
- 1 large egg (room temperature for better incorporation)
- 2 cups apple butter (homemade or store-bought, for layering)
Instructions
- Preheat your oven to 350°F (175°C) and grease a 9-inch round cake pan.
- In a large bowl, whisk together the flour, sugar, baking soda, and ginger until well combined.
- Add the softened butter and buttermilk to the dry ingredients, mixing until just incorporated. Tip: Overmixing can lead to a tough cake.
- Beat in the egg until the batter is smooth and uniform.
- Pour the batter into the prepared pan and bake for 25-30 minutes, or until a toothpick inserted into the center comes out clean. Tip: Rotate the pan halfway through for even baking.
- Allow the cake to cool in the pan for 10 minutes, then transfer to a wire rack to cool completely.
- Once cooled, slice the cake horizontally into 3 even layers. Tip: Use a serrated knife for cleaner cuts.
- Spread apple butter between each layer, stacking them as you go.
- Let the cake sit for at least 4 hours, or overnight, to allow the flavors to meld.
Craving a slice yet? The Kentucky Stack Cake is wonderfully moist with a tender crumb, and the apple butter gives it a sweet, spiced depth that’s irresistible. Serve it with a dollop of whipped cream or a sprinkle of powdered sugar for an extra touch of indulgence.
Bourbon Glazed Carrots

Craving a side dish that’s both sweet and savory with a hint of sophistication? These Bourbon Glazed Carrots are my go-to when I want to impress guests or simply treat myself to something special. The combination of bourbon and brown sugar creates a glaze that’s irresistibly glossy and packed with flavor, turning humble carrots into the star of the meal.
Ingredients
- 1 lb carrots, peeled and sliced into 1/2-inch rounds (uniform size ensures even cooking)
- 2 tbsp unsalted butter (for a richer flavor, or substitute with olive oil for a lighter version)
- 2 tbsp brown sugar (adjust to taste, depending on how sweet you like your glaze)
- 2 tbsp bourbon (the quality of bourbon affects the depth of flavor, so choose one you enjoy drinking)
- 1/4 tsp salt (to balance the sweetness)
- 1/4 tsp black pepper (adds a slight kick)
- 1/4 cup water (helps create the glaze)
Instructions
- In a large skillet over medium heat, melt the butter until it’s just beginning to foam, about 1 minute.
- Add the sliced carrots to the skillet, stirring to coat them evenly with the butter. Cook for 5 minutes, stirring occasionally, until the carrots start to soften slightly.
- Sprinkle the brown sugar, salt, and black pepper over the carrots, stirring to combine. The sugar will begin to melt and coat the carrots.
- Carefully pour in the bourbon and water, stirring to mix everything together. The liquid will bubble up initially, so be cautious.
- Reduce the heat to medium-low and simmer the carrots, uncovered, for 10-12 minutes, stirring occasionally, until the liquid has reduced to a thick glaze and the carrots are tender but still slightly firm.
- Remove the skillet from the heat and let the carrots sit for 2 minutes to allow the glaze to thicken further before serving.
Delightfully glossy and packed with a complex sweetness, these Bourbon Glazed Carrots are a perfect balance of tender and crisp. Serve them alongside a roast chicken or pork chop for a meal that feels gourmet without requiring hours in the kitchen. For an extra touch, sprinkle with fresh thyme or a drizzle of honey before serving.
Southern Fried Apples

Whenever I think of comfort food, my mind immediately goes to the warm, cinnamon-spiced aroma of Southern Fried Apples simmering on the stove. It’s a dish that reminds me of my grandmother’s kitchen, where the simplest ingredients transformed into something magical. Today, I’m sharing my take on this classic, perfect for topping off pancakes or enjoying straight from the bowl.
Ingredients
- 4 large Granny Smith apples, peeled and sliced (about 4 cups)
- 1/4 cup unsalted butter (or margarine for a lighter version)
- 1/2 cup light brown sugar, packed (adjust to sweetness preference)
- 1 tsp ground cinnamon (add a pinch more for extra warmth)
- 1/4 tsp nutmeg (freshly grated if possible)
- 1 tbsp lemon juice (to brighten the flavors)
- 1/4 cup water (helps create a syrupy sauce)
Instructions
- Melt the butter in a large skillet over medium heat, ensuring it coats the bottom evenly.
- Add the sliced apples to the skillet, stirring to coat them in butter. Cook for about 5 minutes, until they start to soften.
- Sprinkle the brown sugar, cinnamon, and nutmeg over the apples. Stir well to combine all the ingredients.
- Pour in the lemon juice and water, then reduce the heat to low. Simmer for 15-20 minutes, stirring occasionally, until the apples are tender and the sauce has thickened.
- Tip: For a deeper flavor, let the apples caramelize slightly by increasing the heat for the last 2 minutes of cooking.
- Tip: If the sauce is too thin, mix 1 tsp of cornstarch with 1 tbsp of water and stir it into the apples during the last 5 minutes of cooking.
- Tip: Serve warm for the best texture and flavor, but they’re also delicious cold straight from the fridge.
Southern Fried Apples are irresistibly tender with a perfect balance of sweet and tart, thanks to the Granny Smith apples. The cinnamon and nutmeg add a cozy warmth that makes this dish a year-round favorite. Try spooning them over vanilla ice cream for a decadent dessert or alongside pork chops for a sweet and savory dinner option.
Conclusion
We hope these 18 Southern Kentucky recipes bring a taste of comfort and tradition to your table. Each dish is a celebration of flavor, perfect for home cooks looking to explore the rich culinary heritage of the South. Don’t forget to try your favorites, share your thoughts in the comments, and pin this article on Pinterest to spread the deliciousness. Happy cooking!


