Ready to turn up the heat at your next gathering? Our roundup of 18 Spicy Hot Appetizer Recipes is packed with fiery flavors that are sure to impress. From sizzling dips to bold bites, these easy-to-make dishes are perfect for home cooks looking to add some spice to their menu. Dive in and discover your next favorite appetizer that’ll have everyone reaching for more!
Spicy Buffalo Chicken Dip
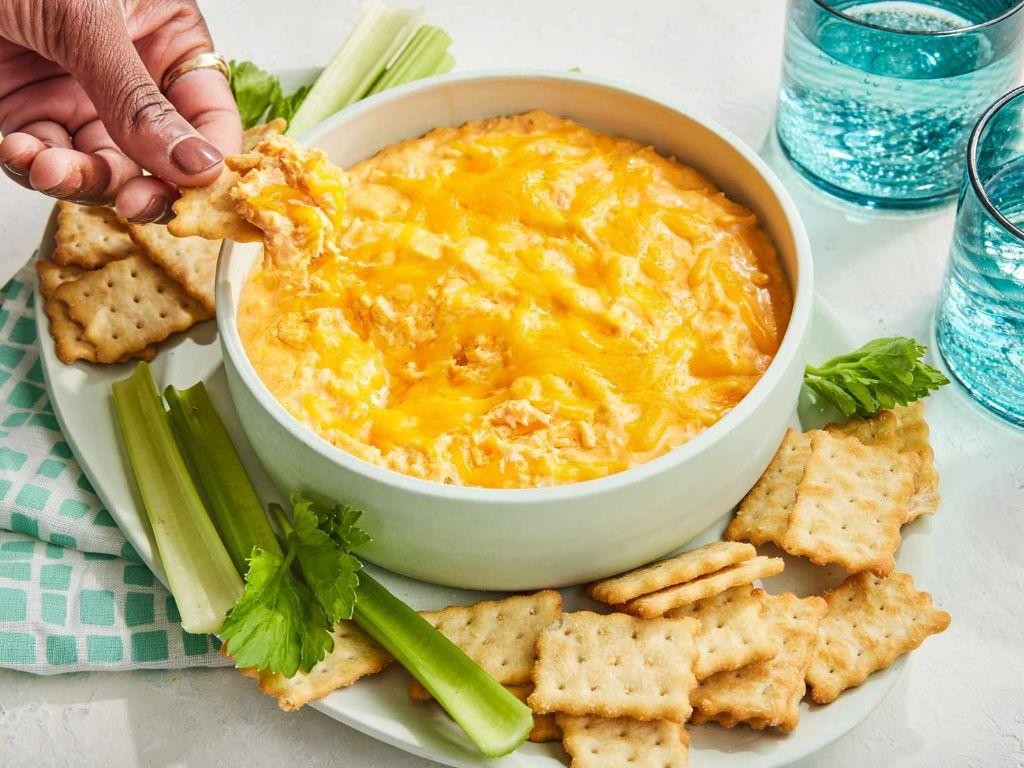
Spicy Buffalo Chicken Dip has become my go-to dish for game nights and casual get-togethers, and it’s always the first to disappear from the table. I remember the first time I made it, thinking it would be too spicy for my taste, but the creamy texture and the perfect balance of flavors won me over instantly.
Ingredients
- 2 cups of shredded cooked chicken (I usually grab a rotisserie chicken to save time)
- 8 oz of cream cheese, softened (leave it out for about 30 minutes before you start)
- 1/2 cup of Frank’s RedHot sauce (trust me, it’s the best for this)
- 1/2 cup of ranch dressing (or blue cheese if you’re feeling adventurous)
- 1 cup of shredded cheddar cheese
- A couple of green onions, chopped (for that fresh crunch)
- A splash of milk if the mixture seems too thick
Instructions
- Preheat your oven to 350°F (175°C) and grab a baking dish that’s about 9×9 inches.
- In a large bowl, mix the shredded chicken, cream cheese, hot sauce, and ranch dressing until everything is well combined. If the mixture feels too thick, add a splash of milk to loosen it up.
- Spread the mixture evenly into your baking dish and sprinkle the shredded cheddar cheese on top.
- Bake for 20-25 minutes, or until the cheese is bubbly and slightly golden on top.
- While it’s baking, chop up those green onions so they’re ready to go.
- Once out of the oven, let it sit for about 5 minutes (this helps it set a bit), then sprinkle the green onions over the top.
Hot out of the oven, this dip is irresistibly creamy with just the right kick of heat. I love serving it with celery sticks and tortilla chips for dipping, but it’s also amazing spread on a toasted baguette for a next-level snack.
Jalapeno Poppers

Gathering around the table with friends and family, there’s nothing quite like the spicy kick of homemade Jalapeno Poppers to get the conversation flowing. I remember the first time I tried making these; they were a hit, and now they’re a staple at my game day gatherings.
Ingredients
- 12 fresh jalapenos
- 8 oz cream cheese, softened
- 1 cup shredded cheddar cheese
- A splash of milk
- A couple of dashes of garlic powder
- 1/2 cup all-purpose flour
- 2 eggs, beaten
- 1 cup breadcrumbs
- Oil for frying
Instructions
- Preheat your oil in a deep fryer or a deep pan to 375°F. Keeping the oil at the right temperature is key to getting that perfect golden crunch.
- Cut the jalapenos in half lengthwise and scoop out the seeds and membranes. Tip: Wearing gloves can save your hands from the spicy oils.
- In a bowl, mix the cream cheese, cheddar cheese, a splash of milk, and a couple of dashes of garlic powder until smooth. This mixture should be creamy but not too runny.
- Fill each jalapeno half with the cheese mixture. Don’t overfill them, or the filling will ooze out during frying.
- Dredge each stuffed jalapeno in flour, then dip into the beaten eggs, and finally coat with breadcrumbs. Tip: For extra crunch, you can double coat them by repeating the egg and breadcrumb steps.
- Fry the poppers in batches for about 2-3 minutes, or until they’re golden brown and crispy. Tip: Don’t overcrowd the fryer to ensure even cooking.
- Remove them with a slotted spoon and let them drain on paper towels to get rid of any excess oil.
Zesty and creamy with a satisfying crunch, these Jalapeno Poppers are irresistible. Serve them with a cool ranch or blue cheese dressing to balance the heat, or get creative by adding a slice of crispy bacon on top for an extra layer of flavor.
Hot Spinach Artichoke Dip
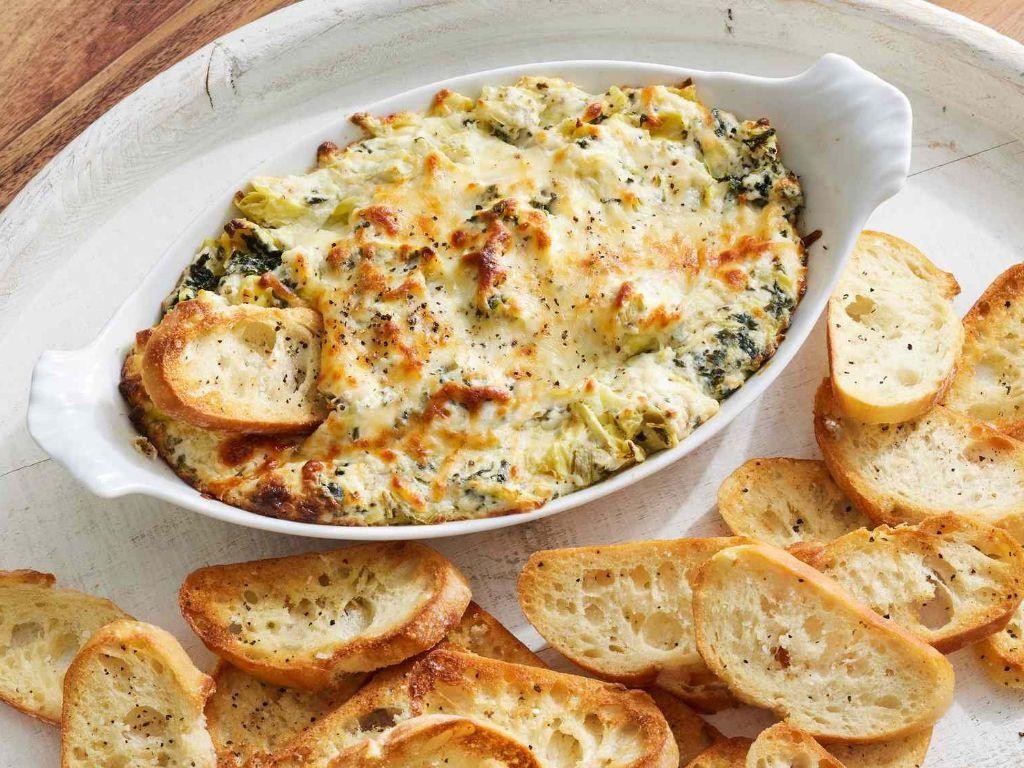
Few things bring people together like a warm, cheesy dip, and this Hot Spinach Artichoke Dip is no exception. I remember the first time I made it for a game day gathering, and it was gone before halftime—talk about a crowd-pleaser!
Ingredients
- 1 (10 oz) package of frozen chopped spinach, thawed and drained
- 1 (14 oz) can of artichoke hearts, drained and chopped
- 1 cup of mayonnaise
- 1 cup of grated Parmesan cheese
- 1 cup of shredded mozzarella cheese
- 2 cloves of garlic, minced
- A splash of lemon juice
- A couple of dashes of hot sauce
Instructions
- Preheat your oven to 350°F (175°C) and grab a baking dish—no need to grease it.
- In a large bowl, mix together the spinach, artichoke hearts, mayonnaise, Parmesan, mozzarella, garlic, lemon juice, and hot sauce until well combined. Tip: Squeezing the spinach in a clean towel removes excess water for a thicker dip.
- Spread the mixture evenly into your baking dish. Tip: For an extra golden top, sprinkle a little extra mozzarella on top before baking.
- Bake for 25 minutes, or until the edges are bubbly and the top is lightly golden. Tip: If you’re short on time, broil for the last 2 minutes for a quicker browning.
- Let it sit for 5 minutes before serving—trust me, it’s molten hot right out of the oven.
Out of the oven, this dip is creamy with just the right amount of chew from the cheeses, and the artichokes add a lovely texture contrast. Serve it with a basket of toasted baguette slices or, for a fun twist, spoon it over grilled chicken breasts for a decadent meal.
Chili Cheese Nachos

Remember those lazy Sunday afternoons when all you wanted was something cheesy, spicy, and downright comforting? That’s exactly what these Chili Cheese Nachos bring to the table. I stumbled upon this recipe during a football game party, and let’s just say, it was the real MVP of the night.
Ingredients
- A bag of your favorite tortilla chips (about 4 cups)
- 2 cups of shredded cheddar cheese (because more cheese is always better)
- 1 cup of cooked chili (homemade or store-bought, no judgment here)
- A splash of pickled jalapeños (adjust based on how brave you’re feeling)
- A couple of tablespoons of sour cream (for that cool, creamy contrast)
- A handful of chopped green onions (for a fresh kick)
Instructions
- Preheat your oven to 350°F (175°C) to get it nice and toasty for the nachos.
- Spread the tortilla chips evenly on a baking sheet. Tip: Use parchment paper for easy cleanup.
- Spoon the chili over the chips, making sure each chip gets some love. Tip: Don’t drown them; you want crispy chips, not soggy ones.
- Sprinkle the shredded cheddar cheese generously over the top. Tip: Mix in some Monterey Jack for extra meltiness.
- Add the pickled jalapeños on top for that spicy kick.
- Bake in the preheated oven for about 10 minutes, or until the cheese is bubbly and golden.
- Remove from the oven and immediately dollop with sour cream and sprinkle with green onions.
You’ll love the crunch of the chips against the gooey cheese and hearty chili. Serve these nachos straight from the baking sheet for that authentic, dig-in-together vibe. Yes, they’re as good as they sound, and yes, they’ll disappear before you know it.
Firecracker Shrimp

Oh my, do I have a treat for you today! Firecracker Shrimp is that perfect blend of sweet, spicy, and crispy that’ll have you reaching for more before you’ve even finished your first bite. I remember the first time I made this dish; it was a hit at my summer BBQ, and now it’s a staple in my recipe rotation.
Ingredients
- 1 pound of large shrimp, peeled and deveined
- A couple of tablespoons of cornstarch
- A splash of vegetable oil for frying
- 1/2 cup of sweet chili sauce
- A tablespoon of sriracha (adjust if you’re not into too much heat)
- A teaspoon of garlic powder
- A pinch of salt
- Some chopped green onions for garnish
Instructions
- Start by patting the shrimp dry with paper towels; this helps the cornstarch stick better.
- Toss the shrimp in cornstarch until they’re lightly coated. Shake off any excess.
- Heat the vegetable oil in a large pan over medium-high heat until it’s shimmering but not smoking.
- Fry the shrimp in batches for about 2 minutes per side, or until they’re golden and crispy. Don’t overcrowd the pan!
- While the shrimp are frying, mix together the sweet chili sauce, sriracha, garlic powder, and salt in a bowl.
- Once all the shrimp are fried, toss them in the sauce until they’re evenly coated.
- Garnish with chopped green onions before serving.
Just imagine the crunch of that perfectly fried shrimp giving way to the juicy inside, all wrapped up in that sticky, spicy-sweet sauce. Serve these bad boys over a bed of rice to soak up all that delicious sauce, or skewer them for a fun appetizer at your next party.
Spicy Meatballs

Whenever I think about comfort food that packs a punch, my mind immediately goes to these spicy meatballs. They’re my go-to when I need something hearty, flavorful, and just the right amount of spicy to wake up the senses. Plus, they’re incredibly versatile—perfect over pasta, tucked into a sub, or even on their own as a party appetizer.
Ingredients
- 1 pound of ground beef (I like an 80/20 mix for juiciness)
- 1/2 cup of breadcrumbs (panko gives a nice crunch)
- 1/4 cup of grated Parmesan cheese (because cheese makes everything better)
- 1 large egg (it’s the glue that holds everything together)
- 2 cloves of garlic, minced (fresh is best here)
- 1 tsp of red pepper flakes (adjust if you’re not into too much heat)
- A splash of olive oil (for frying)
- 1 cup of marinara sauce (homemade or store-bought, no judgment)
- A couple of fresh basil leaves, chopped (for that fresh finish)
Instructions
- In a large bowl, mix the ground beef, breadcrumbs, Parmesan, egg, minced garlic, and red pepper flakes until just combined. Tip: Don’t overmix, or your meatballs will be tough.
- Roll the mixture into 1-inch balls. Wetting your hands slightly can prevent sticking.
- Heat a splash of olive oil in a large skillet over medium heat. Once hot, add the meatballs in batches, making sure not to overcrowd the pan.
- Cook the meatballs for about 4 minutes per side, or until they’re nicely browned and cooked through. Tip: A meat thermometer should read 160°F when they’re done.
- Pour the marinara sauce over the meatballs, reduce the heat to low, and let them simmer for about 10 minutes. This lets the flavors meld beautifully.
- Garnish with chopped basil before serving. Tip: For an extra kick, sprinkle a bit more red pepper flakes on top.
Great for any occasion, these spicy meatballs are juicy on the inside with a slight crunch on the outside, thanks to the panko. The heat from the red pepper flakes is balanced by the richness of the Parmesan and the freshness of the basil. Try serving them over a bed of creamy polenta for a twist on the classic spaghetti and meatballs.
Hot Crab Dip
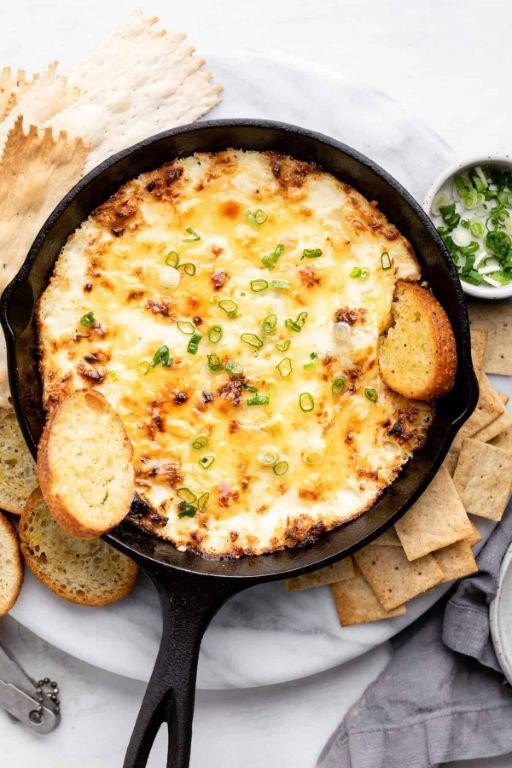
Whenever I think of comfort food that’s both luxurious and easy to whip up, my mind goes straight to Hot Crab Dip. It’s the kind of dish that disappears in minutes at gatherings, and I’ve got a little secret to make it extra special—just wait till you see the ingredients!
Ingredients
- 8 oz cream cheese, softened (because nobody likes lumpy dip)
- 1/2 cup mayonnaise (the secret to creaminess)
- 1/4 cup sour cream (for a little tang)
- 1 tbsp lemon juice (freshly squeezed, please)
- 1 tsp Worcestershire sauce (a splash of umami)
- 1/2 tsp garlic powder (because garlic makes everything better)
- 1/4 tsp cayenne pepper (just a hint of heat)
- 1 cup shredded cheddar cheese (for that gooey goodness)
- 1 lb lump crabmeat, picked over for shells (the star of the show)
- 2 tbsp chopped chives (for a pop of color and freshness)
Instructions
- Preheat your oven to 350°F (175°C) and grab a baking dish—no need to grease it.
- In a large bowl, mix the cream cheese, mayonnaise, sour cream, lemon juice, Worcestershire sauce, garlic powder, and cayenne pepper until smooth. Tip: Let the cream cheese sit out for a bit to soften; it makes mixing a breeze.
- Gently fold in the cheddar cheese and crabmeat until just combined. Tip: Be careful not to overmix to keep those lovely crab lumps intact.
- Spread the mixture evenly into your baking dish and bake for 20-25 minutes, or until bubbly and slightly golden on top. Tip: If you’re into a bit of crunch, broil for the last 2 minutes.
- Sprinkle with chopped chives right before serving.
Creamy, cheesy, and with just the right amount of kick, this Hot Crab Dip is a crowd-pleaser. Serve it with toasted baguette slices or crisp veggies for dipping, and watch it vanish before your eyes.
Stuffed Mushrooms with Spicy Sausage
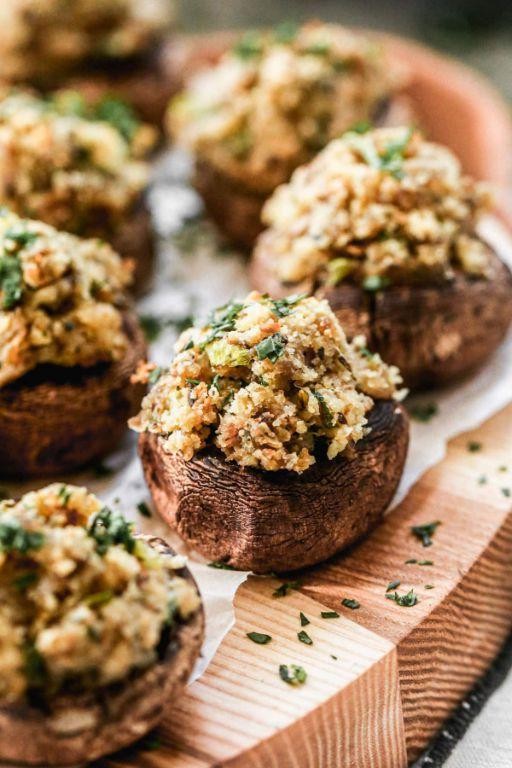
Sometimes, the best dishes come from the simplest ingredients lying around your kitchen. That’s exactly how these Stuffed Mushrooms with Spicy Sausage came to be in my home—a quick, flavorful appetizer that’s perfect for any gathering or a cozy night in.
Ingredients
- 12 large white mushrooms, stems removed and chopped
- A couple of spicy Italian sausage links, casings removed
- 1/4 cup of breadcrumbs
- A splash of olive oil
- 1/4 cup of grated Parmesan cheese
- 2 cloves of garlic, minced
- A pinch of salt and pepper
- A handful of fresh parsley, chopped
Instructions
- Preheat your oven to 375°F and lightly grease a baking sheet with olive oil.
- In a skillet over medium heat, cook the sausage until it’s no longer pink, breaking it apart as it cooks—about 5 minutes.
- Add the chopped mushroom stems and garlic to the skillet, cooking for another 3 minutes until everything’s nicely browned.
- Remove the skillet from heat and stir in the breadcrumbs, Parmesan, and parsley. Season with a pinch of salt and pepper.
- Carefully fill each mushroom cap with the sausage mixture, pressing down gently to pack it in.
- Arrange the stuffed mushrooms on the prepared baking sheet and drizzle with a bit more olive oil.
- Bake for 20 minutes, or until the mushrooms are tender and the tops are golden brown.
- Let them cool for a couple of minutes before serving—trust me, they’re worth the wait!
Rich in flavor with a satisfying crunch from the breadcrumbs, these stuffed mushrooms are a hit every time. Try serving them with a side of marinara sauce for dipping, and watch them disappear before your eyes!
Spicy Queso Fundido

Sometimes, all you need is a bowl of something cheesy, spicy, and utterly comforting to turn your day around. That’s exactly what this Spicy Queso Fundido does for me, especially on those busy weeknights when I’m craving something indulgent but easy to whip up.
Ingredients
- 2 cups of shredded Monterey Jack cheese (because it melts like a dream)
- 1 cup of shredded sharp cheddar (for that extra kick)
- A splash of whole milk (about 1/4 cup, to keep things smooth)
- A couple of diced jalapeños (seeds in if you like it fiery)
- 1 tbsp of olive oil (for sautéing)
- 1/2 tsp of smoked paprika (for that smoky whisper)
- A small handful of chopped cilantro (because freshness is key)
- Tortilla chips (for serving, obviously)
Instructions
- Heat the olive oil in a medium skillet over medium heat. Toss in the jalapeños and sauté until they’re just soft, about 2 minutes. This is where the magic starts.
- Lower the heat to medium-low and add the shredded cheeses and milk to the skillet. Stir constantly until the cheese is fully melted and the mixture is smooth, about 5 minutes. Tip: Keep the heat low to avoid separating the cheese.
- Sprinkle in the smoked paprika and stir to combine. Let it bubble gently for another minute to meld the flavors together. Tip: If the queso thickens too much, a little more milk can loosen it up.
- Remove from heat and sprinkle the chopped cilantro on top. Tip: For an extra layer of flavor, a squeeze of lime juice can brighten the whole dish.
You’ll love how this Spicy Queso Fundido strikes the perfect balance between creamy and spicy, with just enough smokiness to keep things interesting. Serve it straight from the skillet with a mountain of tortilla chips, or get creative by drizzling it over roasted veggies for a decadent twist.
Buffalo Cauliflower Bites

Zesty and bold, these Buffalo Cauliflower Bites are my go-to when I’m craving something spicy but want to keep it on the healthier side. I remember the first time I tried making them; my kitchen was a mess, but the result was so worth it!
Ingredients
- 1 head of cauliflower, cut into bite-sized florets
- A couple of tablespoons of olive oil
- 1/2 cup of hot sauce (I swear by Frank’s RedHot)
- A splash of apple cider vinegar
- 1/4 cup of melted butter
- 1 teaspoon of garlic powder
- 1/2 teaspoon of salt
Instructions
- Preheat your oven to 450°F and line a baking sheet with parchment paper.
- Toss the cauliflower florets with olive oil and spread them out on the baking sheet. Roast for 20 minutes, flipping halfway through, until they’re golden and crispy.
- While the cauliflower roasts, whisk together the hot sauce, apple cider vinegar, melted butter, garlic powder, and salt in a large bowl.
- Once the cauliflower is done, toss it in the sauce until each piece is well coated.
- Return the cauliflower to the baking sheet and roast for another 10 minutes to let the sauce caramelize a bit.
- Tip: For extra crispiness, broil for the last 2 minutes, but keep an eye on it to prevent burning.
- Tip: If you’re not a fan of too much heat, you can adjust the amount of hot sauce or add a bit of honey to sweeten the deal.
- Tip: Serve these straight out of the oven for the best texture; they tend to soften as they cool.
These bites are perfectly crispy with a kick that’ll have you reaching for more. Try serving them with a side of cool ranch or blue cheese dressing to balance the heat. Trust me, they’re addictive!
Spicy Deviled Eggs

Every time I think about deviled eggs, I’m transported back to my grandma’s kitchen, where the smell of paprika and vinegar filled the air. Today, I’m sharing my twist on this classic—Spicy Deviled Eggs—because who doesn’t love a little kick with their bite?
Ingredients
- 6 large eggs (because size matters when it comes to deviled eggs)
- A splash of white vinegar (just to make peeling those eggs a breeze)
- 1/4 cup of mayonnaise (the creamier, the better)
- A couple of tsp of Dijon mustard (for that tangy depth)
- A pinch of salt (to bring all the flavors together)
- 1/2 tsp of cayenne pepper (for the spicy kick we’re after)
- A sprinkle of smoked paprika (for that smoky finish)
Instructions
- Place the eggs in a single layer in a saucepan and cover with water by about an inch. Add a splash of white vinegar to the water—this helps prevent the eggs from cracking and makes them easier to peel later.
- Bring the water to a rolling boil over high heat, then cover the pan and remove it from the heat. Let the eggs sit for 12 minutes for perfectly hard-boiled yolks.
- While the eggs are cooking, prepare an ice bath in a large bowl. After the 12 minutes, transfer the eggs to the ice bath to cool for at least 5 minutes. This stops the cooking process and makes peeling a snap.
- Once cooled, peel the eggs and slice them in half lengthwise. Gently pop out the yolks into a bowl and set the whites aside on a serving plate.
- Mash the yolks with a fork until they’re fine and crumbly. Stir in the mayonnaise, Dijon mustard, salt, and cayenne pepper until the mixture is smooth and creamy. Taste and adjust the seasoning if needed—remember, it’s easier to add more spice than to take it away!
- Spoon or pipe the yolk mixture back into the egg whites. Sprinkle each egg with a little smoked paprika for color and flavor.
Just like that, you’ve got a plate of Spicy Deviled Eggs that are creamy, tangy, and just the right amount of spicy. Serve them on a bed of arugula for a peppery contrast, or alongside crisp celery sticks for a crunchy bite. Either way, they’re sure to disappear fast!
Hot Pepper Jelly Cheese Ball
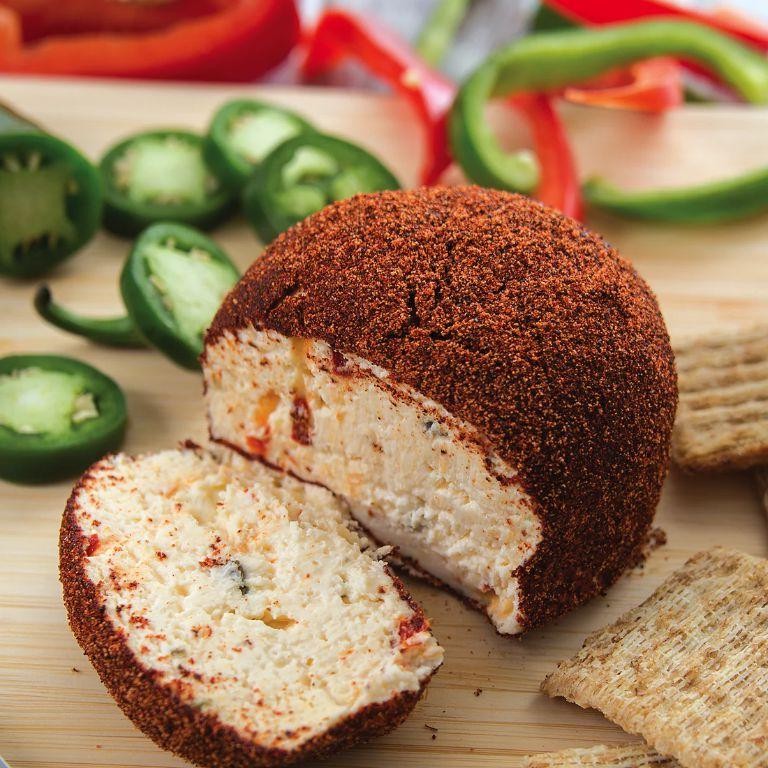
Last weekend, I stumbled upon the most delightful combination of spicy and creamy that I just have to share with you. It’s a Hot Pepper Jelly Cheese Ball, and trust me, it’s as fun to make as it is to eat. Perfect for those who love a little kick in their appetizers!
Ingredients
- 2 packages (8 oz each) of cream cheese, softened
- 1 cup of sharp cheddar cheese, shredded
- 1/4 cup of hot pepper jelly (plus a bit more for glazing)
- 1/2 cup of pecans, finely chopped
- A splash of Worcestershire sauce
- A couple of green onions, thinly sliced
Instructions
- In a large mixing bowl, combine the softened cream cheese and shredded cheddar cheese until well blended. Tip: Letting the cream cheese sit out for about 30 minutes makes this step easier.
- Add the hot pepper jelly, Worcestershire sauce, and green onions to the cheese mixture. Mix until everything is evenly distributed.
- Shape the mixture into a ball with your hands. If it’s too sticky, lightly wet your hands to make shaping easier.
- Roll the cheese ball in the chopped pecans until it’s fully coated. Tip: Pressing the pecans gently into the ball helps them stick better.
- Place the cheese ball on a serving plate and drizzle a little extra hot pepper jelly over the top for a glossy finish. Tip: Warming the jelly slightly makes it easier to drizzle.
- Chill the cheese ball in the refrigerator for at least 1 hour before serving to let the flavors meld together.
Before you know it, you’ll have a cheese ball that’s irresistibly creamy with a spicy-sweet kick. The pecans add a lovely crunch, making it a hit at any gathering. Try serving it with crackers or apple slices for an extra special touch!
Spicy Garlic Parmesan Wings

Believe it or not, the first time I made these Spicy Garlic Parmesan Wings, I was just throwing together whatever I had in the fridge for a last-minute game night. Now, they’re the most requested dish at my gatherings. There’s something about the crispy skin, the kick of heat, and the rich, cheesy finish that keeps everyone coming back for more.
Ingredients
- 2 lbs of chicken wings, split at the joints
- A good glug of olive oil, about 2 tbsp
- 3 cloves of garlic, minced (because fresh is best!)
- A couple of dashes of red pepper flakes, depending on how brave you’re feeling
- 1/2 cup of grated Parmesan cheese, plus extra for serving
- A splash of lemon juice, about 1 tbsp
- Salt and freshly ground black pepper, to coat the wings
Instructions
- Preheat your oven to 400°F (200°C) and line a baking sheet with parchment paper for easy cleanup.
- Toss the wings with olive oil, salt, and pepper in a large bowl until they’re evenly coated. Tip: Patting the wings dry before this step helps them crisp up better.
- Spread the wings out on the prepared baking sheet in a single layer, making sure they’re not touching. This ensures they cook evenly and get that perfect crisp.
- Bake for 45-50 minutes, flipping halfway through, until they’re golden brown and crispy. Tip: If you’re unsure, the internal temperature should reach 165°F (74°C).
- While the wings are baking, mix together the minced garlic, red pepper flakes, Parmesan, and lemon juice in a small bowl.
- Once the wings are done, toss them in the garlic-Parmesan mixture until they’re fully coated. Tip: Doing this while the wings are still hot helps the cheese melt slightly and stick better.
- Serve immediately with extra Parmesan on top and maybe some celery sticks on the side for that classic wing experience.
Unbelievably, these wings manage to be both incredibly flavorful and surprisingly easy to make. The heat from the pepper flakes builds slowly, while the Parmesan adds a salty, umami depth that’s downright addictive. Try serving them with a cool, creamy dip to balance out the spice, or go all in and double the red pepper flakes for those who dare.
Chili Lime Roasted Nuts

Today, I stumbled upon a bag of mixed nuts in my pantry and thought, why not spice things up a bit? That’s how these Chili Lime Roasted Nuts came to life, perfect for those who love a little heat with their sweet.
Ingredients
- 2 cups of mixed nuts (I used almonds, cashews, and pecans)
- A generous squeeze of lime juice (about 2 tbsp)
- A couple of tbsp of honey
- A splash of olive oil (about 1 tbsp)
- A pinch of salt
- 1 tsp of chili powder (adjust if you’re not into too much heat)
Instructions
- Preheat your oven to 350°F and line a baking sheet with parchment paper.
- In a bowl, mix the nuts with olive oil, lime juice, honey, salt, and chili powder until everything’s nicely coated. Tip: Use your hands for mixing to ensure every nut gets an even coat.
- Spread the nuts in a single layer on the prepared baking sheet. Tip: Avoid overcrowding to ensure they roast evenly.
- Roast in the oven for 10 minutes, then give them a stir and roast for another 5-10 minutes until they’re golden and fragrant. Tip: Keep an eye on them after the first 10 minutes to prevent burning.
- Let them cool completely on the baking sheet before serving. They’ll crisp up as they cool.
You’ll love the crunch and the perfect balance of spicy, sweet, and tangy in these nuts. They’re addictive on their own, but try sprinkling them over a salad for an extra kick.
Spicy Tuna Tartare
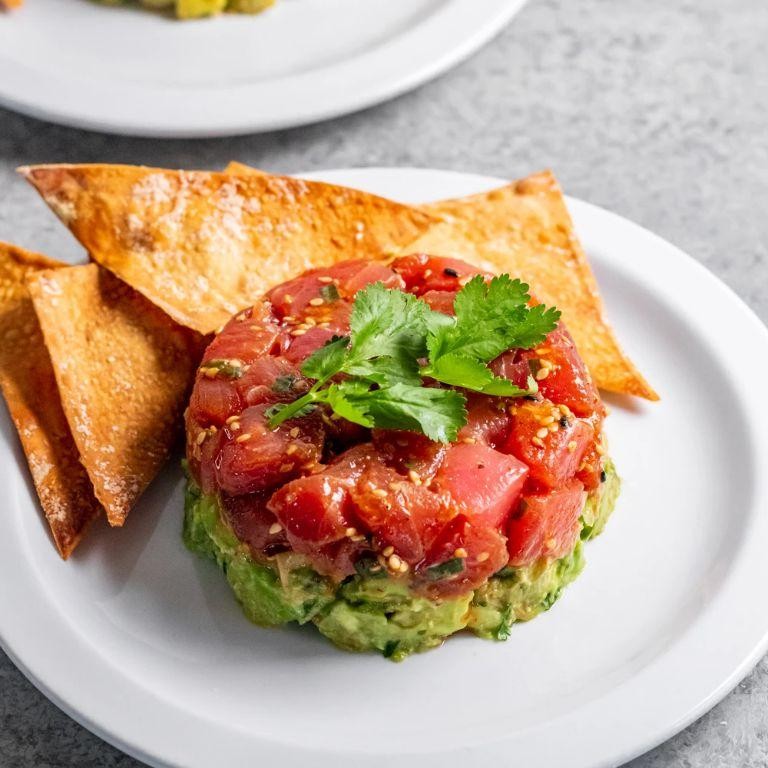
Spicy Tuna Tartare is one of those dishes that looks fancy but is surprisingly simple to make at home. I remember the first time I tried it at a sushi restaurant; I was hooked by the perfect balance of spicy, savory, and fresh flavors. Now, it’s my go-to appetizer for impressing guests or treating myself on a lazy Sunday afternoon.
Ingredients
- 1 lb sushi-grade tuna, diced into small cubes
- 2 tbsp soy sauce (I like to use low-sodium for better control over the saltiness)
- 1 tbsp sesame oil (a little goes a long way!)
- 1 tsp sriracha (adjust based on your heat preference)
- 1 avocado, diced (for that creamy texture)
- A handful of cilantro, finely chopped (if you’re into that)
- The juice of 1 lime (freshly squeezed makes all the difference)
- A couple of green onions, thinly sliced
- 1 tsp toasted sesame seeds (for that nutty crunch)
Instructions
- In a medium bowl, gently mix the diced tuna with soy sauce, sesame oil, and sriracha until evenly coated. Tip: Don’t overmix to keep the tuna nice and chunky.
- Add the diced avocado, cilantro, lime juice, and green onions to the bowl. Fold everything together carefully to avoid mashing the avocado. Tip: Use a rubber spatula for gentle mixing.
- Sprinkle the toasted sesame seeds on top for a bit of texture and nutty flavor. Tip: Toast the sesame seeds in a dry pan over medium heat for 1-2 minutes until golden for extra aroma.
- Let the tartare sit in the fridge for about 10 minutes before serving to let the flavors meld together.
When you take that first bite, the creaminess of the avocado pairs perfectly with the spicy, tangy tuna. Serve it on crispy wonton chips or over a bed of greens for a light, refreshing meal.
Hot Honey Glazed Meatballs
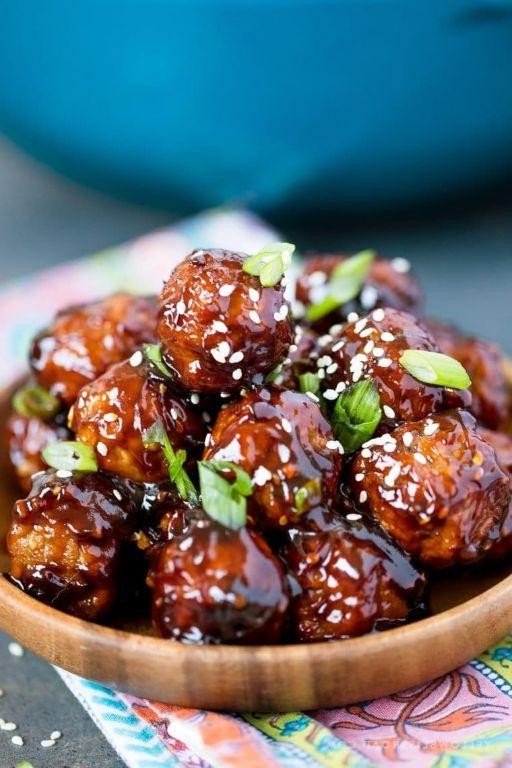
Just last week, I found myself staring into the fridge, wondering what to whip up for a quick yet satisfying dinner. That’s when these Hot Honey Glazed Meatballs came to life—a perfect blend of spicy and sweet that’ll have everyone asking for seconds.
Ingredients
- 1 lb ground beef (or turkey for a lighter option)
- A couple of cloves of garlic, minced
- 1 egg, because it’s the glue that holds everything together
- 1/2 cup breadcrumbs, for that perfect texture
- A splash of milk, to keep things moist
- 1/2 tsp salt, because seasoning is key
- 1/4 tsp black pepper, for a little kick
- 1/2 cup honey, for that sweet glaze
- 2 tbsp hot sauce, adjust based on how brave you’re feeling
- 1 tbsp soy sauce, for a depth of flavor
- 1 tbsp apple cider vinegar, to balance the sweetness
Instructions
- Preheat your oven to 375°F and line a baking sheet with parchment paper for easy cleanup.
- In a large bowl, mix the ground beef, minced garlic, egg, breadcrumbs, milk, salt, and pepper until just combined. Overmixing can make the meatballs tough.
- Roll the mixture into 1-inch balls and place them on the prepared baking sheet. Tip: Wet your hands slightly to prevent sticking.
- Bake for 20 minutes, or until the meatballs are cooked through and slightly browned.
- While the meatballs bake, whisk together the honey, hot sauce, soy sauce, and apple cider vinegar in a small saucepan over medium heat. Let it simmer for about 5 minutes until it thickens slightly. Tip: Keep an eye on it to prevent burning.
- Toss the baked meatballs in the hot honey glaze until they’re evenly coated. Tip: Do this while they’re still hot for the best flavor absorption.
- Serve immediately, garnished with sesame seeds or chopped green onions if you’re feeling fancy.
Last night, these meatballs were the star of our dinner, served over a bed of fluffy rice with a side of steamed veggies. The glaze is sticky, sweet, and just the right amount of spicy, while the meatballs stay juicy and tender. Try skewering them for a fun appetizer at your next gathering!
Spicy Corn Fritters

Growing up in the Midwest, summer meant one thing: corn season. And nothing brings back those warm, lazy afternoons like these Spicy Corn Fritters. They’re my go-to when I want something crispy, spicy, and utterly comforting.
Ingredients
- 2 cups of fresh corn kernels (about 3 ears)
- 1/2 cup of all-purpose flour
- 1/4 cup of cornmeal
- 1 teaspoon of baking powder
- 1/2 teaspoon of salt
- 1/4 teaspoon of cayenne pepper (or more if you’re feeling brave)
- 1 large egg, lightly beaten
- A splash of milk (about 1/4 cup)
- 2 tablespoons of melted butter
- A couple of green onions, finely chopped
- Oil for frying (I use vegetable, but any neutral oil works)
Instructions
- In a large bowl, mix together the corn kernels, flour, cornmeal, baking powder, salt, and cayenne pepper.
- Add the beaten egg, milk, and melted butter to the dry ingredients. Stir until just combined—don’t overmix, or your fritters will be tough.
- Fold in the chopped green onions. Tip: Let the batter sit for 5 minutes; it helps the cornmeal absorb the liquid for a better texture.
- Heat about 1/2 inch of oil in a heavy skillet over medium heat until it shimmers (around 350°F).
- Drop tablespoonfuls of batter into the hot oil, flattening slightly with the back of the spoon. Don’t overcrowd the pan.
- Fry for about 2-3 minutes per side, or until golden brown and crispy. Tip: Keep an eye on the heat; adjust as needed to prevent burning.
- Transfer to a paper towel-lined plate to drain. Tip: Sprinkle with a little extra salt right after frying for maximum flavor.
Hot off the skillet, these fritters are a dream—crispy on the outside, tender inside, with a kick that builds with every bite. Serve them with a dollop of sour cream or a drizzle of honey for a sweet and spicy contrast.
Ghost Pepper Cheese Sticks
Now, if you’re anything like me, the mere mention of ghost peppers gets your heart racing—not just from the heat, but from the excitement of tackling such a fiery challenge in the kitchen. These Ghost Pepper Cheese Sticks are my latest obsession, perfectly balancing that intense heat with the creamy, comforting embrace of melted cheese. Trust me, they’re a game-changer for your next snack attack or party platter.
Ingredients
- 1 cup of shredded mozzarella cheese (because what’s a cheese stick without cheese?)
- 1/2 cup of shredded cheddar cheese (for that extra sharpness)
- 1 ghost pepper, finely diced (handle with care, and maybe wear gloves)
- 1/2 cup of all-purpose flour (to keep everything together)
- 2 eggs, beaten (for that golden, crispy coating)
- 1 cup of breadcrumbs (panko works wonders for extra crunch)
- A splash of milk (to thin out the egg wash just a tad)
- A couple of tbsp of olive oil (for frying)
Instructions
- Start by mixing the mozzarella and cheddar cheeses with the diced ghost pepper in a bowl. Tip: Freeze the mixture for about 30 minutes to make it easier to handle.
- Divide the mixture into 8 equal parts and roll each into a stick shape. Tip: Wetting your hands slightly prevents the cheese from sticking to you.
- Set up your breading station: flour in one bowl, beaten eggs mixed with a splash of milk in another, and breadcrumbs in a third.
- Dredge each cheese stick in flour, then dip into the egg wash, and finally coat with breadcrumbs. Tip: For an extra crispy coating, double dip in the egg and breadcrumbs.
- Heat olive oil in a pan over medium heat (about 350°F) and fry the sticks until golden brown, about 2-3 minutes per side. Tip: Don’t overcrowd the pan to ensure even cooking.
- Remove and let them drain on a paper towel-lined plate for a minute before serving.
Unbelievably, these Ghost Pepper Cheese Sticks manage to pack a punch without overshadowing the gooey, cheesy goodness inside. The crunch gives way to a molten center that’s just the right amount of spicy—perfect for dipping in cool ranch or blue cheese dressing to balance the heat.
Conclusion
We hope these 18 spicy hot appetizer recipes ignite your passion for cooking and bring some heat to your next gathering. Each dish is a testament to the joy of sharing delicious, bold flavors with friends and family. Don’t forget to try them out, share your favorites in the comments, and pin this article on Pinterest to spread the spice love. Happy cooking!


