Ready to spice up your kitchen routine? Dive into the vibrant flavors of Honduras with our roundup of 18 Spicy Honduran Food Recipes Authentic to the core. From sizzling street food to hearty home-cooked meals, these dishes promise a fiery adventure for your taste buds. Perfect for home cooks looking to explore new culinary horizons, each recipe is a ticket to a deliciously bold experience. Let's get cooking!
Baleadas
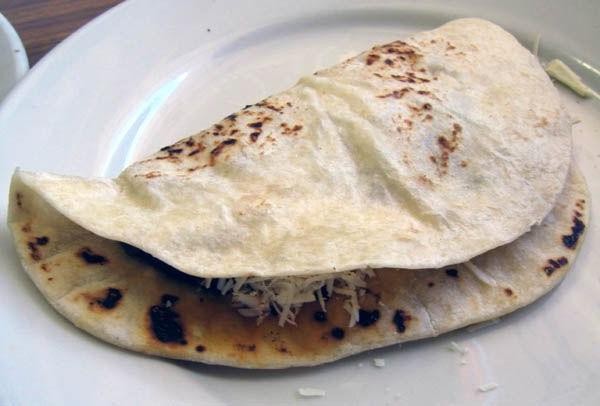
Venturing into the heart of Honduran cuisine, I stumbled upon the humble yet utterly satisfying Baleadas. It’s a dish that reminds me of lazy Sunday mornings when all I want is something comforting yet simple to whip up. The beauty of Baleadas lies in its versatility and the joy of folding warm, fluffy tortillas around a hearty filling.
Ingredients
- 2 cups of all-purpose flour (because sometimes, simple is best)
- A pinch of salt (just enough to whisper to the flour)
- A splash of water (start with 3/4 cup and adjust as needed)
- A couple of tablespoons of vegetable oil (for that perfect dough elasticity)
- 1 cup of refried beans (the heart of the Baleada)
- 1/2 cup of crumbled queso fresco (for a creamy, salty kick)
- A handful of chopped avocado (because avocado makes everything better)
- A drizzle of crema (or sour cream, in a pinch)
Instructions
- In a large bowl, mix the flour and salt. Gradually add water and oil, kneading until the dough is smooth and doesn’t stick to your hands. Tip: If the dough feels too dry, add water a teaspoon at a time.
- Divide the dough into 6 equal parts, rolling each into a ball. Cover with a damp cloth and let rest for 15 minutes. This patience pays off with softer tortillas.
- On a floured surface, roll each ball into a thin, 6-inch circle. Heat a skillet over medium-high heat and cook each tortilla for about 1 minute per side, until lightly browned and puffy.
- Warm the refried beans in a small pot over low heat, stirring occasionally. Tip: A splash of water can loosen them up if they’re too thick.
- Spread a generous spoonful of beans on each tortilla, then sprinkle with queso fresco and avocado. Drizzle with crema before folding in half. Tip: Serve immediately for the best texture contrast between the warm tortilla and cool toppings.
What makes Baleadas truly special is the contrast between the warm, soft tortilla and the cool, creamy fillings. Try serving them with a side of pickled onions for an extra tangy crunch that elevates the whole experience.
Pollo con Tajadas
Every time I think about comfort food that brings a burst of flavor and color to the table, Pollo con Tajadas is the first dish that comes to mind. It’s a delightful combination of crispy fried chicken and sweet plantains that’s as fun to make as it is to eat. I remember the first time I tried it at a friend’s house; the contrast between the savory chicken and the sweet, caramelized plantains was unforgettable.
Ingredients
- 2 cups of vegetable oil for frying
- 4 boneless, skinless chicken breasts
- A good sprinkle of salt and pepper
- 1 cup of all-purpose flour
- 2 eggs, beaten
- A splash of milk
- 2 ripe plantains, sliced into 1/2-inch thick pieces
- A couple of tablespoons of honey for drizzling
Instructions
- Heat the vegetable oil in a large frying pan over medium-high heat until it reaches 350°F. Use a thermometer to check; it’s crucial for getting that perfect crisp.
- Season the chicken breasts with salt and pepper on both sides. This is your base flavor, so don’t skimp!
- Dredge each chicken breast in the flour, then dip into the beaten eggs mixed with a splash of milk, and back into the flour. This double coating ensures extra crunch.
- Carefully place the chicken in the hot oil. Fry for about 6-7 minutes on each side or until golden brown and the internal temperature reaches 165°F. Tip: Don’t overcrowd the pan to keep the oil temperature steady.
- While the chicken rests, fry the plantain slices in the same oil for 2-3 minutes per side until they’re golden and slightly caramelized. Tip: Plantains fry quickly, so keep an eye on them to prevent burning.
- Drizzle the honey over the fried plantains for that extra touch of sweetness. Tip: Warm the honey slightly for easier drizzling.
- Serve the crispy chicken alongside the sweet plantains for a dish that’s a feast for the eyes and the palate.
Zesty and satisfying, this Pollo con Tajadas is a perfect balance of textures and flavors. The chicken stays juicy inside its crispy shell, while the plantains add a soft, sweet contrast. Try serving it with a side of black beans for a complete meal that’ll transport you straight to the tropics.
Sopa de Caracol

After stumbling upon this vibrant dish during a trip to Honduras, I knew I had to bring a taste of it back home. Sopa de Caracol, or conch soup, is a creamy, coconut-based delight that’s as comforting as it is exotic—perfect for when you’re craving something a little different.
Ingredients
- 1 lb conch meat, cleaned and tenderized
- 2 cups coconut milk (the creamier, the better)
- A couple of garlic cloves, minced
- A splash of olive oil
- 1 bell pepper, diced
- 1 onion, chopped
- 2 potatoes, cubed
- A pinch of cumin
- Salt to your liking
- A handful of cilantro, chopped
Instructions
- Heat a splash of olive oil in a large pot over medium heat. Toss in the minced garlic and let it sizzle for about 30 seconds until fragrant—this is your flavor base.
- Add the chopped onion and diced bell pepper to the pot. Stir them around until they start to soften, about 5 minutes. Tip: Don’t rush this step; letting the veggies sweat properly builds depth.
- Throw in the cubed potatoes and conch meat, giving everything a good mix. Pour in the coconut milk and bring the mixture to a gentle simmer.
- Season with a pinch of cumin and salt. Let the soup simmer uncovered for about 20 minutes, or until the potatoes are tender and the conch is cooked through. Tip: Keep the heat low to prevent the coconut milk from separating.
- Stir in the chopped cilantro right before serving. Tip: Fresh herbs add a burst of color and freshness, so don’t skip them!
Digging into this soup, you’ll love how the tender conch and soft potatoes swim in that rich, slightly sweet coconut broth. Serve it with a side of crusty bread to soak up every last drop, or go traditional with a scoop of steamed rice right in the bowl.
Pastelitos de Carne

Just last weekend, I found myself craving something savory and flaky, something that reminded me of my abuela’s kitchen. That’s when I decided to whip up a batch of Pastelitos de Carne, a delicious Latin American meat pastry that’s perfect for any time of the day.
Ingredients
- 2 cups of all-purpose flour
- 1/2 cup of unsalted butter, cold and cubed
- A splash of cold water
- 1/2 lb of ground beef
- A small onion, finely chopped
- A couple of garlic cloves, minced
- 1/2 tsp of cumin
- 1/2 tsp of paprika
- Salt to taste
- 1 egg, beaten (for egg wash)
Instructions
- In a large bowl, mix the flour and butter until the mixture resembles coarse crumbs. Gradually add cold water until the dough comes together. Tip: Keep the butter cold for a flakier pastry.
- Wrap the dough in plastic and chill in the fridge for 30 minutes. This makes it easier to handle.
- While the dough chills, cook the ground beef, onion, and garlic in a pan over medium heat until the beef is browned. Stir in the cumin, paprika, and salt. Let it cool slightly.
- Preheat your oven to 375°F (190°C). Roll out the dough on a floured surface to about 1/8 inch thickness.
- Cut the dough into squares, spoon some of the beef mixture onto each, fold over to form triangles, and seal the edges with a fork. Tip: Don’t overfill to prevent leaks.
- Brush the pastelitos with beaten egg for a golden finish. Bake for 20-25 minutes or until golden brown. Tip: The egg wash gives them a beautiful shine.
Zesty and rich, these Pastelitos de Carne are a hit with their buttery crust and savory filling. Serve them with a side of spicy salsa or a simple salad for a complete meal.
Enchiladas Hondureñas
Zesty and vibrant, Enchiladas Hondureñas have become my go-to dish for bringing a taste of Honduras to my kitchen. There’s something about the combination of tender chicken, savory spices, and that irresistible homemade sauce that makes every bite a celebration.
Ingredients
- 2 cups of shredded chicken (I like to use leftovers from a rotisserie chicken for extra flavor)
- A splash of vegetable oil (about 2 tbsp)
- 1 cup of diced onions
- A couple of minced garlic cloves
- 1 cup of tomato sauce
- 2 cups of chicken broth (homemade if you have it)
- A pinch of cumin (about 1/2 tsp)
- A dash of salt (to your liking, but start with 1/2 tsp)
- 8 corn tortillas
- 1 cup of shredded cheese (I prefer a mix of mozzarella and cheddar)
- A handful of chopped cilantro for garnish
Instructions
- Heat the vegetable oil in a large skillet over medium heat until it shimmers, about 2 minutes.
- Add the diced onions and minced garlic to the skillet, sautéing until they’re soft and fragrant, roughly 3 minutes.
- Stir in the shredded chicken, tomato sauce, chicken broth, cumin, and salt. Let the mixture simmer for 10 minutes, allowing the flavors to meld beautifully.
- Preheat your oven to 350°F (175°C) while the chicken mixture simmers.
- Warm the corn tortillas in a dry skillet for about 30 seconds on each side to make them pliable.
- Fill each tortilla with a generous spoonful of the chicken mixture, roll them up, and place them seam-side down in a baking dish.
- Pour any remaining sauce over the enchiladas and sprinkle the shredded cheese on top.
- Bake in the preheated oven for 20 minutes, or until the cheese is bubbly and slightly golden.
- Garnish with chopped cilantro before serving.
The enchiladas come out perfectly saucy, with the cheese creating a deliciously gooey top layer. I love serving them with a side of pickled onions and a cold beer to cut through the richness.
Tacos Hondureños

Remember the first time I stumbled upon Tacos Hondureños during a food festival? It was love at first bite! The vibrant flavors and the hearty filling made it an instant favorite in my kitchen, and I’ve been tweaking the recipe ever since to get it just right.
Ingredients
- 2 cups of shredded chicken (I like to use leftovers from a roast chicken for extra flavor)
- A couple of tablespoons of vegetable oil (just enough to coat the pan)
- 1 large onion, finely chopped (because nobody likes big onion chunks in their tacos)
- 2 cloves of garlic, minced (fresh is best, but I won’t judge if you use the jarred kind)
- A splash of orange juice (about 1/4 cup, it adds a subtle sweetness that’s divine)
- 1 teaspoon of ground cumin (for that earthy depth)
- Salt to taste (I know, I said avoid ‘to taste,’ but salt is the exception)
- 8 corn tortillas (warmed up, because cold tortillas are a crime)
- A handful of fresh cilantro, chopped (for that fresh kick at the end)
Instructions
- Heat the vegetable oil in a large skillet over medium heat until it shimmers, about 2 minutes.
- Add the chopped onion and minced garlic to the skillet, sautéing until they’re soft and fragrant, roughly 3 minutes.
- Toss in the shredded chicken, stirring to combine with the onions and garlic. Let it cook for another 2 minutes to warm through.
- Pour in the orange juice and sprinkle the ground cumin over the mixture. Stir well to coat everything evenly. Cook for about 5 minutes, letting the flavors meld together.
- Season with salt, starting with 1/2 teaspoon and adjusting as needed. Remember, you can always add more, but you can’t take it out!
- Warm the corn tortillas in a dry skillet over medium heat for about 30 seconds on each side, or until they’re pliable and slightly toasted.
- Divide the chicken mixture evenly among the tortillas, topping each with a sprinkle of fresh cilantro.
Now, the magic of these Tacos Hondureños lies in their perfect balance of flavors and textures—juicy chicken, soft tortillas, and that fresh cilantro finish. Try serving them with a side of pickled onions for an extra zing that’ll make your taste buds sing!
Arroz con Pollo Hondureño

Oh, how I love diving into the flavors of traditional dishes from around the world, and today, I’m thrilled to share a piece of Honduras with you through this Arroz con Pollo Hondureño recipe. It’s a dish that reminds me of a sunny afternoon spent with friends, where the aroma of spices filled the air, and every bite was a celebration of culture and comfort.
Ingredients
- 2 cups of long-grain rice
- 4 chicken thighs, bone-in and skin-on for that extra flavor
- A splash of vegetable oil
- 1 onion, finely chopped
- A couple of garlic cloves, minced
- 1 bell pepper, diced
- 1 tomato, chopped
- 2 cups of chicken broth
- A pinch of saffron threads for that golden hue
- Salt and pepper to season
Instructions
- Heat a splash of vegetable oil in a large pot over medium heat. Add the chicken thighs, skin side down, and cook until golden brown, about 5 minutes per side. Remove and set aside.
- In the same pot, toss in the chopped onion, minced garlic, diced bell pepper, and chopped tomato. Sauté until the veggies are soft, about 5 minutes.
- Tip: Don’t rush the sautéing process; letting the veggies soften properly builds the flavor base.
- Stir in the rice, making sure it’s well coated with the veggie mixture. This step ensures every grain is flavorful.
- Pour in the chicken broth and add the saffron threads, salt, and pepper. Give it a good stir.
- Nestle the chicken thighs back into the pot, cover, and simmer on low heat for 25 minutes. No peeking! The steam is crucial for perfectly cooked rice.
- Tip: If the rice seems dry but isn’t done, add a couple of tablespoons of water and continue cooking.
- Once done, let it sit covered for 5 minutes off the heat. This allows the rice to fluff up beautifully.
- Tip: For an extra touch, garnish with chopped cilantro or a squeeze of lime before serving.
So, there you have it—a dish where the rice is tender and infused with the rich flavors of chicken and spices, while the chicken itself is fall-off-the-bone delicious. Serve it with a side of fried plantains for a truly Hondureño experience.
Plátanos Fritos
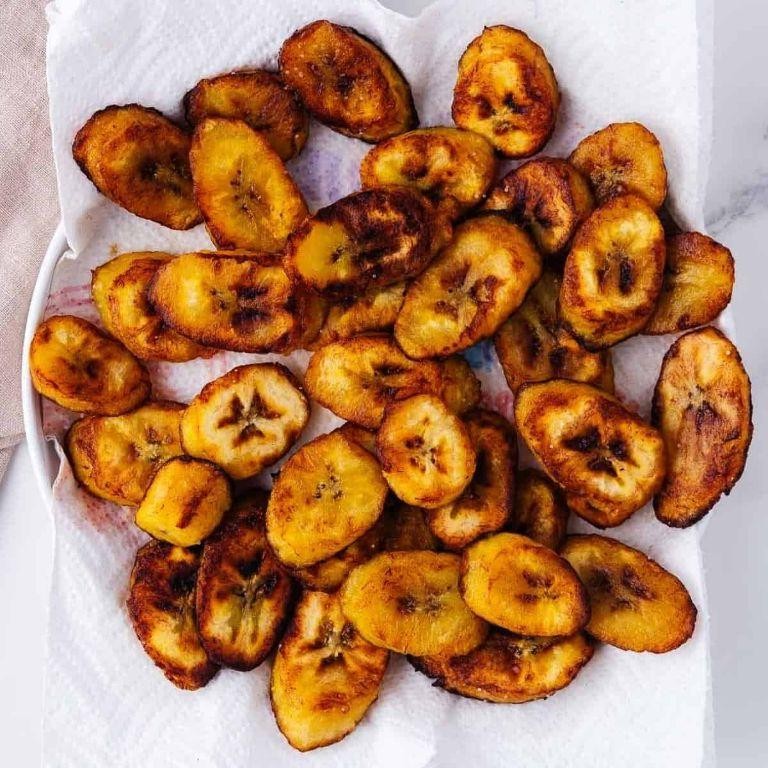
Perfectly ripe plantains are the secret to making the most delicious Plátanos Fritos, a dish that brings back memories of my grandmother’s kitchen. I remember how she’d always say the key is in the ripeness of the plantains, and after years of experimenting, I couldn’t agree more.
Ingredients
- 2 ripe plantains (the skin should be mostly black for sweetness)
- A generous splash of vegetable oil (about 1/4 cup)
- A pinch of salt (just to bring out the flavors)
Instructions
- Start by peeling the plantains. Slice them diagonally into 1/2-inch thick pieces for more surface area, which means more caramelization.
- Heat the vegetable oil in a large skillet over medium heat (around 350°F). You’ll know it’s ready when a small piece of plantain sizzles upon contact.
- Carefully add the plantain slices to the skillet in a single layer. Don’t overcrowd the pan to ensure each piece gets perfectly crispy.
- Fry for about 3 minutes on each side, or until they’re golden brown and crispy. Use a slotted spoon to flip them halfway through.
- Once done, transfer the fried plantains to a paper towel-lined plate to drain any excess oil. Immediately sprinkle with a pinch of salt while they’re still hot.
Delightfully crispy on the outside and tender on the inside, these Plátanos Fritos are a treat on their own or paired with a dollop of sour cream for a contrast in flavors. Try serving them alongside your morning eggs for a sweet and savory breakfast twist.
Carne Asada

Kicking off the grill season with a bang, I can’t help but share my all-time favorite Carne Asada recipe. It’s the perfect blend of smoky, citrusy, and downright delicious, reminding me of those lazy summer evenings spent with friends and family.
Ingredients
- 2 lbs of flank steak (the star of the show)
- A generous splash of olive oil
- The juice of 2 limes (for that zesty kick)
- A couple of minced garlic cloves (because garlic makes everything better)
- 1 tsp of ground cumin (for a hint of earthiness)
- 1 tsp of chili powder (to turn up the heat)
- A pinch of salt and pepper (to season just right)
Instructions
- Start by whisking together the olive oil, lime juice, minced garlic, cumin, chili powder, salt, and pepper in a bowl. This marinade is your flavor powerhouse.
- Place the flank steak in a large resealable bag and pour the marinade over it. Seal the bag, ensuring all the air is out, and let it chill in the fridge for at least 2 hours. Tip: For maximum flavor, marinate overnight.
- Preheat your grill to medium-high heat, about 450°F. A hot grill is key to getting those perfect char marks.
- Remove the steak from the marinade, letting the excess drip off, and place it on the grill. Cook for about 6-7 minutes on each side for medium-rare. Tip: Resist the urge to flip it more than once to get those beautiful grill lines.
- Once cooked to your liking, transfer the steak to a cutting board and let it rest for 10 minutes. This step is crucial for juicy, tender slices. Tip: Cover it loosely with foil to keep it warm.
- Slice the steak against the grain into thin strips. This ensures every bite is as tender as can be.
Loving the vibrant flavors and tender texture of this Carne Asada? Serve it up with warm tortillas, a dollop of guacamole, and a cold beer for the ultimate feast that screams summer.
Pescado Frito
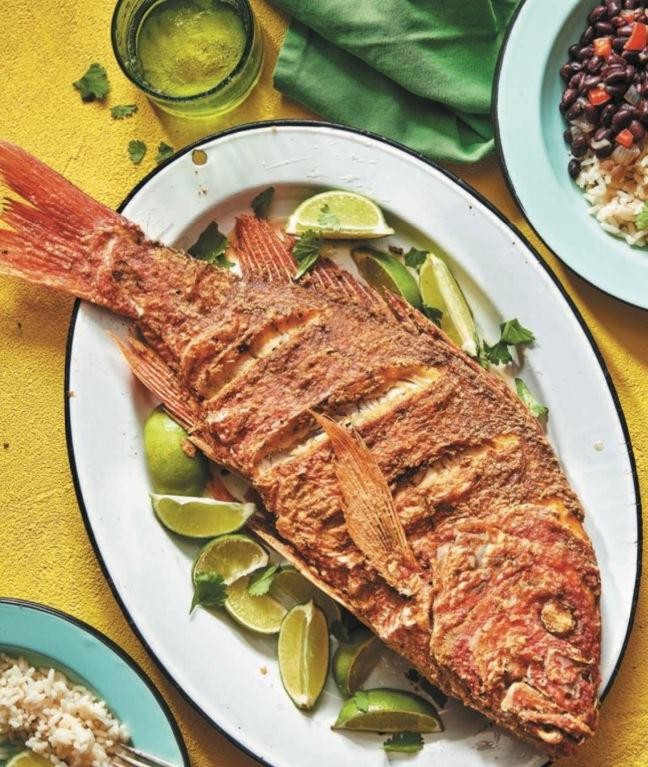
Unbelievably crispy on the outside yet tender on the inside, Pescado Frito is my go-to dish when I’m craving something simple yet utterly satisfying. I remember the first time I tried it at a tiny seaside shack in Florida; the golden crust and the flaky fish won me over instantly. Now, I make it at home whenever I need a quick, delicious meal that reminds me of that sunny day.
Ingredients
- 1 lb of fresh white fish fillets (like cod or tilapia)
- A cup of all-purpose flour
- A couple of teaspoons of garlic powder
- A teaspoon of paprika
- A splash of milk
- 1 egg
- Enough vegetable oil to fill a skillet about an inch deep
- A pinch of salt and pepper
Instructions
- Start by patting the fish fillets dry with paper towels to ensure the coating sticks better.
- In a shallow dish, mix the flour, garlic powder, paprika, salt, and pepper.
- In another dish, whisk together the egg and milk.
- Dip each fillet first into the egg mixture, then dredge in the flour mixture, making sure it’s fully coated.
- Heat the vegetable oil in a large skillet over medium-high heat until it reaches 375°F. A pro tip: if you drop a tiny bit of flour into the oil and it sizzles immediately, it’s ready.
- Carefully place the coated fillets into the hot oil, frying in batches to avoid overcrowding the pan.
- Fry each side for about 3-4 minutes or until golden brown and crispy. Another tip: resist the urge to flip them too soon; let them develop a nice crust.
- Once done, transfer the fillets to a plate lined with paper towels to drain any excess oil.
- Serve immediately with a squeeze of lemon or your favorite dipping sauce. Final tip: for an extra crunch, you can double-dip the fillets in the egg and flour mixture before frying.
Golden and glorious, this Pescado Frito is best enjoyed right out of the fryer when it’s at its crispiest. The contrast between the crunchy exterior and the moist, flaky fish inside is simply irresistible. Try serving it with a side of tangy coleslaw or atop a bed of cilantro-lime rice for a complete meal that’s sure to impress.
Tamales Hondureños
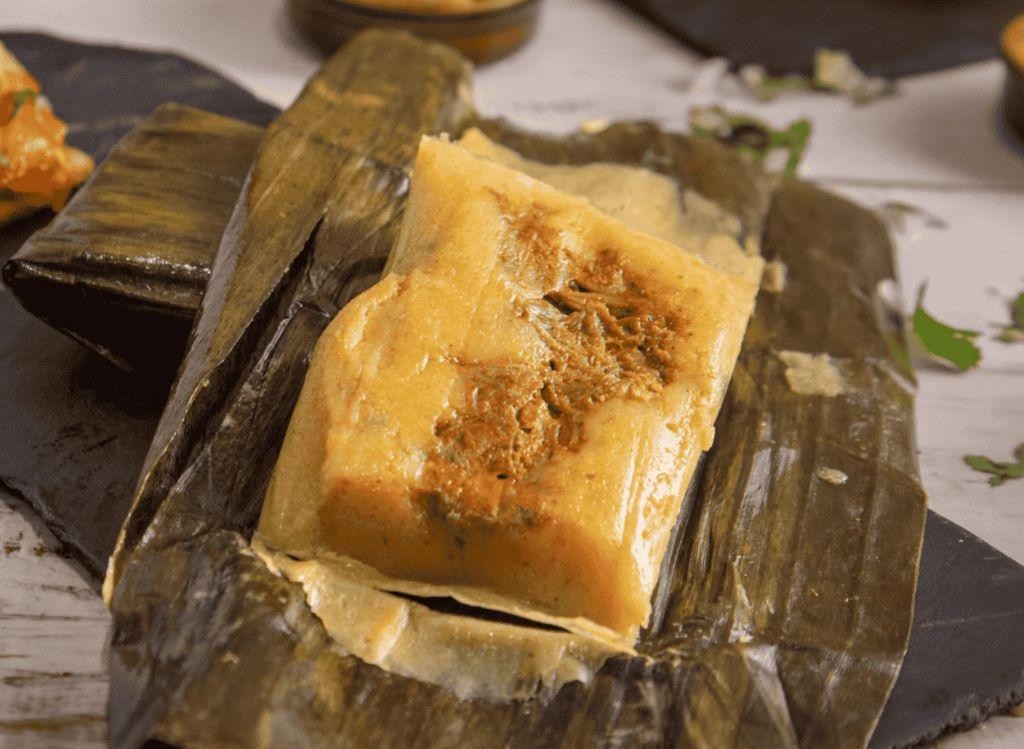
Yesterday, I stumbled upon a recipe that took me straight back to my trip to Honduras—Tamales Hondureños. There’s something incredibly comforting about unwrapping a tamale, steam billowing out, revealing the soft, flavorful masa inside. Let me share how you can bring this cozy memory into your kitchen.
Ingredients
- 2 cups of masa harina (corn flour)
- A splash of chicken broth, about 2 cups
- A couple of tablespoons of achiote oil, for that signature color and flavor
- 1 lb of chicken, shredded (leftovers work great here!)
- A handful of green olives, pitted
- A few slices of bell pepper, because why not add a bit of crunch?
- Banana leaves, cut into squares for wrapping (find these in the freezer aisle)
Instructions
- Soak the banana leaves in warm water for about 10 minutes to make them pliable—this prevents tearing when you wrap your tamales.
- Mix the masa harina with the chicken broth and achiote oil in a large bowl until you get a smooth, spreadable dough. Tip: The dough should stick slightly to your fingers but not be too wet.
- Spread a thin layer of the masa dough onto the center of a banana leaf square, about 1/4 inch thick.
- Place a spoonful of shredded chicken, a couple of olives, and a slice of bell pepper in the center of the masa.
- Fold the banana leaf around the filling, like you’re wrapping a present, and tie it securely with a strip of banana leaf or kitchen twine. Tip: Make sure it’s snug but not too tight—the masa needs room to expand as it cooks.
- Steam the tamales for about 1 hour in a large pot with a steamer insert, making sure the water doesn’t touch the tamales. Tip: Keep the water at a gentle simmer; boiling too hard can make the tamales soggy.
Serve these beauties straight from the steamer, letting everyone unwrap their own. The masa is tender and fragrant, with the chicken and olives offering little surprises in every bite. Try serving them with a side of curtido for an extra kick!
Yuca con Chicharrón
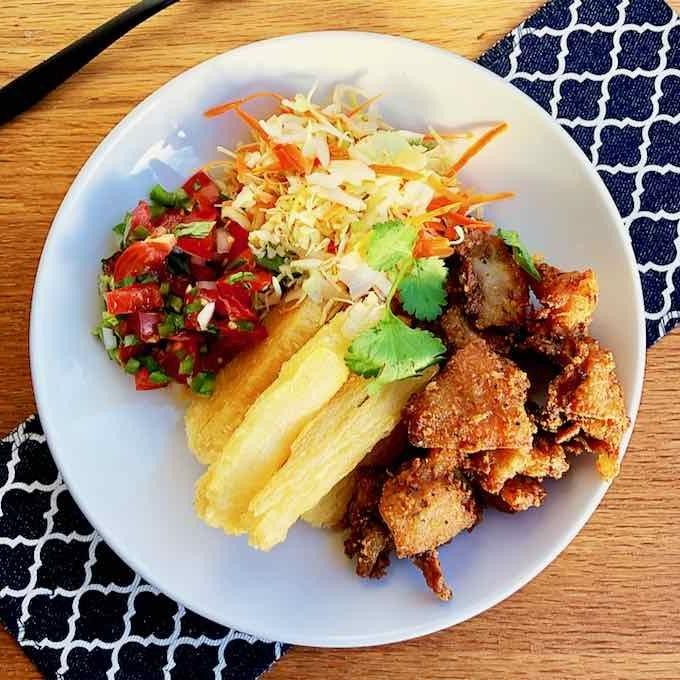
Unbelievably delicious and hearty, Yuca con Chicharrón is a dish that takes me back to my first bite at a little food stall in Miami. It’s a perfect blend of crispy, savory pork and tender yuca, and today, I’m sharing my go-to recipe that’s sure to impress.
Ingredients
- 2 pounds of yuca, peeled and cut into chunks
- 1 pound of pork belly, cut into bite-sized pieces
- A splash of vegetable oil
- A couple of garlic cloves, minced
- 1 teaspoon of salt
- A pinch of cumin
- 1 lime, cut into wedges
- A handful of fresh cilantro, chopped
Instructions
- Start by boiling the yuca in a large pot of salted water for about 20 minutes, or until it’s fork-tender. Tip: Don’t overcook it, or it’ll turn mushy.
- While the yuca cooks, heat a splash of vegetable oil in a skillet over medium-high heat. Add the pork belly pieces and fry until they’re golden and crispy, about 10 minutes. Tip: Render the fat slowly for the crispiest chicharrón.
- Remove the pork from the skillet and set aside. In the same oil, sauté the minced garlic until fragrant, about 30 seconds.
- Drain the yuca and add it to the skillet with the garlic. Toss to combine and season with salt and a pinch of cumin. Tip: The cumin adds a warm depth that balances the dish beautifully.
- Return the pork to the skillet and mix everything together. Cook for another 2 minutes to let the flavors meld.
- Serve hot, garnished with fresh cilantro and lime wedges on the side.
What makes this dish stand out is the contrast between the crispy pork and the soft, buttery yuca. Squeeze some lime over the top for a bright finish, or serve it with a spicy salsa for an extra kick.
Chuleta Frita
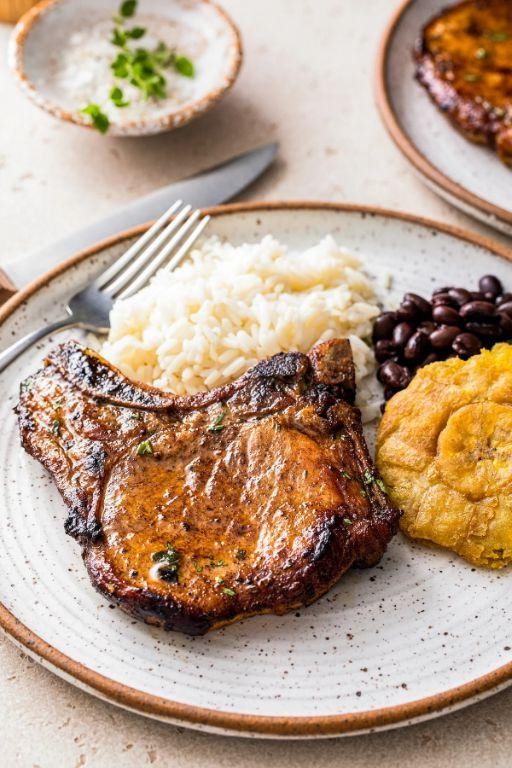
Just last weekend, I found myself craving something crispy, juicy, and utterly comforting—enter Chuleta Frita, a Puerto Rican fried pork chop that’s all about flavor and simplicity. I remember my abuela making this on Sundays, the aroma filling the house, and today, I’m sharing my take on this classic, with a few personal tweaks that make it extra special.
Ingredients
- 4 bone-in pork chops, about 1 inch thick
- A good glug of olive oil, for frying
- A couple of cloves of garlic, minced
- A splash of orange juice
- A pinch of dried oregano
- Salt and pepper, to generously season
- 1 cup of all-purpose flour, for dredging
Instructions
- Start by seasoning your pork chops with salt, pepper, minced garlic, and a sprinkle of oregano. Let them sit for about 10 minutes to soak up all those flavors.
- Heat a large skillet over medium-high heat and add that good glug of olive oil. You’ll know it’s ready when a tiny bit of flour sizzles upon contact.
- Dredge each pork chop in flour, shaking off any excess. This is key for that perfect golden crust.
- Carefully place the chops in the skillet. Don’t overcrowd them—give each one its space to crisp up nicely.
- Fry for about 5 minutes on each side, or until they’re beautifully golden and the internal temperature hits 145°F. That’s your cue they’re perfectly cooked.
- Right before they’re done, add a splash of orange juice to the pan. It’ll create a quick, tangy glaze that’s absolutely divine.
Serve these beauties hot, with the juices from the pan drizzled over the top. The crust is shatteringly crisp, the meat tender and flavorful. I love pairing them with a simple avocado salad or some fried plantains for a meal that’s truly unforgettable.
Sopa de Frijoles
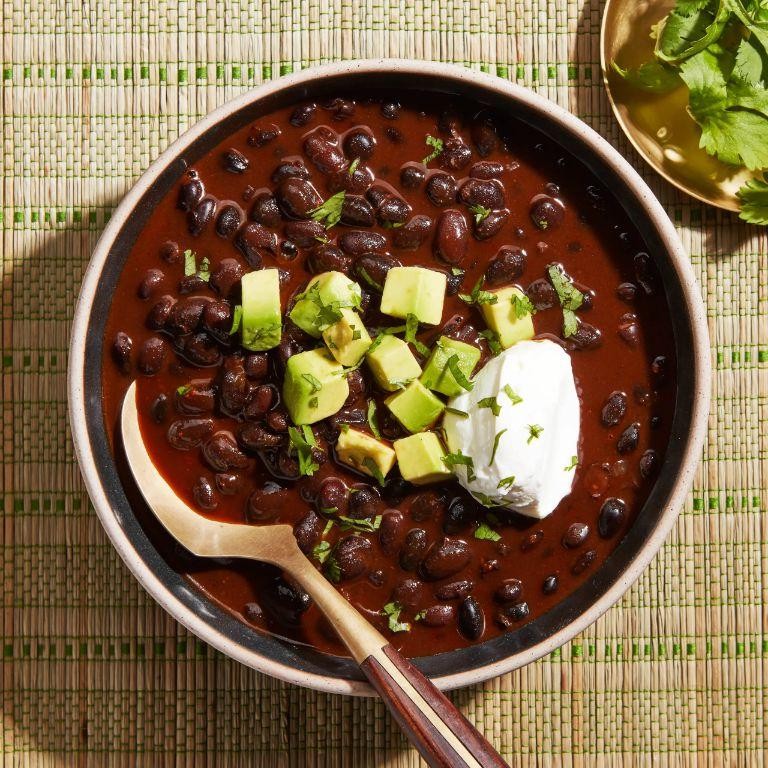
Finally, a bowl of comfort that feels like a warm hug on a chilly evening. I remember my first encounter with Sopa de Frijoles during a family trip to Mexico, and ever since, it’s been my go-to for a quick, nourishing meal. Here’s how I make it at home, with a few personal twists.
Ingredients
- 2 cups of cooked black beans (I love using the ones I’ve soaked overnight, but canned works in a pinch)
- A splash of olive oil
- Half an onion, diced (white or yellow, whatever’s hanging out in your pantry)
- A couple of garlic cloves, minced (because more garlic is always better)
- 4 cups of chicken or vegetable broth (homemade if you’ve got it, but no stress if not)
- A pinch of cumin (it’s the secret weapon here)
- Salt to taste (start with a teaspoon and go from there)
- A handful of fresh cilantro, chopped (for that fresh finish)
Instructions
- Heat a splash of olive oil in a large pot over medium heat. Toss in the diced onion and minced garlic, sautéing until they’re soft and fragrant, about 3 minutes.
- Add the cooked black beans to the pot, stirring to combine with the onions and garlic. Let them get cozy for a minute or two.
- Pour in the chicken or vegetable broth, bringing the mixture to a gentle boil. Tip: If you like a smoother soup, blend half the beans before adding them to the pot.
- Stir in a pinch of cumin and let the soup simmer for about 15 minutes. The flavors will meld beautifully, and your kitchen will smell amazing.
- Season with salt, starting with a teaspoon and adjusting as needed. Tip: Always taste as you go—it’s the best way to get the seasoning just right.
- Right before serving, stir in the chopped cilantro for a burst of freshness. Tip: If you’re not a cilantro fan, a squeeze of lime juice is a great alternative.
Creamy, hearty, and packed with flavor, this Sopa de Frijoles is perfect with a side of warm tortillas or topped with a dollop of sour cream. Sometimes, I even throw in some diced avocado for extra creaminess—it’s all about making it your own.
Pan de Coco

Last weekend, I stumbled upon a bag of shredded coconut in my pantry, and it sparked the idea to bake something tropical and comforting. That’s how I ended up making Pan de Coco, a sweet, coconut-filled bread that’s perfect with your morning coffee or as an afternoon snack. It’s surprisingly simple to make, and the aroma of coconut and bread baking together is absolutely divine.
Ingredients
- 2 cups of all-purpose flour
- 1/2 cup of sugar
- 1/4 cup of melted butter
- 1/2 cup of warm milk
- 1 packet (2 1/4 tsp) of active dry yeast
- 1 egg
- a pinch of salt
- 1 cup of shredded coconut
- a splash of vanilla extract
Instructions
- In a small bowl, dissolve the yeast in warm milk and let it sit for about 5 minutes until it’s frothy. This is your cue that the yeast is alive and ready to work its magic.
- In a larger bowl, mix the flour, sugar, and salt. Make a well in the center and pour in the yeast mixture, melted butter, egg, and vanilla extract. Stir until a dough forms.
- Knead the dough on a floured surface for about 10 minutes until it’s smooth and elastic. If it sticks to your hands, add a little more flour, but don’t overdo it—you want the dough to stay soft.
- Place the dough in a greased bowl, cover it with a damp cloth, and let it rise in a warm spot for 1 hour or until it doubles in size. Patience is key here; a good rise makes all the difference.
- Punch down the dough and divide it into 12 equal pieces. Flatten each piece, add a tablespoon of shredded coconut in the center, then seal and shape into a ball. This is where you can get creative with the filling—some like to mix the coconut with a bit of sugar for extra sweetness.
- Arrange the balls on a baking sheet, cover them, and let them rise again for 30 minutes. Meanwhile, preheat your oven to 350°F.
- Bake for 20-25 minutes or until the tops are golden brown. Keep an eye on them after the 20-minute mark to avoid overbaking.
These little coconut bread rolls come out fluffy with a sweet, chewy coconut center. I love serving them warm, split open with a dab of butter melting inside. They’re also fantastic toasted the next day, bringing out the coconut’s nuttiness even more.
Horchata Hondureña

Zesty and refreshing, Horchata Hondureña is my go-to drink when I’m craving something sweet yet comforting. I remember first trying it at a little Honduran café in Miami, and since then, I’ve been hooked—making it at home has become a weekend ritual for me.
Ingredients
- 1 cup of long-grain white rice
- A couple of cinnamon sticks
- 4 cups of water, divided
- A splash of vanilla extract
- 1/2 cup of sugar
- 2 cups of milk (I prefer whole for creaminess, but any works)
- A handful of ice cubes
Instructions
- Soak the rice and cinnamon sticks in 2 cups of water overnight, or for at least 6 hours. This softens the rice and infuses the water with cinnamon flavor.
- After soaking, discard the cinnamon sticks and blend the rice and water until smooth. Tip: A high-speed blender works best to break down the rice completely.
- Strain the mixture through a fine-mesh sieve into a pitcher, pressing down to extract as much liquid as possible. This step ensures your horchata is smooth, not gritty.
- Add the remaining 2 cups of water, vanilla extract, sugar, and milk to the pitcher. Stir well until the sugar dissolves. Tip: Adjust the sugar based on your sweetness preference, but this ratio is a good starting point.
- Chill in the fridge for at least an hour before serving. The flavors meld together beautifully when cold.
- Serve over ice in tall glasses. Tip: For an extra touch, garnish with a sprinkle of ground cinnamon or a cinnamon stick.
Mmm, the result is a creamy, dreamy drink with the perfect balance of sweetness and spice. I love serving it with a side of sweet pastries for a truly indulgent treat.
Atol de Elote

Venturing into the heart of Central American comfort food, I stumbled upon Atol de Elote, a creamy, sweet corn drink that’s as nourishing as it is delightful. It reminds me of those chilly evenings when all you crave is something warm and comforting, yet surprisingly light. Here’s how I make it, with a few personal twists along the way.
Ingredients
- 4 ears of fresh corn, kernels cut off (about 3 cups)
- A splash of water, just enough to blend the corn
- 1 cinnamon stick
- A couple of cups of milk (I prefer whole for creaminess)
- A dash of vanilla extract
- 1/4 cup of sugar, or to your sweetness liking
- A pinch of salt, to balance the flavors
Instructions
- Blend the corn kernels with a splash of water until smooth. Tip: If you like a bit of texture, blend it less.
- Strain the mixture into a pot, pressing to extract as much liquid as possible. Discard the solids.
- Add the cinnamon stick to the pot and bring the mixture to a simmer over medium heat, stirring occasionally.
- Once simmering, lower the heat and add the milk, vanilla extract, sugar, and salt. Stir well to combine.
- Let it cook on low heat for about 15 minutes, stirring frequently to prevent sticking. Tip: The atol should thicken slightly but still be pourable.
- Remove the cinnamon stick and serve warm. Tip: For an extra touch, sprinkle some cinnamon on top before serving.
Fluffy and fragrant, this Atol de Elote is a hug in a mug. The natural sweetness of the corn shines through, complemented by the warmth of cinnamon and vanilla. Try serving it with a side of sweet bread for dipping, and you’ve got yourself a cozy treat that’s hard to resist.
Rosquillas
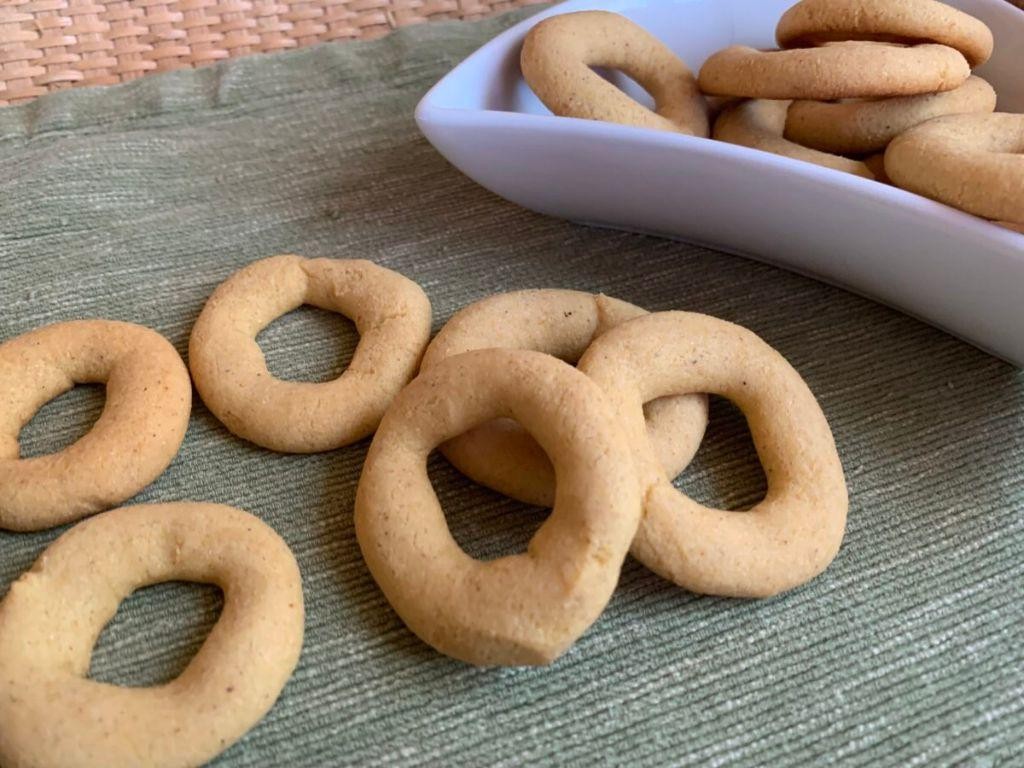
Craving something sweet and simple to brighten up your morning? Let me introduce you to Rosquillas, a delightful Spanish doughnut that’s as fun to make as it is to eat. I stumbled upon this recipe during a lazy Sunday brunch experiment, and now it’s my go-to when I need a quick treat that feels special.
Ingredients
- 2 cups of all-purpose flour (because sometimes, simple is best)
- 1/2 cup of sugar (for that perfect sweetness)
- A pinch of salt (to balance the flavors)
- 3 eggs (room temperature, they mix better)
- A splash of milk (about 1/4 cup, but who’s measuring?)
- 1 tbsp of baking powder (for that fluffy rise)
- Oil for frying (enough to cover the rosquillas, so they swim freely)
Instructions
- In a large bowl, whisk together the flour, sugar, salt, and baking powder. This ensures your rosquillas are evenly flavored.
- Make a well in the center of your dry ingredients and crack in the eggs. Start mixing from the center outward to avoid lumps.
- Gradually add the milk, stirring until the dough comes together. It should be soft but not sticky. Tip: If it’s too sticky, add a bit more flour.
- Heat your oil to 350°F in a deep pan. A candy thermometer is your best friend here to maintain the right temperature.
- Shape the dough into small rings (about the size of a donut hole) and gently drop them into the hot oil. Don’t overcrowd the pan.
- Fry for about 2-3 minutes on each side or until golden brown. Tip: They should float to the top when ready to flip.
- Remove with a slotted spoon and let them drain on paper towels. Tip: Sprinkle with sugar while still warm for extra crunch.
So there you have it, rosquillas that are crispy on the outside, soft and airy inside, with just the right amount of sweetness. I love serving them stacked high on a plate with a side of thick hot chocolate for dipping—pure bliss!
Conclusion
We hope this roundup of 18 authentic spicy Honduran recipes has inspired you to bring a taste of Honduras into your kitchen. Each dish offers a unique blend of flavors that’s sure to delight. Don’t forget to try these recipes, share your favorites in the comments, and pin this article on Pinterest to spread the spice love. Happy cooking!


