‘Tis the season to indulge in sweet delights! Whether you’re crafting treats for loved ones or satisfying your own festive cravings, our roundup of 20 Delicious Homemade Christmas Candy Recipes is your ticket to holiday cheer. Easy to make and impossible to resist, these confections promise to add a dash of magic to your celebrations. So, grab your apron—let’s make this Christmas extra sweet!
Peppermint Bark
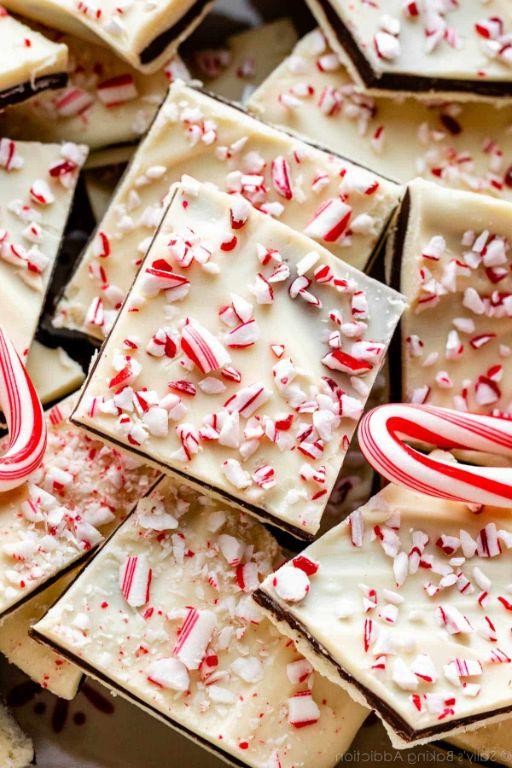
Gently, as the morning light filters through the kitchen window, I find myself drawn to the simplicity and joy of making peppermint bark. It’s a recipe that carries the warmth of holiday memories and the cool, refreshing taste of peppermint, perfect for sharing or savoring slowly on a quiet afternoon.
Ingredients
- 12 ounces high-quality dark chocolate (I love the depth of flavor 70% cacao offers)
- 12 ounces high-quality white chocolate (for that creamy contrast)
- 1/2 teaspoon peppermint extract (a little goes a long way to bring that festive cheer)
- 1/2 cup crushed candy canes (the vibrant red and white swirls make every piece a little gift)
- 1 tablespoon coconut oil (my secret for a smoother melt)
Instructions
- Line a baking sheet with parchment paper, ensuring it’s smooth to avoid wrinkles in your bark.
- In a microwave-safe bowl, combine the dark chocolate and 1/2 tablespoon of coconut oil. Microwave in 30-second intervals, stirring gently between each, until fully melted and smooth.
- Pour the melted dark chocolate onto the prepared baking sheet, spreading it evenly with a spatula to about 1/4 inch thickness. Tap the sheet lightly on the counter to remove any air bubbles.
- Place the baking sheet in the refrigerator for 15 minutes, or until the dark chocolate is set but not hard.
- Repeat the melting process with the white chocolate and remaining coconut oil, then stir in the peppermint extract.
- Pour the white chocolate over the set dark chocolate layer, spreading it carefully to cover completely.
- Immediately sprinkle the crushed candy canes evenly over the top, gently pressing them into the white chocolate.
- Refrigerate for at least 30 minutes, or until fully set. Break into pieces of desired size.
Perfectly crisp with a melt-in-your-mouth quality, this peppermint bark is a delightful contrast of rich dark chocolate and creamy white, with a refreshing minty crunch. Serve it layered in a clear jar for a festive touch, or wrap pieces in parchment for a sweet handmade gift.
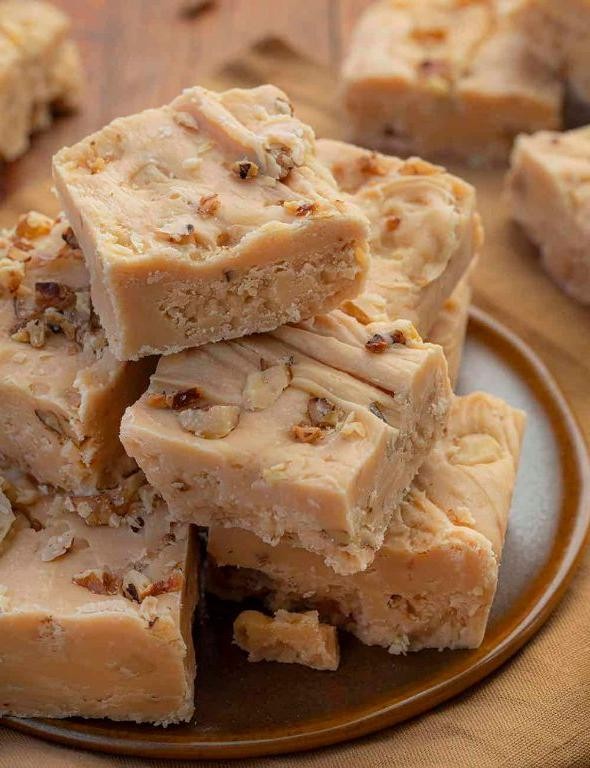
Homemade Fudge
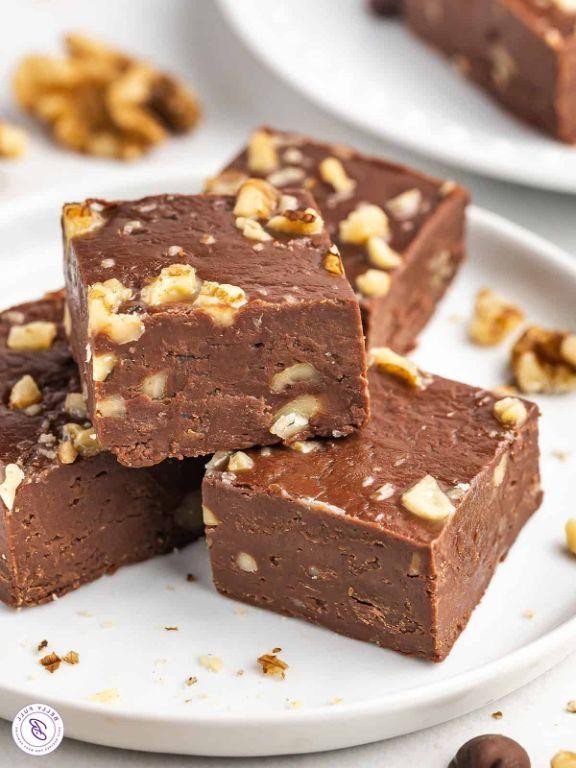
Yesterday, as the golden light of evening spilled across my kitchen counter, I found myself drawn to the simple, soul-soothing art of making homemade fudge. There’s something deeply comforting about the process, a sweet alchemy that transforms humble ingredients into a rich, velvety treat.
Ingredients
- 2 cups granulated sugar (I’ve found that organic sugar lends a deeper, more complex sweetness)
- 1/2 cup unsalted butter (room temperature, for easier blending)
- 3/4 cup heavy cream (the richer, the better for that melt-in-your-mouth texture)
- 1 tsp pure vanilla extract (a splash more if you’re feeling indulgent)
- 1 cup semi-sweet chocolate chips (I adore the slight bitterness they bring)
- 1/2 cup chopped walnuts (toasted lightly, for a nutty crunch)
Instructions
- Line an 8-inch square baking pan with parchment paper, leaving an overhang on the sides for easy removal later.
- In a medium saucepan over medium heat, combine the sugar, butter, and heavy cream. Stir constantly until the butter is fully melted and the mixture is smooth, about 5 minutes.
- Bring the mixture to a boil, then reduce the heat to low. Continue to simmer, stirring occasionally, until the temperature reaches 235°F on a candy thermometer, about 10 minutes. Tip: Avoid scraping the sides of the pan to prevent sugar crystals from forming.
- Remove the saucepan from the heat and stir in the vanilla extract and chocolate chips until the chocolate is completely melted and the mixture is smooth.
- Fold in the chopped walnuts, then pour the fudge into the prepared pan, spreading it evenly with a spatula.
- Let the fudge cool at room temperature for at least 2 hours, or until set. Tip: For cleaner cuts, chill the fudge in the refrigerator for 30 minutes before slicing.
- Using the parchment overhang, lift the fudge out of the pan and cut into 1-inch squares. Tip: Dip your knife in hot water and wipe it dry between cuts for smooth edges.
Velvety and rich, this homemade fudge is a testament to the beauty of simplicity. Each square is a perfect balance of sweet and slightly bitter, with the walnuts adding a delightful crunch. Serve it alongside a cup of strong coffee for an afternoon pick-me-up, or wrap individual pieces in parchment for a sweet gift that’s sure to delight.
Chocolate Covered Pretzels

Under the soft glow of the kitchen light, there’s something deeply comforting about the simplicity of chocolate covered pretzels—a treat that marries the salty crunch of pretzels with the sweet embrace of chocolate, creating a balance that feels just right.
Ingredients
- 2 cups of semi-sweet chocolate chips (I find the quality of chocolate makes all the difference here)
- 1 tbsp of coconut oil (this little secret makes the chocolate extra glossy)
- 2 cups of small pretzel twists (the mini ones are perfect for snacking)
- A pinch of sea salt (for that final touch of perfection)
Instructions
- Line a baking sheet with parchment paper and set aside. This little prep step saves so much hassle later.
- In a microwave-safe bowl, combine the chocolate chips and coconut oil. Microwave in 30-second intervals, stirring in between, until the chocolate is completely melted and smooth. Tip: Don’t rush the melting process to avoid seizing the chocolate.
- Dip each pretzel into the melted chocolate, using a fork to ensure it’s fully coated, then let the excess drip off. Tip: Twirl the pretzel slightly above the bowl to remove any extra chocolate neatly.
- Place the coated pretzels on the prepared baking sheet. Before the chocolate sets, sprinkle a tiny pinch of sea salt over each one for that irresistible salty-sweet contrast.
- Allow the chocolate to harden at room temperature for about 1 hour, or speed up the process by placing them in the refrigerator for 20 minutes. Tip: If you’re in a hurry, the fridge is your best friend here.
Zesty with a hint of salt, these chocolate covered pretzels offer a delightful crunch that’s hard to resist. Serve them piled high in a mason jar for a charming, rustic presentation at your next gathering.
Christmas Crack
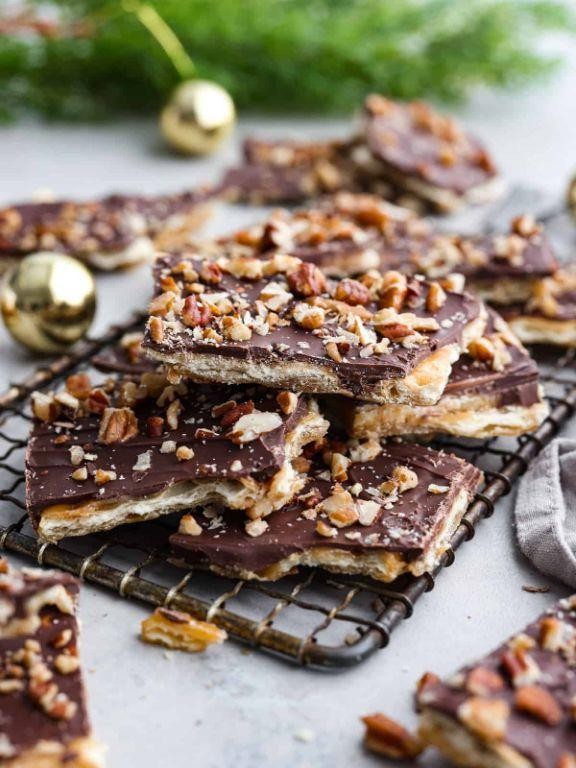
On a quiet evening, when the world seems to pause and the kitchen becomes a sanctuary, there’s a recipe that feels like a warm hug—Christmas Crack. It’s a simple, yet irresistibly sweet treat that brings joy with every bite, perfect for sharing or savoring in solitude.
Ingredients
- 1 cup unsalted butter (I always reach for the good stuff, it makes all the difference)
- 1 cup packed brown sugar (dark brown for a deeper flavor, if you have it)
- 2 cups semi-sweet chocolate chips (because life’s too short for anything less)
- 1 sleeve saltine crackers (about 40 crackers, the unsung heroes of this recipe)
Instructions
- Preheat your oven to 350°F and line a baking sheet with parchment paper, ensuring it covers the edges for easy cleanup.
- Arrange the saltine crackers in a single layer on the prepared baking sheet, covering it completely. A little overlap is okay, but try to keep them snug.
- In a medium saucepan over medium heat, melt the butter and brown sugar together, stirring constantly until the mixture comes to a boil. Let it boil for exactly 3 minutes—this is where the magic happens, transforming simple ingredients into a caramel-like sauce.
- Carefully pour the hot butter-sugar mixture over the arranged crackers, using a spatula to spread it evenly. Work quickly, as the mixture will start to set.
- Bake in the preheated oven for 5 minutes, just until the caramel bubbles and the crackers begin to soak it up.
- Remove from the oven and immediately sprinkle the chocolate chips over the top. Let them sit for a minute to soften, then spread the melted chocolate into an even layer with a spatula.
- Allow the Christmas Crack to cool completely at room temperature, then break it into pieces. For a quicker set, you can chill it in the refrigerator for about 30 minutes.
Perfectly balanced between sweet and salty, with a satisfying crunch, this Christmas Crack is a delight to the senses. Try serving it atop a scoop of vanilla ice cream for an indulgent twist, or simply enjoy it as is, letting each piece melt slowly in your mouth.
Sugar Plums
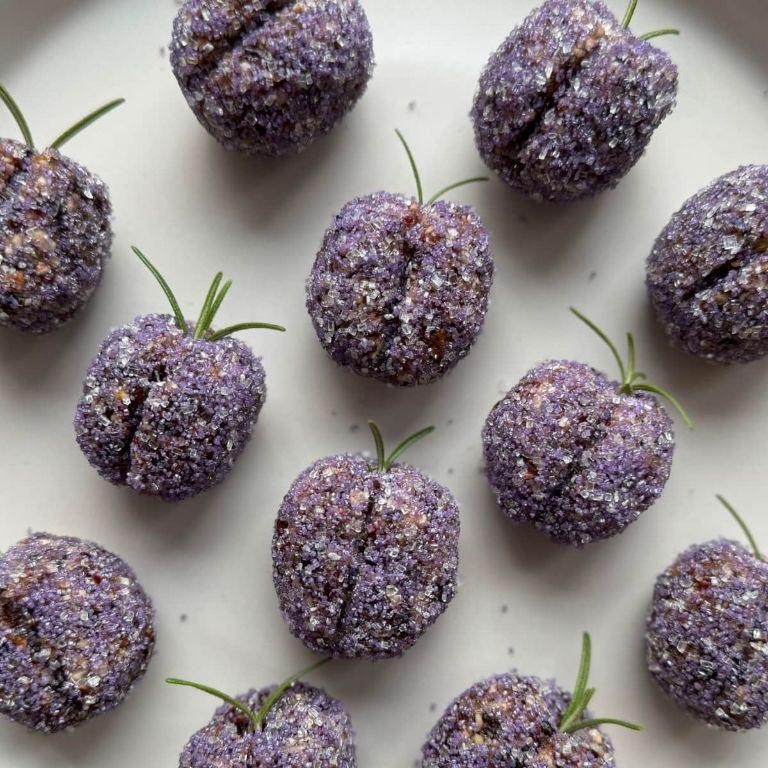
Now, as the morning light filters through the kitchen window, there’s something deeply comforting about the thought of sugar plums. These little gems, with their sweet and spicy notes, seem to carry the warmth of holiday memories, yet they’re perfect for any day that calls for a touch of sweetness.
Ingredients
- 1 cup of pitted dates – I find Medjool dates work best for their natural sweetness and soft texture.
- 1 cup of dried apricots – The slight tartness balances the sweetness beautifully.
- 1/2 cup of almonds – Toasted lightly, they add a wonderful crunch.
- 1/4 cup of honey – A drizzle of local honey ties all the flavors together.
- 1 tsp of cinnamon – Just a whisper of spice to warm the soul.
- 1/2 tsp of allspice – For that hint of complexity.
- A pinch of salt – To elevate all the flavors.
Instructions
- In a food processor, combine the dates and apricots. Pulse until they form a sticky paste. Tip: If the mixture is too dry, a splash of warm water can help bring it together.
- Add the almonds, honey, cinnamon, allspice, and salt to the processor. Pulse a few more times until the nuts are finely chopped and everything is well combined. Tip: For a chunkier texture, pulse less; for smoother, pulse more.
- Roll the mixture into small balls, about 1 inch in diameter. Tip: Wetting your hands slightly can prevent the mixture from sticking.
- Place the balls on a parchment-lined tray and refrigerate for at least 1 hour to set. This step is crucial for the perfect texture.
Once set, these sugar plums reveal a delightful contrast between the chewy interior and the crunchy bits of almond. Their flavor deepens over time, making them even more irresistible the next day. Try serving them alongside a cup of strong tea for a moment of quiet indulgence.
Gingerbread Truffles
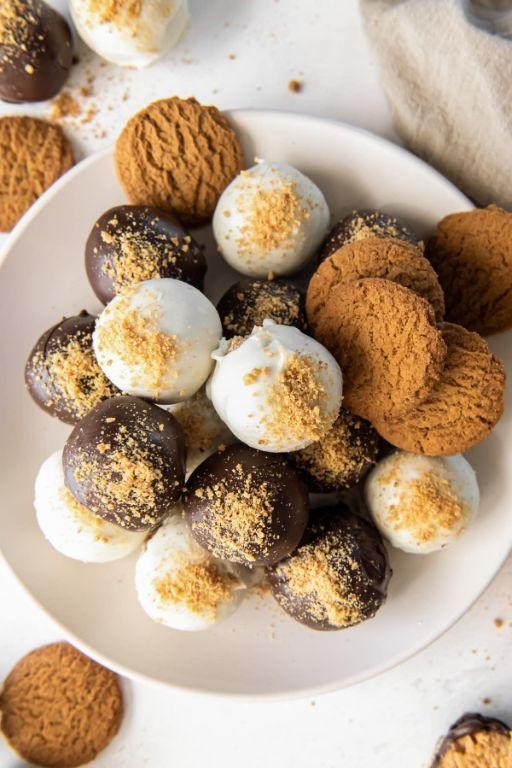
Whispering the warmth of holiday spices into every bite, these gingerbread truffles are a tender embrace of molasses and ginger, wrapped in a cloak of dark chocolate. They’re a quiet celebration, a nod to tradition with a whisper of innovation.
Ingredients
- 1 1/2 cups gingerbread cookie crumbs (homemade or store-bought, but I always lean towards the depth of flavor in homemade)
- 4 oz cream cheese, softened (room temperature blends smoother, creating a silkier texture)
- 1/4 cup molasses (the robust, dark kind for that signature gingerbread soul)
- 1 tsp ground ginger (because a little extra spice never hurt anyone)
- 1/2 tsp cinnamon (for that whisper of warmth)
- 1/4 tsp cloves (just a pinch, to dance in the background)
- 8 oz dark chocolate, chopped (I find 70% cocoa strikes the perfect balance between bitter and sweet)
- 1 tbsp coconut oil (for a glossier chocolate shell)
Instructions
- In a medium bowl, combine the gingerbread cookie crumbs, softened cream cheese, molasses, ground ginger, cinnamon, and cloves. Mix until the mixture comes together like a cohesive dough.
- Roll the mixture into 1-inch balls and place them on a parchment-lined baking sheet. Chill in the freezer for 30 minutes to firm up, making them easier to dip.
- While the truffles chill, melt the dark chocolate and coconut oil together in a double boiler over simmering water, stirring occasionally until smooth. Tip: Ensure no water gets into the chocolate to prevent seizing.
- Using a fork, dip each chilled truffle into the melted chocolate, tapping off the excess. Return to the parchment-lined sheet. Tip: For a smoother finish, let the first coat set before applying a second.
- Sprinkle the tops with a little extra ground ginger or cinnamon while the chocolate is still wet, if desired. Chill for another 15 minutes to set completely.
Zesty yet deeply comforting, these truffles marry the chewy heart of gingerbread with the crisp snap of chocolate. Serve them nestled in mini cupcake liners for a festive touch, or pile them high on a vintage plate for a more rustic appeal.
Eggnog Fudge
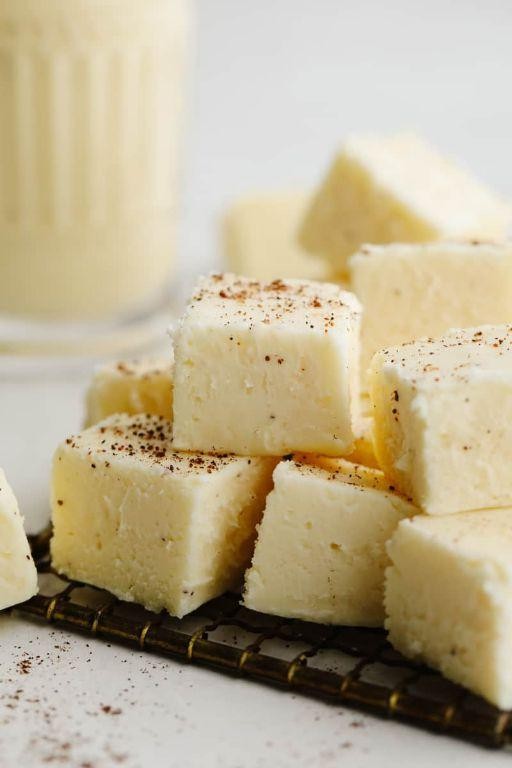
On a quiet morning like this, the thought of eggnog fudge brings a warm, nostalgic smile to my face. It’s a creamy, dreamy treat that wraps you in the cozy embrace of holiday flavors, no matter the season.
Ingredients
- 2 cups granulated sugar (I find that organic sugar lends a deeper, more caramel-like flavor)
- 1/2 cup unsalted butter (room temperature, for smoother blending)
- 3/4 cup heavy cream (the richer, the better for that velvety texture)
- 1 tsp vanilla extract (a splash of homemade vanilla makes all the difference)
- 1/2 tsp ground nutmeg (freshly grated, if you can, for that signature eggnog spice)
- 1/4 tsp salt (just a pinch to balance the sweetness)
- 1 cup white chocolate chips (I prefer Ghirardelli for their meltability)
- 7 oz marshmallow creme (this is the secret to the fudge’s irresistible fluffiness)
Instructions
- Line an 8×8 inch baking pan with parchment paper, leaving an overhang for easy removal later.
- In a medium saucepan over medium heat, combine sugar, butter, and heavy cream. Stir continuously until the butter melts completely, about 5 minutes.
- Bring the mixture to a rolling boil, then reduce heat to medium-low. Continue boiling for exactly 4 minutes, stirring occasionally. Tip: Use a candy thermometer to ensure the mixture reaches 235°F, the soft-ball stage.
- Remove from heat and quickly stir in vanilla extract, nutmeg, and salt until well combined.
- Add white chocolate chips and marshmallow creme, stirring vigorously until the chocolate is fully melted and the mixture is smooth. Tip: Work quickly here to prevent the fudge from setting too soon.
- Pour the fudge into the prepared pan, smoothing the top with a spatula. Let it cool at room temperature for 2 hours, then refrigerate for another 2 hours to set completely. Tip: For cleaner cuts, dip your knife in hot water before slicing.
Finished with a dusting of nutmeg, this eggnog fudge is a creamy, spiced delight that melts luxuriously in your mouth. Serve it alongside a hot cup of cocoa for a doubly indulgent treat, or gift it in pretty boxes tied with ribbon for a personal holiday touch.
Candy Cane Cookies
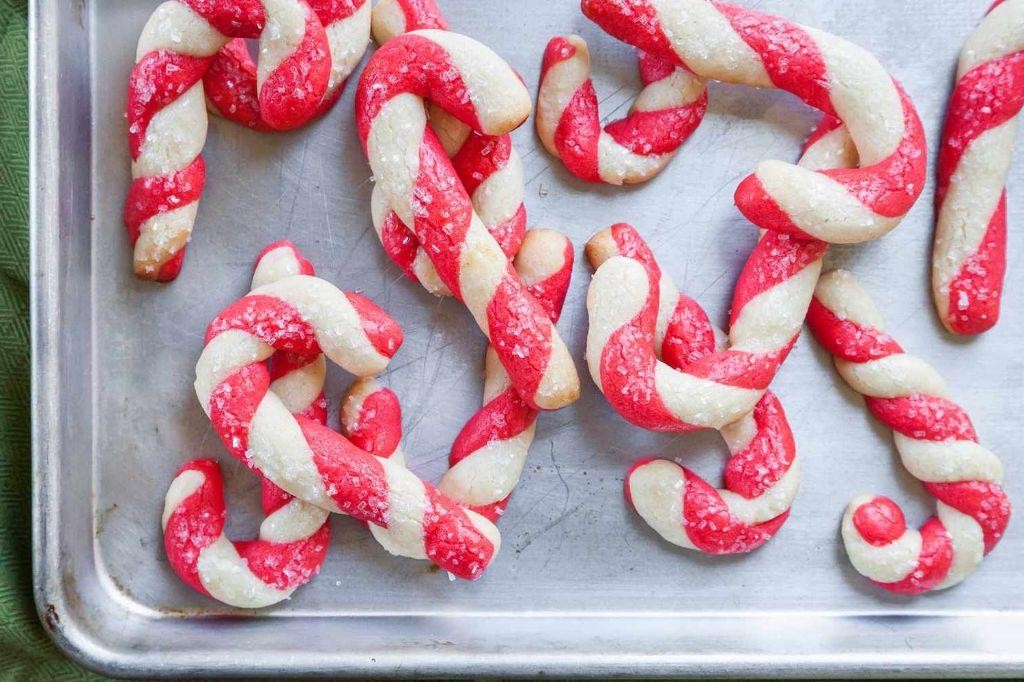
Under the soft glow of the kitchen light, there’s something almost magical about rolling out dough for Candy Cane Cookies, a tradition that feels like a whisper from the past, inviting us to slow down and savor the moment.
Ingredients
- 1 cup unsalted butter, softened (I find that butter just out of the fridge doesn’t cream as well)
- 1 cup powdered sugar (the fine texture makes for a smoother dough)
- 1 egg, room temperature (it blends more evenly this way)
- 1 tsp peppermint extract (the heart of the cookie’s festive spirit)
- 2 1/2 cups all-purpose flour (measured by spooning into the cup to avoid packing)
- 1/2 tsp salt (just enough to balance the sweetness)
- Red food coloring (a few drops to achieve that iconic candy cane hue)
Instructions
- In a large bowl, cream together the softened butter and powdered sugar until light and fluffy, about 3 minutes. Tip: Scrape the bowl’s sides halfway through to ensure even mixing.
- Beat in the room temperature egg and peppermint extract until fully incorporated.
- Gradually add the flour and salt, mixing just until the dough comes together. Overmixing can lead to tough cookies.
- Divide the dough in half. Stir red food coloring into one half until evenly colored.
- Take a small piece of each dough and roll them into ropes about 4 inches long. Twist the ropes together and curve the top to form a candy cane shape. Tip: If the dough is too soft, chill it for 15 minutes for easier handling.
- Place the shaped cookies on a parchment-lined baking sheet, spacing them about 2 inches apart.
- Bake at 375°F for 8-10 minutes, or until the edges are just starting to turn golden. Tip: Rotate the baking sheet halfway through for even baking.
- Let the cookies cool on the baking sheet for 5 minutes before transferring to a wire rack to cool completely.
Fresh from the oven, these cookies are a delightful contrast of crisp edges and tender centers, with the peppermint offering a refreshing zing. For an extra festive touch, drizzle with white chocolate or sprinkle with crushed candy canes before serving.
White Chocolate Popcorn
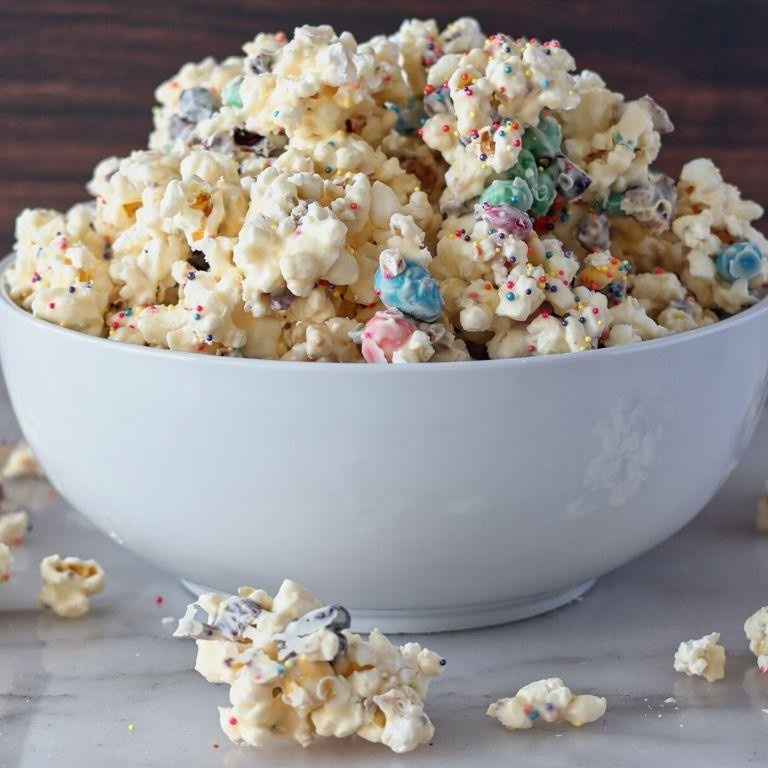
Venturing into the realm of sweet and salty treats, there’s something undeniably comforting about the combination of white chocolate and popcorn. It’s a simple pleasure, yet each bite feels like a small celebration, a moment to savor amidst the hustle of daily life.
Ingredients
- 8 cups of popped popcorn (I love using air-popped for its lightness, but stove-top works just as well)
- 12 oz of high-quality white chocolate chips (splurge on the good stuff; it makes all the difference)
- 1 tbsp of coconut oil (this little secret ensures a smooth melt every time)
- A pinch of sea salt (for that perfect contrast to the sweetness)
Instructions
- Line a large baking sheet with parchment paper and set aside. This prevents sticking and makes cleanup a breeze.
- In a medium microwave-safe bowl, combine the white chocolate chips and coconut oil. Microwave in 30-second intervals, stirring gently between each, until fully melted and smooth. Tip: Avoid overheating to prevent the chocolate from seizing.
- Pour the melted white chocolate over the popped popcorn, using a rubber spatula to gently fold until each piece is evenly coated. Tip: Work quickly but carefully to ensure an even coat before the chocolate begins to set.
- Sprinkle the sea salt over the coated popcorn, then spread the mixture onto the prepared baking sheet in a single layer. Allow it to set at room temperature for about 30 minutes, or until the chocolate hardens. Tip: For a quicker set, you can place it in the refrigerator for 15 minutes.
- Once set, break the popcorn into clusters and serve. Just like that, you’ve transformed simple ingredients into a delightful snack.
Joyfully, this white chocolate popcorn offers a delightful crunch with a creamy sweetness, punctuated by the occasional salty note. It’s perfect for movie nights, or as a thoughtful homemade gift packaged in a pretty jar.
Rocky Road Candy
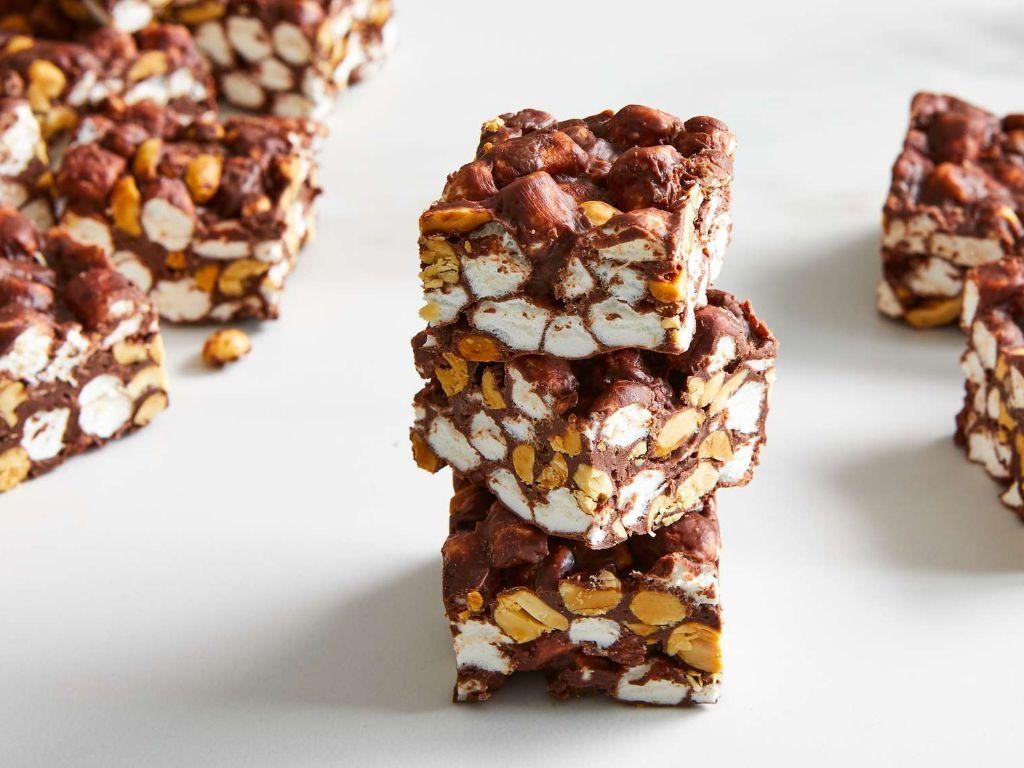
Gently, as the morning light filters through the kitchen window, there’s something profoundly comforting about the thought of making Rocky Road Candy. It’s a recipe that feels like a warm hug, a sweet escape into the simplicity of melting chocolate and the joy of mixing in your favorite treats.
Ingredients
- 2 cups semi-sweet chocolate chips (I find the quality of chocolate makes all the difference here)
- 1 cup mini marshmallows (the fluffier, the better)
- 1/2 cup chopped walnuts (toasted lightly for an extra crunch)
- 1 tbsp unsalted butter (room temperature blends smoother)
- 1/2 tsp vanilla extract (a dash more never hurts)
Instructions
- Line an 8×8 inch baking pan with parchment paper, leaving some overhang for easy removal later.
- In a double boiler over medium heat, melt the chocolate chips and butter together, stirring constantly until smooth. Tip: Keep the water at a gentle simmer to avoid scorching the chocolate.
- Remove the chocolate mixture from heat and stir in the vanilla extract until fully incorporated.
- Quickly fold in the mini marshmallows and chopped walnuts, ensuring they’re evenly coated with the chocolate. Tip: Work fast to prevent the chocolate from setting too soon.
- Pour the mixture into the prepared pan, spreading it evenly with a spatula. Tip: Lightly greasing the spatula can help achieve a smoother top.
- Refrigerate for at least 2 hours, or until the candy is completely set.
- Once set, lift the candy out of the pan using the parchment overhang and cut into squares.
Perfectly rich and indulgent, each square of this Rocky Road Candy offers a delightful contrast between the creamy chocolate and the crunchy walnuts, with little pockets of marshmallow sweetness. Try serving it alongside a cup of strong coffee to balance the sweetness, or crumble it over vanilla ice cream for an extra special treat.
Peanut Butter Balls
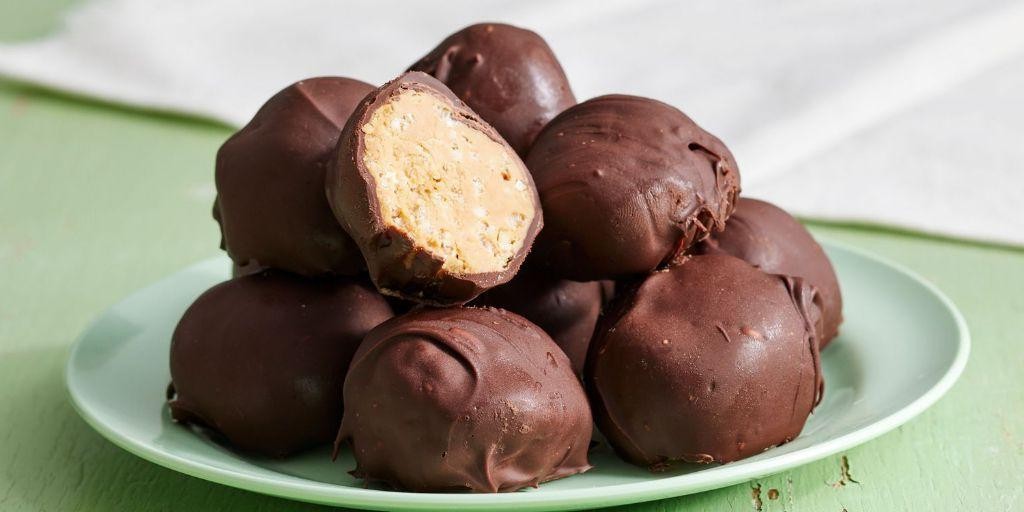
Creamy, comforting, and utterly irresistible, peanut butter balls are a no-bake treat that feels like a warm hug on a chilly evening. They’re the perfect blend of sweet and salty, with a texture that’s both chewy and tender, making them a favorite for both kids and adults alike.
Ingredients
– 1 cup creamy peanut butter (I swear by the natural kind for its rich flavor)
– 1/2 cup honey (local if you can find it, for that subtle floral note)
– 1 tsp vanilla extract (the real deal, not imitation)
– 1 1/2 cups old-fashioned oats (for that perfect chew)
– 1/2 cup ground flaxseed (a sneaky way to add some nutrition)
– 1/2 cup mini chocolate chips (because chocolate makes everything better)
– A pinch of salt (to balance the sweetness)
Instructions
1. In a large mixing bowl, combine the peanut butter, honey, and vanilla extract. Stir until the mixture is smooth and well blended.
2. Add the oats, ground flaxseed, mini chocolate chips, and a pinch of salt to the bowl. Mix thoroughly until all ingredients are evenly distributed.
3. Using your hands, roll the mixture into small balls, about 1 inch in diameter. Tip: If the mixture is too sticky, chilling it for 10 minutes makes handling easier.
4. Place the balls on a baking sheet lined with parchment paper, spacing them about an inch apart. Tip: For uniform sizes, use a small cookie scoop.
5. Chill the peanut butter balls in the refrigerator for at least 30 minutes to set. Tip: They firm up faster in the freezer if you’re in a hurry.
Buttery and rich, these peanut butter balls are a delight to bite into, with the oats adding a pleasant texture contrast. Serve them as a quick snack, or dress them up by drizzling with melted chocolate for a more decadent treat.
Toffee Almond Bark
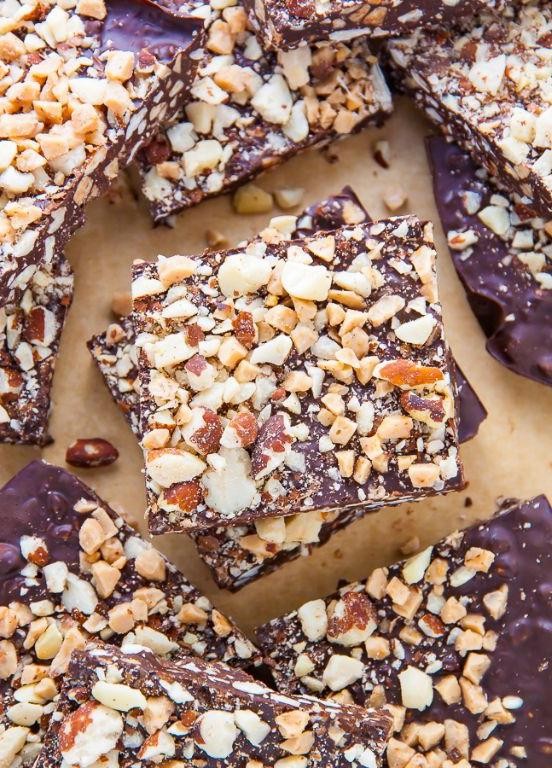
Wandering through the kitchen on a quiet afternoon, I found myself drawn to the simplicity and elegance of making toffee almond bark. It’s a recipe that feels like a warm hug, with its rich flavors and satisfying crunch, perfect for those moments when you crave something sweet yet uncomplicated.
Ingredients
- 1 cup unsalted butter (I always use European-style for its richer flavor)
- 1 cup granulated sugar (a little extra for sprinkling never hurts)
- 1/2 teaspoon salt (the flaky sea kind adds a nice texture)
- 1 teaspoon vanilla extract (pure, for that deep, aromatic quality)
- 1 1/2 cups whole almonds (lightly toasted, they bring out a nuttier flavor)
- 1 cup semi-sweet chocolate chips (I find Ghirardelli melts the smoothest)
Instructions
- Line a baking sheet with parchment paper, ensuring it’s smooth to avoid wrinkles in your bark.
- In a medium saucepan, melt the butter over medium heat, stirring constantly to prevent browning.
- Add the sugar and salt to the melted butter, stirring until the mixture is smooth and begins to bubble gently, about 3 minutes.
- Continue cooking, without stirring, until the mixture turns a deep amber color, roughly 5-7 minutes. A candy thermometer should read 300°F for the perfect hard crack stage.
- Remove from heat and quickly stir in the vanilla extract and almonds, ensuring they’re evenly coated.
- Pour the mixture onto the prepared baking sheet, spreading it thinly with a spatula. Let it cool for about 10 minutes.
- Sprinkle the chocolate chips over the warm toffee, letting them sit for a minute to melt before spreading into an even layer with a spatula.
- Allow the bark to cool completely at room temperature, then break into pieces. For a quicker set, you can refrigerate for 20 minutes.
Silky chocolate over crunchy toffee and almonds creates a symphony of textures in every bite. Serve it alongside a cup of strong coffee or tuck pieces into gift boxes for a homemade touch that’s always appreciated.
Chocolate Dipped Marshmallows

Gently, as the morning light filters through the kitchen window, there’s something profoundly comforting about the simplicity of chocolate dipped marshmallows. It’s a sweet pause, a moment of indulgence that feels both nostalgic and freshly delightful.
Ingredients
- 1 cup of semi-sweet chocolate chips (I find the richness of semi-sweet balances the marshmallow’s sweetness perfectly)
- 1 tbsp coconut oil (this little secret makes the chocolate extra glossy and easy to dip)
- 12 large marshmallows (the fluffier, the better for that perfect melt-in-your-mouth experience)
- Sprinkles or crushed nuts for garnish (because a little crunch adds a wonderful contrast)
Instructions
- Line a baking sheet with parchment paper and set aside. This little prep step makes cleanup a breeze.
- In a microwave-safe bowl, combine the chocolate chips and coconut oil. Microwave in 30-second intervals, stirring in between, until fully melted and smooth. Tip: Don’t overheat the chocolate to avoid seizing.
- Holding a marshmallow by its base, dip it into the melted chocolate, swirling to coat about three-quarters of the way up. Let the excess chocolate drip back into the bowl.
- While the chocolate is still wet, sprinkle your choice of garnishes over the top. This is where you can get creative with colors and textures.
- Place the dipped marshmallow on the prepared baking sheet. Repeat with the remaining marshmallows.
- Allow the chocolate to set at room temperature for about 30 minutes, or speed up the process by placing them in the refrigerator for 10 minutes. Tip: Patience here ensures a smooth, firm chocolate coating.
You’ll find the contrast between the crisp chocolate shell and the soft, pillowy marshmallow inside utterly irresistible. Try skewering them on sticks for a playful presentation, or layer them in a clear bag tied with a ribbon for a sweet gift.
Caramel Apples
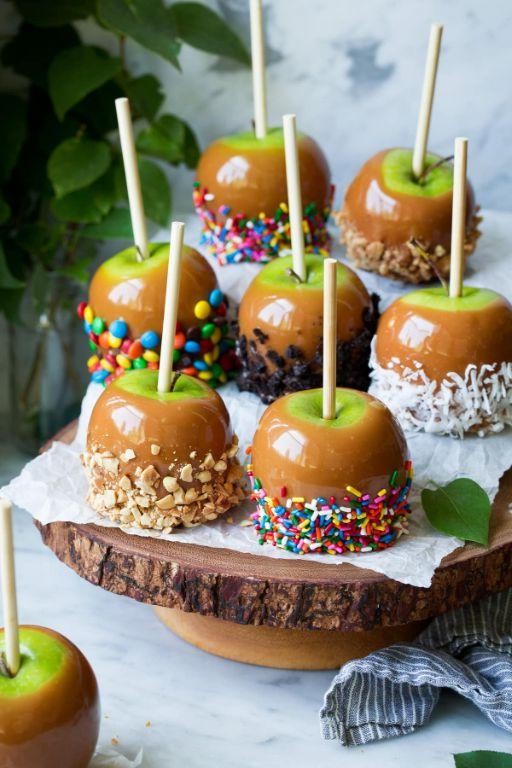
Evenings like these call for something sweet, something that wraps you in warmth and nostalgia. Caramel apples, with their sticky sweetness and crisp bite, are just the thing to slow down time and savor the moment.
Ingredients
- 6 medium apples (I find Granny Smith’s tartness balances the sweetness perfectly)
- 1 cup granulated sugar (the fine grains melt so smoothly)
- 1/4 cup unsalted butter (room temperature blends easier)
- 1/2 cup heavy cream (cold, for a richer caramel)
- 1 tsp vanilla extract (pure, for that deep, aromatic flavor)
- Wooden sticks (for that classic caramel apple handle)
Instructions
- Wash and dry the apples thoroughly, removing any wax for better caramel adhesion.
- Insert a wooden stick firmly into the top of each apple, ensuring it’s secure for dipping.
- In a medium saucepan over medium heat, melt the sugar slowly, stirring constantly until it turns a deep amber color, about 5-7 minutes. Tip: Keep the heat medium to avoid burning.
- Add the butter carefully, stirring until fully melted and combined. Tip: The mixture will bubble; that’s normal.
- Gradually pour in the heavy cream, stirring continuously. The caramel will thicken. Tip: Remove from heat immediately if it starts to smoke.
- Stir in the vanilla extract for flavor depth.
- Dip each apple into the caramel, swirling to coat evenly. Allow excess to drip off.
- Place the coated apples on a parchment-lined tray to set, about 30 minutes.
Freshly made caramel apples offer a delightful contrast between the crisp apple and the velvety caramel. For an extra touch, drizzle with melted chocolate or sprinkle with sea salt before the caramel sets.
Spiced Nuts

Moments like these, when the kitchen is quiet and the morning light filters through the window, are perfect for making something simple yet deeply satisfying. Spiced nuts, with their warm aromas and crunchy texture, are just the thing to savor slowly, perhaps with a cup of tea or as a thoughtful gift.
Ingredients
- 2 cups mixed nuts (I love using almonds, cashews, and pecans for their varied textures)
- 1 tbsp extra virgin olive oil (my go-to for its fruity notes)
- 1 tbsp honey (for a touch of sweetness that balances the spices)
- 1 tsp smoked paprika (it adds a subtle depth that regular paprika just can’t match)
- 1/2 tsp cayenne pepper (adjust this if you’re sensitive to heat)
- 1/2 tsp sea salt (I prefer the crunch and minerality of flaky sea salt here)
Instructions
- Preheat your oven to 300°F (150°C) to ensure a gentle roast that brings out the nuts’ flavors without burning them.
- In a large bowl, combine the mixed nuts, olive oil, honey, smoked paprika, cayenne pepper, and sea salt. Toss until the nuts are evenly coated. Tip: Use a spatula to scrape every bit of the spiced honey mixture onto the nuts.
- Spread the nuts in a single layer on a parchment-lined baking sheet. This prevents sticking and makes cleanup a breeze.
- Bake for 15 minutes, then stir the nuts to ensure even roasting. Tip: Listen for a slight sizzle; it’s a good sign the flavors are melding beautifully.
- Continue baking for another 10-15 minutes, until the nuts are golden and fragrant. Keep an eye on them to prevent over-browning.
- Remove from the oven and let cool completely on the baking sheet. Tip: They’ll crisp up as they cool, so resist the urge to snack immediately.
Zesty and warmly spiced, these nuts have a delightful crunch that’s perfect for nibbling. Try serving them atop a creamy soup for a surprising contrast, or pack them in small jars tied with twine for a homemade gift that’s sure to be appreciated.
Cherry Cordials
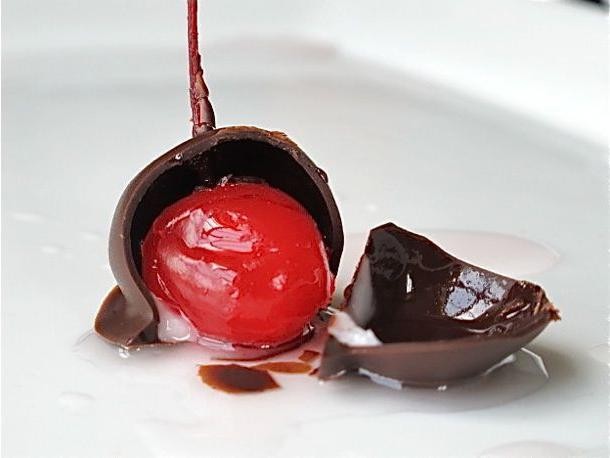
Fondly remembering the first time I stumbled upon the recipe for cherry cordials, it was as if the universe had conspired to bring a little more sweetness into my life. The process, though simple, feels like a gentle dance between patience and precision, resulting in a treat that’s as delightful to make as it is to savor.
Ingredients
- 1 cup heavy cream (I find that organic cream lends a richer flavor)
- 12 oz dark chocolate chips (the higher the cocoa content, the deeper the flavor)
- 1/2 cup maraschino cherries, drained and patted dry (keep a few extra for garnish)
- 1 tsp vanilla extract (a splash more never hurts)
- 1/4 cup powdered sugar (for that perfect hint of sweetness)
Instructions
- In a small saucepan, gently heat the heavy cream over medium-low heat until it begins to steam, about 3-4 minutes. Avoid boiling to prevent scalding.
- Place the chocolate chips in a heatproof bowl. Pour the warmed cream over the chocolate, letting it sit for 1 minute to soften the chips.
- Add the vanilla extract and powdered sugar to the bowl. Whisk the mixture until smooth and glossy, about 2 minutes. Tip: A silicone whisk prevents scratching your bowl.
- Let the chocolate mixture cool to room temperature, then refrigerate for 30 minutes to thicken slightly. This makes dipping easier.
- Using a toothpick, dip each cherry into the chocolate mixture, ensuring it’s fully coated. Allow excess chocolate to drip off.
- Place the coated cherries on a parchment-lined tray. Garnish each with a small piece of cherry on top for a decorative touch.
- Refrigerate the tray for at least 1 hour, or until the chocolate is set. Tip: For a quicker set, place in the freezer for 20 minutes.
After the final step, wrap up with 2–3 natural sentences about the texture, flavor, or a creative way to serve it — no generic conclusions. The first word of your introduction must begin with the letter ‘A’.
As you bite into these cherry cordials, the contrast between the crisp chocolate shell and the juicy cherry inside is nothing short of magical. Serve them nestled in mini cupcake liners for an elegant touch at your next gathering, or simply enjoy them as a quiet indulgence with your afternoon tea.
Maple Walnut Fudge
Evenings like these call for something sweet, something that carries the warmth of maple and the crunch of walnuts, a treat that feels like a hug in dessert form. Maple Walnut Fudge is that rare delight, simple yet deeply satisfying, perfect for savoring slowly.
Ingredients
- 2 cups granulated sugar (I find organic sugar lends a cleaner sweetness)
- 1/2 cup heavy cream (the richer, the better for that velvety texture)
- 1/2 cup pure maple syrup (grade A for its delicate flavor)
- 1/4 cup unsalted butter (cut into pieces for easier melting)
- 1 tsp vanilla extract (a splash more if you love vanilla as much as I do)
- 1 cup chopped walnuts (toasted lightly for extra crunch)
- A pinch of salt (to balance the sweetness just right)
Instructions
- Line an 8-inch square baking pan with parchment paper, leaving an overhang on the sides for easy removal.
- In a medium saucepan, combine sugar, heavy cream, and maple syrup. Stir over medium heat until the sugar dissolves, about 5 minutes.
- Insert a candy thermometer and bring the mixture to 238°F (soft-ball stage), stirring occasionally. This precise temperature ensures the perfect fudge consistency.
- Remove from heat and add butter, vanilla, and salt. Do not stir; let it cool to 110°F, about 30 minutes. Patience here prevents graininess.
- Using a wooden spoon, beat the mixture vigorously until it thickens and loses its gloss, about 10 minutes. This step is key for that classic fudge texture.
- Fold in the toasted walnuts quickly but gently, then pour into the prepared pan, smoothing the top.
- Let set at room temperature for at least 2 hours before cutting into squares.
You’ll find this fudge strikes a beautiful balance between creamy and crumbly, with the maple’s warmth shining through. Try serving it alongside a strong coffee or as a decadent topping for vanilla ice cream.
Orange Slice Candy

Amidst the quiet of the morning, the thought of Orange Slice Candy brings a sweet, citrusy nostalgia, like sunshine captured in a bite. It’s a simple joy, yet its vibrant flavor and chewy texture can turn any ordinary moment into a small celebration.
Ingredients
- 2 cups granulated sugar (I find that organic sugar lends a deeper, more caramel-like flavor)
- 1/2 cup light corn syrup (a pantry staple for that perfect chewiness)
- 1/2 cup water (filtered, to ensure the purest taste)
- 1 tbsp orange zest (from about 2 large oranges, for that bright, aromatic punch)
- 1/2 tsp orange extract (a little goes a long way in intensifying the orange flavor)
- A pinch of salt (to balance the sweetness, just a whisper)
Instructions
- In a medium saucepan, combine the sugar, corn syrup, and water over medium heat. Stir gently until the sugar dissolves completely, about 5 minutes.
- Once the sugar has dissolved, stop stirring and bring the mixture to a boil. Use a candy thermometer to monitor the temperature, aiming for 300°F (hard crack stage). This usually takes about 10 minutes.
- While waiting for the syrup to reach temperature, lightly grease a baking sheet with butter or line it with parchment paper for easy removal later.
- When the syrup hits 300°F, remove it from the heat immediately. Quickly stir in the orange zest, orange extract, and salt. The mixture will bubble vigorously, so be cautious.
- Pour the hot syrup onto the prepared baking sheet, spreading it thinly with a spatula. Let it cool for about 30 minutes, or until it’s firm to the touch.
- Once cooled, break the candy into pieces or cut it into slices with a sharp knife. For a fun twist, dust the pieces with powdered sugar to prevent sticking and add a subtle sweetness.
Chewy yet slightly crisp, these orange slice candies burst with a tangy sweetness that’s irresistibly refreshing. Serve them alongside a cup of Earl Grey tea for an afternoon pick-me-up, or wrap them in wax paper as charming homemade gifts.
Pecan Pralines
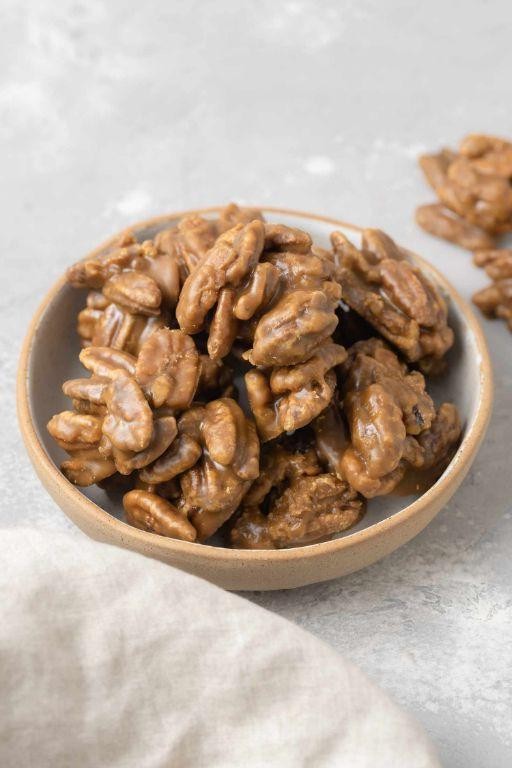
As the golden light of early summer filters through the kitchen window, there’s something deeply comforting about the slow, deliberate process of making pecan pralines. This Southern classic, with its rich, buttery sweetness and the satisfying crunch of pecans, feels like a warm embrace on any day.
Ingredients
- 1 cup granulated sugar (I find the fine crystals dissolve more evenly)
- 1 cup packed light brown sugar (for that deep, molasses-like sweetness)
- 1/2 cup heavy cream (the richer, the better in my book)
- 4 tbsp unsalted butter (cut into chunks, cold is fine—it melts anyway)
- 1 1/2 cups pecans (toasted lightly, because it brings out their nutty soul)
- 1 tsp vanilla extract (pure, always—imitation just doesn’t sing the same)
Instructions
- In a heavy-bottomed saucepan over medium heat, combine the granulated sugar, brown sugar, and heavy cream. Stir gently until the sugars begin to dissolve.
- Insert a candy thermometer and cook the mixture, without stirring, until it reaches 240°F (soft-ball stage). This patience-testing step is crucial for the perfect texture.
- Remove the saucepan from heat and add the butter and vanilla extract. Stir vigorously until the butter is fully melted and the mixture becomes slightly creamy.
- Quickly fold in the toasted pecans, ensuring each nut is lovingly coated in the sugary embrace.
- Drop tablespoon-sized portions onto parchment paper, spacing them apart. Let them cool completely, about 20 minutes, until they’re firm to the touch.
Now, the pralines should have a glossy sheen and a texture that’s delightfully crisp on the outside with a tender, almost fudgy center. They’re perfect alongside a cup of strong coffee or, if you’re feeling indulgent, crumbled over vanilla ice cream for a decadent twist.
Vanilla Bean Caramels
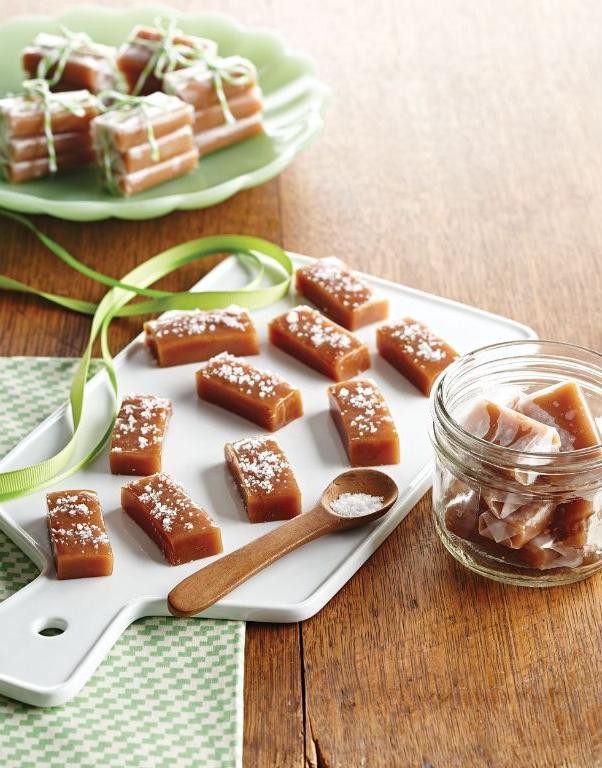
Remembering the first time I made vanilla bean caramels, the kitchen filled with a warm, buttery aroma that seemed to hug every corner. It was a quiet afternoon, the kind that invites you to slow down and savor the process, much like these caramels invite you to savor each bite.
Ingredients
- 1 cup heavy cream (I always opt for organic; the richness it adds is unparalleled)
- 1/2 cup unsalted butter (room temperature, it blends more smoothly)
- 1 1/2 cups granulated sugar (the fine crystals dissolve evenly, creating a silky texture)
- 1/4 cup light corn syrup (this is my secret to preventing crystallization)
- 1 vanilla bean, split and scraped (the flecks of vanilla add such a beautiful speckle)
- 1/2 tsp sea salt (I love the slight crunch and contrast it provides)
Instructions
- In a medium saucepan, combine the heavy cream, butter, sugar, corn syrup, and the seeds from the vanilla bean over medium heat. Stir gently until the sugar dissolves completely, about 5 minutes.
- Attach a candy thermometer to the side of the pan. Increase the heat to medium-high and bring the mixture to a boil without stirring. Watch for the temperature to reach 248°F, the firm-ball stage, which should take about 10-12 minutes.
- Once at temperature, remove the pan from heat immediately and stir in the sea salt. Pour the caramel into a parchment-lined 8×8 inch baking dish. Let it cool at room temperature for at least 2 hours, until set.
- Using a sharp knife, cut the caramel into small squares. For easier cutting, lightly oil the knife between cuts.
Perfectly chewy with a deep vanilla flavor, these caramels are a testament to the beauty of simple ingredients. Try wrapping them in wax paper for a charming homemade gift, or enjoy them as a quiet treat with your afternoon coffee.
Conclusion
We hope this roundup of 20 delicious homemade Christmas candy recipes inspires your holiday baking! Each recipe is a sweet, simple way to spread joy. Try them out, share your favorites in the comments, and don’t forget to pin this article on Pinterest for your next candy-making adventure. Wishing you a merry, sweet-filled Christmas!