Hey there, fitness lovers and kitchen adventurers! If you’re on the hunt for meals that pack a protein punch without skimping on flavor, you’ve hit the jackpot. Our roundup of 17 Delicious High Protein Dinner Recipes is tailored just for you. From quick weeknight fixes to hearty dishes that satisfy, these recipes are your ticket to a nutritious, muscle-fueling feast. Let’s dive in and dish up some inspiration!
Grilled Chicken with Quinoa and Steamed Broccoli
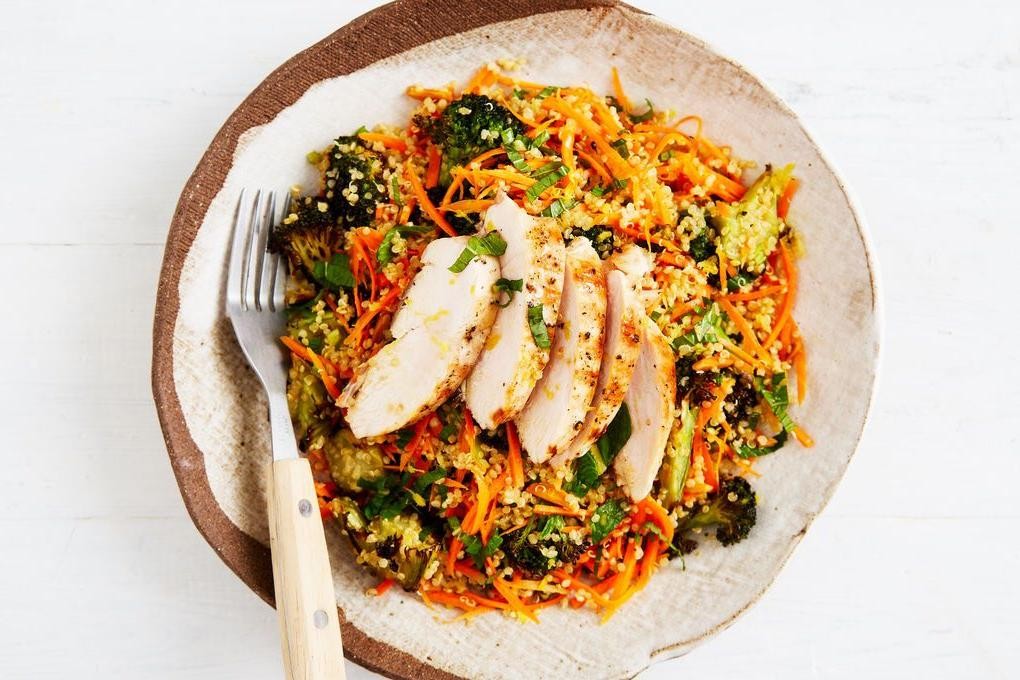
Wandering through the kitchen this evening, I found myself craving something wholesome yet simple, a dish that feels like a warm hug after a long day. Grilled chicken with quinoa and steamed broccoli came to mind, a trio that never fails to satisfy with its balance of protein, grains, and greens.
Ingredients
- 2 boneless, skinless chicken breasts (I like to butterfly them for even cooking)
- 1 cup quinoa (rinsed well to remove any bitterness)
- 2 cups water (for the quinoa, though broth adds more flavor)
- 2 cups broccoli florets (fresh is best, but frozen works in a pinch)
- 2 tbsp extra virgin olive oil (my go-to for its fruity notes)
- 1 tsp salt (I prefer sea salt for its subtle crunch)
- 1/2 tsp black pepper (freshly ground makes all the difference)
- 1 tsp garlic powder (for that gentle kick)
Instructions
- Preheat your grill to medium-high heat, about 375°F, ensuring it’s hot enough to sear the chicken nicely.
- While the grill heats, season the chicken breasts evenly with salt, pepper, and garlic powder, letting the flavors meld for about 5 minutes.
- Grill the chicken for 6-7 minutes per side, or until the internal temperature reaches 165°F, using a meat thermometer for accuracy.
- Meanwhile, bring the quinoa and water to a boil in a saucepan, then reduce to a simmer, cover, and cook for 15 minutes until the water is absorbed and the quinoa is fluffy.
- Steam the broccoli florets for 5 minutes until bright green and tender-crisp, a texture that pairs beautifully with the soft quinoa.
- Drizzle the olive oil over the cooked quinoa and broccoli, tossing gently to coat, for a simple yet flavorful finish.
Now, the chicken rests juicy and charred, the quinoa fluffy with a nutty undertone, and the broccoli crisp-tender, a harmony of textures and flavors. Serve this trio on a warm plate, perhaps with a sprinkle of red pepper flakes for those who dare.
Beef and Mushroom Stir Fry with Brown Rice
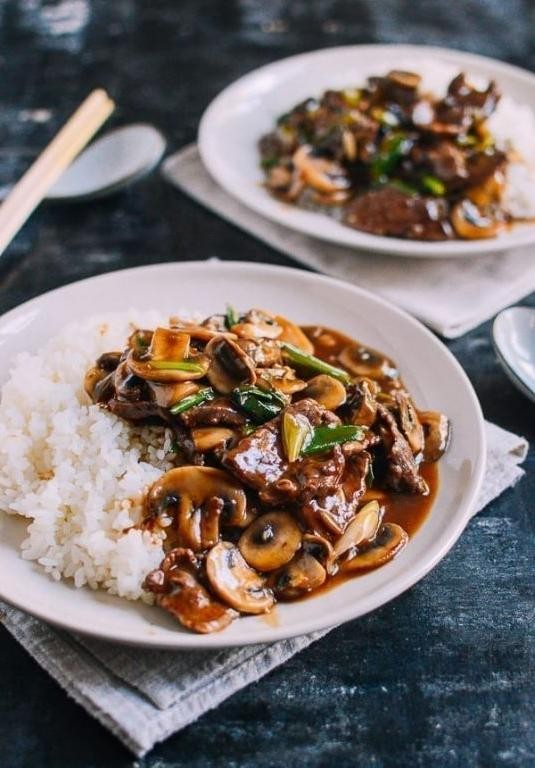
Yesterday, as the evening light faded, I found myself craving something hearty yet simple, a dish that could bridge the gap between comfort and health. That’s when the idea of a Beef and Mushroom Stir Fry with Brown Rice came to mind, a meal that feels like a warm hug after a long day.
Ingredients
- 1 lb beef sirloin, thinly sliced (I find the marbling in sirloin adds just the right amount of richness)
- 2 cups brown rice, uncooked (for that nutty flavor and chewy texture I love)
- 1 tbsp extra virgin olive oil (my kitchen staple for almost everything)
- 2 cups sliced mushrooms (cremini are my go-to for their earthy depth)
- 1 large onion, thinly sliced (yellow onions for their sweetness when caramelized)
- 2 cloves garlic, minced (because what’s a stir fry without garlic?)
- 1 tbsp soy sauce (low sodium, to control the saltiness)
- 1 tsp ginger, grated (fresh ginger brings a bright, spicy note)
- 1/2 tsp black pepper (freshly ground, for that sharp bite)
Instructions
- Start by cooking the brown rice according to package instructions, usually about 45 minutes, to achieve that perfect al dente texture.
- While the rice cooks, heat the olive oil in a large skillet over medium-high heat until it shimmers, about 2 minutes.
- Add the sliced beef to the skillet, spreading it out in a single layer to ensure even browning, and cook for about 3 minutes per side.
- Remove the beef from the skillet and set aside, covering to keep warm.
- In the same skillet, add the onions and mushrooms, stirring occasionally until they begin to soften and caramelize, about 5 minutes.
- Stir in the garlic and ginger, cooking for another minute until fragrant, being careful not to burn them.
- Return the beef to the skillet, add the soy sauce and black pepper, stirring everything together to combine and heat through, about 2 minutes.
- Serve the stir fry over the cooked brown rice, ensuring each plate gets a generous amount of the savory sauce.
The beef is tender against the chew of the brown rice, while the mushrooms and onions add a sweet earthiness that ties the dish together. For an extra touch, sprinkle with sesame seeds or sliced green onions before serving, adding a slight crunch and freshness to each bite.
Salmon with Sweet Potato Mash and Asparagus
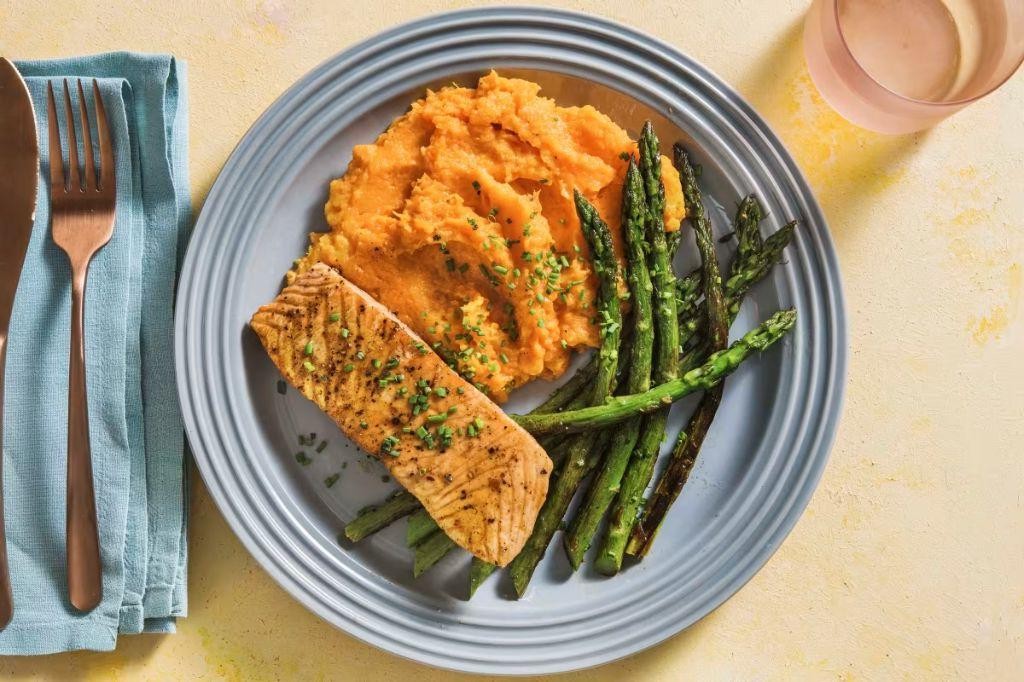
Evenings like these call for something simple yet nourishing, a meal that feels like a warm hug after a long day. This dish, with its vibrant colors and comforting textures, is just that—a gentle reminder of the beauty in simplicity.
Ingredients
- 1 lb salmon fillets (I love wild-caught for its richer flavor)
- 2 large sweet potatoes (the orange-fleshed ones are my favorite for their natural sweetness)
- 1 bunch asparagus (look for firm, bright green stalks)
- 2 tbsp extra virgin olive oil (my kitchen staple for its fruity notes)
- 1/2 tsp salt (I prefer sea salt for its subtle crunch)
- 1/4 tsp black pepper (freshly ground makes all the difference)
- 1/4 cup milk (whole milk gives the mash a creamy texture)
- 1 tbsp butter (unsalted, to control the saltiness)
Instructions
- Preheat your oven to 400°F (200°C), ensuring it’s fully heated for even cooking.
- Peel and cube the sweet potatoes, then boil in salted water for 15 minutes until fork-tender.
- While the potatoes cook, trim the woody ends off the asparagus and toss with 1 tbsp olive oil, salt, and pepper.
- Place the salmon on a baking sheet, drizzle with the remaining olive oil, and season with salt and pepper.
- Roast the salmon and asparagus in the oven for 12-15 minutes, until the salmon flakes easily and the asparagus is bright green.
- Drain the sweet potatoes, return to the pot, and mash with milk and butter until smooth and creamy.
- Tip: For extra flavor, add a pinch of cinnamon to the sweet potato mash.
- Tip: Let the salmon rest for a few minutes after baking to keep it moist.
- Tip: Blanch the asparagus in boiling water for 30 seconds before roasting for extra tenderness.
As you plate this dish, notice how the creamy sweet potato mash contrasts with the flaky salmon and crisp asparagus. It’s a harmony of textures and flavors that’s as pleasing to the eye as it is to the palate. Try serving it with a sprinkle of fresh dill or a wedge of lemon for an extra zing.
Turkey Meatballs with Spaghetti Squash
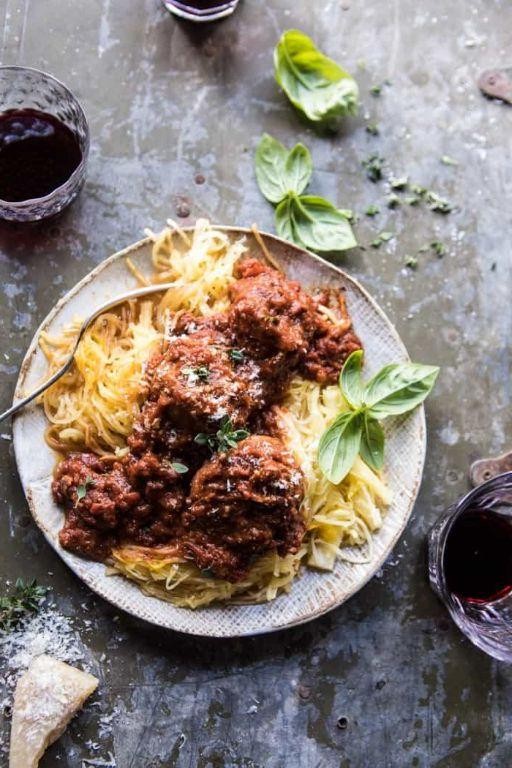
Sometimes, the simplest dishes bring the most comfort, especially when they’re a twist on a classic. Today, let’s gently simmer some turkey meatballs alongside spaghetti squash, a pairing that feels both nourishing and light.
Ingredients
- 1 lb ground turkey (I find the 93% lean variety keeps the meatballs juicy)
- 1/2 cup grated Parmesan cheese (freshly grated makes all the difference)
- 1/4 cup breadcrumbs (I like using panko for a bit of crunch)
- 1 large egg (room temperature helps it bind better)
- 2 cloves garlic, minced (because garlic is always a good idea)
- 1 tsp dried oregano (for that herby whisper)
- 1/2 tsp salt (I use sea salt for its clean taste)
- 1/4 tsp black pepper (freshly ground, if you can)
- 2 tbsp extra virgin olive oil (my go-to for its fruity notes)
- 1 medium spaghetti squash (about 3 lbs, it’s the perfect vessel for our meatballs)
Instructions
- Preheat your oven to 400°F (200°C). This ensures everything cooks evenly.
- Cut the spaghetti squash in half lengthwise and scoop out the seeds. A sharp knife and a bit of patience make this step safer.
- Drizzle the cut sides of the squash with 1 tbsp of olive oil and place them cut-side down on a baking sheet. Roast for 40 minutes, or until the flesh is tender and easily shreds into strands.
- While the squash roasts, mix the ground turkey, Parmesan, breadcrumbs, egg, garlic, oregano, salt, and pepper in a large bowl. Use your hands for the best mix, but don’t overwork the meat.
- Form the mixture into 1-inch meatballs. A small ice cream scoop can help keep them uniform.
- Heat the remaining 1 tbsp of olive oil in a large skillet over medium heat. Add the meatballs, cooking them in batches to avoid crowding, for about 4 minutes per side, or until golden brown and cooked through.
- Once the squash is done, use a fork to scrape the flesh into strands. Serve the meatballs atop the spaghetti squash strands.
Kindly savor the tender meatballs against the delicate, slightly sweet strands of spaghetti squash. For a festive touch, sprinkle with extra Parmesan and a few fresh basil leaves before serving.
Lentil and Spinach Curry with Basmati Rice
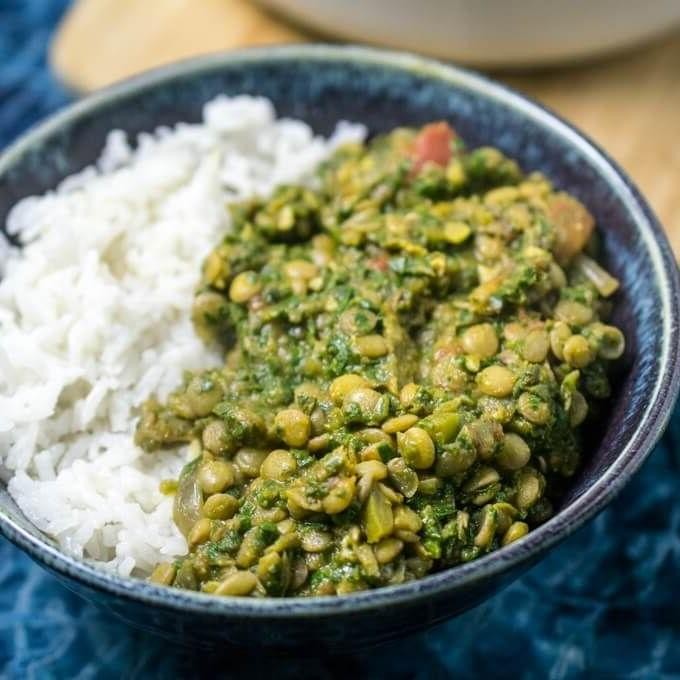
Wandering through the kitchen on a quiet evening, I find myself drawn to the comforting embrace of a lentil and spinach curry, its warmth a gentle reminder of home. The simplicity of its ingredients belies the depth of flavor they create together, a harmony that soothes the soul as much as it satisfies the appetite.
Ingredients
- 1 cup dried green lentils (I love how they hold their shape, offering a slight bite)
- 2 cups fresh spinach, roughly chopped (the vibrant green adds such life to the dish)
- 1 tablespoon extra virgin olive oil (my go-to for its fruity notes)
- 1 medium onion, finely diced (the sweetness balances the spices beautifully)
- 2 cloves garlic, minced (because what’s a curry without garlic?)
- 1 tablespoon curry powder (I prefer a mild one, but feel free to adjust)
- 1 teaspoon ground cumin (its earthy warmth is irreplaceable)
- 1/2 teaspoon salt (just enough to enhance the flavors)
- 2 cups water (for cooking the lentils to perfection)
- 1 cup basmati rice (rinsed until the water runs clear, for the fluffiest results)
- 2 cups water (for the rice, because precision matters)
Instructions
- In a medium saucepan, heat the olive oil over medium heat until shimmering, about 1 minute.
- Add the diced onion and sauté until translucent, about 5 minutes, stirring occasionally to prevent burning.
- Stir in the minced garlic, curry powder, and ground cumin, cooking for another minute until fragrant. Tip: Toasting the spices releases their full aroma.
- Add the dried lentils and 2 cups of water to the saucepan, bringing the mixture to a boil.
- Reduce the heat to low, cover, and simmer for 20 minutes, or until the lentils are tender but not mushy. Tip: Checking at the 15-minute mark ensures they’re perfectly cooked.
- While the lentils cook, prepare the basmati rice by combining it with 2 cups of water in another saucepan. Bring to a boil, then reduce the heat to low, cover, and simmer for 18 minutes. Tip: Letting the rice sit covered for 5 minutes after cooking makes it even fluffier.
- Once the lentils are tender, stir in the chopped spinach and salt, cooking just until the spinach wilts, about 2 minutes.
- Serve the lentil and spinach curry over the fluffy basmati rice.
Zesty yet comforting, this dish marries the earthiness of lentils with the freshness of spinach, all brought together by the aromatic spices. The basmati rice, with its delicate grains, serves as the perfect canvas, making each bite a delightful contrast of textures and flavors. Consider garnishing with a dollop of yogurt or a sprinkle of fresh cilantro for an extra layer of freshness.
Tofu and Vegetable Stir Fry with Peanut Sauce
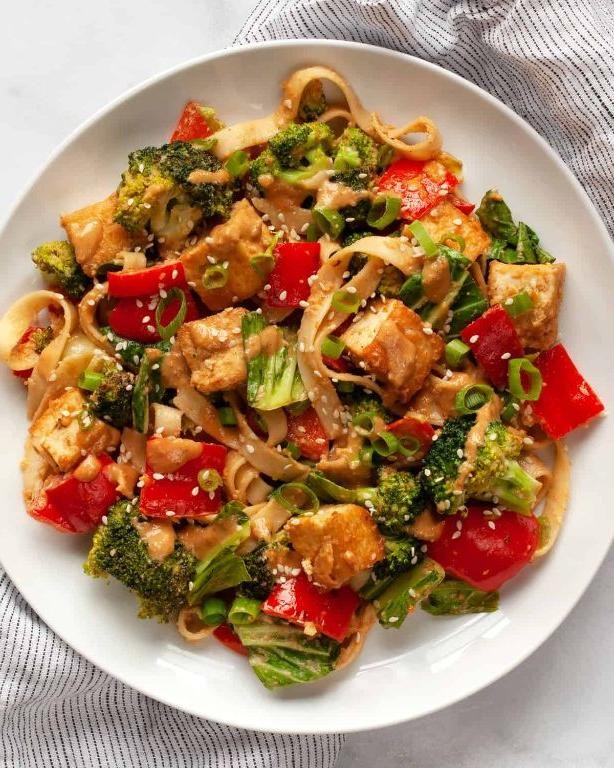
Under the soft glow of the kitchen light, there’s something deeply comforting about the sizzle of tofu meeting the pan, a moment where simplicity and flavor begin to dance together. This stir fry, with its creamy peanut sauce, is my go-to when the evening calls for something both nourishing and effortless.
Ingredients
- 1 block of firm tofu, pressed and cubed (I find that pressing it for at least 15 minutes makes all the difference)
- 2 cups of mixed vegetables (bell peppers, broccoli, and carrots are my favorites for their crunch and color)
- 3 tbsp of peanut butter (creamy or chunky, depending on your texture preference)
- 2 tbsp of soy sauce (I always reach for the low-sodium version to control the saltiness)
- 1 tbsp of maple syrup (a little sweetness balances the sauce beautifully)
- 1 tsp of grated ginger (freshly grated brings a vibrant kick)
- 2 cloves of garlic, minced (because garlic is non-negotiable in my kitchen)
- 1 tbsp of vegetable oil (a neutral oil ensures the flavors shine)
- 1/4 cup of water (to adjust the sauce consistency)
Instructions
- Heat the vegetable oil in a large skillet over medium-high heat until shimmering, about 1 minute.
- Add the cubed tofu to the skillet, spreading it out in a single layer. Cook for 5-7 minutes, flipping occasionally, until all sides are golden brown.
- Push the tofu to one side of the skillet and add the mixed vegetables. Stir fry for 4-5 minutes until they’re just tender but still crisp.
- In a small bowl, whisk together the peanut butter, soy sauce, maple syrup, grated ginger, minced garlic, and water until smooth.
- Pour the peanut sauce over the tofu and vegetables in the skillet. Stir gently to coat everything evenly, cooking for another 2 minutes until the sauce is heated through.
- Remove from heat and let it sit for a minute; the sauce will thicken slightly as it cools.
Just as the dish comes together, the creamy peanut sauce clings to each piece of tofu and vegetable, creating a harmony of textures and flavors that’s both rich and refreshing. Serve it over a bed of steamed rice or noodles, or enjoy it as is for a lighter meal that doesn’t skimp on satisfaction.
Baked Cod with Lemon Garlic Butter and Roasted Brussels Sprouts
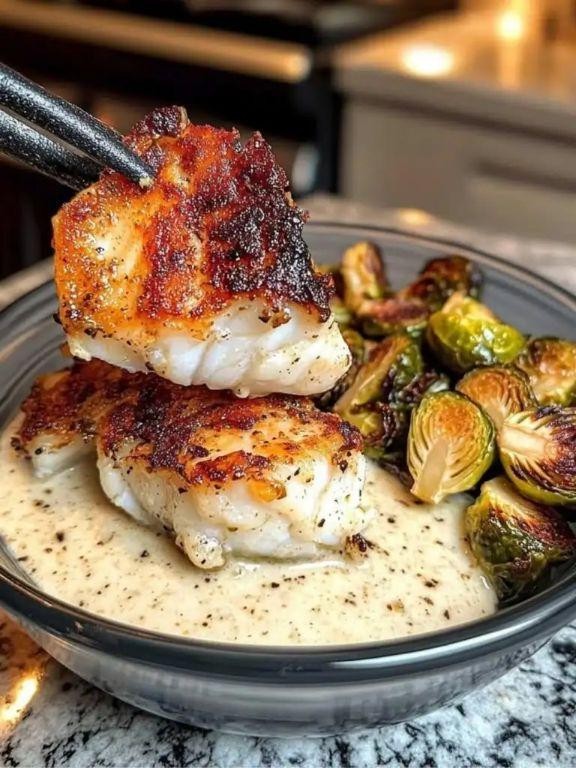
Perhaps there’s no simpler joy than the melding of flavors in a dish that feels both nourishing and indulgent. This baked cod, kissed with lemon garlic butter and paired with roasted Brussels sprouts, is a testament to that quiet delight.
Ingredients
- 1 lb cod fillets (I find thicker cuts hold up better)
- 1 lb Brussels sprouts, halved (the smaller ones are sweeter)
- 4 tbsp unsalted butter, melted (extra virgin olive oil is my go-to, but butter wins here)
- 2 cloves garlic, minced (freshly minced makes all the difference)
- 1 lemon, juiced and zested (room temp for maximum juice)
- Salt and pepper (I like a coarse sea salt for texture)
Instructions
- Preheat your oven to 400°F (200°C) to ensure it’s perfectly hot for roasting.
- Toss the halved Brussels sprouts with 2 tbsp of the melted butter, salt, and pepper on a baking sheet. Spread them out evenly for optimal crispiness.
- Roast the Brussels sprouts for 15 minutes before adding the cod, giving them a head start to caramelize.
- While the sprouts begin roasting, mix the remaining 2 tbsp butter with minced garlic, lemon juice, and zest in a small bowl for the sauce.
- Place the cod fillets on the same baking sheet among the Brussels sprouts. Spoon the lemon garlic butter over the cod, ensuring each piece is generously coated.
- Return the baking sheet to the oven and bake for another 12-15 minutes, or until the cod flakes easily with a fork and the sprouts are golden.
- Let the dish rest for 2 minutes after baking; this allows the flavors to meld beautifully.
Every bite of this dish offers a harmony of textures—the flaky, buttery cod against the crisp, caramelized sprouts. Serve it atop a bed of quinoa for a heartier meal, or enjoy it as is for a light yet satisfying dinner.
Chickpea and Avocado Salad Wrap

As the morning light filters through the kitchen window, I find myself reaching for the simple, nourishing ingredients that make this wrap a weekday favorite. It’s a dish that feels like a gentle hug, perfect for those moments when you need a quick yet wholesome meal.
Ingredients
- 1 cup cooked chickpeas, drained and rinsed (I love the creamy texture they add)
- 1 ripe avocado, pitted and mashed (extra ripe for that buttery smoothness)
- 1/4 cup diced red onion (for a slight crunch and a pop of color)
- 2 tbsp extra virgin olive oil (my go-to for its fruity notes)
- 1 tbsp lemon juice (freshly squeezed, to brighten up the flavors)
- 1/2 tsp salt (I prefer sea salt for its subtle minerality)
- 1/4 tsp black pepper (freshly ground, for that aromatic kick)
- 2 large whole wheat tortillas (warmed slightly for extra pliability)
- 1 cup baby spinach leaves (for a fresh, green contrast)
Instructions
- In a medium bowl, combine the mashed avocado, chickpeas, red onion, olive oil, lemon juice, salt, and black pepper. Gently mix until everything is well incorporated.
- Lay out the whole wheat tortillas on a clean, flat surface. Divide the baby spinach leaves evenly between them, spreading them out in the center.
- Spoon the chickpea and avocado mixture over the spinach on each tortilla, aiming for an even distribution.
- Fold the sides of the tortillas inward, then roll them up tightly from the bottom to encase the filling completely.
- If desired, cut each wrap in half diagonally for easier handling and a more appealing presentation.
Offering a delightful contrast of creamy avocado and hearty chickpeas, this wrap is a testament to the beauty of simple ingredients. Serve it with a side of sweet potato fries or a crisp apple for a meal that’s both satisfying and light.
Pork Tenderloin with Roasted Carrots and Cauliflower
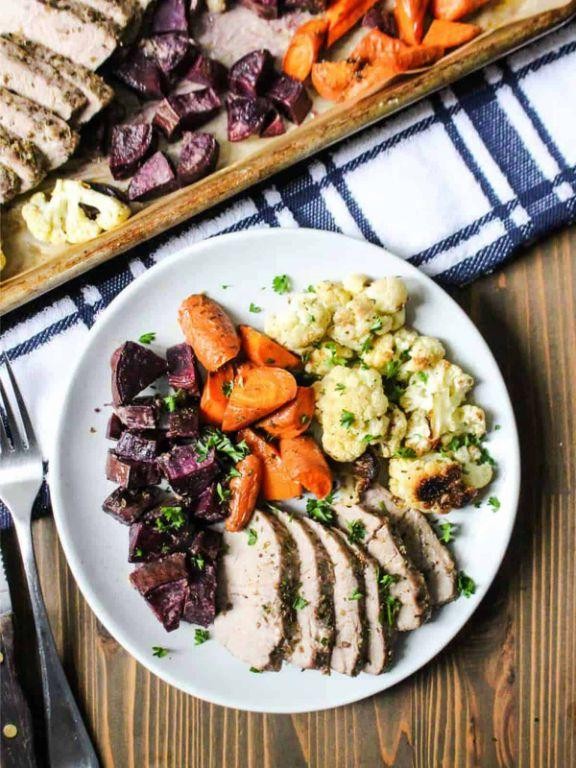
On a quiet morning like this, the thought of preparing a comforting meal feels like a gentle embrace. Pork tenderloin with roasted carrots and cauliflower is a dish that whispers of home, its simplicity belying the depth of flavor it brings to the table.
Ingredients
- 1 pork tenderloin (about 1.5 lbs) – I find the smaller ones cook more evenly.
- 2 cups carrots, peeled and sliced into 1-inch pieces – their sweetness intensifies when roasted.
- 2 cups cauliflower florets – the larger pieces hold up better in the oven.
- 2 tbsp extra virgin olive oil – my go-to for its fruity notes.
- 1 tsp salt – I prefer sea salt for its clean taste.
- 1/2 tsp black pepper – freshly ground makes all the difference.
- 1 tsp garlic powder – for a hint of warmth without overpowering.
- 1 tsp dried thyme – its earthy aroma complements the pork beautifully.
Instructions
- Preheat your oven to 400°F. A properly heated oven ensures even cooking.
- In a large bowl, toss the carrots and cauliflower with 1 tbsp olive oil, 1/2 tsp salt, and 1/4 tsp black pepper. Coating the vegetables evenly helps them roast to perfection.
- Spread the vegetables on a baking sheet in a single layer. Crowding can lead to steaming instead of roasting.
- Rub the pork tenderloin with the remaining olive oil, then season with the remaining salt, black pepper, garlic powder, and thyme. Massaging the spices into the meat enhances flavor penetration.
- Place the pork on the baking sheet among the vegetables. Roasting them together allows the flavors to meld.
- Roast for 25-30 minutes, or until the pork reaches an internal temperature of 145°F and the vegetables are tender and caramelized. Using a meat thermometer ensures perfectly cooked pork.
- Let the pork rest for 5 minutes before slicing. This keeps the juices from running out.
Kindly savor the tender pork, its edges slightly crisp from the roast, alongside the sweet, caramelized vegetables. For a playful twist, serve it over a bed of creamy polenta or alongside a crisp apple slaw.
Shrimp and Black Bean Tacos with Corn Salsa
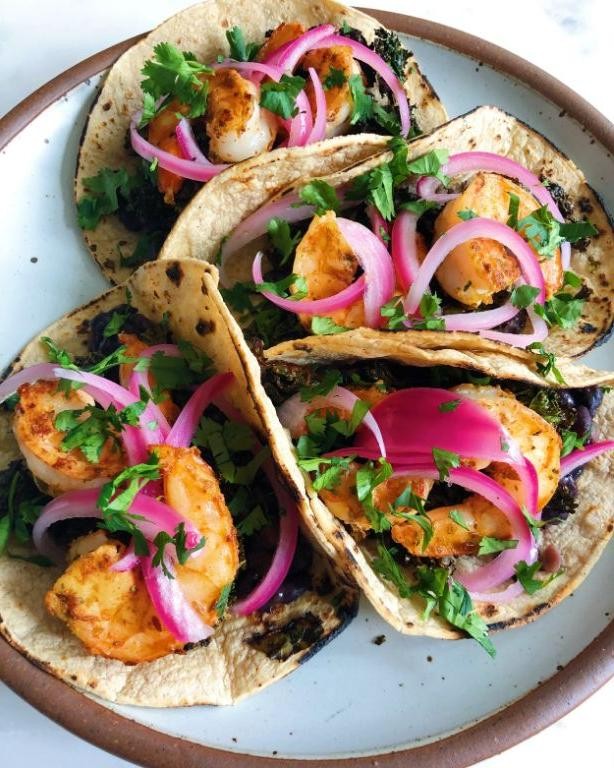
Now, as the early morning light filters through the kitchen window, there’s something comforting about the thought of Shrimp and Black Bean Tacos with Corn Salsa. It’s a dish that brings together the warmth of summer and the simplicity of ingredients that speak for themselves.
Ingredients
- 1 lb medium shrimp, peeled and deveined (I find that wild-caught shrimp have a sweeter taste)
- 1 can (15 oz) black beans, rinsed and drained (for that creamy texture)
- 1 cup corn kernels, fresh or frozen (thawed if frozen, for the salsa)
- 1/2 cup diced red onion (for a bit of crunch and color)
- 1 jalapeño, seeded and minced (adjust according to your heat preference)
- 2 tbsp extra virgin olive oil (my go-to for its fruity notes)
- 1 tsp ground cumin (toasted, if you have the time)
- 1/2 tsp smoked paprika (for that subtle smokiness)
- 8 small corn tortillas (warmed, they just taste better)
- Salt, to taste (I like to use sea salt for its clean flavor)
- Fresh cilantro, chopped (for garnish, because it’s not just about the taste but also the presentation)
- Lime wedges (because a squeeze of lime makes everything better)
Instructions
- In a medium bowl, toss the shrimp with 1 tbsp olive oil, cumin, smoked paprika, and a pinch of salt. Let it marinate for 10 minutes at room temperature.
- Heat the remaining 1 tbsp olive oil in a large skillet over medium-high heat. Add the shrimp in a single layer and cook for 2 minutes per side, until pink and opaque. Remove from skillet and set aside.
- In the same skillet, add the black beans and a pinch of salt. Cook for 2-3 minutes, stirring occasionally, until heated through. Tip: Mash a few beans to thicken the mixture slightly.
- For the corn salsa, combine corn, red onion, jalapeño, and a pinch of salt in a bowl. Mix well and let it sit for 5 minutes to allow the flavors to meld.
- Warm the tortillas in a dry skillet over medium heat for about 30 seconds per side, or until pliable. Tip: Keep them wrapped in a clean kitchen towel to stay warm.
- Assemble the tacos by spreading a layer of black beans on each tortilla, topping with shrimp, and then the corn salsa. Garnish with cilantro and serve with lime wedges on the side. Tip: For an extra touch, drizzle with a bit of hot sauce or crema.
Gently, the tacos come together with a harmony of textures—the creamy beans, the succulent shrimp, and the crisp corn salsa. Serve them on a platter with extra lime wedges and let everyone build their own, making each bite a personal celebration of flavors.
Egg White Omelette with Spinach, Tomatoes, and Feta

Calm mornings call for simplicity, and nothing embodies this quite like an egg white omelette, light yet satisfying, with the fresh flavors of spinach, tomatoes, and feta coming together in a harmonious blend.
Ingredients
- 3 large egg whites (I find room temperature eggs blend more smoothly)
- 1/4 cup fresh spinach, roughly chopped (baby spinach leaves are my preference for their tenderness)
- 2 tbsp diced tomatoes (I love the burst of flavor from cherry tomatoes)
- 1 tbsp crumbled feta cheese (the saltiness of feta adds a perfect contrast)
- 1 tsp extra virgin olive oil (my go-to for its fruity notes)
- Pinch of salt (just a whisper to enhance the natural flavors)
Instructions
- Heat a non-stick skillet over medium heat (about 300°F) and add the extra virgin olive oil, swirling to coat the pan evenly.
- In a bowl, gently whisk the egg whites with a pinch of salt until just combined; over-whisking can make the omelette tough.
- Pour the egg whites into the skillet, tilting to spread them into an even layer. Let cook undisturbed for about 30 seconds until the edges start to set.
- Scatter the chopped spinach, diced tomatoes, and crumbled feta evenly over one half of the omelette. Tip: Adding toppings to one side makes folding easier.
- Using a spatula, carefully fold the omelette in half over the fillings. Cook for another 30 seconds to 1 minute, until the cheese begins to melt.
- Slide the omelette onto a plate, serving immediately for the best texture and warmth.
The omelette emerges fluffy and light, with the spinach and tomatoes adding a fresh crunch, while the feta offers creamy pockets of saltiness. Try serving it alongside a slice of whole-grain toast for a complete, comforting meal.
Quinoa and Black Bean Stuffed Peppers

Today feels like the perfect day to share a dish that’s as nourishing as it is comforting, a recipe that has become a quiet favorite in my kitchen. These quinoa and black bean stuffed peppers are a testament to the beauty of simple ingredients coming together to create something truly special.
Ingredients
- 4 large bell peppers, any color (I love the vibrancy of red and yellow together)
- 1 cup quinoa, rinsed (this step is crucial for removing any bitterness)
- 1 can (15 oz) black beans, drained and rinsed (I sometimes add a pinch of salt here)
- 1 cup corn kernels (fresh or frozen, both work wonderfully)
- 1 small onion, finely diced (white or yellow, depending on what’s in your pantry)
- 2 cloves garlic, minced (because what’s a dish without garlic?)
- 1 tsp ground cumin (the aroma is just heavenly)
- 1/2 tsp chili powder (adjust based on your heat preference)
- 1 cup shredded cheese (I’m partial to a sharp cheddar for its meltiness)
- 2 tbsp extra virgin olive oil (my go-to for its fruity notes)
- Salt to taste (I always start with 1/2 tsp and adjust from there)
Instructions
- Preheat your oven to 375°F (190°C), allowing it to come to temperature while you prep.
- Cut the tops off the bell peppers and remove the seeds and membranes. A small paring knife works wonders here.
- In a medium saucepan, bring 2 cups of water to a boil. Add the quinoa, reduce heat to low, cover, and simmer for 15 minutes. Tip: Let it sit covered for 5 minutes off the heat for fluffier quinoa.
- While the quinoa cooks, heat olive oil in a large skillet over medium heat. Add the onion and garlic, sautéing until translucent, about 3 minutes.
- Stir in the black beans, corn, cumin, chili powder, and salt. Cook for another 2 minutes to let the flavors meld.
- Fluff the quinoa with a fork and gently fold it into the skillet mixture. Tip: Taste and adjust seasoning now, as the cheese will add saltiness later.
- Stuff each pepper with the quinoa mixture, packing it lightly. Top with shredded cheese.
- Place the stuffed peppers in a baking dish and bake for 25-30 minutes, until the peppers are tender and the cheese is bubbly and slightly golden. Tip: For an extra crispy top, broil for the last 2 minutes.
The peppers emerge from the oven with a satisfying tenderness, the filling a hearty mix of textures from the fluffy quinoa to the creamy beans. Serve them atop a bed of greens for a contrast in temperatures, or alongside a dollop of cool sour cream to balance the warmth of the spices.
Grilled Steak with Roasted Sweet Potatoes and Green Beans
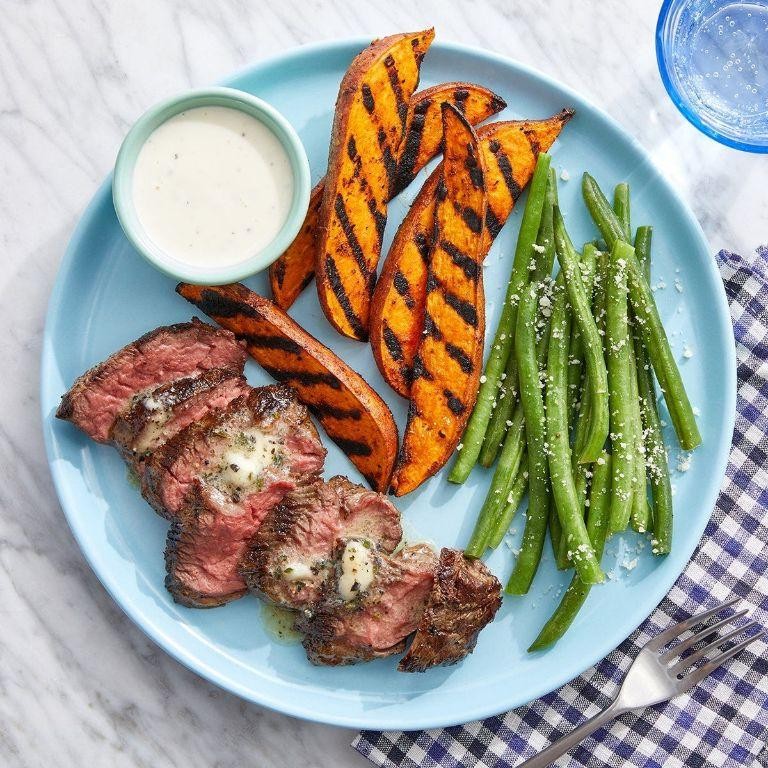
Now, as the early summer light filters through the kitchen window, I find myself drawn to the simplicity and heartiness of a meal that feels both grounding and celebratory. It’s a dish that marries the robust flavors of the grill with the sweet, earthy notes of the oven, creating a symphony of tastes that are as comforting as they are vibrant.
Ingredients
- 1.5 lbs ribeye steak (I find the marbling in ribeye adds unparalleled flavor and tenderness)
- 2 large sweet potatoes, peeled and cubed (about 2 cups)
- 1 lb green beans, trimmed (the crispier, the better in my book)
- 3 tbsp extra virgin olive oil (my go-to for its fruity notes)
- 1 tsp salt (I prefer sea salt for its subtle crunch)
- 1/2 tsp black pepper (freshly ground makes all the difference)
- 2 cloves garlic, minced (because garlic is life)
Instructions
- Preheat your grill to medium-high heat, about 450°F, ensuring it’s clean to prevent sticking.
- While the grill heats, toss the sweet potatoes with 2 tbsp olive oil, 1/2 tsp salt, and 1/4 tsp black pepper on a baking sheet. Roast in a preheated 400°F oven for 25 minutes, stirring halfway, until tender and slightly caramelized.
- Season the steak evenly with the remaining salt and pepper, letting it sit at room temperature for 10 minutes to ensure even cooking.
- Grill the steak for 4-5 minutes per side for medium-rare, or until it reaches an internal temperature of 135°F. Let it rest for 5 minutes before slicing against the grain.
- In the last 5 minutes of the sweet potatoes roasting, add the green beans to the baking sheet, tossing with the remaining olive oil and minced garlic, roasting until the beans are bright and slightly tender.
Combining the smoky char of the steak with the sweet, soft potatoes and the crisp, garlicky beans creates a plate that’s as visually appealing as it is delicious. Consider serving it family-style on a large platter, letting everyone help themselves to the vibrant colors and textures.
Greek Yogurt Chicken Salad with Whole Grain Crackers
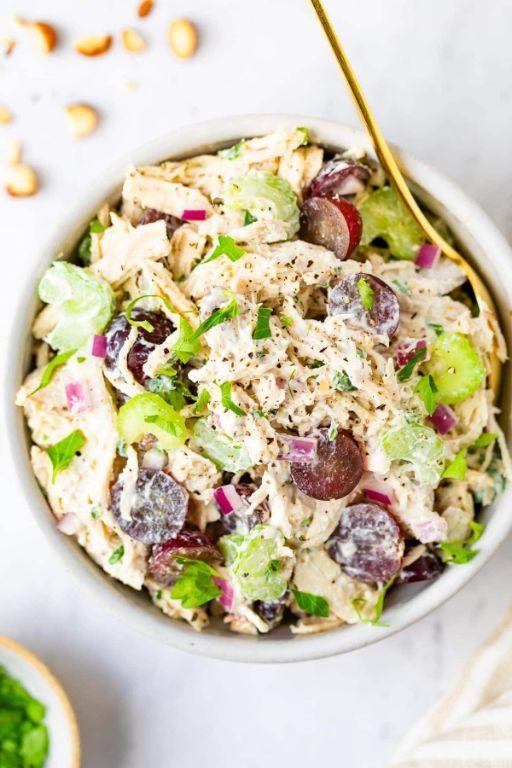
Delving into the simplicity of this dish feels like a quiet morning, where each ingredient tells its own story, blending into a harmony that’s both refreshing and satisfying.
Ingredients
- 2 cups cooked chicken, shredded (I find rotisserie chicken adds a depth of flavor that’s hard to beat)
- 1 cup Greek yogurt (opt for full-fat for creaminess that clings to every bite)
- 1/2 cup celery, finely chopped (for that essential crunch)
- 1/4 cup red onion, minced (soaking in cold water for 5 minutes tames the sharpness)
- 1 tbsp fresh dill, chopped (dried works in a pinch, but fresh is transformative)
- 1 tsp lemon juice (a squeeze more if you love that zesty kick)
- 1/2 tsp garlic powder (because a little goes a long way)
- Salt and pepper to taste (I’m generous with the pepper for a slight heat)
- Whole grain crackers (for serving, the nuttier the better in my book)
Instructions
- In a large mixing bowl, combine the shredded chicken, Greek yogurt, celery, red onion, dill, lemon juice, and garlic powder. Stir gently until everything is evenly coated.
- Season the mixture with salt and pepper, then give it one final stir to distribute the seasoning throughout.
- Cover the bowl with plastic wrap and refrigerate for at least 30 minutes. This rest time allows the flavors to meld beautifully.
- Serve the chicken salad chilled, with a side of whole grain crackers for dipping or scooping.
Soothingly creamy with bursts of crunch, this chicken salad is a testament to the beauty of simplicity. Try piling it high on a bed of greens for a lunch that feels both indulgent and wholesome.
Baked Chicken Thighs with Garlic Mashed Cauliflower
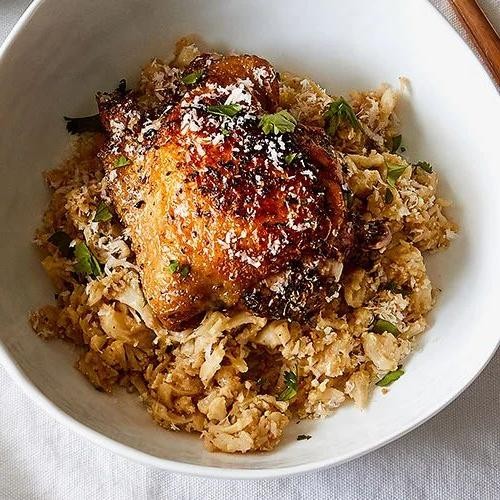
As the morning light filters through the kitchen window, there’s something deeply comforting about preparing a meal that feels both nourishing and indulgent. Today, let’s embrace the simplicity of baked chicken thighs paired with the creamy elegance of garlic mashed cauliflower, a dish that whispers of home and heart.
Ingredients
- 4 bone-in, skin-on chicken thighs (I find the skin adds an irresistible crispiness)
- 1 large head of cauliflower, cut into florets (the fresher, the sweeter)
- 4 cloves of garlic, minced (because garlic is life)
- 1/4 cup extra virgin olive oil (my go-to for its fruity notes)
- 1/2 cup heavy cream (for that velvety texture)
- 2 tbsp unsalted butter (room temperature blends smoother)
- 1 tsp salt (I prefer sea salt for its mild flavor)
- 1/2 tsp black pepper (freshly ground, if you please)
Instructions
- Preheat your oven to 375°F (190°C), ensuring it’s fully heated for even cooking.
- Season the chicken thighs with salt and pepper, rubbing the spices gently into the skin.
- Place the thighs skin-side up on a baking sheet, allowing space between each for crispiness. Bake for 35-40 minutes until the skin is golden and the juices run clear.
- While the chicken bakes, steam the cauliflower florets until fork-tender, about 10 minutes. Tip: Don’t overcook to avoid mushiness.
- In a pan, sauté minced garlic in olive oil over low heat until fragrant, about 1 minute. Tip: Keep the heat low to prevent bitterness.
- Transfer the steamed cauliflower to a food processor, add the garlic oil, heavy cream, butter, salt, and pepper. Blend until smooth. Tip: Pause to scrape down the sides for uniformity.
- Once the chicken is done, let it rest for 5 minutes to redistribute the juices.
Kindly savor the contrast of the crispy, juicy chicken against the smooth, garlicky cauliflower. For a playful twist, serve atop a warm, toasted slice of sourdough, letting the mash soak into the bread.
Spicy Tuna and Avocado Salad
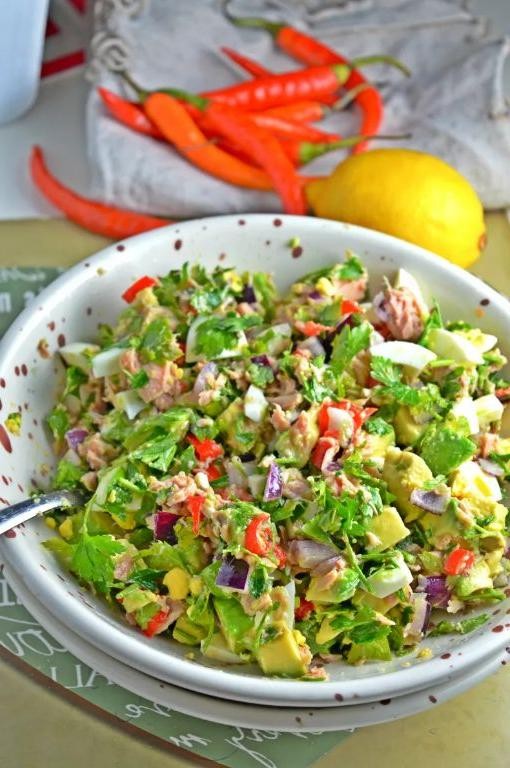
Lately, I’ve found myself craving something that balances the richness of avocado with the boldness of spicy tuna, a dish that feels both indulgent and refreshingly simple.
Ingredients
- 1 cup sushi-grade tuna, diced (I always look for the freshest, brightest red tuna at my local market)
- 1 ripe avocado, cubed (there’s something so satisfying about the creaminess of a perfectly ripe avocado)
- 2 tbsp mayonnaise (I lean towards Kewpie for its slight sweetness)
- 1 tbsp sriracha (adjust according to your heat preference, but this amount gives a nice kick)
- 1 tsp soy sauce (a dash of umami that ties everything together)
- 1/2 tsp sesame oil (just a hint for that nutty aroma)
- 1 green onion, thinly sliced (for a pop of color and sharpness)
- 1/2 tsp sesame seeds (toasted, if you have the time, for extra crunch)
Instructions
- In a medium bowl, gently combine the diced tuna and cubed avocado, being careful not to mash the avocado.
- In a small bowl, whisk together the mayonnaise, sriracha, soy sauce, and sesame oil until smooth.
- Pour the dressing over the tuna and avocado, and fold gently to coat evenly.
- Sprinkle the sliced green onion and sesame seeds over the top for garnish.
- Let the salad chill in the refrigerator for about 15 minutes before serving to allow the flavors to meld.
Mixing the creamy avocado with the spicy tuna creates a texture that’s both luxurious and light. Serve it atop a crisp bed of greens or with a side of crunchy crackers for a delightful contrast.
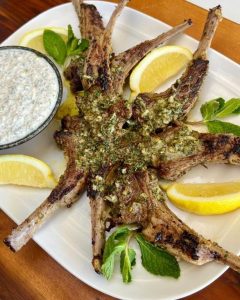
Lamb Chops with Mint Yogurt Sauce and Grilled Zucchini

Feeling the warmth of the summer evening, I find myself drawn to the simplicity and elegance of lamb chops, paired with a refreshing mint yogurt sauce and the subtle char of grilled zucchini. It’s a dish that speaks of leisurely dinners under the stars, where each bite is a reminder of the season’s bounty.
Ingredients
- 4 lamb chops (I like them about 1 inch thick for that perfect medium-rare)
- 1 cup plain yogurt (Greek yogurt adds a lovely thickness)
- 1/4 cup fresh mint leaves, finely chopped (the more, the merrier in my book)
- 2 medium zucchinis, sliced lengthwise (look for firm, shiny skins)
- 2 tbsp extra virgin olive oil (my go-to for its fruity notes)
- 1 garlic clove, minced (fresh is always best)
- 1/2 tsp salt (I prefer sea salt for its clean taste)
- 1/4 tsp black pepper (freshly ground makes all the difference)
Instructions
- Preheat your grill to medium-high heat, about 400°F, ensuring it’s clean to prevent sticking.
- In a small bowl, mix the yogurt, mint, minced garlic, and a pinch of salt. Set aside in the fridge to let the flavors meld.
- Brush the zucchini slices lightly with olive oil on both sides, seasoning them with salt and pepper.
- Season the lamb chops evenly with the remaining salt and pepper, then drizzle with olive oil.
- Place the lamb chops and zucchini on the grill. Cook the lamb for 3-4 minutes per side for medium-rare, and the zucchini for 2-3 minutes per side until tender with grill marks.
- Remove everything from the grill and let the lamb rest for 5 minutes to redistribute the juices.
- Serve the lamb chops with a generous dollop of the mint yogurt sauce and the grilled zucchini on the side.
With each component bringing its own texture and flavor—the juicy lamb, the creamy sauce with a burst of mint, and the smoky zucchini—this dish is a celebration of summer. Try serving it with a side of couscous or a fresh salad to round out the meal.
Conclusion
Kickstart your fitness journey with these 17 high-protein dinners that are as tasty as they are nutritious! Perfect for home cooks across North America, these recipes promise to fuel your body and delight your taste buds. Don’t forget to share your favorites in the comments and pin this roundup on Pinterest to keep these delicious ideas handy for your next meal prep. Happy cooking!