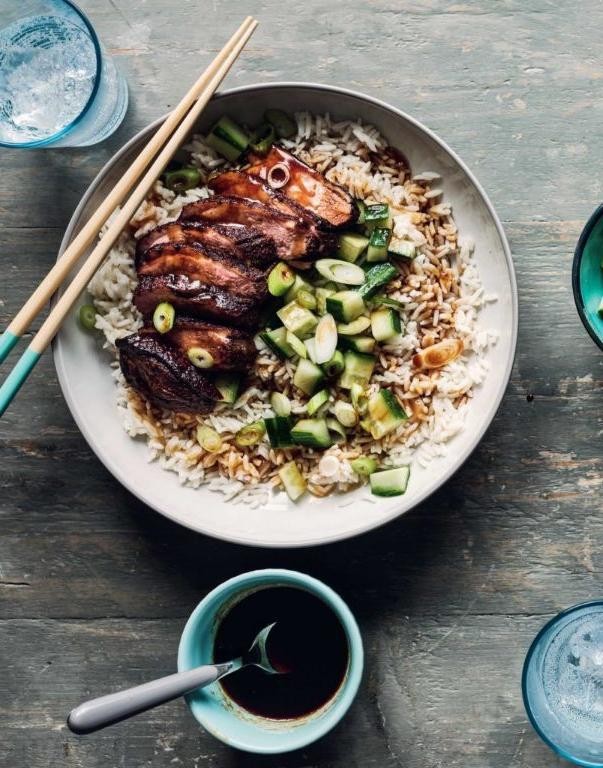
Ready to turn up the heat in your kitchen? Our roundup of 20 Spicy Hibachi Grill Recipes for Beginners is your ticket to flavor-packed, easy-to-make meals that’ll impress everyone at the table. Whether you’re craving a quick weeknight dinner or looking to spice up your weekend cookout, these recipes are sure to delight. Let’s fire up the grill and dive into a world of bold, mouthwatering flavors!
Hibachi Grilled Chicken with Garlic Butter
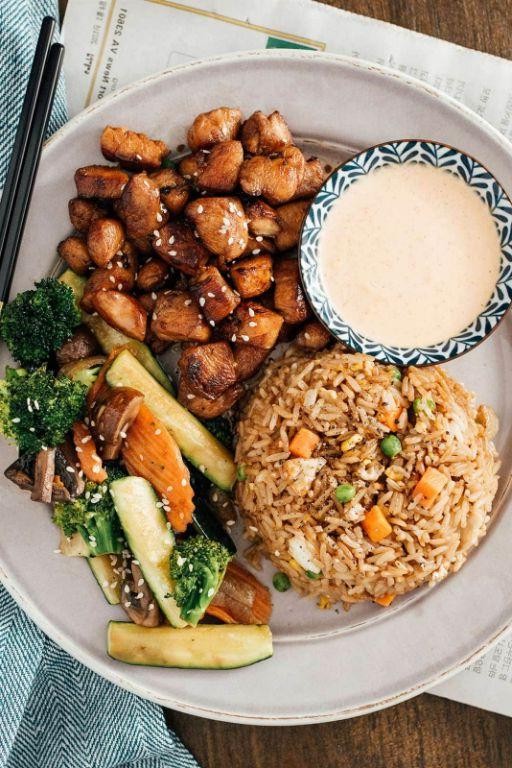
Backyard barbecues just got a major upgrade with this Hibachi Grilled Chicken with Garlic Butter. It’s juicy, flavorful, and surprisingly simple to make at home.
Ingredients
- 2 boneless, skinless chicken breasts (about 1 lb total) – I like to butterfly them for even cooking.
- 2 tbsp soy sauce – low sodium works great if you’re watching your salt intake.
- 1 tbsp vegetable oil – keeps the chicken from sticking to the grill.
- 3 cloves garlic, minced – fresh is best for that punchy flavor.
- 4 tbsp unsalted butter – because everything’s better with butter, right?
- 1 tsp lemon juice – just a splash to brighten up the dish.
- Salt and pepper – to season the chicken before grilling.
Instructions
- Preheat your grill to medium-high heat, about 375°F to 400°F. A clean grill is a happy grill, so give those grates a quick brush.
- Season both sides of the chicken breasts with salt and pepper. Remember, seasoning early means flavor in every bite.
- Brush the chicken with vegetable oil to prevent sticking. This little step saves you from a sticky situation later.
- Grill the chicken for 6-7 minutes on each side. Look for those beautiful grill marks and an internal temp of 165°F.
- While the chicken rests, melt the butter in a small pan over low heat. Add the minced garlic and cook until fragrant, about 1 minute. Stir in the soy sauce and lemon juice for that signature hibachi flavor.
- Slice the chicken against the grain for maximum tenderness and drizzle with the garlic butter sauce.
Fresh off the grill, this chicken is tender with a smoky char that pairs perfectly with the rich, garlicky butter. Serve it over a bed of steamed rice or with a side of grilled veggies for a complete meal that’ll have everyone asking for seconds.
Spicy Hibachi Shrimp with Zucchini
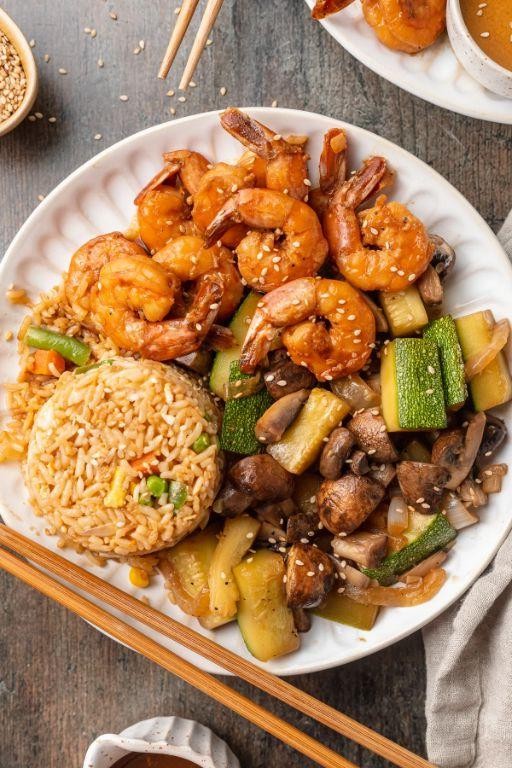
Zucchini and shrimp come together in this fiery hibachi dish that’s perfect for a quick weeknight dinner. You’ll love how the spicy sauce clings to every bite, making it impossible to stop after just one.
Ingredients
- 1 lb large shrimp, peeled and deveined (I like to keep the tails on for presentation)
- 2 medium zucchinis, sliced into half-moons (about 2 cups)
- 2 tbsp extra virgin olive oil (my go-to for its flavor)
- 3 cloves garlic, minced (fresh is best here)
- 1 tbsp soy sauce (low sodium works too)
- 1 tbsp sriracha (adjust if you’re not into too much heat)
- 1 tsp honey (for that perfect balance of sweet and spicy)
- 1/2 tsp red pepper flakes (because we’re going for spicy, right?)
- Salt to taste (I usually start with 1/4 tsp)
Instructions
- Heat olive oil in a large skillet over medium-high heat until shimmering, about 1 minute.
- Add the shrimp to the skillet in a single layer. Cook for 2 minutes per side, until pink and slightly curled. Remove and set aside.
- In the same skillet, add the zucchini. Cook for 3-4 minutes, stirring occasionally, until they start to soften.
- Push the zucchini to one side of the skillet. Add the garlic to the empty space and cook for 30 seconds, until fragrant.
- Mix the garlic with the zucchini, then add the soy sauce, sriracha, honey, and red pepper flakes. Stir to combine everything well.
- Return the shrimp to the skillet. Toss everything together and cook for another 1-2 minutes, until the shrimp is fully coated and heated through.
- Season with salt, give it one final stir, and remove from heat.
Great for serving over a bed of steamed rice or alongside a crisp salad. The shrimp are juicy, the zucchini tender-crisp, and that sauce? Absolutely addictive.
Hibachi Steak with Mushrooms and Onions
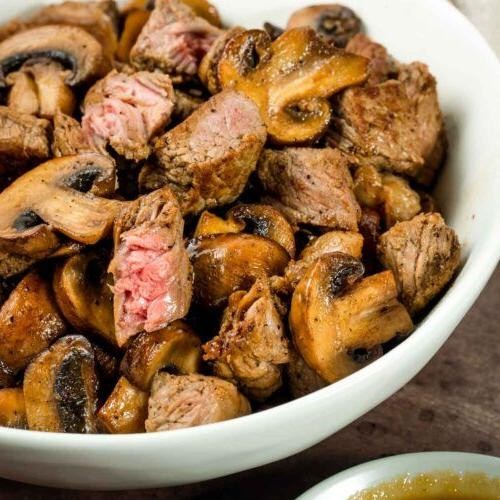
Mmm, there’s nothing quite like the sizzle of steak on a hot grill, especially when it’s paired with earthy mushrooms and sweet onions. This Hibachi Steak with Mushrooms and Onions brings the excitement of Japanese teppanyaki right to your kitchen, and trust me, it’s easier to make than you might think.
Ingredients
- 1 lb sirloin steak, sliced thin (freezing it for 20 minutes makes slicing a breeze)
- 2 cups sliced mushrooms (I love cremini for their meaty texture)
- 1 large onion, sliced into half-moons (sweet onions are my pick for this dish)
- 2 tbsp soy sauce (low sodium works great if you’re watching your salt intake)
- 1 tbsp butter (unsalted, because we’re adding soy sauce)
- 1 tbsp vegetable oil (high smoke point is key for that perfect sear)
- 1 tsp garlic, minced (fresh is best, but hey, we’ve all been in a pinch)
Instructions
- Heat a large skillet or griddle over medium-high heat until it’s smoking hot, about 2 minutes. This is crucial for that authentic hibachi char.
- Add vegetable oil to the skillet, swirling to coat. Immediately add the steak slices in a single layer. Sear for 1 minute per side without moving them for a perfect crust.
- Push the steak to one side of the skillet. Add the butter to the other side, letting it melt. Tip: If your skillet isn’t big enough, cook the steak in batches to avoid steaming.
- Toss in the mushrooms and onions, stirring them into the butter. Cook for 3-4 minutes until they start to soften and caramelize.
- Mix everything together in the skillet. Add the soy sauce and minced garlic, stirring well to coat. Cook for another 2 minutes until the garlic is fragrant.
- Remove from heat immediately to prevent overcooking. The steak should be medium-rare, and the veggies tender-crisp.
Absolutely divine! The steak is juicy with a hint of smokiness, while the mushrooms and onions add a sweet and savory depth. Serve it over steamed rice or with a side of crispy tempura veggies for a full hibachi experience at home.
Grilled Hibachi Vegetables with Soy Sauce
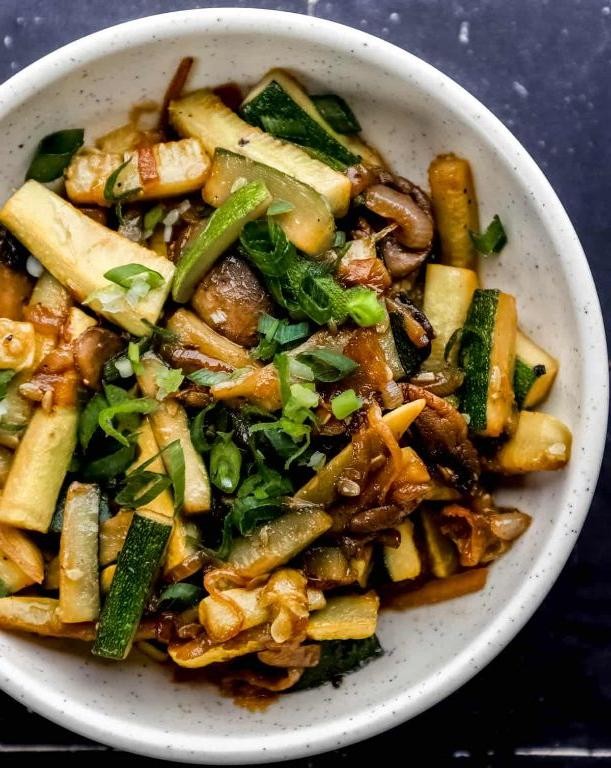
Summer’s here, and there’s nothing like firing up the grill for some vibrant, smoky veggies. You’re going to love how these grilled hibachi vegetables with soy sauce bring a bit of that teppanyaki magic right to your backyard.
Ingredients
- 2 cups zucchini, sliced into 1/2-inch rounds (I like them a bit thick for that perfect grill mark)
- 1 cup red bell pepper, cut into 1-inch pieces (the sweetness after grilling is unreal)
- 1 cup yellow onion, quartered (keeps them from falling through the grates)
- 2 tbsp soy sauce (low-sodium is my pick to control the saltiness)
- 1 tbsp extra virgin olive oil (for that rich, smooth coating)
- 1 tsp garlic powder (because fresh garlic burns too fast on the grill)
- 1/2 tsp black pepper (freshly ground makes all the difference)
Instructions
- Preheat your grill to medium-high, about 400°F, to get those perfect grill marks without charring.
- In a large bowl, toss the zucchini, red bell pepper, and yellow onion with extra virgin olive oil until evenly coated. This helps them grill evenly and not stick.
- Sprinkle the garlic powder and black pepper over the veggies, then toss again. The powder sticks better than fresh garlic for grilling.
- Place the veggies on the grill in a single layer. Grill for 4-5 minutes per side, or until you see those beautiful grill marks and they’re tender-crisp.
- Right before taking them off the grill, drizzle the soy sauce over the veggies for a quick glaze. It’ll sizzle and caramelize slightly, adding amazing flavor.
- Remove from the grill and serve immediately. The smoky, slightly sweet flavor with that salty soy sauce kick is irresistible.
Absolutely serve these veggies over a bed of steamed rice or alongside your favorite grilled protein. The contrast of the smoky veggies with the sweet and salty soy sauce is a game-changer for any summer meal.
Hibachi Salmon with Lemon Butter Sauce
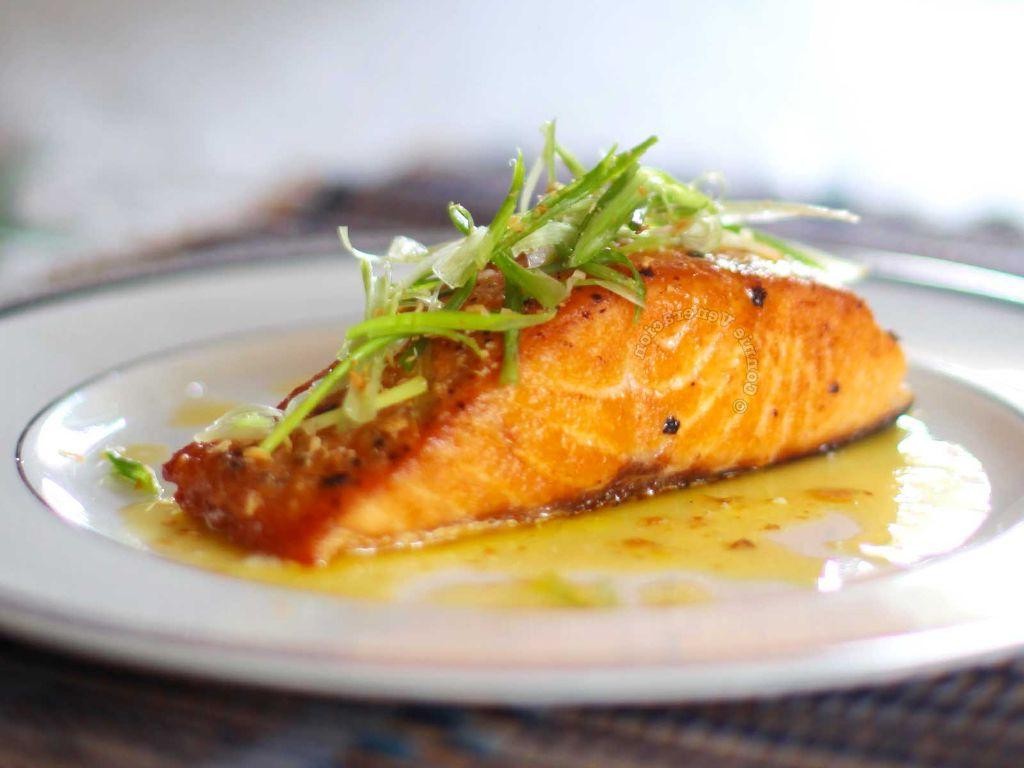
Wow, if you’re looking for a dish that’s both impressive and surprisingly simple to whip up, this Hibachi Salmon with Lemon Butter Sauce is your go-to. It’s got that restaurant-quality flair without the fuss, perfect for a weeknight dinner that feels special.
Ingredients
- 1 lb salmon fillets (skin-on for extra flavor, but skinless works too)
- 2 tbsp unsalted butter (I always go for unsalted to control the seasoning)
- 1 tbsp olive oil (extra virgin is my favorite for its fruity notes)
- 1 lemon, juiced (about 2 tbsp, and zest it first for extra aroma)
- 2 cloves garlic, minced (fresh is best here, no substitutes)
- Salt and pepper (to season, but be generous with the pepper)
- 1 tbsp soy sauce (low-sodium if you’re watching salt intake)
- 1 tsp honey (just a touch to balance the acidity)
- 1 tbsp chopped parsley (for that fresh finish)
Instructions
- Pat the salmon fillets dry with paper towels. This ensures a nice sear.
- Season both sides of the salmon with salt and pepper. Don’t be shy with the pepper.
- Heat olive oil in a large skillet over medium-high heat until shimmering. A hot pan is key to preventing sticking.
- Place salmon in the skillet, skin-side down if using skin-on. Cook for 4 minutes without moving to get that perfect crust.
- Flip the salmon and cook for another 3 minutes. The salmon should be just opaque in the center.
- Remove salmon from the skillet and set aside on a warm plate. Tent with foil to keep warm.
- In the same skillet, melt butter over medium heat. Add garlic and cook until fragrant, about 30 seconds. Tip: Don’t let the garlic brown or it’ll turn bitter.
- Stir in lemon juice, soy sauce, and honey. Simmer for 1 minute to combine flavors.
- Return salmon to the skillet, spooning the sauce over it. Cook for another minute to warm through.
- Sprinkle with chopped parsley and serve immediately. Tip: A little extra lemon zest on top brightens everything up.
Rich in flavor with a buttery, tangy sauce clinging to perfectly seared salmon, this dish is a winner. Serve it over a bed of steamed rice or with a side of crisp asparagus for a complete meal that’s sure to impress.
Hibachi Tofu with Teriyaki Glaze
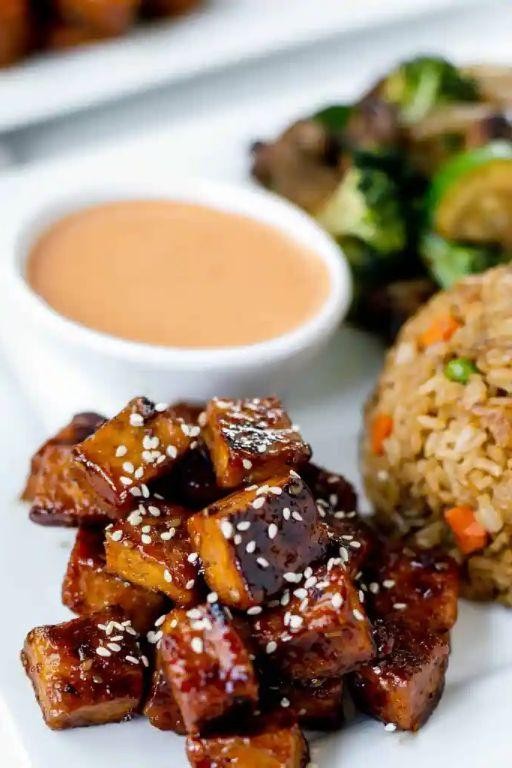
Ever find yourself craving something that’s both comforting and a bit fancy? This Hibachi Tofu with Teriyaki Glaze hits all the right notes—crispy, savory, and just a little sweet.
Ingredients
- 1 block extra firm tofu (pressed for at least 30 minutes—trust me, it makes all the difference)
- 2 tbsp extra virgin olive oil (my go-to for its fruity notes)
- 1/4 cup soy sauce (low sodium works great if you’re watching salt)
- 2 tbsp honey (for that perfect glaze consistency)
- 1 tbsp grated ginger (fresh is best, but powdered will do in a pinch)
- 2 cloves garlic, minced (because more garlic is always better)
- 1/2 tsp sesame oil (just a dash adds so much depth)
- 1 tbsp cornstarch (to get that crispy exterior we all love)
- 1/4 cup water (to thin the glaze as needed)
- Green onions, sliced (for a fresh, colorful finish)
Instructions
- Preheat your skillet over medium-high heat with the olive oil. A well-heated pan is key to getting that perfect sear on the tofu.
- Cut the pressed tofu into 1-inch cubes. Toss them gently with cornstarch until evenly coated. This little step ensures each piece is wonderfully crispy.
- Add the tofu to the skillet in a single layer. Don’t overcrowd the pan—work in batches if needed. Cook for about 4 minutes per side, until golden and crispy.
- While the tofu cooks, whisk together soy sauce, honey, ginger, garlic, sesame oil, and water in a small bowl. This is your teriyaki glaze magic.
- Once the tofu is crispy, pour the glaze over it. Stir gently to coat every piece. Let it simmer for 2 minutes until the glaze thickens slightly.
- Garnish with sliced green onions right before serving. They add a nice crunch and a pop of color.
Just like that, you’ve got a dish that’s crispy on the outside, tender inside, and packed with flavor. Serve it over steamed rice or alongside some stir-fried veggies for a complete meal that’s sure to impress.
Hibachi Pork Chops with Pineapple Salsa
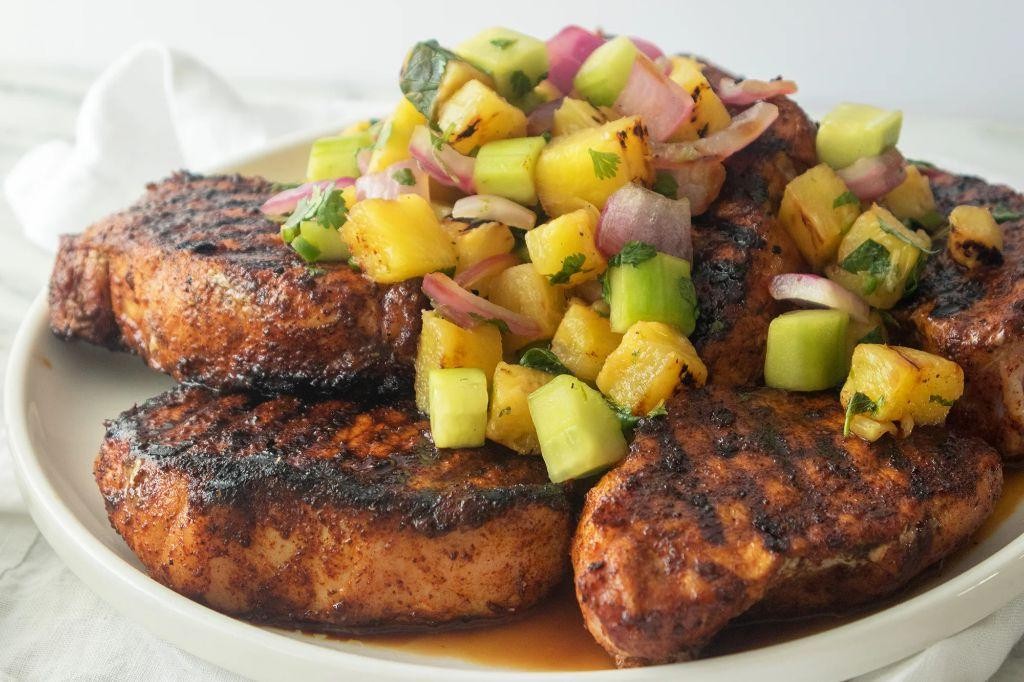
Now, let’s dive into making something that’ll transport your taste buds straight to a tropical paradise. Hibachi pork chops with pineapple salsa is the perfect blend of savory and sweet, and it’s surprisingly simple to whip up.
Ingredients
- 2 pork chops (about 1 inch thick for juiciness)
- 1 cup diced pineapple (fresh is best, but canned works in a pinch)
- 1/4 cup red onion, finely chopped (for a bit of crunch and zing)
- 1 tbsp soy sauce (I always go for low-sodium to control the saltiness)
- 1 tbsp olive oil (extra virgin is my kitchen staple)
- 1 tsp garlic powder (because everything’s better with garlic)
- 1/2 tsp ginger powder (for that warm, spicy kick)
- Salt and pepper (to season, but remember, the soy sauce adds salt too)
Instructions
- Preheat your grill or skillet to medium-high heat (around 375°F) to get those perfect grill marks.
- Season the pork chops evenly with garlic powder, ginger powder, salt, and pepper. Let them sit for 5 minutes to absorb the flavors.
- Drizzle olive oil over the chops right before they hit the grill to prevent sticking and add a nice crust.
- Grill the pork chops for 4-5 minutes on each side, or until the internal temperature reaches 145°F for perfect doneness.
- While the chops cook, mix the diced pineapple and red onion in a bowl for the salsa. Add a splash of soy sauce for depth.
- Let the pork chops rest for 3 minutes after grilling. This keeps them juicy when you cut into them.
- Top each chop with a generous spoonful of pineapple salsa before serving.
This dish is all about the contrast—tender, smoky pork against the bright, tangy salsa. Try serving it over a bed of coconut rice to round out the tropical theme.
Hibachi Scallops with Ginger Sauce
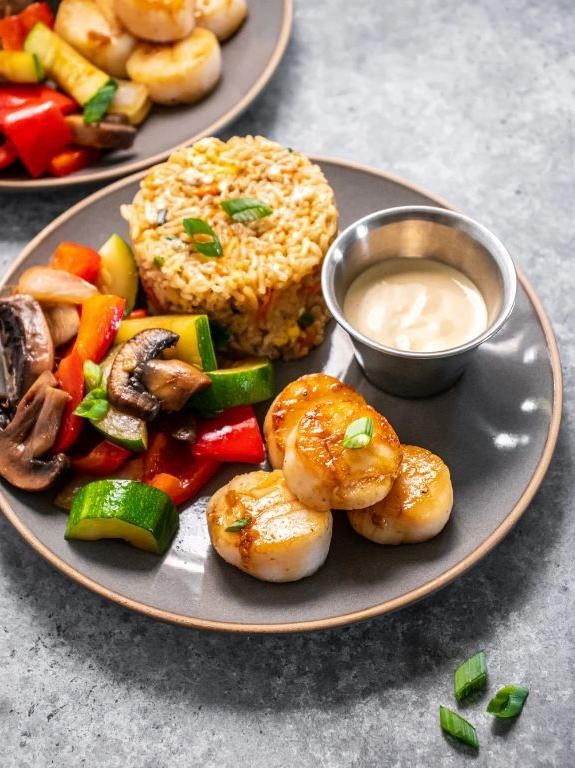
Zesty and full of flavor, this Hibachi Scallops with Ginger Sauce recipe is a game-changer for your weeknight dinners. You’ll love how quick and easy it is to bring a restaurant-quality dish right to your kitchen table.
Ingredients
- 1 lb fresh scallops (look for dry-packed for the best sear)
- 2 tbsp extra virgin olive oil (my go-to for its fruity notes)
- 1 tbsp unsalted butter (because everything’s better with butter)
- 2 cloves garlic, minced (fresh is key here)
- 1 tbsp fresh ginger, grated (trust me, the jarred stuff won’t cut it)
- 2 tbsp soy sauce (I opt for low-sodium to control the saltiness)
- 1 tbsp honey (for that perfect sweet and savory balance)
- 1 tsp sesame oil (a little goes a long way)
- Green onions, sliced (for a pop of color and crunch)
Instructions
- Pat the scallops dry with paper towels to ensure a good sear.
- Heat olive oil in a large skillet over medium-high heat until shimmering.
- Add scallops to the skillet, making sure not to overcrowd them. Cook for 2 minutes per side until golden brown. Tip: Don’t move them around too much to get that perfect crust.
- Remove scallops from the skillet and set aside on a plate.
- In the same skillet, melt butter over medium heat. Add garlic and ginger, sautéing for 30 seconds until fragrant. Tip: Keep the heat medium to avoid burning the garlic.
- Stir in soy sauce, honey, and sesame oil. Bring to a simmer for 1 minute to thicken slightly.
- Return scallops to the skillet, tossing gently to coat in the sauce. Cook for another minute to warm through.
- Garnish with sliced green onions before serving. Tip: Serve immediately to enjoy the scallops at their juiciest.
Flaky, tender scallops paired with that bold ginger sauce make every bite irresistible. Try serving them over a bed of steamed rice or alongside some crisp veggies for a complete meal.
Hibachi Lobster Tail with Garlic Herb Butter
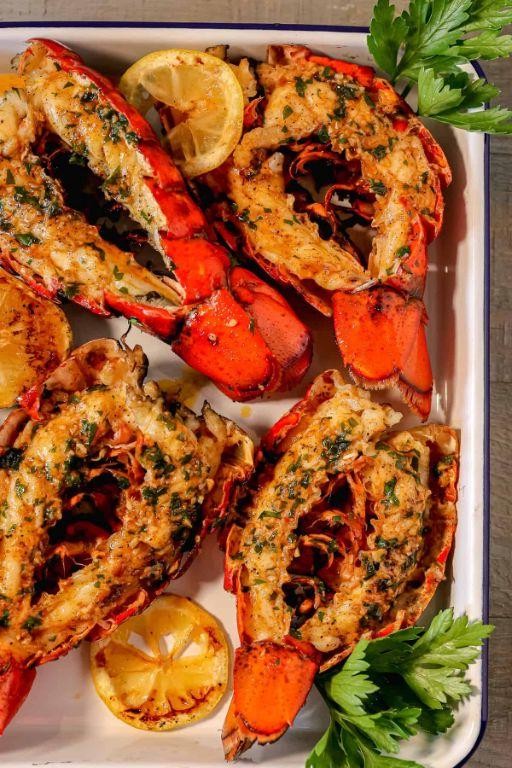
Just when you thought lobster couldn’t get any better, here comes this hibachi-style lobster tail with garlic herb butter to prove you wrong. It’s all about that smoky flavor and buttery goodness, making it a showstopper for any dinner party or a fancy night in.
Ingredients
- 2 lobster tails (about 6 oz each) – go for fresh if you can, it makes all the difference.
- 4 tbsp unsalted butter – I like to use European-style for its richer flavor.
- 2 garlic cloves, minced – fresh is best here, no jarred stuff.
- 1 tbsp fresh parsley, chopped – it adds a nice color and freshness.
- 1 tbsp fresh chives, chopped – for a slight oniony kick.
- 1/2 tsp smoked paprika – this gives it that hibachi smokiness.
- Salt to taste – I prefer sea salt for its clean flavor.
- 1 tbsp olive oil – extra virgin is my go-to for its fruity notes.
Instructions
- Preheat your grill or hibachi to medium-high heat, about 400°F. You want it hot enough to get those nice grill marks.
- While the grill heats up, butterfly the lobster tails by cutting through the top shell and meat, but not the bottom shell. Press open to fan out.
- In a small saucepan, melt the butter over low heat. Add the minced garlic, parsley, chives, and smoked paprika. Stir until fragrant, about 1 minute. Remove from heat.
- Brush the lobster meat with olive oil and season lightly with salt. This helps to keep it moist and adds flavor.
- Place the lobster tails on the grill, meat side down. Cook for 2-3 minutes until you see those beautiful grill marks.
- Flip the tails and spoon the garlic herb butter over the meat. Continue grilling for another 4-5 minutes, basting occasionally with more butter.
- Once the lobster meat is opaque and slightly firm to the touch, remove from the grill. Tip: Don’t overcook, or it’ll get rubbery.
- Serve immediately with any remaining butter sauce drizzled on top. For an extra touch, garnish with a sprinkle of fresh herbs.
Flaky, juicy, and packed with flavor, this hibachi lobster tail is a game-changer. Try serving it over a bed of garlic fried rice or with a side of grilled veggies for a complete meal that’ll impress anyone.
Hibachi Duck Breast with Hoisin Sauce
Got a craving for something savory with a sweet twist? This Hibachi Duck Breast with Hoisin Sauce is your ticket to a deliciously unique dinner that’s sure to impress.
Ingredients
- 2 duck breasts (skin on, because that crispy skin is everything)
- 1/4 cup hoisin sauce (the star of the show, go for a brand you love)
- 2 tbsp soy sauce (I always opt for low-sodium to control the saltiness)
- 1 tbsp honey (for that perfect glaze)
- 1 tsp garlic powder (because garlic makes everything better)
- 1/2 tsp ginger powder (a little goes a long way)
- 1 tbsp vegetable oil (my go-to for high heat cooking)
- Green onions, sliced (for garnish, and they add a nice crunch)
Instructions
- Preheat your hibachi grill or a large skillet over medium-high heat to 375°F. You want it hot enough to sear the duck perfectly.
- Score the duck breast skin in a crosshatch pattern. This helps render the fat and makes the skin extra crispy.
- Season both sides of the duck breasts with garlic powder and ginger powder. Don’t be shy; the spices add depth.
- Add vegetable oil to the grill or skillet. Place the duck breasts skin side down. Cook for 5 minutes without moving them to get that golden crust.
- Flip the duck breasts and cook for another 4 minutes for medium-rare. Adjust time if you prefer more doneness.
- In a small bowl, mix hoisin sauce, soy sauce, and honey. Brush this mixture over the duck during the last 2 minutes of cooking.
- Remove the duck from heat and let it rest for 5 minutes. This keeps it juicy when you slice it.
- Slice the duck against the grain and garnish with green onions.
Perfectly cooked, the duck is juicy inside with a caramelized, sticky-sweet exterior. Serve it over steamed rice or with a side of stir-fried veggies for a complete meal that’s bursting with flavor.
Hibachi Lamb Chops with Mint Jelly
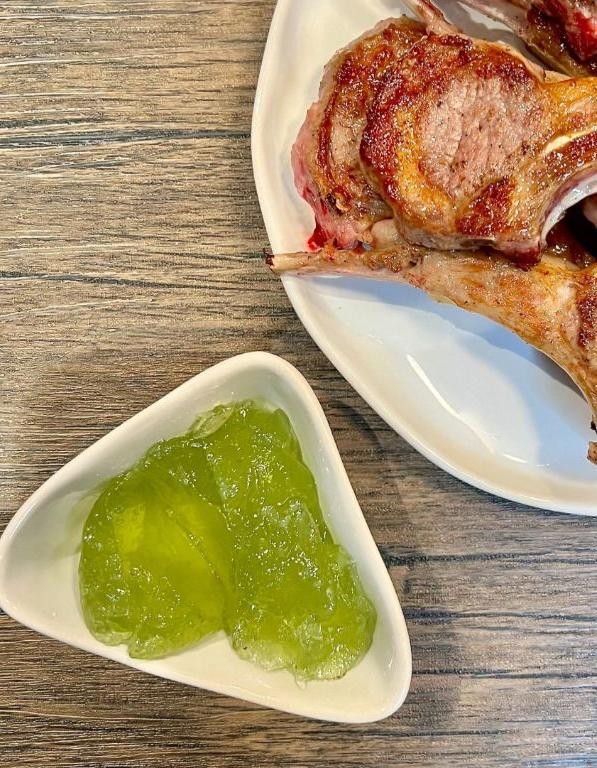
Ever find yourself craving something that’s both fancy and totally doable on a weeknight? These Hibachi Lamb Chops with Mint Jelly are your answer—juicy, flavorful, and with a hint of sweetness that’ll make your taste buds dance.
Ingredients
- 4 lamb chops (about 1 inch thick, because thickness matters for that perfect sear)
- 2 tbsp soy sauce (I go for low-sodium to control the saltiness)
- 1 tbsp olive oil (extra virgin, always, for that fruity note)
- 1 tbsp garlic, minced (fresh is best, but hey, we’ve all used the jarred kind in a pinch)
- 1 tsp ginger, grated (keep a knob in the freezer for easy grating)
- 1/4 cup mint jelly (the star of the show, don’t skimp)
- Salt and pepper (to season, but measure with your heart)
Instructions
- Preheat your grill or grill pan to medium-high heat (about 400°F). A hot grill means a better sear.
- While the grill heats, mix soy sauce, olive oil, garlic, and ginger in a bowl. This marinade is quick but packs a punch.
- Season the lamb chops with salt and pepper, then coat them in the marinade. Let them sit for 5 minutes—no longer, or the salt will start to cure the meat.
- Grill the chops for 4 minutes on the first side. You’re looking for those gorgeous grill marks.
- Flip and grill for another 3-4 minutes for medium-rare. Remember, they’ll keep cooking a bit off the heat.
- Remove the chops from the grill and let them rest for 5 minutes. This keeps all those juicy flavors locked in.
- While the chops rest, warm the mint jelly in the microwave for 20 seconds. It should be pourable but not hot.
- Drizzle the mint jelly over the chops or serve it on the side for dipping. Either way, it’s a game-changer.
Here’s the deal: these chops are tender with a slight char, and the mint jelly adds a sweet contrast that’s unexpectedly perfect. Try serving them over a bed of garlic butter rice for a meal that feels like a special occasion.
Hibachi Turkey Breast with Cranberry Sauce

Craving something a little different for your next dinner? This hibachi turkey breast with cranberry sauce is a game-changer, blending savory and sweet in the most delicious way.
Ingredients
- 1 lb turkey breast, sliced thin (trust me, thinner slices cook faster and soak up more flavor)
- 1 cup fresh cranberries (frozen works in a pinch, but fresh gives the best zing)
- 1/2 cup sugar (adjust if you like your sauce more tart)
- 1/4 cup water (just enough to get those cranberries popping)
- 2 tbsp soy sauce (I always go for low-sodium to control the saltiness)
- 1 tbsp olive oil (extra virgin is my kitchen staple)
- 1 clove garlic, minced (because garlic makes everything better)
- 1/2 tsp ginger, grated (fresh ginger adds a nice kick)
Instructions
- Heat olive oil in a large skillet over medium-high heat until it shimmers, about 2 minutes.
- Add turkey slices in a single layer. Cook for 3 minutes per side until golden brown. Tip: Don’t overcrowd the pan to get a nice sear.
- Remove turkey from skillet and set aside. Keep warm.
- In the same skillet, add cranberries, sugar, and water. Bring to a boil over high heat.
- Reduce heat to medium and simmer for 5 minutes, stirring occasionally, until cranberries burst and sauce thickens. Tip: Press some berries against the side of the pan to thicken the sauce faster.
- Stir in soy sauce, garlic, and ginger. Cook for 1 minute until fragrant.
- Return turkey to the skillet, tossing to coat in the sauce. Heat for 2 minutes to let flavors meld. Tip: A quick toss ensures every slice is perfectly sauced.
Perfectly tender turkey meets a tangy-sweet cranberry sauce that’s downright addictive. Serve it over a bed of fluffy rice or with a side of steamed veggies for a complete meal that’ll have everyone asking for seconds.
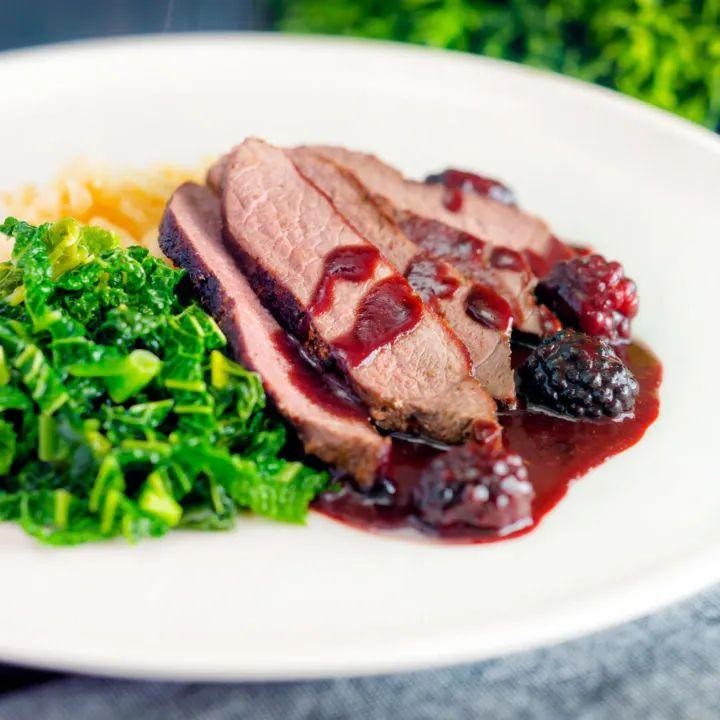
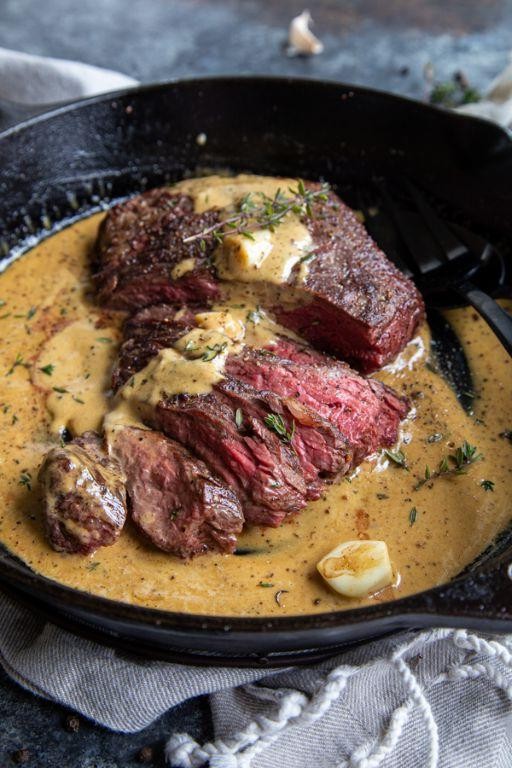
Hibachi Venison Steak with Red Wine Reduction
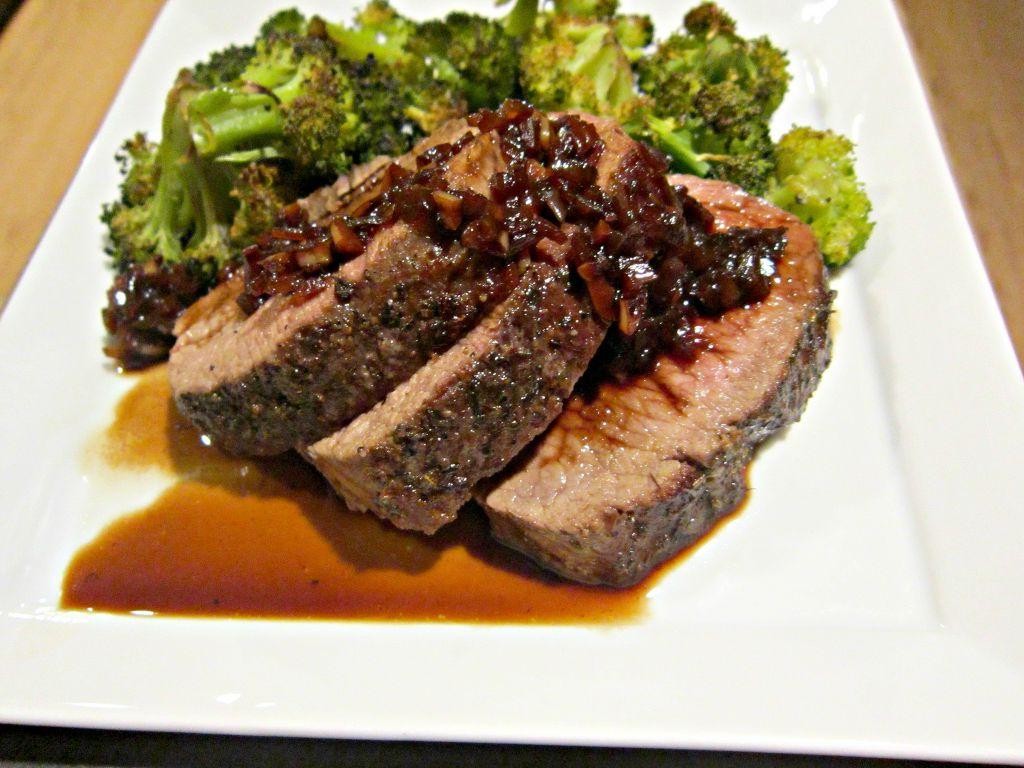
Just when you thought venison couldn’t get any better, here comes a hibachi twist that’ll knock your socks off. Pair it with a rich red wine reduction, and you’ve got a dish that’s both rustic and refined.
Ingredients
- 1 lb venison steak (I like mine about 1 inch thick for the perfect sear)
- 2 tbsp extra virgin olive oil (my go-to for its fruity notes)
- 1 cup red wine (a bold Cabernet works wonders here)
- 2 tbsp unsalted butter (because everything’s better with butter)
- 1 tsp garlic powder (for that quick flavor boost)
- Salt and pepper (to season, but we’ll be specific about amounts)
Instructions
- Heat a large skillet over medium-high heat for 2 minutes until it’s screaming hot.
- Season the venison steak with 1/2 tsp salt, 1/4 tsp pepper, and 1 tsp garlic powder on both sides.
- Add 2 tbsp olive oil to the skillet, then place the steak in. Sear for 3 minutes per side for medium-rare. Tip: Don’t move the steak while it’s searing to get that perfect crust.
- Remove the steak from the skillet and let it rest on a plate. Tent with foil to keep warm.
- In the same skillet, pour in 1 cup red wine. Scrape up any browned bits with a wooden spoon—that’s flavor gold!
- Simmer the wine for 5 minutes until it’s reduced by half. Tip: Keep an eye on it; reductions can go from perfect to burnt in a flash.
- Whisk in 2 tbsp butter until the sauce is glossy and smooth. Tip: Cold butter helps thicken the sauce better.
- Slice the venison against the grain, drizzle with the red wine reduction, and serve immediately.
Every bite of this hibachi venison steak is a juicy, tender delight, with the red wine reduction adding a deep, velvety contrast. Try serving it over a bed of wild rice for an earthy complement to the rich flavors.
Hibachi Quail with Honey Glaze
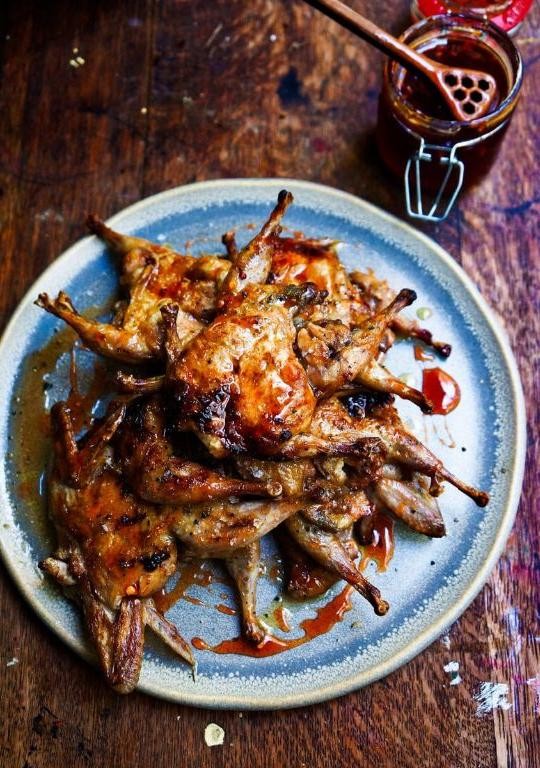
Mmm, you’re in for a treat with this Hibachi Quail with Honey Glaze—it’s a game-changer for your dinner routine. Perfectly crispy on the outside, juicy on the inside, and that glaze? Absolutely irresistible.
Ingredients
- 4 quails, spatchcocked (trust me, it makes all the difference for even cooking)
- 1/4 cup soy sauce (I always go for low-sodium to control the saltiness)
- 2 tbsp honey (local if you can find it, for that extra flavor punch)
- 1 tbsp garlic, minced (fresh is best, but hey, we’ve all been in a pinch)
- 1 tbsp ginger, grated (a microplane zester works wonders here)
- 1 tbsp sesame oil (toasted, for that nutty depth)
- 1/2 tsp black pepper (freshly ground, because pre-ground just doesn’t cut it)
Instructions
- Preheat your hibachi grill to medium-high heat, about 375°F. A little splash of water should sizzle off immediately when it’s ready.
- In a small bowl, whisk together soy sauce, honey, garlic, ginger, sesame oil, and black pepper. Tip: Let it sit for 5 minutes to let the flavors marry.
- Brush the quails generously with the glaze, saving half for later. Tip: Get under the skin for maximum flavor penetration.
- Place the quails on the grill, skin side down first. Grill for 5 minutes, then flip. Tip: Don’t move them around too much to get those perfect grill marks.
- Brush with the remaining glaze and grill for another 5 minutes, or until the internal temperature hits 165°F.
- Let them rest for 3 minutes before serving. This keeps them juicy.
The quail comes out with a sticky-sweet crust, while the meat stays tender and flavorful. Serve it over a bed of steamed rice with some grilled veggies on the side for a meal that’ll have everyone asking for seconds.
Hibachi Rabbit with Mustard Sauce
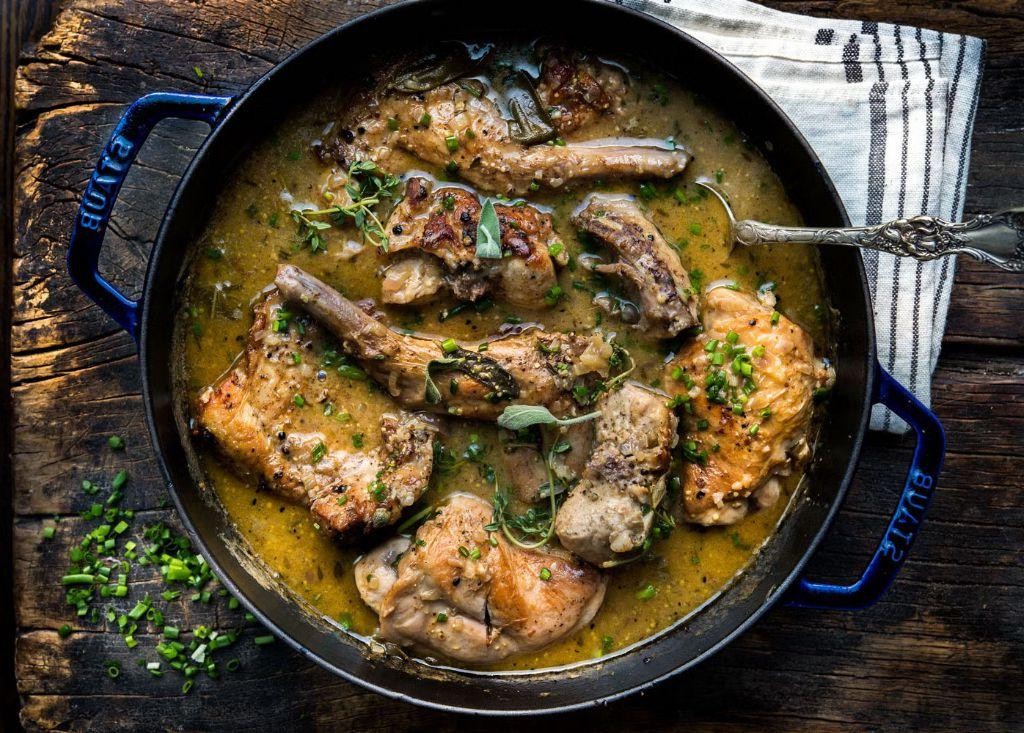
Dig into this unique twist on hibachi with our Hibachi Rabbit with Mustard Sauce. It’s a game-changer for your dinner routine, offering a juicy, flavorful experience that’s surprisingly easy to pull off.
Ingredients
- 1 lb rabbit meat, cut into bite-sized pieces (trust me, the tenderness is worth it)
- 2 tbsp extra virgin olive oil (my kitchen staple for that perfect sear)
- 1/4 cup Dijon mustard (for that tangy kick)
- 2 tbsp honey (to balance the mustard’s sharpness)
- 1 tbsp soy sauce (adds a depth of flavor)
- 1 tsp garlic powder (because everything’s better with garlic)
- 1/2 tsp black pepper (freshly ground, if you can)
- 1/4 cup water (to thin the sauce just right)
Instructions
- Heat the olive oil in a large skillet over medium-high heat until it shimmers, about 2 minutes.
- Add the rabbit pieces to the skillet, searing them for 3-4 minutes on each side until golden brown. Tip: Don’t overcrowd the pan to ensure each piece gets a perfect crust.
- While the rabbit cooks, whisk together the Dijon mustard, honey, soy sauce, garlic powder, and black pepper in a small bowl.
- Pour the mustard sauce over the seared rabbit in the skillet, stirring to coat each piece evenly.
- Add the water to the skillet, reducing the heat to medium-low. Let it simmer for 10 minutes, stirring occasionally. Tip: The sauce should thicken slightly but still coat the back of a spoon.
- Remove from heat and let it rest for 2 minutes before serving. Tip: This rest time lets the flavors meld beautifully.
Look at that glossy, golden sauce clinging to each piece of rabbit. The meat is tender, with a slight chew, and the mustard sauce brings a bright, tangy contrast. Serve it over a bed of steamed rice or with a side of roasted veggies for a complete meal that’s anything but ordinary.
Hibachi Pheasant with Apple Cider Glaze
Believe it or not, this Hibachi Pheasant with Apple Cider Glaze is a game-changer for your dinner routine. It’s got that perfect mix of sweet and savory, and the best part? It’s surprisingly easy to pull off.
Ingredients
- 1 pheasant, cut into pieces (trust me, fresh makes all the difference)
- 1 cup apple cider (the unfiltered kind adds a nice depth)
- 2 tbsp soy sauce (I always go for low-sodium to control the saltiness)
- 1 tbsp honey (local if you can find it, for that extra flavor punch)
- 1 tsp garlic powder (fresh minced garlic works too, but powder is quicker)
- 1 tbsp olive oil (extra virgin is my go-to for its fruity notes)
- Salt and pepper (just a pinch of each to start, you can adjust later)
Instructions
- Heat your hibachi grill to medium-high, about 375°F. A quick tip: if you don’t have a hibachi, a cast-iron skillet works just fine.
- While the grill heats, mix the apple cider, soy sauce, honey, and garlic powder in a small bowl. This is your glaze, so give it a good whisk to combine.
- Season the pheasant pieces lightly with salt and pepper. Remember, you can always add more later.
- Brush the grill with olive oil to prevent sticking. Those pheasant pieces are precious, don’t let them stick!
- Place the pheasant on the grill. Cook for about 5 minutes on each side, or until you see those beautiful grill marks.
- Start brushing the glaze onto the pheasant after the first flip. Do this every couple of minutes to build up that sticky, sweet layer.
- Once the pheasant reaches an internal temperature of 165°F, it’s done. Let it rest for a few minutes before serving to keep it juicy.
Get ready to dive into a dish where the pheasant is tender, the glaze is sticky-sweet with a hint of tang, and every bite is a little celebration. Try serving it over a bed of wild rice to soak up all that delicious glaze.
Hibachi Wild Boar with Berry Sauce
Oh, you’re in for a treat with this one! Hibachi wild boar with berry sauce is a game-changer, combining rich, savory flavors with a sweet, tangy twist. Perfect for impressing guests or treating yourself to something special.
Ingredients
- 1 lb wild boar tenderloin, sliced into 1-inch strips (trust me, the gamey flavor is worth it)
- 1 cup mixed berries (strawberries, blueberries, and raspberries work wonders together)
- 2 tbsp soy sauce (I always go for low-sodium to control the saltiness)
- 1 tbsp honey (local if you can find it, for that extra touch)
- 1 tbsp olive oil (extra virgin is my kitchen staple)
- 1 tsp minced garlic (freshly minced makes all the difference)
- 1/2 tsp ginger powder (for that subtle kick)
- Salt and pepper to taste (but be generous with the pepper)
Instructions
- Heat olive oil in a large skillet over medium-high heat until shimmering, about 2 minutes.
- Add wild boar strips to the skillet, searing each side for 3 minutes until a golden crust forms. Tip: Don’t overcrowd the pan to ensure even cooking.
- Remove the boar from the skillet and set aside. In the same skillet, add minced garlic and ginger powder, sautéing for 30 seconds until fragrant.
- Pour in the mixed berries, soy sauce, and honey, stirring to combine. Let the mixture simmer for 5 minutes, mashing the berries slightly to release their juices. Tip: A wooden spoon works best for mashing without scratching your pan.
- Return the wild boar strips to the skillet, coating them evenly with the berry sauce. Cook for an additional 2 minutes to let the flavors meld. Tip: If the sauce thickens too much, a splash of water can loosen it up.
- Season with salt and pepper, then remove from heat.
Ready to dive in? The wild boar is tender and juicy, with the berry sauce adding a perfect balance of sweetness and acidity. Serve it over a bed of fluffy rice or with a side of roasted veggies for a complete meal that’s anything but ordinary.
Hibachi Bison Steak with Whiskey Sauce
Unbelievably tender and packed with flavor, this Hibachi Bison Steak with Whiskey Sauce is a game-changer for your dinner routine. You’ll love how the whiskey sauce adds a smoky depth that pairs perfectly with the rich bison.
Ingredients
- 1 lb bison steak (I find that about 1 inch thick works best for even cooking)
- 2 tbsp soy sauce (low sodium is my preference to control the saltiness)
- 1 tbsp olive oil (extra virgin for that fruity note)
- 2 cloves garlic, minced (fresh is key here for the best aroma)
- 1/4 cup whiskey (a good quality bourbon whiskey makes all the difference)
- 1 tbsp brown sugar (for that perfect caramelized glaze)
- 1 tsp ginger, grated (adds a nice zing)
- 1/2 tsp black pepper (freshly ground for maximum flavor)
Instructions
- Preheat your grill or hibachi to high heat, about 450°F, to get those perfect grill marks.
- While the grill heats, mix soy sauce, olive oil, garlic, whiskey, brown sugar, ginger, and black pepper in a bowl to make the marinade.
- Place the bison steak in the marinade, ensuring it’s fully coated. Let it sit for 10 minutes at room temperature for the flavors to meld.
- Grill the steak for 4-5 minutes on each side for medium-rare, or until it reaches your desired doneness. Tip: Resist the urge to move the steak around too much to get those perfect grill marks.
- Remove the steak from the grill and let it rest for 5 minutes. This allows the juices to redistribute, making the steak even more tender.
- While the steak rests, pour the remaining marinade into a small saucepan. Bring to a boil over medium heat, then simmer for 3 minutes to create a thick, glossy sauce. Tip: Always boil marinades that have been in contact with raw meat to kill any bacteria.
- Slice the steak against the grain for maximum tenderness and drizzle with the whiskey sauce before serving.
Rich in flavor with a slightly charred exterior and a juicy interior, this steak is a showstopper. Serve it over a bed of steamed rice or with a side of grilled vegetables for a complete meal that’ll impress anyone.
Hibachi Elk with Cherry Sauce
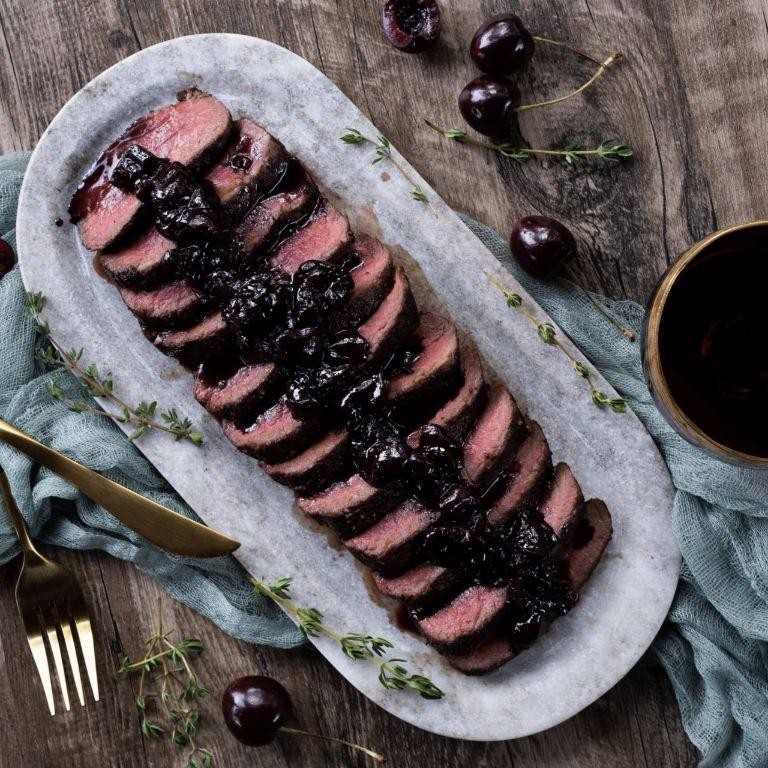
Got a hankering for something wild and sweet? This hibachi elk with cherry sauce is a game-changer, literally. It’s a perfect blend of savory and sweet that’ll have you coming back for seconds.
Ingredients
- 1 lb elk steak, sliced thin (trust me, the thinner the better for that perfect sear)
- 1 cup fresh cherries, pitted and halved (frozen works in a pinch, but fresh is king)
- 2 tbsp soy sauce (I always go for low-sodium to control the saltiness)
- 1 tbsp honey (local if you can, it adds a nice floral touch)
- 1 tsp ginger, grated (fresh ginger makes all the difference here)
- 2 cloves garlic, minced (because everything’s better with garlic)
- 1 tbsp olive oil (extra virgin is my go-to for its fruity notes)
- Salt and pepper to taste (but really, just a pinch of each)
Instructions
- Heat your skillet or hibachi grill to medium-high heat. You want it hot enough to sear the elk but not so hot it burns.
- Add olive oil to the skillet, swirling to coat. Wait until it shimmers before adding the elk.
- Season the elk slices with salt and pepper, then lay them in the skillet. Sear for 2 minutes per side for medium-rare. Tip: Don’t overcrowd the pan; cook in batches if needed.
- Remove the elk from the skillet and set aside. Keep warm.
- In the same skillet, add the cherries, soy sauce, honey, ginger, and garlic. Cook over medium heat, stirring occasionally, until the cherries soften and the sauce thickens, about 5 minutes. Tip: If the sauce thickens too much, a splash of water can loosen it up.
- Return the elk to the skillet, tossing to coat in the cherry sauce. Cook for an additional minute to warm through.
- Serve immediately. Tip: Garnish with fresh thyme or a sprinkle of sesame seeds for an extra pop of flavor and texture.
This dish is a beautiful marriage of tender, juicy elk and a sticky, sweet cherry sauce that’s got just the right amount of tang. Try serving it over a bed of wild rice or with a side of roasted veggies for a complete meal that’s as nutritious as it is delicious.
Hibachi Kangaroo with Pepper Sauce
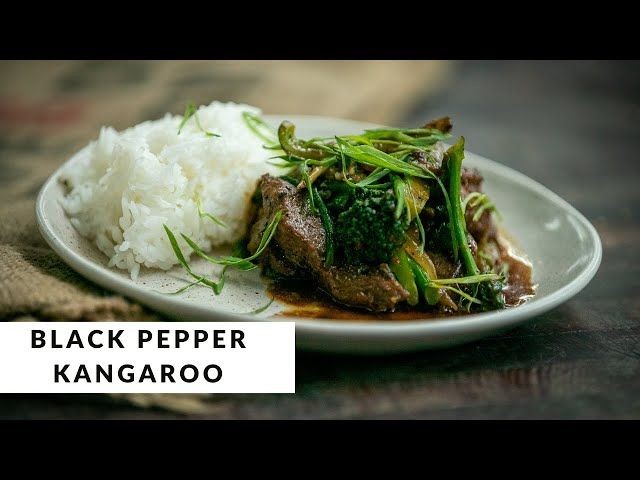
Kangaroo meat might sound exotic, but trust me, this Hibachi Kangaroo with Pepper Sauce is a game-changer for your dinner routine. It’s juicy, flavorful, and surprisingly easy to whip up.
Ingredients
- 1 lb kangaroo meat, sliced thin (I find the lean cuts work best for quick cooking)
- 2 tbsp extra virgin olive oil (my go-to for its fruity notes)
- 1 large bell pepper, sliced (go for red for a sweeter touch)
- 2 cloves garlic, minced (fresh is always better)
- 1/4 cup soy sauce (low sodium lets you control the saltiness)
- 1 tbsp honey (for that perfect glaze)
- 1 tsp crushed red pepper flakes (adjust if you’re not into heat)
- 1/2 tsp ground black pepper (freshly ground packs more punch)
Instructions
- Heat olive oil in a large skillet over medium-high heat until shimmering, about 2 minutes.
- Add kangaroo slices in a single layer. Sear for 2 minutes per side until browned. Tip: Don’t overcrowd the pan to ensure even cooking.
- Remove meat and set aside. In the same pan, add bell peppers and garlic. Sauté for 3 minutes until soft.
- Whisk together soy sauce, honey, red pepper flakes, and black pepper in a small bowl. Tip: This sauce is versatile—feel free to tweak the sweetness or heat.
- Return kangaroo to the pan, pour sauce over, and toss to coat. Cook for another 2 minutes until everything is glazed and hot. Tip: Letting it sit for a minute off the heat thickens the sauce.
Final thoughts: The kangaroo stays tender, and the pepper sauce adds a sweet-spicy kick that’s addictive. Serve it over steamed rice or with a side of grilled veggies for a complete meal.
Conclusion
We hope this roundup of 20 Spicy Hibachi Grill Recipes for Beginners inspires your next cookout with easy-to-follow, flavorful dishes. Whether you’re a hibachi newbie or looking to spice up your grilling game, there’s something here for everyone. Don’t forget to try these recipes, share your favorites in the comments, and pin this article to your Pinterest for your next fiery feast. Happy grilling!


