Hey there, grill masters and healthy eaters! Summer’s here, and it’s the perfect time to fire up the grill for some mouthwatering, nutritious meals that won’t weigh you down. From smoky veggies to lean proteins, we’ve rounded up 23 delicious recipes that promise flavor without the guilt. Ready to make your summer cookouts both tasty and wholesome? Let’s dive into these must-try grill favorites!
Grilled Lemon Herb Mediterranean Chicken
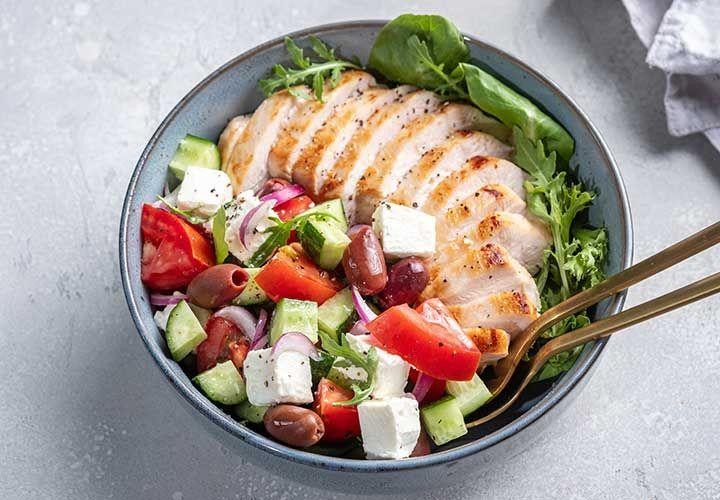
Ready to take your taste buds on a sunny vacation without leaving your backyard? This Grilled Lemon Herb Mediterranean Chicken is like a one-way ticket to flavor town, with a layover in zest city and a final destination of juicy, herbaceous perfection.
Ingredients
- 4 boneless, skinless chicken breasts (because nobody got time for bones)
- A generous glug of olive oil (about 1/4 cup)
- The juice of 2 lemons (freshly squeezed, unless you’re into that bottled sadness)
- A couple of garlic cloves, minced (more if you’re not planning any kisses)
- A handful of fresh oregano, chopped (or a tablespoon of the dried stuff in a pinch)
- A sprinkle of salt and pepper (to make everything right in the world)
Instructions
- In a bowl, whisk together the olive oil, lemon juice, minced garlic, oregano, salt, and pepper. This is your chicken’s spa treatment, so make it count.
- Add the chicken breasts to the marinade, ensuring they’re fully submerged. Let them soak up the goodness for at least 30 minutes in the fridge, though overnight is the VIP treatment.
- Preheat your grill to a medium-high heat (about 375°F to 400°F). You want it hot enough to sear but not so hot that your chicken turns into a charcoal briquette.
- Grill the chicken for about 6-7 minutes per side, or until the internal temperature hits 165°F. No guessing games here—use a meat thermometer for the win.
- Let the chicken rest for 5 minutes before slicing. This is the hardest part, but patience rewards you with juiciness.
Every bite of this chicken is a burst of bright lemon and earthy herbs, with a perfectly charred exterior that’s music to your mouth. Serve it over a bed of fluffy couscous or chop it up for a salad that’s anything but sad.
Healthy Grilled Salmon with Avocado Salsa
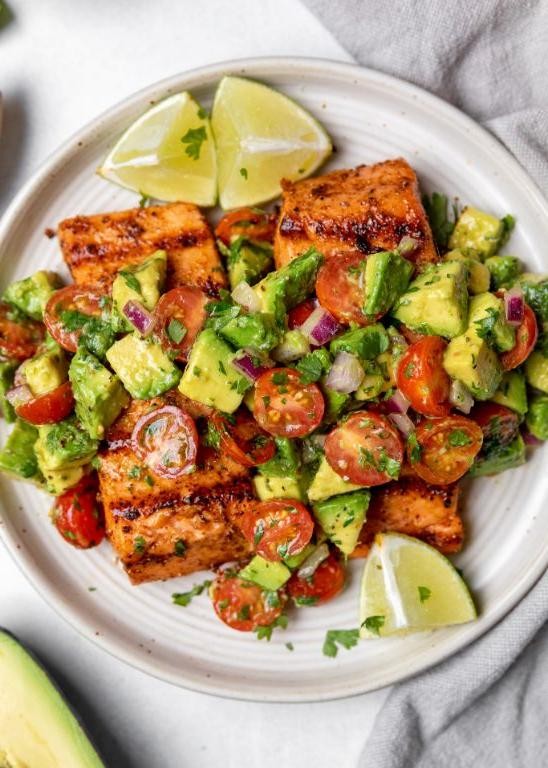
Kick your dinner game up a notch with this Healthy Grilled Salmon with Avocado Salsa that’s so good, it’ll make your taste buds do a happy dance. Perfect for those nights when you want to impress without the stress, this dish is a breeze to whip up and packed with flavors that sing.
Ingredients
- 2 salmon fillets (about 6 oz each)
- A generous pinch of salt and pepper
- A drizzle of olive oil (about 1 tbsp)
- 1 ripe avocado, diced
- A handful of cherry tomatoes, quartered
- A small red onion, finely chopped
- A splash of lime juice (about 1 tbsp)
- A couple of cilantro leaves, chopped
Instructions
- Preheat your grill to medium-high heat (about 375°F to 400°F). Tip: Make sure the grill grates are clean and lightly oiled to prevent sticking.
- Season the salmon fillets with salt and pepper on both sides, then drizzle with olive oil. Tip: Let the salmon sit at room temperature for about 10 minutes before grilling for even cooking.
- Place the salmon on the grill, skin-side down, and cook for about 4-5 minutes. Don’t peek! Let it get those gorgeous grill marks.
- Carefully flip the salmon and cook for another 3-4 minutes, or until it flakes easily with a fork. Tip: The internal temperature should reach 145°F for perfect doneness.
- While the salmon is grilling, mix the diced avocado, cherry tomatoes, red onion, lime juice, and cilantro in a bowl to make the salsa. Season with a pinch of salt.
- Serve the grilled salmon topped with the avocado salsa. How about that? You’ve just made a dish that’s as vibrant in color as it is in flavor. The creamy avocado salsa pairs beautifully with the smoky, tender salmon, making every bite a little celebration. Try serving it over a bed of quinoa or with a side of grilled veggies for a meal that’s as nutritious as it is delicious.
Grilled Veggie Skewers with Balsamic Glaze
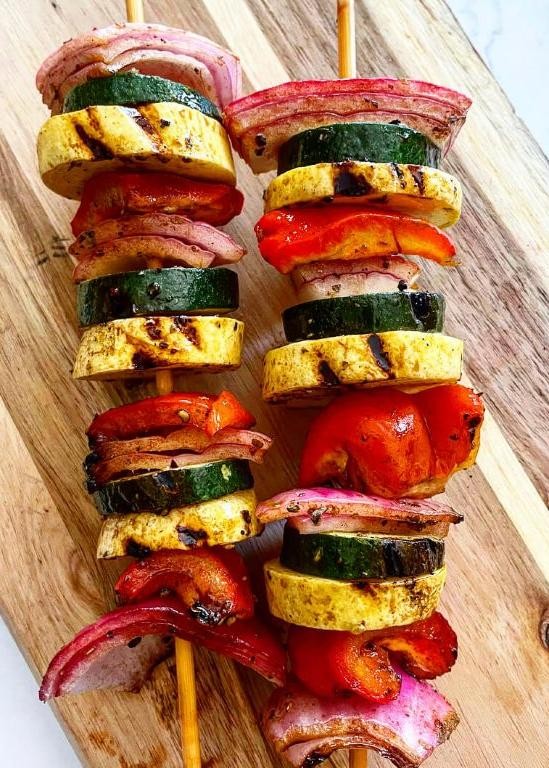
Yum, it’s time to fire up the grill and get those veggies dancing on skewers! These Grilled Veggie Skewers with Balsamic Glaze are not just a feast for the eyes but a party in your mouth, combining smoky flavors with a sweet and tangy kick that’ll have everyone asking for seconds.
Ingredients
- A couple of bell peppers (red and yellow), cut into 1-inch pieces
- 2 medium zucchinis, sliced into 1/2-inch rounds
- A handful of cherry tomatoes
- 1 red onion, cut into 1-inch chunks
- A splash of olive oil
- 2 tablespoons of balsamic vinegar
- 1 tablespoon of honey
- A pinch of salt and pepper
- Wooden or metal skewers (if using wooden, soak them in water for 30 minutes first)
Instructions
- Preheat your grill to medium-high heat, about 400°F, because we’re aiming for those perfect grill marks, not charcoal.
- Thread your prepped veggies onto the skewers, alternating colors and types for that Instagram-worthy look. Pro tip: Leave a little space between pieces for even cooking.
- In a small bowl, whisk together the olive oil, balsamic vinegar, honey, salt, and pepper. This glaze is the secret handshake to flavor town.
- Brush the skewers generously with the balsamic glaze. Don’t be shy; the more, the merrier.
- Place the skewers on the grill. Cook for about 10-12 minutes, turning occasionally, until the veggies are tender and have those sexy grill marks. Another pro tip: Keep an eye on the tomatoes; they’re the first to call it quits.
- During the last 2 minutes of grilling, brush the skewers with another layer of glaze for an extra flavor punch. This is the step where magic happens.
- Remove from the grill and let them rest for a couple of minutes. They’ve been through a lot.
Crunchy, smoky, and with a glaze that’s the perfect balance of sweet and tangy, these skewers are a hit on their own or piled high on a bed of quinoa for a heartier meal. Serve them up at your next BBQ and watch them disappear faster than your patience on hold with customer service.
Quinoa Stuffed Grilled Portobello Mushrooms
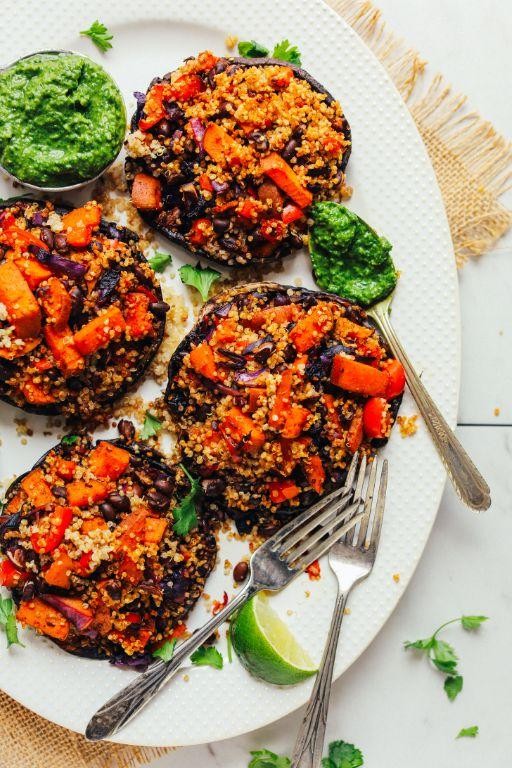
Kickstart your culinary adventure with these Quinoa Stuffed Grilled Portobello Mushrooms, a dish that’s as fun to make as it is to devour. Perfect for those who love a good grill mark and a hearty, healthy bite.
Ingredients
- 4 large Portobello mushrooms, stems removed (save ’em for stock!)
- A cup of cooked quinoa (because we’re fancy like that)
- A couple of tablespoons of olive oil (for that golden kiss)
- A splash of balsamic vinegar (for a tangy twist)
- A handful of fresh spinach, roughly chopped (for a pop of green)
- Half a cup of crumbled feta cheese (because cheese makes everything better)
- Salt and pepper to taste (but let’s not go overboard)
Instructions
- Preheat your grill to a medium-high heat, about 375°F, because we’re not trying to turn these beauties into charcoal.
- Brush both sides of the Portobello mushrooms with olive oil and season with salt and pepper. This is their spa treatment before the grill.
- Grill the mushrooms for about 5 minutes on each side. You’re looking for those sexy grill marks and a tender texture.
- While the mushrooms are grilling, mix the cooked quinoa, chopped spinach, feta cheese, and a splash of balsamic vinegar in a bowl. This is your stuffing, so make it proud.
- Once the mushrooms are grilled, stuff them generously with the quinoa mixture. Pack it in there; no one likes a skimpy stuffing.
- Return the stuffed mushrooms to the grill for another 5 minutes, just to warm the stuffing through and melt the feta a bit. Patience is key here.
- Serve these bad boys hot off the grill. They’re perfect as a main dish or a side that steals the show.
Heavenly is the first word that comes to mind with these stuffed mushrooms. The quinoa adds a nutty crunch, while the feta brings a creamy saltiness that’s downright addictive. Try serving them on a bed of arugula for an extra peppery punch.
Grilled Shrimp and Pineapple Kabobs
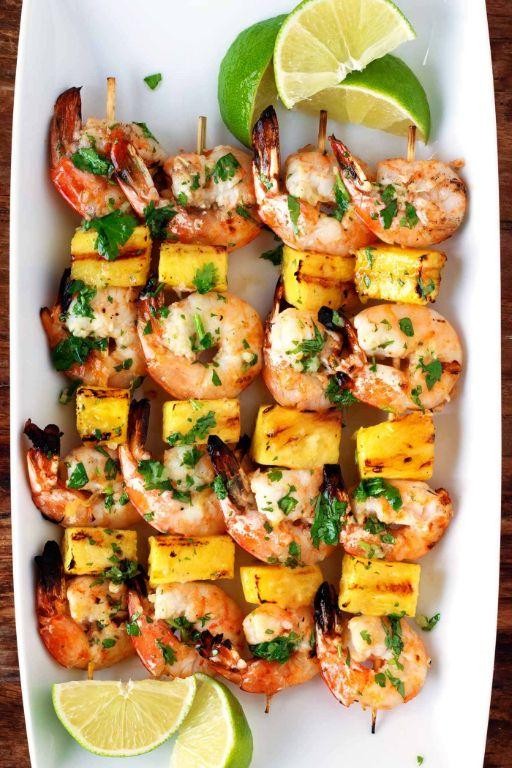
Zesty and zippy, these Grilled Shrimp and Pineapple Kabobs are your ticket to a tropical flavor getaway without leaving your backyard. Perfect for when you’re craving something sweet, smoky, and a little bit sassy.
Ingredients
- 1 pound of large shrimp, peeled and deveined (because nobody likes a sandy bite)
- 2 cups of fresh pineapple chunks (about the size of a shrimp’s ego)
- 3 tablespoons of olive oil (a good glug)
- 2 tablespoons of honey (nature’s sticky gold)
- 1 tablespoon of soy sauce (for that umami oomph)
- 1 teaspoon of garlic powder (because fresh is great, but we’re keeping it simple)
- A pinch of red pepper flakes (for a cheeky little kick)
- Wooden or metal skewers (if using wooden, give ’em a 30-minute bath in water first to avoid a kabob catastrophe)
Instructions
- Fire up your grill to medium-high heat, aiming for about 375°F. No grill? A grill pan on the stove will do in a pinch.
- In a bowl, whisk together the olive oil, honey, soy sauce, garlic powder, and red pepper flakes. This is your flavor bomb—taste it and do a little happy dance.
- Thread the shrimp and pineapple onto the skewers, alternating between the two like you’re making the most delicious edible necklace.
- Brush the kabobs generously with the marinade. Don’t be shy; they can take it.
- Grill for 2-3 minutes per side. Shrimp cook faster than a TikTok trend, so keep an eye on them.
- Once they’re pink and slightly charred, pull them off the grill. Let them rest for a minute—patience is a virtue, especially when it comes to juicy shrimp.
Heavenly is the first word that comes to mind when you bite into these kabobs. The shrimp are succulent, the pineapple caramelizes into sweet perfection, and together they’re a match made in grill heaven. Serve them over a bed of coconut rice for a full-on island vibe, or just eat them straight off the skewer—no judgment here.
Healthy Grilled Turkey Burgers with Sweet Potato Fries
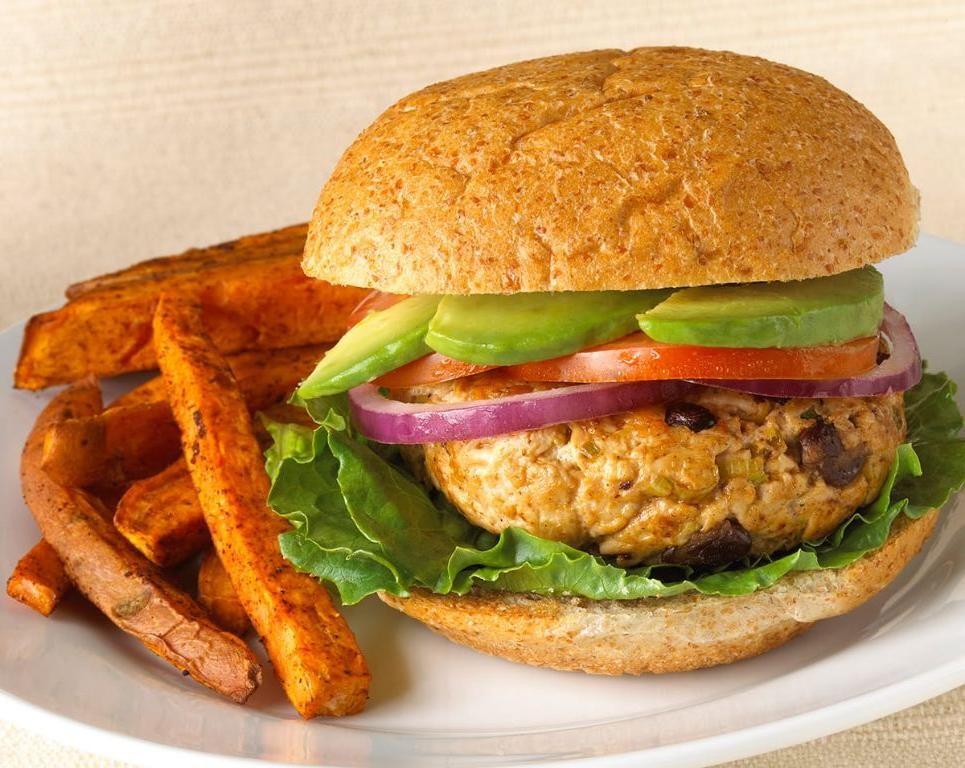
Gather ’round, burger enthusiasts and health-conscious foodies alike, because we’re about to dive into a dish that’s as nutritious as it is delicious. Who said healthy eating had to be boring? Not us, especially when we’re talking about these juicy grilled turkey burgers paired with the ultimate comfort side: sweet potato fries.
Ingredients
- 1 pound of ground turkey (the leaner, the meaner)
- 1 egg (the glue that holds our burger dreams together)
- 1/2 cup of breadcrumbs (for that perfect crunch)
- A splash of Worcestershire sauce (because flavor is key)
- A couple of garlic cloves, minced (no vampire worries here)
- 1 teaspoon of smoked paprika (for a little smoky drama)
- Salt and pepper (the dynamic duo of seasoning)
- 2 large sweet potatoes, cut into fries (the sweeter, the better)
- 2 tablespoons of olive oil (to keep things slick)
- A pinch of cayenne pepper (for those who like it hot)
Instructions
- Preheat your grill to a medium-high heat of 375°F because we’re not playing around with lukewarm burgers.
- In a large bowl, mix the ground turkey, egg, breadcrumbs, Worcestershire sauce, minced garlic, smoked paprika, salt, and pepper like you’re the conductor of a flavor orchestra.
- Shape the mixture into 4 patties. Pro tip: make a slight indentation in the center of each patty to prevent them from puffing up like a proud turkey.
- Grill the patties for about 6 minutes on each side or until they’re no longer pink inside. No guessing games here—use a meat thermometer to ensure they’ve reached 165°F.
- While the burgers are grilling, toss the sweet potato fries with olive oil, cayenne pepper, salt, and pepper. Spread them out on a baking sheet in a single layer—no fry left behind!
- Bake the fries at 425°F for 20 minutes, flip them halfway through for even crispiness. Because nobody likes a soggy fry.
- Serve the burgers on your favorite buns with all the fixings, and don’t forget those crispy, spicy sweet potato fries on the side.
Ready to take a bite? These turkey burgers are juicy, packed with flavor, and the sweet potato fries? They’re the crispy, slightly spicy sidekick you didn’t know you needed. Try serving them with a dollop of avocado mayo for an extra creamy twist.
Grilled Asparagus with Parmesan
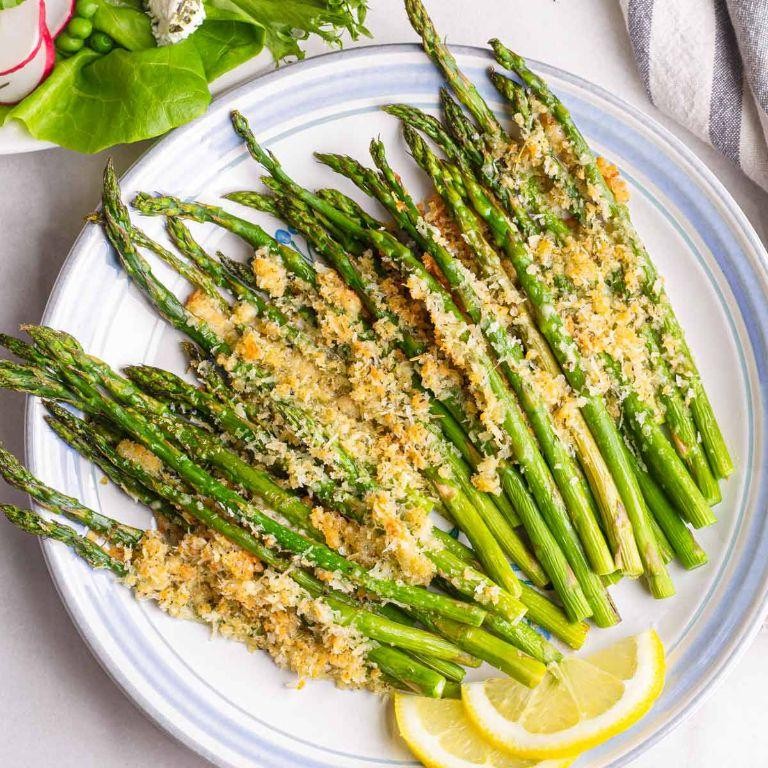
Who knew that making grilled asparagus with Parmesan could be as easy as convincing a cat to take a bath? This dish is the perfect blend of simplicity and sophistication, turning your average veggie into a crispy, cheesy masterpiece that’ll have everyone at the table fighting for the last spear.
Ingredients
- A bunch of asparagus (about 1 lb), because we’re not playing the ‘how much is enough’ game
- A generous drizzle of olive oil, or as I like to call it, liquid gold
- A couple of cloves of garlic, minced, because flavor is non-negotiable
- A pinch of salt and a crack of black pepper, to make everything right in the world
- A handful of grated Parmesan cheese, for that cheesy goodness we all crave
- A squeeze of lemon juice, because a little zing never hurt anybody
Instructions
- Preheat your grill to medium-high heat (about 400°F), because we’re not cooking with wishes and dreams here.
- Toss the asparagus with olive oil, minced garlic, salt, and pepper. Make sure each spear is slicker than a politician during election season.
- Place the asparagus on the grill perpendicular to the grates to avoid any tragic falling-through-the-cracks incidents. Grill for 3-4 minutes per side, or until they’ve got those sexy grill marks and are tender-crisp.
- Sprinkle the grilled asparagus with Parmesan cheese while they’re still hot, letting it melt into a gooey blanket of deliciousness.
- Finish with a squeeze of lemon juice for a bright pop of flavor that’ll make your taste buds do a happy dance.
Just like that, you’ve got a dish that’s crispy, tender, and packed with flavor. Serve it alongside your favorite protein or chop it up and toss it into a salad for a veggie-packed punch. Either way, it’s a win.
Spicy Grilled Cauliflower Steaks
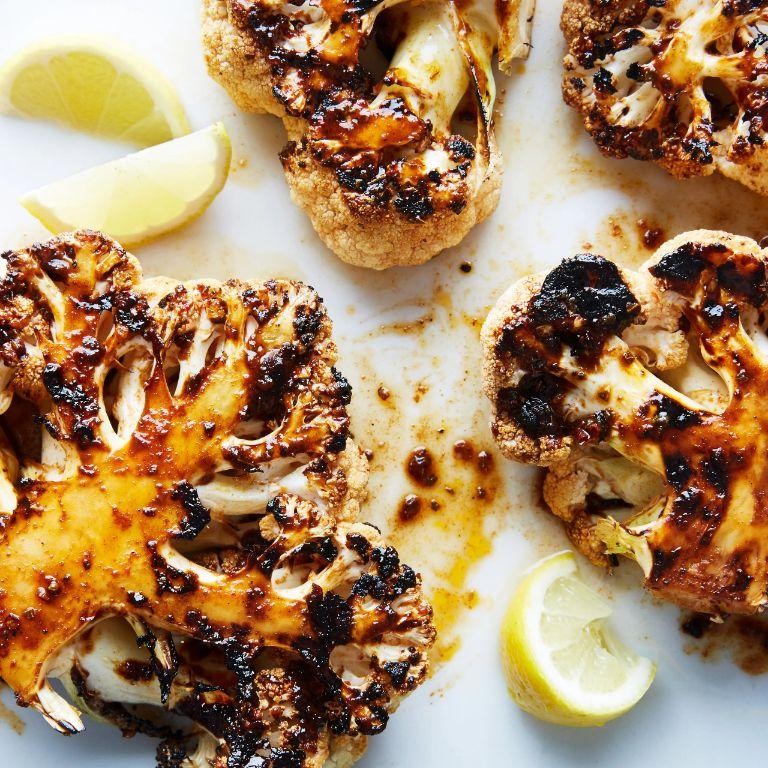
Today’s the day we turn the humble cauliflower into the star of the grill with these Spicy Grilled Cauliflower Steaks. Trust me, even the meat-lovers at your BBQ will be begging for seconds after one bite of these flavor-packed veggie delights.
Ingredients
- 1 large head of cauliflower (because size matters when you’re making steaks)
- A generous glug of olive oil (about 1/4 cup)
- A couple of tbsp of your favorite hot sauce (we’re not judging, but the spicier, the better)
- A splash of lime juice (about 1 tbsp, for that zesty kick)
- A pinch of salt and pepper (to make all those flavors pop)
- 1 tsp of smoked paprika (for that irresistible smoky whisper)
Instructions
- Preheat your grill to a medium-high heat (around 400°F, because we’re searing, not scorching).
- Slice the cauliflower into 1-inch thick steaks. Pro tip: Keep the core intact to hold the steaks together.
- Whisk together the olive oil, hot sauce, lime juice, salt, pepper, and smoked paprika in a bowl. This is your flavor bomb—don’t be shy.
- Brush both sides of each cauliflower steak with the spicy mixture. Yes, both sides. We’re not playing favorites here.
- Place the steaks on the grill and cook for about 5-7 minutes per side. You’re looking for those gorgeous grill marks and a tender-but-not-mushy texture.
- Flip once, and only once. These steaks need patience, not poking. Another pro tip: Use a wide spatula to keep them from falling apart.
- Remove from the grill when they’re charred to perfection and let them rest for a couple of minutes. This isn’t a race to the plate.
Zesty, smoky, and with just the right amount of heat, these cauliflower steaks are a game-changer. Serve them up with a cool yogurt dip or pile them high on a bun for the ultimate veggie burger experience.
Grilled Peach and Arugula Salad
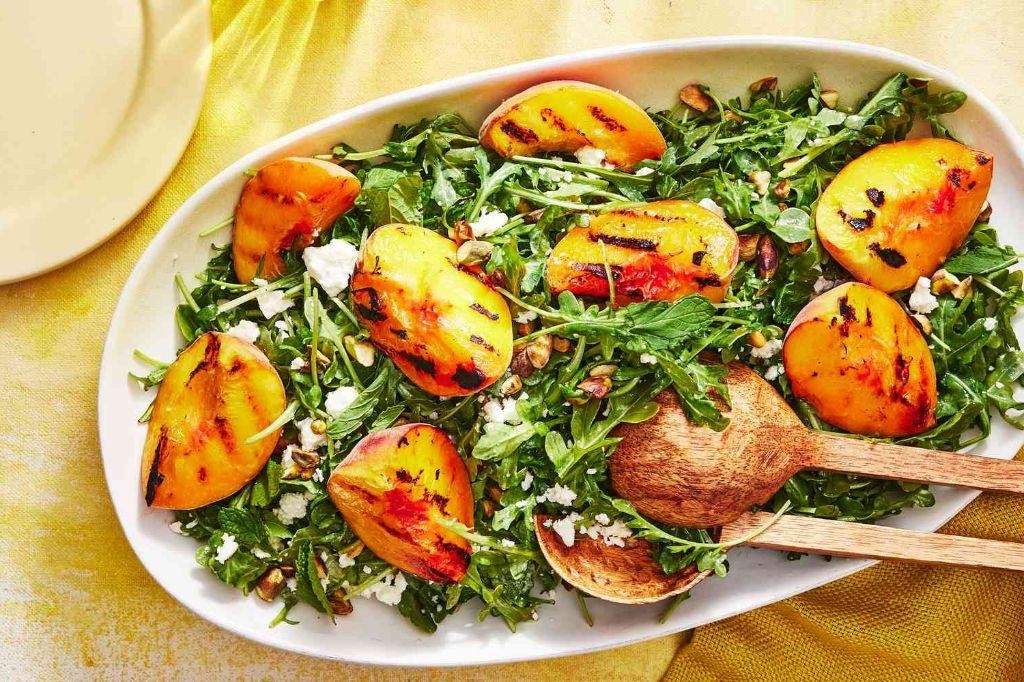
Dive into summer with this Grilled Peach and Arugula Salad that’s as easy on the eyes as it is on the palate. Perfect for those days when you want to feel fancy without the fuss, this dish is a sweet, savory, and slightly smoky dream come true.
Ingredients
- 2 ripe peaches, halved and pitted
- 4 cups of arugula, because we’re fancy like that
- A couple of tablespoons of olive oil, for drizzling and grilling
- A splash of balsamic vinegar, for that tangy kick
- A handful of goat cheese, crumbled (because cheese makes everything better)
- A sprinkle of salt and pepper, to make all the flavors pop
Instructions
- Preheat your grill to medium-high heat (about 375°F to 400°F) because we’re not cooking peaches in the dark ages.
- Lightly brush the peach halves with olive oil to prevent them from sticking to the grill like a bad date.
- Place the peaches cut side down on the grill. Grill for about 3-4 minutes until you see those gorgeous grill marks and the peaches start to caramelize. Tip: Don’t wander off; peaches can go from perfectly grilled to perfectly ruined in seconds.
- While the peaches are grilling, toss the arugula with a drizzle of olive oil and a splash of balsamic vinegar in a large bowl. Season with a pinch of salt and pepper to taste.
- Once the peaches are done, let them cool for a minute before slicing them into wedges. This keeps them from turning into mush when you mix them into the salad.
- Add the grilled peach wedges to the arugula mixture and gently toss to combine. Tip: Use your hands for this step to feel like a true salad artist.
- Sprinkle the crumbled goat cheese over the top because, let’s be honest, it’s the star of the show.
Perfect for a light lunch or as a standout side, this salad brings a juicy crunch from the peaches, a peppery bite from the arugula, and a creamy tang from the goat cheese. Serve it on a platter for a family-style feast or plate it up fancy to impress your in-laws.
Healthy Grilled Chicken Caesar Salad

Picture this: a salad that’s not just a sidekick but the superhero of your meal, packing flavor, crunch, and a guilt-free grin. Our Healthy Grilled Chicken Caesar Salad is here to save your dinner from the mundane.
Ingredients
- A couple of boneless, skinless chicken breasts
- A generous drizzle of olive oil
- A pinch of salt and pepper
- A splash of lemon juice
- 2 cups of chopped romaine lettuce
- A handful of grated Parmesan cheese
- A small handful of croutons
- A dollop of Caesar dressing (light version, because we’re being healthy)
Instructions
- Preheat your grill to a medium-high heat of 375°F. This is the sweet spot for getting those perfect grill marks without charring your chicken into oblivion.
- While the grill heats up, rub the chicken breasts with olive oil, then season both sides with salt, pepper, and a splash of lemon juice for that zesty kick.
- Grill the chicken for about 6-7 minutes on each side. No peeking! Let it cook undisturbed to get those gorgeous grill lines.
- Once cooked, let the chicken rest for 5 minutes. This is the secret to juicy chicken – it lets the juices redistribute instead of running all over your cutting board.
- While the chicken rests, toss the romaine lettuce, Parmesan cheese, and croutons in a large bowl with the Caesar dressing. Don’t be shy with the dressing, but remember, we’re keeping it light.
- Slice the grilled chicken and lay it atop your salad like the crown it is.
Look at that masterpiece! The chicken is juicy with a smoky char, the lettuce is crisp, and the dressing ties it all together with creamy, garlicky goodness. Serve it up in a big bowl or get fancy with individual plates – either way, it’s a win.
Grilled Zucchini and Squash Medley
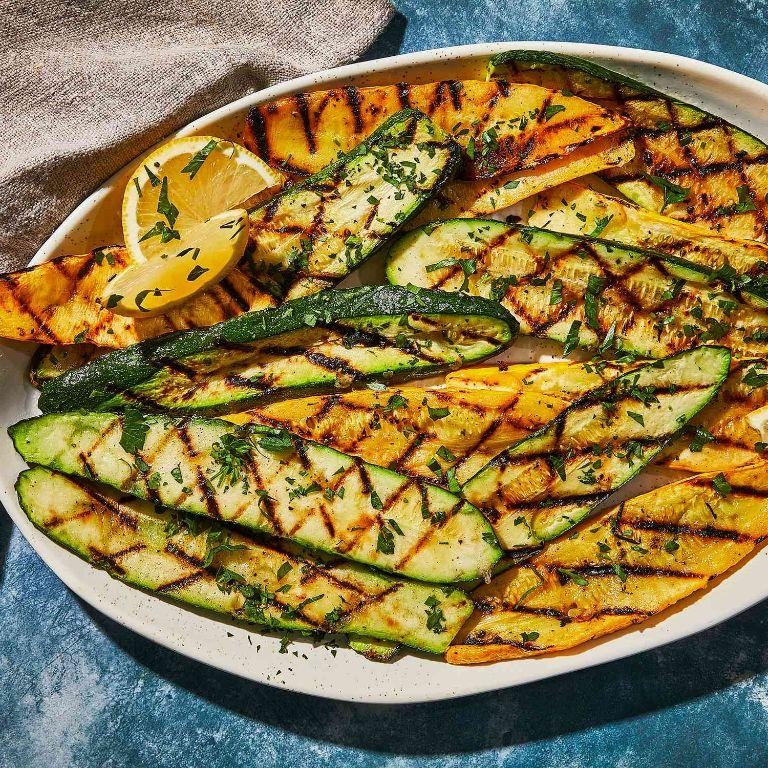
Zesty and zippy, this Grilled Zucchini and Squash Medley is your summer side dish soulmate, ready to jazz up any BBQ or weeknight dinner with minimal fuss and maximum flavor.
Ingredients
- 2 medium zucchinis, sliced into 1/2-inch rounds
- 2 medium yellow squashes, sliced into 1/2-inch rounds
- A generous glug of olive oil (about 2 tbsp)
- A couple of cloves of garlic, minced
- A splash of balsamic vinegar (about 1 tbsp)
- A pinch of salt and a crack of black pepper
- A sprinkle of red pepper flakes (optional, for those who like it hot)
Instructions
- Fire up your grill to a medium-high heat, aiming for about 400°F. No grill? A grill pan on the stove works too!
- Toss your zucchini and squash slices with olive oil, garlic, salt, and pepper in a big bowl. Make sure every piece gets a little love.
- Lay the slices on the grill in a single layer. Grill for about 3-4 minutes per side, or until you see those sexy grill marks and the veggies are tender but still have a bit of crunch.
- Drizzle with balsamic vinegar right before serving for a tangy twist. Tip: If you’re adding red pepper flakes, now’s the time!
- Let the veggies rest for a minute off the heat. This lets the flavors mingle and the juices redistribute.
Unbelievably simple, right? This medley brings a smoky, slightly sweet vibe with a hint of tang from the balsamic. Serve it atop a bed of quinoa for a hearty bowl, or alongside your favorite grilled protein for a plate that screams summer.
Lemon Garlic Grilled Lamb Chops
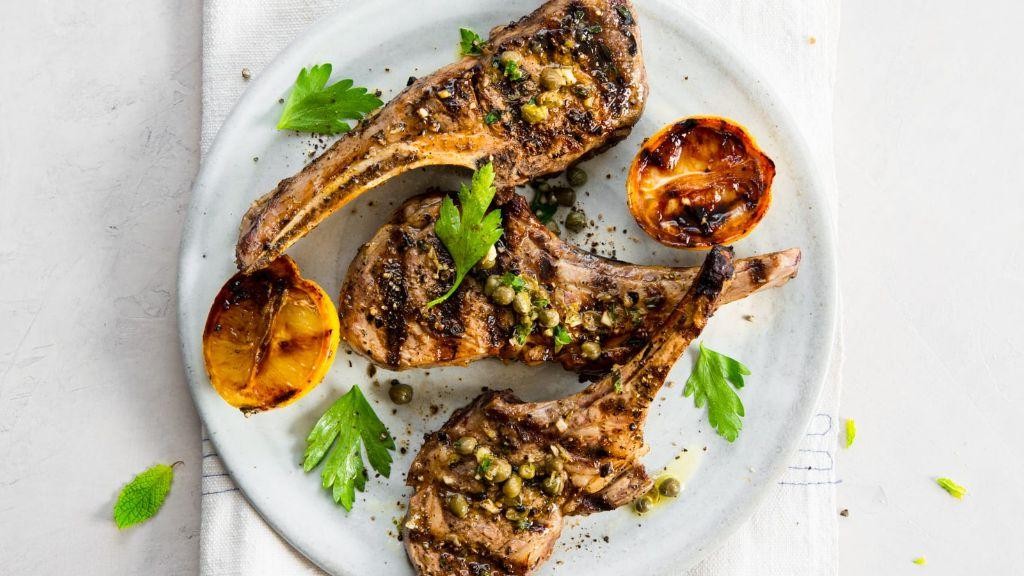
So, you’ve decided to grill like a boss today, huh? These Lemon Garlic Grilled Lamb Chops are about to become your new best friend, offering a zesty kick that’ll make your taste buds dance the cha-cha.
Ingredients
- 4 lamb chops (because who stops at one?)
- A generous glug of olive oil (about 2 tbsp)
- The juice of 1 lemon (freshly squeezed, no cheating)
- 3 garlic cloves, minced (more if you’re fighting vampires)
- A sprinkle of salt (to make everything better)
- A couple of cracks of black pepper (for that little bit of spice)
- A handful of fresh rosemary, chopped (for that fancy touch)
Instructions
- In a bowl, whisk together the olive oil, lemon juice, minced garlic, salt, pepper, and rosemary. This is your magic marinade.
- Place the lamb chops in a dish and pour the marinade over them, making sure each chop gets a good coat. Cover and let them chill in the fridge for at least 1 hour (patience is key here).
- Preheat your grill to a medium-high heat (about 375°F to 400°F). You want it hot enough to sizzle but not so hot that you’re summoning the fire department.
- Grill the lamb chops for about 4-5 minutes per side for medium-rare. If you’re not into pink, add a couple more minutes, but don’t turn them into shoe leather.
- Let the chops rest for 5 minutes after grilling. This lets the juices redistribute, making them even more delicious.
Kick back and admire your handiwork. These chops are juicy, packed with flavor, and have just the right amount of char. Serve them up with a side of roasted veggies or a crisp salad, and watch as your dinner guests silently vow to never order takeout again.
Grilled Eggplant with Tahini Sauce
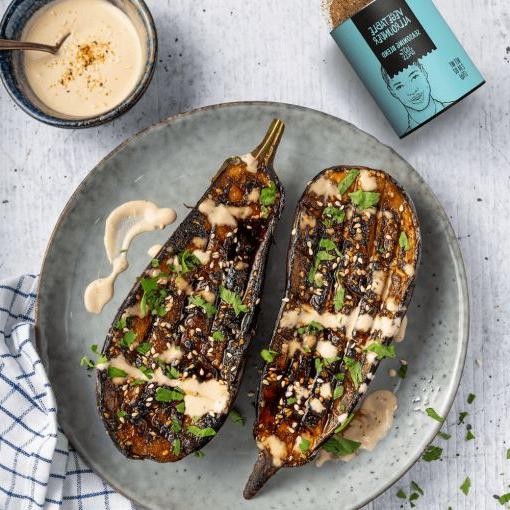
Mmm, have you ever met a vegetable as versatile and downright sexy as the eggplant? When grilled to perfection and drizzled with creamy tahini sauce, it’s like the eggplant is putting on its little black dress and ready to party on your plate.
Ingredients
- 1 large eggplant, sliced into 1/2-inch rounds
- A couple of tablespoons of olive oil
- A pinch of salt and pepper
- 1/4 cup of tahini
- A splash of lemon juice
- A clove of garlic, minced
- A sprinkle of paprika for that extra flair
Instructions
- Preheat your grill to a medium-high heat, about 400°F, because we’re not just warming up, we’re getting ready to sizzle.
- Brush both sides of your eggplant slices with olive oil like you’re painting the next masterpiece. Season with salt and pepper because flavor is king.
- Grill the eggplant for about 4-5 minutes per side. You’re looking for those gorgeous grill marks and a tender, but not mushy, texture. Tip: Don’t overcrowd the grill, or you’ll steam the eggplant instead of grilling it.
- While the eggplant is showing off on the grill, whisk together tahini, lemon juice, minced garlic, and a tablespoon of water in a bowl until smooth. Tip: If the sauce is too thick, add water a teaspoon at a time until it’s drizzle-worthy.
- Once the eggplant is grilled to perfection, arrange it on a platter and drizzle with the tahini sauce like you’re Jackson Pollock creating art. Sprinkle with paprika for a pop of color and a hint of smokiness. Tip: Let the eggplant sit for a minute after grilling; it’ll soak up the sauce like a flavor sponge.
Bold flavors and textures are the name of the game here—creamy, smoky, with a little tang. Serve it atop a bed of greens for a salad that eats like a meal, or alongside some grilled pita for dipping into that luscious tahini sauce.
Healthy Grilled Tofu with Mango Salsa
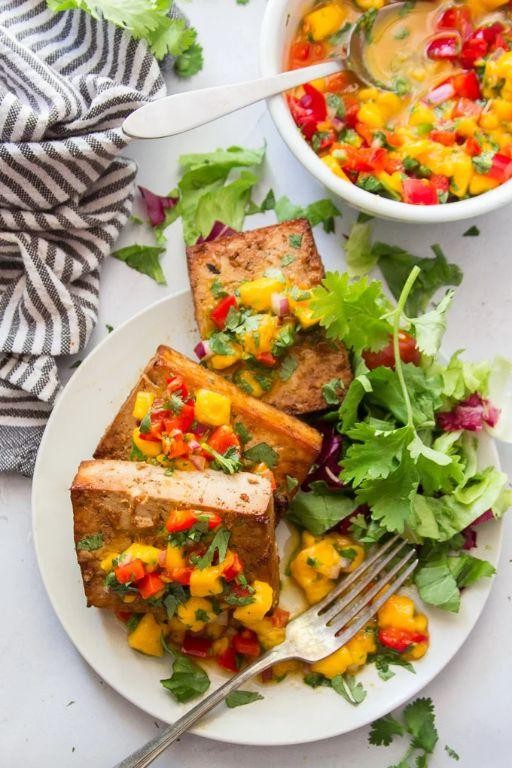
Who knew that tofu could steal the spotlight? This Healthy Grilled Tofu with Mango Salsa is here to prove that it’s not just a sidekick but the superhero of your dinner table, especially when paired with the sweet and zesty mango salsa that’ll make your taste buds do a happy dance.
Ingredients
- 1 block of extra-firm tofu (because flimsy tofu is a no-go)
- A couple of tablespoons of olive oil (for that golden, crispy magic)
- A splash of lime juice (to brighten things up)
- A pinch of salt and pepper (the dynamic duo of seasoning)
- 1 ripe mango, diced (the sweeter, the better)
- A handful of cilantro, chopped (for that fresh kick)
- Half a red onion, finely diced (for a bit of crunch and zing)
- 1 jalapeño, seeded and minced (if you like it spicy, keep some seeds)
Instructions
- Press the tofu for at least 30 minutes to squeeze out all the water – trust me, it’s worth the wait for that perfect texture.
- Preheat your grill to medium-high heat, about 375°F, because we’re not just warming it up, we’re getting it ready to perform.
- Slice the tofu into ½-inch thick slabs. Brush both sides with olive oil and season with salt and pepper – this is where the flavor starts.
- Grill the tofu for about 5 minutes on each side until you see those gorgeous grill marks. Flip it like you mean it!
- While the tofu is grilling, mix the diced mango, cilantro, red onion, jalapeño, and a splash of lime juice in a bowl. Give it a gentle toss – think of it as mixing a cocktail for your tofu.
- Serve the grilled tofu hot off the grill with a generous spoonful of mango salsa on top. The contrast of the warm, smoky tofu with the cool, refreshing salsa is a match made in heaven.
Unbelievably good, this dish brings a party of textures and flavors to your plate. The tofu is crispy on the outside, tender on the inside, and the mango salsa adds a juicy, vibrant pop. Try serving it over a bed of quinoa or alongside some grilled veggies for a meal that’s as nutritious as it is delicious.
Grilled Corn on the Cob with Chili Lime Butter
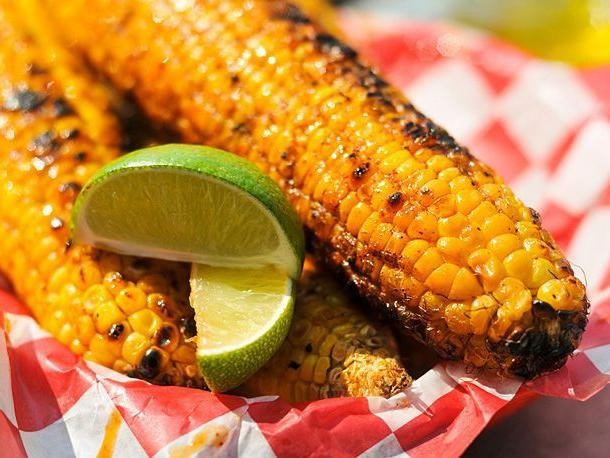
Zesty doesn’t even begin to cover it—this grilled corn on the cob with chili lime butter is about to be the MVP of your summer BBQs. Imagine the smokiness of grilled corn meeting the tangy, spicy kick of chili lime butter, and you’ve got a match made in flavor heaven.
Ingredients
- 4 ears of corn, husks on
- A stick of butter (1/2 cup), softened
- The zest and juice of 1 lime
- A couple of teaspoons of chili powder
- A pinch of salt
- A splash of honey (about 1 tbsp)
Instructions
- Preheat your grill to medium-high, about 400°F, because we’re aiming for those perfect grill marks, not a corn massacre.
- While the grill heats up, mix the softened butter, lime zest, lime juice, chili powder, salt, and honey in a bowl. Taste it? Yeah, that’s the good stuff.
- Peel back the corn husks but don’t remove them—think of it as undressing the corn just enough to get it ready for its butter bath. Remove the silk.
- Slather each ear of corn with the chili lime butter, then pull the husks back up. This keeps the corn moist and infuses it with flavor as it grills.
- Grill the corn for about 15-20 minutes, turning occasionally, until the husks are charred and the kernels are tender. Tip: Listen for a slight sizzle—that’s the sound of success.
- Let the corn cool for a minute (unless you’re into molten corn burns), then serve with extra chili lime butter on the side because more is more.
Magical is the first word that comes to mind when you bite into this corn—the kernels are juicy, the butter is zingy with a hint of sweetness, and the grill adds that unbeatable smoky depth. Serve it up with a cold drink in hand and watch it disappear before your eyes.
Grilled Halibut with Cherry Tomato Relish
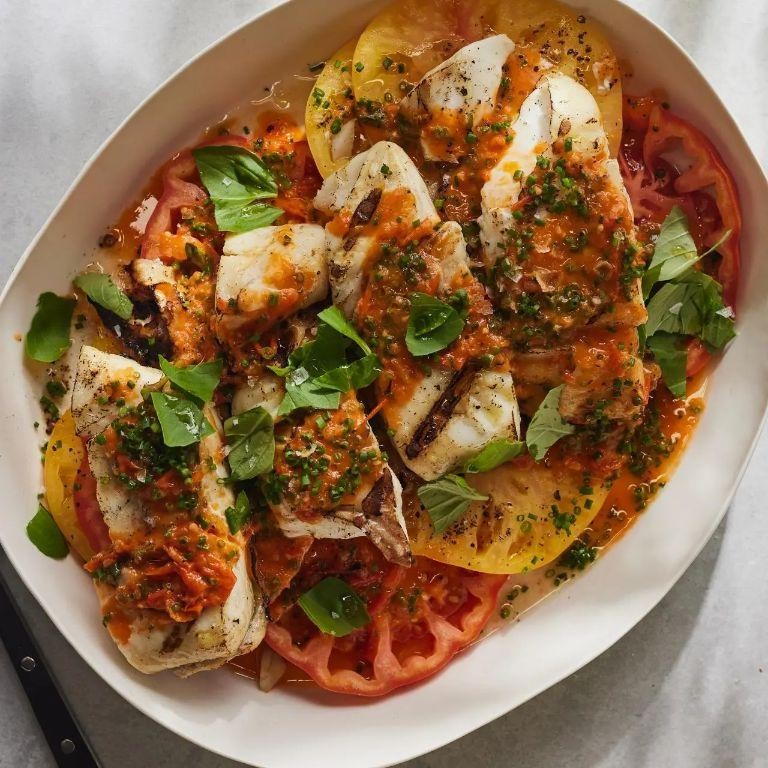
Oh boy, have we got a treat for you today! Imagine the flakiest, most succulent halibut meeting its match with a zesty cherry tomato relish that’s basically summer on a plate. It’s the kind of dish that’ll have you pretending you’re seaside, even if you’re just in your backyard.
Ingredients
- 2 halibut fillets (about 6 oz each)
- A generous glug of olive oil
- A pinch of salt and a crack of black pepper
- A couple of cups of cherry tomatoes, halved
- A small handful of fresh basil, chopped
- A splash of balsamic vinegar
- A teaspoon of honey (because life’s sweet)
- One garlic clove, minced (or two if you’re feeling bold)
Instructions
- Preheat your grill to a medium-high heat, about 375°F to 400°F, because we’re not trying to turn our halibut into charcoal.
- While the grill heats up, toss your halibut fillets with that glug of olive oil, then season both sides with salt and pepper. Tip: Let the fish sit at room temperature for about 10 minutes before grilling for even cooking.
- Grill the halibut for about 4-5 minutes per side. You’ll know it’s ready when it flakes easily with a fork but still looks juicy.
- Meanwhile, in a bowl, mix together the cherry tomatoes, basil, balsamic vinegar, honey, and garlic. Tip: Let this relish sit for at least 10 minutes to let the flavors marry—it’s worth the wait.
- Once the halibut is off the grill, top each fillet with a generous spoonful of the cherry tomato relish. Tip: If you’re feeling fancy, a drizzle of extra olive oil on top never hurt anybody.
Yum, right? The halibut is so tender it practically melts in your mouth, and that relish? It’s like a burst of sunshine with every bite. Serve it over a bed of quinoa or with a side of grilled asparagus for a meal that’s as nutritious as it is delicious.
Healthy Grilled Pork Tenderloin with Apple Chutney
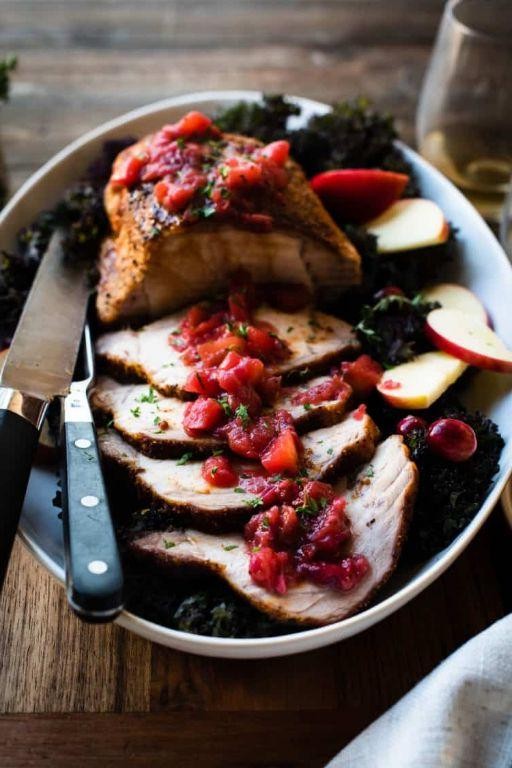
Gather ’round, food lovers, because we’re about to turn the humble pork tenderloin into the star of your dinner table with a side of apple chutney that’ll make your taste buds do a happy dance. This dish is so good, it might just become your new weeknight hero.
Ingredients
- 1 pork tenderloin (about 1 to 1.5 pounds)
- A couple of apples, peeled and diced
- A splash of apple cider vinegar
- A drizzle of olive oil
- A pinch of salt and pepper
- A sprinkle of brown sugar
- A dash of cinnamon
- A handful of chopped onions
Instructions
- Preheat your grill to a medium-high heat, around 375°F to 400°F, because we’re aiming for those perfect grill marks, not a charcoal briquette.
- While the grill heats up, season the pork tenderloin with a pinch of salt and pepper, and a drizzle of olive oil to keep it juicy. Tip: Letting the meat sit at room temperature for about 15 minutes before grilling ensures even cooking.
- Place the pork on the grill and cook for about 20-25 minutes, turning occasionally, until the internal temperature hits 145°F. Remember, a meat thermometer is your best friend here.
- Meanwhile, in a saucepan over medium heat, combine the diced apples, a splash of apple cider vinegar, a sprinkle of brown sugar, a dash of cinnamon, and a handful of chopped onions. Cook until the apples are soft and the mixture has thickened, about 10 minutes. Tip: Stir occasionally to prevent sticking and to help the flavors meld beautifully.
- Once the pork is done, let it rest for 5 minutes before slicing. This little patience test ensures all those delicious juices stay right where they belong.
- Serve the sliced pork with a generous spoonful of apple chutney on top. Tip: For an extra touch of elegance, garnish with a sprig of fresh thyme or rosemary.
Combining the succulent, slightly smoky pork with the sweet and tangy apple chutney creates a symphony of flavors that’s downright irresistible. Try serving it over a bed of wild rice or alongside roasted Brussels sprouts for a meal that’s as nutritious as it is delicious.
Grilled Romaine Hearts with Blue Cheese Dressing
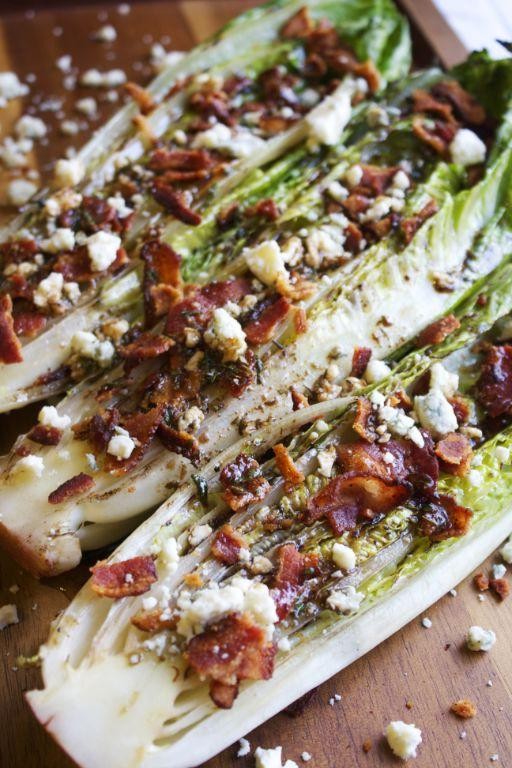
Picture this: a salad that’s bold enough to face the flames and come out charred, smoky, and utterly irresistible. That’s right, we’re grilling lettuce, and it’s about to blow your mind.
Ingredients
- 2 romaine hearts (because one is never enough)
- A generous glug of olive oil (about 2 tbsp)
- A pinch of salt and pepper (to make it pop)
- 1/2 cup of crumbled blue cheese (the stinkier, the better)
- A splash of buttermilk (1/4 cup, for tang)
- A dollop of mayonnaise (1/4 cup, for creaminess)
- A squeeze of lemon juice (about 1 tbsp, for zing)
- A whisper of garlic powder (1/4 tsp, because garlic is life)
Instructions
- Fire up your grill to medium-high heat (around 400°F) because we’re not playing around here.
- While the grill heats, halve the romaine hearts lengthwise, keeping the stem end intact so they don’t fall apart on the grill.
- Drizzle the cut sides with olive oil and sprinkle with salt and pepper. This is their spa treatment before the heat.
- Place the romaine halves cut-side down on the grill. Grill for 2-3 minutes until you see those sexy char marks. Flip and grill the other side for another minute. Tip: Don’t wander off; grilled lettuce waits for no one.
- In a bowl, whisk together the blue cheese, buttermilk, mayonnaise, lemon juice, and garlic powder until it’s as smooth as a jazz singer’s voice. Tip: If it’s too thick, add a tad more buttermilk.
- Drizzle the dressing over the grilled romaine or serve it on the side for dipping. Tip: Extra dressing? Save it for your next burger adventure.
Who knew lettuce could be this exciting? The grilled romaine hearts are smoky with a slight crunch, while the blue cheese dressing is creamy with a punch. Serve them as a starter that’ll steal the show or as a side that’ll make your steak jealous.
Grilled Swordfish with Olive Tapenade
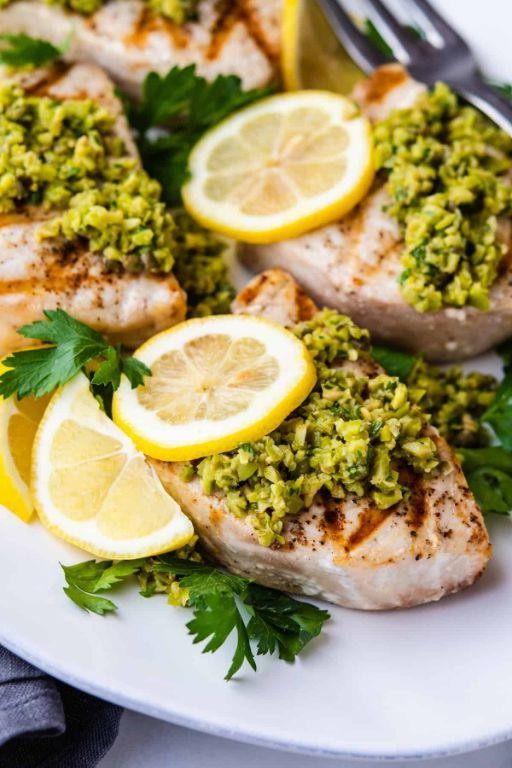
Ready to dive into a dish that’s as bold and adventurous as your summer ambitions? Grilled Swordfish with Olive Tapenade is here to prove that the ocean’s bounty and your grill can become the best of friends, with a little help from a zesty, briny tapenade that’ll have your taste buds doing backflips.
Ingredients
- 2 swordfish steaks, about 1 inch thick (because nobody likes a wimpy steak)
- A generous glug of olive oil (for that slick, non-stick magic)
- A couple of garlic cloves, minced (for a punch of flavor)
- A handful of pitted Kalamata olives (the star of our tapenade show)
- A splash of lemon juice (to brighten things up)
- A sprinkle of capers (for that extra briny kick)
- A pinch of salt and pepper (to make everything pop)
Instructions
- Preheat your grill to a medium-high heat, around 400°F, because we’re aiming for perfect grill marks, not a charcoal briquette.
- While the grill heats up, let’s make the tapenade: toss the olives, garlic, lemon juice, capers, and a glug of olive oil into a food processor. Pulse until it’s chunky, not smooth – we’re making tapenade, not baby food.
- Brush both sides of the swordfish steaks with olive oil and season with salt and pepper. This isn’t just for flavor; it’s also to prevent the fish from sticking to the grill like a bad date.
- Place the swordfish on the grill and cook for about 4-5 minutes per side. You’ll know it’s ready to flip when it releases easily from the grill – if it sticks, give it another minute.
- Once the swordfish is grilled to perfection, slather the top with your homemade tapenade. The residual heat will help the flavors meld together beautifully.
Oh, the joy of cutting into that perfectly grilled swordfish, with the tapenade adding a salty, tangy contrast to the meaty, flaky fish. Serve it atop a bed of arugula for a peppery crunch or alongside some grilled veggies to keep the summer vibes going strong.
Healthy Grilled Chicken Thighs with Herb Marinade
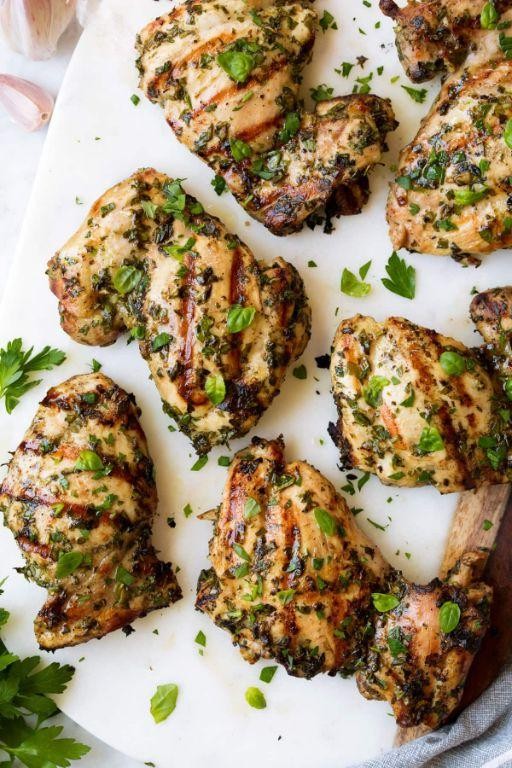
Mmm, get ready to turn your grill into a stage and these chicken thighs into the stars of the show with a herb marinade that’s basically a standing ovation in a bowl. Perfect for those who like their meals lean, mean, and packed with flavor without the fuss.
Ingredients
- 4 chicken thighs, because who’s counting? (Okay, we are.)
- A generous glug of olive oil, about 1/4 cup
- A couple of garlic cloves, minced – vampire repellent optional
- A handful of fresh rosemary, chopped, because fresh is best
- A splash of lemon juice, about 2 tbsp, for that zesty kick
- A pinch of salt and pepper, to make everything pop
Instructions
- In a bowl, whisk together the olive oil, minced garlic, chopped rosemary, lemon juice, salt, and pepper. This is your marinade, aka the flavor bomb.
- Add the chicken thighs to the marinade, ensuring each piece is thoroughly coated. Let them soak up the goodness for at least 30 minutes in the fridge – patience is a virtue here.
- Preheat your grill to a medium-high heat, about 375°F. You want it hot enough to sizzle but not so hot that you’re summoning the fire department.
- Place the chicken thighs on the grill. Cook for about 6-7 minutes on each side, or until the internal temperature hits 165°F. No guessing games here – use a meat thermometer.
- Let the chicken rest for a few minutes off the grill. This isn’t just for dramatic effect; it lets the juices redistribute so every bite is moist and flavorful.
These grilled chicken thighs come out with a crispy skin that gives way to juicy, herb-infused meat. Serve them atop a crisp salad, alongside some grilled veggies, or just tear into them with your hands – we won’t judge.
Grilled Figs with Honey and Goat Cheese
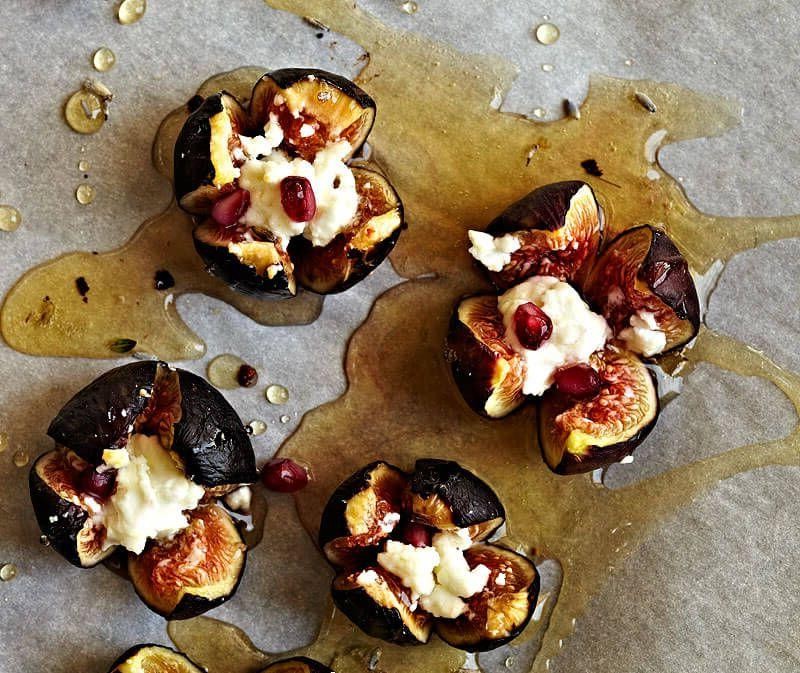
Look, if you’re not grilling figs and drizzling them with honey while whispering sweet nothings to them, are you even summering right? This dish is the love child of simplicity and elegance, perfect for those ‘I want to impress but also nap’ kind of days.
Ingredients
- 8 fresh figs, halved (because sharing is caring, but also because more surface area for grilling)
- A generous drizzle of honey (about 2 tbsp, but who’s measuring?)
- 4 oz goat cheese, crumbled (the creamier, the dreamier)
- A splash of olive oil (just enough to make the figs not stick to the grill and throw a tantrum)
- A pinch of sea salt (to make all the flavors pop like fireworks)
Instructions
- Preheat your grill to medium-high heat (about 375°F, because we’re grilling, not cremating).
- While the grill heats up, halve your figs and lightly brush them with olive oil. This is their sunscreen, so don’t skip it.
- Place the figs cut-side down on the grill. Grill for 2-3 minutes until you see those sexy grill marks and the figs start to caramelize.
- Flip the figs carefully (they’re hot and fragile, just like my patience on a Monday morning) and grill for another 2 minutes.
- Remove the figs from the grill and let them cool for a hot minute (literally, about 1 minute).
- Arrange the figs on a plate, drizzle with honey, sprinkle with goat cheese, and finish with a pinch of sea salt. Boom. You’re a culinary artist.
Every bite is a symphony of sweet, creamy, and smoky flavors, with the figs turning into little jammy pockets of joy. Serve them on a rustic wooden board with a side of ‘look at me, I’m fancy’ attitude, or just eat them straight off the plate—no judgment here.
Grilled Lobster Tails with Garlic Butter
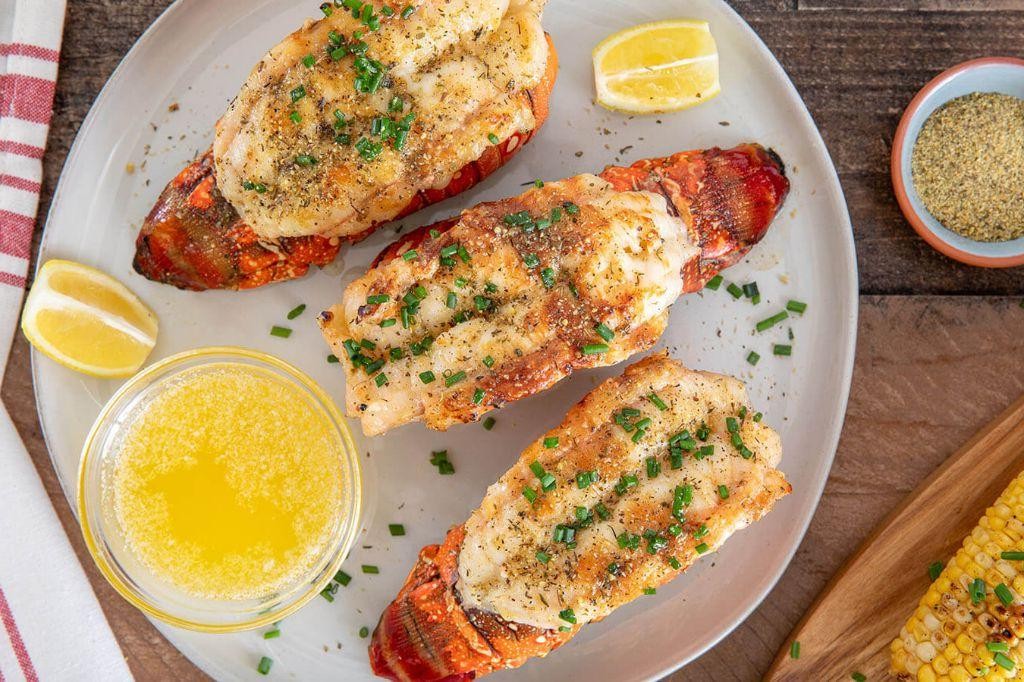
Zesty and zippy, grilled lobster tails with garlic butter are the showstoppers your summer BBQ has been dreaming of. Imagine succulent, buttery lobster meat with a smoky char, all drenched in a garlicky, herb-infused butter that’ll have you licking your fingers—no shame, we’ve all been there.
Ingredients
- 4 lobster tails, because sharing is optional
- A generous 1/2 cup of unsalted butter, because why skimp?
- 4 garlic cloves, minced, for that punchy flavor
- A splash of lemon juice, to brighten things up
- A couple of tbsp of chopped parsley, for a fresh finish
- Salt, just a pinch to make everything pop
Instructions
- Preheat your grill to medium-high, about 375°F to 400°F, because we’re not playing with fire, we’re mastering it.
- While the grill heats up, melt the butter in a small saucepan over low heat. Toss in the minced garlic and let it get fragrant, about 1-2 minutes—no burning, or it’s game over.
- Stir in the lemon juice, parsley, and that pinch of salt into the butter mixture. Set aside but keep warm; this is your liquid gold.
- With kitchen shears, carefully cut the top shell of each lobster tail lengthwise. Gently pull the meat up and over the shell, leaving it attached at the base—this is called the ‘butterfly’ technique, and yes, it’s as fancy as it sounds.
- Place the lobster tails on the grill, meat side down first, for about 5-6 minutes. Flip them over, brush generously with your garlic butter, and grill for another 4-5 minutes until the meat is opaque and slightly charred.
- Remove from the grill and give them one last brush of garlic butter because more is more in this scenario.
Grilled to perfection, these lobster tails are a symphony of textures—tender, juicy meat with a slight crunch from the grill marks. Serve them with an extra side of that garlic butter for dipping, because let’s be real, you’re going to want it. Pair with a crisp salad or some crusty bread to sop up all that goodness, and watch as your guests silently thank you with every bite.
Healthy Grilled Vegetable Wrap with Hummus
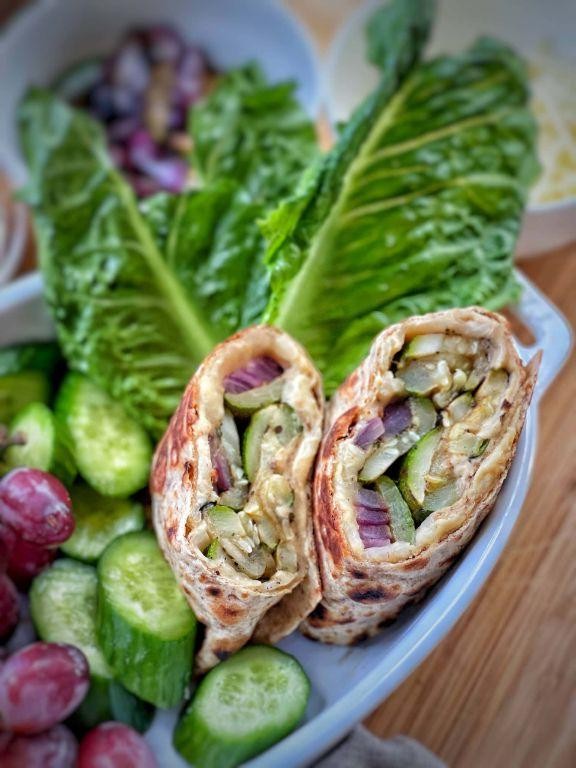
Dive into the world of guilt-free indulgence with this vibrant, crunchy, and downright delicious Healthy Grilled Vegetable Wrap with Hummus. It’s the perfect way to trick yourself into eating your veggies while feeling like you’re cheating on your diet—because who said healthy can’t be hearty?
Ingredients
- A couple of whole wheat tortillas
- A generous smear of hummus (about 1/4 cup per wrap)
- A splash of olive oil (about 2 tbsp)
- A handful of sliced bell peppers (1 cup)
- A handful of sliced zucchini (1 cup)
- A sprinkle of salt and pepper (to your heart’s content)
- A dash of garlic powder (1/2 tsp)
Instructions
- Fire up your grill or grill pan to a medium-high heat (about 375°F).
- Toss those sliced bell peppers and zucchini with olive oil, salt, pepper, and garlic powder like they’re in a salad bar.
- Grill the veggies for about 4-5 minutes on each side, or until they’ve got those sexy grill marks and are just tender enough to bite without a crunch.
- Warm your whole wheat tortillas on the grill for about 30 seconds per side—just enough to make them pliable but not crispy.
- Slather each tortilla with a generous smear of hummus, acting as the glue for your veggie masterpiece.
- Pile on the grilled veggies like you’re building a skyscraper of flavor.
- Roll that bad boy up tightly, tucking in the sides as you go, to prevent any filling from making a break for it.
- Slice the wrap in half diagonally because everything tastes better in triangle form.
How’s that for a wrap-up? The hummus adds a creamy dreaminess that complements the smoky, charred veggies, all hugged by the soft, whole wheat tortilla. Serve it with a side of smug satisfaction for choosing such a nutritious yet indulgent lunch option.
Conclusion
Brimming with flavor and nutrition, our roundup of 23 healthy grill recipes is your ticket to a delicious summer. Whether you’re craving veggies, seafood, or lean meats, there’s something here for every grill master. We’d love to hear which recipes become your favorites—drop us a comment below! Don’t forget to share the love on Pinterest so others can enjoy these tasty, healthy options too. Happy grilling!