Diving into a gluten-free lifestyle doesn’t mean sacrificing flavor or fun in the kitchen! Our roundup of 17 Delicious Healthy Gluten-Free Dinner Recipes is packed with nutritious, mouthwatering meals that’ll keep everyone at the table happy. Whether you’re a seasoned gluten-free guru or just starting out, these dishes promise to inspire your next wholesome, satisfying dinner. Let’s get cooking!
Quinoa Stuffed Bell Peppers
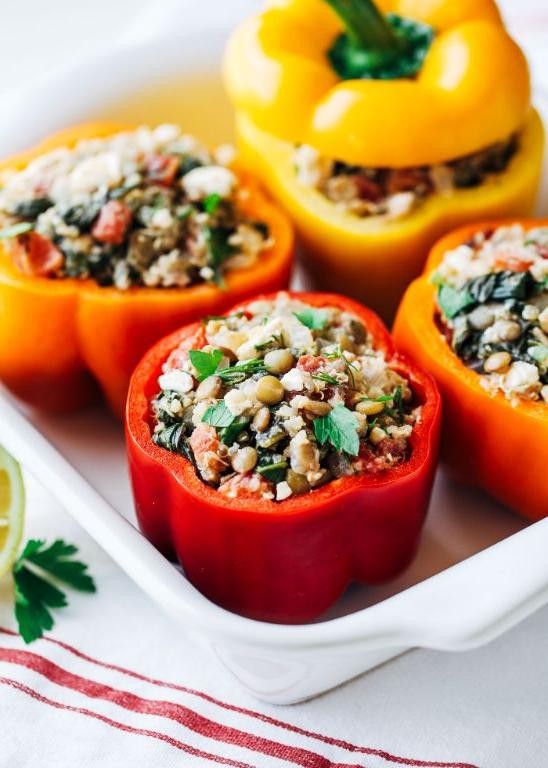
Very few dishes manage to be as colorful, nutritious, and downright delicious as quinoa stuffed bell peppers. You’re going to love how these vibrant peppers pack a punch of flavor and texture, making them a perfect meal for any day of the week.
Ingredients
- 4 large, vibrant bell peppers (any color)
- 1 cup of fluffy, cooked quinoa
- 1 tbsp of rich extra virgin olive oil
- 1/2 cup of finely diced red onion
- 2 cloves of garlic, minced to perfection
- 1 cup of juicy, diced tomatoes
- 1/2 cup of sweet corn kernels
- 1/2 cup of black beans, rinsed and drained
- 1 tsp of ground cumin
- 1 tsp of smoky paprika
- 1/2 cup of shredded sharp cheddar cheese
- Salt and freshly ground black pepper to taste
Instructions
- Preheat your oven to 375°F (190°C) and lightly grease a baking dish with olive oil.
- Cut the tops off the bell peppers and remove the seeds and membranes. Tip: Save the tops for a colorful garnish if you like.
- Heat olive oil in a large skillet over medium heat. Add the red onion and garlic, sautéing until they’re soft and fragrant, about 3 minutes.
- Stir in the tomatoes, corn, black beans, cumin, and paprika. Cook for another 5 minutes, until everything is heated through.
- Remove the skillet from heat and fold in the cooked quinoa and half of the cheddar cheese. Season with salt and pepper. Tip: The quinoa should be fluffy and slightly cooled to prevent it from becoming mushy.
- Spoon the quinoa mixture into the prepared bell peppers, packing it lightly. Top with the remaining cheese.
- Place the stuffed peppers in the baking dish and bake for 25-30 minutes, until the peppers are tender and the cheese is bubbly and golden. Tip: For an extra crispy top, broil for the last 2 minutes.
When these quinoa stuffed bell peppers come out of the oven, they’re a sight to behold—tender yet crisp, with a melty cheese topping that’s irresistible. Serve them alongside a fresh green salad or with a dollop of cool sour cream for a meal that’s as satisfying as it is beautiful.
Zucchini Noodles with Avocado Pesto
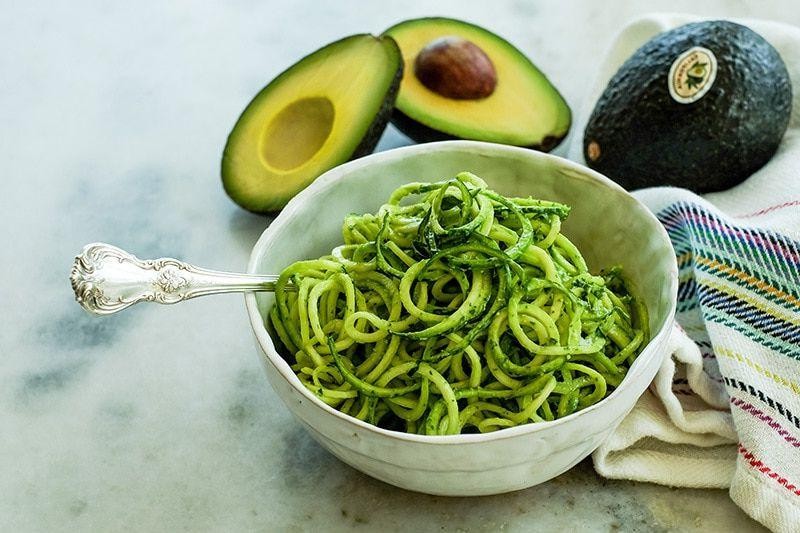
Mmm, you’re going to love this light and refreshing dish that’s perfect for those warm summer nights. Zucchini noodles with avocado pesto is a game-changer for anyone looking to eat healthier without sacrificing flavor.
Ingredients
- 2 medium zucchinis, spiralized into noodles
- 1 ripe avocado, creamy and pitted
- 1/4 cup fresh basil leaves, fragrant and tightly packed
- 2 tbsp rich extra virgin olive oil
- 1 tbsp fresh lemon juice, zesty and bright
- 1 clove garlic, minced
- 1/4 tsp sea salt, finely ground
- 1/4 tsp black pepper, freshly cracked
- 2 tbsp grated Parmesan cheese, sharp and savory
- 1 tbsp pine nuts, lightly toasted
Instructions
- In a food processor, combine the avocado, basil, olive oil, lemon juice, garlic, salt, and pepper. Blend until smooth, scraping down the sides as needed.
- Heat a large skillet over medium heat. Add the zucchini noodles and sauté for 2-3 minutes, just until they’re slightly softened but still crisp.
- Remove the skillet from heat and toss the zucchini noodles with the avocado pesto until evenly coated.
- Sprinkle with Parmesan cheese and pine nuts before serving.
The zucchini noodles offer a satisfying crunch, while the avocado pesto is luxuriously creamy with a hint of garlic and lemon. Serve it in a bowl with a sprinkle of extra Parmesan on top for an Instagram-worthy meal.
Grilled Salmon with Asparagus
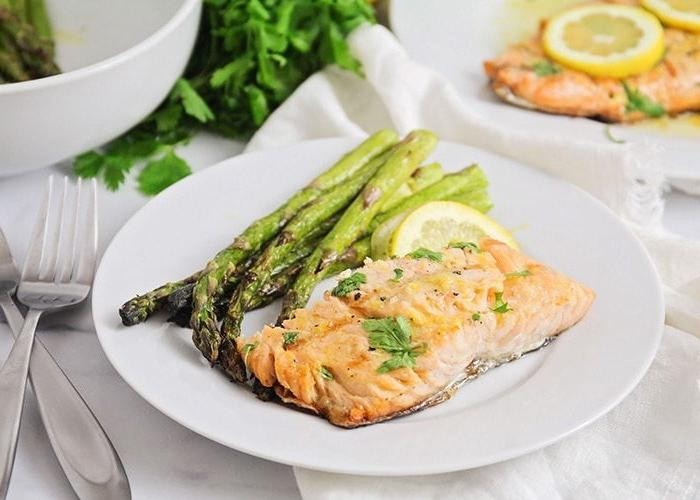
Just imagine biting into a perfectly grilled piece of salmon, its edges slightly crispy, paired with tender, vibrant asparagus. You’re in for a treat with this simple yet elegant dish that’s sure to impress.
Ingredients
- 1 lb fresh salmon fillet, skin-on for extra crispiness
- 1 bunch fresh asparagus, ends trimmed
- 2 tbsp rich extra virgin olive oil
- 1 tsp finely ground black pepper
- 1/2 tsp sea salt
- 1 lemon, thinly sliced for garnish
Instructions
- Preheat your grill to medium-high heat, about 375°F, ensuring it’s clean to prevent sticking.
- Brush both sides of the salmon fillet with olive oil, then season evenly with salt and black pepper.
- Place the salmon skin-side down on the grill. Close the lid and cook for 6 minutes without flipping to get that perfect sear.
- While the salmon cooks, toss the asparagus with the remaining olive oil, salt, and pepper. Tip: Use a grill basket for the asparagus to keep them from falling through the grates.
- After the initial 6 minutes, carefully flip the salmon. Add the asparagus to the grill. Cook for another 4-5 minutes, or until the salmon flakes easily with a fork and the asparagus is tender-crisp.
- Remove everything from the grill. Let the salmon rest for 2 minutes before serving to keep it juicy.
Look at that gorgeous meal you’ve just made! The salmon is buttery and flaky, while the asparagus adds a fresh, crunchy contrast. Serve it with those lemon slices on top for a bright, zesty finish that ties it all together.
Cauliflower Rice Stir Fry
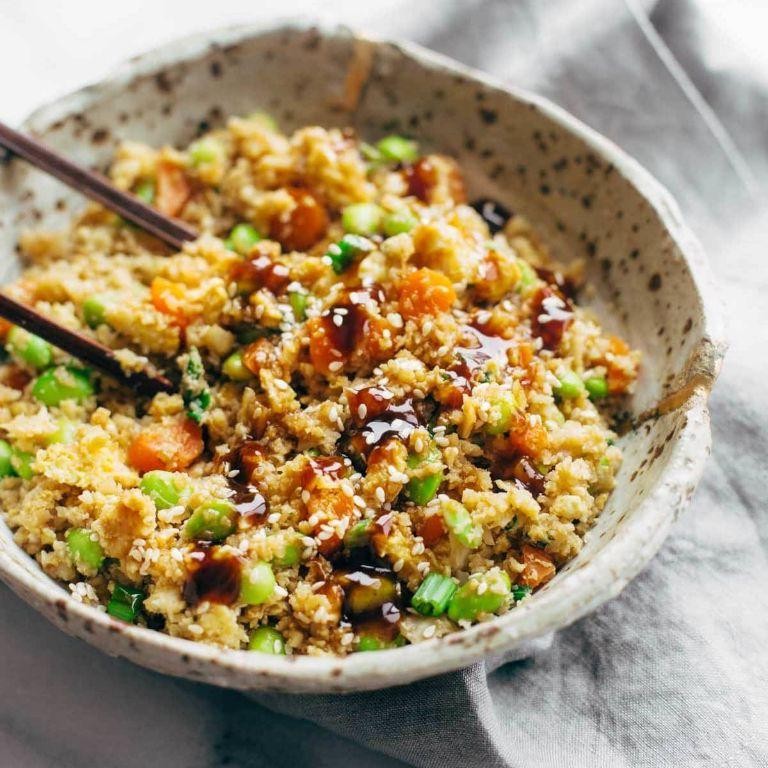
Believe it or not, this cauliflower rice stir fry is about to become your go-to weeknight dinner. It’s quick, packed with flavor, and oh-so-satisfying.
Ingredients
- 1 large head of fresh cauliflower, grated into rice-like pieces
- 2 tbsp rich extra virgin olive oil
- 1 cup crisp, colorful bell peppers, thinly sliced
- 1/2 cup sweet, crunchy carrots, julienned
- 2 cloves of aromatic garlic, minced
- 1 tbsp fresh, zesty ginger, grated
- 2 tbsp savory soy sauce
- 1 tsp toasted sesame oil
- 2 farm-fresh eggs, lightly beaten
- 1/4 cup fresh, green scallions, chopped
Instructions
- Heat the olive oil in a large skillet over medium-high heat until shimmering.
- Add the bell peppers and carrots, stirring frequently for about 3 minutes until they start to soften.
- Toss in the garlic and ginger, cooking for another 30 seconds until fragrant. Tip: Keep the garlic moving to prevent burning.
- Push the veggies to one side of the skillet and pour the beaten eggs into the other side. Scramble the eggs until just set, about 1 minute, then mix with the vegetables.
- Add the cauliflower rice to the skillet, stirring to combine. Cook for 5 minutes, stirring occasionally, until the cauliflower is tender but still has a bit of crunch. Tip: Don’t overcrowd the skillet to ensure everything cooks evenly.
- Drizzle with soy sauce and sesame oil, tossing to coat everything evenly. Cook for another minute to let the flavors meld.
- Remove from heat and sprinkle with scallions before serving. Tip: For an extra kick, add a dash of red pepper flakes.
The stir fry comes out with a delightful mix of textures—crisp veggies, tender cauliflower, and fluffy eggs. Serve it straight from the skillet for a fun, family-style meal, or top with a fried egg for extra richness.
Lentil and Sweet Potato Curry

Deliciously hearty and packed with flavor, this lentil and sweet potato curry is your go-to for a cozy night in. You’ll love how the spices meld together, creating a dish that’s both comforting and exciting.
Ingredients
- 1 cup dried green lentils, rinsed and picked over
- 2 medium sweet potatoes, peeled and diced into 1-inch cubes
- 1 tablespoon fragrant curry powder
- 1 teaspoon ground turmeric, for that golden hue
- 1 can (14 oz) creamy coconut milk
- 2 tablespoons rich extra virgin olive oil
- 1 large onion, finely chopped
- 3 cloves garlic, minced
- 1 inch fresh ginger, grated
- 4 cups vegetable broth, low sodium
- 1 teaspoon sea salt
- 1/2 teaspoon freshly ground black pepper
- 1 bunch fresh cilantro, chopped for garnish
Instructions
- Heat the olive oil in a large pot over medium heat until shimmering.
- Add the onion, garlic, and ginger, sautéing until the onion is translucent, about 5 minutes.
- Stir in the curry powder and turmeric, cooking for 1 minute until fragrant.
- Add the sweet potatoes and lentils, stirring to coat them in the spices.
- Pour in the vegetable broth and bring to a boil. Tip: Make sure the lentils are submerged for even cooking.
- Reduce heat to low, cover, and simmer for 25 minutes, or until the lentils are tender.
- Stir in the coconut milk, salt, and pepper. Simmer uncovered for another 10 minutes. Tip: The curry will thicken slightly as it cooks.
- Adjust seasoning if necessary, then remove from heat. Tip: Letting it sit for 5 minutes before serving enhances the flavors.
- Garnish with fresh cilantro before serving.
Enjoy the creamy texture and the sweet-spicy flavor profile of this curry. Serve it over a bed of fluffy basmati rice or with warm naan bread for a complete meal.
Baked Chicken with Roasted Vegetables
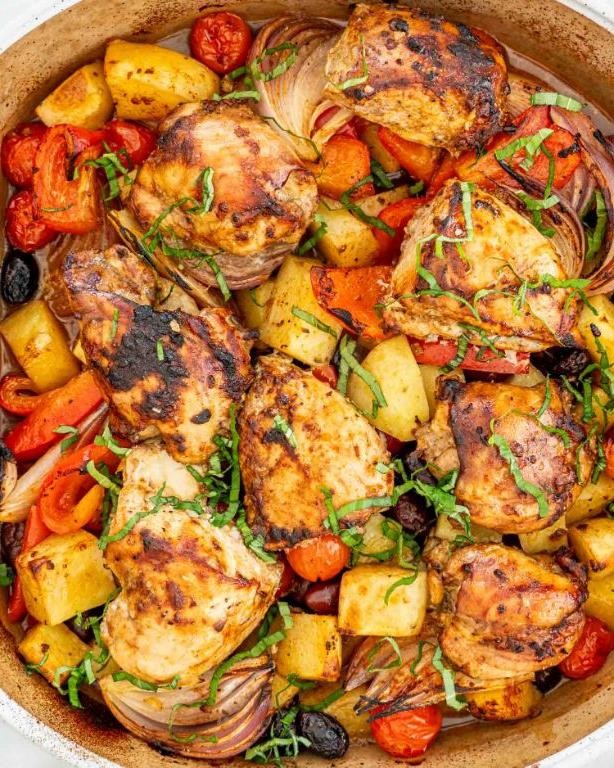
Back to basics with this hearty, wholesome dish that’s as easy to make as it is delicious. You’ll love how the juicy baked chicken pairs perfectly with the caramelized roasted vegetables.
Ingredients
- 1.5 lbs of skin-on, bone-in chicken thighs (for that crispy, golden skin)
- 2 cups of colorful baby potatoes, halved (they roast up so tender)
- 1 cup of fresh, crisp carrots, sliced into thick coins
- 1 large red onion, cut into wedges (for a sweet, mellow flavor)
- 3 tbsp of rich extra virgin olive oil (for that luxurious mouthfeel)
- 1 tbsp of minced garlic (because everything’s better with garlic)
- 1 tsp of smoked paprika (adds a deep, smoky note)
- 1 tsp of sea salt (to enhance all the flavors)
- 1/2 tsp of finely ground black pepper (for a little kick)
- 1/2 tsp of dried thyme (for an herby aroma)
Instructions
- Preheat your oven to 400°F (200°C) to ensure it’s hot enough for roasting.
- In a large bowl, toss the baby potatoes, carrots, and red onion with 2 tbsp of olive oil, the minced garlic, smoked paprika, sea salt, black pepper, and dried thyme until evenly coated.
- Spread the vegetables in a single layer on a large baking sheet, leaving space for the chicken.
- Rub the chicken thighs with the remaining 1 tbsp of olive oil and season both sides with a pinch of sea salt and black pepper.
- Place the chicken thighs skin-side up among the vegetables on the baking sheet.
- Bake for 35-40 minutes, or until the chicken skin is crispy and golden, and the vegetables are tender and caramelized at the edges.
- Let the dish rest for 5 minutes before serving to allow the juices to redistribute in the chicken.
Craving something comforting yet sophisticated? The crispy skin of the chicken contrasts beautifully with the soft, sweet vegetables, making every bite a delight. Serve it straight from the baking sheet for a rustic, family-style meal that’s sure to impress.
Turkey and Kale Stuffed Acorn Squash

Wow, have you ever tried stuffing an acorn squash? It’s like nature’s perfect little bowl, just waiting to be filled with something delicious. This Turkey and Kale Stuffed Acorn Squash is a cozy, nutritious meal that’s as pleasing to the eye as it is to the palate.
Ingredients
- 2 medium acorn squashes, halved and seeds removed
- 1 tbsp rich extra virgin olive oil
- 1 lb lean ground turkey
- 1 small yellow onion, finely diced
- 2 cloves garlic, minced
- 1 bunch kale, stems removed and leaves chopped
- 1/2 cup grated Parmesan cheese
- 1/2 tsp finely ground black pepper
- 1/2 tsp sea salt
Instructions
- Preheat your oven to 400°F. Place the acorn squash halves cut-side down on a baking sheet. Roast for 25 minutes until just tender.
- While the squash roasts, heat olive oil in a large skillet over medium heat. Add the ground turkey, breaking it apart with a spoon, and cook until no longer pink, about 5 minutes.
- Add the diced onion and minced garlic to the skillet. Cook for another 3 minutes until the onion is translucent.
- Stir in the chopped kale, cooking until wilted, about 2 minutes. Tip: Massaging the kale with a bit of olive oil before cooking can help soften it.
- Remove the skillet from heat. Mix in the Parmesan cheese, black pepper, and sea salt.
- Flip the roasted squash halves cut-side up. Divide the turkey and kale mixture evenly among them, packing it in lightly.
- Return to the oven and bake for another 15 minutes until the tops are golden and the squash is fork-tender. Tip: For extra crispiness, broil for the last 2 minutes.
- Let the stuffed squashes cool for 5 minutes before serving. Tip: Drizzling with a balsamic glaze adds a sweet and tangy finish.
Zesty and hearty, this dish offers a delightful contrast between the creamy squash and the savory filling. Serve it on a bed of wild rice for an extra layer of texture and flavor.
Shrimp and Broccoli Stir Fry
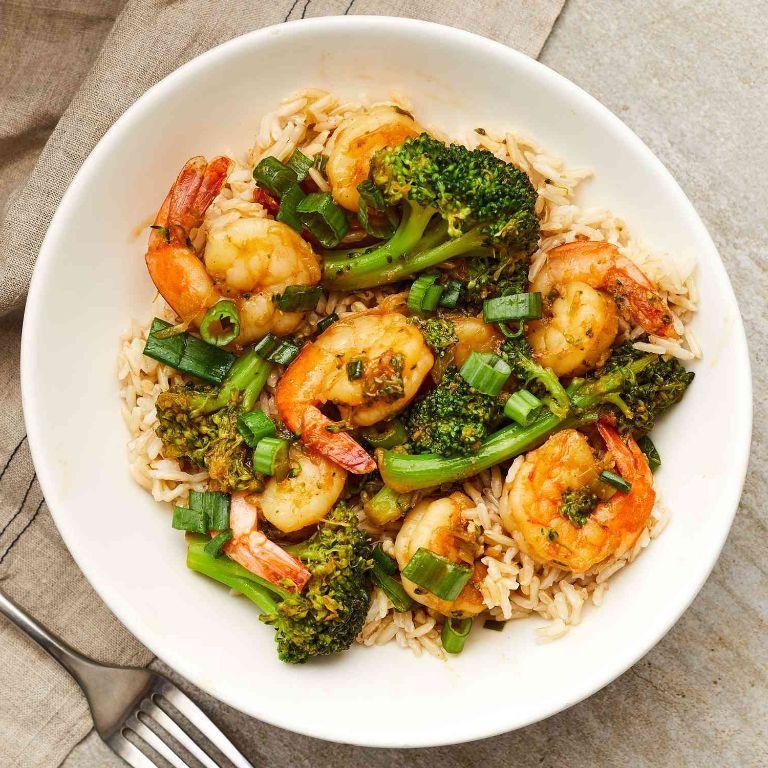
Looking for a quick, healthy dinner that doesn’t skimp on flavor? You’ve hit the jackpot with this shrimp and broccoli stir fry—it’s a breeze to whip up and packed with vibrant tastes.
Ingredients
- 1 lb large, succulent shrimp, peeled and deveined
- 2 cups crisp broccoli florets
- 2 tbsp aromatic minced garlic
- 1 tbsp freshly grated ginger
- 3 tbsp rich soy sauce
- 1 tbsp smooth honey
- 2 tbsp toasted sesame oil
- 1/2 tsp fiery red pepper flakes
- 1/4 cup vibrant green onions, thinly sliced
Instructions
- Heat a large skillet over medium-high heat and add 1 tbsp of toasted sesame oil, swirling to coat the pan evenly.
- Add the shrimp in a single layer, cooking for 2 minutes per side until they turn pink and opaque—don’t overcrowd the pan to ensure a perfect sear.
- Remove the shrimp from the skillet and set aside on a plate, covering loosely to keep warm.
- In the same skillet, add the remaining 1 tbsp of sesame oil, then toss in the broccoli florets, stirring frequently for about 3 minutes until they brighten in color but remain crisp.
- Push the broccoli to one side of the skillet, adding the minced garlic and grated ginger to the cleared space. Sauté for 30 seconds until fragrant—this quick step unlocks their flavors without burning.
- Return the shrimp to the skillet, pouring over the soy sauce and honey, then sprinkle with red pepper flakes. Stir everything together for 1 minute, ensuring the shrimp and broccoli are evenly coated with the sauce.
- Garnish with sliced green onions just before serving to add a fresh, sharp contrast to the dish.
Just like that, you’ve got a dish where the shrimp are juicy, the broccoli snaps with freshness, and the sauce brings a sweet-heat balance. Try serving it over a bed of fluffy jasmine rice or alongside crunchy Asian slaw for extra texture.
Beef and Mushroom Lettuce Wraps

Mmm, imagine biting into a crisp, refreshing lettuce wrap filled with savory beef and earthy mushrooms—it’s a flavor explosion that’s both light and satisfying. Perfect for a quick lunch or a fun dinner, these wraps are a breeze to make and even easier to love.
Ingredients
- 1 lb ground beef (preferably 80/20 for juiciness)
- 2 cups cremini mushrooms, finely chopped (for a deep, earthy flavor)
- 1 tbsp fresh ginger, minced (for a spicy kick)
- 2 cloves garlic, minced (for aromatic depth)
- 3 tbsp soy sauce (rich and savory)
- 1 tbsp sesame oil (toasted, for nutty aroma)
- 1 tbsp brown sugar (for a hint of sweetness)
- 1 head butter lettuce, leaves separated (crisp and cool)
- 2 green onions, thinly sliced (for a fresh crunch)
Instructions
- Heat a large skillet over medium-high heat. Add the ground beef, breaking it apart with a spoon, and cook until no pink remains, about 5 minutes.
- Add the chopped mushrooms, ginger, and garlic to the skillet. Cook, stirring frequently, until the mushrooms are soft and the mixture is fragrant, about 3 minutes.
- Stir in the soy sauce, sesame oil, and brown sugar. Cook for another 2 minutes, allowing the flavors to meld together. Tip: If the mixture seems dry, a splash of water can loosen it up.
- Remove the skillet from heat. Let the beef and mushroom mixture cool slightly, about 2 minutes, to prevent the lettuce from wilting.
- Spoon the mixture into the center of each lettuce leaf. Sprinkle with green onions before serving. Tip: For extra crunch, add a handful of chopped peanuts or water chestnuts to the filling.
Great for sharing or enjoying solo, these beef and mushroom lettuce wraps offer a delightful contrast of textures—tender, juicy filling wrapped in crisp, cool lettuce. Serve them with a side of spicy mayo or hoisin sauce for dipping, and watch them disappear!
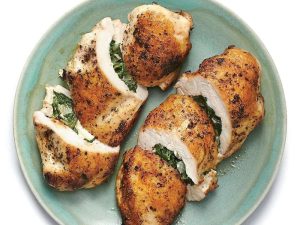
Spinach and Feta Stuffed Chicken Breast
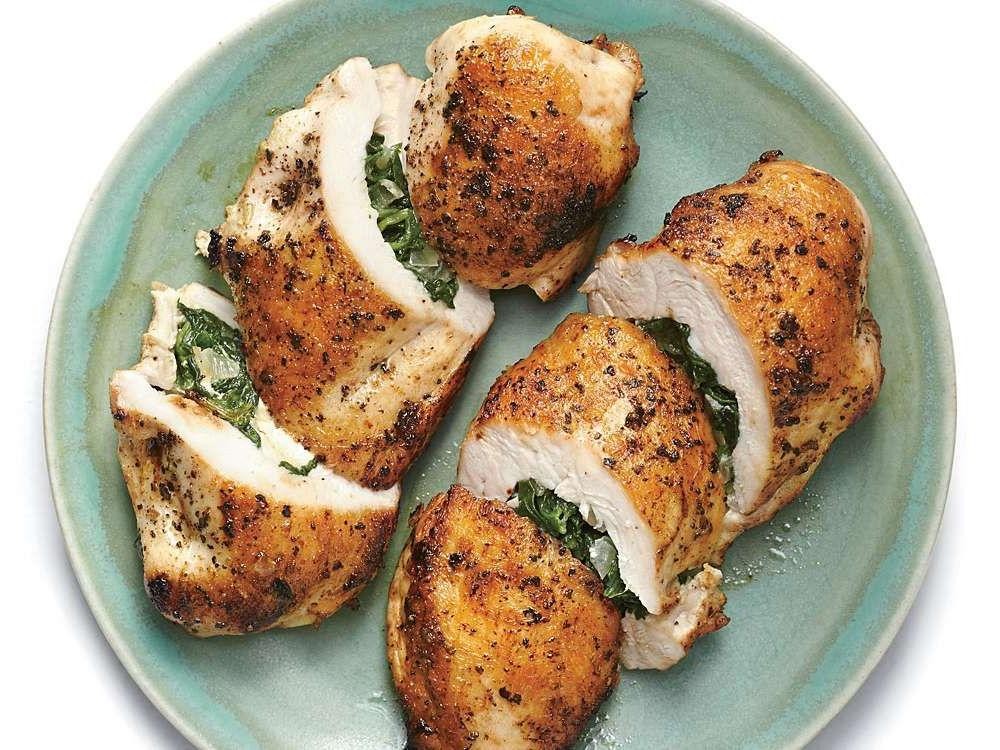
Hey, you’re going to love this Spinach and Feta Stuffed Chicken Breast recipe. It’s a juicy, flavorful dish that’s surprisingly simple to make, perfect for impressing guests or treating yourself to a fancy dinner at home.
Ingredients
- 4 boneless, skinless chicken breasts (about 6 oz each)
- 1 cup fresh spinach, roughly chopped
- 1/2 cup crumbled feta cheese, creamy and tangy
- 2 tbsp rich extra virgin olive oil
- 1 tsp finely ground black pepper
- 1/2 tsp sea salt, for that perfect seasoning
- 1 clove garlic, minced, for a punch of flavor
Instructions
- Preheat your oven to 375°F (190°C) to ensure it’s ready for baking.
- Using a sharp knife, carefully cut a pocket into the side of each chicken breast, being careful not to cut all the way through.
- In a bowl, mix the chopped spinach, crumbled feta, minced garlic, 1 tbsp of olive oil, salt, and pepper until well combined.
- Stuff each chicken breast with the spinach and feta mixture, using a spoon to pack it in tightly.
- Heat the remaining olive oil in a large oven-safe skillet over medium-high heat. Once hot, add the chicken breasts.
- Sear the chicken for 3-4 minutes on each side, or until golden brown, to lock in those juices.
- Transfer the skillet to the preheated oven and bake for 20-25 minutes, or until the chicken reaches an internal temperature of 165°F (74°C).
- Let the chicken rest for 5 minutes before slicing to keep it moist and tender.
Craving something delicious? This dish delivers with its juicy chicken, creamy feta, and vibrant spinach. Serve it over a bed of fluffy quinoa or alongside roasted veggies for a complete meal that’s as nutritious as it is tasty.
Eggplant Lasagna
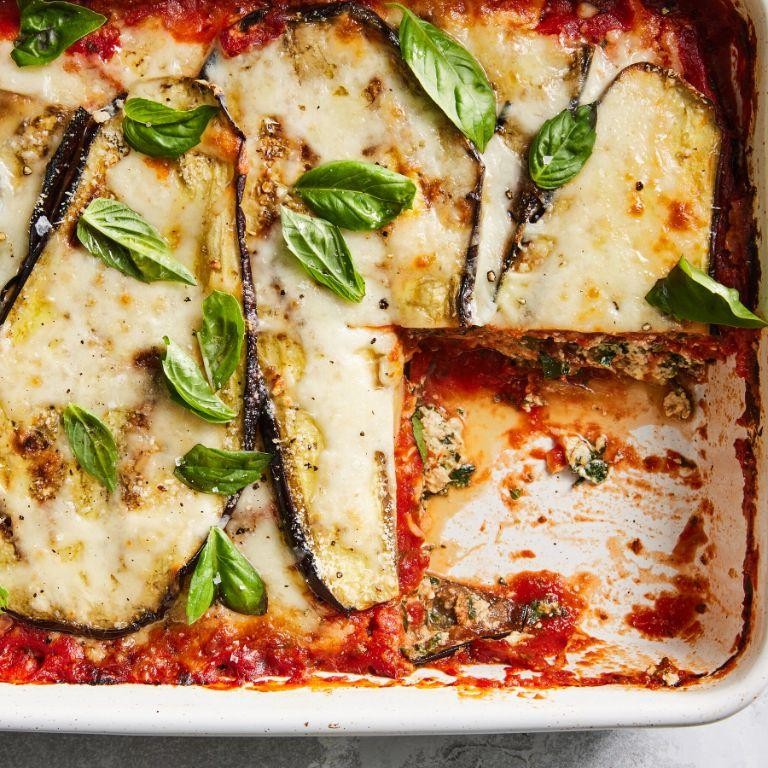
Now, let’s dive into making a comforting Eggplant Lasagna that’s perfect for any night of the week. You’ll love how the layers of flavor come together in this dish.
Ingredients
- 2 large, firm eggplants, sliced into 1/4-inch rounds
- 1 lb. ground beef, preferably 80/20 for juiciness
- 24 oz. rich marinara sauce, homemade or your favorite store-bought
- 15 oz. whole milk ricotta cheese, creamy and smooth
- 1 large egg, farm-fresh
- 2 cups shredded mozzarella cheese, divided
- 1/2 cup grated Parmesan cheese, freshly grated for best flavor
- 1 tbsp. extra virgin olive oil, for brushing
- 1 tsp. dried basil, fragrant
- 1 tsp. dried oregano, earthy
- 1/2 tsp. garlic powder, for a hint of warmth
- Salt and finely ground black pepper, to season
Instructions
- Preheat your oven to 375°F (190°C). Brush both sides of the eggplant slices with extra virgin olive oil and season lightly with salt and pepper.
- Arrange the eggplant slices on a baking sheet in a single layer. Roast for 20 minutes, flipping halfway through, until they’re tender and slightly golden.
- While the eggplant roasts, brown the ground beef in a large skillet over medium heat, breaking it apart with a spoon. Drain any excess fat.
- Stir in the marinara sauce, dried basil, dried oregano, and garlic powder into the beef. Simmer for 5 minutes to let the flavors meld.
- In a mixing bowl, combine the ricotta cheese, egg, 1 cup of mozzarella, and Parmesan cheese. Season with a pinch of salt and pepper.
- In a 9×13 inch baking dish, layer half of the eggplant slices, followed by half of the beef mixture, and then half of the ricotta mixture. Repeat the layers.
- Sprinkle the remaining 1 cup of mozzarella cheese on top. Bake for 25 minutes, or until the cheese is bubbly and golden.
- Let the lasagna rest for 10 minutes before slicing. This helps the layers set for cleaner cuts.
Here’s the deal: this lasagna is all about the creamy ricotta, savory beef, and tender eggplant layers. Serve it with a crisp green salad for a meal that feels both indulgent and balanced.
Black Bean and Corn Tacos with Avocado Cream

Alright, let’s dive into making these vibrant Black Bean and Corn Tacos with Avocado Cream. You’re going to love how easy and flavorful they are, perfect for a quick weeknight dinner or a fun weekend meal.
Ingredients
- 1 can (15 oz) black beans, drained and rinsed
- 1 cup sweet corn kernels, fresh or frozen
- 1 ripe avocado, peeled and pitted
- 1/2 cup sour cream
- 1 tbsp fresh lime juice
- 1/2 tsp ground cumin
- 1/4 tsp smoked paprika
- Salt, to taste
- 8 small corn tortillas, warmed
- 1/4 cup chopped fresh cilantro
- 1/2 cup diced red onion
Instructions
- In a medium skillet over medium heat, warm the black beans and corn for 5 minutes, stirring occasionally, until heated through.
- While the beans and corn cook, blend the avocado, sour cream, lime juice, cumin, smoked paprika, and a pinch of salt in a blender until smooth. Tip: For a thinner consistency, add a tablespoon of water at a time until desired texture is reached.
- Warm the corn tortillas in a dry skillet over medium heat for about 30 seconds on each side, or until pliable. Tip: Keep them wrapped in a clean kitchen towel to stay warm until serving.
- To assemble the tacos, spread a generous spoonful of the avocado cream on each tortilla, top with the black bean and corn mixture, and garnish with chopped cilantro and diced red onion. Tip: For an extra kick, add a few slices of jalapeño or a dash of hot sauce.
Delight in the creamy texture of the avocado against the hearty beans and sweet corn, all wrapped up in a soft tortilla. These tacos are a colorful, satisfying meal that’s as fun to make as it is to eat—try serving them with a side of crispy sweet potato fries for a complete feast.
Roasted Butternut Squash Soup

After a long day, there’s nothing like a bowl of warm, creamy roasted butternut squash soup to make everything better. You’ll love how the natural sweetness of the squash gets caramelized in the oven, bringing out its best flavors.
Ingredients
- 1 large butternut squash, peeled and cubed
- 2 tbsp rich extra virgin olive oil
- 1 medium yellow onion, finely chopped
- 2 cloves garlic, minced
- 4 cups low-sodium vegetable broth
- 1/2 cup heavy cream
- 1 tsp finely ground black pepper
- 1/2 tsp sea salt
Instructions
- Preheat your oven to 400°F (200°C).
- Toss the cubed butternut squash with 1 tbsp of olive oil, sea salt, and black pepper on a baking sheet. Tip: Make sure the squash is in a single layer for even roasting.
- Roast for 25-30 minutes until the edges are golden and the squash is fork-tender.
- While the squash roasts, heat the remaining olive oil in a large pot over medium heat. Add the onion and garlic, sautéing until translucent, about 5 minutes.
- Add the roasted squash and vegetable broth to the pot. Bring to a boil, then reduce heat and simmer for 10 minutes. Tip: This helps the flavors meld together beautifully.
- Use an immersion blender to puree the soup until smooth. Alternatively, carefully transfer to a blender in batches. Tip: If using a blender, leave the vent open to let steam escape and prevent splatters.
- Stir in the heavy cream and adjust seasoning if needed. Heat through for another 2 minutes.
The soup is velvety smooth with a sweet, nutty depth from the roasted squash. Serve it with a drizzle of cream and a sprinkle of black pepper for an extra touch of elegance.
Grilled Lemon Herb Chicken with Quinoa
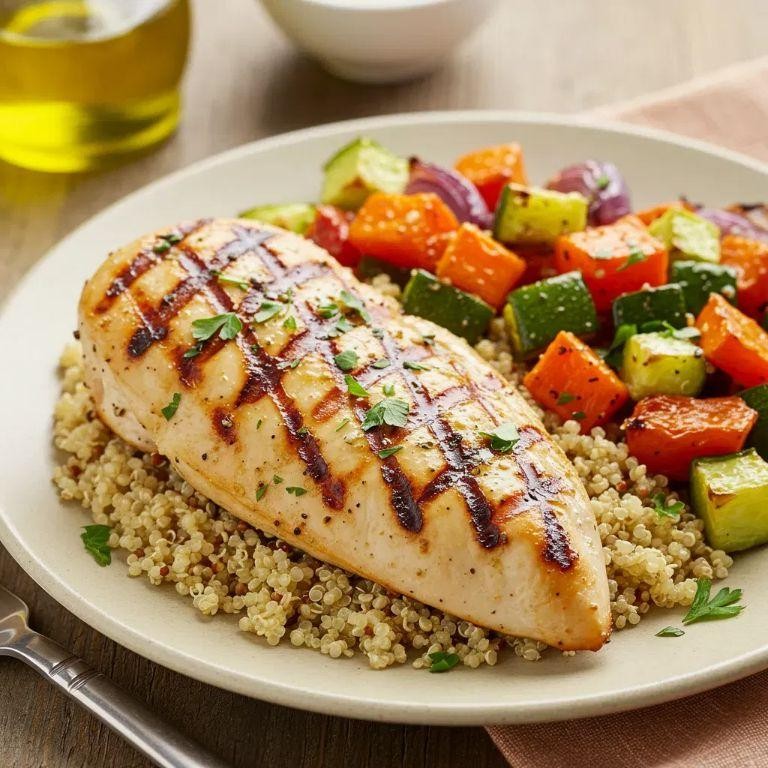
Dinner just got a whole lot brighter with this grilled lemon herb chicken paired with fluffy quinoa. It’s the perfect combo of zesty and hearty, ready in no time for those busy weeknights.
Ingredients
- 1.5 lbs boneless, skinless chicken breasts (thick and juicy)
- 1/4 cup fresh lemon juice (bright and tangy)
- 2 tbsp extra virgin olive oil (rich and smooth)
- 2 cloves garlic (minced, aromatic)
- 1 tbsp fresh rosemary (finely chopped, fragrant)
- 1 tbsp fresh thyme (finely chopped, earthy)
- 1 tsp sea salt (coarse and crunchy)
- 1/2 tsp black pepper (freshly ground, bold)
- 1 cup quinoa (rinsed, light and fluffy)
- 2 cups water (clear and cool)
Instructions
- In a large bowl, whisk together the lemon juice, olive oil, minced garlic, rosemary, thyme, sea salt, and black pepper to create the marinade.
- Add the chicken breasts to the marinade, ensuring they’re fully coated. Cover and refrigerate for at least 30 minutes, or up to 4 hours for deeper flavor.
- Preheat your grill to medium-high heat, about 375°F, ensuring the grates are clean and lightly oiled to prevent sticking.
- Remove the chicken from the marinade, letting excess drip off. Grill for 6-7 minutes per side, or until the internal temperature reaches 165°F and the outside is beautifully charred.
- While the chicken cooks, bring the water to a boil in a medium saucepan. Add the quinoa, reduce heat to low, cover, and simmer for 15 minutes, or until all water is absorbed and quinoa is tender.
- Let the chicken rest for 5 minutes before slicing to keep the juices locked in.
- Fluff the quinoa with a fork and serve alongside the sliced chicken.
Succulent and flavorful, this dish offers a delightful contrast between the charred, herby chicken and the light, nutty quinoa. Try topping it with a sprinkle of feta cheese or a drizzle of balsamic glaze for an extra flavor boost.
Spaghetti Squash with Tomato Basil Sauce
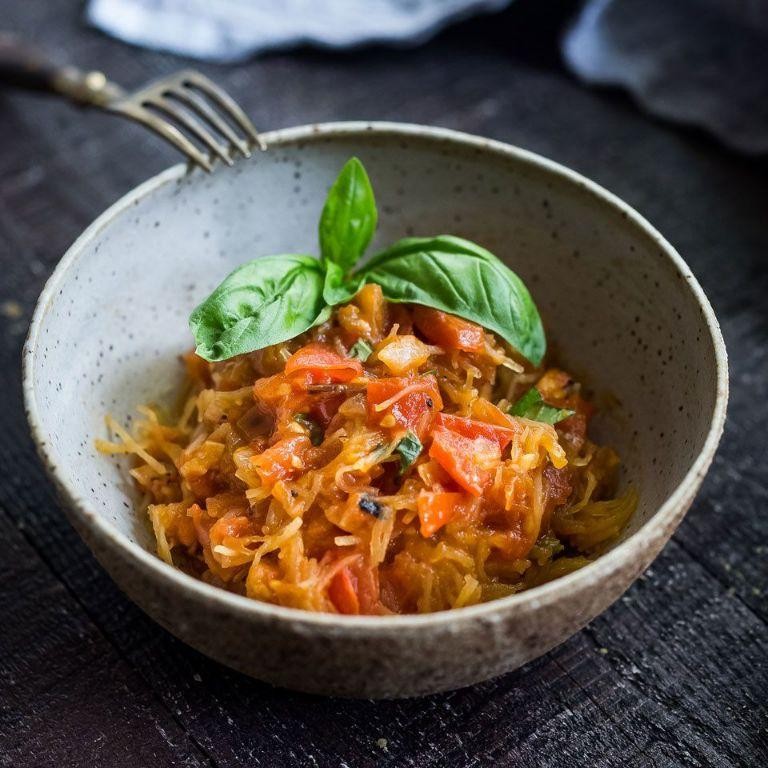
Believe it or not, spaghetti squash is your ticket to a guilt-free pasta night. Toss it with a vibrant tomato basil sauce, and you’ve got a dish that’s as satisfying as it is wholesome.
Ingredients
- 1 medium spaghetti squash, halved and seeds removed
- 2 tbsp rich extra virgin olive oil
- 3 cloves garlic, minced
- 1 can (28 oz) crushed tomatoes, with their juices
- 1/4 cup fresh basil leaves, thinly sliced
- 1/2 tsp finely ground black pepper
- 1/2 tsp sea salt
- 1/4 cup grated Parmesan cheese, for serving
Instructions
- Preheat your oven to 400°F. Place the spaghetti squash halves cut-side down on a baking sheet. Roast for 40 minutes, or until the flesh is tender and easily shreds into strands with a fork.
- While the squash roasts, heat the olive oil in a large skillet over medium heat. Add the minced garlic and sauté for about 1 minute, until fragrant but not browned.
- Pour in the crushed tomatoes, then stir in the basil, black pepper, and sea salt. Simmer the sauce for 15 minutes, stirring occasionally, to let the flavors meld.
- Once the squash is done, use a fork to scrape the flesh into strands directly into the skillet with the sauce. Gently toss to combine everything evenly.
- Serve hot, sprinkled with grated Parmesan cheese for a salty, umami finish.
Kind of amazing how the squash strands mimic pasta, right? The sauce clings beautifully, offering a sweet and herby contrast to the squash’s mild, nutty flavor. Try topping it with a fried egg for a hearty twist.
Coconut Curry Chicken
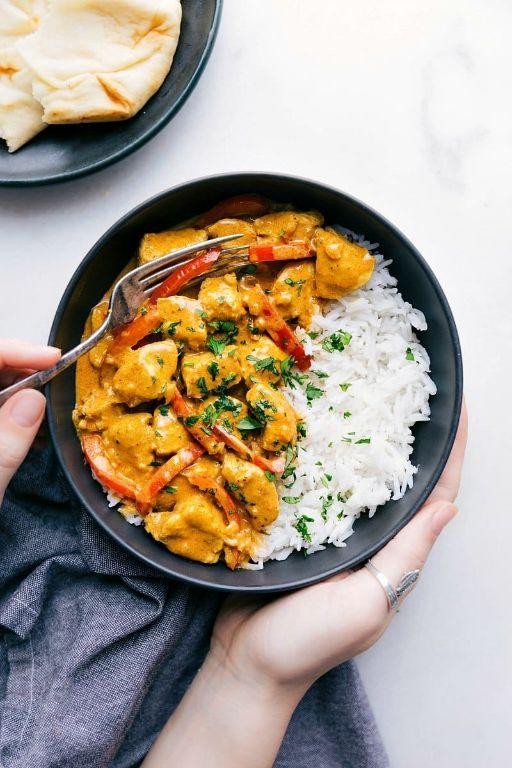
Vibrant and full of flavor, this Coconut Curry Chicken is your ticket to a deliciously easy dinner. You’ll love how the creamy coconut milk and aromatic spices come together to create something truly special.
Ingredients
- 1.5 lbs boneless, skinless chicken thighs, cut into bite-sized pieces
- 1 tbsp fragrant curry powder
- 1 can (13.5 oz) creamy coconut milk
- 2 tbsp golden coconut oil
- 1 medium yellow onion, finely diced
- 3 cloves garlic, minced
- 1 tbsp freshly grated ginger
- 1 red bell pepper, thinly sliced
- 1 tbsp fish sauce
- 1 tbsp brown sugar
- 1/2 cup fresh cilantro, chopped
- 1 lime, juiced
Instructions
- Heat the golden coconut oil in a large skillet over medium heat until shimmering.
- Add the finely diced yellow onion and cook until translucent, about 3 minutes.
- Stir in the minced garlic and freshly grated ginger, cooking until fragrant, about 30 seconds.
- Sprinkle the fragrant curry powder over the onions, stirring to coat, and cook for 1 minute to toast the spices.
- Add the bite-sized chicken pieces to the skillet, browning on all sides, about 5 minutes.
- Pour in the creamy coconut milk, scraping up any browned bits from the bottom of the pan.
- Mix in the thinly sliced red bell pepper, fish sauce, and brown sugar, bringing the mixture to a gentle simmer.
- Reduce heat to low, cover, and let the curry simmer for 20 minutes, stirring occasionally.
- Remove from heat and stir in the chopped fresh cilantro and lime juice.
Lusciously creamy with a hint of sweetness and spice, this Coconut Curry Chicken is perfect over steamed jasmine rice or with a side of naan for dipping. The tender chicken and crisp-tender peppers make every bite a delight.
Baked Cod with Lemon and Dill
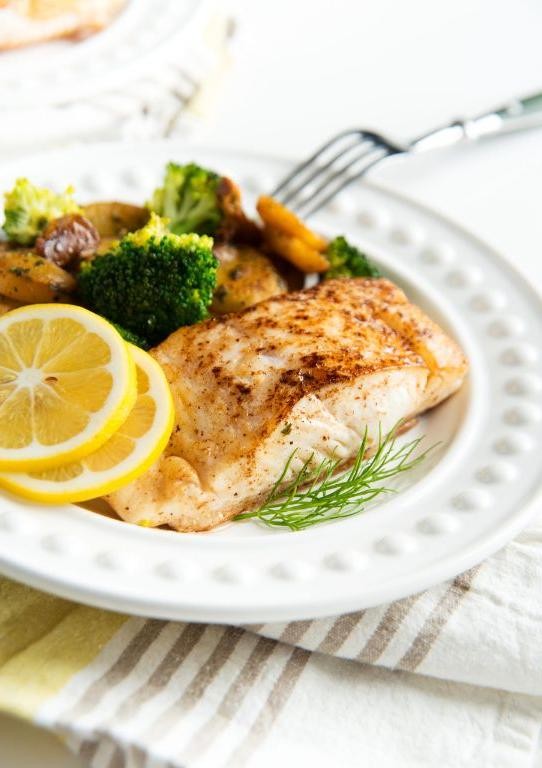
Hey there, let’s talk about a dish that’s as easy to make as it is delicious. Baked cod with lemon and dill is a light, flavorful meal that’s perfect for any night of the week.
Ingredients
- 1 lb fresh cod fillets, skinless and firm to the touch
- 2 tbsp rich extra virgin olive oil
- 1 medium lemon, thinly sliced and seeds removed
- 1 tbsp fresh dill, finely chopped
- 1/2 tsp sea salt, finely ground
- 1/4 tsp freshly ground black pepper
- 2 cloves garlic, minced
Instructions
- Preheat your oven to 375°F and lightly grease a baking dish with a bit of the olive oil.
- Pat the cod fillets dry with paper towels to ensure they brown nicely, then place them in the prepared dish.
- Drizzle the remaining olive oil over the cod, then sprinkle with sea salt and black pepper.
- Scatter the minced garlic and chopped dill evenly over the fillets.
- Arrange the lemon slices on top of the fillets, covering them as much as possible for maximum flavor.
- Bake in the preheated oven for 12-15 minutes, or until the cod flakes easily with a fork.
- Tip: For an extra burst of flavor, squeeze a little fresh lemon juice over the cod right before serving.
- Tip: If you’re using thicker fillets, you might need to add a couple more minutes to the baking time.
- Tip: Serve immediately to enjoy the cod at its most tender and flavorful.
You’ll love how the cod turns out—moist, flaky, and infused with the bright flavors of lemon and dill. Try serving it over a bed of quinoa or with a side of roasted vegetables for a complete meal.
Conclusion
Ready to transform your dinner routine? These 17 gluten-free recipes prove that healthy eating doesn’t mean sacrificing flavor. Whether you’re gluten-sensitive or simply exploring nutritious options, there’s something here for everyone. We’d love to hear which dishes become your favorites—drop a comment below! And if you found this roundup helpful, don’t forget to share the love on Pinterest. Happy cooking!