Boo! Halloween is just around the corner, and what better way to celebrate than by whipping up some frightfully fun treats with your little ghouls and goblins? Our roundup of 16 Spooky Halloween Recipes for Kids Easy is packed with simple, delicious ideas that are sure to cast a spell on your family. From creepy cookies to monstrous munchies, these recipes will make your Halloween festivities unforgettable. Keep reading to discover how easy it is to add a dash of magic to your Halloween table!
Witch’s Finger Cookies
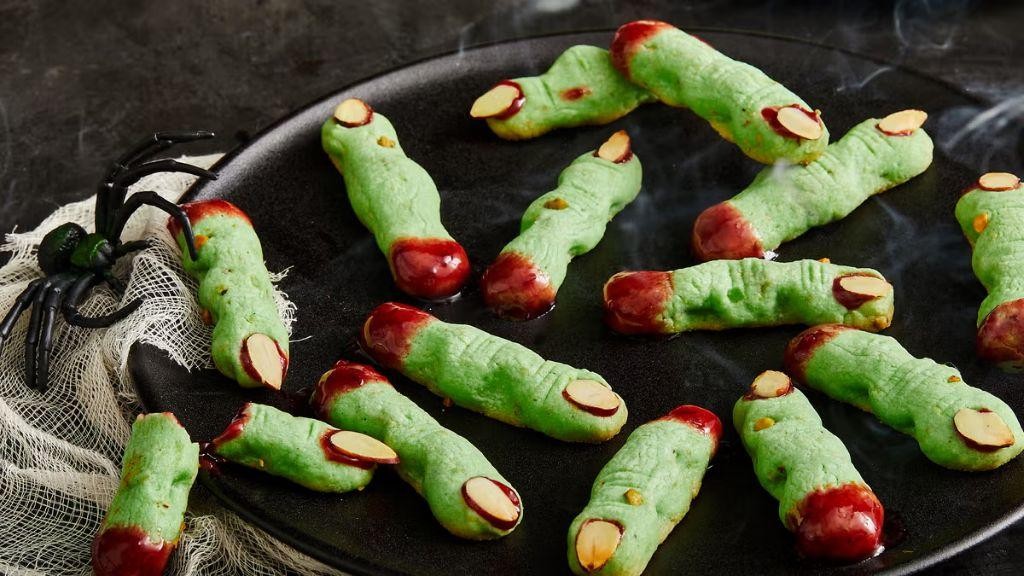
Gathering around the kitchen during Halloween has always been a tradition in my family, especially when it comes to baking these eerily delicious Witch’s Finger Cookies. They’re not only a hit at parties but also a fun way to get creative with your little ones. I remember the first time we made them; my niece was convinced we were baking real witch fingers!
Ingredients
- 1 cup butter, softened
- 1 cup powdered sugar
- 1 egg
- 1 tsp almond extract
- 2 3/4 cups all-purpose flour
- 1 tsp baking powder
- 1/2 tsp salt
- 3/4 cup whole almonds
- 1 tube red gel icing
Instructions
- Preheat your oven to 325°F (165°C) and line two baking sheets with parchment paper.
- In a large bowl, cream together the butter and powdered sugar until light and fluffy. Tip: Ensure your butter is at room temperature for easier mixing.
- Beat in the egg and almond extract until well combined.
- In a separate bowl, whisk together the flour, baking powder, and salt.
- Gradually add the dry ingredients to the wet ingredients, mixing until a dough forms.
- Divide the dough into quarters, then roll each portion into thin logs about 4 inches long, tapering one end to resemble a finger. Tip: If the dough is too sticky, lightly flour your hands.
- Press an almond into the tapered end of each ‘finger’ to create a fingernail.
- Use a knife to make small cuts on the dough to resemble knuckles.
- Bake for 20-25 minutes, or until the cookies are lightly golden. Tip: Keep an eye on them after 15 minutes to prevent over-browning.
- Let the cookies cool on the baking sheet for 5 minutes, then transfer to a wire rack.
- Once completely cool, use the red gel icing to create ‘blood’ around the almond nails.
Delightfully creepy and surprisingly tasty, these Witch’s Finger Cookies have the perfect crunch with a buttery almond flavor. Serve them on a platter with a spooky cloth for an extra Halloween touch, or pack them in treat bags for a ghoulish gift.
Pumpkin Patch Dirt Cups
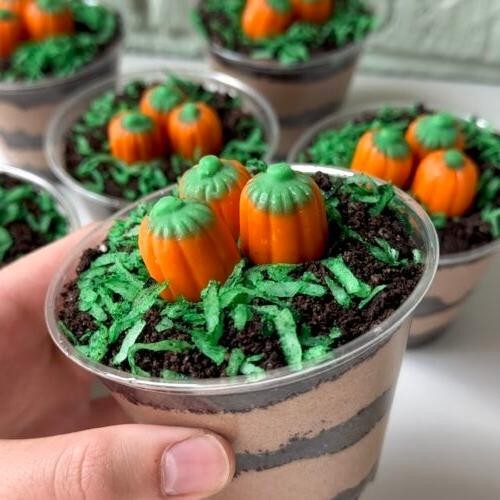
How many times have you walked through a pumpkin patch and wished you could capture that earthy, sweet essence in a dessert? I know I have, especially during the fall when pumpkins are everywhere. That’s why I love making these Pumpkin Patch Dirt Cups—they’re a playful, delicious nod to the season.
Ingredients
- 1 cup graham cracker crumbs
- 1/4 cup unsalted butter, melted
- 1 cup canned pumpkin puree
- 1/2 cup powdered sugar
- 1 tsp pumpkin pie spice
- 1 cup heavy cream
- 2 tbsp granulated sugar
- 1 tsp vanilla extract
- Gummy worms for decoration
Instructions
- In a medium bowl, mix graham cracker crumbs and melted butter until well combined. Tip: For a finer texture, pulse the graham crackers in a food processor before mixing.
- Press the mixture into the bottom of 4 serving cups to form the ‘dirt’ layer. Chill in the refrigerator for 10 minutes to set.
- In another bowl, whisk together pumpkin puree, powdered sugar, and pumpkin pie spice until smooth. Tip: Ensure the pumpkin puree is at room temperature to avoid lumps.
- In a separate bowl, whip heavy cream, granulated sugar, and vanilla extract to stiff peaks. Tip: Chill your mixing bowl and beaters in the freezer for 10 minutes before whipping for better volume.
- Gently fold the whipped cream into the pumpkin mixture until fully incorporated.
- Spoon the pumpkin mixture over the chilled graham cracker layer in the cups.
- Top with additional graham cracker crumbs and gummy worms for decoration.
- Chill for at least 1 hour before serving to allow the flavors to meld.
Just one bite of these Pumpkin Patch Dirt Cups and you’ll be transported to a crisp autumn day. The creamy pumpkin layer contrasts beautifully with the crunchy ‘dirt,’ and the gummy worms add a fun, chewy surprise. Serve them at your next fall gathering or enjoy as a whimsical treat after a day of leaf-peeping.
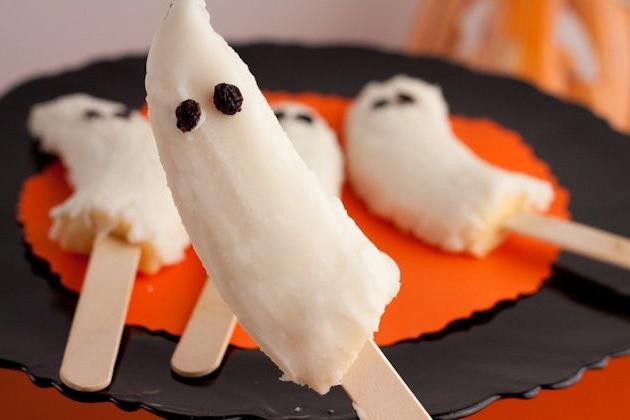
Ghostly Banana Pops

After a long day of experimenting in the kitchen, I stumbled upon a recipe that’s as fun to make as it is to eat—Ghostly Banana Pops. Perfect for Halloween or just a spooky snack night, these treats are a hit with both kids and adults. I remember the first time I made them; my kitchen was a mess, but the laughter and sticky fingers were totally worth it.
Ingredients
- 4 ripe bananas
- 8 wooden popsicle sticks
- 1 cup white chocolate chips
- 1 tbsp coconut oil
- 1/4 cup mini chocolate chips
Instructions
- Peel the bananas and cut them in half crosswise.
- Insert a wooden popsicle stick into the cut end of each banana half.
- Place the bananas on a tray lined with parchment paper and freeze for 2 hours, or until solid.
- In a microwave-safe bowl, combine the white chocolate chips and coconut oil. Microwave in 30-second intervals, stirring in between, until fully melted and smooth.
- Dip each frozen banana into the melted white chocolate, allowing the excess to drip off.
- While the chocolate is still wet, press mini chocolate chips into the banana to create ghost faces.
- Return the bananas to the parchment-lined tray and freeze for an additional 30 minutes, or until the chocolate is set.
Ghostly Banana Pops are a delightful mix of creamy banana and sweet white chocolate, with a playful crunch from the mini chips. Serve them at your next Halloween party or as a fun after-school treat—either way, they’re sure to disappear quickly!
Monster Mouth Apples
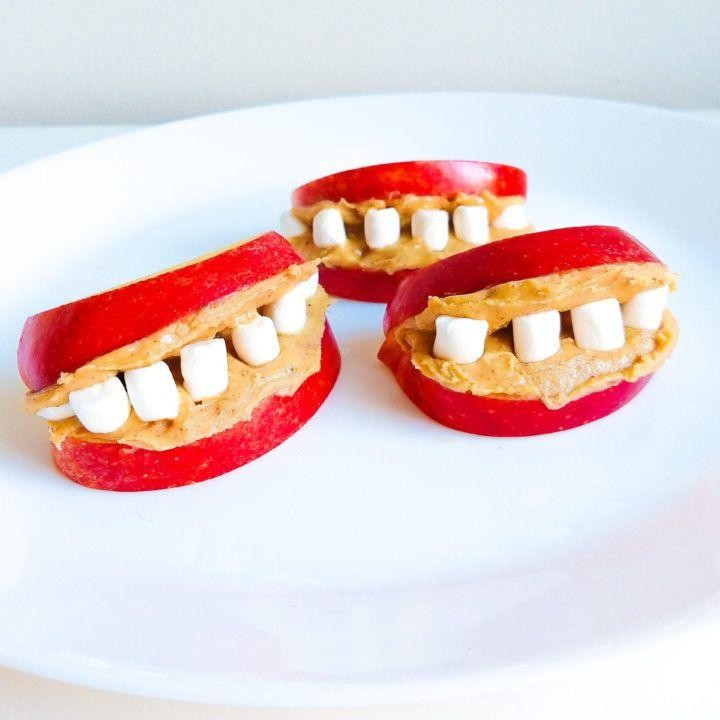
Perfect for Halloween or just a fun snack, these Monster Mouth Apples are a hit with kids and adults alike. I remember the first time I made them; my nieces couldn’t stop giggling at the silly faces!
Ingredients
- 4 large apples
- 1/4 cup peanut butter
- 1/4 cup mini marshmallows
- 1/4 cup slivered almonds
Instructions
- Wash and dry the apples thoroughly to ensure they’re clean and ready for decorating.
- Cut each apple into quarters from the top down, stopping about halfway to leave the bottom intact, creating a ‘mouth’ that can open and close.
- Spread 1 tablespoon of peanut butter inside each ‘mouth’ to act as the ‘glue’ for the teeth.
- Press mini marshmallows into the peanut butter on the top and bottom of the ‘mouth’ to create ‘teeth’. Tip: For a more monstrous look, vary the sizes and spacing of the marshmallows.
- Insert slivered almonds between the marshmallows on the top ‘lip’ to mimic fangs. Tip: Lightly pressing them into the peanut butter ensures they stay in place.
- Chill the apples in the refrigerator for 30 minutes to set the peanut butter and marshmallows. Tip: This step is crucial for making the ‘mouths’ easier to handle and eat.
Vibrant and playful, these Monster Mouth Apples offer a delightful crunch from the apples, a creamy contrast from the peanut butter, and a sweet chewiness from the marshmallows. Serve them on a platter at your next party, and watch them disappear before your eyes!
Spiderweb Pizza
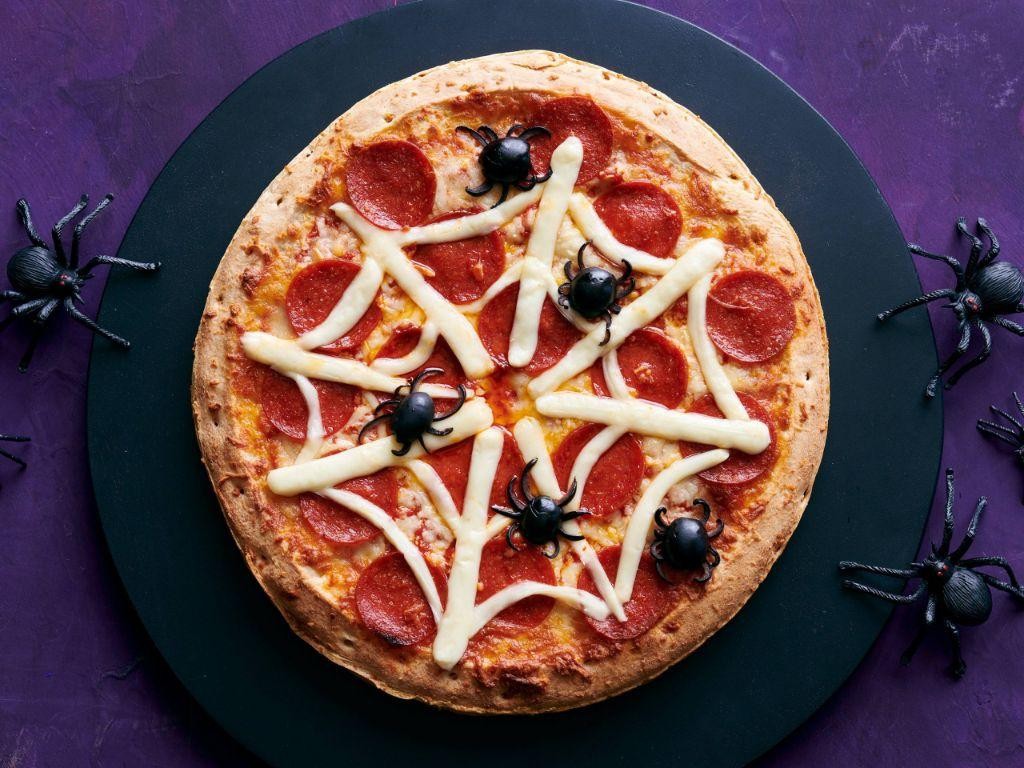
Every Halloween, I find myself craving something spooky yet delicious, and that’s how this Spiderweb Pizza came to life. It’s a fun twist on the classic pizza night, perfect for getting into the holiday spirit without sacrificing flavor. Plus, it’s a hit with both kids and adults at any Halloween gathering.
Ingredients
- 1 lb pizza dough
- 1/2 cup pizza sauce
- 2 cups shredded mozzarella cheese
- 1/4 cup black olives, sliced
- 1 tbsp olive oil
- 1/2 tsp garlic powder
Instructions
- Preheat your oven to 475°F and place a pizza stone or baking sheet inside to heat up.
- On a floured surface, roll out the pizza dough into a 12-inch circle. Transfer the dough to a piece of parchment paper.
- Spread the pizza sauce evenly over the dough, leaving a 1-inch border around the edges.
- Sprinkle the shredded mozzarella cheese over the sauce, covering it completely.
- Using the sliced black olives, create a spiderweb design on top of the cheese. Start with a small circle in the center and add lines radiating outwards.
- Drizzle the olive oil over the pizza and sprinkle with garlic powder for extra flavor.
- Carefully transfer the pizza on the parchment paper to the preheated pizza stone or baking sheet. Bake for 12-15 minutes, or until the crust is golden and the cheese is bubbly.
- Let the pizza cool for 5 minutes before slicing to allow the cheese to set slightly.
Last but not least, this Spiderweb Pizza is as fun to eat as it is to make. The crispy crust, gooey cheese, and savory olives create a perfect bite every time. Serve it with a side of marinara for dipping, or enjoy it as is for a spooky snack that’s sure to impress.
Creepy Crawly Cupcakes
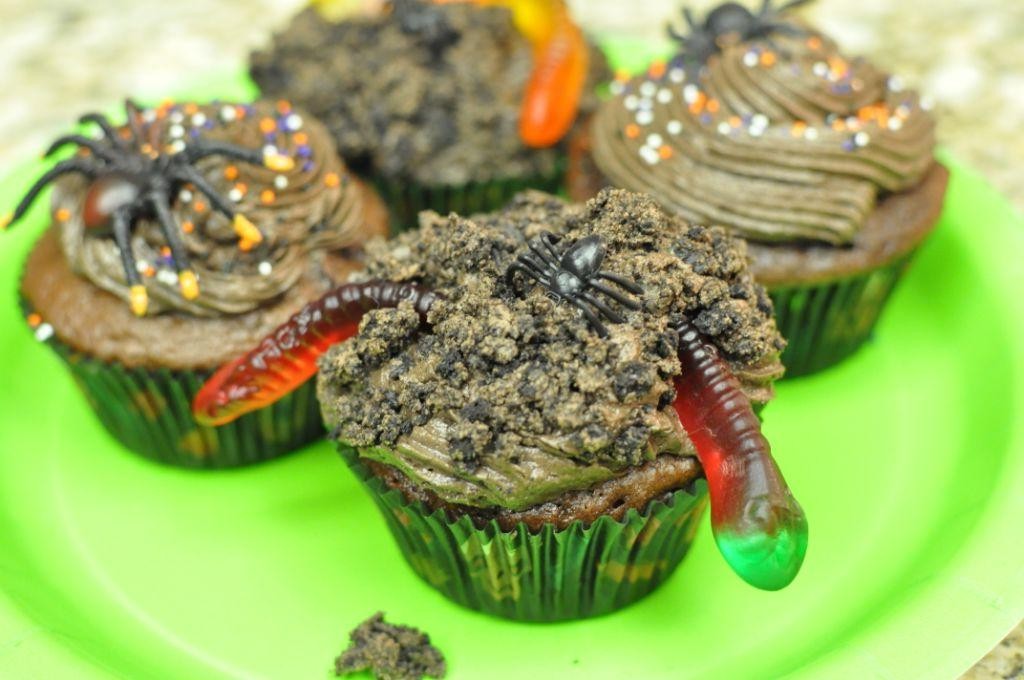
Back when I was a kid, Halloween wasn’t just about the costumes; it was about the treats, especially the ones that looked as spooky as they tasted. That’s why I’m thrilled to share these Creepy Crawly Cupcakes with you today. They’re a fun, eerie twist on the classic cupcake, perfect for your next Halloween bash or just to spook your family on a regular Tuesday.
Ingredients
- 1 1/2 cups all-purpose flour
- 1 cup granulated sugar
- 1/2 cup unsweetened cocoa powder
- 1 tsp baking soda
- 1/2 tsp salt
- 1 cup water
- 1/3 cup vegetable oil
- 1 tbsp white vinegar
- 1 tsp vanilla extract
- 12 pieces gummy worms
- 1 cup chocolate frosting
Instructions
- Preheat your oven to 350°F (175°C) and line a muffin tin with 12 cupcake liners.
- In a large bowl, whisk together 1 1/2 cups all-purpose flour, 1 cup granulated sugar, 1/2 cup unsweetened cocoa powder, 1 tsp baking soda, and 1/2 tsp salt until well combined.
- Add 1 cup water, 1/3 cup vegetable oil, 1 tbsp white vinegar, and 1 tsp vanilla extract to the dry ingredients. Mix until the batter is smooth and free of lumps.
- Divide the batter evenly among the 12 cupcake liners, filling each about 2/3 full.
- Bake for 20 minutes, or until a toothpick inserted into the center of a cupcake comes out clean.
- Allow the cupcakes to cool completely on a wire rack before frosting.
- Once cooled, frost each cupcake with about 1 tbsp of chocolate frosting.
- Press a gummy worm into the frosting of each cupcake, letting it peek out as if crawling out of the cupcake.
My favorite part about these cupcakes is how the rich chocolate flavor pairs perfectly with the playful texture of the gummy worms. Serve them at your next Halloween party and watch them disappear—just like magic!
Frankenstein’s Monster Rice Krispie Treats
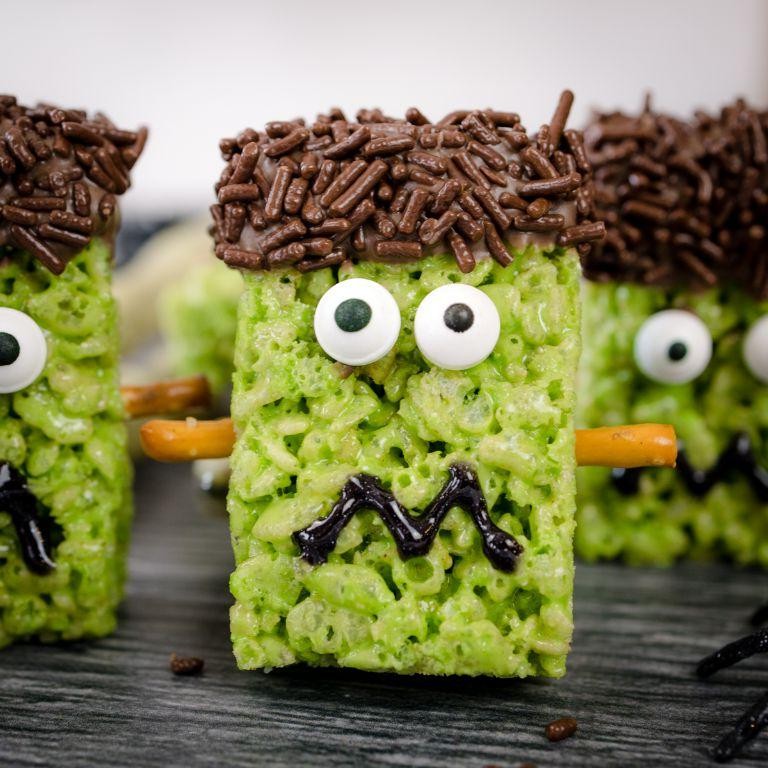
Just when you thought Rice Krispie Treats couldn’t get any more fun, here comes a version that’s perfect for Halloween or any day you’re feeling a bit monstrous. I stumbled upon this idea after a particularly messy kitchen experiment, and it’s been a hit at every party since.
Ingredients
- 6 cups Rice Krispies cereal
- 10 oz marshmallows
- 3 tbsp unsalted butter
- 1/2 cup green candy melts
- 1/4 cup black decorating gel
Instructions
- Line a 9×13 inch baking pan with parchment paper, leaving an overhang on the sides for easy removal.
- In a large pot, melt the butter over low heat. Tip: Keeping the heat low prevents the butter from browning too quickly.
- Add the marshmallows to the pot, stirring constantly until completely melted. Tip: For extra gooey treats, remove the pot from the heat as soon as the marshmallows are melted.
- Quickly stir in the Rice Krispies cereal until evenly coated.
- Press the mixture firmly into the prepared pan using a piece of parchment paper to avoid sticking. Tip: Wetting your hands slightly can help press the mixture without it sticking to you.
- Let the treats cool completely, about 1 hour at room temperature.
- Melt the green candy melts according to package instructions, then drizzle over the cooled treats to create ‘Frankenstein’s monster’ skin.
- Use the black decorating gel to add stitches and facial features.
- Allow the decorations to set before cutting into squares.
Crunchy yet chewy, these treats are a playful twist on a classic. Serve them at your next Halloween bash or pack them in lunchboxes for a spooky surprise.
Boo-nana Pops
Just when I thought bananas couldn’t get any more fun, I stumbled upon the idea of Boo-nana Pops during a late-night Pinterest binge. These frozen treats are not only a hit with the kids but also a guilt-free way to satisfy my sweet tooth. Let me walk you through how to make these adorable and delicious snacks.
Ingredients
- 4 ripe bananas
- 1 cup dark chocolate chips
- 2 tbsp coconut oil
- 1/4 cup chopped almonds
- 8 popsicle sticks
Instructions
- Peel the bananas and cut them in half crosswise.
- Insert a popsicle stick into the cut end of each banana half, ensuring it’s secure but doesn’t go all the way through.
- Place the bananas on a tray lined with parchment paper and freeze for 2 hours, or until solid.
- In a microwave-safe bowl, combine the dark chocolate chips and coconut oil. Microwave in 30-second intervals, stirring in between, until fully melted and smooth.
- Dip each frozen banana into the melted chocolate, using a spoon to help coat it evenly.
- Immediately sprinkle the chopped almonds over the chocolate-coated bananas before the chocolate sets.
- Return the coated bananas to the parchment-lined tray and freeze for another 30 minutes, or until the chocolate is firm.
Kind of magical how these Boo-nana Pops turn out, right? The contrast between the creamy banana and the crunchy chocolate shell is simply irresistible. Serve them at your next Halloween party or enjoy them as a cool summer treat—either way, they’re bound to disappear in no time.
Eyeball Tacos
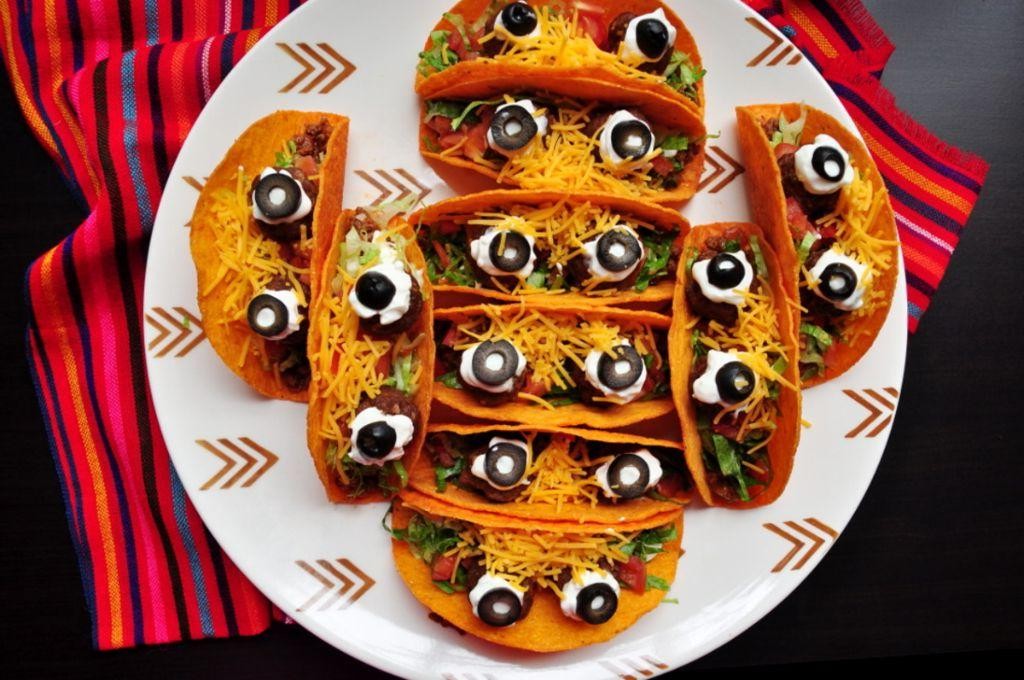
Today, I stumbled upon a recipe that’s as fun to make as it is to eat—Eyeball Tacos. Perfect for Halloween or just to spice up your taco Tuesday, these creepy yet delicious treats will have everyone at the table doing a double-take. I remember the first time I made them; my kids couldn’t decide whether to be horrified or delighted, but they sure didn’t hesitate to dig in!
Ingredients
- 1 lb ground beef
- 1 tbsp taco seasoning
- 1/2 cup water
- 8 small flour tortillas
- 1 cup shredded lettuce
- 1/2 cup diced tomatoes
- 1/2 cup shredded cheddar cheese
- 1/4 cup sour cream
- 8 large pitted black olives
- 1 tbsp vegetable oil
Instructions
- Heat 1 tbsp vegetable oil in a large skillet over medium heat.
- Add 1 lb ground beef to the skillet, breaking it apart with a spoon, and cook until no longer pink, about 5-7 minutes.
- Drain excess fat from the skillet, then stir in 1 tbsp taco seasoning and 1/2 cup water. Simmer for 5 minutes, stirring occasionally, until the mixture thickens. Tip: For extra flavor, toast the taco seasoning in a dry pan for 30 seconds before adding it to the beef.
- Warm 8 small flour tortillas in a dry skillet over medium heat for about 30 seconds on each side. Tip: Keep them covered with a towel to stay warm and pliable.
- Assemble the tacos by dividing the beef mixture, 1 cup shredded lettuce, 1/2 cup diced tomatoes, and 1/2 cup shredded cheddar cheese among the tortillas.
- Place a dollop of sour cream on top of each taco, then press a large pitted black olive into the sour cream to create the ‘eyeball’. Tip: For a more dramatic effect, slice the olives in half before placing them on the tacos.
Kicking off your meal with these Eyeball Tacos guarantees a fun and flavorful experience. The creamy sour cream and crisp olive ‘eyeball’ add a surprising texture contrast to the savory beef and fresh veggies. Serve them under dim lighting for an extra spooky effect that’ll have your guests talking long after the last bite.
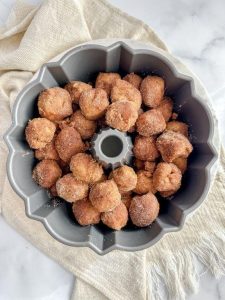
Vampire Donuts
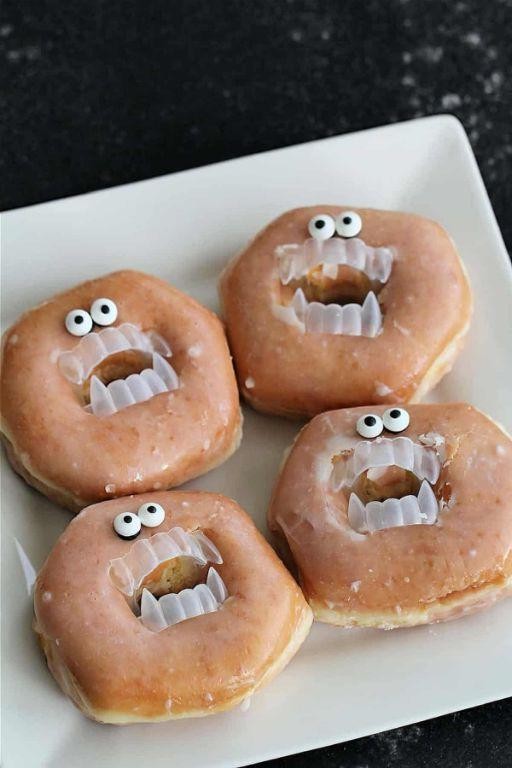
How many times have you craved something sweet but also wanted to feel a bit mischievous? That’s exactly how I felt when I first stumbled upon the idea of Vampire Donuts. These delightful treats are not only a joy to make but also a fun way to add a little drama to your dessert table.
Ingredients
- 2 cups all-purpose flour
- 1/2 cup granulated sugar
- 1 tbsp baking powder
- 1/2 tsp salt
- 3/4 cup milk
- 2 large eggs
- 1/4 cup unsalted butter, melted
- 1 tsp vanilla extract
- 1/2 cup raspberry jam
- 1 cup powdered sugar
- 2 tbsp red food coloring
Instructions
- Preheat your oven to 375°F and grease a donut pan with butter or non-stick spray.
- In a large bowl, whisk together 2 cups all-purpose flour, 1/2 cup granulated sugar, 1 tbsp baking powder, and 1/2 tsp salt.
- In another bowl, mix 3/4 cup milk, 2 large eggs, 1/4 cup melted unsalted butter, and 1 tsp vanilla extract until well combined.
- Pour the wet ingredients into the dry ingredients and stir until just combined; overmixing can lead to tough donuts.
- Fill each donut cavity 2/3 full with batter. Bake for 10-12 minutes or until a toothpick inserted comes out clean.
- Let the donuts cool in the pan for 5 minutes, then transfer to a wire rack to cool completely.
- Once cooled, use a piping bag to inject each donut with 1/2 cup raspberry jam, creating a ‘blood’ effect.
- Mix 1 cup powdered sugar with 2 tbsp red food coloring and a splash of water to create a glaze. Dip the top of each donut into the glaze.
- Allow the glaze to set for 10 minutes before serving.
You’ll love the contrast between the sweet, fluffy donut and the tart raspberry jam ‘blood.’ These Vampire Donuts are perfect for Halloween or any time you want to add a little thrill to your baking.
Jack-O’-Lantern Stuffed Peppers
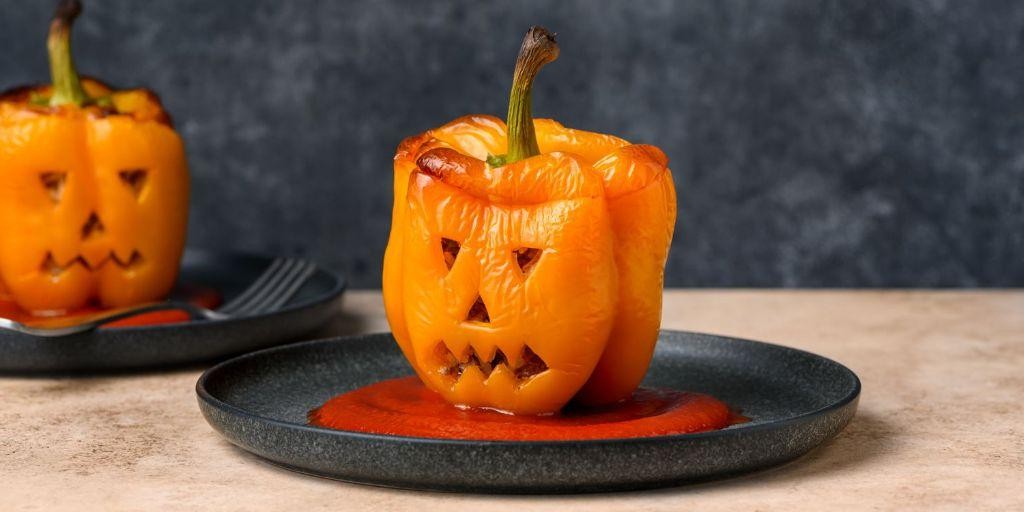
Craving something festive yet easy to whip up for dinner? These Jack-O’-Lantern Stuffed Peppers are not only a hit during Halloween but also a fun way to enjoy a hearty meal any time of the year. I remember the first time I made these; my kids couldn’t stop giggling at the silly faces, making it a memorable dinner indeed.
Ingredients
- 4 large orange bell peppers
- 1 lb ground beef
- 1 cup cooked rice
- 1/2 cup diced onion
- 1/2 cup diced tomatoes
- 1 tbsp olive oil
- 1 tsp salt
- 1/2 tsp black pepper
- 1 tsp garlic powder
- 1 cup shredded cheddar cheese
Instructions
- Preheat your oven to 375°F (190°C).
- Cut the tops off the bell peppers and remove the seeds and membranes. Tip: Save the tops to use as ‘lids’ for a more authentic Jack-O’-Lantern look.
- In a large skillet, heat 1 tbsp olive oil over medium heat. Add the diced onion and cook until translucent, about 3 minutes.
- Add the ground beef to the skillet, breaking it apart with a spoon. Cook until no longer pink, about 5 minutes. Tip: Draining excess fat will keep the filling from being too greasy.
- Stir in the cooked rice, diced tomatoes, salt, black pepper, and garlic powder. Cook for another 2 minutes to combine the flavors.
- Spoon the beef mixture into the prepared bell peppers, filling them to the top. Place them in a baking dish.
- Sprinkle the shredded cheddar cheese on top of each stuffed pepper.
- Bake in the preheated oven for 25 minutes, or until the peppers are tender and the cheese is bubbly and slightly golden. Tip: For an extra crispy cheese top, broil for the last 2 minutes of baking.
Vibrant and packed with flavor, these stuffed peppers offer a delightful contrast between the sweet, tender bell pepper and the savory, cheesy filling. Serve them with a side of sour cream or guacamole for an extra layer of deliciousness.
Mummy Hot Dogs

Back when my kids were little, Halloween was always a big deal in our house, and these Mummy Hot Dogs became a staple for our spooky celebrations. They’re not just adorable but also incredibly easy to make, perfect for busy parents or anyone looking to add a fun twist to their meal.
Ingredients
- 8 hot dogs
- 1 can (8 oz) refrigerated crescent roll dough
- 1 tbsp mustard
- 1 tbsp ketchup
- 2 slices cheddar cheese
Instructions
- Preheat your oven to 375°F and line a baking sheet with parchment paper.
- Unroll the crescent dough and separate it into triangles. Using a pizza cutter or knife, cut each triangle into thin strips, about 1/4 inch wide.
- Wrap each hot dog with the dough strips, leaving a small space uncovered near one end to resemble a mummy’s face. Tip: Don’t wrap the dough too tightly to allow for expansion during baking.
- Place the wrapped hot dogs on the prepared baking sheet and bake for 12-15 minutes, or until the dough is golden brown.
- While the hot dogs are baking, cut the cheddar cheese into small circles for the eyes. Tip: Use the back of a piping tip for perfectly round eyes.
- Once baked, let the hot dogs cool for a minute, then carefully add the cheese eyes. Use a toothpick to dab a small amount of mustard or ketchup on the cheese to create pupils.
- Serve with ketchup and mustard on the side for dipping. Tip: For an extra spooky effect, serve them on a black plate with a drizzle of mustard ‘bandages’.
Great for parties or a fun family dinner, these Mummy Hot Dogs are sure to be a hit with their crispy, flaky exterior and juicy interior. The combination of the savory hot dog with the slight sweetness of the crescent dough is irresistibly delicious, and the cheesy eyes add a playful touch that kids absolutely love.
Bat Wing Chips
Wow, have you ever stumbled upon a snack so intriguing that you just had to try making it yourself? That’s exactly how I felt when I first heard about Bat Wing Chips. Perfect for Halloween or just a fun movie night, these crispy, savory treats are surprisingly simple to whip up with ingredients you likely already have in your pantry.
Ingredients
- 2 cups all-purpose flour
- 1 tsp salt
- 1 tsp paprika
- 1/2 tsp garlic powder
- 1/2 tsp onion powder
- 1/4 tsp black pepper
- 1 cup water
- 2 tbsp olive oil
- 1 qt vegetable oil for frying
Instructions
- In a large mixing bowl, combine 2 cups all-purpose flour, 1 tsp salt, 1 tsp paprika, 1/2 tsp garlic powder, 1/2 tsp onion powder, and 1/4 tsp black pepper. Tip: Sifting the flour can help avoid lumps in your batter.
- Gradually add 1 cup water and 2 tbsp olive oil to the dry ingredients, stirring until a smooth batter forms. Tip: Let the batter rest for 10 minutes to allow the flavors to meld.
- Heat 1 qt vegetable oil in a deep fryer or large pot to 375°F. Tip: Use a candy thermometer to ensure the oil is at the perfect temperature for frying.
- Using a spoon, drop small amounts of batter into the hot oil, shaping them into wing-like forms as they fry. Fry for 2-3 minutes or until golden brown and crispy.
- Remove the chips with a slotted spoon and drain on paper towels.
Light and crispy with a hint of spice, these Bat Wing Chips are a hit at any gathering. Serve them with a side of spicy aioli or your favorite dipping sauce for an extra kick.
Poison Apple Punch
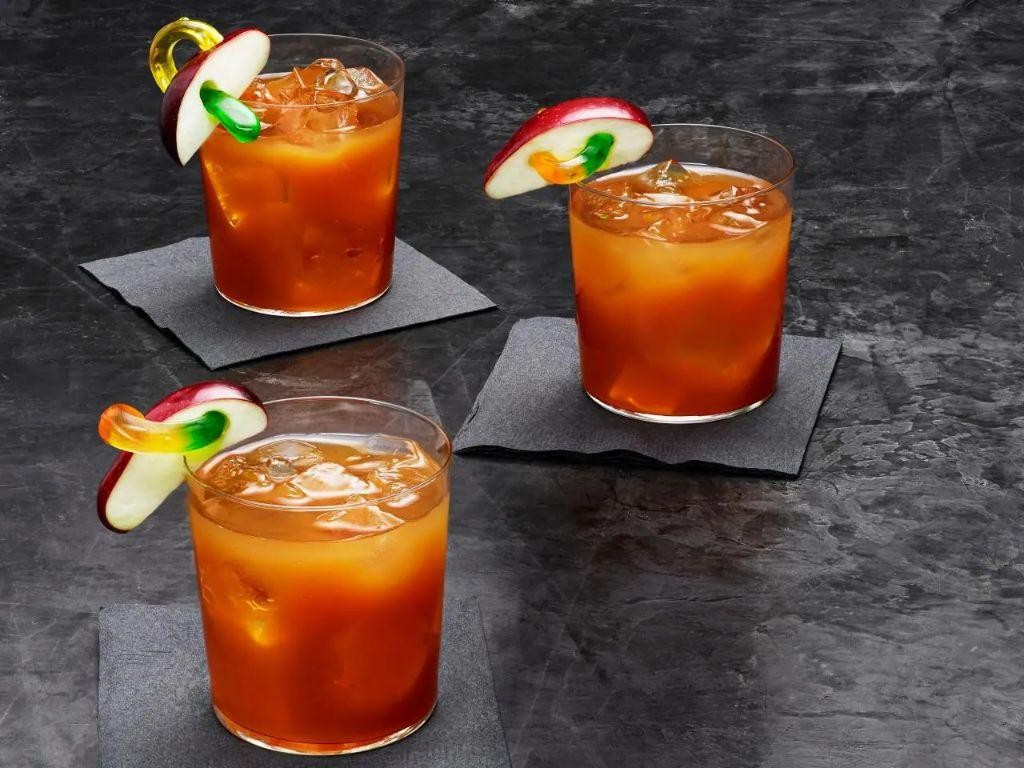
Zesty and a little mysterious, this Poison Apple Punch is my go-to for Halloween parties, but honestly, it’s so good I find excuses to make it year-round. The combination of tart apples and deep berry flavors creates a drink that’s as enchanting as its name suggests.
Ingredients
- 2 cups apple cider
- 1 cup cranberry juice
- 1/2 cup lemon juice
- 1/4 cup honey
- 1 tsp cinnamon
- 1/2 tsp nutmeg
- 2 cups sparkling water
- 1 apple, thinly sliced
Instructions
- In a large pitcher, combine 2 cups apple cider, 1 cup cranberry juice, and 1/2 cup lemon juice.
- Add 1/4 cup honey, 1 tsp cinnamon, and 1/2 tsp nutmeg to the pitcher, stirring until the honey is fully dissolved.
- Chill the mixture in the refrigerator for at least 1 hour to allow the flavors to meld.
- Just before serving, gently stir in 2 cups sparkling water to add a fizzy lift to the punch.
- Garnish with thinly sliced apples for a decorative and tasty touch.
Perfectly balanced between sweet and tart, this punch has a refreshing sparkle that makes it irresistible. Serve it in a hollowed-out pumpkin for an extra festive touch at your next gathering.
Zombie Brain Jello
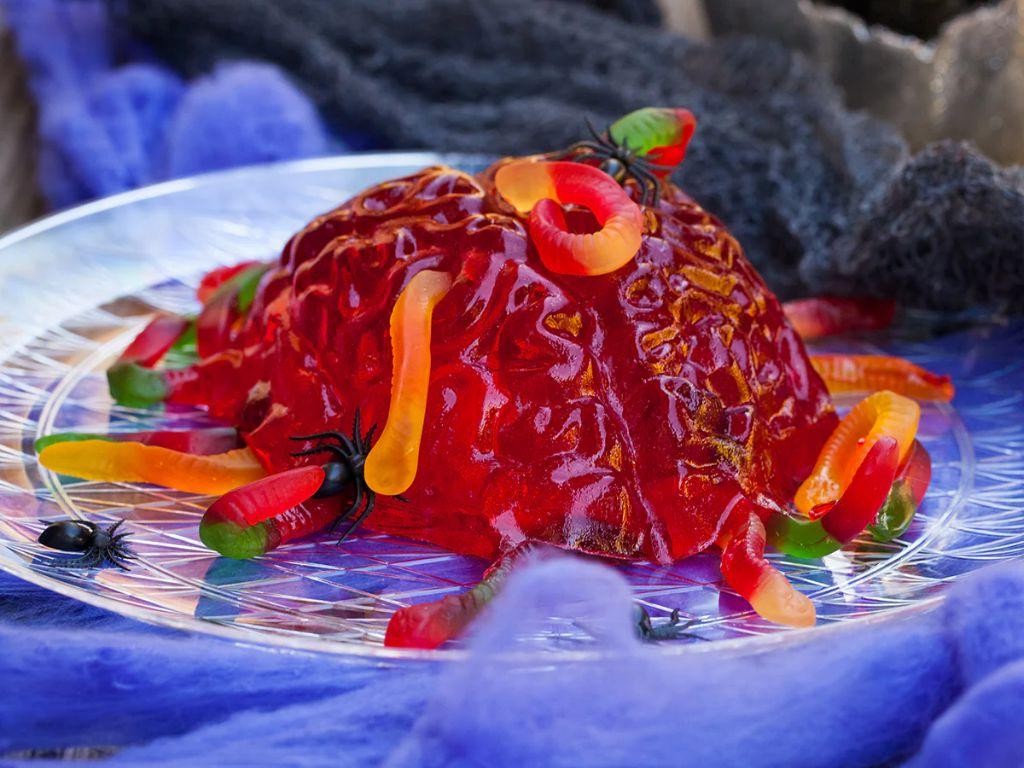
Craving something spooky yet delicious for your next Halloween party? I stumbled upon this Zombie Brain Jello recipe during one of my late-night Pinterest scrolling sessions, and let me tell you, it was a hit at my last gathering. The eerie appearance combined with the fruity flavor makes it a perfect centerpiece for any horror-themed event.
Ingredients
- 2 cups cranberry juice
- 1 cup water
- 1/2 cup sugar
- 3 tbsp unflavored gelatin
- 1/2 cup heavy cream
- 1 tbsp lime juice
- Green food coloring, as needed
Instructions
- In a medium saucepan, combine 2 cups cranberry juice, 1 cup water, and 1/2 cup sugar over medium heat. Stir until the sugar is completely dissolved.
- Sprinkle 3 tbsp unflavored gelatin over the mixture, whisking continuously to prevent clumps. Tip: Blooming the gelatin first in a little cold water can help it dissolve more evenly.
- Remove the saucepan from heat and stir in 1/2 cup heavy cream and 1 tbsp lime juice. The acidity from the lime juice balances the sweetness perfectly.
- Add green food coloring, a few drops at a time, until you achieve a sickly, zombie-like hue. Tip: Use a toothpick to add the coloring drop by drop for better control over the shade.
- Pour the mixture into a brain-shaped mold. Chill in the refrigerator for at least 4 hours, or until fully set. Tip: For an extra eerie effect, lightly spray the mold with cooking spray before pouring to create a slimy surface.
- Once set, carefully unmold the jello onto a serving plate. The gelatin should hold its shape but still wobble menacingly.
Just imagine the look on your guests’ faces when they see this wobbly, brain-like dessert on your table. The combination of tart cranberry and creamy texture makes it irresistibly creepy yet delicious. Serve it with a side of ‘blood’ sauce (raspberry coulis) for an extra gory touch.
Candy Corn Parfait

This summer, I stumbled upon a delightful way to bring a bit of Halloween cheer to any season with a Candy Corn Parfait. It’s a playful, layered dessert that’s as fun to make as it is to eat, and it’s perfect for those who love a sweet treat with a nostalgic twist.
Ingredients
- 1 cup vanilla pudding
- 1 cup whipped cream
- 1/2 cup candy corn
- 1/4 cup crushed graham crackers
- 1 tbsp orange food coloring
- 1 tbsp yellow food coloring
Instructions
- In a small bowl, mix the vanilla pudding with orange food coloring until evenly colored.
- In another small bowl, mix the whipped cream with yellow food coloring until evenly colored.
- Layer the bottom of a parfait glass with 1/4 cup of the orange pudding.
- Add a layer of 1/4 cup whipped cream on top of the pudding.
- Sprinkle 2 tbsp of crushed graham crackers over the whipped cream.
- Repeat the layers until the glass is full, ending with a layer of whipped cream.
- Top the parfait with a handful of candy corn for garnish.
- Chill in the refrigerator for at least 30 minutes before serving to allow the layers to set.
Very creamy and sweet, this Candy Corn Parfait is a visual and tasty delight. The contrast between the smooth pudding and whipped cream with the crunchy graham crackers and candy corn makes every bite interesting. Serve it in clear glasses to show off the vibrant layers, or add a sprinkle of edible glitter for an extra magical touch.
Conclusion
Valuable for any Halloween party, these 16 spooky recipes promise fun and frightfully delicious treats for kids! We’d love to hear which ones bewitched your taste buds—drop a comment below. Don’t forget to share the scares by pinning your favorites on Pinterest. Happy haunting and happy cooking!