Get ready to gross out your guests and delight their taste buds with our 20 Spooky Gross Halloween Recipes that are disgustingly delicious! Perfect for home cooks looking to add a playful, eerie twist to their Halloween spread, these recipes blend frightful fun with mouthwatering flavors. Whether you’re hosting a monster mash or just love seasonal scares, keep scrolling for treats that are as fun to make as they are to eat!
Eyeball Tacos with Bloody Salsa

Under the soft glow of the kitchen light, there’s something oddly comforting about preparing a dish that’s as playful as it is delicious, a reminder not to take life too seriously.
Ingredients
- 1 lb ground beef (I find 80/20 gives the perfect juiciness)
- 1 tbsp olive oil (extra virgin, for that rich flavor)
- 1 small onion, finely diced (white onions are my preference for their sharpness)
- 2 cloves garlic, minced (freshly minced makes all the difference)
- 1 tsp cumin (toasted and ground at home if you’re feeling fancy)
- 1 tsp smoked paprika (for that deep, smoky undertone)
- Salt to taste (I like to use sea salt for its clean taste)
- 8 small flour tortillas (warmed slightly for flexibility)
- 1 cup cherry tomatoes, halved (they mimic eyeballs so perfectly)
- 1/4 cup cilantro, chopped (for a fresh burst of color and flavor)
- 1 jalapeño, finely diced (seeds removed unless you like the heat)
- 1 lime, juiced (about 2 tbsp, freshly squeezed is key)
Instructions
- Heat olive oil in a large skillet over medium heat until shimmering, about 2 minutes.
- Add diced onion to the skillet, sautéing until translucent, roughly 3 minutes, stirring occasionally to prevent burning.
- Stir in minced garlic, cumin, and smoked paprika, cooking for another minute until fragrant.
- Increase heat to medium-high, add ground beef, breaking it apart with a spoon, and cook until no pink remains, about 5 minutes. Tip: Don’t overcrowd the pan to ensure even cooking.
- While the beef cooks, mix cherry tomatoes, cilantro, jalapeño, and lime juice in a bowl to create the ‘bloody’ salsa. Tip: Let it sit for at least 10 minutes to allow flavors to meld.
- Season the cooked beef with salt, then remove from heat.
- Warm tortillas in a dry skillet over medium heat for about 30 seconds per side, just until pliable. Tip: Keep them wrapped in a towel to stay warm.
- Assemble tacos by spooning beef onto tortillas, topping with a generous amount of salsa, and folding gently.
Yielding tacos that are a feast for the eyes as much as the palate, the juicy beef contrasts beautifully with the crisp freshness of the salsa. Serve them under dim lighting for an extra eerie effect, or brighten the table for a playful twist on taco night.
Witch’s Fingers Breadsticks with Marinara Sauce

Beneath the soft glow of the kitchen light, there’s something almost magical about shaping dough into eerie, finger-like breadsticks, especially as October’s chill begins to whisper through the trees. This recipe, a playful nod to the spooky season, combines the comfort of homemade bread with a dash of whimsy, perfect for gathering around the table with loved ones or enjoying a quiet moment of baking solitude.
Ingredients
- 1 1/2 cups warm water (110°F, just warm to the touch)
- 1 packet active dry yeast (I find the little packets at the grocery store work just fine)
- 1 tbsp sugar (a touch of sweetness to wake up the yeast)
- 3 1/2 cups all-purpose flour (plus extra for dusting, because dough can be sticky)
- 1 tsp salt (I always use sea salt for its subtle crunch)
- 2 tbsp extra virgin olive oil (my go-to for its fruity notes)
- 1/2 cup marinara sauce (homemade or your favorite jarred variety)
- 1 egg, beaten (room temp eggs blend more smoothly)
- Sliced almonds (for the ‘fingernails’, about 24 pieces)
Instructions
- In a large bowl, combine warm water, yeast, and sugar. Let sit for 5 minutes until frothy, a sign the yeast is alive and ready.
- Stir in flour, salt, and olive oil until a dough forms. Tip: If the dough feels too sticky, add flour a tablespoon at a time until manageable.
- Knead the dough on a floured surface for about 5 minutes until smooth and elastic. This builds the gluten for chewy breadsticks.
- Place the dough in a greased bowl, cover with a damp towel, and let rise in a warm spot for 1 hour, or until doubled in size.
- Preheat your oven to 375°F and line a baking sheet with parchment paper.
- Divide the dough into 12 equal pieces. Roll each into a thin rope, about 6 inches long, tapering one end to resemble a finger.
- Press a sliced almond into the tapered end of each ‘finger’ for the nail. Brush lightly with beaten egg for a golden finish.
- Bake for 15-20 minutes until golden brown and firm to the touch. Tip: Rotate the pan halfway through for even browning.
- Serve warm with marinara sauce for dipping. The breadsticks are delightfully crisp on the outside, soft inside, with a playful crunch from the almond nails.
Remember, the joy of these breadsticks isn’t just in their taste but in the laughter they bring to the table. Perfect for a Halloween party or a cozy night in, they’re a reminder that food can be fun, flavorful, and a little bit frightful.
Brain Jello Mold with Berry Syrup
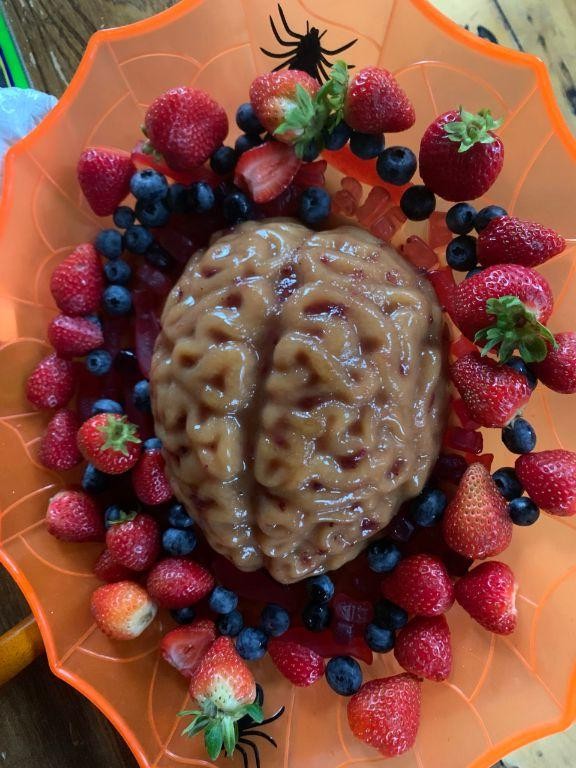
Yesterday, as the early summer light filtered through my kitchen window, I found myself drawn to the quiet art of making something both whimsical and a tad macabre. It’s a dish that surprises with its playful appearance and delightful contrast of flavors.
Ingredients
- 1 package (3 oz) of raspberry gelatin – the vibrant color is key here.
- 1 cup boiling water – just off the kettle for the best dissolve.
- 1/2 cup cold heavy cream – I find the richness balances the sweetness.
- 1/2 cup mixed berries (fresh or frozen) – for that burst of natural flavor.
- 1 tbsp lemon juice – a splash to brighten everything up.
- A pinch of salt – because even sweets need a little balance.
Instructions
- In a large bowl, combine the raspberry gelatin with boiling water. Stir for 2 minutes until fully dissolved. Tip: Ensure the water is truly boiling for a smooth texture.
- Gently whisk in the cold heavy cream until the mixture is uniform. The contrast in temperatures helps achieve the perfect consistency.
- Fold in the mixed berries and lemon juice, then add a pinch of salt. Tip: If using frozen berries, no need to thaw; they’ll add a lovely chill.
- Pour the mixture into a brain-shaped mold. Chill in the refrigerator for at least 4 hours, or until set. Tip: For an extra firm set, leave it overnight.
- Once set, carefully unmold onto a serving plate. The reveal is part of the fun!
Vibrant and wobbly, this jello mold offers a playful texture against the creamy backdrop, with the berries providing little pockets of tartness. Serve it at your next gathering for a conversation starter, or enjoy it as a solitary treat that reminds you not to take life too seriously.
Slime Punch with Gummy Worms

Now, as the morning light filters through the kitchen window, there’s something whimsically nostalgic about preparing a bowl of Slime Punch with Gummy Worms. It’s a playful nod to childhood, yet sophisticated enough for adult gatherings, blending vibrant colors with a touch of humor.
Ingredients
- 2 cups of lime sherbet (the vibrant green hue is essential for that slimy effect)
- 1 liter of lemon-lime soda (chilled, for that fizzy punch)
- 1 cup of pineapple juice (I find the tropical sweetness balances the tartness beautifully)
- A handful of gummy worms (the more colorful, the better—they’re the star of the show)
- Ice cubes (as needed, but I like to keep it just a few to not dilute the flavors too much)
Instructions
- In a large punch bowl, gently scoop the lime sherbet. Let it sit for a minute to soften slightly—this makes it easier to mix.
- Slowly pour the chilled lemon-lime soda over the sherbet, watching as it fizzes and creates a frothy, slime-like texture.
- Add the pineapple juice, stirring lightly to combine without losing too much fizz. Tip: Pouring the juice down the side of the bowl helps maintain the soda’s bubbles.
- Drop in the gummy worms, letting them peek out of the punch like they’re swimming in a lime-green lagoon.
- Add a few ice cubes to keep the punch cool without watering it down too quickly. Tip: Freeze some of the pineapple juice into ice cubes for an extra flavor boost.
- Serve immediately, ensuring each glass gets a generous helping of gummy worms. Tip: For an extra touch, rim the glasses with green sugar to echo the slime theme.
Lusciously creamy yet refreshingly fizzy, this punch is a delightful contrast of textures. The gummy worms add a chewy surprise, making each sip an adventure. Consider serving it in hollowed-out lime halves for an Instagram-worthy presentation that’ll have everyone talking.
Mummified Hot Dogs in Puff Pastry
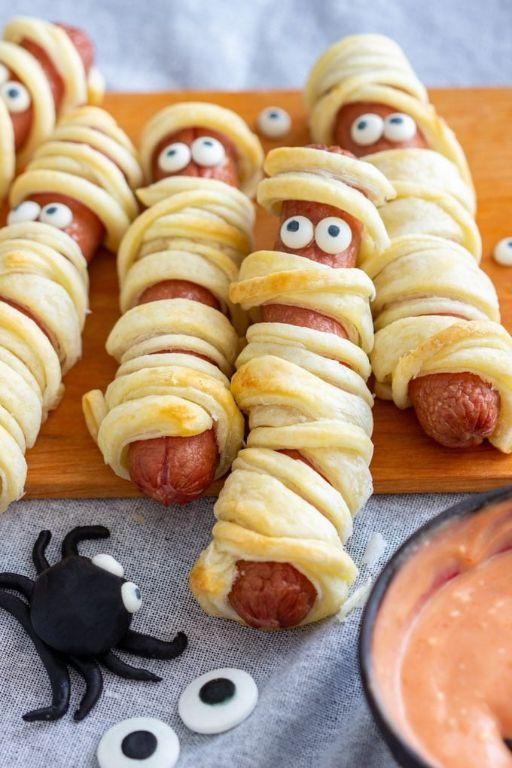
Perhaps there’s something whimsically comforting about wrapping familiar flavors in a blanket of pastry, transforming the ordinary into a playful feast for the senses.
Ingredients
- 1 package of puff pastry sheets (I always keep an extra in the freezer for last-minute creations)
- 8 hot dogs (the classic, all-beef kind brings back childhood memories)
- 1 egg, beaten (room temperature eggs blend more smoothly)
- 1 tbsp water (to mix with the egg for an easy egg wash)
- 1/2 cup ketchup (for serving, though I sometimes swap in spicy mustard for a kick)
Instructions
- Preheat your oven to 400°F (200°C), allowing it to fully heat for even baking.
- Thaw the puff pastry sheets according to package instructions, usually about 30 minutes at room temperature.
- Unfold the pastry sheets on a lightly floured surface, rolling them out slightly to smooth any creases.
- Cut each sheet into strips, about 1/2 inch wide, ensuring you have enough to wrap each hot dog mummy-style.
- Wrap each hot dog with the pastry strips, leaving small gaps to resemble mummy bandages, and place them on a baking sheet lined with parchment paper.
- Mix the beaten egg with water to create an egg wash, then lightly brush it over the pastry-wrapped hot dogs for a golden finish.
- Bake in the preheated oven for 15-20 minutes, or until the pastry is puffed and golden brown.
- Serve warm with ketchup or your preferred dipping sauce, and watch as these mummified delights disappear.
Biting into these mummified hot dogs reveals a delightful contrast between the crispy, buttery pastry and the juicy, savory hot dog inside. They’re perfect for a Halloween party or any day you’re in the mood for something fun and flavorful.
Poison Apple Cider with Dry Ice
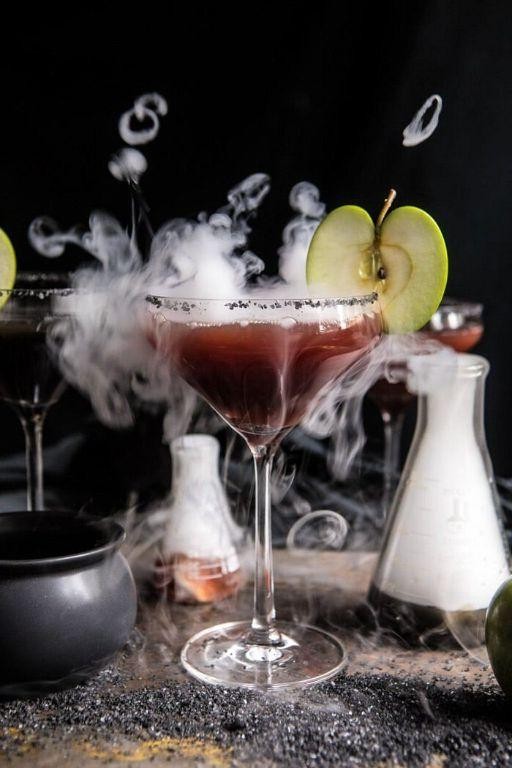
Drifting through the crisp autumn air, the scent of apples and cinnamon beckons like a whisper from the past. This Poison Apple Cider, with its mystical dry ice fog, is not just a drink but an experience, a momentary escape into the enchanting embrace of fall.
Ingredients
- 4 cups of apple cider (I always go for the local orchard’s blend; it’s richer and more aromatic)
- 1 cinnamon stick (a little longer than your thumb for that perfect spice level)
- 1/2 cup of caramel sauce (homemade or store-bought, but warm it slightly for easier mixing)
- 1 tsp of vanilla extract (the real deal, not imitation, makes all the difference)
- Dry ice pellets (about a cup, handle with gloves for safety)
Instructions
- In a medium saucepan, combine the apple cider and cinnamon stick. Heat over medium-low until it simmers gently, about 5 minutes, stirring occasionally to infuse the flavors.
- Remove from heat and stir in the caramel sauce and vanilla extract until fully blended. Tip: If the caramel is too thick, a quick zap in the microwave for 10 seconds can help.
- Let the mixture cool for 10 minutes, then remove the cinnamon stick. This waiting period allows the spices to meld beautifully.
- Pour the cider into a heatproof serving bowl or cauldron for effect. Just before serving, add the dry ice pellets carefully to create a mesmerizing fog. Tip: Always use gloves when handling dry ice to avoid burns.
- Serve immediately, ensuring no dry ice pellets are ingested. The fog will last for about 5 minutes, adding a magical touch to your gathering.
Velvety and warm, this cider wraps around you like a cozy blanket, with the caramel adding a luxurious depth. For an extra twist, serve with a side of spiced rum for adults to spike their own cups, transforming it into a bewitching cocktail.
Monster Mash Potato Brains
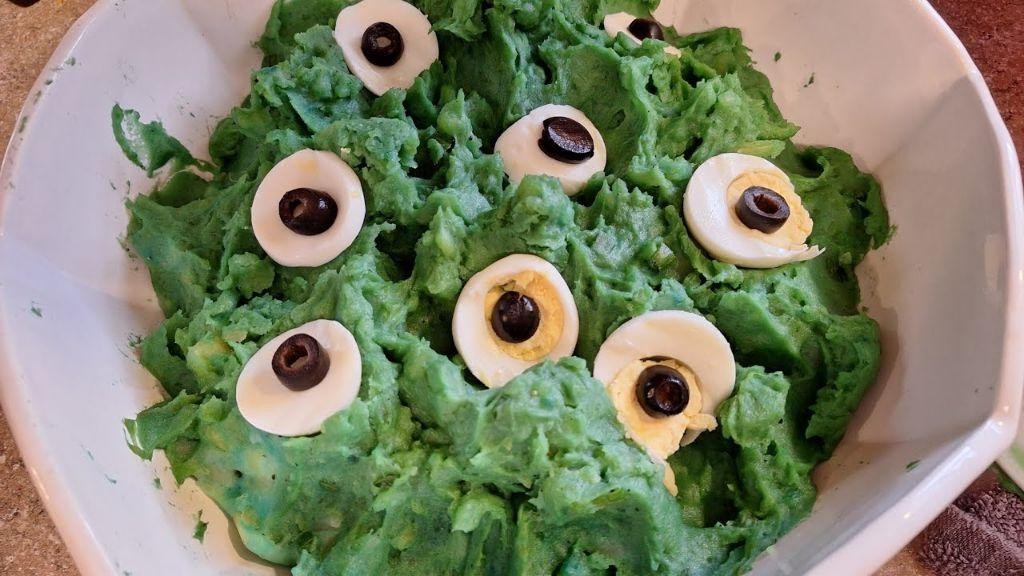
Mornings like these, when the light filters through the kitchen window just so, I find myself drawn to recipes that comfort and surprise in equal measure. This dish, a playful twist on a classic, is one of those rare creations that feels both familiar and entirely new.
Ingredients
- 2 lbs Yukon Gold potatoes (their buttery texture is unmatched)
- 1/2 cup heavy cream (warmed slightly, it blends smoother)
- 4 tbsp unsalted butter (I always reach for European-style for its richness)
- 1 tsp salt (fine sea salt dissolves more evenly)
- 1/4 tsp freshly ground black pepper (freshly cracked makes all the difference)
- 1/2 cup sharp cheddar cheese, shredded (extra sharp gives a nice bite)
- 2 tbsp chives, finely chopped (for a gentle oniony crunch)
Instructions
- Peel the Yukon Gold potatoes and cut them into 1-inch cubes for even cooking.
- Place the potato cubes in a large pot, cover with cold water by 1 inch, and bring to a boil over high heat. Tip: Starting with cold water ensures the potatoes cook evenly.
- Once boiling, reduce the heat to medium and simmer until the potatoes are fork-tender, about 15 minutes.
- Drain the potatoes well and return them to the pot. Let them sit for 1 minute to evaporate any excess water. Tip: Dry potatoes mash better, absorbing more butter and cream.
- Add the warm heavy cream, unsalted butter, salt, and black pepper to the potatoes. Mash until smooth and creamy. Tip: For extra fluffy mash, use a potato ricer or food mill.
- Fold in the shredded sharp cheddar cheese and chopped chives until just combined.
- Serve warm, garnished with additional chives if desired. Just like that, you’ve transformed simple ingredients into a dish with layers of texture and flavor, perfect for scooping onto plates or eating straight from the bowl under the soft morning light.
Creepy Crawly Spider Deviled Eggs
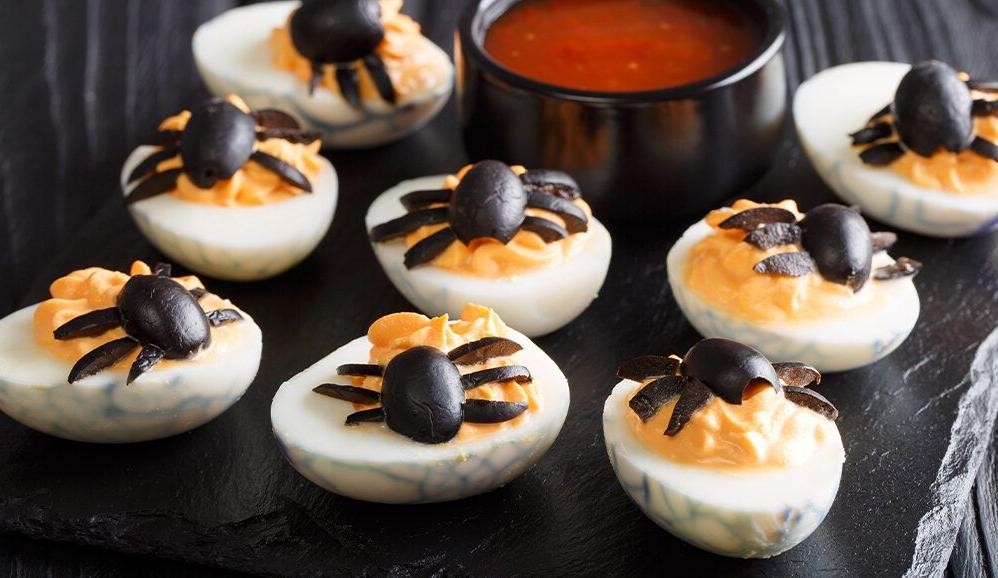
Very quietly, as the morning light filters through the kitchen window, I find myself drawn to the simplicity and creativity of deviled eggs, transformed into playful Halloween treats. These Creepy Crawly Spider Deviled Eggs are not just a dish but a conversation starter, blending the creamy comfort of traditional deviled eggs with a whimsical twist.
Ingredients
- 6 large eggs (I find room temperature eggs peel more easily, a little tip from my grandmother)
- 1/4 cup mayonnaise (the creamier, the better for that smooth filling)
- 1 teaspoon Dijon mustard (for a slight tang that balances the richness)
- 1/8 teaspoon salt (just a pinch to enhance all the flavors)
- 1/8 teaspoon paprika (plus a little extra for dusting, for that smoky hint and a pop of color)
- 12 small black olives (for the spider bodies and legs, the darker the better for dramatic effect)
Instructions
- Place the eggs in a single layer in a saucepan and cover with water by 1 inch. Bring to a boil over high heat, then cover and remove from heat. Let stand for 12 minutes for perfectly hard-boiled eggs.
- Transfer the eggs to a bowl of ice water to cool for at least 5 minutes. This stops the cooking process and makes peeling a breeze.
- Once cooled, peel the eggs carefully under running water to help remove any stubborn shell pieces.
- Slice each egg in half lengthwise and gently remove the yolks to a small bowl.
- Mash the yolks with a fork, then stir in the mayonnaise, Dijon mustard, salt, and paprika until smooth. A little patience here ensures a lump-free filling.
- Spoon or pipe the yolk mixture back into the egg white halves, creating a slight mound for the spider body to sit on.
- For each spider, place a small black olive half on top of the yolk mixture. Then, slice another olive into thin strips to create 8 legs, arranging 4 on each side of the body.
- Lightly dust the eggs with additional paprika for a finished look that hints at the flavors inside.
Finally, these Creepy Crawly Spider Deviled Eggs offer a delightful contrast of textures—creamy filling against the firm egg whites and chewy olives. The flavors are rich and slightly tangy, with a smoky undertone from the paprika. Serve them on a platter lined with lettuce leaves for an eerie yet elegant presentation that’s sure to captivate your guests.
Bloody Bandage Nachos
Mornings like these, when the light filters through the kitchen window just so, I find myself drawn to recipes that tell a story, that evoke a sense of nostalgia and comfort. ‘Bloody Bandage Nachos’ is one such dish, a playful yet deeply satisfying creation that marries the crunch of tortilla chips with the rich, savory depth of a tomato-based sauce, all topped with melty cheese and a hint of spice.
Ingredients
- 1 bag of tortilla chips (I always go for the thick-cut ones; they hold up better under the toppings.)
- 2 cups of shredded cheddar cheese (Sharp cheddar gives the best flavor, in my opinion.)
- 1 cup of tomato sauce (Homemade is ideal, but a good quality store-bought works in a pinch.)
- 1/2 cup of sour cream (I like to use full-fat for extra creaminess.)
- 1 tbsp of olive oil (Extra virgin is my go-to for its fruity notes.)
- 1 tsp of chili powder (Adjust based on your heat preference.)
- 1/2 tsp of garlic powder (For that essential depth of flavor.)
- 1/4 tsp of salt (I prefer sea salt for its clean taste.)
Instructions
- Preheat your oven to 350°F (175°C) to ensure it’s ready for baking.
- Spread the tortilla chips evenly on a large baking sheet, making sure they’re in a single layer for even coverage.
- In a small saucepan over medium heat, warm the olive oil, then stir in the tomato sauce, chili powder, garlic powder, and salt. Let it simmer for 5 minutes, stirring occasionally, to blend the flavors.
- Drizzle the tomato sauce mixture over the tortilla chips, using a spoon to distribute it evenly. Tip: Don’t oversaturate the chips; you want them to stay crispy.
- Sprinkle the shredded cheddar cheese over the sauced chips, covering them as evenly as possible.
- Bake in the preheated oven for 10 minutes, or until the cheese is fully melted and bubbly.
- Remove from the oven and let cool for 2 minutes before dolloping with sour cream. Tip: Letting it cool slightly prevents the sour cream from melting too quickly.
- Serve immediately, garnished with a sprinkle of chili powder for an extra kick. Tip: For a fun presentation, serve on a platter lined with parchment paper to mimic a bandage.
Rich in flavor and texture, these nachos offer a delightful contrast between the crispy chips and the gooey cheese, with the tomato sauce adding a tangy brightness. Perfect for sharing, they’re a hit at gatherings or as a comforting solo treat on a quiet evening.
Zombie Finger Cookies with Almond Nails
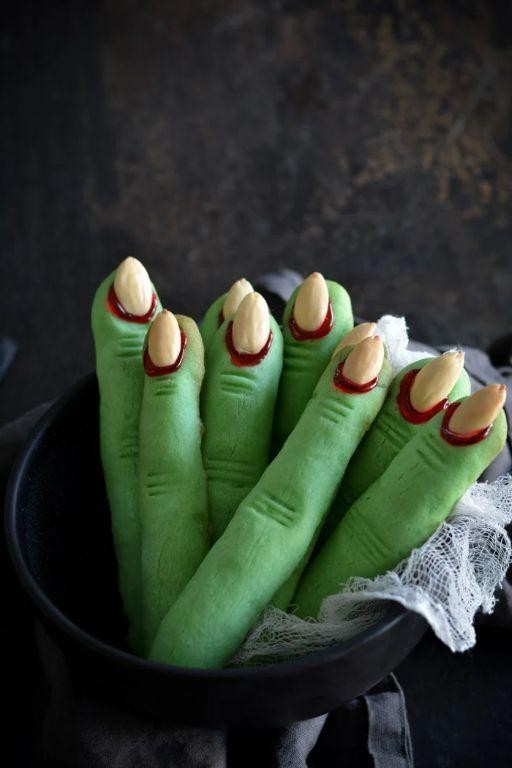
Today, as the light filters softly through my kitchen window, I find myself drawn to the whimsical and slightly macabre charm of creating something that delights both the eye and the palate. These Zombie Finger Cookies with Almond Nails are a playful nod to the Halloween season, yet their buttery, sweet flavor makes them a year-round treat in my home.
Ingredients
- 1 cup unsalted butter, softened (I find that butter at room temperature blends more smoothly, creating a tender cookie.)
- 1 cup powdered sugar (A little extra for dusting gives them a ghostly appearance.)
- 1 large egg (Room temperature eggs incorporate better, ensuring a uniform dough.)
- 1 tsp vanilla extract (Pure vanilla adds a depth of flavor that imitation just can’t match.)
- 2 3/4 cups all-purpose flour (Sifted flour prevents lumps, making the dough easier to work with.)
- 1/2 tsp almond extract (This is my secret ingredient; it adds a subtle nuttiness that complements the almonds perfectly.)
- 24 whole almonds (For the nails, I like to use blanched almonds for a more realistic look.)
- Red food coloring gel (A tiny dab mixed with water creates the perfect ‘blood’ effect.)
Instructions
- Preheat your oven to 350°F (177°C). A properly heated oven ensures even baking.
- In a large bowl, cream together the softened butter and powdered sugar until light and fluffy. This step is crucial for a tender texture.
- Beat in the egg, vanilla extract, and almond extract until well combined. The almond extract should be just enough to hint at its presence without overpowering.
- Gradually add the sifted flour, mixing until the dough comes together. If the dough feels too sticky, a bit more flour can be added, but sparingly.
- Divide the dough into 24 pieces. Roll each piece into a finger shape, about 3 inches long. Press an almond into one end to create the nail.
- Use a toothpick to make knuckle marks on each finger. This detail adds to the eerie realism.
- Bake for 12-15 minutes, or until the edges are just starting to turn golden. Overbaking will make them too hard.
- Let the cookies cool on the baking sheet for 5 minutes, then transfer to a wire rack.
- Mix a small amount of red food coloring gel with water and dab a little at the base of each almond nail for a gruesome yet tasty effect.
After the final step, wrap up with 2–3 natural sentences about the texture, flavor, or a creative way to serve it — no generic conclusions. A batch of these cookies, with their crisp edges and soft centers, carries a buttery sweetness that’s perfectly offset by the crunch of the almond nails. Serve them on a platter lined with parchment for a spooky yet elegant presentation, or pack them in individual treat bags for a hauntingly good gift.
Ghostly Banana Pops with Chocolate Drizzle
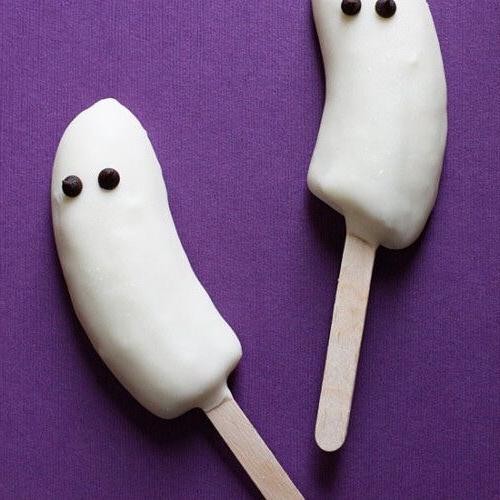
Just as the morning light filters through the kitchen window, there’s something quietly magical about transforming simple bananas into a treat that’s both playful and elegant. These ghostly banana pops, with their creamy texture and rich chocolate drizzle, are a testament to the joy found in the simplest of desserts.
Ingredients
- 4 ripe bananas (the speckled ones are my favorite for their natural sweetness)
- 1 cup dark chocolate chips (I love the depth of flavor they bring)
- 2 tablespoons coconut oil (it makes the chocolate drizzle perfectly smooth)
- 8 popsicle sticks (because every ghost needs a handle)
Instructions
- Peel the bananas and cut them in half crosswise. Insert a popsicle stick into the cut end of each banana half.
- Place the bananas on a tray lined with parchment paper and freeze for at least 2 hours, until solid. This ensures they’ll hold their shape when dipped.
- In a microwave-safe bowl, combine the chocolate chips and coconut oil. Microwave in 30-second intervals, stirring in between, until fully melted and smooth. Tip: Don’t overheat the chocolate to avoid seizing.
- Remove the bananas from the freezer. Holding by the stick, dip each banana into the melted chocolate, allowing the excess to drip off. Tip: Work quickly to prevent the bananas from thawing.
- Return the dipped bananas to the parchment-lined tray. Drizzle any remaining chocolate over the tops for extra flair. Tip: Use a spoon or piping bag for more controlled drizzling.
- Freeze again for about 10 minutes, just until the chocolate sets.
Frozen to perfection, these banana pops offer a delightful contrast between the icy fruit and the silky chocolate shell. Serve them at a Halloween party or as a whimsical after-school snack, watching as the chocolate cracks with each bite reveals the ghostly banana beneath.
Black Cat Cupcakes with Licorice Whiskers

Baking these Black Cat Cupcakes with Licorice Whiskers feels like weaving a little magic into the kitchen, a quiet moment where flour and sugar transform into something whimsical and delightful.
Ingredients
- 1 1/2 cups all-purpose flour (I always sift mine for extra lightness)
- 1 cup granulated sugar (the fine grains dissolve beautifully)
- 1/2 cup unsweetened cocoa powder (dark as midnight)
- 1 tsp baking soda (freshness is key here)
- 1/2 tsp salt (I like using sea salt for its subtle crunch)
- 1 cup water (room temperature blends better)
- 1/3 cup vegetable oil (a neutral oil lets the chocolate shine)
- 1 tbsp white vinegar (yes, vinegar! It reacts with the baking soda for lift)
- 1 tsp vanilla extract (pure extract makes all the difference)
- Black licorice strings (for the whiskers, cut into 2-inch pieces)
- 1 batch of your favorite vanilla frosting (I swear by homemade, but store-bought works in a pinch)
Instructions
- Preheat your oven to 350°F (175°C) and line a muffin tin with cupcake liners. This ensures even baking and easy cleanup.
- In a large bowl, whisk together the flour, sugar, cocoa powder, baking soda, and salt until no lumps remain. A fine mesh sieve can help here.
- Add the water, vegetable oil, vinegar, and vanilla extract to the dry ingredients. Mix until just combined; overmixing can lead to dense cupcakes.
- Divide the batter evenly among the cupcake liners, filling each about 2/3 full. This leaves room for them to rise without spilling over.
- Bake for 20-25 minutes, or until a toothpick inserted into the center comes out clean. The tops should spring back when lightly touched.
- Allow the cupcakes to cool completely on a wire rack before frosting. Patience here prevents melting frosting.
- Once cooled, frost each cupcake generously with vanilla frosting. A piping bag gives a professional look, but a knife works just fine.
- Gently press two licorice whiskers into the frosting on each cupcake to create the cat’s face. Position them like a wide ‘V’ for the best effect.
Creating these cupcakes is like painting with flavors and textures—the soft, moist crumb against the chewy licorice whiskers is a playful contrast. Serve them at a Halloween party or as a surprise treat to brighten an ordinary day.
Pumpkin Vomit Dip with Tortilla Chips

Sometimes, the most comforting dishes come from the simplest ingredients, blending together in a way that feels both familiar and unexpectedly delightful.
Ingredients
- 1 can (15 oz) pure pumpkin puree – not pumpkin pie mix, as we want the pure, unadulterated flavor.
- 1 cup sour cream – full fat for that creamy, dreamy texture.
- 1/2 cup mayonnaise – I find that the tanginess of mayo balances the sweetness of the pumpkin beautifully.
- 1 packet (1 oz) taco seasoning – because sometimes, convenience is key.
- 1 bag (10 oz) tortilla chips – for scooping up every last bit.
Instructions
- In a large mixing bowl, combine the pumpkin puree, sour cream, and mayonnaise. Stir until the mixture is smooth and uniform in color.
- Add the taco seasoning to the bowl. Mix thoroughly to ensure the seasoning is evenly distributed throughout the dip.
- Cover the bowl with plastic wrap and refrigerate for at least 1 hour. This chilling time allows the flavors to meld together perfectly.
- Once chilled, give the dip a quick stir to recombine any ingredients that may have settled.
- Serve the dip in a bowl alongside the tortilla chips for dipping.
Unassuming at first glance, this dip transforms into a creamy, tangy, and slightly spicy delight that pairs wonderfully with the crispness of tortilla chips. Try serving it at your next gathering, or enjoy it as a cozy snack on a quiet evening.
Frankenstein’s Monster Green Smoothie
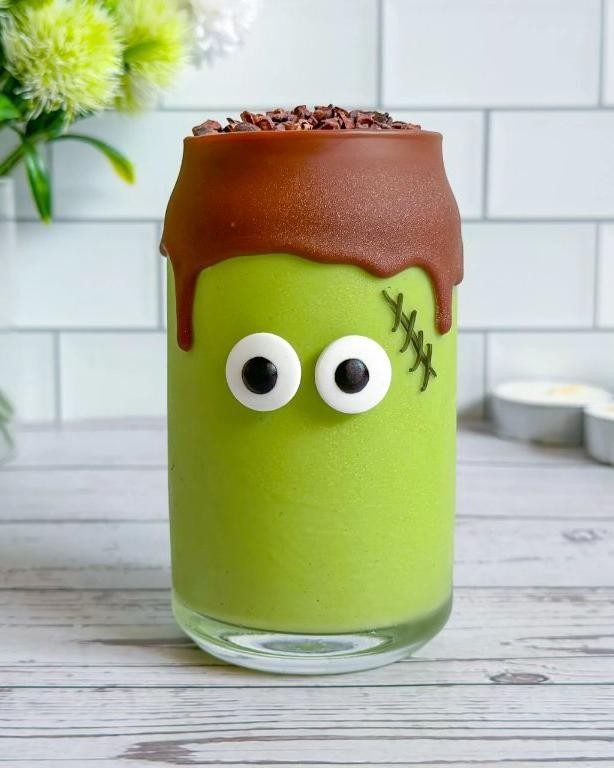
Gently, as the morning light filters through the kitchen window, I find myself reaching for the blender to craft something vibrant and alive, much like the dawn itself. This green smoothie, a patchwork of nature’s bounty, feels like stitching together pieces of the earth’s goodness into one glass.
Ingredients
- 2 cups fresh spinach (I love how its earthy depth anchors the smoothie)
- 1 frozen banana, sliced (the colder, the creamier the texture)
- 1/2 cup plain Greek yogurt (for a tangy twist and protein punch)
- 1 tbsp honey (local, if you have it, to sweeten just right)
- 1 cup almond milk (unsweetened keeps it light)
- 1/2 avocado (adds a lush, velvety finish)
- A handful of ice cubes (because I prefer my smoothie frosty)
Instructions
- Begin by adding the spinach and almond milk to the blender. This order helps the spinach blend more smoothly.
- Next, add the frozen banana slices and Greek yogurt. The banana not only sweetens but also gives the smoothie a creamy texture.
- Drizzle in the honey and add the avocado. The honey balances the greens, while the avocado enriches the smoothie’s body.
- Finally, toss in a handful of ice cubes. Blend on high for about 45 seconds, or until the mixture is uniformly smooth with no leafy bits.
- Pour into a tall glass and serve immediately. The coldness is part of the charm, so don’t let it sit too long.
Bright and brimming with life, this smoothie pours like liquid silk, with flavors that dance between sweet and earthy. Try it with a sprinkle of chia seeds on top for a playful crunch, or enjoy it as is, letting the smooth, cool sips wake you up gently.
Bat Wing Chicken Drumsticks
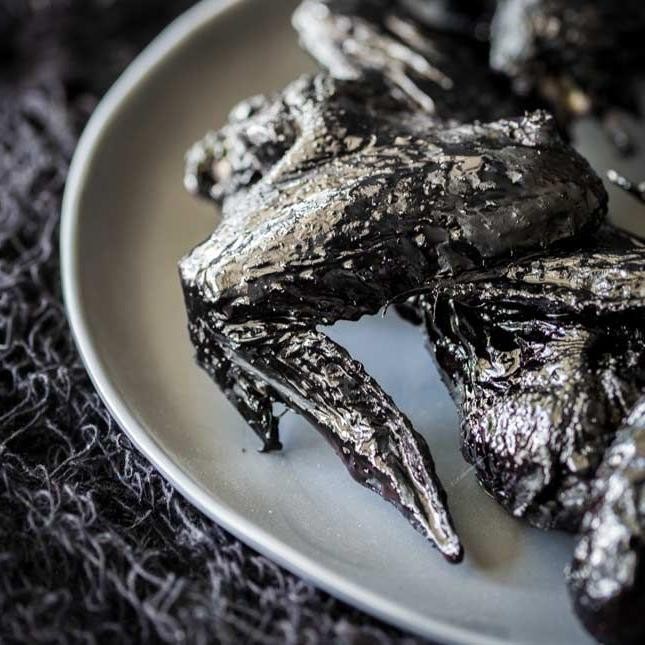
Now, as the morning light filters through the kitchen window, I find myself drawn to the simplicity and comfort of preparing Bat Wing Chicken Drumsticks. It’s a dish that carries the warmth of home and the thrill of a little culinary adventure, perfect for a quiet weekend.
Ingredients
- 8 chicken drumsticks (I like to pat them dry for better browning)
- 2 tbsp extra virgin olive oil (my go-to for its fruity notes)
- 1 tbsp smoked paprika (for that deep, smoky flavor)
- 1 tsp garlic powder (a little goes a long way)
- 1 tsp onion powder (for a subtle sweetness)
- 1/2 tsp salt (I prefer sea salt for its texture)
- 1/2 tsp black pepper (freshly ground, always)
- 1/4 cup honey (for a sticky, sweet glaze)
- 2 tbsp soy sauce (adds a nice umami kick)
Instructions
- Preheat your oven to 375°F (190°C) to ensure it’s perfectly heated for the drumsticks.
- In a large bowl, mix the olive oil, smoked paprika, garlic powder, onion powder, salt, and black pepper until well combined.
- Add the chicken drumsticks to the bowl, tossing them gently to coat each piece evenly with the spice mixture.
- Arrange the drumsticks on a baking sheet lined with parchment paper, leaving space between each for even cooking.
- Bake in the preheated oven for 25 minutes, then flip each drumstick to ensure they brown evenly on both sides.
- While the drumsticks bake, whisk together the honey and soy sauce in a small bowl for the glaze.
- After flipping, brush each drumstick generously with the honey-soy glaze.
- Return to the oven and bake for an additional 15 minutes, or until the drumsticks are golden brown and the internal temperature reaches 165°F (74°C).
- Let the drumsticks rest for 5 minutes before serving to allow the juices to redistribute.
Unbelievably tender and bursting with flavor, these Bat Wing Chicken Drumsticks offer a delightful contrast between the crispy exterior and the juicy meat inside. Serve them atop a bed of fluffy rice or alongside a crisp salad for a meal that’s as visually appealing as it is delicious.
Coffin-shaped Meatloaf with Ketchup Blood
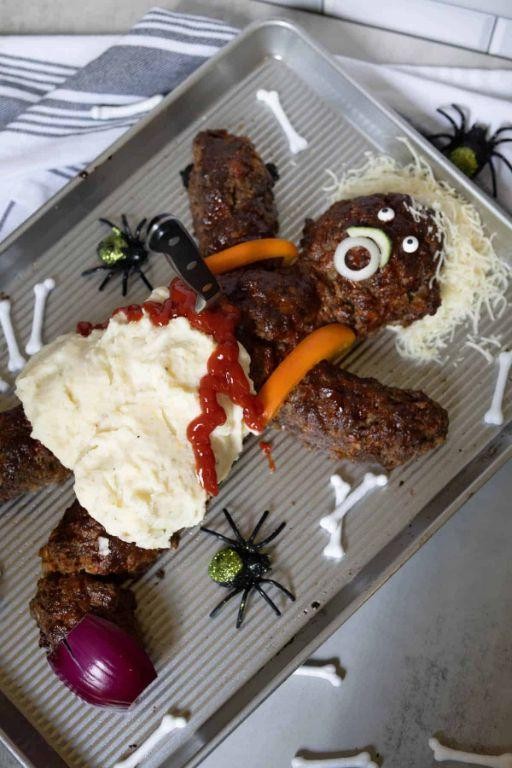
Remembering the first time I made this dish, it was a chilly evening, and the idea of combining the comfort of meatloaf with a playful Halloween twist seemed just right. The coffin shape and ketchup blood not only make it a conversation starter but also a deliciously moist and flavorful meal.
Ingredients
- 2 lbs ground beef (I find an 80/20 mix perfect for juiciness)
- 1 cup breadcrumbs (I like to use panko for that extra crunch)
- 1 large egg, room temperature (it blends better when not cold)
- 1/2 cup ketchup, plus more for decorating (I always have a bottle of organic ketchup in my pantry)
- 1 small onion, finely diced (yellow onions are my go-to for their sweetness)
- 2 cloves garlic, minced (freshly minced garlic makes all the difference)
- 1 tsp salt (I prefer sea salt for its clean taste)
- 1/2 tsp black pepper (freshly ground gives the best flavor)
- 1 tbsp Worcestershire sauce (this adds a depth of flavor that’s irreplaceable)
Instructions
- Preheat your oven to 375°F (190°C) to ensure it’s ready for baking.
- In a large mixing bowl, combine the ground beef, breadcrumbs, egg, 1/2 cup ketchup, diced onion, minced garlic, salt, black pepper, and Worcestershire sauce. Mix gently with your hands until just combined; overmixing can make the meatloaf tough.
- Shape the mixture into a coffin shape on a greased baking sheet. A tip: use a knife to smooth the edges for a more defined shape.
- Bake in the preheated oven for 50 minutes, or until the internal temperature reaches 160°F (71°C). Another tip: placing a meat thermometer in the thickest part ensures it’s perfectly cooked.
- Remove from the oven and let it rest for 10 minutes. This allows the juices to redistribute, making every slice moist.
- Decorate with additional ketchup to create the ‘blood’ effect. A final tip: warming the ketchup slightly makes it easier to drizzle artistically.
Just out of the oven, this meatloaf is wonderfully tender with a slightly crispy exterior. The ketchup blood not only adds a visual punch but a sweet tanginess that complements the savory meat. Serve it with mashed potatoes dyed purple with food coloring for a complete Halloween-themed meal.
Werewolf Fur Rice Krispie Treats

Remembering the first time I made these, the kitchen was bathed in the golden light of late afternoon, and the scent of melted butter and marshmallows filled the air. It was a moment of pure, simple joy, creating something whimsically named yet deeply comforting.
Ingredients
- 6 cups Rice Krispies cereal (the snap, crackle, pop is essential for texture)
- 10 oz marshmallows (I find the mini ones melt faster, but any will do)
- 3 tbsp unsalted butter (I always use unsalted to control the sweetness)
- 1/2 tsp vanilla extract (a splash adds a lovely depth)
- Black food coloring gel (for that eerie werewolf hue, gel works best for vibrant color)
Instructions
- In a large pot, melt the butter over low heat, stirring occasionally to prevent browning.
- Add the marshmallows to the melted butter, stirring constantly until completely melted and smooth.
- Remove the pot from heat and quickly stir in the vanilla extract and black food coloring gel until the mixture is uniformly colored.
- Immediately add the Rice Krispies cereal to the marshmallow mixture, folding gently to coat each piece without crushing the cereal.
- Press the mixture firmly into a greased 9×13 inch pan using a piece of wax paper to avoid sticking and to create an even layer.
- Allow the treats to cool at room temperature for at least 1 hour before cutting into squares.
Once set, these treats reveal a delightfully chewy interior with a crisp outer shell, the black color making them mysteriously appealing. Serve them under the glow of a full moon for an extra touch of magic, or pack them in a lunchbox for a surprise that’s sure to spark conversation.
Haunted House Gingerbread with Candy Bones

Yesterday, as the first light of dawn crept through my kitchen window, I found myself drawn to the comforting ritual of baking, a perfect moment to bring to life a creation as whimsical as it is delicious—a gingerbread house, not just any, but one adorned with candy bones, a playful nod to the spooky season that always seems to linger in our hearts.
Ingredients
- 3 cups all-purpose flour (I always sift mine for that extra lightness)
- 1 tbsp ground ginger (the fresher, the better—it makes all the difference)
- 1 tsp cinnamon (a little warmth goes a long way)
- 1/2 tsp cloves (just a hint, for depth)
- 1/2 cup unsalted butter, room temperature (softened to the touch, like a gentle hug)
- 1/2 cup brown sugar (packed tight, for that rich molasses flavor)
- 1 large egg (room temperature, it blends smoother)
- 1/2 cup molasses (the darker, the more intense the flavor)
- 1 tsp baking soda (the magic that makes it rise)
- 1/2 cup boiling water (to dissolve the baking soda, creating a bubbly reaction)
- Assorted candy bones (for decoration, because every haunted house needs its ghosts)
Instructions
- Preheat your oven to 350°F (175°C), a gentle warmth to coax the flavors out.
- In a large bowl, whisk together the flour, ginger, cinnamon, and cloves, ensuring each speck of spice is evenly distributed.
- Cream the butter and brown sugar together until light and fluffy, about 3 minutes—this is where the magic starts.
- Beat in the egg, then the molasses, mixing until the batter is a smooth, dark pool of potential.
- Dissolve the baking soda in the boiling water, then stir it into the batter; watch as it transforms, becoming lighter right before your eyes.
- Gradually add the dry ingredients to the wet, mixing just until combined—overmixing is the enemy of tender gingerbread.
- Roll out the dough on a floured surface to about 1/4 inch thickness, then cut into your desired haunted house shapes.
- Bake for 10-12 minutes, until the edges are just firm to the touch but the centers are still soft—they’ll firm up as they cool.
- Once cooled, decorate with the candy bones, letting your imagination run wild as you bring your haunted house to life.
Somehow, the gingerbread emerges with a perfect balance of spice and sweetness, its texture sturdy yet tender, ready to stand as a centerpiece or be devoured piece by piece. Serve it with a side of storytelling, each candy bone a character in its own right, waiting to be discovered.
Vampire Blood Pasta with Beet Sauce
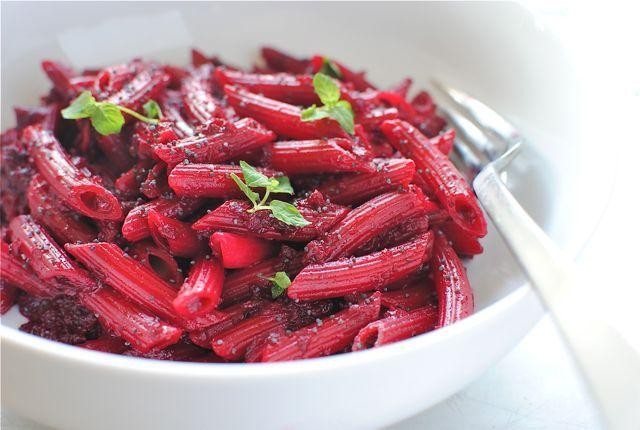
Perhaps there’s no better way to embrace the quiet of the evening than by preparing a dish that’s as visually striking as it is comforting. This Vampire Blood Pasta with Beet Sauce is a playful yet deeply satisfying meal, perfect for those nights when you crave something out of the ordinary.
Ingredients
- 8 oz spaghetti (I find that Barilla holds its texture beautifully)
- 3 medium beets, peeled and diced (their earthy sweetness is key)
- 2 tbsp extra virgin olive oil (my go-to for its fruity notes)
- 3 cloves garlic, minced (because more garlic is always better)
- 1/2 cup heavy cream (it adds a luxurious silkiness)
- 1/4 cup grated Parmesan cheese (for that umami punch)
- Salt, to taste (I like to use sea salt for its mineral quality)
Instructions
- Bring a large pot of salted water to a boil over high heat. Add the spaghetti and cook according to package instructions until al dente, about 8-10 minutes.
- While the pasta cooks, heat the olive oil in a large skillet over medium heat. Add the minced garlic and sauté until fragrant, about 1 minute.
- Add the diced beets to the skillet and cook, stirring occasionally, until they begin to soften, about 5 minutes. Tip: Covering the skillet helps the beets cook evenly.
- Reduce the heat to low and stir in the heavy cream. Let the mixture simmer gently for 3 minutes, allowing the flavors to meld.
- Drain the pasta, reserving 1/4 cup of the cooking water. Add the pasta to the skillet with the beet sauce, tossing to coat. If the sauce is too thick, add the reserved pasta water a little at a time until desired consistency is reached.
- Remove the skillet from the heat and stir in the grated Parmesan cheese. Season with salt to taste.
You’ll find the sauce clings to each strand of pasta, offering a velvety texture with a sweet, earthy depth. For an extra touch of drama, serve it under candlelight to really let the deep red hues shine.
Graveyard Dirt Pudding with Gummy Worms

Whispering the secrets of childhood memories into the kitchen, this dessert brings back the playful yet eerie charm of Halloween, any time of the year. It’s a simple, no-bake treat that layers chocolate pudding, crushed cookies, and gummy worms to mimic a graveyard scene, perfect for sparking joy and a bit of spooky fun.
Ingredients
- 2 cups cold whole milk (I find whole milk makes the pudding extra creamy)
- 1 package (3.9 oz) instant chocolate pudding mix (the darker, the better for that grave dirt look)
- 1 package (14.3 oz) chocolate sandwich cookies, crushed (Oreos work wonderfully, and crushing them in a bag is oddly satisfying)
- 1 tub (8 oz) whipped topping, thawed (Cool Whip is my go-to for its lightness)
- 1 cup gummy worms (the more colorful, the more they pop against the dark ‘dirt’)
Instructions
- In a large bowl, whisk together the cold milk and chocolate pudding mix for 2 minutes until smooth. Let it sit for 5 minutes to thicken.
- Gently fold in the whipped topping into the pudding until fully combined, creating a light, mousse-like texture.
- In a clear serving dish, layer half of the crushed cookies, followed by half of the pudding mixture. Repeat the layers.
- Sprinkle the remaining crushed cookies on top to resemble dirt. Press some gummy worms into the top layer and let a few peek out from the sides for a realistic effect.
- Chill in the refrigerator for at least 1 hour before serving to allow the flavors to meld and the pudding to set.
Silky smooth pudding meets the crunchy, earthy texture of cookie crumbs, while the gummy worms add a chewy surprise. Serve in individual cups with a mini shovel for digging in, or as a centerpiece at your next gathering to delight both kids and adults alike.
Conclusion
There you have it—20 Spooky Gross Halloween Recipes that are disgustingly delicious! Perfect for adding a fun, eerie twist to your Halloween festivities. We hope you’re inspired to try these creepy creations and make your Halloween unforgettable. Don’t forget to share your favorites in the comments and pin this article on Pinterest to spread the spooky fun. Happy cooking, and have a hauntingly good time!