Oh, the sweet, nostalgic joy of Girl Scout cookies! Whether you’re a Thin Mint devotee or a Samoas enthusiast, we’ve got a treat for you. Dive into our roundup of 25 Delicious Girl Scout Cookie Recipes that bring the iconic flavors right into your kitchen. Perfect for bakers of all levels, these recipes promise to satisfy your cookie cravings any day of the year. Ready to get baking?
Thin Mints Chocolate Chip Cookies
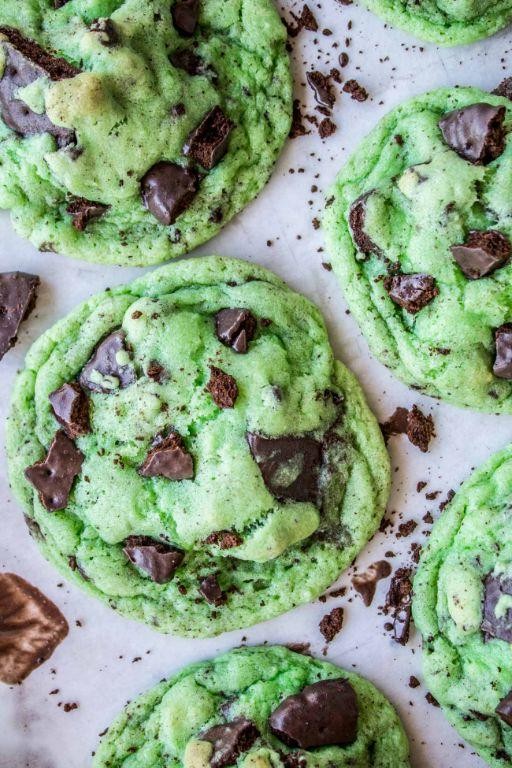
Let’s dive into making these irresistible Thin Mints Chocolate Chip Cookies, a perfect blend of crunchy and chewy with a hint of mint that’ll remind you of your favorite childhood treat.
Ingredients
- 1 cup all-purpose flour (spooned and leveled for accuracy)
- 1/2 cup unsweetened cocoa powder (for a deep chocolate flavor)
- 1/2 tsp baking soda (helps the cookies rise)
- 1/4 tsp salt (enhances all the flavors)
- 1/2 cup unsalted butter, softened (for a tender texture)
- 3/4 cup granulated sugar (adjust slightly for sweetness preference)
- 1 large egg (binds the ingredients together)
- 1 tsp peppermint extract (for that signature minty flavor)
- 1 cup chocolate chips (milk or dark, depending on your preference)
Instructions
- Preheat your oven to 350°F (175°C) and line a baking sheet with parchment paper for easy cleanup.
- In a medium bowl, whisk together the flour, cocoa powder, baking soda, and salt until well combined.
- In a large bowl, beat the softened butter and granulated sugar together until light and fluffy, about 2 minutes.
- Add the egg and peppermint extract to the butter mixture, beating until fully incorporated.
- Gradually mix in the dry ingredients to the wet ingredients, stirring just until combined to avoid overmixing.
- Fold in the chocolate chips evenly throughout the dough.
- Drop tablespoon-sized balls of dough onto the prepared baking sheet, spacing them about 2 inches apart.
- Bake for 10-12 minutes, or until the edges are set but the centers are still soft. They will firm up as they cool.
- Allow the cookies to cool on the baking sheet for 5 minutes before transferring to a wire rack to cool completely.
These cookies boast a crisp edge with a soft, chewy center, packed with chocolatey goodness and a refreshing mint twist. Try serving them slightly warm with a glass of cold milk for an extra indulgent treat.
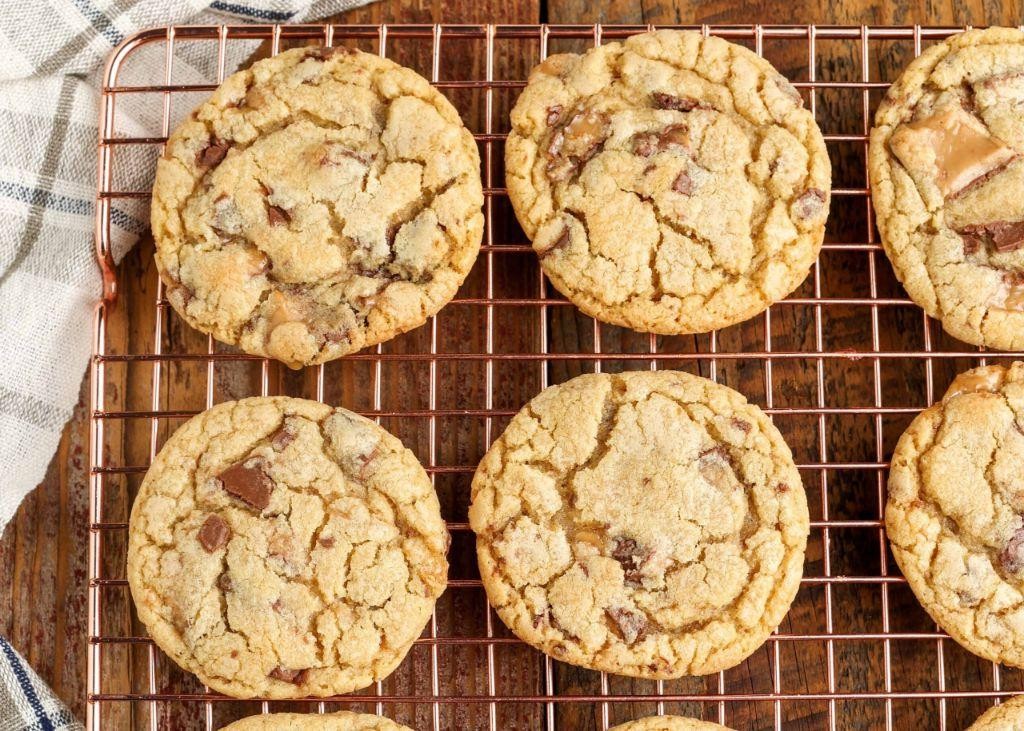
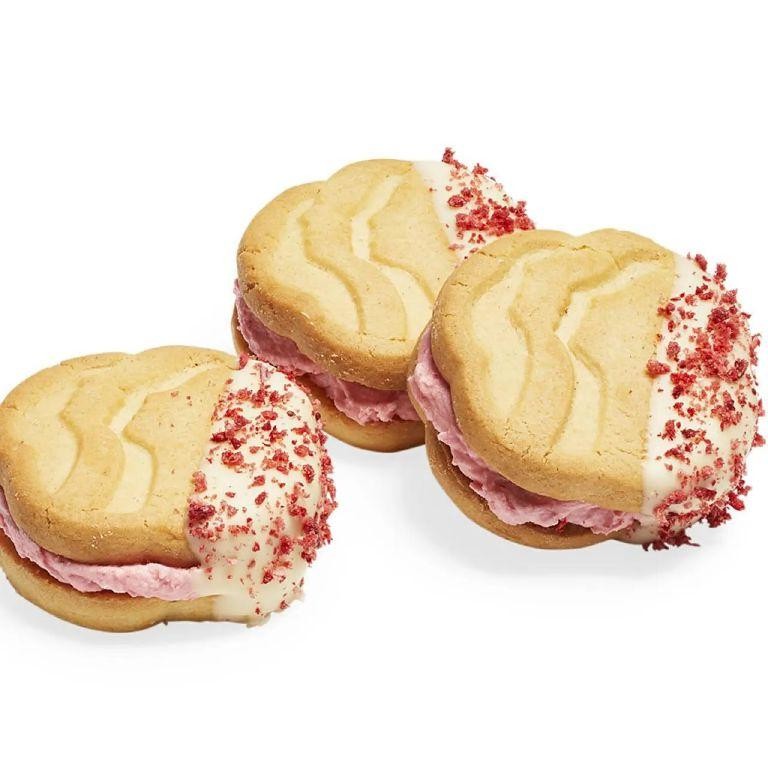
Samoas Coconut Caramel Delights
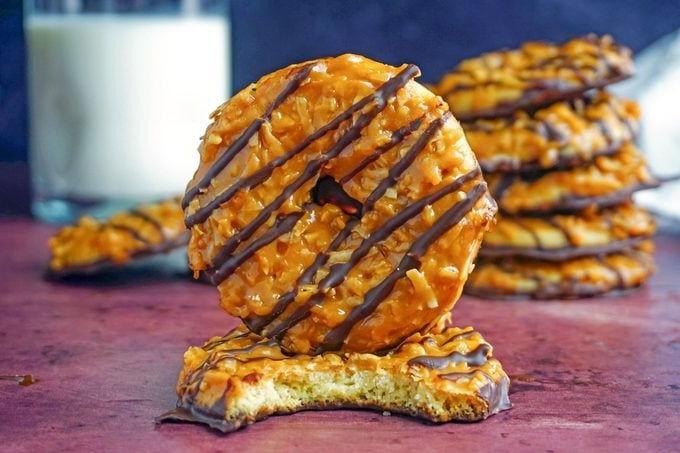
Kickstart your baking adventure with these irresistible Samoas Coconut Caramel Delights, a perfect blend of sweet, crunchy, and chewy textures that will transport you to dessert heaven with every bite. This recipe is designed for beginners, guiding you through each step with precision to ensure delicious results every time.
Ingredients
- 1 cup sweetened shredded coconut (toast lightly for extra flavor)
- 1/2 cup caramel sauce (homemade or store-bought, warmed slightly for easier spreading)
- 1 1/2 cups all-purpose flour (sifted to avoid lumps)
- 1/2 cup unsalted butter, softened (room temperature for easy mixing)
- 1/4 cup granulated sugar (adjust to taste)
- 1/4 tsp salt (enhances the flavors)
- 1/2 cup semi-sweet chocolate chips (melted for drizzling)
Instructions
- Preheat your oven to 350°F (175°C) and line a baking sheet with parchment paper to prevent sticking.
- In a medium bowl, mix the softened butter and granulated sugar until light and fluffy, about 2 minutes, for a smooth base.
- Gradually add the sifted flour and salt to the butter mixture, stirring until a dough forms. Tip: If the dough is too sticky, chill it for 10 minutes for easier handling.
- Roll the dough into 1-inch balls and place them on the prepared baking sheet, flattening slightly with your palm.
- Bake for 12-15 minutes, or until the edges are just starting to turn golden, for the perfect crispness.
- While the cookies cool, spread a thin layer of warmed caramel sauce over each, then sprinkle with toasted coconut, pressing gently to adhere.
- Drizzle melted chocolate over the cookies in a zigzag pattern for a decorative finish. Tip: Use a piping bag for more precise chocolate drizzling.
- Allow the chocolate to set at room temperature for about 30 minutes before serving.
Bursting with flavors, these delights offer a delightful contrast between the crispy cookie base, gooey caramel, and crunchy coconut, finished with a rich chocolate drizzle. Serve them at your next gathering or package them beautifully as a thoughtful homemade gift.
Tagalongs Peanut Butter Patties
Starting with the basics, Tagalongs Peanut Butter Patties are a delightful treat that combines the rich flavors of peanut butter and chocolate in a crisp cookie base. Perfect for beginners, this recipe guides you through each step to ensure success.
Ingredients
- 1 cup creamy peanut butter (use natural for a healthier option)
- 1/2 cup powdered sugar (sifted to avoid lumps)
- 2 tbsp unsalted butter, softened (or margarine as a substitute)
- 1 tsp vanilla extract (pure extract for best flavor)
- 24 shortbread cookies (store-bought or homemade)
- 1 cup semi-sweet chocolate chips (milk chocolate can be used for a sweeter taste)
- 1 tbsp coconut oil (or any neutral oil to thin the chocolate)
Instructions
- In a medium bowl, mix together the peanut butter, powdered sugar, butter, and vanilla extract until smooth and well combined.
- Using a small spoon or cookie scoop, place a dollop of the peanut butter mixture on top of each shortbread cookie, spreading it evenly to the edges.
- Place the prepared cookies on a parchment-lined baking sheet and freeze for 30 minutes to firm up the peanut butter layer.
- In a microwave-safe bowl, combine the chocolate chips and coconut oil. Microwave in 30-second intervals, stirring in between, until the chocolate is fully melted and smooth.
- Dip each peanut butter-covered cookie into the melted chocolate, ensuring it’s fully coated. Use a fork to let excess chocolate drip off.
- Return the coated cookies to the parchment-lined baking sheet and refrigerate for at least 1 hour, or until the chocolate is set.
Here’s how these Tagalongs Peanut Butter Patties turn out: the peanut butter layer is creamy and rich, perfectly complementing the crisp shortbread and the smooth chocolate coating. For a festive twist, sprinkle sea salt or crushed peanuts on top before the chocolate sets.
Do-si-dos Peanut Butter Sandwich Cookies

Now, let’s dive into making these delightful Do-si-dos Peanut Butter Sandwich Cookies, a perfect blend of crunchy and creamy that’s sure to satisfy your sweet tooth.
Ingredients
- 1 cup creamy peanut butter (for a smoother texture)
- 1/2 cup unsalted butter, softened (ensures easy mixing)
- 1/2 cup granulated sugar (adjust to taste)
- 1/2 cup brown sugar, packed (adds moisture and depth)
- 1 large egg (room temperature for better incorporation)
- 1 tsp vanilla extract (pure for best flavor)
- 1 1/4 cups all-purpose flour (sifted to avoid lumps)
- 1/2 tsp baking soda (check expiry for effectiveness)
- 1/4 tsp salt (enhances flavors)
- 1/2 cup powdered sugar (for filling, sifted to avoid lumps)
- 2 tbsp milk (any fat percentage, adjust for desired consistency)
Instructions
- Preheat your oven to 350°F (175°C) and line baking sheets with parchment paper for easy cleanup.
- In a large bowl, cream together 1/2 cup softened unsalted butter, 1/2 cup granulated sugar, and 1/2 cup packed brown sugar until light and fluffy, about 3 minutes.
- Beat in 1 large egg and 1 tsp vanilla extract until fully incorporated, scraping down the sides of the bowl as needed.
- Gradually mix in 1 cup creamy peanut butter until the mixture is smooth and uniform.
- In a separate bowl, whisk together 1 1/4 cups sifted all-purpose flour, 1/2 tsp baking soda, and 1/4 tsp salt.
- Slowly add the dry ingredients to the wet ingredients, mixing just until combined to avoid overworking the dough.
- Roll the dough into 1-inch balls and place them 2 inches apart on the prepared baking sheets. Flatten slightly with a fork in a crisscross pattern.
- Bake for 10-12 minutes, or until the edges are lightly golden. Let cool on the baking sheets for 5 minutes before transferring to a wire rack.
- For the filling, whisk together 1/2 cup sifted powdered sugar and 2 tbsp milk until smooth. Adjust milk for desired consistency.
- Once cookies are completely cool, spread filling on the flat side of half the cookies and top with the remaining cookies to form sandwiches.
Crunchy on the outside with a creamy peanut butter filling, these cookies are a delightful treat. Serve them with a glass of cold milk for the ultimate comfort food experience.
Trefoils Shortbread Cookies
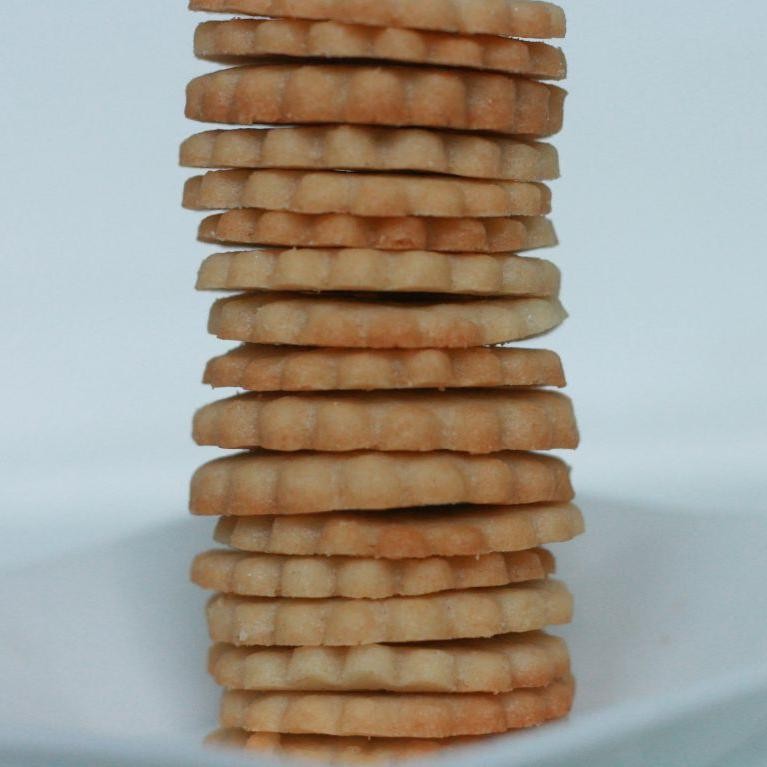
Unveiling the simplicity and elegance of Trefoils Shortbread Cookies, this recipe is a delightful journey into the world of buttery, crumbly treats that are as easy to make as they are to love. Perfect for beginners and seasoned bakers alike, these cookies promise a foolproof path to deliciousness.
Ingredients
- 1 cup unsalted butter, softened (for easier mixing)
- 1/2 cup granulated sugar (adjust to taste)
- 2 cups all-purpose flour (sifted for a lighter texture)
- 1/2 tsp vanilla extract (or almond extract for a twist)
Instructions
- Preheat your oven to 325°F (163°C) to ensure it’s ready for baking.
- In a large bowl, cream together the softened butter and granulated sugar until light and fluffy, about 3 minutes. Tip: Scrape down the sides of the bowl to ensure even mixing.
- Gradually add the sifted all-purpose flour to the butter mixture, mixing until just combined. Tip: Overmixing can lead to tough cookies, so stop as soon as the flour is incorporated.
- Mix in the vanilla extract until evenly distributed throughout the dough.
- Roll the dough into 1-inch balls and place them on a parchment-lined baking sheet, spacing them about 2 inches apart. Tip: Flatten each ball slightly with the bottom of a glass for even baking.
- Bake in the preheated oven for 18-20 minutes, or until the edges are lightly golden. Visual cue: The cookies should remain pale but firm to the touch.
- Allow the cookies to cool on the baking sheet for 5 minutes before transferring to a wire rack to cool completely.
Marvel at the delicate, buttery flavor and the melt-in-your-mouth texture of these Trefoils Shortbread Cookies. Serve them alongside a cup of tea for a classic pairing, or get creative by sandwiching them with a layer of chocolate ganache for an extra indulgent treat.
Lemonades Crispy Lemon Cookies
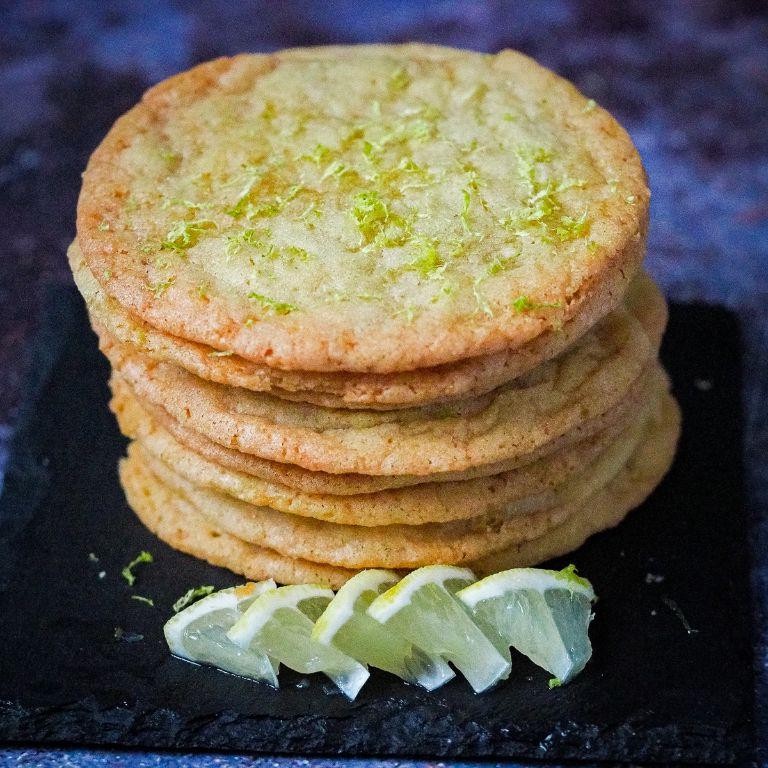
Discover the perfect balance of tangy and sweet with these Lemonades Crispy Lemon Cookies, a delightful treat that’s as fun to make as it is to eat. Designed for beginners, this recipe walks you through each step to ensure your cookies come out perfectly crispy and bursting with lemon flavor every time.
Ingredients
- 1 cup all-purpose flour (for a lighter texture, sift before using)
- 1/2 cup granulated sugar (adjust to taste)
- 1/4 cup unsalted butter, softened (or any neutral oil for a dairy-free version)
- 1 large egg (room temperature for better mixing)
- 2 tbsp fresh lemon juice (for the brightest flavor)
- 1 tbsp lemon zest (adds a vibrant lemon aroma)
- 1/2 tsp baking powder (ensure it’s fresh for maximum rise)
- 1/4 tsp salt (balances the sweetness)
Instructions
- Preheat your oven to 350°F (175°C) and line a baking sheet with parchment paper for easy cleanup.
- In a large bowl, cream together the softened butter and granulated sugar until light and fluffy, about 2 minutes. Tip: Scrape down the sides of the bowl to ensure even mixing.
- Beat in the egg, followed by the fresh lemon juice and zest, mixing until well combined.
- Whisk together the flour, baking powder, and salt in a separate bowl, then gradually add to the wet ingredients, mixing just until the dough comes together. Tip: Overmixing can lead to tough cookies.
- Drop tablespoon-sized portions of dough onto the prepared baking sheet, spacing them about 2 inches apart. Tip: For uniform cookies, use a cookie scoop.
- Bake for 10-12 minutes, or until the edges are golden brown. The centers will look soft but will firm up as they cool.
- Allow the cookies to cool on the baking sheet for 5 minutes before transferring to a wire rack to cool completely.
Perfectly crisp with a chewy center, these Lemonades Crispy Lemon Cookies offer a refreshing zing that’s irresistible. Serve them alongside a cup of tea for a delightful afternoon treat, or package them in a cute box for a thoughtful homemade gift.
Savannah Smiles Lemon Wedge Cookies
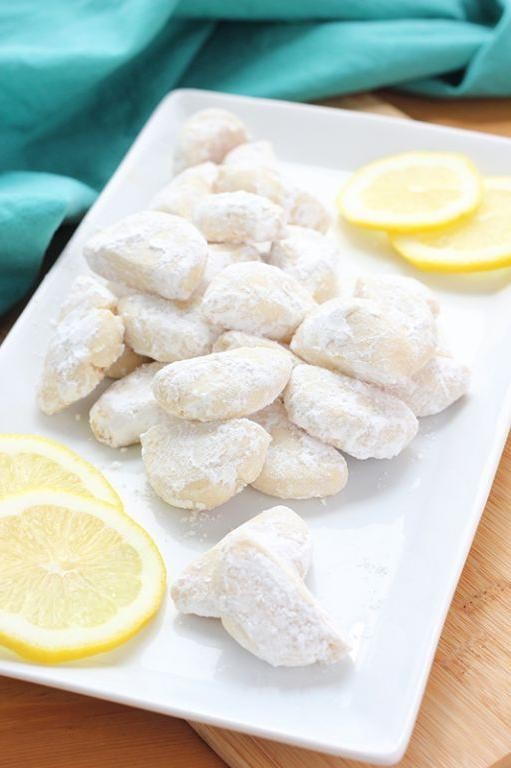
Let’s embark on a delightful baking journey to create Savannah Smiles Lemon Wedge Cookies, a treat that combines the tangy zest of lemon with the sweet comfort of cookies. Perfect for beginners, this recipe is straightforward and rewarding.
Ingredients
- 1 cup unsalted butter, softened (room temperature ensures smooth mixing)
- 1 1/2 cups granulated sugar (for a slightly less sweet version, reduce by 1/4 cup)
- 2 large eggs (bring to room temperature for better incorporation)
- 1 tbsp lemon zest (freshly grated for the brightest flavor)
- 3 tbsp lemon juice (freshly squeezed is ideal)
- 2 1/2 cups all-purpose flour (spooned and leveled for accuracy)
- 1/2 tsp baking powder (ensure it’s fresh for optimal rise)
- 1/4 tsp salt (balances the sweetness)
Instructions
- Preheat your oven to 350°F (175°C) and line baking sheets with parchment paper for easy cleanup.
- In a large bowl, cream together the softened butter and granulated sugar until light and fluffy, about 3 minutes. Tip: Scrape down the sides of the bowl to ensure even mixing.
- Beat in the eggs one at a time, then stir in the lemon zest and juice. The mixture may look curdled but will come together with the dry ingredients.
- In a separate bowl, whisk together the flour, baking powder, and salt. Gradually add to the wet ingredients, mixing just until combined. Tip: Overmixing can lead to tough cookies.
- Drop tablespoon-sized portions of dough onto the prepared baking sheets, spacing them 2 inches apart. Bake for 10-12 minutes, or until the edges are lightly golden. Tip: For uniform cookies, use a cookie scoop.
- Allow the cookies to cool on the baking sheets for 5 minutes before transferring to a wire rack to cool completely.
With their crisp edges and soft centers, these lemon wedge cookies offer a refreshing burst of citrus in every bite. Serve them alongside a cup of tea for a cozy afternoon treat or pack them in a picnic basket for a sunny day outing.
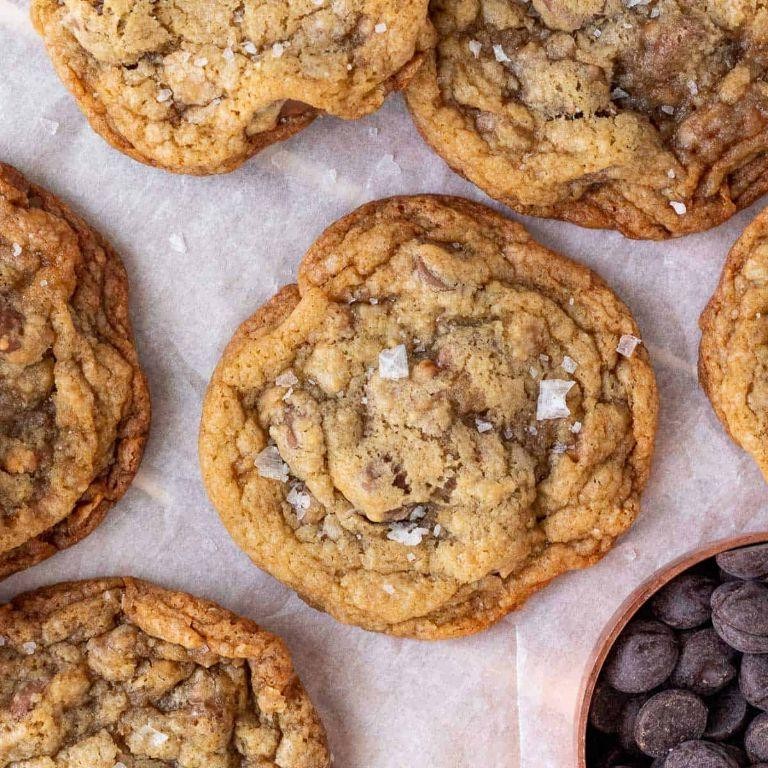
Toffee-tastic Buttery Toffee Cookies
Just imagine biting into a cookie that’s a perfect blend of crunchy toffee and buttery dough, melting in your mouth with every bite. Today, we’re diving into making these irresistible Toffee-tastic Buttery Toffee Cookies, a recipe that’s as fun to make as it is to eat.
Ingredients
- 1 cup unsalted butter, softened (for easier mixing)
- 1 cup brown sugar, packed (for a deeper flavor)
- 1/2 cup granulated sugar (adjust to taste)
- 2 large eggs (room temperature for better incorporation)
- 2 tsp vanilla extract (or almond extract for a twist)
- 2 1/4 cups all-purpose flour (sifted for lighter cookies)
- 1 tsp baking soda (ensure it’s fresh for proper rise)
- 1/2 tsp salt (to balance the sweetness)
- 1 1/2 cups toffee bits (for that signature crunch)
Instructions
- Preheat your oven to 350°F (175°C) and line baking sheets with parchment paper to prevent sticking.
- In a large bowl, cream together the softened butter, brown sugar, and granulated sugar until light and fluffy, about 3 minutes. Tip: Scrape down the sides of the bowl to ensure even mixing.
- Beat in the eggs one at a time, then stir in the vanilla extract until well combined.
- In a separate bowl, whisk together the sifted flour, baking soda, and salt. Gradually add this to the wet ingredients, mixing just until incorporated. Tip: Overmixing can lead to tough cookies.
- Fold in the toffee bits evenly throughout the dough.
- Drop tablespoon-sized balls of dough onto the prepared baking sheets, spacing them about 2 inches apart. Tip: For uniform cookies, use a cookie scoop.
- Bake for 10-12 minutes, or until the edges are golden but the centers are still soft. They will firm up as they cool.
- Let the cookies cool on the baking sheets for 5 minutes before transferring to a wire rack to cool completely.
Buttery and rich, these cookies boast a delightful contrast between the soft center and the crunchy toffee bits. Serve them warm with a glass of cold milk for the ultimate comfort food experience, or package them in a pretty box for a thoughtful homemade gift.
S’mores Graham Cracker Cookies
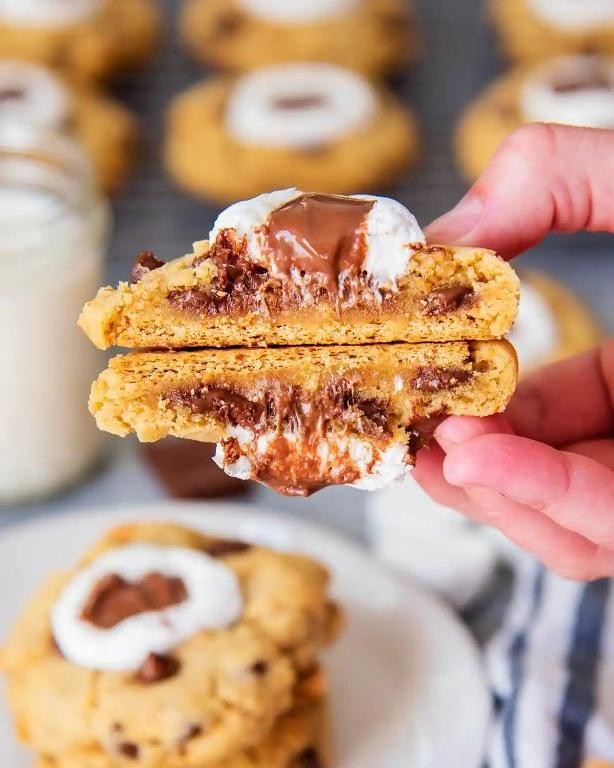
Kickstart your baking adventure with these irresistible S’mores Graham Cracker Cookies, a delightful twist on the classic campfire treat. Perfect for beginners, this recipe guides you through each step to ensure delicious results every time.
Ingredients
- 1 cup graham cracker crumbs (store-bought or homemade)
- 1/2 cup all-purpose flour (for a lighter texture)
- 1/4 tsp baking soda (ensure it’s fresh for best rise)
- 1/4 tsp salt (enhances flavors)
- 1/2 cup unsalted butter, softened (room temperature for easy mixing)
- 1/4 cup brown sugar (packed for accurate measurement)
- 1/4 cup granulated sugar (adjust to sweetness preference)
- 1 large egg (room temperature blends better)
- 1 tsp vanilla extract (pure for best flavor)
- 1 cup mini marshmallows (plus extra for topping)
- 1/2 cup chocolate chips (milk or dark, according to preference)
Instructions
- Preheat your oven to 350°F (175°C) and line a baking sheet with parchment paper for easy cleanup.
- In a medium bowl, whisk together graham cracker crumbs, flour, baking soda, and salt until well combined.
- In a large bowl, beat the softened butter with brown sugar and granulated sugar until light and fluffy, about 2 minutes.
- Add the egg and vanilla extract to the butter mixture, beating until fully incorporated.
- Gradually mix in the dry ingredients until just combined, being careful not to overmix.
- Fold in mini marshmallows and chocolate chips evenly throughout the dough.
- Using a tablespoon, scoop dough onto the prepared baking sheet, spacing them 2 inches apart.
- Bake for 10-12 minutes, or until the edges are golden but the centers are still soft.
- Immediately after removing from the oven, press a few extra marshmallows on top of each cookie for that classic s’mores look.
- Let cookies cool on the baking sheet for 5 minutes before transferring to a wire rack to cool completely.
These cookies boast a chewy center with a crispy edge, packed with gooey marshmallows and melted chocolate. Try serving them warm with a glass of cold milk for the ultimate comfort food experience.
Rah-Rah Raisin Oatmeal Cookies
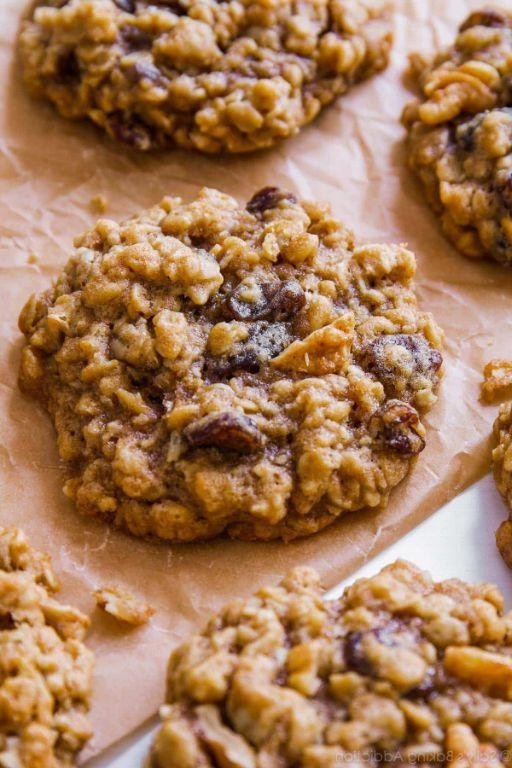
You’ll find that making Rah-Rah Raisin Oatmeal Cookies is a delightful way to bring warmth and comfort to your kitchen. These cookies are packed with wholesome oats and sweet raisins, offering a chewy texture and a hint of cinnamon that makes them irresistible.
Ingredients
- 1 cup unsalted butter, softened (for easier mixing)
- 1 cup packed brown sugar (for a deeper flavor)
- 1/2 cup granulated sugar
- 2 large eggs (room temperature blends better)
- 1 tsp vanilla extract (pure extract recommended)
- 1 1/2 cups all-purpose flour (spooned and leveled)
- 1 tsp baking soda
- 1 tsp ground cinnamon (adjust to taste)
- 1/2 tsp salt
- 3 cups old-fashioned oats (not instant for better texture)
- 1 cup raisins (soak in warm water for 10 minutes if too dry)
Instructions
- Preheat your oven to 350°F (175°C) and line baking sheets with parchment paper.
- In a large bowl, cream together the softened butter, brown sugar, and granulated sugar until light and fluffy, about 3 minutes.
- Beat in the eggs one at a time, then stir in the vanilla extract.
- In a separate bowl, whisk together the flour, baking soda, cinnamon, and salt.
- Gradually add the dry ingredients to the wet ingredients, mixing just until combined.
- Fold in the oats and raisins until evenly distributed throughout the dough.
- Drop rounded tablespoons of dough onto the prepared baking sheets, spacing them about 2 inches apart.
- Bake for 10-12 minutes, or until the edges are golden but the centers are still soft.
- Let the cookies cool on the baking sheets for 5 minutes before transferring to a wire rack to cool completely.
Very satisfying, these cookies boast a perfect balance of chewiness and crispness. Enjoy them with a glass of cold milk or crumble over vanilla ice cream for a decadent dessert.
Girl Scout Cookie Dough Ice Cream
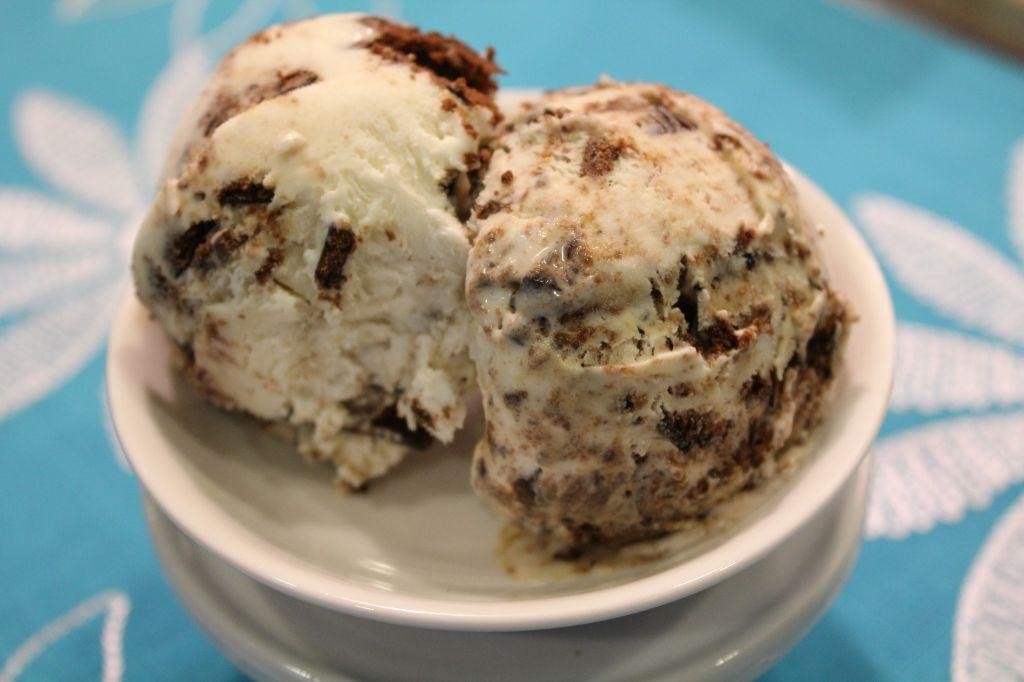
Very few treats can rival the nostalgic joy of Girl Scout cookies, and transforming them into a creamy ice cream is a game-changer. This recipe guides you through creating a decadent Girl Scout Cookie Dough Ice Cream, perfect for those who love a sweet, crunchy texture in their dessert.
Ingredients
- 2 cups heavy cream (chilled for best results)
- 1 cup whole milk (for a creamier texture)
- 3/4 cup granulated sugar (adjust to taste)
- 1 tsp vanilla extract (pure for optimal flavor)
- 1 cup chopped Girl Scout cookies (any variety, but Thin Mints are a favorite)
- 1/2 cup cookie dough pieces (ensure they’re safe to eat raw)
Instructions
- In a large bowl, whisk together the heavy cream, whole milk, granulated sugar, and vanilla extract until the sugar is completely dissolved.
- Pour the mixture into your ice cream maker and churn according to the manufacturer’s instructions, usually about 20-25 minutes, until it reaches a soft-serve consistency.
- Gently fold in the chopped Girl Scout cookies and cookie dough pieces into the churned ice cream to distribute evenly without overmixing.
- Transfer the ice cream to a freezer-safe container, cover with parchment paper pressed directly on the surface to prevent ice crystals, and freeze for at least 4 hours or until firm.
Unbelievably creamy with bursts of cookie crunch, this ice cream is a dream come true for cookie lovers. Serve it sandwiched between two cookies for an extra indulgent treat or drizzle with chocolate sauce for a decadent dessert.
Thin Mints Brownies
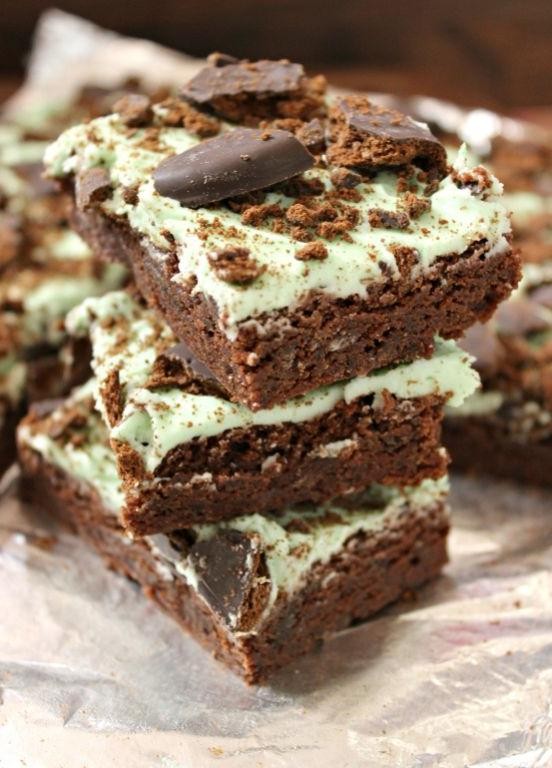
Out of all the decadent desserts to grace your kitchen, these Thin Mints Brownies stand out for their perfect blend of rich chocolate and a refreshing minty crunch. They’re surprisingly simple to make, even for beginners, and the step-by-step guide below will ensure you nail them on your first try.
Ingredients
- 1 cup unsalted butter, melted (or any neutral oil for a lighter version)
- 2 cups granulated sugar (adjust to taste if you prefer less sweet)
- 4 large eggs, room temperature (for smoother mixing)
- 1 tsp vanilla extract (pure extract for best flavor)
- 1 cup all-purpose flour (sifted to avoid lumps)
- 3/4 cup cocoa powder, unsweetened (for deep chocolate flavor)
- 1/2 tsp salt (enhances the chocolate taste)
- 1 box Thin Mints cookies, roughly chopped (reserve a few whole for topping)
Instructions
- Preheat your oven to 350°F (175°C) and line a 9×13 inch baking pan with parchment paper, leaving an overhang for easy removal.
- In a large bowl, whisk together the melted butter and sugar until fully combined. Tip: Ensure the butter is slightly cooled to avoid cooking the eggs.
- Add the eggs one at a time, whisking well after each addition, then stir in the vanilla extract.
- Sift in the flour, cocoa powder, and salt, folding gently until just combined to keep the brownies tender. Tip: Avoid overmixing to prevent tough brownies.
- Fold in the chopped Thin Mints cookies, reserving a handful for the top, then pour the batter into the prepared pan, smoothing the top.
- Bake for 25-30 minutes, or until a toothpick inserted into the center comes out with a few moist crumbs. Tip: The brownies will continue to set as they cool.
- Let cool in the pan for 10 minutes, then use the parchment overhang to lift them out onto a wire rack to cool completely.
Zesty and rich, these brownies offer a delightful contrast between the fudgy base and the crisp minty cookies. Serve them slightly warm with a scoop of vanilla ice cream for an irresistible dessert that’s sure to impress.
Samoas Cheesecake Bars
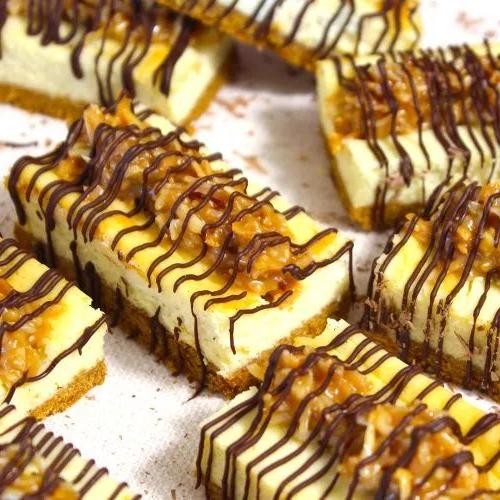
Sampling the flavors of your favorite Girl Scout cookies in a decadent dessert, these Samoas Cheesecake Bars combine the rich, creamy texture of cheesecake with the caramel, coconut, and chocolate notes of Samoas cookies. Perfect for beginners, this recipe guides you through each step to ensure delicious results.
Ingredients
- 1 1/2 cups graham cracker crumbs (about 10 full sheets)
- 1/4 cup granulated sugar
- 6 tbsp unsalted butter, melted (cooled slightly)
- 16 oz cream cheese, softened to room temperature (use full-fat for best texture)
- 1/2 cup granulated sugar
- 2 large eggs, room temperature
- 1 tsp vanilla extract
- 1 cup sweetened shredded coconut, toasted (for extra flavor)
- 1/2 cup caramel sauce (homemade or store-bought)
- 1/2 cup semi-sweet chocolate chips (melted for drizzling)
Instructions
- Preheat your oven to 325°F (163°C) and line an 8×8 inch baking pan with parchment paper, leaving an overhang for easy removal.
- In a medium bowl, mix graham cracker crumbs, 1/4 cup sugar, and melted butter until combined. Press firmly into the bottom of the prepared pan. Bake for 10 minutes, then set aside to cool slightly.
- In a large bowl, beat the cream cheese and 1/2 cup sugar on medium speed until smooth. Tip: Scrape down the sides of the bowl to ensure even mixing.
- Add eggs one at a time, beating well after each addition. Stir in vanilla extract.
- Pour the cheesecake batter over the cooled crust. Sprinkle toasted coconut evenly over the top.
- Bake for 35-40 minutes, or until the edges are set but the center still jiggles slightly. Tip: Avoid overbaking to prevent cracks.
- Cool completely at room temperature, then refrigerate for at least 4 hours or overnight.
- Drizzle with caramel sauce and melted chocolate before serving. Tip: Warm the caramel slightly for easier drizzling.
Yielding a creamy, dreamy dessert, these bars feature a delightful contrast between the crunchy crust and the smooth cheesecake. Serve chilled, with extra caramel and chocolate on the side for those who love an extra indulgent treat.
Tagalongs Chocolate Peanut Butter Pie
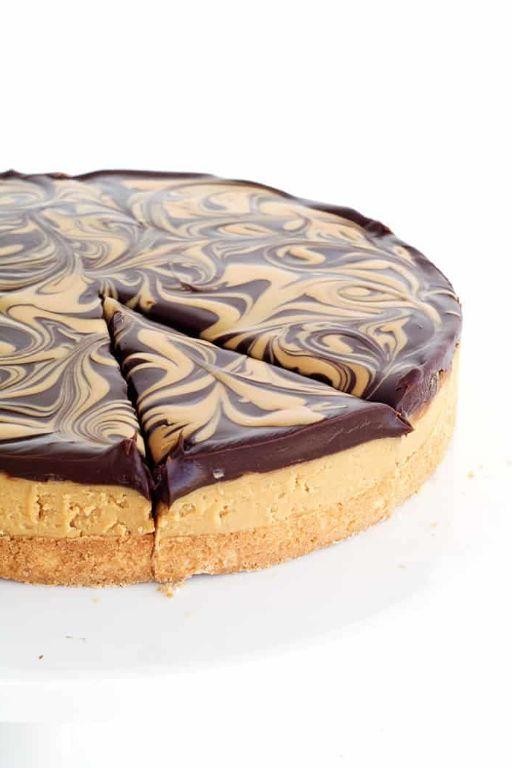
Are you ready to dive into the delicious world of no-bake desserts? Today, we’re making a Tagalongs Chocolate Peanut Butter Pie that’s as easy to whip up as it is irresistible. This pie combines the classic flavors of chocolate and peanut butter in a creamy, dreamy filling atop a crunchy cookie crust.
Ingredients
- 1 1/2 cups crushed Tagalongs cookies (or any peanut butter-filled cookies)
- 1/4 cup unsalted butter, melted (use microwave for 30 seconds)
- 1 cup creamy peanut butter (natural or regular, but avoid oily varieties)
- 8 oz cream cheese, softened (leave out for 30 minutes)
- 1/2 cup powdered sugar (sift to avoid lumps)
- 1 tsp vanilla extract (pure for best flavor)
- 1 1/2 cups heavy cream (cold, for whipping)
- 1/2 cup semi-sweet chocolate chips (melt with care)
- 1 tbsp coconut oil (or any neutral oil, for smoother melting)
Instructions
- In a medium bowl, mix crushed Tagalongs cookies and melted butter until combined. Tip: Use a food processor for finer crumbs.
- Press the mixture firmly into the bottom of a 9-inch pie dish. Chill for 10 minutes to set. Tip: Use the back of a spoon for an even layer.
- In a large bowl, beat peanut butter, cream cheese, powdered sugar, and vanilla until smooth. Tip: Scrape the bowl sides for even mixing.
- In another bowl, whip heavy cream to stiff peaks. Fold gently into the peanut butter mixture. Tip: Fold in two additions to keep it light.
- Spread the filling over the chilled crust. Smooth the top with a spatula. Chill for 4 hours, or until set.
- Melt chocolate chips and coconut oil together, stirring until smooth. Drizzle over the pie before serving. Tip: Use a piping bag for neat lines.
You’ll love the contrast between the creamy peanut butter filling and the crisp cookie crust, with a rich chocolate finish. Serve chilled, perhaps with a scoop of vanilla ice cream for an extra treat.
Do-si-dos Peanut Butter Blossoms
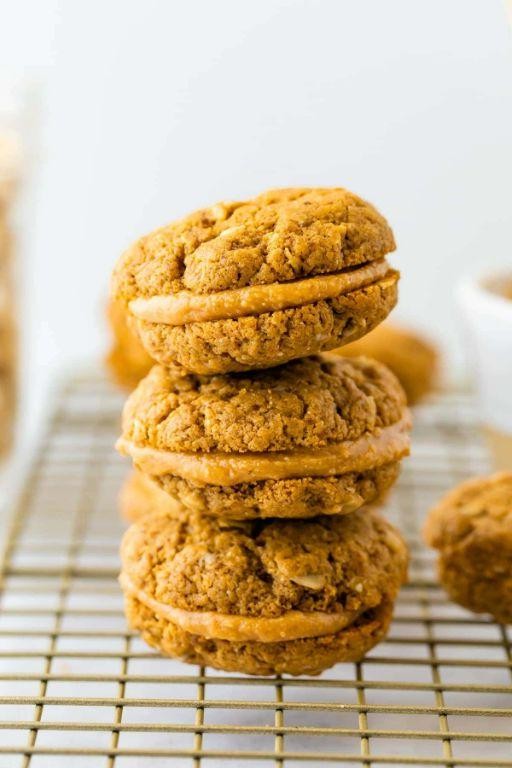
Preparing Do-si-dos Peanut Butter Blossoms is a delightful way to combine the rich flavors of peanut butter and chocolate in a cookie that’s both easy to make and irresistibly tasty. Perfect for beginners, this recipe guides you through each step to ensure your cookies come out perfectly every time.
Ingredients
- 1 cup creamy peanut butter (for a smoother texture)
- 1 cup granulated sugar (adjust to taste)
- 1 large egg (room temperature for better mixing)
- 1 tsp vanilla extract (pure for best flavor)
- 24 milk chocolate kisses (unwrapped)
- Additional sugar for rolling (about 1/4 cup)
Instructions
- Preheat your oven to 375°F (190°C) to ensure it’s ready for baking.
- In a medium bowl, mix together the peanut butter, 1 cup sugar, egg, and vanilla extract until well combined. Tip: Scrape the sides of the bowl to incorporate all ingredients evenly.
- Shape the dough into 1-inch balls, then roll each ball in the additional sugar to coat lightly. Tip: Use a cookie scoop for uniformly sized cookies.
- Place the sugar-coated balls on an ungreased baking sheet, spacing them about 2 inches apart.
- Bake for 8-10 minutes, or until the cookies are set and slightly cracked. Tip: The cookies will continue to set as they cool, so don’t overbake.
- Immediately after removing from the oven, press a chocolate kiss into the center of each cookie. The heat from the cookies will soften the chocolate slightly.
- Allow the cookies to cool on the baking sheet for 5 minutes before transferring to a wire rack to cool completely.
Yield: These Do-si-dos Peanut Butter Blossoms offer a perfect balance of crunchy and chewy textures, with the chocolate kiss adding a creamy contrast. Serve them at room temperature for the best flavor, or slightly warmed for a gooier chocolate experience.
Trefoils Strawberry Shortcake Cookies
Haven’t you ever wished for a dessert that combines the buttery goodness of cookies with the fresh, tangy sweetness of strawberries? These Trefoils Strawberry Shortcake Cookies are your answer, blending the classic flavors of strawberry shortcake into a delightful, easy-to-make cookie form. Perfect for beginners, this recipe guides you through each step to ensure delicious results.
Ingredients
- 1 cup unsalted butter, softened (for easier mixing)
- 1/2 cup granulated sugar (adjust to sweetness preference)
- 2 cups all-purpose flour (sifted for lighter cookies)
- 1/2 tsp salt (enhances flavor)
- 1 cup fresh strawberries, diced (pat dry to prevent dough from becoming too wet)
- 1/2 cup powdered sugar (for dusting, optional)
Instructions
- Preheat your oven to 350°F (175°C) to ensure it’s ready for baking.
- In a large bowl, cream together the softened butter and granulated sugar until light and fluffy, about 3 minutes. Tip: Scrape down the sides of the bowl to ensure even mixing.
- Gradually add the sifted flour and salt to the butter mixture, mixing until just combined. Overmixing can lead to tough cookies.
- Gently fold in the diced strawberries until evenly distributed throughout the dough. Tip: Handle the dough gently to keep the strawberries intact.
- Drop tablespoon-sized portions of dough onto a baking sheet lined with parchment paper, spacing them about 2 inches apart.
- Bake for 12-15 minutes, or until the edges are lightly golden. Tip: Check the cookies at the 12-minute mark to prevent overbaking.
- Allow the cookies to cool on the baking sheet for 5 minutes before transferring to a wire rack to cool completely.
- Once cooled, dust with powdered sugar if desired for an extra touch of sweetness.
These cookies offer a delightful contrast between the crisp edges and soft, strawberry-filled centers, making them a perfect treat for summer picnics or a sweet afternoon snack. Serve them alongside a glass of cold milk or a scoop of vanilla ice cream for an extra indulgent dessert.
Lemonades Lemon Bars
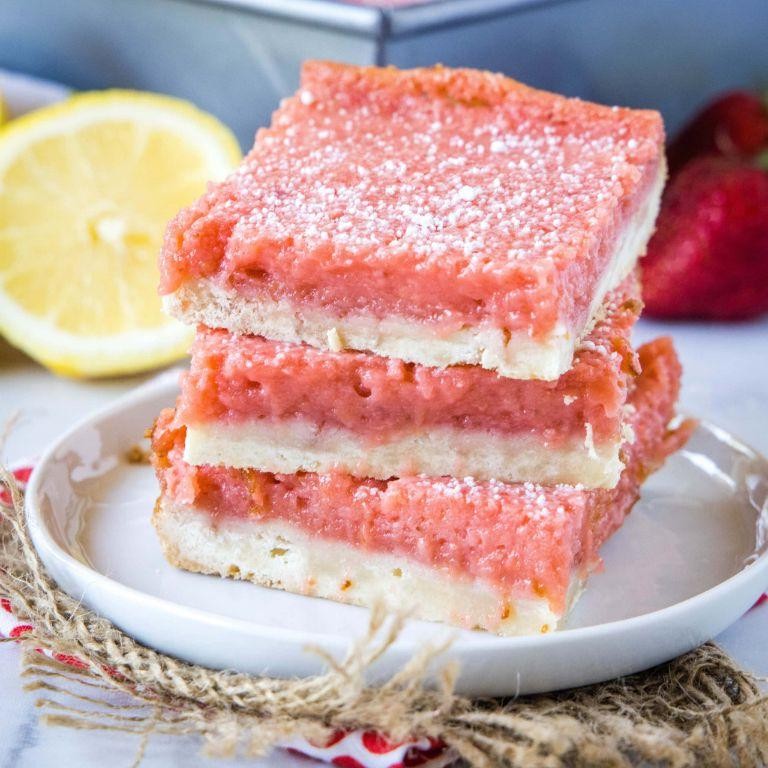
Gathering the perfect balance of tart and sweet, these Lemonades Lemon Bars are a refreshing treat that combines a buttery shortbread crust with a zesty lemon filling. Ideal for beginners, this recipe walks you through each step to ensure a delicious outcome every time.
Ingredients
- 1 cup all-purpose flour (for a tender crust)
- 1/4 cup powdered sugar (plus extra for dusting)
- 1/2 cup unsalted butter, chilled and cubed (ensures flakiness)
- 2 large eggs (room temperature for better mixing)
- 1 cup granulated sugar (adjust to taste)
- 2 tbsp all-purpose flour (to thicken the filling)
- 1/4 cup fresh lemon juice (about 2 lemons, for vibrant flavor)
- 1 tbsp lemon zest (for an extra zing)
- 1/4 tsp baking powder (helps the filling set)
Instructions
- Preheat your oven to 350°F (175°C) and line an 8-inch square baking pan with parchment paper, leaving an overhang for easy removal.
- In a medium bowl, whisk together 1 cup flour and 1/4 cup powdered sugar. Add the cubed butter and use your fingers to rub it into the flour mixture until it resembles coarse crumbs.
- Press the mixture firmly into the bottom of the prepared pan. Bake for 20 minutes, or until the edges are lightly golden. Tip: Chilling the crust for 15 minutes before baking can prevent shrinking.
- While the crust bakes, whisk the eggs, granulated sugar, 2 tbsp flour, lemon juice, lemon zest, and baking powder in a bowl until smooth. Tip: Straining the mixture ensures a silky filling.
- Pour the lemon mixture over the hot crust and return to the oven. Bake for 20-25 minutes, or until the filling is set and slightly jiggly in the center.
- Cool completely in the pan on a wire rack, then refrigerate for at least 2 hours before cutting into squares. Tip: Use a hot, wet knife for clean cuts.
These Lemonades Lemon Bars boast a crisp crust contrasting with the creamy, tangy filling. Serve them chilled with a dusting of powdered sugar or alongside fresh berries for a colorful presentation.
Savannah Smiles Lemon Meringue Pie
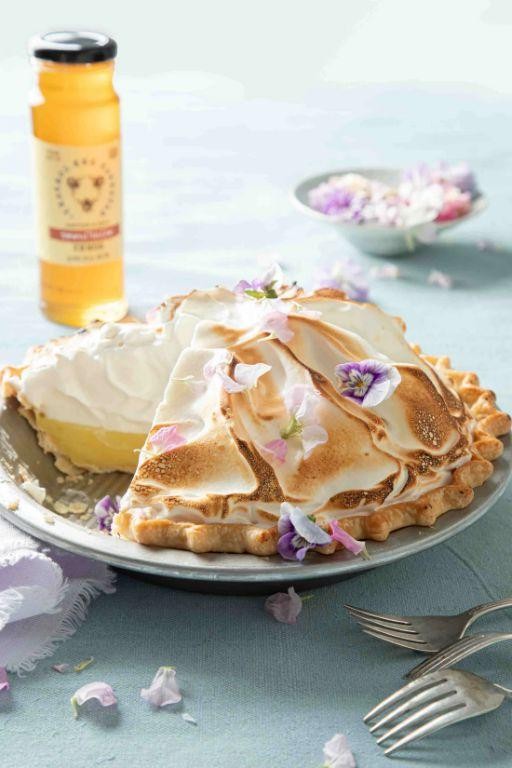
Now, let’s embark on a culinary journey to create a dessert that’s as joyful as its name suggests. This lemon meringue pie combines the tangy zest of lemon with the sweet, fluffy peaks of meringue, all nestled in a buttery crust. Perfect for any occasion, it’s a dessert that promises to bring smiles to your table.
Ingredients
- 1 1/4 cups all-purpose flour (for a flakier crust, chill the flour before using)
- 1/2 cup unsalted butter, chilled and diced (keep cold until ready to use)
- 1/4 cup ice water (add gradually, just until dough comes together)
- 1 cup granulated sugar (for a smoother filling, use superfine sugar)
- 1/4 cup cornstarch (sift to avoid lumps in the filling)
- 1 1/2 cups water (use filtered for the clearest flavor)
- 4 large egg yolks (save whites for the meringue)
- 1/2 cup fresh lemon juice (about 3 lemons, adjust to taste)
- 1 tbsp lemon zest (for an extra burst of flavor)
- 4 large egg whites (room temperature for best volume)
- 1/2 tsp cream of tartar (stabilizes the meringue)
- 1/2 cup granulated sugar (for the meringue, add gradually)
Instructions
- Preheat your oven to 375°F (190°C) to ensure it’s ready for baking the crust.
- In a large bowl, combine the flour and diced butter. Use a pastry cutter or your fingers to blend until the mixture resembles coarse crumbs.
- Gradually add ice water, one tablespoon at a time, stirring until the dough just comes together. Tip: Overworking the dough can make the crust tough.
- Press the dough into a 9-inch pie dish, ensuring an even layer on the bottom and sides. Chill for 30 minutes to prevent shrinking during baking.
- Line the chilled crust with parchment paper and fill with pie weights or dried beans. Bake for 15 minutes, then remove weights and parchment, and bake for another 10 minutes until golden. Tip: Blind baking ensures a crisp crust that won’t get soggy from the filling.
- In a medium saucepan, whisk together sugar and cornstarch. Gradually whisk in water until smooth. Cook over medium heat, stirring constantly, until the mixture thickens and boils.
- Remove from heat and gradually whisk in egg yolks, then stir in lemon juice and zest. Pour the filling into the baked crust.
- In a clean, dry bowl, beat egg whites and cream of tartar on medium speed until soft peaks form. Gradually add sugar, beating until stiff, glossy peaks form. Tip: Ensure no yolk is in the whites for the best meringue.
- Spread the meringue over the hot filling, sealing to the edges of the crust. Bake at 350°F (175°C) for 15 minutes or until the meringue is golden.
Finally, this pie offers a delightful contrast between the crisp, buttery crust and the creamy, tangy filling, topped with a light, sweet meringue. For an extra touch, serve with a sprinkle of lemon zest or a dollop of whipped cream on the side.
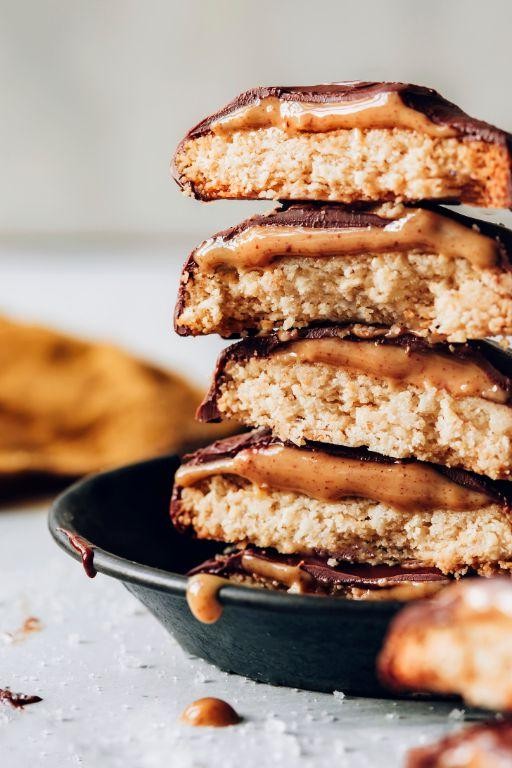
Toffee-tastic Toffee Cookies with Sea Salt
First, let’s dive into making these irresistible Toffee-tastic Toffee Cookies with Sea Salt, a perfect blend of sweet and salty that’s sure to delight your taste buds. Follow these steps carefully to ensure your cookies come out perfectly every time.
Ingredients
- 1 cup unsalted butter, softened (for easier mixing)
- 1 cup packed brown sugar (adds a deep, molasses flavor)
- 1/2 cup granulated sugar (for sweetness)
- 2 large eggs (room temperature blends better)
- 2 tsp vanilla extract (pure extract recommended)
- 2 1/4 cups all-purpose flour (spooned and leveled)
- 1 tsp baking soda (ensure it’s fresh for rise)
- 1/2 tsp sea salt, plus extra for sprinkling (flaky sea salt preferred)
- 1 1/2 cups toffee bits (check for gluten-free if needed)
Instructions
- Preheat your oven to 350°F (175°C) and line baking sheets with parchment paper for easy cleanup.
- In a large bowl, cream together the softened butter, brown sugar, and granulated sugar until light and fluffy, about 3 minutes. Tip: Scrape down the sides of the bowl to ensure even mixing.
- Beat in the eggs one at a time, then stir in the vanilla extract until well combined.
- In a separate bowl, whisk together the flour, baking soda, and sea salt. Gradually add this to the wet ingredients, mixing just until combined. Tip: Overmixing can lead to tough cookies.
- Fold in the toffee bits until evenly distributed throughout the dough.
- Drop rounded tablespoons of dough onto the prepared baking sheets, spacing them about 2 inches apart. Sprinkle each cookie lightly with additional sea salt.
- Bake for 10-12 minutes, or until the edges are golden but the centers are still soft. Tip: For chewier cookies, slightly underbake.
- Allow the cookies to cool on the baking sheets for 5 minutes before transferring to a wire rack to cool completely.
Delight in the contrast of the crunchy toffee bits against the soft, chewy cookie, with the sea salt enhancing every bite. Serve these cookies slightly warm with a glass of cold milk for an indulgent treat, or package them beautifully as a thoughtful homemade gift.
S’mores Chocolate Chip Cookie Bars

Unleash the ultimate fusion of campfire nostalgia and home-baked goodness with these S’mores Chocolate Chip Cookie Bars. Perfect for beginners, this recipe combines simple techniques with irresistible flavors, guiding you through each step to ensure success.
Ingredients
- 1 cup unsalted butter, softened (room temperature ensures even mixing)
- 1 cup granulated sugar (for that perfect sweetness)
- 1 cup packed brown sugar (adds moisture and depth)
- 2 large eggs (bring to room temperature for better incorporation)
- 2 tsp vanilla extract (pure extract recommended for best flavor)
- 3 cups all-purpose flour (spooned and leveled for accuracy)
- 1 tsp baking soda (check expiry date for effectiveness)
- 1/2 tsp salt (fine sea salt preferred)
- 2 cups chocolate chips (semi-sweet for balance)
- 1 cup mini marshmallows (for that classic s’mores texture)
- 1 cup graham cracker crumbs (about 8 full sheets, crushed)
Instructions
- Preheat your oven to 375°F (190°C) and line a 9×13 inch baking pan with parchment paper, leaving an overhang for easy removal.
- In a large bowl, cream together the softened butter, granulated sugar, and brown sugar until light and fluffy, about 3 minutes. Tip: Scrape down the sides of the bowl to ensure all ingredients are evenly incorporated.
- Beat in the eggs one at a time, then stir in the vanilla extract. Tip: Adding eggs one at a time prevents the mixture from separating.
- In a separate bowl, whisk together the flour, baking soda, and salt. Gradually add this to the wet ingredients, mixing just until combined. Tip: Overmixing can lead to tough bars, so stop as soon as the flour disappears.
- Fold in the chocolate chips and mini marshmallows, then spread the dough evenly into the prepared pan. Sprinkle the graham cracker crumbs on top.
- Bake for 25-30 minutes, or until the edges are golden and the center is set. Tip: The bars will continue to cook as they cool, so it’s okay if the center seems slightly underdone.
- Allow to cool completely in the pan on a wire rack before slicing into bars.
These bars offer a delightful contrast of textures, from the crispy edges to the gooey center, with the graham cracker crumbs adding a satisfying crunch. Serve them slightly warmed with a scoop of vanilla ice cream for an extra indulgent treat.
Rah-Rah Raisin Bread Pudding
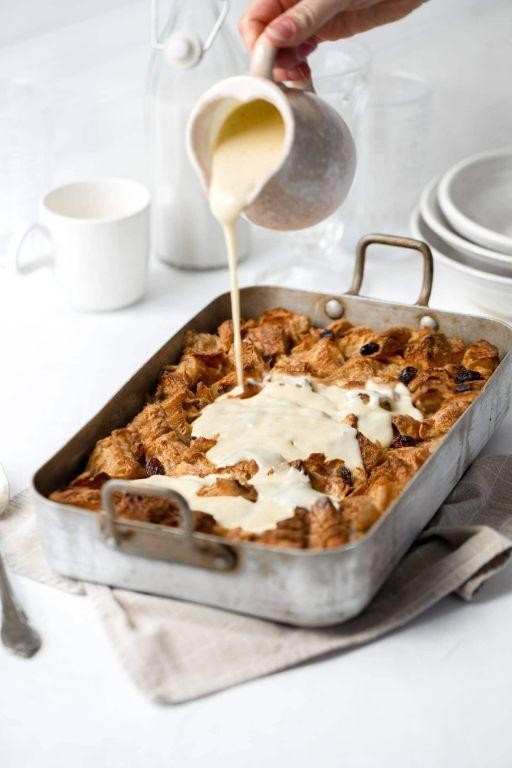
Sometimes, the simplest ingredients come together to create something unexpectedly delightful. This Rah-Rah Raisin Bread Pudding is a testament to that, combining everyday items into a comforting dessert that’s perfect for any occasion.
Ingredients
- 4 cups stale bread, cubed (day-old bread works best)
- 2 cups whole milk (for richness, but 2% works too)
- 3 large eggs (room temperature blends easier)
- 1/2 cup granulated sugar (adjust slightly for sweetness preference)
- 1/4 cup unsalted butter, melted (plus extra for greasing)
- 1 tsp vanilla extract (pure extract for best flavor)
- 1/2 cup raisins (soak in warm water for 10 minutes if too dry)
- 1/2 tsp ground cinnamon (add a pinch more for extra warmth)
Instructions
- Preheat your oven to 350°F (175°C) and lightly grease a 9-inch baking dish with butter.
- In a large bowl, whisk together the milk, eggs, sugar, melted butter, and vanilla extract until well combined.
- Add the cubed bread and raisins to the bowl, gently pressing down to ensure all pieces are soaked in the liquid mixture. Let it sit for 10 minutes to absorb.
- Transfer the mixture to the prepared baking dish, spreading it evenly. Sprinkle the top with ground cinnamon.
- Bake for 45-50 minutes, or until the top is golden brown and the center is set but slightly wobbly.
- Remove from the oven and let it cool for 5 minutes before serving. Tip: For a crispier top, broil for the last 2-3 minutes.
Moist and rich with a hint of cinnamon, this bread pudding is a cozy treat. Serve it warm with a dollop of whipped cream or a scoop of vanilla ice cream for an extra indulgent dessert.
Girl Scout Cookie Truffles
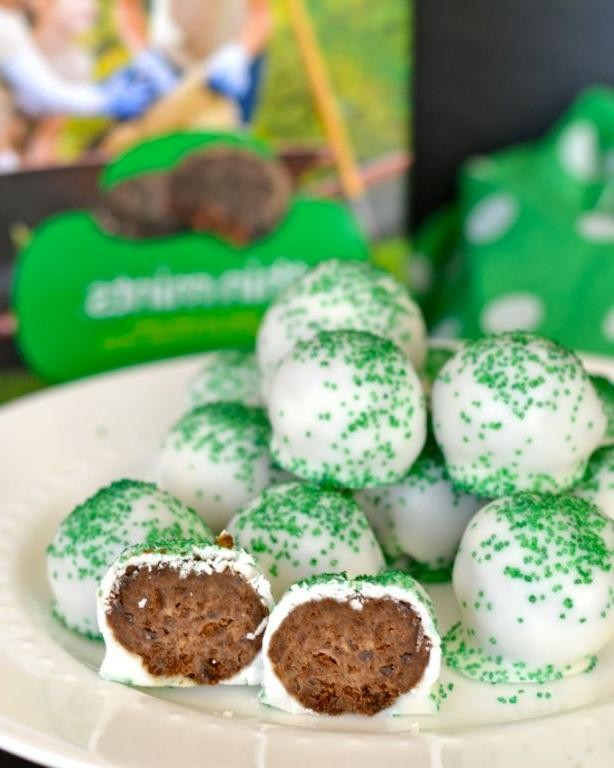
Unwrap the joy of making these irresistible Girl Scout Cookie Truffles, a no-bake treat that combines the beloved flavors of your favorite cookies with the creamy richness of chocolate. Perfect for beginners, this recipe guides you through each step to ensure delicious results every time.
Ingredients
- 1 package (about 14 oz) Girl Scout Cookies (Thin Mints or Samoas recommended for best flavor)
- 4 oz cream cheese, softened (use full-fat for creamier texture)
- 1 cup semi-sweet chocolate chips (or dark chocolate for a richer taste)
- 1 tbsp coconut oil (helps thin the chocolate for smoother coating)
- Sprinkles or extra cookie crumbs for garnish (optional, adds crunch and color)
Instructions
- Place the Girl Scout Cookies in a food processor and pulse until finely crushed. Tip: For a chunkier texture, pulse fewer times.
- Add the softened cream cheese to the crushed cookies in the food processor. Pulse until the mixture comes together into a dough-like consistency.
- Roll the mixture into 1-inch balls and place them on a baking sheet lined with parchment paper. Freeze for 30 minutes to firm up. Tip: Wetting your hands slightly prevents sticking.
- In a microwave-safe bowl, combine the chocolate chips and coconut oil. Microwave in 30-second intervals, stirring in between, until fully melted and smooth.
- Using a fork, dip each truffle into the melted chocolate, ensuring it’s fully coated. Let excess chocolate drip off before returning to the parchment paper. Tip: Work quickly to prevent the truffles from softening too much.
- Immediately garnish with sprinkles or extra cookie crumbs before the chocolate sets. Chill in the refrigerator for at least 1 hour to set completely.
What makes these truffles stand out is their perfect balance of creamy and crunchy textures, with a deep chocolate flavor that’s enhanced by the cookie pieces. Serve them at room temperature for the best texture, or get creative by skewering them for a fun dessert presentation.
Thin Mints Chocolate Covered Pretzels
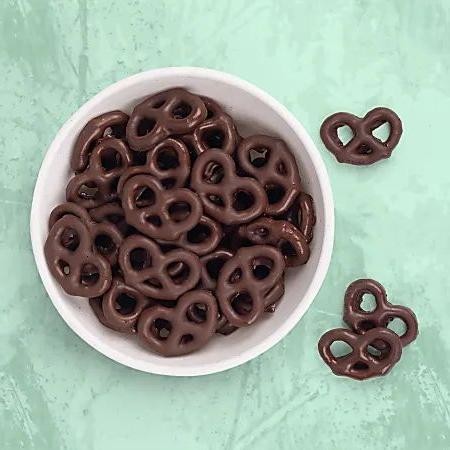
Making Thin Mints Chocolate Covered Pretzels is a delightful way to combine the crunchy texture of pretzels with the rich flavor of chocolate and a hint of mint. This recipe is perfect for beginners, offering a simple yet satisfying treat that’s sure to impress.
Ingredients
- 2 cups thin pretzel twists (look for uniform size for even coating)
- 1 cup semi-sweet chocolate chips (high-quality for smoother melting)
- 1/2 tsp peppermint extract (adjust to taste for stronger mint flavor)
- 1 tbsp coconut oil (or any neutral oil to thin the chocolate)
Instructions
- Line a baking sheet with parchment paper and set aside.
- In a microwave-safe bowl, combine chocolate chips and coconut oil. Microwave in 30-second intervals, stirring each time, until fully melted (about 1-2 minutes total).
- Stir in peppermint extract into the melted chocolate until well combined.
- Using a fork, dip each pretzel into the chocolate mixture, ensuring it’s fully coated. Tap off excess chocolate against the side of the bowl.
- Place coated pretzels on the prepared baking sheet. If desired, sprinkle with a pinch of sea salt for a sweet and salty contrast.
- Allow the pretzels to set at room temperature for about 30 minutes, or refrigerate for 15 minutes for quicker setting.
How these Thin Mints Chocolate Covered Pretzels turn out is nothing short of magical. The crisp pretzel provides a satisfying crunch, while the chocolate and mint meld together for a refreshing finish. Serve them at your next gathering or package them in a cute box for a thoughtful homemade gift.
Samoas Coconut Macaroons
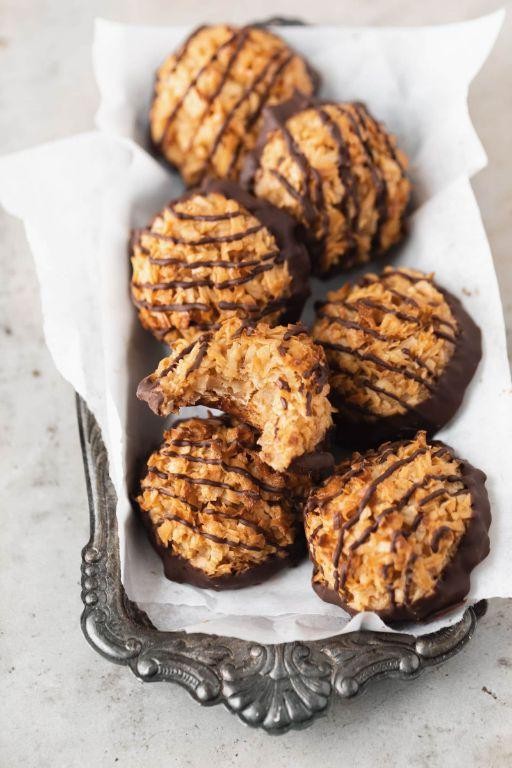
These Samoas Coconut Macaroons are a delightful twist on the classic cookie, combining the rich flavors of caramel and chocolate with the tropical taste of coconut. Perfect for beginners, this recipe guides you through each step to ensure delicious results.
Ingredients
- 3 cups sweetened shredded coconut (packed tightly for best texture)
- 1/2 cup granulated sugar (adjust to taste)
- 1/4 cup all-purpose flour (for binding)
- 1/4 tsp salt (enhances flavors)
- 2 large egg whites (room temperature for easier mixing)
- 1 tsp vanilla extract (pure for best flavor)
- 1/2 cup caramel sauce (homemade or store-bought)
- 1/2 cup dark chocolate chips (melted for drizzling)
Instructions
- Preheat your oven to 325°F (163°C) and line a baking sheet with parchment paper.
- In a large bowl, mix the shredded coconut, granulated sugar, all-purpose flour, and salt until well combined.
- Add the egg whites and vanilla extract to the dry ingredients, stirring until the mixture is evenly moistened.
- Using a tablespoon, scoop the mixture onto the prepared baking sheet, spacing them about 2 inches apart.
- Bake for 20-25 minutes, or until the edges are golden brown and the macaroons are set.
- Allow the macaroons to cool on the baking sheet for 5 minutes before transferring them to a wire rack to cool completely.
- Once cooled, drizzle each macaroon with caramel sauce and melted dark chocolate.
- Let the caramel and chocolate set for about 10 minutes before serving.
Here’s how these macaroons turn out: crispy on the outside, chewy on the inside, with a perfect balance of sweetness from the caramel and a slight bitterness from the dark chocolate. Try serving them alongside a cup of coffee for an afternoon treat that’s sure to impress.
Tagalongs Peanut Butter Cupcakes

Creating the perfect Tagalongs Peanut Butter Cupcakes is easier than you think, especially when you follow these detailed steps. Let’s dive into the process of making these delightful treats that combine the rich flavors of peanut butter and chocolate in every bite.
Ingredients
- 1 1/2 cups all-purpose flour (sifted for lightness)
- 1/2 cup unsweetened cocoa powder (for deep chocolate flavor)
- 1 tsp baking soda (ensure it’s fresh for best rise)
- 1/4 tsp salt (balances sweetness)
- 1/2 cup unsalted butter, softened (room temperature for easy mixing)
- 1 cup granulated sugar (adjust to taste)
- 2 large eggs (room temperature blends better)
- 1 tsp vanilla extract (pure for best flavor)
- 1/2 cup buttermilk (adds moisture, can substitute with milk + 1/2 tbsp vinegar)
- 1/2 cup creamy peanut butter (natural or processed, but avoid oily types)
- 1 cup powdered sugar (for frosting, sifted to avoid lumps)
- 1/2 cup heavy cream (for frosting, cold whips better)
- 1/2 cup chocolate chips (melted for drizzle, semi-sweet recommended)
Instructions
- Preheat your oven to 350°F (175°C) and line a muffin tin with cupcake liners.
- In a medium bowl, whisk together the flour, cocoa powder, baking soda, and salt until well combined.
- In a large bowl, beat the softened butter and granulated sugar together on medium speed until light and fluffy, about 2 minutes.
- Add the eggs one at a time to the butter mixture, beating well after each addition. Mix in the vanilla extract.
- Alternately add the dry ingredients and buttermilk to the butter mixture, beginning and ending with the dry ingredients. Mix until just combined.
- Fill each cupcake liner 2/3 full with batter. Bake for 18-20 minutes, or until a toothpick inserted into the center comes out clean.
- While the cupcakes cool, beat the peanut butter, powdered sugar, and heavy cream together until smooth and fluffy to make the frosting.
- Once cupcakes are completely cool, frost them with the peanut butter mixture.
- Melt the chocolate chips and drizzle over the frosted cupcakes for decoration.
You’ll love the moist, chocolatey base paired with the creamy peanut butter frosting, creating a perfect balance of flavors. For an extra touch, sprinkle crushed peanuts on top before the chocolate drizzle sets.
Conclusion
Delightful doesn’t even begin to cover it! This roundup of 25 Girl Scout cookie recipes is your ticket to baking bliss. Whether you’re craving Thin Mints or Samoas, there’s something here for every sweet tooth. We’d love to hear which recipes stole your heart—drop us a comment below. And if you enjoyed this collection, don’t forget to share the love on Pinterest. Happy baking!