Garlic scapes are the unsung heroes of the seasonal kitchen, offering a mild, garlicky flavor that’s perfect for everything from quick weeknight dinners to your next backyard barbecue. Whether you’re a garlic scape guru or just discovering these curly green delights, we’ve rounded up 20 mouthwatering recipes that showcase their versatility. Get ready to transform your meals with these delicious ideas—your taste buds will thank you!
Garlic Scape Pesto Pasta
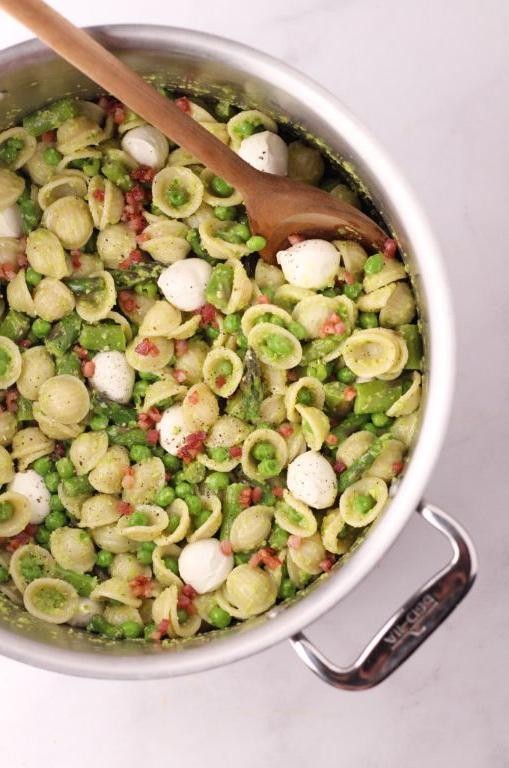
Now, if you’ve ever found yourself staring down a bunch of garlic scapes, wondering what magic you can whip up, let me introduce you to your new favorite pasta dish. It’s like pesto went on a garlicky adventure and came back with a story to tell.
Ingredients
- A big handful of garlic scapes (about 1 cup chopped)
- A couple of good glugs of olive oil (about 1/2 cup)
- A small handful of pine nuts (1/4 cup)
- A generous sprinkle of grated Parmesan (1/2 cup)
- A squeeze of lemon juice (about 1 tbsp)
- A pinch of salt and a crack of black pepper
- Your favorite pasta (about 12 oz)
Instructions
- Chop those garlic scapes into small pieces, about 1 inch long, because nobody wants a mouthful of scape.
- Toast the pine nuts in a dry pan over medium heat for about 3 minutes, or until they’re golden and smell like heaven. Tip: Keep an eye on them; they go from toasted to burnt faster than you can say ‘pesto’.
- Throw the scapes, toasted pine nuts, Parmesan, lemon juice, salt, and pepper into a food processor. Pulse a few times to get things started.
- With the processor running, slowly drizzle in the olive oil until the pesto is smooth but still has a bit of texture. Tip: If it’s too thick, add a splash of water to loosen it up.
- Cook your pasta according to the package instructions, but steal a minute less for al dente perfection. Drain, but save a cup of that starchy pasta water.
- Toss the pasta with the pesto, adding a splash of pasta water if needed to get everything nicely coated. Tip: The starchy water is like liquid gold for creating a silky sauce that clings to every noodle.
Just like that, you’ve got a bowl of vibrant, garlicky goodness that’s begging to be devoured. Serve it with an extra sprinkle of Parmesan and maybe a side of ‘I made this myself’ pride.
Grilled Garlic Scapes with Olive Oil
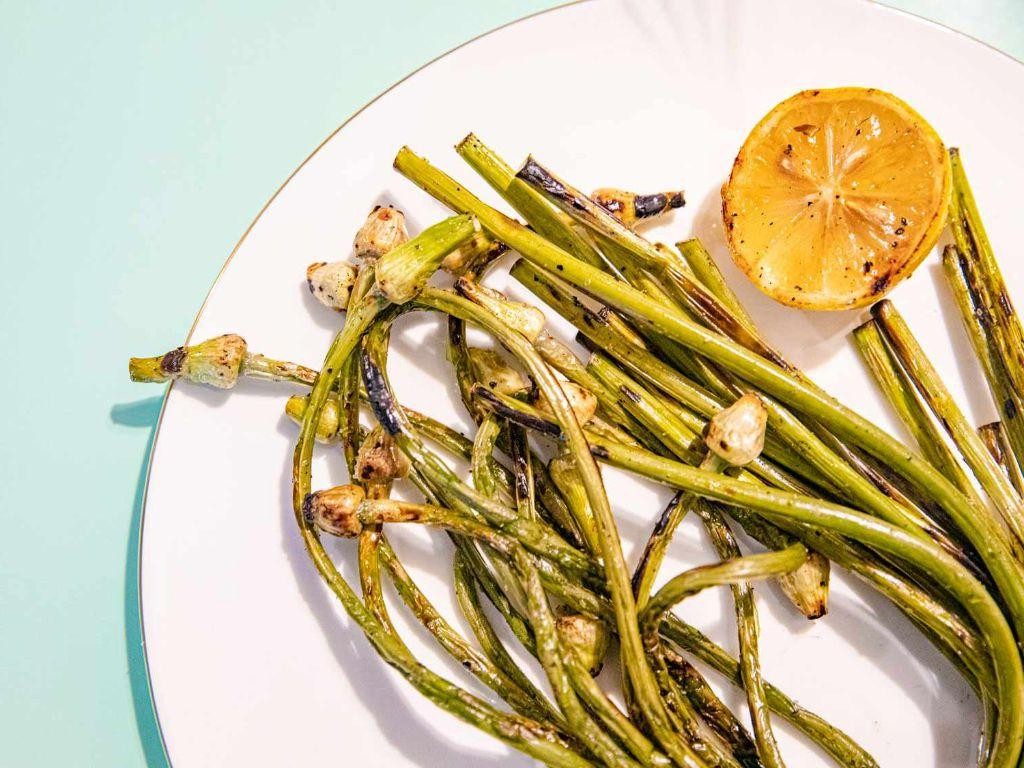
You’ve probably walked past garlic scapes at the farmer’s market a hundred times, scratching your head at these curly green wonders. Well, buckle up, buttercup, because we’re about to turn those overlooked gems into the star of your next BBQ with this ridiculously easy recipe.
Ingredients
- A bunch of garlic scapes (about 10-12)
- A generous glug of olive oil (about 2 tbsp)
- A pinch of salt (because we’re fancy like that)
- A squeeze of lemon juice (about 1 tbsp, for that zing)
Instructions
- Fire up your grill to a medium-high heat (around 400°F) – we’re aiming for those sexy grill marks, not a scape cremation.
- While the grill heats up, toss your garlic scapes in that glorious olive oil until they’re slicker than a politician. Tip: Don’t drown them; we’re dressing, not bathing.
- Sprinkle with a pinch of salt because, let’s face it, everything’s better with a little salt.
- Lay the scapes on the grill like they’re sunbathing. Grill for about 2-3 minutes per side, until they’ve got those charred lines and are tender-crisp. Tip: No grill? A grill pan on your stove will do the trick!
- Once off the grill, hit them with a squeeze of lemon juice for that bright, punchy finish. Tip: Want more zing? Add a sprinkle of chili flakes before serving.
Perfectly charred with a snappy texture and a flavor that’s garlicky but not overwhelming, these grilled garlic scapes are your new go-to side. Serve them alongside a juicy steak or chop them up to add a punch to your morning eggs – because why not start your day with a little garlic breath?
Garlic Scape and Potato Soup

Dive into the cozy embrace of this Garlic Scape and Potato Soup, where the quirky curls of garlic scapes meet the humble potato in a dance of flavors that’ll make your taste buds do the tango. Perfect for those days when you’re craving something comforting yet slightly adventurous, this soup is like a warm hug with a garlicky kick.
Ingredients
- 2 cups of chopped garlic scapes (those funky, curly green things)
- 3 medium potatoes, peeled and diced (because nobody likes peeling after cooking)
- 4 cups of vegetable broth (the soup’s swimming pool)
- A splash of olive oil (just enough to make things slippery)
- A couple of cloves of garlic, minced (for that extra oomph)
- 1/2 cup of heavy cream (because why not?)
- Salt and pepper to make it sing
Instructions
- Heat a splash of olive oil in a large pot over medium heat. Toss in the garlic and scapes, sautéing until they’re just shy of golden, about 3 minutes. Tip: Don’t let the garlic turn into little brown soldiers; nobody likes bitter surprises.
- Add the diced potatoes and vegetable broth to the pot. Bring to a boil, then reduce the heat to a simmer. Let it bubble away until the potatoes are tender enough to poke with a fork without resistance, about 15 minutes. Tip: Cover the pot to speed things up, but don’t forget to stir occasionally to prevent potato mutiny at the bottom.
- Once the potatoes are tender, blend the soup until smooth. An immersion blender is your best friend here, but a regular blender works too—just don’t forget to let the soup cool a bit first to avoid a hot soup explosion. Tip: For extra silkiness, strain the soup through a fine mesh sieve, but that’s only if you’re feeling fancy.
- Stir in the heavy cream and season with salt and pepper. Heat through for another 2 minutes, then serve. Tip: A little cream goes a long way; add it gradually to hit your perfect richness level.
Creamy with a vibrant garlic punch, this soup is a bowl of comfort with a side of personality. Serve it with a crusty bread for dipping, or go wild and top it with crispy bacon bits for a smoky contrast. Either way, it’s a dish that’s as fun to eat as it is to say—garlic scape, anyone?
Garlic Scape Hummus
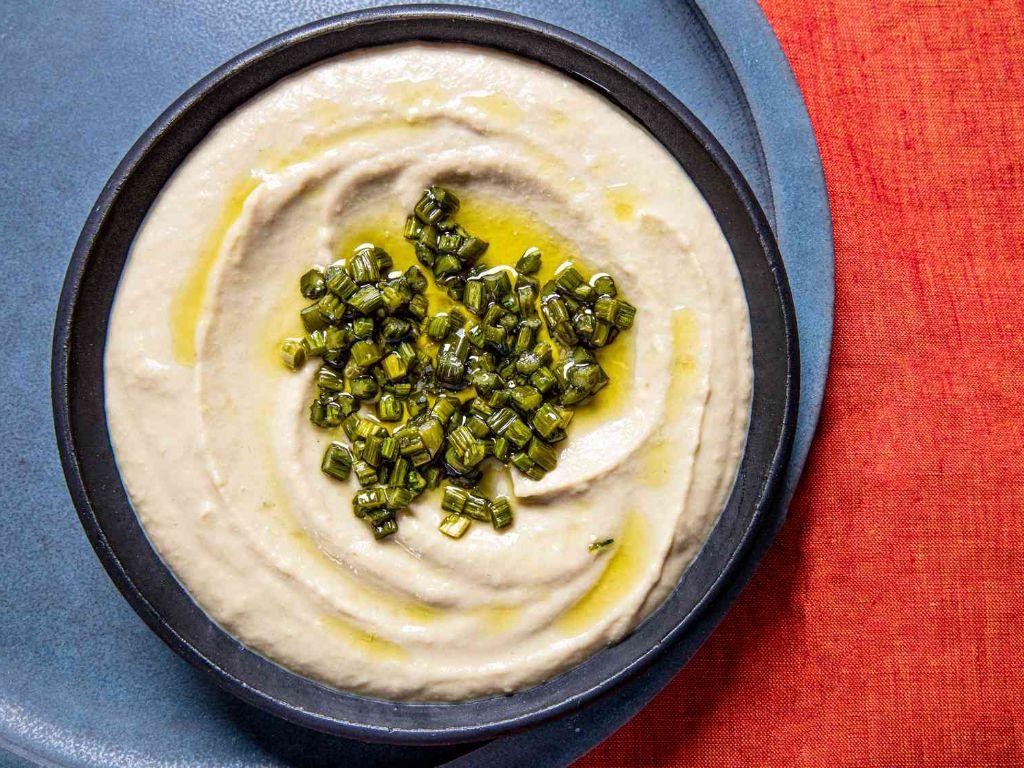
Alright, let’s dive into the world of hummus with a twist that’ll make your taste buds do a happy dance. Garlic scape hummus is here to shake up your snack game, blending the creamy goodness of traditional hummus with the bold, garlicky punch of those curly green wonders.
Ingredients
- 1 can (15 oz) of chickpeas, drained but save that aquafaba, friend!
- A couple of garlic scapes, roughly chopped (about 1/2 cup)
- A generous glug of olive oil (about 1/4 cup)
- A splash of lemon juice (2 tbsp, because we like it zesty)
- A pinch of salt (start with 1/2 tsp, then adjust)
- A dollop of tahini (2 tbsp, for that creamy dreaminess)
- A sprinkle of cumin (1/2 tsp, because why not?)
- Ice water (2 tbsp, for that smooth operator texture)
Instructions
- Throw the chickpeas, garlic scapes, olive oil, lemon juice, salt, tahini, and cumin into your food processor. Pro tip: If your scapes are feeling a bit wild, give them a rough chop first to keep things civil.
- Blend on high for about a minute, then scrape down the sides. Here’s a secret: the pause-and-scrape is your hummus’s best friend.
- With the processor running, slowly drizzle in the ice water. Watch as your hummus goes from “meh” to “whoa!” in seconds. Another pro tip: Ice water is the magic wand for ultra-smooth hummus.
- Give it a taste and adjust the salt or lemon if needed. Remember, you’re the boss of your hummus.
- Transfer to a bowl, drizzle with a little more olive oil, and maybe a sprinkle of paprika if you’re feeling fancy. Final pro tip: Let it sit for 10 minutes before serving. Patience makes perfect hummus.
Look at that! You’ve just made a hummus that’s creamy with a kick, perfect for dipping, spreading, or, let’s be honest, eating straight with a spoon. The garlic scapes add a fresh, slightly spicy note that’ll have you coming back for more. Try it with crispy pita chips or as a bold sandwich spread—your kitchen, your rules.
Garlic Scape Butter
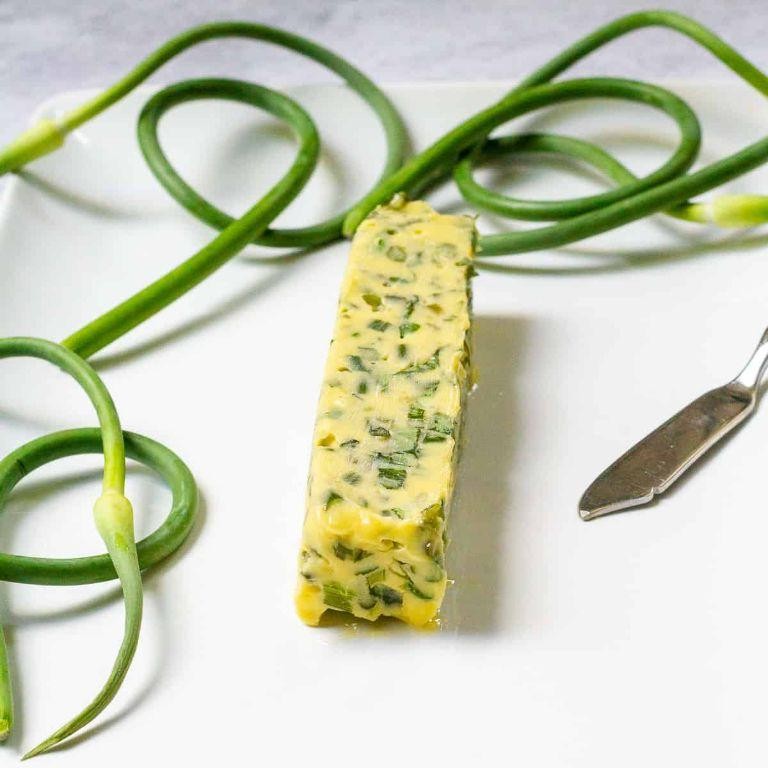
Just when you thought butter couldn’t get any better, along comes garlic scape butter to prove you wrong. This vibrant, flavorful spread is like summer in a bowl, ready to jazz up everything from your morning toast to your grilled corn on the cob.
Ingredients
- 1 cup of unsalted butter, softened (because life’s too short for salted)
- a handful of garlic scapes, about 10-12, finely chopped (the more, the merrier)
- a splash of lemon juice (for that zesty zing)
- a pinch of salt (to make the flavors pop)
Instructions
- Grab a mixing bowl and toss in the softened butter. Pro tip: If your butter’s harder than a rock, microwave it for 10 seconds, but no longer—you’re making butter, not soup.
- Add the finely chopped garlic scapes to the bowl. The finer the chop, the more evenly the flavor spreads. Literally.
- Squeeze in that splash of lemon juice. It’s not just for taste; the acidity helps balance the richness of the butter.
- Sprinkle in the pinch of salt. Remember, you can always add more, but you can’t take it out, so start small.
- Mix everything together until it’s as smooth as your favorite jazz playlist. No lumps allowed here.
- Transfer the mixture onto a sheet of parchment paper and roll it into a log. Twist the ends like a Christmas cracker, and pop it in the fridge for at least 2 hours to firm up.
Magic happens when this butter melts over warm bread or grilled veggies, releasing a garlicky, slightly sweet aroma that’ll have everyone asking for seconds. Try slathering it on a steak right off the grill for a flavor bomb that’s out of this world.
Roasted Garlic Scapes
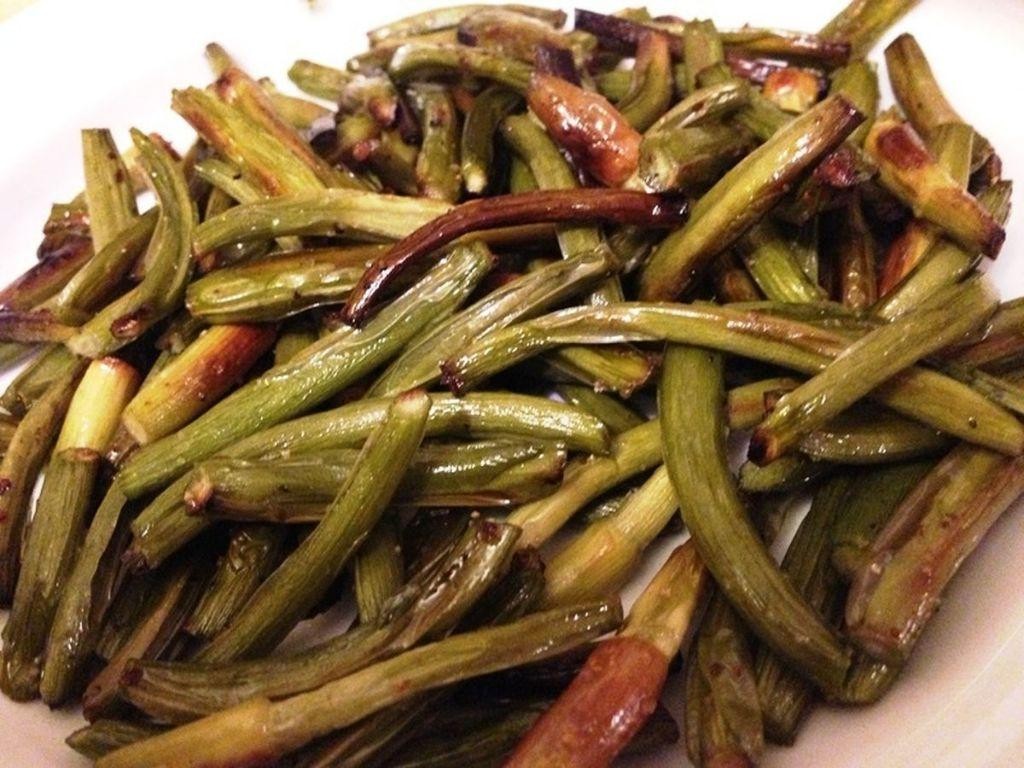
Look, if you haven’t tried roasted garlic scapes yet, you’re missing out on one of summer’s greatest hits. These curly green wonders turn into something magical when roasted—think crispy, garlicky goodness that’ll make your taste buds do a happy dance.
Ingredients
- A bunch of garlic scapes (about 10-12)
- A couple of tablespoons of olive oil
- A pinch of salt (because we’re fancy like that)
- A splash of lemon juice (for that zesty kick)
Instructions
- Preheat your oven to 400°F because we’re about to turn up the heat on these scapes.
- Give your garlic scapes a quick rinse and pat them dry—no one likes a soggy scape.
- Trim off the tough ends of the scapes; we’re here for the tender, flavorful parts.
- Toss the scapes with olive oil, salt, and a splash of lemon juice. Make sure they’re evenly coated—no scape left behind!
- Spread them out on a baking sheet in a single layer. Crowding leads to steaming, and we’re roasting, not steaming.
- Pop them in the oven for about 10-15 minutes, flipping halfway through, until they’re golden and slightly crispy at the edges.
- Let them cool for a minute (if you can resist), then dig in. Tip: They’re like garlicky green beans but with way more personality.
These roasted garlic scapes come out with a delightful crunch and a mellow garlic flavor that’s not too overpowering. Serve them as a quirky side dish, or chop them up and toss into pasta for an instant upgrade. Either way, you’re winning at summer.
Garlic Scape Stir Fry
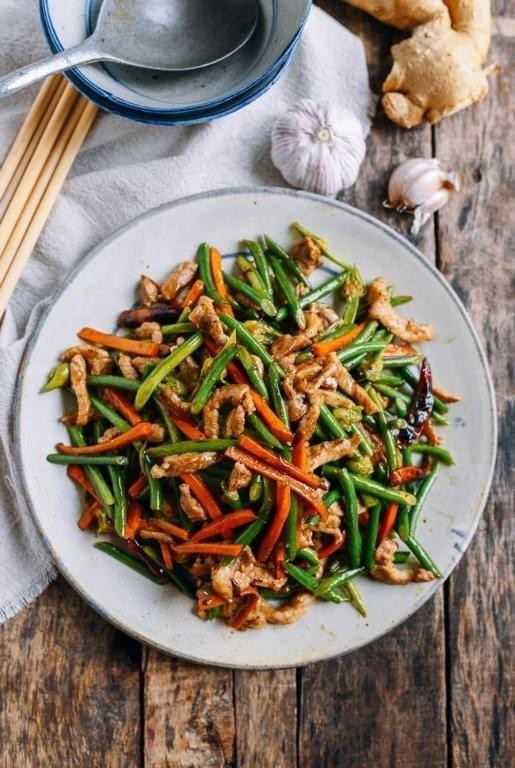
Unbelievably easy and bursting with flavor, this Garlic Scape Stir Fry is your ticket to a quick, veggie-packed meal that’ll make your taste buds dance. Perfect for those nights when you’re racing against the clock but still want something deliciously green and garlicky.
Ingredients
- A handful of garlic scapes, chopped into 2-inch pieces
- A couple of tablespoons of olive oil
- A splash of soy sauce
- A pinch of red pepper flakes (because we like it spicy)
- 1 cup of sliced bell peppers (any color, but red makes it pop)
- 1 cup of snap peas, because crunch is everything
Instructions
- Heat a large skillet over medium-high heat and add the olive oil. Wait until it’s shimmering but not smoking – that’s your cue.
- Toss in the garlic scapes and bell peppers. Stir them around for about 3 minutes until they start to soften but still have some bite.
- Add the snap peas and red pepper flakes. Keep stirring! You want everything to get friendly in the pan for another 2 minutes.
- Drizzle in the soy sauce, give it a good mix, and let it cook for another minute. Tip: If it starts to look dry, a tiny splash of water can save the day.
- Once everything is vibrant and slightly charred at the edges, you’re done. Tip: Don’t overcook the veggies; they should still be bright and crisp.
Bold flavors and a satisfying crunch make this stir fry a standout. Serve it over a heap of steaming rice or toss it with noodles for a heartier meal. Either way, it’s a garlic lover’s dream come true.
Garlic Scape and Cheese Scones
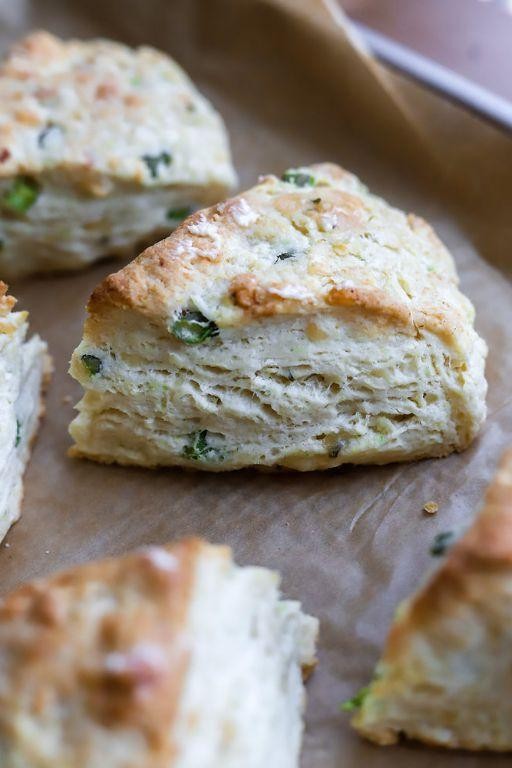
Garlic scapes are the unsung heroes of the garden, and when paired with cheese in a scone, they become the life of the brunch party. Get ready to meet your new favorite savory treat that’s as fun to make as it is to eat.
Ingredients
- 2 cups of all-purpose flour (because we’re not reinventing the wheel here)
- 1 tbsp of baking powder (for that perfect rise)
- 1/2 tsp of salt (just a pinch to keep things interesting)
- 1/2 cup of cold butter, cubed (keep it chilly for flaky goodness)
- 1/2 cup of shredded sharp cheddar cheese (the sharper, the better)
- 1/4 cup of chopped garlic scapes (those curly green wonders)
- 3/4 cup of heavy cream (plus a splash more if the dough plays hard to get)
- 1 egg (for that golden glow)
Instructions
- Preheat your oven to 400°F because we’re about to get baking.
- In a large bowl, whisk together the flour, baking powder, and salt like you mean it.
- Toss in the cold butter cubes and use your fingers to rub them into the flour until it looks like coarse crumbs. Tip: Keep your hands cold to prevent the butter from melting.
- Stir in the cheddar cheese and garlic scapes until they’re evenly distributed. No cheese left behind!
- Pour in the heavy cream and mix just until the dough comes together. Tip: Overmixing is the enemy of tender scones.
- Turn the dough out onto a floured surface and pat it into a 1-inch thick circle. No rolling pin? No problem—your hands work just fine.
- Cut the dough into 8 wedges and place them on a baking sheet lined with parchment paper. Tip: For extra flair, brush the tops with a beaten egg before baking.
- Bake for 18-20 minutes, or until the scones are golden and irresistible.
Every bite of these scones is a buttery, cheesy, garlicky delight with just the right amount of crunch from the scapes. Serve them warm with a smear of butter or alongside a bowl of soup for a cozy meal that feels like a hug.
Pickled Garlic Scapes

Ready to add a zing to your pantry with something uniquely tangy? Pickled garlic scapes are your new crunchy, garlicky obsession, perfect for jazzing up sandwiches, salads, or just snacking straight from the jar. Let’s dive into this easy-peasy recipe that’ll have you pickling like a pro in no time.
Ingredients
- A bunch of garlic scapes (about 10-12), chopped into jar-friendly lengths
- 1 cup of white vinegar (because we’re keeping it classic)
- 1 cup of water (to balance the tang)
- 1 tbsp of sugar (for that sneaky sweet hint)
- 1 tbsp of salt (the pickling powerhouse)
- A couple of peppercorns (for a tiny kick)
- A splash of red pepper flakes (if you’re feeling spicy)
Instructions
- Grab a clean jar and pack your chopped garlic scapes in there like you’re stuffing a sleeping bag—snug but not squished.
- In a saucepan, mix the vinegar, water, sugar, and salt. Heat it over medium until the sugar and salt dissolve—no boiling needed, just a warm, welcoming bath for your scapes.
- Pour the warm liquid over the scapes in the jar, making sure they’re fully submerged. Toss in the peppercorns and red pepper flakes now if you’re using them.
- Seal the jar tight and let it cool to room temperature before popping it in the fridge. Patience is key here—wait at least 48 hours before diving in for the flavors to really mingle.
- Tip: Use a chopstick to poke down any floaters and keep everything under the brine. No one likes a dry scape!
- Tip: The longer they sit, the better they get. Try to wait a week if you can resist.
- Tip: These make a killer gift. Just sayin’.
Expect a crisp texture with a punchy garlic flavor that mellows into a tangy delight the longer they pickle. Serve them alongside a charcuterie board for an unexpected twist or chop them into a potato salad for a garlicky upgrade.
Garlic Scape and Almond Dip
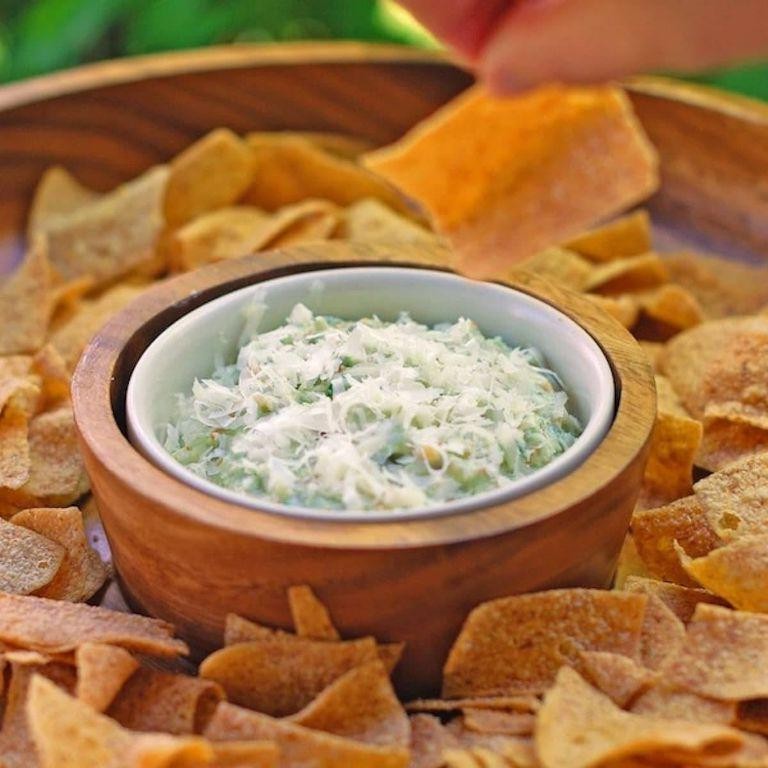
Now, let’s dive into a dip that’s as fun to say as it is to eat—Garlic Scape and Almond Dip. Perfect for those who love a little garlicky kick without the commitment of bad breath for days, this dip is your next party hero or solo snack session sidekick.
Ingredients
- 1 cup of garlic scapes, chopped (because we’re not monsters, chop off the tough ends)
- A generous handful of almonds (about 1/2 cup, but who’s counting?)
- A splash of olive oil (about 2 tbsp, or enough to make things slick)
- A couple of tablespoons of lemon juice (fresh, because bottled lemon juice is a sad imitation)
- A pinch of salt (to make the flavors pop like fireworks)
- A dash of water (just enough to get the blender moving without drowning the party)
Instructions
- Grab your blender or food processor—this is where the magic happens.
- Toss in the garlic scapes and almonds. Pulse a few times to break them down into smaller pieces. Tip: Don’t overdo it; we’re not making dust here.
- Drizzle in the olive oil and lemon juice. Add the salt. Blend until the mixture starts to come together. Tip: Scrape down the sides if things are getting clingy.
- Add a dash of water to loosen the mixture. Blend until smooth or leave it a bit chunky if that’s your jam. Tip: The dip thickens in the fridge, so err on the side of too loose.
- Taste and adjust the seasoning if needed. Remember, you can always add more, but you can’t take it out!
Velvety with a punch, this dip walks the line between bold and sophisticated. Serve it with crunchy veggies for a healthy twist or slather it on toast for a garlic scape revelation.
Garlic Scape Pizza

Look, we’ve all been there—staring into the fridge, wondering how to turn those curly garlic scapes into something magical. Well, buckle up, because this Garlic Scape Pizza is about to become your new obsession. It’s quirky, it’s flavorful, and it’s got just the right amount of garlicky punch to make your taste buds dance.
Ingredients
- 1 pizza dough (store-bought or homemade, we don’t judge)
- A generous handful of garlic scapes, chopped into 2-inch pieces
- A couple of tablespoons of olive oil (the good stuff)
- 1 cup of shredded mozzarella (because what’s pizza without cheese?)
- A splash of balsamic glaze for that fancy finish
- A pinch of red pepper flakes (if you like a little heat)
Instructions
- Preheat your oven to 475°F. If you’ve got a pizza stone, toss it in there to heat up—it’ll give you that crispy crust we all crave.
- Roll out your pizza dough on a floured surface to about 12 inches. No need to be perfect; rustic is in.
- Brush the dough with olive oil, making sure to get the edges for that golden finish.
- Scatter the chopped garlic scapes evenly over the dough. Pro tip: if you’re not a fan of too much garlic breath, you can sauté the scapes in olive oil for a couple of minutes first to mellow them out.
- Top with mozzarella, and don’t be shy—this is pizza, after all.
- Sprinkle on those red pepper flakes if you’re feeling spicy.
- Bake for 10-12 minutes, or until the crust is golden and the cheese is bubbly and slightly browned.
- Drizzle with balsamic glaze right before serving. It’s not just for looks; it adds a sweet tang that’s *chef’s kiss*.
Crunchy, cheesy, and with a garlic kick that’s not for the faint of heart, this pizza is a game-changer. Serve it up with a crisp salad or—let’s be real—just eat it straight off the cutting board. No one’s judging.
Garlic Scape and Mushroom Risotto
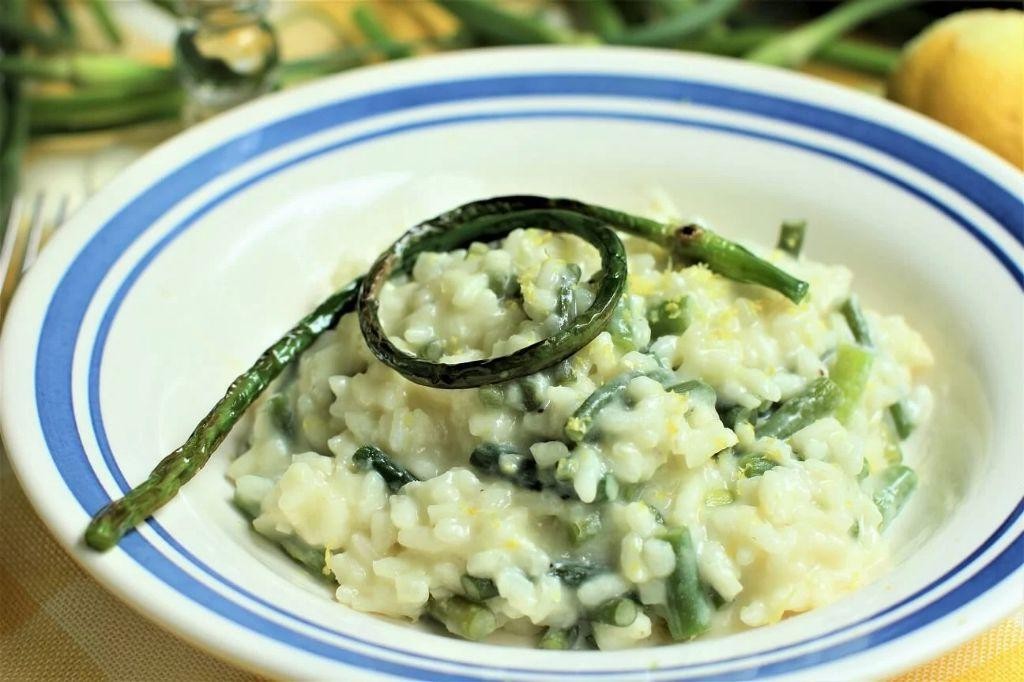
Buckle up, buttercups, because we’re about to dive into a creamy, dreamy bowl of Garlic Scape and Mushroom Risotto that’ll make your taste buds do a happy dance. This dish is the perfect excuse to wear your stretchy pants and embrace the carb-loaded goodness.
Ingredients
- 1 cup of Arborio rice (because regular rice just won’t cut it)
- A couple of garlic scapes, chopped (they’re like garlic’s fun, curly cousin)
- 8 oz of mushrooms, sliced (any kind you like, but cremini are my ride or die)
- 4 cups of chicken or veggie stock (homemade if you’re fancy, store-bought if you’re human)
- A splash of white wine (for the risotto and the chef)
- 2 tbsp of butter (the unsung hero of creaminess)
- 1/4 cup of grated Parmesan (plus extra for sprinkling like confetti)
- A drizzle of olive oil (for good measure)
Instructions
- Heat the olive oil in a large pan over medium heat. Toss in the mushrooms and sauté until they’re golden and have released their juices, about 5 minutes. Tip: Don’t crowd the pan, or they’ll steam instead of sauté.
- Add the garlic scapes and cook for another 2 minutes until they’re just tender. They should still have a bit of a bite to them.
- Push the veggies to one side and melt the butter in the pan. Stir in the Arborio rice, coating it in the butter, and toast for a minute until it’s slightly translucent around the edges.
- Pour in the white wine and stir until it’s mostly absorbed. This is where the risotto starts to develop its signature flavor, so don’t skip it!
- Begin adding the stock, one ladle at a time, stirring constantly and allowing each addition to be absorbed before adding the next. This patience-testing process takes about 18-20 minutes. Tip: Keep the stock warm in a separate pot to maintain the cooking temperature.
- Once the rice is al dente and the risotto is creamy, stir in the Parmesan. Season with salt if needed, but remember, the stock and cheese are already salty.
- Remove from heat and let it sit for a minute. This rest period is crucial for the risotto to achieve its ultimate creaminess. Tip: Cover it with a lid to keep it warm.
Just imagine the creamy texture hugging each grain of rice, with the earthy mushrooms and punchy garlic scapes leading the flavor parade. Serve it up in a big bowl, maybe with an extra sprinkle of Parmesan and a side of crusty bread for the ultimate comfort food experience.
Garlic Scape Vinaigrette
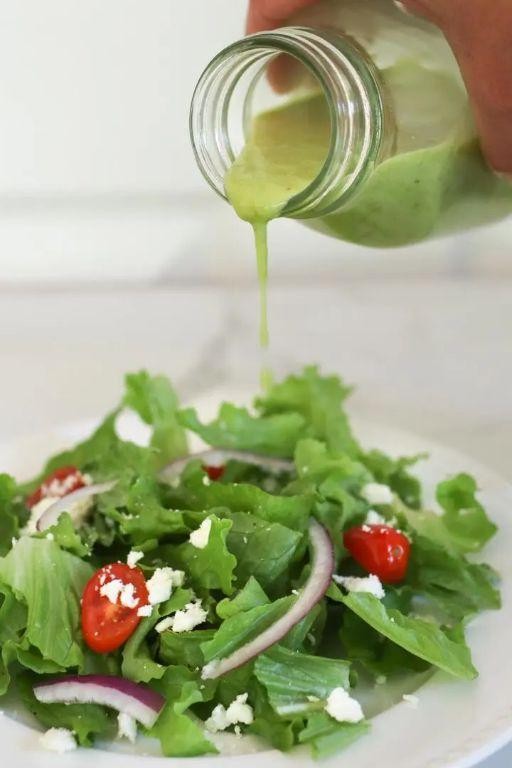
Fancy a dressing that’s as quirky as its name? Garlic Scape Vinaigrette is here to jazz up your salads with a punch of flavor and a dash of fun. It’s the kind of recipe that makes you wonder why you ever settled for store-bought.
Ingredients
- A handful of garlic scapes (about 1/2 cup, chopped)
- A generous glug of olive oil (1/3 cup)
- A splash of apple cider vinegar (2 tbsp)
- A squeeze of lemon juice (1 tbsp)
- A pinch of salt (1/4 tsp)
- A couple of cracks of black pepper (1/8 tsp)
- A tiny dollop of honey (1 tsp)
Instructions
- Chop those curly garlic scapes into small pieces—think confetti, but for your taste buds.
- Throw the scapes into a blender or food processor. Add the olive oil, apple cider vinegar, lemon juice, salt, pepper, and honey. Pro tip: If your blender is shy, pulse a few times to get things moving.
- Blend until smooth. This should take about 30 seconds, but peek in to ensure no rogue scape pieces are hiding. Another pro tip: If the vinaigrette is too thick, a little water can loosen it up.
- Taste and adjust the seasoning if needed. Remember, you can always add, but you can’t take away—so go easy on the salt at first.
- Pour your vibrant green creation into a jar or bottle. Final pro tip: Let it sit for at least 30 minutes before serving to let the flavors mingle and get to know each other.
Just like that, you’ve got a vinaigrette that’s bold, garlicky, and slightly sweet, with a texture that’s smooth yet packs a little crunch from the scapes. Drizzle it over grilled veggies, or be bold and use it as a marinade for chicken. Either way, it’s a game-changer.
Garlic Scape and Chicken Skewers
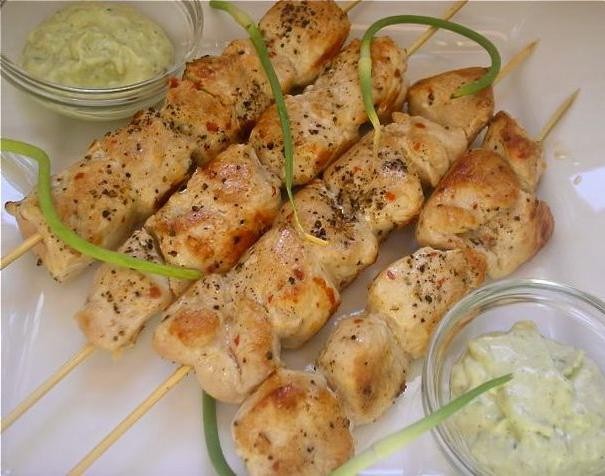
Yikes, it’s that time of year again when garlic scapes start popping up at the farmers’ markets, and you’re like, ‘What the heck do I do with these curly green things?’ Well, buckle up, buttercup, because we’re about to turn those funky scapes and some chicken into the skewers of your dreams.
Ingredients
- 1 pound of chicken breast, cut into bite-sized chunks (because nobody wants to wrestle with a giant piece of chicken on a stick)
- A handful of garlic scapes, chopped into 2-inch pieces (they’re like the wild child of the garlic family)
- A couple of tablespoons of olive oil (for slicking things up)
- A splash of soy sauce (for that umami kick)
- A pinch of salt and pepper (because seasoning is key, folks)
- 1 teaspoon of smoked paprika (for a little smoky drama)
Instructions
- Preheat your grill or grill pan to medium-high heat (about 375°F to 400°F). You want it hot enough to get those sexy grill marks but not so hot that your skewers turn into charcoal.
- While the grill is heating up, thread your chicken and garlic scapes onto skewers. Pro tip: If you’re using wooden skewers, soak them in water for 30 minutes first to prevent them from turning into tiny torches.
- In a small bowl, whisk together the olive oil, soy sauce, salt, pepper, and smoked paprika. Brush this magical mixture all over your skewers. Don’t be shy—get in there!
- Place your skewers on the grill. Cook for about 4-5 minutes on each side, or until the chicken is no longer pink inside and the scapes are tender with a slight crunch. Another pro tip: Don’t play hockey with your skewers; let them sit to get those perfect grill marks.
- Remove from the grill and let them rest for a couple of minutes. This is a good time to practice patience, which is hard when they smell this good.
Unbelievable, right? These skewers are a juicy, garlicky, slightly smoky revelation. Serve them over a bed of quinoa or with a side of tzatziki for dipping, and watch them disappear faster than your resolve to eat ‘just one.’
Garlic Scape and Tomato Salad
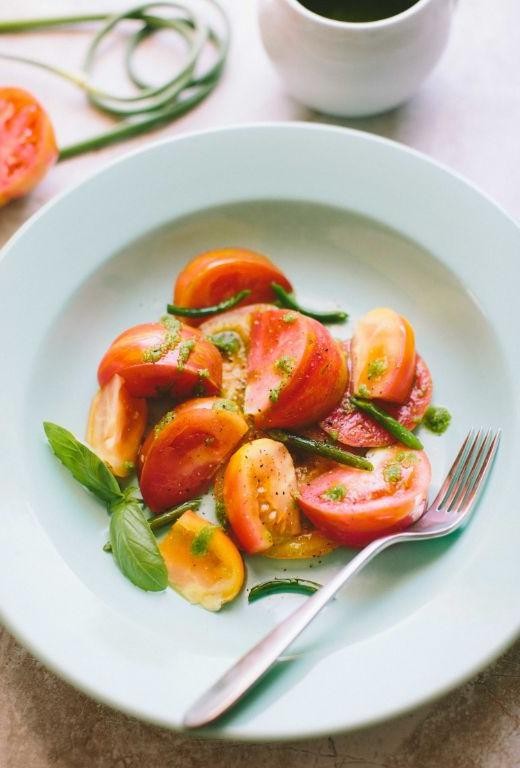
Today’s the day we throw caution to the wind and let garlic scapes take the spotlight in a salad that’s as bold as it is refreshing. Think of it as summer’s answer to ‘what’s green, garlicky, and utterly irresistible?’
Ingredients
- a handful of garlic scapes, chopped into bite-sized pieces
- a couple of cups of cherry tomatoes, halved
- a splash of olive oil (about 2 tbsp)
- a squeeze of lemon juice (about 1 tbsp)
- a pinch of salt and a grind of black pepper
- a sprinkle of feta cheese (optional, but highly recommended)
Instructions
- Grab a large bowl and toss in the chopped garlic scapes and halved cherry tomatoes.
- Drizzle the olive oil over the top like you’re painting a masterpiece.
- Add the lemon juice, salt, and pepper, then give everything a good mix. Tip: The lemon juice not only adds zing but also helps to mellow out the garlicky bite.
- Let the salad sit for about 10 minutes to let the flavors get to know each other. Tip: This is the perfect time to set the table or pour yourself a glass of wine.
- Sprinkle with feta cheese if you’re feeling fancy. Tip: The feta adds a creamy contrast that’s downright magical.
Garlicky, tangy, and with just the right amount of crunch, this salad is a summer fling you’ll want to have all season long. Serve it alongside grilled chicken or fish, or be rebellious and eat it straight out of the bowl.
Garlic Scape and Shrimp Linguine
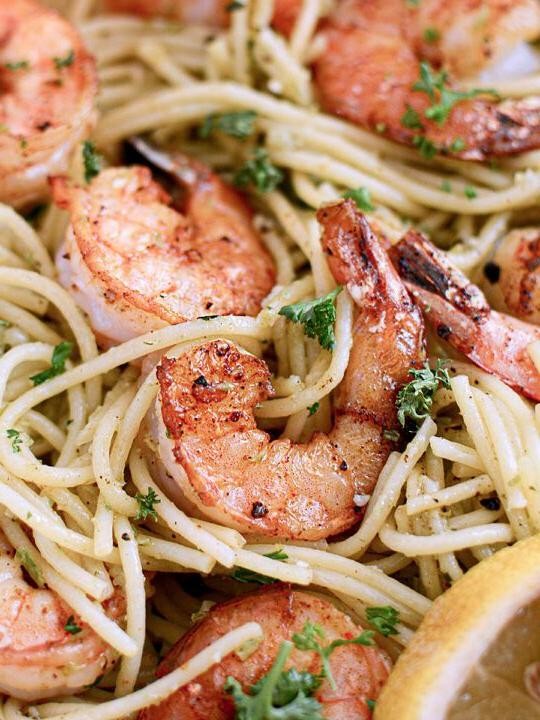
Hold onto your hats, pasta lovers, because we’re about to dive fork-first into a dish that’s as fun to make as it is to devour. Garlic scape and shrimp linguine is here to shake up your dinner routine with its vibrant flavors and simple elegance.
Ingredients
- 8 oz linguine (because every great pasta dish starts with the pasta)
- 1 lb shrimp, peeled and deveined (the star of the show)
- 1 cup garlic scapes, chopped (for that punchy, garlicky goodness)
- 2 tbsp olive oil (a splash of liquid gold)
- 1/2 cup white wine (for deglazing and a bit of flair)
- 1/4 tsp red pepper flakes (just a pinch for a gentle kick)
- Salt to taste (because seasoning is key)
- A couple of fresh basil leaves, torn (for that herby freshness)
Instructions
- Bring a large pot of salted water to a boil and cook the linguine according to package instructions until al dente. Tip: Save a cup of pasta water for later; it’s liquid gold for sauces.
- While the pasta cooks, heat olive oil in a large skillet over medium heat. Add the shrimp and cook for 2 minutes per side until pink and opaque. Tip: Don’t overcrowd the shrimp; give them space to breathe and sear properly.
- Remove the shrimp from the skillet and set aside. In the same skillet, add the garlic scapes and red pepper flakes, sautéing for about 3 minutes until fragrant.
- Pour in the white wine to deglaze the pan, scraping up any browned bits. Let it simmer for 2 minutes to reduce slightly.
- Drain the pasta and add it to the skillet along with the shrimp. Toss everything together, adding a splash of reserved pasta water if needed to bring the sauce together. Tip: The starch in the pasta water helps the sauce cling to the noodles.
- Finish with torn basil leaves and a final sprinkle of salt if needed.
This dish is a textural dream with the al dente pasta, juicy shrimp, and crisp-tender garlic scapes. The flavors? Bold, garlicky, with just the right amount of heat. Serve it up with a crusty piece of bread to sop up every last bit of that delicious sauce.
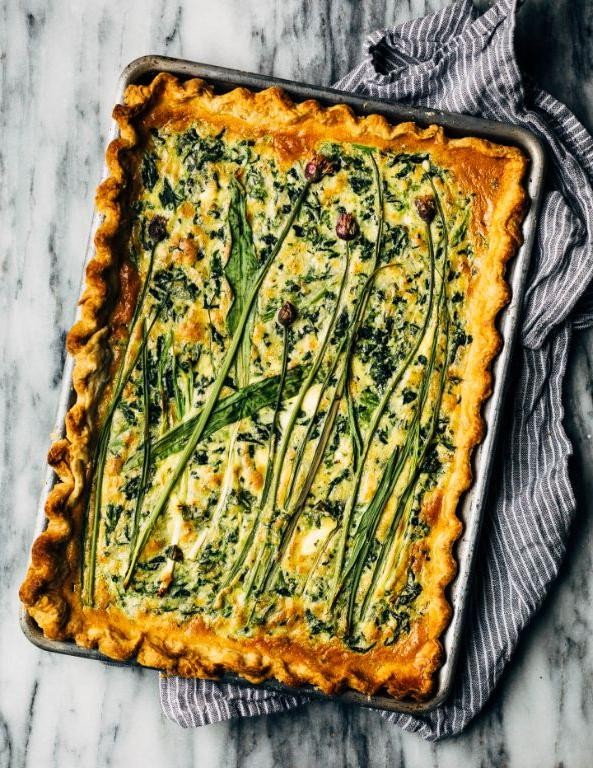
Garlic Scape and Spinach Quiche
Today is ‘2025-06-08 07:36:50.756864’, You’re a professional food blogger writing a relatable US-based roundup-style recipe article. Introduce the dish: ‘Garlic Scape and Spinach Quiche’ using the structure below.
Tone: Use a playful, witty voice. Add light humor, bold phrasing, and fun energy throughout.
Write a short 2-3 sentence intro, The first word of your introduction must begin with the letter ‘T’. Do not display the title. Start directly with the introduction.
Ingredients
- 1 pie crust (store-bought or homemade, because we’re not here to judge)
- A handful of garlic scapes, chopped (about 1/2 cup, because ‘a handful’ sounds more fun)
- A couple of cups of fresh spinach (because everything’s better with greens)
- 4 large eggs (the chickens worked hard for these)
- 1 cup of heavy cream (for that luxurious texture)
- A splash of milk (about 1/4 cup, to lighten things up)
- 1 cup of shredded cheese (mix it up with your favorite kind)
- A pinch of salt and pepper (to make everything pop)
Instructions
- Preheat your oven to 375°F (because patience is a virtue, especially in baking).
- Roll out your pie crust and fit it into a 9-inch pie dish, crimping the edges for that fancy touch.
- In a skillet over medium heat, sauté the garlic scapes until they’re just soft, about 3 minutes (tip: don’t let them brown, or they’ll lose their charm).
- Add the spinach to the skillet and cook until wilted, about 2 minutes (tip: squeeze out any excess water to avoid a soggy quiche).
- In a bowl, whisk together the eggs, heavy cream, milk, salt, and pepper until smooth (tip: a little air in the mix makes the quiche fluffier).
- Spread the garlic scape and spinach mixture over the pie crust, then sprinkle the cheese on top.
- Pour the egg mixture over everything, giving it a gentle shake to settle the fillings.
- Bake for 35-40 minutes, until the center is set and the top is golden brown (the waiting is the hardest part).
- Let it cool for a few minutes before slicing (because no one likes a burnt tongue).
How this quiche turns out is nothing short of magical—creamy, with a punch of garlic scape goodness and the freshness of spinach. Serve it warm with a side of sass or a simple salad for brunch that’ll have everyone asking for seconds.
Garlic Scape and White Bean Puree
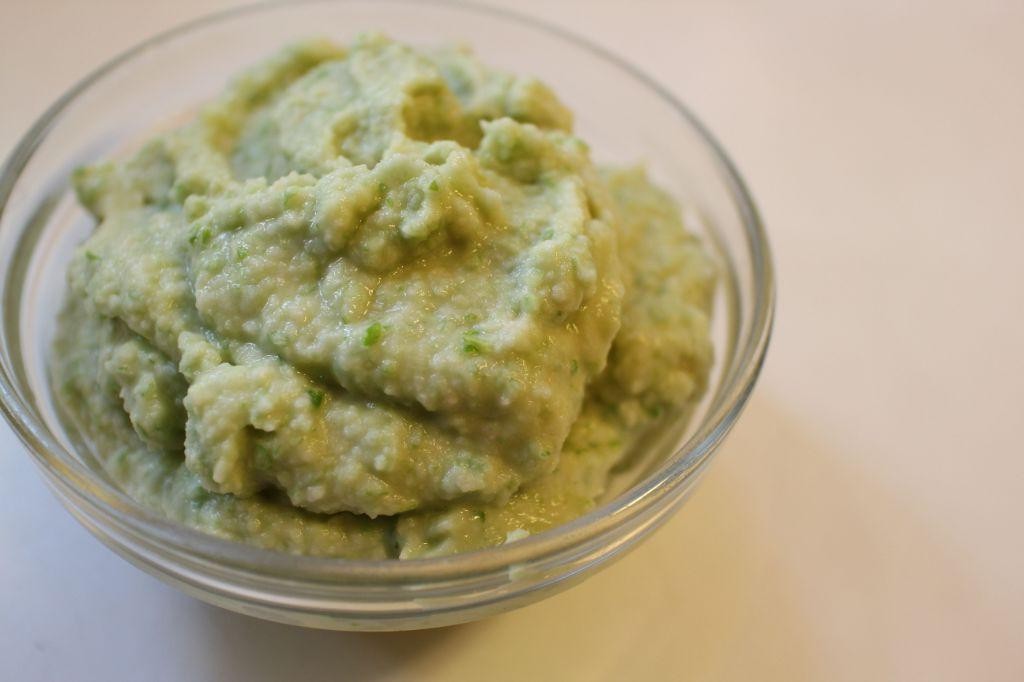
Ready to whip up something that’s as fun to say as it is to eat? Let’s dive into the world of garlic scapes and white beans, where creamy meets quirky in this utterly spreadable puree that’ll have your taste buds doing the cha-cha.
Ingredients
- A bunch of garlic scapes (about 1 cup, chopped)
- A can of white beans (15 oz, drained and rinsed)
- A glug of olive oil (about 2 tbsp)
- A squeeze of lemon juice (about 1 tbsp)
- A pinch of salt (to start, you can always add more)
- A splash of water (if needed, to thin it out)
Instructions
- Chop those curly garlic scapes into small pieces—think confetti, but for your blender.
- Toss the garlic scapes, white beans, olive oil, lemon juice, and salt into your blender or food processor.
- Blend until smooth. If it’s thicker than your favorite sweater, add a splash of water and blend again. Tip: Scrape down the sides occasionally to make sure everything gets evenly pureed.
- Taste and adjust the salt or lemon juice if needed. Tip: Remember, you can always add more, but you can’t take it out, so start small.
- Once it’s as smooth as a jazz tune, transfer it to a bowl. Tip: Let it sit for 10 minutes before serving to let the flavors mingle like guests at a dinner party.
Great for slathering on toast, dolloping on grilled veggies, or sneaking straight from the bowl with a spoon (we won’t judge), this puree is silky, garlicky with a hint of brightness from the lemon. It’s like spring in a bowl, but way more delicious.
Garlic Scape and Lemon Roasted Chicken
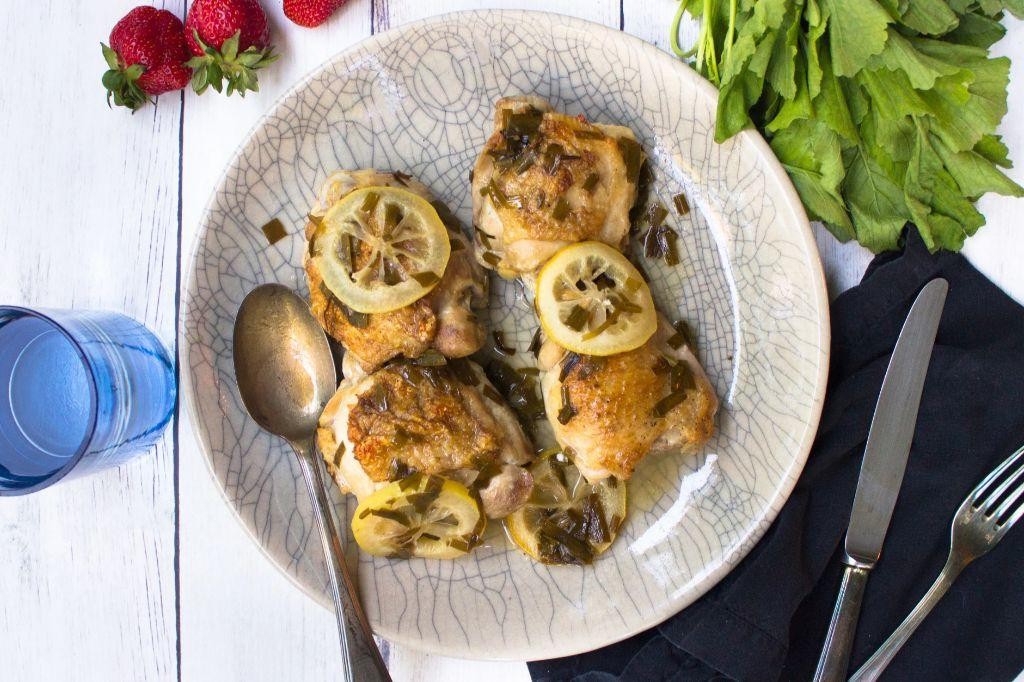
Wow, do we have a zesty, garlicky surprise for your dinner table tonight! This dish is like summer decided to throw a party in your mouth, and everyone’s invited.
Ingredients
- A couple of garlic scapes, chopped into 2-inch pieces
- 1 whole chicken, about 4 lbs, because size matters
- A splash of olive oil, about 2 tbsp
- The zest and juice of 1 lemon, for that tangy kick
- A pinch of salt and pepper, to make everything right
- 1 tsp of paprika, for a little smoky whisper
Instructions
- Preheat your oven to 375°F, because we’re not baking cookies here.
- In a bowl, mix the chopped garlic scapes, olive oil, lemon zest, lemon juice, salt, pepper, and paprika. This is your flavor bomb.
- Pat the chicken dry with paper towels. A dry chicken means crispy skin, and who doesn’t love that?
- Rub the flavor bomb all over the chicken, under the skin too, because we’re sneaky like that.
- Place the chicken in a roasting pan and pop it in the oven. Set a timer for 1 hour and 30 minutes.
- Halfway through, baste the chicken with its own juices. This keeps it moist and happy.
- Check the chicken’s temperature with a meat thermometer; it should read 165°F in the thickest part. No guesswork here!
- Let the chicken rest for 10 minutes before carving. Patience is a virtue, especially with juicy chicken.
Finally, this chicken comes out with a crispy golden skin, juicy inside, and a flavor that’s bright and garlicky. Serve it with a side of roasted potatoes or over a bed of greens for a meal that screams summer.
Garlic Scape and Avocado Toast
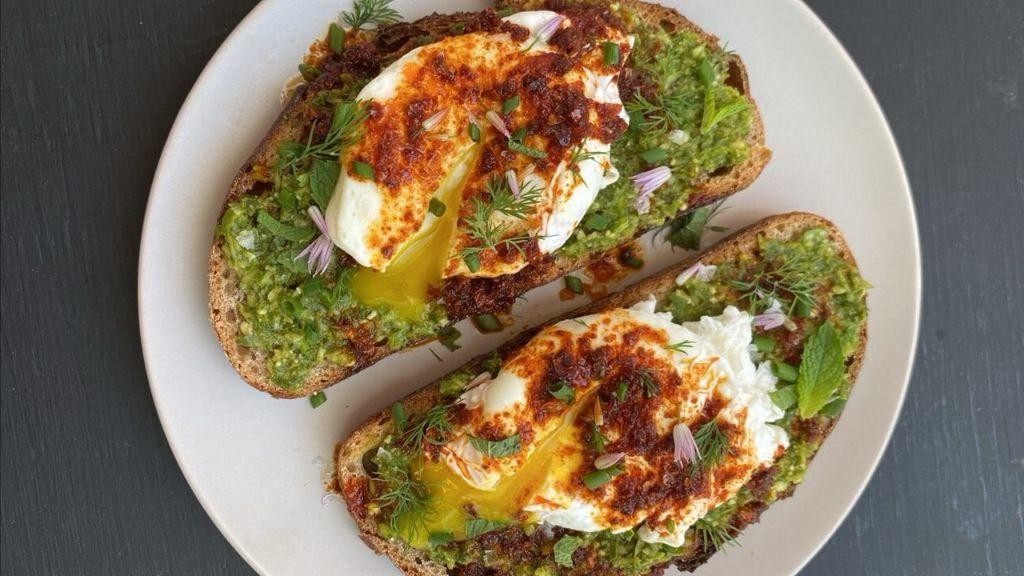
Look, we’ve all been there—staring into the abyss of our fridge, wondering what magical concoction we can whip up that’s both Instagram-worthy and actually edible. Enter the hero of our story: Garlic Scape and Avocado Toast, the dish that’s about to make your brunch game stronger than your coffee.
Ingredients
- 2 slices of your favorite bread (because life’s too short for mediocre carbs)
- 1 ripe avocado (you know, the one that’s perfectly squishy)
- 3 garlic scapes, chopped (these curly guys pack a punch)
- A splash of olive oil (for that fancy chef drizzle)
- A pinch of salt (to make everything pop)
- A couple of red pepper flakes (for those who like to live dangerously)
- 1 tbsp lemon juice (to keep things fresh)
Instructions
- Toast your bread until it’s golden and crispy—about 3 minutes in a toaster or under the broiler. Watch it like a hawk; nobody likes charcoal.
- While the bread is toasting, mash the avocado in a bowl with the lemon juice and salt until it’s smooth but still a bit chunky. Think ‘cloud with a chance of avocado chunks’.
- Heat a splash of olive oil in a pan over medium heat. Toss in the chopped garlic scapes and sauté for about 2 minutes until they’re just soft. Tip: If they start to brown too quickly, lower the heat. Burnt garlic is a sad garlic.
- Spread the mashed avocado evenly on your toasted bread. Top with the sautéed garlic scapes and a sprinkle of red pepper flakes for that ‘oh wow’ factor.
- Now, take a moment to admire your creation before devouring it. The creamy avocado paired with the sharp, garlicky scapes and a hint of heat from the pepper flakes is a flavor explosion. Serve it with a side of ‘I made this’ pride.
Now, not only does this toast bring the crunch and the creaminess, but it’s also a conversation starter. Imagine serving this at your next brunch and casually dropping, ‘Oh, these? Just some garlic scapes I had lying around.’ Instant brunch royalty.
Conclusion
We hope this roundup of 20 delicious garlic scape recipes inspires your next culinary adventure! Whether you’re a seasoned chef or a curious home cook, there’s something here for every occasion. Don’t forget to try your favorites, share your thoughts in the comments, and pin this article on Pinterest to spread the garlic scape love. Happy cooking!


