Feeling hungry for a good laugh as much as a tasty bite? You’re in for a treat! Our roundup of 20 Hilarious Funny Recipes You Can’t Stop Laughing At is here to spice up your kitchen with giggles and grins. From whimsical twists on classics to downright silly creations, these recipes promise fun on a plate. Ready to cook up some joy? Let’s dive in!
Spaghetti Tacos

Venturing into the kitchen tonight, I found myself craving something that bridges the comfort of pasta with the playful crunch of a taco. Thus, the spaghetti taco was born—a whimsical yet satisfying dish that’s as fun to make as it is to eat.
Ingredients
- Spaghetti – 8 oz
- Taco shells – 6
- Marinara sauce – 1 cup
- Shredded cheese – ½ cup
- Olive oil – 1 tbsp
Instructions
- Bring a large pot of salted water to a boil over high heat. Add 8 oz of spaghetti and cook for 9 minutes, stirring occasionally to prevent sticking.
- While the spaghetti cooks, preheat your oven to 350°F. Arrange 6 taco shells on a baking sheet and warm them in the oven for 5 minutes to crisp up.
- Drain the spaghetti and return it to the pot. Toss with 1 tbsp of olive oil to prevent clumping.
- Heat 1 cup of marinara sauce in a small saucepan over medium heat until simmering, about 3 minutes. Tip: For a richer flavor, let the sauce simmer for an extra 2 minutes.
- Combine the cooked spaghetti with the warmed marinara sauce, mixing well to coat every strand.
- Fill each taco shell with the spaghetti mixture, topping with ½ cup of shredded cheese. Tip: For even melting, place the filled tacos under a broiler for 1 minute.
- Serve immediately. Tip: Garnish with fresh basil leaves for a pop of color and freshness.
Fresh from the oven, these spaghetti tacos offer a delightful contrast between the tender pasta and the crispy shell, with the melted cheese adding a creamy texture. Try serving them with a side of garlic bread for an extra indulgent meal.
Pancake Cereal
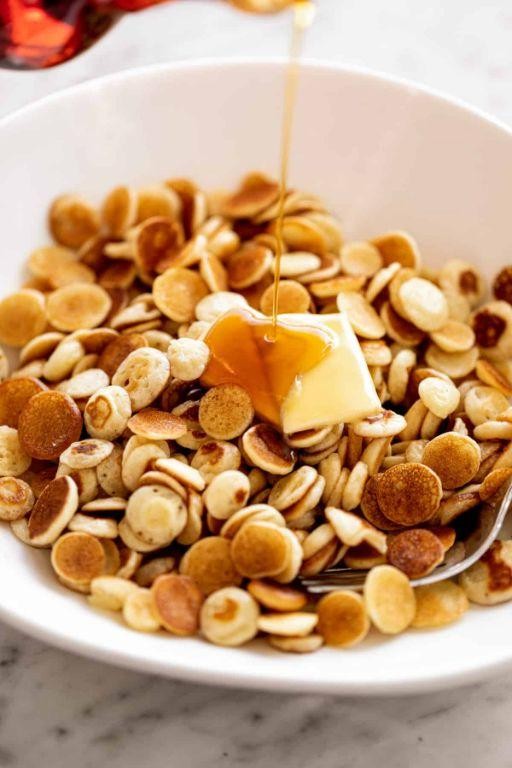
Evenings like these call for something simple yet whimsical, a dish that bridges the gap between childhood nostalgia and the minimalist trends of today. Pancake cereal, with its tiny, spoonable bites, offers just that—a comforting, playful start to the day or a sweet, light dessert.
Ingredients
- Flour – 1 cup
- Sugar – 2 tbsp
- Baking powder – 1 tsp
- Salt – ½ tsp
- Milk – ¾ cup
- Egg – 1
- Butter – 2 tbsp, melted
Instructions
- In a large bowl, whisk together flour, sugar, baking powder, and salt until well combined.
- Add milk, egg, and melted butter to the dry ingredients. Whisk until the batter is smooth with no lumps.
- Heat a non-stick skillet over medium-low heat (300°F). Tip: A properly heated skillet ensures even cooking without burning.
- Pour the batter into a squeeze bottle or a piping bag for precision. Tip: This makes creating tiny pancakes easier and more uniform.
- Squeeze small, dime-sized circles of batter onto the skillet, leaving space between each.
- Cook for 1-2 minutes until bubbles form on the surface, then flip each pancake carefully. Tip: Use a small spatula for flipping to maintain their shape.
- Cook for another 1-2 minutes until golden brown on the other side.
- Transfer to a plate and repeat with the remaining batter.
Best enjoyed warm, these miniature pancakes offer a delightful crunch on the outside with a soft, fluffy interior. Drizzle with maple syrup or layer with fresh berries for a burst of flavor in every bite.
Banana Hot Dog
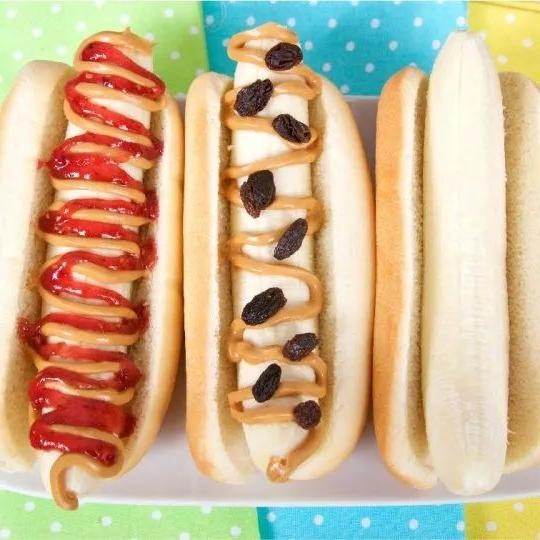
Evenings like these call for something whimsically simple, a dish that bridges the gap between nostalgia and novelty. The banana hot dog is just that—a playful twist on a classic, inviting you to slow down and savor each bite.
Ingredients
- Bananas – 2
- Hot dog buns – 2
- Peanut butter – ¼ cup
- Honey – 2 tbsp
Instructions
- Preheat your oven to 350°F to lightly toast the buns for a crisp texture.
- While the oven heats, peel the bananas and slice them lengthwise, ensuring they fit snugly inside the buns.
- Spread 2 tbsp of peanut butter inside each bun, creating a creamy base for the banana.
- Place the sliced bananas into the buns, pressing gently to adhere to the peanut butter.
- Drizzle 1 tbsp of honey over each banana-filled bun for a touch of sweetness.
- Bake in the preheated oven for 5 minutes, just until the buns are golden and the bananas are slightly warm.
- Remove from the oven and let cool for a minute before serving to avoid burns.
Kindly note how the warmth softens the banana slightly, making each bite a harmonious blend of textures. The peanut butter adds a rich depth, while the honey brightens the dish with its floral sweetness. For an extra crunch, sprinkle chopped nuts on top before baking.
Pizza Cake
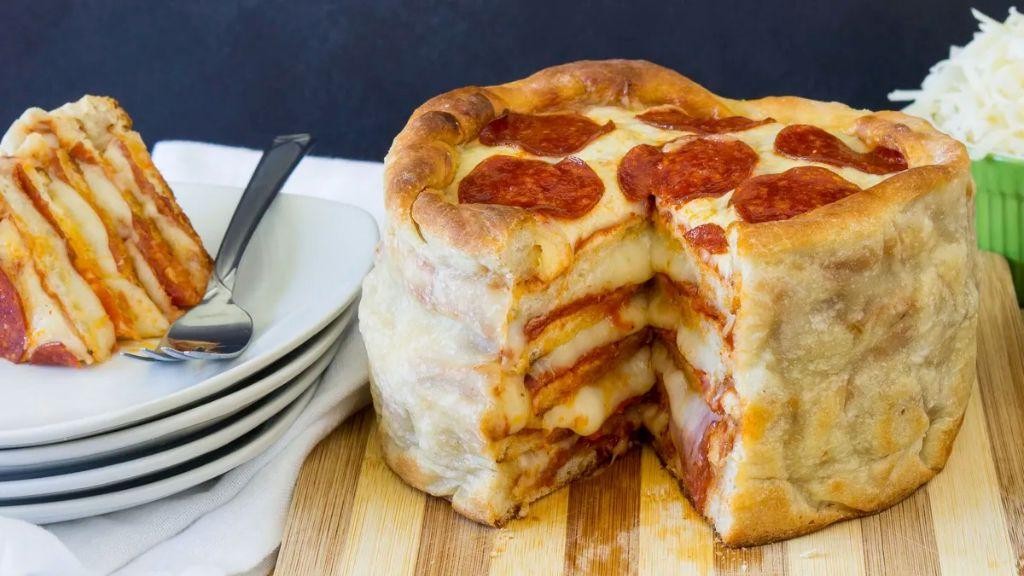
Moments like these, when the kitchen is quiet and the world outside feels distant, are perfect for creating something unexpectedly delightful. Today, let’s explore the layers of a Pizza Cake, a dish that marries the comfort of pizza with the grandeur of a cake, perfect for sharing or savoring alone.
Ingredients
- Pizza dough – 1 lb
- Tomato sauce – 1 cup
- Mozzarella cheese – 2 cups, shredded
- Pepperoni slices – 1 cup
- Olive oil – 1 tbsp
Instructions
- Preheat your oven to 375°F and lightly grease a 9-inch round cake pan with olive oil.
- Divide the pizza dough into 4 equal portions. Roll out the first portion to fit the bottom of the cake pan, ensuring it covers the base evenly.
- Spread ¼ cup of tomato sauce over the dough, followed by ½ cup of mozzarella cheese and ¼ cup of pepperoni slices.
- Repeat the layering process with the remaining dough, sauce, cheese, and pepperoni, finishing with a layer of dough on top.
- Brush the top layer with olive oil to achieve a golden crust. Bake for 25 minutes, or until the top is golden and the cheese is bubbly.
- Let the Pizza Cake cool in the pan for 5 minutes before transferring to a wire rack to cool slightly. This resting period makes slicing easier.
You’ll find the Pizza Cake boasts a crispy exterior with gooey, flavorful layers inside. Try serving it with a side of marinara for dipping, or slice it into wedges for a playful twist on pizza night.
Donut Burger

Sometimes, the most unexpected combinations bring the greatest joy, like the donut burger, a playful twist on classic comfort foods that surprises and delights with every bite.
Ingredients
- Ground beef – 1 lb
- Salt – ½ tsp
- Black pepper – ¼ tsp
- Glazed donuts – 4
- American cheese slices – 4
- Lettuce leaves – 4
- Tomato slices – 4
Instructions
- Preheat your grill or skillet to medium-high heat, around 375°F, ensuring it’s hot enough to sear the beef.
- Divide the ground beef into 4 equal portions and gently shape each into a patty, about ½ inch thick, being careful not to overwork the meat to keep it tender.
- Season both sides of each patty with salt and black pepper, pressing the seasoning lightly into the meat to ensure it sticks.
- Place the patties on the grill or skillet, cooking for 4 minutes on the first side without moving them to get a good sear.
- Flip the patties and cook for another 3 minutes, then add a slice of American cheese on top of each patty, allowing it to melt for the last minute of cooking.
- While the patties cook, slice the glazed donuts in half horizontally, creating a top and bottom bun for each burger.
- Once the patties are done, remove them from the heat and let them rest for 1 minute to redistribute the juices.
- Assemble each burger by placing a lettuce leaf and a tomato slice on the bottom half of a donut, followed by the cheeseburger patty, and then the top half of the donut.
Perfectly balancing sweet and savory, the donut burger offers a juicy, cheesy center with a crisp, sugary exterior. Try serving it with a side of sweet potato fries to complement its unique flavors.
Watermelon Shark Fruit Bowl
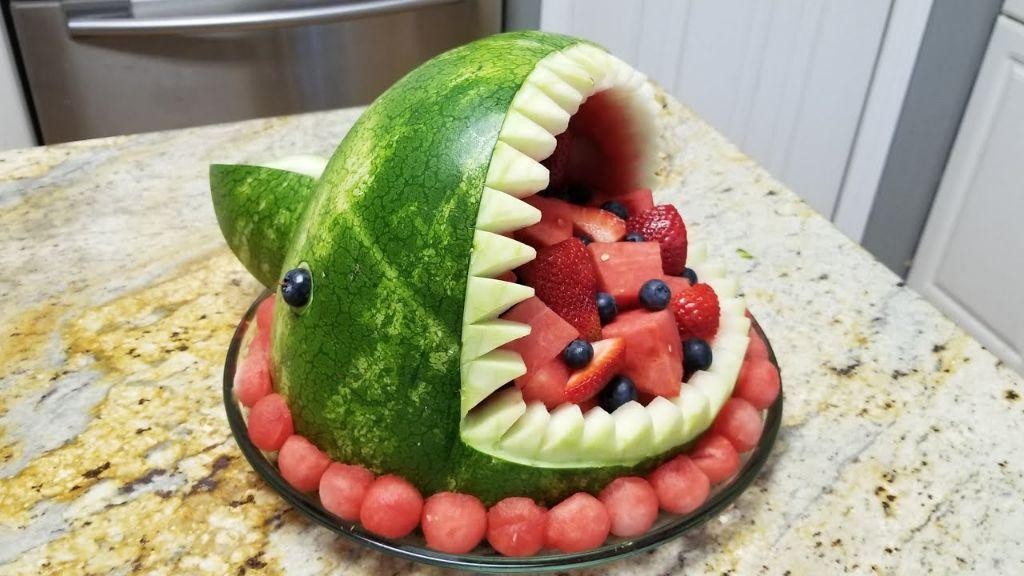
Perhaps there’s no better way to celebrate the height of summer than with a dish that’s as playful as it is refreshing. The Watermelon Shark Fruit Bowl is a whimsical creation that brings a splash of joy to any table, combining the sweetness of watermelon with the vibrant colors of assorted fruits.
Ingredients
- Watermelon – 1 large
- Blueberries – 1 cup
- Strawberries – 1 cup, halved
- Kiwi – 2, sliced
Instructions
- Wash all fruits thoroughly under cold running water to ensure they’re clean.
- Cut the watermelon in half lengthwise. Using a sharp knife, carve one half into the shape of a shark’s mouth, creating a large opening at the top.
- Scoop out the flesh of the carved watermelon half with a melon baller, leaving about a 1-inch thick shell to maintain the shark’s structure.
- Arrange the watermelon balls, blueberries, strawberry halves, and kiwi slices inside the carved watermelon shark, filling it generously for a colorful display.
- Chill the assembled fruit bowl in the refrigerator for at least 30 minutes before serving to enhance the flavors and ensure a refreshing taste.
Enjoy the crisp texture of the watermelon against the juicy burst of berries and the slight tartness of kiwi. For an extra touch of whimsy, serve with small umbrellas or shark-themed decorations to delight your guests.
Gummy Bear Sushi
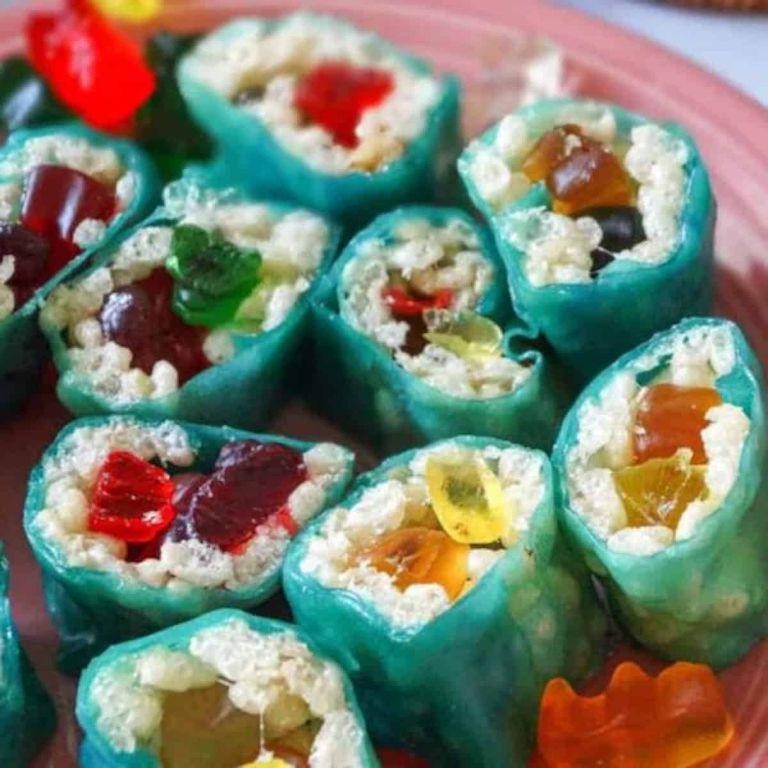
Wandering through the aisles of a candy store, I stumbled upon the idea of creating something whimsically delicious—a treat that marries the playful charm of gummy bears with the elegant presentation of sushi. This recipe is a sweet escape, a playful nod to traditional sushi that’s as fun to make as it is to eat.
Ingredients
- Gummy bears – 1 cup
- Rice Krispies cereal – 2 cups
- Marshmallows – 3 cups
- Butter – 2 tbsp
- Green fruit leather – 1 sheet
Instructions
- Line a baking sheet with parchment paper and set aside.
- In a large microwave-safe bowl, combine Rice Krispies cereal, marshmallows, and butter. Microwave on high for 1 minute, then stir until fully combined.
- Tip: For an even melt, stir the marshmallow mixture every 20 seconds during microwaving.
- Press the mixture onto the prepared baking sheet into a thin, even layer. Let cool for 10 minutes.
- Cut the cooled mixture into rectangles measuring about 2×4 inches.
- Place a row of gummy bears along one long edge of each rectangle, then roll tightly to encase the gummy bears.
- Tip: Wet your fingers slightly to prevent sticking while rolling.
- Cut the green fruit leather into thin strips to resemble seaweed. Wrap a strip around each roll to secure.
- Tip: Use a dab of water to help the fruit leather stick if needed.
- Chill the rolls in the refrigerator for 15 minutes to set before serving.
How delightful these gummy bear sushi rolls turn out, with their chewy centers and crispy exteriors. Serve them on a platter with chopsticks for a playful twist, or pack them in a bento box for a sweet surprise.
Rainbow Grilled Cheese
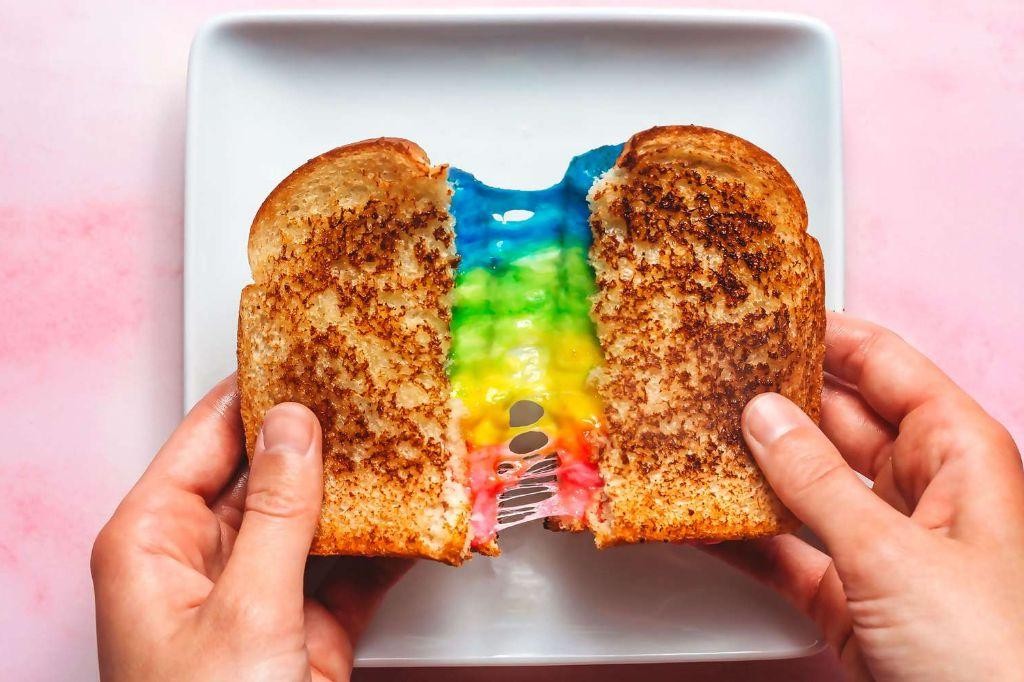
Yesterday, I found myself lost in the simple joy of creating something both vibrant and comforting. The rainbow grilled cheese, a twist on the classic, brings a splash of color to the table, turning an ordinary meal into a moment of delight.
Ingredients
- Bread – 2 slices
- Cheddar cheese – 1 slice
- Mozzarella cheese – 1 slice
- Butter – 1 tbsp
- Food coloring (red, yellow, green, blue) – 1 drop each
Instructions
- Preheat a skillet over medium heat (350°F).
- Divide the cheddar and mozzarella into four equal parts.
- Add a drop of different food coloring to each cheese portion, mixing gently to achieve vibrant colors.
- Butter one side of each bread slice evenly.
- Place one bread slice, buttered side down, onto the skillet.
- Layer the colored cheeses on the bread in a rainbow sequence.
- Top with the second bread slice, buttered side up.
- Cook for 3-4 minutes until the bottom is golden brown, then flip carefully.
- Cook the other side for another 3-4 minutes until equally golden and the cheese is melted.
- Remove from heat and let it sit for a minute before cutting to allow the cheese to set slightly.
Unbelievably, the first bite reveals a gooey center with a crisp exterior, the colors blending as the cheeses melt together. Serve it with a side of tomato soup for dipping, or enjoy it as is, letting the colors brighten your day.
Cookie Dough Hummus
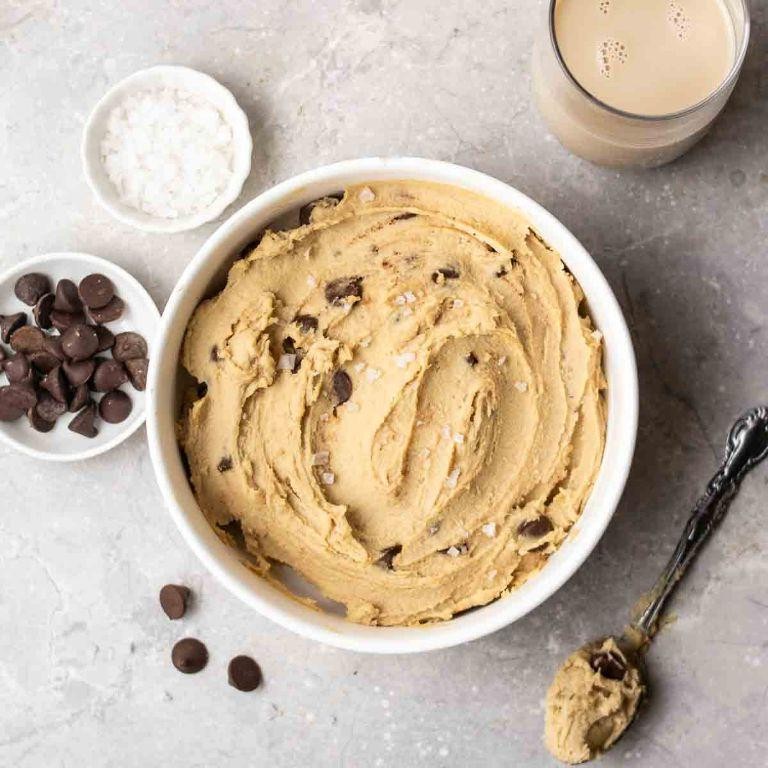
Whispering to the quiet of the kitchen, there’s a recipe that feels like a secret between friends—cookie dough hummus, a playful twist on tradition that invites spoonfuls of comfort.
Ingredients
- Chickpeas – 1 can (15 oz), drained and rinsed
- Tahini – ¼ cup
- Maple syrup – ¼ cup
- Vanilla extract – 1 tsp
- Chocolate chips – ½ cup
- Salt – ¼ tsp
Instructions
- Combine chickpeas, tahini, maple syrup, vanilla extract, and salt in a food processor.
- Process on high for 2 minutes, scraping down the sides halfway through, until completely smooth. Tip: For extra creaminess, let the food processor run an additional 30 seconds.
- Add chocolate chips and pulse 3-4 times just to incorporate. Tip: Reserve a few chocolate chips to sprinkle on top for texture.
- Transfer to a bowl and let chill in the refrigerator for at least 1 hour before serving. Tip: The flavors meld beautifully if left overnight.
Velvety with a hint of grain from the chickpeas, this hummus carries the nostalgic sweetness of cookie dough, perfect for dipping apple slices or spreading on warm toast.
Avocado Chocolate Mousse
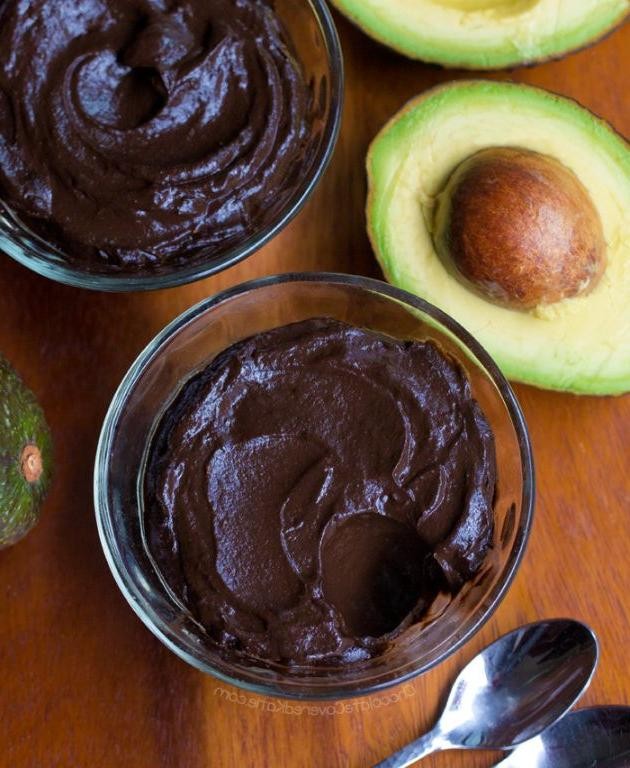
Venturing into the realm of desserts that both comfort and surprise, this avocado chocolate mousse is a revelation. It’s a dish that whispers of indulgence yet speaks volumes of health, a paradox that delights with every spoonful.
Ingredients
- Ripe avocados – 2
- Unsweetened cocoa powder – ½ cup
- Maple syrup – ¼ cup
- Vanilla extract – 1 tsp
- Almond milk – ¼ cup
Instructions
- Cut the avocados in half, remove the pits, and scoop the flesh into a blender.
- Add the cocoa powder, maple syrup, vanilla extract, and almond milk to the blender.
- Blend on high speed for 1 minute, then stop to scrape down the sides with a spatula to ensure everything is incorporated.
- Blend again for another minute until the mixture is completely smooth and no avocado chunks remain. Tip: If the mousse is too thick, add almond milk one tablespoon at a time until desired consistency is reached.
- Transfer the mousse to serving bowls or glasses. Tip: For an elegant presentation, pipe the mousse into glasses using a piping bag.
- Chill in the refrigerator for at least 30 minutes before serving to allow the flavors to meld. Tip: The mousse can be made up to a day in advance, making it a perfect make-ahead dessert.
Now, this mousse is luxuriously creamy, with a deep chocolate flavor that’s subtly balanced by the richness of avocado. Serve it topped with fresh berries or a sprinkle of sea salt for a delightful contrast.
Mac and Cheese Ice Cream
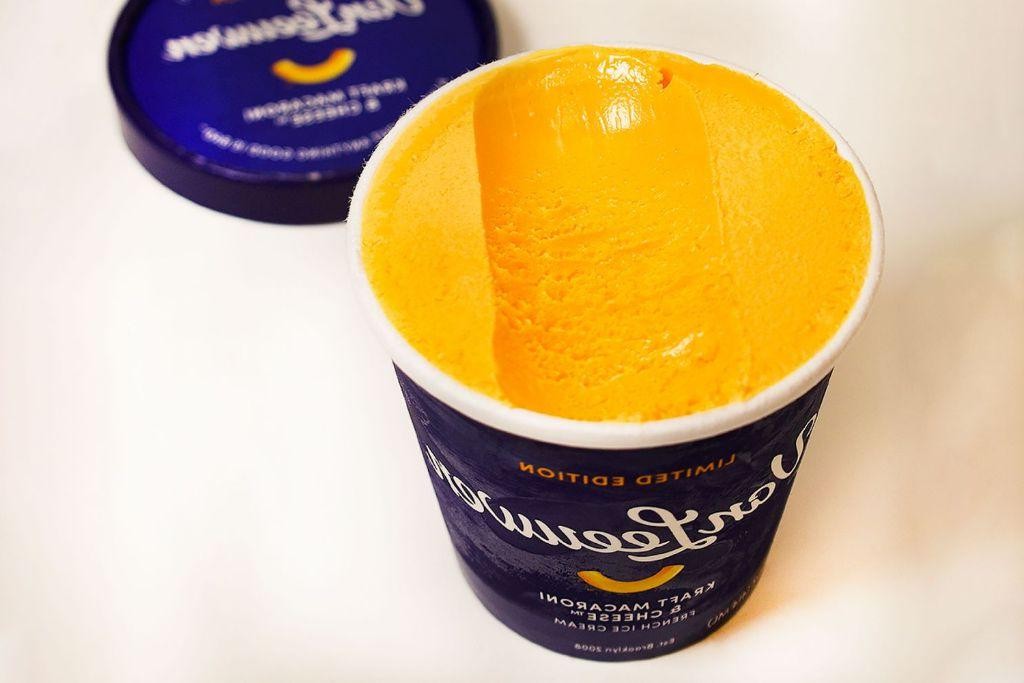
Amidst the quiet hum of the kitchen, where the warmth of the stove meets the chill of the freezer, there exists a dish that defies expectations—Mac and Cheese Ice Cream. A curious blend of comfort and novelty, it invites you to explore the boundaries of flavor with each spoonful.
Ingredients
- Elbow macaroni – 1 cup
- Cheddar cheese – 1 cup, shredded
- Heavy cream – 2 cups
- Whole milk – 1 cup
- Sugar – ½ cup
- Salt – ¼ tsp
Instructions
- Cook elbow macaroni according to package instructions until al dente, then drain and set aside to cool.
- In a medium saucepan over low heat, combine heavy cream, whole milk, sugar, and salt, stirring until sugar is completely dissolved.
- Remove the saucepan from heat and stir in the shredded cheddar cheese until the mixture is smooth and the cheese is fully melted.
- Transfer the cheese mixture to a blender and blend on high for 30 seconds to ensure a smooth consistency.
- Fold the cooled macaroni into the blended cheese mixture gently to distribute evenly.
- Pour the mixture into an ice cream maker and churn according to the manufacturer’s instructions, usually about 20-25 minutes, until it reaches a soft-serve consistency.
- Transfer the churned ice cream to a freezer-safe container and freeze for at least 4 hours, or until firm.
How the creamy sweetness of the ice cream contrasts with the savory bite of cheddar and the tender macaroni creates a symphony of textures and tastes. Serve it in a waffle cone for an extra crunch, or alongside a warm slice of apple pie to play with temperatures and flavors.
Bacon Weave Pancakes
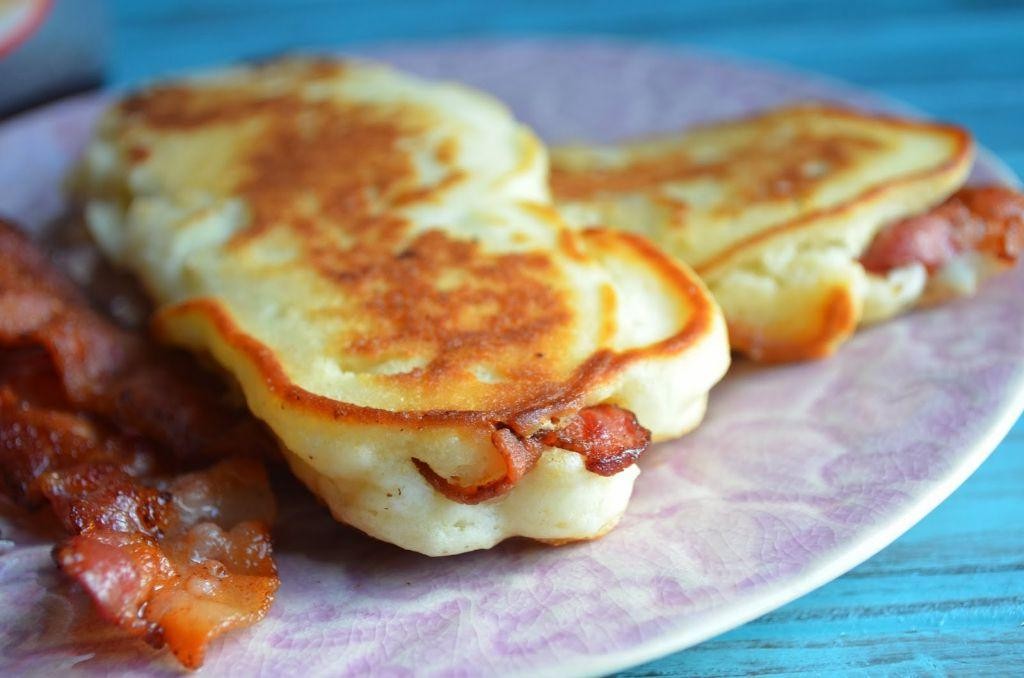
Calmly, as the morning light filters through the kitchen window, there’s something deeply satisfying about combining the savory crunch of bacon with the soft, fluffy embrace of pancakes. This dish, a playful twist on breakfast classics, invites a moment of indulgence to start the day.
Ingredients
- Flour – 1 cup
- Baking powder – 2 tsp
- Sugar – 1 tbsp
- Salt – ½ tsp
- Milk – 1 cup
- Egg – 1
- Butter – 2 tbsp, melted
- Bacon – 6 slices
Instructions
- Preheat your skillet over medium heat (350°F) and begin weaving the bacon into a square lattice directly on the skillet.
- Cook the bacon weave for 5 minutes on one side, then carefully flip it and cook for another 5 minutes until crispy. Remove and set aside on a paper towel to drain.
- In a large bowl, whisk together the flour, baking powder, sugar, and salt.
- In another bowl, beat the egg, then stir in the milk and melted butter.
- Pour the wet ingredients into the dry ingredients and stir until just combined; a few lumps are okay.
- Pour ¼ cup of the pancake batter over the bacon weave in the skillet, spreading it gently to cover the bacon completely.
- Cook for 2-3 minutes until bubbles form on the surface, then flip and cook for another 2 minutes until golden brown.
- Tip: Keep the heat at medium to prevent the bacon from burning while the pancake cooks through.
- Tip: For extra fluffy pancakes, let the batter rest for 5 minutes before cooking.
- Tip: Serve immediately with maple syrup drizzled over the top for the perfect sweet and salty combination.
Now, the bacon weave pancakes offer a delightful contrast between the crispy, salty bacon and the sweet, soft pancake. Try serving them stacked high with a dollop of whipped cream and fresh berries for a breakfast that feels like a celebration.
Peanut Butter and Pickle Sandwich
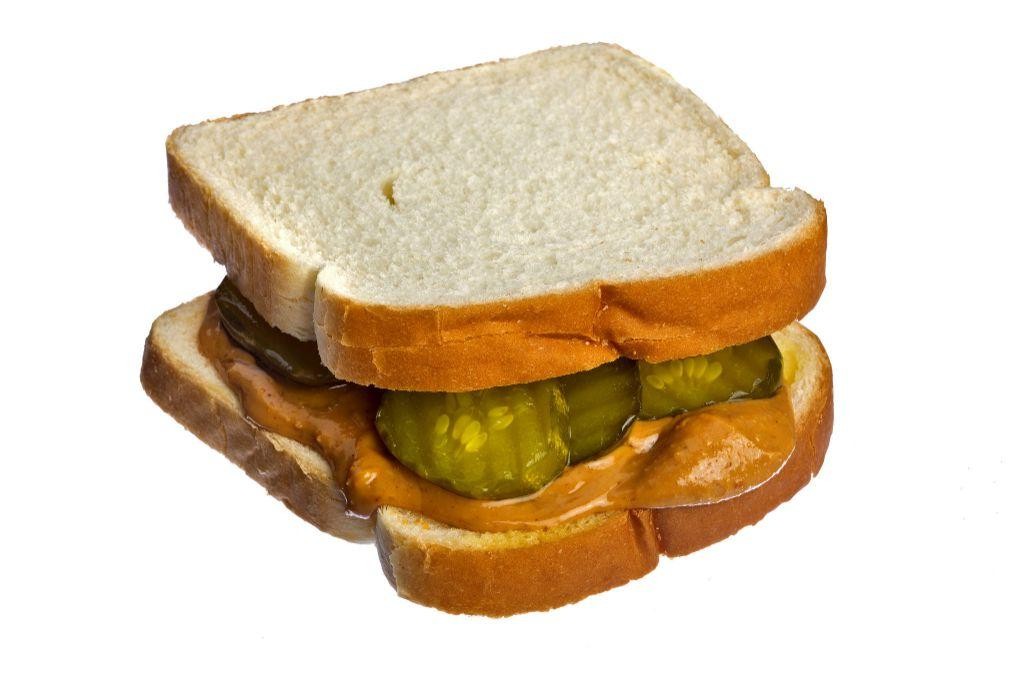
Today, as the soft morning light filters through the kitchen window, I find myself drawn to the simplicity and unexpected harmony of a peanut butter and pickle sandwich. There’s something quietly revolutionary about combining these two flavors, a testament to the beauty of culinary experimentation.
Ingredients
- Peanut butter – 2 tbsp
- Bread – 2 slices
- Dill pickles – 4 slices
Instructions
- Lay out two slices of bread on a clean, flat surface.
- Spread 1 tablespoon of peanut butter evenly on one side of each bread slice. Tip: For a smoother spread, let the peanut butter sit at room temperature for a few minutes before using.
- Place 2 pickle slices on one slice of bread, covering the peanut butter layer evenly.
- Gently press the second slice of bread, peanut butter side down, onto the pickles to form a sandwich. Tip: Pressing lightly ensures the sandwich holds together without squeezing out the fillings.
- Cut the sandwich diagonally for easier handling. Tip: A serrated knife works best for clean cuts without squishing the sandwich.
Each bite offers a delightful contrast between the creamy, rich peanut butter and the crisp, tangy pickles, creating a balance that’s both surprising and satisfying. Try serving it with a side of potato chips for an added crunch that complements the sandwich’s textures.
Jello Swimming Pool

Calmly, as the summer heat wraps around us like a warm blanket, there’s a playful dish that brings back the joy of childhood summers—a jiggly, colorful creation that’s as fun to make as it is to eat.
Ingredients
- Blue Jello mix – 2 boxes (3 oz each)
- Boiling water – 2 cups
- Cold water – 2 cups
- Gummy fish – 1 cup
Instructions
- In a large bowl, dissolve the blue Jello mix in 2 cups of boiling water, stirring for 2 minutes until completely dissolved.
- Add 2 cups of cold water to the mixture, stirring gently to combine without creating bubbles.
- Pour the Jello mixture into a clear, rectangular baking dish to create the ‘pool’ effect, then refrigerate for 4 hours or until fully set.
- Once set, arrange the gummy fish on top of the Jello to simulate swimming, pressing them lightly so they stay in place.
- Return the dish to the refrigerator for 30 minutes to allow the gummy fish to adhere slightly to the Jello surface.
Zesty and whimsical, this Jello Swimming Pool offers a cool, wobbly texture with a sweet, fruity flavor that’s irresistible. Serve it at your next summer gathering, or let the kids help decorate their own edible pool for a fun, interactive dessert.
Cheetos Crusted Chicken
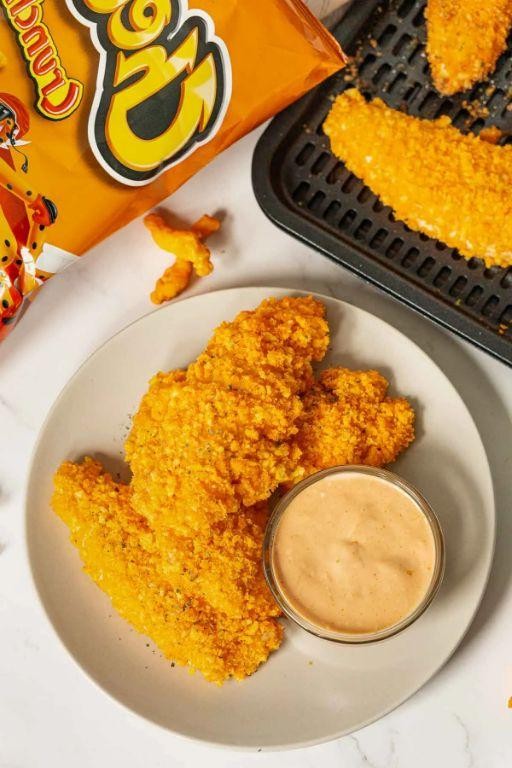
Now, imagine a dish that brings together the playful crunch of Cheetos with the comforting warmth of chicken, a combination that’s as unexpected as it is delightful. This recipe is a nod to those moments when comfort food meets a dash of whimsy, perfect for a quiet evening when you’re craving something uniquely satisfying.
Ingredients
- Chicken breasts – 2
- Cheetos – 2 cups, crushed
- Egg – 1
- Flour – 1/2 cup
Instructions
- Preheat your oven to 375°F and line a baking sheet with parchment paper.
- Place the Cheetos in a zip-top bag and crush them into fine crumbs using a rolling pin.
- Beat the egg in a shallow bowl until fully blended.
- Spread the flour on a separate plate.
- Dredge each chicken breast in the flour, shaking off any excess.
- Dip the floured chicken into the beaten egg, ensuring it’s fully coated.
- Coat the chicken with the crushed Cheetos, pressing gently to adhere.
- Place the coated chicken on the prepared baking sheet.
- Bake for 25 minutes, or until the chicken reaches an internal temperature of 165°F.
- Let the chicken rest for 5 minutes before serving to ensure juiciness.
Crunchy on the outside and tender within, this Cheetos crusted chicken offers a bold flavor that’s both fun and fulfilling. Serve it alongside a crisp salad or slice it over a bed of creamy mashed potatoes for a meal that’s sure to spark joy.
Spam Sushi

Now, as the quiet hum of the kitchen fills the space, let’s explore the humble yet surprising delight of Spam sushi, a dish that marries the simplicity of pantry staples with the elegance of Japanese tradition.
Ingredients
- Spam – 1 can
- Sushi rice – 2 cups
- Nori sheets – 4
- Rice vinegar – 2 tbsp
- Sugar – 1 tbsp
- Salt – ½ tsp
Instructions
- Slice the Spam into 8 even rectangles, about ¼ inch thick.
- Heat a non-stick skillet over medium heat and cook the Spam slices for 2-3 minutes on each side until lightly browned. Tip: For extra flavor, drizzle a little of the Spam juice into the skillet as it cooks.
- Rinse the sushi rice under cold water until the water runs clear, then cook according to package instructions.
- In a small bowl, mix the rice vinegar, sugar, and salt until dissolved. Fold this mixture gently into the cooked rice while it’s still warm. Tip: Use a cutting motion with a rice paddle to avoid mashing the grains.
- Lay a nori sheet on a bamboo mat, spread a thin layer of rice over the nori, leaving a 1-inch border at the top.
- Place two slices of cooked Spam near the bottom edge of the rice-covered nori.
- Roll the sushi tightly from the bottom, using the bamboo mat to help shape it. Tip: Wet the top border of the nori slightly to help it seal the roll.
- Repeat with the remaining ingredients to make 4 rolls.
- Slice each roll into 6 pieces with a sharp, wet knife for clean cuts.
Here, the salty richness of Spam contrasts beautifully with the subtle tang of vinegared rice, all wrapped in the crisp embrace of nori. Serve these bite-sized delights with a dab of wasabi or a sprinkle of sesame seeds for an extra layer of flavor.
Hot Dog Stuffed Crust Pizza
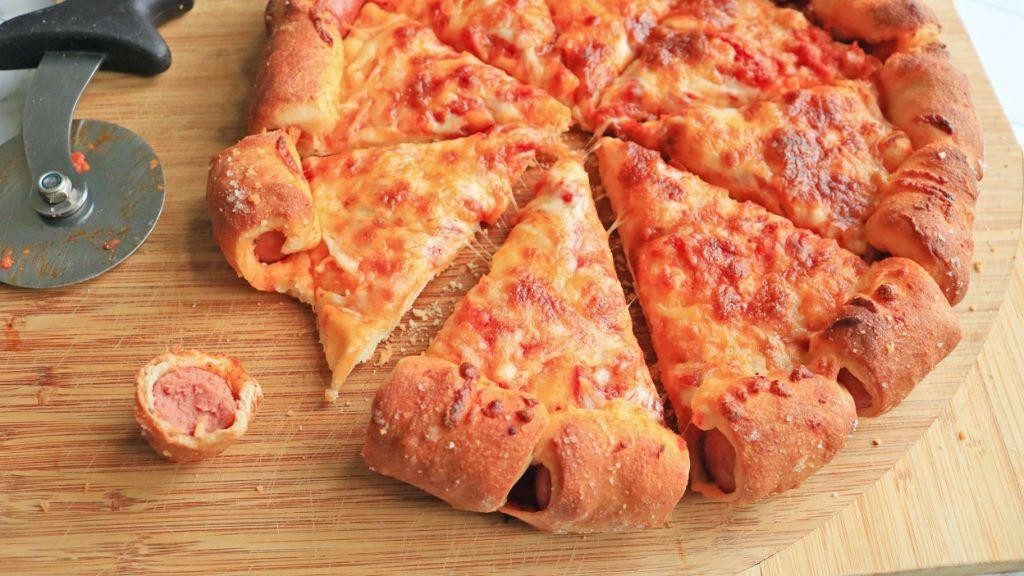
How often do we find ourselves torn between the simplicity of a hot dog and the comforting embrace of a pizza? Tonight, let’s bridge that gap with a creation that marries the two in a way that’s both nostalgic and novel.
Ingredients
- Pizza dough – 1 lb
- Hot dogs – 4
- Mozzarella cheese – 1 cup, shredded
- Pizza sauce – ½ cup
- Butter – 2 tbsp, melted
Instructions
- Preheat your oven to 425°F. This ensures a crispy crust.
- Roll out the pizza dough on a floured surface to a 12-inch circle. Tip: Let the dough rest for 10 minutes before rolling for easier handling.
- Place the hot dogs around the edge of the dough, leaving a small border. Fold the dough over the hot dogs, sealing them inside to create the stuffed crust.
- Spread the pizza sauce evenly over the dough, avoiding the stuffed edges.
- Sprinkle the shredded mozzarella cheese over the sauce.
- Brush the stuffed crust with melted butter for a golden finish. Tip: Adding garlic powder to the butter enhances flavor.
- Bake for 15-20 minutes, or until the cheese is bubbly and the crust is golden brown. Tip: Rotate the pizza halfway through baking for even cooking.
- Let the pizza cool for 5 minutes before slicing to allow the cheese to set.
The first bite reveals a crispy, buttery crust giving way to the smoky hot dog, while the gooey cheese and tangy sauce bring it all together. Try serving it with a side of mustard for dipping the crust, blending the classic hot dog experience with every slice.
Popcorn Salad
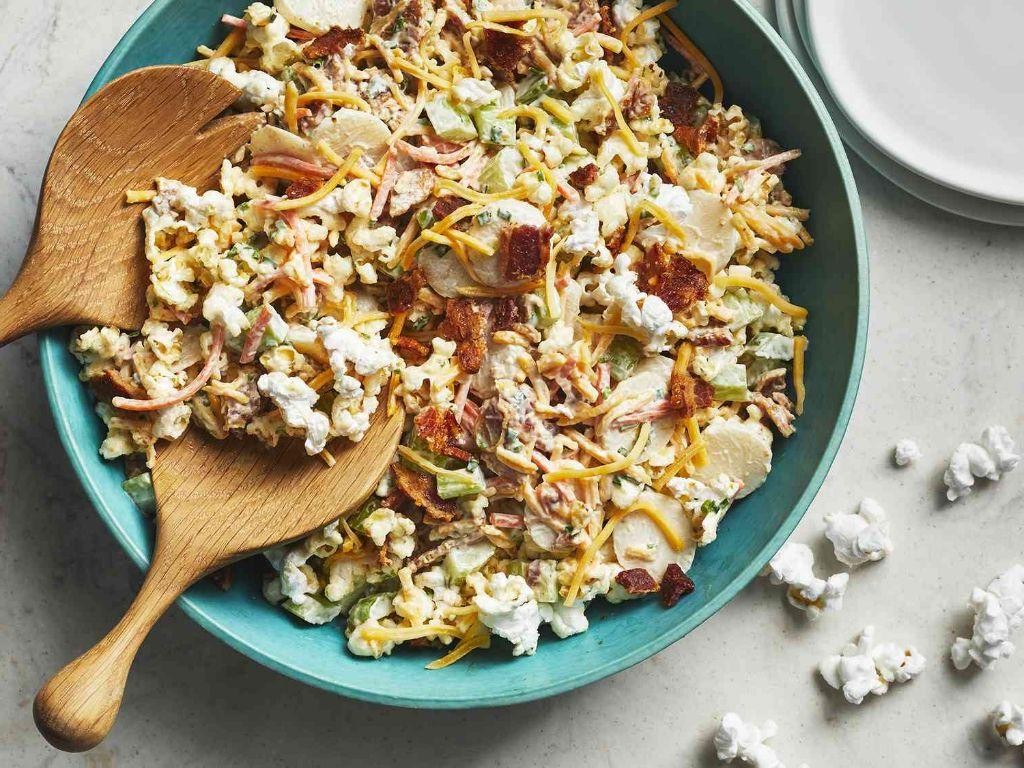
Zestfully, let’s embark on a culinary journey that marries the simplicity of popcorn with the freshness of a salad, creating a dish that’s both unexpected and delightfully satisfying.
Ingredients
- Popcorn – 4 cups
- Mayonnaise – ½ cup
- Celery – ½ cup, diced
- Green onions – ¼ cup, sliced
- Salt – ½ tsp
Instructions
- Pop the popcorn using your preferred method, ensuring it’s unsalted and unbuttered. Let it cool to room temperature.
- In a large mixing bowl, combine the mayonnaise, diced celery, sliced green onions, and salt. Stir until the ingredients are evenly distributed.
- Gently fold the cooled popcorn into the mayonnaise mixture, taking care not to crush the popcorn. The goal is to coat each piece lightly without making the salad soggy.
- Chill the salad in the refrigerator for 30 minutes before serving to allow the flavors to meld together.
- Give the salad a final gentle toss before serving to redistribute any dressing that may have settled at the bottom of the bowl.
Unassuming yet unforgettable, this popcorn salad offers a playful crunch with every bite, its creamy dressing subtly enhancing the natural flavors of the popcorn and vegetables. Serve it in individual cups for a fun, portable snack at your next gathering.
Oreo-stuffed Chocolate Chip Cookies

Baking these Oreo-stuffed Chocolate Chip Cookies feels like uncovering a hidden treasure, where each bite reveals a delightful surprise. The process is a gentle reminder of the joy in creating something uniquely comforting.
Ingredients
- Flour – 2 1/4 cups
- Baking soda – 1 tsp
- Salt – 1 tsp
- Butter – 1 cup, softened
- Brown sugar – 3/4 cup
- Granulated sugar – 3/4 cup
- Vanilla extract – 1 tsp
- Eggs – 2
- Chocolate chips – 2 cups
- Oreos – 24
Instructions
- Preheat your oven to 375°F (190°C) and line baking sheets with parchment paper.
- In a small bowl, whisk together the flour, baking soda, and salt. Set aside.
- In a large bowl, cream together the softened butter, brown sugar, and granulated sugar until light and fluffy, about 3 minutes.
- Beat in the vanilla extract and eggs, one at a time, ensuring each is fully incorporated before adding the next.
- Gradually mix in the dry ingredients until just combined, then fold in the chocolate chips.
- Take a tablespoon of dough, flatten it slightly, place an Oreo in the center, and wrap the dough around it, sealing completely.
- Place the dough balls on the prepared baking sheets, spacing them about 2 inches apart.
- Bake for 10-12 minutes, or until the edges are golden but the centers are still soft.
- Let the cookies cool on the baking sheets for 5 minutes before transferring to a wire rack to cool completely.
Very much like a hug in cookie form, these treats boast a crispy edge with a chewy center, the Oreo adding a crunchy contrast. Serve them slightly warm with a glass of cold milk for an indulgent twist on the classic.
Cereal Milk Popsicles
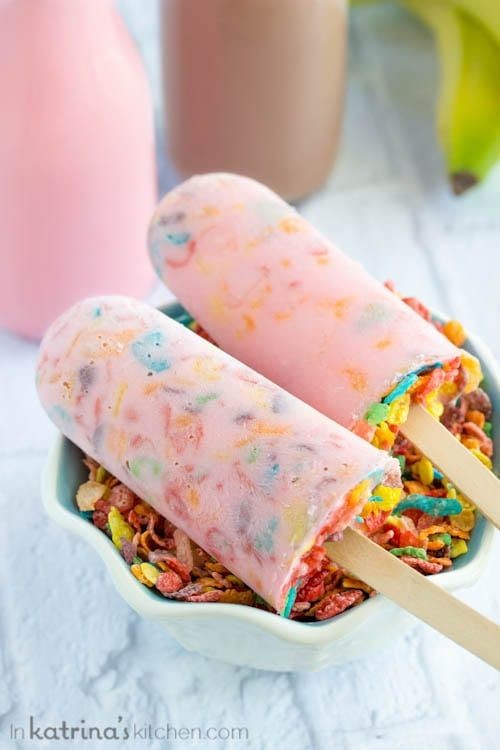
Vaguely reminiscent of childhood mornings, these cereal milk popsicles bring a nostalgic twist to summer treats. They’re simple, subtly sweet, and surprisingly refreshing, perfect for those languid afternoons when the sun lingers a little too long.
Ingredients
- Milk – 2 cups
- Sugar – ¼ cup
- Cornflakes – 1 cup
- Vanilla extract – 1 tsp
Instructions
- In a medium bowl, combine milk and sugar. Stir until the sugar is completely dissolved.
- Add cornflakes to the milk mixture. Let sit for 30 minutes at room temperature to infuse the milk with the cereal flavor.
- Strain the mixture through a fine-mesh sieve into another bowl, pressing gently on the cornflakes to extract all the flavored milk. Discard the soggy cornflakes.
- Stir in vanilla extract for an extra layer of flavor.
- Pour the mixture into popsicle molds, leaving a little space at the top for expansion.
- Insert popsicle sticks and freeze for at least 6 hours, or until completely solid.
- To unmold, run warm water over the outside of the molds for a few seconds, then gently pull the popsicles out.
Yieldingly creamy with a hint of vanilla, these popsicles are a playful nod to breakfast. Try drizzling them with honey or sprinkling crushed cornflakes on top for added crunch.
Conclusion
Giggles guaranteed with these 20 hilarious recipes that blend humor and home cooking perfectly! Whether you’re looking to lighten up your meal prep or just in need of a good laugh, these dishes deliver. Don’t forget to whip up your favorites, share your thoughts in the comments, and pin the fun on Pinterest for others to enjoy. Happy cooking and laughing!