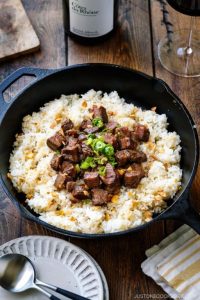
Oh, the joy of Thanksgiving—a time for gratitude, family, and, of course, an abundance of delicious food! Whether you’re a seasoned chef or a first-time host, our roundup of 19 Fun Thanksgiving Recipes is here to inspire your holiday menu. From timeless classics to creative twists, these dishes promise to delight every palate. So, grab your apron and let’s make this Thanksgiving unforgettable with flavors that everyone will love!
Turkey and Stuffing Cupcakes
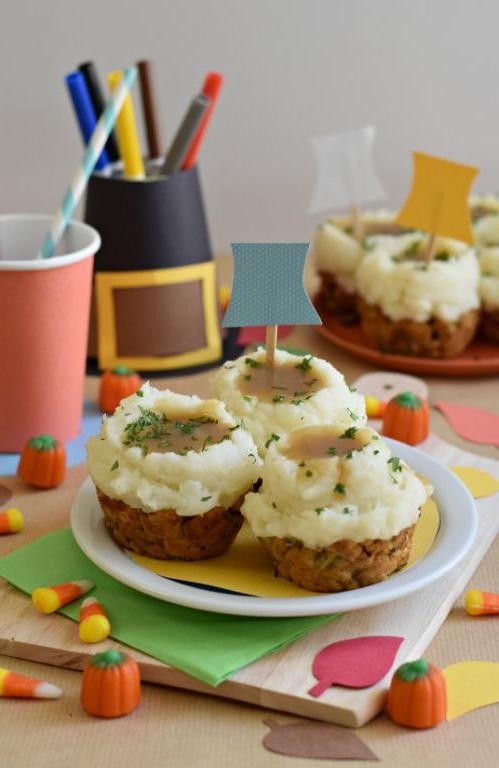
Just when you thought the classic Thanksgiving flavors couldn’t get any more delightful, these Turkey and Stuffing Cupcakes come along to redefine comfort food. Elegantly portioned and bursting with the savory essence of the holidays, they’re a creative twist that’s as pleasing to the eye as it is to the palate.
Ingredients
- 2 cups cooked turkey, finely shredded (leftovers work perfectly)
- 1 1/2 cups prepared stuffing (homemade or store-bought, slightly moist)
- 1/2 cup cranberry sauce (whole berry or jellied, for a sweet contrast)
- 1/4 cup gravy (warmed, for drizzling)
- 1 tbsp olive oil (or any neutral oil, for greasing)
Instructions
- Preheat your oven to 375°F (190°C) and lightly grease a muffin tin with olive oil to prevent sticking.
- Press 2 tablespoons of prepared stuffing into the bottom of each muffin cup, forming a firm base. Tip: Use the back of a spoon to compact the stuffing evenly.
- Layer 2 tablespoons of shredded turkey over the stuffing in each cup, ensuring an even distribution for consistent flavor in every bite.
- Top each turkey layer with 1 tablespoon of cranberry sauce, spreading gently to cover. Tip: For a decorative touch, leave a small well in the center for the gravy.
- Bake in the preheated oven for 15-20 minutes, or until the edges are golden and the cranberry sauce is bubbly. Tip: Rotate the tin halfway through for even browning.
- Remove from the oven and let cool for 5 minutes before carefully lifting each cupcake out with a spoon.
- Drizzle each cupcake with warm gravy just before serving, enhancing the moisture and richness of the dish.
The texture is a delightful contrast between the crispy stuffing crust and the tender turkey, all brought together by the sweet and tangy cranberry sauce. Serve these cupcakes on a platter garnished with fresh thyme for an elegant presentation that’s sure to impress at any gathering.
Pumpkin Pie Dip
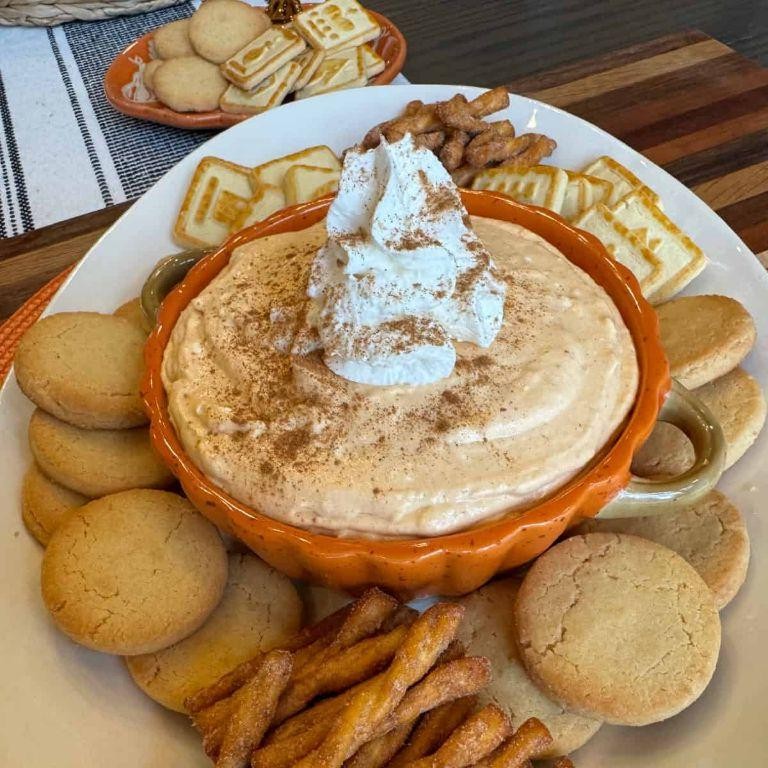
Savory and sweet come together in this Pumpkin Pie Dip, a delightful concoction that captures the essence of autumn in every bite. Perfect for gatherings or a cozy night in, this dip pairs wonderfully with crisp apple slices, graham crackers, or even a spoon.
Ingredients
- 1 cup canned pumpkin puree (not pumpkin pie filling)
- 8 oz cream cheese, softened (for easier blending)
- 1/2 cup brown sugar, packed (adjust to sweetness preference)
- 1/4 cup maple syrup (pure for best flavor)
- 1 tsp vanilla extract (or almond extract for a twist)
- 1 tsp pumpkin pie spice (homemade or store-bought)
- 1/2 tsp cinnamon (extra for garnish)
- 1/4 tsp salt (to balance the sweetness)
Instructions
- In a large mixing bowl, combine the softened cream cheese and pumpkin puree until smooth, using a hand mixer or whisk.
- Add the brown sugar, maple syrup, vanilla extract, pumpkin pie spice, cinnamon, and salt to the bowl. Mix until all ingredients are fully incorporated and the mixture is creamy.
- Transfer the dip to a serving bowl and sprinkle with a little extra cinnamon on top for garnish.
- Chill in the refrigerator for at least 1 hour before serving to allow the flavors to meld together.
Rich in flavor and velvety in texture, this Pumpkin Pie Dip is a versatile treat that can elevate your dessert table or serve as a sweet snack. For an extra indulgent twist, drizzle with caramel sauce or top with whipped cream before serving.
Cranberry Sauce Meatballs

Vibrant and versatile, these Cranberry Sauce Meatballs are a delightful twist on a classic appetizer, blending the tangy sweetness of cranberry with the savory depth of perfectly seasoned meatballs. Ideal for gatherings or a cozy night in, they promise to elevate any table with their rich flavors and elegant presentation.
Ingredients
- 1 lb ground beef (for a leaner option, try ground turkey)
- 1/2 cup breadcrumbs (panko for extra crunch)
- 1 large egg (lightly beaten)
- 1/4 cup milk (whole milk recommended for richness)
- 1 tsp garlic powder (adjust to taste)
- 1 tsp onion powder
- 1/2 tsp salt
- 1/4 tsp black pepper (freshly ground preferred)
- 1 cup cranberry sauce (homemade or store-bought)
- 1/2 cup ketchup
- 1 tbsp soy sauce (low sodium if preferred)
- 1 tbsp brown sugar (adjust to sweetness preference)
Instructions
- Preheat your oven to 375°F (190°C) and line a baking sheet with parchment paper for easy cleanup.
- In a large bowl, combine the ground beef, breadcrumbs, egg, milk, garlic powder, onion powder, salt, and black pepper. Mix gently until just combined to avoid tough meatballs.
- Shape the mixture into 1-inch meatballs, placing them on the prepared baking sheet. Tip: Use a small cookie scoop for uniform size.
- Bake the meatballs for 20 minutes, or until they are cooked through and lightly browned.
- While the meatballs bake, whisk together the cranberry sauce, ketchup, soy sauce, and brown sugar in a saucepan over medium heat until smooth and heated through, about 5 minutes.
- Transfer the baked meatballs to a serving dish and pour the warm cranberry sauce over them, gently tossing to coat evenly. Tip: For a glossy finish, broil the coated meatballs for 2 minutes before serving.
- Serve warm, garnished with fresh parsley or orange zest for a pop of color and freshness.
Unbelievably tender and bursting with flavor, these Cranberry Sauce Meatballs offer a perfect balance of sweet and savory. Serve them atop a bed of creamy mashed potatoes or as a standout appetizer at your next dinner party for a dish that’s sure to impress.
Sweet Potato Marshmallow Bites
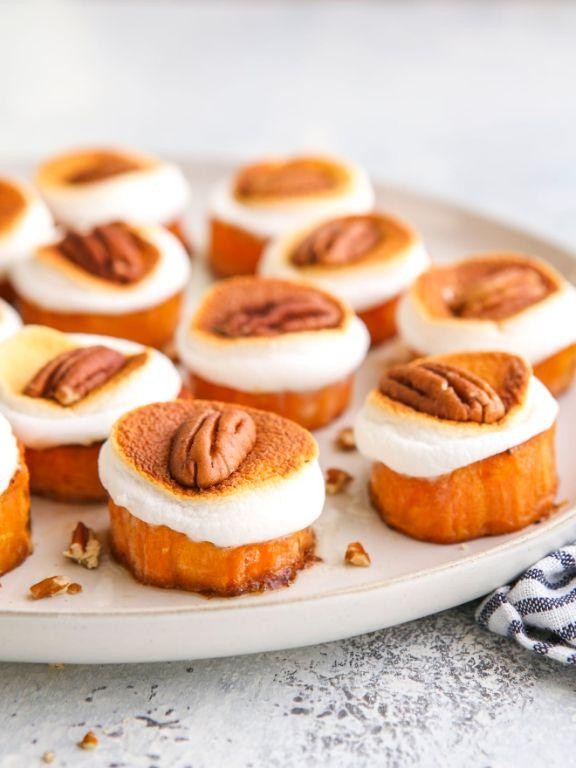
Few treats blend the earthy sweetness of root vegetables with the fluffy decadence of marshmallows quite like these Sweet Potato Marshmallow Bites. Perfect for holiday gatherings or a cozy night in, this dish offers a delightful contrast of textures and flavors that will captivate your palate.
Ingredients
- 2 medium sweet potatoes, peeled and cubed (about 2 cups)
- 1/4 cup unsalted butter, melted (or coconut oil for a vegan option)
- 1/4 cup brown sugar, packed (adjust to sweetness preference)
- 1/2 tsp ground cinnamon (plus extra for sprinkling)
- 1/4 tsp salt
- 1 cup mini marshmallows (ensure freshness for best melt)
Instructions
- Preheat your oven to 375°F (190°C) and line a baking sheet with parchment paper for easy cleanup.
- Toss the cubed sweet potatoes with melted butter, brown sugar, cinnamon, and salt until evenly coated. Tip: For deeper flavor, let the mixture sit for 10 minutes before baking.
- Spread the sweet potatoes in a single layer on the prepared baking sheet. Bake for 25 minutes, or until the edges start to caramelize. Tip: Stir halfway through to ensure even cooking.
- Remove from the oven and evenly scatter the mini marshmallows over the sweet potatoes. Return to the oven for 3-5 minutes, just until the marshmallows are lightly golden and puffed. Tip: Watch closely to prevent burning.
- Let cool for 5 minutes before serving to allow the marshmallows to set slightly. Sprinkle with additional cinnamon if desired.
Velvety sweet potatoes paired with gooey marshmallows create a dessert that’s as visually appealing as it is delicious. Serve these bites warm for a comforting treat that’s sure to impress, or layer them in a trifle for an elegant dessert presentation.
Thanksgiving Leftover Quesadillas
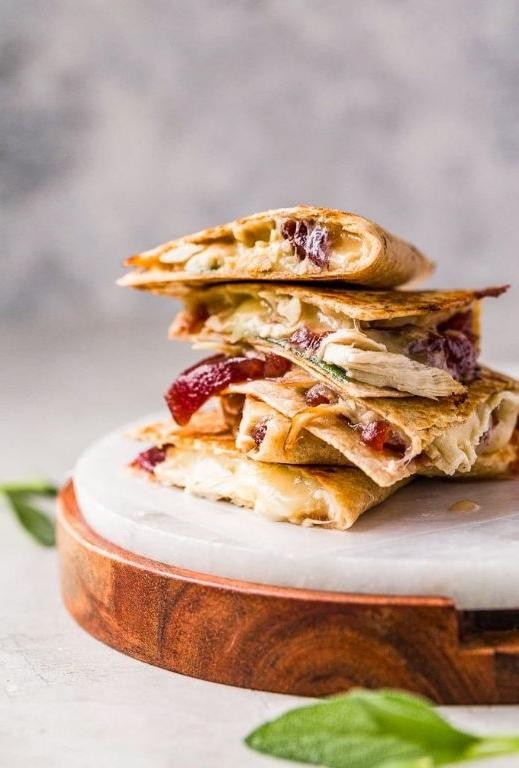
Venture beyond the traditional turkey sandwich with these Thanksgiving Leftover Quesadillas, a clever and delicious way to repurpose your holiday feast into a meal that feels entirely new yet comfortingly familiar.
Ingredients
- 2 cups shredded cooked turkey (use dark meat for more flavor)
- 1 cup cranberry sauce (whole berry preferred for texture)
- 1 cup stuffing (lightly moistened if dry)
- 1 cup shredded cheese (a mix of cheddar and Monterey Jack works well)
- 4 large flour tortillas (burrito-size for easy folding)
- 2 tbsp butter (unsalted, or any neutral oil for frying)
- 1/2 cup gravy (for dipping, warm before serving)
Instructions
- Heat a large skillet over medium heat (350°F) and melt 1/2 tbsp of butter, swirling to coat the pan evenly.
- Place one tortilla in the skillet, then layer 1/2 cup of turkey, 1/4 cup of cranberry sauce, 1/4 cup of stuffing, and 1/4 cup of cheese on one half of the tortilla.
- Fold the tortilla over the filling, pressing gently with a spatula to seal. Cook for 3-4 minutes until the bottom is golden brown and crispy.
- Carefully flip the quesadilla and cook the other side for another 3-4 minutes, adding more butter if necessary to prevent sticking.
- Remove from the skillet and let it rest for a minute before cutting into wedges. Repeat with the remaining tortillas and filling.
- Serve warm with a side of gravy for dipping, ensuring each bite is as moist and flavorful as the last.
How the melty cheese binds the savory turkey and sweet cranberry sauce within a crispy tortilla creates a delightful contrast of textures and flavors. For an extra touch, garnish with fresh herbs or a drizzle of balsamic reduction to elevate this humble dish into something truly special.
Green Bean Casserole Stuffed Mushrooms
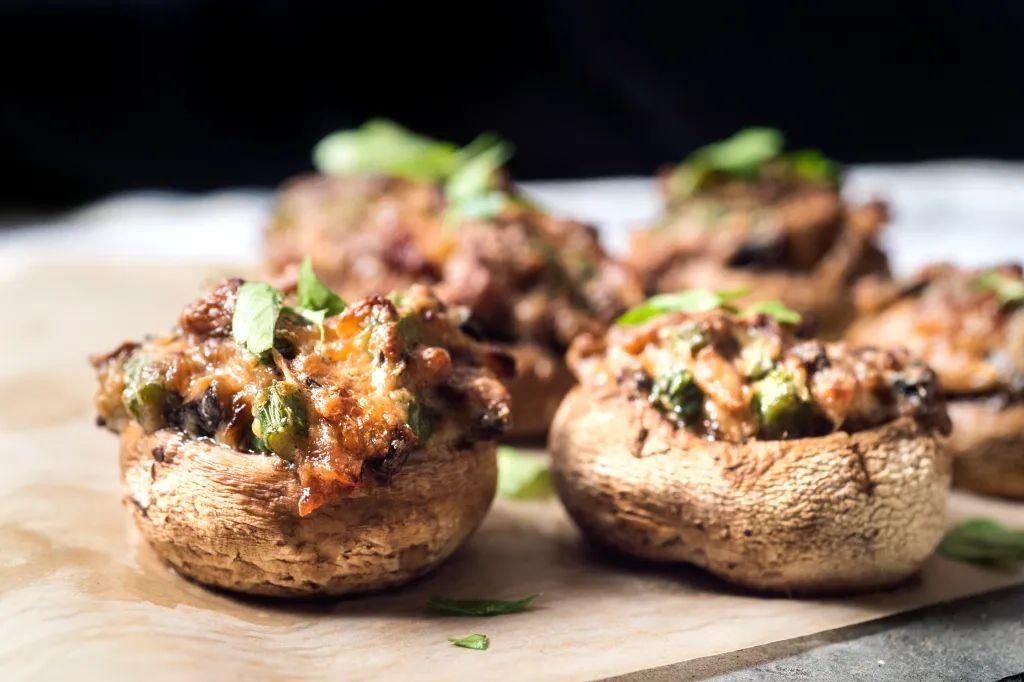
Fusing the comforting familiarity of green bean casserole with the sophisticated appeal of stuffed mushrooms, this recipe offers a delightful twist on two classic dishes. Perfect for entertaining or a cozy night in, these bites are as visually appealing as they are delicious.
Ingredients
- 24 large white mushrooms (stems removed and reserved)
- 2 cups fresh green beans (trimmed and cut into 1/2-inch pieces)
- 1/2 cup heavy cream (for a richer taste, substitute with half-and-half)
- 1/4 cup grated Parmesan cheese (plus extra for sprinkling)
- 1/4 cup fried onions (crushed, plus extra for topping)
- 2 tbsp unsalted butter (or any neutral oil)
- 1 tbsp all-purpose flour (for thickening the sauce)
- 1/2 tsp garlic powder (adjust to taste)
- Salt and pepper (to taste)
Instructions
- Preheat your oven to 375°F (190°C) and lightly grease a baking sheet.
- In a medium skillet over medium heat, melt the butter and sauté the mushroom stems and green beans until tender, about 5 minutes.
- Sprinkle the flour over the vegetables, stirring constantly for 1 minute to cook off the raw flour taste.
- Gradually whisk in the heavy cream, ensuring no lumps form, then stir in the Parmesan cheese, garlic powder, salt, and pepper. Cook until the mixture thickens, about 2 minutes.
- Remove from heat and fold in the crushed fried onions, then carefully spoon the mixture into the mushroom caps.
- Arrange the stuffed mushrooms on the prepared baking sheet, sprinkle with additional Parmesan and fried onions, and bake for 20 minutes, or until the mushrooms are tender and the tops are golden brown.
- Let cool for 5 minutes before serving to allow the filling to set slightly.
At first bite, the creamy, savory filling contrasts beautifully with the earthy mushroom and crispy onion topping. Serve these elegant appetizers on a platter garnished with fresh thyme for an extra touch of sophistication.
Cornbread Madeleines
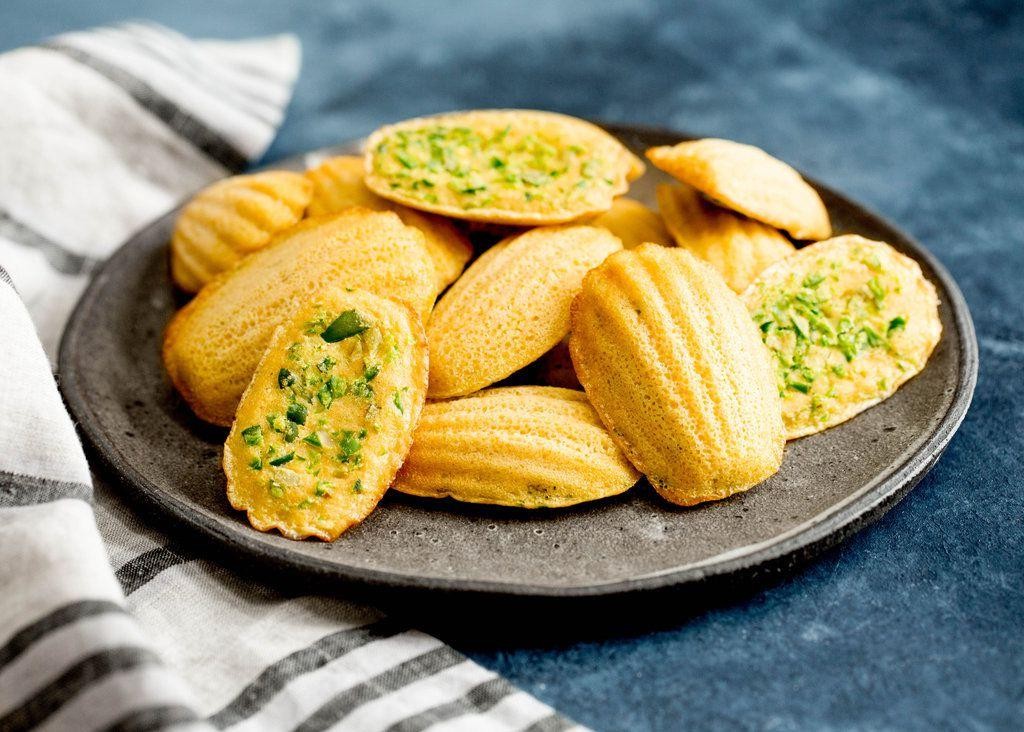
Savory yet subtly sweet, these Cornbread Madeleines blend the rustic charm of Southern cornbread with the delicate sophistication of French patisserie, offering a unique twist on classic flavors that’s perfect for any occasion.
Ingredients
- 1 cup fine cornmeal (for a tender crumb)
- 1 cup all-purpose flour (or gluten-free blend as alternative)
- 1/2 cup granulated sugar (adjust to taste)
- 1 tbsp baking powder (ensure it’s fresh for maximum rise)
- 1/2 tsp salt (enhances flavor)
- 1 cup buttermilk (or milk with 1 tbsp lemon juice as substitute)
- 2 large eggs (room temperature for better incorporation)
- 1/2 cup unsalted butter, melted (cooled slightly)
- 1 tbsp honey (for a hint of sweetness)
Instructions
- Preheat your oven to 375°F (190°C) and generously butter a madeleine pan to ensure easy release.
- In a large bowl, whisk together the cornmeal, flour, sugar, baking powder, and salt until well combined.
- In another bowl, mix the buttermilk, eggs, melted butter, and honey until smooth. Tip: For a lighter texture, let the wet ingredients sit for 5 minutes before mixing.
- Gently fold the wet ingredients into the dry ingredients until just combined; avoid overmixing to keep the madeleines tender.
- Spoon the batter into the prepared madeleine pan, filling each mold about 3/4 full. Tip: Use a piping bag for cleaner, more precise filling.
- Bake for 10-12 minutes, or until the edges are golden and the centers spring back when lightly touched. Tip: Rotate the pan halfway through baking for even color.
- Allow the madeleines to cool in the pan for 2 minutes before transferring to a wire rack to cool completely.
Delightfully crisp on the outside with a moist, fluffy interior, these Cornbread Madeleines are a delightful nod to both American and French baking traditions. Serve them warm with a drizzle of honey or alongside a bowl of chili for an unexpected but utterly satisfying pairing.
Pecan Pie Cheesecake Bars
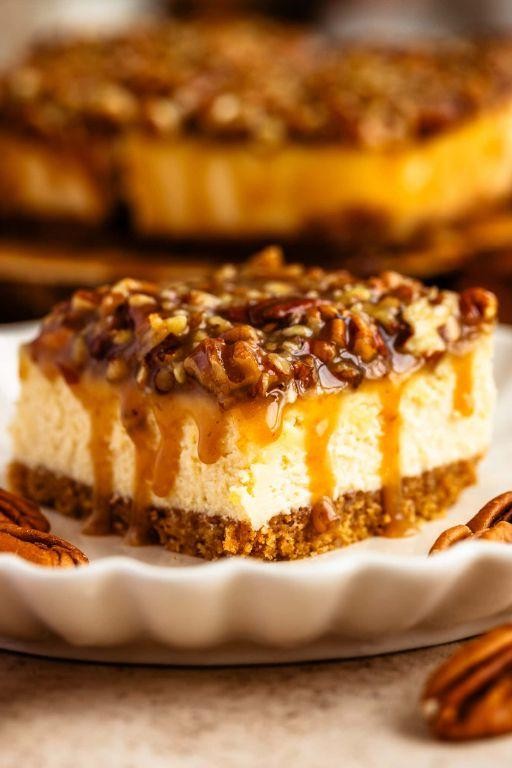
Outstanding in its fusion of classic Southern charm and creamy indulgence, this dessert marries the rich, buttery crunch of pecan pie with the smooth, tangy allure of cheesecake. Perfect for gatherings or a decadent treat at home, these bars promise to delight with every bite.
Ingredients
- 1 1/2 cups graham cracker crumbs (ensure they’re finely ground for a firm base)
- 1/2 cup unsalted butter, melted (cool slightly before mixing)
- 1/4 cup granulated sugar (adjust to taste if preferred)
- 16 oz cream cheese, softened (room temperature ensures a smooth filling)
- 1/2 cup brown sugar, packed (for a deeper flavor)
- 2 large eggs (room temperature blends more evenly)
- 1 tsp vanilla extract (pure extract recommended for best flavor)
- 1 cup chopped pecans (toasted for enhanced nuttiness)
- 1/2 cup corn syrup (light or dark, based on preference)
Instructions
- Preheat your oven to 350°F (175°C) and line an 8×8 inch baking pan with parchment paper, leaving an overhang for easy removal.
- In a medium bowl, combine graham cracker crumbs, melted butter, and granulated sugar until the mixture resembles wet sand. Press firmly into the bottom of the prepared pan to form an even layer. Bake for 10 minutes, then set aside to cool slightly.
- While the crust cools, beat the cream cheese and brown sugar in a large bowl until smooth and creamy. Tip: Scrape down the sides of the bowl to ensure no lumps remain.
- Add eggs one at a time, beating well after each addition, then stir in vanilla extract until just combined. Pour this mixture over the pre-baked crust, spreading evenly.
- Sprinkle chopped pecans over the cream cheese layer, then drizzle with corn syrup, ensuring an even distribution. Tip: Warm the corn syrup slightly for easier drizzling.
- Bake for 25-30 minutes, or until the edges are set but the center still has a slight jiggle. Tip: Avoid overbaking to prevent cracks in the cheesecake layer.
- Allow to cool completely in the pan on a wire rack, then refrigerate for at least 4 hours, or overnight, before slicing into bars.
Just as satisfying to make as they are to eat, these Pecan Pie Cheesecake Bars boast a harmonious blend of textures—from the crisp crust to the creamy filling and crunchy pecans. For an extra touch of elegance, serve each bar with a dollop of whipped cream and a light dusting of cinnamon.
Maple Glazed Carrot Coins
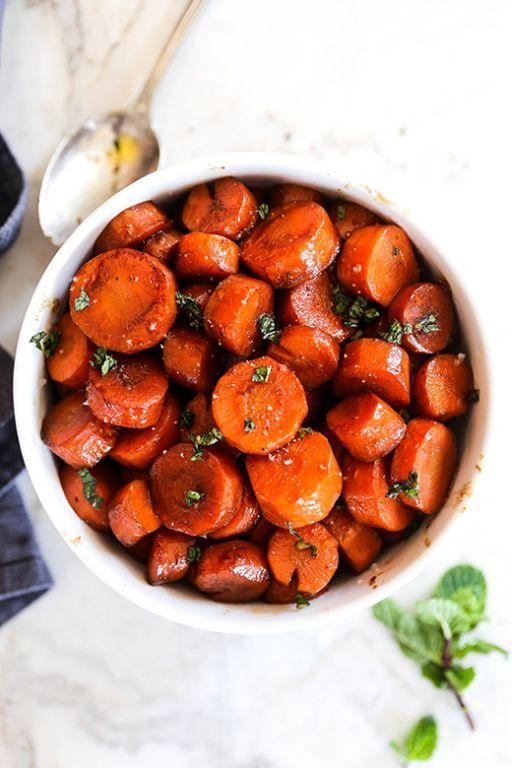
Few side dishes strike the perfect balance between simplicity and sophistication quite like these glazed carrot coins. Their natural sweetness is enhanced by a rich maple glaze, creating a dish that’s as visually appealing as it is delicious.
Ingredients
- 1 lb carrots, peeled and sliced into 1/4-inch coins (uniform thickness ensures even cooking)
- 2 tbsp unsalted butter (for a richer flavor, or substitute with olive oil for a lighter version)
- 2 tbsp pure maple syrup (the darker the syrup, the more robust the flavor)
- 1/2 tsp salt (adjust to taste)
- 1/4 tsp black pepper (freshly ground preferred)
- 1/4 cup water (to help steam the carrots)
Instructions
- In a large skillet over medium heat, melt the butter until it begins to foam slightly, about 1 minute.
- Add the carrot coins to the skillet, stirring to coat them evenly with the butter. Cook for 2 minutes to lightly sauté.
- Pour in the water and immediately cover the skillet to steam the carrots. Reduce heat to medium-low and cook for 5 minutes, or until the carrots are just tender.
- Uncover the skillet and add the maple syrup, salt, and pepper. Increase the heat to medium-high and cook, stirring frequently, until the syrup reduces to a glossy glaze that coats the carrots, about 3-4 minutes.
- Remove from heat and let stand for 1 minute to allow the glaze to thicken slightly before serving.
Caramelized to perfection, these maple glazed carrot coins offer a delightful contrast of tender interiors and glossy, sweet exteriors. Serve them alongside a roasted main for a touch of elegance, or atop a bed of greens for a vibrant salad addition.
Stuffing Waffles with Gravy
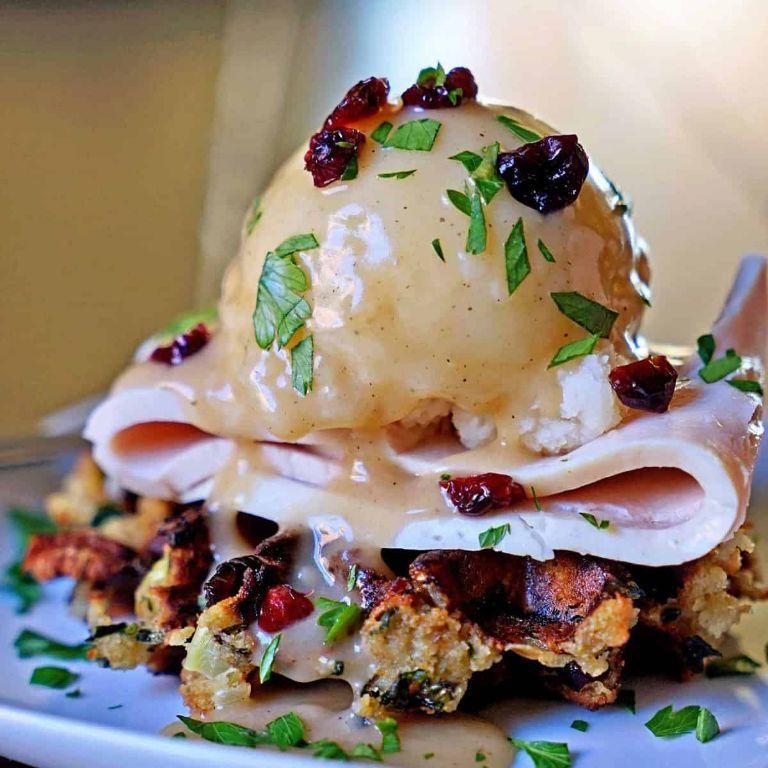
Gracefully bridging the gap between breakfast and dinner, these stuffing waffles with gravy offer a delightful twist on traditional comfort food, transforming leftover stuffing into a crispy, golden waffle topped with rich, savory gravy.
Ingredients
- 2 cups leftover stuffing (ensure it’s moist for best results)
- 1 egg, beaten (acts as a binder)
- 1/4 cup all-purpose flour (for extra crispiness, optional)
- 1/2 cup milk (whole milk recommended for creaminess)
- 2 tbsp unsalted butter (for the waffle iron, or any neutral oil)
- 2 cups chicken or turkey gravy (homemade or store-bought, warmed)
- Salt and pepper to taste (adjust according to your stuffing’s seasoning)
Instructions
- Preheat your waffle iron to medium-high heat (375°F) and lightly grease with butter or oil.
- In a large bowl, mix the leftover stuffing with the beaten egg and flour until well combined. The mixture should hold together when pressed.
- Scoop 1/2 cup of the stuffing mixture onto the center of the waffle iron. Close the lid and cook for 5-7 minutes, or until the waffle is golden brown and crispy.
- Carefully remove the waffle from the iron and repeat with the remaining mixture.
- While the waffles cook, warm the gravy in a small saucepan over low heat, stirring occasionally to prevent a skin from forming.
- Serve the stuffing waffles hot, topped with the warm gravy. For an extra touch, garnish with fresh herbs like thyme or parsley.
Crispy on the outside yet tender within, these stuffing waffles are a perfect canvas for the rich, velvety gravy. Consider serving them with a side of cranberry sauce for a festive twist or a fried egg for added protein.
Turkey-Shaped Cheese Ball
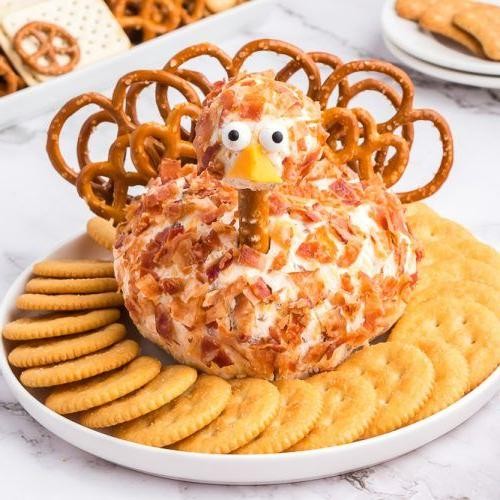
Nothing heralds the festive season quite like a whimsically shaped appetizer that doubles as a conversation starter. Our Turkey-Shaped Cheese Ball, with its rich, creamy base and playful presentation, is a delightful nod to tradition, offering both visual appeal and irresistible flavor.
Ingredients
- 2 cups sharp cheddar cheese, shredded (for a smoother texture, grate your own)
- 8 oz cream cheese, softened (leave out at room temperature for 30 minutes)
- 1/2 cup pecans, finely chopped (toast lightly for enhanced flavor)
- 1/4 cup green onions, thinly sliced (include both white and green parts)
- 1 tsp Worcestershire sauce (adjust to taste)
- 1/2 tsp garlic powder (or fresh minced garlic for a sharper taste)
- 1/2 tsp smoked paprika (for a subtle smoky note)
- Assorted crackers and vegetables, for serving
Instructions
- In a large mixing bowl, combine the shredded cheddar cheese, softened cream cheese, chopped pecans, sliced green onions, Worcestershire sauce, garlic powder, and smoked paprika. Mix until all ingredients are evenly incorporated.
- Transfer the mixture onto a large piece of plastic wrap. Use the wrap to shape the mixture into a ball, then twist the top to seal tightly. Chill in the refrigerator for at least 2 hours, or until firm.
- Once chilled, unwrap the cheese ball and place it on a serving platter. Using a knife, score the top to resemble turkey feathers, and add a small piece of carrot or bell pepper at one end to mimic a turkey’s head.
- Serve immediately with an assortment of crackers and fresh vegetables. For an extra festive touch, surround the cheese ball with rosemary sprigs to resemble turkey feathers.
Beyond its charming appearance, this cheese ball boasts a harmonious blend of creamy, tangy, and nutty flavors, with a texture that’s both smooth and crunchy. Perfect for holiday gatherings, it pairs wonderfully with crisp apples or pear slices for a sweet contrast.
Pumpkin Spice Latte Cupcakes
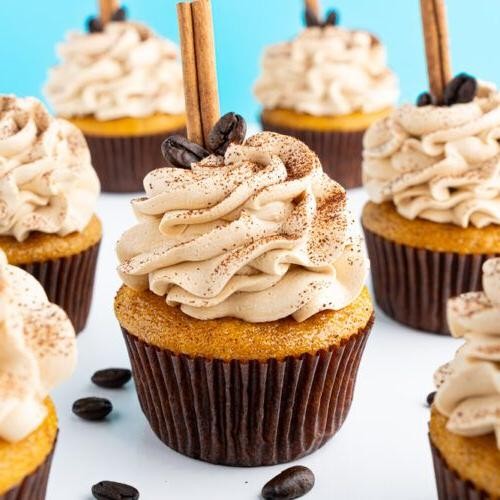
Unveiling the essence of autumn in every bite, these Pumpkin Spice Latte Cupcakes marry the warmth of pumpkin spice with the rich, comforting notes of a classic latte, creating a dessert that’s as indulgent as it is nostalgic.
Ingredients
- 1 1/2 cups all-purpose flour (spooned and leveled)
- 1 tsp baking powder
- 1/2 tsp baking soda
- 1/2 tsp salt
- 1 tsp ground cinnamon
- 1/2 tsp ground ginger
- 1/4 tsp ground nutmeg
- 1/4 tsp ground cloves
- 1/2 cup unsalted butter, softened (or any neutral oil)
- 1 cup granulated sugar
- 2 large eggs, room temperature
- 1 tsp vanilla extract
- 3/4 cup canned pumpkin puree (not pumpkin pie filling)
- 1/2 cup strong brewed coffee, cooled
- 1/4 cup milk
Instructions
- Preheat your oven to 350°F (175°C) and line a 12-cup muffin tin with cupcake liners.
- In a medium bowl, whisk together the flour, baking powder, baking soda, salt, cinnamon, ginger, nutmeg, and cloves until well combined.
- In a large bowl, beat the butter and sugar together on medium speed until light and fluffy, about 2 minutes. Tip: Ensure your butter is at room temperature for a smoother batter.
- Add the eggs one at a time to the butter mixture, beating well after each addition. Stir in the vanilla extract.
- Alternately add the dry ingredients and the pumpkin puree to the butter mixture, beginning and ending with the dry ingredients. Mix until just combined. Tip: Overmixing can lead to dense cupcakes.
- Gradually mix in the cooled coffee and milk until the batter is smooth.
- Divide the batter evenly among the prepared muffin cups, filling each about 2/3 full.
- Bake for 18-20 minutes, or until a toothpick inserted into the center of a cupcake comes out clean. Tip: Rotate the pan halfway through baking for even browning.
- Allow the cupcakes to cool in the pan for 5 minutes before transferring to a wire rack to cool completely.
These cupcakes boast a moist, tender crumb infused with the quintessential flavors of fall, perfectly balanced with the boldness of coffee. For an extra touch of elegance, serve them with a dollop of whipped cream and a sprinkle of cinnamon on top.
Cranberry Brie Bites
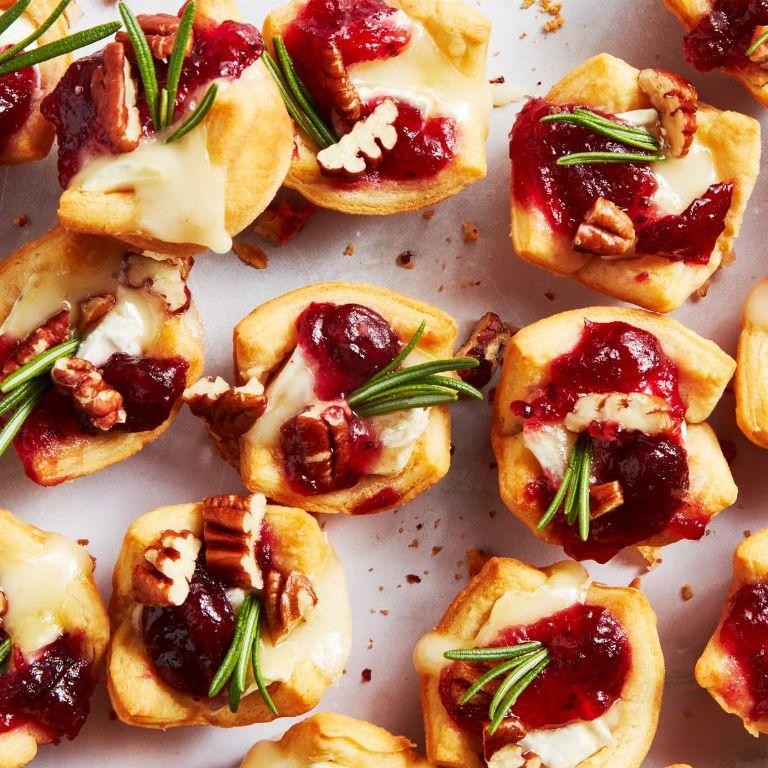
Unveiling a delightful appetizer that marries the creamy richness of brie with the tart sweetness of cranberries, these Cranberry Brie Bites are a festive addition to any gathering. Perfectly portioned for easy serving, they promise a burst of flavor in every bite.
Ingredients
- 1 sheet puff pastry, thawed (keep chilled until ready to use for easier handling)
- 8 oz brie cheese, rind removed and cut into 1/2-inch cubes (chill brie for cleaner cuts)
- 1/2 cup cranberry sauce (homemade or store-bought, whole berry preferred for texture)
- 1 tbsp honey (for drizzling, adjust to sweetness preference)
- 1 egg, beaten (for egg wash, ensures golden pastry)
- Fresh thyme leaves, for garnish (optional, adds a fresh herbal note)
Instructions
- Preheat your oven to 400°F (200°C) and line a baking sheet with parchment paper.
- Roll out the puff pastry on a lightly floured surface to a 12-inch square, then cut into 24 equal squares.
- Press each square into the cups of a mini muffin tin, ensuring the corners point upwards for a decorative edge.
- Place a cube of brie into each pastry cup, followed by a teaspoon of cranberry sauce.
- Brush the edges of the pastry with the beaten egg to promote a golden finish.
- Bake for 15-18 minutes, or until the pastry is puffed and golden brown.
- Remove from the oven and let cool in the tin for 5 minutes before transferring to a serving platter.
- Drizzle with honey and sprinkle with fresh thyme leaves before serving.
Kaleidoscopic in flavor, these bites offer a crispy, buttery crust that gives way to the molten brie and vibrant cranberry center. Serve them warm to appreciate the full spectrum of textures, perhaps alongside a glass of sparkling wine for an elevated appetizer experience.
Sweet Corn Spoon Bread
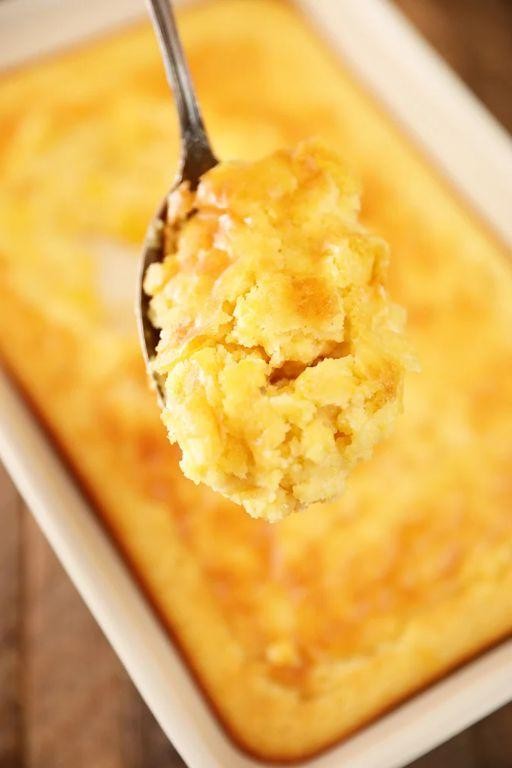
Whispering of summer’s bounty, this Sweet Corn Spoon Bread marries the rustic charm of cornbread with the creamy indulgence of a pudding, creating a dish that’s as versatile as it is comforting. Perfect for brunch or as a side, its golden edges and tender center invite you to dig in with a spoon.
Ingredients
- 1 cup fresh corn kernels (or frozen, thawed)
- 1 cup yellow cornmeal (for a finer texture, use stone-ground)
- 1/2 cup all-purpose flour
- 1 tsp baking powder (ensure it’s fresh for maximum rise)
- 1/2 tsp salt (adjust to taste)
- 1 cup whole milk (for richness, substitute with half-and-half)
- 1/4 cup unsalted butter, melted (plus extra for greasing)
- 2 large eggs (room temperature for better incorporation)
- 2 tbsp honey (or maple syrup for a deeper flavor)
Instructions
- Preheat your oven to 375°F (190°C) and generously butter a 9-inch baking dish to prevent sticking.
- In a large bowl, whisk together the cornmeal, flour, baking powder, and salt until well combined.
- In another bowl, mix the milk, melted butter, eggs, and honey until smooth, then gently fold into the dry ingredients until just combined; avoid overmixing to keep the spoon bread light.
- Fold in the corn kernels, distributing them evenly throughout the batter for bursts of sweetness in every bite.
- Pour the batter into the prepared dish and bake for 25-30 minutes, or until the edges are golden and a toothpick inserted in the center comes out clean.
- Let the spoon bread rest for 5 minutes before serving to allow it to set slightly, making it easier to scoop.
Offering a delightful contrast of textures, this spoon bread is wonderfully moist with a slight crumb, punctuated by the juicy pop of corn kernels. Serve it warm with a drizzle of honey or alongside a spicy chili for a comforting meal that celebrates the simplicity of ingredients.
Herb Roasted Turkey Breast
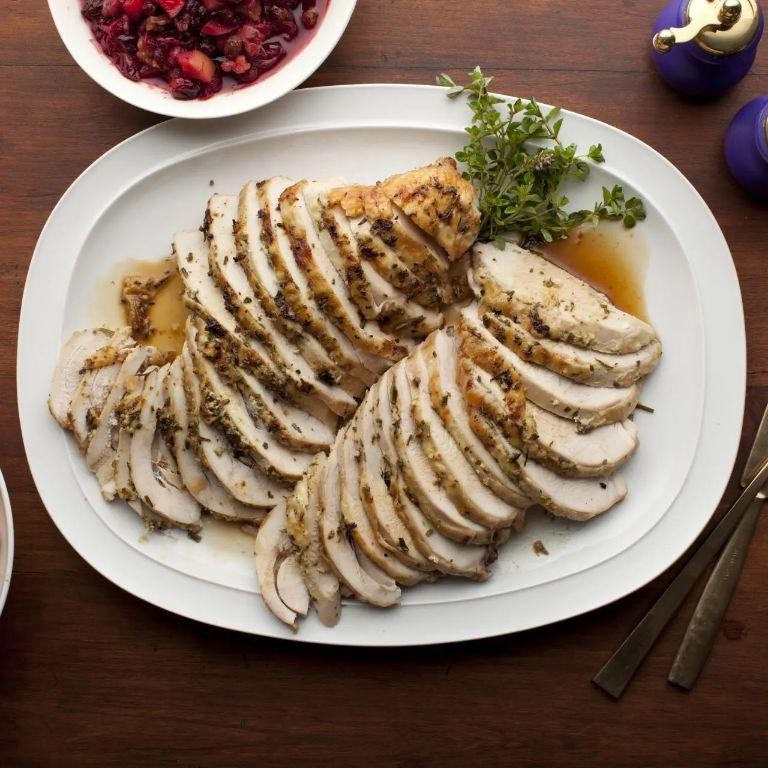
Mastering the art of a succulent Herb Roasted Turkey Breast begins with selecting the finest ingredients and embracing the slow, aromatic journey of roasting. This dish, with its golden-brown crust and juicy interior, is a testament to the beauty of simplicity and the power of herbs.
Ingredients
- 1 (3 to 4-pound) boneless turkey breast (ensure it’s at room temperature for even cooking)
- 2 tbsp olive oil (or any neutral oil for a lighter taste)
- 1 tbsp chopped fresh rosemary (dried can be used in a pinch, but fresh is preferred)
- 1 tbsp chopped fresh thyme (similarly, dried in moderation if fresh isn’t available)
- 1 tsp garlic powder (for a subtle depth of flavor)
- 1 tsp salt (adjust to taste, but don’t skimp for the perfect crust)
- 1/2 tsp black pepper (freshly ground for the best aroma)
Instructions
- Preheat your oven to 375°F (190°C) to ensure a perfectly roasted turkey breast.
- Pat the turkey breast dry with paper towels; this step is crucial for achieving that desirable golden crust.
- In a small bowl, mix together the olive oil, rosemary, thyme, garlic powder, salt, and pepper to create a fragrant herb rub.
- Generously coat the turkey breast with the herb rub, making sure to cover all sides for maximum flavor.
- Place the turkey breast on a rack in a roasting pan, allowing heat to circulate evenly around the meat.
- Roast in the preheated oven for about 60 to 75 minutes, or until the internal temperature reaches 165°F (74°C) when checked with a meat thermometer.
- Let the turkey breast rest for 10 minutes before slicing; this ensures the juices redistribute, keeping the meat moist.
Now, the Herb Roasted Turkey Breast emerges from the oven, its skin crackling with herbs, the meat beneath tender and infused with aromatic flavors. Serve it sliced atop a bed of wild rice or alongside roasted autumn vegetables for a meal that celebrates the season’s bounty.
Apple Cider Donut Holes
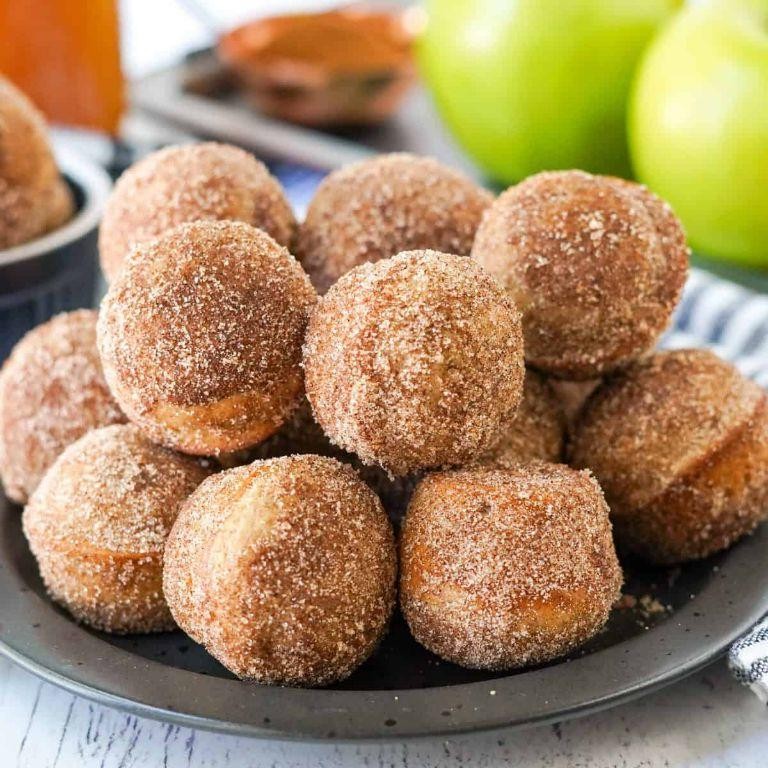
Amidst the crisp embrace of autumn, these Apple Cider Donut Holes emerge as a delightful confection, marrying the rich, spiced warmth of apple cider with the tender, sugary bliss of freshly fried dough.
Ingredients
- 2 cups apple cider, reduced to 1/2 cup (for concentrated flavor)
- 2 cups all-purpose flour (spooned and leveled for accuracy)
- 1/2 cup granulated sugar (plus extra for coating)
- 1 tsp baking powder (ensure it’s fresh for maximum rise)
- 1/2 tsp baking soda
- 1 tsp ground cinnamon (or more for a spicier kick)
- 1/4 tsp ground nutmeg
- 1/2 tsp salt
- 1 large egg, room temperature (for smoother blending)
- 1/4 cup buttermilk (substitute with milk + 1 tsp vinegar if needed)
- 2 tbsp unsalted butter, melted (cooled slightly)
- Vegetable oil, for frying (about 2 cups, or enough for 2 inches depth)
Instructions
- In a small saucepan, simmer the apple cider over medium heat until reduced to 1/2 cup, about 20 minutes. Let it cool completely.
- In a large bowl, whisk together flour, sugar, baking powder, baking soda, cinnamon, nutmeg, and salt.
- In another bowl, mix the cooled reduced cider, egg, buttermilk, and melted butter until well combined.
- Gradually add the wet ingredients to the dry ingredients, stirring until just combined. Avoid overmixing to keep the donut holes tender.
- Heat oil in a deep fryer or heavy-bottomed pot to 350°F. Use a candy thermometer for accuracy.
- Using a small cookie scoop or two spoons, drop tablespoon-sized portions of dough into the hot oil. Fry in batches to avoid overcrowding.
- Fry for about 2 minutes per side, or until golden brown and cooked through. Adjust heat as needed to maintain temperature.
- Remove with a slotted spoon and drain on paper towels. While still warm, roll in granulated sugar for a sweet, crisp coating.
Offering a perfect balance of spice and sweetness, these donut holes boast a moist interior with a slightly crisp exterior. Serve them warm alongside a mug of spiced cider for an autumnal treat that delights the senses.
Roasted Garlic Mashed Potato Puffs
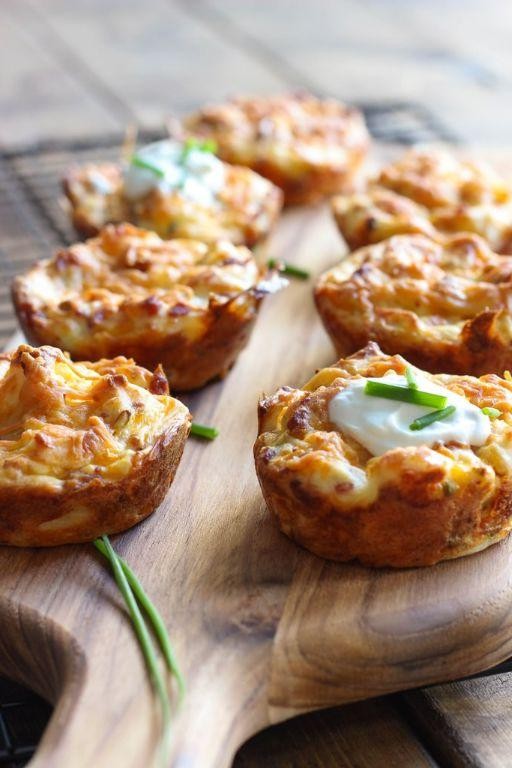
Combining the comforting familiarity of mashed potatoes with the sophisticated flair of roasted garlic, these puffs are a delightful twist on a classic side dish. Perfect for elevating your dinner table or impressing guests at your next gathering, they strike a harmonious balance between creamy and crisp.
Ingredients
- 2 lbs Yukon Gold potatoes, peeled and quartered (for their buttery texture)
- 1 head garlic, top sliced off to expose cloves (for roasting)
- 1/2 cup heavy cream (warmed, for smoother blending)
- 4 tbsp unsalted butter, melted (plus extra for greasing)
- 1 tsp salt (adjust to taste)
- 1/2 tsp black pepper (freshly ground preferred)
- 1/4 cup grated Parmesan cheese (for a savory crust)
- 1 tbsp olive oil (or any neutral oil, for drizzling)
Instructions
- Preheat your oven to 400°F (200°C) and lightly grease a muffin tin with butter.
- Drizzle the head of garlic with olive oil, wrap in foil, and roast for 30 minutes until soft and golden. Let cool, then squeeze out the cloves.
- While the garlic roasts, boil the potatoes in salted water until fork-tender, about 15 minutes. Drain well.
- Mash the potatoes with roasted garlic, warm heavy cream, melted butter, salt, and pepper until smooth and creamy.
- Spoon the mixture into the prepared muffin tin, sprinkle with Parmesan cheese, and bake for 20-25 minutes until the tops are golden and puffed.
- Let cool for 5 minutes before gently removing from the tin with a butter knife to serve.
Enjoy these Roasted Garlic Mashed Potato Puffs as a standout side that pairs wonderfully with roasted meats or as a luxurious base for a poached egg. Their golden exterior gives way to a fluffy, garlic-infused interior, making each bite a testament to the magic of simple ingredients transformed.
Brussels Sprouts Gratin
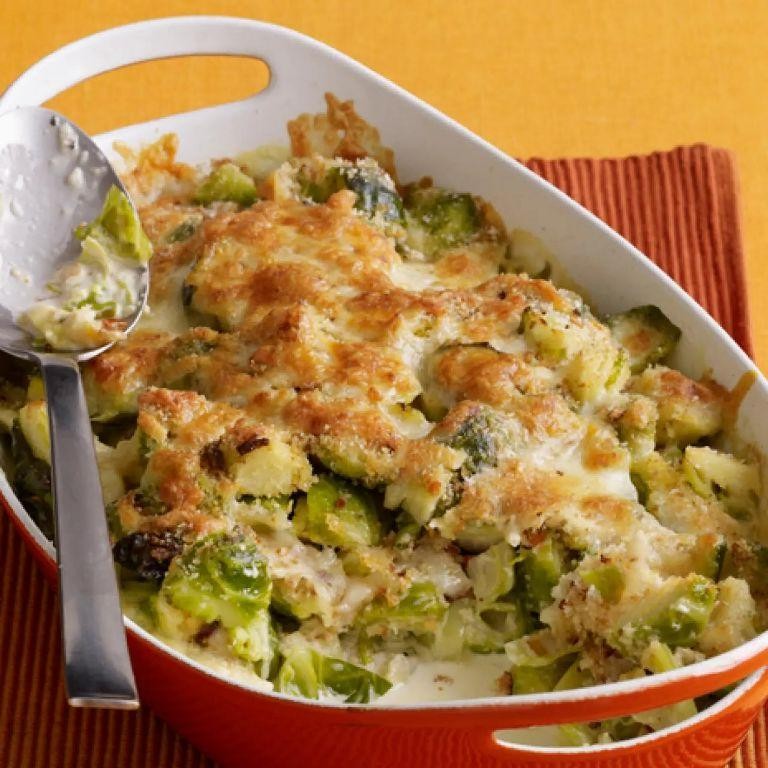
Amidst the crisp air of the season, a dish that marries the earthy depth of Brussels sprouts with the indulgent creaminess of a gratin emerges as a testament to comfort and sophistication. This Brussels Sprouts Gratin transforms the humble vegetable into a decadent side that’s as suitable for a weeknight dinner as it is for a festive gathering.
Ingredients
- 1 1/2 pounds Brussels sprouts, trimmed and halved (select uniform sizes for even cooking)
- 1 cup heavy cream (for a lighter version, half-and-half can be substituted)
- 1/2 cup grated Gruyère cheese (Parmesan can be used for a sharper taste)
- 1/4 cup breadcrumbs (panko for extra crunch)
- 2 tablespoons unsalted butter (cut into small pieces for easy melting)
- 1 teaspoon kosher salt (adjust based on the saltiness of your cheese)
- 1/4 teaspoon freshly ground black pepper (freshly cracked for best flavor)
- 1/8 teaspoon grated nutmeg (a pinch more for a pronounced aroma)
Instructions
- Preheat your oven to 375°F (190°C) to ensure it’s ready for baking the gratin to perfection.
- Bring a large pot of salted water to a boil. Add the Brussels sprouts and blanch for 3 minutes, then drain and immediately plunge into ice water to halt cooking. This step preserves their vibrant color and tender-crisp texture.
- In a medium saucepan over medium heat, warm the heavy cream with nutmeg, salt, and pepper until it just begins to simmer, about 3 minutes. Stir occasionally to prevent scorching.
- Arrange the blanched Brussels sprouts cut-side down in a single layer in a greased baking dish. Pour the warm cream mixture evenly over the sprouts.
- Sprinkle the grated Gruyère cheese and breadcrumbs over the top, then dot with pieces of butter for a golden, crispy crust.
- Bake in the preheated oven for 25-30 minutes, or until the top is bubbly and golden brown. Let it rest for 5 minutes before serving to allow the gratin to set.
Just out of the oven, this gratin boasts a luxurious contrast between the creamy interior and the crisp, cheesy topping. Serve it alongside a roasted main for a meal that feels both rustic and refined, or as a standout dish that celebrates the versatility of Brussels sprouts.
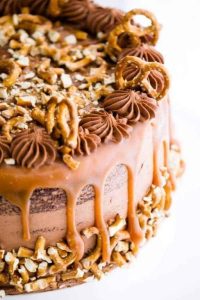
Pecan Pie Brownies
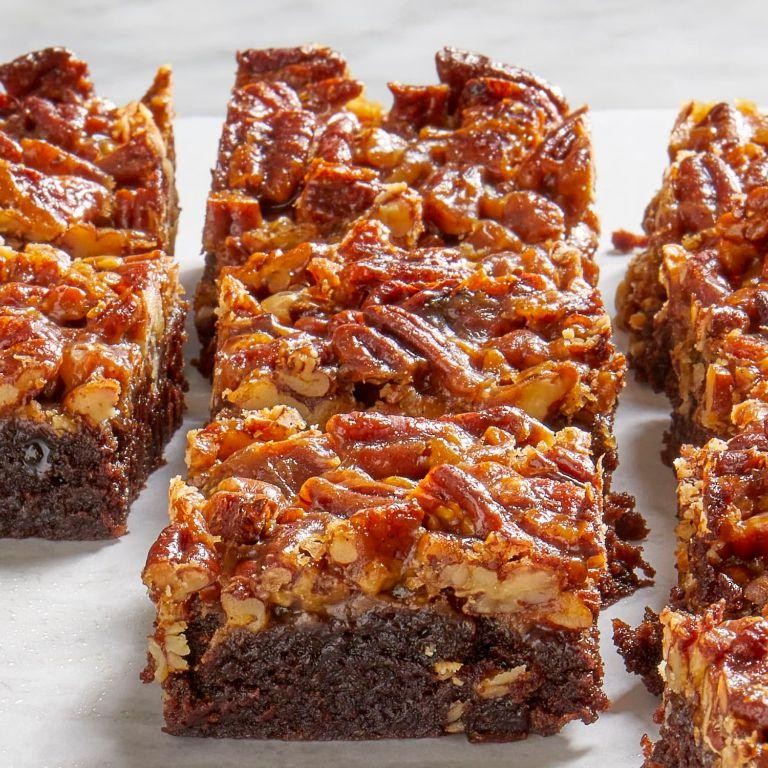
Few desserts marry the rich, buttery depth of pecan pie with the dense, chocolatey allure of brownies as harmoniously as this decadent creation. Perfect for those who cherish the intersection of texture and taste, these Pecan Pie Brownies promise a luxurious bite every time.
Ingredients
- 1 cup unsalted butter, melted (cool slightly to avoid cooking the eggs)
- 2 cups granulated sugar (for a deeper flavor, consider using half brown sugar)
- 4 large eggs, room temperature (ensures smoother batter)
- 1 tsp vanilla extract (pure extract recommended for best flavor)
- 1 cup all-purpose flour (spoon and level to avoid dense brownies)
- 3/4 cup cocoa powder (Dutch-processed for a richer color and taste)
- 1/2 tsp salt (enhances the chocolate flavor)
- 1 cup chopped pecans (toast lightly for extra crunch and aroma)
- 1/2 cup corn syrup (light or dark, depending on desired sweetness level)
- 1/4 cup brown sugar (packed, for the pecan pie topping)
Instructions
- Preheat your oven to 350°F (175°C) and line a 9×13 inch baking pan with parchment paper, leaving an overhang for easy removal.
- In a large bowl, whisk together the melted butter and granulated sugar until well combined. Tip: The mixture should look shiny and smooth.
- Add the eggs one at a time, whisking well after each addition, then stir in the vanilla extract. Tip: Room temperature eggs incorporate more easily, creating a uniform batter.
- Sift in the flour, cocoa powder, and salt, folding gently until just combined. Avoid overmixing to keep the brownies tender.
- Spread the batter evenly into the prepared pan. Tip: Use a spatula lightly greased with butter to smooth the top without sticking.
- In a small bowl, mix the chopped pecans, corn syrup, and brown sugar. Drop spoonfuls of the pecan mixture over the brownie batter, then swirl lightly with a knife.
- Bake for 25-30 minutes, or until the edges are set but the center is still slightly soft. Tip: A toothpick inserted near the edge should come out with moist crumbs.
- Allow the brownies to cool completely in the pan before lifting out and cutting into squares.
Pecan Pie Brownies offer a delightful contrast between the fudgy brownie base and the sticky, nutty topping. Serve them slightly warmed with a scoop of vanilla ice cream for an indulgent dessert experience.
Conclusion
Perfect for bringing new flavors to your holiday table, our roundup of 19 Fun Thanksgiving Recipes offers something delicious for everyone. We hope these dishes inspire your feast and create memorable moments. Don’t forget to try your favorites, share your thoughts in the comments, and pin this article on Pinterest to spread the joy of cooking. Happy Thanksgiving!