There’s nothing quite like gathering your favorite people around the table for a Friendsgiving feast that’s all about warmth, laughter, and, of course, mouthwatering dishes. Whether you’re in charge of the main event or bringing a standout side, our roundup of 25 delicious recipes is packed with seasonal favorites and comfort food classics to make your celebration unforgettable. Let’s dive into the flavors that will have everyone asking for seconds!
Herb-Roasted Turkey with Garlic Butter
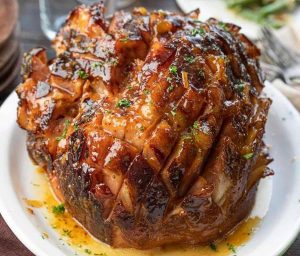
Deliciously aromatic and perfectly golden, this herb-roasted turkey with garlic butter is a showstopper that never fails to impress at my dinner table. I remember the first time I made it; the scent of herbs and butter filled the kitchen, and my family knew they were in for a treat.
Ingredients
- 1 whole turkey (12-14 lbs) – I always opt for a fresh one if possible, for the best flavor.
- 1 cup unsalted butter, softened – Room temp is key for easy mixing.
- 4 cloves garlic, minced – Freshly minced garlic makes all the difference.
- 2 tbsp fresh rosemary, chopped – I love the earthy aroma it adds.
- 2 tbsp fresh thyme, chopped – Thyme brings a subtle, lovely depth.
- 1 tbsp salt – Kosher salt is my go-to for even seasoning.
- 1 tsp black pepper – Freshly ground, for that extra kick.
Instructions
- Preheat your oven to 325°F (163°C) – A lower temperature ensures even cooking without drying out the turkey.
- In a bowl, mix the softened butter, minced garlic, rosemary, thyme, salt, and pepper until well combined – This garlic butter will be your turkey’s best friend.
- Pat the turkey dry with paper towels – A dry surface helps the skin get crispy.
- Gently loosen the skin over the turkey breast and thighs with your fingers – Be careful not to tear it.
- Spread half of the garlic butter mixture under the skin, directly on the meat – This infuses the turkey with flavor from the inside out.
- Rub the remaining butter mixture all over the outside of the turkey – Don’t forget the legs and wings!
- Place the turkey on a rack in a roasting pan, breast side up – The rack allows heat to circulate evenly.
- Roast in the preheated oven for about 3 to 3.5 hours, or until a meat thermometer inserted into the thickest part of the thigh reads 165°F (74°C) – Trust the thermometer for perfect doneness.
- Let the turkey rest for 20 minutes before carving – This keeps the juices from running out.
Last but not least, the moment you slice into this turkey, you’ll be greeted with juicy, flavorful meat and a crispy, golden skin that’s simply irresistible. Serve it with a side of roasted vegetables or over a bed of wild rice for a meal that’s as beautiful as it is delicious.
Creamy Mashed Potatoes with Roasted Garlic
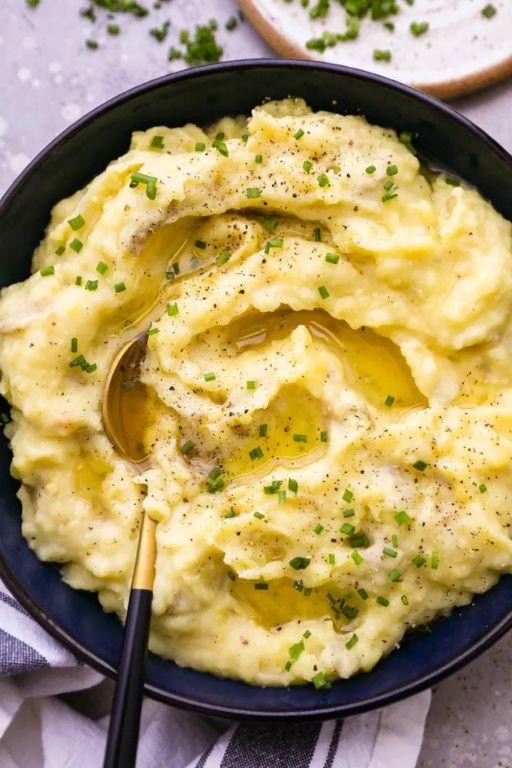
Delightfully creamy and bursting with flavor, this mashed potatoes recipe is a game-changer for any meal. I remember the first time I added roasted garlic to my mash; it was a chilly evening, and the aroma filled my kitchen, promising comfort in every bite.
Ingredients
- 2 lbs Yukon Gold potatoes (their buttery texture is unbeatable for mashing)
- 1 whole garlic head (roasting it transforms the flavor completely)
- 1/2 cup heavy cream (I like to warm it up before adding for extra creaminess)
- 4 tbsp unsalted butter (room temperature blends in smoother)
- 1 tsp salt (adjust based on your preference, but don’t skimp)
- 1/2 tsp black pepper (freshly ground makes all the difference)
Instructions
- Preheat your oven to 400°F. Cut the top off the garlic head to expose the cloves, drizzle with a bit of olive oil, wrap in foil, and roast for 40 minutes until soft and golden.
- While the garlic roasts, peel and quarter the potatoes. Place them in a large pot, cover with cold water, and add a pinch of salt. Bring to a boil over high heat, then reduce to a simmer for 15-20 minutes until fork-tender.
- Drain the potatoes well and return them to the pot. Squeeze the roasted garlic cloves into the pot, add the butter, and mash until smooth.
- Warm the heavy cream in a small saucepan over low heat until just steaming. Gradually mix into the potatoes until you reach your desired consistency.
- Season with salt and pepper, mixing well to combine. Taste and adjust seasoning if necessary.
What you’ll love about this dish is its velvety texture and the deep, caramelized notes from the roasted garlic. Serve it alongside a juicy steak or fold in some grated Parmesan for an extra indulgent twist.
Sweet Potato Casserole with Pecan Streusel
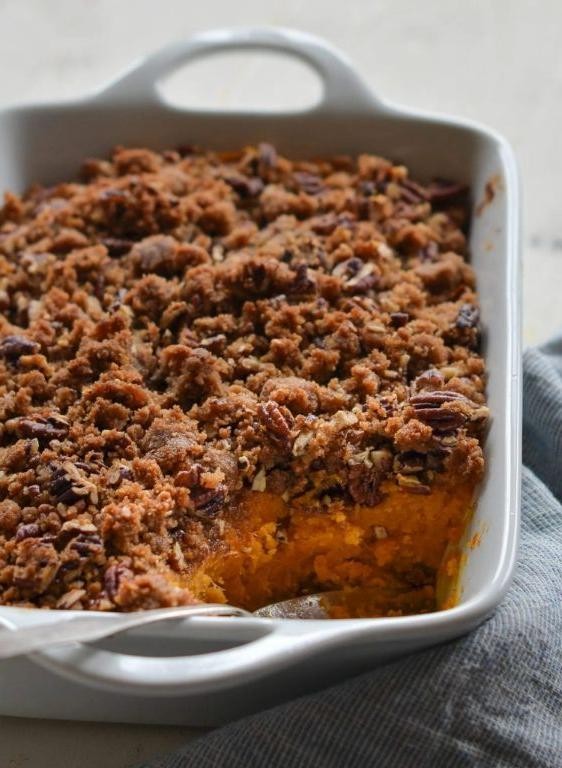
Remember those chilly autumn evenings when all you crave is something sweet, comforting, and a little bit indulgent? That’s exactly how I felt when I first whipped up this Sweet Potato Casserole with Pecan Streusel. It’s become a staple at my Thanksgiving table, but honestly, it’s too good to save just for holidays.
Ingredients
- 3 cups mashed sweet potatoes (I swear by roasting them for deeper flavor)
- 1/2 cup granulated sugar (sometimes I swap in brown sugar for a caramel note)
- 2 large eggs, room temperature (they blend smoother when not cold)
- 1/2 cup milk (whole milk makes it luxuriously creamy)
- 1/4 cup melted butter (salted, because life’s too short for unsalted)
- 1 tsp vanilla extract (the real deal, no imitation)
- 1 cup chopped pecans (toasted, because it brings out their nuttiness)
- 1/2 cup all-purpose flour (I’ve tried gluten-free blends with success)
- 1/2 cup packed brown sugar (dark brown for molasses richness)
- 1/4 cup cold butter, cubed (keeps the streusel crumbly)
Instructions
- Preheat your oven to 350°F (175°C) and grease a 9×13 inch baking dish.
- In a large bowl, mix the mashed sweet potatoes, granulated sugar, eggs, milk, melted butter, and vanilla extract until smooth. Tip: A hand mixer on low avoids lumps.
- Pour the sweet potato mixture into the prepared baking dish, spreading it evenly.
- In a separate bowl, combine the chopped pecans, flour, brown sugar, and cold butter cubes. Use your fingers to mix until crumbly. Tip: Don’t overmix; pea-sized crumbs are perfect.
- Sprinkle the pecan streusel evenly over the sweet potato mixture.
- Bake for 35-40 minutes, or until the edges are bubbly and the streusel is golden brown. Tip: A toothpick inserted in the center should come out clean.
Kind of magical how the creamy sweet potato and crunchy pecan streusel play off each other, right? Serve it warm with a dollop of whipped cream or a scoop of vanilla ice cream for an extra decadent touch.
Green Bean Casserole with Crispy Onions
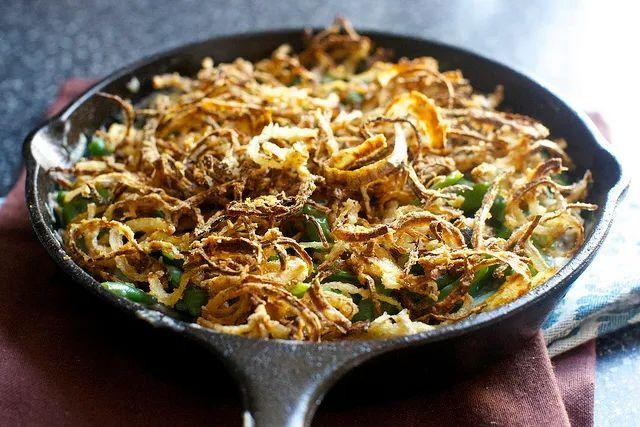
Oh, the comfort of a classic green bean casserole! It’s a dish that takes me back to family gatherings, where the table was always full and the conversations even fuller. Today, I’m sharing my go-to version, topped with those irresistible crispy onions that add just the right amount of crunch.
Ingredients
- 1 lb fresh green beans, trimmed and halved (I find the crunch of fresh beans unbeatable)
- 1 can (10.5 oz) condensed cream of mushroom soup (the secret to that creamy, dreamy base)
- 1/2 cup milk (whole milk gives it richness, but any will do)
- 1 tsp soy sauce (a splash adds depth)
- 1/4 tsp black pepper (freshly ground, if you can)
- 1 1/3 cups crispy fried onions (because more is always better)
Instructions
- Preheat your oven to 350°F (175°C). A properly heated oven ensures even cooking.
- In a large bowl, mix the condensed cream of mushroom soup, milk, soy sauce, and black pepper until smooth. This is your sauce base, so make sure it’s well combined.
- Add the green beans to the sauce mixture, tossing gently to coat every bean. Tip: If you’re short on time, blanching the beans for 2 minutes beforehand keeps them bright and crisp.
- Transfer the mixture to a 1.5-quart baking dish, spreading it out evenly. The right size dish prevents overflow and ensures even baking.
- Sprinkle the crispy onions evenly over the top. They’ll form that golden crust we all love.
- Bake for 25-30 minutes, or until the casserole is bubbly and the onions are golden brown. Tip: For extra crispiness, broil for the last 2 minutes, but watch closely to avoid burning.
Best served straight from the oven, this casserole is a symphony of textures—creamy, crunchy, and utterly comforting. Try pairing it with a crisp white wine to cut through the richness, or serve it as the star of your next potluck. Either way, it’s sure to disappear fast!
Cranberry Orange Sauce with a Hint of Cinnamon
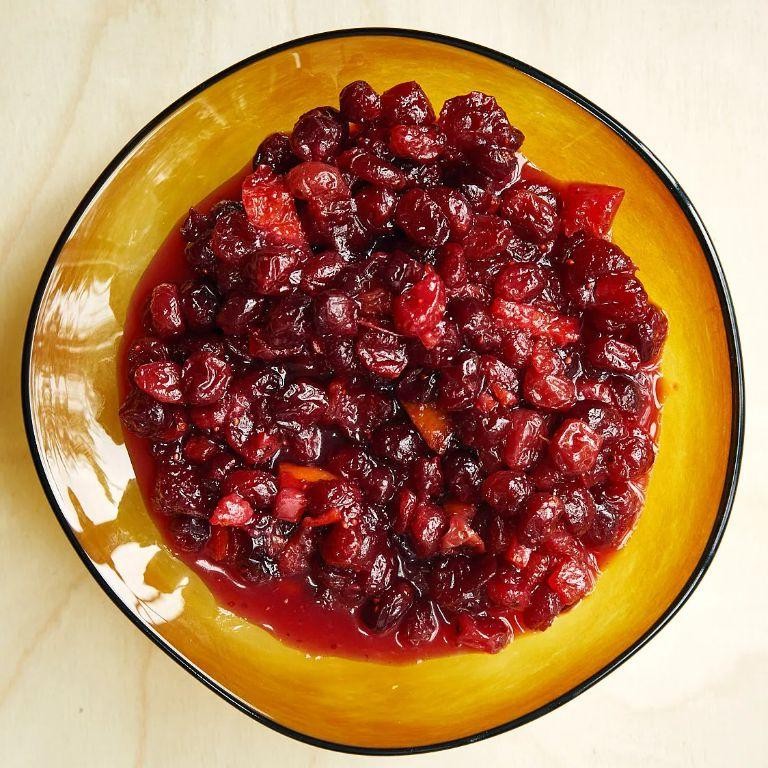
Remember those chilly autumn evenings when all you crave is something sweet yet tangy to brighten up your dinner table? That’s exactly how I stumbled upon this Cranberry Orange Sauce with a Hint of Cinnamon recipe. It’s become a staple in my kitchen, especially during the holiday season, and I’m thrilled to share it with you.
Ingredients
- 12 oz fresh cranberries (I love the pop they make when they start to cook)
- 1 cup granulated sugar (adjust if you like it less sweet)
- 1 cup orange juice (freshly squeezed makes all the difference)
- Zest of 1 orange (for that extra zing)
- 1/2 tsp cinnamon (a hint goes a long way)
- 1/2 cup water (to get the right consistency)
Instructions
- In a medium saucepan, combine the cranberries, sugar, orange juice, orange zest, cinnamon, and water over medium heat.
- Stir the mixture occasionally, watching for the cranberries to pop open, which takes about 10 minutes. Tip: Listen for the popping sound—it’s your cue to check on them.
- Once all the cranberries have popped, reduce the heat to low and let the sauce simmer for another 5 minutes to thicken slightly. Tip: If you prefer a smoother sauce, you can mash the cranberries with a spoon at this stage.
- Remove the saucepan from the heat and let the sauce cool to room temperature. It will continue to thicken as it cools. Tip: For a glossy finish, give it a quick stir as it cools.
You’ll love the vibrant color and the perfect balance of sweet and tart flavors in this sauce. It pairs wonderfully with turkey, but don’t stop there—try it on pancakes or swirl it into yogurt for a breakfast twist.
Classic Stuffing with Sage and Sausage

Diving into the heart of comfort food, I can’t help but reminisce about the first time I made Classic Stuffing with Sage and Sausage. It was a chilly November evening, and the aroma of sage and sausage filling the kitchen was nothing short of magical. Since then, this dish has become a staple at my holiday table, loved for its hearty flavors and the warmth it brings to any gathering.
Ingredients
- 1 lb Italian sausage (I love using a mix of sweet and spicy for depth of flavor)
- 1/2 cup unsalted butter (because everything’s better with butter, right?)
- 2 large onions, diced (the sharper, the better in my book)
- 4 celery stalks, diced (for that perfect crunch)
- 3 tbsp fresh sage, chopped (fresh is key here, it makes all the difference)
- 8 cups stale bread cubes (I usually go for a rustic sourdough)
- 2 cups chicken broth (homemade if you have it, but store-bought works in a pinch)
- 2 large eggs (room temp eggs blend more smoothly)
- 1 tsp salt (to enhance all those beautiful flavors)
- 1/2 tsp black pepper (freshly ground, please)
Instructions
- Preheat your oven to 350°F (175°C) and grease a 9×13 inch baking dish. Trust me, a well-greased dish means easy serving later.
- In a large skillet over medium heat, cook the sausage until it’s nicely browned, about 8 minutes. Breaking it into small pieces as it cooks ensures every bite is flavorful.
- Remove the sausage and set aside. In the same skillet, melt the butter and sauté the onions and celery until they’re soft and translucent, about 5 minutes. This builds a flavor base that’s unbeatable.
- Add the sage to the skillet and cook for another minute until fragrant. The aroma at this point is your cue that you’re on the right track.
- In a large bowl, combine the bread cubes, sausage, and the onion-celery mixture. Toss gently to mix. The key here is to not overmix; you want to keep those bread cubes intact.
- Whisk together the chicken broth and eggs in a separate bowl, then pour over the bread mixture. Stir until everything is evenly moistened. This is where the magic happens, turning dry bread into moist, flavorful stuffing.
- Transfer the mixture to the prepared baking dish and cover with foil. Bake for 30 minutes, then remove the foil and bake for another 20 minutes until the top is golden and crispy. That crispy top is what dreams are made of.
Just out of the oven, this stuffing is a symphony of textures—crispy on top, moist and tender inside, with bursts of savory sausage and aromatic sage. Serve it alongside your favorite roast or, for a twist, use it to stuff mushrooms for an elegant appetizer.
Buttery Dinner Rolls with Honey Glaze
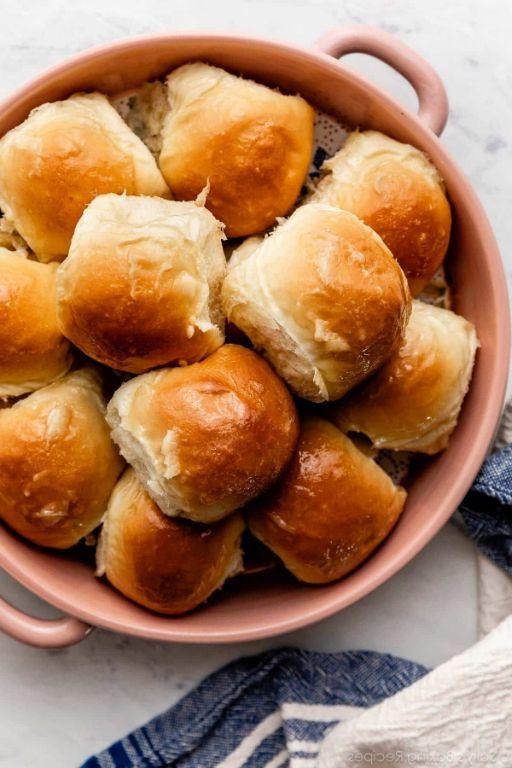
Every time I think about comfort food, my mind immediately goes to these buttery dinner rolls with a honey glaze. There’s something about pulling apart a warm, fluffy roll that feels like a hug from the inside, especially when it’s drizzled with that sweet, sticky glaze. I remember making these for the first time during a chilly autumn evening, and now, they’re a staple at my family gatherings.
Ingredients
- 1 cup whole milk, warmed to about 110°F (I find that whole milk gives the rolls a richer texture, but you can use 2% in a pinch.)
- 1/4 cup honey, plus 2 tablespoons for the glaze (Local honey is my favorite for its depth of flavor.)
- 1 packet (2 1/4 teaspoons) active dry yeast (Always check the expiration date to ensure your yeast is alive and kicking!)
- 3 1/2 cups all-purpose flour, plus more for dusting (I like to use unbleached flour for a more natural taste.)
- 1 teaspoon salt
- 1/2 cup unsalted butter, softened, plus 2 tablespoons melted for brushing (Room temperature butter blends more smoothly into the dough.)
- 1 large egg, room temperature (This helps it incorporate evenly into the dough.)
Instructions
- In a large bowl, combine the warmed milk, 1/4 cup honey, and yeast. Let it sit for about 5 minutes until frothy. This is your proof that the yeast is active.
- Add 3 cups of flour, salt, softened butter, and the egg to the yeast mixture. Stir until a shaggy dough forms.
- Turn the dough onto a floured surface and knead for about 8 minutes, adding the remaining 1/2 cup flour as needed, until the dough is smooth and elastic. Tip: If the dough sticks to your hands, lightly flour them, but avoid adding too much flour to keep the rolls tender.
- Place the dough in a greased bowl, cover with a damp towel, and let it rise in a warm place for 1 hour, or until doubled in size.
- Punch down the dough and divide it into 12 equal pieces. Shape each piece into a smooth ball and place in a greased 9×13 inch baking dish. Cover and let rise for another 30 minutes.
- Preheat your oven to 375°F. Bake the rolls for 20-25 minutes, or until golden brown. Tip: For an even bake, rotate the pan halfway through.
- While the rolls are baking, warm the remaining 2 tablespoons of honey. Brush the warm honey over the hot rolls right out of the oven for a glossy, sweet finish. Tip: Use a silicone brush for easy glazing without sticking.
Fresh out of the oven, these rolls are impossibly soft with a delicate crumb, and the honey glaze adds a subtle sweetness that’s irresistible. Try serving them alongside a savory stew or as the base for mini sliders at your next get-together.
Roasted Brussels Sprouts with Bacon and Balsamic
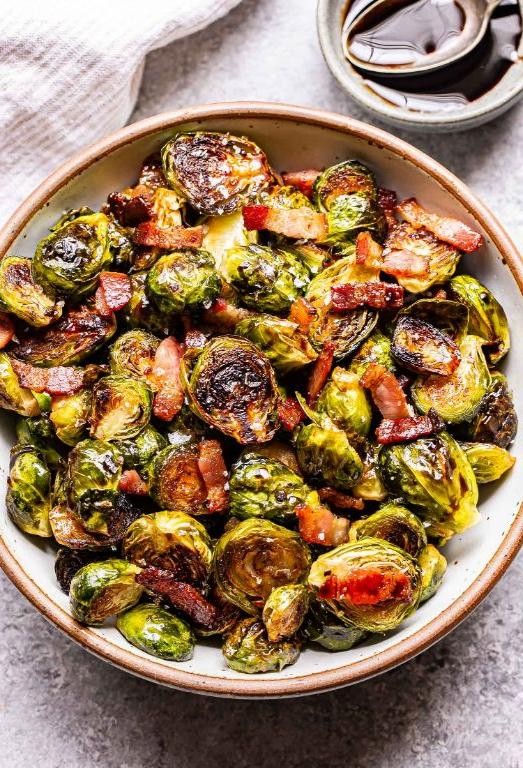
Every time I think about making a side dish that steals the show, I come back to these Roasted Brussels Sprouts with Bacon and Balsamic. It’s a dish that turned my husband, a former Brussels sprouts skeptic, into a believer. The combination of crispy bacon, caramelized sprouts, and that tangy balsamic glaze is just irresistible.
Ingredients
- 1 lb Brussels sprouts, halved (I look for the smaller ones; they’re sweeter and more tender.)
- 4 slices thick-cut bacon, chopped (The smokier, the better in my book.)
- 2 tbsp extra virgin olive oil (My go-to for roasting; it brings out the flavors beautifully.)
- 2 tbsp balsamic vinegar (Aged is worth the splurge for its deeper flavor.)
- 1/2 tsp salt (I use sea salt for its clean taste.)
- 1/4 tsp black pepper (Freshly ground makes all the difference.)
Instructions
- Preheat your oven to 400°F (200°C). A hot oven is key for getting those sprouts crispy.
- Toss the halved Brussels sprouts and chopped bacon with olive oil, salt, and pepper on a large baking sheet. Spread them out in a single layer for even cooking.
- Roast for 20 minutes, then give everything a good stir. This prevents sticking and ensures even browning.
- After another 10 minutes, drizzle the balsamic vinegar over the sprouts and bacon. The vinegar will reduce and glaze the sprouts as they finish roasting.
- Roast for a final 5-10 minutes until the sprouts are deeply caramelized and the bacon is crispy. Keep an eye on it to prevent burning.
Now, the moment of truth. The sprouts should be fork-tender with crispy edges, and the bacon adds a salty crunch that’s just perfect. I love serving this dish straight from the oven, with an extra drizzle of balsamic if I’m feeling fancy. It’s a side that often becomes the main event at my table.
Pumpkin Pie with Whipped Cream Topping
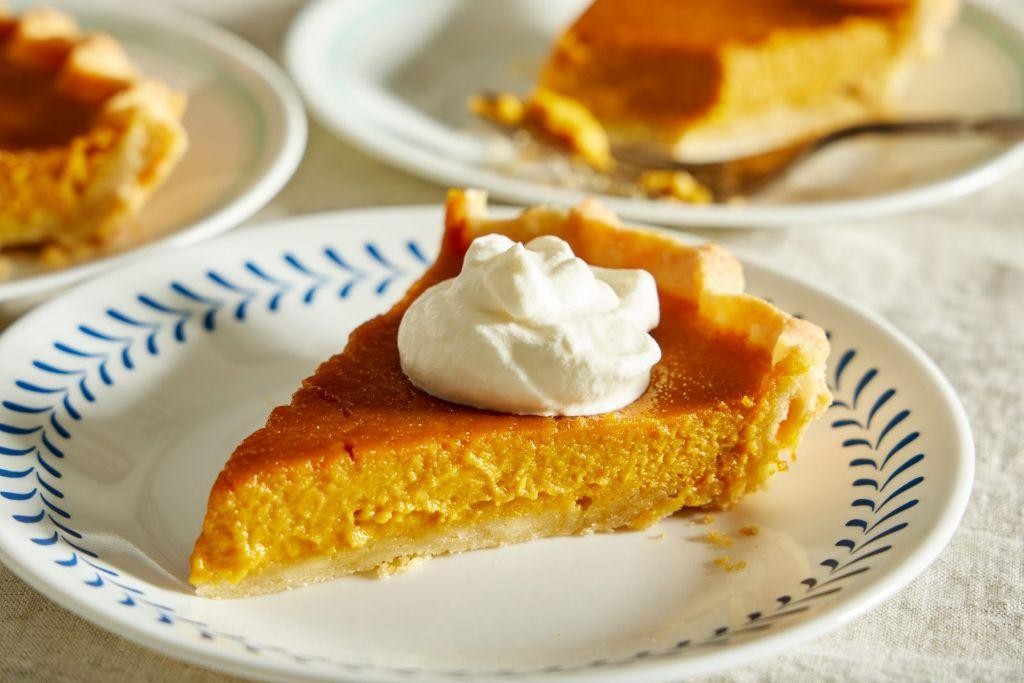
Zesty aromas fill my kitchen every fall, but nothing beats the classic pumpkin pie with a fluffy whipped cream topping. It’s my go-to dessert for Thanksgiving, and honestly, any day that calls for a slice of comfort. Here’s how I make it, with a few personal twists along the way.
Ingredients
- 1 1/2 cups pure pumpkin puree (I swear by the organic kind for its deep flavor)
- 3/4 cup granulated sugar (sometimes I sneak in a tablespoon of brown sugar for a caramel hint)
- 1/2 teaspoon salt (sea salt is my preference for its subtle crunch)
- 1 teaspoon ground cinnamon (because you can never have too much)
- 1/2 teaspoon ground ginger (freshly grated if I’m feeling fancy)
- 1/4 teaspoon ground cloves (just a pinch, it’s potent!)
- 2 large eggs (room temp, they blend smoother)
- 1 cup heavy cream (for the pie and the topping, because why not?)
- 1 unbaked 9-inch pie crust (homemade or store-bought, no judgment here)
Instructions
- Preheat your oven to 425°F (220°C). A hot start gives the crust a nice lift.
- In a large bowl, whisk together the pumpkin puree, sugar, salt, cinnamon, ginger, and cloves until smooth. Tip: Taste as you go to adjust the spices to your liking.
- Beat in the eggs one at a time, then stir in 1/2 cup of heavy cream until fully incorporated. The mixture should be silky.
- Pour the filling into the pie crust. Smooth the top with a spatula for an even bake.
- Bake for 15 minutes at 425°F, then reduce the temperature to 350°F (175°C) and continue baking for 40-50 minutes. Tip: The pie is done when the center is just set but still a bit wobbly.
- Let the pie cool on a wire rack for at least 2 hours. Patience is key for the perfect slice.
- While the pie cools, whip the remaining 1/2 cup of heavy cream until soft peaks form. Tip: Chill your bowl and beaters first for quicker whipping.
- Serve each slice with a dollop of whipped cream. A sprinkle of cinnamon on top adds a nice touch.
Absolutely divine, this pie is creamy, spiced just right, and the whipped cream topping is like a cloud on top. Try serving it with a drizzle of caramel for an extra indulgent twist.
Apple Crisp with Vanilla Ice Cream
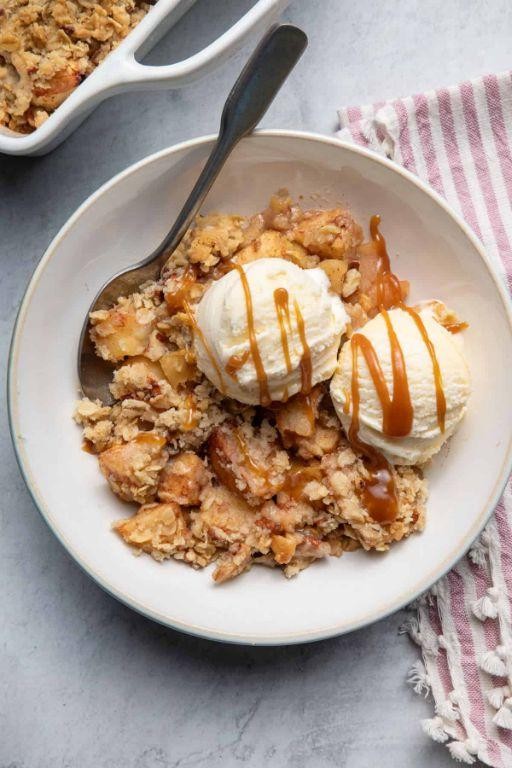
Oh, the joy of biting into a warm, cinnamon-spiced apple crisp topped with a melting scoop of vanilla ice cream is unmatched. It’s my go-to dessert when I want something comforting yet effortless, especially during those chilly evenings when the oven’s warmth is a welcome bonus.
Ingredients
- 6 cups of thinly sliced apples (I love a mix of Granny Smith and Honeycrisp for that perfect balance of tart and sweet)
- 1 cup of old-fashioned oats (the heartier, the better for that crisp topping)
- 1/2 cup of packed brown sugar (dark brown sugar adds a deeper flavor, but light works too)
- 1/2 cup of all-purpose flour (I sometimes swap half for whole wheat flour for a nuttier taste)
- 1/2 cup of unsalted butter, cold and cubed (trust me, cold butter is key to a flaky topping)
- 1 tsp of ground cinnamon (I’m generous with this—can you tell?)
- 1/4 tsp of salt (just a pinch to balance the sweetness)
- Vanilla ice cream, for serving (because what’s apple crisp without it?)
Instructions
- Preheat your oven to 375°F (190°C). This ensures a perfectly crisp topping without burning the apples.
- In a large bowl, toss the sliced apples with 1/4 cup of the brown sugar and 1/2 tsp of cinnamon until evenly coated. Tip: Letting the apples sit for 10 minutes helps them release some juices, creating a saucier filling.
- Transfer the apple mixture to a 9×13 inch baking dish, spreading it out evenly.
- In the same bowl, combine the oats, remaining brown sugar, flour, remaining cinnamon, and salt. Add the cold butter cubes and use your fingers to work the butter into the dry ingredients until the mixture resembles coarse crumbs. Tip: Don’t overmix—those butter chunks are what make the topping crisp.
- Sprinkle the oat mixture evenly over the apples in the baking dish.
- Bake for 35-40 minutes, or until the topping is golden brown and the apples are bubbling around the edges. Tip: If the topping browns too quickly, loosely cover with foil.
- Let the crisp cool for about 10 minutes before serving—this allows the filling to thicken slightly.
Every bite of this apple crisp is a delightful contrast between the tender, spiced apples and the crunchy, buttery topping. Serve it warm with a generous scoop of vanilla ice cream, and watch as the ice cream melts into the crevices, creating little pools of creamy goodness. For an extra touch, drizzle with caramel sauce or sprinkle with chopped nuts for added texture.
Maple Glazed Carrots with Thyme
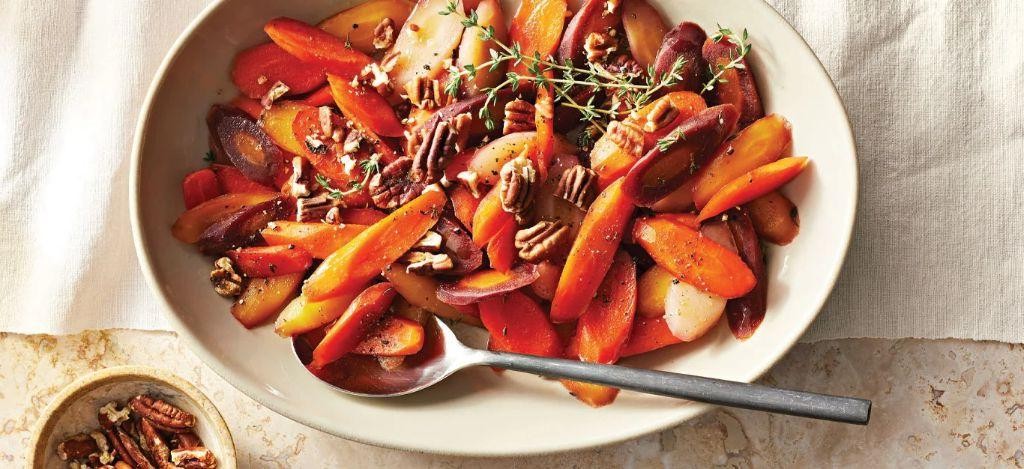
There’s something about the combination of sweet maple syrup and earthy thyme that makes these glazed carrots a standout side dish. I remember the first time I made them for a family gathering, and they were gone before I could even snap a photo for the blog!
Ingredients
- 1 lb carrots, peeled and sliced into 1/2-inch rounds (I like to leave a bit of the green stem on for a rustic look)
- 2 tbsp unsalted butter (because let’s be honest, everything’s better with butter)
- 2 tbsp pure maple syrup (the real deal, none of that pancake syrup stuff)
- 1 tsp fresh thyme leaves (dried works in a pinch, but fresh is worth the splurge)
- 1/2 tsp salt (I use sea salt for a cleaner taste)
- 1/4 tsp black pepper (freshly ground, please)
Instructions
- Preheat your oven to 400°F (200°C) and line a baking sheet with parchment paper for easy cleanup.
- Toss the carrot rounds with melted butter, maple syrup, thyme, salt, and pepper in a large bowl until evenly coated. Tip: Make sure the carrots are dry before tossing to help the glaze stick better.
- Spread the carrots in a single layer on the prepared baking sheet. Tip: Don’t overcrowd the pan, or they’ll steam instead of roast.
- Roast for 20 minutes, then stir the carrots and roast for another 10-15 minutes until they’re tender and the glaze is bubbly and slightly caramelized. Tip: Keep an eye on them during the last few minutes to prevent burning.
Once out of the oven, these carrots are irresistibly glossy with a perfect balance of sweetness and herbiness. I love serving them alongside a roast chicken or tossing them into a grain bowl for a pop of color and flavor.
Cornbread with Jalapeno and Cheddar
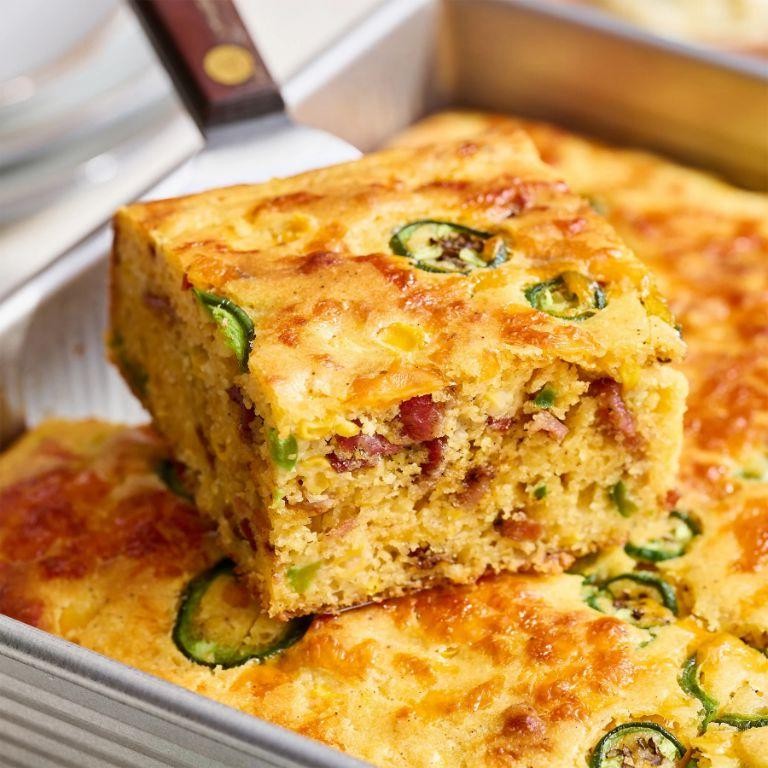
My love for cornbread took a spicy turn last summer when I decided to throw in some jalapenos and cheddar on a whim. The result? A mouthwatering twist on the classic that’s become a staple in my kitchen.
Ingredients
- 1 cup cornmeal – I swear by the stone-ground variety for that perfect texture.
- 1 cup all-purpose flour – because sometimes, tradition just works.
- 1 tbsp baking powder – the unsung hero of fluffy cornbread.
- 1/2 tsp salt – just enough to enhance all the flavors.
- 1 cup buttermilk – for that tangy depth, though I’ve used regular milk in a pinch.
- 1 large egg – room temperature eggs blend smoother, in my experience.
- 1/4 cup honey – a sweet contrast to the heat.
- 1/4 cup melted unsalted butter – extra virgin olive oil is my go-to, but butter wins here.
- 1 cup shredded cheddar cheese – sharp cheddar for that bold flavor.
- 2 jalapenos, diced – seeds in if you like it hot, out for milder.
Instructions
- Preheat your oven to 375°F (190°C) and grease an 8-inch baking pan. A well-greased pan ensures easy release.
- In a large bowl, whisk together the cornmeal, flour, baking powder, and salt. This avoids lumps and ensures even distribution.
- In another bowl, mix the buttermilk, egg, honey, and melted butter until well combined. Room temperature ingredients mix more uniformly.
- Pour the wet ingredients into the dry ingredients and stir until just combined. Overmixing leads to tough cornbread.
- Fold in the shredded cheddar and diced jalapenos gently. This distributes the add-ins without overworking the batter.
- Pour the batter into the prepared pan and smooth the top with a spatula. Even batter means even baking.
- Bake for 20-25 minutes, or until a toothpick inserted in the center comes out clean. Watch for a golden-brown crust as a visual cue.
- Let the cornbread cool in the pan for 10 minutes before slicing. Patience here prevents crumbling.
Now, this cornbread comes out with a perfect crumb—moist yet firm, with pockets of melted cheddar and bursts of jalapeno heat. Try serving it warm with a drizzle of honey or alongside a bowl of chili for a comforting meal.
Baked Macaroni and Cheese with Three Cheeses
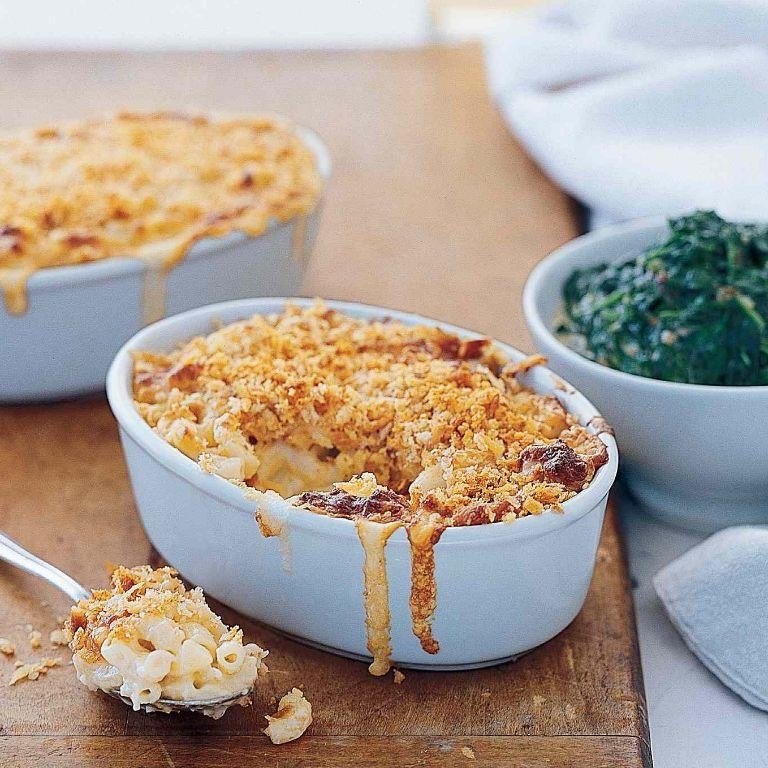
Every time I think about comfort food, my mind immediately goes to a creamy, cheesy baked macaroni and cheese. It’s the dish that never fails to bring back memories of family dinners and cozy winter nights. Today, I’m sharing my ultimate version, loaded with three kinds of cheese for that perfect melt and flavor.
Ingredients
- 8 oz elbow macaroni (I always go for the classic elbow shape for that nostalgic feel)
- 2 cups sharp cheddar cheese, shredded (the sharper, the better for that punch of flavor)
- 1 cup Gruyère cheese, shredded (this adds a nutty depth that’s irresistible)
- 1/2 cup Parmesan cheese, grated (for that golden, crispy top we all love)
- 2 cups whole milk (trust me, the richness makes a difference)
- 1/4 cup unsalted butter (I prefer unsalted to control the dish’s saltiness)
- 1/4 cup all-purpose flour (this is the base for our creamy sauce)
- 1/2 tsp paprika (a little spice to balance the richness)
- 1/2 tsp mustard powder (it’s my secret ingredient for a bit of tang)
- Salt and pepper to taste (but be generous with the pepper for a slight kick)
Instructions
- Preheat your oven to 375°F (190°C) and grease a 9×13 inch baking dish. This ensures your mac and cheese doesn’t stick and gets that perfect crust.
- Cook the macaroni according to package instructions until al dente, then drain and set aside. Tip: Salt your boiling water well; it’s the only chance to season the pasta itself.
- In a large saucepan, melt the butter over medium heat. Whisk in the flour and cook for 1 minute until golden. This roux is the foundation of your sauce.
- Gradually whisk in the milk, ensuring no lumps form. Cook until the mixture thickens, about 5 minutes. Tip: Keep the heat medium to avoid scorching.
- Remove from heat and stir in the cheddar, Gruyère, and half the Parmesan until melted and smooth. The cheeses should blend seamlessly into the sauce.
- Add the cooked macaroni to the sauce, stirring to coat every piece evenly. Tip: Let the macaroni sit in the sauce for a minute off the heat to absorb some of the flavors.
- Transfer the mixture to the prepared baking dish and sprinkle the remaining Parmesan on top. This will give you that irresistible cheesy crust.
- Bake for 25 minutes, or until bubbly and golden on top. Let it rest for 5 minutes before serving to allow the sauce to set slightly.
Serve this mac and cheese straight from the oven for the best experience. The combination of the three cheeses creates a rich, velvety sauce with a slight tang, while the top gets beautifully crisp. For an extra touch, try adding a sprinkle of fresh herbs or a dash of hot sauce to elevate the flavors even further.
Roasted Butternut Squash Soup

Remember those chilly autumn evenings when all you crave is something warm and comforting? That’s exactly when I turn to this Roasted Butternut Squash Soup, a recipe that feels like a hug in a bowl. It’s my go-to for using up those beautiful squashes from the farmer’s market, and the roasting process? Absolutely game-changing for depth of flavor.
Ingredients
- 1 large butternut squash, peeled and cubed (about 4 cups) – I always look for one that feels heavy for its size.
- 2 tbsp extra virgin olive oil – my kitchen staple for roasting.
- 1 medium onion, diced – yellow onions are my preference here for their sweetness.
- 2 cloves garlic, minced – because what’s soup without garlic?
- 4 cups vegetable broth – homemade if you have it, but store-bought works in a pinch.
- 1/2 tsp ground cinnamon – just a hint to warm things up.
- Salt and pepper to taste – I’m generous with the pepper for a little kick.
Instructions
- Preheat your oven to 400°F (200°C). This ensures your squash roasts evenly.
- Toss the cubed butternut squash with 1 tbsp olive oil on a baking sheet. Spread them out in a single layer for the best caramelization.
- Roast for 25-30 minutes, flipping halfway, until the edges are golden and the squash is fork-tender.
- While the squash roasts, heat the remaining 1 tbsp olive oil in a large pot over medium heat. Add the diced onion and cook until translucent, about 5 minutes.
- Stir in the minced garlic and cook for another minute until fragrant – be careful not to burn it.
- Add the roasted squash, vegetable broth, and cinnamon to the pot. Bring to a simmer, then reduce heat and let it cook for 10 minutes to meld the flavors.
- Use an immersion blender to puree the soup until smooth. If you don’t have one, a regular blender works – just blend in batches and be cautious with the hot liquid.
- Season with salt and pepper to taste. I like to start with 1/2 tsp salt and adjust from there.
Absolutely velvety with a sweet, nutty flavor that’s perfectly balanced by the cinnamon. Try swirling in a little coconut milk before serving for an extra creamy texture, or top with roasted pumpkin seeds for crunch.
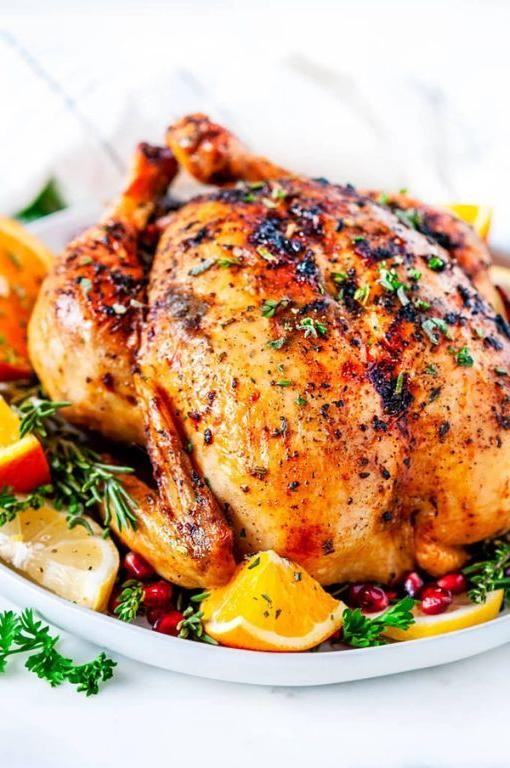
Garlic Herb Roasted Chicken
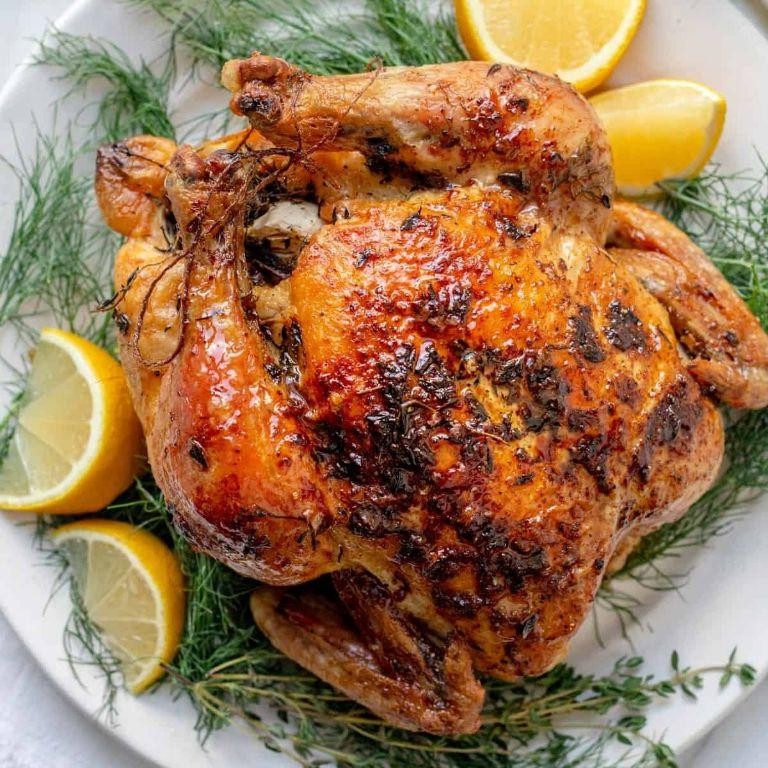
Garlic Herb Roasted Chicken is one of those dishes that never fails to bring comfort to the table. Growing up, the aroma of garlic and herbs wafting through the house was my cue that something delicious was about to be served. It’s a recipe that’s as forgiving as it is flavorful, perfect for both weeknight dinners and special occasions.
Ingredients
- 1 whole chicken (about 4 lbs) – I like to pat it dry with paper towels for crispier skin.
- 3 tbsp extra virgin olive oil – my go-to for its fruity flavor.
- 4 cloves garlic, minced – because more garlic is always better.
- 1 tbsp fresh rosemary, chopped – from my little herb garden.
- 1 tbsp fresh thyme, chopped – ditto on the herb garden.
- 1 tsp salt – I use sea salt for its clean taste.
- 1/2 tsp black pepper – freshly ground, please.
Instructions
- Preheat your oven to 375°F (190°C). A properly heated oven is key to even cooking.
- In a small bowl, mix together the olive oil, minced garlic, rosemary, thyme, salt, and pepper. This herb rub is going to make your chicken sing.
- Place the chicken in a roasting pan. Gently loosen the skin over the breasts and thighs with your fingers, being careful not to tear it.
- Rub the herb mixture under the skin and all over the outside of the chicken. Getting the herbs under the skin ensures the meat is flavorful.
- Roast the chicken in the preheated oven for about 1 hour and 30 minutes, or until the internal temperature reaches 165°F (74°C) at the thickest part of the thigh. A meat thermometer is your best friend here.
- Let the chicken rest for 10 minutes before carving. This allows the juices to redistribute, making every bite succulent.
Mouthwatering doesn’t even begin to describe this Garlic Herb Roasted Chicken. The skin is irresistibly crispy, while the meat underneath is juicy and bursting with flavor. Serve it alongside some roasted vegetables or over a bed of wild rice for a meal that feels both rustic and refined.
Wild Mushroom and Leek Stuffing
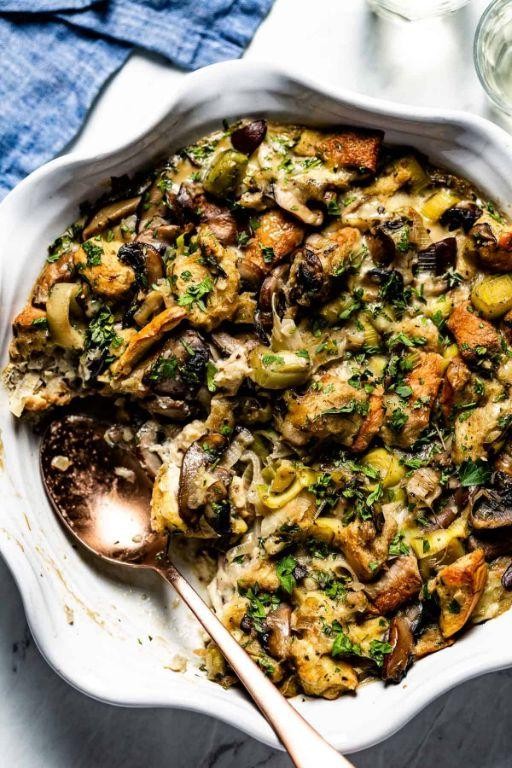
Growing up, the aroma of mushrooms sautéing in butter was my signal that the holidays were near. This Wild Mushroom and Leek Stuffing is my twist on the classic, packed with earthy flavors and a hint of sweetness from the leeks. It’s the side dish that often steals the show at my dinner table.
Ingredients
- 1 loaf of day-old sourdough bread, cubed (about 8 cups) – I find the slight tanginess of sourdough adds a nice contrast to the mushrooms.
- 1/2 cup unsalted butter – Because everything’s better with butter, right?
- 2 large leeks, white and light green parts only, thinly sliced – Don’t skip rinsing them well; leeks can be sneaky with dirt.
- 1 lb wild mushrooms, chopped – A mix of cremini, shiitake, and oyster mushrooms gives the best flavor.
- 3 cloves garlic, minced – Freshly minced is my go-to for that punch of flavor.
- 2 cups chicken or vegetable broth – Homemade broth elevates the dish, but store-bought works in a pinch.
- 2 large eggs, lightly beaten – I prefer room temp eggs here for even mixing.
- 1/4 cup fresh parsley, chopped – Adds a fresh pop of color and flavor.
- 1 tsp fresh thyme leaves – Because dried thyme just doesn’t compare.
- 1/2 tsp salt – Adjust based on your broth’s saltiness.
- 1/4 tsp black pepper – Freshly ground, please.
Instructions
- Preheat your oven to 350°F (175°C) and grease a 9×13 inch baking dish. Tip: A well-greased dish means easy serving later.
- Spread the cubed sourdough on a baking sheet and toast in the oven for 10 minutes until slightly dry. This step is crucial for the perfect texture.
- In a large skillet, melt the butter over medium heat. Add the leeks and sauté for 5 minutes until soft. Tip: Keep the heat medium to avoid browning the leeks too quickly.
- Add the mushrooms and garlic to the skillet, cooking for another 8 minutes until the mushrooms release their moisture and start to brown.
- In a large bowl, combine the toasted bread cubes, mushroom-leek mixture, parsley, thyme, salt, and pepper.
- Whisk together the broth and eggs in a separate bowl, then pour over the bread mixture. Stir gently to combine, ensuring all the bread is moistened.
- Transfer the mixture to the prepared baking dish, cover with foil, and bake for 30 minutes. Then, remove the foil and bake for an additional 15 minutes until the top is golden and crispy.
Just out of the oven, this stuffing is a harmony of crispy top and moist interior, with the mushrooms and leeks offering a deep, savory flavor. Serve it alongside your favorite roast or, for a twist, use it to stuff bell peppers for a vegetarian main dish.
Pecan Pie with Chocolate Drizzle
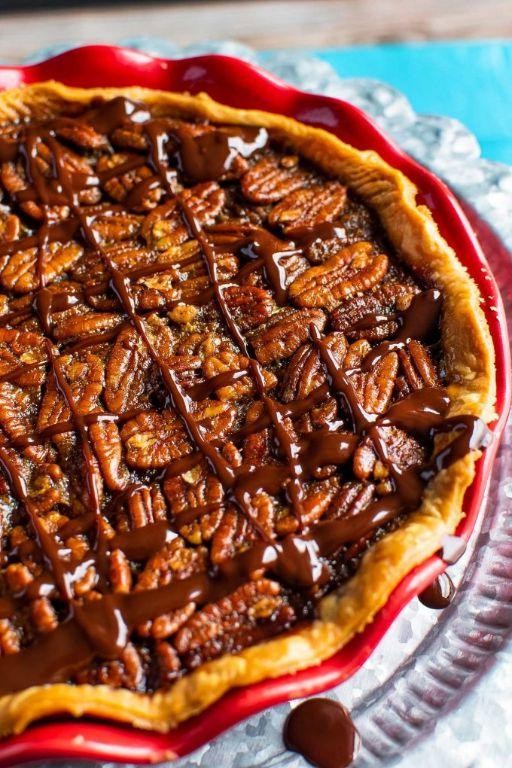
Kicking off the holiday season always calls for something sweet, and nothing says celebration like a pecan pie with a luxurious chocolate drizzle. I remember the first time I tried this combo; it was a game-changer, blending the classic nutty sweetness with a rich, velvety chocolate that had everyone asking for seconds.
Ingredients
- 1 1/2 cups pecans, roughly chopped (I love to toast them slightly for extra crunch)
- 1 cup light corn syrup (the clear kind gives a prettier finish)
- 1/2 cup granulated sugar (I sometimes swap in brown sugar for a deeper flavor)
- 3 large eggs, room temperature (they blend smoother when not cold)
- 2 tbsp unsalted butter, melted (salted works in a pinch, but adjust other salts)
- 1 tsp vanilla extract (the real deal, please)
- 1/4 tsp salt (I use sea salt for a subtle texture)
- 1 unbaked 9-inch pie crust (homemade or store-bought, no judgment here)
- 1/2 cup semi-sweet chocolate chips (because life’s too short for anything less)
- 1 tbsp coconut oil (makes the drizzle silky smooth)
Instructions
- Preheat your oven to 350°F (175°C). A properly heated oven is key to a perfectly set pie.
- In a large bowl, whisk together the corn syrup, sugar, eggs, melted butter, vanilla extract, and salt until smooth. Tip: A fork works wonders here for breaking up any egg clumps.
- Stir in the chopped pecans until they’re evenly coated with the mixture.
- Pour the filling into the unbaked pie crust, spreading it out evenly. Tip: Give the pie a gentle shake to level the filling without air bubbles.
- Bake for 50-60 minutes, or until the filling is set and the crust is golden brown. Tip: Cover the edges with foil if they start browning too quickly.
- Let the pie cool completely on a wire rack, about 2 hours. Patience is a virtue here.
- In a microwave-safe bowl, melt the chocolate chips and coconut oil in 30-second bursts, stirring in between, until smooth. Drizzle over the cooled pie.
Rich, gooey, and with just the right amount of crunch, this pie is a showstopper. Serve it slightly warm with a scoop of vanilla ice cream for an unforgettable dessert experience.
Spiced Pumpkin Cheesecake

Kicking off the fall season with a Spiced Pumpkin Cheesecake feels like wrapping yourself in a cozy blanket. There’s something magical about the combination of creamy cheesecake and warm spices that just screams autumn to me. I remember the first time I made this, the aroma filled my entire house, and my family knew it was going to be a good day.
Ingredients
- 1 1/2 cups graham cracker crumbs (I always grab an extra sleeve because, let’s be honest, some crumbs mysteriously disappear.)
- 1/4 cup granulated sugar (For that slight sweetness in the crust that contrasts beautifully with the filling.)
- 1/2 cup unsalted butter, melted (I prefer using unsalted to control the saltiness, but salted works in a pinch.)
- 24 oz cream cheese, room temperature (This is non-negotiable for a smooth filling.)
- 3/4 cup granulated sugar (Yes, more sugar, but it’s dessert after all.)
- 1 cup canned pumpkin puree (Not pumpkin pie filling—this is crucial.)
- 3 large eggs, room temperature (They blend better when not cold.)
- 1 tsp vanilla extract (The good stuff makes a difference.)
- 1 tsp ground cinnamon (Because what’s pumpkin without cinnamon?)
- 1/2 tsp ground nutmeg (Freshly grated if you’re feeling fancy.)
- 1/4 tsp ground cloves (A little goes a long way.)
Instructions
- Preheat your oven to 325°F (163°C). A properly heated oven is key to even baking.
- Mix graham cracker crumbs, 1/4 cup sugar, and melted butter in a bowl until well combined. Tip: Press the mixture firmly into the pan to avoid a crumbly crust.
- Press the mixture into the bottom of a 9-inch springform pan. Use the bottom of a glass to get it even.
- Bake the crust for 10 minutes, then let it cool. This step helps prevent a soggy bottom.
- Beat the cream cheese and 3/4 cup sugar until smooth. Scrape the bowl to ensure no lumps.
- Add pumpkin puree, eggs, vanilla, cinnamon, nutmeg, and cloves. Mix until just combined. Overmixing can lead to cracks.
- Pour the filling over the crust and smooth the top with a spatula.
- Bake for 50-55 minutes until the edges are set but the center is slightly wobbly. Tip: A water bath can prevent cracks, but it’s optional.
- Turn off the oven, crack the door, and let the cheesecake cool inside for 1 hour. This gradual cooling helps prevent sinking.
- Refrigerate for at least 4 hours, preferably overnight. Patience is key for the perfect texture.
Here’s the deal: this cheesecake is luxuriously creamy with a hint of spice that warms you from the inside out. Serve it with a dollop of whipped cream and a sprinkle of cinnamon for that extra flair. Happy baking!
Caramelized Onion and Goat Cheese Tart
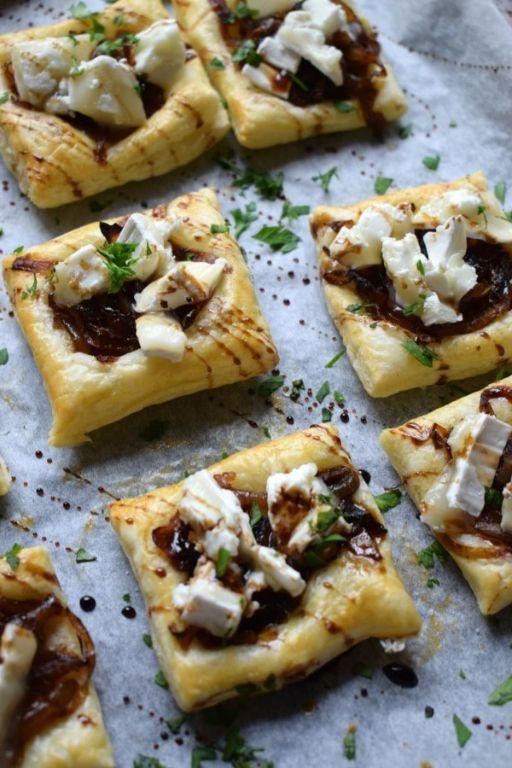
Absolutely nothing beats the combination of sweet caramelized onions and tangy goat cheese nestled in a flaky tart crust. It’s a dish that feels fancy but is surprisingly simple to make, and it’s been a staple at my dinner parties ever since I discovered how much my friends adore it.
Ingredients
- 1 1/4 cups all-purpose flour (I swear by King Arthur for consistent results)
- 1/2 teaspoon salt (sea salt adds a nice crunch)
- 1/2 cup unsalted butter, chilled and diced (European-style butter makes all the difference)
- 3-4 tablespoons ice water (just enough to bring the dough together)
- 2 large yellow onions, thinly sliced (sweet onions work best for caramelizing)
- 2 tablespoons extra virgin olive oil (my go-to for its fruity notes)
- 1 teaspoon sugar (helps the onions caramelize beautifully)
- 4 ounces goat cheese, crumbled (I love the creamy texture of Montchevre)
- 1 large egg, beaten (room temp eggs blend more smoothly)
Instructions
- In a large bowl, whisk together the flour and salt. Add the diced butter and use your fingers to work it into the flour until the mixture resembles coarse crumbs.
- Gradually add ice water, one tablespoon at a time, mixing until the dough just comes together. Tip: Don’t overwork the dough to keep it tender.
- Shape the dough into a disk, wrap in plastic, and refrigerate for at least 30 minutes. This chilling step is crucial for a flaky crust.
- While the dough chills, heat olive oil in a large skillet over medium heat. Add the onions and sugar, stirring occasionally, until deeply golden, about 25 minutes. Tip: Low and slow is the key to perfect caramelization.
- Preheat your oven to 375°F. Roll out the chilled dough on a floured surface to fit a 9-inch tart pan. Trim the edges and prick the bottom with a fork.
- Spread the caramelized onions evenly over the crust, then sprinkle with crumbled goat cheese. Brush the edges with beaten egg for a golden finish.
- Bake for 25-30 minutes, until the crust is golden and the cheese is slightly melted. Tip: Let it cool for 5 minutes before slicing to set the filling.
Velvety caramelized onions paired with the creamy tang of goat cheese make this tart a showstopper. Serve it warm with a side of arugula salad for a light lunch or as an elegant appetizer at your next gathering.
Roasted Acorn Squash with Brown Sugar
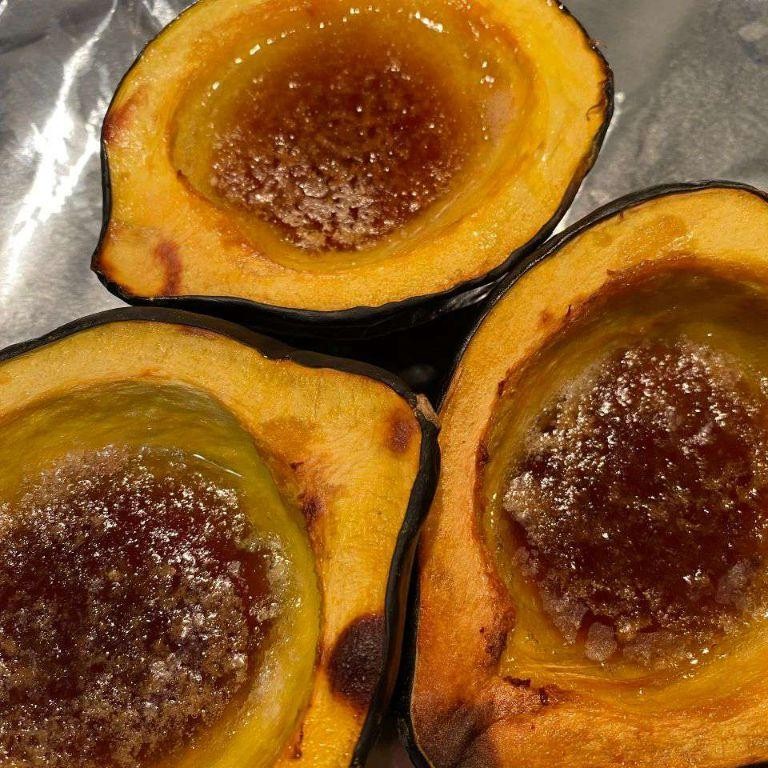
Unbelievably simple yet utterly delicious, this Roasted Acorn Squash with Brown Sugar recipe is a fall favorite in my kitchen. It’s the kind of dish that fills your home with warmth and your heart with joy, perfect for those cozy evenings when you crave something sweet and satisfying.
Ingredients
- 1 medium acorn squash (look for one that feels heavy for its size—it’s a sign of freshness)
- 2 tablespoons unsalted butter (I always go for unsalted to control the dish’s saltiness)
- 1/4 cup brown sugar (packed, because that’s where the magic happens)
- 1/2 teaspoon cinnamon (my secret weapon for that extra warmth)
- A pinch of salt (just a pinch to balance the sweetness)
Instructions
- Preheat your oven to 400°F (200°C). A properly heated oven is key to getting that perfect caramelization.
- Cut the acorn squash in half from stem to end. Scoop out the seeds and stringy bits with a spoon—save the seeds for roasting if you’re feeling adventurous!
- Place the squash halves cut side up on a baking sheet. Dot each half with 1 tablespoon of butter, ensuring it’s evenly distributed.
- Sprinkle each half with 2 tablespoons of brown sugar, 1/4 teaspoon of cinnamon, and a tiny pinch of salt. The sugar should cover the surface for that irresistible glaze.
- Roast in the preheated oven for 45-50 minutes. The squash is done when it’s fork-tender and the sugar has melted into a glossy, bubbly topping.
- Let it cool for a few minutes before serving. This wait is tough, but it prevents burns and lets the flavors settle.
Zesty and sweet, this roasted acorn squash is a testament to how simple ingredients can create something extraordinary. The flesh turns buttery soft, while the brown sugar forms a crackly crust that’s pure heaven. Try serving it with a dollop of whipped cream or a sprinkle of toasted pecans for an extra layer of texture and flavor.
Chocolate Pecan Pie Bars
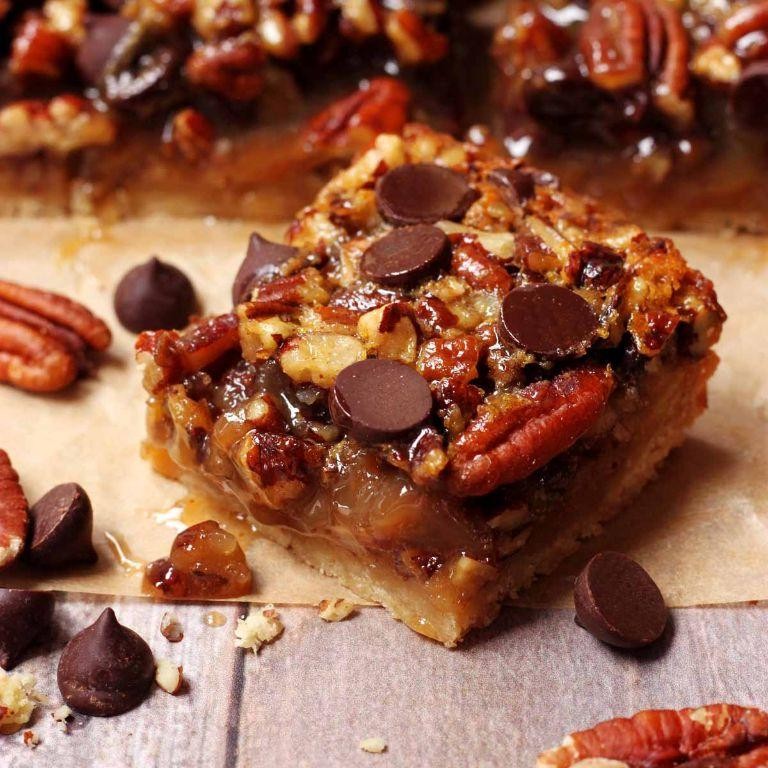
Remember the first time I tried Chocolate Pecan Pie Bars at a friend’s potluck, I was instantly hooked. The rich, gooey chocolate paired with the crunchy pecans was a match made in heaven, and I knew I had to recreate it at home.
Ingredients
- 1 1/2 cups all-purpose flour (I like to sift mine for a lighter texture)
- 1/2 cup unsalted butter, chilled and cubed (cold butter is key for a flaky crust)
- 1/4 cup granulated sugar (just enough to sweeten the crust)
- 1/4 tsp salt (to balance the sweetness)
- 3 large eggs (room temperature eggs blend better)
- 1 cup light corn syrup (the secret to that signature gooeyness)
- 1 cup packed brown sugar (for a deep, molasses-like flavor)
- 2 tbsp unsalted butter, melted (adds richness to the filling)
- 1 tsp vanilla extract (pure vanilla makes all the difference)
- 1 1/2 cups semi-sweet chocolate chips (because more chocolate is always better)
- 1 1/2 cups chopped pecans (toasted pecans add an extra crunch)
Instructions
- Preheat your oven to 350°F (175°C) and line a 9×13 inch baking pan with parchment paper, leaving an overhang for easy removal.
- In a food processor, pulse the flour, chilled butter, granulated sugar, and salt until the mixture resembles coarse crumbs. Tip: If you don’t have a food processor, a pastry cutter works just as well.
- Press the mixture firmly into the bottom of the prepared pan and bake for 15 minutes, or until lightly golden. This pre-baking step ensures a crisp crust.
- While the crust bakes, whisk together the eggs, corn syrup, brown sugar, melted butter, and vanilla extract until smooth. Tip: Whisk by hand to avoid incorporating too much air, which can cause bubbles.
- Sprinkle the chocolate chips and pecans evenly over the hot crust, then pour the egg mixture over the top. Tip: Letting the crust cool slightly before adding the toppings prevents them from sinking.
- Return the pan to the oven and bake for 25-30 minutes, or until the filling is set and the edges are slightly puffed.
- Allow the bars to cool completely in the pan on a wire rack before lifting out and cutting into squares. This patience-testing step ensures clean cuts.
Chewy, chocolatey, and packed with pecans, these bars are a decadent treat that’s perfect for sharing. Serve them warm with a scoop of vanilla ice cream for an indulgent dessert that’ll have everyone asking for seconds.
Savory Herb and Cheese Biscuits

Goodness, there’s nothing quite like the aroma of freshly baked biscuits wafting through the kitchen, especially when they’re packed with savory herbs and melty cheese. I remember the first time I made these; it was a chilly Sunday morning, and I wanted something comforting yet easy to whip up. These biscuits were the answer, and they’ve been a staple in my home ever since.
Ingredients
- 2 cups all-purpose flour (I swear by King Arthur for consistent results)
- 1 tbsp baking powder (make sure it’s fresh for the best rise)
- 1/2 tsp salt (I like to use sea salt for its subtle crunch)
- 1/2 cup unsalted butter, cold and cubed (the colder, the flakier the biscuits)
- 1 cup sharp cheddar cheese, grated (extra sharp gives a nice bite)
- 2 tbsp fresh chives, finely chopped (dried just don’t compare here)
- 2 tbsp fresh parsley, finely chopped (flat-leaf is my preference)
- 3/4 cup whole milk (room temp blends better)
Instructions
- Preheat your oven to 425°F (220°C). A hot oven is key to getting that perfect golden top.
- In a large bowl, whisk together the flour, baking powder, and salt. This ensures even distribution of the leavening agent.
- Add the cold, cubed butter to the dry ingredients. Using your fingers or a pastry cutter, work the butter into the flour until the mixture resembles coarse crumbs. Tip: Leave some larger butter pieces for extra flakiness.
- Stir in the grated cheddar, chives, and parsley until evenly distributed. The cheese should be well-coated with flour to prevent clumping.
- Gradually add the milk, stirring just until the dough comes together. Overmixing leads to tough biscuits.
- Turn the dough onto a lightly floured surface and gently pat it into a 1-inch thick rectangle. Fold the dough over itself a few times to create layers.
- Using a 2-inch round cutter, cut out the biscuits and place them on a parchment-lined baking sheet. Re-roll the scraps once for minimal waste.
- Bake for 12-15 minutes, or until the biscuits are golden brown and have risen beautifully. Tip: Rotate the baking sheet halfway through for even browning.
- Let the biscuits cool on the baking sheet for 5 minutes before serving. They’re best enjoyed warm, with the cheese still gooey.
Oh, the joy of biting into one of these biscuits! The exterior is crisp and golden, while the inside is tender and bursting with herb and cheese flavors. Try splitting them open and slathering with a bit of honey butter for a sweet and savory twist.
Cranberry Brie Bites with Pecans

Back when I first stumbled upon the idea of combining cranberries and brie, I was skeptical. But let me tell you, these Cranberry Brie Bites with Pecans are a game-changer for any gathering. They’re the perfect blend of sweet, savory, and crunchy, and they’ve become my go-to appetizer for impressing guests without spending hours in the kitchen.
Ingredients
- 1 sheet of puff pastry (I always keep a box in the freezer for last-minute recipes like this)
- 1 cup cranberry sauce (homemade or store-bought, but I swear by the extra chunky kind)
- 8 oz brie cheese (room temperature makes it easier to slice)
- 1/2 cup pecans, roughly chopped (toasting them first brings out an incredible flavor)
- 1 tbsp honey (for that perfect drizzle)
Instructions
- Preheat your oven to 400°F (200°C) and line a baking sheet with parchment paper.
- Roll out the puff pastry on a lightly floured surface to about a 12-inch square, then cut into 24 equal squares. Tip: Using a pizza cutter makes this step a breeze.
- Place each square into the cups of a mini muffin tin, gently pressing down to form a cup shape.
- Bake for 10 minutes, or until the pastry cups are golden and puffed. Tip: They’ll puff up a lot, but don’t worry, they’ll deflate once out of the oven, making room for the filling.
- While the pastry cups are baking, slice the brie into 24 small pieces, ensuring each piece will fit into the cups.
- Once the pastry cups are out of the oven and slightly cooled, place a piece of brie into each cup.
- Top each with a teaspoon of cranberry sauce and a sprinkle of chopped pecans.
- Return to the oven for 5 minutes, just until the brie starts to melt.
- Remove from the oven and drizzle with honey before serving. Tip: Let them cool for a minute or two; the filling will be molten hot!
Combining the gooey brie with the tart cranberries and crunchy pecans creates a symphony of textures in every bite. Serve these warm, and watch them disappear before your eyes—I like to arrange them on a wooden board for a rustic, inviting presentation.
Autumn Harvest Salad with Maple Vinaigrette
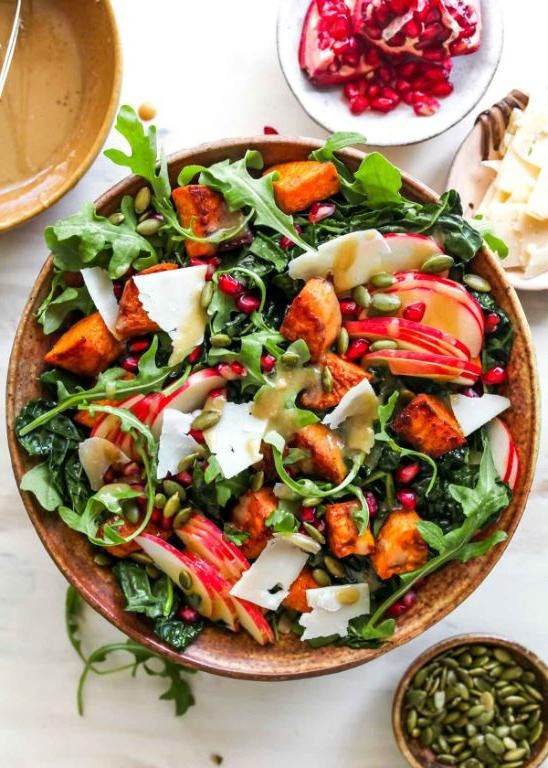
As the leaves begin to turn and the air gets crisp, I find myself craving dishes that celebrate the season’s bounty. This Autumn Harvest Salad with Maple Vinaigrette is my go-to for a quick, nutritious meal that doesn’t skimp on flavor. It’s a dish that reminds me of weekend farmers’ market trips, where the colors and smells inspire my cooking for the week ahead.
Ingredients
- 2 cups mixed greens (I love a blend of arugula and spinach for a peppery kick)
- 1/2 cup roasted butternut squash, cubed (roasting brings out its natural sweetness)
- 1/4 cup dried cranberries (for a chewy, tart contrast)
- 1/4 cup crumbled goat cheese (the creaminess balances the salad’s textures)
- 1/4 cup pecans, toasted (toasting nuts is a game-changer for depth of flavor)
- 2 tbsp extra virgin olive oil (my kitchen staple for dressings)
- 1 tbsp maple syrup (the real deal, please—none of that imitation stuff)
- 1 tbsp apple cider vinegar (adds a bright acidity)
- 1/2 tsp Dijon mustard (for a subtle sharpness)
- Salt and freshly ground black pepper (to season)
Instructions
- Preheat your oven to 400°F. Toss the butternut squash cubes with 1 tbsp olive oil, salt, and pepper. Roast for 25 minutes until tender and slightly caramelized.
- While the squash roasts, toast the pecans in a dry skillet over medium heat for 3-5 minutes, stirring frequently, until fragrant. Tip: Keep an eye on them—nuts go from toasted to burnt quickly!
- In a small bowl, whisk together the remaining olive oil, maple syrup, apple cider vinegar, Dijon mustard, salt, and pepper to make the vinaigrette. Tip: Adjust the sweetness or acidity to your liking by adding more syrup or vinegar.
- In a large bowl, combine the mixed greens, roasted squash, cranberries, goat cheese, and toasted pecans. Drizzle with the maple vinaigrette and toss gently to coat. Tip: Add the dressing just before serving to keep the greens crisp.
Last but not least, this salad is a delightful mix of textures and flavors—creamy, crunchy, sweet, and tangy all at once. I love serving it with a slice of crusty bread to soak up any extra dressing, making it a satisfying meal on its own.
Slow Cooker Mulled Apple Cider
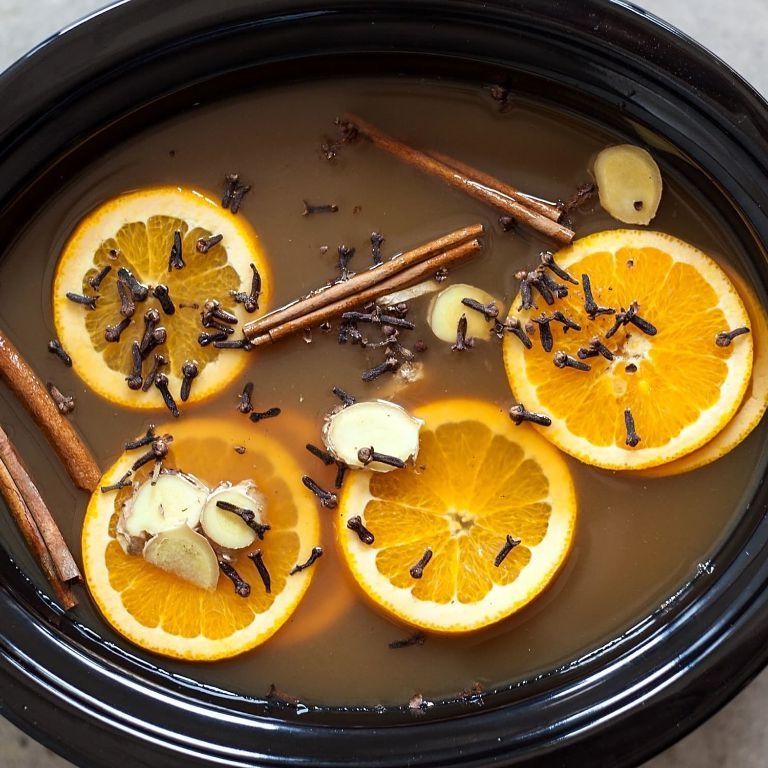
Last weekend, as the crisp autumn air began to whisper through the trees, I found myself craving something warm and spiced to fill the house with cozy aromas. That’s when I decided to whip up a batch of slow cooker mulled apple cider, a recipe that’s become a seasonal staple in my home.
Ingredients
- 8 cups of apple cider (I love using local, unfiltered cider for its rich flavor)
- 1 orange, thinly sliced (leave the peel on for extra zestiness)
- 4 cinnamon sticks (because who can resist that warm, woody aroma?)
- 1 tsp whole cloves (they pack a punch, so I’m careful not to overdo it)
- 1/2 tsp ground nutmeg (a little goes a long way in adding depth)
- 1/4 cup brown sugar (adjust based on your sweetness preference, but this is my sweet spot)
Instructions
- Pour the apple cider into your slow cooker, setting the stage for what’s about to become liquid gold.
- Add the orange slices, cinnamon sticks, cloves, nutmeg, and brown sugar to the cider, stirring gently to combine. Tip: Toasting the cinnamon sticks and cloves lightly before adding can unlock even more flavor.
- Cover and cook on LOW for 3 hours, allowing the spices to meld beautifully with the cider. Tip: Resist the urge to peek too often; keeping the lid on ensures all those aromatic compounds stay right where you want them.
- After 3 hours, give the cider a gentle stir and taste, adjusting the sweetness or spice level if needed. Tip: If you prefer a stronger spice flavor, let it steep for an additional 30 minutes before serving.
- Strain the cider to remove the solids, serving it warm in mugs garnished with a fresh cinnamon stick or orange slice for that Instagram-worthy touch.
Kindly note, the final brew should be a harmonious blend of sweet, spicy, and slightly tangy, with the orange adding a bright note against the deeper spices. For an adult version, a splash of bourbon or rum before serving transforms it into a delightful nightcap.
Conclusion
Such a delightful collection of 25 Friendsgiving recipes awaits you, each promising to add a special touch to your festive feast. Whether you’re a seasoned chef or a cooking novice, these dishes are sure to impress. Don’t forget to try them out, share your favorites in the comments, and spread the joy by pinning this article on Pinterest. Happy cooking and even happier feasting!