You don’t have to fly to Paris to indulge in the exquisite flavors of French pastries! Whether you’re a seasoned baker or just starting out, our roundup of 22 Delicious French Pastries Recipes Easy is your ticket to bringing a taste of France into your kitchen. From buttery croissants to delicate macarons, these recipes are designed for home cooks in North America to master with ease. Let’s get baking!
Classic French Croissants
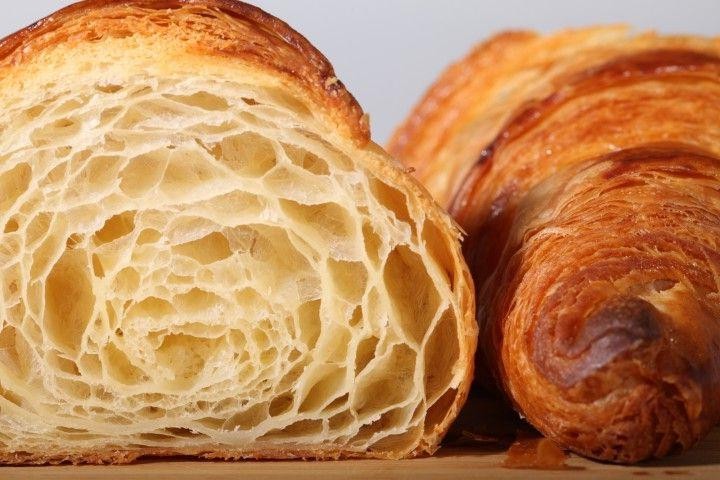
Alright, let’s dive into the art of making Classic French Croissants, a pastry that’s as rewarding to make as it is to eat. A perfect croissant starts with patience and precision, so let’s take it step by step to achieve those flaky, buttery layers.
Ingredients
- 4 cups of all-purpose flour, plus a little extra for dusting
- 1/3 cup of granulated sugar
- 1 tbsp of active dry yeast
- 1 1/4 cups of whole milk, lukewarm
- 1 1/4 cups of unsalted butter, cold but pliable
- A pinch of salt
- A splash of vanilla extract
- An egg, for egg wash
Instructions
- In a large bowl, whisk together the flour, sugar, yeast, and salt.
- Gradually add the lukewarm milk and vanilla extract to the dry ingredients, mixing until a dough forms.
- Turn the dough onto a lightly floured surface and knead for about 5 minutes until smooth. Tip: The dough should be soft but not sticky. Adjust with a little more flour if needed.
- Shape the dough into a rectangle, wrap in plastic, and chill in the fridge for 1 hour.
- Place the cold butter between two sheets of parchment paper and pound it into a rectangle about 1/2 inch thick using a rolling pin.
- Roll out the chilled dough into a larger rectangle, place the butter in the center, and fold the dough over the butter, sealing the edges.
- Roll the dough into a long rectangle, then fold it into thirds like a letter. Wrap and chill for 30 minutes. Tip: This is the first ‘turn’. For flaky layers, repeat this process two more times.
- After the final chill, roll the dough to about 1/4 inch thickness and cut into long triangles.
- Roll each triangle from the base to the tip to form a croissant shape, then place on a baking sheet lined with parchment paper.
- Let the croissants rise in a warm place for about 2 hours, or until they’ve doubled in size. Tip: They’re ready when they feel light and puffy.
- Preheat your oven to 375°F. Brush the croissants with beaten egg for a golden finish.
- Bake for 15-20 minutes until they’re golden brown and crisp.
Now, these croissants are best enjoyed fresh out of the oven, when the layers are at their flakiest and the aroma fills your kitchen. Not only are they perfect with a cup of coffee, but they also make an impressive base for sandwiches or a sweet treat with jam.
Chocolate Eclairs

Perfecting the art of making Chocolate Eclairs is easier than you think, especially when you break it down into simple, manageable steps. Let’s dive into creating these delightful pastries that are sure to impress.
Ingredients
- 1 cup of water
- 1/2 cup of unsalted butter
- a pinch of salt
- 1 cup of all-purpose flour
- 4 large eggs
- a splash of vanilla extract
- 1 cup of heavy cream
- 2 tbsp of powdered sugar
- a couple of ounces of dark chocolate, chopped
Instructions
- Preheat your oven to 375°F (190°C) and line a baking sheet with parchment paper.
- In a medium saucepan, combine the water, butter, and salt. Bring to a boil over medium heat.
- Once boiling, reduce the heat to low and add the flour all at once. Stir vigorously until the mixture forms a ball and pulls away from the sides of the pan. Tip: This step is crucial for the right dough consistency.
- Remove from heat and let cool for about 5 minutes. Then, add the eggs one at a time, beating well after each addition until the dough is smooth. Tip: The dough should be glossy and sticky but hold its shape.
- Transfer the dough to a piping bag fitted with a large round tip. Pipe 4-inch logs onto the prepared baking sheet, leaving space between each.
- Bake for 30-35 minutes, or until the eclairs are golden brown and puffed. Do not open the oven door during the first 20 minutes to prevent them from collapsing. Tip: They’re done when they sound hollow when tapped.
- Let the eclairs cool completely on a wire rack.
- While cooling, whip the heavy cream with powdered sugar and vanilla extract until stiff peaks form.
- Once the eclairs are cool, slice them horizontally and fill with the whipped cream.
- Melt the dark chocolate in a microwave-safe bowl in 30-second intervals, stirring in between, until smooth. Drizzle or dip the tops of the eclairs in the melted chocolate.
Out of the oven, these Chocolate Eclairs boast a crisp shell with a light, airy interior, perfectly complemented by the creamy filling and rich chocolate topping. Serve them at your next gathering or enjoy as a decadent treat with your afternoon coffee.
French Macarons

Over the years, French Macarons have danced their way into the hearts of dessert lovers everywhere, and today, we’re breaking down how to make these delicate treats at home. With a methodical approach, even beginners can achieve that perfect chewy interior and crisp shell.
Ingredients
- 1 cup of almond flour, sifted
- 1 3/4 cups of powdered sugar, because we’re keeping it sweet
- 3 large egg whites, at room temperature for peak perfection
- 1/4 cup of granulated sugar, for that slight crunch
- A pinch of salt, to balance the sweetness
- A couple of drops of food coloring, if you’re feeling fancy
Instructions
- Preheat your oven to 300°F (150°C) and line two baking sheets with parchment paper.
- In a bowl, whisk together the sifted almond flour and powdered sugar until fully combined.
- In a separate bowl, beat the egg whites with a pinch of salt until soft peaks form. Gradually add the granulated sugar, continuing to beat until stiff peaks form. Tip: Ensure your bowl and beaters are grease-free for the best volume.
- Gently fold the almond flour mixture into the egg whites in two additions, along with any food coloring, until the batter flows like lava. Tip: Overmixing will deflate the batter, so stop when it’s just combined.
- Transfer the batter to a piping bag fitted with a round tip and pipe 1-inch circles onto the prepared baking sheets. Tap the sheets firmly on the counter to release any air bubbles. Tip: Let the piped macarons sit for 30 minutes until a skin forms; this helps create those iconic feet.
- Bake for 18 minutes, rotating the sheets halfway through, until the macarons are set and can be lifted from the parchment without sticking.
- Let cool completely on the baking sheets before filling with your choice of ganache, buttercream, or jam.
Light as air with a slightly chewy center, these macarons are a testament to the beauty of precision in baking. Serve them stacked high on a vintage cake stand for an Instagram-worthy dessert table centerpiece.
Pain au Chocolat
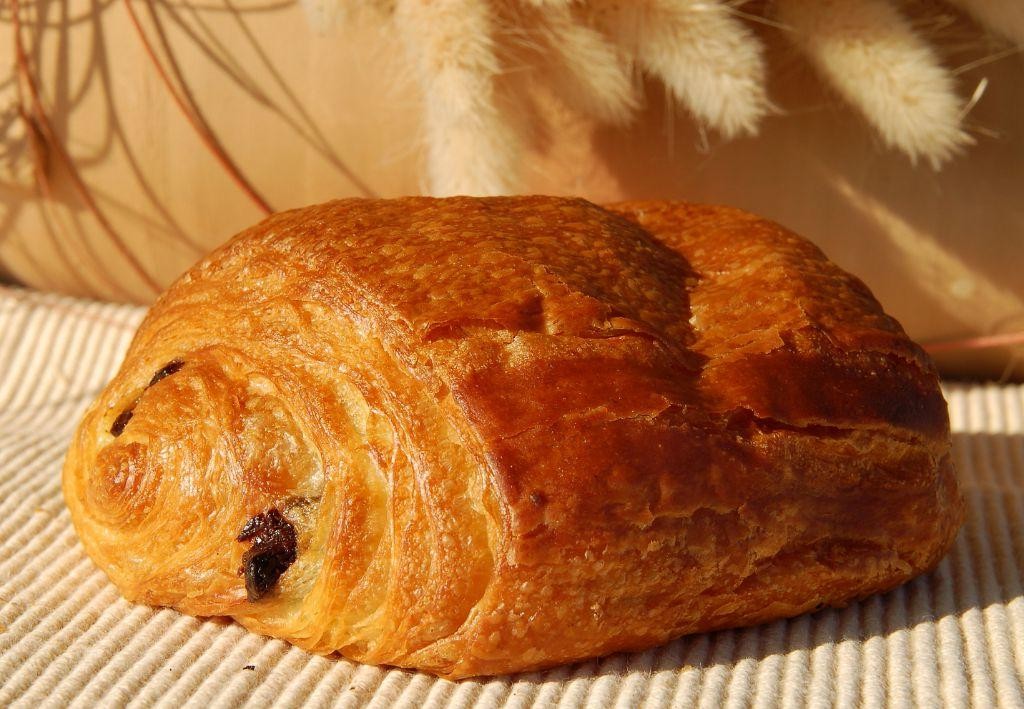
Whisking up a batch of Pain au Chocolat is simpler than you might think, especially when you follow these straightforward steps. Let’s dive into the flaky, buttery layers and rich chocolate centers that make this pastry a beloved treat.
Ingredients
- 2 cups of all-purpose flour, plus a little extra for dusting
- 1 cup of cold unsalted butter, cut into slices
- A splash of cold water
- A pinch of salt
- 1/4 cup of granulated sugar
- 1 packet (2 1/4 tsp) of active dry yeast
- A couple of high-quality dark chocolate bars, chopped into sticks
- 1 egg, beaten for egg wash
Instructions
- In a large bowl, mix the flour, sugar, yeast, and salt. Add the butter slices and use your fingers to press them into the flour until the mixture resembles coarse crumbs.
- Gradually add cold water, a splash at a time, until the dough comes together. Tip: The dough should be slightly sticky but not wet.
- Turn the dough onto a floured surface and knead lightly for about 2 minutes. Wrap it in plastic and chill in the fridge for 1 hour. Tip: Chilling the dough makes it easier to handle and helps create those flaky layers.
- Preheat your oven to 375°F (190°C) and line a baking sheet with parchment paper.
- Roll the dough into a rectangle about 1/4 inch thick. Cut into smaller rectangles, place a chocolate stick at the end of each, and roll them up tightly.
- Place the rolls seam-side down on the baking sheet, brush with beaten egg, and bake for 20-25 minutes until golden brown. Tip: The egg wash gives them that beautiful glossy finish.
- Let them cool on a wire rack for at least 10 minutes before serving.
Perfectly baked Pain au Chocolat should have a crisp exterior that gives way to soft, buttery layers and a molten chocolate center. Try serving them warm with a dusting of powdered sugar for an extra touch of sweetness.
Tarte Tatin
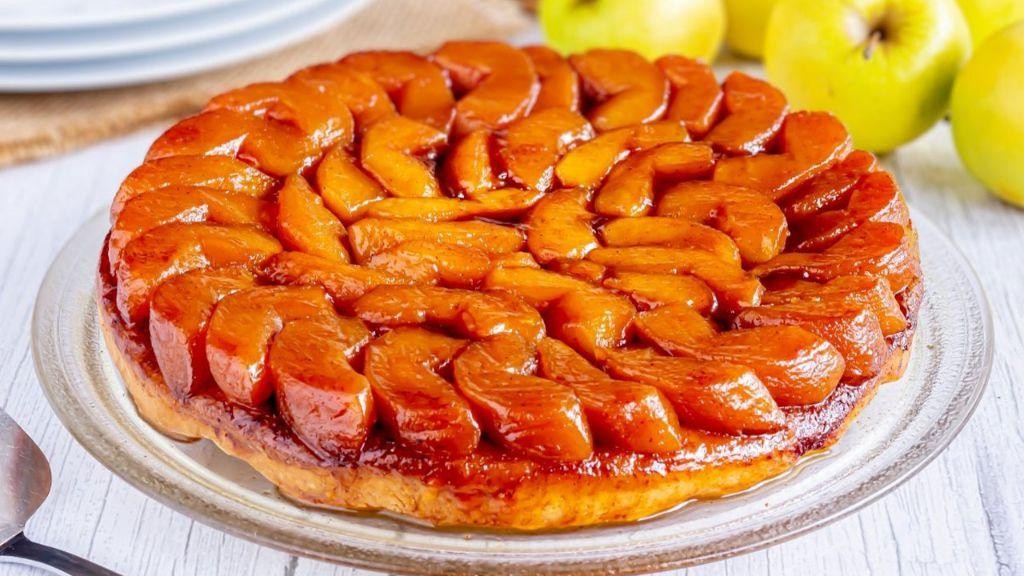
First, let’s dive into the classic Tarte Tatin, a stunning upside-down caramelized apple tart that’s as delightful to make as it is to devour. Perfect for beginners, this recipe breaks down each step to ensure your dessert turns out beautifully golden and irresistibly sweet.
Ingredients
- 4 medium apples, peeled, cored, and quartered
- 1 cup of granulated sugar
- 1/2 cup of unsalted butter
- A splash of vanilla extract
- A pinch of salt
- 1 sheet of puff pastry, thawed
Instructions
- Preheat your oven to 375°F (190°C) to ensure it’s ready when you are.
- In a 9-inch ovenproof skillet, melt the butter over medium heat. Tip: Swirl the pan occasionally for even melting.
- Sprinkle the sugar evenly over the melted butter and cook without stirring until the mixture turns a deep amber color, about 5-7 minutes. Tip: Watch closely to prevent burning.
- Remove the skillet from heat and stir in the vanilla extract and salt. Tip: The vanilla adds depth to the caramel’s flavor.
- Arrange the apple quarters in a circular pattern over the caramel, packing them tightly. Return the skillet to medium heat and cook for 10 minutes to soften the apples slightly.
- Roll out the puff pastry to fit the skillet and place it over the apples, tucking the edges inside the skillet. Bake for 25-30 minutes, or until the pastry is golden and puffed.
- Let the tart cool for 5 minutes, then carefully invert it onto a serving plate. Serve warm to enjoy the contrast between the crispy pastry and the soft, caramelized apples.
Perfectly balanced between sweet and tart, this Tarte Tatin boasts a buttery crust and tender apples. Try serving it with a dollop of crème fraîche for an extra layer of richness.
Crème Brûlée

First, let’s dive into the creamy, dreamy world of Crème Brûlée, a dessert that’s as fun to make as it is to eat. With its crisp sugar top and velvety custard beneath, mastering this classic is a rite of passage for any home baker.
Ingredients
- 2 cups of heavy cream
- 5 egg yolks
- 1/2 cup of granulated sugar, plus a couple of tablespoons for the topping
- A splash of vanilla extract
- A pinch of salt
Instructions
- Preheat your oven to 325°F and grab four ramekins.
- In a saucepan, warm the heavy cream over medium heat until it’s just about to simmer, then turn off the heat. Tip: Keep an eye on it to prevent boiling.
- In a bowl, whisk together the egg yolks, 1/2 cup sugar, vanilla extract, and salt until smooth.
- Slowly pour the warm cream into the egg mixture, whisking constantly to avoid curdling.
- Divide the mixture evenly among the ramekins and place them in a baking dish. Fill the dish with hot water until it reaches halfway up the sides of the ramekins. Tip: This water bath ensures gentle cooking.
- Bake for 30-35 minutes until the edges are set but the center is slightly jiggly.
- Remove from the oven and water bath, then cool to room temperature before refrigerating for at least 2 hours. Tip: Chilling firms up the custard for that perfect texture.
- Before serving, sprinkle a thin, even layer of sugar over each custard and caramelize with a kitchen torch until golden and crisp.
Kindly savor the contrast between the crunchy caramelized sugar and the smooth, rich custard underneath. For a twist, serve with fresh berries or a drizzle of chocolate to elevate this timeless dessert.
Madeleines
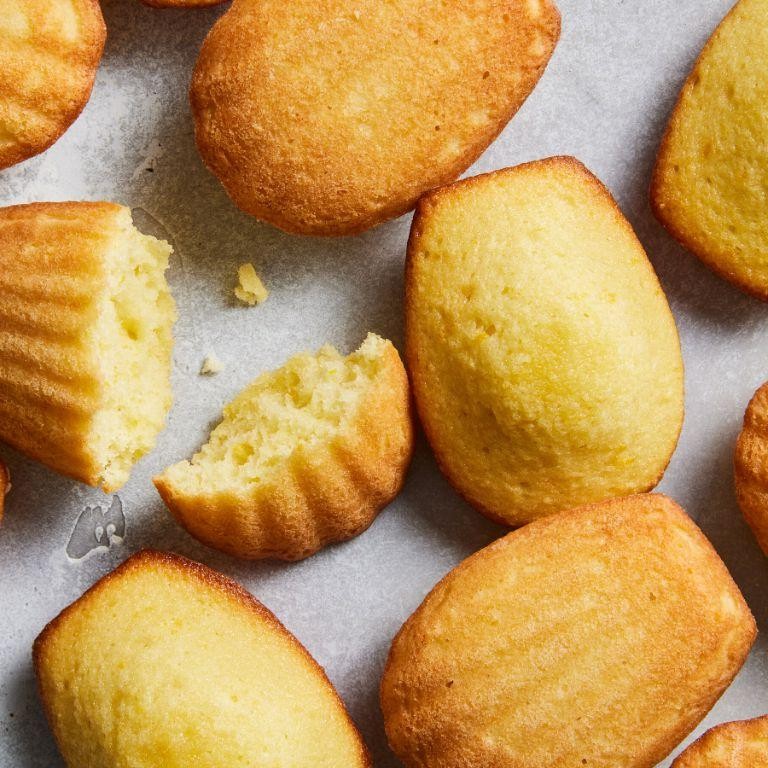
Always a delight to bake, madeleines are those classic French tea cakes that boast a tender, buttery interior with just the right amount of crisp around the edges. Perfect for beginners, this recipe walks you through each step to ensure your madeleines turn out just right.
Ingredients
- 1/2 cup unsalted butter, melted and slightly cooled, plus a bit more for greasing
- 2/3 cup granulated sugar
- A couple of large eggs, at room temperature
- 1 teaspoon pure vanilla extract
- 1 cup all-purpose flour, spooned and leveled
- 1/2 teaspoon baking powder
- A pinch of salt
- A splash of whole milk
Instructions
- Preheat your oven to 375°F (190°C). Lightly grease your madeleine pan with butter, ensuring each shell is well coated to prevent sticking.
- In a large bowl, whisk together the melted butter and sugar until well combined. Tip: The mixture should look smooth and glossy.
- Add the eggs one at a time, whisking well after each addition. Stir in the vanilla extract.
- In a separate bowl, sift together the flour, baking powder, and salt. Gradually fold this into the wet ingredients, alternating with a splash of milk, until just combined. Tip: Overmixing can lead to tough madeleines, so stop as soon as the flour disappears.
- Spoon the batter into the prepared madeleine pan, filling each shell about 3/4 full. Tip: For evenly sized madeleines, use a small cookie scoop or a tablespoon measure.
- Bake for 10-12 minutes, or until the edges are golden and the centers spring back when lightly touched.
- Let the madeleines cool in the pan for a couple of minutes before transferring them to a wire rack to cool completely.
Kick back and enjoy these little beauties with a cup of tea or coffee. Their light, cakey texture and rich, buttery flavor make them irresistible. For an extra touch, dust them with powdered sugar or dip the edges in melted chocolate before serving.
Palmiers
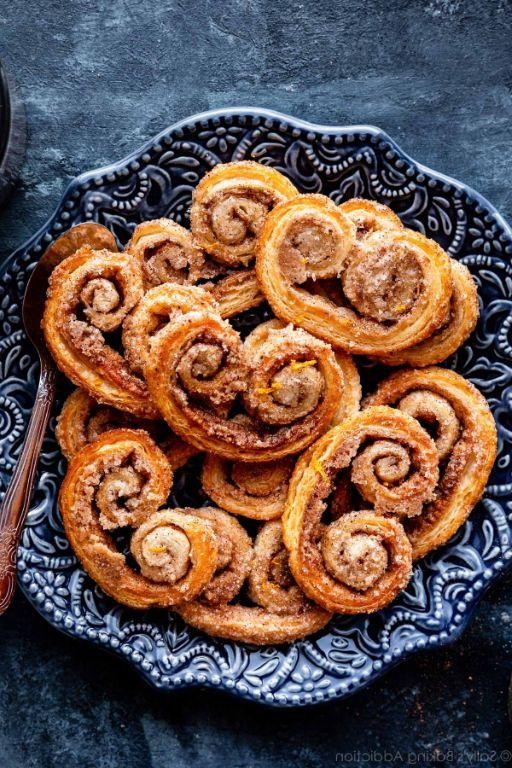
Oftentimes, the simplest recipes yield the most impressive results, and that’s certainly the case with palmiers. These elegant, heart-shaped pastries are a testament to the magic of puff pastry and sugar, requiring just a few ingredients and a bit of patience to transform into something truly special.
Ingredients
- 1 sheet of puff pastry, thawed but still cold
- A generous 1/2 cup of granulated sugar
- A couple of tablespoons of melted butter, just to brush
Instructions
- Preheat your oven to 400°F (200°C) and line a baking sheet with parchment paper.
- Unfold the puff pastry sheet on a clean surface lightly dusted with some of the sugar to prevent sticking.
- Sprinkle the remaining sugar evenly over the pastry, then gently roll it with a rolling pin to press the sugar into the dough.
- Fold the sides of the pastry towards the center so they meet in the middle, then fold again like a book to create a double layer.
- Slice the folded pastry into 1/2-inch pieces and place them cut-side up on the prepared baking sheet, leaving space between each for expansion.
- Lightly brush the tops with melted butter for a golden finish.
- Bake for 10-12 minutes, or until the bottoms are golden brown, then carefully flip each palmier and bake for another 5-7 minutes until crisp and caramelized.
- Transfer to a wire rack to cool completely; they’ll crisp up as they cool.
Remarkably crisp and caramelized on the outside with a tender, flaky interior, palmiers are a delightful treat. Serve them alongside a cup of coffee for dipping, or get creative by drizzling with melted chocolate for an extra indulgent twist.
Canelés de Bordeaux
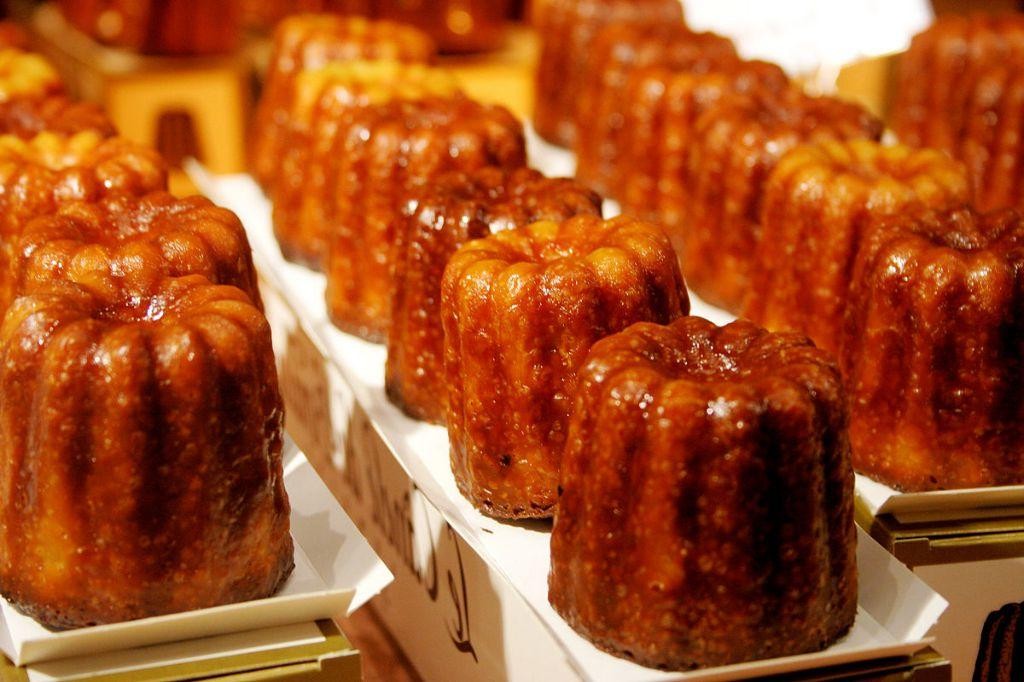
Baking Canelés de Bordeaux might seem daunting, but with patience and precision, you’ll master these caramelized French pastries. Let’s break down the process into manageable steps, ensuring your canelés come out perfectly crisp on the outside and custardy inside.
Ingredients
- 2 cups whole milk
- 3.5 oz unsalted butter (that’s about 7 tbsp)
- 1 cup granulated sugar
- 1/2 cup all-purpose flour
- 1/2 cup cake flour
- a pinch of salt
- 2 large eggs
- 2 large egg yolks
- a splash of vanilla extract
- a couple of tbsp dark rum
Instructions
- In a saucepan, heat the milk and butter over medium heat until the butter melts and the milk is warm but not boiling. Remove from heat and let it cool slightly.
- In a large bowl, whisk together the sugar, all-purpose flour, cake flour, and salt until well combined.
- Add the eggs and egg yolks to the dry ingredients, whisking until smooth. This is your chance to ensure there are no lumps for a silky batter.
- Gradually pour the warm milk mixture into the bowl, whisking constantly to combine. Tip: A steady hand here prevents the eggs from scrambling.
- Stir in the vanilla extract and dark rum, then cover the bowl with plastic wrap. Chill the batter in the fridge for at least 24 hours, or up to 48 hours. This resting period is crucial for flavor development.
- Preheat your oven to 450°F (232°C) and generously butter your canelé molds. Tip: Properly greased molds ensure easy release and a beautiful crust.
- Fill each mold about 3/4 full with the chilled batter. Bake for 15 minutes at 450°F, then reduce the temperature to 375°F (190°C) and bake for another 45 minutes. Watch for a deep golden brown color.
- Immediately turn the canelés out onto a wire rack to cool. Tip: Doing this while hot helps maintain their shape and crispness.
Just out of the oven, these canelés boast a contrast of textures that’s simply irresistible. Serve them slightly warm with a dusting of powdered sugar or alongside a cup of strong coffee for a truly indulgent experience.
Profiteroles

Now, let’s dive into the delightful world of profiteroles, a classic French dessert that’s as fun to make as it is to eat. These light, airy choux pastry puffs filled with cream and drizzled with chocolate are sure to impress.
Ingredients
- 1 cup of water
- 1/2 cup of unsalted butter
- a pinch of salt
- 1 cup of all-purpose flour
- 4 large eggs
- a splash of vanilla extract
- 2 cups of heavy cream
- 1/4 cup of powdered sugar
- a couple of ounces of dark chocolate, chopped
Instructions
- Preheat your oven to 425°F and line a baking sheet with parchment paper.
- In a medium saucepan, combine the water, butter, and salt. Bring to a boil over medium heat.
- Once boiling, add the flour all at once, stirring vigorously until the mixture forms a ball and pulls away from the sides of the pan. Tip: This step is crucial for the right dough consistency.
- Remove from heat and let cool for a couple of minutes. Then, beat in the eggs one at a time, ensuring each is fully incorporated before adding the next. Tip: The dough should be smooth and shiny.
- Transfer the dough to a piping bag fitted with a large round tip and pipe small mounds onto the prepared baking sheet. Tip: Space them about 2 inches apart to allow for expansion.
- Bake for 20 minutes, then reduce the oven temperature to 375°F and bake for another 15 minutes until golden and puffed. Do not open the oven door during baking.
- While the puffs cool, whip the heavy cream with powdered sugar and vanilla extract until stiff peaks form.
- Once the puffs are completely cool, slice them in half horizontally and fill with the whipped cream.
- Melt the dark chocolate in a double boiler or microwave, then drizzle over the filled profiteroles.
Absolutely divine, these profiteroles offer a perfect contrast of crisp shell and soft, creamy filling. Serve them as a elegant dessert at your next dinner party or enjoy them as a sweet treat any day of the week.
Galette des Rois
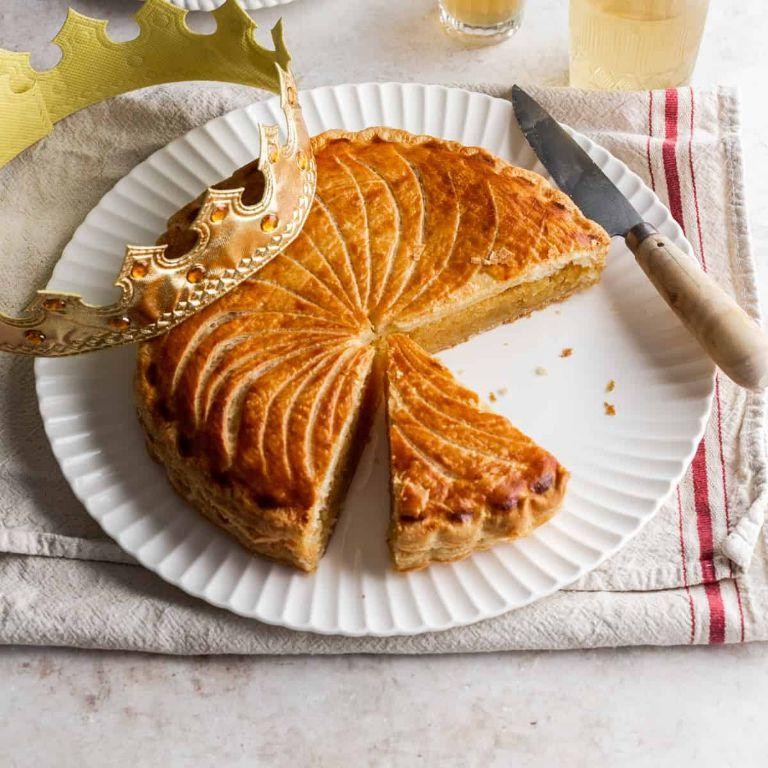
Creating a Galette des Rois is simpler than you might think, especially when you break it down into manageable steps. Let’s dive into the process together, ensuring you end up with a delicious, flaky pastry that’s perfect for any celebration.
Ingredients
- 2 sheets of puff pastry, thawed
- 1/2 cup almond flour
- 1/4 cup granulated sugar
- A pinch of salt
- 3 tbsp unsalted butter, softened
- 1 large egg
- A splash of vanilla extract
- 1 more egg, for egg wash
Instructions
- Preheat your oven to 375°F (190°C) and line a baking sheet with parchment paper.
- In a bowl, mix together the almond flour, sugar, salt, softened butter, egg, and vanilla extract until smooth. This is your frangipane.
- Unfold one sheet of puff pastry onto the prepared baking sheet. Spread the frangipane evenly over the pastry, leaving a 1-inch border around the edges.
- Place the second sheet of puff pastry on top. Press the edges together to seal, then crimp them with a fork for a decorative touch.
- Beat the remaining egg and brush it over the top of the galette for a golden finish.
- Using a sharp knife, make a few small slits on the top to allow steam to escape.
- Bake for 25-30 minutes, or until the galette is puffed and golden brown.
- Let it cool for at least 10 minutes before serving to allow the filling to set.
Once baked, the Galette des Rois boasts a buttery, flaky crust with a rich, almond-filled center. For an extra touch of elegance, dust it with powdered sugar or serve with a dollop of whipped cream.
Financiers
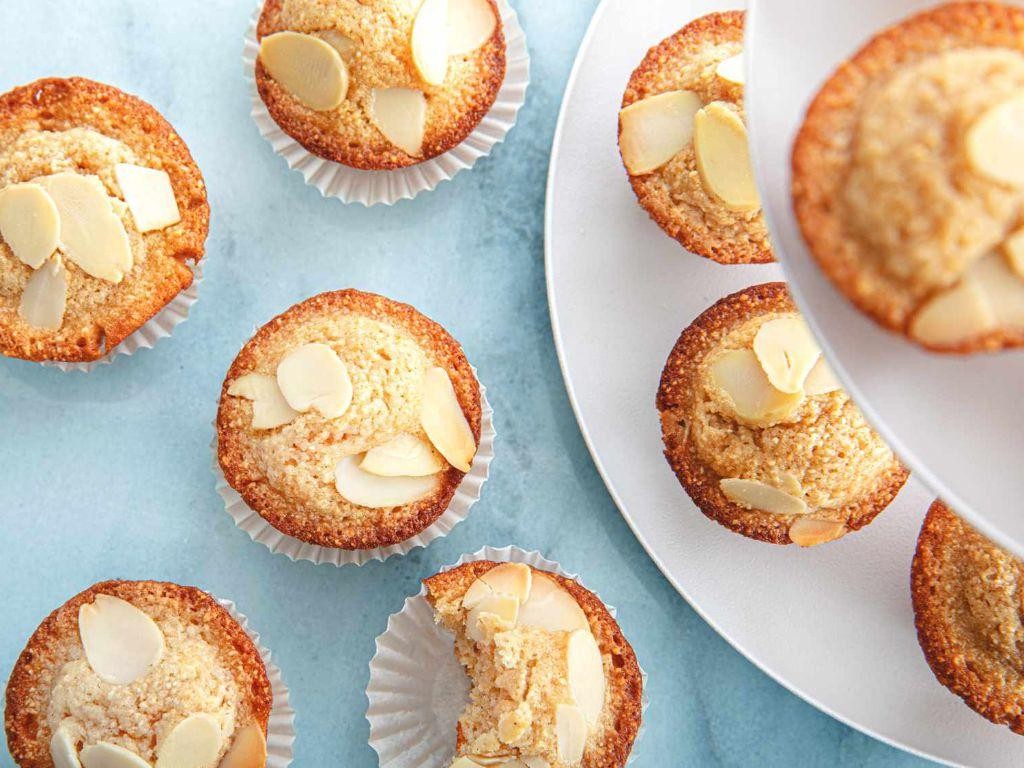
Gather around, budding bakers! Today, we’re diving into the delicate world of Financiers, those irresistibly light and buttery French teacakes that are as fun to make as they are to eat. Perfect for beginners, this recipe breaks down each step to ensure your baking success.
Ingredients
- 1 cup almond flour
- 1 1/4 cups powdered sugar
- 1/2 cup all-purpose flour
- 6 egg whites
- 1/2 cup unsalted butter, melted and slightly cooled
- A splash of vanilla extract
- A pinch of salt
Instructions
- Preheat your oven to 375°F (190°C) and generously butter a financier mold or mini muffin tin.
- In a large bowl, whisk together the almond flour, powdered sugar, all-purpose flour, and salt until well combined.
- Tip: Sifting the dry ingredients can help achieve a finer texture in your financiers.
- Gently stir in the egg whites until the mixture is smooth and free of lumps.
- Add the melted butter and vanilla extract to the batter, mixing until just incorporated. Be careful not to overmix.
- Tip: Letting the batter rest for 10 minutes before baking can enhance the flavors.
- Fill each mold about 3/4 full with the batter, smoothing the tops with a spoon.
- Bake for 12-15 minutes, or until the edges are golden brown and the tops spring back when lightly touched.
- Tip: Rotating the pan halfway through baking ensures even browning.
- Allow the financiers to cool in the mold for 5 minutes before transferring them to a wire rack to cool completely.
Out of the oven, these financiers boast a crisp exterior that gives way to a moist, tender crumb inside, with a rich, nutty flavor that’s subtly sweet. Serve them alongside a cup of tea for an elegant afternoon treat, or dress them up with a dollop of whipped cream and fresh berries for a dessert that’s sure to impress.
Saint Honoré Cake
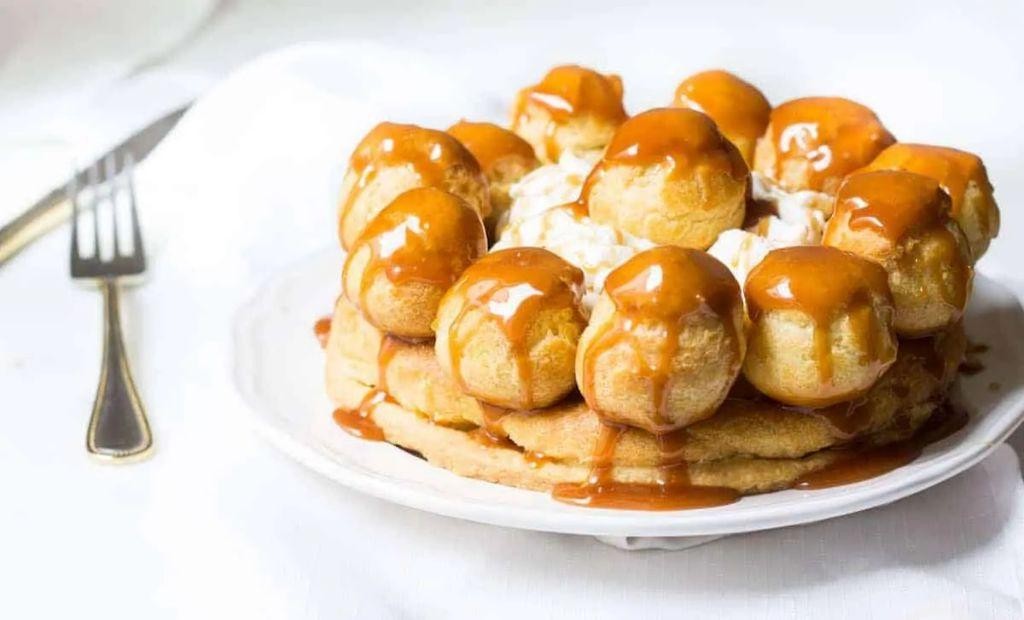
Very few desserts command the elegance and sophistication of the Saint Honoré Cake, a French classic that combines creamy custard, crisp puff pastry, and caramel-glazed cream puffs into a show-stopping masterpiece. Today, we’ll walk through crafting this beauty step by step, ensuring even beginners can achieve bakery-worthy results.
Ingredients
- 2 cups of all-purpose flour, plus a bit extra for dusting
- A stick of unsalted butter, chilled and cubed
- A pinch of salt
- About 1/2 cup of ice water
- 1 cup of whole milk
- 3 large eggs, plus a couple more yolks
- 1/2 cup of granulated sugar
- A splash of vanilla extract
- 1 cup of heavy cream
- 1/4 cup of powdered sugar
- A handful of small cream puffs (store-bought or homemade)
- 1/2 cup of caramel sauce, warmed
Instructions
- Start by making the puff pastry: mix the flour and salt in a large bowl, then cut in the butter until it resembles coarse crumbs. Gradually add ice water until the dough comes together. Wrap and chill for at least 30 minutes.
- Roll out the dough on a floured surface to about 1/4 inch thickness, then transfer to a baking sheet. Prick all over with a fork and bake at 400°F for 15-20 minutes, until golden and puffed. Let cool.
- For the custard: heat the milk in a saucepan until steaming. Whisk together the eggs, yolks, and sugar, then slowly whisk in the hot milk. Return to the pan and cook over medium heat, stirring constantly, until thickened. Stir in vanilla and let cool.
- Whip the heavy cream with powdered sugar to stiff peaks, then fold into the cooled custard to make the cream filling.
- Spread the cream filling over the cooled pastry base. Arrange the cream puffs on top, then drizzle with warm caramel sauce.
- Chill the cake for at least 2 hours before serving to set the layers.
Zesty yet rich, the Saint Honoré Cake offers a delightful contrast between the crisp pastry, smooth cream, and the sweet crunch of caramel. Serve it chilled with a dusting of powdered sugar or alongside a cup of strong coffee for an indulgent treat.
Paris-Brest
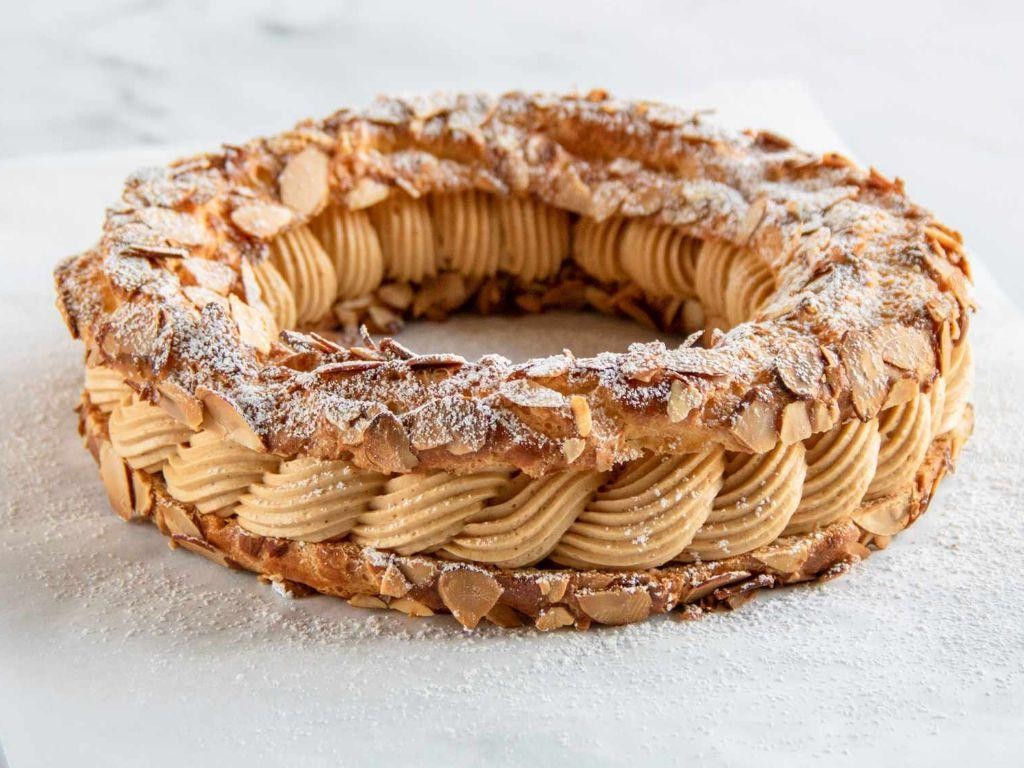
Paris-Brest is a classic French dessert that’s as fun to make as it is to eat, featuring a ring of choux pastry filled with a rich, creamy praline-flavored filling. Perfect for impressing guests or treating yourself, this dessert combines textures and flavors in a way that’s simply unforgettable.
Ingredients
- 1 cup water
- 1/2 cup unsalted butter, cut into pieces
- a pinch of salt
- 1 cup all-purpose flour
- 4 large eggs
- 1 cup heavy cream
- a couple of tablespoons of powdered sugar
- a splash of vanilla extract
- 1/2 cup praline paste
Instructions
- Preheat your oven to 375°F and line a baking sheet with parchment paper.
- In a medium saucepan, bring the water, butter, and salt to a boil over medium heat.
- Quickly stir in the flour with a wooden spoon until the mixture forms a ball and pulls away from the sides of the pan. Tip: Keep stirring for about 2 minutes to cook the flour slightly.
- Remove from heat and let cool for a couple of minutes. Then, beat in the eggs one at a time until the dough is smooth and shiny.
- Pipe or spoon the dough into a ring shape on the prepared baking sheet. Tip: Wet your finger to smooth out any bumps for a more even bake.
- Bake for 30-35 minutes until golden and puffed. Do not open the oven door during the first 20 minutes to prevent collapse.
- Let the pastry cool completely on a wire rack.
- While the pastry cools, whip the heavy cream, powdered sugar, and vanilla extract until stiff peaks form. Fold in the praline paste gently.
- Once the pastry is cool, slice it horizontally and fill with the praline cream. Tip: Use a piping bag for a neater, more professional look.
Outstanding in both appearance and taste, the Paris-Brest offers a delightful contrast between the crisp, airy pastry and the smooth, nutty filling. Serve it as a show-stopping centerpiece at your next dinner party or enjoy it as a decadent afternoon treat.
Mille-Feuille
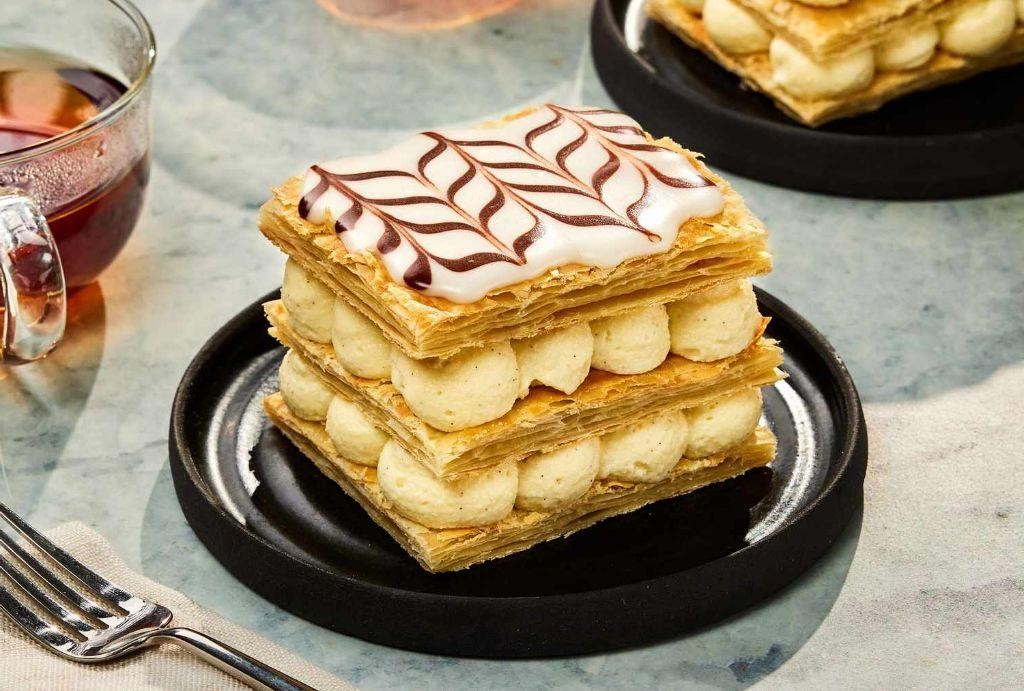
Gathering the delicate layers of Mille-Feuille might seem daunting, but with patience and precision, you’ll create a dessert that’s as impressive to look at as it is to eat. Let’s break down the process into manageable steps, ensuring each layer is perfectly crisp and the filling luxuriously smooth.
Ingredients
- 2 cups of all-purpose flour, plus a little extra for dusting
- 1 cup of unsalted butter, cold and cut into small pieces
- A pinch of salt
- About 1/2 cup of ice water
- 1 1/2 cups of heavy cream
- 1/4 cup of powdered sugar
- A splash of vanilla extract
- 1 cup of pastry cream (store-bought or homemade)
Instructions
- Start by making the puff pastry: In a large bowl, mix the flour and salt. Add the cold butter pieces and quickly rub them into the flour with your fingertips until the mixture resembles coarse crumbs.
- Gradually add ice water, a tablespoon at a time, mixing until the dough just comes together. Tip: Don’t overwork the dough to keep it flaky.
- Wrap the dough in plastic and chill for at least 30 minutes. This rest period is crucial for easy rolling.
- Preheat your oven to 400°F (200°C). Roll out the dough on a lightly floured surface to about 1/8 inch thickness, then fold it into thirds like a letter. Repeat this rolling and folding process two more times, chilling the dough for 10 minutes between each fold.
- After the final fold, roll the dough out to fit a baking sheet, prick all over with a fork, and bake for 20-25 minutes until golden and puffed. Let it cool completely.
- While the pastry cools, whip the heavy cream with powdered sugar and vanilla until stiff peaks form. Gently fold in the pastry cream to create a light filling.
- Cut the cooled pastry into three equal rectangles. Spread half of the cream mixture over the first layer, top with the second pastry sheet, and repeat. Finish with the third pastry layer on top.
- Dust the top with powdered sugar or drizzle with melted chocolate for an extra touch of elegance. Tip: For cleaner slices, chill the assembled Mille-Feuille for an hour before serving.
Achieving the perfect Mille-Feuille is all about the contrast between the crisp, buttery layers and the creamy, rich filling. Serve it as a show-stopping dessert at your next dinner party, or enjoy a slice with a cup of coffee for a truly indulgent treat.
Opera Cake
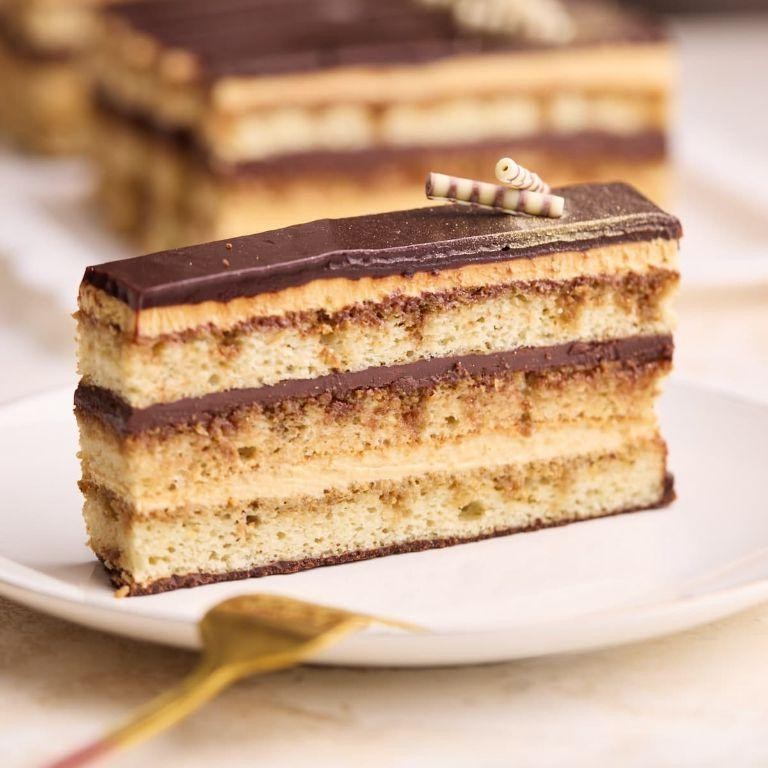
Very few desserts strike the perfect balance between elegance and flavor quite like the Opera Cake. This guide will walk you through creating this classic French dessert, layer by layer, ensuring you achieve that signature harmony of coffee, chocolate, and almond.
Ingredients
- 1 cup of almond flour, because it’s all about that nutty base
- A splash of strong espresso, for that kick of coffee flavor
- 2 sticks of unsalted butter, softened, because butter makes everything better
- 4 large eggs, separated, to give our cake that airy texture
- 1 cup of granulated sugar, divided, for just the right amount of sweetness
- A couple of ounces of dark chocolate, melted, for that rich, glossy ganache
Instructions
- Preheat your oven to 350°F (175°C) and line a baking sheet with parchment paper. Tip: Ensuring your oven is at the right temperature is key to even baking.
- In a bowl, whisk together the almond flour and half of the sugar. Tip: Sifting the almond flour can prevent lumps for a smoother batter.
- Beat the egg whites until stiff peaks form, then gradually add the remaining sugar. This will give your cake layers their light, airy structure.
- Gently fold the egg whites into the almond mixture, then spread evenly on the baking sheet. Bake for 10-12 minutes until golden. Tip: Don’t open the oven door too early to prevent the cake from sinking.
- Once cooled, cut the cake into three equal rectangles. Brush each layer with espresso.
- Spread a layer of softened butter between each cake layer, then top with melted dark chocolate. Chill for at least 2 hours before serving.
Zesty yet sophisticated, this Opera Cake boasts layers of moist almond sponge, rich buttercream, and a glossy chocolate topping. Serve it chilled with a dusting of cocoa powder for an extra touch of elegance.
Brioche
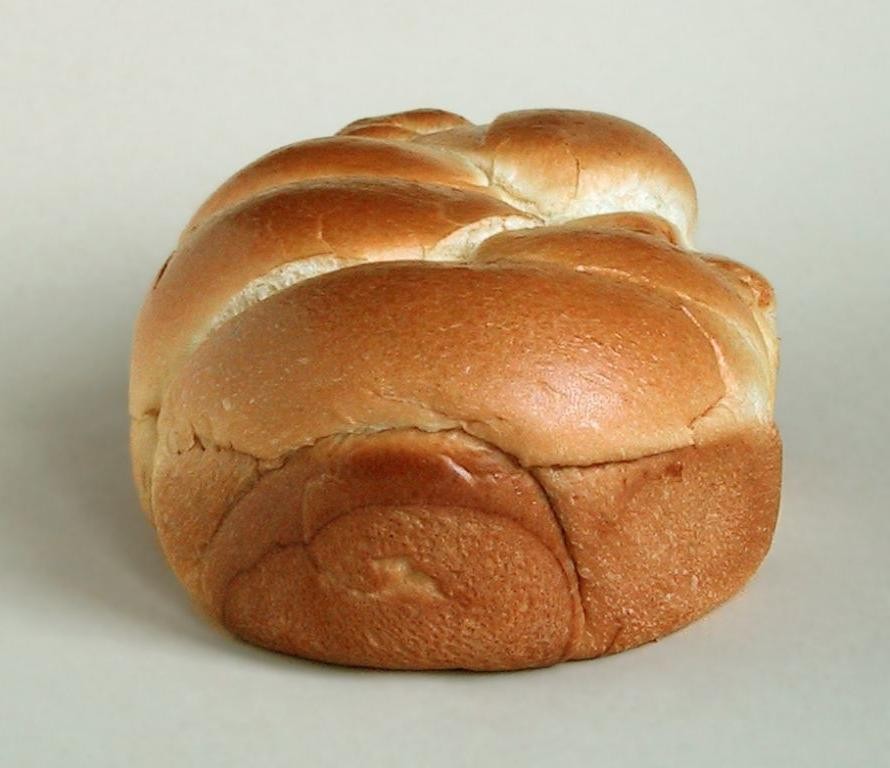
Alright, let’s dive into the world of baking with a classic brioche recipe that’s as rewarding to make as it is to eat. This buttery, slightly sweet bread is perfect for everything from breakfast toast to gourmet sandwiches.
Ingredients
- 4 cups of all-purpose flour
- 1/3 cup of granulated sugar
- 1 tsp of salt
- 2 1/4 tsp of active dry yeast
- 1/2 cup of whole milk, lukewarm
- 4 large eggs
- 1 cup of unsalted butter, softened
- a splash of vanilla extract
- a couple of egg yolks for glazing
Instructions
- In a large bowl, whisk together the flour, sugar, and salt.
- Dissolve the yeast in the lukewarm milk and let it sit for about 5 minutes until frothy.
- Add the yeast mixture, eggs, and vanilla extract to the dry ingredients. Mix until a dough forms.
- Knead the dough on a floured surface for about 10 minutes until smooth and elastic.
- Gradually incorporate the softened butter into the dough, a few tablespoons at a time, kneading until fully absorbed.
- Place the dough in a greased bowl, cover with a damp cloth, and let it rise in a warm place for 1 to 1.5 hours, or until doubled in size.
- Punch down the dough and divide it into equal portions for shaping. Let them rest for 10 minutes.
- Shape the dough into desired forms and place them on a baking sheet lined with parchment paper.
- Cover with a damp cloth and let rise again for about 45 minutes, until puffy.
- Preheat your oven to 375°F (190°C).
- Brush the tops of the brioche with egg yolks for a golden finish.
- Bake for 20-25 minutes, or until deeply golden and sounds hollow when tapped.
- Cool on a wire rack before serving.
This brioche comes out with a tender crumb and a rich, buttery flavor that’s irresistible. Try slicing it thick for French toast or use it as the base for a decadent bread pudding.
Chouquettes
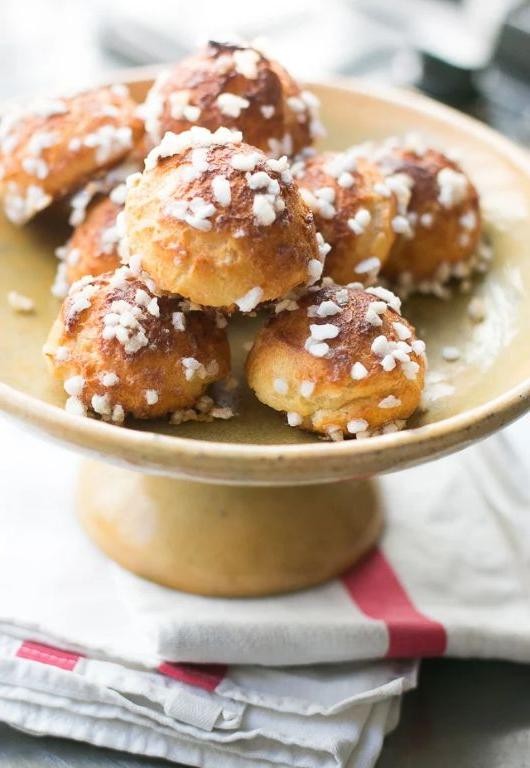
Unlock the secrets to making the lightest, airiest Chouquettes with this beginner-friendly guide. These French sugar puffs are not just a treat to eat but also a joy to make, perfect for those looking to dip their toes into the world of French pastry.
Ingredients
- 1 cup of water
- 1/2 cup of unsalted butter
- A pinch of salt
- 1 cup of all-purpose flour
- 4 large eggs
- A couple of tablespoons of pearl sugar
Instructions
- Preheat your oven to 375°F (190°C) and line a baking sheet with parchment paper.
- In a medium saucepan, combine the water, butter, and a pinch of salt. Bring to a boil over medium heat, stirring occasionally.
- Once boiling, remove from heat and add the flour all at once. Stir vigorously until the mixture forms a smooth ball and pulls away from the sides of the pan.
- Let the dough cool for about 2 minutes, then add the eggs one at a time, beating well after each addition until the dough is shiny and smooth.
- Transfer the dough to a piping bag fitted with a plain tip. Pipe small mounds onto the prepared baking sheet, leaving space between each.
- Sprinkle each mound generously with pearl sugar.
- Bake for 20-25 minutes, or until the Chouquettes are puffed, golden, and crisp. Avoid opening the oven door during the first 15 minutes to prevent them from collapsing.
- Remove from the oven and let cool on a wire rack.
Melt-in-your-mouth tender with a delightful crunch from the pearl sugar, these Chouquettes are best enjoyed fresh out of the oven. For an extra touch, serve them with a dusting of powdered sugar or a side of chocolate dipping sauce.
French Apple Tart
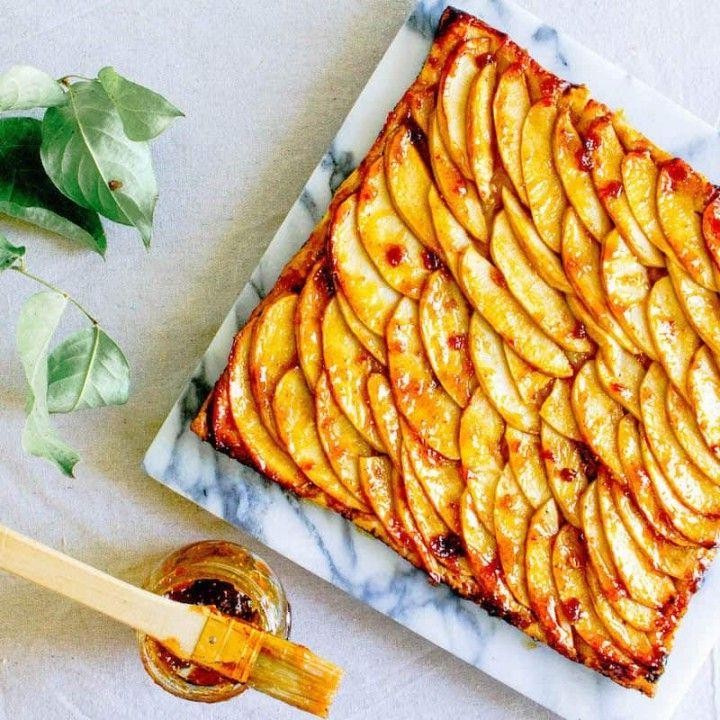
Creating a French Apple Tart is simpler than you might think, and the result is a beautifully rustic dessert that’s sure to impress. Let’s walk through the process together, step by step, to ensure your tart turns out perfectly.
Ingredients
- 1 1/4 cups all-purpose flour
- 1/2 cup unsalted butter, chilled and diced
- a splash of ice water
- 4 large apples, peeled, cored, and thinly sliced
- 1/4 cup granulated sugar
- a couple of tablespoons apricot jam
- a pinch of cinnamon
Instructions
- Preheat your oven to 375°F (190°C) to ensure it’s ready when you are.
- In a large bowl, mix the flour and butter until the mixture resembles coarse crumbs. Tip: Keep the butter cold for a flakier crust.
- Add a splash of ice water, just enough to bring the dough together into a ball. Wrap it in plastic and chill for 30 minutes.
- Roll out the dough on a floured surface to fit a 9-inch tart pan. Press it into the pan and trim the edges. Tip: Don’t stretch the dough; it can shrink during baking.
- Arrange the apple slices in concentric circles over the dough. Sprinkle with sugar and cinnamon.
- Bake for 45 minutes, or until the crust is golden and the apples are tender. Tip: Rotate the tart halfway through for even baking.
- Warm the apricot jam and brush it over the tart for a shiny finish.
Serve this tart warm, with the apples tender and the crust crisp. The apricot glaze adds a subtle sweetness that complements the cinnamon-spiced apples beautifully. For an extra touch, a scoop of vanilla ice cream makes it irresistible.
Pithiviers
Very few pastries can boast the elegance and simplicity of a Pithiviers, a classic French pie that’s as delightful to make as it is to eat. Let’s break down this flaky, buttery masterpiece into manageable steps, ensuring even beginners can achieve bakery-quality results.
Ingredients
- 2 cups of all-purpose flour, plus a little extra for dusting
- a pinch of salt
- a stick of unsalted butter, chilled and cubed
- about 1/4 cup of ice water
- a cup of almond flour
- 1/2 cup of granulated sugar
- a couple of eggs
- a splash of vanilla extract
- a tablespoon of milk, for glazing
Instructions
- In a large bowl, whisk together the 2 cups of flour and pinch of salt.
- Add the cubed butter to the flour, using your fingers to rub it in until the mixture resembles coarse crumbs.
- Gradually add ice water, a tablespoon at a time, mixing until the dough just comes together. Tip: Don’t overwork the dough to keep it flaky.
- Wrap the dough in plastic and chill for at least 30 minutes. This rest period is crucial for easy rolling.
- While the dough chills, mix almond flour, sugar, one egg, and vanilla extract in a bowl to make the filling.
- Preheat your oven to 375°F (190°C) and line a baking sheet with parchment paper.
- Roll out half the dough on a floured surface to about 1/8-inch thickness, then cut into a 9-inch circle.
- Spread the almond filling over the circle, leaving a 1-inch border.
- Roll out the remaining dough to the same thickness, place over the filling, and seal the edges by crimping with a fork.
- Brush the top with milk, then score lightly with a knife in a decorative pattern. Tip: This not only looks pretty but lets steam escape.
- Bake for 25-30 minutes, until golden and puffed. Tip: Rotate the baking sheet halfway through for even browning.
Enjoy the Pithiviers warm, when the almond filling is just set and the pastry is at its flakiest. For an extra touch, serve with a dusting of powdered sugar or a side of fresh berries.
Kouign-Amann
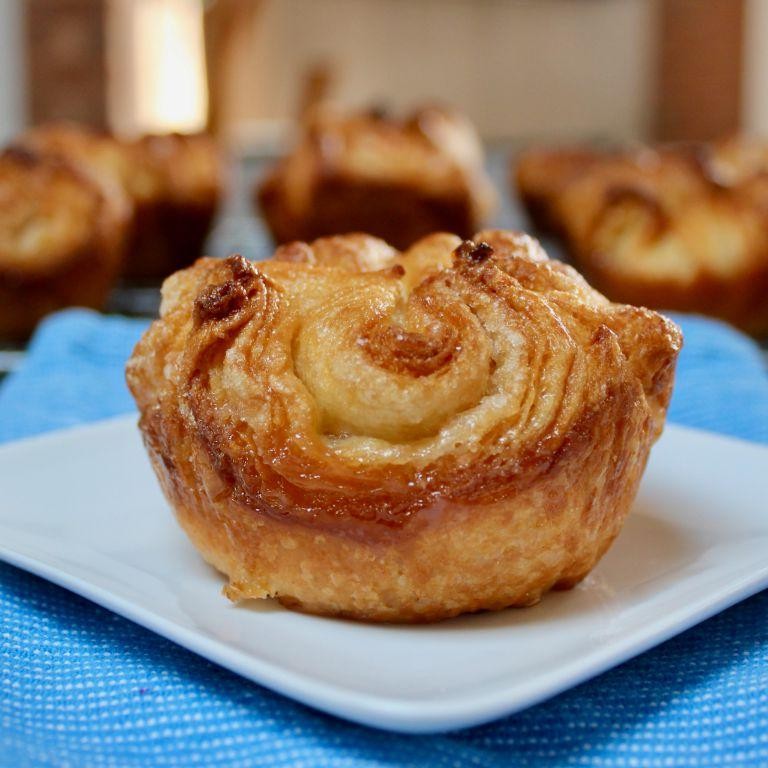
Baking a perfect Kouign-Amann might seem daunting, but with patience and attention to detail, you’ll master this buttery, caramelized pastry. Let’s break it down into manageable steps, ensuring you understand each part of the process.
Ingredients
- 2 cups of all-purpose flour, plus a little extra for dusting
- 1 cup of water, just warm to the touch
- 1 tbsp of active dry yeast
- 1 tsp of sugar, to wake up the yeast
- 1/2 cup of unsalted butter, cold and cubed
- 3/4 cup of granulated sugar, plus more for sprinkling
- A pinch of salt, to balance the sweetness
Instructions
- In a large bowl, mix the warm water, yeast, and 1 tsp of sugar. Let it sit for 5 minutes until frothy, proving the yeast is alive and kicking.
- Add the flour and salt to the yeast mixture, stirring until a shaggy dough forms. Tip: Don’t overmix; a rough dough is what we’re after here.
- Turn the dough onto a lightly floured surface and knead for about 5 minutes until smooth. Cover with a damp cloth and let it rest for 1 hour, or until doubled in size.
- Roll the dough into a rectangle about 1/4 inch thick. Dot the surface with the cold butter cubes, then fold the dough into thirds like a letter.
- Roll the folded dough out again to the same thickness, sprinkle with 1/4 cup of sugar, and fold into thirds once more. Repeat this process twice, chilling the dough for 30 minutes between folds to keep the butter firm.
- Preheat your oven to 375°F. Cut the dough into squares, twist each into a spiral, and place in a muffin tin. Sprinkle generously with the remaining sugar.
- Bake for 25-30 minutes until deeply golden and caramelized. Tip: Keep an eye on them after 20 minutes to prevent burning.
- Let the pastries cool in the tin for 5 minutes, then transfer to a wire rack. Tip: They’ll be molten hot, so resist the urge to bite in immediately.
Melt-in-your-mouth layers with a crispy, sugary crust make Kouign-Amann irresistible. Serve them warm with a dollop of clotted cream or alongside your morning coffee for a truly decadent treat.
Sablé Breton
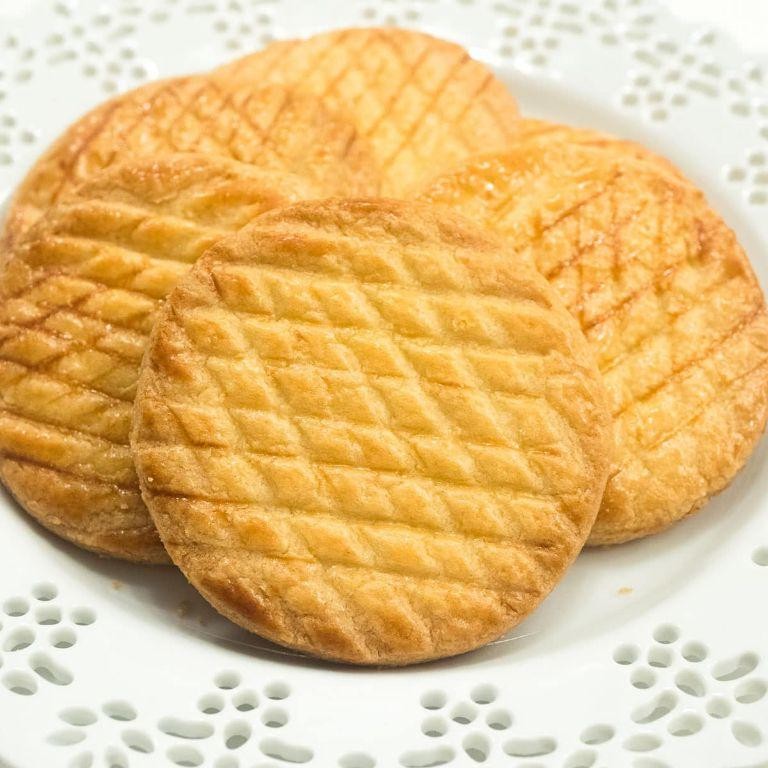
Discover the buttery, crumbly delight of Sablé Breton, a classic French cookie that’s surprisingly simple to make. Perfect for beginners, this recipe walks you through each step to achieve that signature sandy texture.
Ingredients
- 2 cups of all-purpose flour
- 1 cup of unsalted butter, softened
- 3/4 cup of granulated sugar
- a pinch of salt
- 4 egg yolks
- a splash of vanilla extract
Instructions
- Preheat your oven to 350°F (175°C) and line a baking sheet with parchment paper.
- In a large bowl, cream together the softened butter and sugar until light and fluffy, about 3 minutes. Tip: Ensure your butter is at room temperature for easier mixing.
- Beat in the egg yolks one at a time, then add the vanilla extract and a pinch of salt, mixing well after each addition.
- Gradually add the flour to the wet ingredients, mixing just until the dough comes together. Tip: Overmixing can lead to tough cookies, so stop as soon as the flour is incorporated.
- Roll the dough into a log about 2 inches in diameter, wrap in plastic, and chill for at least 1 hour. Tip: Chilling the dough makes it easier to slice and helps the cookies hold their shape while baking.
- Slice the dough into 1/4-inch thick rounds and place them on the prepared baking sheet, leaving about 1 inch between each cookie.
- Bake for 12-15 minutes, or until the edges are just starting to turn golden. The centers should remain soft.
- Let the cookies cool on the baking sheet for 5 minutes before transferring to a wire rack to cool completely.
Kick back and enjoy these Sablé Bretons with their melt-in-your-mouth texture and rich, buttery flavor. For an extra touch, serve them alongside a cup of tea or coffee, or sandwich them with a layer of jam or chocolate for a decadent treat.
Conclusion
Now that you’ve explored these 22 delicious French pastry recipes, it’s clear there’s something for every home cook to love. From flaky croissants to decadent éclairs, each recipe offers a taste of France’s rich culinary tradition. We invite you to try these treats, share your favorites in the comments, and spread the joy by pinning this article on Pinterest. Happy baking!