Game day just got a whole lot tastier! Whether you’re hosting the ultimate football party or just craving some fiery flavors to spice up your watch party, we’ve got you covered. Dive into our sizzling lineup of 20 Spicy Football Game Recipes that promise to keep the crowd cheering and the taste buds dancing. From kickoff to the final whistle, these dishes are sure to score big with fans and foodies alike!
Buffalo Chicken Wings

These Buffalo chicken wings are the perfect game-day snack or party appetizer. You’ll love the crispy skin and spicy, tangy sauce that’s downright addictive.
Ingredients
- 2 lbs chicken wings, split at joints, tips discarded
- 1/2 cup all-purpose flour (for extra crispiness)
- 1 tsp garlic powder (adds depth of flavor)
- 1/2 tsp salt (adjust to taste)
- 1/4 tsp black pepper (freshly ground preferred)
- 1/2 cup hot sauce (like Frank’s RedHot for authenticity)
- 1/4 cup unsalted butter, melted (or use salted and adjust salt)
- 1 tbsp white vinegar (balances the heat)
- 1/2 tsp Worcestershire sauce (for umami)
- Vegetable oil, for frying (or any neutral oil with high smoke point)
Instructions
- In a large bowl, toss the chicken wings with flour, garlic powder, salt, and pepper until evenly coated.
- Heat vegetable oil in a deep fryer or large pot to 375°F. Use enough oil to fully submerge the wings.
- Fry the wings in batches for about 10-12 minutes, or until golden brown and crispy. Avoid overcrowding the pot.
- While the wings fry, whisk together hot sauce, melted butter, vinegar, and Worcestershire sauce in a separate bowl.
- Transfer the fried wings to a paper towel-lined plate to drain excess oil, then immediately toss them in the sauce until well coated.
- Serve the wings hot with celery sticks and blue cheese dressing on the side for cooling contrast.
Delightfully crispy with a fiery kick, these wings are best enjoyed fresh. For a twist, try adding a sprinkle of blue cheese crumbles right on top before serving.
Spicy Jalapeno Poppers
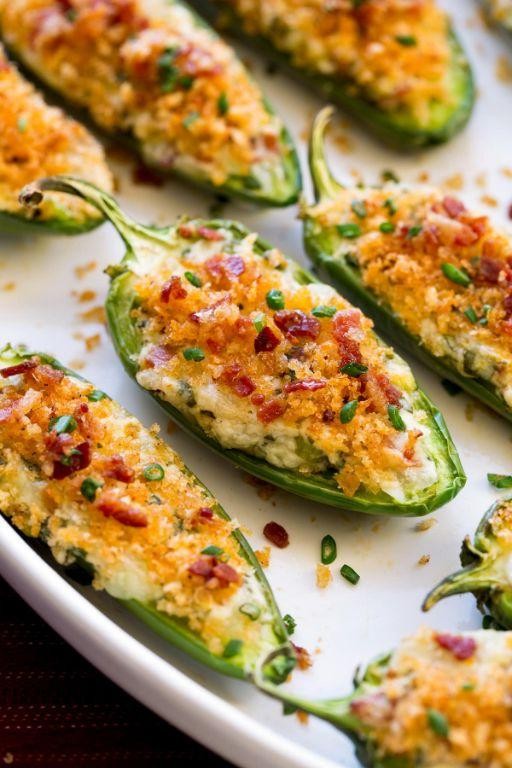
Unbelievably easy and irresistibly tasty, these Spicy Jalapeno Poppers are your next go-to snack for game night or any gathering. You’ll love the creamy, cheesy filling paired with that signature jalapeno kick.
Ingredients
- 12 fresh jalapenos (look for firm, bright green ones)
- 8 oz cream cheese, softened (for easier mixing)
- 1 cup shredded cheddar cheese (sharp for more flavor)
- 1/2 tsp garlic powder (adjust to taste)
- 1/2 tsp onion powder
- 1/4 tsp salt
- 1 cup all-purpose flour (for dredging)
- 2 large eggs (beaten, for binding)
- 1 cup breadcrumbs (panko for extra crunch)
- Oil for frying (or baking spray for a lighter option)
Instructions
- Preheat your oven to 400°F if baking, or heat oil in a deep fryer to 375°F.
- Cut jalapenos in half lengthwise. Scoop out seeds and membranes for less heat.
- In a bowl, mix cream cheese, cheddar cheese, garlic powder, onion powder, and salt until well combined.
- Fill each jalapeno half with the cheese mixture, pressing gently to pack it in.
- Dredge each stuffed jalapeno in flour, dip in beaten eggs, then coat with breadcrumbs.
- If baking, place on a greased baking sheet and spray lightly with oil. Bake for 20 minutes until golden. If frying, cook in batches for 2-3 minutes until crispy.
- Let them cool slightly before serving to avoid burns.
Vibrant and crunchy on the outside with a molten, spicy cheese center, these poppers are a crowd-pleaser. Try serving them with a cool ranch or blue cheese dip to balance the heat.
Loaded Nachos with Beef and Cheese

Mmm, who doesn’t love a plate of loaded nachos? Perfect for game day, movie night, or just because, this beef and cheese version is a crowd-pleaser that’s easy to whip up.
Ingredients
- 1 lb ground beef (85% lean for best flavor)
- 1 tbsp taco seasoning (or make your own blend)
- 1/2 cup water
- 1 bag (10 oz) tortilla chips (sturdy ones hold up better)
- 2 cups shredded cheddar cheese (pre-shredded saves time)
- 1/2 cup diced tomatoes (drain excess liquid to prevent sogginess)
- 1/4 cup sliced jalapeños (pickled for extra tang, if you like)
- 1/4 cup sour cream (light or full-fat, your choice)
- 1/4 cup chopped cilantro (skip if you’re not a fan)
Instructions
- Preheat your oven to 375°F (190°C) to get it ready for baking the nachos.
- In a skillet over medium heat, cook the ground beef until no pink remains, about 5-7 minutes. Tip: Break it into small pieces as it cooks for even browning.
- Drain any excess fat from the beef, then stir in the taco seasoning and water. Simmer for 3-4 minutes until the mixture thickens slightly.
- Arrange the tortilla chips in a single layer on a large baking sheet. Tip: Overlapping is fine, but don’t pile too high or some chips won’t get toppings.
- Sprinkle half the cheese over the chips, then evenly distribute the beef mixture. Top with the remaining cheese.
- Bake for 5-7 minutes, until the cheese is fully melted and bubbly. Tip: Watch closely to prevent burning—every oven is different.
- Remove from the oven and immediately add the diced tomatoes, jalapeños, dollops of sour cream, and cilantro.
All that cheesy, beefy goodness piled high on crispy chips? Absolute perfection. Try serving with a side of guacamole or extra salsa for dipping.
BBQ Pulled Pork Sliders

Ready to dive into some mouthwatering BBQ pulled pork sliders? These little bites are perfect for your next gathering or just a cozy night in. You’ll love how tender the pork gets after a slow cook in all those delicious spices.
Ingredients
- 2 lbs pork shoulder (also known as pork butt)
- 1 cup BBQ sauce (your favorite brand, or homemade)
- 1/2 cup apple cider vinegar (helps tenderize the meat)
- 1 tbsp brown sugar (for a touch of sweetness)
- 1 tbsp smoked paprika (adds a deep, smoky flavor)
- 1 tsp garlic powder (or fresh minced garlic for more punch)
- 1 tsp onion powder
- 1/2 tsp salt (adjust to taste)
- 1/2 tsp black pepper
- 12 slider buns (toasted for extra crunch)
Instructions
- Trim any excess fat from the pork shoulder, leaving a thin layer for flavor.
- In a small bowl, mix together the apple cider vinegar, brown sugar, smoked paprika, garlic powder, onion powder, salt, and black pepper to create a rub.
- Massage the rub all over the pork shoulder, ensuring it’s evenly coated. Let it marinate in the fridge for at least 1 hour, or overnight for deeper flavor.
- Preheat your oven to 300°F. Place the pork in a baking dish, cover tightly with foil, and bake for 4 hours, or until the meat is fork-tender.
- Remove the pork from the oven and let it rest for 10 minutes. Then, shred the meat using two forks, discarding any large fat pieces.
- Toss the shredded pork with BBQ sauce until well coated. Serve warm on toasted slider buns.
Look at how the pork just falls apart, soaking up all that smoky, tangy BBQ goodness. These sliders are a hit every time, especially when paired with a crisp coleslaw or pickles for that perfect crunch.
Hot Pepperoni Pizza Rolls
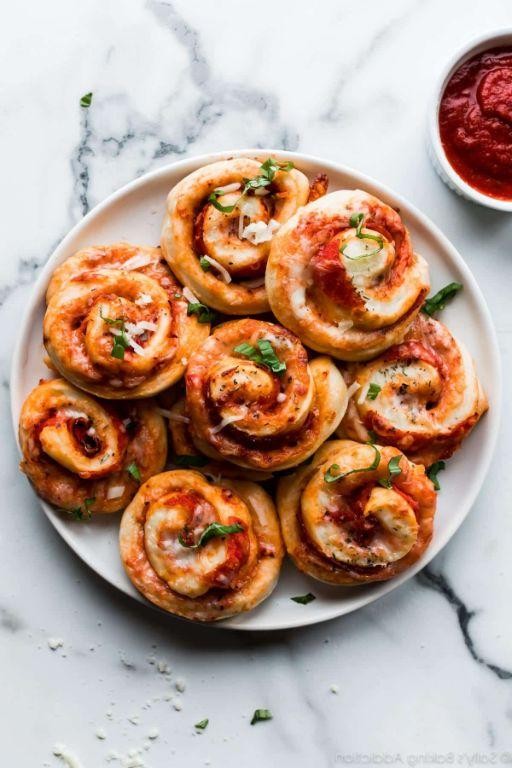
Oh, you’re going to love these Hot Pepperoni Pizza Rolls. They’re the perfect grab-and-go snack for game day or any time you’re craving something cheesy, spicy, and utterly delicious.
Ingredients
- 1 can (13.8 oz) refrigerated pizza dough (or homemade if you’re feeling ambitious)
- 1 cup shredded mozzarella cheese (for that perfect melt)
- 1/2 cup sliced pepperoni (go for the mini ones for easier rolling)
- 1/4 cup grated Parmesan cheese (for a salty, nutty flavor)
- 1 tbsp Italian seasoning (or a mix of dried oregano and basil)
- 1/2 cup marinara sauce (for dipping, warm it up first)
- 2 tbsp melted butter (brush on top for a golden finish)
Instructions
- Preheat your oven to 375°F (190°C) and line a baking sheet with parchment paper.
- Roll out the pizza dough on a lightly floured surface into a 12×8-inch rectangle. Tip: If the dough springs back, let it rest for 5 minutes before trying again.
- Sprinkle the mozzarella cheese evenly over the dough, leaving a 1-inch border around the edges.
- Layer the pepperoni slices over the cheese, then sprinkle with Parmesan and Italian seasoning.
- Starting from the long side, tightly roll the dough into a log. Pinch the seam to seal. Tip: Use a bit of water on the edges if they’re not sticking.
- Cut the log into 1-inch slices and place them cut side up on the prepared baking sheet. Brush the tops with melted butter.
- Bake for 20-25 minutes, or until the rolls are golden brown and the cheese is bubbly. Tip: Rotate the pan halfway through for even browning.
- Serve warm with marinara sauce for dipping.
Perfectly crispy on the outside and packed with gooey cheese and spicy pepperoni inside, these rolls are a crowd-pleaser. Try serving them with a side of ranch dressing for an extra flavor kick.
Chili Cheese Dip with Tortilla Chips

So, you’re looking for the ultimate crowd-pleaser that’s as easy to make as it is delicious? This chili cheese dip with tortilla chips is your go-to for any gathering, game day, or just a cozy night in.
Ingredients
- 1 lb ground beef (or turkey for a lighter option)
- 1 can (15 oz) chili beans, undrained
- 1 can (10 oz) diced tomatoes with green chilies, undrained
- 1 package (8 oz) cream cheese, softened (easier to mix)
- 2 cups shredded cheddar cheese (sharp for more flavor)
- 1 tbsp chili powder (adjust to taste)
- 1/2 tsp garlic powder
- Tortilla chips for serving
Instructions
- In a large skillet over medium heat, cook the ground beef until no longer pink, about 5-7 minutes. Drain any excess fat.
- Add the chili beans, diced tomatoes with green chilies, chili powder, and garlic powder to the skillet. Stir to combine.
- Reduce heat to low. Add the cream cheese and cheddar cheese, stirring until fully melted and combined, about 3-5 minutes. Tip: Keep the heat low to prevent the cheese from separating.
- Once everything is melted and bubbly, remove from heat. Let it sit for 2 minutes to thicken slightly. Tip: The dip will continue to thicken as it cools.
- Serve warm with tortilla chips. Tip: For an extra touch, garnish with sliced green onions or a dollop of sour cream.
Mmm, this dip is creamy, cheesy, and has just the right amount of kick. Try serving it in a bread bowl for an edible serving dish that’s sure to impress.
Spicy Meatball Subs
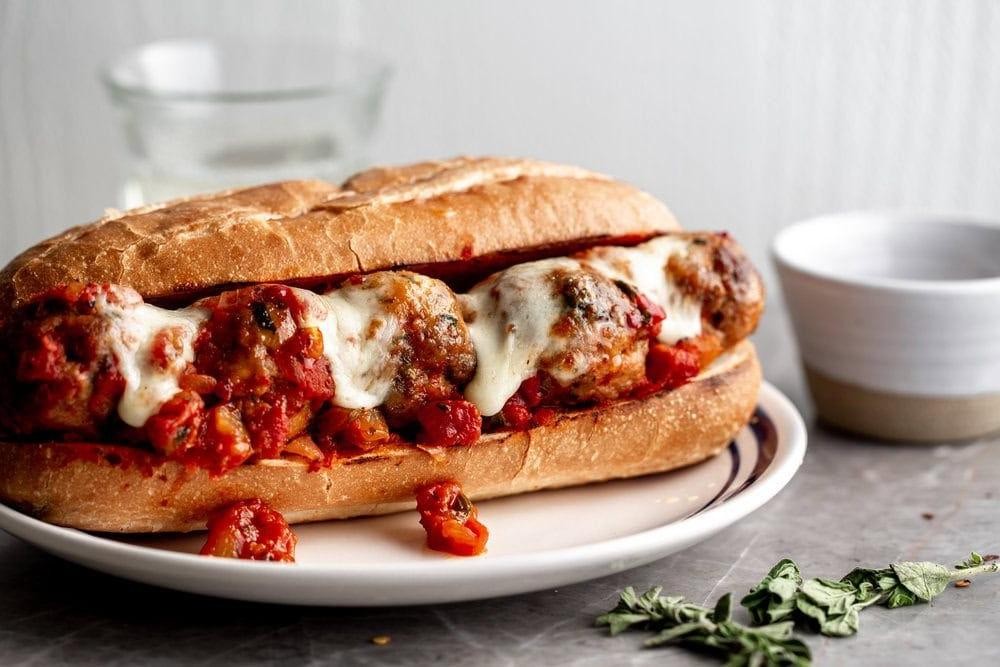
These spicy meatball subs are the perfect blend of heat and comfort, ideal for when you’re craving something hearty with a kick. You’ll love how the flavors meld together in every bite.
Ingredients
- 1 lb ground beef (or a mix of beef and pork for more flavor)
- 1/2 cup breadcrumbs (panko works great for extra crunch)
- 1/4 cup grated Parmesan cheese (freshly grated tastes best)
- 1 large egg (helps bind the meatballs)
- 2 cloves garlic, minced (or 1/2 tsp garlic powder if you’re in a pinch)
- 1 tsp red pepper flakes (adjust to taste for more or less heat)
- 1 tsp salt (kosher salt preferred for even seasoning)
- 1/2 tsp black pepper (freshly ground adds more flavor)
- 1 tbsp olive oil (or any neutral oil for frying)
- 1 24-oz jar marinara sauce (homemade or your favorite store brand)
- 4 sub rolls (toasted for extra texture)
- 1 cup shredded mozzarella cheese (for that perfect melt)
Instructions
- Preheat your oven to 375°F (190°C) to get it ready for toasting the subs later.
- In a large bowl, combine the ground beef, breadcrumbs, Parmesan, egg, garlic, red pepper flakes, salt, and black pepper. Mix gently with your hands until just combined—overmixing can make the meatballs tough.
- Shape the mixture into 12 equal-sized meatballs, about 1.5 inches in diameter. Tip: Wet your hands slightly to prevent sticking.
- Heat the olive oil in a large skillet over medium heat. Add the meatballs, working in batches if necessary, and brown them on all sides, about 2 minutes per side. They don’t need to be cooked through yet.
- Transfer the browned meatballs to a plate. In the same skillet, pour in the marinara sauce and bring to a simmer. Tip: Scrape up any browned bits for extra flavor.
- Return the meatballs to the skillet, cover, and simmer for 15 minutes, or until the meatballs are cooked through.
- While the meatballs simmer, split the sub rolls and toast them in the oven for about 5 minutes, until lightly crispy.
- Divide the meatballs and sauce among the toasted rolls, then top each with shredded mozzarella. Tip: Broil for 1-2 minutes if you like your cheese extra bubbly.
Unbelievably juicy and packed with flavor, these subs are a hit. Serve them with a side of pickled jalapeños for an extra spicy kick or a simple green salad to balance the richness.
Garlic Parmesan Chicken Wings

Garlic Parmesan Chicken Wings are the ultimate crowd-pleaser, perfect for game day or a cozy night in. You’ll love how the crispy wings get coated in a rich, savory sauce that’s packed with flavor.
Ingredients
- 2 lbs chicken wings (split into drumettes and flats)
- 1/2 cup grated Parmesan cheese (freshly grated for best flavor)
- 1/4 cup unsalted butter (melted)
- 3 cloves garlic (minced, or more to taste)
- 1 tbsp olive oil (or any neutral oil)
- 1/2 tsp salt (adjust to taste)
- 1/4 tsp black pepper (freshly ground preferred)
- 1/4 tsp paprika (for a subtle smokiness)
Instructions
- Preheat your oven to 400°F (200°C) and line a baking sheet with parchment paper for easy cleanup.
- In a large bowl, toss the chicken wings with olive oil, salt, pepper, and paprika until evenly coated.
- Spread the wings in a single layer on the prepared baking sheet. Bake for 40-45 minutes, flipping halfway through, until golden and crispy.
- While the wings bake, mix melted butter, minced garlic, and Parmesan cheese in a small bowl to create the sauce.
- Once the wings are done, immediately toss them in the garlic Parmesan sauce until fully coated. Tip: Do this while the wings are hot to ensure the sauce sticks well.
- Serve the wings hot, garnished with extra Parmesan if desired. Tip: Pair with a side of ranch or blue cheese dressing for dipping.
Zesty and aromatic, these wings are irresistibly crispy on the outside and tender inside. Try serving them over a bed of arugula for a fresh contrast to the rich flavors.
Bacon Wrapped Jalapenos
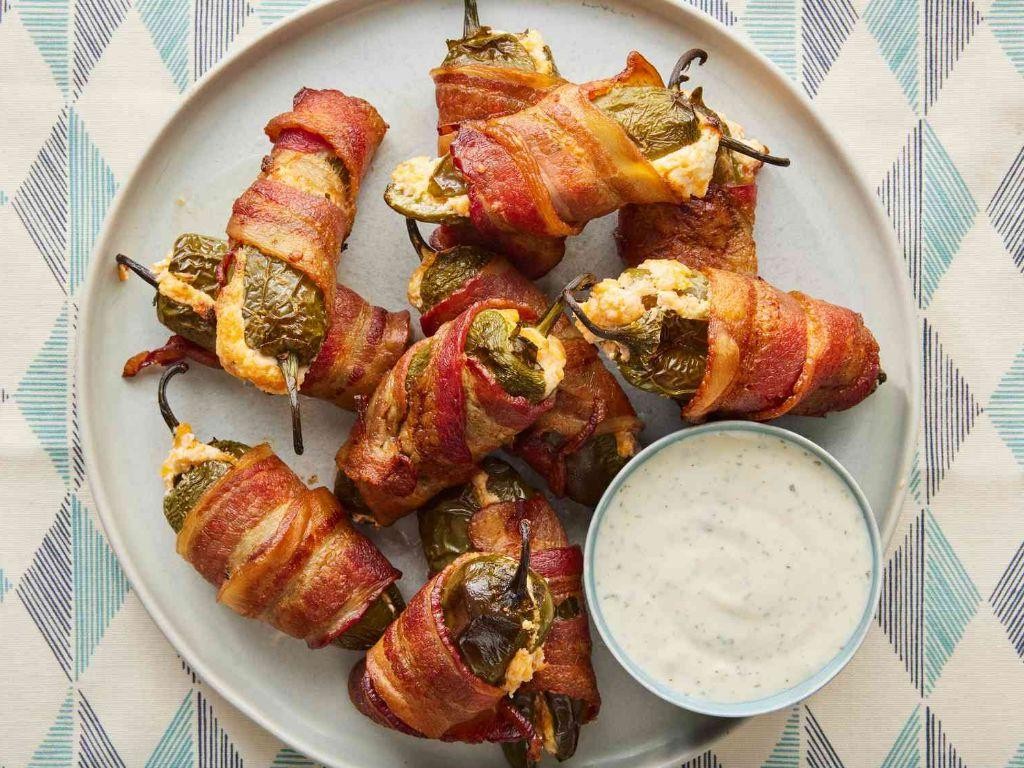
Oh, you’re in for a treat with these bacon-wrapped jalapenos! They’re the perfect blend of spicy, smoky, and creamy, making them an irresistible appetizer for any gathering.
Ingredients
- 12 fresh jalapenos (look for firm, bright green ones)
- 8 oz cream cheese, softened (easier to mix and fill)
- 1 cup shredded cheddar cheese (sharp for more flavor)
- 12 slices bacon (thin slices wrap easier)
- 1 tsp garlic powder (adjust to taste)
Instructions
- Preheat your oven to 375°F (190°C) and line a baking sheet with parchment paper for easy cleanup.
- Cut the jalapenos in half lengthwise. Use a spoon to scoop out the seeds and membranes for less heat.
- In a bowl, mix the cream cheese, cheddar cheese, and garlic powder until well combined. Tip: Letting the cream cheese soften at room temperature makes mixing easier.
- Fill each jalapeno half with the cheese mixture, slightly mounding it on top.
- Wrap each stuffed jalapeno with a slice of bacon, covering the cheese as much as possible. Secure with a toothpick if needed.
- Place the bacon-wrapped jalapenos on the prepared baking sheet. Bake for 20-25 minutes, or until the bacon is crispy and the cheese is bubbly. Tip: For extra crispiness, broil for the last 2-3 minutes, watching closely to prevent burning.
- Let them cool for a few minutes before serving. They’ll be hot! Tip: Serve with a side of ranch or blue cheese dressing for dipping.
Vibrant with a kick, these bacon-wrapped jalapenos offer a creamy contrast to the crispy bacon. Try serving them atop a slice of toasted baguette for an extra crunch.
Cheesy Bacon Potato Skins
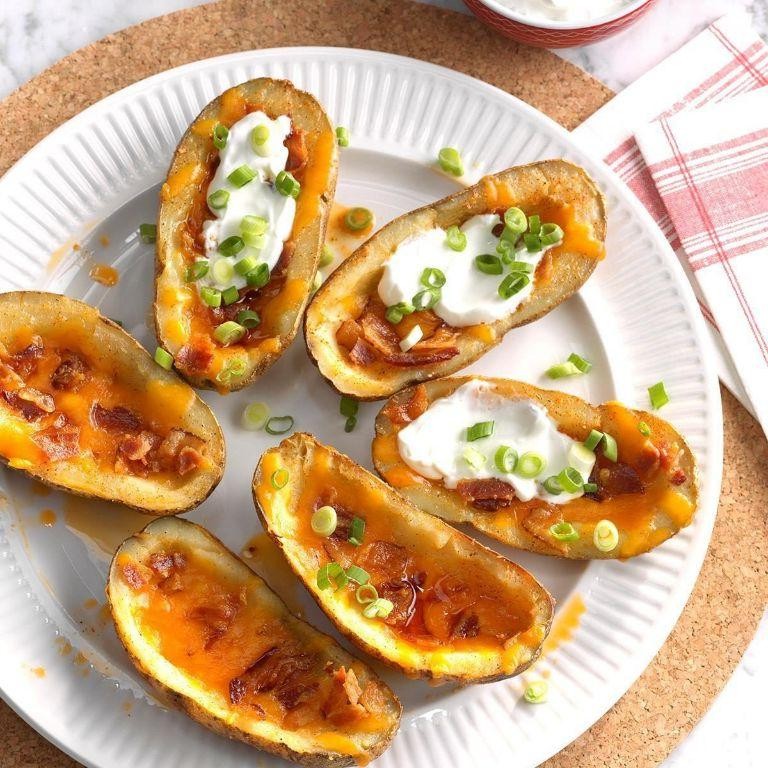
These cheesy bacon potato skins are the ultimate comfort food, perfect for game day or a cozy night in. They’re crispy, loaded with flavor, and oh-so-satisfying.
Ingredients
- 4 large russet potatoes (scrubbed clean)
- 2 tbsp olive oil (or any neutral oil)
- 1 tsp salt (adjust to taste)
- 1/2 tsp black pepper (freshly ground for best flavor)
- 6 strips bacon (cooked crispy and crumbled)
- 1 cup shredded cheddar cheese (sharp for more flavor)
- 1/4 cup sour cream (for serving)
- 2 tbsp chopped chives (for garnish)
Instructions
- Preheat your oven to 400°F (200°C).
- Pierce the potatoes all over with a fork, then rub them with olive oil and sprinkle with salt and pepper.
- Bake the potatoes directly on the oven rack for 50-60 minutes, or until tender when pierced with a fork.
- Let the potatoes cool for 10 minutes, then cut them in half lengthwise.
- Scoop out the insides, leaving about a 1/4-inch thick shell. Tip: Save the scooped-out potato for another use, like mashed potatoes.
- Brush the inside and outside of the potato skins with olive oil, then return them to the oven for 10 minutes to crisp up.
- Sprinkle the inside of each skin with cheddar cheese and crumbled bacon.
- Bake for another 5 minutes, or until the cheese is melted and bubbly.
- Top with a dollop of sour cream and a sprinkle of chives before serving. Tip: For extra flavor, try adding a dash of hot sauce or a sprinkle of smoked paprika.
Very crispy on the outside with a gooey, cheesy center, these potato skins are a crowd-pleaser. Serve them with a cold beer or as part of a bigger spread for the ultimate snack experience.
Spicy Sausage Stuffed Mushrooms
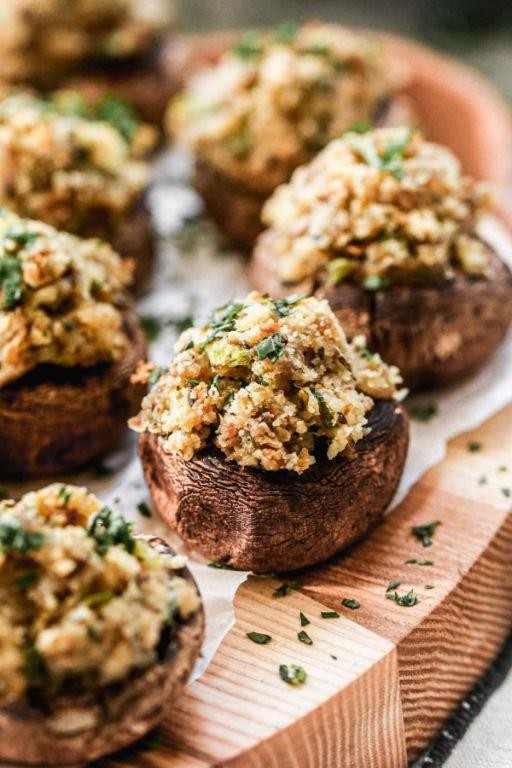
Unbelievably easy and packed with flavor, these spicy sausage stuffed mushrooms are the perfect appetizer for any gathering. You’ll love how the spicy sausage pairs with the earthy mushrooms, creating a bite-sized treat that’s hard to resist.
Ingredients
- 12 large white mushrooms (stems removed and reserved)
- 1/2 pound spicy Italian sausage (casings removed)
- 1/4 cup cream cheese, softened (for easier mixing)
- 1/4 cup grated Parmesan cheese (plus extra for topping)
- 1 clove garlic, minced (or 1/2 tsp garlic powder)
- 1 tbsp olive oil (or any neutral oil)
- 1/4 tsp salt (adjust to taste)
- 1/4 tsp black pepper (adjust to taste)
Instructions
- Preheat your oven to 375°F (190°C) and line a baking sheet with parchment paper for easy cleanup.
- Heat olive oil in a skillet over medium heat. Add the spicy Italian sausage, breaking it apart with a spoon, and cook until no longer pink, about 5 minutes.
- While the sausage cooks, finely chop the reserved mushroom stems and add them to the skillet along with the minced garlic. Cook for another 2 minutes until the mushrooms are soft.
- Remove the skillet from heat and stir in the cream cheese, Parmesan cheese, salt, and pepper until well combined. Tip: Let the mixture cool slightly to make it easier to handle.
- Stuff each mushroom cap with the sausage mixture, pressing down lightly to pack it in. Sprinkle the tops with a little extra Parmesan cheese.
- Bake in the preheated oven for 20 minutes, or until the mushrooms are tender and the tops are golden brown. Tip: For a crispier top, broil for the last 2 minutes.
- Let the mushrooms cool for a few minutes before serving. They’ll be easier to pick up and the flavors will have melded beautifully.
Delightfully spicy and creamy, these stuffed mushrooms offer a satisfying crunch with every bite. Serve them on a platter with a side of marinara sauce for dipping, or as a standout addition to your charcuterie board.
Beer Battered Onion Rings
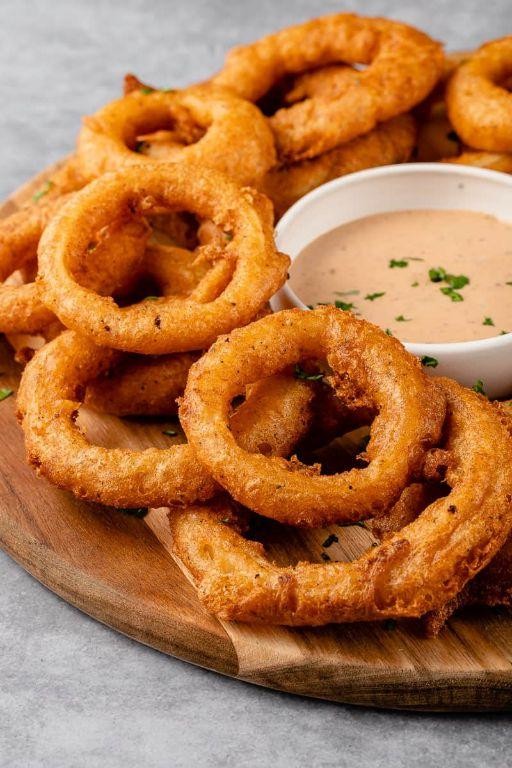
Mmm, there’s nothing quite like the crispy, golden perfection of beer-battered onion rings. Whether you’re gearing up for game day or just craving something crunchy, this recipe is a surefire hit.
Ingredients
- 1 large onion, sliced into 1/2-inch rings (sweet varieties like Vidalia work best)
- 1 cup all-purpose flour (plus extra for dusting)
- 1 tsp baking powder (for extra puffiness)
- 1 tsp salt (adjust to taste)
- 1/2 tsp paprika (for a smoky hint)
- 1 cup beer (lager or ale, cold)
- Vegetable oil, for frying (or any neutral oil with a high smoke point)
Instructions
- In a large bowl, whisk together 1 cup flour, baking powder, salt, and paprika.
- Gradually pour in the cold beer, stirring until just combined. Let the batter rest for 10 minutes; it’ll thicken slightly.
- Heat oil in a deep fryer or large pot to 375°F. Use a thermometer for accuracy.
- Lightly dust onion rings with extra flour. This helps the batter stick better.
- Dip each ring into the batter, letting excess drip off. Fry in batches to avoid crowding, about 2-3 minutes per side, until golden brown.
- Transfer to a wire rack or paper towels to drain. Sprinkle with a pinch of salt while still hot.
Fresh out of the fryer, these onion rings are irresistibly crisp with a tender, sweet center. Serve them stacked high with a side of spicy aioli or tucked into a burger for the ultimate crunch.
Hot Honey Glazed Chicken Bites
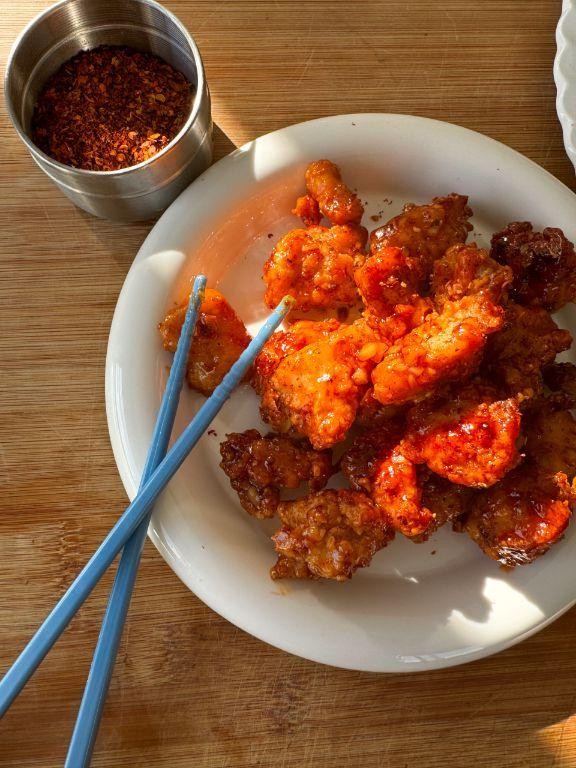
Just imagine biting into crispy, juicy chicken pieces coated in a sweet and spicy glaze that’s got just the right kick. These Hot Honey Glazed Chicken Bites are your next favorite snack or dinner, ready in no time and packed with flavors that’ll have you reaching for more.
Ingredients
- 1 lb chicken breast, cut into 1-inch pieces (for even cooking)
- 1/2 cup all-purpose flour (for a light, crispy coating)
- 1/2 tsp salt (adjust to taste)
- 1/4 tsp black pepper (freshly ground preferred)
- 1/2 cup hot honey (or regular honey mixed with 1/2 tsp chili flakes for heat)
- 2 tbsp butter (unsalted, for a rich glaze)
- 1 tbsp olive oil (or any neutral oil, for frying)
Instructions
- In a bowl, mix the flour, salt, and pepper. Toss the chicken pieces in the mixture until fully coated.
- Heat olive oil in a large skillet over medium-high heat. Once hot, add the chicken in a single layer. Cook for 4-5 minutes per side until golden and crispy. Tip: Don’t overcrowd the pan to ensure even cooking.
- While the chicken cooks, melt butter in a small saucepan over low heat. Stir in the hot honey until well combined. Tip: Keep the heat low to prevent the honey from burning.
- Once the chicken is cooked, pour the hot honey glaze over the chicken in the skillet. Toss gently to coat each piece evenly. Cook for another 1-2 minutes to let the glaze thicken slightly. Tip: Use a silicone spatula for easy tossing and to avoid scratching your pan.
- Remove from heat and let sit for a minute before serving. This allows the glaze to set a bit.
With a perfect balance of sweet and heat, these chicken bites are irresistibly sticky and crunchy. Serve them over a bed of rice for a hearty meal or with toothpicks as a party appetizer that’ll disappear fast.
Smoky BBQ Ribs
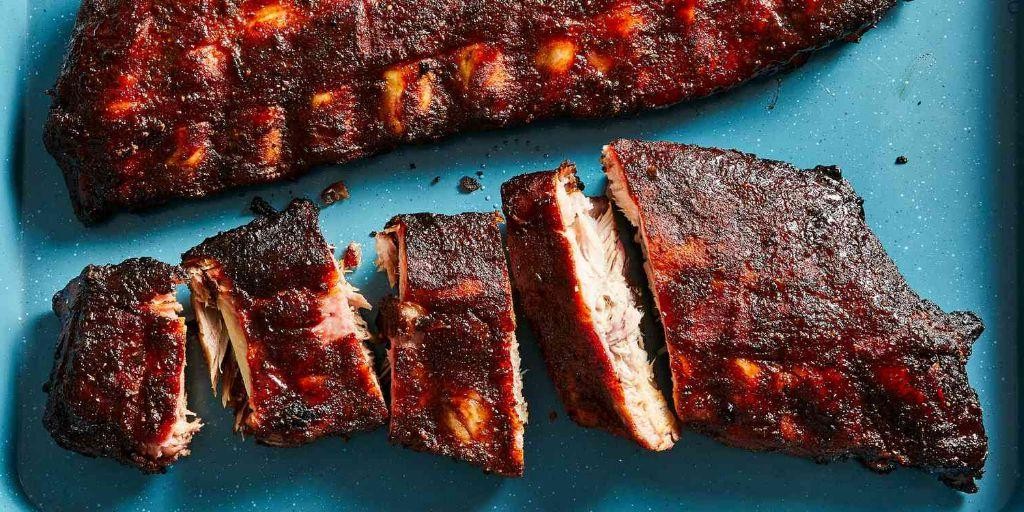
Alright, you’re in for a treat with these smoky BBQ ribs that’ll have your taste buds dancing. Perfect for a weekend cookout or when you’re just craving something deliciously meaty.
Ingredients
- 2 racks of baby back ribs (about 2 lbs each)
- 1/4 cup brown sugar (packed, for that sweet touch)
- 2 tbsp smoked paprika (the key to smokiness)
- 1 tbsp garlic powder (because everything’s better with garlic)
- 1 tbsp onion powder (adds depth)
- 1 tsp cayenne pepper (adjust to spice preference)
- 1 cup BBQ sauce (your favorite brand or homemade)
- 1/2 cup apple cider vinegar (for tenderizing)
- Aluminum foil (for wrapping)
Instructions
- Preheat your oven to 275°F. Low and slow is the way to go for tender ribs.
- In a bowl, mix brown sugar, smoked paprika, garlic powder, onion powder, and cayenne pepper. This is your dry rub.
- Remove the membrane from the back of the ribs for better flavor penetration. Tip: Use a paper towel for a better grip.
- Generously apply the dry rub to both sides of the ribs. Don’t be shy; every inch should be covered.
- Place the ribs on a large piece of aluminum foil, meat side up. Drizzle with apple cider vinegar before tightly wrapping in the foil.
- Bake in the preheated oven for 3 hours. The wait will be worth it.
- Carefully unwrap the ribs and brush them with BBQ sauce. Tip: Save some sauce for serving.
- Switch your oven to broil and place the ribs back in, uncovered, for 5 minutes or until the sauce is bubbly and slightly charred.
- Let the ribs rest for 10 minutes before slicing. This keeps them juicy.
Smoky, sweet, and with just the right amount of kick, these ribs are fall-off-the-bone tender. Serve them with extra BBQ sauce on the side and a cold beer for the ultimate experience.
Fiery Buffalo Chicken Dip

Ready to spice up your snack game? This Fiery Buffalo Chicken Dip is the perfect blend of creamy, cheesy, and spicy, guaranteed to be a hit at any gathering. You’ll love how easy it is to whip up, especially when you’re craving something with a kick.
Ingredients
- 2 cups shredded cooked chicken (rotisserie works great)
- 8 oz cream cheese, softened (microwave for 20 sec if needed)
- 1/2 cup hot sauce (Frank’s RedHot is a classic choice)
- 1/2 cup ranch dressing (or blue cheese for a tangier twist)
- 1 cup shredded cheddar cheese (sharp for more flavor)
- 1/2 cup crumbled blue cheese (optional, for extra tang)
- 1/4 cup chopped green onions (for garnish)
Instructions
- Preheat your oven to 350°F (175°C) to ensure it’s ready for baking.
- In a large mixing bowl, combine the shredded chicken, softened cream cheese, hot sauce, and ranch dressing. Mix until well blended. Tip: If the cream cheese is too firm, a quick microwave zap makes mixing easier.
- Stir in 3/4 cup of the shredded cheddar cheese and all of the blue cheese if using. Reserve the remaining cheddar for topping.
- Transfer the mixture to an oven-safe dish, spreading it evenly. Sprinkle the remaining cheddar cheese on top.
- Bake for 20-25 minutes, or until the dip is bubbly and the cheese on top is golden. Tip: For a crispier top, broil for the last 2 minutes.
- Garnish with chopped green onions right before serving. Tip: Let it sit for 5 minutes after baking for easier dipping.
Ultimate comfort food alert! This dip is irresistibly creamy with just the right amount of heat, making it a crowd-pleaser. Serve it with celery sticks, tortilla chips, or even slathered on a burger for an extra kick.
Crispy Fried Pickles with Spicy Mayo

Who doesn’t love a crunchy, tangy snack that’s perfect for game day or just because? These crispy fried pickles with spicy mayo are a crowd-pleaser, and guess what? They’re super easy to make at home.
Ingredients
- 1 cup dill pickles, sliced into rounds (pat them dry for extra crispiness)
- 1 cup all-purpose flour (for a lighter batter, you can use half flour, half cornstarch)
- 1 tsp garlic powder (because everything’s better with garlic)
- 1/2 tsp paprika (smoked paprika adds a nice depth)
- 1/2 cup buttermilk (or milk with a splash of vinegar as a quick substitute)
- 1 egg (helps the batter stick to the pickles)
- 1 cup panko breadcrumbs (for that unbeatable crunch)
- Vegetable oil for frying (or any neutral oil with a high smoke point)
- 1/2 cup mayonnaise (the base of your spicy mayo)
- 1 tbsp hot sauce (adjust to taste, but don’t skip the heat!)
- 1 tsp lemon juice (brightens up the spicy mayo)
Instructions
- In a shallow bowl, whisk together the flour, garlic powder, and paprika.
- In another bowl, beat the egg and buttermilk together until smooth.
- Place the panko breadcrumbs in a third bowl. This is your breading station.
- Dip each pickle slice into the flour mixture, then the buttermilk mixture, and finally coat it in panko. Press gently to ensure the breadcrumbs stick.
- Heat oil in a deep fryer or large pot to 375°F. Fry the pickles in batches until golden brown, about 2-3 minutes per batch. Don’t overcrowd the pot!
- While the pickles fry, mix the mayonnaise, hot sauce, and lemon juice in a small bowl. Taste and adjust the heat as needed.
- Transfer the fried pickles to a paper towel-lined plate to drain any excess oil.
Ultimate snack alert! These pickles are crunchy on the outside, tangy on the inside, and that spicy mayo? It’s the perfect dip. Try serving them on a platter with extra napkins—they’re that addictive.
Spicy Taco Popcorn

Who doesn’t love a snack that packs a punch? This Spicy Taco Popcorn is your go-to for movie nights or when you’re craving something with a bit of heat. It’s easy, quick, and totally addictive.
Ingredients
- 1/2 cup popcorn kernels (or 8 cups popped popcorn)
- 2 tbsp olive oil (or any neutral oil)
- 1 tbsp taco seasoning (adjust to taste)
- 1/2 tsp chili powder (for extra heat)
- 1/4 tsp garlic powder
- 1/4 tsp onion powder
- Salt to taste
Instructions
- Heat the olive oil in a large pot over medium heat. Tip: Test the oil by adding a couple of kernels; when they pop, the oil is ready.
- Add the popcorn kernels to the pot and cover with a lid. Shake the pot occasionally to prevent burning.
- Once the popping slows to about 2 seconds between pops, remove the pot from heat. Let it sit for 30 seconds to catch any late popcorns.
- Transfer the popped popcorn to a large bowl. Drizzle with a bit more olive oil if needed to help the seasoning stick.
- Sprinkle the taco seasoning, chili powder, garlic powder, onion powder, and salt over the popcorn. Toss well to coat evenly. Tip: Use a large spoon or your hands (clean, of course) for best results.
- Serve immediately or store in an airtight container for up to 2 days. Tip: For an extra kick, add a squeeze of lime juice before serving.
Vibrant with flavors and a satisfying crunch, this Spicy Taco Popcorn is a crowd-pleaser. Try serving it with a side of cool guacamole to balance the heat.
Cheesy Garlic Bread with a Kick

Nothing beats the comforting aroma of garlic bread baking in the oven, especially when it’s loaded with cheese and has a little spicy kick to wake up your taste buds. This cheesy garlic bread with a kick is the perfect side dish for any meal or a tasty snack on its own.
Ingredients
- 1 loaf French bread (or any crusty bread)
- 1/2 cup unsalted butter, softened (for easy spreading)
- 4 cloves garlic, minced (more if you love garlic)
- 1/4 tsp red pepper flakes (adjust to taste)
- 1 cup shredded mozzarella cheese (for that perfect melt)
- 1/4 cup grated Parmesan cheese (adds a nice salty flavor)
- 1 tbsp fresh parsley, chopped (for a fresh finish)
Instructions
- Preheat your oven to 375°F (190°C) to ensure it’s hot enough to melt the cheese and crisp the bread.
- Cut the French bread in half lengthwise and place it on a baking sheet, cut side up.
- In a small bowl, mix the softened butter, minced garlic, and red pepper flakes until well combined. Tip: Letting the butter sit at room temperature for a bit makes it easier to mix.
- Spread the garlic butter mixture evenly over the cut sides of the bread. Tip: Covering every inch ensures every bite is flavorful.
- Sprinkle the shredded mozzarella and grated Parmesan cheese over the buttered bread. Tip: Mixing the cheeses gives a better flavor and melt.
- Bake in the preheated oven for 10-12 minutes, or until the cheese is bubbly and slightly golden.
- Remove from the oven and sprinkle with chopped parsley for a fresh, colorful touch.
Zesty and irresistible, this cheesy garlic bread with a kick comes out perfectly crispy on the outside and gooey on the inside. Serve it alongside your favorite pasta dish or enjoy it as a standalone treat with a cold beverage.
Ghost Pepper Mac and Cheese Bites

Ghost pepper mac and cheese bites are the perfect blend of creamy, cheesy goodness with a fiery kick that’ll wake up your taste buds. You’ll love these bite-sized treats for game day or any time you’re craving something spicy and comforting.
Ingredients
- 1 cup elbow macaroni (or any small pasta)
- 2 cups shredded cheddar cheese (sharp for best flavor)
- 1/2 cup milk (whole milk recommended)
- 2 tbsp butter (unsalted)
- 1 tbsp flour (for thickening)
- 1/2 tsp ghost pepper powder (adjust to heat preference)
- 1/2 cup panko breadcrumbs (for extra crunch)
- 1 egg (beaten, for binding)
- Oil for frying (or any neutral oil)
Instructions
- Cook the macaroni according to package instructions until al dente, then drain and set aside.
- In a saucepan, melt the butter over medium heat, then whisk in the flour to create a roux. Cook for 1 minute until golden.
- Slowly add the milk to the roux, whisking constantly to avoid lumps. Bring to a simmer.
- Stir in the shredded cheddar cheese until melted and smooth. Add the ghost pepper powder, mixing well.
- Combine the cheese sauce with the cooked macaroni, then let the mixture cool slightly.
- Once cool enough to handle, form the mac and cheese into small balls, about 1-inch in diameter.
- Dip each ball into the beaten egg, then roll in panko breadcrumbs to coat evenly.
- Heat oil in a deep fryer or large pan to 375°F. Fry the bites in batches until golden brown, about 2-3 minutes.
- Remove with a slotted spoon and drain on paper towels.
Delightfully crispy on the outside with a molten, spicy cheese center, these bites are irresistible. Serve them with a cool ranch or blue cheese dip to balance the heat, or toss them in your favorite hot sauce for an extra kick.
Sriracha Lime Grilled Shrimp Skewers
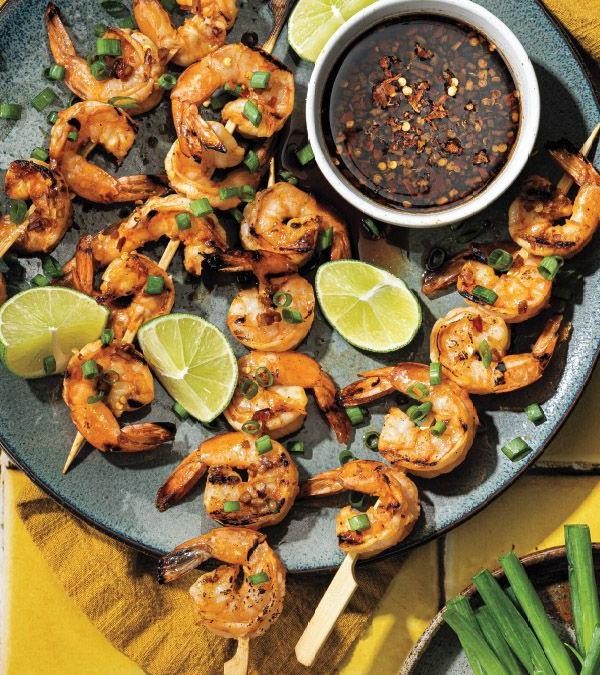
Hey, you’re going to love these Sriracha Lime Grilled Shrimp Skewers. They’re the perfect mix of spicy and tangy, and they cook up in no time, making them ideal for those lazy summer evenings when you want something delicious without much fuss.
Ingredients
- 1 lb large shrimp, peeled and deveined (tails on or off, your choice)
- 2 tbsp olive oil (or any neutral oil)
- 2 tbsp Sriracha sauce (adjust to taste)
- 1 lime, juiced (about 2 tbsp)
- 1 tbsp honey (for a touch of sweetness)
- 1 tsp garlic powder (or fresh minced garlic for more punch)
- 1/2 tsp salt (adjust to taste)
- Wooden or metal skewers (if using wooden, soak in water for 30 mins to prevent burning)
Instructions
- In a large bowl, whisk together olive oil, Sriracha, lime juice, honey, garlic powder, and salt until well combined.
- Add the shrimp to the bowl and toss to coat evenly. Let marinate in the fridge for at least 15 minutes, but no more than 30 to avoid the lime juice cooking the shrimp.
- While the shrimp marinates, preheat your grill to medium-high heat (about 375°F to 400°F).
- Thread the shrimp onto skewers, about 4-5 shrimp per skewer, leaving a little space between each for even cooking.
- Grill the skewers for 2-3 minutes per side, or until the shrimp are pink and opaque. Avoid overcooking to keep them juicy.
- Remove from the grill and let rest for a minute before serving. This allows the juices to redistribute.
Fresh off the grill, these skewers are juicy with a perfect char. The Sriracha gives them a nice kick, balanced by the lime and honey. Serve them over a bed of cilantro lime rice or alongside a crisp salad for a complete meal.
Conclusion
There you have it—20 fiery recipes to spice up your football game day! Whether you’re feeding a crowd or just treating yourself, these dishes are sure to score big. Don’t forget to try them out, share your favorites in the comments, and pin the ones you love on Pinterest. Here’s to delicious wins and even better eats!


