Who knew that the simplest pantry staples—flour and water—could unlock a world of delicious possibilities? Whether you’re whipping up a quick weeknight dinner, craving some homemade comfort food, or just looking to get creative in the kitchen without a trip to the grocery store, these 18 easy recipes are about to become your new favorites. Let’s dive into the magic of flour and water together!
Homemade Flour Tortillas
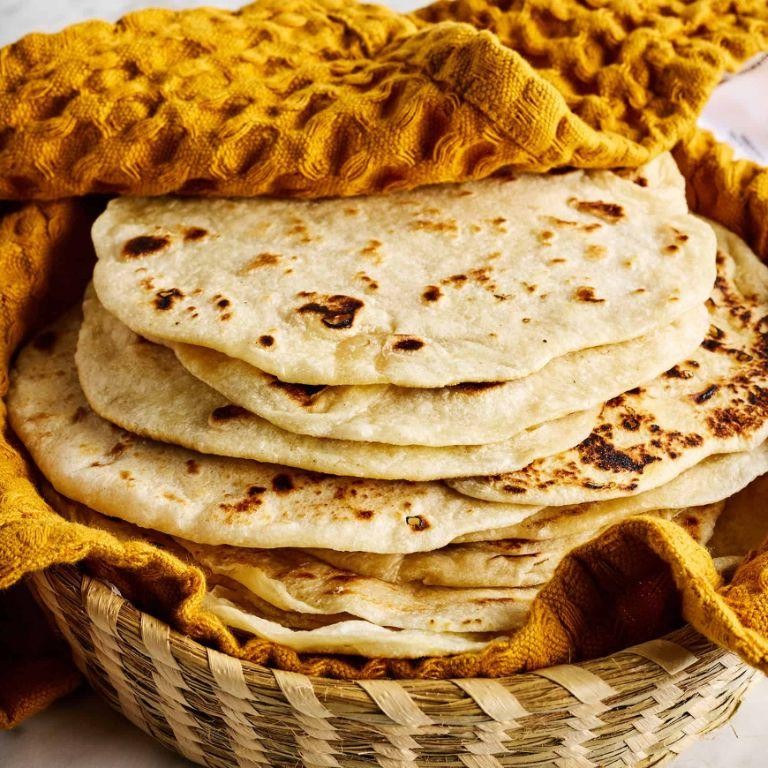
Finally, let’s talk about something that’s a staple in my kitchen and probably in yours too—homemade flour tortillas. There’s something incredibly satisfying about rolling out your own tortillas, and trust me, once you’ve tried them fresh off the skillet, there’s no going back to store-bought.
Ingredients
- 2 cups of all-purpose flour, plus a little extra for dusting
- 1/2 teaspoon of salt
- 3/4 cup of warm water
- 3 tablespoons of vegetable oil or lard
- A splash of milk if you’re feeling fancy
Instructions
- In a large bowl, whisk together the flour and salt until they’re best friends.
- Make a well in the center and pour in the warm water and oil. If you’re using milk, now’s the time to add that splash.
- Mix everything with a fork until it starts to come together, then get in there with your hands and knead it into a smooth dough. Tip: If the dough feels too sticky, sprinkle a bit more flour, but don’t overdo it—tough tortillas are sad tortillas.
- Cover the dough with a damp towel and let it rest for about 30 minutes. This is the perfect time to clean up or, let’s be real, scroll through your phone.
- Divide the dough into 8 equal pieces and roll each into a ball. Tip: If you have a kitchen scale, now’s the time to use it for perfectly even tortillas.
- On a lightly floured surface, roll each ball into a thin, about 8-inch circle. Don’t worry if they’re not perfect—rustic is charming.
- Heat a dry skillet over medium-high heat and cook each tortilla for about 30 seconds on each side, or until you see those lovely golden spots. Tip: Keep them warm under a towel while you cook the rest—they’ll steam slightly and stay pliable.
Absolutely nothing beats the taste of these tortillas—soft, slightly chewy, and with just the right amount of char. Try them with your favorite fillings, or for a real treat, slather with butter and a sprinkle of cinnamon sugar while they’re still warm.
Easy Flatbread
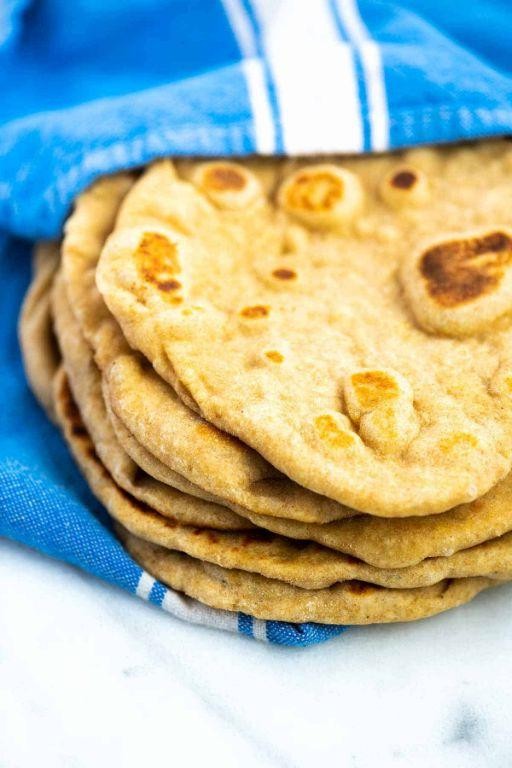
Whenever I’m in a pinch for a quick, satisfying meal, I turn to this easy flatbread recipe. It’s my go-to for those nights when I want something homemade but don’t have hours to spend in the kitchen.
Ingredients
- 2 cups of all-purpose flour
- 1 teaspoon of salt
- 1 tablespoon of olive oil, plus a little extra for greasing
- 3/4 cup of warm water
- A sprinkle of your favorite herbs (I love rosemary or thyme)
Instructions
- In a large bowl, mix together the flour and salt until they’re well combined.
- Make a well in the center of the flour mixture and pour in the olive oil and warm water. Tip: The water should be warm to the touch but not too hot, or it’ll kill the yeast if you’re using any.
- Stir everything together until a dough starts to form. If it’s too sticky, add a bit more flour; if it’s too dry, add a splash more water.
- Knead the dough on a lightly floured surface for about 5 minutes, until it’s smooth and elastic. Tip: This is a great arm workout, so put some muscle into it!
- Cover the dough with a damp towel and let it rest for 10 minutes. This relaxes the gluten, making the flatbread easier to roll out.
- Divide the dough into 4 equal pieces and roll each one out into a thin circle, about 1/8 inch thick. Tip: Don’t worry about making them perfect—rustic shapes have more character.
- Heat a dry skillet over medium-high heat and cook each flatbread for about 2 minutes on each side, or until golden brown spots appear.
Unbelievably soft with just the right amount of chew, these flatbreads are perfect for tearing and sharing. I love serving them with a drizzle of olive oil and a sprinkle of sea salt for a simple, yet delicious treat.
Basic Pizza Dough
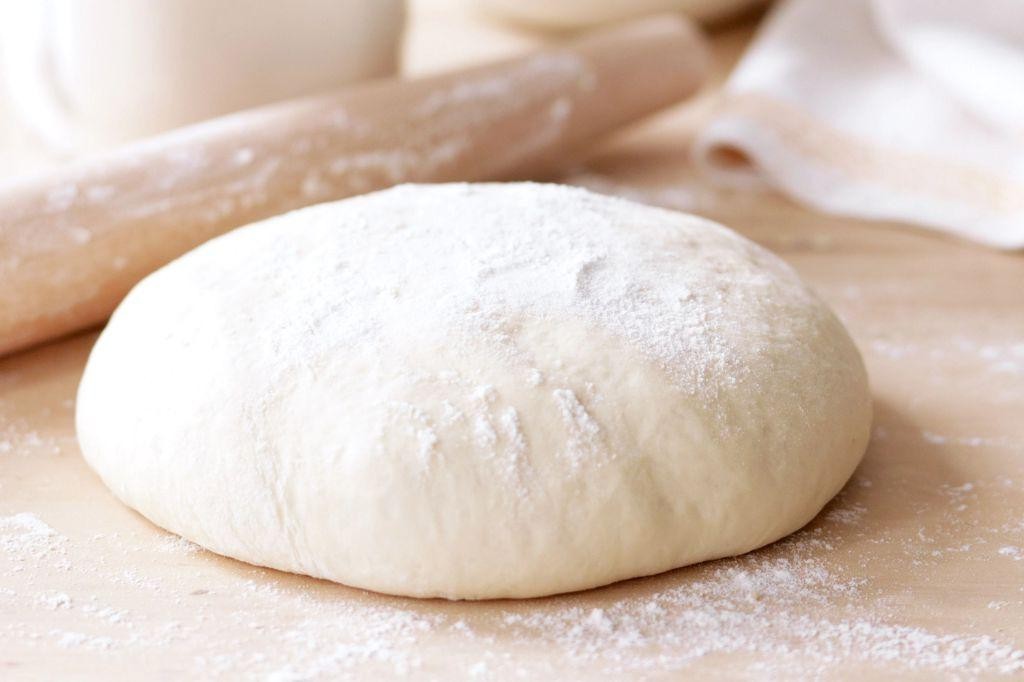
Goodness, there’s nothing quite like the smell of fresh pizza dough baking in the oven, is there? I remember the first time I tried making my own dough; it was a bit of a disaster, but now it’s my go-to for a quick and satisfying meal. Let me share my foolproof Basic Pizza Dough recipe with you.
Ingredients
- 3 1/2 cups of all-purpose flour, plus a little extra for dusting
- 1 teaspoon of sugar
- 1 envelope (about 2 1/4 teaspoons) of instant yeast
- 2 teaspoons of salt
- 1 1/2 cups of warm water (around 110°F, just warm to the touch)
- 2 tablespoons of olive oil, plus a splash for greasing the bowl
Instructions
- In a large mixing bowl, whisk together the flour, sugar, yeast, and salt until well combined.
- Make a well in the center of the dry ingredients and pour in the warm water and olive oil. Stir with a wooden spoon until a shaggy dough forms.
- Turn the dough out onto a lightly floured surface and knead for about 10 minutes, until it’s smooth and elastic. Tip: If the dough sticks to your hands, add a bit more flour, but go easy—too much flour makes tough dough.
- Lightly grease a clean bowl with olive oil, place the dough inside, and cover with a damp towel. Let it rise in a warm spot for about 1 hour, or until doubled in size. Tip: No warm spot? Preheat your oven to the lowest setting, turn it off, and let the dough rise inside with the door closed.
- Punch down the dough to release the air, then divide it into two equal pieces for two pizzas or leave it whole for one large pizza. Tip: At this point, you can wrap the dough in plastic and refrigerate it for up to 24 hours for even more flavor development.
- Preheat your oven to 475°F. If you have a pizza stone, place it in the oven now to heat up.
- Roll out the dough on a floured surface to your desired thickness, then transfer it to a parchment-lined baking sheet or pizza peel if using a stone.
- Add your favorite toppings and bake for 12-15 minutes, until the crust is golden and the cheese is bubbly.
Delightfully crisp on the outside and chewy on the inside, this Basic Pizza Dough is the perfect canvas for your culinary creativity. Try serving it with a drizzle of garlic-infused olive oil and a sprinkle of fresh herbs for an extra touch of flavor.
Classic Crepes
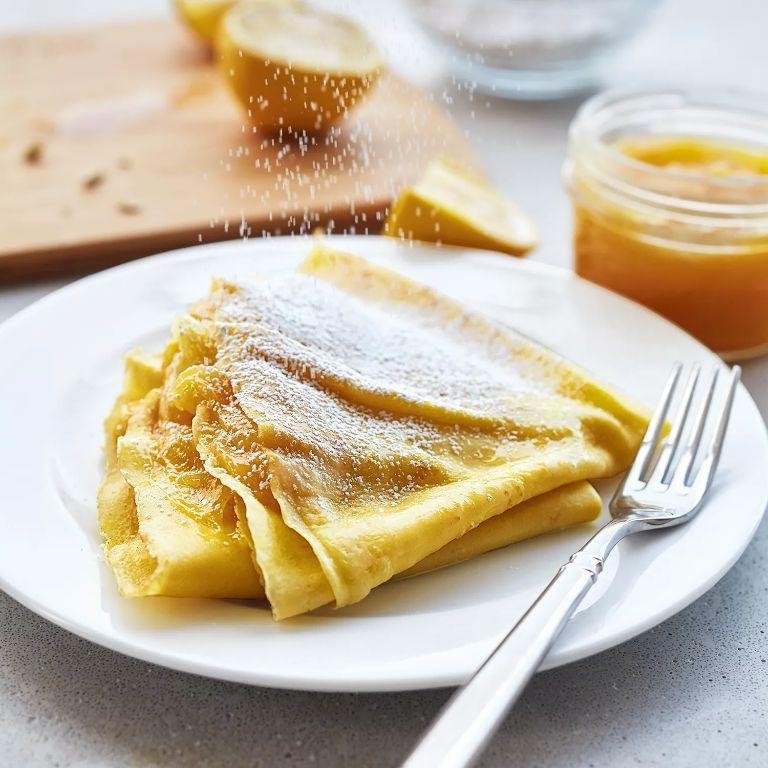
Perfect for a lazy Sunday morning or a fancy brunch, these classic crepes have been my go-to recipe for years. I remember the first time I made them; they were a bit of a disaster, but now, they’re my signature dish that even my picky eater nephew can’t resist.
Ingredients
- 1 cup all-purpose flour
- A couple of eggs
- 1 1/2 cups milk
- A splash of vanilla extract
- 2 tablespoons melted butter, plus a bit more for the pan
- A pinch of salt
- 2 tablespoons sugar
Instructions
- In a large mixing bowl, whisk together the flour, sugar, and salt until well combined.
- Make a well in the center of the dry ingredients and crack the eggs into it. Start whisking the eggs, gradually incorporating the dry ingredients.
- Slowly pour in the milk, continuing to whisk, to avoid lumps. Tip: If the batter seems too thick, add a little more milk until it’s the consistency of heavy cream.
- Stir in the melted butter and vanilla extract until the batter is smooth. Let it rest for 30 minutes at room temperature; this helps the gluten relax, making the crepes tender.
- Heat a non-stick skillet over medium heat and brush it lightly with butter. Tip: The pan is ready when a drop of water sizzles upon contact.
- Pour 1/4 cup of batter into the center of the pan, tilting it in a circular motion to spread the batter thinly and evenly.
- Cook for about 1-2 minutes until the edges start to lift and the bottom is golden brown. Flip carefully with a spatula and cook for another minute on the other side. Tip: Don’t rush the flip; patience ensures the crepe doesn’t tear.
- Repeat with the remaining batter, stacking the cooked crepes on a plate as you go.
Fresh off the pan, these crepes are delightfully thin and slightly crisp at the edges, with a buttery, vanilla-kissed flavor that’s simply irresistible. Try them rolled up with a sprinkle of powdered sugar and a squeeze of lemon, or go all out with Nutella and sliced strawberries for a decadent treat.
Simple Pancakes
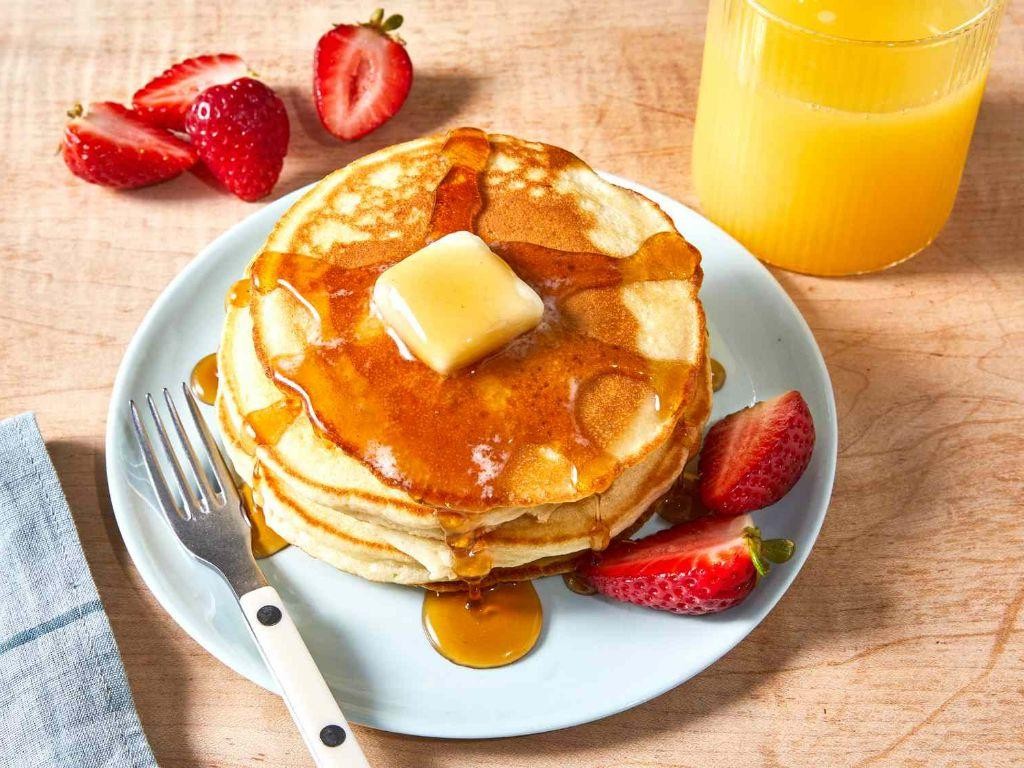
Sometimes, all you need is a stack of fluffy, golden pancakes to turn a mundane morning into something special. I remember whipping these up on a lazy Sunday, the smell of butter and vanilla filling the air, and just like that, the day felt brighter.
Ingredients
- 1 cup of all-purpose flour (because who has time to sift?)
- 2 tablespoons of sugar (a little sweet never hurt anyone)
- 1 tablespoon of baking powder (the secret to those sky-high fluffs)
- A pinch of salt (just to balance the sweetness)
- 1 cup of milk (whole milk for richness, but any will do)
- 1 large egg (room temperature blends better)
- 2 tablespoons of melted butter (plus extra for the pan)
- A splash of vanilla extract (because why not?)
Instructions
- In a large bowl, whisk together the flour, sugar, baking powder, and salt. No need to overmix—just until they’re friends.
- In another bowl, beat the egg lightly, then stir in the milk, melted butter, and vanilla. Tip: If your butter is too hot, it’ll cook the egg. Cool it down a bit first.
- Pour the wet ingredients into the dry ones. Stir until just combined; a few lumps are totally fine. Overmixing is the enemy of fluffy pancakes.
- Heat a non-stick pan over medium heat and add a little butter. Wait until it’s melted and bubbling but not smoking—that’s your cue.
- Pour 1/4 cup of batter for each pancake. Cook until you see bubbles on the surface and the edges look set, about 2-3 minutes. Tip: Don’t press them down! Let them rise.
- Flip carefully and cook for another 1-2 minutes until golden brown. Tip: The second side always cooks faster, so keep an eye out.
Here you have it—pancakes that are light as a cloud with just the right amount of sweetness. Heap them high, drizzle with maple syrup, or get creative with fresh berries and a dollop of whipped cream. How you enjoy them is up to you, but one thing’s for sure: they won’t last long.
Quick Breadsticks
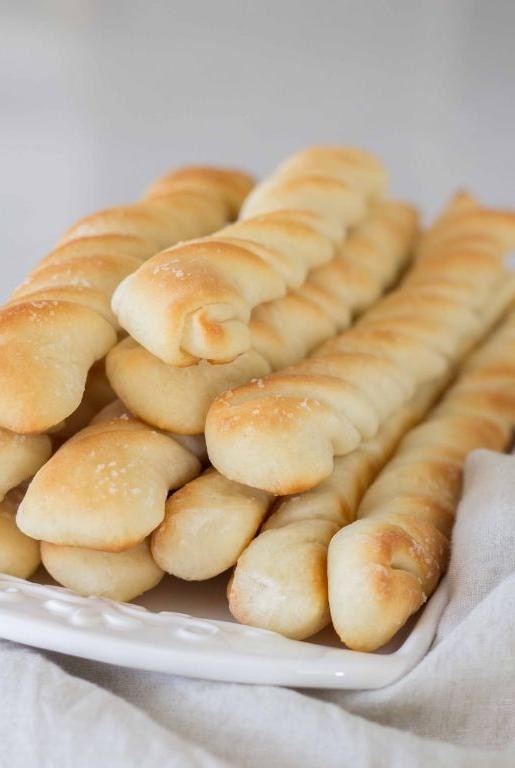
Craving something crunchy to dip into your favorite sauce or soup? These quick breadsticks are my go-to when I need a speedy side that feels a bit fancy without the fuss. I remember whipping these up during a last-minute dinner party, and they were such a hit that they’ve become a staple in my kitchen.
Ingredients
- 1 1/2 cups of all-purpose flour
- 1/2 teaspoon of salt
- 2 teaspoons of baking powder
- 2/3 cup of milk
- 3 tablespoons of melted butter
- A sprinkle of garlic powder (because everything’s better with garlic, right?)
- A handful of grated Parmesan cheese for that cheesy goodness
Instructions
- Preheat your oven to 425°F (220°C) and line a baking sheet with parchment paper. This little step saves so much cleanup time later.
- In a large bowl, whisk together the flour, salt, and baking powder. Tip: Sifting the flour can make your breadsticks even lighter.
- Stir in the milk and melted butter until a soft dough forms. If it’s too sticky, a bit more flour does the trick.
- Turn the dough onto a floured surface and knead gently for about a minute. Overworking the dough makes tough breadsticks, so keep it light.
- Roll the dough into a rectangle about 1/2 inch thick, then cut into strips. Twist each strip if you’re feeling fancy—it adds texture.
- Place the strips on the prepared baking sheet, sprinkle with garlic powder and Parmesan, and bake for 12-15 minutes until golden. Tip: Keep an eye on them after 10 minutes to avoid over-browning.
These breadsticks come out perfectly crisp on the outside with a soft, fluffy inside. Try serving them with a warm marinara sauce or alongside a fresh salad for a simple yet satisfying meal.
Homemade Noodles
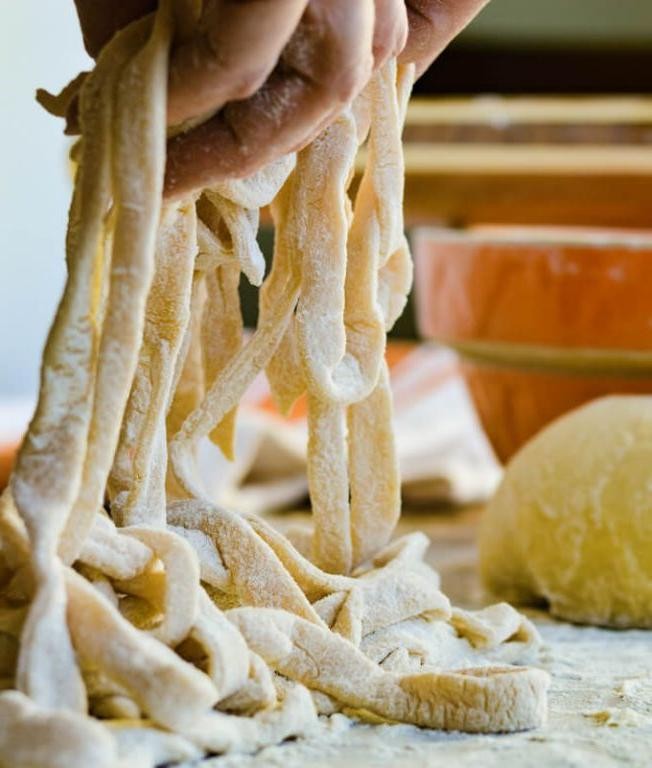
After countless attempts to perfect my noodle game, I’ve finally stumbled upon a recipe that’s both foolproof and delicious. Let me walk you through how to make these homemade noodles that have become a staple in my kitchen.
Ingredients
- 2 cups of all-purpose flour, plus a little extra for dusting
- 3 large eggs, because size matters here
- A splash of water, just enough to bring the dough together
- A pinch of salt, because every dish needs a little love
Instructions
- Start by creating a well in the center of your flour on a clean, flat surface. Crack the eggs into the well and add that pinch of salt.
- Using a fork, gently beat the eggs, gradually incorporating the flour from the sides of the well. This is your arm workout for the day, so take it slow.
- Once the dough starts to come together, knead it with your hands for about 10 minutes until it’s smooth and elastic. If it’s too sticky, a little more flour won’t hurt.
- Wrap the dough in plastic wrap and let it rest at room temperature for 30 minutes. This relaxes the gluten, making it easier to roll out.
- After resting, divide the dough into 4 equal parts. Roll each piece out on a floured surface until it’s about 1/8 inch thick. The thinner, the better for that perfect noodle bite.
- Fold the rolled-out dough like a letter, then slice into your desired noodle width. Unfold the noodles and toss them with a bit of flour to prevent sticking.
- Bring a large pot of salted water to a boil. Cook the noodles for about 3-4 minutes until they float to the top. Fresh noodles cook fast, so keep an eye on them.
Kneading the dough might seem like a chore, but the payoff is worth it. These noodles have a delightful chewiness that store-bought versions just can’t match. Serve them tossed in your favorite sauce or in a hearty broth for a comforting meal that feels like a hug from the inside.
Easy Dumpling Wrappers
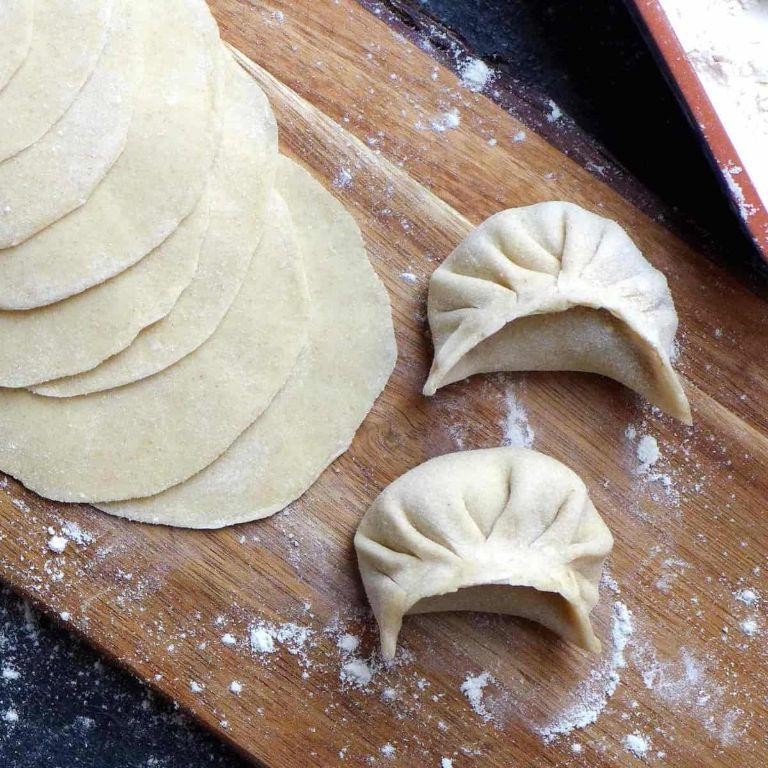
Unbelievably, making dumpling wrappers from scratch is easier than you think, and honestly, it’s a game-changer for your homemade dumplings. I remember the first time I tried it; I was skeptical, but the difference in texture and taste was night and day compared to store-bought ones.
Ingredients
- 2 cups of all-purpose flour, plus a little extra for dusting
- A splash of water, about 3/4 cup, but you might need a tad more
- A pinch of salt, because even dough needs a little love
Instructions
- In a large mixing bowl, combine the 2 cups of flour and that pinch of salt. Mix them together like you’re introducing two friends at a party.
- Slowly add the water to the flour mixture, stirring with a fork or your fingers until it starts to come together. Tip: If the dough feels too dry, add water a teaspoon at a time. Too sticky? A sprinkle more flour will do the trick.
- Once the dough is shaggy but holding together, turn it out onto a lightly floured surface and knead for about 5 minutes until it’s smooth and elastic. This is your arm workout for the day.
- Wrap the dough in plastic wrap and let it rest at room temperature for 30 minutes. This relaxes the gluten, making the dough easier to roll out.
- After resting, divide the dough into 4 equal parts. Roll each piece into a rope about 1 inch in diameter, then cut into 1-inch pieces. Tip: Keep the pieces you’re not working with covered to prevent drying out.
- Flatten each piece with your palm, then roll out into a thin circle, about 3 inches in diameter, for the perfect wrapper thickness. Tip: Rotate the dough as you roll to ensure an even thickness.
Kneading your own dumpling wrappers might seem like a small step, but it elevates your dumplings to restaurant quality. The texture is chewy yet tender, and they hold the filling like a dream. Try serving them with a spicy dipping sauce or in a clear broth for a comforting twist.
Basic Biscuits

Ah, there’s nothing quite like the smell of freshly baked biscuits wafting through the kitchen. It takes me back to my grandma’s house, where she’d whip up a batch every Sunday without fail. Today, I’m sharing my go-to recipe for Basic Biscuits, perfect for beginners and seasoned bakers alike.
Ingredients
- 2 cups of all-purpose flour (because sometimes, simple is best)
- 1 tablespoon of baking powder (for that perfect rise)
- 1 teaspoon of salt (just enough to bring out the flavors)
- 1/4 cup of cold butter, cubed (the colder, the flakier the biscuits)
- 3/4 cup of milk (a splash more if the dough’s too dry)
Instructions
- Preheat your oven to 450°F (232°C). Trust me, a hot oven is key to golden biscuits.
- In a large bowl, whisk together the flour, baking powder, and salt. Tip: Sifting the flour can make your biscuits even lighter.
- Add the cold butter cubes to the dry ingredients. Using your fingers or a pastry cutter, work the butter into the flour until it resembles coarse crumbs. Tip: Don’t overmix; you want those little butter pieces for flakiness.
- Pour in the milk and stir until just combined. The dough should be sticky but manageable. Tip: If it’s too dry, add a tablespoon more milk, but go easy.
- Turn the dough onto a floured surface and gently pat it into a 1-inch thick rectangle. Fold the dough over itself a couple of times for layers, then pat down to 1-inch thick again.
- Using a floured biscuit cutter or glass, cut out biscuits and place them on an ungreased baking sheet. For softer sides, place them close together.
- Bake for 10-12 minutes, or until the tops are golden brown. No peeking too early!
Just out of the oven, these biscuits are flaky, buttery, and begging for a drizzle of honey or a smear of jam. Try splitting them warm and stuffing with a slice of sharp cheddar for a savory twist.
Simple Scones
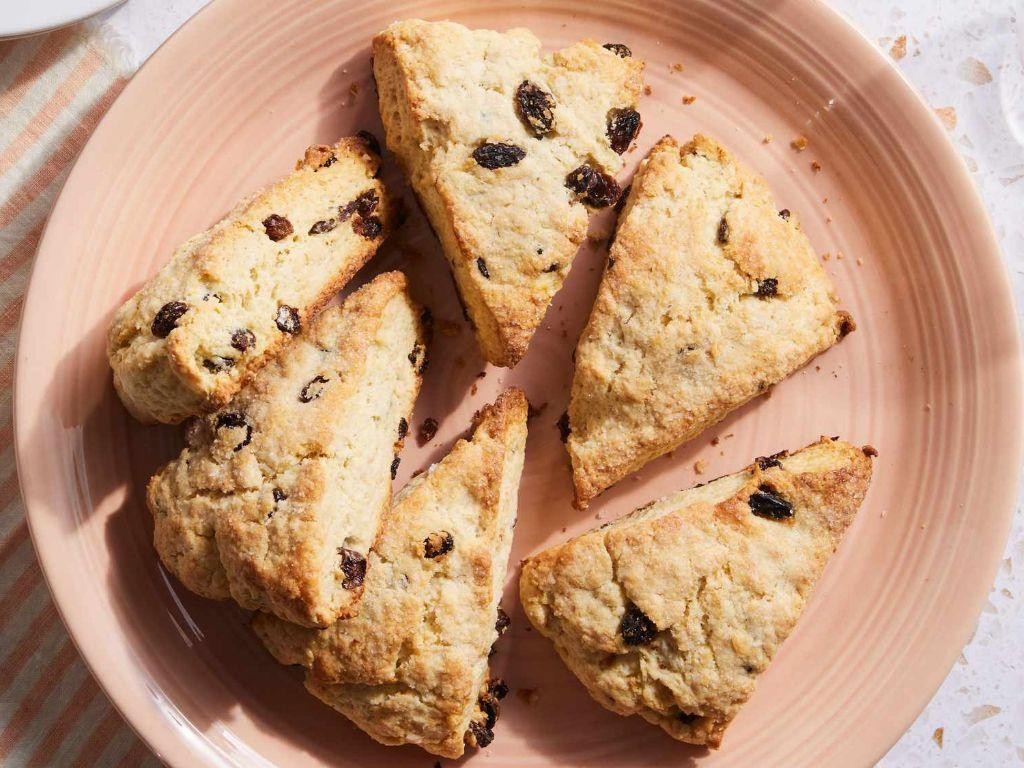
Afternoon tea just isn’t the same without a batch of freshly baked scones, and I’ve found that keeping the recipe simple lets their buttery goodness shine. Whether it’s a lazy Sunday or you’re hosting a last-minute brunch, these scones are my go-to for a quick, satisfying treat.
Ingredients
- 2 cups of all-purpose flour
- 1/4 cup of granulated sugar
- 1 tbsp of baking powder
- A pinch of salt
- 1/2 cup of cold butter, cubed
- A splash of vanilla extract
- 3/4 cup of heavy cream, plus a little extra for brushing
Instructions
- Preheat your oven to 400°F (200°C) and line a baking sheet with parchment paper.
- In a large bowl, whisk together the flour, sugar, baking powder, and salt.
- Add the cubed butter to the dry ingredients. Use your fingers to rub the butter into the flour until the mixture resembles coarse crumbs. Tip: Keep the butter cold for flakier scones.
- Stir in the vanilla extract and heavy cream until just combined. The dough should be shaggy but hold together when pressed.
- Turn the dough onto a lightly floured surface and gently pat it into a 1-inch thick circle. Tip: Don’t overwork the dough to keep the scones tender.
- Cut the dough into 8 wedges and transfer them to the prepared baking sheet. Brush the tops with a little heavy cream for a golden finish.
- Bake for 15-18 minutes, or until the scones are lightly golden and firm to the touch. Tip: Rotate the baking sheet halfway through for even browning.
These scones come out perfectly crumbly and rich, with just the right amount of sweetness. Try splitting them warm and slathering with clotted cream and jam for the ultimate indulgence.
Quick Pretzels
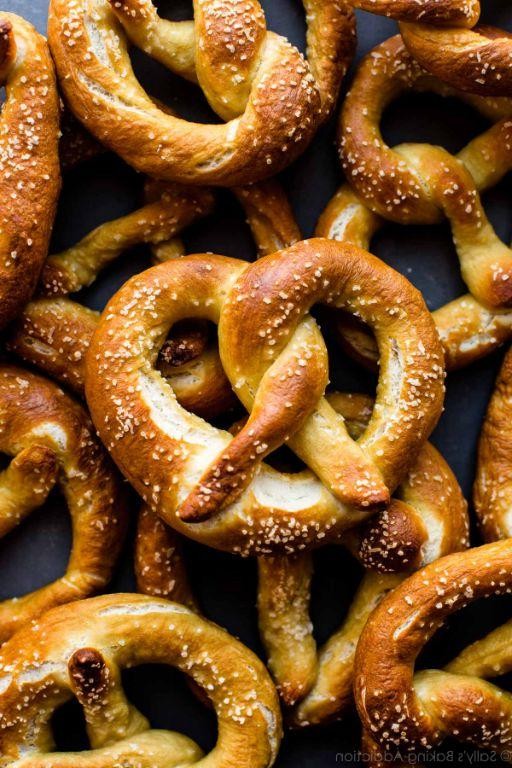
Craving something salty, chewy, and downright delicious? I’ve got you covered with these quick pretzels that are perfect for snacking, parties, or just because. I remember the first time I tried making these; my kitchen was a floury mess, but the smell of baking pretzels made it all worth it.
Ingredients
- 1 1/2 cups warm water (about 110°F, just right to wake up the yeast)
- 1 packet (2 1/4 tsp) active dry yeast
- 1 tbsp sugar (to feed the yeast)
- 4 cups all-purpose flour, plus a little extra for dusting
- 1 tsp salt (plus more for topping)
- 2 tbsp unsalted butter, melted (because everything’s better with butter)
- a splash of vegetable oil (for greasing the bowl)
- 1/2 cup baking soda (for that classic pretzel bath)
- 1 egg, beaten (for that golden shine)
Instructions
- In a large bowl, mix the warm water, yeast, and sugar. Let it sit for 5 minutes until it’s frothy. This means your yeast is alive and kicking!
- Add the flour, salt, and melted butter to the yeast mixture. Stir until a dough forms. Tip: If the dough feels too sticky, add a tablespoon of flour at a time until it’s manageable.
- Knead the dough on a floured surface for about 5 minutes until it’s smooth and elastic. This is your mini workout for the day.
- Grease a clean bowl with vegetable oil, place the dough inside, and cover with a damp towel. Let it rise in a warm spot for 1 hour, or until doubled in size. Patience is key here.
- Preheat your oven to 450°F and line a baking sheet with parchment paper. Bring a large pot of water to a boil and add the baking soda. Be careful, it’ll bubble up!
- Divide the dough into 12 equal pieces. Roll each piece into a rope about 20 inches long and twist into a pretzel shape. Tip: Wet your hands slightly to prevent sticking.
- Boil each pretzel in the baking soda water for 30 seconds, then transfer to the baking sheet. This step gives pretzels their signature chewy texture.
- Brush each pretzel with beaten egg and sprinkle with salt. Bake for 12-15 minutes until deep golden brown. Tip: Keep an eye on them after 10 minutes to avoid over-browning.
Out of the oven, these pretzels are golden, slightly crisp on the outside, and wonderfully soft inside. Serve them warm with mustard or cheese dip for an extra indulgent treat. Trust me, they won’t last long!
Homemade Crackers
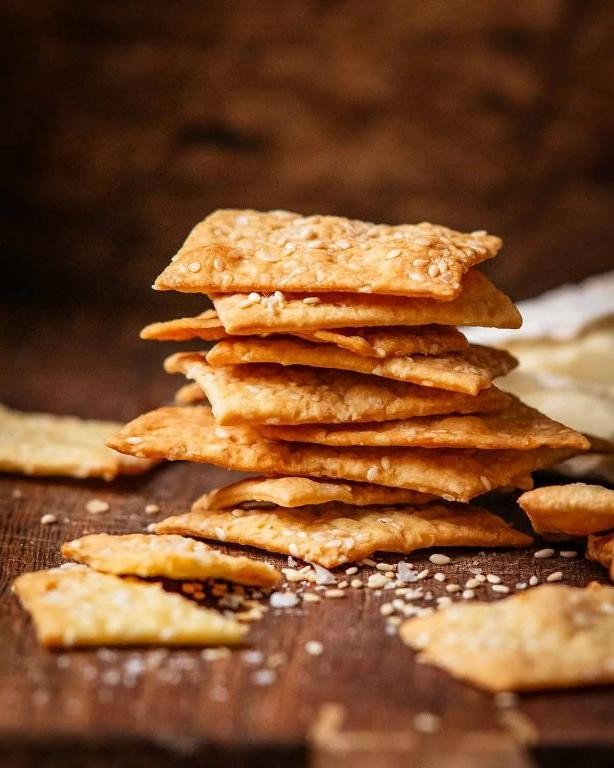
Craving something crunchy to pair with your favorite cheese or dip? I’ve been there, and let me tell you, making your own crackers at home is not only easier than you think but also a game-changer for your snack game. Plus, it’s a great way to impress your friends with your baking skills!
Ingredients
- 1 cup of all-purpose flour
- 1/2 tsp of salt
- 1/4 tsp of baking powder
- 4 tbsp of cold unsalted butter, cubed
- a splash of cold water
- a couple of tbsp of your favorite seeds (like sesame or poppy) for topping
Instructions
- Preheat your oven to 350°F and line a baking sheet with parchment paper.
- In a large bowl, whisk together the flour, salt, and baking powder.
- Add the cubed butter to the dry ingredients. Use your fingers to rub the butter into the flour until the mixture resembles coarse crumbs. Tip: Keep everything cold for the flakiest crackers.
- Gradually add a splash of cold water, just enough to bring the dough together into a ball. Don’t overwork it!
- Roll the dough out on a lightly floured surface until it’s about 1/8 inch thick. Tip: For even thickness, use rolling pin guides or two wooden spoons on either side of the dough.
- Cut the dough into squares or use a cookie cutter for fun shapes. Transfer to the prepared baking sheet.
- Sprinkle the tops with your favorite seeds and lightly press them in so they stick.
- Bake for 15-20 minutes, or until the edges are golden brown. Tip: Keep an eye on them after 15 minutes to prevent over-browning.
- Let the crackers cool on the baking sheet for a few minutes before transferring to a wire rack to cool completely.
These homemade crackers come out perfectly crisp with a buttery flavor that’s just irresistible. Try serving them with a sharp cheddar or a creamy hummus for a snack that’s sure to disappear fast!
Easy Pie Crust
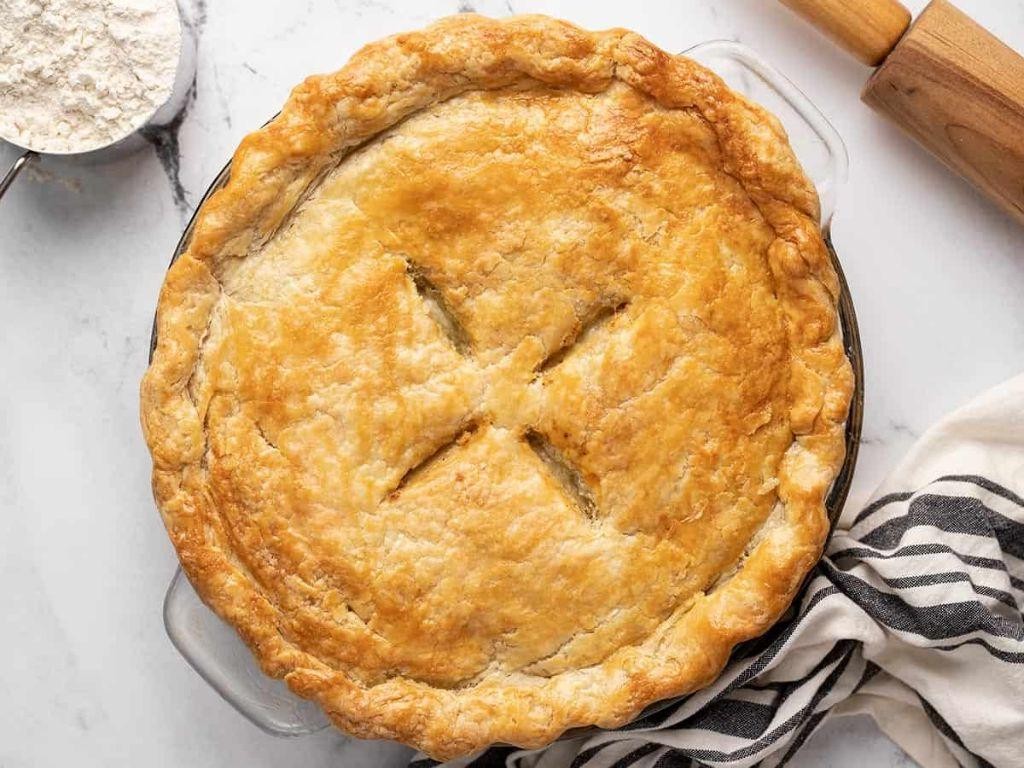
Over the years, I’ve tried countless pie crust recipes, but this easy pie crust has become my go-to for its foolproof method and buttery flavor. It’s the kind of recipe that feels like a warm hug, perfect for both beginners and seasoned bakers looking for a reliable staple.
Ingredients
- 2 1/2 cups of all-purpose flour, plus a little extra for dusting
- A teaspoon of salt, because every good crust needs it
- A cup of unsalted butter, cold and cut into small cubes—trust me, cold is key
- A splash of ice water, about 6-8 tablespoons, just enough to bring it all together
Instructions
- In a large bowl, whisk together the flour and salt to ensure they’re well combined.
- Add the cold butter cubes to the flour mixture. Using your fingers or a pastry cutter, work the butter into the flour until the mixture resembles coarse crumbs with some pea-sized pieces of butter remaining. This step is crucial for a flaky crust, so don’t rush it.
- Drizzle in the ice water, a tablespoon at a time, gently mixing with a fork after each addition. Stop adding water when the dough just begins to clump together. Tip: You might not need all the water, so go slow.
- Turn the dough out onto a lightly floured surface and knead it a couple of times to bring it together into a ball. Then, divide the dough in half, flatten each half into a disk, and wrap them in plastic wrap. Chill in the fridge for at least 1 hour before rolling out. Tip: This resting period relaxes the gluten, making the dough easier to roll and preventing shrinkage during baking.
- When ready to use, roll out one disk on a floured surface to fit your pie dish, then proceed with your pie recipe as directed. Tip: For a golden finish, brush the crust with a little beaten egg or milk before baking.
You’ll love how this crust bakes up golden and flaky, with layers that shatter beautifully with each bite. It’s versatile enough for sweet or savory pies, but my favorite way to serve it is with a generous scoop of vanilla ice cream on top of a still-warm apple pie.
Basic Waffles
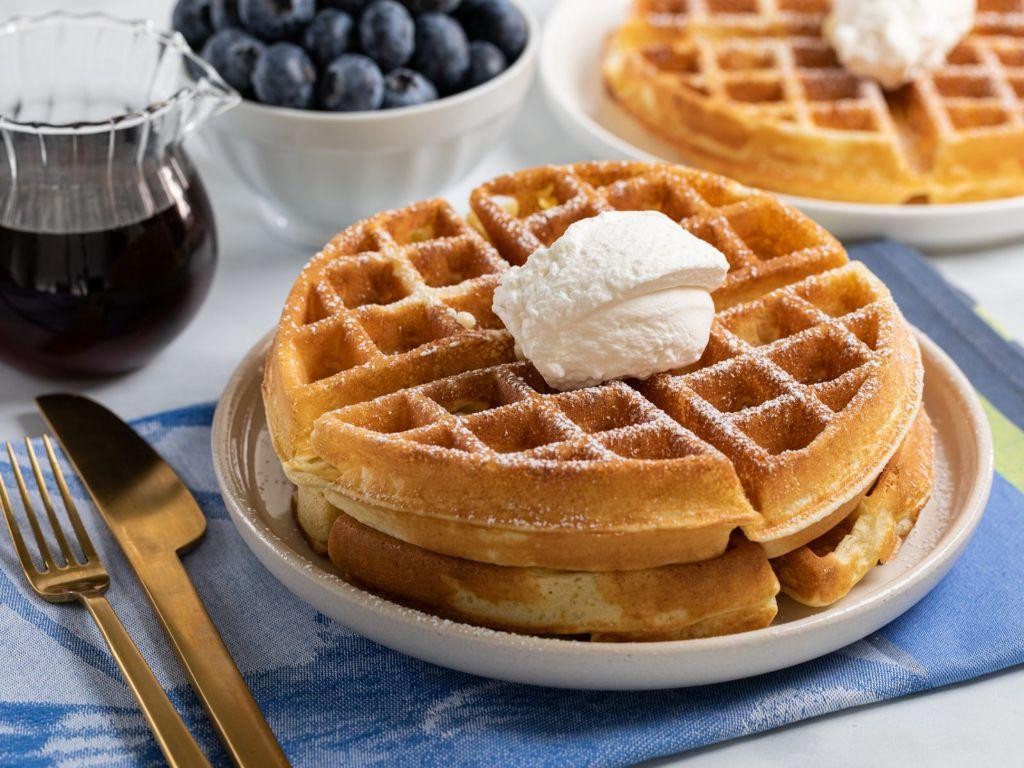
There’s something about the smell of waffles in the morning that just feels like home to me. Maybe it’s because my grandma used to make them every Sunday, or maybe it’s because they’re just so darn easy to whip up. Either way, I’m sharing my go-to basic waffle recipe that never fails to please.
Ingredients
- 2 cups of all-purpose flour
- 1 tablespoon of sugar
- 1 tablespoon of baking powder
- A pinch of salt
- 2 large eggs
- 1 1/2 cups of milk
- 1/3 cup of melted butter
- A splash of vanilla extract
Instructions
- Preheat your waffle iron to 375°F. This ensures a crispy exterior and fluffy interior.
- In a large bowl, whisk together the flour, sugar, baking powder, and salt. Tip: Sifting the flour can make your waffles even lighter.
- In another bowl, beat the eggs, then mix in the milk, melted butter, and vanilla extract.
- Pour the wet ingredients into the dry ingredients and stir until just combined. Tip: Overmixing can lead to tough waffles, so a few lumps are okay.
- Lightly grease the waffle iron with a bit of butter or non-stick spray.
- Pour about 1/2 cup of batter onto the center of the iron, close the lid, and cook until golden brown, about 3-4 minutes. Tip: Don’t peek too soon! Let the waffle cook undisturbed for the best results.
- Carefully remove the waffle and repeat with the remaining batter.
Kicking off your day with these waffles is a game-changer. They’re crispy on the outside, soft on the inside, and just begging for a drizzle of maple syrup or a dollop of whipped cream. For a fun twist, try adding chocolate chips or blueberries to the batter before cooking.
Simple Muffins
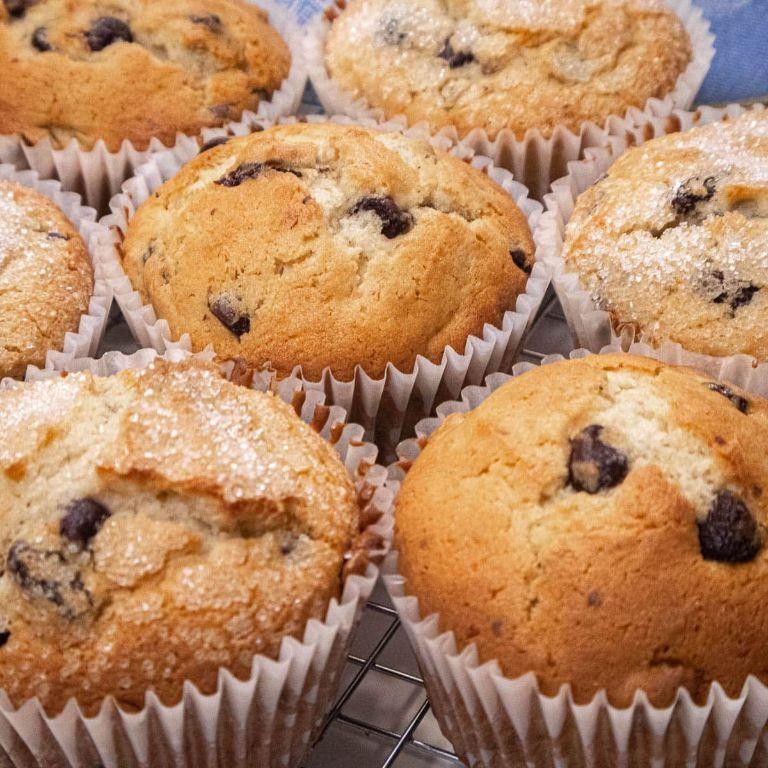
Last weekend, I found myself craving something sweet but didn’t want to spend hours in the kitchen. That’s when I remembered this simple muffin recipe that’s been my go-to for years. It’s quick, easy, and absolutely delicious—perfect for those lazy Sunday mornings or when you need a quick treat.
Ingredients
- 2 cups of all-purpose flour
- 1/2 cup of sugar
- 1 tbsp of baking powder
- A pinch of salt
- 1 cup of milk
- 1/4 cup of vegetable oil
- 1 egg
- A splash of vanilla extract
Instructions
- Preheat your oven to 375°F (190°C) and line a muffin tin with paper liners or grease it lightly.
- In a large bowl, whisk together the flour, sugar, baking powder, and salt until well combined.
- In another bowl, mix the milk, vegetable oil, egg, and vanilla extract until smooth.
- Pour the wet ingredients into the dry ingredients and stir until just combined. Tip: Overmixing can lead to tough muffins, so stop as soon as you no longer see dry flour.
- Divide the batter evenly among the muffin cups, filling each about 2/3 full. Tip: An ice cream scoop works great for this and keeps your hands clean.
- Bake for 20-25 minutes, or until the tops are golden and a toothpick inserted into the center comes out clean. Tip: Rotate the pan halfway through baking for even browning.
- Let the muffins cool in the pan for 5 minutes, then transfer to a wire rack to cool completely.
Rich in flavor and wonderfully moist, these muffins are perfect as is or with a dab of butter. For an extra treat, try adding a handful of blueberries or chocolate chips to the batter before baking—it’s a simple way to make them even more special.
Quick Bagels

Kneading dough has always been my therapy, especially when it’s for something as comforting as homemade bagels. Today, I’m sharing my go-to quick bagel recipe that’s perfect for those mornings when you’re craving something fresh out of the oven but are short on time.
Ingredients
- 2 cups of all-purpose flour, because that’s what I always have on hand
- 1 tbsp of sugar, just enough to sweeten the deal
- 1 tsp of salt, for that perfect balance
- 1 tbsp of baking powder, the secret to our quick rise
- 1 cup of Greek yogurt, the thicker the better
- 1 egg, beaten, for that golden shine
- A splash of water, just in case the dough feels too dry
Instructions
- Preheat your oven to 375°F (190°C) and line a baking sheet with parchment paper. This ensures your bagels won’t stick and clean-up is a breeze.
- In a large mixing bowl, whisk together the flour, sugar, salt, and baking powder. Tip: Sifting the flour can make your bagels lighter, but it’s not a deal-breaker if you skip it.
- Add the Greek yogurt to the dry ingredients and mix until a dough forms. If it’s too dry, add a splash of water. The dough should be tacky but not sticky.
- Divide the dough into 4 equal parts and shape each into a ball. Poke a hole in the center of each ball to form the bagel shape. Tip: Wetting your fingers can prevent the dough from sticking to you.
- Place the shaped bagels on the prepared baking sheet and brush the tops with the beaten egg. This gives them that beautiful golden color.
- Bake for 25 minutes, or until the bagels are golden brown and sound hollow when tapped on the bottom. Tip: Rotating the baking sheet halfway through ensures even baking.
Just out of the oven, these bagels have a chewy exterior with a soft, fluffy interior that’s absolutely divine. Try them toasted with a schmear of cream cheese or use them as the base for your favorite breakfast sandwich.
Homemade Pita Bread
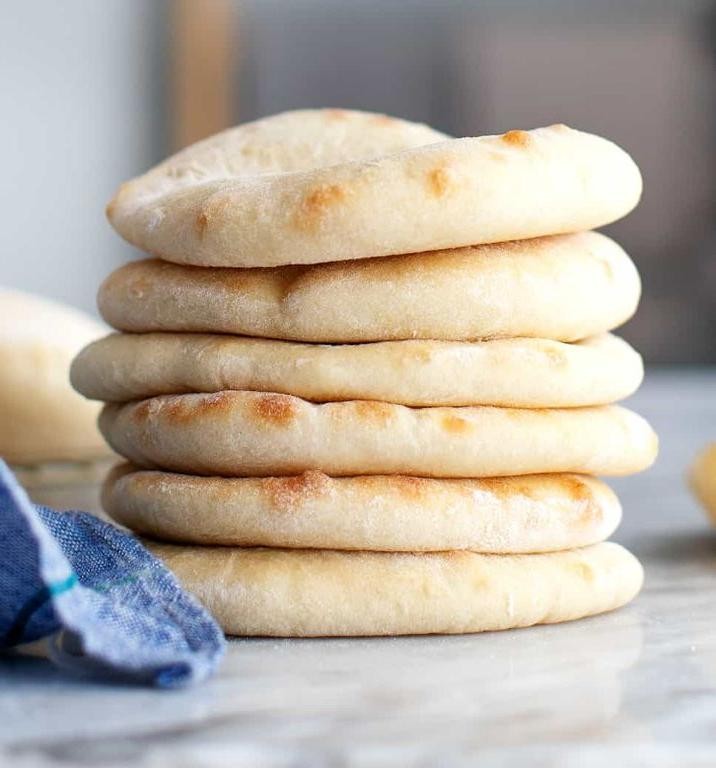
Making homemade pita bread has been a game-changer in my kitchen. There’s something incredibly satisfying about watching those pockets puff up in the oven, ready to be stuffed with your favorite fillings. I remember the first time I tried it; the aroma filled my house, and I knew I’d never go back to store-bought.
Ingredients
- 3 cups of all-purpose flour (plus a little extra for dusting)
- 1 tablespoon of sugar
- 1 teaspoon of salt
- 1 packet of active dry yeast (that’s about 2 1/4 teaspoons)
- 1 1/4 cups of warm water (think baby bath temperature, around 110°F)
- 2 tablespoons of olive oil (plus a splash for greasing the bowl)
Instructions
- In a large bowl, whisk together the flour, sugar, salt, and yeast. This ensures everything is evenly distributed.
- Make a well in the center of your dry ingredients and pour in the warm water and olive oil. Stir until a shaggy dough forms.
- Turn the dough out onto a lightly floured surface and knead for about 5 minutes, until it’s smooth and elastic. If it sticks to your hands, add a bit more flour, but go easy—too much can make your pita tough.
- Lightly grease a clean bowl with olive oil, place your dough inside, and cover it with a damp towel. Let it rise in a warm spot for about an hour, or until it’s doubled in size. Tip: If your kitchen is cool, heat your oven to 200°F, turn it off, and let the dough rise in there with the door slightly ajar.
- Punch down the dough to release the air, then divide it into 8 equal pieces. Roll each piece into a ball, then flatten into a disc about 1/4 inch thick.
- Preheat your oven to 475°F and place a baking sheet inside to get hot. This mimics the effect of a traditional pita oven and helps create those perfect pockets.
- Carefully place a couple of dough discs onto the hot baking sheet and bake for 4-5 minutes. You’ll know they’re ready when they puff up like little balloons.
- Remove from the oven and wrap them in a clean kitchen towel to keep them soft. Repeat with the remaining dough.
Delightfully soft and slightly chewy, these pitas are perfect for tearing and dipping or stuffing with your favorite fillings. Try them with falafel or as a base for a quick pizza—they’re incredibly versatile.
Easy Focaccia
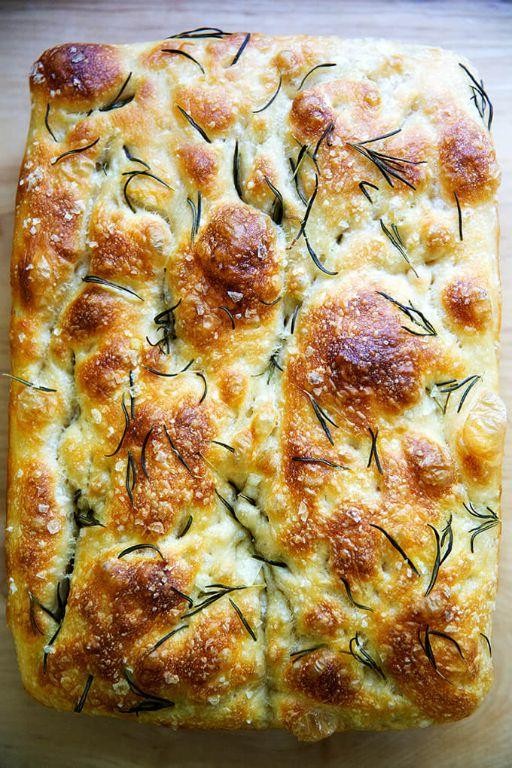
How many times have I promised myself I’d bake more bread at home? Too many to count. But this Easy Focaccia recipe? It’s my go-to because it’s forgiving, delicious, and feels like a hug in bread form. Perfect for those days when you want something homemade without the fuss.
Ingredients
- 4 cups of all-purpose flour (because sometimes, simplicity is key)
- 1 packet (2 1/4 tsp) of active dry yeast (the magic maker)
- 1 1/2 cups of warm water (not too hot, or you’ll say goodbye to your yeast)
- A good glug of olive oil (about 1/4 cup, plus more for drizzling)
- A couple of tsp of salt (because flavor)
- A handful of fresh rosemary leaves (for that aromatic touch)
Instructions
- In a large bowl, whisk together the flour, yeast, and salt. This is where the magic starts.
- Add the warm water and olive oil to the dry ingredients. Mix until a shaggy dough forms. Tip: If the dough feels too sticky, don’t panic. It’s supposed to be that way.
- Cover the bowl with a damp towel and let it rise in a warm spot for about 1 hour, or until it’s doubled in size. Patience is key here.
- Preheat your oven to 425°F (220°C). While it’s heating, drizzle a baking sheet with olive oil and spread the dough onto it, pressing it out to the edges. Tip: Wet your hands to prevent sticking.
- Dimple the dough with your fingers, drizzle with more olive oil, and sprinkle the rosemary on top. This not only looks pretty but adds flavor in every bite.
- Bake for 20-25 minutes, or until golden brown. Tip: The bottom should sound hollow when tapped.
Absolutely nothing beats the crisp crust and soft, airy interior of this focaccia. Tear it apart with your hands and serve it with a bowl of olive oil and balsamic vinegar for dipping, or use it as the base for the most epic sandwich you’ve ever made.
Conclusion
We hope these 18 simple flour and water recipes inspire your next kitchen adventure! Perfect for home cooks looking for easy, delicious options, each recipe proves that great flavors start with just the basics. Try them out, share your favorites in the comments, and don’t forget to pin this article on Pinterest for your next cooking session. Happy baking!


