Dive into the festive spirit with our collection of 22 Delicious Feast of Seven Fishes Recipes for Holiday Celebrations! Whether you’re a seasoned chef or a curious newcomer, these dishes promise to bring joy, tradition, and a splash of the sea to your holiday table. From classic favorites to innovative twists, there’s something here to inspire every home cook. Let’s make this holiday season unforgettable with flavors that dazzle and delight!
Classic Italian Baccalà (Salt Cod) Salad
When it comes to refreshing yet hearty salads, the Classic Italian Baccalà (Salt Cod) Salad stands out with its perfect balance of flavors and textures. Let’s dive into making this delightful dish, step by step, ensuring even beginners can achieve great results.
Ingredients
- 1 lb salt cod (soaked for 48 hours, changing the water every 12 hours—patience here pays off!)
- 2 cups extra virgin olive oil (my go-to for its fruity notes)
- 1 cup red wine vinegar (adds a nice tang)
- 3 cloves garlic, minced (fresh is best for that punchy flavor)
- 1/2 cup green olives, pitted and sliced (for a briny contrast)
- 1/4 cup capers, drained (they bring a lovely salty pop)
- 1 red onion, thinly sliced (soak in cold water for 10 minutes to mellow the bite)
- 1 bunch parsley, finely chopped (for freshness and color)
- Salt and pepper (to taste, but remember the cod is already salty)
Instructions
- Start by placing the soaked salt cod in a large pot, cover with fresh water, and bring to a gentle simmer over medium heat. Cook for 15 minutes—just until the fish flakes easily.
- While the cod cooks, whisk together the olive oil, red wine vinegar, and minced garlic in a large bowl to create the dressing. Tip: Letting it sit for a few minutes helps the flavors meld.
- Once the cod is done, remove it from the water and let it cool slightly before flaking it into large chunks, discarding any bones or skin.
- Add the flaked cod to the dressing along with the green olives, capers, and red onion. Gently toss to combine. Tip: Be gentle to keep the cod chunks intact.
- Fold in the chopped parsley and season with a little pepper. Taste before adding salt—the cod and capers add plenty. Tip: This salad benefits from resting for an hour before serving to let the flavors deepen.
Vibrant and versatile, this salad boasts a delightful mix of textures—from the tender cod to the crisp onions and briny olives. Serve it atop a bed of greens for a light meal or with crusty bread to soak up the delicious dressing.
Grilled Octopus with Lemon and Olive Oil
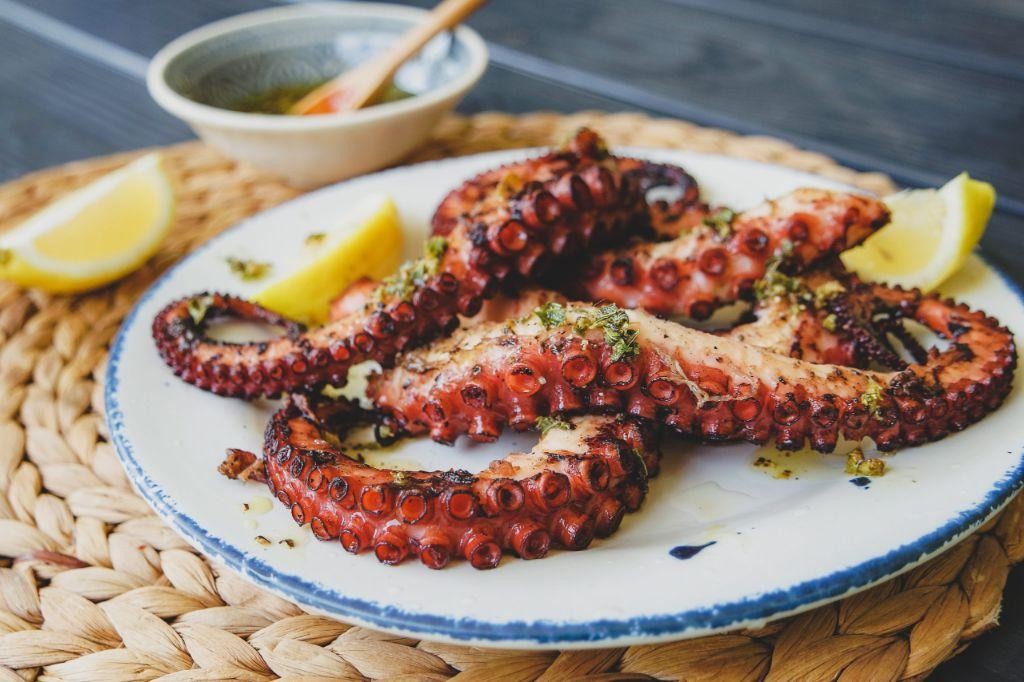
Here’s a simple yet elegant dish that brings the taste of the Mediterranean right to your kitchen. Grilled octopus with lemon and olive oil is a dish that’s as delightful to prepare as it is to eat, perfect for those looking to impress at their next dinner party.
Ingredients
- 1 large octopus (about 3 pounds), thawed if frozen – I find that a slower thaw in the fridge overnight yields the best texture.
- 1/2 cup extra virgin olive oil – my go-to for its fruity notes and health benefits.
- 3 tbsp fresh lemon juice – freshly squeezed makes all the difference.
- 2 cloves garlic, minced – for that punch of flavor.
- 1 tsp salt – to enhance all the flavors.
- 1/2 tsp black pepper – freshly ground, if possible.
Instructions
- Rinse the octopus under cold water, paying special attention to the tentacles. Pat dry with paper towels.
- In a large pot, bring water to a boil. Add the octopus, reduce heat to a simmer, and cook for about 45 minutes until tender. Tip: A fork should easily pierce the thickest part of the tentacle.
- Preheat your grill to medium-high heat (about 400°F).
- While the grill heats, whisk together olive oil, lemon juice, garlic, salt, and pepper in a small bowl. Tip: Letting this sit for a few minutes allows the flavors to meld beautifully.
- Brush the octopus generously with the olive oil mixture. Tip: Don’t skimp here; this is where the magic happens.
- Grill the octopus for about 3-4 minutes per side, until you see those beautiful char marks.
- Remove from the grill and drizzle with any remaining olive oil mixture.
The grilled octopus should be tender with a slight chew, bathed in the bright flavors of lemon and the richness of olive oil. Serve it sliced over a bed of arugula for a refreshing contrast, or alongside roasted potatoes for a heartier meal.
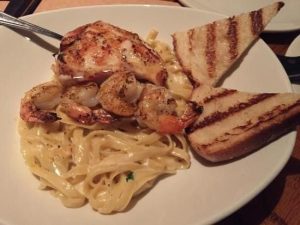
Garlic Butter Shrimp Scampi
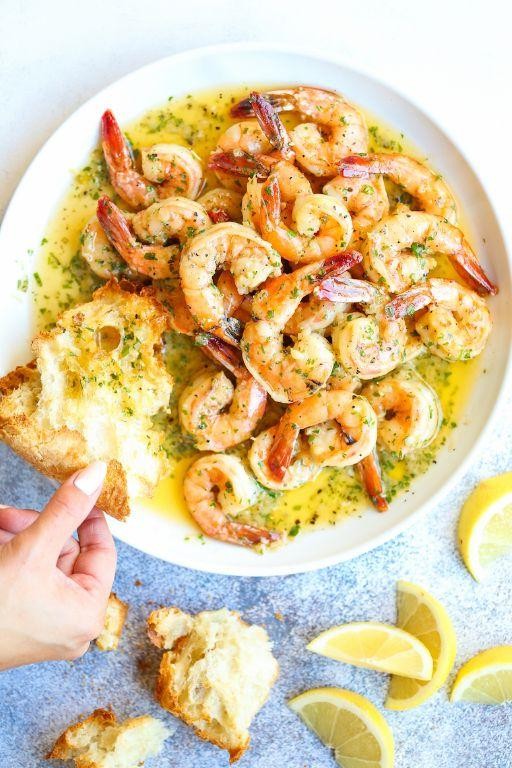
Delightfully simple yet impressively flavorful, Garlic Butter Shrimp Scampi is a dish that brings the elegance of Italian cuisine to your weeknight dinner table with minimal effort. Perfect for beginners, this recipe walks you through each step to ensure a delicious outcome every time.
Ingredients
- 1 lb large shrimp, peeled and deveined (I like to leave the tails on for presentation)
- 4 tbsp unsalted butter (salted works too, but adjust seasoning accordingly)
- 3 cloves garlic, minced (fresh is best for that punchy flavor)
- 1/2 cup dry white wine (a crisp Pinot Grigio is my go-to)
- 1 tbsp lemon juice (freshly squeezed makes all the difference)
- 1/4 tsp red pepper flakes (adjust to your heat preference)
- Salt to taste (I start with 1/4 tsp and adjust from there)
- 2 tbsp chopped parsley (for that fresh, herby finish)
- 8 oz linguine pasta (or your favorite long pasta)
Instructions
- Bring a large pot of salted water to a boil over high heat for the pasta.
- While the water heats, melt butter in a large skillet over medium heat until foamy.
- Add minced garlic and red pepper flakes to the skillet, sautéing for about 1 minute until fragrant but not browned.
- Increase heat to medium-high, add shrimp to the skillet in a single layer, and cook for 2 minutes per side until pink and opaque.
- Remove shrimp from the skillet and set aside on a plate.
- Deglaze the skillet with white wine and lemon juice, scraping up any browned bits, and let the mixture reduce by half, about 3 minutes.
- Meanwhile, cook the linguine according to package instructions until al dente, then drain, reserving 1/2 cup of pasta water.
- Return the shrimp to the skillet, add the cooked linguine, and toss everything together, adding reserved pasta water as needed to loosen the sauce.
- Finish with chopped parsley and an extra sprinkle of red pepper flakes if desired.
Every bite of this Garlic Butter Shrimp Scampi offers a harmonious blend of buttery richness, bright acidity, and a hint of heat. Serve it with a side of crusty bread to soak up the sauce, or over a bed of greens for a lighter take.
Pan-Seared Sea Bass with Cherry Tomatoes
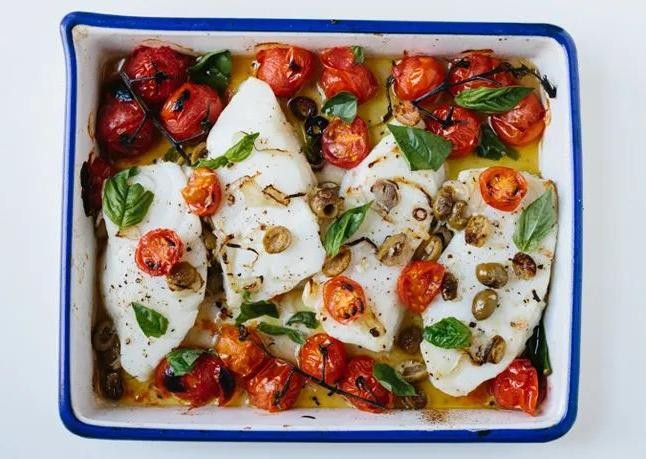
Starting with a simple yet elegant dish, pan-seared sea bass with cherry tomatoes is a perfect weeknight dinner that feels gourmet. Sea bass, known for its buttery texture, pairs beautifully with the sweet acidity of cherry tomatoes, creating a harmonious balance on the plate.
Ingredients
- 2 sea bass fillets (about 6 oz each, skin-on for that crispy texture)
- 1 cup cherry tomatoes (I love using a mix of colors for a vibrant dish)
- 2 tbsp extra virgin olive oil (my go-to for its fruity notes)
- 1 tbsp unsalted butter (because everything’s better with butter)
- 2 cloves garlic, minced (freshly minced makes all the difference)
- 1/2 tsp salt (I prefer sea salt for its clean taste)
- 1/4 tsp black pepper (freshly ground to awaken the flavors)
- 1 tbsp fresh basil, chopped (for a fresh finish)
Instructions
- Pat the sea bass fillets dry with paper towels to ensure a good sear. Season both sides with salt and pepper.
- Heat olive oil in a non-stick skillet over medium-high heat until shimmering but not smoking, about 2 minutes.
- Place the fillets skin-side down in the skillet. Cook undisturbed for 4 minutes until the skin is crispy and golden.
- Flip the fillets carefully and add butter to the skillet. Spoon the melted butter over the fillets for 30 seconds, then remove them to a plate.
- In the same skillet, add cherry tomatoes and garlic. Sauté for 2 minutes until the tomatoes start to blister.
- Return the sea bass to the skillet, skin-side up, and cook for another minute to warm through.
- Sprinkle with fresh basil before serving.
Perfectly seared sea bass offers a crispy skin contrast to its tender flesh, while the cherry tomatoes burst with sweetness. Serve this dish over a bed of quinoa or with a side of steamed asparagus for a complete meal.
Spicy Calamari with Marinara Sauce
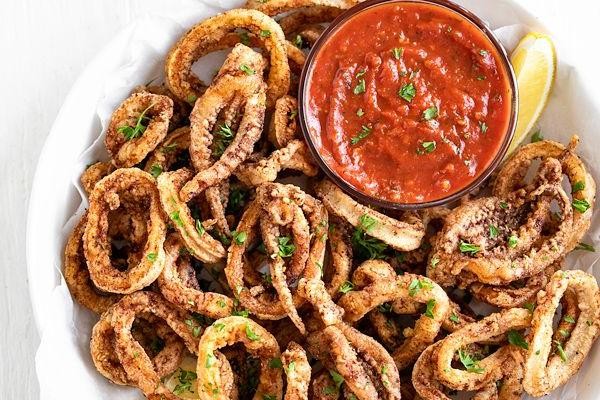
Discover the perfect balance of heat and tang with this Spicy Calamari with Marinara Sauce recipe, a dish that promises to elevate your seafood game with its straightforward yet flavorful approach.
Ingredients
- 1 lb cleaned squid, tubes and tentacles – I find that fresh squid makes all the difference, but frozen works in a pinch if thawed properly.
- 1 cup all-purpose flour – for that light, crispy coating we all love.
- 1 tsp salt – just enough to enhance the natural flavors.
- 1 tsp cayenne pepper – my secret for that irresistible kick.
- 1/2 tsp black pepper – freshly ground, if possible.
- 2 cups marinara sauce – homemade or your favorite store-bought brand.
- 1/2 cup extra virgin olive oil – my go-to for frying, it adds a subtle fruitiness.
- 1 lemon, cut into wedges – for that bright, finishing touch.
Instructions
- Pat the squid dry with paper towels to ensure the flour sticks properly.
- In a bowl, mix the flour, salt, cayenne, and black pepper for an even spice distribution.
- Dredge each piece of squid in the flour mixture, shaking off any excess.
- Heat the olive oil in a large skillet over medium-high heat until it reaches 350°F, a candy thermometer works great here.
- Fry the squid in batches to avoid overcrowding, about 2 minutes per side or until golden and crispy.
- Transfer the fried squid to a paper towel-lined plate to drain any excess oil.
- Warm the marinara sauce in a small saucepan over low heat, stirring occasionally, for about 5 minutes.
- Serve the spicy calamari hot with the marinara sauce on the side and lemon wedges for squeezing.
You’ll love the contrast between the crispy, spicy exterior and the tender squid inside. Pair it with a chilled white wine for an unbeatable combination.
Lobster Linguine with Garlic White Wine Sauce
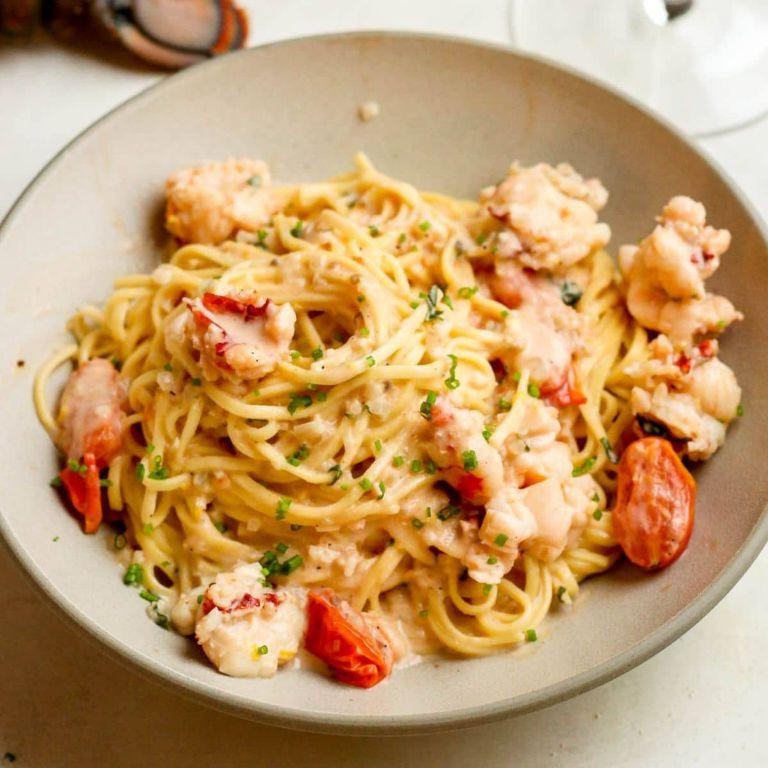
Absolutely nothing beats the luxurious taste of seafood paired with pasta, especially when it’s a Lobster Linguine with Garlic White Wine Sauce. This dish is a perfect blend of rich flavors and elegant simplicity, making it ideal for both weeknight dinners and special occasions.
Ingredients
- 1 lb linguine pasta (I always go for the bronze-die cut for that perfect sauce cling)
- 2 live lobsters, about 1.5 lbs each (freshness is key here, so ask your fishmonger for the most active ones)
- 4 tbsp unsalted butter (I prefer European-style for its richer flavor)
- 4 cloves garlic, minced (the more, the merrier in my book)
- 1 cup dry white wine (a crisp Sauvignon Blanc works wonders)
- 1/2 cup heavy cream (for that silky, luxurious sauce texture)
- 1/4 cup chopped fresh parsley (adds a bright, fresh contrast)
- Salt to taste (I like to use sea salt for its clean flavor)
- 1/2 tsp crushed red pepper flakes (adjust based on your heat preference)
Instructions
- Bring a large pot of salted water to a boil. Add the linguine and cook according to package instructions until al dente, about 9 minutes.
- While the pasta cooks, prepare the lobsters. Bring a separate large pot of water to a boil. Add the lobsters and cook for 8 minutes. Remove and let cool slightly before removing the meat from the shells.
- In a large skillet over medium heat, melt the butter. Add the minced garlic and sauté until fragrant, about 1 minute, being careful not to burn it.
- Pour in the white wine, increase the heat to medium-high, and let it simmer until reduced by half, about 3 minutes.
- Stir in the heavy cream and crushed red pepper flakes. Let the sauce simmer for another 2 minutes to thicken slightly.
- Add the cooked linguine and lobster meat to the skillet. Toss everything together until the pasta is evenly coated with the sauce.
- Garnish with chopped fresh parsley before serving.
Zesty and rich, this Lobster Linguine with Garlic White Wine Sauce offers a delightful contrast of flavors and textures. Serve it with a side of crusty bread to soak up every last bit of that creamy sauce, or pair it with a simple green salad for a lighter meal.
Fried Smelts with Aioli Dip
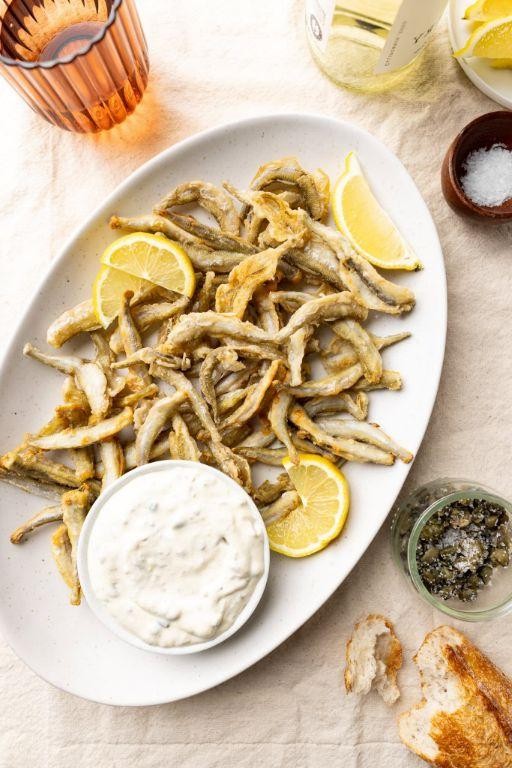
Zesty and light, fried smelts with aioli dip is a dish that brings the ocean’s freshness right to your table, perfect for those who love a crispy bite with a creamy, garlicky dip. This recipe is straightforward, ensuring even beginners can achieve delicious results with a bit of guidance.
Ingredients
- 1 lb smelts, cleaned and patted dry (I find smaller smelts crisp up better)
- 1 cup all-purpose flour (for that perfect golden crust)
- 1 tsp salt (sea salt adds a nice touch)
- 1/2 tsp black pepper (freshly ground for maximum flavor)
- 1 cup vegetable oil (high smoke point is key for frying)
- 2 large eggs, beaten (room temperature eggs mix more evenly)
- 1/2 cup mayonnaise (I swear by Duke’s for its tanginess)
- 2 garlic cloves, minced (the fresher, the better for that punch)
- 1 tbsp lemon juice (freshly squeezed makes all the difference)
- 1/2 tsp paprika (smoked paprika adds depth)
Instructions
- In a shallow dish, whisk together flour, salt, and pepper. This is your dredging station.
- Heat vegetable oil in a deep skillet over medium-high heat until it reaches 375°F. A candy thermometer is your best friend here.
- Dip each smelt into the beaten eggs, then coat evenly in the flour mixture. Shake off any excess.
- Carefully place the smelts in the hot oil, frying in batches to avoid overcrowding. Cook for 2-3 minutes per side until golden brown and crispy.
- Transfer the fried smelts to a paper towel-lined plate to drain any excess oil.
- For the aioli, combine mayonnaise, minced garlic, lemon juice, and paprika in a small bowl. Stir until smooth. Let it sit for 10 minutes to meld the flavors.
- Serve the fried smelts hot with the aioli dip on the side. A squeeze of extra lemon juice right before eating brightens up the dish beautifully.
Absolutely irresistible, the smelts boast a crispy exterior with tender flesh inside, while the aioli adds a creamy, garlicky contrast. Try serving them atop a bed of mixed greens for a light meal or as a standout appetizer at your next gathering.
Clams Casino with Bacon and Breadcrumbs
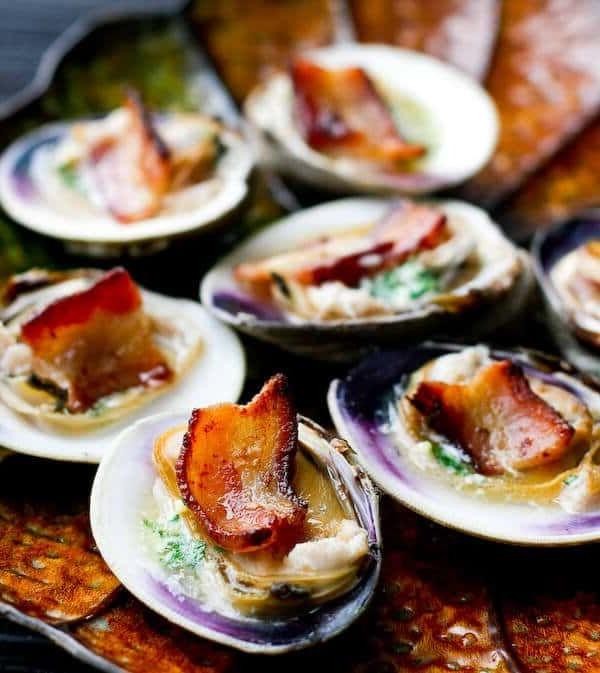
Today we’re diving into the classic appetizer that’s a hit at any gathering: Clams Casino with Bacon and Breadcrumbs. This dish combines the briny sweetness of clams with the smoky crunch of bacon, all topped with a golden breadcrumb mixture that’s simply irresistible.
Ingredients
- 24 littleneck clams, scrubbed clean (freshness is key here, so give them a good rinse)
- 6 slices of bacon, diced (I go for thick-cut for that extra crunch)
- 1/2 cup breadcrumbs (panko works wonders for texture)
- 1/4 cup unsalted butter, melted (because everything’s better with butter)
- 2 cloves garlic, minced (freshly minced garlic makes all the difference)
- 2 tbsp parsley, finely chopped (for that fresh, herby finish)
- 1/2 tsp black pepper (freshly ground, if you can)
Instructions
- Preheat your oven to 425°F (220°C) to ensure it’s hot enough for the clams to cook perfectly.
- In a skillet over medium heat, cook the diced bacon until crispy, about 5 minutes. Tip: Reserve some bacon fat for sautéing the garlic for an extra flavor boost.
- Remove the bacon and set aside. In the same skillet, sauté the minced garlic in the reserved bacon fat for about 30 seconds until fragrant.
- In a bowl, combine the cooked bacon, sautéed garlic, breadcrumbs, melted butter, parsley, and black pepper. Mix well to ensure every breadcrumb is coated.
- Shuck the clams, leaving the meat on the half shell. Tip: Use a clam knife and a towel to protect your hand while shucking.
- Place the clams on a baking sheet. Spoon the breadcrumb mixture evenly over each clam.
- Bake in the preheated oven for 10-12 minutes, or until the breadcrumbs are golden brown and the clams are cooked through. Tip: Keep an eye on them after 10 minutes to avoid burning the topping.
Mouthwatering is the first word that comes to mind when you pull these clams out of the oven. The combination of crispy bacon, buttery breadcrumbs, and tender clams is a texture and flavor dream. Serve them on a platter with lemon wedges for a bright finish that cuts through the richness.
Baked Stuffed Lobster with Crabmeat Stuffing
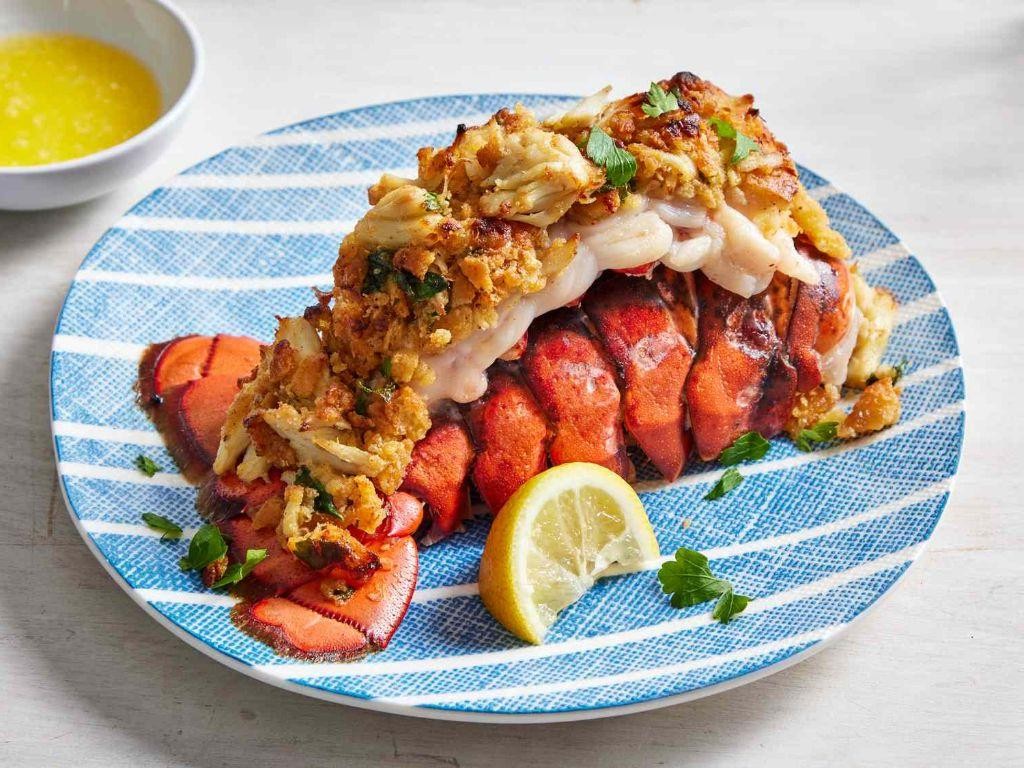
Zesty flavors and luxurious textures come together in this Baked Stuffed Lobster with Crabmeat Stuffing, a dish that promises to elevate your dining experience. Perfect for special occasions or when you’re in the mood to treat yourself, this recipe guides you through each step to ensure a delicious outcome.
Ingredients
- 2 live lobsters (1.5 lbs each) – always choose lively ones for the freshest taste.
- 1 cup crabmeat – I prefer lump crabmeat for its texture and sweetness.
- 1/2 cup breadcrumbs – panko gives a delightful crunch.
- 1/4 cup mayonnaise – it binds the stuffing beautifully.
- 1 tbsp lemon juice – fresh squeezed, please, for that bright note.
- 1 tsp Old Bay seasoning – a must for that authentic seafood flavor.
- 2 tbsp melted butter – unsalted, so you control the seasoning.
- 1/4 tsp salt – just enough to enhance the natural flavors.
Instructions
- Preheat your oven to 375°F (190°C) to ensure it’s ready for baking.
- Humanely dispatch the lobsters by placing them in the freezer for 30 minutes before cooking. This step is crucial for ethical preparation.
- Once the lobsters are no longer moving, split them in half lengthwise with a sharp chef’s knife. Remove the tomalley and roe if present, but save the tomalley for the stuffing if you like its rich flavor.
- In a mixing bowl, combine the crabmeat, breadcrumbs, mayonnaise, lemon juice, Old Bay seasoning, and salt. Gently fold the ingredients together to keep the crabmeat intact.
- Stuff each lobster half generously with the crabmeat mixture, pressing lightly to adhere.
- Drizzle the melted butter over the stuffed lobsters for a golden finish.
- Bake in the preheated oven for 20-25 minutes, or until the stuffing is golden and the lobster meat is opaque.
- Let the lobsters rest for 5 minutes before serving to allow the flavors to meld.
Out of the oven, the lobster is succulent and the crabmeat stuffing is irresistibly crispy on top yet moist inside. Serve with a side of drawn butter and a wedge of lemon for a restaurant-quality presentation at home.
Seafood Paella with Saffron and Chorizo
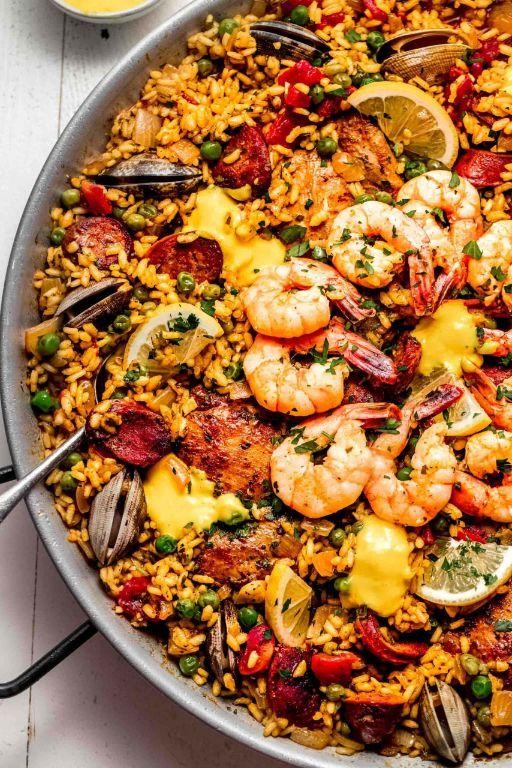
Ready to dive into the vibrant flavors of Spain with a dish that’s as colorful as it is delicious? Seafood Paella with Saffron and Chorizo is a feast for the senses, combining the richness of the sea with the smoky depth of chorizo, all brought together with the golden hue of saffron.
Ingredients
- 2 cups Bomba rice – the star of the show, it absorbs flavors like a dream.
- 1/2 lb chorizo, sliced – I love the smoky kick it adds.
- 1 lb mixed seafood (shrimp, mussels, squid) – fresh is best, but frozen works in a pinch.
- 4 cups chicken stock – homemade gives it that extra love.
- 1 pinch saffron threads – worth every penny for that signature color and aroma.
- 1 large onion, diced – the foundation of flavor.
- 3 cloves garlic, minced – because what’s paella without garlic?
- 1 red bell pepper, sliced – for a sweet crunch.
- 1/4 cup extra virgin olive oil – my go-to for richness.
- 1 tsp smoked paprika – it’s all about that depth.
- Salt to taste – but be mindful, the chorizo and stock already bring saltiness.
Instructions
- Heat the olive oil in a large paella pan over medium heat until shimmering.
- Add the chorizo and cook until lightly browned, about 3 minutes, stirring occasionally.
- Toss in the onion, garlic, and bell pepper, cooking until soft, about 5 minutes. Tip: Keep the heat medium to avoid burning the garlic.
- Stir in the rice and smoked paprika, coating the rice evenly with the oil and spices, for about 2 minutes.
- Dissolve the saffron in 1/4 cup of warm chicken stock, then pour it and the remaining stock into the pan. Tip: This ensures the saffron distributes evenly.
- Arrange the seafood on top of the rice, pressing lightly to submerge. Do not stir from this point on.
- Bring to a boil, then reduce to a simmer. Cook uncovered for 20 minutes, or until the rice is tender and the liquid is absorbed. Tip: Listen for a crackling sound; it’s a sign the socarrat (crispy bottom) is forming.
- Remove from heat and let rest for 5 minutes before serving.
Zesty and vibrant, this paella boasts a perfect socarrat, tender seafood, and a melody of flavors. Serve it straight from the pan for that authentic communal dining experience.
Grilled Swordfish with Herb Butter
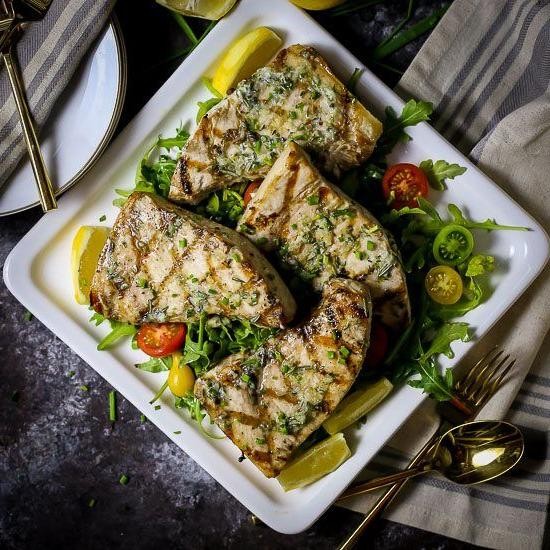
On a warm summer evening, nothing beats the simplicity and elegance of grilled swordfish, especially when it’s topped with a vibrant herb butter that melts beautifully over the hot fish. This recipe is straightforward, ensuring even beginners can achieve restaurant-quality results at home.
Ingredients
- 1.5 lbs swordfish steaks, about 1-inch thick (thicker cuts stay juicier on the grill)
- 4 tbsp unsalted butter, softened (I always use unsalted to control the seasoning)
- 2 tbsp fresh parsley, finely chopped (flat-leaf parsley has a more robust flavor)
- 1 tbsp fresh dill, finely chopped (dill adds a lovely freshness)
- 1 tbsp fresh chives, finely chopped (chives bring a mild oniony kick)
- 1 lemon, zested and juiced (Meyer lemons are my favorite for their sweetness)
- 1/2 tsp salt (I prefer sea salt for its clean taste)
- 1/4 tsp black pepper, freshly ground (freshly ground pepper is a game-changer)
- 1 tbsp extra virgin olive oil (my go-to for its fruity notes)
Instructions
- Preheat your grill to medium-high heat, aiming for about 400°F. A properly heated grill ensures those perfect grill marks and prevents sticking.
- While the grill heats, make the herb butter by mixing the softened butter, parsley, dill, chives, lemon zest, salt, and pepper in a small bowl until well combined. Tip: Let the butter sit at room temperature for easier mixing.
- Brush both sides of the swordfish steaks with olive oil to prevent sticking and help the seasoning adhere.
- Place the swordfish on the grill and cook for 4-5 minutes on the first side. You’re looking for a nice sear and the fish to release easily from the grill.
- Flip the swordfish and cook for another 3-4 minutes on the second side. The fish is done when it’s opaque throughout and flakes easily with a fork. Tip: Avoid overcooking to keep the swordfish moist.
- Remove the swordfish from the grill and immediately top each steak with a generous dollop of the herb butter. The residual heat will melt the butter, creating a delicious sauce. Tip: Serve with extra lemon wedges for those who love a brighter flavor.
Here, the swordfish boasts a perfectly charred exterior with a moist, flaky interior, while the herb butter adds a rich, aromatic finish. For a stunning presentation, serve atop a bed of arugula with grilled lemon halves on the side.
Anchovy Pasta with Garlic and Chili Flakes
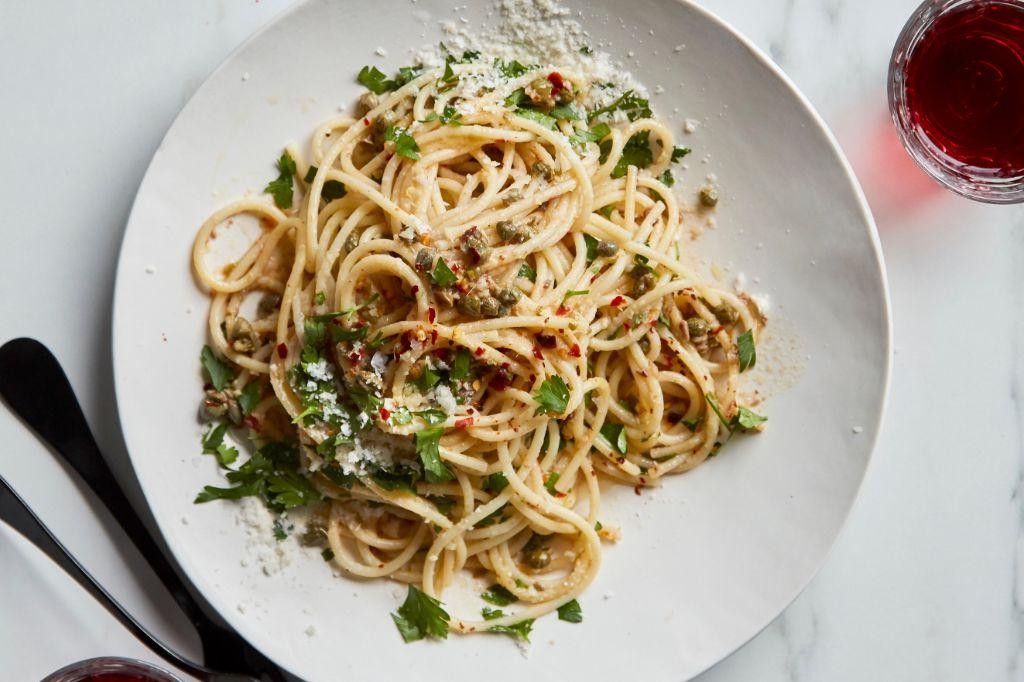
Just when you think pasta couldn’t get any simpler, this Anchovy Pasta with Garlic and Chili Flakes comes along to prove you wrong. It’s a dish that packs a punch with minimal ingredients, perfect for those nights when you want something quick yet flavorful.
Ingredients
- 8 oz spaghetti (I always keep a box in my pantry for emergencies)
- 3 tbsp extra virgin olive oil (my go-to for its fruity notes)
- 4 garlic cloves, thinly sliced (the thinner, the better for even cooking)
- 1/2 tsp chili flakes (adjust based on your heat preference)
- 6 anchovy fillets, chopped (don’t be scared; they melt into the sauce)
- 1/4 cup pasta water (reserved gold for silky sauces)
- Salt, to season the pasta water (it should taste like the sea)
Instructions
- Bring a large pot of salted water to a boil over high heat. Tip: The saltier the water, the more flavorful the pasta.
- Add the spaghetti and cook according to package instructions until al dente, about 8-10 minutes. Tip: Stir occasionally to prevent sticking.
- While the pasta cooks, heat olive oil in a large skillet over medium heat. Add garlic and chili flakes, sautéing until garlic is golden, about 1 minute. Tip: Watch closely to avoid burning the garlic.
- Stir in the chopped anchovies, cooking until they dissolve into the oil, about 2 minutes.
- Reserve 1/4 cup of pasta water, then drain the spaghetti and add it to the skillet with the anchovy mixture.
- Toss the pasta with the sauce, adding reserved pasta water a little at a time until the sauce clings to the pasta, about 1 minute.
The result is a beautifully balanced dish where the umami of anchovies meets the heat of chili flakes, all wrapped around perfectly cooked spaghetti. Serve it with a sprinkle of fresh parsley or a grating of Parmesan for an extra layer of flavor.
Steamed Mussels in White Wine and Garlic Broth
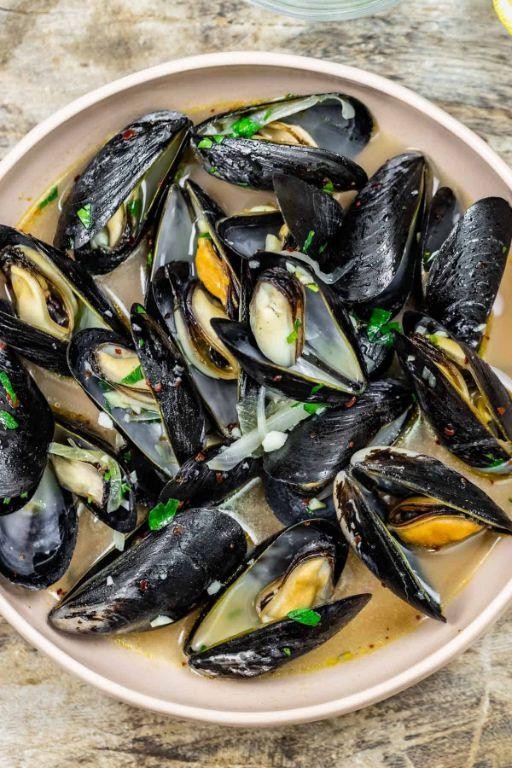
Kickstart your culinary adventure with this simple yet elegant dish that’s perfect for any occasion. Steamed mussels in white wine and garlic broth is a classic that combines the freshness of the sea with the aromatic depth of garlic and the brightness of white wine.
Ingredients
- 2 lbs fresh mussels, scrubbed and debearded (I always give them a quick rinse under cold water to ensure they’re clean)
- 2 tbsp extra virgin olive oil (my go-to for its fruity notes)
- 4 cloves garlic, minced (freshly minced garlic makes all the difference)
- 1 cup dry white wine (a Sauvignon Blanc works beautifully here)
- 1/2 cup water
- 2 tbsp unsalted butter (for that rich, silky finish)
- 1/4 cup fresh parsley, chopped (adds a pop of color and freshness)
- 1/2 tsp red pepper flakes (adjust according to your heat preference)
- Salt to taste (I like to use sea salt for its clean flavor)
Instructions
- Heat the olive oil in a large pot over medium heat until shimmering, about 2 minutes.
- Add the minced garlic and red pepper flakes, sautéing until fragrant, about 30 seconds. Be careful not to burn the garlic.
- Pour in the white wine and water, bringing the mixture to a simmer. Let it cook for 2 minutes to slightly reduce.
- Add the mussels to the pot, covering with a lid. Steam for 5-7 minutes, or until the mussels have opened. Discard any that remain closed.
- Remove the pot from heat and stir in the butter until melted. This enriches the broth beautifully.
- Sprinkle with chopped parsley and a pinch of salt, giving it a gentle stir to combine.
Now, the mussels should be plump and tender, swimming in a fragrant broth that’s begging to be sopped up with crusty bread. The combination of garlic, white wine, and a hint of heat from the pepper flakes creates a symphony of flavors that’s both comforting and sophisticated. Serve this dish with a side of toasted baguette to make sure none of that delicious broth goes to waste.
Crab Cakes with Remoulade Sauce

Great crab cakes are a delightful blend of tender crab meat, crisp breadcrumbs, and a hint of seasoning, all brought together with a creamy remoulade sauce that adds a tangy kick. Today, we’ll walk through making these savory treats from scratch, ensuring even beginners can achieve restaurant-quality results at home.
Ingredients
- 1 lb fresh crab meat – look for jumbo lump for the best texture.
- 1/2 cup panko breadcrumbs – they stay crispier than regular breadcrumbs.
- 1/4 cup mayonnaise – I prefer Duke’s for its tangy flavor.
- 1 large egg – room temperature eggs blend more smoothly.
- 1 tbsp Dijon mustard – adds a nice depth of flavor.
- 1 tbsp Worcestershire sauce – a splash enhances the umami.
- 1/2 tsp Old Bay seasoning – it’s a must for authentic crab cakes.
- 2 tbsp extra virgin olive oil – my go-to for frying.
- 1/4 cup chopped parsley – fresh herbs make all the difference.
- For the remoulade: 1/2 cup mayonnaise, 1 tbsp capers, 1 tbsp pickle relish, 1 tsp lemon juice, and 1/2 tsp smoked paprika.
Instructions
- In a large bowl, gently mix the crab meat, panko, mayonnaise, egg, Dijon mustard, Worcestershire sauce, Old Bay seasoning, and parsley until just combined. Tip: Overmixing can break down the crab meat, so fold gently.
- Form the mixture into 8 equal-sized patties, about 1/2 inch thick. Tip: Wet your hands slightly to prevent sticking.
- Heat the olive oil in a large skillet over medium heat until shimmering, about 350°F.
- Carefully place the crab cakes in the skillet and cook for 4-5 minutes per side, until golden brown and crispy. Tip: Don’t overcrowd the pan; cook in batches if necessary.
- While the crab cakes cook, whisk together all the remoulade sauce ingredients in a small bowl until smooth.
- Serve the crab cakes hot with a dollop of remoulade sauce on top.
These crab cakes are wonderfully crispy on the outside, tender and flaky on the inside, with the remoulade adding a creamy, tangy contrast. Try serving them on a bed of mixed greens for a light, elegant presentation.
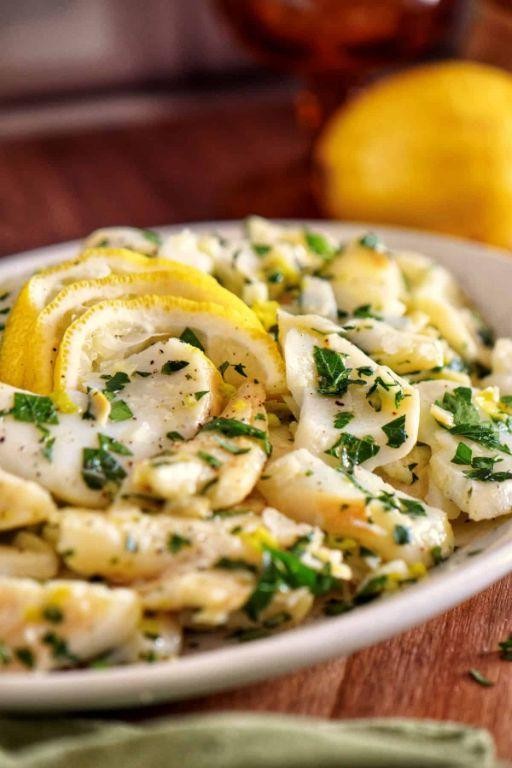
Fried Calamari Rings with Lemon Wedges
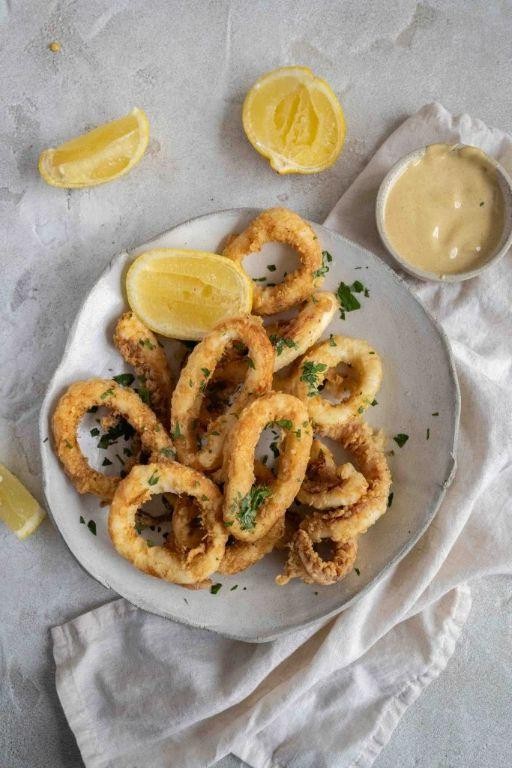
Let’s dive into making the crispiest, most delightful Fried Calamari Rings with Lemon Wedges you’ve ever tasted. Perfect for beginners, this recipe walks you through each step to ensure golden, tender calamari every time.
Ingredients
- 1 lb squid, cleaned and cut into 1/2-inch rings (I find fresh squid makes all the difference, but frozen works in a pinch)
- 1 cup all-purpose flour (for that perfect, light coating)
- 1 tsp salt (sea salt is my preference for its clean taste)
- 1/2 tsp black pepper, freshly ground (it really elevates the flavor)
- 1 cup vegetable oil (high smoke point is key for frying)
- 1 lemon, cut into wedges (for that bright, acidic finish)
Instructions
- Pat the squid rings dry with paper towels to ensure the flour sticks properly.
- In a mixing bowl, combine the flour, salt, and pepper, whisking to blend evenly.
- Heat the vegetable oil in a deep fryer or large skillet to 375°F over medium-high heat. Tip: Use a candy thermometer to monitor the temperature accurately.
- Dredge the squid rings in the flour mixture, shaking off any excess. Tip: Do this in batches to avoid overcrowding the pan.
- Carefully add the squid rings to the hot oil, frying for about 2 minutes or until golden brown. Tip: Don’t overcook, or the squid will become tough.
- Remove the fried calamari with a slotted spoon and drain on paper towels.
- Serve immediately with lemon wedges on the side for squeezing over the top.
You’ll love the contrast between the crispy exterior and the tender, flavorful squid inside. For a fun twist, serve these calamari rings with a spicy aioli or a tangy marinara sauce for dipping.
Shrimp and Crab Stuffed Mushrooms

Mastering the art of stuffed mushrooms is easier than you think, especially when you start with this shrimp and crab version that’s sure to impress at any gathering.
Ingredients
- 12 large white mushrooms (I find the bigger caps easier to stuff and more satisfying to eat)
- 1/2 cup cooked shrimp, finely chopped (freshly cooked shrimp make all the difference here)
- 1/2 cup crab meat, drained and flaked (I opt for lump crab for its sweet, tender texture)
- 1/4 cup cream cheese, softened (room temperature blends smoother)
- 2 tbsp mayonnaise (this adds a lovely richness)
- 1/4 cup grated Parmesan cheese (the sharper, the better for flavor)
- 1 clove garlic, minced (freshly minced gives the best punch)
- 1 tbsp fresh parsley, chopped (for a bright, herby note)
- 1/2 tsp Old Bay seasoning (a must for that classic seafood flavor)
- Salt and pepper to taste (I like to season as I go)
Instructions
- Preheat your oven to 375°F (190°C) and line a baking sheet with parchment paper for easy cleanup.
- Clean the mushrooms with a damp paper towel, remove the stems, and set the caps aside. Tip: Save the stems for another recipe like soup or stock.
- In a mixing bowl, combine the shrimp, crab meat, cream cheese, mayonnaise, Parmesan, garlic, parsley, and Old Bay seasoning until well blended. Tip: Mixing with a fork helps keep the crab meat flaky.
- Season the mixture with salt and pepper, then spoon generously into each mushroom cap. Tip: A small cookie scoop makes this step quicker and less messy.
- Arrange the stuffed mushrooms on the prepared baking sheet and bake for 20-25 minutes, or until the tops are golden and the mushrooms are tender.
After baking, these stuffed mushrooms emerge with a creamy, savory filling that contrasts beautifully with the earthy mushroom caps. Serve them warm as an elegant appetizer or alongside a crisp salad for a light meal.
Seafood Risotto with Parmesan and Peas
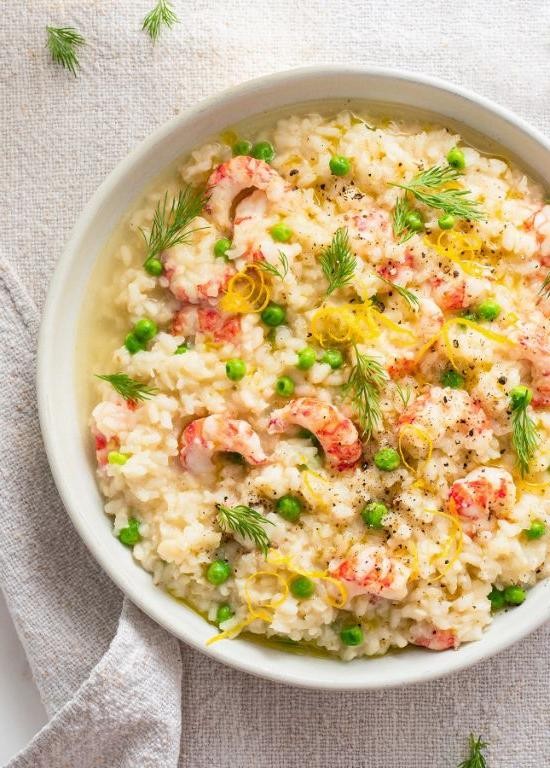
Let’s dive into creating a comforting and creamy Seafood Risotto with Parmesan and Peas, a dish that’s as rewarding to make as it is to eat. Perfect for beginners, this recipe walks you through each step to ensure a delicious outcome.
Ingredients
- 1 1/2 cups Arborio rice – the star of the show for that perfect creamy texture.
- 4 cups seafood stock – I like to warm it up first for better absorption.
- 1/2 cup dry white wine – a splash adds depth, and yes, it’s worth it.
- 1/2 cup grated Parmesan cheese – freshly grated melts smoother.
- 1 cup frozen peas – no need to thaw, they’ll cook perfectly in the risotto.
- 1/2 lb mixed seafood (shrimp and scallops work great) – fresh or thawed if frozen.
- 2 tbsp extra virgin olive oil – my go-to for its fruity note.
- 1 small onion, finely diced – the foundation of flavor.
- 2 cloves garlic, minced – because garlic makes everything better.
- Salt to taste – but we’ll be specific about when and how much.
Instructions
- Heat the seafood stock in a saucepan over medium heat until simmering, then reduce to low to keep warm.
- In a large pan, heat the olive oil over medium heat. Add the onion and sauté until translucent, about 3 minutes.
- Add the garlic and cook for another minute until fragrant. Tip: Don’t let the garlic brown to avoid bitterness.
- Stir in the Arborio rice, coating it well with the oil, onion, and garlic mixture. Toast for 2 minutes until the edges become slightly translucent.
- Pour in the white wine, stirring constantly until the liquid is mostly absorbed. Tip: This deglazes the pan and adds flavor.
- Begin adding the warm stock one ladle at a time, stirring frequently. Wait until each addition is nearly absorbed before adding the next. This process should take about 18-20 minutes.
- After about 15 minutes, add the mixed seafood and peas. Continue adding stock and stirring until the rice is al dente and the seafood is cooked through.
- Remove from heat. Stir in the Parmesan cheese until melted and creamy. Tip: Let it rest for 2 minutes off the heat for the perfect consistency.
- Season with salt if needed, but remember the stock and Parmesan add saltiness.
Enjoy the creamy texture and rich flavors of this Seafood Risotto with Parmesan and Peas. For a creative twist, serve it in hollowed-out bell peppers for an edible bowl that adds a pop of color to your table.
Broiled Oysters with Spinach and Cheese
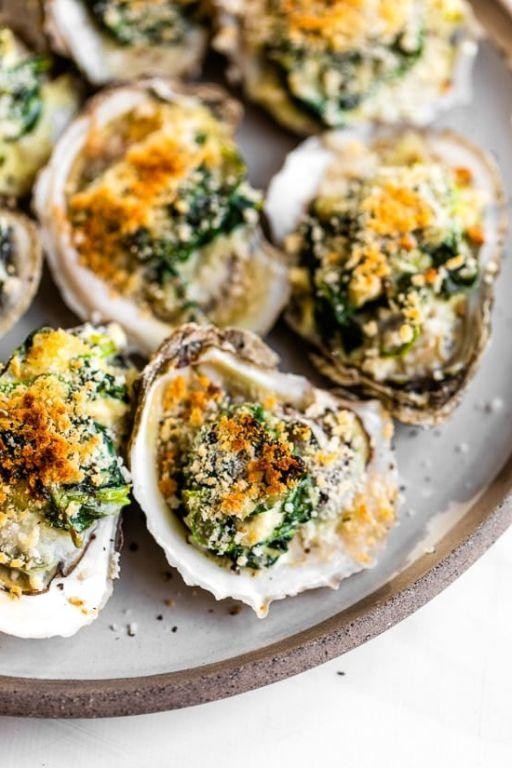
Now, let’s dive into creating a dish that’s as delightful to make as it is to eat. Broiled oysters with spinach and cheese combines the briny sweetness of oysters with the earthy tones of spinach and the creamy richness of cheese, all brought together under the broiler for a quick, elegant dish.
Ingredients
- 12 fresh oysters, shucked – I find that smaller oysters work best for this recipe, as they’re easier to eat in one bite.
- 1 cup fresh spinach, finely chopped – Baby spinach is my preference for its tenderness.
- 1/2 cup grated Parmesan cheese – The sharper, the better, in my opinion.
- 2 tbsp unsalted butter, melted – I always use unsalted to control the dish’s saltiness.
- 1/4 tsp garlic powder – A little goes a long way to enhance the oysters’ natural flavors.
- 1/4 tsp black pepper – Freshly ground adds a nice kick.
Instructions
- Preheat your broiler to high, ensuring the rack is positioned about 6 inches from the heat source.
- Arrange the shucked oysters on a broiler-safe tray or dish, making sure they’re stable.
- In a small bowl, mix the chopped spinach, Parmesan cheese, melted butter, garlic powder, and black pepper until well combined.
- Spoon the spinach and cheese mixture evenly over each oyster, covering them completely.
- Place the tray under the broiler and cook for 3-5 minutes, or until the cheese is bubbly and slightly golden. Keep a close eye to prevent burning.
- Remove from the broiler and let sit for a minute before serving. Tip: The oysters will be very hot, so caution is advised.
Just out of the broiler, these oysters offer a wonderful contrast of textures – the creamy topping against the tender oyster. Serve them on a bed of rock salt for an elegant presentation, or alongside a crisp white wine to complement their richness.
Tuna Tartare with Avocado and Crispy Wontons
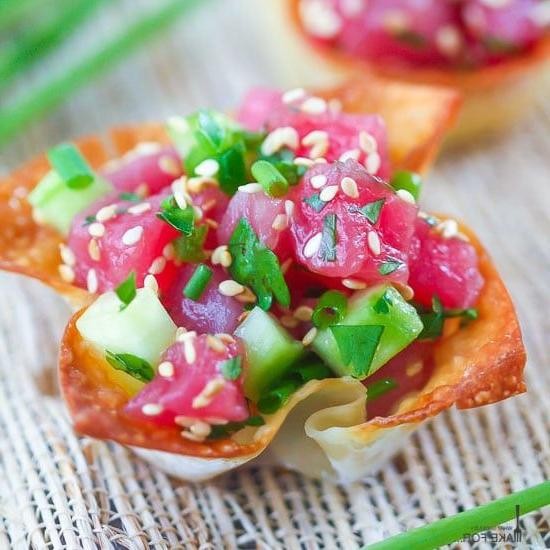
Zesty and refreshing, this Tuna Tartare with Avocado and Crispy Wontons is a perfect blend of textures and flavors that’s surprisingly simple to make. Let’s dive into the methodical process of creating this elegant dish, ensuring every step is clear and achievable for beginners.
Ingredients
- 1 lb sushi-grade tuna, diced into 1/4-inch pieces (the fresher, the better for that melt-in-your-mouth texture)
- 2 ripe avocados, diced (I find Hass avocados work best for their creamy texture)
- 1/4 cup soy sauce (low sodium is my preference to control the saltiness)
- 1 tbsp sesame oil (toasted sesame oil adds a deeper flavor)
- 1 tbsp lime juice (freshly squeezed makes all the difference)
- 1 tsp ginger, minced (a little goes a long way in adding a spicy kick)
- 1/4 cup green onions, thinly sliced (for a pop of color and mild onion flavor)
- 1 package wonton wrappers, cut into strips (for that irresistible crunch)
- 2 tbsp vegetable oil (for frying the wontons to golden perfection)
Instructions
- In a large bowl, gently mix the diced tuna, soy sauce, sesame oil, lime juice, minced ginger, and green onions until evenly coated. Tip: Let the mixture marinate in the fridge for 10 minutes to enhance the flavors.
- While the tuna marinates, heat the vegetable oil in a skillet over medium-high heat (350°F is ideal for frying).
- Fry the wonton strips in batches until golden and crispy, about 1-2 minutes per side. Tip: Keep an eye on them; they go from golden to burnt quickly.
- Remove the wonton strips from the oil and drain on paper towels. Tip: Sprinkle with a pinch of salt while still warm for extra flavor.
- Gently fold the diced avocados into the marinated tuna mixture, being careful not to mash the avocados.
- To serve, spoon the tuna and avocado mixture onto plates and top with the crispy wonton strips.
Crispy, creamy, and bursting with fresh flavors, this dish is a delight to the senses. Serve it as an appetizer at your next dinner party or enjoy it as a light lunch with a side of mixed greens for a complete meal.
Scallops Wrapped in Bacon with Maple Glaze

Gathering around the kitchen to prepare something both elegant and comforting? Let’s dive into making scallops wrapped in bacon with a sweet maple glaze, a dish that perfectly balances the richness of bacon with the delicate sweetness of scallops.
Ingredients
- 12 large sea scallops (look for dry-packed for the best sear)
- 12 slices of thin-cut bacon (I find applewood smoked adds a nice depth)
- 1/4 cup pure maple syrup (the real deal, please, for that authentic sweetness)
- 1 tbsp Dijon mustard (adds a slight tang that cuts through the richness)
- 1/2 tsp smoked paprika (for a hint of warmth and color)
- Toothpicks (soaked in water for 30 minutes to prevent burning)
Instructions
- Preheat your oven to 400°F (200°C) and line a baking sheet with parchment paper for easy cleanup.
- Pat the scallops dry with paper towels to ensure they sear properly, not steam.
- Wrap each scallop with a slice of bacon, securing it with a toothpick. The bacon should snugly envelop the scallop.
- In a small bowl, whisk together the maple syrup, Dijon mustard, and smoked paprika until smooth.
- Brush each bacon-wrapped scallop generously with the maple glaze, reserving some for later.
- Arrange the scallops on the prepared baking sheet, ensuring they’re not touching for even cooking.
- Bake for 10 minutes, then flip each scallop and brush with the remaining glaze.
- Return to the oven and bake for another 10-12 minutes, or until the bacon is crispy and the scallops are just opaque.
- Let them rest for 2 minutes before serving to allow the juices to redistribute.
Delight in the contrast of textures—the crispy bacon against the tender scallop, all glazed with a sticky, sweet maple coating. Serve these on a bed of arugula for a peppery contrast or alongside a creamy polenta to soak up the glaze.
Fisherman’s Stew with Mixed Seafood in Tomato Broth
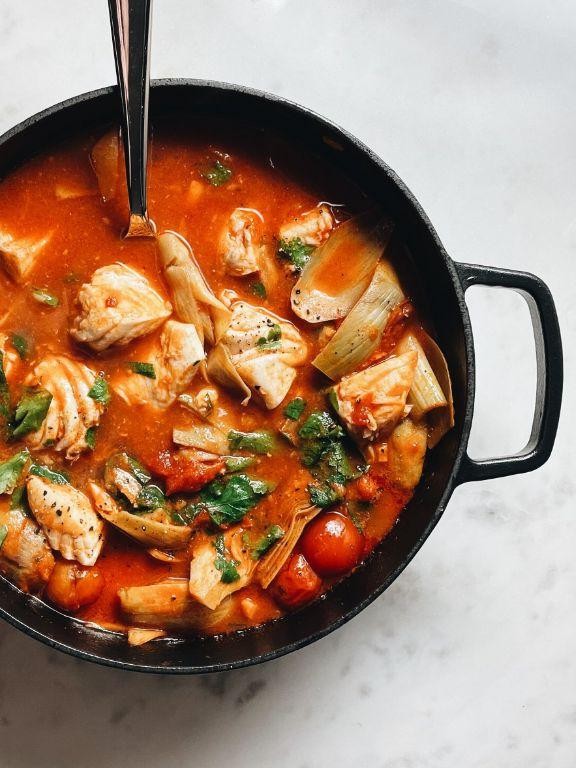
Gathering around the table for a hearty meal is one of life’s simple pleasures, and this Fisherman’s Stew with Mixed Seafood in Tomato Broth is a dish that promises to bring everyone together. Perfect for beginners, this recipe walks you through each step to ensure a delicious outcome.
Ingredients
- 1 tbsp extra virgin olive oil (my go-to for its fruity notes)
- 1 medium onion, diced (yellow onions are my preference for their sweetness)
- 2 garlic cloves, minced (freshly minced garlic makes all the difference)
- 1 can (28 oz) crushed tomatoes (I love the richness of San Marzano tomatoes)
- 2 cups fish stock (homemade stock elevates the dish, but store-bought works fine)
- 1 lb mixed seafood (such as shrimp, scallops, and mussels, fresh or thawed if frozen)
- 1/2 tsp red pepper flakes (adjust according to your heat preference)
- Salt to taste (I start with 1/2 tsp and adjust from there)
- Fresh parsley, chopped (for garnish, it adds a fresh pop of color and flavor)
Instructions
- Heat the olive oil in a large pot over medium heat until shimmering, about 1 minute.
- Add the diced onion and cook, stirring occasionally, until translucent, about 5 minutes.
- Stir in the minced garlic and red pepper flakes, cooking until fragrant, about 30 seconds.
- Pour in the crushed tomatoes and fish stock, bringing the mixture to a simmer. Let it cook for 10 minutes to meld the flavors.
- Gently add the mixed seafood to the pot, ensuring each piece is submerged in the broth. Cook until the seafood is just done, about 5 minutes (shrimp will turn pink, and mussels will open).
- Season with salt, starting with 1/2 tsp and adjusting as needed.
- Remove from heat and sprinkle with chopped parsley before serving.
Velvety textures and a harmonious blend of flavors make this stew a standout. Serve it with crusty bread to soak up the rich tomato broth, or over a bed of steamed rice for a more substantial meal.
Lobster Bisque with Cream and Sherry
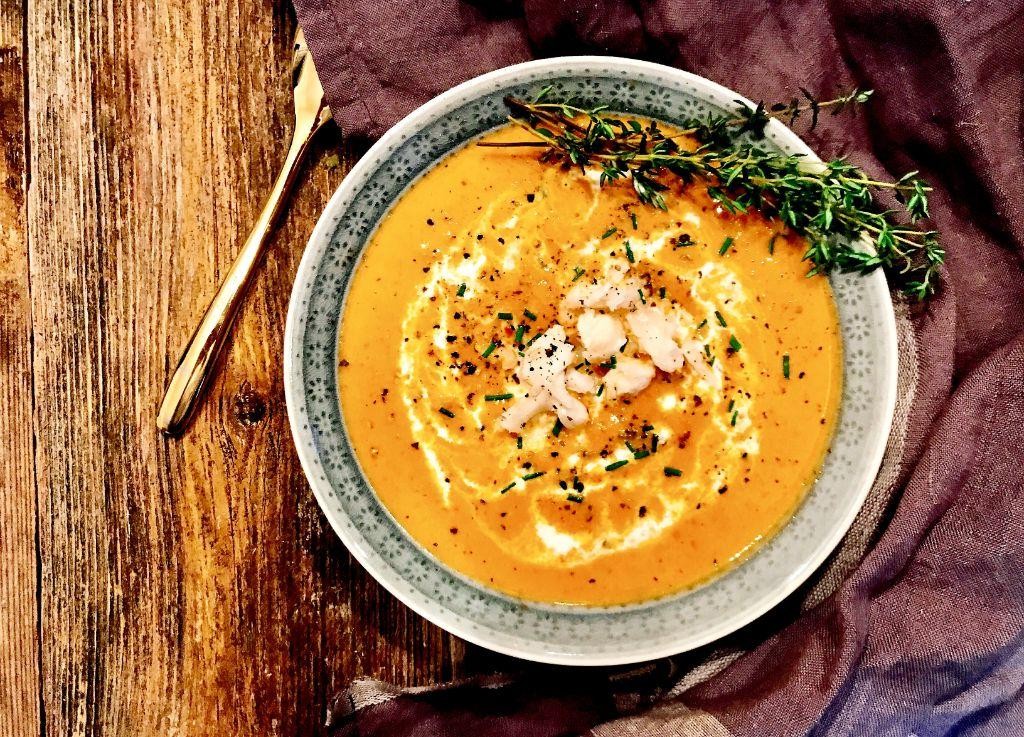
One of the most luxurious soups you can make at home, Lobster Bisque with Cream and Sherry, is surprisingly approachable when broken down into simple steps. Let’s walk through the process together, ensuring every spoonful is rich, creamy, and perfectly balanced.
Ingredients
- 1.5 lbs lobster tails (fresh or thawed, I find fresh gives a sweeter flavor)
- 4 tbsp unsalted butter (I always use European-style for its richness)
- 1 medium onion, finely diced (yellow onions work best for their sweetness)
- 2 cloves garlic, minced (freshly minced garlic elevates the dish)
- 1/4 cup all-purpose flour (for thickening, sifted to avoid lumps)
- 4 cups seafood stock (homemade stock is ideal, but store-bought works in a pinch)
- 1/2 cup dry sherry (a good quality sherry makes all the difference)
- 1 cup heavy cream (room temperature to prevent curdling)
- 1 tsp paprika (smoked paprika adds a nice depth)
- Salt to taste (I prefer sea salt for its clean flavor)
Instructions
- In a large pot, melt the butter over medium heat until it starts to foam slightly.
- Add the diced onion and minced garlic, sautéing until translucent, about 5 minutes.
- Sprinkle the flour over the onions and garlic, stirring constantly to form a roux, cook for 2 minutes until golden.
- Gradually whisk in the seafood stock, ensuring no lumps remain, then bring to a gentle simmer.
- Add the lobster tails to the pot, cover, and simmer for 10 minutes until the lobster is cooked through.
- Remove the lobster tails, let them cool slightly, then remove the meat and chop into bite-sized pieces.
- Return the lobster meat to the pot, stir in the sherry, heavy cream, and paprika, then simmer for another 5 minutes.
- Season with salt to taste, remembering the seafood stock may already be salty.
Delightfully creamy with a hint of sherry, this bisque is a showstopper. Serve it with a sprinkle of fresh herbs or a side of crusty bread for dipping into its velvety depths.
Conclusion
Joyful feasting awaits with our 22 Delicious Feast of Seven Fishes Recipes, perfect for your holiday celebrations. Dive into these seafood delights that promise to bring family and friends together. Don’t forget to try your favorites, share your thoughts in the comments, and spread the joy by pinning this article on Pinterest. Happy cooking and merry feasting!