Bored of the same old dishes? Spice up your kitchen routine with our roundup of 17 Exotic Ethnic Recipes Delicious! From the vibrant streets of Bangkok to the cozy trattorias of Rome, we’ve gathered flavors that’ll transport your taste buds around the world. Perfect for home cooks looking to explore global cuisines, these recipes promise to turn any meal into an adventure. Ready to embark on a culinary journey? Let’s dive in!
Thai Green Curry with Chicken

Waking up to the aroma of Thai green curry simmering on the stove is one of my favorite ways to start the day. There’s something about the blend of spicy, sweet, and creamy that just feels like a hug in a bowl. I remember the first time I tried making it at home, thinking it would be complicated, but it’s surprisingly straightforward with the right ingredients.
Ingredients
- Chicken breast – 1 lb, sliced
- Thai green curry paste – 2 tbsp
- Coconut milk – 1 can (13.5 oz)
- Fish sauce – 1 tbsp
- Brown sugar – 1 tbsp
- Basil leaves – ½ cup
- Jasmine rice – 1 cup
Instructions
- Heat a large pan over medium heat and add the Thai green curry paste, stirring for 1 minute until fragrant.
- Add the sliced chicken breast to the pan, cooking for 5 minutes until no longer pink.
- Pour in the coconut milk, stirring to combine with the curry paste and chicken.
- Add the fish sauce and brown sugar, stirring until the sugar dissolves.
- Reduce the heat to low and simmer for 10 minutes, allowing the flavors to meld.
- Tear the basil leaves by hand and stir them into the curry just before serving.
- While the curry simmers, cook the jasmine rice according to package instructions.
Perfectly balanced, this Thai green curry with chicken is creamy with a kick, and the fresh basil adds a bright finish. Serve it over fluffy jasmine rice for a meal that’s as comforting as it is vibrant.
Authentic Mexican Tacos al Pastor

There’s something magical about the way the flavors of Authentic Mexican Tacos al Pastor come together, creating a symphony of taste that’s hard to forget. I remember the first time I tried them at a small street vendor in Mexico City, and I’ve been obsessed with recreating that experience at home ever since.
Ingredients
- Pork shoulder – 2 lbs, thinly sliced
- Pineapple – 1 cup, diced
- White onion – ½ cup, finely chopped
- Cilantro – ¼ cup, chopped
- Corn tortillas – 12
- Chili powder – 1 tbsp
- Garlic powder – 1 tsp
- Salt – 1 tsp
- Lime – 2, cut into wedges
Instructions
- In a large bowl, mix the pork slices with chili powder, garlic powder, and salt until evenly coated. Let it marinate for at least 30 minutes in the fridge for the flavors to meld.
- Heat a large skillet over medium-high heat (375°F) and cook the marinated pork slices for about 5 minutes on each side, or until they’re nicely browned and cooked through.
- While the pork is cooking, warm the corn tortillas in a dry skillet over medium heat for about 30 seconds on each side. Keep them wrapped in a clean towel to stay warm.
- Once the pork is done, let it rest for a couple of minutes before slicing it into thin strips.
- Assemble the tacos by placing a few strips of pork on each tortilla, topped with diced pineapple, chopped onion, and cilantro. Serve with lime wedges on the side.
Don’t be surprised if these tacos become a regular in your meal rotation. The juicy pork paired with the sweet pineapple and fresh toppings creates a perfect balance of flavors and textures. For an extra kick, add a dash of hot sauce or serve with a side of guacamole.
Indian Butter Chicken
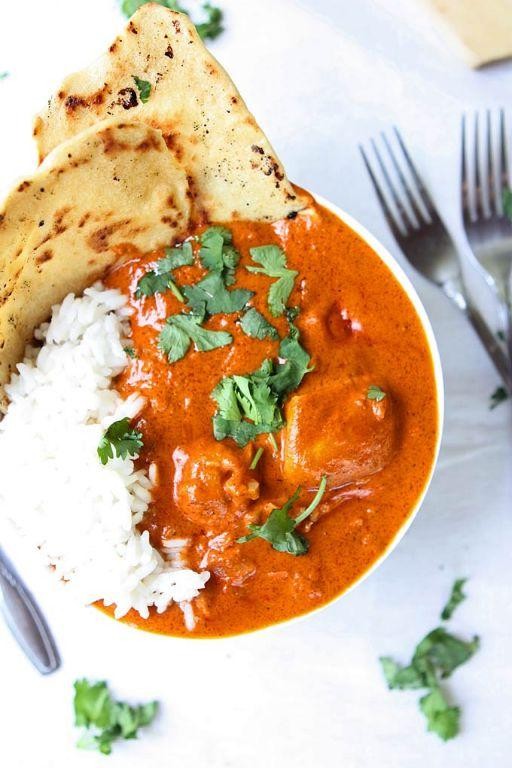
Many evenings, I find myself craving something creamy, spicy, and utterly comforting, and that’s when Indian Butter Chicken comes to mind. It’s a dish that never fails to warm my heart and fill my kitchen with the most inviting aromas.
Ingredients
- Chicken thighs – 1.5 lbs
- Yogurt – 1 cup
- Tomato sauce – 1 cup
- Heavy cream – 1/2 cup
- Butter – 4 tbsp
- Garam masala – 2 tsp
- Turmeric – 1/2 tsp
- Cumin – 1 tsp
- Salt – 1 tsp
Instructions
- Marinate chicken thighs in yogurt, 1 tsp garam masala, turmeric, and salt for at least 2 hours, preferably overnight for deeper flavor.
- Preheat oven to 375°F and bake the marinated chicken for 25 minutes until just cooked through.
- In a large pan, melt butter over medium heat and add cumin, sautéing for 30 seconds until fragrant.
- Add tomato sauce and remaining garam masala, simmering for 10 minutes to thicken slightly.
- Stir in heavy cream and bring to a gentle simmer, being careful not to boil to prevent curdling.
- Add baked chicken to the sauce, simmering together for 5 minutes to let flavors meld.
- Tip: For an extra silky sauce, blend it before adding the chicken. Tip: Always use full-fat yogurt for marination to ensure tender chicken. Tip: Garnish with fresh cilantro for a pop of color and freshness.
Unbelievably rich and velvety, this butter chicken pairs perfectly with fluffy naan or steamed basmati rice. The sauce clings beautifully to the chicken, offering a burst of flavors with every bite.
Japanese Ramen with Pork Chashu

Last weekend, I found myself craving something hearty and comforting, and nothing hits the spot quite like a bowl of Japanese Ramen with Pork Chashu. It’s a dish that reminds me of my first trip to Tokyo, where I learned the art of balancing rich flavors with delicate textures.
Ingredients
- Pork belly – 1 lb
- Soy sauce – ½ cup
- Mirin – ¼ cup
- Sugar – 2 tbsp
- Garlic – 2 cloves, minced
- Ginger – 1 tbsp, grated
- Ramen noodles – 2 servings
- Eggs – 2
- Green onions – 2, sliced
Instructions
- Combine soy sauce, mirin, sugar, garlic, and ginger in a pot over medium heat. Stir until sugar dissolves, about 2 minutes.
- Add pork belly to the pot, ensuring it’s fully submerged. Simmer on low heat for 2 hours, turning occasionally.
- Remove pork from the pot and let it cool. Then, slice it into ½-inch thick pieces.
- Boil ramen noodles according to package instructions, usually 3-4 minutes. Drain and set aside.
- Soft boil eggs by placing them in boiling water for 6 minutes, then transferring to an ice bath. Peel and halve.
- Assemble ramen bowls by placing noodles at the bottom, adding sliced pork, a halved egg, and garnishing with green onions.
- Pour hot broth over the assembled ingredients, ensuring everything is warmed through.
Best enjoyed immediately, this ramen boasts a perfect harmony of savory pork, silky noodles, and a rich, flavorful broth. For an extra touch, I like to add a sprinkle of sesame seeds or a dash of chili oil for heat.
Moroccan Lamb Tagine
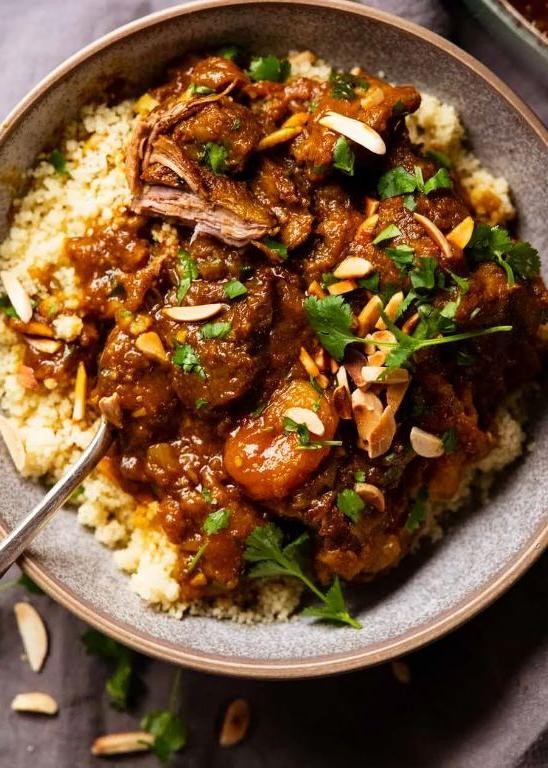
Oh, the aroma of Moroccan Lamb Tagine simmering on the stove is something I look forward to every time I decide to treat myself to this exotic dish. It’s a recipe that takes me back to my trip to Marrakech, where the blend of spices and the tender lamb left an unforgettable mark on my palate.
Ingredients
- Lamb shoulder – 2 lbs, cubed
- Olive oil – 2 tbsp
- Onion – 1 large, diced
- Garlic – 4 cloves, minced
- Ginger – 1 tbsp, grated
- Cumin – 1 tsp
- Cinnamon – 1 tsp
- Chickpeas – 1 can (15 oz), drained
- Dried apricots – 1/2 cup
- Chicken stock – 2 cups
- Salt – 1 tsp
Instructions
- Heat olive oil in a tagine or heavy-bottomed pot over medium heat until shimmering, about 2 minutes.
- Add the lamb cubes and brown on all sides, approximately 5 minutes total. Tip: Don’t overcrowd the pot to ensure a good sear.
- Stir in the onion, garlic, and ginger, cooking until softened, about 3 minutes.
- Sprinkle cumin, cinnamon, and salt over the lamb, stirring to coat evenly.
- Pour in the chicken stock, scraping up any browned bits from the bottom of the pot. Tip: Those bits are flavor gold!
- Add the chickpeas and apricots, then bring the mixture to a simmer.
- Cover and reduce heat to low, simmering for 1.5 hours until the lamb is fork-tender. Tip: Check occasionally to ensure there’s enough liquid; add a splash of water if needed.
Lamb Tagine is a symphony of textures and flavors, with the meat meltingly tender against the sweet apricots and earthy chickpeas. Serve it over a bed of couscous or with warm, crusty bread to soak up every bit of the rich sauce.
Greek Moussaka

Zesty and rich, Greek Moussaka has always been my go-to comfort dish, especially during those chilly evenings when only something hearty will do. I remember the first time I tried making it at home; the layers of eggplant, spiced meat, and creamy béchamel seemed daunting, but the result was utterly rewarding.
Ingredients
- Eggplant – 2 large
- Ground lamb – 1 lb
- Tomato paste – 2 tbsp
- All-purpose flour – 3 tbsp
- Milk – 2 cups
- Butter – 4 tbsp
- Egg – 1
- Salt – 1 tsp
- Black pepper – ½ tsp
- Cinnamon – ½ tsp
- Olive oil – ¼ cup
Instructions
- Preheat your oven to 375°F (190°C).
- Slice the eggplants into ½-inch rounds, sprinkle with salt, and let sit for 20 minutes to draw out bitterness. Pat dry.
- Heat olive oil in a pan over medium heat and fry eggplant slices until golden, about 3 minutes per side. Drain on paper towels.
- In the same pan, cook ground lamb until browned. Stir in tomato paste, cinnamon, salt, and black pepper. Cook for 5 minutes.
- For the béchamel, melt butter in a saucepan, whisk in flour, and cook for 2 minutes. Gradually add milk, stirring constantly until thickened. Remove from heat, then beat in the egg.
- Layer half the eggplant in a baking dish, top with the lamb mixture, then the remaining eggplant. Pour béchamel over the top.
- Bake for 45 minutes, or until the top is golden and bubbly. Let stand for 10 minutes before serving.
Golden and bubbling straight from the oven, this Moussaka is a symphony of textures—creamy, meaty, and slightly crisp. Serve it with a simple Greek salad to cut through the richness, and you’ve got a meal that’s as satisfying to eat as it is to make.
Vietnamese Pho Bo

Believe it or not, my first encounter with Vietnamese Pho Bo was at a tiny, no-frills spot in downtown Seattle during a rainy afternoon. The warmth of the broth and the tender slices of beef instantly won me over, and I’ve been perfecting my homemade version ever since.
Ingredients
- Beef bones – 2 lbs
- Water – 8 cups
- Star anise – 2 pods
- Cinnamon stick – 1
- Ginger – 1 inch piece, sliced
- Fish sauce – 2 tbsp
- Rice noodles – 8 oz
- Beef sirloin – 1/2 lb, thinly sliced
- Green onions – 1/4 cup, chopped
- Bean sprouts – 1 cup
- Lime – 1, cut into wedges
Instructions
- In a large pot, add beef bones and cover with water. Bring to a boil over high heat, then reduce to a simmer for 10 minutes to blanch. Tip: This step removes impurities for a clearer broth.
- Drain and rinse the bones under cold water. Clean the pot and return the bones to it with 8 cups of fresh water.
- Add star anise, cinnamon stick, and ginger to the pot. Simmer on low heat for 3 hours. Tip: Skim off any foam that rises to the top to keep the broth clean.
- Strain the broth into a clean pot, discarding the solids. Stir in fish sauce and keep warm.
- Cook rice noodles according to package instructions, then drain and divide among bowls.
- Top noodles with raw beef slices, then ladle hot broth over the beef to cook it. Tip: The heat of the broth will perfectly cook the thin slices of beef.
- Garnish with green onions, bean sprouts, and lime wedges.
Combining the rich, aromatic broth with the freshness of the garnishes creates a balance that’s hard to beat. For an extra kick, I love adding a spoonful of chili paste to my bowl.
Ethiopian Doro Wat
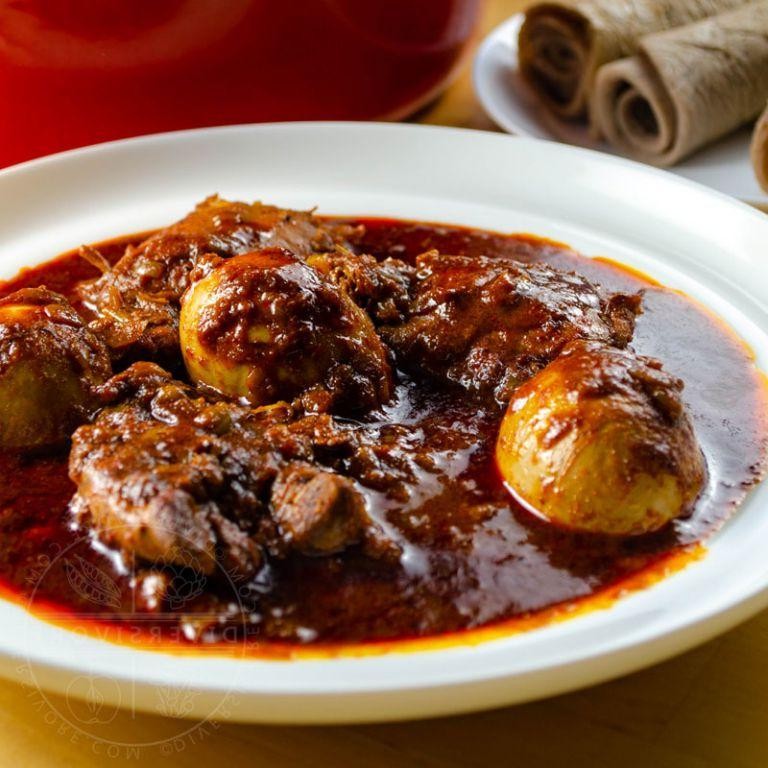
Every time I think about comfort food that packs a punch, Ethiopian Doro Wat comes to mind. It’s a dish that’s as rich in flavor as it is in history, and making it at home always feels like a special occasion. I remember the first time I tried it; the deep, spicy berbere sauce had me hooked, and now, it’s a staple in my kitchen.
Ingredients
- Chicken thighs – 4
- Butter – ½ cup
- Onion – 1 large, finely chopped
- Garlic – 4 cloves, minced
- Berbere spice – 3 tbsp
- Chicken broth – 2 cups
- Hard-boiled eggs – 4
Instructions
- Melt the butter in a large pot over medium heat.
- Add the chopped onion and cook until translucent, about 5 minutes.
- Stir in the minced garlic and berbere spice, cooking for another 2 minutes until fragrant.
- Add the chicken thighs to the pot, turning to coat them in the spice mixture.
- Pour in the chicken broth, bring to a boil, then reduce heat to low and simmer for 45 minutes.
- Add the hard-boiled eggs to the pot during the last 10 minutes of cooking.
- Tip: For an extra layer of flavor, let the dish sit for 10 minutes after cooking before serving.
- Tip: If the sauce is too thick, add a little more broth until you reach your desired consistency.
- Tip: Serve with injera or rice to soak up all the delicious sauce.
Nothing beats the tender chicken and eggs swimming in that vibrant, spicy sauce. The berbere gives it a warmth that’s unforgettable, and serving it with injera turns it into a hands-on, communal dining experience that’s truly special.
Korean Kimchi Jjigae
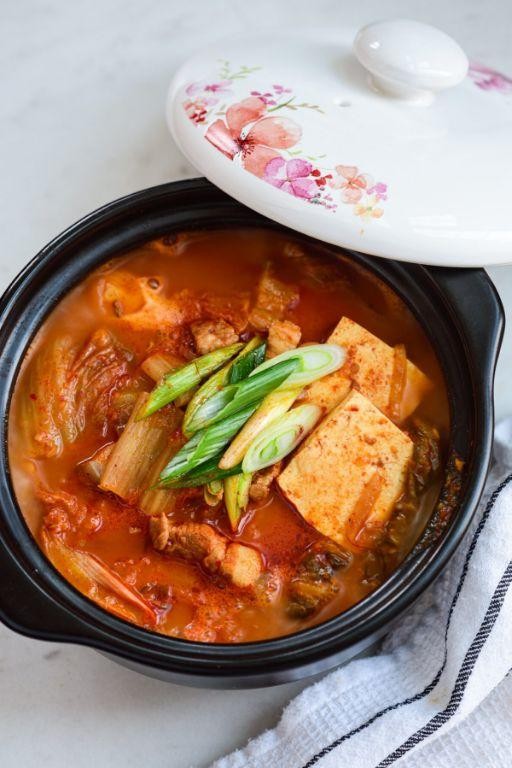
Last weekend, I found myself craving something hearty and comforting, yet packed with flavor—enter Korean Kimchi Jjigae. It’s my go-to dish when I need a quick, satisfying meal that feels like a hug in a bowl.
Ingredients
- Kimchi – 2 cups
- Pork belly – 1/2 lb, sliced
- Tofu – 1/2 block, cubed
- Gochujang – 1 tbsp
- Garlic – 2 cloves, minced
- Water – 2 cups
- Sesame oil – 1 tsp
Instructions
- Heat a pot over medium heat and add the sesame oil.
- Add the sliced pork belly to the pot and cook until lightly browned, about 5 minutes.
- Stir in the minced garlic and cook for 1 minute until fragrant.
- Add the kimchi and gochujang to the pot, stirring well to combine.
- Pour in the water and bring the mixture to a boil.
- Reduce the heat to low and simmer for 15 minutes to allow the flavors to meld.
- Gently add the cubed tofu to the pot and simmer for an additional 5 minutes.
- Tip: For a richer flavor, let the stew sit for 10 minutes off the heat before serving.
- Tip: If you prefer a spicier stew, add an extra teaspoon of gochujang.
- Tip: Serve with a side of steamed rice to balance the heat and richness of the stew.
So there you have it—a bowl of Kimchi Jjigae that’s bursting with umami, spice, and everything nice. The tofu adds a soft contrast to the hearty kimchi and pork, making every spoonful a delight. Try topping it with a fried egg for an extra layer of flavor and texture.
Spanish Paella Valenciana

Kicking off our culinary journey today with a dish that’s as vibrant as its origins, Spanish Paella Valenciana. I remember the first time I tasted this masterpiece; it was at a tiny seaside restaurant in Valencia, where the aroma of saffron and simmering broth filled the air. Since then, I’ve been obsessed with recreating that perfect paella at home, and I’m thrilled to share my go-to recipe with you.
Ingredients
- Olive oil – 2 tbsp
- Chicken thighs – 4, bone-in, skin-on
- Garlic – 3 cloves, minced
- Tomato – 1, grated
- Bomba rice – 1 ½ cups
- Chicken broth – 4 cups
- Saffron threads – 1 pinch
- Green beans – 1 cup, trimmed
- Lemon – 1, cut into wedges
Instructions
- Heat olive oil in a paella pan over medium-high heat until shimmering.
- Season chicken thighs with salt and sear in the pan until golden brown, about 5 minutes per side. Remove and set aside.
- In the same pan, sauté minced garlic until fragrant, about 30 seconds.
- Add grated tomato and cook until the mixture thickens, about 2 minutes.
- Stir in Bomba rice, coating it well with the tomato mixture.
- Pour in chicken broth and add saffron threads, stirring gently to distribute evenly.
- Return the chicken thighs to the pan, nestling them into the rice.
- Scatter green beans over the top, then reduce heat to low and simmer uncovered for 20 minutes. Tip: Resist the urge to stir the rice to achieve the perfect socarrat (crispy bottom).
- Remove from heat and let rest for 5 minutes before serving. Tip: Cover with a clean towel to keep warm.
- Garnish with lemon wedges. Tip: A squeeze of lemon juice just before eating brightens all the flavors.
The paella should have a slightly crispy bottom layer with tender, flavorful rice and perfectly cooked chicken. Serve it straight from the pan for that authentic communal dining experience, and don’t forget to pair it with a glass of crisp white wine to complement the rich flavors.
Lebanese Falafel Wrap

Last summer, I stumbled upon this tiny Lebanese food truck tucked away in a bustling city corner, and their falafel wrap was a revelation. It was so good, I’ve been perfecting my own version at home ever since, and today, I’m sharing it with you.
Ingredients
- Chickpeas – 2 cups, soaked overnight
- Garlic – 2 cloves
- Parsley – ½ cup, chopped
- Cumin – 1 tsp
- Baking soda – ½ tsp
- Salt – 1 tsp
- Vegetable oil – for frying
- Pita bread – 4 pieces
- Tahini sauce – ½ cup
- Lettuce – 1 cup, shredded
- Tomato – 1, sliced
Instructions
- Drain the soaked chickpeas and pat them dry with a paper towel.
- In a food processor, combine chickpeas, garlic, parsley, cumin, baking soda, and salt. Pulse until the mixture is finely ground but not pureed.
- Heat vegetable oil in a deep fryer or large pan to 375°F.
- Shape the chickpea mixture into small balls, about 1 inch in diameter.
- Fry the falafel balls in batches for 3-4 minutes, or until golden brown and crispy. Tip: Don’t overcrowd the pan to ensure even cooking.
- Remove the falafel with a slotted spoon and drain on paper towels.
- Warm the pita bread in a dry skillet over medium heat for about 30 seconds on each side.
- Spread tahini sauce on each pita, then add lettuce, tomato slices, and falafel balls. Tip: For extra flavor, drizzle a bit more tahini sauce over the falafel before wrapping.
- Fold the sides of the pita over the filling, then roll it up tightly. Tip: If you’re packing these for lunch, wrap them in foil to keep everything snug and secure.
Perfectly crispy on the outside and tender on the inside, these falafel wraps are a delight. Serve them with a side of pickled vegetables for an extra tangy crunch, or enjoy as is for a quick, satisfying meal.
Peruvian Ceviche

Remember the first time I tried Peruvian ceviche? It was during a summer trip to Lima, where the dish is practically a religion. The burst of citrus, the tender fish, and the kick of chili left me hooked. Now, I make it at home to bring a piece of that vibrant Peruvian coast to my kitchen.
Ingredients
- Fresh white fish – 1 lb, cubed
- Lime juice – 1 cup
- Red onion – 1, thinly sliced
- Aji amarillo paste – 1 tbsp
- Cilantro – ¼ cup, chopped
- Salt – 1 tsp
Instructions
- In a large bowl, combine the cubed fish and lime juice, ensuring the fish is fully submerged. Let it marinate in the refrigerator for 15 minutes. The acid in the lime will ‘cook’ the fish, turning it opaque.
- While the fish marinates, soak the sliced red onion in cold water for 10 minutes to mellow its sharpness. Drain well before using.
- After marinating, drain most of the lime juice from the fish, leaving about 2 tablespoons in the bowl.
- Add the soaked red onion, aji amarillo paste, chopped cilantro, and salt to the fish. Gently toss to combine all the ingredients evenly.
- Let the ceviche sit for 5 minutes before serving to allow the flavors to meld together beautifully.
Key to serving this ceviche is its freshness; the fish should be tender with a slight bite, and the flavors bright and zesty. I love scooping it up with crispy plantain chips for an extra crunch. Perfect for those sweltering summer days when you crave something light yet bursting with flavor.
Russian Beef Stroganoff

Last winter, I stumbled upon the rich and comforting flavors of Russian Beef Stroganoff at a tiny diner in Brooklyn. It was love at first bite, and I’ve been perfecting my version ever since, with a few personal tweaks that make it just right for a cozy night in.
Ingredients
- Beef sirloin – 1 lb
- Butter – 2 tbsp
- Onion – 1 medium, sliced
- Mushrooms – 8 oz, sliced
- Beef broth – 1 cup
- Sour cream – 1/2 cup
- Flour – 1 tbsp
- Salt – 1/2 tsp
- Pepper – 1/4 tsp
Instructions
- Cut the beef sirloin into thin strips, about 1/2 inch wide. Tip: Partially freezing the beef for 30 minutes makes slicing easier.
- Melt 1 tbsp of butter in a large skillet over medium-high heat. Add the beef strips and cook until browned, about 3 minutes per side. Remove and set aside.
- In the same skillet, melt the remaining 1 tbsp of butter. Add the sliced onion and mushrooms, cooking until soft, about 5 minutes. Tip: Don’t overcrowd the skillet to ensure they brown nicely.
- Sprinkle the flour over the vegetables, stirring to coat evenly. Cook for 1 minute to remove the raw flour taste.
- Gradually add the beef broth, stirring constantly to avoid lumps. Bring to a simmer and cook until the sauce thickens, about 3 minutes.
- Return the beef to the skillet, stirring to combine with the sauce. Simmer for another 2 minutes to heat through.
- Remove the skillet from heat and stir in the sour cream. Tip: Adding sour cream off the heat prevents curdling. Season with salt and pepper.
Hearty and creamy, this Beef Stroganoff is a dream over egg noodles or mashed potatoes. The tender beef and earthy mushrooms in a velvety sauce are comfort food at its finest, especially when garnished with a sprinkle of fresh dill.
Turkish Baklava

Oh, the first time I tried Turkish Baklava, it was love at first bite. The layers of crisp phyllo dough, the sweet syrup, and the crunch of nuts—it’s a dessert that’s as fun to make as it is to eat. I remember thinking, ‘I have to learn how to make this at home,’ and after a few trials (and errors), I’ve got a recipe that’s just right.
Ingredients
- Phyllo dough – 1 package (16 oz)
- Butter – 1 cup, melted
- Walnuts – 2 cups, finely chopped
- Sugar – 1 cup
- Water – 1 cup
- Lemon juice – 1 tbsp
- Cinnamon – 1 tsp
Instructions
- Preheat your oven to 350°F (175°C). This ensures your baklava bakes evenly.
- Brush a 9×13 inch baking dish with melted butter to prevent sticking.
- Layer 8 sheets of phyllo dough in the dish, brushing each with butter before adding the next. Tip: Keep unused phyllo covered with a damp towel to prevent drying.
- Sprinkle half of the chopped walnuts and cinnamon over the phyllo layers.
- Add another 8 layers of phyllo, buttering each sheet, then top with the remaining walnuts and cinnamon.
- Finish with 8 more layers of phyllo, buttering each sheet. Tip: Use a sharp knife to cut the baklava into diamonds or squares before baking for easier serving.
- Bake for 50 minutes, or until golden and crisp.
- While baking, combine sugar, water, and lemon juice in a saucepan. Bring to a boil, then simmer for 10 minutes to make the syrup. Tip: Let the syrup cool slightly before pouring over the hot baklava to absorb better.
- Pour the syrup over the baklava as soon as it comes out of the oven. Let it soak for at least 4 hours before serving.
What makes this baklava truly special is the contrast between the crispy layers and the soft, syrup-soaked center. Serve it with a scoop of vanilla ice cream for an extra indulgent treat, or enjoy it as is with a cup of strong Turkish coffee.
Chinese Peking Duck

Zesty flavors and crispy skin are what come to mind when I think of Chinese Peking Duck, a dish that’s as fun to make as it is to eat. I remember the first time I attempted this at home; the aroma filled my kitchen, transporting me straight to the bustling streets of Beijing.
Ingredients
- Whole duck – 1 (5-6 lbs)
- Honey – 2 tbsp
- Soy sauce – 1/4 cup
- Rice vinegar – 2 tbsp
- Ginger – 1 inch piece, sliced
- Green onions – 2, cut into 2-inch pieces
Instructions
- Rinse the duck under cold water and pat dry thoroughly with paper towels.
- In a small bowl, mix honey, soy sauce, and rice vinegar to create the glaze.
- Rub the duck inside and out with the glaze, ensuring even coverage.
- Place the ginger slices and green onions inside the duck cavity for flavor.
- Preheat your oven to 350°F and place the duck on a rack in a roasting pan.
- Roast for 2 hours, then increase the temperature to 400°F for 30 minutes to crisp the skin.
- Let the duck rest for 15 minutes before carving to allow the juices to redistribute.
Lusciously crispy on the outside and tender on the inside, this Peking Duck is perfect served with steamed pancakes, hoisin sauce, and thinly sliced cucumbers for a DIY wrap experience.
Brazilian Feijoada
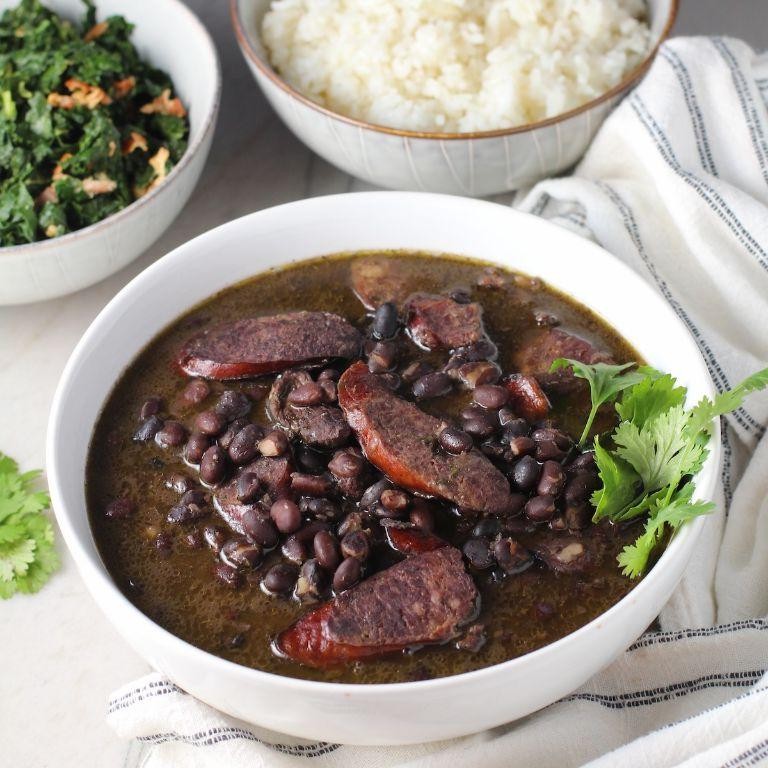
My first encounter with Brazilian Feijoada was during a chilly evening in São Paulo, where the rich, smoky aroma from a street vendor’s pot lured me in. Since then, I’ve been obsessed with recreating that comforting bowl at home, tweaking the recipe to perfection. Here’s my simplified version that brings Brazil to your kitchen with minimal fuss.
Ingredients
- Black beans – 2 cups
- Smoked sausage – 1 lb, sliced
- Bacon – 4 slices, chopped
- Onion – 1 large, diced
- Garlic – 4 cloves, minced
- Bay leaves – 2
- Water – 6 cups
- Salt – 1 tsp
Instructions
- Soak the black beans in water overnight, then drain. Tip: This reduces cooking time and makes the beans easier to digest.
- In a large pot, cook the bacon over medium heat until crispy, about 5 minutes. Remove and set aside, leaving the fat in the pot.
- Add the sausage to the pot and brown on all sides, about 5 minutes. Remove and set aside with the bacon.
- Sauté the onion and garlic in the same pot until soft, about 3 minutes. Tip: Don’t rush this step; it builds the flavor base.
- Return the bacon and sausage to the pot. Add the beans, bay leaves, and water. Bring to a boil.
- Reduce heat to low, cover, and simmer for 2 hours, stirring occasionally. Tip: If the beans aren’t tender after 2 hours, continue cooking, checking every 15 minutes.
- Season with salt, simmer uncovered for 10 minutes to thicken the stew.
Feijoada is a hearty stew with deep, smoky flavors that improve overnight. Serve it over rice with a sprinkle of fresh cilantro or orange slices for a bright contrast.
Jamaican Jerk Chicken
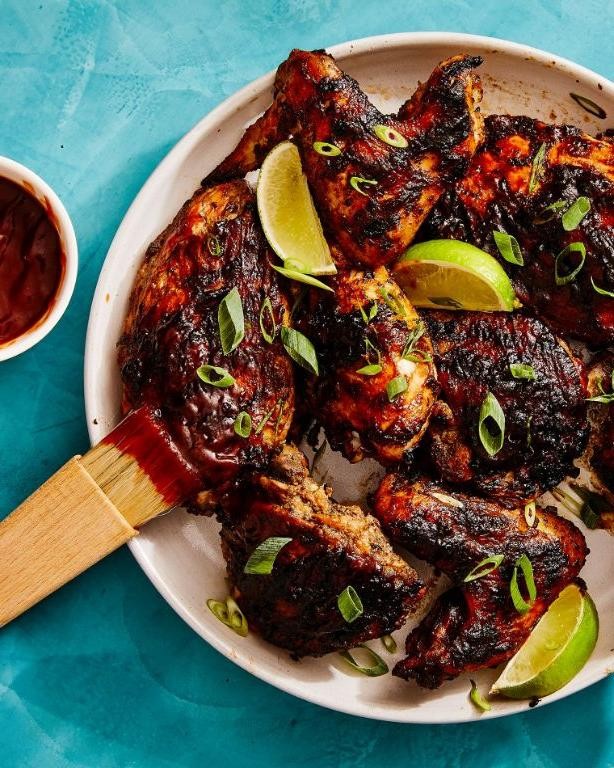
Perfect for those who love a bit of spice in their life, Jamaican Jerk Chicken has become a staple in my kitchen, especially during summer barbecues. The blend of fiery scotch bonnet peppers and fragrant allspice transports me straight to the Caribbean with every bite.
Ingredients
- Chicken thighs – 2 lbs
- Scotch bonnet peppers – 2, minced
- Allspice – 2 tbsp
- Brown sugar – 1 tbsp
- Soy sauce – ¼ cup
- Lime juice – 2 tbsp
- Garlic – 3 cloves, minced
- Thyme – 1 tsp
- Vegetable oil – 1 tbsp
Instructions
- In a large bowl, combine minced scotch bonnet peppers, allspice, brown sugar, soy sauce, lime juice, minced garlic, thyme, and vegetable oil to make the marinade.
- Add chicken thighs to the marinade, ensuring each piece is thoroughly coated. Cover and refrigerate for at least 4 hours, preferably overnight for deeper flavor.
- Preheat your grill to medium-high heat (375°F) and lightly oil the grates to prevent sticking.
- Remove chicken from marinade, letting excess drip off, and place on the grill. Discard remaining marinade.
- Grill chicken for 6-7 minutes on each side, or until internal temperature reaches 165°F and skin is charred to your liking.
- Let chicken rest for 5 minutes before serving to allow juices to redistribute.
Absolutely bursting with flavor, this Jamaican Jerk Chicken is irresistibly juicy with a perfect charred exterior. Serve it alongside a cool mango salsa or over a bed of coconut rice for a complete tropical feast.
Conclusion
Brimming with flavors from around the globe, our roundup of 17 Exotic Ethnic Recipes offers a delicious adventure for your taste buds. Whether you’re a seasoned home cook or just starting out, these dishes promise to bring excitement to your kitchen. Don’t forget to try them out, share your favorites in the comments, and spread the culinary love by pinning this article on Pinterest. Happy cooking!


