Oh, the joy of cooking with kids! It’s not just about the delicious outcomes but the fun-filled journey there. Our roundup of 25 Simple Easy Recipes for Kids Fun is packed with quick, tasty, and kid-friendly dishes that promise to turn meal prep into playtime. From whimsical breakfasts to playful dinners, these recipes are sure to spark creativity in your little chefs. Ready to make cooking an adventure? Let’s dive in!
Peanut Butter and Jelly Sandwich
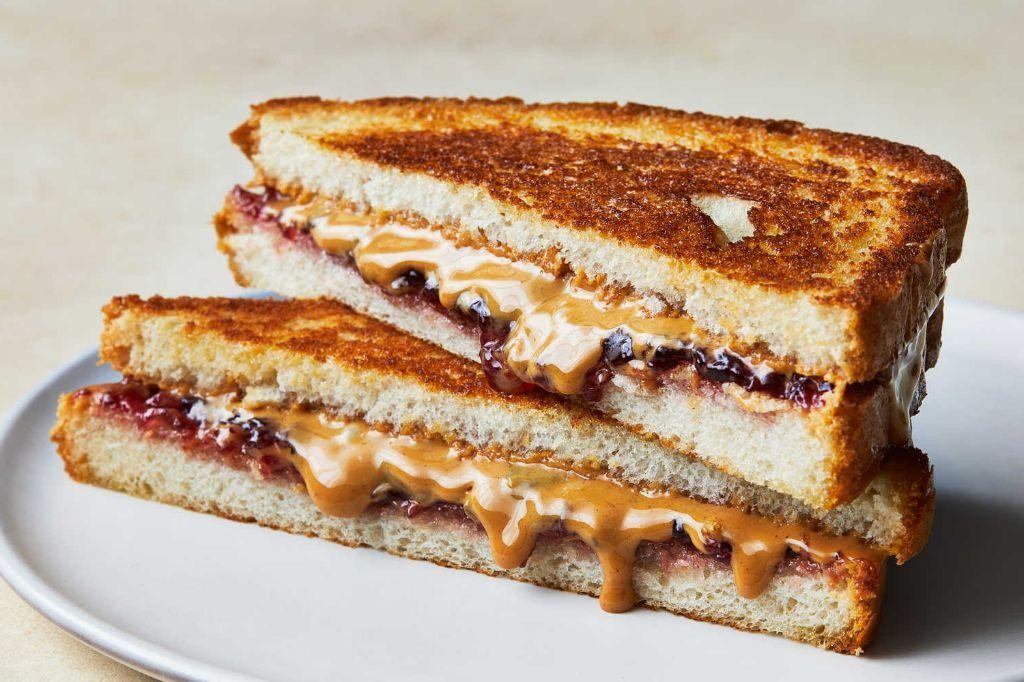
Transform your lunch game with this timeless classic that’s anything but basic. Grab your ingredients—this PB&J is about to level up.
Ingredients
- 2 slices of artisan whole grain bread, lightly toasted
- 2 tbsp smooth, organic peanut butter
- 1 tbsp premium raspberry preserves
- 1 tsp clarified butter
Instructions
- Heat a non-stick skillet over medium-low heat (300°F) and add clarified butter, swirling to coat the surface evenly.
- Spread peanut butter on one slice of bread, ensuring coverage reaches the edges for maximum flavor in every bite.
- On the other slice, evenly distribute raspberry preserves, avoiding over-application to prevent sogginess.
- Press both slices together, peanut butter and jelly sides facing inward, to form the sandwich.
- Place the sandwich in the skillet, cooking for 2-3 minutes on each side or until golden brown and crispy.
- Remove from heat, let it cool for 1 minute to allow the fillings to set slightly, then slice diagonally for presentation.
Delight in the contrast of crunchy, buttery bread against the creamy peanut butter and sweet, tangy jelly. Serve with a cold glass of almond milk for a nostalgic yet sophisticated twist.
Cheese Quesadilla
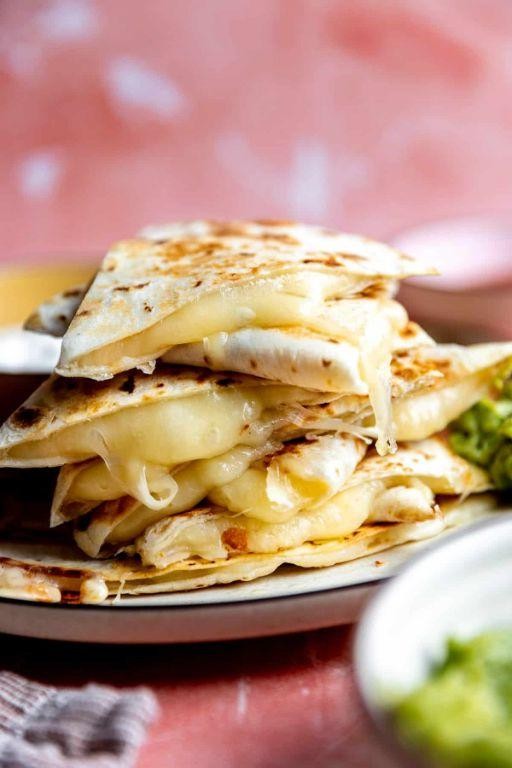
Transform your snack game with this crispy, gooey cheese quesadilla—**quick**, **easy**, and **irresistibly cheesy**.
Ingredients
- 2 large flour tortillas (10-inch diameter)
- 1 cup shredded Oaxaca cheese
- 1/2 cup shredded sharp cheddar cheese
- 2 tbsp clarified butter
- 1/4 tsp smoked paprika
- 1/4 tsp garlic powder
Instructions
- **Heat** a large skillet over medium heat (350°F) for 2 minutes until evenly warm.
- **Spread** 1 tbsp clarified butter evenly across the skillet’s surface.
- **Place** one flour tortilla in the skillet, ensuring it lies flat without folds.
- **Sprinkle** Oaxaca and cheddar cheeses evenly over the tortilla, leaving a 1/2-inch border.
- **Dust** with smoked paprika and garlic powder for a smoky, aromatic kick.
- **Top** with the second tortilla, pressing down gently to adhere.
- **Cook** for 3-4 minutes until the bottom tortilla is golden brown and crispy.
- **Flip** the quesadilla carefully using a wide spatula, adding the remaining 1 tbsp clarified butter to the skillet before the second side cooks.
- **Cook** for another 3-4 minutes until the second side is equally golden and the cheese is fully melted.
- **Transfer** to a cutting board, let rest for 1 minute to set, then slice into wedges.
Enjoy the **crispy exterior** giving way to a **stretchy, molten cheese center**. Serve with a side of **chilled avocado crema** for a cool contrast.
Mini Pizza Bagels

Elevate your snack game with these Mini Pizza Bagels—**quick**, **cheesy**, and **irresistibly crispy**. Perfect for parties or a lazy night in, they’re a bite-sized twist on a classic.
Ingredients
- 6 mini bagels, halved
- 1/2 cup marinara sauce, homemade or high-quality store-bought
- 1 cup shredded mozzarella cheese, low-moisture
- 1/4 cup pepperoni slices, quartered
- 1 tbsp extra-virgin olive oil
- 1/2 tsp dried oregano
- 1/4 tsp red pepper flakes
Instructions
- Preheat your oven to 375°F (190°C) and line a baking sheet with parchment paper.
- Arrange the bagel halves cut-side up on the prepared baking sheet. Lightly brush each with extra-virgin olive oil for a golden finish.
- Spread 1 tbsp of marinara sauce evenly over each bagel half, leaving a small border to prevent sogginess.
- Sprinkle shredded mozzarella cheese generously over the sauce, ensuring full coverage for maximum melt.
- Top each bagel half with quartered pepperoni slices, arranging them for even distribution.
- Finish with a pinch of dried oregano and red pepper flakes for a flavor boost.
- Bake in the preheated oven for 10-12 minutes, or until the cheese is bubbly and the edges are crisp.
- Let cool for 2 minutes before serving to allow the cheese to set slightly.
Fresh out of the oven, these Mini Pizza Bagels boast a **crispy exterior** with a **gooey, cheesy center**. Serve them with a side of warmed marinara for dipping or stack them high for a shareable snack platter.
Fruit Kabobs
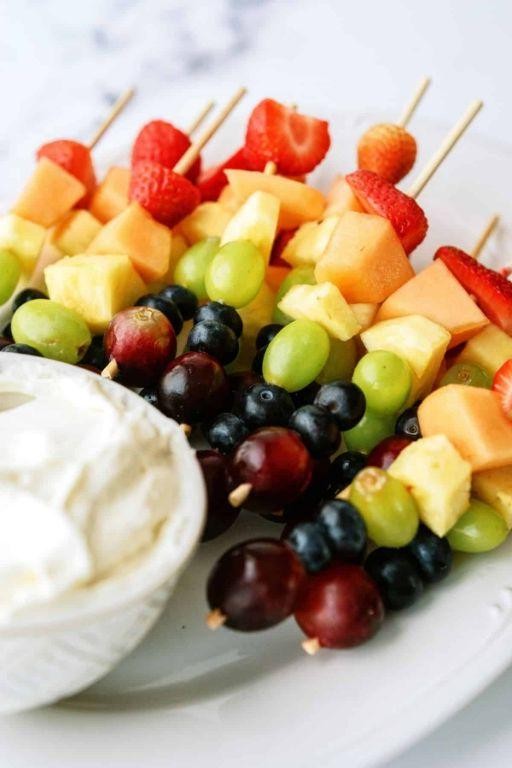
Transform your snack game with these vibrant Fruit Kabobs—**quick**, **colorful**, and **impossibly easy** to love.
Ingredients
- 1 cup fresh strawberries, hulled and halved
- 1 cup fresh pineapple, cut into 1-inch chunks
- 1 cup seedless grapes, any color
- 1 cup fresh blueberries
- 1/4 cup organic honey, for drizzling
- 1 tbsp fresh lime juice
- 1/4 tsp ground cinnamon
Instructions
- **Prep the fruit**: Wash all fruit thoroughly under cold running water. Pat dry with a clean kitchen towel to ensure the honey adheres well.
- **Cut uniformly**: Slice strawberries and pineapple into even, bite-sized pieces to ensure consistent skewering and cooking.
- **Skewer creatively**: Alternate fruits on bamboo skewers, creating a visually appealing pattern. Tip: Soak skewers in water for 30 minutes beforehand to prevent burning.
- **Mix the glaze**: In a small bowl, whisk together honey, lime juice, and cinnamon until fully combined. Tip: Warm the honey slightly for easier mixing.
- **Glaze generously**: Brush the honey mixture evenly over the assembled kabobs, coating all sides for a glossy finish.
- **Chill to set**: Place kabobs on a parchment-lined tray and refrigerate for 15 minutes to allow the glaze to set. Tip: This step enhances the flavors and makes the kabobs less messy to eat.
**Crisp** textures and **juicy** bursts make these kabobs a hit. Serve them atop a scoop of coconut sorbet for an unexpected twist.
Yogurt Parfait

Make mornings effortless with this yogurt parfait—layers of creamy, tangy goodness that’s as nutritious as it is Instagram-worthy.
Ingredients
- 1 cup Greek yogurt, full-fat
- 1/2 cup granola, artisanal
- 1/4 cup honey, raw
- 1 cup mixed berries (strawberries, blueberries, raspberries), fresh
- 1 tbsp chia seeds
- 1/4 tsp vanilla extract, pure
Instructions
- In a clear glass, layer 1/4 cup of Greek yogurt at the bottom for a visually appealing base.
- Drizzle 1 tbsp of raw honey over the yogurt for a subtle sweetness that permeates every bite.
- Sprinkle 2 tbsp of artisanal granola evenly over the honey to add a satisfying crunch.
- Scatter 1/4 cup of mixed berries atop the granola, ensuring a variety in every spoonful.
- Repeat the layers once more, starting with yogurt and ending with berries, for a parfait that’s as generous as it is gorgeous.
- Finish with a sprinkle of chia seeds and a dash of pure vanilla extract on the top layer for an antioxidant boost and aromatic depth.
- Chill in the refrigerator for 10 minutes to allow the flavors to meld and the granola to soften slightly.
With its creamy texture, crunchy contrast, and bursts of berry freshness, this parfait is a symphony of sensations. Serve it in a mason jar for a portable breakfast or layer it in a wine glass for an elegant brunch centerpiece.
Scrambled Eggs
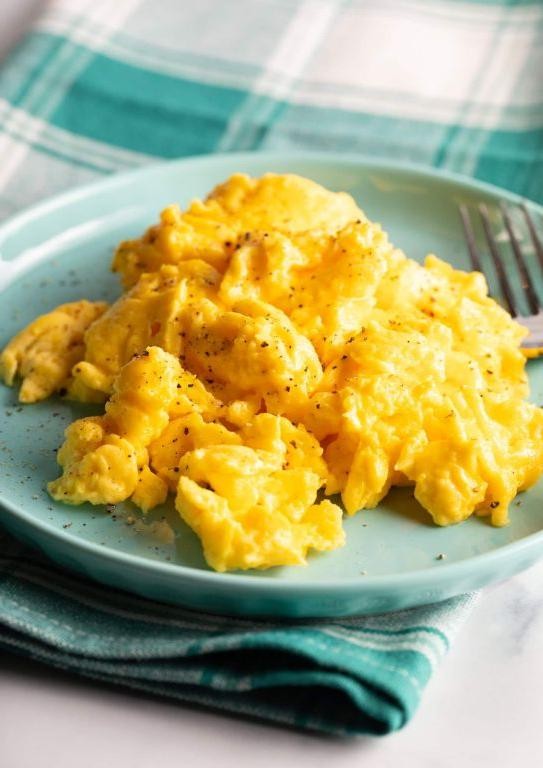
Never underestimate the power of perfectly scrambled eggs—fluffy, creamy, and just begging to be devoured. Nail this breakfast staple with precision and flair.
Ingredients
- 4 large pasture-raised eggs, lightly beaten
- 2 tbsp clarified butter
- 1/4 tsp fine sea salt
- 1/8 tsp freshly ground black pepper
- 2 tbsp whole milk
Instructions
- Heat a non-stick skillet over medium-low heat (300°F) for 2 minutes to ensure even cooking.
- Add clarified butter to the skillet, swirling to coat the surface evenly.
- In a bowl, whisk together the lightly beaten eggs, whole milk, fine sea salt, and freshly ground black pepper until fully combined.
- Pour the egg mixture into the skillet, letting it sit undisturbed for 20 seconds to form a slight base.
- Using a silicone spatula, gently push the eggs from the edges toward the center, allowing the uncooked eggs to flow to the edges. Repeat this process every 20 seconds for 3 minutes.
- Remove the skillet from the heat when the eggs are mostly set but still slightly runny, as residual heat will continue to cook them.
- Let the eggs rest in the skillet for 1 minute to achieve a creamy, custard-like texture.
Kickstart your morning with these velvety scrambled eggs, their rich flavor enhanced by the subtle nuttiness of clarified butter. Serve atop toasted artisan bread or alongside crispy bacon for a decadent twist.
Pancake Faces

Unleash your inner artist with Pancake Faces—a playful twist on breakfast that’s as fun to make as it is to eat. Grab your spatula; it’s time to flip creativity onto your plate.
Ingredients
- 1 cup all-purpose flour, sifted
- 2 tbsp granulated sugar
- 1 tsp baking powder
- 1/2 tsp baking soda
- 1/4 tsp fine sea salt
- 3/4 cup buttermilk, room temperature
- 1/4 cup clarified butter, melted
- 1 pasture-raised egg, lightly beaten
- 1 tsp pure vanilla extract
- Assorted fresh berries and sliced bananas for decoration
- Maple syrup, warmed
Instructions
- In a large mixing bowl, whisk together the sifted flour, sugar, baking powder, baking soda, and sea salt until fully combined.
- Create a well in the center of the dry ingredients; pour in the buttermilk, clarified butter, beaten egg, and vanilla extract. Whisk until just combined—avoid overmixing to ensure fluffy pancakes.
- Heat a non-stick skillet over medium-low heat (325°F) for 2 minutes. Test the heat by sprinkling a few drops of water; they should dance and evaporate quickly.
- Pour 1/4 cup of batter onto the skillet for each pancake. Cook until bubbles form on the surface and edges look set, about 2 minutes.
- Flip carefully with a spatula; cook for another 1-2 minutes until golden brown. Tip: Keep pancakes warm in a 200°F oven while you finish the batch.
- Arrange pancakes on plates. Use berries and banana slices to create faces—get creative with expressions! Drizzle with warm maple syrup before serving.
Relish the contrast of crispy edges against the pillowy centers, with bursts of freshness from the fruit. Serve with a side of whipped cream or yogurt for an extra indulgent touch.
Banana Sushi
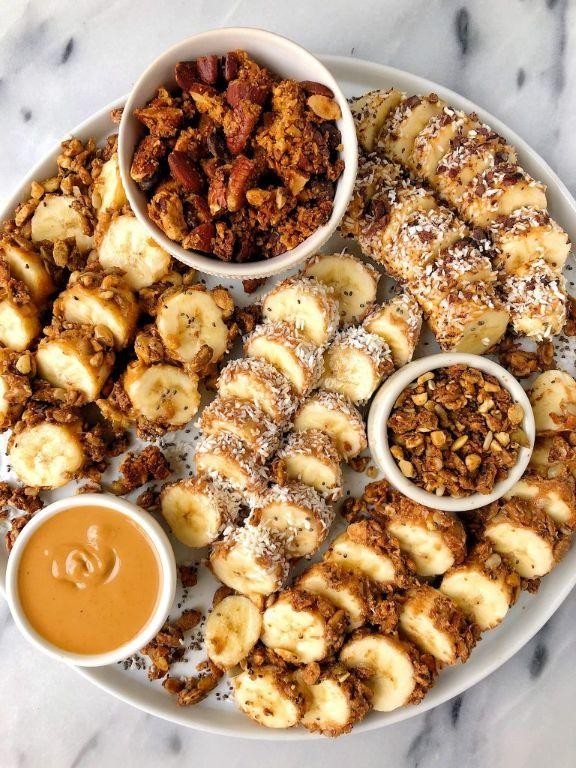
Forget everything you know about sushi—this is the snack hack you didn’t know you needed. **Banana Sushi** twists the classic into a sweet, no-cook treat that’s ready in minutes.
Ingredients
- 1 large ripe banana, peeled
- 2 tbsp smooth almond butter
- 1 tbsp local honey
- 2 tbsp crushed roasted almonds
- 1/4 tsp ground cinnamon
- 1/4 cup dark chocolate chips, melted
Instructions
- **Lay** the peeled banana on a flat surface. Using a sharp knife, **slice** it in half lengthwise for easier handling.
- **Spread** the almond butter evenly over each banana half with a small offset spatula for a thin, uniform layer.
- **Drizzle** honey over the almond butter, then **sprinkle** crushed almonds and cinnamon on top for crunch and warmth.
- **Place** the banana halves on a parchment-lined tray and **freeze** for 10 minutes to firm up before slicing.
- **Remove** from freezer and **cut** into 1-inch pieces with a warm knife for clean edges.
- **Dip** the top of each piece into melted dark chocolate, then **return** to the tray to set for 5 minutes.
Perfectly portable, these bites balance creamy, crunchy, and chocolatey in every piece. **Play** with toppings like coconut flakes or a pinch of sea salt for a gourmet twist.
Ants on a Log
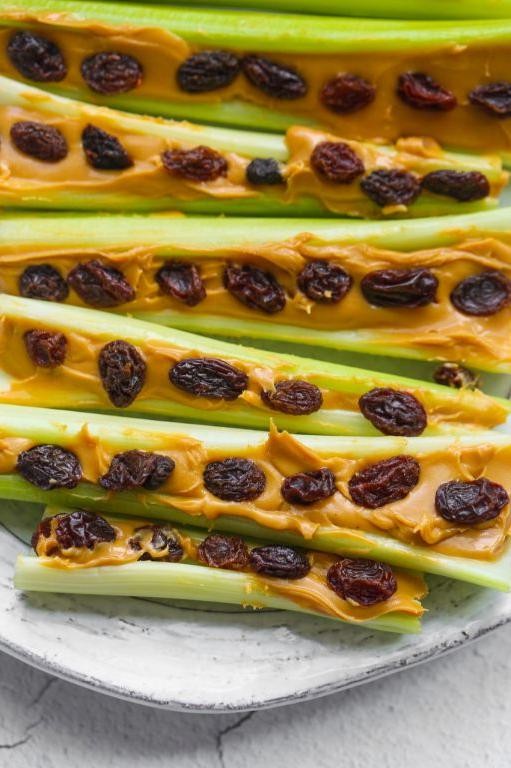
Viral for a reason, this crunchy, creamy, sweet snack is a no-brainer for busy bees. **Ants on a Log** turns celery sticks into a fun, edible raft for peanut butter and raisins—kid-friendly, adult-approved.
Ingredients
- 4 large celery stalks, trimmed and cut into 3-inch pieces
- 1/2 cup smooth, organic peanut butter
- 1/4 cup golden raisins
Instructions
- **Wash** the celery stalks under cold running water. Pat dry with a clean kitchen towel to ensure the peanut butter adheres properly.
- **Fill** the celery grooves with peanut butter using a small offset spatula for a smooth, even layer.
- **Press** the golden raisins into the peanut butter at 1/2-inch intervals, mimicking ants on a log. Tip: For a twist, swap raisins with dried cranberries or mini chocolate chips.
- **Chill** in the refrigerator for 15 minutes to set the peanut butter, making them easier to handle. Tip: This step is optional but recommended for a firmer texture.
- **Serve** immediately on a platter. Tip: For an elegant touch, drizzle with a light honey glaze before adding raisins.
Zesty yet comforting, the crisp celery contrasts beautifully with the rich peanut butter and chewy raisins. Try stacking them vertically in a glass for a playful, Instagram-worthy presentation.
Homemade Chicken Nuggets
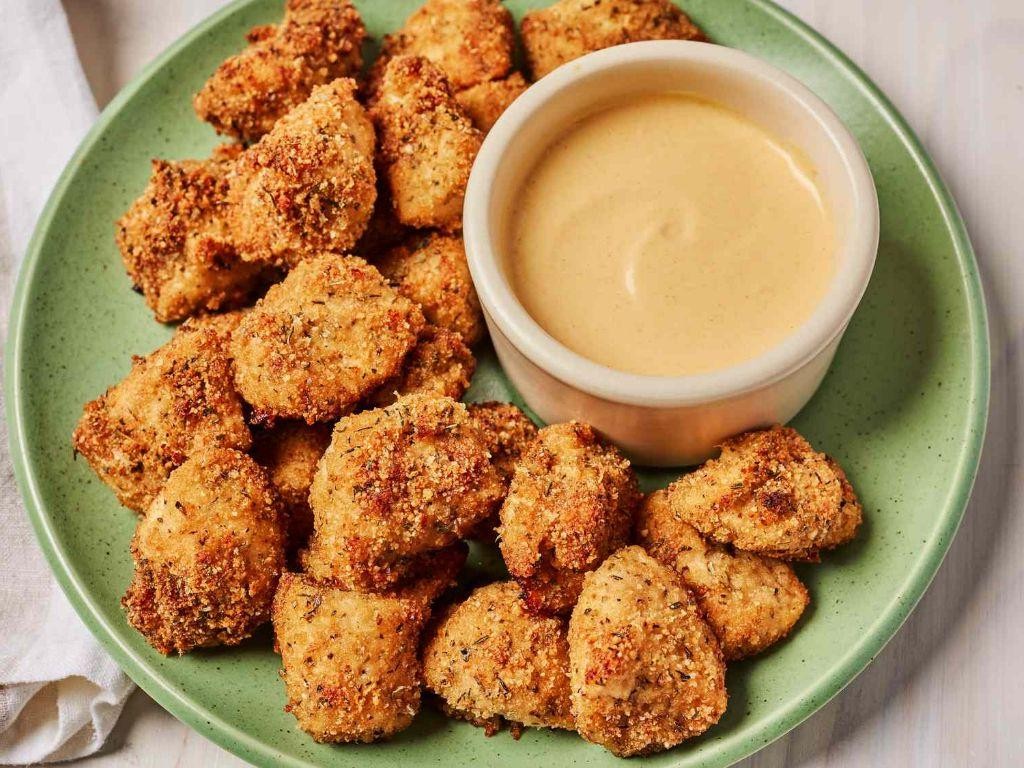
Transform your kitchen into a fast-food joint with these Homemade Chicken Nuggets—crispy, juicy, and utterly addictive.
Ingredients
- 1 lb boneless, skinless chicken breasts, cut into 1-inch pieces
- 1 cup all-purpose flour
- 2 pasture-raised eggs, lightly beaten
- 1 cup panko breadcrumbs
- 1 tsp garlic powder
- 1 tsp onion powder
- 1/2 tsp smoked paprika
- 1/2 tsp sea salt
- 1/4 tsp black pepper, freshly ground
- 1 cup clarified butter, for frying
Instructions
- Preheat your deep fryer to 375°F or heat clarified butter in a heavy skillet over medium-high heat until shimmering.
- In a shallow dish, whisk together flour, garlic powder, onion powder, smoked paprika, sea salt, and black pepper.
- Dip each chicken piece into the beaten eggs, allowing excess to drip off, then dredge in the flour mixture, pressing lightly to adhere.
- Coat the floured chicken pieces in panko breadcrumbs, ensuring an even, crispy layer.
- Fry the nuggets in batches for 3-4 minutes, or until golden brown and the internal temperature reaches 165°F. Avoid overcrowding to ensure even cooking.
- Transfer the nuggets to a wire rack set over a baking sheet to drain and stay crisp. Tip: This prevents sogginess.
- Serve immediately with your favorite dipping sauce. Tip: For an extra crunch, double-dip in egg and breadcrumbs before frying.
Lightly golden and impossibly crunchy on the outside, these nuggets reveal tender, flavorful chicken inside. Elevate them with a drizzle of hot honey or a sprinkle of flaky sea salt for a gourmet twist.
Veggie Wraps
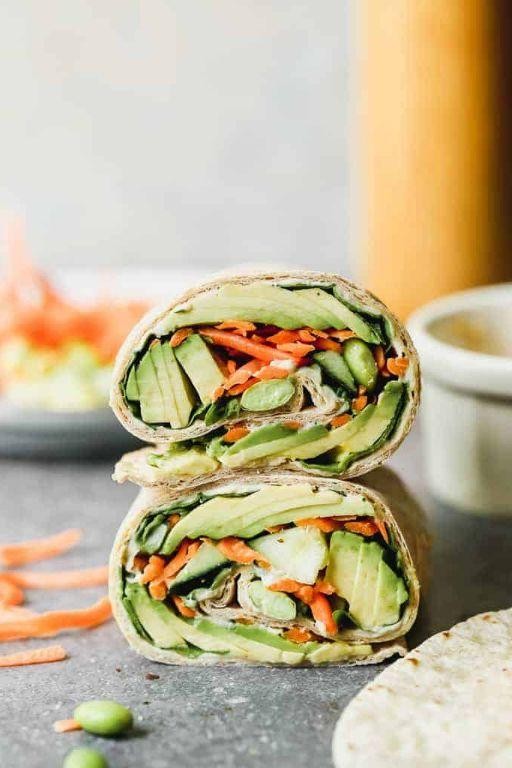
Make your lunch break legendary with these veggie wraps—packed with crunch, color, and a kick of flavor that’ll have you ditching the deli line for good.
Ingredients
- 1 cup hummus, homemade or store-bought
- 4 large whole wheat tortillas
- 2 cups mixed greens, thoroughly washed and dried
- 1 medium avocado, thinly sliced
- 1 cup roasted red peppers, julienned
- 1/2 cup feta cheese, crumbled
- 1/4 cup Kalamata olives, pitted and halved
- 2 tbsp extra-virgin olive oil
- 1 tbsp lemon juice, freshly squeezed
- 1 tsp smoked paprika
- Salt and freshly ground black pepper, to taste
Instructions
- Lay out the whole wheat tortillas on a clean, flat surface.
- Spread 1/4 cup of hummus evenly over each tortilla, leaving a 1-inch border around the edges.
- Layer 1/2 cup of mixed greens, followed by avocado slices, roasted red peppers, feta cheese, and Kalamata olives on each tortilla.
- In a small bowl, whisk together extra-virgin olive oil, lemon juice, smoked paprika, salt, and black pepper. Drizzle this dressing over the fillings in each wrap.
- Fold the sides of the tortillas inward, then roll tightly from the bottom up to encase the fillings.
- Heat a large skillet over medium heat for 1 minute. Place each wrap seam-side down and cook for 2-3 minutes per side, or until golden and crisp.
- Remove from heat and let rest for 1 minute before slicing diagonally.
Enjoy the contrast of creamy hummus against the crisp veggies and the smoky hint from the paprika. Serve these wraps with a side of sweet potato fries or a crisp apple for a meal that’s as satisfying as it is vibrant.
Mac and Cheese
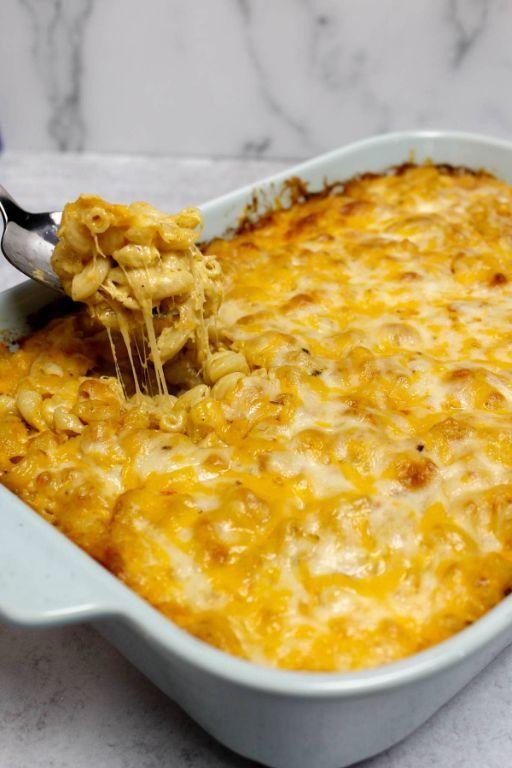
Unleash the ultimate comfort food with this creamy, dreamy Mac and Cheese. It’s a hug in a bowl, ready in under 30 minutes.
Ingredients
- 8 oz elbow macaroni
- 2 cups sharp cheddar cheese, freshly grated
- 1 cup Gruyère cheese, freshly grated
- 2 tbsp unsalted butter
- 2 tbsp all-purpose flour
- 1 1/2 cups whole milk, warmed
- 1/2 tsp smoked paprika
- 1/4 tsp cayenne pepper
- 1/2 tsp kosher salt
- 1/4 tsp freshly ground black pepper
- 1/4 cup panko breadcrumbs
- 1 tbsp clarified butter, melted
Instructions
- Preheat oven to 375°F. Butter a 2-quart baking dish.
- Cook macaroni in salted boiling water for 6 minutes, until al dente. Drain and set aside.
- In a saucepan, melt unsalted butter over medium heat. Whisk in flour, cooking for 1 minute to form a roux.
- Gradually whisk in warm milk, ensuring no lumps remain. Cook for 3 minutes, until thickened.
- Remove from heat. Stir in cheddar and Gruyère until melted. Season with smoked paprika, cayenne, salt, and pepper.
- Fold in cooked macaroni, transferring to the prepared baking dish.
- Combine panko with clarified butter. Sprinkle over macaroni.
- Bake for 20 minutes, until bubbly and golden.
Perfectly creamy with a crispy top, this Mac and Cheese is a texture lover’s dream. Serve with a side of pickled jalapeños for a spicy kick.
Apple Sandwiches
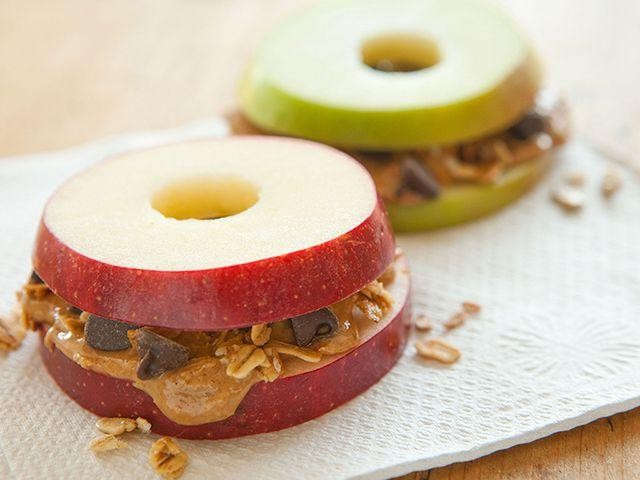
Who knew apples could steal the show in a sandwich? These crisp, sweet rounds are the ultimate vehicle for creamy, crunchy fillings—no bread needed.
Ingredients
- 2 large Honeycrisp apples, cored and sliced into 1/2-inch rounds
- 1/2 cup smooth almond butter
- 1/4 cup granola
- 1 tbsp pure maple syrup
- 1/2 tsp ground cinnamon
- 1/4 cup dark chocolate chips, melted
Instructions
- **Prep the apples:** Slice apples horizontally into 1/2-inch thick rounds, removing the core to create a ring. Pat dry with a paper towel to ensure fillings stick.
- **Spread the base:** On half the apple slices, spread 1 tbsp almond butter evenly, leaving a small border to prevent spillage.
- **Add crunch:** Sprinkle 1 tsp granola over the almond butter, pressing lightly to adhere.
- **Drizzle sweetness:** Lightly drizzle maple syrup over the granola, using no more than 1/2 tsp per slice to avoid sogginess.
- **Dust with spice:** Sprinkle a pinch of cinnamon over the maple syrup for a warm, aromatic touch.
- **Top it off:** Place the remaining apple slices on top to form sandwiches. Press gently to secure.
- **Finish with chocolate:** Drizzle melted dark chocolate over the assembled sandwiches. Let set for 5 minutes at room temperature.
Apple sandwiches offer a playful crunch with a melt-in-your-mouth center. Serve them chilled for a refreshing snack or drizzle with extra chocolate for a decadent dessert twist.
Oatmeal Cookies
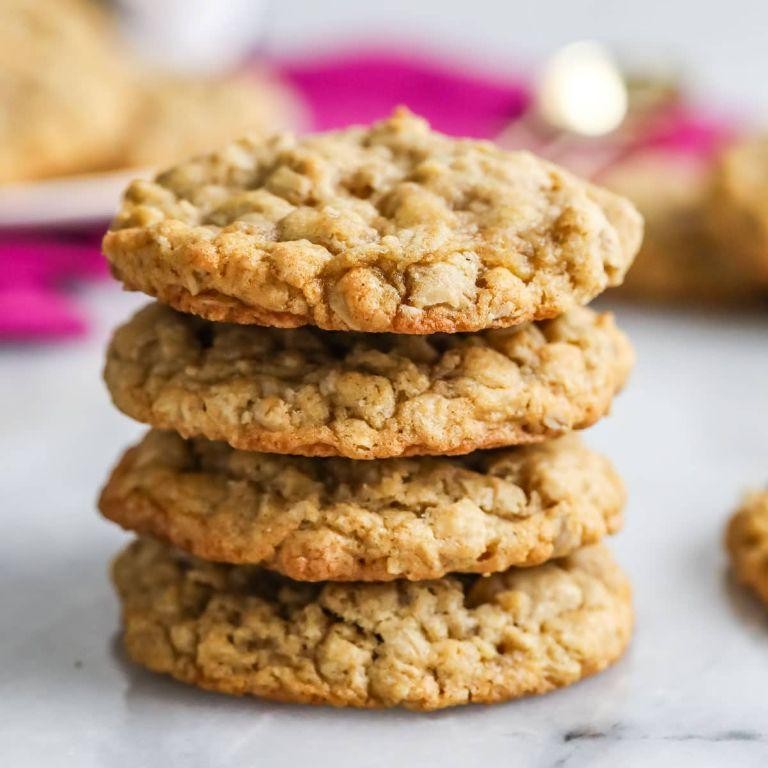
Elevate your snack game with these oatmeal cookies—crispy edges, chewy centers, and packed with flavor that’ll make your taste buds dance.
Ingredients
- 1 cup unsalted butter, softened
- 1 cup light brown sugar, packed
- 1/2 cup granulated sugar
- 2 pasture-raised eggs, lightly beaten
- 1 tsp pure vanilla extract
- 1 1/2 cups all-purpose flour
- 1 tsp baking soda
- 1 tsp ground cinnamon
- 1/2 tsp fine sea salt
- 3 cups old-fashioned rolled oats
- 1 cup dark chocolate chips
Instructions
- Preheat your oven to 350°F (175°C) and line two baking sheets with parchment paper.
- In a large bowl, cream together the softened unsalted butter, light brown sugar, and granulated sugar until light and fluffy, about 3 minutes.
- Add the lightly beaten pasture-raised eggs and pure vanilla extract to the butter mixture, beating until fully incorporated.
- In a separate bowl, whisk together the all-purpose flour, baking soda, ground cinnamon, and fine sea salt.
- Gradually add the dry ingredients to the wet mixture, mixing just until combined to avoid overworking the dough.
- Fold in the old-fashioned rolled oats and dark chocolate chips until evenly distributed throughout the dough.
- Using a 1.5-tablespoon cookie scoop, portion the dough onto the prepared baking sheets, spacing them 2 inches apart.
- Bake for 10-12 minutes, or until the edges are golden but the centers are still soft. For even baking, rotate the pans halfway through.
- Allow the cookies to cool on the baking sheets for 5 minutes before transferring to a wire rack to cool completely.
Heavenly when warm, these oatmeal cookies boast a perfect balance of sweetness and spice. Serve them with a cold glass of almond milk for a classic combo, or crumble over vanilla ice cream for an indulgent twist.
Tuna Salad Sandwich
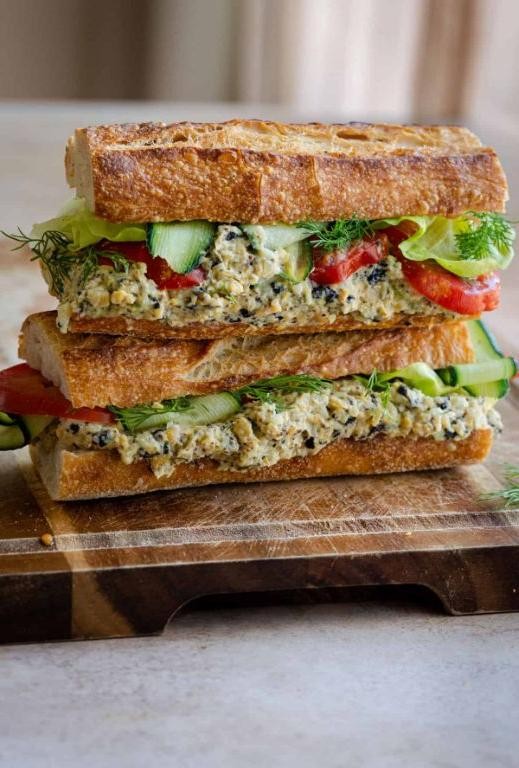
Make your lunch break legendary with this no-fuss, flavor-packed tuna salad sandwich that’s anything but basic.
Ingredients
- 2 cans (5 oz each) wild-caught tuna in water, drained
- 1/4 cup high-quality mayonnaise
- 1 tbsp Dijon mustard
- 1/2 cup finely diced celery
- 1/4 cup minced red onion
- 1 tbsp fresh lemon juice
- 1/2 tsp sea salt
- 1/4 tsp freshly ground black pepper
- 4 slices artisan whole-grain bread
- 1 cup arugula
- 1 medium ripe avocado, sliced
Instructions
- In a medium mixing bowl, combine the drained tuna, mayonnaise, and Dijon mustard. Use a fork to flake the tuna and mix until evenly coated.
- Add the diced celery, minced red onion, fresh lemon juice, sea salt, and black pepper to the tuna mixture. Stir gently to incorporate all ingredients without overmixing.
- Toast the artisan whole-grain bread slices in a toaster or on a grill pan over medium heat for 2-3 minutes per side, until golden and crisp.
- Layer the arugula and sliced avocado on two slices of the toasted bread. Spoon the tuna salad mixture evenly over the avocado.
- Top with the remaining slices of bread, press gently, and slice each sandwich in half diagonally for serving.
The creamy avocado and crisp arugula add a luxurious texture contrast to the rich, savory tuna salad. Serve with a side of sweet potato chips for a crunch that complements the sandwich’s creamy interior.
French Toast Sticks

Never settle for soggy breakfasts again. French Toast Sticks are your crispy, golden ticket to morning glory—dunkable, dippable, and downright irresistible.
Ingredients
- 4 slices of brioche bread, cut into 1-inch sticks
- 2 pasture-raised eggs, lightly beaten
- 1/2 cup whole milk
- 1 tbsp pure vanilla extract
- 1 tsp ground cinnamon
- 1/4 tsp freshly grated nutmeg
- 2 tbsp clarified butter
- 1/4 cup granulated sugar
- Maple syrup, for serving
Instructions
- In a shallow dish, whisk together the lightly beaten eggs, whole milk, pure vanilla extract, ground cinnamon, and freshly grated nutmeg until fully combined.
- Heat a large non-stick skillet over medium heat and add 1 tbsp of clarified butter, swirling to coat the pan evenly.
- Dip each brioche stick into the egg mixture, allowing excess to drip off, then place immediately into the skillet. Tip: Do not overcrowd the pan to ensure even cooking.
- Cook for 2-3 minutes on each side or until golden brown and crispy. Tip: Adjust heat as needed to prevent burning.
- Transfer cooked sticks to a wire rack set over a baking sheet. Repeat with remaining sticks, adding more clarified butter as needed.
- While still warm, roll the sticks in granulated sugar for a sweet, crunchy exterior. Tip: For extra flavor, mix sugar with a pinch of cinnamon before coating.
- Serve immediately with maple syrup for dipping.
Delight in the contrast of the crisp sugar shell against the soft, custardy center. For a playful twist, skewer the sticks and serve with a side of warm chocolate sauce for dipping.
Chocolate Covered Strawberries

Boldly transform simple strawberries into decadent delights with this no-fuss recipe. Perfect for impressing guests or treating yourself, these chocolate-covered strawberries are a game-changer.
Ingredients
- 1 lb fresh strawberries, stems intact
- 8 oz high-quality dark chocolate, finely chopped
- 1 tbsp coconut oil
- 1/4 cup white chocolate, finely chopped (for drizzling)
Instructions
- Line a baking sheet with parchment paper and set aside.
- Rinse strawberries under cold water and pat dry thoroughly with paper towels to ensure the chocolate adheres properly.
- In a double boiler over medium heat, melt the dark chocolate with coconut oil, stirring constantly until smooth and glossy, about 5 minutes.
- Holding each strawberry by the stem, dip into the melted chocolate, swirling to coat evenly. Allow excess chocolate to drip off.
- Place dipped strawberries on the prepared baking sheet. Repeat with remaining strawberries.
- In a separate double boiler, melt the white chocolate until smooth, about 3 minutes.
- Using a fork, drizzle the melted white chocolate over the dipped strawberries for an elegant finish.
- Refrigerate the strawberries for 30 minutes, or until the chocolate is fully set.
Fancy these strawberries boast a crisp chocolate shell with a juicy, sweet center. Serve them on a sleek platter for a dinner party or pack them in a chic box for a heartfelt gift.
Grilled Cheese Sandwich
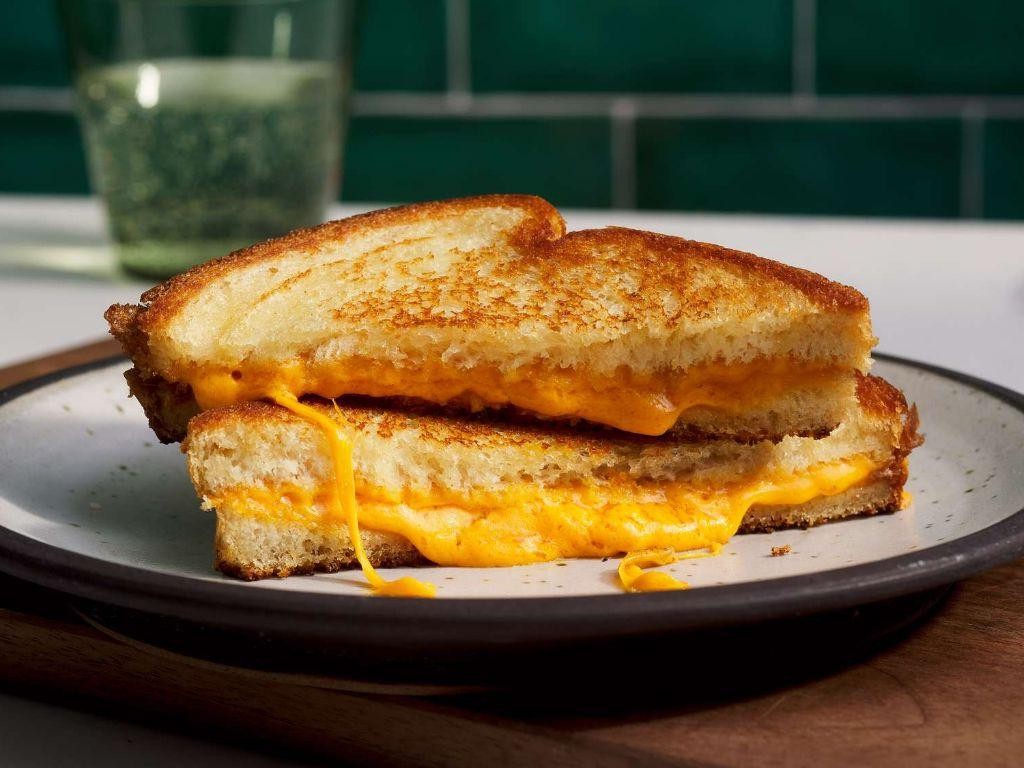
Overload your senses with this ultimate Grilled Cheese Sandwich—crispy, gooey, and utterly irresistible.
Ingredients
- 2 slices of artisanal sourdough bread
- 2 oz aged sharp cheddar cheese, thinly sliced
- 1 oz Gruyère cheese, grated
- 1 tbsp clarified butter
- 1 tsp Dijon mustard
Instructions
- Preheat a cast-iron skillet over medium-low heat (300°F) to ensure even cooking without burning.
- Spread Dijon mustard evenly on one side of each sourdough slice for a tangy depth of flavor.
- Layer the aged sharp cheddar and Gruyère between the mustard-spread sides of the bread.
- Brush the outer sides of the sandwich with clarified butter for a golden, crispy exterior.
- Place the sandwich in the skillet, pressing lightly with a spatula to encourage even browning.
- Cook for 3-4 minutes on each side, or until the bread is golden brown and the cheese is fully melted.
- Let the sandwich rest for 1 minute before slicing to allow the cheese to set slightly.
Zesty and rich, this sandwich boasts a perfect crunch with a molten cheese center. Serve with a side of tomato soup for dipping or enjoy solo for a quick, satisfying meal.
Pasta Salad
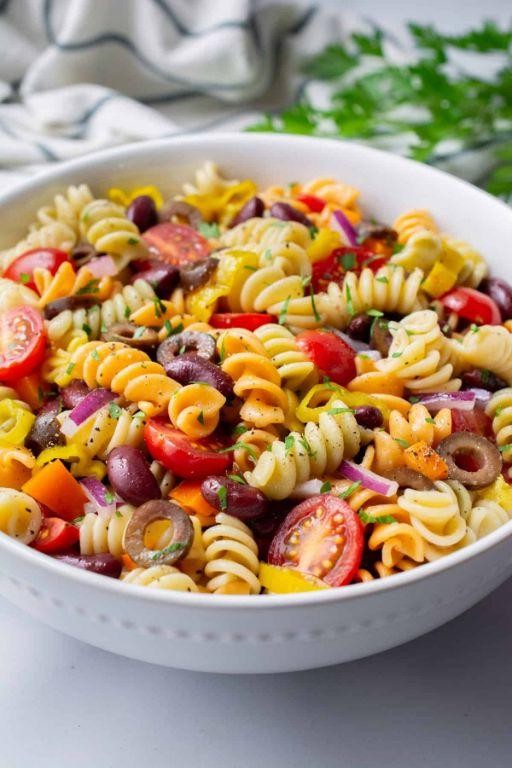
Hang onto your forks, because this pasta salad is about to be the star of your next picnic or potluck. **Bold flavors** and **crunchy textures** come together in a dish that’s as easy to make as it is to devour.
Ingredients
– 8 oz fusilli pasta, al dente
– 1/2 cup extra-virgin olive oil
– 3 tbsp red wine vinegar
– 1 tsp Dijon mustard
– 1 clove garlic, minced
– 1/2 tsp sea salt
– 1/4 tsp freshly ground black pepper
– 1 cup cherry tomatoes, halved
– 1/2 cup Kalamata olives, pitted and sliced
– 1/4 cup red onion, finely diced
– 1/2 cup feta cheese, crumbled
– 1/4 cup fresh basil leaves, chiffonade
Instructions
1. **Cook** the fusilli pasta in a large pot of boiling salted water until al dente, about 8-10 minutes. Drain and rinse under cold water to stop the cooking process.
2. **Whisk** together the olive oil, red wine vinegar, Dijon mustard, minced garlic, sea salt, and black pepper in a large bowl to create the dressing.
3. **Add** the cooled pasta to the bowl with the dressing and toss to coat evenly.
4. **Fold** in the cherry tomatoes, Kalamata olives, and red onion until well distributed throughout the pasta.
5. **Sprinkle** the crumbled feta cheese and chiffonade basil over the top of the pasta salad and gently toss to combine.
6. **Chill** the pasta salad in the refrigerator for at least 30 minutes to allow the flavors to meld together.
**Tip:** For an extra crunch, add some toasted pine nuts right before serving.
**Tip:** If you’re making this ahead of time, hold off on adding the basil until just before serving to keep it fresh and vibrant.
**Tip:** For a creamier texture, add a dollop of Greek yogurt to the dressing.
Serve this pasta salad on a bed of arugula for a peppery contrast, or alongside grilled chicken for a heartier meal. The **tangy feta** and **briny olives** play off the **sweet tomatoes** and **aromatic basil**, creating a symphony of flavors in every bite.
Rice Krispie Treats
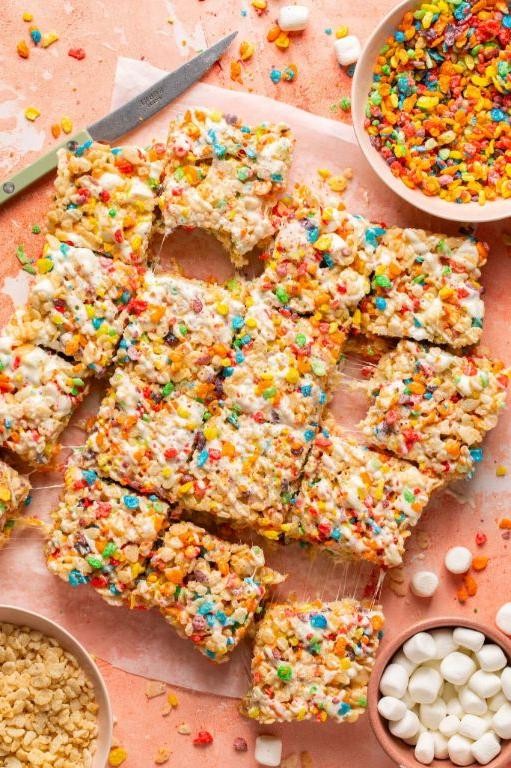
Absolutely everyone loves a classic Rice Krispie Treat—crunchy, chewy, and irresistibly sweet. These no-bake bars are the ultimate crowd-pleaser, perfect for any occasion.
Ingredients
- 6 cups crispy rice cereal
- 10 oz marshmallows, mini
- 3 tbsp unsalted butter, clarified
- 1 tsp pure vanilla extract
Instructions
- Line a 9×13-inch baking dish with parchment paper, ensuring overhang on all sides for easy removal.
- In a large pot, melt clarified butter over low heat, swirling occasionally to ensure even melting.
- Add mini marshmallows to the pot, stirring constantly with a silicone spatula until completely melted and smooth, about 5 minutes.
- Remove pot from heat and immediately stir in pure vanilla extract for a depth of flavor.
- Quickly fold in crispy rice cereal until evenly coated with the marshmallow mixture, working swiftly to prevent hardening.
- Transfer the mixture to the prepared baking dish, pressing firmly with a greased spatula to create an even layer.
- Allow treats to cool at room temperature for at least 1 hour before cutting into squares with a sharp knife.
Freshly made Rice Krispie Treats boast a perfect balance of crispy and gooey textures, with a buttery vanilla undertone. For a twist, drizzle with melted dark chocolate or sprinkle with flaky sea salt before serving.
Smoothie Bowls

Let’s blend our way to breakfast bliss with smoothie bowls—thick, creamy, and loaded with toppings that crunch, pop, and dazzle.
Ingredients
- 1 cup frozen mixed berries (strawberries, blueberries, raspberries)
- 1 ripe banana, peeled and sliced
- 1/2 cup unsweetened almond milk
- 1 tbsp chia seeds
- 1 tsp pure vanilla extract
- 1/4 cup granola
- 1 tbsp raw honey
- Fresh mint leaves for garnish
Instructions
- In a high-speed blender, combine the frozen mixed berries, sliced banana, almond milk, chia seeds, and vanilla extract.
- Blend on high for 45 seconds, or until the mixture is smooth and reaches a thick, spoonable consistency. Tip: For a thicker bowl, add less almond milk; for a thinner consistency, add more.
- Pour the smoothie into a bowl, using the back of a spoon to create a swirl effect on the surface.
- Drizzle the raw honey over the top in a zigzag pattern for a touch of natural sweetness.
- Sprinkle the granola evenly over the smoothie, ensuring each bite has a satisfying crunch. Tip: Toast the granola beforehand for an extra layer of flavor.
- Garnish with fresh mint leaves for a pop of color and a refreshing finish. Tip: Slap the mint leaves between your hands before adding to release their aromatic oils.
Dig into a bowl that’s a riot of textures—silky smoothness, crunchy granola, and the occasional burst of berry. Serve it in a hollowed-out pineapple half for a tropical twist that’s as Instagram-worthy as it is delicious.
Deviled Eggs

Boldly reinvent your snack game with these creamy, tangy deviled eggs—a classic with a twist that’s sure to disappear fast.
Ingredients
- 6 pasture-raised eggs, hard-boiled and peeled
- 1/4 cup mayonnaise
- 1 tsp Dijon mustard
- 1 tbsp white vinegar
- 1/8 tsp smoked paprika
- Salt, to precise taste
- Fresh chives, finely chopped for garnish
Instructions
- Slice the hard-boiled eggs in half lengthwise. Carefully remove the yolks and place them in a medium bowl.
- Mash the yolks with a fork until they reach a fine crumbly texture.
- Add the mayonnaise, Dijon mustard, white vinegar, and smoked paprika to the yolks. Mix until the filling is smooth and creamy. Tip: For an extra smooth filling, press the mixture through a fine mesh sieve.
- Season the filling with salt, starting with 1/8 tsp and adjusting as needed. Tip: Always taste as you go to ensure the perfect balance of flavors.
- Spoon or pipe the filling back into the egg white halves. Tip: For a professional look, use a piping bag with a star tip.
- Garnish each deviled egg with finely chopped fresh chives.
Creamy, smoky, and with just the right amount of tang, these deviled eggs are a crowd-pleaser. Serve them on a slate board for a rustic touch or alongside crisp crudités for contrast.
Popcorn Balls
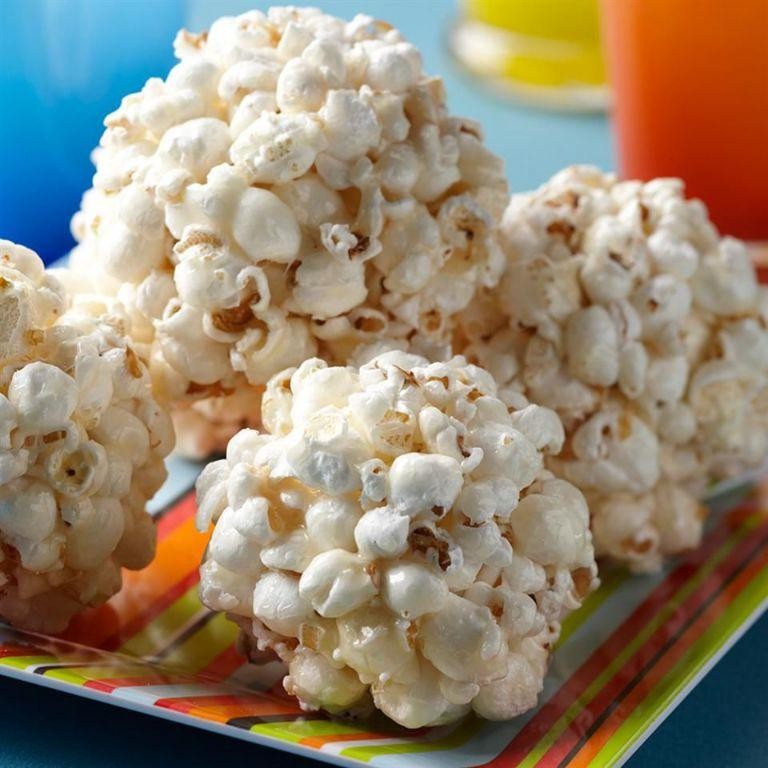
Let’s crunch into these sweet, sticky Popcorn Balls—perfect for snacking or gifting, and ridiculously easy to whip up.
Ingredients
- 8 cups freshly popped popcorn (air-popped preferred for texture)
- 1 cup pure cane sugar
- 1/2 cup light corn syrup
- 1/4 cup clarified butter
- 1/4 tsp fine sea salt
- 1 tsp pure vanilla extract
Instructions
- Line a baking sheet with parchment paper and lightly grease with clarified butter. Set aside.
- In a medium saucepan over medium heat, combine sugar, corn syrup, clarified butter, and sea salt. Stir until sugar dissolves completely.
- Increase heat to medium-high and bring to a boil without stirring. Use a candy thermometer to reach 250°F (hard-ball stage).
- Remove from heat and immediately stir in vanilla extract. Be cautious—mixture will bubble vigorously.
- Pour syrup over popcorn in a large bowl. Using a silicone spatula, fold gently until all kernels are evenly coated.
- With buttered hands, quickly shape into 2-inch balls, pressing firmly to compact. Place on prepared sheet to set for 30 minutes.
Just like that, you’ve got a batch of glossy, caramel-kissed Popcorn Balls with a satisfying crunch. Serve them stacked on a vintage cake stand for a nostalgic touch at your next gathering.
English Muffin Pizzas
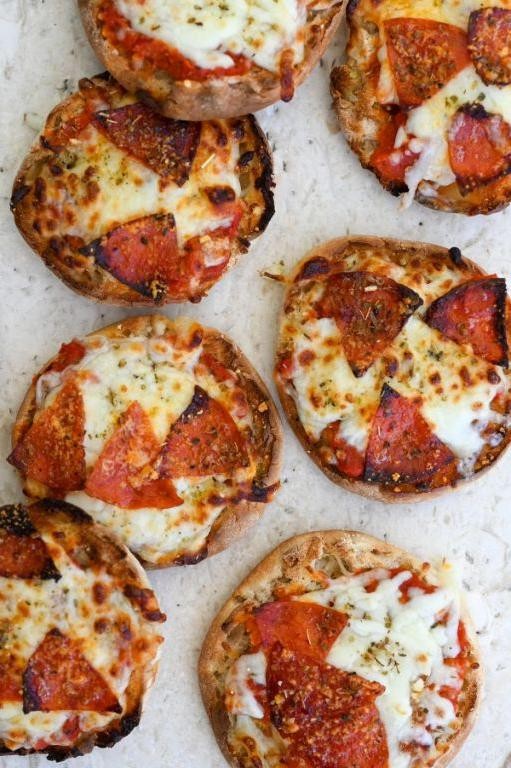
Overlooked no more, these English Muffin Pizzas are your ticket to a quick, crave-worthy meal. Crisp, cheesy, and endlessly customizable, they’re a foolproof fix for any hunger emergency.
Ingredients
- 4 English muffins, split
- 1 cup marinara sauce, preferably San Marzano tomato-based
- 2 cups whole-milk mozzarella, freshly shredded
- 1/4 cup extra-virgin olive oil
- 1/2 tsp crushed red pepper flakes
- 1/2 tsp dried oregano
- 1/4 cup fresh basil leaves, chiffonade
- Sea salt, to finish
Instructions
- Preheat your oven to 425°F (218°C) and line a baking sheet with parchment paper.
- Brush each English muffin half with extra-virgin olive oil, ensuring even coverage for optimal crispness.
- Spread 2 tablespoons of marinara sauce on each muffin half, leaving a small border for the crust.
- Sprinkle shredded mozzarella evenly over the sauce, covering completely to the edges.
- Add a pinch of crushed red pepper flakes and dried oregano to each pizza for a flavor boost.
- Bake in the preheated oven for 10-12 minutes, or until the cheese is bubbly and golden.
- Remove from oven and immediately garnish with fresh basil chiffonade and a light sprinkle of sea salt.
Yield: These mini pizzas boast a perfect contrast of textures—crispy edges with a soft, chewy center. Serve them straight from the oven with a side of garlic-infused olive oil for dipping, or top with arugula for a peppery crunch.
Frozen Yogurt Dots
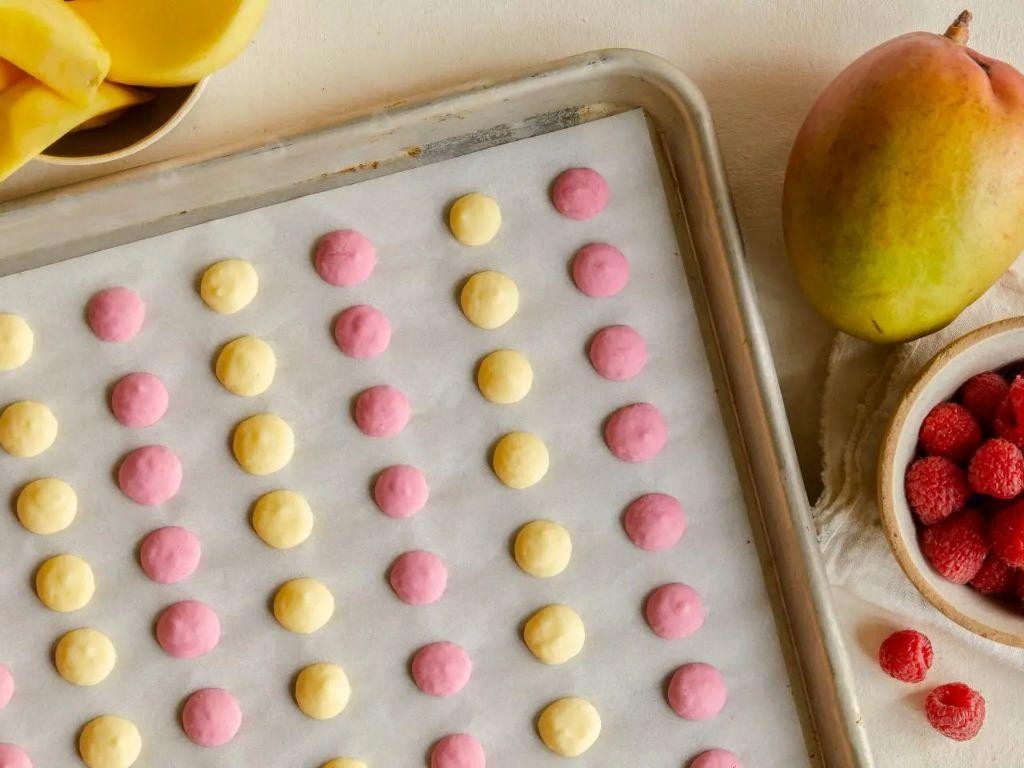
Elevate your snack game with these bite-sized Frozen Yogurt Dots—cool, creamy, and ridiculously easy to make. Perfect for beating the heat or a fun, healthy treat the kids will love.
Ingredients
- 2 cups Greek yogurt, full-fat
- 1/4 cup organic honey
- 1 tsp pure vanilla extract
- 1/2 cup fresh blueberries, finely chopped
Instructions
- In a medium bowl, whisk together 2 cups Greek yogurt, 1/4 cup organic honey, and 1 tsp pure vanilla extract until smooth.
- Gently fold in 1/2 cup finely chopped fresh blueberries for a burst of flavor.
- Line a baking sheet with parchment paper. Using a teaspoon, drop small dots of the yogurt mixture onto the sheet, spacing them about 1 inch apart.
- Freeze the dots for at least 2 hours, or until solid. For best results, freeze overnight.
- Once frozen, transfer the dots to an airtight container, separating layers with parchment paper to prevent sticking.
Munch on these Frozen Yogurt Dots straight from the freezer for a refreshing treat. The creamy texture paired with the tangy sweetness of honey and the fresh pop of blueberries makes them irresistible. Try mixing in different fruits or a drizzle of dark chocolate for a customizable twist.
Conclusion
You’ve just discovered a treasure trove of 25 simple, easy recipes perfect for kids and fun for the whole family! Whether you’re looking for quick snacks or delightful meals, this list has something for every little chef. We’d love to hear which recipes became your favorites—drop us a comment below. And if you enjoyed this roundup, don’t forget to share the joy by pinning it on Pinterest!