Oh, the joy of cooking Japanese cuisine at home! Whether you’re craving the comfort of a steaming bowl of miso soup or the quick satisfaction of a perfectly rolled sushi, our roundup of 21 Delicious Easy Japanese Recipes for Beginners is your ticket to a culinary adventure. Perfect for North American home cooks, these dishes promise simplicity without sacrificing flavor. Ready to explore? Let’s dive in!
Miso Soup with Tofu and Wakame
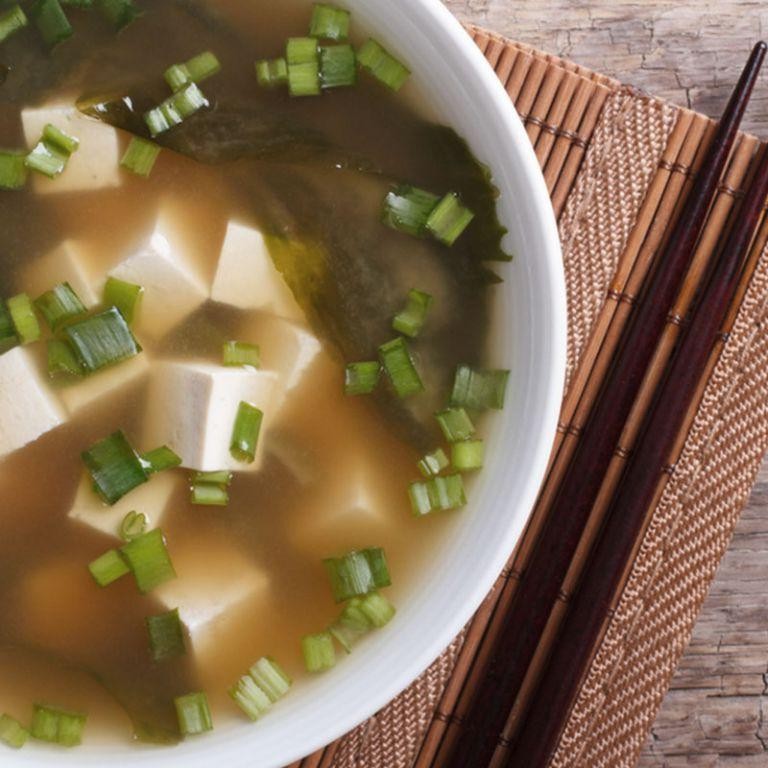
Just imagine coming home to a warm, comforting bowl of miso soup after a long day. You’ll love how simple it is to whip up this classic Japanese dish, packed with savory flavors and soothing textures.
Ingredients
- 4 cups water
- 1/4 cup white miso paste
- 1/2 cup firm tofu, cubed
- 2 tbsp dried wakame
- 2 green onions, thinly sliced
Instructions
- Heat 4 cups of water in a medium pot over medium heat until it reaches a gentle simmer, about 5 minutes.
- Reduce the heat to low and add 1/4 cup of white miso paste to the pot, whisking until fully dissolved.
- Add 1/2 cup of cubed firm tofu and 2 tbsp of dried wakame to the pot, stirring gently to combine.
- Let the soup simmer for another 5 minutes, ensuring the tofu heats through and the wakame rehydrates.
- Remove the pot from the heat and stir in the sliced green onions.
Zesty and umami-rich, this miso soup is perfect for a light lunch or as a starter. The tofu adds a soft bite, while the wakame brings a slight chewiness. Try serving it with a sprinkle of sesame seeds for an extra nutty flavor.
Teriyaki Chicken
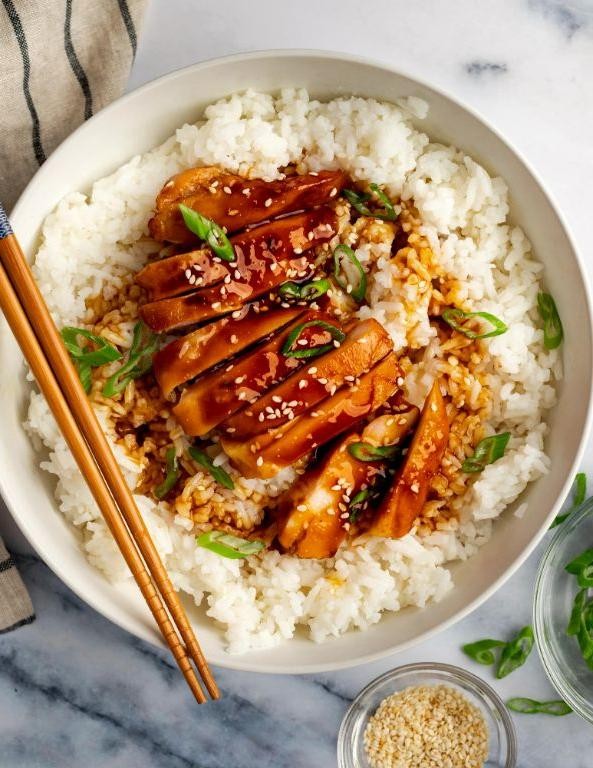
Hey, you know that craving for something sweet, savory, and just a bit sticky? Teriyaki chicken hits all those notes, and it’s surprisingly simple to whip up at home.
Ingredients
- 1.5 lbs chicken thighs
- 1/2 cup soy sauce
- 1/4 cup brown sugar
- 2 tbsp honey
- 1 tbsp minced garlic
- 1 tbsp minced ginger
- 1 tbsp cornstarch
- 1/4 cup water
- 1 tbsp vegetable oil
Instructions
- In a bowl, whisk together soy sauce, brown sugar, honey, garlic, and ginger to make the teriyaki sauce.
- Heat vegetable oil in a large skillet over medium-high heat. Add chicken thighs and cook for 5-7 minutes per side until golden brown.
- Pour the teriyaki sauce over the chicken. Reduce heat to medium and simmer for 10 minutes, flipping the chicken halfway through.
- In a small bowl, mix cornstarch and water to create a slurry. Stir this into the skillet to thicken the sauce, cooking for an additional 2 minutes.
- Remove from heat and let the chicken rest for 5 minutes before serving. This allows the juices to redistribute, ensuring moist chicken.
Perfectly glazed and glossy, this teriyaki chicken boasts a balance of sweetness and umami. Serve it over a bed of steamed rice with a sprinkle of sesame seeds for an extra touch of elegance.
Japanese Curry Rice

Ever craved something cozy yet exciting for dinner? Japanese Curry Rice is your go-to, blending rich flavors with hearty comfort in every bite.
Ingredients
- 1 tbsp vegetable oil
- 1 lb chicken thighs, cut into bite-sized pieces
- 1 large onion, sliced
- 2 carrots, chopped
- 2 potatoes, cubed
- 3 cups water
- 1 package Japanese curry roux
- 2 cups cooked white rice
Instructions
- Heat 1 tbsp vegetable oil in a large pot over medium heat.
- Add 1 lb chicken thighs, cooking until browned, about 5 minutes. Tip: Don’t overcrowd the pot to ensure even browning.
- Stir in 1 large onion, 2 carrots, and 2 potatoes, sautéing until the onions are translucent, about 5 minutes.
- Pour in 3 cups water, bringing the mixture to a boil. Then, reduce heat to low, simmering for 15 minutes. Tip: Skim off any foam for a clearer broth.
- Break 1 package Japanese curry roux into pieces, adding them to the pot. Stir until completely dissolved.
- Simmer for another 10 minutes, stirring occasionally, until the sauce thickens. Tip: If the curry thickens too much, add a little water to reach your desired consistency.
- Serve hot over 2 cups cooked white rice.
Lusciously thick and mildly spicy, this curry pairs wonderfully with a side of pickled vegetables for a refreshing contrast. Try topping it with a soft-boiled egg for an extra layer of richness.
Tamagoyaki (Japanese Rolled Omelette)
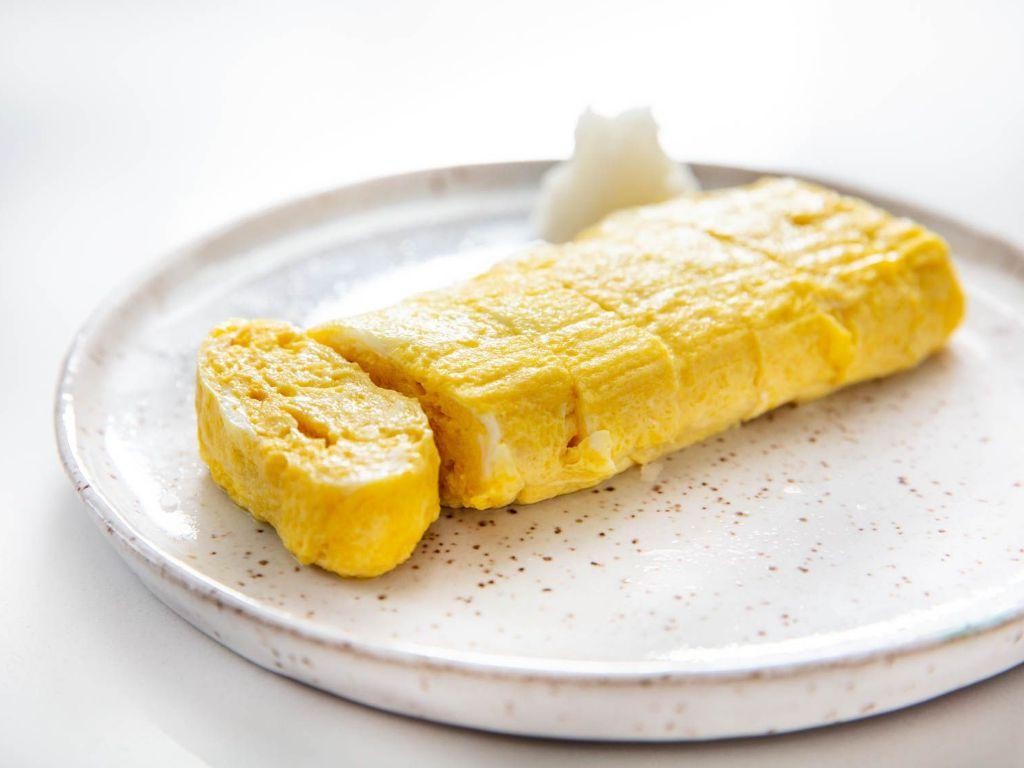
Hey there! Ever tried making Tamagoyaki at home? It’s this super tasty Japanese rolled omelette that’s perfect for breakfast or a snack. Let’s dive into how you can whip it up easily.
Ingredients
- 4 large eggs
- 1 tbsp sugar
- 1/2 tsp salt
- 1 tbsp soy sauce
- 1 tbsp mirin
- 1 tsp vegetable oil
Instructions
- In a bowl, whisk together 4 large eggs, 1 tbsp sugar, 1/2 tsp salt, 1 tbsp soy sauce, and 1 tbsp mirin until well combined.
- Heat a non-stick pan over medium heat and add 1 tsp vegetable oil, spreading it evenly.
- Pour a thin layer of the egg mixture into the pan, tilting to cover the bottom. Cook until the edges start to set but the top is still slightly runny, about 1-2 minutes.
- Using chopsticks or a spatula, gently roll the omelette from one side to the other. Tip: Keep the roll to one side of the pan.
- Pour another thin layer of egg mixture into the pan, lifting the rolled omelette to let the mixture flow underneath. Cook until set, about 1-2 minutes, then roll the omelette over the new layer.
- Repeat the process until all the egg mixture is used, ensuring each layer is cooked before rolling. Tip: Adjust the heat if the omelette is browning too quickly.
- Once all layers are cooked and rolled, transfer the Tamagoyaki to a cutting board. Let it rest for a minute before slicing. Tip: Use a sharp knife for clean cuts.
Perfectly cooked Tamagoyaki is slightly sweet, savory, and has a delightful layered texture. Serve it with a sprinkle of green onions or alongside a bowl of rice for a simple, satisfying meal.
Onigiri (Japanese Rice Balls)
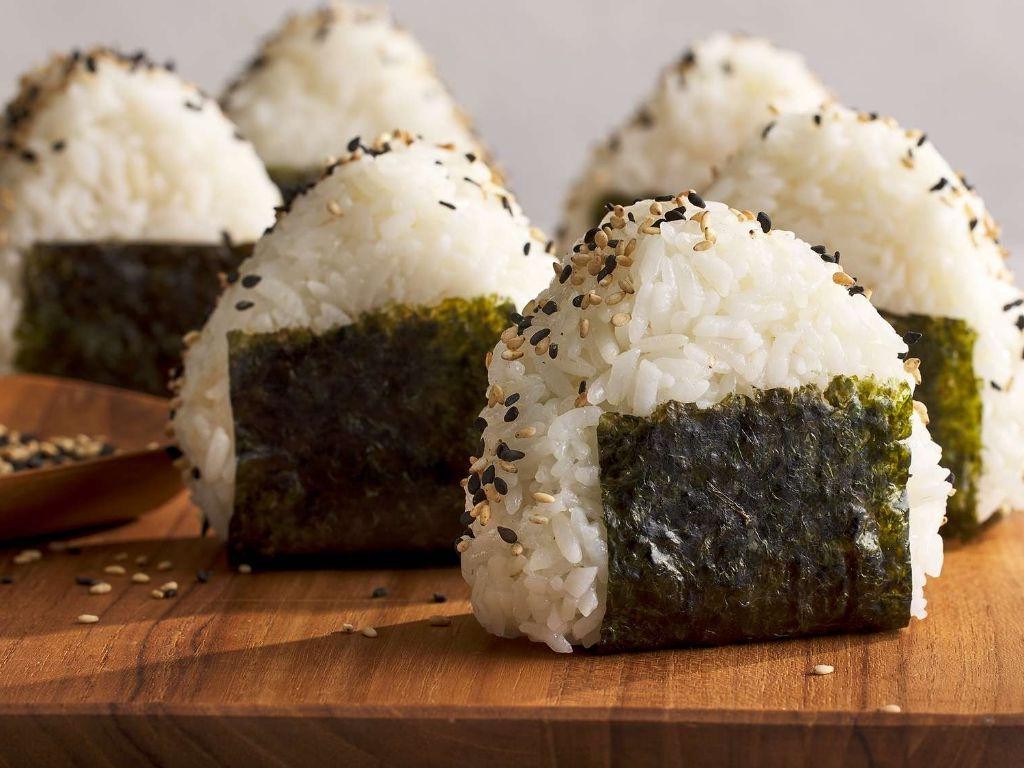
Unwrapping the simplicity and joy of Japanese cuisine, onigiri is your go-to snack that’s as fun to make as it is to eat. You’ll love how these rice balls can be customized with whatever fillings you fancy, making them a perfect quick bite or lunchbox staple.
Ingredients
- 2 cups short-grain Japanese rice
- 2 cups water
- 1/2 tsp salt
- 1 sheet nori (seaweed), cut into strips
- 1/4 cup canned tuna, drained
- 1 tbsp mayonnaise
- 1 tsp soy sauce
Instructions
- Rinse the rice under cold water until the water runs clear, then drain well.
- Combine the rice and water in a rice cooker and cook according to the manufacturer’s instructions. Tip: Let the rice sit for 10 minutes after cooking for the best texture.
- While the rice is cooking, mix the tuna, mayonnaise, and soy sauce in a small bowl. Set aside.
- Once the rice is done, transfer it to a large bowl and gently fold in the salt. Allow it to cool slightly until it’s comfortable to handle.
- Wet your hands with water to prevent sticking, then take a handful of rice and flatten it in your palm.
- Place a teaspoon of the tuna mixture in the center of the rice, then mold the rice around the filling to form a triangle or ball shape. Tip: Keep a bowl of water nearby to rewet your hands as needed.
- Wrap a strip of nori around the bottom of each onigiri, leaving the top exposed. Tip: The nori adds a nice crunch and makes it easier to hold.
With their soft, slightly sticky texture and savory filling, these onigiri are a delight to bite into. Try serving them with a side of pickled ginger for an extra zing or pack them for a picnic to enjoy the great outdoors with a taste of Japan.
Okonomiyaki (Japanese Savory Pancake)
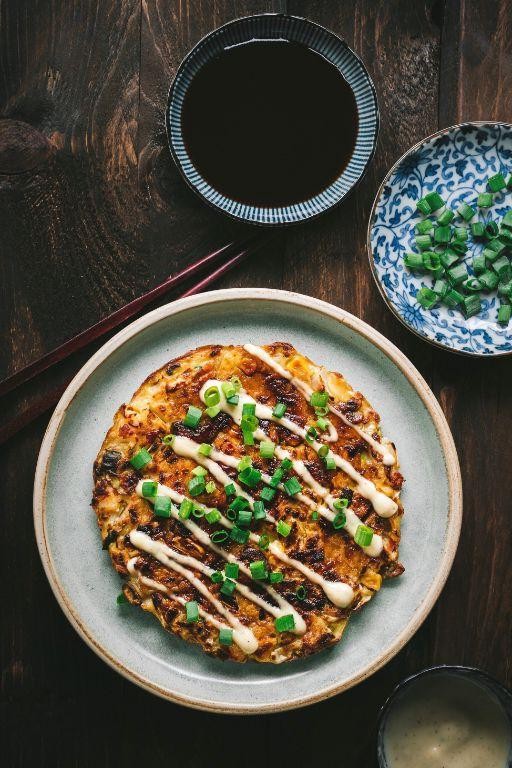
Venturing into the world of Japanese cuisine at home? Okonomiyaki, often dubbed as a savory pancake, is your ticket to a fun, flavorful meal that’s surprisingly easy to whip up. Perfect for when you’re craving something different but don’t want to spend hours in the kitchen.
Ingredients
- 1 cup all-purpose flour
- 3/4 cup dashi stock
- 1 large egg
- 1/2 tsp salt
- 1/4 tsp baking powder
- 2 cups shredded cabbage
- 2 green onions, thinly sliced
- 2 tbsp vegetable oil
- 1/4 cup okonomiyaki sauce
- 1 tbsp mayonnaise
- 1 tsp bonito flakes
- 1 tsp dried seaweed flakes
Instructions
- In a large bowl, whisk together 1 cup all-purpose flour, 3/4 cup dashi stock, 1 large egg, 1/2 tsp salt, and 1/4 tsp baking powder until smooth.
- Fold in 2 cups shredded cabbage and 2 thinly sliced green onions into the batter until evenly distributed.
- Heat 2 tbsp vegetable oil in a large skillet over medium heat (350°F). Pour the batter into the skillet, shaping it into a round pancake.
- Cook for 5 minutes, then flip carefully. Cook for another 5 minutes until golden brown and crispy on the edges.
- Transfer to a plate. Drizzle with 1/4 cup okonomiyaki sauce and 1 tbsp mayonnaise in a zigzag pattern.
- Sprinkle 1 tsp bonito flakes and 1 tsp dried seaweed flakes on top for garnish.
Crunchy on the outside, tender on the inside, this okonomiyaki is a umami-packed delight. Serve it straight from the skillet for an authentic touch, or pair with a cold beer to elevate your meal.
Yakitori (Grilled Chicken Skewers)

Wow, you’re in for a treat with these Yakitori skewers! They’re the perfect blend of smoky, sweet, and savory, and honestly, they’re easier to make than you might think. Let’s dive right in.
Ingredients
- 1.5 lbs chicken thighs, cut into 1-inch pieces
- 1/2 cup soy sauce
- 1/4 cup mirin
- 1/4 cup sake
- 2 tbsp sugar
- 1 tbsp vegetable oil
- 6 green onions, cut into 1-inch pieces
- Bamboo skewers, soaked in water for 30 minutes
Instructions
- Preheat your grill to medium-high heat, about 375°F.
- Thread the chicken and green onion pieces onto the soaked skewers, alternating between them.
- In a small saucepan, combine the soy sauce, mirin, sake, and sugar. Bring to a simmer over medium heat, stirring until the sugar dissolves. Reduce the heat to low and let it thicken slightly for about 5 minutes. Tip: Keep an eye on the sauce to prevent burning.
- Brush the skewers lightly with vegetable oil to prevent sticking.
- Place the skewers on the grill. Cook for 4-5 minutes on one side, then flip and brush with the sauce. Repeat the flipping and brushing every 2 minutes until the chicken is cooked through, about 10-12 minutes total. Tip: The chicken is done when it reaches an internal temperature of 165°F.
- Remove the skewers from the grill and brush with one final layer of sauce. Tip: Let them rest for a couple of minutes before serving to allow the juices to redistribute.
Grilled to perfection, these Yakitori skewers have a juicy interior with a slightly charred, sticky-sweet exterior. Serve them over a bed of steamed rice or with a side of pickled vegetables for an extra punch of flavor.
Gyudon (Beef Bowl)

Just imagine coming home after a long day to a steaming bowl of Gyudon, a comforting Japanese beef bowl that’s both easy to make and incredibly satisfying. You’ll love how the savory-sweet flavors meld together with the tender slices of beef and onions over a bed of fluffy rice.
Ingredients
- 1 cup water
- 1/2 cup soy sauce
- 1/4 cup mirin
- 2 tbsp sugar
- 1 onion, thinly sliced
- 1 lb beef chuck, thinly sliced
- 4 cups cooked white rice
- 2 green onions, chopped
- 1 tbsp vegetable oil
Instructions
- Heat the vegetable oil in a large skillet over medium heat.
- Add the sliced onions to the skillet and cook until translucent, about 5 minutes.
- Tip: Stir occasionally to prevent burning and ensure even cooking.
- Add the beef slices to the skillet, spreading them out to cook evenly.
- Cook the beef until it’s no longer pink, about 3-4 minutes.
- Tip: Avoid overcrowding the skillet to get a nice sear on the beef.
- Pour in the water, soy sauce, mirin, and sugar, stirring to combine.
- Bring the mixture to a simmer and let it cook for 10 minutes, allowing the flavors to meld.
- Tip: Skim off any foam that rises to the surface for a clearer broth.
- Divide the cooked rice among four bowls.
- Top each bowl with the beef and onion mixture, then garnish with chopped green onions.
Mmm, the Gyudon is best enjoyed hot, with the beef meltingly tender and the sauce slightly sweet and deeply umami. Try topping it with a soft-boiled egg for an extra layer of richness, or serve it with a side of pickled ginger to cut through the sweetness.
Chawanmushi (Savory Egg Custard)
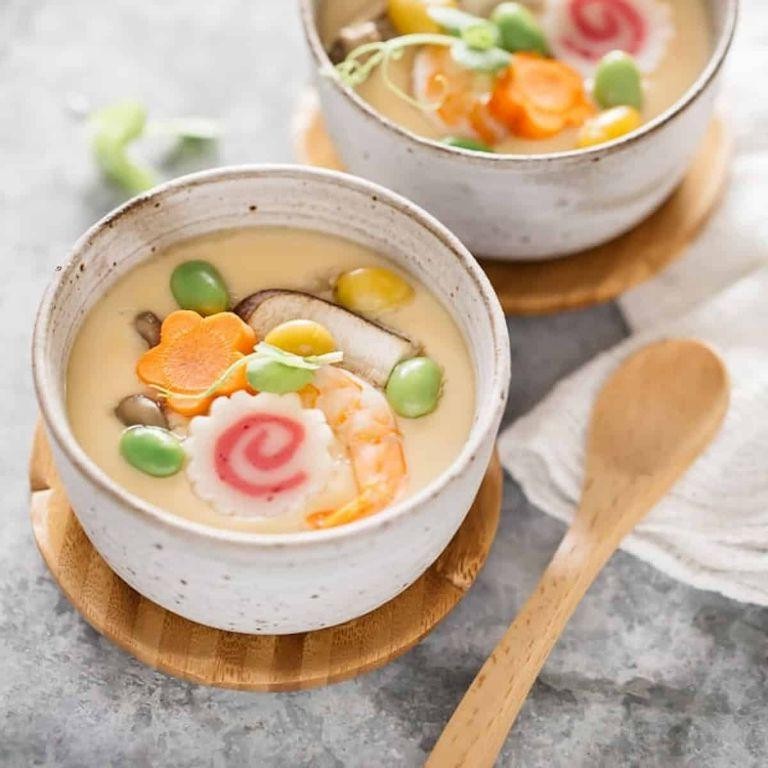
Unbelievably smooth and subtly flavored, Chawanmushi is like a savory hug in a cup. You’ll love how this Japanese egg custard combines simplicity with elegance, making it perfect for any meal.
Ingredients
- 2 cups dashi stock
- 4 large eggs
- 1/2 tsp salt
- 1 tbsp soy sauce
- 1 tbsp mirin
- 1/2 cup chicken breast, thinly sliced
- 4 shrimp, peeled and deveined
- 4 shiitake mushrooms, thinly sliced
- 2 green onions, thinly sliced
Instructions
- Preheat your steamer to 200°F. Tip: A stable temperature is key for the custard’s smooth texture.
- In a bowl, gently whisk the eggs without creating foam. Combine with dashi stock, salt, soy sauce, and mirin. Strain the mixture through a fine sieve for a silky finish.
- Divide the chicken, shrimp, shiitake mushrooms, and green onions evenly among 4 custard cups.
- Pour the egg mixture into each cup, filling them 3/4 full. Cover each cup with aluminum foil to prevent water droplets from falling in.
- Steam for 15 minutes, then check doneness by inserting a toothpick. If it comes out clean, it’s ready. Tip: Avoid opening the steamer too often to maintain the temperature.
- Let the custards rest for 5 minutes before serving. Tip: This allows the flavors to meld beautifully.
Yielding a delicate, jiggly texture, Chawanmushi surprises with its depth of flavor. Serve it as a sophisticated starter or a light main, garnished with a sprinkle of fresh herbs for a pop of color.
Sukiyaki (Japanese Hot Pot)
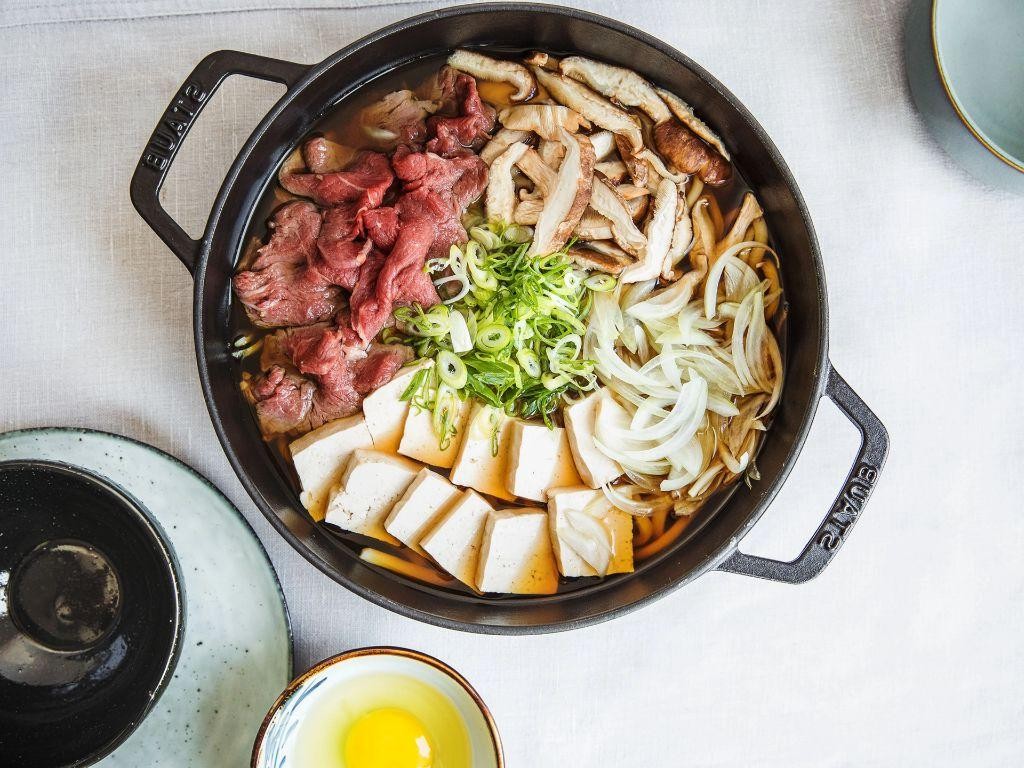
Mmm, there’s nothing like gathering around a steaming pot of Sukiyaki on a cozy evening. This Japanese hot pot is a delightful mix of sweet, savory, and umami flavors, all simmered together in a rich broth.
Ingredients
- 1 tbsp vegetable oil
- 1 lb thinly sliced beef
- 1 cup soy sauce
- 1 cup mirin
- 1 cup sugar
- 4 cups dashi stock
- 1 onion, sliced
- 1 package shirataki noodles
- 1 block tofu, cubed
- 2 cups sliced mushrooms
- 2 cups chopped napa cabbage
- 4 green onions, cut into 2-inch pieces
Instructions
- Heat the vegetable oil in a large pot over medium heat.
- Add the beef slices and cook until just browned, about 2 minutes per side. Tip: Don’t overcrowd the pot to ensure even browning.
- Remove the beef and set aside.
- In the same pot, combine soy sauce, mirin, sugar, and dashi stock. Bring to a simmer over medium heat, stirring until the sugar dissolves.
- Add the onion, shirataki noodles, tofu, mushrooms, napa cabbage, and green onions to the pot. Tip: Layer the ingredients for even cooking.
- Return the beef to the pot, submerging it in the broth.
- Simmer for 10 minutes, or until the vegetables are tender. Tip: Keep the heat at a gentle simmer to prevent the broth from reducing too quickly.
- Serve hot, directly from the pot.
Savory and slightly sweet, this Sukiyaki is a comforting dish that’s perfect for sharing. The tender beef and vegetables soak up the flavorful broth, making every bite delicious. Try serving it with a side of steamed rice to round out the meal.
Katsudon (Pork Cutlet Rice Bowl)
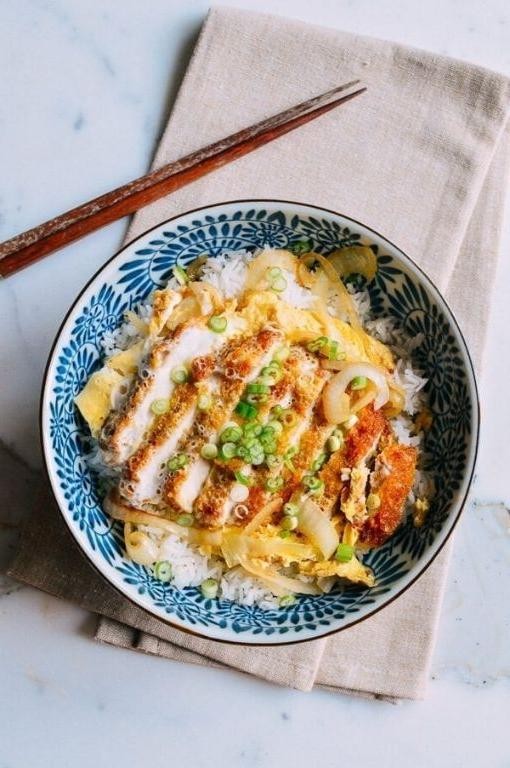
Zesty and comforting, katsudon is your go-to when you’re craving something hearty yet easy to whip up. Imagine tender pork cutlets, crispy on the outside, smothered in a slightly sweet onion and egg mixture, all over a bed of steaming rice.
Ingredients
- 2 cups cooked white rice
- 1 pork loin cutlet (about 1/2 inch thick)
- 1/4 cup all-purpose flour
- 1 large egg, beaten
- 1/2 cup panko breadcrumbs
- 1/2 cup dashi stock
- 1 tbsp soy sauce
- 1 tbsp mirin
- 1 tbsp sugar
- 1/2 onion, thinly sliced
- 2 large eggs
- 1 tbsp vegetable oil
Instructions
- Heat the vegetable oil in a pan over medium heat until it shimmers, about 2 minutes.
- Coat the pork cutlet in flour, dip in the beaten egg, then press into panko breadcrumbs to coat evenly.
- Fry the pork cutlet in the hot oil until golden brown, about 3 minutes per side. Tip: Ensure the oil is hot enough to prevent the cutlet from absorbing too much oil.
- Remove the cutlet and drain on paper towels. Slice into strips.
- In the same pan, add the dashi stock, soy sauce, mirin, and sugar. Bring to a simmer over medium heat.
- Add the sliced onion to the pan and cook until translucent, about 2 minutes.
- Place the pork cutlet strips on top of the onions. Pour the remaining beaten egg over the pork and onions. Cover and cook until the egg is just set, about 2 minutes. Tip: Covering the pan helps the egg cook evenly without stirring.
- Divide the cooked rice into two bowls. Top each with the pork and egg mixture. Tip: Serve immediately to enjoy the contrast between the crispy pork and the soft, savory egg.
Fluffy rice soaks up the savory-sweet sauce, while the pork adds a satisfying crunch. Try garnishing with green onions or a sprinkle of sesame seeds for an extra layer of flavor.
Oyakodon (Chicken and Egg Bowl)

Hey there! If you’re craving something cozy yet quick, oyakodon is your go-to. This Japanese comfort dish combines tender chicken and softly set eggs over a bed of rice, all in one bowl.
Ingredients
- 1 cup dashi stock
- 2 tbsp soy sauce
- 1 tbsp mirin
- 1 tsp sugar
- 1/2 onion, thinly sliced
- 1 skinless, boneless chicken thigh, cut into bite-sized pieces
- 2 eggs, lightly beaten
- 1 green onion, thinly sliced
- 1 cup cooked white rice
Instructions
- In a small saucepan, combine 1 cup dashi stock, 2 tbsp soy sauce, 1 tbsp mirin, and 1 tsp sugar. Bring to a simmer over medium heat.
- Add 1/2 thinly sliced onion to the saucepan. Cook for 2 minutes until slightly softened.
- Place 1 cut chicken thigh into the saucepan. Cook for 5 minutes, ensuring the chicken is fully cooked.
- Pour 2 lightly beaten eggs over the chicken and onion. Cover and cook for 1 minute until the eggs are just set.
- Remove from heat. Let it sit covered for 30 seconds to finish cooking the eggs gently.
- Place 1 cup cooked white rice in a bowl. Carefully slide the chicken and egg mixture over the rice.
- Garnish with 1 thinly sliced green onion.
With its silky eggs and savory-sweet broth, oyakodon is a hug in a bowl. Try topping it with a sprinkle of shichimi togarashi for an extra kick.
Nasu Dengaku (Miso Glazed Eggplant)
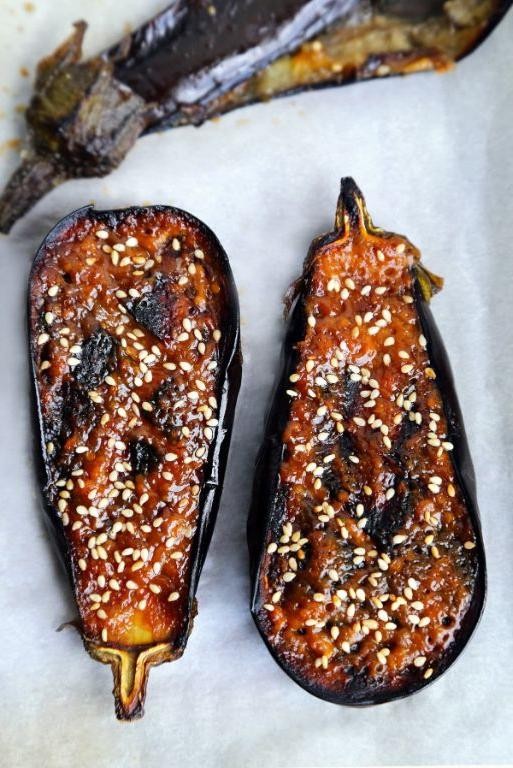
So, you’re looking for a dish that’s both comforting and a bit fancy? Nasu Dengaku, or miso glazed eggplant, is your answer. It’s sweet, savory, and utterly delicious.
Ingredients
- 2 medium eggplants
- 3 tbsp white miso paste
- 2 tbsp mirin
- 1 tbsp sugar
- 1 tbsp sake
- 1 tsp sesame oil
- 1 tbsp vegetable oil
- 1 tbsp toasted sesame seeds
- 2 green onions, thinly sliced
Instructions
- Preheat your oven to 400°F (200°C).
- Cut the eggplants in half lengthwise. Score the flesh in a crosshatch pattern without piercing the skin.
- Brush the eggplant halves with vegetable oil. Place them on a baking sheet, flesh side up.
- Roast in the oven for 20 minutes, or until the flesh is soft and slightly golden.
- While the eggplants roast, mix the miso paste, mirin, sugar, and sake in a small bowl until smooth.
- Remove the eggplants from the oven. Spread the miso mixture evenly over the flesh of each half.
- Return to the oven and broil on high for 3-5 minutes, until the glaze is bubbly and caramelized. Watch closely to prevent burning.
- Drizzle with sesame oil and sprinkle with sesame seeds and green onions before serving.
Keep in mind, the eggplant should be tender but not mushy, with a rich, caramelized top. Serve it as a side or over rice for a hearty meal.
Japanese Potato Salad

Did you know Japanese potato salad is a creamy, dreamy side dish that’s perfect for picnics or as a refreshing side? You’ll love how the crisp veggies and tender potatoes come together in this no-fuss recipe.
Ingredients
- 2 lbs potatoes, peeled and cubed
- 1/2 cup mayonnaise
- 1 tbsp rice vinegar
- 1 tsp sugar
- 1/2 tsp salt
- 1/4 tsp black pepper
- 1/2 cup cucumber, thinly sliced
- 1/4 cup carrot, julienned
- 2 tbsp red onion, finely chopped
- 2 hard-boiled eggs, chopped
Instructions
- Place the potatoes in a large pot and cover with cold water. Bring to a boil over high heat, then reduce to a simmer and cook for 15 minutes, or until the potatoes are fork-tender.
- Drain the potatoes and let them cool slightly. Tip: For extra creaminess, mash half of the potatoes lightly with a fork.
- In a large bowl, whisk together the mayonnaise, rice vinegar, sugar, salt, and black pepper until smooth.
- Add the slightly cooled potatoes to the bowl with the dressing, along with the cucumber, carrot, red onion, and hard-boiled eggs. Gently fold everything together until well combined. Tip: For the best flavor, let the salad chill in the fridge for at least 1 hour before serving.
- Adjust seasoning with additional salt and pepper if needed. Tip: If the salad seems too thick, a splash of milk can loosen it up to your desired consistency.
Kind of amazing how this salad balances the richness of mayo and eggs with the freshness of cucumbers and carrots, right? Serve it alongside grilled meats or as a unique sandwich filler for a twist on the usual.
Gyoza (Japanese Dumplings)

Mmm, there’s nothing quite like biting into a crispy, juicy gyoza. Whether you’re a dumpling newbie or a seasoned pro, this recipe will guide you through making these delicious Japanese treats at home.
Ingredients
- 1 cup all-purpose flour
- 1/2 cup water
- 1/2 lb ground pork
- 1 cup finely chopped cabbage
- 2 tbsp minced garlic
- 1 tbsp minced ginger
- 2 tbsp soy sauce
- 1 tbsp sesame oil
- 1/4 tsp salt
- 1/4 tsp black pepper
- 2 tbsp vegetable oil
- 1/2 cup water (for steaming)
Instructions
- In a large bowl, mix 1 cup all-purpose flour and 1/2 cup water until a dough forms. Knead for 5 minutes until smooth, then let rest for 30 minutes covered with a damp cloth.
- While the dough rests, combine 1/2 lb ground pork, 1 cup finely chopped cabbage, 2 tbsp minced garlic, 1 tbsp minced ginger, 2 tbsp soy sauce, 1 tbsp sesame oil, 1/4 tsp salt, and 1/4 tsp black pepper in a bowl. Mix well.
- Divide the dough into 24 pieces. Roll each into a thin circle about 3 inches in diameter.
- Place 1 tbsp of the pork mixture in the center of each dough circle. Fold and pleat the edges to seal.
- Heat 2 tbsp vegetable oil in a large skillet over medium heat. Add the gyoza in a single layer and cook for 2-3 minutes until the bottoms are golden brown.
- Carefully add 1/2 cup water to the skillet, cover immediately, and steam for 5 minutes. Remove the lid and cook for another 2 minutes until the water evaporates.
- Serve hot with a dipping sauce of your choice.
You’ll love the contrast between the crispy bottom and the tender, flavorful filling. Try serving them with a spicy mayo dip for an extra kick!
Ramen with Soy Sauce Based Broth
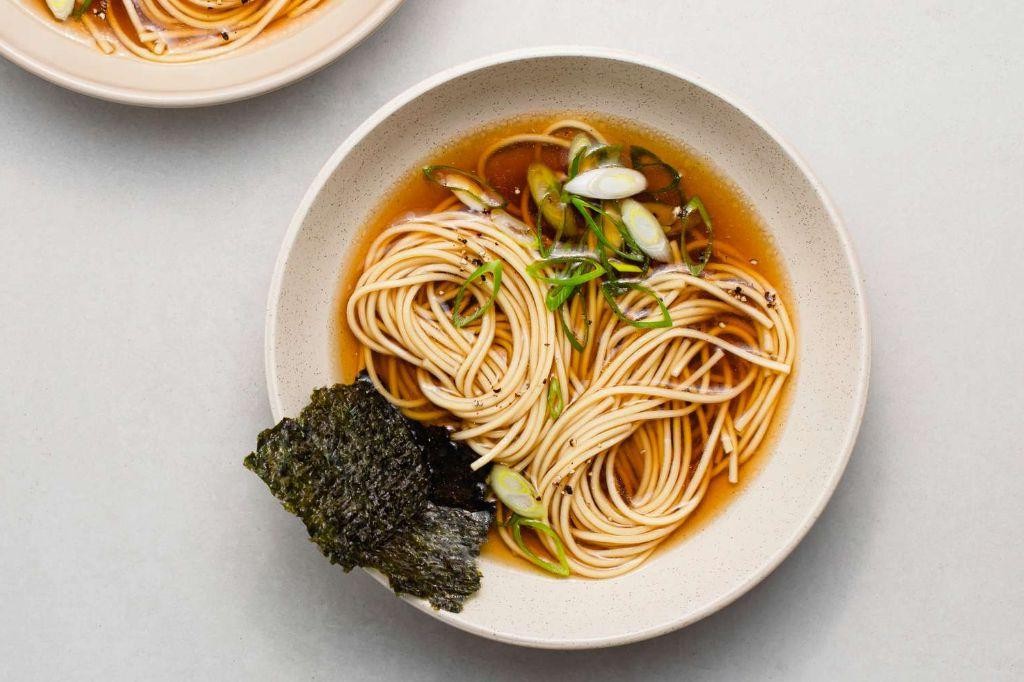
Oh, you’re in for a treat with this ramen recipe—it’s all about that rich, soy sauce-based broth that hugs every noodle. Perfect for those nights when you crave something comforting yet effortlessly chic.
Ingredients
- 4 cups water
- 2 tbsp soy sauce
- 1 tsp sesame oil
- 1 clove garlic, minced
- 1 inch ginger, sliced
- 1 green onion, chopped
- 1 pack ramen noodles
- 1 soft-boiled egg
- 1/2 cup spinach
Instructions
- In a pot, bring 4 cups of water to a boil over high heat.
- Add 2 tbsp soy sauce, 1 tsp sesame oil, 1 minced garlic clove, and 1 inch of sliced ginger to the boiling water. Tip: Toasting the garlic and ginger in a dry pan before adding can deepen the flavors.
- Reduce heat to medium and let the broth simmer for 10 minutes to infuse the flavors.
- While the broth simmers, cook 1 pack of ramen noodles according to package instructions, then drain. Tip: Rinsing the noodles under cold water after cooking stops them from overcooking and keeps them springy.
- Add the cooked noodles to the broth.
- Stir in 1/2 cup of spinach and let it wilt for about 1 minute. Tip: Adding the spinach last preserves its vibrant color and nutrients.
- Serve the ramen in a bowl, topped with 1 soft-boiled egg and chopped green onion.
The broth is deeply savory with a hint of sesame, while the noodles stay perfectly chewy. Try adding a sprinkle of chili flakes for a spicy kick or a drizzle of extra sesame oil for richness.
Soba Noodles with Dipping Sauce
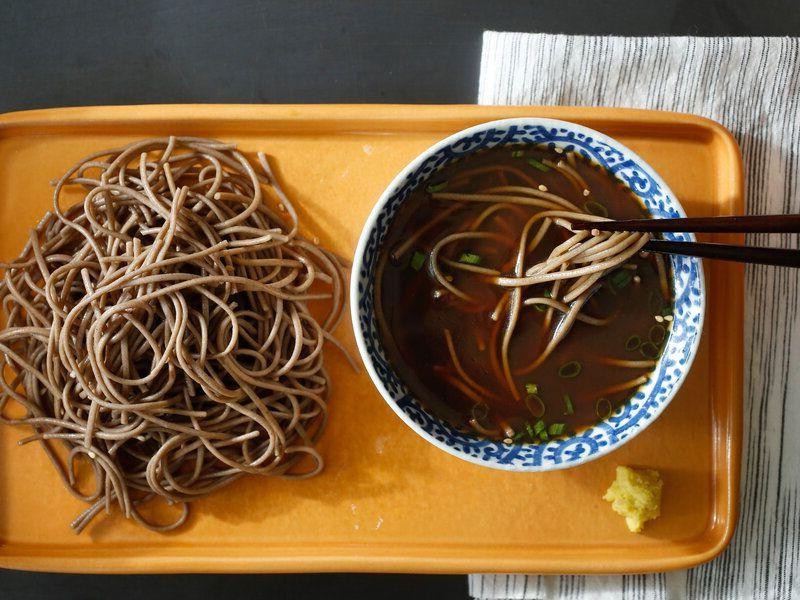
Kickstart your meal with this refreshing soba noodles dish, perfect for those days when you crave something light yet satisfying. You’ll love the combination of chewy noodles and a savory dipping sauce that’s surprisingly easy to whip up.
Ingredients
- 8 oz soba noodles
- 1/4 cup soy sauce
- 2 tbsp mirin
- 1 tbsp sugar
- 1 tsp grated ginger
- 1 green onion, thinly sliced
- 1 tsp sesame seeds
- 2 cups water
Instructions
- Bring 2 cups of water to a boil in a medium pot over high heat.
- Add 8 oz soba noodles to the boiling water, stirring gently to prevent sticking.
- Cook the noodles for 4-5 minutes, or until al dente, then drain and rinse under cold water to stop the cooking process.
- In a small bowl, whisk together 1/4 cup soy sauce, 2 tbsp mirin, 1 tbsp sugar, and 1 tsp grated ginger until the sugar is fully dissolved.
- Transfer the drained noodles to a serving plate and sprinkle with 1 tsp sesame seeds and thinly sliced green onion.
- Serve the noodles with the dipping sauce on the side for dipping or drizzling.
Opt for this dish when you’re in the mood for something that’s both simple and packed with flavor. The noodles have a delightful chewiness, while the dipping sauce adds a perfect balance of sweet and savory. Try serving it with a side of pickled vegetables for an extra crunch.
Udon Noodle Soup

Let’s dive into making a comforting bowl of Udon Noodle Soup that’s perfect for any day. You’ll love how simple it is to bring together, with flavors that feel like a warm hug.
Ingredients
- 6 cups water
- 2 cups chicken broth
- 1 tbsp soy sauce
- 1 tsp sesame oil
- 2 cloves garlic, minced
- 1 inch ginger, sliced
- 2 green onions, chopped
- 1 carrot, julienned
- 1 cup shiitake mushrooms, sliced
- 2 packs udon noodles
- 1 cup baby spinach
- 1 soft-boiled egg, halved
Instructions
- In a large pot, bring 6 cups water and 2 cups chicken broth to a boil over high heat.
- Add 1 tbsp soy sauce, 1 tsp sesame oil, 2 cloves minced garlic, and 1 inch sliced ginger to the pot. Reduce heat to medium and simmer for 10 minutes to infuse the flavors.
- Tip: For a deeper flavor, let the broth simmer a bit longer, but keep an eye on the liquid level.
- Add 2 chopped green onions, 1 julienned carrot, and 1 cup sliced shiitake mushrooms. Simmer for another 5 minutes until the vegetables are slightly tender.
- Tip: Feel free to swap shiitake with any mushrooms you have on hand.
- Stir in 2 packs udon noodles and cook according to package instructions, usually about 3-4 minutes.
- Add 1 cup baby spinach in the last minute of cooking, just until wilted.
- Tip: Adding spinach at the end keeps its color vibrant and nutrients intact.
- Divide the soup into bowls and top each with half of a soft-boiled egg.
This Udon Noodle Soup boasts a silky broth with a hint of umami, paired with chewy noodles and crisp veggies. Try garnishing with extra green onions or a sprinkle of sesame seeds for an extra layer of flavor.
Takoyaki (Octopus Balls)

Mmm, have you ever tried takoyaki? These savory Japanese octopus balls are a street food favorite, and once you get the hang of making them, they’re a blast to whip up at home.
Ingredients
- 1 cup all-purpose flour
- 1 1/2 cups dashi stock
- 2 eggs
- 1/2 tsp salt
- 1/2 tsp soy sauce
- 1/2 cup chopped cooked octopus
- 1/4 cup green onions, finely chopped
- 1/4 cup tenkasu (tempura scraps)
- 1 tbsp pickled ginger, finely chopped
- Vegetable oil, for greasing
- Takoyaki sauce, for serving
- Japanese mayonnaise, for serving
- Bonito flakes, for serving
- Aonori (dried seaweed flakes), for serving
Instructions
- In a large bowl, whisk together the flour, dashi stock, eggs, salt, and soy sauce until smooth. Let the batter rest for 10 minutes to allow the flour to hydrate.
- Heat a takoyaki pan over medium heat and brush each mold with vegetable oil.
- Pour the batter into each mold until it’s about 3/4 full.
- Add a piece of octopus, a pinch of green onions, tenkasu, and pickled ginger into each mold.
- After about 2 minutes, when the edges start to cook, use a skewer to flip each ball 90 degrees and pour a little more batter to fill the mold.
- Continue cooking and turning the balls frequently until they’re golden brown and crispy on the outside, about 5-7 minutes total.
- Transfer the takoyaki to a plate and drizzle with takoyaki sauce and Japanese mayonnaise.
- Sprinkle with bonito flakes and aonori before serving.
Vibrant and packed with umami, these takoyaki are crispy on the outside, tender on the inside, and bursting with flavor. Serve them straight from the pan for the ultimate street food experience at home.
Japanese Fruit Sandwich

Looking for a refreshing twist on your sandwich game? Japanese Fruit Sandwich is your answer, combining fluffy bread with creamy filling and fresh fruit for a delightful treat.
Ingredients
- 2 slices white bread
- 1/2 cup heavy cream
- 1 tbsp sugar
- 1/2 tsp vanilla extract
- 1/2 cup mixed fresh fruits (strawberries, kiwi, mango)
Instructions
- In a mixing bowl, whip the heavy cream, sugar, and vanilla extract until stiff peaks form.
- Spread a generous layer of the whipped cream on one slice of bread.
- Arrange the mixed fresh fruits evenly over the whipped cream.
- Top with the second slice of bread and press gently to adhere.
- Trim the crusts off the sandwich for a clean look.
- Cut the sandwich diagonally into two triangles.
Fresh and creamy, this sandwich is a perfect balance of sweet and tangy. Serve it chilled for a refreshing summer snack or as a unique dessert option at your next gathering.
Matcha Green Tea Ice Cream
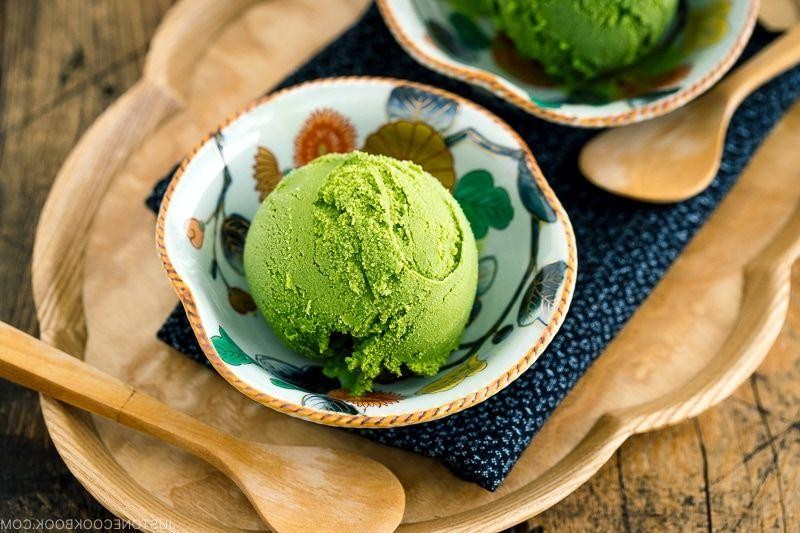
Kick off your summer with this creamy, dreamy Matcha Green Tea Ice Cream that’s as easy to make as it is delicious. You’ll love the vibrant color and the perfect balance of sweet and earthy flavors.
Ingredients
- 2 cups heavy cream
- 1 cup whole milk
- 3/4 cup granulated sugar
- 2 tbsp matcha green tea powder
- 1 tsp vanilla extract
- 1/4 tsp salt
Instructions
- In a medium bowl, whisk together the heavy cream, whole milk, and granulated sugar until the sugar is completely dissolved.
- Sift the matcha green tea powder into the cream mixture to avoid lumps, then add the vanilla extract and salt, whisking until smooth.
- Pour the mixture into an ice cream maker and churn according to the manufacturer’s instructions, usually about 20-25 minutes, until it reaches a soft-serve consistency.
- Transfer the ice cream to a lidded container and freeze for at least 4 hours, or until firm.
- For the best texture, let the ice cream sit at room temperature for 5 minutes before scooping.
Ultra-smooth and rich, this matcha ice cream is a refreshing twist on the classic. Serve it in a waffle cone for crunch or alongside a warm brownie for a decadent dessert.
Conclusion
Great news for anyone eager to dive into Japanese cooking! This roundup of 21 delicious and easy recipes is your perfect starting point. From savory to sweet, there’s something for every beginner to try. We’d love to hear which dishes become your favorites—drop us a comment below. And if you found this guide helpful, don’t forget to share the love on Pinterest. Happy cooking!