Summer’s here, and it’s time to fire up the grill for some unforgettable meals that are as easy as they are delicious! Whether you’re craving quick weeknight dinners, seasonal favorites, or just some good old-fashioned comfort food, we’ve got you covered. Dive into our roundup of 20 Delicious Easy Grill Recipes that promise to make your summer gatherings a hit. Keep reading to find your next grill masterpiece!
Grilled Lemon Herb Chicken

Remember those summer evenings when the grill is your best friend, and the aroma of charred goodness fills the air? That’s exactly what this Grilled Lemon Herb Chicken brings to mind. It’s my go-to dish for a quick, flavorful meal that never fails to impress, and today, I’m sharing how you can make it your own.
Ingredients
- 4 boneless, skinless chicken breasts (about 1.5 lbs) – for even cooking, pound to an even thickness
- 1/4 cup olive oil – or any neutral oil you prefer
- 2 tbsp fresh lemon juice – freshly squeezed makes a difference
- 2 cloves garlic, minced – adjust to taste
- 1 tbsp fresh rosemary, chopped – dried works in a pinch, but fresh is best
- 1 tbsp fresh thyme, chopped – see rosemary note
- 1 tsp salt – adjust to taste
- 1/2 tsp black pepper – freshly ground preferred
Instructions
- In a large bowl, whisk together olive oil, lemon juice, garlic, rosemary, thyme, salt, and pepper to create the marinade.
- Add chicken breasts to the bowl, ensuring each piece is well coated. Cover and refrigerate for at least 30 minutes, or up to 4 hours for deeper flavor.
- Preheat your grill to medium-high heat (about 375°F to 400°F) to ensure a good sear without burning.
- Remove chicken from marinade, letting excess drip off. Discard the remaining marinade.
- Grill chicken for 6-7 minutes on each side, or until internal temperature reaches 165°F. Avoid flipping more than once to get those perfect grill marks.
- Let chicken rest for 5 minutes before slicing to keep juices locked in.
You’ll love the juicy tenderness and the bright, herby kick of this chicken. Serve it atop a crisp salad, alongside grilled veggies, or sliced in a sandwich for a versatile meal that’s anything but boring.
Easy Grilled Vegetable Skewers
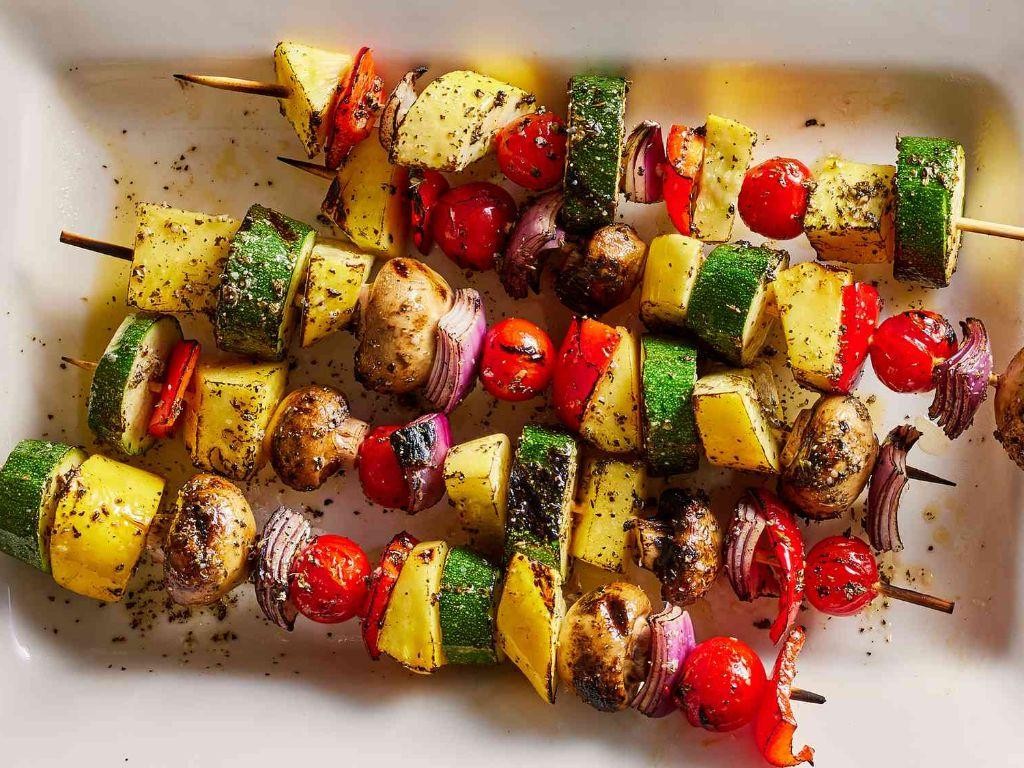
How many times have I stood in front of my fridge, staring at a colorful array of vegetables, wondering how to turn them into a quick, delicious meal? Too many to count! That’s why these Easy Grilled Vegetable Skewers have become my go-to solution. They’re not only simple to make but also a fantastic way to enjoy the season’s best produce.
Ingredients
- 2 cups bell peppers, cut into 1-inch pieces (mix colors for visual appeal)
- 1 cup zucchini, sliced into 1/2-inch rounds
- 1 cup red onion, cut into 1-inch chunks
- 1 cup cherry tomatoes
- 2 tbsp olive oil (or any neutral oil)
- 1 tbsp balsamic vinegar
- 1 tsp garlic powder
- 1/2 tsp salt (adjust to taste)
- 1/2 tsp black pepper (adjust to taste)
Instructions
- Preheat your grill to medium-high heat (about 400°F).
- While the grill heats, thread the bell peppers, zucchini, red onion, and cherry tomatoes onto skewers, alternating the vegetables for a colorful effect.
- In a small bowl, whisk together the olive oil, balsamic vinegar, garlic powder, salt, and black pepper.
- Brush the skewers generously with the oil and vinegar mixture, ensuring all vegetables are coated.
- Place the skewers on the grill. Cook for 10-12 minutes, turning every 3 minutes, until the vegetables are tender and have nice grill marks.
- Remove from the grill and let them rest for 2 minutes before serving.
Perfectly charred yet still crisp, these skewers are a testament to how simple ingredients can transform into something extraordinary. Serve them over a bed of quinoa or with a dollop of hummus for an extra layer of flavor.
Grilled Honey Garlic Pork Chops

Last weekend, I found myself staring at a pack of pork chops in my fridge, wondering how to turn them into something spectacular. That’s when I remembered my grandma’s secret—honey and garlic. It’s a combo that never fails to bring out the best in pork.
Ingredients
- 4 bone-in pork chops, about 1 inch thick
- 1/4 cup honey (for a deeper flavor, try dark honey)
- 3 cloves garlic, minced (or 1 tbsp pre-minced garlic)
- 2 tbsp soy sauce (low sodium works too)
- 1 tbsp olive oil (or any neutral oil)
- 1/2 tsp black pepper (adjust to taste)
- 1/4 tsp salt (adjust to taste)
Instructions
- In a small bowl, whisk together honey, minced garlic, soy sauce, olive oil, black pepper, and salt until well combined.
- Place pork chops in a large resealable bag or shallow dish. Pour the marinade over the chops, ensuring they’re fully coated. Marinate in the refrigerator for at least 1 hour, or up to 4 hours for deeper flavor.
- Preheat your grill to medium-high heat (about 375°F to 400°F). Clean and lightly oil the grate to prevent sticking.
- Remove pork chops from the marinade, letting excess drip off. Reserve the marinade for basting.
- Grill pork chops for about 5-6 minutes on the first side, then flip and baste with reserved marinade. Grill for another 5-6 minutes, or until the internal temperature reaches 145°F for medium doneness.
- Let the pork chops rest for 3 minutes before serving to allow juices to redistribute.
Unbelievably juicy with a caramelized crust, these pork chops are a testament to the magic of honey and garlic. Serve them alongside a crisp apple slaw or over a bed of garlic mashed potatoes for a meal that’s anything but ordinary.
Simple Grilled Salmon with Dill
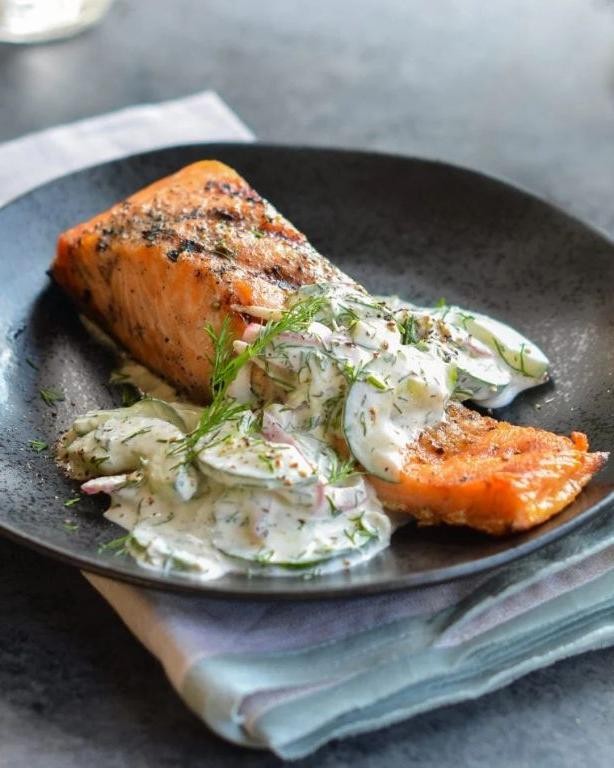
Unbelievable how a few simple ingredients can transform into something so delicious and healthy. I remember the first time I tried grilling salmon; it was a game-changer for my weeknight dinners. Now, it’s a staple in my kitchen, especially during the summer when I crave something light yet satisfying.
Ingredients
- 1 lb salmon fillet (skin-on for extra flavor)
- 2 tbsp olive oil (or any neutral oil)
- 1 tbsp fresh dill, chopped (dried works in a pinch)
- 1/2 tsp salt (adjust to taste)
- 1/4 tsp black pepper (freshly ground preferred)
- 1 lemon, sliced (for serving)
Instructions
- Preheat your grill to medium-high heat, about 375°F to 400°F, ensuring it’s clean to prevent sticking.
- While the grill heats, pat the salmon fillet dry with paper towels to ensure a good sear.
- Brush both sides of the salmon with olive oil, then season evenly with salt, pepper, and dill.
- Place the salmon skin-side down on the grill. Close the lid and cook for 4-5 minutes. Tip: Don’t peek too often; keeping the lid closed ensures even cooking.
- Carefully flip the salmon using a spatula. Grill for another 3-4 minutes until the internal temperature reaches 145°F. Tip: A meat thermometer is your best friend here.
- Remove the salmon from the grill and let it rest for 2 minutes before serving. Tip: Resting allows the juices to redistribute, making the salmon even more flavorful.
Moist and flaky with a hint of lemon and dill, this grilled salmon is perfection on a plate. Serve it alongside a crisp salad or over a bed of quinoa for a complete meal that’s as nutritious as it is delicious.
Grilled Corn on the Cob with Chili Lime Butter
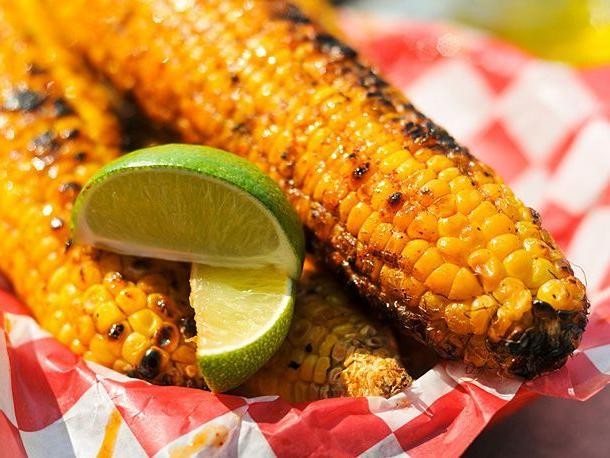
Mmm, there’s nothing quite like the smell of grilled corn wafting through the air on a warm summer evening. It takes me back to backyard barbecues where the corn was as much a staple as the burgers and hot dogs. Today, I’m sharing my go-to recipe for Grilled Corn on the Cob with Chili Lime Butter, a dish that’s as easy to make as it is delicious.
Ingredients
- 4 ears of corn, husks removed
- 1/2 cup unsalted butter, softened (for easier mixing)
- 1 tbsp chili powder (adjust to taste)
- 1 lime, zested and juiced (about 2 tbsp juice)
- 1/2 tsp salt (adjust to taste)
- 1/4 tsp black pepper (freshly ground preferred)
Instructions
- Preheat your grill to medium-high heat, about 400°F, ensuring it’s clean to prevent sticking.
- In a small bowl, mix the softened butter, chili powder, lime zest, lime juice, salt, and black pepper until well combined. Tip: Taste the butter mixture and adjust seasoning if needed.
- Place the corn directly on the grill grates. Grill for 10-12 minutes, turning every 2-3 minutes, until the corn is lightly charred and tender. Tip: Listen for a slight sizzle to know the corn is cooking properly.
- Remove the corn from the grill and immediately brush each ear generously with the chili lime butter. Tip: For extra flavor, let the butter melt into the corn for a minute before serving.
Fresh off the grill, this corn is a burst of flavors—smoky, spicy, tangy, and buttery all at once. Serve it alongside your favorite grilled meats or enjoy it as a standalone treat with an extra sprinkle of chili powder for those who love a bit more heat.
Easy Grilled Shrimp Tacos
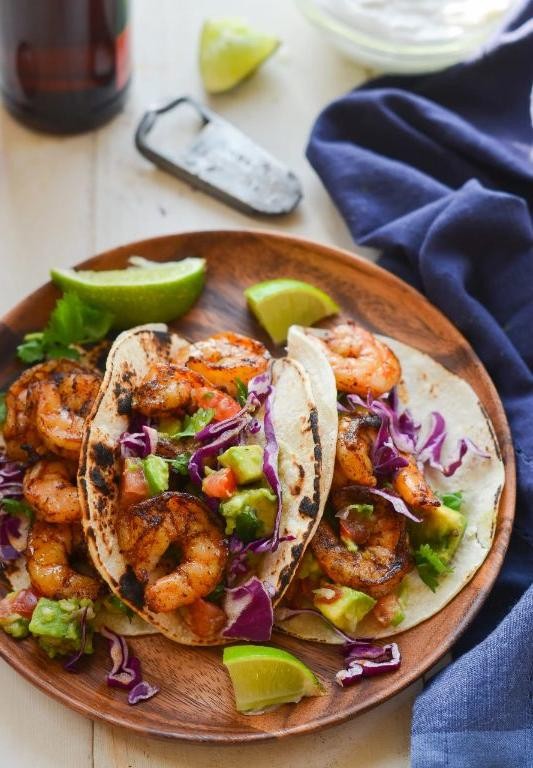
Back when I first tried making grilled shrimp tacos, I was amazed at how simple yet flavorful they turned out. Now, it’s my go-to summer dish when I want something light but packed with flavor.
Ingredients
- 1 lb medium shrimp, peeled and deveined (thaw if frozen)
- 2 tbsp olive oil (or any neutral oil)
- 1 tsp chili powder (adjust to taste)
- 1/2 tsp garlic powder
- 1/2 tsp cumin
- 1/4 tsp salt
- 8 small corn tortillas
- 1 cup shredded cabbage (for crunch)
- 1/2 cup diced avocado (adds creaminess)
- 1/4 cup chopped cilantro (for freshness)
- Lime wedges (for serving)
Instructions
- Preheat your grill to medium-high heat (about 375°F).
- In a bowl, toss the shrimp with olive oil, chili powder, garlic powder, cumin, and salt until evenly coated.
- Grill the shrimp for 2-3 minutes per side, or until they turn pink and opaque. Tip: Don’t overcrowd the shrimp to ensure even cooking.
- While the shrimp cooks, warm the tortillas on the grill for about 30 seconds per side. Tip: Keep them warm by wrapping in a clean kitchen towel.
- Assemble the tacos by placing shrimp on each tortilla, then topping with shredded cabbage, diced avocado, and chopped cilantro. Tip: Squeeze lime juice over the top for an extra zing.
Mouthwatering doesn’t even begin to describe these tacos. The shrimp are perfectly spiced and slightly smoky from the grill, while the fresh toppings add a delightful contrast in textures. Serve them with an extra lime wedge on the side for those who love a tangy kick.
Grilled BBQ Chicken Pizza

Yesterday, I found myself craving something that combines the smoky goodness of BBQ with the comfort of pizza. That’s when I decided to whip up a Grilled BBQ Chicken Pizza, a dish that’s become a staple in my summer cooking repertoire. It’s the perfect blend of tangy, sweet, and smoky flavors, all atop a crispy, charred crust that only a grill can deliver.
Ingredients
- 1 lb pizza dough (store-bought or homemade, let it come to room temperature for easier stretching)
- 1 cup BBQ sauce (I prefer a smoky, sweet variety)
- 2 cups shredded cooked chicken (leftover rotisserie chicken works great here)
- 1 1/2 cups shredded mozzarella cheese (or a blend of your favorite cheeses)
- 1/2 red onion, thinly sliced (soak in cold water for 10 minutes to mellow the flavor)
- 2 tbsp olive oil (for brushing the dough)
- 1/4 cup fresh cilantro, chopped (for garnish, optional)
Instructions
- Preheat your grill to medium-high heat, about 400°F, ensuring one side is cooler for indirect cooking.
- Roll out the pizza dough on a floured surface to your desired thickness, then brush both sides lightly with olive oil to prevent sticking.
- Place the dough directly on the grill over direct heat. Grill for 2-3 minutes until you see grill marks and the dough starts to bubble, then flip.
- Spread BBQ sauce evenly over the grilled side of the dough, leaving a small border for the crust.
- Top with shredded chicken, red onion slices, and cheese, spreading evenly.
- Move the pizza to the cooler side of the grill, close the lid, and cook for 5-7 minutes until the cheese is melted and bubbly.
- Remove from the grill, let it sit for a minute, then garnish with fresh cilantro before slicing.
Very few things beat the first bite of this pizza, where the smoky crust meets the gooey cheese and tangy BBQ sauce. It’s a crowd-pleaser that’s as fun to make as it is to eat, especially when served with a cold beer on a warm summer evening.
Simple Grilled Steak with Garlic Butter
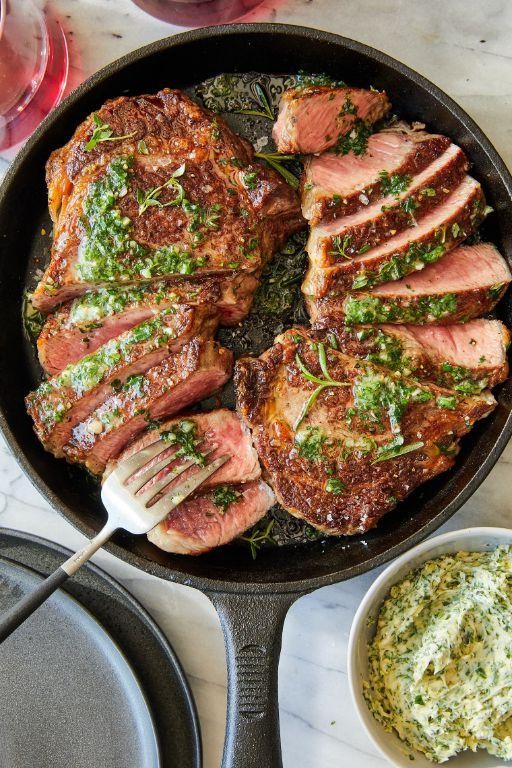
How many times have I found myself staring into the fridge, craving something hearty yet simple? Too many to count. That’s when this Simple Grilled Steak with Garlic Butter comes to the rescue—a dish that’s as straightforward as it is delicious, perfect for those nights when you want minimal fuss but maximum flavor.
Ingredients
- 1.5 lbs ribeye steak (about 1 inch thick for even cooking)
- 2 tbsp olive oil (or any neutral oil)
- 1 tsp salt (adjust to taste)
- 1/2 tsp black pepper (freshly ground preferred)
- 3 tbsp unsalted butter (room temperature for easy mixing)
- 2 garlic cloves (minced, more if you love garlic)
- 1 tbsp fresh parsley (chopped, for a fresh finish)
Instructions
- Preheat your grill to high heat, aiming for about 450°F to get those perfect grill marks.
- While the grill heats, pat the steak dry with paper towels to ensure a good sear.
- Rub the steak with olive oil, then season both sides evenly with salt and pepper.
- Place the steak on the grill and cook for 4-5 minutes per side for medium-rare, or until it reaches an internal temperature of 135°F.
- While the steak cooks, mix the butter, minced garlic, and parsley in a small bowl until well combined.
- Once the steak is done, let it rest for 5 minutes off the grill to allow the juices to redistribute.
- Top the rested steak with the garlic butter, letting it melt over the warm meat.
Out of the grill, this steak is juicy and packed with flavor, the garlic butter adding a rich, aromatic finish. Serve it alongside a crisp salad or roasted vegetables for a meal that feels indulgent yet balanced.
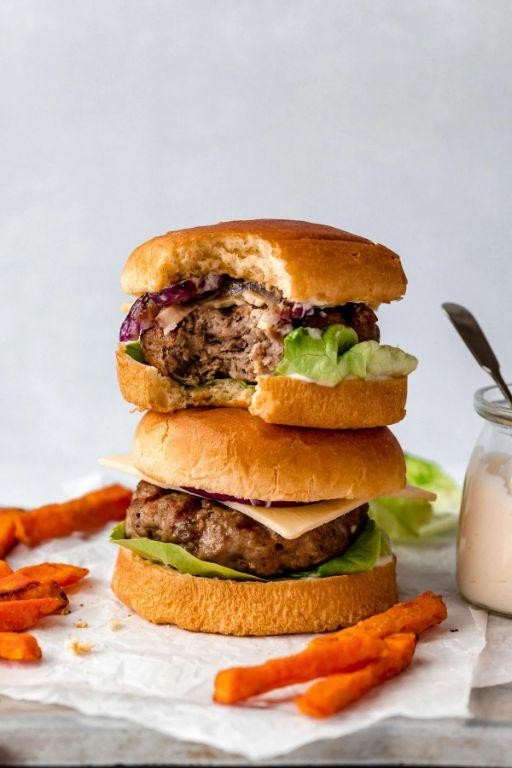
Grilled Portobello Mushroom Burgers

Nothing beats the savory, meaty texture of a well-grilled Portobello mushroom, especially when it’s sandwiched between a soft bun with all the fixings. I remember the first time I tried making these at home; the aroma alone was enough to convince me that vegetarian burgers could stand their ground. Now, it’s a staple in my summer grilling lineup.
Ingredients
- 4 large Portobello mushroom caps (look for ones with a deep, even color)
- 1/4 cup balsamic vinegar (adds a nice tangy flavor)
- 2 tbsp olive oil (or any neutral oil)
- 1 tbsp soy sauce (for that umami kick)
- 1 tsp garlic powder (adjust to taste)
- 1/2 tsp black pepper (freshly ground is best)
- 4 burger buns (toasted for extra crunch)
- Lettuce, tomato, and avocado for serving (or any toppings you love)
Instructions
- Preheat your grill to medium-high heat, about 375°F to 400°F.
- In a small bowl, whisk together balsamic vinegar, olive oil, soy sauce, garlic powder, and black pepper.
- Brush both sides of the Portobello mushroom caps with the marinade, letting them sit for 5 minutes to absorb the flavors.
- Place the mushrooms on the grill, gill side down first, and cook for 5 minutes.
- Flip the mushrooms and cook for another 5 minutes, or until they’re tender and have nice grill marks.
- While the mushrooms are grilling, lightly toast the burger buns on the grill for about 1 minute, just until they’re warm and slightly crispy.
- Assemble your burgers by placing a grilled Portobello mushroom on each bun, then topping with lettuce, tomato, and avocado.
Serve these Grilled Portobello Mushroom Burgers immediately, and enjoy the juicy, flavorful bite that’s surprisingly satisfying. The combination of the smoky mushroom and the fresh toppings makes for a perfect summer meal. Try adding a slice of melted cheese on top for an extra indulgent touch.
Easy Grilled Pineapple Dessert
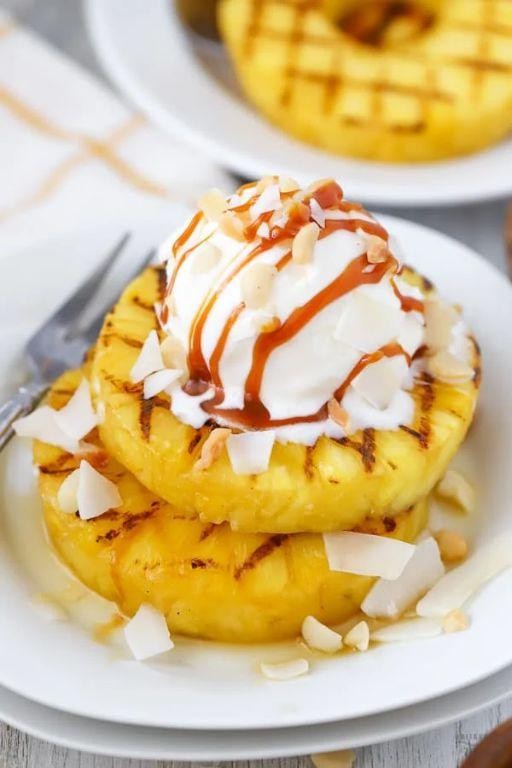
Craving something sweet but want to keep it simple? I’ve been there, especially during these warm summer evenings when turning on the oven feels like a crime. That’s why this Easy Grilled Pineapple Dessert has become my go-to. It’s not just about the ease; the caramelized edges and the smoky flavor from the grill transform the humble pineapple into something extraordinary.
Ingredients
- 1 whole pineapple, peeled and cored (look for one that’s ripe but firm)
- 2 tbsp unsalted butter, melted (or coconut oil for a dairy-free version)
- 2 tbsp brown sugar (adjust to your sweetness preference)
- 1 tsp ground cinnamon (try adding a pinch of nutmeg for extra warmth)
Instructions
- Preheat your grill to medium-high heat, about 375°F to 400°F. A clean grill prevents sticking and ensures those beautiful grill marks.
- Slice the pineapple into 1/2-inch thick rings. Uniform slices cook evenly, so take your time with this step.
- Brush both sides of each pineapple ring with melted butter. This not only adds flavor but helps the sugar and cinnamon stick.
- Sprinkle the brown sugar and cinnamon mixture evenly over both sides of the pineapple rings. Don’t skip the edges for that perfect caramelization.
- Place the pineapple rings on the grill. Grill for 3-4 minutes per side, or until you see deep grill marks and the sugar has caramelized.
- Remove from the grill and let them sit for a minute. This brief rest allows the juices to redistribute, making every bite juicy.
Just imagine the contrast of the smoky, caramelized exterior with the juicy, tangy interior of the pineapple. Serve these warm with a scoop of vanilla ice cream or a dollop of whipped cream for an indulgent treat that’s surprisingly simple to make.
Grilled Teriyaki Beef Skewers
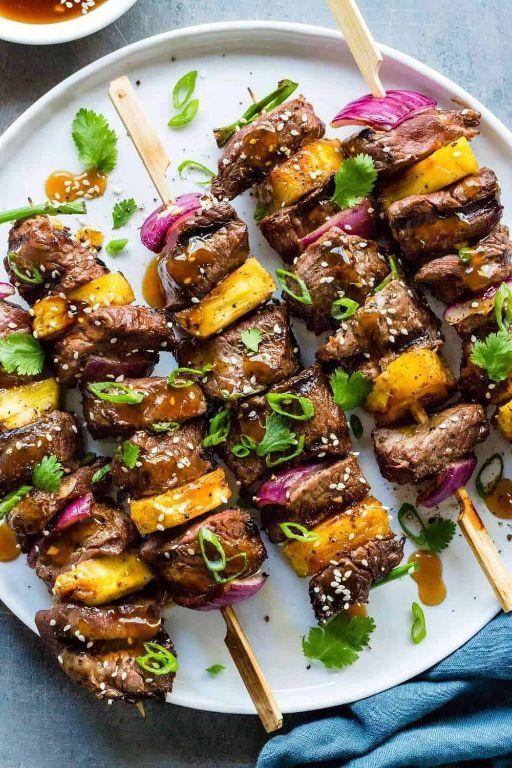
Unbelievably easy and packed with flavor, these Grilled Teriyaki Beef Skewers have become a staple in my summer grilling lineup. I remember the first time I tried them at a friend’s BBQ; the tender beef and sweet, sticky glaze had me hooked, and I’ve been tweaking my recipe ever since to get it just right.
Ingredients
- 1.5 lbs beef sirloin, cut into 1-inch cubes (look for well-marbled pieces for juicier skewers)
- 1/2 cup soy sauce (low sodium works great to control saltiness)
- 1/4 cup brown sugar (pack it tight for that rich sweetness)
- 2 tbsp mirin (or substitute with a mix of 1 tbsp sugar and 1 tbsp water)
- 1 tbsp grated ginger (fresh is best for that zingy kick)
- 2 cloves garlic, minced (because everything’s better with garlic)
- 1 tbsp sesame oil (toasted adds a deeper flavor)
- 1 tbsp vegetable oil (or any neutral oil for the grill)
- Wooden skewers, soaked in water for 30 minutes (to prevent burning)
Instructions
- In a bowl, whisk together soy sauce, brown sugar, mirin, ginger, garlic, and sesame oil until the sugar dissolves completely.
- Add beef cubes to the marinade, ensuring each piece is well coated. Cover and refrigerate for at least 2 hours, or overnight for deeper flavor.
- Preheat your grill to medium-high heat (about 375°F to 400°F) and lightly oil the grates to prevent sticking.
- Thread the marinated beef onto the soaked skewers, leaving a little space between each piece for even cooking.
- Grill the skewers for 3-4 minutes per side, turning once, until the beef is nicely charred and reaches an internal temperature of 145°F for medium-rare.
- Brush the skewers with any remaining marinade during the last minute of grilling for an extra glaze.
- Let the skewers rest for 5 minutes before serving to allow the juices to redistribute.
Bursting with the perfect balance of sweet and savory, these skewers are irresistibly tender with a slight chew. Serve them over a bed of steamed rice with a sprinkle of sesame seeds and sliced green onions for a meal that’s as beautiful as it is delicious.
Simple Grilled Lobster Tails
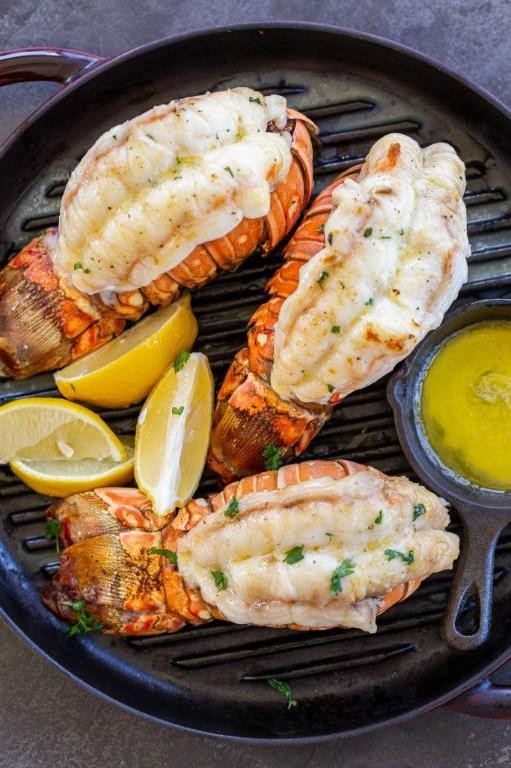
Very few things scream summer like the sight of lobster tails sizzling on the grill. I remember the first time I tried grilling them at home; the mix of excitement and fear of overcooking was real. But trust me, with this simple method, you’ll nail it every time.
Ingredients
- 4 lobster tails (about 6 oz each), thawed if frozen
- 1/4 cup unsalted butter, melted (try clarified butter for a richer flavor)
- 2 tbsp olive oil (or any neutral oil)
- 1 tsp garlic powder (fresh minced garlic works too)
- 1/2 tsp paprika (smoked paprika adds a nice depth)
- 1/4 tsp salt (adjust to taste)
- 1/4 tsp black pepper (freshly ground preferred)
- 1 tbsp lemon juice (freshly squeezed for the best flavor)
- 2 tbsp chopped parsley (for garnish, optional)
Instructions
- Preheat your grill to medium-high heat, about 375°F to 400°F.
- Using kitchen shears, cut the top shell of each lobster tail lengthwise down the middle, stopping at the tail fin.
- Gently pull the meat upwards, keeping it attached at the base, and rest it on top of the shell.
- In a small bowl, mix melted butter, olive oil, garlic powder, paprika, salt, pepper, and lemon juice.
- Brush the lobster meat generously with the butter mixture, ensuring it gets into the cuts.
- Place the lobster tails on the grill, meat side down first, for 5-6 minutes until lightly charred.
- Flip the tails, shell side down, and grill for another 4-5 minutes, basting with remaining butter mixture.
- Remove from grill when the meat is opaque and firm to the touch.
- Sprinkle with chopped parsley before serving.
Perfectly grilled lobster tails are juicy, with a slight smokiness from the grill and a buttery, garlicky finish. Serve them with a side of grilled corn or over a bed of fresh pasta for a decadent meal that’s surprisingly easy to pull off.
Grilled Caprese Chicken

Warm summer evenings call for dishes that are both easy to make and bursting with flavor, and that’s exactly what this Grilled Caprese Chicken delivers. I remember the first time I made it; the aroma of basil and melted mozzarella filled my kitchen, and I knew it was going to be a staple in my recipe rotation.
Ingredients
- 4 boneless, skinless chicken breasts (about 1.5 lbs)
- 1 tbsp olive oil (or any neutral oil)
- 1 tsp salt (adjust to taste)
- 1/2 tsp black pepper (freshly ground preferred)
- 2 cloves garlic, minced (about 1 tbsp)
- 1 cup cherry tomatoes, halved
- 1/2 cup fresh basil leaves, chopped
- 4 slices mozzarella cheese (about 4 oz total)
- 1 tbsp balsamic glaze (for drizzling)
Instructions
- Preheat your grill to medium-high heat (about 375°F to 400°F).
- Brush both sides of the chicken breasts with olive oil and season with salt and black pepper.
- Place the chicken on the grill and cook for 5-6 minutes on each side, or until the internal temperature reaches 165°F.
- While the chicken is grilling, mix the minced garlic, cherry tomatoes, and basil in a small bowl.
- Once the chicken is cooked, top each breast with a slice of mozzarella cheese and close the grill lid for 1-2 minutes to melt the cheese.
- Remove the chicken from the grill and top with the tomato and basil mixture.
- Drizzle with balsamic glaze before serving.
The melted mozzarella creates a creamy texture that pairs perfectly with the juicy tomatoes and fresh basil. Serve this dish with a side of grilled vegetables or over a bed of arugula for a light, summery meal.
Easy Grilled Asparagus with Parmesan

Nothing says summer like the smell of veggies hitting the grill, and this Easy Grilled Asparagus with Parmesan is my go-to side dish for those lazy Sunday BBQs. I remember the first time I tried adding Parmesan right off the grill—the way it melts slightly from the residual heat is nothing short of magic.
Ingredients
- 1 lb asparagus, trimmed (look for firm, bright green stalks)
- 2 tbsp olive oil (or any neutral oil)
- 1/2 tsp salt (adjust to taste)
- 1/4 tsp black pepper (freshly ground preferred)
- 1/4 cup grated Parmesan cheese (the real deal, not the powdered stuff)
Instructions
- Preheat your grill to medium-high heat, about 400°F. This ensures those beautiful grill marks without burning.
- In a large bowl, toss the asparagus with olive oil, salt, and pepper until evenly coated. Tip: Use your hands to really massage the oil into the stalks for even cooking.
- Place the asparagus on the grill perpendicular to the grates to prevent falling through. Grill for 3-4 minutes per side, or until tender and slightly charred.
- Transfer the grilled asparagus to a serving platter and immediately sprinkle with Parmesan cheese. Tip: The residual heat will melt the cheese slightly, enhancing the flavor.
Grilled to perfection, this asparagus boasts a smoky flavor with a crisp-tender bite, and the Parmesan adds a salty, umami kick. Try serving it alongside a juicy steak or as part of a vibrant veggie platter for your next gathering.
Grilled Peach and Prosciutto Salad

Grilled peaches have a way of turning an ordinary salad into something extraordinary, especially when paired with the salty crispness of prosciutto. I remember the first time I tried this combination at a summer BBQ; it was love at first bite. Now, it’s my go-to when I want to impress guests or just treat myself to something special.
Ingredients
- 2 ripe peaches, halved and pitted (firm but slightly soft to the touch)
- 4 slices of prosciutto (thinly sliced for maximum crispiness)
- 4 cups arugula (or any leafy greens you prefer)
- 1/4 cup balsamic glaze (adjust to taste)
- 1 tbsp olive oil (or any neutral oil)
- 1/4 cup crumbled goat cheese (optional for extra creaminess)
- Salt and pepper to taste
Instructions
- Preheat your grill to medium-high heat, about 400°F, ensuring the grates are clean to prevent sticking.
- Brush the peach halves lightly with olive oil to help them caramelize and not stick to the grill.
- Place the peaches cut side down on the grill. Cook for 3-4 minutes until you see grill marks and the peaches soften slightly.
- While the peaches grill, lay the prosciutto slices on the grill. Cook for about 1-2 minutes per side until crispy, then set aside.
- In a large bowl, toss the arugula with a drizzle of olive oil and a pinch of salt and pepper to lightly coat.
- Arrange the grilled peaches and crispy prosciutto on top of the arugula. Drizzle with balsamic glaze and sprinkle with goat cheese if using.
You’ll love how the sweetness of the peaches contrasts with the salty prosciutto, all balanced by the peppery arugula. Try serving this salad with a chilled glass of rosé for the ultimate summer dining experience.
Simple Grilled Turkey Burgers
Nothing beats the joy of firing up the grill on a warm summer evening, especially when it’s for making these Simple Grilled Turkey Burgers. I remember the first time I swapped out beef for turkey in my burgers, skeptical about the flavor, but one bite was all it took to convert me. Now, it’s a staple in my summer cooking repertoire, and I’m excited to share my go-to recipe with you.
Ingredients
- 1 lb ground turkey (look for 93% lean for the best balance of flavor and juiciness)
- 1/4 cup breadcrumbs (helps bind the burgers without drying them out)
- 1 tbsp Worcestershire sauce (adds a depth of flavor)
- 1 tsp garlic powder (or fresh minced garlic for a sharper taste)
- 1/2 tsp salt (adjust to taste)
- 1/4 tsp black pepper (freshly ground preferred)
- 1 tbsp olive oil (or any neutral oil, for brushing the grill)
Instructions
- In a large bowl, gently mix the ground turkey, breadcrumbs, Worcestershire sauce, garlic powder, salt, and pepper until just combined. Overmixing can make the burgers tough.
- Divide the mixture into 4 equal portions and shape each into a patty about 1/2 inch thick. Make a slight indentation in the center of each patty to prevent bulging during cooking.
- Preheat your grill to medium-high heat (about 375°F) and brush the grates with olive oil to prevent sticking.
- Place the patties on the grill and cook for about 5-6 minutes on the first side, until you see grill marks and the edges start to firm up.
- Flip the burgers and cook for another 5-6 minutes, or until the internal temperature reaches 165°F on a meat thermometer.
- Remove the burgers from the grill and let them rest for a couple of minutes before serving. This allows the juices to redistribute, ensuring a moist burger.
Zesty and juicy, these turkey burgers are a lighter alternative that doesn’t skimp on flavor. Serve them on toasted buns with your favorite toppings, or for a low-carb option, try them wrapped in crisp lettuce leaves with a slice of avocado and a dollop of spicy mayo.
Grilled Margherita Flatbread

Summer evenings call for something light yet satisfying, and that’s exactly what this Grilled Margherita Flatbread delivers. I stumbled upon this recipe during a backyard BBQ mishap when I ran out of pizza dough but had all the toppings ready—talk about a happy accident!
Ingredients
- 1 pre-made flatbread (or homemade if you’re feeling ambitious)
- 1/2 cup tomato sauce (homemade or store-bought, but go for the good stuff)
- 1 cup fresh mozzarella, sliced (the creamier, the better)
- 1/4 cup fresh basil leaves (tear them for a more rustic look)
- 2 tbsp olive oil (extra virgin for that fruity note)
- 1/2 tsp salt (adjust to taste, but don’t skimp)
- 1/4 tsp black pepper (freshly ground makes all the difference)
Instructions
- Preheat your grill to medium-high heat, about 400°F, ensuring it’s clean to prevent sticking.
- Brush one side of the flatbread with olive oil; this will be the side that hits the grill first for that perfect crisp.
- Place the oiled side down on the grill and cook for 2-3 minutes until you see grill marks and the edges start to crisp.
- Flip the flatbread and quickly spread the tomato sauce evenly, leaving a small border for the crust.
- Arrange the mozzarella slices over the sauce, then close the grill lid to melt the cheese, about 2 minutes.
- Once the cheese is bubbly, remove the flatbread from the grill and top with fresh basil, salt, and pepper.
- Let it sit for a minute before slicing; this helps the cheese set slightly so it doesn’t slide off.
Perfectly charred edges with a gooey center, this flatbread is a testament to simplicity. Serve it with a drizzle of balsamic glaze or a side of arugula salad for an extra punch of flavor.
Easy Grilled Lamb Chops with Mint Sauce
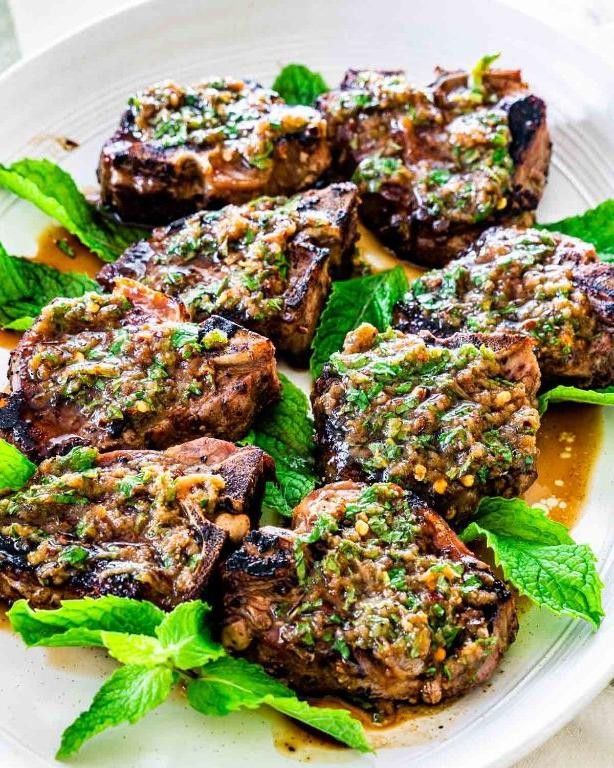
Over the years, I’ve found that grilling lamb chops is one of those dishes that impresses with minimal effort. There’s something about the smoky char and the tender meat that feels like a special occasion, even on a weeknight. Today, I’m sharing my go-to recipe for Easy Grilled Lamb Chops with Mint Sauce, a dish that’s as simple to make as it is delicious.
Ingredients
- 8 lamb chops (about 1 inch thick, for even cooking)
- 2 tbsp olive oil (or any neutral oil)
- 1 tsp salt (adjust to taste)
- 1/2 tsp black pepper (freshly ground preferred)
- 1/2 cup fresh mint leaves (packed, for the sauce)
- 1/4 cup water (to blend the sauce)
- 2 tbsp honey (or maple syrup for a vegan option)
- 1 tbsp apple cider vinegar (adjust to taste)
Instructions
- Preheat your grill to medium-high heat (about 400°F) to ensure a good sear without burning.
- While the grill heats, rub the lamb chops with olive oil, then season both sides with salt and black pepper.
- Place the lamb chops on the grill. Cook for 3-4 minutes per side for medium-rare, or until they reach your desired doneness. Tip: Avoid moving them around too much to get those perfect grill marks.
- While the lamb cooks, blend the mint leaves, water, honey, and apple cider vinegar in a blender until smooth. Tip: For a smoother sauce, strain it through a fine mesh sieve.
- Once the lamb chops are done, let them rest for 5 minutes before serving to allow the juices to redistribute. Tip: Covering them loosely with foil keeps them warm.
- Serve the lamb chops with the mint sauce drizzled over the top or on the side for dipping.
Absolutely, the combination of the juicy, flavorful lamb with the fresh, tangy mint sauce is a match made in heaven. For an extra touch, serve them over a bed of arugula with some grilled lemon halves on the side to squeeze over just before eating.
Grilled Stuffed Bell Peppers

Every summer, I find myself craving the vibrant colors and flavors of grilled stuffed bell peppers. There’s something about the smoky char from the grill combined with the juicy, savory filling that makes this dish a staple at my backyard gatherings.
Ingredients
- 4 large bell peppers, any color (choose ones that can stand upright for easier grilling)
- 1 lb ground beef (or ground turkey for a lighter option)
- 1 cup cooked rice (white or brown, depending on your preference)
- 1/2 cup diced onions (sauté them first for extra flavor)
- 1/2 cup shredded cheddar cheese (plus extra for topping)
- 1 tbsp olive oil (or any neutral oil)
- 1 tsp garlic powder (adjust to taste)
- 1 tsp salt (adjust to taste)
- 1/2 tsp black pepper (adjust to taste)
Instructions
- Preheat your grill to medium heat, about 350°F, ensuring it’s clean to prevent sticking.
- Cut the tops off the bell peppers and remove the seeds and membranes, keeping the peppers whole.
- In a skillet over medium heat, cook the ground beef until no longer pink, about 5-7 minutes, then drain excess fat.
- Add the diced onions to the skillet with the beef and cook until translucent, about 3 minutes.
- Stir in the cooked rice, cheddar cheese, garlic powder, salt, and black pepper into the beef mixture until well combined.
- Brush the outside of each bell pepper with olive oil to prevent sticking and help with charring.
- Stuff each pepper with the beef and rice mixture, packing it down lightly, and top with extra cheese.
- Place the stuffed peppers on the grill, cover, and cook for about 20-25 minutes, or until the peppers are tender and the cheese is bubbly and slightly golden.
Unbelievably satisfying, these grilled stuffed bell peppers offer a perfect balance of smoky, savory, and cheesy flavors. Serve them with a side of cool sour cream or a fresh salad to complement the richness. The peppers should be tender but still hold their shape, making them as pleasing to the eye as they are to the palate.
Simple Grilled Fish Tacos with Avocado Crema
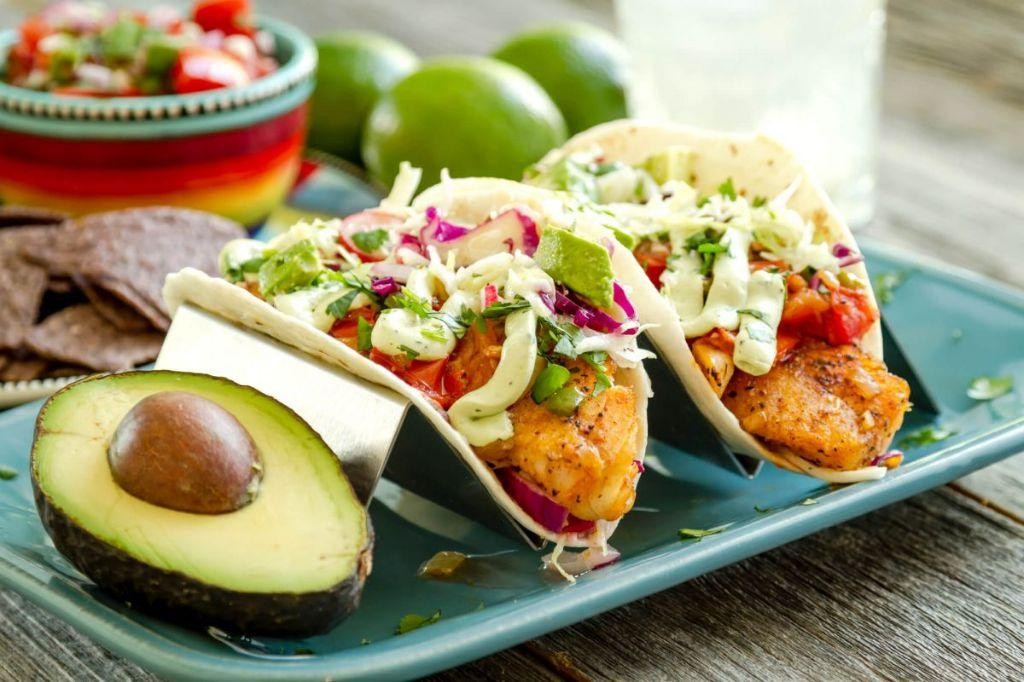
Growing up near the coast, I’ve always had a soft spot for seafood, especially when it’s as simple and flavorful as these grilled fish tacos. There’s something about the smoky char from the grill paired with the creamy avocado crema that just screams summer to me.
Ingredients
- 1 lb white fish fillets (like cod or tilapia), patted dry
- 2 tbsp olive oil (or any neutral oil)
- 1 tsp chili powder, adjust to taste
- 1/2 tsp garlic powder
- 1/2 tsp salt
- 8 small corn tortillas, warmed
- 1 ripe avocado, pitted and peeled
- 1/4 cup sour cream
- 1 tbsp lime juice
- 1/4 cup cilantro, chopped, plus extra for garnish
- 1/2 cup red cabbage, thinly sliced
Instructions
- Preheat your grill to medium-high heat (about 375°F to 400°F).
- In a small bowl, mix the olive oil, chili powder, garlic powder, and salt. Brush this mixture evenly over both sides of the fish fillets.
- Grill the fish for about 3-4 minutes per side, or until it flakes easily with a fork. Tip: Don’t move the fish too much while grilling to get those perfect grill marks.
- While the fish is grilling, make the avocado crema by blending the avocado, sour cream, lime juice, and cilantro in a blender until smooth. Tip: If the crema is too thick, add a teaspoon of water at a time until desired consistency.
- Once the fish is done, let it rest for a minute before flaking it into large pieces.
- To assemble the tacos, spread a spoonful of avocado crema on each tortilla, top with flaked fish, and garnish with red cabbage and extra cilantro. Tip: For an extra kick, add a dash of hot sauce or a squeeze of lime juice before serving.
Perfectly grilled fish tacos are all about the contrast between the smoky, tender fish and the cool, creamy avocado crema. Serve them with a side of grilled corn or a crisp salad for a complete meal that’s sure to impress.
Conclusion
We hope these 20 easy grill recipes inspire your summer cooking! Perfect for home cooks looking for delicious, no-fuss ideas. Try them out, share your favorites in the comments, and don’t forget to pin this article on Pinterest for your next BBQ adventure. Happy grilling!


