Get ready to sprinkle some festive magic into your kitchen with our roundup of 20 Delicious Easy Christmas Recipes! Whether you’re whipping up a quick dinner for the family or indulging in seasonal favorites that scream comfort, we’ve got you covered. These foolproof dishes are sure to bring joy and flavor to your holiday table. So, grab your apron, and let’s make this Christmas deliciously memorable!
Christmas Tree Pull-Apart Bread

First off, let me tell you, there’s something magical about pulling apart warm, buttery bread with friends and family during the holidays. This Christmas Tree Pull-Apart Bread is not just a showstopper on your table; it’s a fun, interactive way to enjoy a meal together. I remember the first time I made it; the kids couldn’t wait to dig in, and honestly, neither could I!
Ingredients
- 2 cups all-purpose flour (plus extra for dusting)
- 1 tbsp sugar (for a hint of sweetness)
- 1 tsp salt (adjust to taste)
- 1 packet instant yeast (about 2 1/4 tsp)
- 3/4 cup warm milk (110°F, perfect for activating yeast)
- 2 tbsp unsalted butter, melted (plus extra for brushing)
- 1/2 cup grated cheese (cheddar or mozzarella works great)
- 1/4 cup finely chopped herbs (parsley or rosemary for a festive touch)
Instructions
- In a large bowl, whisk together flour, sugar, salt, and yeast.
- Gradually add warm milk and melted butter to the dry ingredients, stirring until a dough forms.
- Turn the dough onto a floured surface and knead for about 5 minutes, until smooth and elastic. Tip: If the dough sticks, add a little more flour, but avoid making it too dry.
- Place the dough in a greased bowl, cover with a damp cloth, and let it rise in a warm place for 1 hour, or until doubled in size.
- Preheat your oven to 375°F (190°C) and lightly grease a baking sheet.
- Punch down the dough and roll it into a large rectangle on a floured surface.
- Cut the dough into small squares and arrange them in a Christmas tree shape on the baking sheet. Tip: Leave a little space between each piece for expansion.
- Sprinkle cheese and herbs over the dough pieces, then bake for 20-25 minutes, until golden brown. Tip: Brush with melted butter halfway through for extra flavor.
- Remove from the oven and let it cool slightly before serving.
Buttery and soft with a cheesy, herby finish, this pull-apart bread is irresistible straight from the oven. Serve it as the centerpiece of your holiday brunch or alongside a warm bowl of soup for a cozy dinner.
Easy Peppermint Bark
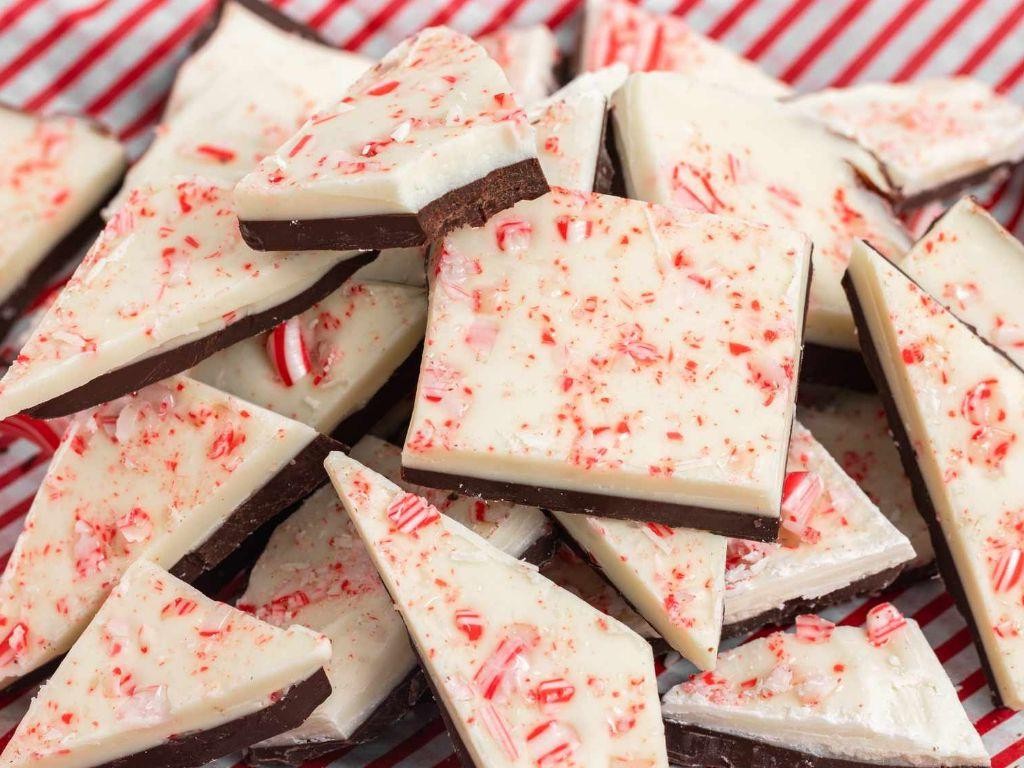
During the holiday season, I always find myself craving something sweet and minty, and nothing hits the spot quite like homemade peppermint bark. It’s a tradition in my kitchen to whip up a batch as soon as the first snowflake falls, but honestly, this easy recipe is so good, I make it year-round.
Ingredients
- 12 oz semi-sweet chocolate chips (or dark chocolate for a richer flavor)
- 12 oz white chocolate chips (high-quality brands melt smoother)
- 1/2 tsp peppermint extract (adjust to taste)
- 1 cup crushed peppermint candies (about 20 candies, crushed finely)
- 1 tbsp coconut oil (or any neutral oil, to help with melting)
Instructions
- Line a 9×13 inch baking sheet with parchment paper, ensuring it covers the bottom and sides for easy removal.
- In a microwave-safe bowl, combine semi-sweet chocolate chips and 1/2 tbsp coconut oil. Microwave in 30-second intervals, stirring between each, until fully melted (about 1.5 minutes total).
- Pour the melted chocolate onto the prepared baking sheet, spreading evenly with a spatula. Tap the sheet gently on the counter to remove air bubbles.
- Place the baking sheet in the refrigerator for 15 minutes, or until the chocolate is completely set.
- Repeat the melting process with white chocolate chips and remaining coconut oil, then stir in peppermint extract.
- Pour the white chocolate mixture over the set dark chocolate layer, spreading evenly. Immediately sprinkle crushed peppermint candies on top, pressing lightly to adhere.
- Refrigerate for another 30 minutes, or until fully set. Break into pieces by hand or cut with a sharp knife for cleaner edges.
What I love most about this peppermint bark is the perfect contrast between the rich dark chocolate and the creamy, minty white chocolate. The crunchy peppermint topping adds a festive touch, making it a hit at parties or as a thoughtful homemade gift.
Slow Cooker Hot Chocolate

Nothing warms the soul quite like a rich, creamy cup of hot chocolate, especially when it’s been simmering away in the slow cooker, filling your home with an irresistible aroma. I remember the first time I tried making it this way; it was a snowy afternoon, and the idea of not having to stand by the stove was a game-changer. Now, it’s my go-to method for gatherings or just a cozy night in.
Ingredients
- 4 cups whole milk (for extra creaminess, or substitute with your preferred milk)
- 1 cup heavy cream (this adds a luxurious thickness)
- 1/2 cup granulated sugar (adjust to taste)
- 1/4 cup unsweetened cocoa powder (high-quality makes a difference)
- 1 cup semi-sweet chocolate chips (or chopped chocolate for smoother melting)
- 1 tsp vanilla extract (pure extract for the best flavor)
- Pinch of salt (enhances all the flavors)
Instructions
- In your slow cooker, whisk together the milk, heavy cream, sugar, cocoa powder, and salt until well combined.
- Add the chocolate chips and vanilla extract to the mixture, stirring gently to distribute evenly.
- Cover and cook on LOW for 2 hours, stirring every 30 minutes to ensure the chocolate melts smoothly and doesn’t stick to the bottom.
- After 2 hours, switch the slow cooker to WARM and let it sit for up to 1 hour before serving. This allows the flavors to meld beautifully.
- Give it a final stir before serving to achieve that perfect, velvety consistency.
Silky, rich, and deeply chocolatey, this slow cooker hot chocolate is a dream in a mug. For an extra special touch, top with whipped cream and a sprinkle of cocoa powder or cinnamon. It’s also fantastic with a dash of peppermint extract during the holidays!
Christmas Morning Wife Saver

Growing up, Christmas mornings were always a whirlwind of excitement, presents, and the most incredible aromas wafting from the kitchen. One dish that stands out in my memory is the Christmas Morning Wife Saver, a make-ahead breakfast casserole that’s as hearty as it is delicious. It’s the kind of meal that lets you enjoy the morning with your loved ones, without being tied to the stove.
Ingredients
- 6 slices of white bread, crusts removed (or leave them on for extra texture)
- 2 cups of shredded cheddar cheese (sharp cheddar works best for flavor)
- 1 lb of cooked ham, diced (leftover holiday ham is perfect here)
- 6 large eggs
- 2 cups of whole milk (for richness, but 2% works in a pinch)
- 1/2 tsp of dry mustard (adds a subtle depth)
- 1/4 tsp of onion powder (for a hint of savoriness)
- 1/4 tsp of paprika (smoked paprika adds a nice twist)
Instructions
- Grease a 9×13 inch baking dish with butter or cooking spray to prevent sticking.
- Layer the bread slices on the bottom of the dish, covering it completely. You might need to tear some pieces to fit.
- Sprinkle the diced ham evenly over the bread, followed by the shredded cheddar cheese.
- In a large bowl, whisk together the eggs, milk, dry mustard, onion powder, and paprika until well combined.
- Pour the egg mixture over the bread, ham, and cheese, making sure everything is evenly coated.
- Cover the dish with plastic wrap and refrigerate overnight, or for at least 8 hours. This allows the bread to soak up the egg mixture.
- Preheat your oven to 350°F (175°C) in the morning, and remove the casserole from the fridge to sit at room temperature while the oven heats.
- Bake uncovered for 45-50 minutes, or until the top is golden brown and the center is set. A knife inserted in the center should come out clean.
- Let the casserole stand for 5 minutes before serving to allow it to set further, making it easier to slice.
Zesty and comforting, this Christmas Morning Wife Saver is a delightful mix of creamy, cheesy, and savory flavors, with the bread turning into a soft, custard-like layer. Serve it with a side of fresh fruit or a light salad to balance the richness, and watch it become a new holiday tradition in your home.
Gingerbread Cookie Bars
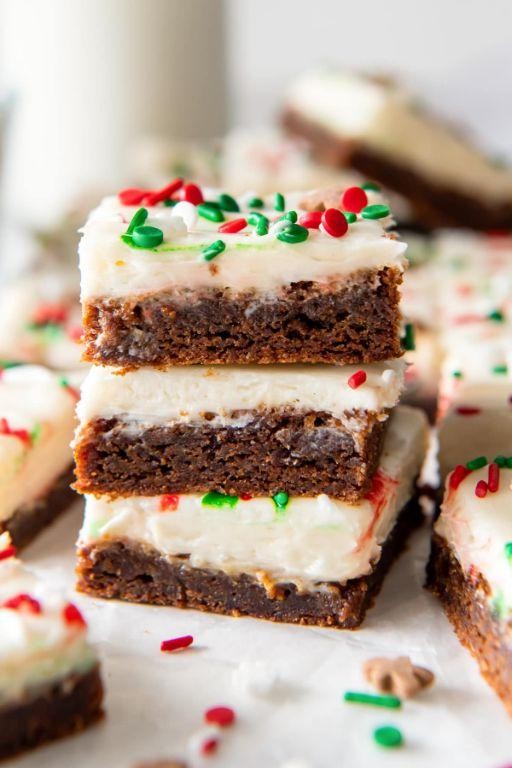
Yesterday, as the first hints of fall began to whisper through the air, I found myself craving the warm, spicy embrace of gingerbread. But, let’s be honest, rolling out cookies can feel like a chore. That’s when I decided to simplify things with these Gingerbread Cookie Bars—all the flavor, none of the fuss.
Ingredients
- 2 1/4 cups all-purpose flour (spooned and leveled for accuracy)
- 1 tsp baking soda
- 1 1/2 tsp ground ginger (freshly ground for more punch)
- 1 tsp ground cinnamon
- 1/4 tsp ground cloves
- 1/4 tsp salt
- 3/4 cup unsalted butter, softened (room temperature for easy mixing)
- 3/4 cup packed dark brown sugar (light brown works too, but dark adds depth)
- 1 large egg
- 1/4 cup molasses (not blackstrap, too bitter)
- 1 tsp pure vanilla extract
Instructions
- Preheat your oven to 350°F (175°C) and line a 9×13 inch baking pan with parchment paper, leaving an overhang for easy removal.
- In a medium bowl, whisk together the flour, baking soda, ginger, cinnamon, cloves, and salt. Set aside.
- In a large bowl, beat the butter and brown sugar together on medium speed until light and fluffy, about 2 minutes. Tip: Scrape down the sides of the bowl to ensure everything is evenly mixed.
- Add the egg, molasses, and vanilla extract to the butter mixture. Beat until well combined.
- Gradually add the dry ingredients to the wet ingredients, mixing on low speed until just combined. Tip: Overmixing can lead to tough bars, so stop as soon as the flour disappears.
- Spread the dough evenly into the prepared pan. Tip: A lightly greased offset spatula makes this step a breeze.
- Bake for 20-25 minutes, or until the edges are firm and the center is set but still slightly soft. A toothpick inserted into the center should come out with a few moist crumbs.
- Allow the bars to cool completely in the pan on a wire rack before cutting into squares.
These Gingerbread Cookie Bars are wonderfully soft and chewy, with just the right amount of spice. Try serving them warm with a dollop of whipped cream for a simple dessert that feels special.
Easy Christmas Punch

Every year, as soon as the holiday season rolls around, I find myself craving the festive flavors of Christmas punch. It’s not just a drink; it’s a celebration in a glass, bringing together family and friends with its sweet, tangy, and slightly spicy notes. I love how easy it is to whip up, leaving me more time to enjoy the holiday cheer.
Ingredients
- 4 cups cranberry juice (use 100% juice for the best flavor)
- 2 cups orange juice (freshly squeezed adds a bright note)
- 1 cup pineapple juice (for a tropical twist)
- 1/2 cup lemon juice (adjust to taste for more tang)
- 1/4 cup honey (or maple syrup for a vegan option)
- 2 cinnamon sticks (plus extra for garnish)
- 1 tsp whole cloves (tied in a cheesecloth for easy removal)
- 2 cups ginger ale (chilled, add just before serving)
- Orange slices and cranberries (for garnish)
Instructions
- In a large pot, combine the cranberry juice, orange juice, pineapple juice, and lemon juice over medium heat.
- Stir in the honey and add the cinnamon sticks and cloves. Heat the mixture until it’s warm but not boiling, about 5 minutes, stirring occasionally to dissolve the honey.
- Reduce the heat to low and let the punch simmer for 10 minutes to infuse the spices. Tip: Taste and adjust the sweetness or tanginess by adding more honey or lemon juice if needed.
- Remove the pot from the heat and let the punch cool to room temperature. Then, refrigerate it for at least 2 hours to chill thoroughly. Tip: This step enhances the flavors, making the punch even more delicious.
- Before serving, remove the cinnamon sticks and cloves. Stir in the chilled ginger ale for a fizzy finish. Tip: For an adult version, a splash of rum or vodka can be added.
- Serve the punch over ice in a festive bowl or pitcher, garnished with orange slices, cranberries, and extra cinnamon sticks.
How the punch turns out is nothing short of magical—the perfect balance of sweet, tart, and spicy, with a refreshing fizz from the ginger ale. It’s a showstopper when served in a large glass bowl with floating cranberries and orange slices, making it as beautiful as it is delicious.
Festive Cheese Ball

Gathering around the table with friends and family during the holidays always calls for something special, and that’s where this Festive Cheese Ball comes into play. I remember the first time I made it; the mix of creamy cheese and crunchy nuts was such a hit that it’s now a non-negotiable part of our festive spread.
Ingredients
- 2 cups shredded sharp cheddar cheese (for a smoother texture, grate your own)
- 8 oz cream cheese, softened (leave it out for 30 minutes to soften)
- 1/2 cup chopped pecans (toast them for extra flavor)
- 1/4 cup finely chopped dried cranberries (adds a sweet and tart contrast)
- 1 tbsp Worcestershire sauce (adjust to taste)
- 1/2 tsp garlic powder (fresh minced garlic works too)
- 1/4 tsp smoked paprika (for a subtle smoky flavor)
Instructions
- In a large mixing bowl, combine the shredded cheddar cheese and softened cream cheese until well blended.
- Add the Worcestershire sauce, garlic powder, and smoked paprika to the cheese mixture, mixing thoroughly to ensure even distribution of flavors.
- Fold in the chopped pecans and dried cranberries, reserving a small amount of each for garnishing the outside of the cheese ball.
- Shape the mixture into a ball using your hands. If the mixture is too sticky, lightly wet your hands to make shaping easier.
- Roll the cheese ball in the reserved pecans and cranberries, pressing gently to adhere them to the surface.
- Wrap the cheese ball in plastic wrap and refrigerate for at least 2 hours, or until firm. This step is crucial for the cheese ball to hold its shape.
This Festive Cheese Ball is a delightful combination of creamy, crunchy, and slightly tangy flavors, making it a versatile appetizer. Try serving it with an array of crackers, apple slices, or even celery sticks for a refreshing contrast.
Christmas Crack

Unbelievably addictive and irresistibly crunchy, Christmas Crack is the holiday treat that disappears faster than you can make it. I remember the first time I whipped up a batch; my kitchen smelled like a cozy winter wonderland, and the crackling sound of the toffee hardening was music to my ears.
Ingredients
- 1 sleeve of saltine crackers (about 40 crackers)
- 1 cup unsalted butter (2 sticks, no substitutions for that rich flavor)
- 1 cup packed brown sugar (light or dark, depending on your preference)
- 2 cups semi-sweet chocolate chips (or milk chocolate for a sweeter version)
- 1/2 cup chopped nuts (optional, but pecans add a lovely crunch)
Instructions
- Preheat your oven to 350°F and line a large baking sheet with parchment paper.
- Arrange the saltine crackers in a single layer on the prepared baking sheet, covering it completely.
- In a medium saucepan, melt the butter and brown sugar together over medium heat, stirring constantly until the mixture comes to a boil. Let it boil for exactly 3 minutes without stirring to ensure the sugar fully dissolves and the mixture thickens slightly.
- Immediately pour the hot butter-sugar mixture over the arranged crackers, using a spatula to spread it evenly.
- Bake in the preheated oven for 5 minutes, or until the toffee is bubbly and the crackers begin to float.
- Remove from the oven and sprinkle the chocolate chips evenly over the hot toffee. Let sit for 2 minutes to allow the chocolate to melt, then spread it smoothly with a spatula.
- Sprinkle the chopped nuts over the melted chocolate if using, pressing them lightly to adhere.
- Allow the Christmas Crack to cool completely at room temperature, then refrigerate for 30 minutes to set the chocolate before breaking into pieces.
Outrageously delicious, this Christmas Crack combines the perfect balance of sweet, salty, and crunchy. Serve it piled high on a festive platter or package in cute boxes for edible holiday gifts that everyone will rave about.
Reindeer Chow
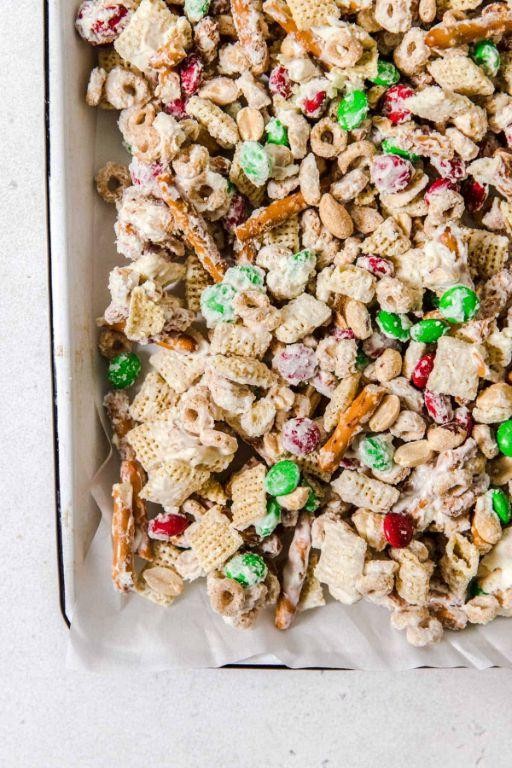
Just when I thought my holiday snack game couldn’t get any better, I stumbled upon this irresistible Reindeer Chow recipe that’s become a staple in my kitchen. It’s the perfect mix of sweet, salty, and crunchy, and trust me, it’s as fun to make as it is to eat.
Ingredients
- 6 cups Rice Chex cereal (or any similar crispy cereal)
- 1 cup semi-sweet chocolate chips (milk chocolate works too for a sweeter version)
- 1/2 cup creamy peanut butter (crunchy adds a nice texture)
- 1/4 cup unsalted butter (salted butter can be used, just adjust added salt)
- 1 tsp vanilla extract (pure extract for the best flavor)
- 1 1/2 cups powdered sugar (sifted to avoid lumps)
Instructions
- In a large microwave-safe bowl, combine the chocolate chips, peanut butter, and butter. Microwave on high for 1 minute, then stir. If not fully melted, microwave in 30-second intervals until smooth.
- Stir in the vanilla extract into the melted mixture until well combined.
- Add the Rice Chex cereal to the bowl. Gently fold the cereal into the chocolate mixture until evenly coated. Tip: Use a rubber spatula to avoid breaking the cereal pieces.
- Transfer the coated cereal to a large resealable plastic bag. Add the powdered sugar, seal the bag, and shake until the cereal is fully covered. Tip: Let the mixture cool slightly before adding sugar to prevent melting.
- Spread the Reindeer Chow on a baking sheet lined with parchment paper to cool and set for about 30 minutes. Tip: For quicker setting, place in the refrigerator for 15 minutes.
Great for gifting or keeping all to yourself, this Reindeer Chow offers a delightful crunch with a perfect balance of chocolate and peanut butter flavors. Serve it in festive bowls at your next holiday gathering, or pack it into mason jars for a sweet homemade gift.
Snowman Cheese Ball

Kicking off the holiday season with a fun and festive appetizer is my kind of tradition, and this Snowman Cheese Ball is just the ticket. It’s not only adorable but also packed with flavors that’ll have your guests coming back for more. I remember the first time I made it; my niece thought it was too cute to eat—until she took the first bite!
Ingredients
- 2 cups shredded sharp cheddar cheese (for a smoother texture, grate your own)
- 8 oz cream cheese, softened (leave out at room temperature for 30 minutes)
- 1/2 cup sour cream (full fat for the best consistency)
- 1 tsp garlic powder (adjust to taste)
- 1/2 tsp onion powder
- 1/4 tsp black pepper (freshly ground preferred)
- 1/4 cup finely chopped pecans (for coating, or substitute with walnuts)
- 2 whole black peppercorns (for the eyes)
- 1 small carrot piece (for the nose)
- Pretzel sticks (for the arms)
Instructions
- In a large mixing bowl, combine the shredded cheddar cheese, softened cream cheese, sour cream, garlic powder, onion powder, and black pepper until well blended. Tip: For an extra smooth mixture, use a hand mixer on low speed.
- Divide the mixture into two portions, one slightly larger than the other. Shape the larger portion into a ball for the body and the smaller portion into a ball for the head. Tip: Wet your hands slightly to prevent sticking.
- Roll both cheese balls in the finely chopped pecans until fully coated. Tip: For even coating, place pecans on a plate and gently roll the balls over them.
- Place the larger ball on a serving plate and gently press the smaller ball on top to form the snowman. Insert the peppercorns for eyes and the carrot piece for the nose. Break pretzel sticks in half and insert them into the sides for arms.
- Refrigerate for at least 1 hour before serving to allow the cheese ball to firm up. Tip: Cover loosely with plastic wrap to prevent drying out.
Bursting with creamy, tangy flavors and a delightful crunch from the pecans, this Snowman Cheese Ball is as delicious as it is charming. Serve it with crackers or veggie sticks for a festive touch that’s sure to impress at any holiday gathering.
Easy Eggnog

Just like that, the holiday season sneaks up on us, and with it comes the craving for something creamy, sweet, and spiced. I remember my first attempt at making eggnog was a disaster—too thick, too sweet, and let’s not talk about the texture. But after years of tweaking, I’ve landed on this easy eggnog recipe that’s foolproof and absolutely delicious.
Ingredients
- 4 cups whole milk (for richness, but 2% works in a pinch)
- 1 cup heavy cream (the secret to that luxurious mouthfeel)
- 6 large eggs (room temperature blends better)
- 1/2 cup granulated sugar (adjust to taste if you prefer it less sweet)
- 1 tsp vanilla extract (pure extract makes a difference)
- 1/2 tsp ground nutmeg (freshly grated adds a brighter flavor)
- 1/4 tsp ground cinnamon (or a cinnamon stick for steeping)
- 1/4 cup bourbon or rum (optional, but highly recommended for adults)
Instructions
- In a large bowl, whisk together the eggs and sugar until the mixture is pale and slightly thickened, about 2 minutes.
- Slowly pour in the milk and heavy cream, whisking constantly to combine without creating too much foam.
- Transfer the mixture to a saucepan over medium heat. Cook, stirring constantly, until it reaches 160°F on a candy thermometer—this ensures safety without scrambling the eggs.
- Remove from heat and stir in the vanilla extract, nutmeg, cinnamon, and bourbon or rum if using. Tip: Straining through a fine-mesh sieve can remove any accidental bits of cooked egg for a smoother texture.
- Chill in the refrigerator for at least 4 hours, though overnight is better to let the flavors meld. Tip: A sprinkle of nutmeg on top before serving adds a festive touch.
- Serve cold in glasses or mugs. For an extra indulgent twist, top with whipped cream and a cinnamon stick stirrer.
Oh, the joy of sipping this eggnog—it’s creamy with just the right amount of sweetness and spice, and the optional bourbon gives it a warm kick that’s perfect for chilly evenings. Try serving it alongside gingerbread cookies for a match made in holiday heaven.
Christmas Wreath Cookies
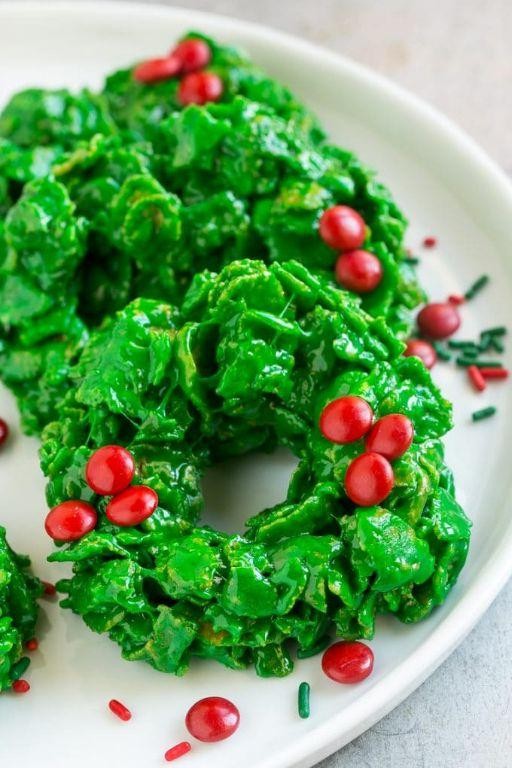
Zesty and festive, these Christmas Wreath Cookies are a delightful treat that brings the holiday spirit right into your kitchen. I remember the first time I made these; the aroma of almond and vanilla filled the air, making my tiny apartment feel like a winter wonderland. Perfect for cookie exchanges or as a sweet gift, they’re as fun to make as they are to eat.
Ingredients
- 1 cup unsalted butter, softened (room temperature for easier mixing)
- 1 cup granulated sugar (for a slightly less sweet version, reduce by 2 tbsp)
- 2 large eggs (bring to room temperature for better incorporation)
- 1 tsp almond extract (vanilla extract works too, but almond gives a unique flavor)
- 3 cups all-purpose flour (sifted to avoid lumps)
- 1/2 tsp salt (balances the sweetness)
- Green food coloring (gel-based for vibrant color without thinning the dough)
- 1/2 cup red hot candies (for decoration, or use any small red candy)
Instructions
- Preheat your oven to 350°F (175°C) and line baking sheets with parchment paper for easy cleanup.
- In a large bowl, cream together the softened butter and granulated sugar until light and fluffy, about 3 minutes. Tip: Scrape down the sides of the bowl to ensure even mixing.
- Beat in the eggs one at a time, then stir in the almond extract. The mixture should be smooth and cohesive.
- Gradually add the sifted flour and salt to the wet ingredients, mixing until just combined. Overmixing can lead to tough cookies.
- Add green food coloring a few drops at a time until the desired shade is reached. Mix thoroughly to ensure even color distribution.
- Roll the dough into 1-inch balls, then shape each ball into a rope about 6 inches long. Form into a wreath shape, pinching the ends together to seal. Tip: If the dough is too sticky, chill it for 30 minutes before shaping.
- Place the wreaths on the prepared baking sheets and decorate with red hot candies, pressing them gently into the dough.
- Bake for 10-12 minutes, or until the edges are just starting to turn golden. Let cool on the baking sheet for 5 minutes before transferring to a wire rack.
Delicate and buttery, these wreath cookies have a slight crunch with a soft center, making them irresistible. Serve them on a festive platter or tie them with ribbon for a charming edible gift. The almond flavor pairs wonderfully with a cup of hot cocoa, making them a perfect treat for chilly December nights.
Slow Cooker Christmas Ham

Just when you think the holidays can’t get any cozier, along comes this Slow Cooker Christmas Ham recipe to prove you wrong. I remember the first time I tried making ham in a slow cooker; it was a game-changer, freeing up my oven for all those pies and sides while still delivering a show-stopping centerpiece.
Ingredients
- 1 (8-10 lb) fully cooked, bone-in ham (spiral-cut works great for even flavor distribution)
- 1 cup brown sugar (pack it tight for that rich sweetness)
- 1/2 cup pure maple syrup (the real deal adds depth)
- 1/4 cup Dijon mustard (adds a tangy contrast)
- 1 tbsp apple cider vinegar (a splash to balance the sweetness)
- 2 tsp ground cloves (for that classic holiday spice)
- 1/2 cup pineapple juice (or orange juice for a citrusy twist)
Instructions
- Place the ham in your slow cooker, flat side down. If it’s too large, trim the edges slightly to fit.
- In a medium bowl, whisk together brown sugar, maple syrup, Dijon mustard, apple cider vinegar, ground cloves, and pineapple juice until smooth.
- Pour the glaze mixture over the ham, ensuring it’s evenly coated. Use a brush to spread it into the spiral cuts for maximum flavor.
- Cover and cook on LOW for 4-5 hours. The ham is ready when it’s heated through and the glaze is bubbly and caramelized.
- For a final touch, broil the ham in the oven for 2-3 minutes to crisp up the glaze, watching closely to prevent burning.
Nothing beats the tender, juicy texture of this ham, with its perfect balance of sweet and spicy flavors. Serve it sliced on a platter with the reduced glaze drizzled over the top, or alongside a fresh arugula salad for a bright contrast.
Peppermint Mocha
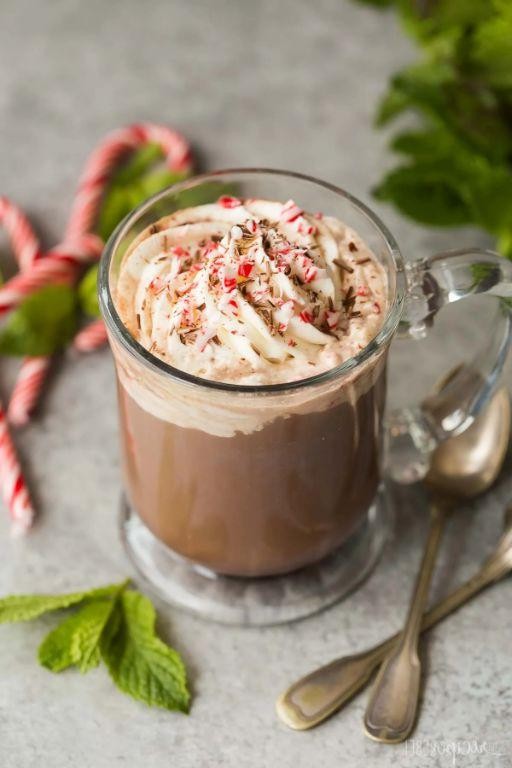
Waking up to the chilly breeze this morning had me craving something warm and festive, and nothing hits the spot quite like a homemade Peppermint Mocha. It’s like a hug in a mug, blending the rich depth of coffee with the cool kick of peppermint—a perfect pick-me-up for any time of day.
Ingredients
- 1 cup milk (whole for creaminess, but any works)
- 1/2 cup strong brewed coffee (espresso if you’re feeling fancy)
- 2 tbsp chocolate syrup (or more for extra chocolatey goodness)
- 1/4 tsp peppermint extract (adjust to taste)
- Whipped cream (for topping)
- Crushed candy canes (for garnish, optional but festive)
Instructions
- Heat the milk in a small saucepan over medium heat until it’s steaming but not boiling, about 3-5 minutes. Stir occasionally to prevent a skin from forming.
- While the milk heats, brew your coffee. A strong brew works best to stand up to the sweetness and mint.
- Once the milk is hot, whisk in the chocolate syrup and peppermint extract until fully combined. Tip: Taste as you go to adjust the mint level to your preference.
- Pour the coffee into a large mug, then add the peppermint chocolate milk mixture. Stir gently to combine.
- Top with whipped cream and a sprinkle of crushed candy canes for that extra festive touch. Tip: For a dairy-free version, coconut milk and coconut whipped cream are great substitutes.
Every sip of this Peppermint Mocha is a delightful balance of rich chocolate, bold coffee, and refreshing mint. Serve it in your favorite holiday mug for an extra cozy vibe, or add a shot of bourbon for an adult version that’s sure to warm you from the inside out.
Christmas Sugar Cookies

Zesty and joyful, just like the holiday season itself, these Christmas Sugar Cookies are a must-have on your festive table. I remember the first time I baked these; the kitchen was filled with the sweet aroma of vanilla and butter, making it impossible for anyone to resist sneaking a bite before dinner. Now, it’s a tradition I look forward to every year.
Ingredients
- 2 3/4 cups all-purpose flour (scoop and level for accuracy)
- 1 tsp baking soda
- 1/2 tsp baking powder
- 1 cup unsalted butter, softened (room temperature for easier mixing)
- 1 1/2 cups white sugar
- 1 egg (large, at room temperature)
- 1 tsp vanilla extract (pure for best flavor)
- 1/2 tsp salt (fine sea salt dissolves evenly)
Instructions
- Preheat your oven to 375°F (190°C) and line baking sheets with parchment paper for easy cleanup.
- In a medium bowl, whisk together the flour, baking soda, baking powder, and salt. Set aside.
- In a large bowl, cream together the softened butter and sugar until light and fluffy, about 3 minutes. Tip: Scrape down the sides of the bowl to ensure even mixing.
- Beat in the egg and vanilla extract until fully incorporated.
- Gradually add the dry ingredients to the wet ingredients, mixing until just combined. Tip: Overmixing can lead to tough cookies, so stop as soon as the flour disappears.
- Roll the dough into 1-inch balls and place them 2 inches apart on the prepared baking sheets. Tip: For uniform cookies, use a cookie scoop.
- Bake for 8 to 10 minutes, or until the edges are lightly golden. The centers will look soft but will firm up as they cool.
- Allow the cookies to cool on the baking sheet for 5 minutes before transferring to a wire rack to cool completely.
Out of the oven, these cookies are delightfully crisp around the edges with a soft, chewy center. The vanilla flavor shines through, making them perfect for pairing with a glass of cold milk or decorating with festive icing for an extra special touch.
Easy Fruitcake
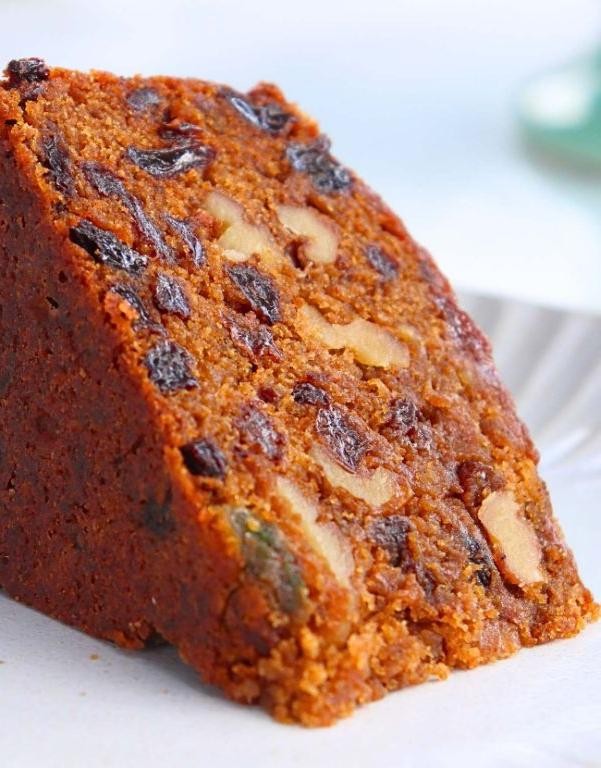
Fruitcake might seem like a holiday-only treat, but I’m here to tell you it’s a year-round delight in my kitchen. Whether it’s the nostalgia of my grandma’s recipe or the joy of mixing in whatever fruits I have on hand, this easy fruitcake has become a staple. Today, I’m sharing my go-to version that’s as simple as it is delicious.
Ingredients
- 2 cups all-purpose flour (for a lighter cake, you can substitute half with cake flour)
- 1 cup granulated sugar (adjust to taste if your dried fruits are very sweet)
- 1/2 cup unsalted butter, softened (or any neutral oil for a dairy-free version)
- 3 large eggs (room temperature for best mixing)
- 1 cup mixed dried fruits (I love a mix of raisins, cranberries, and apricots)
- 1/2 cup chopped nuts (walnuts or pecans add a nice crunch)
- 1 tsp baking powder (ensure it’s fresh for maximum rise)
- 1/2 tsp salt (balances the sweetness)
- 1 tsp vanilla extract (or almond extract for a different flavor profile)
- 1/2 cup milk (any kind works, I’ve used almond milk with great results)
Instructions
- Preheat your oven to 350°F (175°C) and grease a 9×5 inch loaf pan. Lining it with parchment paper makes removal a breeze.
- In a large bowl, cream together the butter and sugar until light and fluffy. This step is crucial for a tender crumb.
- Beat in the eggs one at a time, then stir in the vanilla extract. Tip: Adding eggs one at a time ensures they incorporate fully.
- Whisk together the flour, baking powder, and salt in a separate bowl. Gradually add to the wet ingredients, alternating with milk. Mix just until combined to avoid a tough cake.
- Fold in the dried fruits and nuts. Tip: Tossing the fruits in a bit of flour prevents them from sinking to the bottom.
- Pour the batter into the prepared pan and smooth the top. Bake for 50-60 minutes, or until a toothpick inserted into the center comes out clean.
- Let the cake cool in the pan for 10 minutes, then transfer to a wire rack to cool completely. Tip: This resting time makes slicing easier.
Moist, flavorful, and packed with goodies, this fruitcake is perfect as is or toasted with a smear of butter. For a festive twist, drizzle with a simple glaze or serve with a dollop of whipped cream.
Grinch Kabobs
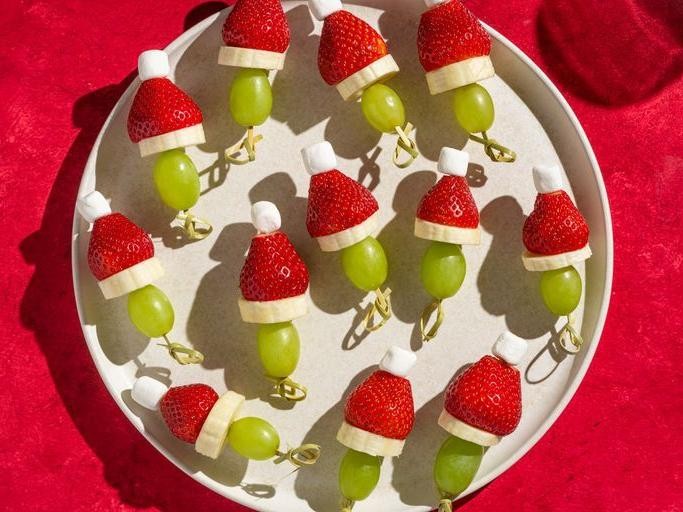
After a long day of holiday shopping, I found myself craving something whimsical yet easy to whip up. That’s when the idea of Grinch Kabobs came to mind—a playful, colorful dish that’s as fun to make as it is to eat. Perfect for holiday parties or a festive family dinner, these kabobs are sure to bring a smile to everyone’s face.
Ingredients
- 1 lb chicken breast, cut into 1-inch cubes (for a juicier result, don’t overcook)
- 1 cup green bell peppers, cut into 1-inch pieces (adds a crisp texture)
- 1 cup red grapes (for a sweet contrast)
- 1/4 cup olive oil (or any neutral oil)
- 2 tbsp lemon juice (adjust to taste)
- 1 tsp salt (adjust to taste)
- 1/2 tsp black pepper (freshly ground preferred)
- Wooden skewers, soaked in water for 30 minutes (to prevent burning)
Instructions
- Preheat your grill or grill pan to medium-high heat (about 375°F).
- In a large bowl, mix the olive oil, lemon juice, salt, and black pepper to create the marinade.
- Add the chicken cubes to the marinade, ensuring each piece is well coated. Let it sit for 15 minutes for the flavors to meld.
- Thread the marinated chicken, green bell peppers, and red grapes alternately onto the soaked wooden skewers.
- Place the kabobs on the grill. Cook for 4-5 minutes on each side, or until the chicken is fully cooked (internal temperature should reach 165°F).
- Remove from the grill and let rest for 2 minutes before serving to allow the juices to redistribute.
With their vibrant colors and delightful combination of sweet and savory flavors, these Grinch Kabobs are a hit at any gathering. Serve them on a platter garnished with fresh herbs for an extra festive touch, or pair with a light dipping sauce to complement the flavors.
Christmas Sausage Balls
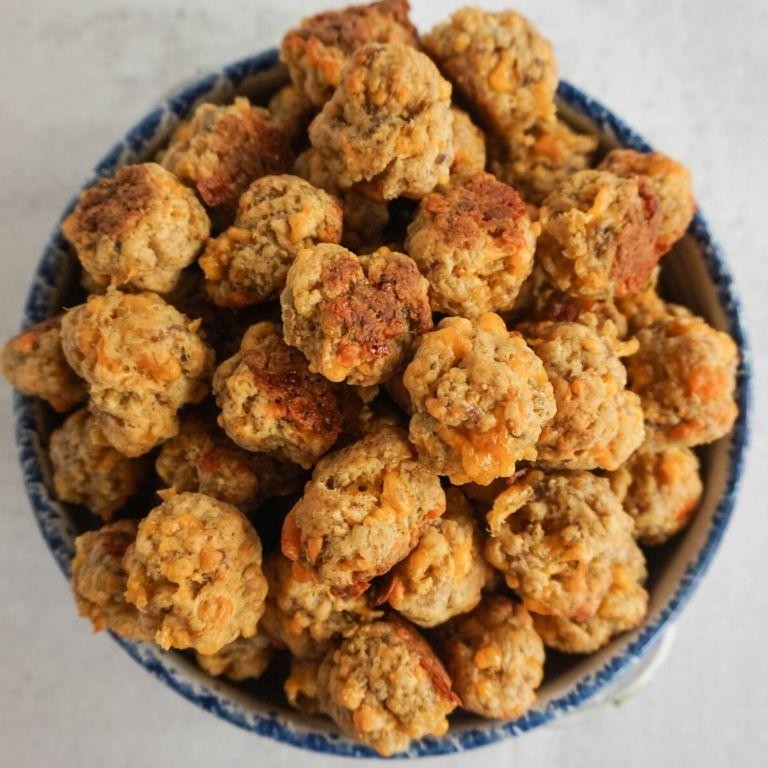
Every year, as soon as the holiday season rolls around, I find myself craving the cozy, comforting flavors of Christmas Sausage Balls. There’s something about the combination of spicy sausage, sharp cheddar, and fluffy biscuit mix that just screams festive to me. I remember my grandma making these for every family gathering, and now, I’ve taken up the tradition, tweaking the recipe here and there to make it my own.
Ingredients
- 1 lb spicy pork sausage (or mild, if you prefer less heat)
- 2 cups shredded sharp cheddar cheese (freshly shredded melts better)
- 2 cups biscuit baking mix (like Bisquick)
- 1/2 cup whole milk (add a splash more if the dough feels dry)
Instructions
- Preheat your oven to 375°F (190°C) and line a baking sheet with parchment paper for easy cleanup.
- In a large mixing bowl, combine the sausage, cheddar cheese, biscuit mix, and milk. Use your hands to mix until all ingredients are fully incorporated. Tip: If the dough is too sticky, let it rest for 5 minutes to firm up.
- Roll the mixture into 1-inch balls and place them on the prepared baking sheet, spacing them about 1 inch apart. Tip: For uniform balls, use a small cookie scoop.
- Bake for 18-20 minutes, or until the sausage balls are golden brown and cooked through. Tip: Rotate the baking sheet halfway through for even browning.
You’ll love the crispy exterior and tender, flavorful interior of these sausage balls. They’re perfect for holiday parties, and I sometimes serve them with a side of spicy mustard or cranberry sauce for dipping.
Yule Log Cake

First introduced to me during a cozy winter gathering, the Yule Log Cake, or Bûche de Noël, has since become a holiday staple in my kitchen. Its rich, chocolatey layers rolled into the perfect log shape not only bring a festive touch to the table but also a deliciously moist and tender bite that everyone adores.
Ingredients
- 4 large eggs (room temperature for best results)
- 3/4 cup granulated sugar (adjust to taste)
- 2/3 cup all-purpose flour (sifted to avoid lumps)
- 1/4 cup cocoa powder (use high-quality for deeper flavor)
- 1 tsp vanilla extract (or almond extract for a twist)
- 1 cup heavy cream (chilled for easier whipping)
- 1/2 cup powdered sugar (for dusting or sweetening the cream)
- 2 tbsp unsalted butter (melted, for greasing the pan)
Instructions
- Preheat your oven to 350°F (175°C) and grease a 10×15 inch jelly roll pan with melted butter, then line it with parchment paper.
- In a large bowl, beat the eggs and granulated sugar together until the mixture is pale and thick, about 5 minutes on high speed.
- Gently fold in the sifted flour and cocoa powder with a spatula, being careful not to deflate the mixture, then stir in the vanilla extract.
- Pour the batter into the prepared pan, spreading it evenly with a spatula to ensure uniform thickness.
- Bake for 12-15 minutes, or until the cake springs back when lightly touched. Tip: Avoid overbaking to keep the cake flexible for rolling.
- While the cake is still warm, carefully roll it up with the parchment paper inside to set its shape, then let it cool completely on a wire rack.
- Whip the heavy cream and powdered sugar until stiff peaks form, then unroll the cake, spread the cream evenly, and roll it back up without the parchment.
- Chill the rolled cake for at least an hour before serving to set the shape and flavors. Tip: For a festive look, dust with powdered sugar to mimic snow.
My favorite part about this Yule Log Cake is its delightful contrast of textures—the soft, airy sponge against the rich, creamy filling. Serve it with a sprinkle of cocoa powder or alongside a cup of hot cocoa for the ultimate winter treat.
Easy Christmas Fudge
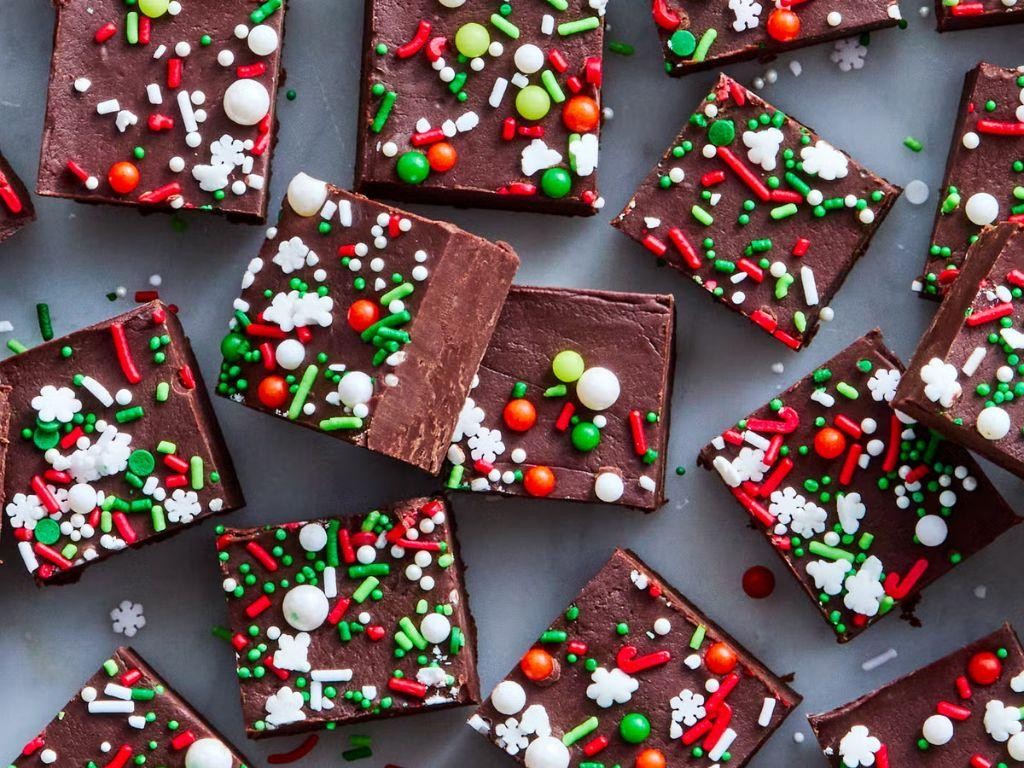
Wondering how to make your holiday season even sweeter? I’ve got just the thing—Easy Christmas Fudge. This recipe is a staple in my home during the holidays, and it’s so simple that even my kids can help make it. There’s something magical about the combination of rich chocolate and sweet condensed milk that makes this fudge irresistible.
Ingredients
- 3 cups semi-sweet chocolate chips (high quality for best results)
- 1 can (14 oz) sweetened condensed milk (not evaporated milk)
- 1 tbsp unsalted butter (plus extra for greasing)
- 1 tsp vanilla extract (pure for the best flavor)
- 1/2 cup chopped nuts (optional, walnuts or pecans work great)
Instructions
- Grease an 8×8 inch baking dish with butter and line it with parchment paper, leaving some overhang for easy removal.
- In a medium saucepan, combine the chocolate chips, sweetened condensed milk, and butter over low heat. Stir constantly until the chocolate is completely melted and the mixture is smooth, about 5 minutes. Tip: Keep the heat low to prevent the chocolate from burning.
- Remove the saucepan from the heat and stir in the vanilla extract and chopped nuts (if using) until well combined.
- Pour the fudge mixture into the prepared baking dish and spread it evenly with a spatula. Tip: For a smoother top, lightly grease the spatula with butter.
- Refrigerate the fudge for at least 2 hours, or until it’s firm to the touch. Tip: If you’re in a hurry, you can place it in the freezer for about 30 minutes, but don’t let it freeze.
- Once set, lift the fudge out of the dish using the parchment paper overhang and cut it into 1-inch squares.
Here’s the best part—this fudge is incredibly creamy and melts in your mouth with every bite. For a festive touch, sprinkle the top with crushed candy canes or drizzle with white chocolate before cutting. Happy holidays and happy baking!
Conclusion
We hope these 20 easy Christmas recipes bring festive cheer to your table! Perfect for home cooks, each dish is designed to delight without the stress. Try them out, share your favorites in the comments, and don’t forget to pin this roundup on Pinterest for your next holiday gathering. Wishing you a deliciously merry Christmas!


